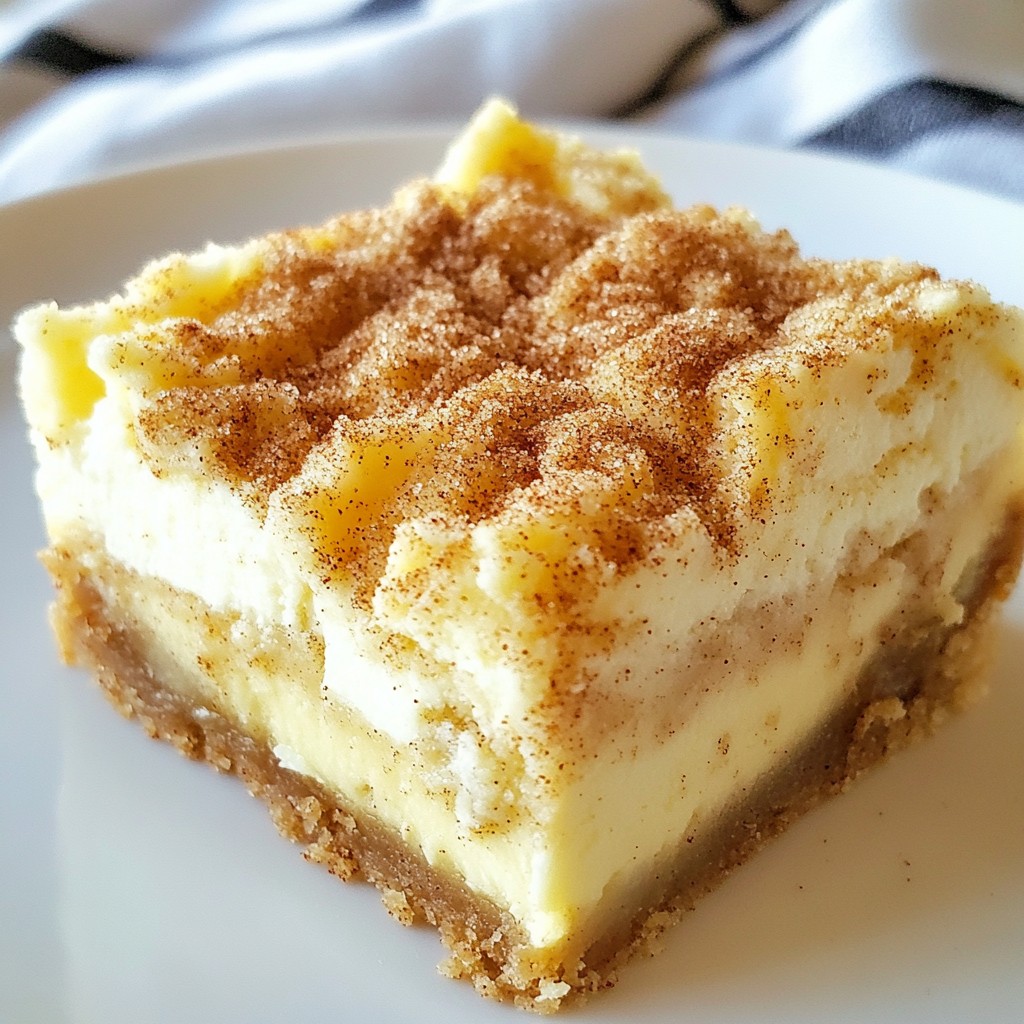
Get ready to indulge in a sweet treat that combines the warmth of snickerdoodles with creamy cheesecake! In this easy recipe for Snickerdoodle Cheesecake Bars, I'll guide you step-by-step. You’ll need simple ingredients and just a few tools. This dessert is perfect for any occasion, and you’ll impress your friends and family. Let’s dive in and make these delicious bars together!
Why I Love This Recipe
- Comforting Flavor: The combination of cinnamon and sugar gives these bars a warm, nostalgic taste that reminds me of home.
- Decadent Texture: The creamy cheesecake layer contrasts beautifully with the soft, cookie-like crust, creating a delightful bite.
- Easy to Make: This recipe is straightforward, making it perfect for both novice and experienced bakers alike.
- Perfect for Sharing: These bars are cut into easy-to-serve pieces, making them ideal for parties and gatherings.
Ingredients
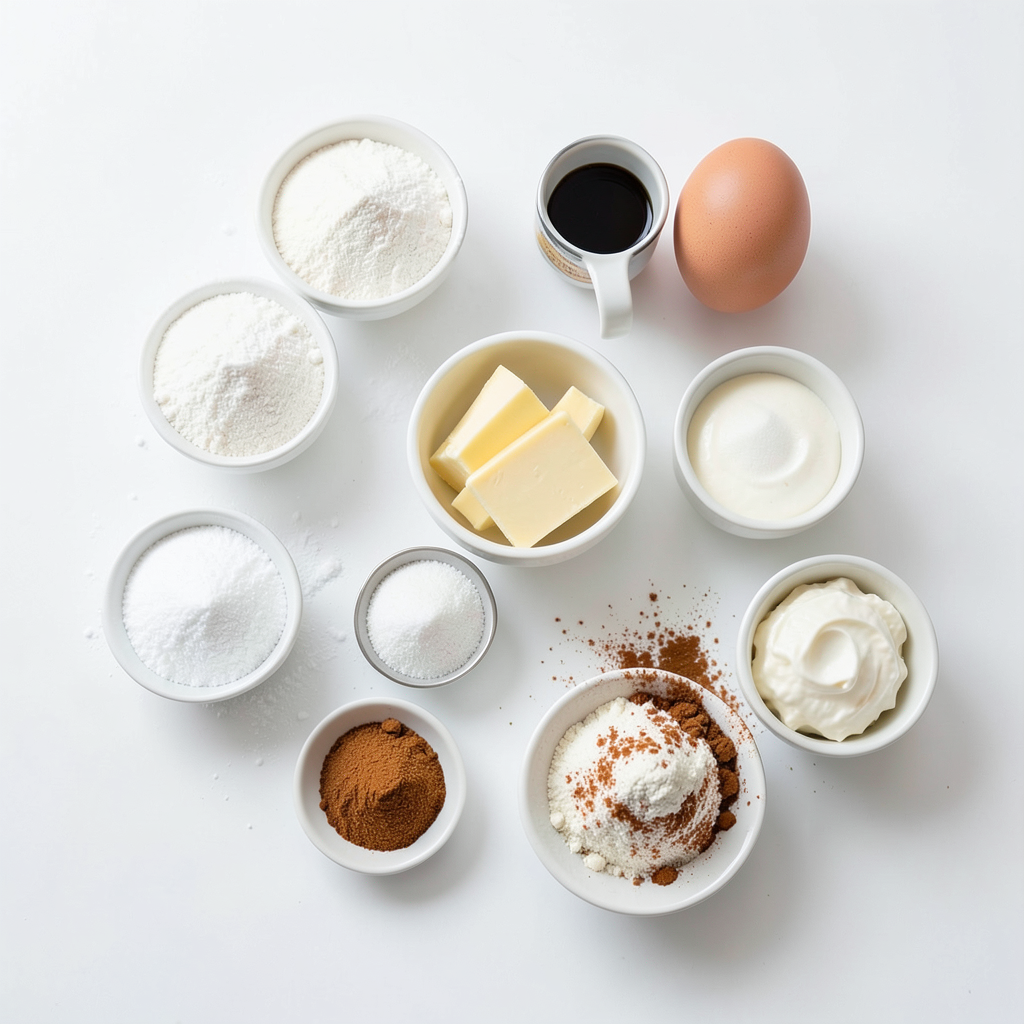
Complete list of ingredients
To make Snickerdoodle Cheesecake Bars, you will need:
- 1 ½ cups all-purpose flour
- 1 teaspoon baking powder
- 1 teaspoon cream of tartar
- ½ teaspoon salt
- ½ cup unsalted butter, softened
- 1 cup brown sugar, packed
- 1 large egg
- 1 teaspoon vanilla extract
- 8 oz cream cheese, softened
- ½ cup granulated sugar
- 1 teaspoon cinnamon
- ½ cup sour cream
- 1 tablespoon cinnamon-sugar mixture (for sprinkling on top)
Ingredient substitutions
You can swap some ingredients if needed. Use coconut oil instead of unsalted butter for a dairy-free option. For a gluten-free version, try a gluten-free flour blend. You can replace cream cheese with a dairy-free cream cheese alternative.
Necessary tools and equipment
To make these bars, you'll need a few tools:
- An 8x8-inch square baking pan
- Parchment paper for easy removal
- Mixing bowls for combining ingredients
- A whisk for mixing dry ingredients
- An electric mixer for beating the butter and cream cheese
- A spatula for spreading the batter and filling
- A wire rack for cooling the bars
These tools help make the process smooth and enjoyable.
Step-by-Step Instructions
Preparing the baking pan
Start by preheating your oven to 350°F (175°C). Next, grab an 8x8-inch square baking pan. Grease it well with butter or cooking spray. Line the bottom and sides with parchment paper. Leave some paper hanging over the edges. This makes it easy to lift out the bars later.
Making the cookie crust
In a bowl, whisk together 1 ½ cups of all-purpose flour, 1 teaspoon of baking powder, 1 teaspoon of cream of tartar, and ½ teaspoon of salt. Set this dry mix aside. In another bowl, cream together ½ cup of softened unsalted butter and 1 cup of packed brown sugar. Mix for about 2-3 minutes until it’s light and fluffy. Add in 1 large egg and 1 teaspoon of vanilla extract, mixing until combined. Gradually add the dry ingredients to the butter mixture. Mix on low until just combined. Press two-thirds of the dough into the bottom of your prepared pan to form a nice crust.
Preparing the cheesecake filling
In a separate bowl, beat 8 oz of softened cream cheese with ½ cup of granulated sugar until smooth. Add 1 teaspoon of cinnamon and ½ cup of sour cream to the mix. Blend well until it’s creamy and free of lumps.
Assembling the bars
Spread the cream cheese mixture evenly over the cookie crust in the pan. Take the leftover dough and pinch off small pieces. Crumble this dough over the cream cheese layer. Make sure to leave some filling showing through. Finally, sprinkle 1 tablespoon of cinnamon-sugar mixture on top for extra flavor.
Baking and cooling process
Bake your bars for 30-35 minutes. They are done when the edges are lightly golden and the center is set. Once baked, let the bars cool in the pan on a wire rack. After they cool, refrigerate them for at least 2 hours. When chilled, use the parchment overhang to lift the bars out. Cut them into squares and enjoy!
Tips & Tricks
Tips for achieving the perfect crust
To get a great crust, start with soft butter. This helps mix it easily with brown sugar. Cream them together until it looks light and fluffy. Don’t over-mix the dough. When you press it into the pan, make it even. Use your fingers or a measuring cup to help. This will give you a nice, firm base.
How to make the cheesecake layer smooth
For a smooth cheesecake layer, use softened cream cheese. Cold cream cheese may leave lumps. Mix the cream cheese and sugar well until it is creamy. Add the sour cream slowly. Mix gently, so you keep air in the mixture. Air makes it fluffy and light. When pouring it over the crust, spread it evenly to avoid gaps.
Cooling and serving tips
After baking, let the bars cool in the pan. This helps set the filling. Once cool, chill them in the fridge for at least two hours. This helps the bars slice better. To serve, lift them out using the parchment paper. Cut them into even squares. For a special touch, drizzle with caramel or dust with powdered sugar before serving.
Pro Tips
- Chill the Cream Cheese: Ensure your cream cheese is at room temperature for easy blending, resulting in a smooth, lump-free filling.
- Don’t Overbake: Keep an eye on the baking time. Remove the bars from the oven when the edges are golden and the center is slightly jiggly for the best texture.
- Use Quality Cinnamon: A high-quality cinnamon will elevate the flavor of your Snickerdoodle Cheesecake Bars, making them more aromatic and delicious.
- Let Them Rest: Allow the bars to cool completely and chill in the refrigerator for at least 2 hours to enhance the flavors and make them easier to cut.
Variations
Adding different spices or flavors
You can change up the flavor of your Snickerdoodle Cheesecake Bars. Try adding nutmeg or ginger for a warm twist. You could also mix in some cocoa powder for a chocolate touch. Want a fruity flavor? Fold in some lemon or orange zest into the cream cheese layer. These small changes give your bars a unique taste.
Alternative toppings
Toppings can make your bars even more fun. Instead of just cinnamon-sugar, try crushed nuts or chocolate chips for extra crunch. A drizzle of caramel or chocolate sauce adds a sweet touch, too. Fresh berries on top can brighten the dish and add a tart flavor. Feel free to get creative with your toppings!
Gluten-free and vegan adaptations
You can make these bars gluten-free by using a gluten-free flour blend. For a vegan version, swap the cream cheese for a plant-based cream cheese. Use flax eggs instead of regular eggs. You can also replace the butter with coconut oil for a dairy-free option. These swaps keep the flavor but make it fit your diet!
Storage Info
Best storage practices
To keep your Snickerdoodle Cheesecake Bars fresh, store them in an airtight container. This helps to prevent drying out. Be sure to place parchment paper between layers to avoid sticking. Store them in the fridge for the best flavor and texture.
Freezing the bars
You can freeze these bars for later enjoyment. First, cut them into squares. Wrap each piece in plastic wrap. Then, place the wrapped bars in a freezer-safe bag. They can last up to three months in the freezer. When you want one, just thaw it in the fridge overnight.
How long they last in the fridge
In the fridge, these bars last about five to seven days. The flavors continue to blend over time, making them even tastier. Just make sure to keep them covered. This helps them stay moist and delicious for every bite.
FAQs
How do I know when the bars are done baking?
You can tell when the bars are done baking by looking at the edges. The edges should be lightly golden. The center should be set and not jiggly. A toothpick inserted in the center will come out clean or with a few moist crumbs. Keep an eye on them. Baking time is usually 30-35 minutes at 350°F.
Can I make these bars ahead of time?
Yes, you can make these bars ahead of time. They store well in the fridge. After baking, let them cool completely. Then, cover them tightly with plastic wrap. You can keep them in the fridge for up to five days. They taste great chilled!
What if I don't have cream of tartar?
If you don't have cream of tartar, you can use lemon juice or vinegar. Use one teaspoon of either for each teaspoon of cream of tartar. This will help keep your bars soft and fluffy. The taste will not change much, so don’t worry!
Can I use a different size baking pan?
Yes, you can use a different size baking pan. Just keep in mind that baking time may vary. If you use a larger pan, the bars will bake faster. If you use a smaller pan, they may need more time. Always check for doneness using the toothpick method.
This post covered all you need to make delicious cheesecake bars at home. We went through the essential ingredients and tools, step-by-step instructions, and helpful tips. I shared variations and storage tips to suit your needs. Remember, baking is fun and allows you to be creative. Don't fear trying new flavors and adjustments. Enjoy your cheesecake bars, and trust that with practice, you’ll master them in no time.