Salted Caramel Pumpkin Cheesecake Cups No Bake Delight

WANT TO SAVE THIS RECIPE?

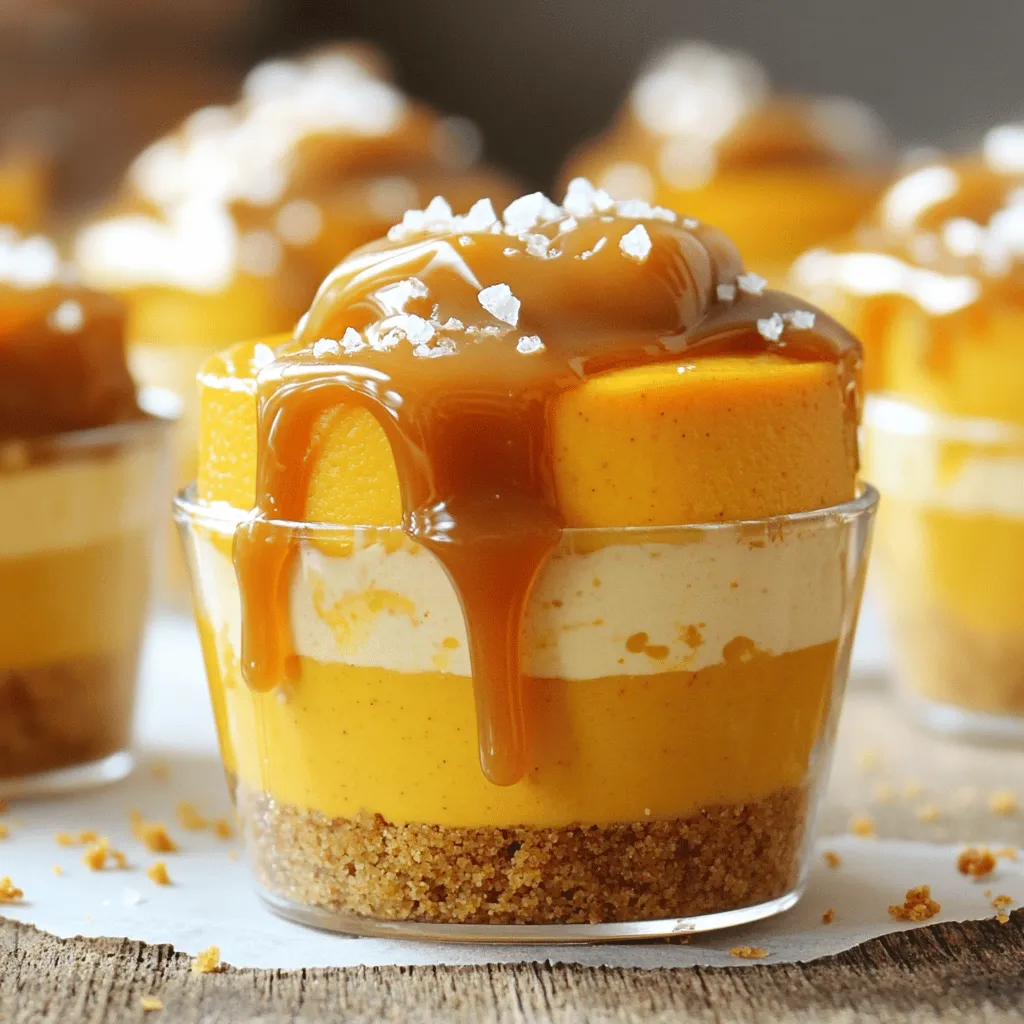
Get ready for a treat that’s perfect for fall: Salted Caramel Pumpkin Cheesecake Cups! These no-bake delights combine creamy cheesecake with rich pumpkin flavor. You’ll love how easy they are to make. Plus, they satisfy that sweet tooth without heating up your kitchen. In this post, I’ll share simple steps, ingredient tips, and fun variations to give you the perfect dessert for any occasion. Let’s dive in!

To make these delightful Salted Caramel Pumpkin Cheesecake Cups, gather the following: - 1 cup graham cracker crumbs - 4 tablespoons unsalted butter, melted - 1 (8 oz) package cream cheese, softened - 1/2 cup powdered sugar - 1 cup pumpkin puree - 1 teaspoon vanilla extract - 1 teaspoon pumpkin pie spice - 1/2 cup heavy whipping cream - 1/4 cup salted caramel sauce (plus extra for drizzling) - Sea salt flakes for garnish You can easily swap some ingredients if needed: - Use gluten-free graham crackers for a gluten-free crust. - Swap cream cheese with dairy-free cream cheese for a vegan option. - Replace heavy cream with coconut cream for a dairy-free version. - Maple syrup can replace powdered sugar for a natural sweetener. Selecting the right ingredients makes a big difference: - Choose fresh pumpkin puree for the best flavor. Canned is okay, but fresh shines. - Look for high-quality cream cheese. A richer cream cheese makes the cheesecake smooth. - When picking graham crackers, look for ones with simple ingredients. This helps avoid added sugars. - For the salted caramel sauce, select a brand known for its rich flavor. Homemade sauce can also elevate your dish. To make the crust, start with graham cracker crumbs. In a medium bowl, mix 1 cup of crumbs with 4 tablespoons of melted butter. Use a fork to blend them well. This mixture should feel like wet sand. Next, take about 2 tablespoons of this mix and press it into the bottom of each serving cup. Make sure to press down firmly so it holds together. This forms a solid base for your cheesecake cups. For the cheesecake filling, grab a large mixing bowl. Beat 1 package of softened cream cheese until it’s creamy and smooth. Gradually add in 1/2 cup of powdered sugar, mixing until combined. Then, add 1 cup of pumpkin puree, 1 teaspoon of vanilla extract, and 1 teaspoon of pumpkin pie spice. Mix everything until it is all blended together. In a separate bowl, whip 1/2 cup of heavy cream until you see stiff peaks. Gently fold this whipped cream into the pumpkin mixture. Be careful not to deflate the whipped cream. This keeps your cheesecake light and fluffy. Now it's time to assemble! Spoon or pipe the pumpkin cheesecake mixture on top of the crust in each cup. Fill them to the brim for a nice presentation. Drizzle some salted caramel sauce over the top of each cup. For the final touch, sprinkle a few sea salt flakes on top. This adds a nice contrast to the sweetness. Finally, chill the cups in the refrigerator for at least 2 hours. This allows the cheesecake to set perfectly before serving. Enjoy your delicious salted caramel pumpkin cheesecake cups! To get a creamy filling, make sure your cream cheese is soft. Let it sit at room temperature for about 30 minutes. When mixing, beat it well until smooth. This helps to avoid lumps. When adding the whipped cream, fold gently. This keeps the mix light and fluffy. The goal is to have a light and airy cheesecake texture. You need a few simple tools for this recipe. A medium bowl works for the crust. Use a large bowl for the filling. A hand mixer or stand mixer is great for beating the cream cheese. You'll also need measuring cups and spoons. A spatula helps to fold the whipped cream. Lastly, grab serving cups or small glasses for the final assembly. One big mistake is not chilling the cups long enough. They need at least two hours in the fridge. This helps the layers set. Another error is over-mixing the whipped cream. If you mix too much, it can deflate. Lastly, don’t skip the sea salt on top. The salt enhances the sweetness and balances the flavor. {{image_2}} You can switch up the flavors in your salted caramel pumpkin cheesecake cups. For a rich twist, add chocolate. Use chocolate graham cracker crumbs for the crust. Mix melted chocolate into the cheesecake filling for a deep, creamy taste. Another great option is maple. Replace pumpkin pie spice with maple syrup. This adds a warm, sweet flavor that pairs nicely with the pumpkin. If you need a dairy-free version, swap out the cream cheese and heavy cream. Use a plant-based cream cheese and coconut cream. These options keep the texture creamy and rich while being dairy-free. For gluten-free needs, use gluten-free graham crackers. They work just as well for the crust, keeping it tasty and safe for everyone. These cheesecake cups shine on their own, but you can elevate them further. Serve them with a dollop of whipped cream on top. A sprinkle of crushed nuts adds a nice crunch. Pair these cups with a warm drink, like spiced apple cider or coffee. The flavors complement each other, making your dessert experience even more delightful. Store your salted caramel pumpkin cheesecake cups in the fridge. Use an airtight container to keep them fresh. This way, they stay cool and tasty. Avoid stacking them to keep the topping nice. If you have leftovers, eat them within three days for the best taste. You can freeze these cheesecake cups for a longer shelf life. First, let them chill completely in the fridge. Then, wrap each cup tightly in plastic wrap. Place them in a freezer-safe container or bag. They can last up to two months. When ready to eat, thaw them in the fridge overnight. These cheesecake cups are best enjoyed fresh. In the fridge, they last up to three days. If left out at room temperature, they only stay good for about two hours. To keep the flavors bright, store them as soon as you finish eating. Yes, you can make these cups ahead of time. They stay fresh in the fridge for up to three days. Just prepare them and chill. The flavors meld together nicely when they sit. You will enjoy the taste even more! If you don’t have heavy cream, try using coconut cream. It gives a nice texture and flavor. You can also use Greek yogurt as a lighter option. It may change the taste slightly, but it will still be delicious. You can customize the salted caramel topping in many ways. For a bolder flavor, add a pinch of cinnamon or nutmeg. You can also mix in a splash of bourbon for a fun twist. Try different types of caramel sauce for varied tastes. Drizzle extra caramel on each cup for a sweeter treat! This blog post covered how to make delicious cheesecake cups. We explored the best ingredients, how to prepare each layer, and tips for perfect texture. I shared popular flavor variations and storage tips to keep your treats fresh. Remember, good choices make a big difference. Experiment with flavors and toppings to find your favorite. With these steps and tips, you can enjoy making these treats for any occasion. Enjoy your baking adventure!

Ingredients

Complete Ingredient List

To make these delightful Salted Caramel Pumpkin Cheesecake Cups, gather the following:

– 1 cup graham cracker crumbs

– 4 tablespoons unsalted butter, melted

– 1 (8 oz) package cream cheese, softened

– 1/2 cup powdered sugar

– 1 cup pumpkin puree

– 1 teaspoon vanilla extract

– 1 teaspoon pumpkin pie spice

– 1/2 cup heavy whipping cream

– 1/4 cup salted caramel sauce (plus extra for drizzling)

– Sea salt flakes for garnish

Ingredient Substitutions

You can easily swap some ingredients if needed:

– Use gluten-free graham crackers for a gluten-free crust.

– Swap cream cheese with dairy-free cream cheese for a vegan option.

– Replace heavy cream with coconut cream for a dairy-free version.

– Maple syrup can replace powdered sugar for a natural sweetener.

Tips for Choosing Quality Ingredients

Selecting the right ingredients makes a big difference:

– Choose fresh pumpkin puree for the best flavor. Canned is okay, but fresh shines.

– Look for high-quality cream cheese. A richer cream cheese makes the cheesecake smooth.

– When picking graham crackers, look for ones with simple ingredients. This helps avoid added sugars.

– For the salted caramel sauce, select a brand known for its rich flavor. Homemade sauce can also elevate your dish.

Step-by-Step Instructions

Preparing the Crust

To make the crust, start with graham cracker crumbs. In a medium bowl, mix 1 cup of crumbs with 4 tablespoons of melted butter. Use a fork to blend them well. This mixture should feel like wet sand. Next, take about 2 tablespoons of this mix and press it into the bottom of each serving cup. Make sure to press down firmly so it holds together. This forms a solid base for your cheesecake cups.

Making the Cheesecake Mixture

For the cheesecake filling, grab a large mixing bowl. Beat 1 package of softened cream cheese until it’s creamy and smooth. Gradually add in 1/2 cup of powdered sugar, mixing until combined. Then, add 1 cup of pumpkin puree, 1 teaspoon of vanilla extract, and 1 teaspoon of pumpkin pie spice. Mix everything until it is all blended together. In a separate bowl, whip 1/2 cup of heavy cream until you see stiff peaks. Gently fold this whipped cream into the pumpkin mixture. Be careful not to deflate the whipped cream. This keeps your cheesecake light and fluffy.

Assembly and Finishing Touches

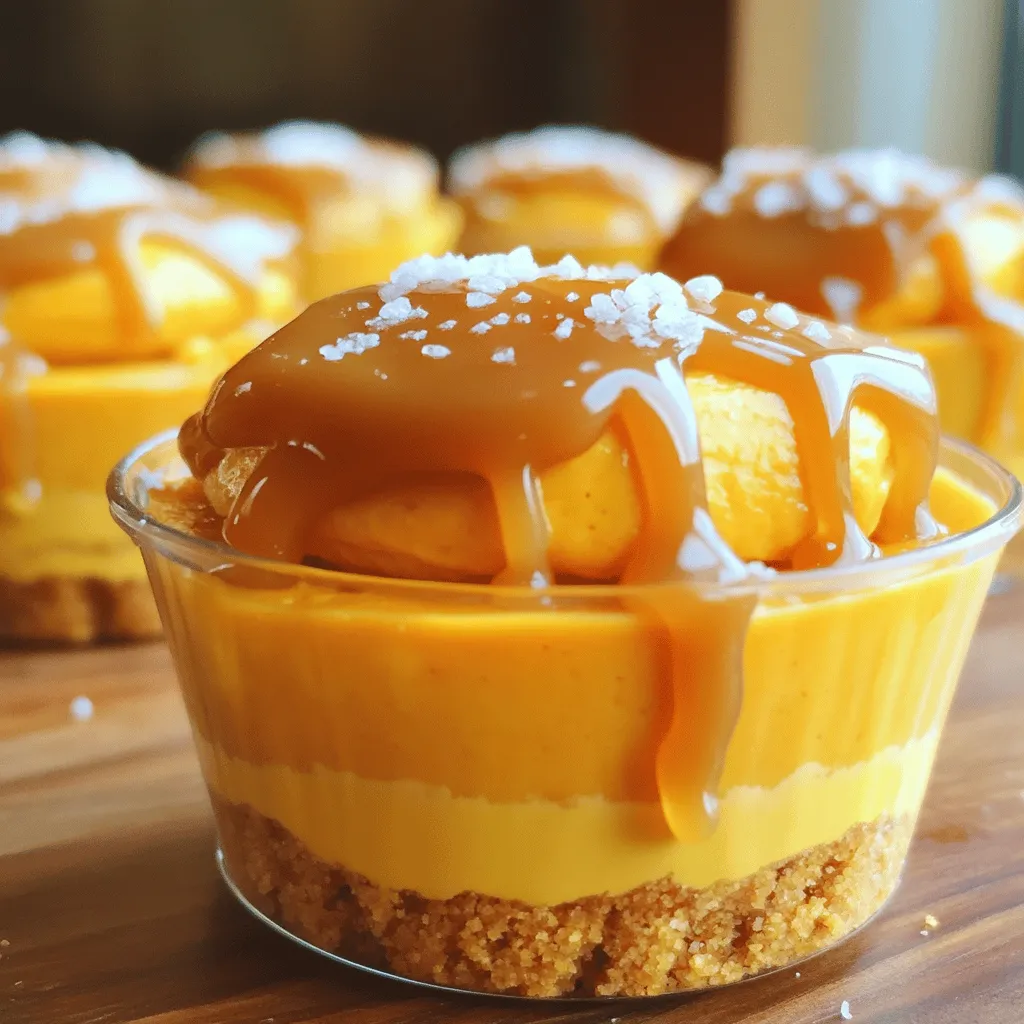
Now it’s time to assemble! Spoon or pipe the pumpkin cheesecake mixture on top of the crust in each cup. Fill them to the brim for a nice presentation. Drizzle some salted caramel sauce over the top of each cup. For the final touch, sprinkle a few sea salt flakes on top. This adds a nice contrast to the sweetness. Finally, chill the cups in the refrigerator for at least 2 hours. This allows the cheesecake to set perfectly before serving. Enjoy your delicious salted caramel pumpkin cheesecake cups!

Tips & Tricks

How to Achieve the Best Texture

To get a creamy filling, make sure your cream cheese is soft. Let it sit at room temperature for about 30 minutes. When mixing, beat it well until smooth. This helps to avoid lumps. When adding the whipped cream, fold gently. This keeps the mix light and fluffy. The goal is to have a light and airy cheesecake texture.

Essential Tools and Equipment

You need a few simple tools for this recipe. A medium bowl works for the crust. Use a large bowl for the filling. A hand mixer or stand mixer is great for beating the cream cheese. You’ll also need measuring cups and spoons. A spatula helps to fold the whipped cream. Lastly, grab serving cups or small glasses for the final assembly.

Common Mistakes to Avoid

One big mistake is not chilling the cups long enough. They need at least two hours in the fridge. This helps the layers set. Another error is over-mixing the whipped cream. If you mix too much, it can deflate. Lastly, don’t skip the sea salt on top. The salt enhances the sweetness and balances the flavor.

Variations

Flavor Variations

You can switch up the flavors in your salted caramel pumpkin cheesecake cups. For a rich twist, add chocolate. Use chocolate graham cracker crumbs for the crust. Mix melted chocolate into the cheesecake filling for a deep, creamy taste.

Another great option is maple. Replace pumpkin pie spice with maple syrup. This adds a warm, sweet flavor that pairs nicely with the pumpkin.

Allergen-Friendly Options

If you need a dairy-free version, swap out the cream cheese and heavy cream. Use a plant-based cream cheese and coconut cream. These options keep the texture creamy and rich while being dairy-free.

For gluten-free needs, use gluten-free graham crackers. They work just as well for the crust, keeping it tasty and safe for everyone.

Serving Suggestions and Pairings

These cheesecake cups shine on their own, but you can elevate them further. Serve them with a dollop of whipped cream on top. A sprinkle of crushed nuts adds a nice crunch.

Pair these cups with a warm drink, like spiced apple cider or coffee. The flavors complement each other, making your dessert experience even more delightful.

Storage Info

Best Practices for Storing Leftovers

Store your salted caramel pumpkin cheesecake cups in the fridge. Use an airtight container to keep them fresh. This way, they stay cool and tasty. Avoid stacking them to keep the topping nice. If you have leftovers, eat them within three days for the best taste.

Freezing Instructions

You can freeze these cheesecake cups for a longer shelf life. First, let them chill completely in the fridge. Then, wrap each cup tightly in plastic wrap. Place them in a freezer-safe container or bag. They can last up to two months. When ready to eat, thaw them in the fridge overnight.

Shelf Life for Freshness

These cheesecake cups are best enjoyed fresh. In the fridge, they last up to three days. If left out at room temperature, they only stay good for about two hours. To keep the flavors bright, store them as soon as you finish eating.

FAQs

Can I make these cups ahead of time?

Yes, you can make these cups ahead of time. They stay fresh in the fridge for up to three days. Just prepare them and chill. The flavors meld together nicely when they sit. You will enjoy the taste even more!

What can I use instead of heavy cream?

If you don’t have heavy cream, try using coconut cream. It gives a nice texture and flavor. You can also use Greek yogurt as a lighter option. It may change the taste slightly, but it will still be delicious.

How can I customize the salted caramel topping?

You can customize the salted caramel topping in many ways. For a bolder flavor, add a pinch of cinnamon or nutmeg. You can also mix in a splash of bourbon for a fun twist. Try different types of caramel sauce for varied tastes. Drizzle extra caramel on each cup for a sweeter treat!

This blog post covered how to make delicious cheesecake cups. We explored the best ingredients, how to prepare each layer, and tips for perfect texture. I shared popular flavor variations and storage tips to keep your treats fresh. Remember, good choices make a big difference. Experiment with flavors and toppings to find your favorite. With these steps and tips, you can enjoy making these treats for any occasion. Enjoy your baking adventure!

To make these delightful Salted Caramel Pumpkin Cheesecake Cups, gather the following: - 1 cup graham cracker crumbs - 4 tablespoons unsalted butter, melted - 1 (8 oz) package cream cheese, softened - 1/2 cup powdered sugar - 1 cup pumpkin puree - 1 teaspoon vanilla extract - 1 teaspoon pumpkin pie spice - 1/2 cup heavy whipping cream - 1/4 cup salted caramel sauce (plus extra for drizzling) - Sea salt flakes for garnish You can easily swap some ingredients if needed: - Use gluten-free graham crackers for a gluten-free crust. - Swap cream cheese with dairy-free cream cheese for a vegan option. - Replace heavy cream with coconut cream for a dairy-free version. - Maple syrup can replace powdered sugar for a natural sweetener. Selecting the right ingredients makes a big difference: - Choose fresh pumpkin puree for the best flavor. Canned is okay, but fresh shines. - Look for high-quality cream cheese. A richer cream cheese makes the cheesecake smooth. - When picking graham crackers, look for ones with simple ingredients. This helps avoid added sugars. - For the salted caramel sauce, select a brand known for its rich flavor. Homemade sauce can also elevate your dish. To make the crust, start with graham cracker crumbs. In a medium bowl, mix 1 cup of crumbs with 4 tablespoons of melted butter. Use a fork to blend them well. This mixture should feel like wet sand. Next, take about 2 tablespoons of this mix and press it into the bottom of each serving cup. Make sure to press down firmly so it holds together. This forms a solid base for your cheesecake cups. For the cheesecake filling, grab a large mixing bowl. Beat 1 package of softened cream cheese until it’s creamy and smooth. Gradually add in 1/2 cup of powdered sugar, mixing until combined. Then, add 1 cup of pumpkin puree, 1 teaspoon of vanilla extract, and 1 teaspoon of pumpkin pie spice. Mix everything until it is all blended together. In a separate bowl, whip 1/2 cup of heavy cream until you see stiff peaks. Gently fold this whipped cream into the pumpkin mixture. Be careful not to deflate the whipped cream. This keeps your cheesecake light and fluffy. Now it's time to assemble! Spoon or pipe the pumpkin cheesecake mixture on top of the crust in each cup. Fill them to the brim for a nice presentation. Drizzle some salted caramel sauce over the top of each cup. For the final touch, sprinkle a few sea salt flakes on top. This adds a nice contrast to the sweetness. Finally, chill the cups in the refrigerator for at least 2 hours. This allows the cheesecake to set perfectly before serving. Enjoy your delicious salted caramel pumpkin cheesecake cups! To get a creamy filling, make sure your cream cheese is soft. Let it sit at room temperature for about 30 minutes. When mixing, beat it well until smooth. This helps to avoid lumps. When adding the whipped cream, fold gently. This keeps the mix light and fluffy. The goal is to have a light and airy cheesecake texture. You need a few simple tools for this recipe. A medium bowl works for the crust. Use a large bowl for the filling. A hand mixer or stand mixer is great for beating the cream cheese. You'll also need measuring cups and spoons. A spatula helps to fold the whipped cream. Lastly, grab serving cups or small glasses for the final assembly. One big mistake is not chilling the cups long enough. They need at least two hours in the fridge. This helps the layers set. Another error is over-mixing the whipped cream. If you mix too much, it can deflate. Lastly, don’t skip the sea salt on top. The salt enhances the sweetness and balances the flavor. {{image_2}} You can switch up the flavors in your salted caramel pumpkin cheesecake cups. For a rich twist, add chocolate. Use chocolate graham cracker crumbs for the crust. Mix melted chocolate into the cheesecake filling for a deep, creamy taste. Another great option is maple. Replace pumpkin pie spice with maple syrup. This adds a warm, sweet flavor that pairs nicely with the pumpkin. If you need a dairy-free version, swap out the cream cheese and heavy cream. Use a plant-based cream cheese and coconut cream. These options keep the texture creamy and rich while being dairy-free. For gluten-free needs, use gluten-free graham crackers. They work just as well for the crust, keeping it tasty and safe for everyone. These cheesecake cups shine on their own, but you can elevate them further. Serve them with a dollop of whipped cream on top. A sprinkle of crushed nuts adds a nice crunch. Pair these cups with a warm drink, like spiced apple cider or coffee. The flavors complement each other, making your dessert experience even more delightful. Store your salted caramel pumpkin cheesecake cups in the fridge. Use an airtight container to keep them fresh. This way, they stay cool and tasty. Avoid stacking them to keep the topping nice. If you have leftovers, eat them within three days for the best taste. You can freeze these cheesecake cups for a longer shelf life. First, let them chill completely in the fridge. Then, wrap each cup tightly in plastic wrap. Place them in a freezer-safe container or bag. They can last up to two months. When ready to eat, thaw them in the fridge overnight. These cheesecake cups are best enjoyed fresh. In the fridge, they last up to three days. If left out at room temperature, they only stay good for about two hours. To keep the flavors bright, store them as soon as you finish eating. Yes, you can make these cups ahead of time. They stay fresh in the fridge for up to three days. Just prepare them and chill. The flavors meld together nicely when they sit. You will enjoy the taste even more! If you don’t have heavy cream, try using coconut cream. It gives a nice texture and flavor. You can also use Greek yogurt as a lighter option. It may change the taste slightly, but it will still be delicious. You can customize the salted caramel topping in many ways. For a bolder flavor, add a pinch of cinnamon or nutmeg. You can also mix in a splash of bourbon for a fun twist. Try different types of caramel sauce for varied tastes. Drizzle extra caramel on each cup for a sweeter treat! This blog post covered how to make delicious cheesecake cups. We explored the best ingredients, how to prepare each layer, and tips for perfect texture. I shared popular flavor variations and storage tips to keep your treats fresh. Remember, good choices make a big difference. Experiment with flavors and toppings to find your favorite. With these steps and tips, you can enjoy making these treats for any occasion. Enjoy your baking adventure!

Salted Caramel Pumpkin Cheesecake Cups No Bake

Indulge in the ultimate fall dessert with Salted Caramel Pumpkin Cheesecake Cups! These delightful no-bake treats combine creamy pumpkin cheesecake with a buttery graham cracker crust, drizzled with rich salted caramel. Perfect for gatherings or a cozy night in, this simple recipe will impress everyone. Ready to make a seasonal favorite? Click through to explore the full recipe and delight your taste buds!

Ingredients
  

1 cup graham cracker crumbs

4 tablespoons unsalted butter, melted

1 (8 oz) package cream cheese, softened

1/2 cup powdered sugar

1 cup pumpkin puree

1 teaspoon vanilla extract

1 teaspoon pumpkin pie spice

1/2 cup heavy whipping cream

1/4 cup salted caramel sauce (plus extra for drizzling)

Sea salt flakes for garnish

Instructions
 

In a medium bowl, mix the graham cracker crumbs and melted butter until well combined. Spoon about 2 tablespoons of the mixture into the bottom of each serving cup, pressing down firmly to form a crust layer.

    In a large mixing bowl, beat the softened cream cheese until creamy and smooth. Gradually add the powdered sugar, beating until combined.

      Add the pumpkin puree, vanilla extract, and pumpkin pie spice to the cream cheese mixture, and mix until fully incorporated and smooth.

        In another bowl, whip the heavy cream until stiff peaks form. Gently fold the whipped cream into the pumpkin mixture, being careful not to deflate the whipped cream.

          Spoon or pipe the pumpkin cheesecake mixture on top of the crust in each cup, filling them to the brim.

            Drizzle salted caramel sauce over the top of each cup and sprinkle a few sea salt flakes for garnish.

              Chill in the refrigerator for at least 2 hours to set before serving.

                Prep Time, Total Time, Servings: 20 mins | 2 hrs chilling | serves 6-8

                  WANT TO SAVE THIS RECIPE?