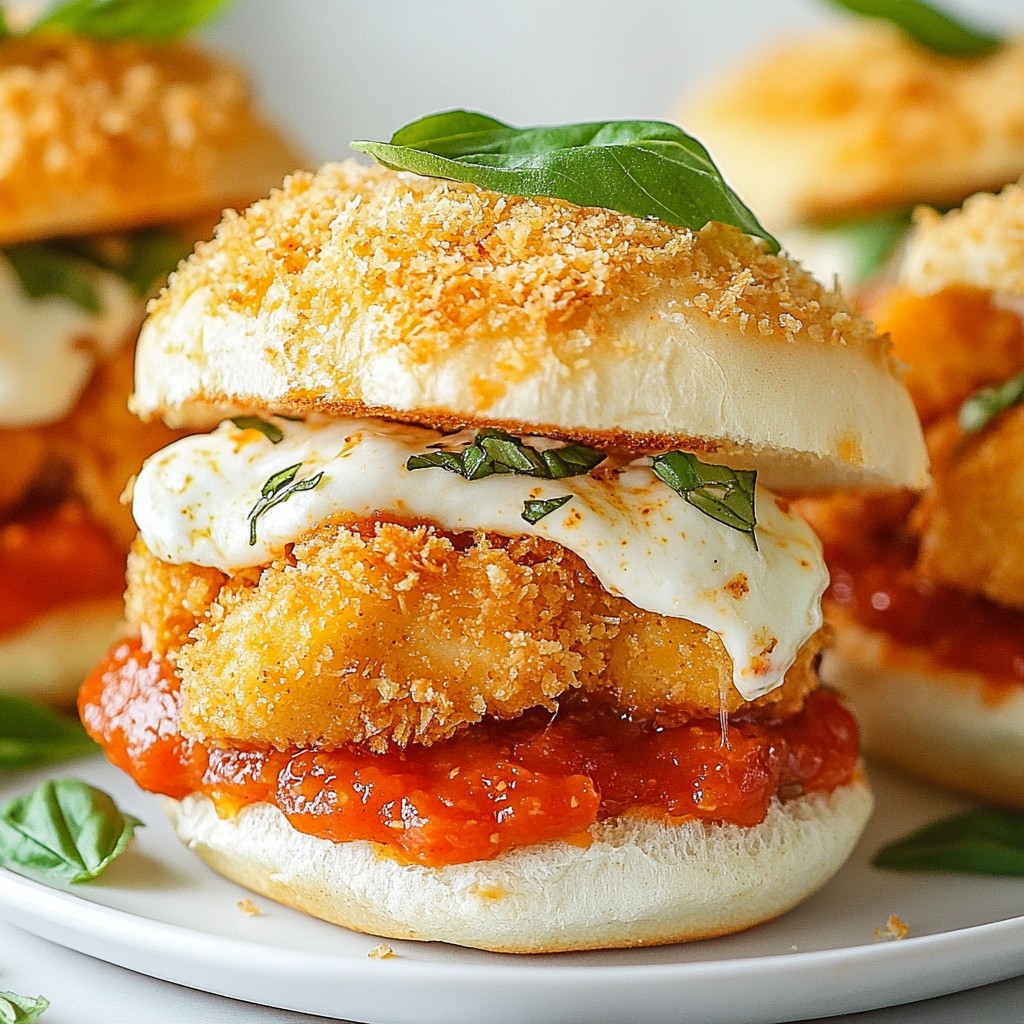
Looking for a tasty meal that’s quick and easy? You’ll love my Crispy Chicken Parmesan Sliders! These sliders are loaded with crunchy chicken, rich sauce, and gooey cheese. They’re perfect for busy nights or casual gatherings. I’ll guide you through each step, so you can impress your family and friends with ease. Get ready to savor every bite of this delicious treat! Let’s dive into the recipe!
Why I Love This Recipe
- Quick and Easy: This recipe comes together in just 40 minutes, making it perfect for a weeknight dinner or a casual gathering.
- Flavor Packed: The combination of crispy chicken, marinara sauce, and gooey mozzarella creates a symphony of flavors that everyone will love.
- Customizable: You can easily swap out ingredients, such as using different types of cheese or adding extra toppings like jalapeños or roasted red peppers.
- Perfect for Sharing: These sliders are the ideal size for sharing, making them a hit at parties or game day gatherings.
Ingredients
Main Ingredients for Crispy Chicken Parmesan Sliders
To make these tasty sliders, you need the following main ingredients:
- 1 lb chicken breast, boneless and skinless
- 1 cup all-purpose flour
- 2 large eggs, beaten
- 1 cup breadcrumbs (preferably Italian-seasoned)
- 1/2 cup grated Parmesan cheese
- 1 cup marinara sauce
- 1 cup shredded mozzarella cheese
- 4 slider buns
- 1 teaspoon garlic powder
- 1 teaspoon dried oregano
- Salt and pepper to taste
- Fresh basil leaves for garnish
- Olive oil for frying
Each ingredient plays a key role in flavor and texture. The chicken provides the main protein, while the flour, eggs, and breadcrumbs create a crispy coating. The cheeses add rich flavors, and the marinara sauce brings moisture and zest.
Optional Add-ins and Seasonings
You can enhance your sliders with optional add-ins and seasonings. Some ideas include:
- Red pepper flakes for heat
- Fresh herbs like thyme or parsley
- Spinach for extra greens
- Sautéed mushrooms for umami flavor
These additions can make your sliders unique. Feel free to experiment based on your taste!
Recommended Cheese Varieties
For the best flavor, I recommend using these cheese varieties:
- Whole milk mozzarella for creaminess
- Provolone for a sharper taste
- Fontina for a nutty finish
Mixing different cheeses can elevate the flavor. You’ll get a deliciously gooey texture and a rich taste that pairs well with the chicken and sauce.

Step-by-Step Instructions
Preparing the Chicken for Cooking
Start by preheating your oven to 375°F (190°C). This helps the sliders finish well later. Next, take your chicken breasts and place them on a cutting board. Use a meat mallet to pound them to an even thickness. This step ensures that the chicken cooks evenly. Season both sides of each chicken breast with salt, pepper, garlic powder, and dried oregano. This adds great flavor to your chicken.
Setting Up the Breading Station
Now, let’s set up your breading station. Grab three separate bowls. In the first bowl, add 1 cup of all-purpose flour. In the second bowl, beat two large eggs and pour them in. In the third bowl, mix together 1 cup of breadcrumbs and 1/2 cup of grated Parmesan cheese. This setup makes breading easy and fun.
Frying the Chicken to Perfection
Heat some olive oil in a large skillet over medium heat. You want enough oil to cover the bottom of the pan. Once the oil is hot, carefully add the breaded chicken breasts. Fry them for about 4-5 minutes on each side. You want them crispy and golden brown. Check that the internal temperature reaches at least 165°F (74°C). When done, transfer the chicken to a plate lined with paper towels. This helps drain any excess oil.
Assembling the Sliders
Slice your slider buns in half. On each bottom half, place a piece of fried chicken. Spoon marinara sauce generously over each piece. Don’t be shy with the sauce! Next, sprinkle shredded mozzarella cheese on top. This will melt beautifully when we bake them.
Baking for the Perfect Finish
Arrange the assembled sliders on a baking sheet. Place them in your preheated oven and bake for about 10 minutes. You want the cheese to melt and get bubbly. Once done, take them out and let them cool slightly. Optionally, garnish with fresh basil leaves for a nice touch. Finally, place the top half of the buns on each slider and get ready to enjoy!
Tips & Tricks
Achieving Optimal Crispiness
To make your chicken sliders super crispy, I have a few tips. First, use a mix of breadcrumbs and Parmesan cheese. This adds flavor and texture. Press the breadcrumbs firmly onto the chicken. This helps them stick better. Fry the chicken in hot oil. This keeps the breading from getting soggy. Make sure you don’t crowd the pan. Fry in batches if needed. After frying, let the chicken rest on paper towels. This removes excess oil and keeps it crispy.
Common Mistakes to Avoid
Many home cooks make a few common mistakes. One big mistake is not seasoning the chicken well. Always season both sides with salt and pepper. Another mistake is using cold oil. Always heat your oil before adding the chicken. This ensures a good fry. Also, don’t skip the resting time after frying. It helps keep the crust intact when you assemble the sliders. If the chicken is too thick, it may not cook through. Pound the chicken to an even thickness for the best results.
Suggestions for Perfectly Baked Cheese
When you bake the sliders, use a good amount of cheese. I recommend about a cup of shredded mozzarella. Spread it evenly over the chicken. This creates a gooey, melty layer. To get a nice brown top, broil the sliders for a minute after baking. Just watch them closely. They can burn fast. If you want extra flavor, sprinkle some grated Parmesan on top before baking. This gives a rich taste and a nice crunch.
Pro Tips
- Use Panko Breadcrumbs: For an extra crispy texture, consider using panko breadcrumbs instead of regular breadcrumbs.
- Keep Oil Temperature Steady: Ensure the oil is hot enough before adding the chicken to prevent sogginess, but not so hot that it burns the coating.
- Experiment with Cheese: Try mixing different cheeses like provolone or fontina for a unique flavor twist.
- Make Ahead: You can prepare the chicken and bread it in advance, then fry just before serving for a fresh, hot slider.
Variations
Alternative Proteins for Sliders
You can use more than just chicken for these sliders. Consider using turkey or even pork. For a meatless option, try crispy eggplant or cauliflower. These choices add new flavors and textures. Each option cooks similarly to chicken, so keep your breading steps the same.
Different Sauce Options
While marinara sauce shines in this recipe, feel free to mix it up. Try pesto for a fresh twist. A spicy arrabbiata sauce can add heat. You could even use alfredo sauce for a creamy delight. Each sauce changes the slider's flavor, making it exciting to try.
Unique Toppings and Garnishes
Toppings can elevate your sliders to new heights. Add slices of fresh tomatoes or roasted red peppers. You can also sprinkle chopped olives or pepperoncini for a briny kick. Fresh herbs like parsley or arugula can add a pop of color and taste. Experiment with your favorites for a custom slider experience.
Storage Info
Best Ways to Store Leftover Sliders
To keep your leftover sliders fresh, first let them cool down. Place them in an airtight container. You can also wrap each slider in plastic wrap. This helps keep them from drying out. Store them in the fridge for up to three days. If you need to keep them longer, freezing is a great option.
Reheating Instructions
When you're ready to enjoy your sliders again, you can reheat them easily. The best way is to use an oven. Preheat your oven to 350°F (175°C). Place the sliders on a baking sheet. Heat for about 10-15 minutes, until they are warm and the cheese melts again. You can also microwave them, but the texture may change. If you use a microwave, heat them in 30-second bursts.
Freezing Tips and Best Practices
To freeze your sliders, wrap them tightly in plastic wrap. Then place them in a freezer-safe bag or container. Make sure to remove as much air as possible to prevent freezer burn. These sliders can last up to three months in the freezer. When you're ready to eat, thaw them in the fridge overnight before reheating.
FAQs
Can I make Crispy Chicken Parmesan Sliders in advance?
Yes, you can make these sliders ahead of time. Prepare the chicken and bread it. Then, fry it just before serving. You can also assemble the sliders, cover them, and store in the fridge for a few hours. Bake them right before you want to eat. This keeps the bread fresh and the cheese melty.
What can I substitute for breadcrumbs?
If you need a substitute for breadcrumbs, try crushed crackers or panko. You can also use ground oats for a gluten-free option. These alternatives give a nice crunch. Just make sure to season them well to keep the flavor strong.
How can I make these sliders healthier?
To make these sliders healthier, use whole-grain buns. You can also bake the chicken instead of frying. Just coat the chicken in breadcrumbs and bake it at 400°F (200°C) for about 20 minutes. Try low-fat cheese or less cheese overall. Add more veggies, like spinach or peppers, for extra nutrients.
Can I use different types of buns?
Absolutely! You can use any type of bun you like. Slider buns, whole wheat buns, or even lettuce wraps work well. Choose a bun that fits your taste or diet. This adds a fun twist to your Crispy Chicken Parmesan Sliders.
Crispy Chicken Parmesan Sliders combine simple ingredients and steps for delicious results. We discussed main ingredients, optional add-ins, and the best cheeses to use. You learned how to prepare, bread, fry, and assemble these sliders. Key tips helped you avoid common mistakes while ensuring optimal crispiness. Plus, we explored delicious variations and storage methods.
Enjoy crafting your own sliders. Share your creations with friends and family for a fun meal!