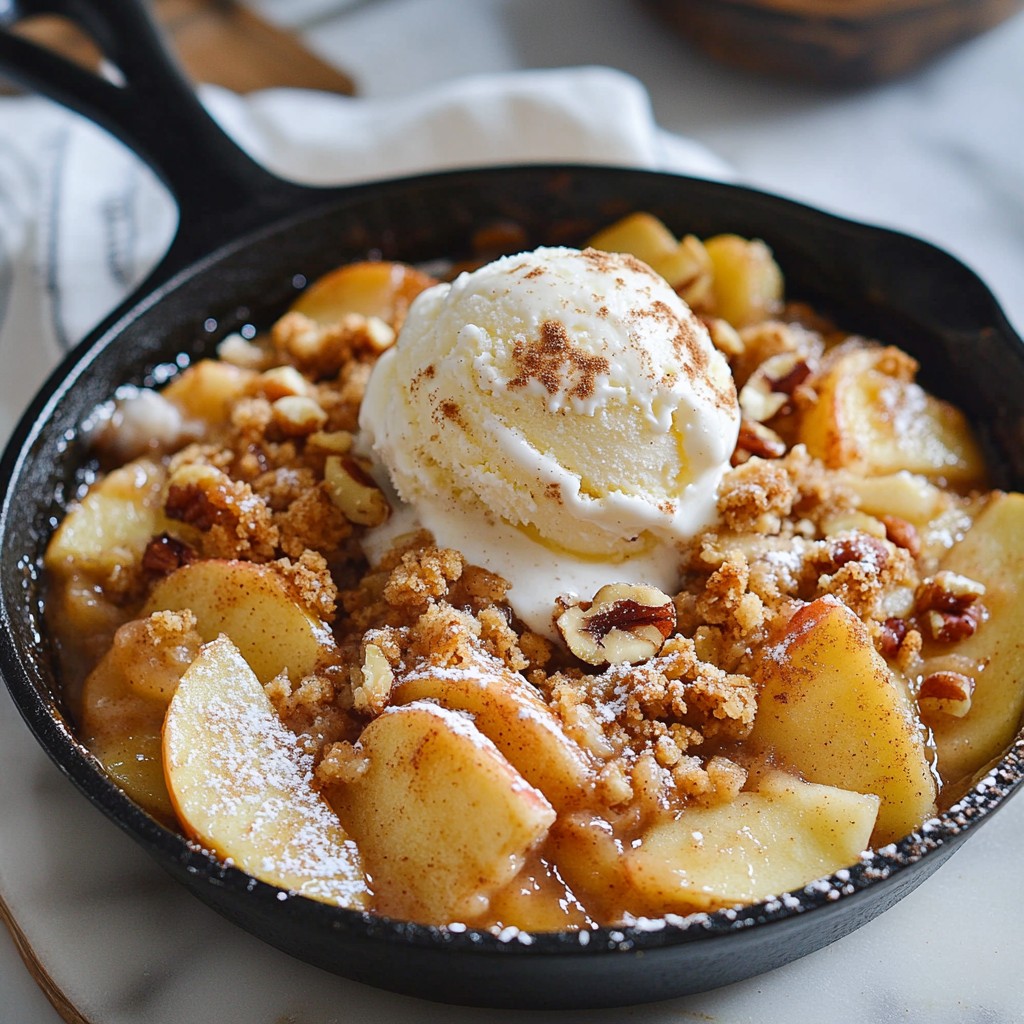
If you crave a warm, comforting dessert, let me introduce you to my Cinnamon Apple Crisp Skillet. This simple treat is packed with juicy apples and a crunchy oat topping. Whether you’re a beginner or a seasoned cook, you’ll find joy in each easy step. Get ready to impress your family and friends with a dessert that’s bursting with flavor and simplicity. Let’s dive into this delightful recipe!
Why I Love This Recipe
- Delicious Flavor Combination: The sweet and tart apples combined with warm spices create a comforting and delightful flavor profile that is perfect for any occasion.
- Easy Preparation: This recipe comes together quickly, making it an ideal choice for busy weeknights or last-minute gatherings.
- Warm and Cozy Dessert: There's nothing quite like a warm apple crisp fresh from the oven, especially when served with a scoop of ice cream!
- Customizable: You can easily adjust the sweetness, add different nuts, or even mix in other fruits to make it your own!
Ingredients
List of Ingredients
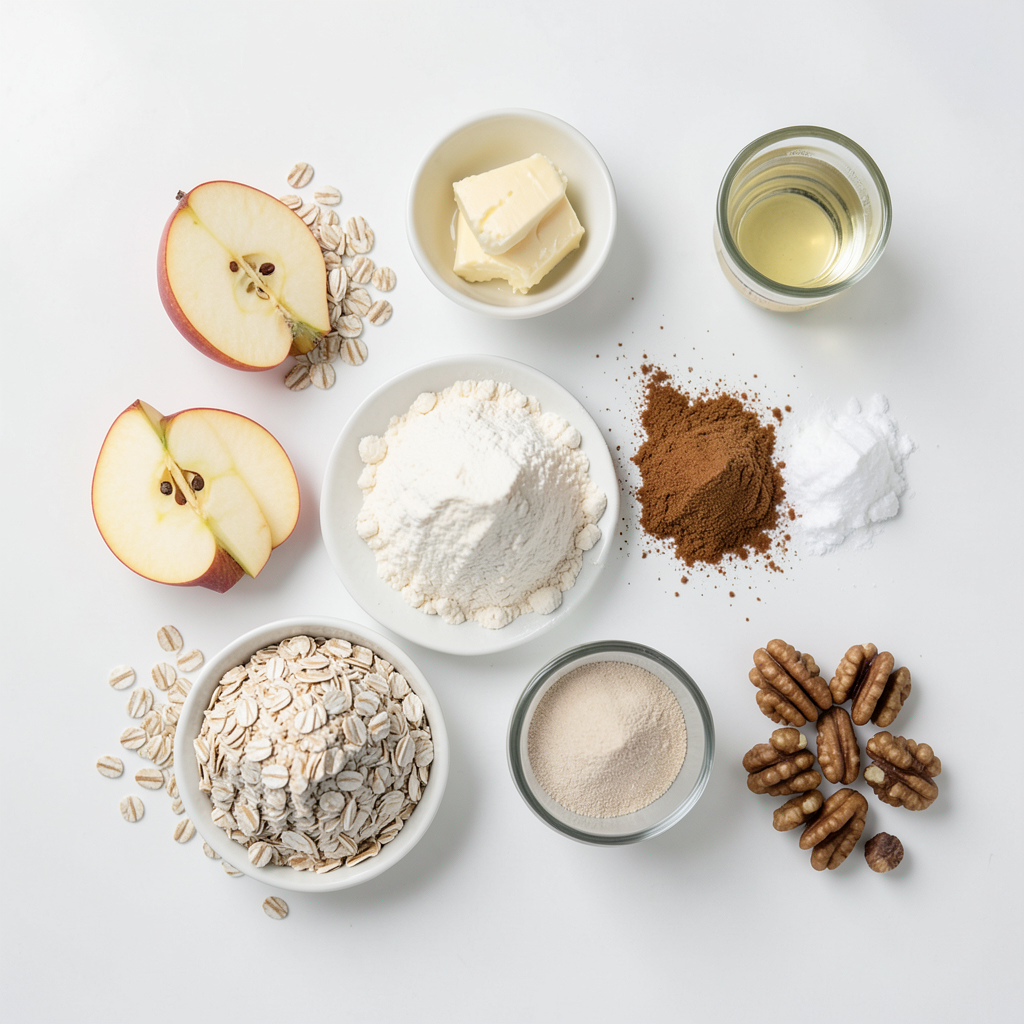
To make the Cinnamon Apple Crisp Skillet, gather these ingredients:
- 4 medium apples, peeled, cored, and sliced (Gala or Honeycrisp work well)
- 1 cup rolled oats
- 1/2 cup all-purpose flour
- 1/2 cup brown sugar
- 1/2 teaspoon ground cinnamon
- 1/4 teaspoon nutmeg
- 1/4 teaspoon salt
- 1/2 cup unsalted butter, melted
- 1 teaspoon vanilla extract
- 1/2 cup chopped nuts (walnuts or pecans)
- Vanilla ice cream or whipped cream, for serving (optional)
Tips for Choosing the Best Apples
Choose apples that are firm and fresh. Gala and Honeycrisp are my favorites. They add great sweetness and flavor. Avoid apples that feel soft or have bruises. Look for vibrant color; this shows freshness. You can also mix different types of apples. This gives a nice blend of tastes.
Recommended Alternatives for Allergies
If you have nut allergies, skip the chopped nuts. Use seeds like sunflower seeds instead. For gluten-free options, substitute all-purpose flour with a gluten-free blend. Make sure to check labels for allergens. If you're dairy-free, use a plant-based butter. You can still enjoy this dessert without worry!
Step-by-Step Instructions
Prepping the Apples
Start by peeling and coring four medium apples. I like using Gala or Honeycrisp because they taste great. Slice the apples thin and place them in a large bowl. Sprinkle a little cinnamon and a tablespoon of brown sugar over the apples. This helps bring out their juice. Let them sit for about 10 minutes. You will see them start to glisten as they release their juices.
Mixing the Oat Topping
In another bowl, mix together one cup of rolled oats, half a cup of all-purpose flour, and half a cup of brown sugar. Add half a teaspoon of ground cinnamon, a quarter teaspoon of nutmeg, and a quarter teaspoon of salt. These spices add flavor and warmth to your crisp. Pour in half a cup of melted unsalted butter and one teaspoon of vanilla extract. Mix it all together until it looks crumbly. Finally, stir in half a cup of chopped nuts. Walnuts or pecans work well for this topping.
Baking the Cinnamon Apple Crisp
Preheat your oven to 350°F (170°C). In a 10-inch cast-iron skillet, arrange the apple slices evenly along the bottom. Make sure they fit snugly. Then, sprinkle the oat topping over the apples. Bake in the oven for 30 to 35 minutes. You want the apples to get tender and the topping to turn golden brown. Once done, remove it from the oven and let it cool for a few minutes. Serve it warm with vanilla ice cream or whipped cream for a special treat!
Tips & Tricks
How to Achieve the Perfect Crisp Topping
To make a great topping, use old-fashioned rolled oats. They create a chewy texture. Mix your oats with flour, brown sugar, cinnamon, nutmeg, and salt. This mix adds flavor and crunch. When you add melted butter, mix until it looks crumbly. If it’s too wet, add more oats or flour.
Common Mistakes to Avoid
One big mistake is using too many apples. Stick to four medium apples for the best taste. Avoid cutting apples too thin; thicker slices hold up better while baking. Don’t forget to let the apples sit with cinnamon and sugar. This step brings out their natural juices. Lastly, don’t rush the baking time. A golden brown topping means it’s ready!
Serving Suggestions for Maximum Flavor
Serving warm is key. Top it with vanilla ice cream or whipped cream. This adds creaminess that pairs well with warm apples. A sprinkle of cinnamon on top makes it look pretty and adds flavor. You can also add a few extra chopped nuts for crunch. Enjoy it straight from the skillet for a cozy experience!
Pro Tips
- Choose the Right Apples: Gala or Honeycrisp apples work best for this recipe due to their sweetness and texture, which hold up well during baking.
- Make it Nut-Free: If you're serving someone with nut allergies, simply omit the nuts from the topping for a delicious and safe dessert.
- Serve it Warm: For the best experience, serve the apple crisp warm with a scoop of vanilla ice cream or a dollop of whipped cream.
- Customize the Spices: Feel free to adjust the spices to your liking; adding a pinch of ginger or cloves can give a unique twist to the flavor.
Variations
Adding Fruits or Berries
You can make your cinnamon apple crisp even better with other fruits. Try adding blueberries, raspberries, or sliced pears. These fruits add a burst of flavor and color. Just mix them in with the apples before you bake. This makes each bite sweet and juicy.
Gluten-Free Options
If you need a gluten-free dessert, swap the all-purpose flour. Use almond flour or gluten-free flour instead. Both options work well and keep the crisp tasty. Just make sure to check the labels. Some gluten-free flours may have extra ingredients.
Different Nut Combinations
Nuts add crunch and flavor to your crisp. While walnuts and pecans are great, try hazelnuts or almonds too. Chop them up and mix them into the oat topping. This gives your dessert a fun twist. Each nut brings its own unique taste.
Storage Info
Best Practices for Storing Leftovers
After making your cinnamon apple crisp, let it cool to room temperature. This step helps keep the topping crispy. Once cooled, cover the skillet tightly with plastic wrap or foil. You can also transfer it to an airtight container for better storage. Store it in the fridge for up to four days.
How to Reheat for Optimal Flavor
When you want to enjoy leftovers, preheat your oven to 350°F (175°C). Place the cinnamon apple crisp in an oven-safe dish. Cover it with foil to keep it moist while reheating. Bake for about 15-20 minutes. This method keeps the topping crunchy and warms the apples perfectly. You can also reheat it in the microwave. Heat it in short bursts, checking every 30 seconds.
Freezing Cinnamon Apple Crisp for Future Enjoyment
Freezing is a great way to save your cinnamon apple crisp for later. First, let it cool completely. Then, cut it into portions. Wrap each piece tightly in plastic wrap, followed by aluminum foil. This method prevents freezer burn. Label each package with the date. You can freeze it for up to three months. When you're ready to eat, just thaw it overnight in the fridge and reheat as mentioned above.
FAQs
Can I use different types of apples?
Yes, you can! While Gala and Honeycrisp apples work best, you can try other types. For a sweet taste, use Fuji or Ambrosia. For a tart flavor, choose Granny Smith. Mixing apple types can give a nice balance of sweet and tart flavors.
How to make Cinnamon Apple Crisp Skillet vegan?
To make this dessert vegan, replace the unsalted butter with a plant-based butter. You can also use maple syrup or coconut sugar instead of brown sugar. These swaps keep the taste rich and delicious while making it dairy-free.
What can I serve with Cinnamon Apple Crisp?
This crisp tastes great on its own. You can serve it warm with vanilla ice cream or whipped cream. A dollop of yogurt also adds a nice twist. Enjoy it with a sprinkle of extra cinnamon for that perfect finish.
This blog post covered all you need to make a great cinnamon apple crisp. We explored key ingredients and tips for choosing apples. I shared steps for prepping, mixing, and baking your dish perfectly.
You learned methods for achieving the best topping and avoiding mistakes. We also discussed fun variations and how to store leftovers well. Finally, the FAQs answered important questions for custom recipes.
Now, you can enjoy a delicious treat anytime!