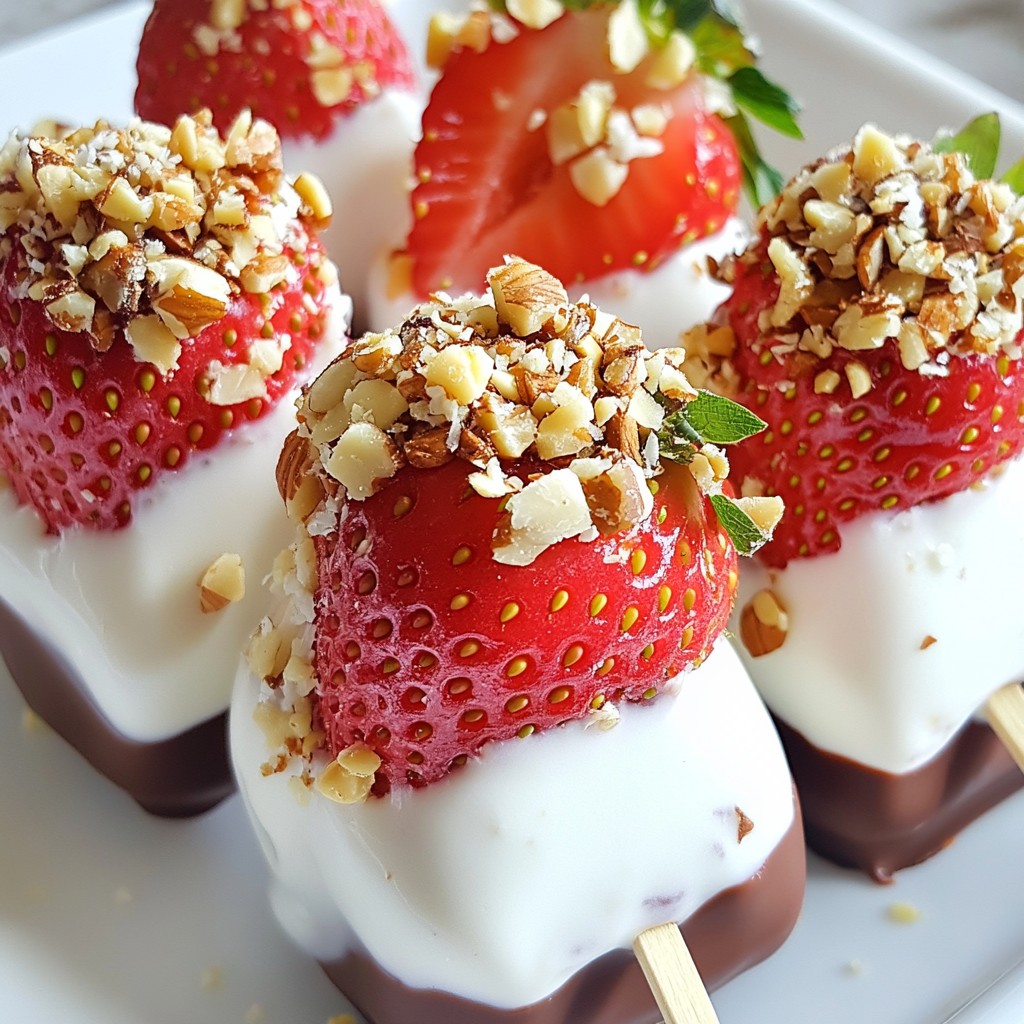
Do you love fresh, tasty treats? You'll adore making Chocolate Dipped Strawberry Yogurt Pops! These delightful pops are easy to whip up and perfect for a warm day. With fresh strawberries, creamy yogurt, and a rich chocolate coating, they offer a fun twist on snacking. Let me guide you step by step to create these sweet, refreshing pops that everyone will enjoy. Ready to dive in?
Why I Love This Recipe
- Deliciously Healthy: These pops are made with Greek yogurt and fresh strawberries, providing a nutritious treat that's rich in protein and vitamins.
- Customizable Flavors: You can easily adjust the sweetness and choose your favorite chocolate, making these pops perfect for any palate.
- Fun for All Ages: Kids and adults alike will enjoy making and eating these colorful and delightful pops!
- Perfect for Hot Days: These refreshing yogurt pops are a great way to beat the heat during summer months.
Ingredients
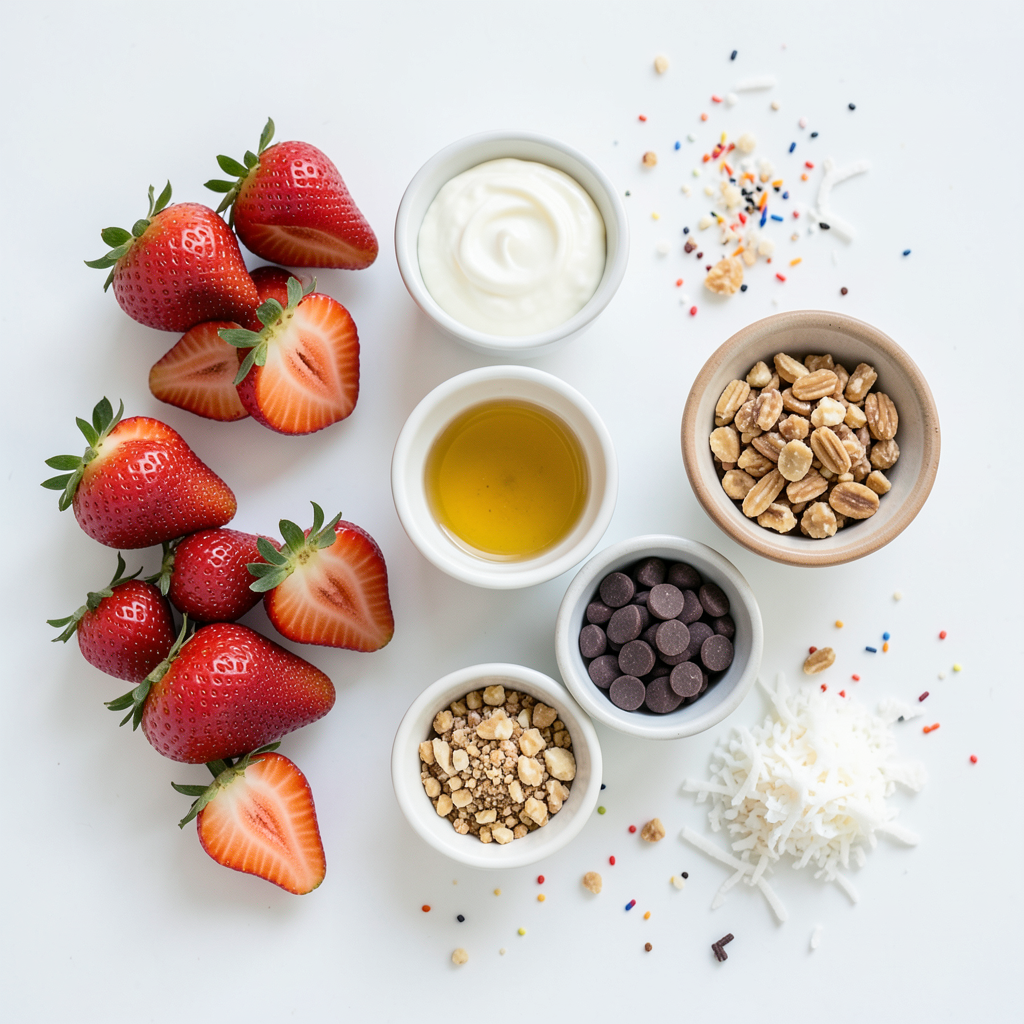
Main Ingredients
- 2 cups fresh strawberries, hulled and halved
- 1 cup Greek yogurt (plain or vanilla)
- 2 tablespoons honey or maple syrup (adjust to taste)
To make these pops, fresh strawberries are key. Choose ripe, sweet strawberries for the best flavor. The yogurt adds creaminess and tang. You can pick plain Greek yogurt for a simple taste or vanilla for a hint of sweetness. Sweeteners like honey or maple syrup help balance the tang of the yogurt. Adjust the amount to your liking.
Chocolate Coating Ingredients
- 1 cup chocolate chips (dark or milk chocolate)
- 1 tablespoon coconut oil (for melting)
The chocolate coating makes these pops truly special. You can use dark or milk chocolate chips based on your taste. Adding coconut oil helps the chocolate melt smoothly. This combination creates a shiny, delicious coating.
Optional Toppings
- Crushed nuts
- Shredded coconut
- Sprinkles
Optional toppings let you get creative. Crushed nuts add crunch and depth. Shredded coconut gives a tropical twist. Sprinkles add a fun and colorful touch. Feel free to mix and match these toppings to make your pops unique!
Step-by-Step Instructions
Preparing the Yogurt Mixture
First, grab a medium bowl and add the Greek yogurt. Next, pour in two tablespoons of honey or maple syrup. Mix them together until smooth. Taste the mixture to check if it's sweet enough for you. If you want it sweeter, add more honey or syrup.
Assembling the Pops
Now, it's time to layer your pops. Take your molds and start with a layer of the yogurt mix. Then, add a layer of halved strawberries. Press them gently into the yogurt. Add another layer of yogurt on top, but leave a little space at the top of the molds. This space helps the pops freeze better. Now, insert popsicle sticks into the middle of each mold.
Freezing the Pops
Put your molds in the freezer. Let them freeze for at least four hours. You want them solid, so don't rush this part. If you want to check, gently wiggle the molds. If they feel firm, they are ready!
Melting and Dipping in Chocolate
To make the chocolate coating, take a microwave-safe bowl. Add one cup of chocolate chips and one tablespoon of coconut oil. Heat them in short bursts, stirring in between. Once melted and smooth, it’s time to dip. Grab a yogurt pop and dip it into the chocolate. Allow any extra chocolate to drip off before setting it aside.
Setting and Finalizing
While the chocolate is still soft, you can add optional toppings. Try crushed nuts, shredded coconut, or colorful sprinkles. Place the dipped pops on a parchment-lined baking sheet. After that, return them to the freezer for about 30 minutes. This extra time helps the chocolate harden perfectly.
Tips & Tricks
Making the Best Chocolate Dipped Strawberry Yogurt Pops
- Choosing ripe strawberries: Select fresh, bright red strawberries. Ripe strawberries taste sweet and juicy. Look for firm berries without blemishes. They add great flavor to your pops.
- Yogurt consistency for easier layering: Use thick Greek yogurt. It holds its shape well in the molds. If you prefer a sweeter taste, mix in honey or maple syrup. This helps balance the tartness of the yogurt.
Avoiding Common Mistakes
- Preventing chocolate from seizing: When melting chocolate, use short bursts in the microwave. Stir between each burst to keep it smooth. If you heat it too long, it will clump. Adding a bit of coconut oil helps keep it silky.
- Ensuring even popsicle distribution: Fill your molds evenly. Layer yogurt and strawberries carefully. This ensures each pop has a nice mix. Avoid overfilling to prevent spills when inserting sticks.
Serving Suggestions
- Display ideas for parties: Arrange pops on a colorful platter. Use decorative paper or a cake stand for height. Colorful garnishes like fresh strawberries or edible flowers add flair.
- Drizzling extra chocolate for presentation: Melt extra chocolate and drizzle it over the pops. Use a fork for a fun zig-zag pattern. This adds an extra touch to impress your guests. Consider adding sprinkles or crushed nuts for texture.
Pro Tips
- Choose the Right Chocolate: Use high-quality chocolate chips for the best flavor. Dark chocolate pairs beautifully with the sweetness of strawberries and yogurt.
- Freeze for Perfectly Solid Pops: Ensure your yogurt pops are frozen for at least 4 hours to prevent them from being too soft when dipped in chocolate.
- Experiment with Flavors: Try adding vanilla extract or a pinch of cinnamon to the yogurt mixture for an extra flavor dimension.
- Make Ahead and Store: These pops can be made in advance and stored in an airtight container in the freezer for up to 2 weeks.
Variations
Different Fruit Options
You can use more than just strawberries for your yogurt pops. Try using bananas, blueberries, or raspberries. Each fruit brings its own taste. You can also mix fruits together. For instance, combine strawberries and bananas for a fun twist. This combination creates a sweet and creamy flavor.
Yogurt Options
Flavored yogurt adds a special touch. Use vanilla, strawberry, or any fruit flavor you like. If you prefer dairy-free, choose almond, coconut, or soy yogurt. These options taste great and work well in the recipe. They keep the pops creamy while being suitable for everyone.
Chocolate Types
White chocolate is a fun choice if you want a change. Vegan chocolate is perfect for those who avoid dairy. You can also add spices. A pinch of cinnamon makes the chocolate unique. Experimenting with flavors can make your pops even more exciting.
Storage Info
Storing Leftover Pops
To keep your leftover pops fresh, use an airtight container. A silicone mold works well too. Place parchment paper between pops to avoid sticking. This keeps each pop safe and sound for later enjoyment.
Freezing Tips
Your pops can last up to two months in the freezer. Make sure to label the container with the date. When it’s time to enjoy, take out a pop and let it thaw for about five minutes. This helps it soften just enough for easy eating.
Avoiding Freezer Burn
Wrap each pop in plastic wrap to prevent freezer burn. You can also use aluminum foil for extra protection. Store them in a sturdy bag to seal in flavor. This way, your pops stay tasty and creamy, just like when you first made them.
FAQs
Can I use frozen strawberries for this recipe?
Yes, you can use frozen strawberries. Frozen berries save time and are easy to find. They blend well into the yogurt and still taste good. However, they may make the yogurt mixture a bit watery. This can change the pops' texture. If you use frozen strawberries, drain any excess liquid before mixing. Fresh strawberries provide the best flavor and texture.
How do I know when the pops are fully frozen?
Your pops are ready when they feel solid to the touch. You can gently poke the side of a pop. If it feels hard, it is frozen. Another sign is that the color looks more vibrant. The yogurt should not feel soft or mushy. If you are unsure, leave them in the freezer for a bit longer. Generally, four hours is a good time for freezing.
Can I make these without popsicle molds?
Yes, you can use other methods to shape your pops. Small cups or ice cube trays work well. Just fill them with the yogurt mixture and insert a stick when they are partly frozen. You can even use a muffin tin for larger pops. Just remember to freeze them well to hold their shape. This gives you room for creativity when making your treats!
In this post, we covered how to make delicious chocolate-dipped strawberry yogurt pops. You learned about the main ingredients, including fresh strawberries and Greek yogurt, plus sweetener options. I shared simple steps for making, assembling, and freezing the pops. You gained tips for avoiding common mistakes and ideas for variations, storage, and serving.
These pops are easy, tasty, and perfect for warm days. Enjoy making them your own!