Are you craving a sweet, fruity treat? You’re in luck! In this blog post, I'll show you how to make Cherry Garcia Ice Cream at home. With a simple list of key ingredients and easy steps, you’ll whip up this classic flavor in no time. Plus, I'll share fun tips and variations to make it exactly how you like it. Let’s dive in and bring this creamy delight to life!
Why I Love This Recipe
- Rich and Creamy Texture: This ice cream boasts a luxurious texture that melts in your mouth, making every bite feel indulgent.
- Fresh Ingredients: Using fresh cherries adds a burst of natural flavor and vibrant color, elevating the overall taste experience.
- Chocolate Delight: The combination of dark chocolate with cherries creates a perfect balance of sweetness and richness, appealing to chocolate lovers.
- Simple to Make: With just a few ingredients and straightforward steps, this recipe is an accessible way to enjoy homemade ice cream.
Ingredients
Key Ingredients for Cherry Garcia Ice Cream
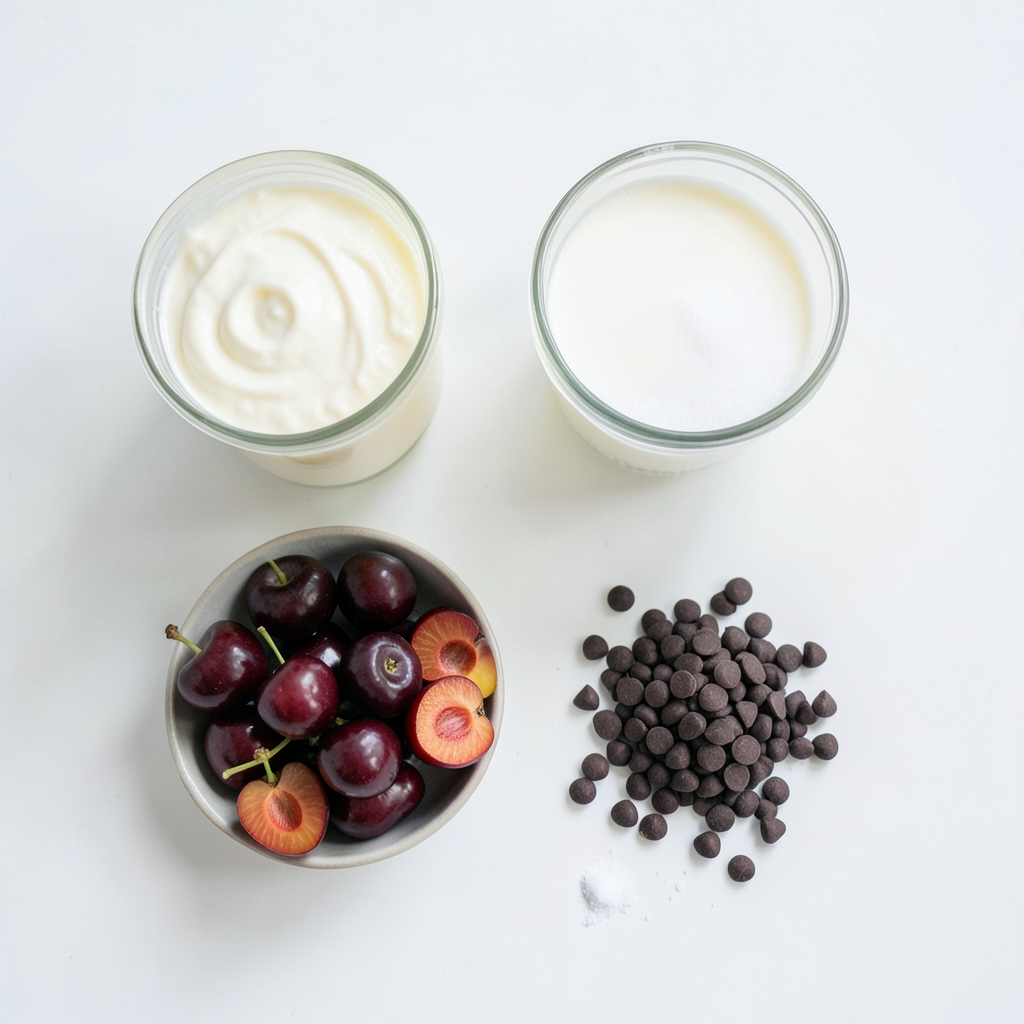
To create Cherry Garcia Ice Cream, you need some key ingredients:
- 2 cups heavy cream
- 1 cup whole milk
- 3/4 cup granulated sugar
- 1 teaspoon vanilla extract
- 1 cup fresh cherries, pitted and halved
- 1/2 cup dark chocolate chips (or grated dark chocolate)
- A pinch of salt
These ingredients work together to create a creamy, rich base with sweet and tart flavors. The heavy cream and whole milk provide a smooth texture. Sugar adds sweetness, while vanilla brings warmth. Cherries and chocolate give the ice cream its iconic taste.
Substitutes for Key Ingredients
If you can’t find some ingredients, don’t worry! Here are some easy substitutes:
- Heavy cream: Use half-and-half for a lighter option.
- Whole milk: You can use low-fat milk, but the texture will be less creamy.
- Granulated sugar: Try honey or maple syrup for a different sweet taste.
- Fresh cherries: Frozen cherries work well too, just thaw and drain.
- Dark chocolate: Milk chocolate can replace dark chocolate if you prefer a sweeter taste.
These substitutes can help you adapt the recipe to what you have at home.
Importance of Ingredient Quality
Using high-quality ingredients is key to great ice cream. Fresh cherries make a big difference in taste. They should be ripe and juicy. The heavy cream and milk should be fresh and rich. Good quality chocolate enhances the flavor. Always choose chocolate with a high cocoa content for the best results.
Investing in quality ingredients pays off in flavor and texture. Your homemade Cherry Garcia Ice Cream will taste better, and you’ll enjoy every scoop!
Step-by-Step Instructions
Preparation of the Ice Cream Base
Start by gathering your ingredients. In a large mixing bowl, combine:
- 2 cups heavy cream
- 1 cup whole milk
- 3/4 cup granulated sugar
- 1 teaspoon vanilla extract
- A pinch of salt
Whisk the mix until the sugar dissolves completely. This step is key for smooth ice cream.
Churning Process in an Ice Cream Maker
Pour your creamy mixture into the ice cream maker. Follow the maker's instructions. It usually takes about 20-25 minutes. You want it to reach a soft-serve texture. Keep an eye on it. The ice cream should look thick and fluffy.
Incorporating Cherries and Chocolate
While the ice cream churns, prep your cherries. Rinse them well, pit them, and slice them in half. If you want, you can mash some to release their juice. This adds extra flavor!
Once your ice cream is thick, gently fold in:
- 1 cup fresh cherries
- 1/2 cup dark chocolate chips
Use a spatula to mix them in evenly. Transfer the ice cream to an airtight container. Smooth the top, then freeze it for at least 4 hours. This step helps the ice cream firm up. Before serving, let it sit at room temp for 5-10 minutes. This makes scooping easier. Enjoy your homemade Cherry Garcia Ice Cream!
Tips & Tricks
Tips for Achieving the Best Texture
To get the best texture in your Cherry Garcia ice cream, start with cold ingredients. Use cold heavy cream and milk. This helps the ice cream churn better. Whisk the mixture until the sugar dissolves fully. This step ensures a smooth base. Churn the mixture in your ice cream maker for about 20-25 minutes. The ice cream should look thick and creamy before you add the cherries and chocolate.
Flavor Enhancements and Additions
You can boost the flavor of your ice cream with a few simple tricks. Try adding a splash of almond extract for a nutty twist. You can also mix in a bit of lemon juice to brighten the taste. For those who love more texture, try adding crushed nuts. Chopped walnuts or almonds can add crunch and flavor. If you want to make it richer, use dark chocolate fudge swirls instead of chips. These swaps can take your Cherry Garcia to the next level.
Troubleshooting Common Issues
Sometimes, things can go wrong when making ice cream. If your ice cream is too icy, it may have been frozen too fast. Make sure your mixture is well-chilled before churning. If it’s too soft, it might need more time in the freezer. Let it freeze longer after churning. If your ice cream separates or is grainy, you may not have mixed it well. Always whisk until smooth and avoid over-churning. Fixing these common issues helps ensure a perfect Cherry Garcia treat every time.
Pro Tips
- Chill Your Ingredients: For creamier ice cream, chill your heavy cream and milk in the refrigerator for a few hours before mixing. Cold ingredients churn better and help achieve a smooth texture.
- Use Quality Chocolate: Opt for high-quality dark chocolate for the best flavor. It will enhance the richness of your ice cream and complement the tartness of the cherries.
- Don’t Over-Churn: Keep an eye on the churning process to avoid over-churning. Once it reaches a soft-serve consistency, stop the ice cream maker to maintain a creamy texture.
- Store Properly: When storing your ice cream, press a piece of parchment paper directly onto the surface before sealing the container. This helps prevent ice crystals from forming and keeps your ice cream smooth.
Variations
Vegan Cherry Garcia Ice Cream Recipe
To make a vegan version, swap heavy cream and whole milk for coconut cream and almond milk. Use the same sugar and vanilla. The steps stay the same. This version tastes rich and creamy. You still get the cherry and chocolate goodness.
Cherry Garcia with Different Chocolate Types
You can change the chocolate type for fun. Use milk chocolate for a sweeter bite. If you like dark chocolate, try bittersweet. You could also use white chocolate for a unique twist. Each chocolate brings its own flavor. Just mix in the chocolate chips like in the main recipe.
Seasonal Variations Using Other Fruits
Feel free to swap cherries with other fruits. Fresh strawberries or raspberries work well. You can also use peaches or blueberries in summer. Each fruit adds a new taste. Keep the chocolate to add that signature touch. Get creative and try different fruits for a fresh take!
Storage Info
How to Properly Store Cherry Garcia Ice Cream
To keep your Cherry Garcia ice cream fresh, use an airtight container. This helps prevent ice crystals from forming. Make sure to smooth the top of the ice cream before sealing. This keeps air out and flavor in.
Shelf Life and Freezing Tips
Cherry Garcia ice cream lasts about two weeks in the freezer. After that, it may lose some flavor and texture. For best results, eat it within this time. Always set your freezer to 0°F (-18°C) or lower. This ensures the ice cream stays firm and delicious.
Re-freezing and Quality Maintenance
If you take out the ice cream, do not let it melt too much. If it gets too soft, avoid re-freezing it unless you plan to eat it soon. Re-freezing can lead to a grainy texture. If you must re-freeze, let it harden for a few hours before serving again.
FAQs
What is Cherry Garcia Ice Cream?
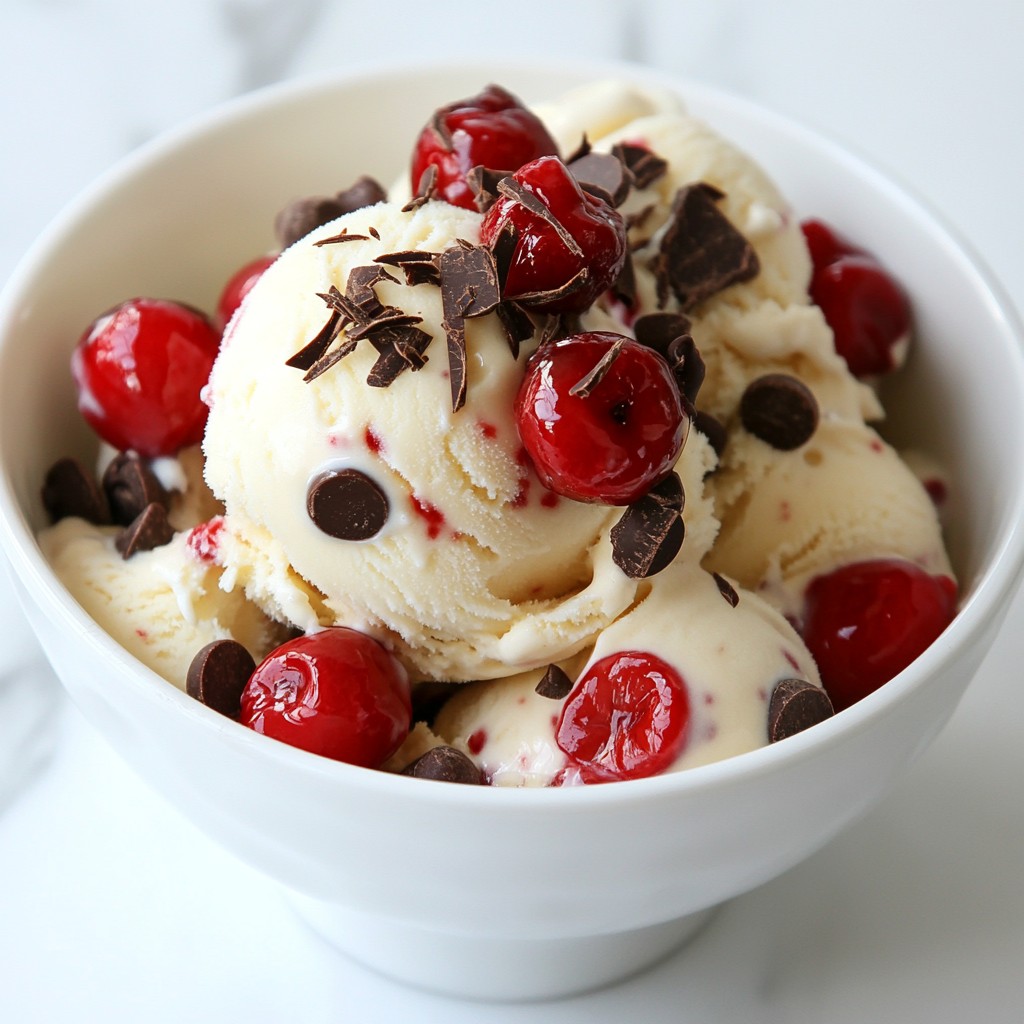
Cherry Garcia Ice Cream is a tasty blend of sweet cherries and rich chocolate. The base is creamy and smooth, made from heavy cream and milk. This ice cream gets its name from the famous band Grateful Dead's Jerry Garcia. It combines fresh cherries and dark chocolate chips, making each scoop a delight. The balance of flavors makes it a favorite for many ice cream lovers.
Can I make Cherry Garcia Ice Cream without an ice cream maker?
Yes, you can make Cherry Garcia Ice Cream without an ice cream maker. Start by mixing the cream, milk, sugar, and vanilla in a bowl. Then, pour it into a large dish. Place it in the freezer. Every 30-60 minutes, take it out and stir well. This hand-mixing helps break up ice crystals. Repeat this for about 4 hours until it is firm and creamy.
How to serve Cherry Garcia Ice Cream?
Serving Cherry Garcia Ice Cream is fun and easy. Use colorful bowls to make it extra special. Scoop the ice cream into each bowl. Top it with extra cherry halves and chocolate shavings. You can also add a drizzle of chocolate syrup for more flavor. This makes the dish look pretty and inviting!
In this post, we explored how to make Cherry Garcia Ice Cream. We covered key ingredients, the steps to create the perfect base, and tips for great texture. We also looked at fun variations and how to store your ice cream properly. Quality matters, so choose the best ingredients. Making ice cream at home is fun and rewarding. With these tips, you can create a tasty treat that everyone will love. Enjoy your Cherry Garcia Ice Cream!