
Looking for a quick and tasty snack? Try these Cheesy Broccoli Rice Cups! Packed with flavor and nutrition, they’re perfect for busy days. With simple steps and easy ingredients, you’ll whip them up in no time. Whether as a snack or part of a meal, these cups will please everyone. Let’s dive into the delicious world of cheesy goodness! Your new favorite snack awaits!
Why I Love This Recipe
- Healthy Ingredients: This recipe incorporates brown rice and fresh broccoli, making it a nutritious option for a snack or meal.
- Cheesy Goodness: The combination of cheddar and Parmesan cheese ensures a rich and creamy flavor in every bite.
- Easy to Prepare: With minimal prep time and straightforward instructions, this dish is perfect for cooks of all skill levels.
- Customizable: You can easily modify the recipe by adding other vegetables or spices to suit your taste preferences.
Ingredients
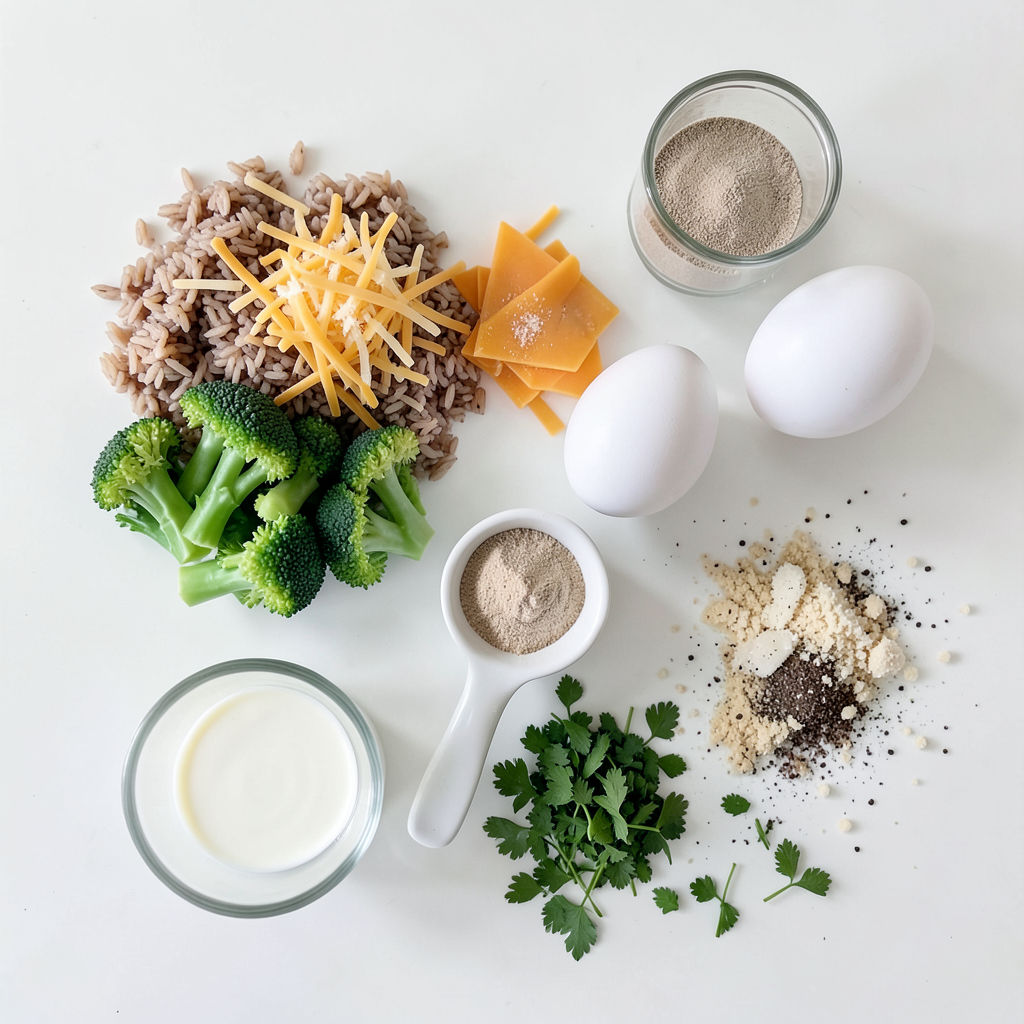
List of Ingredients
- 2 cups cooked brown rice
- 1 cup fresh broccoli florets, finely chopped
- 1 cup shredded cheddar cheese
- 1/2 cup grated Parmesan cheese
- 2 large eggs
- 1/4 cup milk
- 1 teaspoon garlic powder
- 1 teaspoon onion powder
- Salt and pepper to taste
- 1/4 cup breadcrumbs (for topping)
- Fresh parsley, chopped (for garnish)
These ingredients make cheesy broccoli rice cups a tasty snack. I love using cooked brown rice as a base. It adds fiber and a nice texture. Fresh broccoli florets add color and nutrients. Make sure to chop them fine so they mix well.
Cheddar cheese gives a rich, creamy flavor. I also add Parmesan for an extra kick. Eggs and milk bind everything together, keeping the cups firm. Garlic and onion powder enhance the taste, making each bite savory.
Don’t forget salt and pepper. They balance the flavors. The breadcrumbs on top give a crunchy finish. Finally, fresh parsley adds a pop of color. You can use these ingredients to create a healthy, fun snack.
Step-by-Step Instructions
Preparation Steps
1. Preheat your oven to 375°F (190°C). This helps the cheesy broccoli rice cups cook evenly.
2. Prepare the muffin tin by lightly greasing it with cooking spray. This prevents sticking and makes cleanup easy.
3. In a large bowl, mix 2 cups of cooked brown rice with 1 cup of finely chopped broccoli. Stir until well combined.
4. Add cheeses: Toss in 1 cup of shredded cheddar cheese and 1/2 cup of grated Parmesan cheese. Mix until the cheeses coat the rice and broccoli.
Egg Mixture Preparation
1. In another bowl, whisk together 2 large eggs and 1/4 cup of milk.
2. Add seasonings: Stir in 1 teaspoon of garlic powder, 1 teaspoon of onion powder, and salt and pepper to taste. Mix until smooth.
Baking Process
1. Pour the egg mixture over the rice and broccoli mix. Stir well to coat everything evenly.
2. Using a spoon or your hands, scoop the mixture into the muffin cups. Fill each cup about three-quarters full.
3. Sprinkle breadcrumbs on top of each cup for an extra crunch.
4. Bake in the preheated oven for 20-25 minutes. Check for doneness when the tops are golden brown and set.
5. Remove from the oven and let cool for a few minutes. Carefully take the cups out of the muffin tin.
Now, your cheesy broccoli rice cups are ready to enjoy!
Tips & Tricks
Serving Suggestions
Serve your cheesy broccoli rice cups warm for the best taste. You can add fresh parsley on top for a pop of color. A dollop of sour cream or a sprinkle of chili flakes will give your cups a nice kick. Pair them with a fresh salad or a light soup to make a full meal.
Cooking Tips
To get the perfect texture in your cheese cups, make sure not to overmix the ingredients. This keeps them light and fluffy. Use freshly grated cheese for better melting. If you want a gooey inside, try adding a bit more cheese to the mix. Bake them until the tops are golden brown for that crunchy outer layer.
Best Practices
Avoid overcooking your rice before mixing. You want it tender but not mushy. When adding eggs, mix gently to keep air in the batter. This helps the cups rise nicely. Lastly, make sure to grease your muffin tin well to prevent sticking. Remember, patience is key when letting them cool a bit before removing!
Pro Tips
- Use Leftover Rice: If you have leftover rice from a previous meal, this is a perfect recipe to utilize it, making the prep even quicker!
- Broccoli Alternatives: Feel free to substitute fresh broccoli with other vegetables like spinach, kale, or even shredded carrots for a different flavor profile.
- Cheese Variety: Experiment with different cheeses such as mozzarella or pepper jack to add unique flavors to your rice cups.
- Make Ahead: These rice cups can be made ahead of time and stored in the fridge or freezer. Just reheat them in the oven for a quick snack or meal!
Variations
Ingredient Substitutions
You can switch up the cheeses and veggies in these cups. Try using mozzarella or gouda for a creamy twist. Feta cheese adds a tangy flavor. For veggies, use spinach, zucchini, or bell peppers. They all work well in this recipe. Just chop them finely, so they mix well.
Dietary Adjustments
To make these cups gluten-free, use gluten-free breadcrumbs. You can also skip the breadcrumbs to keep it simple. For a vegetarian option, ensure all cheeses are rennet-free. This way, you can enjoy cheesy broccoli rice cups without meat.
Flavor Enhancements
Boost the flavor of your rice cups with spices and herbs. Add paprika or chili powder for a kick. Fresh herbs like basil or thyme can make a big difference too. Just sprinkle in a little before mixing. These small changes can create a whole new taste experience.
Storage Info
How to Store Leftovers
To store your cheesy broccoli rice cups, place them in an airtight container. Make sure they cool down first. Store them in the fridge for up to four days. Lay parchment paper between layers if stacking them. This keeps the cups from sticking together.
Reheating Instructions
Reheat your cups in the oven for the best taste. Preheat your oven to 350°F (175°C). Place the cups on a baking sheet. Heat for about 10-15 minutes. You can also use a microwave. Heat them for 1-2 minutes, but the oven keeps them crispy.
Freezing Tips
Freezing is great if you want to save some for later. First, let the cups cool completely. Then, wrap each cup in plastic wrap. Place them in a freezer bag. Label the bag with the date. They can stay in the freezer for up to three months. When ready, thaw in the fridge before reheating.
FAQs
Common Questions
Can I use cauliflower rice instead of brown rice? Yes, you can use cauliflower rice. It will change the texture and flavor. Cauliflower rice is lower in carbs, making it a great option for a lighter snack. Just make sure to squeeze out excess moisture from the cauliflower before mixing.
How long do these cups last in the refrigerator? These cheesy broccoli rice cups last about three to four days in the fridge. Store them in an airtight container to keep them fresh. Before eating, you can reheat them in the microwave or oven.
Can I make these in advance for meal prep? Absolutely! You can make these cups ahead of time. Just prepare them, bake, and let them cool. Then, store them in the fridge. They are perfect for quick snacks throughout the week.
What can I serve alongside cheesy broccoli rice cups? These cups pair well with a fresh salad or some sliced veggies. You can also serve them with a side of ranch or yogurt dip for added flavor. They make a great addition to any meal!
This blog post covered a tasty recipe for cheesy broccoli rice cups. I detailed the key ingredients and provided clear steps to make them. You learned helpful tips for serving, cooking, and storing these cups. Variations let you customize the dish to fit your needs. Remember, you can switch ingredients and add spices for fun new flavors. Enjoy making these easy, delicious cups for yourself or to share. This dish is sure to please everyone at your table. Happy cooking!