Candy Cane Brownie Truffles Irresistible Treat Idea

WANT TO SAVE THIS RECIPE?

Who doesn’t love a sweet treat during the holidays? Candy Cane Brownie Truffles are the perfect mix of rich chocolate and refreshing mint. These little bites of joy will impress your friends and family. Plus, they’re simple to make! In this post, I’ll guide you through each step, share tips to perfect your truffles, and offer fun variations to make them your own. Let’s get started on this festive delight!

- Brownie mix and additional ingredients - 1 box of brownie mix (plus ingredients required on the box: typically eggs, water, and oil) Brownie mix is the base of this treat. Follow the box directions for the best results. - Cream cheese and powdered sugar - 1 cup cream cheese, softened - ½ cup powdered sugar - 1 teaspoon vanilla extract Cream cheese adds a creamy texture. Powdered sugar sweetens the mix. The vanilla gives a warm flavor. - Dark chocolate and coconut oil - 8 oz dark chocolate, chopped (or chocolate chips) - 1 tablespoon coconut oil (or vegetable oil) Dark chocolate coats the truffles and adds rich taste. Coconut oil helps the chocolate melt smoothly. These ingredients create a tasty mix of flavors and textures. Each one plays a key role in making the Candy Cane Brownie Truffles special and festive. {{ingredient_image_1}} First, you need to bake the brownies. Preheat your oven as per the box instructions. Prepare a baking dish and pour in the brownie mix. Bake until done, then let them cool completely. This cooling step is key. It helps you crumble them easily later. Once cool, crumble the brownies. Break them into small pieces until they look like sand. This makes it easier to mix with the filling later on. Now, let’s make the filling. In a large bowl, add the crumbled brownies. Then, add the softened cream cheese. Make sure it is soft enough to mix in easily. Next, pour in the vanilla extract and powdered sugar. Now comes the fun part! Add in the ½ cup of crushed candy canes. Mix everything until it is well combined. You want it to hold together when you press it. This tells you it's ready for the next step. It's time to shape the truffles. Take small portions of the brownie mixture. Roll each into bite-sized balls, about 1 inch wide. Place them on a baking sheet lined with parchment paper. Refrigerate the truffles for about 30 minutes. This helps them firm up, making the next steps easier. While waiting, let’s melt the chocolate. In a microwave-safe bowl, add the chopped dark chocolate and coconut oil. Microwave in 30-second bursts. Stir in between until smooth. Now, dip each chilled truffle into the melted chocolate. Make sure each one gets covered completely. Let any extra chocolate drip off before placing them back on the parchment paper. This is where the magic happens! While the chocolate is still wet, sprinkle crushed candy canes on top. This gives your truffles that festive look. Let them sit at room temperature until the chocolate hardens. You can also pop them in the fridge for a faster set. Enjoy your creation! To get the best texture for your truffles, crumble the brownies into fine pieces. This helps them blend well with the cream cheese. The mixture should hold together when pressed. If it's too dry, add a bit more cream cheese. Add the crushed candy canes right into the mixture before rolling into balls. This ensures every bite has that minty crunch. When coating the truffles, sprinkle more candy canes on top while the chocolate is still wet. This creates a fun and festive look. One common mistake is overmixing the ingredients. Mix just until combined; otherwise, your truffles may become tough. Another mistake is not chilling the truffles enough before coating. Refrigerating them for at least 30 minutes helps the chocolate stick better. For mixing, use a large bowl and a sturdy mixer. A stand mixer works great but a hand mixer is fine too. When it comes to baking sheets, choose ones with a flat surface. Line them with parchment paper for easy cleanup. This prevents sticking and makes it easier to remove the truffles once coated. Pro Tips Use Quality Chocolate: For the best flavor, choose high-quality dark chocolate. It will enhance the overall taste of the truffles. Chill the Mixture: After mixing the brownie and cream cheese, chill the mixture for about 10 minutes before rolling into balls. This makes it easier to shape. Experiment with Flavors: Try adding a dash of peppermint extract for an extra minty kick, or substitute different flavored chocolates for unique variations. Storage Tips: Store truffles in an airtight container in the refrigerator for up to a week. They can also be frozen for longer storage. {{image_2}} You can switch up the flavor of your truffles easily. Instead of candy canes, try using crushed Oreos or pretzels. This adds a fun twist to the classic taste. You can also change the chocolate. Use milk chocolate or white chocolate for a sweeter flavor. Each option gives a unique taste and feel to your truffles. If you need gluten-free options, use a gluten-free brownie mix. This lets everyone enjoy these treats without worry. For vegan substitutions, swap cream cheese for a plant-based alternative. Use dairy-free chocolate to keep it vegan. These adjustments make the truffles more accessible to different diets. Pair your Candy Cane Brownie Truffles with festive drinks, like hot cocoa or peppermint tea. The rich chocolate blends well with these flavors. For a fun presentation, place truffles in cute holiday cups. You can also sprinkle extra crushed candy canes on a platter for a colorful look. These touches make serving more special and festive. To keep your Candy Cane Brownie Truffles fresh, use airtight containers. Glass or plastic containers work well. Layer the truffles with parchment paper to avoid sticking. Store them in the fridge for up to one week. This keeps them firm and tasty. You can freeze truffles for longer storage. Place them in a single layer on a baking sheet first. Freeze them for about two hours until solid. Then, transfer the truffles to a freezer-safe bag. They can last up to three months in the freezer. When you're ready to enjoy, move them to the fridge overnight. This helps them thaw slowly and stay fresh. These truffles make great gifts! Use clear cellophane bags for wrapping. Add festive ribbons to make them look special. You can also use small boxes with decorative paper. Custom labels add a nice touch. Write the name of the treat and the date made. This way, your friends will know what to expect! Yes, you can use homemade brownies instead of a boxed mix. Just make sure your brownies are moist and dense. Crumble them finely, just like you would with boxed brownies. This helps the filling mix well. Using homemade brownies can add a personal touch and unique flavor. These truffles can last about one week in the fridge. Store them in an airtight container to keep them fresh. If you leave them at room temperature, they may get soft. For longer storage, you can freeze them. They last about three months in the freezer. Absolutely! You can add different mix-ins to the truffles. Consider using nuts, dried fruit, or other candies. You can also switch the chocolate type. Try white chocolate or milk chocolate for a twist. Adding a splash of peppermint extract can enhance the candy cane flavor. The options are endless! You learned how to make delicious truffles using brownie mix and cream cheese. We covered each step, from baking to garnishing. With tips on avoiding common mistakes, your truffles will impress everyone. Remember to experiment with flavors and adjust for your dietary needs. Proper storage will keep them fresh longer. These truffles are not just treats; they make great gifts too. Enjoy making them for yourself or to share. Dive in and get creative with your truffle-making adventures!

Why I Love This Recipe

  1. Festive Flavor: The combination of rich brownie, creamy filling, and refreshing candy cane creates a delightful holiday treat.
  2. Easy to Make: With simple steps and minimal ingredients, these truffles are perfect for bakers of any skill level.
  3. Perfect for Gift Giving: These truffles look beautiful and taste amazing, making them a great homemade gift for friends and family.
  4. Customizable: You can easily swap out the chocolate or candy cane for your favorite flavors or toppings to make them your own!
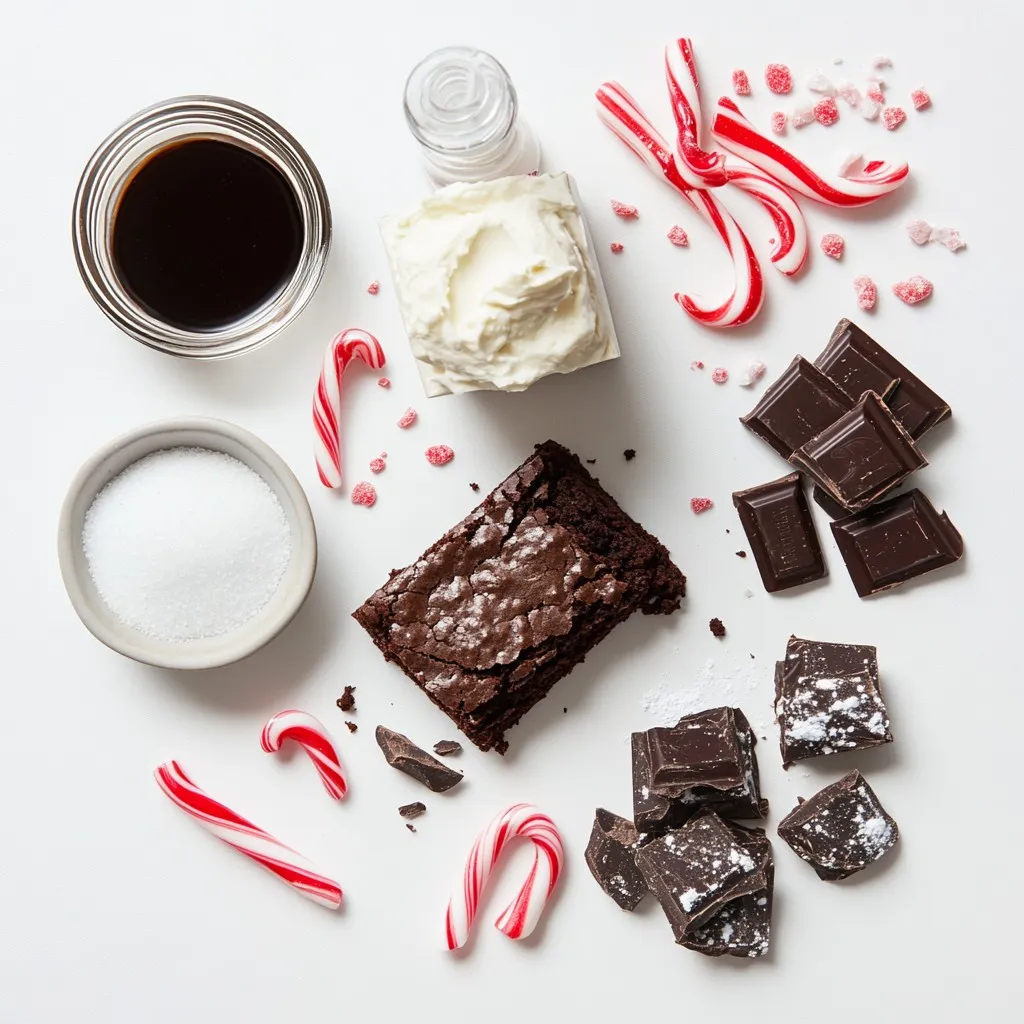
Ingredients

Required Ingredients

Brownie mix and additional ingredients

– 1 box of brownie mix (plus ingredients required on the box: typically eggs, water, and oil)

Brownie mix is the base of this treat. Follow the box directions for the best results.

Cream cheese and powdered sugar

– 1 cup cream cheese, softened

– ½ cup powdered sugar

– 1 teaspoon vanilla extract

Cream cheese adds a creamy texture. Powdered sugar sweetens the mix. The vanilla gives a warm flavor.

Dark chocolate and coconut oil

– 8 oz dark chocolate, chopped (or chocolate chips)

– 1 tablespoon coconut oil (or vegetable oil)

Dark chocolate coats the truffles and adds rich taste. Coconut oil helps the chocolate melt smoothly.

These ingredients create a tasty mix of flavors and textures. Each one plays a key role in making the Candy Cane Brownie Truffles special and festive.

Step-by-Step Instructions

Preparing the Brownies

First, you need to bake the brownies. Preheat your oven as per the box instructions. Prepare a baking dish and pour in the brownie mix. Bake until done, then let them cool completely. This cooling step is key. It helps you crumble them easily later.

Once cool, crumble the brownies. Break them into small pieces until they look like sand. This makes it easier to mix with the filling later on.

Mixing the Filling

Now, let’s make the filling. In a large bowl, add the crumbled brownies. Then, add the softened cream cheese. Make sure it is soft enough to mix in easily. Next, pour in the vanilla extract and powdered sugar.

Now comes the fun part! Add in the ½ cup of crushed candy canes. Mix everything until it is well combined. You want it to hold together when you press it. This tells you it’s ready for the next step.

Forming the Truffles

It’s time to shape the truffles. Take small portions of the brownie mixture. Roll each into bite-sized balls, about 1 inch wide. Place them on a baking sheet lined with parchment paper.

Refrigerate the truffles for about 30 minutes. This helps them firm up, making the next steps easier.

Chocolate Coating

While waiting, let’s melt the chocolate. In a microwave-safe bowl, add the chopped dark chocolate and coconut oil. Microwave in 30-second bursts. Stir in between until smooth.

Now, dip each chilled truffle into the melted chocolate. Make sure each one gets covered completely. Let any extra chocolate drip off before placing them back on the parchment paper.

Garnishing

This is where the magic happens! While the chocolate is still wet, sprinkle crushed candy canes on top. This gives your truffles that festive look. Let them sit at room temperature until the chocolate hardens. You can also pop them in the fridge for a faster set. Enjoy your creation!

Tips & Tricks

Perfecting the Truffles

To get the best texture for your truffles, crumble the brownies into fine pieces. This helps them blend well with the cream cheese. The mixture should hold together when pressed. If it’s too dry, add a bit more cream cheese.

Add the crushed candy canes right into the mixture before rolling into balls. This ensures every bite has that minty crunch. When coating the truffles, sprinkle more candy canes on top while the chocolate is still wet. This creates a fun and festive look.

Common Mistakes to Avoid

One common mistake is overmixing the ingredients. Mix just until combined; otherwise, your truffles may become tough. Another mistake is not chilling the truffles enough before coating. Refrigerating them for at least 30 minutes helps the chocolate stick better.

Equipment Suggestions

For mixing, use a large bowl and a sturdy mixer. A stand mixer works great but a hand mixer is fine too. When it comes to baking sheets, choose ones with a flat surface. Line them with parchment paper for easy cleanup. This prevents sticking and makes it easier to remove the truffles once coated.

Pro Tips

  1. Use Quality Chocolate: For the best flavor, choose high-quality dark chocolate. It will enhance the overall taste of the truffles.
  2. Chill the Mixture: After mixing the brownie and cream cheese, chill the mixture for about 10 minutes before rolling into balls. This makes it easier to shape.
  3. Experiment with Flavors: Try adding a dash of peppermint extract for an extra minty kick, or substitute different flavored chocolates for unique variations.
  4. Storage Tips: Store truffles in an airtight container in the refrigerator for up to a week. They can also be frozen for longer storage.

Variations

Flavor Modifications

You can switch up the flavor of your truffles easily. Instead of candy canes, try using crushed Oreos or pretzels. This adds a fun twist to the classic taste. You can also change the chocolate. Use milk chocolate or white chocolate for a sweeter flavor. Each option gives a unique taste and feel to your truffles.

Dietary Adjustments

If you need gluten-free options, use a gluten-free brownie mix. This lets everyone enjoy these treats without worry. For vegan substitutions, swap cream cheese for a plant-based alternative. Use dairy-free chocolate to keep it vegan. These adjustments make the truffles more accessible to different diets.

Serving Suggestions

Pair your Candy Cane Brownie Truffles with festive drinks, like hot cocoa or peppermint tea. The rich chocolate blends well with these flavors. For a fun presentation, place truffles in cute holiday cups. You can also sprinkle extra crushed candy canes on a platter for a colorful look. These touches make serving more special and festive.

Storage Info

How to Store

To keep your Candy Cane Brownie Truffles fresh, use airtight containers. Glass or plastic containers work well. Layer the truffles with parchment paper to avoid sticking. Store them in the fridge for up to one week. This keeps them firm and tasty.

Freezing Truffles

You can freeze truffles for longer storage. Place them in a single layer on a baking sheet first. Freeze them for about two hours until solid. Then, transfer the truffles to a freezer-safe bag. They can last up to three months in the freezer.

When you’re ready to enjoy, move them to the fridge overnight. This helps them thaw slowly and stay fresh.

Gift Ideas

These truffles make great gifts! Use clear cellophane bags for wrapping. Add festive ribbons to make them look special. You can also use small boxes with decorative paper. Custom labels add a nice touch. Write the name of the treat and the date made. This way, your friends will know what to expect!

FAQs

Can I use homemade brownies?

Yes, you can use homemade brownies instead of a boxed mix. Just make sure your brownies are moist and dense. Crumble them finely, just like you would with boxed brownies. This helps the filling mix well. Using homemade brownies can add a personal touch and unique flavor.

How long do these truffles last?

These truffles can last about one week in the fridge. Store them in an airtight container to keep them fresh. If you leave them at room temperature, they may get soft. For longer storage, you can freeze them. They last about three months in the freezer.

Can I customize the flavors further?

Absolutely! You can add different mix-ins to the truffles. Consider using nuts, dried fruit, or other candies. You can also switch the chocolate type. Try white chocolate or milk chocolate for a twist. Adding a splash of peppermint extract can enhance the candy cane flavor. The options are endless!

You learned how to make delicious truffles using brownie mix and cream cheese. We covered each step, from baking to garnishing. With tips on avoiding common mistakes, your truffles will impress everyone. Remember to experiment with flavors and adjust for your dietary needs. Proper storage will keep them fresh longer. These truffles are not just treats; they make great gifts too. Enjoy making them for yourself or to share. Dive in and get creative with your truffle-making adventure

- Brownie mix and additional ingredients - 1 box of brownie mix (plus ingredients required on the box: typically eggs, water, and oil) Brownie mix is the base of this treat. Follow the box directions for the best results. - Cream cheese and powdered sugar - 1 cup cream cheese, softened - ½ cup powdered sugar - 1 teaspoon vanilla extract Cream cheese adds a creamy texture. Powdered sugar sweetens the mix. The vanilla gives a warm flavor. - Dark chocolate and coconut oil - 8 oz dark chocolate, chopped (or chocolate chips) - 1 tablespoon coconut oil (or vegetable oil) Dark chocolate coats the truffles and adds rich taste. Coconut oil helps the chocolate melt smoothly. These ingredients create a tasty mix of flavors and textures. Each one plays a key role in making the Candy Cane Brownie Truffles special and festive. {{ingredient_image_1}} First, you need to bake the brownies. Preheat your oven as per the box instructions. Prepare a baking dish and pour in the brownie mix. Bake until done, then let them cool completely. This cooling step is key. It helps you crumble them easily later. Once cool, crumble the brownies. Break them into small pieces until they look like sand. This makes it easier to mix with the filling later on. Now, let’s make the filling. In a large bowl, add the crumbled brownies. Then, add the softened cream cheese. Make sure it is soft enough to mix in easily. Next, pour in the vanilla extract and powdered sugar. Now comes the fun part! Add in the ½ cup of crushed candy canes. Mix everything until it is well combined. You want it to hold together when you press it. This tells you it's ready for the next step. It's time to shape the truffles. Take small portions of the brownie mixture. Roll each into bite-sized balls, about 1 inch wide. Place them on a baking sheet lined with parchment paper. Refrigerate the truffles for about 30 minutes. This helps them firm up, making the next steps easier. While waiting, let’s melt the chocolate. In a microwave-safe bowl, add the chopped dark chocolate and coconut oil. Microwave in 30-second bursts. Stir in between until smooth. Now, dip each chilled truffle into the melted chocolate. Make sure each one gets covered completely. Let any extra chocolate drip off before placing them back on the parchment paper. This is where the magic happens! While the chocolate is still wet, sprinkle crushed candy canes on top. This gives your truffles that festive look. Let them sit at room temperature until the chocolate hardens. You can also pop them in the fridge for a faster set. Enjoy your creation! To get the best texture for your truffles, crumble the brownies into fine pieces. This helps them blend well with the cream cheese. The mixture should hold together when pressed. If it's too dry, add a bit more cream cheese. Add the crushed candy canes right into the mixture before rolling into balls. This ensures every bite has that minty crunch. When coating the truffles, sprinkle more candy canes on top while the chocolate is still wet. This creates a fun and festive look. One common mistake is overmixing the ingredients. Mix just until combined; otherwise, your truffles may become tough. Another mistake is not chilling the truffles enough before coating. Refrigerating them for at least 30 minutes helps the chocolate stick better. For mixing, use a large bowl and a sturdy mixer. A stand mixer works great but a hand mixer is fine too. When it comes to baking sheets, choose ones with a flat surface. Line them with parchment paper for easy cleanup. This prevents sticking and makes it easier to remove the truffles once coated. Pro Tips Use Quality Chocolate: For the best flavor, choose high-quality dark chocolate. It will enhance the overall taste of the truffles. Chill the Mixture: After mixing the brownie and cream cheese, chill the mixture for about 10 minutes before rolling into balls. This makes it easier to shape. Experiment with Flavors: Try adding a dash of peppermint extract for an extra minty kick, or substitute different flavored chocolates for unique variations. Storage Tips: Store truffles in an airtight container in the refrigerator for up to a week. They can also be frozen for longer storage. {{image_2}} You can switch up the flavor of your truffles easily. Instead of candy canes, try using crushed Oreos or pretzels. This adds a fun twist to the classic taste. You can also change the chocolate. Use milk chocolate or white chocolate for a sweeter flavor. Each option gives a unique taste and feel to your truffles. If you need gluten-free options, use a gluten-free brownie mix. This lets everyone enjoy these treats without worry. For vegan substitutions, swap cream cheese for a plant-based alternative. Use dairy-free chocolate to keep it vegan. These adjustments make the truffles more accessible to different diets. Pair your Candy Cane Brownie Truffles with festive drinks, like hot cocoa or peppermint tea. The rich chocolate blends well with these flavors. For a fun presentation, place truffles in cute holiday cups. You can also sprinkle extra crushed candy canes on a platter for a colorful look. These touches make serving more special and festive. To keep your Candy Cane Brownie Truffles fresh, use airtight containers. Glass or plastic containers work well. Layer the truffles with parchment paper to avoid sticking. Store them in the fridge for up to one week. This keeps them firm and tasty. You can freeze truffles for longer storage. Place them in a single layer on a baking sheet first. Freeze them for about two hours until solid. Then, transfer the truffles to a freezer-safe bag. They can last up to three months in the freezer. When you're ready to enjoy, move them to the fridge overnight. This helps them thaw slowly and stay fresh. These truffles make great gifts! Use clear cellophane bags for wrapping. Add festive ribbons to make them look special. You can also use small boxes with decorative paper. Custom labels add a nice touch. Write the name of the treat and the date made. This way, your friends will know what to expect! Yes, you can use homemade brownies instead of a boxed mix. Just make sure your brownies are moist and dense. Crumble them finely, just like you would with boxed brownies. This helps the filling mix well. Using homemade brownies can add a personal touch and unique flavor. These truffles can last about one week in the fridge. Store them in an airtight container to keep them fresh. If you leave them at room temperature, they may get soft. For longer storage, you can freeze them. They last about three months in the freezer. Absolutely! You can add different mix-ins to the truffles. Consider using nuts, dried fruit, or other candies. You can also switch the chocolate type. Try white chocolate or milk chocolate for a twist. Adding a splash of peppermint extract can enhance the candy cane flavor. The options are endless! You learned how to make delicious truffles using brownie mix and cream cheese. We covered each step, from baking to garnishing. With tips on avoiding common mistakes, your truffles will impress everyone. Remember to experiment with flavors and adjust for your dietary needs. Proper storage will keep them fresh longer. These truffles are not just treats; they make great gifts too. Enjoy making them for yourself or to share. Dive in and get creative with your truffle-making adventures!

Candy Cane Brownie Truffles

Delicious brownie truffles infused with cream cheese and crushed candy canes, coated in dark chocolate.
Prep Time 20 minutes
Cook Time 40 minutes
Total Time 1 hour
Course Dessert
Cuisine American
Servings 24
Calories 150 kcal

Ingredients
  

  • 1 box brownie mix (plus ingredients required on the box: typically eggs, water, and oil)
  • 1 cup cream cheese, softened
  • 1 teaspoon vanilla extract
  • ½ cup powdered sugar
  • ½ cup crushed candy canes (plus extra for garnish)
  • 8 oz dark chocolate, chopped (or chocolate chips)
  • 1 tablespoon coconut oil (or vegetable oil)

Instructions
 

  • Preheat your oven according to the instructions on the brownie mix box. Prepare a baking dish and bake the brownies as directed. Let them cool completely after baking.
  • In a large bowl, crumble the cooled brownies until they are fine and resemble sand.
  • Add the softened cream cheese, vanilla extract, powdered sugar, and ½ cup of crushed candy canes to the crumbled brownies. Mix thoroughly until well combined and the mixture holds together when pressed.
  • Using your hands, take small portions of the brownie mixture and roll them into bite-sized balls (about 1 inch in diameter). Place the formed truffles on a baking sheet lined with parchment paper. Refrigerate for about 30 minutes to firm up.
  • In a microwave-safe bowl, combine the chopped dark chocolate and coconut oil. Microwave in 30-second intervals, stirring in between, until the chocolate is completely melted and smooth.
  • Dip each chilled brownie truffle into the melted chocolate, making sure it's completely coated. Allow any excess chocolate to drip off before placing the truffles back on the parchment paper.
  • While the chocolate is still wet, sprinkle the tops with the remaining crushed candy canes for a festive touch. Let the truffles sit at room temperature until the chocolate hardens, or refrigerate for quicker results.
  • Once the chocolate has set, enjoy your Candy Cane Brownie Truffles!

Notes

For best results, ensure the brownies are completely cooled before crumbling.
Keyword brownies, candy cane, chocolate, holiday, truffles

WANT TO SAVE THIS RECIPE?