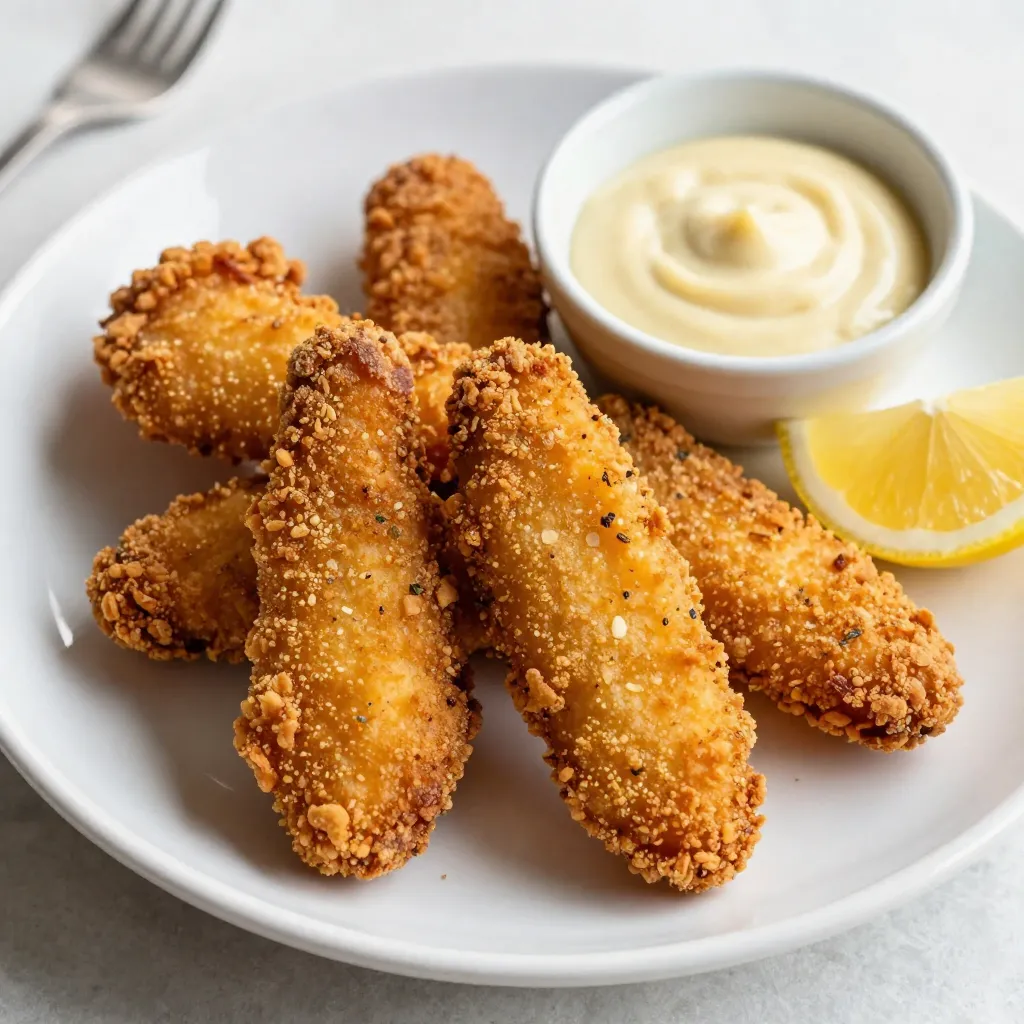
Are you ready to savor the crispy joy of Buttermilk Fried Chicken Tenders? These delicious bites combine juicy chicken and a crunchy coating that will make your taste buds dance. In this guide, I’ll share easy steps, key tips, and fun variations to create your perfect tenders. Whether you’re a newbie or a kitchen pro, this recipe is for you. Let’s dive into the world of mouthwatering fried chicken!
Why I Love This Recipe
- Flavorful Marinade: The buttermilk marinade infuses the chicken with incredible flavor and moisture, making every bite deliciously tender.
- Crispy Coating: The combination of flour and cornstarch creates a perfectly crispy exterior that contrasts beautifully with the juicy chicken inside.
- Customizable: Feel free to adjust the spices in the marinade to suit your taste, or try different dipping sauces for a variety of flavors.
- Perfect for Any Occasion: These chicken tenders are a hit at parties, family dinners, or even as a quick weeknight meal!
Ingredients
Main Ingredients for Buttermilk Fried Chicken Tenders
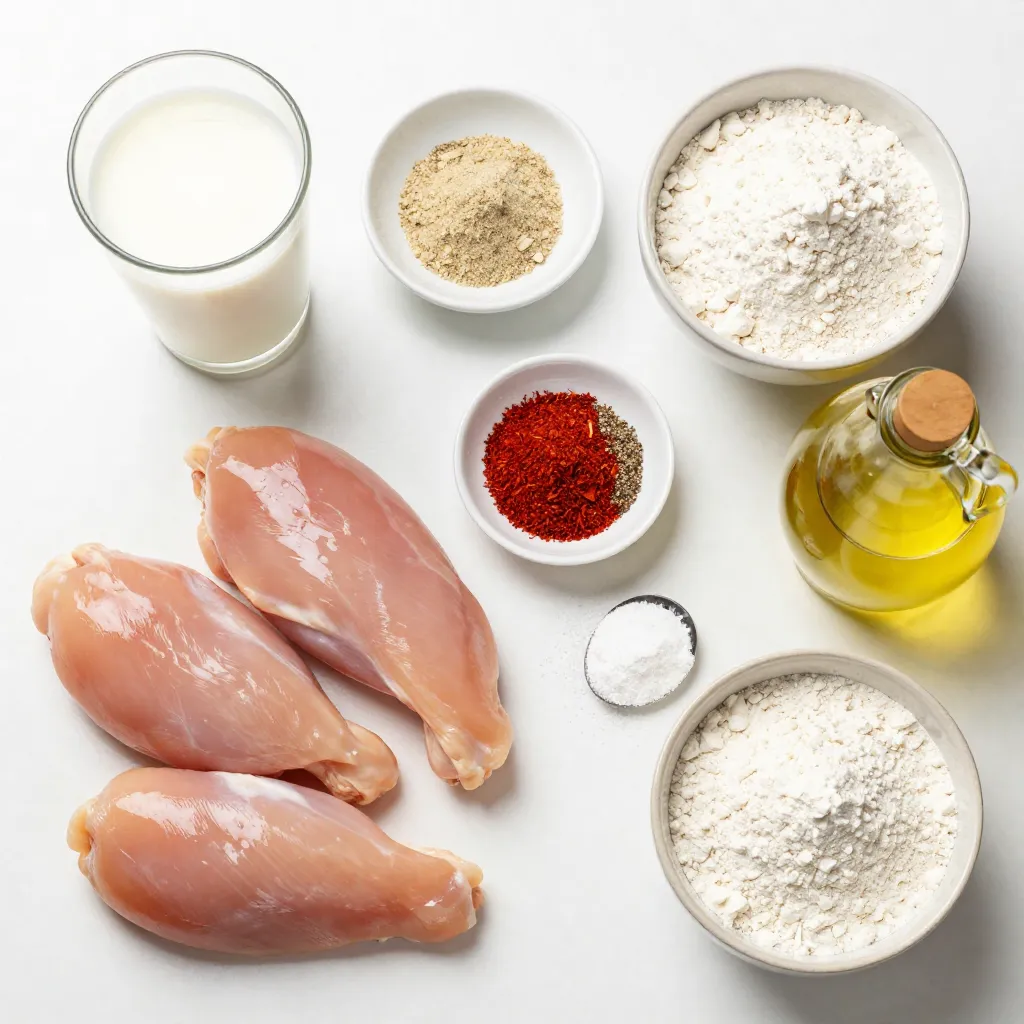
To make tasty buttermilk fried chicken tenders, you need a few key items. Here’s what you’ll need:
– 1 pound chicken tenderloins
– 1 cup buttermilk
– 1 teaspoon garlic powder
– 1 teaspoon onion powder
– 1 teaspoon paprika
– 1 teaspoon black pepper
– 1 teaspoon salt
– 1 cup all-purpose flour
– 1/2 cup cornstarch
– 1 teaspoon baking powder
– Vegetable oil, for frying
These ingredients work together to create a crispy and flavorful coating. The buttermilk adds moisture and flavor. The spices give the chicken a nice kick.
Seasoning Blend Details
For the seasoning blend, you will mix garlic powder, onion powder, paprika, black pepper, and salt into the buttermilk. Each spice plays its part.
– Garlic powder adds a nice aroma.
– Onion powder gives a hint of sweetness.
– Paprika adds color and a smoky flavor.
– Black pepper adds a bit of heat.
– Salt enhances all the flavors.
This blend makes your chicken tender and full of taste. Don’t skip this step; it makes a big difference!
Alternative Options for Ingredients
If you want to switch things up, there are options. Here are a few ideas:
– Chicken: You can use chicken breasts instead of tenderloins. Just cut them into strips.
– Buttermilk: If you don’t have buttermilk, mix milk with a bit of vinegar. Let it sit for a few minutes to sour.
– Flour: For a gluten-free option, use almond flour or a gluten-free flour blend.
– Spices: Feel free to add cayenne pepper for heat or Italian herbs for a different flavor.
These alternatives keep the dish fresh and fun. Experiment and find what you love best!
Step-by-Step Instructions
Preparing the Buttermilk Marinade
Start by making the buttermilk marinade. In a large bowl, mix 1 cup of buttermilk, 1 teaspoon of garlic powder, 1 teaspoon of onion powder, 1 teaspoon of paprika, 1 teaspoon of black pepper, and 1 teaspoon of salt. Whisk this mixture well until it is smooth. This blend adds flavor and tenderizes the chicken.
Next, add 1 pound of chicken tenderloins to the bowl. Make sure each piece is fully submerged in the buttermilk. Cover the bowl with plastic wrap and refrigerate it for at least 1 hour. If you have more time, letting it sit overnight gives even better flavor.
Dredging Chicken Tenders
Once the chicken has marinated, it’s time to dredge it. In another bowl, mix together 1 cup of all-purpose flour, 1/2 cup of cornstarch, and 1 teaspoon of baking powder. Stir this mixture well to combine.
Take the chicken out of the fridge. Allow the excess buttermilk to drip off each piece. One by one, coat the chicken in the flour mixture. Make sure each piece is evenly covered. Shake off any extra flour before frying.
Frying Techniques for Perfect Crispy Tenders
Now, heat about 1 inch of vegetable oil in a large skillet over medium-high heat. Use a thermometer to check the temperature. You want it to reach 350°F (175°C).
Carefully place the coated chicken tenders into the hot oil. Avoid overcrowding the pan, as this can make the coating soggy. Fry the tenders for about 4-6 minutes on each side. They should be golden brown and reach an internal temperature of 165°F (75°C).
When the chicken is done, use a slotted spoon to transfer the tenders to a paper towel-lined plate. This helps drain off excess oil. Repeat this process with the remaining chicken tenders. Enjoy the crispy and delicious results!
Tips & Tricks
Ensuring Crispy Coating Every Time
To get that crispy coating, the secret is in the dredging. After marinating the chicken in buttermilk, let the excess drip off. Then, coat the chicken with the flour mix. Make sure every area is covered. A light dusting works best. If you want an extra crunch, double dip! First, coat the chicken, dip it back in buttermilk, and coat it again in flour. This adds more layers for crunch.
Recommended Cooking Oil Types
For frying, I recommend using vegetable oil. It has a high smoke point, which helps the chicken cook well. You can also use peanut oil or canola oil. Both work great and add a nice flavor. Avoid oils like olive oil. They burn too quickly and can change the taste.
How to Know When Chicken is Fully Cooked
To be sure your chicken is safe to eat, check the internal temperature. It should reach 165°F (75°C). Use a meat thermometer for accuracy. If you don’t have one, cut into the thickest part of a tender. The meat should be white, not pink. Juices should run clear. This ensures your chicken is delicious and safe!
Pro Tips
- Marinate Longer for Flavor: For the best flavor and tenderness, marinate the chicken in the buttermilk mixture overnight. This allows the spices to penetrate deeply.
- Use a Thermometer: To ensure perfectly cooked chicken, use a meat thermometer to check that the internal temperature reaches 165°F (75°C).
- Don’t Overcrowd the Pan: Fry the chicken tenders in batches to avoid lowering the oil temperature, which can make them greasy instead of crispy.
- Double Dredge for Extra Crunch: For an extra crispy coating, dip the chicken tenders back in the buttermilk and then dredge them in the flour mixture a second time before frying.
Variations
Spicy Buttermilk Fried Chicken Tenders
To make spicy buttermilk fried chicken tenders, add heat to your marinade. I suggest adding 1 to 2 teaspoons of cayenne pepper or hot sauce. This spice gives a nice kick. You can also mix in some chili powder for more depth. The heat balances well with the creamy buttermilk.
Gluten-Free Adaptation
If you need a gluten-free option, swap regular flour for gluten-free flour. You can also use almond flour or chickpea flour. Make sure your cornstarch is pure and gluten-free too. This keeps your tenders just as crispy without the gluten. You won’t lose flavor or crunch with this swap.
Adding Different Seasonings
You can customize your chicken tenders by adding different seasonings. Try adding Italian herbs like oregano and thyme for a fresh twist. A bit of lemon zest can brighten the flavor, too. For a smoky taste, use smoked paprika instead of regular paprika. Experiment with these ideas to find your favorite flavor profile!
Storage Info
Storing Leftover Chicken Tenders
After enjoying your crispy buttermilk fried chicken tenders, store any leftovers in an airtight container. This method keeps them fresh and safe to eat. Place the container in the fridge. They will stay good for about 3 to 4 days. If you want to keep them longer, consider freezing.
Reheating Techniques for Best Flavor
To bring back the crunch, reheat the chicken tenders in the oven. Preheat your oven to 375°F (190°C). Spread the tenders on a baking sheet lined with parchment paper. Bake them for about 10 to 15 minutes. This method helps them stay crispy. You can also use an air fryer for reheating. Set it to 350°F (175°C) and cook for about 5 to 7 minutes.
Freezing Tips for Long-term Storage
If you want to freeze the tenders, first let them cool completely. Place them in a single layer on a baking sheet and freeze for about 1 hour. Once frozen, transfer them to a freezer-safe bag or container. Be sure to remove as much air as possible. They can last in the freezer for about 2 to 3 months. When ready to eat, thaw in the fridge overnight and reheat as mentioned above. Enjoy your crispy chicken tenders anytime!
FAQs
How long should I marinate the chicken?
Marinating the chicken is key for great flavor. I recommend marinating the chicken for at least 1 hour. This allows the buttermilk and spices to soak in. For even better results, marinate overnight. The longer you marinate, the more tender and tasty your chicken will be.
Can I use chicken breasts instead of tenders?
Yes, you can use chicken breasts. However, cut them into strips. This way, they will cook evenly like tenders. Adjust the cooking time since thicker pieces may need longer. Aim for an internal temperature of 165°F (75°C) for safety.
What dipping sauces pair well with fried chicken tenders?
Dipping sauces can make your meal more fun. I love using honey mustard or ranch dressing. These sauces add creaminess and sweetness that balance the crispy chicken. You can also try BBQ sauce or a spicy aioli for a kick. A squeeze of lemon adds freshness too!
In this article, we explored how to make buttermilk fried chicken tenders. We covered everything from key ingredients to step-by-step cooking methods. You learned tips for a perfect crispy coating, variations you can try, and how to store your leftovers. Remember, the right marinade and frying technique matter. Enjoy your cooking journey, and don’t hesitate to experiment with flavors. Fried chicken can be simple and yet so rewarding. Happy cookin