Are you ready to create a cool, creamy treat that will impress everyone? This Butterfinger Icebox Cake is not only delightful but also easy to make. With simple layers of cookies, whipped cream, and Butterfinger candy, you’ll have a dessert that’s perfect for any occasion. Join me as we dive into this fun recipe, packed with tips and tricks to make your cake the star of the show. Let’s get started!
Why I Love This Recipe
- Decadent Flavor: This Butterfinger Icebox Cake combines the rich, creamy texture of cream cheese and whipped cream with the crunchy, nutty goodness of Butterfinger candy bars, making every bite a delightful experience.
- No-Bake Delight: Perfect for hot summer days, this dessert requires no baking, allowing you to create an impressive treat without heating up the kitchen.
- Easy to Assemble: The layers of cookies and cream come together quickly, making it an ideal recipe for both novice and experienced bakers looking for a simple yet stunning dessert.
- Perfect for Any Occasion: Whether it's a birthday party, holiday gathering, or just a sweet treat for yourself, this cake is versatile enough to impress anyone!
Ingredients
List of Ingredients
- 1 (8 oz) package cream cheese, softened
- 1 cup powdered sugar
- 2 cups heavy whipping cream
- 1 teaspoon vanilla extract
- 20 Butterfinger candy bars, crushed
- 30-40 chocolate wafer cookies
- Crushed Butterfinger for garnish
Measurement Guide
Using the right measurements is key. For the cream cheese, ensure it is softened. This helps it mix well. Measure one cup of powdered sugar. This adds sweetness without being too heavy. You will need two cups of heavy whipping cream. This will create the fluffy texture. The vanilla extract adds a lovely flavor. Use one teaspoon for the best taste. For the Butterfinger bars, crush them into small pieces. You will need twenty bars for this cake. Finally, have thirty to forty chocolate wafer cookies. These form the base layers.
Recommended Products or Brands
I suggest using Philadelphia cream cheese. It blends well and has a great taste. For heavy whipping cream, look for brands like Land O'Lakes or Horizon. They whip nicely and create stiff peaks. For the chocolate wafer cookies, Nabisco's Famous Chocolate Wafers are perfect. They have the right flavor and texture. When it comes to Butterfinger bars, grab the regular size ones. They crush easily and add the best crunch.

Step-by-Step Instructions
Preparation Steps Overview
To make the Butterfinger Icebox Cake, first gather all your ingredients. You will need cream cheese, powdered sugar, heavy cream, vanilla extract, Butterfinger bars, and chocolate wafer cookies. Start by beating the cream cheese and powdered sugar together until smooth. This is the base for your cake.
Layering the Cake
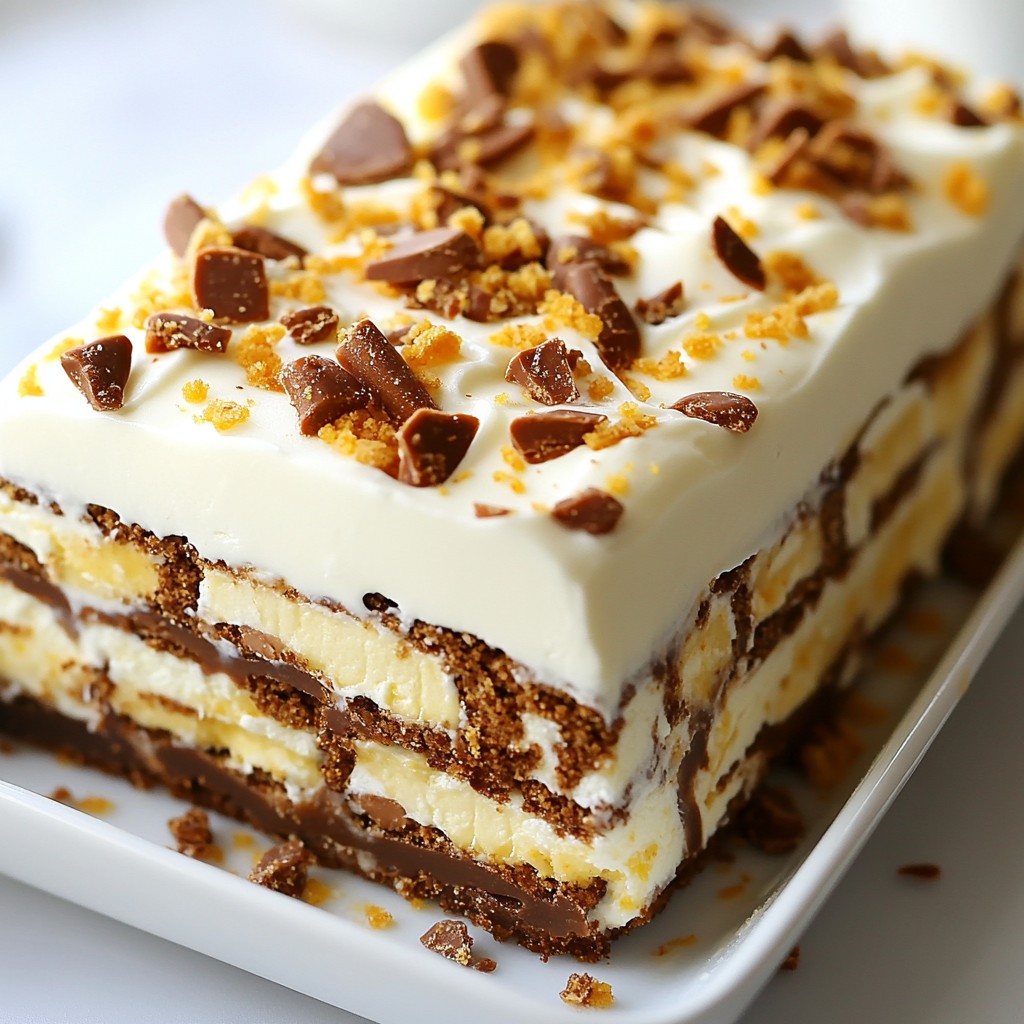
Next, you will layer the cake. Use a rectangular dish for this step. Start by laying down a single layer of chocolate wafer cookies at the bottom. Spread a layer of the cream mixture over the cookies. Then, sprinkle crushed Butterfinger on top. Repeat the layers until you use all the ingredients. Finish with a layer of cream on top.
Refrigeration and Setting Time
Once you finish layering, cover the dish with plastic wrap. Place the cake in the fridge for at least 4 hours. For the best results, refrigerate it overnight. This gives the cake time to set and the flavors to blend. Before serving, garnish with more crushed Butterfinger. Enjoy your delicious creation!
Tips & Tricks
Best Practices for Whipping Cream
Whipping cream is key for a fluffy cake. Start with cold heavy cream for the best results. Use a chilled bowl and beaters to help the cream whip faster. Whip until you see stiff peaks form. This means it holds shape well. Avoid over-whipping; this can turn it into butter. A gentle hand helps keep the cream light and airy.
How to Achieve Optimal Layering
Layering makes the cake look and taste great. Start with a flat layer of chocolate wafer cookies. Spread the cream mixture evenly over the cookies. Sprinkle crushed Butterfinger on top before adding the next layer. Repeat this process. Make sure to finish with cream on top. This creates a smooth finish and a nice look.
Common Mistakes to Avoid
One common mistake is not chilling the cake long enough. The cake needs at least four hours in the fridge. This allows the layers to set well. Another mistake is not crushing the Butterfinger enough. Large pieces can make it harder to cut. Lastly, don't skip the garnish. A sprinkle of crushed Butterfinger on top makes it pop!
Pro Tips
- Chill Your Ingredients: Make sure your cream cheese is at room temperature for easy mixing, and chill the heavy cream before whipping for the best volume.
- Layering Technique: For a more attractive presentation, ensure that you press down gently on each layer to eliminate air pockets and create a more compact cake.
- Variations on Toppings: Experiment with different toppings such as crushed Oreos or nuts for added texture and flavor, or drizzle with caramel for a sweet twist.
- Make Ahead: This dessert is perfect for making ahead of time; the flavors meld beautifully when it sits overnight, enhancing the overall taste.
Variations
Alternative Candy Options
You can swap out Butterfinger for other candies. Try Snickers for a nutty twist. Milky Way adds caramel and chocolate flavors. For a fruity touch, use crushed M&M's or Skittles. Just remember to adjust the amount to keep layers balanced.
Gluten-Free Cookie Substitutes
If you need gluten-free options, use gluten-free chocolate cookies. Brands like Glutino or Kinnikinnick work well. You can also use crushed gluten-free graham crackers. This keeps the texture similar and allows everyone to enjoy this treat.
Seasonal Flavor Additions
You can add seasonal flavors to your Butterfinger Icebox Cake. In fall, try adding pumpkin spice to the cream mixture. For winter, mix in peppermint extract for a minty kick. In summer, fresh berries can brighten up the layers. These small changes can make your cake feel special for any occasion.
Storage Info
Proper Refrigeration Techniques
To keep your Butterfinger Icebox Cake fresh, store it in the fridge. Use a tight lid or plastic wrap to cover the dish. This helps keep the cake moist and prevents it from absorbing other odors.
Freezing Instructions
You can freeze this cake if you want to save some for later. First, let the cake set in the fridge for at least four hours. Then, wrap it tightly in plastic wrap. After that, place it in a freezer-safe container. This will help it stay fresh for up to three months.
Shelf Life of Butterfinger Icebox Cake
When stored properly in the fridge, the Butterfinger Icebox Cake lasts about five days. If frozen, it stays good for up to three months. Just remember to thaw it in the fridge overnight before serving. Enjoy every bite!
FAQs
Can I make this cake in advance?
Yes, you can make this cake in advance. It actually tastes better when it sits. I suggest making it the day before you plan to serve it. This gives the layers time to blend and the flavors to develop. Just cover it tightly with plastic wrap and keep it in the fridge.
How long does the Butterfinger Icebox Cake last?
The Butterfinger Icebox Cake lasts about 3 to 5 days in the fridge. Make sure to keep it covered to prevent it from drying out. If you see any signs of spoilage, it’s best to toss it. Always trust your senses when it comes to food safety.
Can I substitute cream cheese with another ingredient?
You can substitute cream cheese with mascarpone or Greek yogurt. Both options provide a creamy texture. However, do note that the taste will change slightly. Mascarpone will be sweeter, while Greek yogurt adds a tangy flavor. Adjust the sugar to balance the flavors if needed.
You learned about making a Butterfinger Icebox Cake in this post. We covered ingredients, steps, tips, and variations. Each section helps you create this tasty treat with less hassle.
Remember to use the right measurements and products. Follow the steps closely for the best results. With these tips and tricks, you can avoid common mistakes. Enjoy experimenting with new flavors and proper storage methods.
Now, you’re ready to impress friends and family with your delicious cake!