Biscoff Cookie Butter Truffles Irresistible Treats

WANT TO SAVE THIS RECIPE?

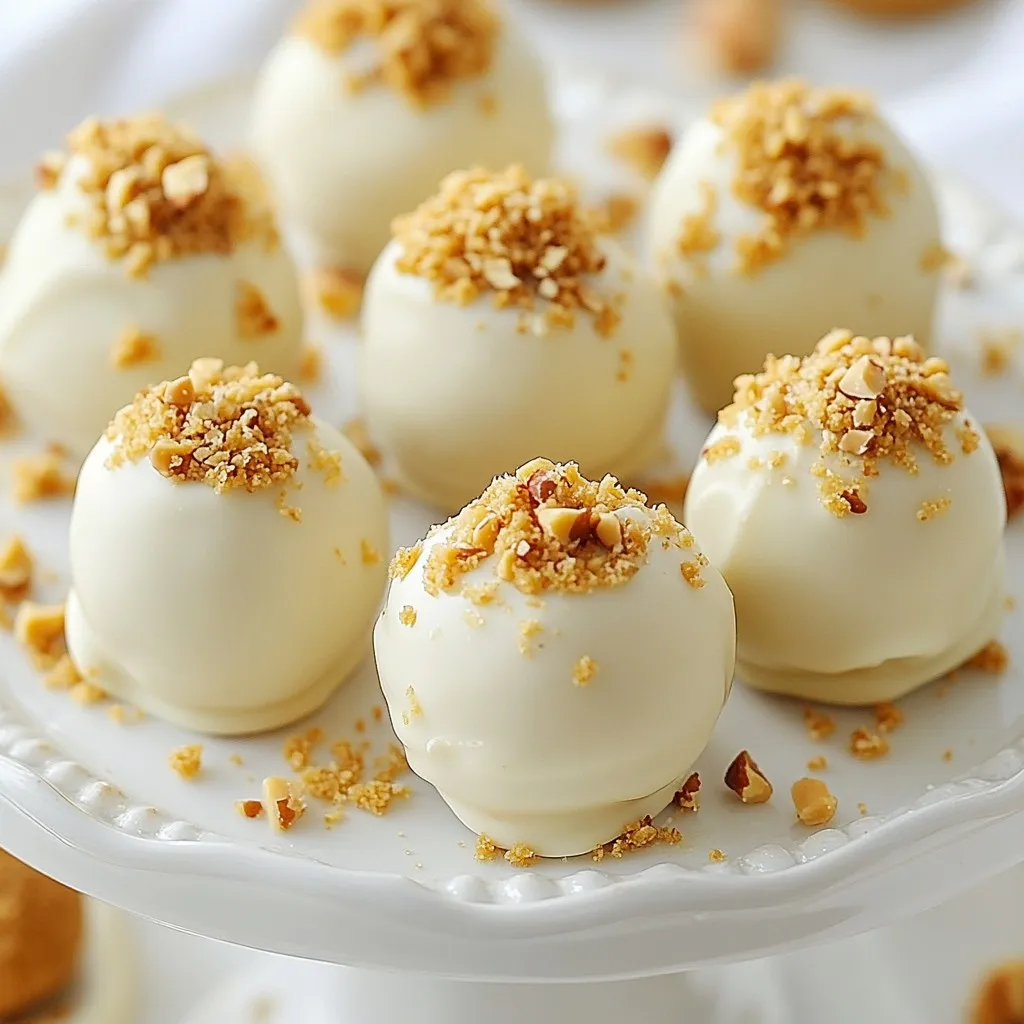
Indulge your sweet tooth with Biscoff Cookie Butter Truffles, an easy and delicious treat! You’ll love how the smooth cookie butter, crunchy cookies, and creamy chocolate blend together. Whether you’re making them for a party or just to enjoy at home, these truffles are a hit! Follow my simple steps to create these blissful bites, and impress your friends and family with your dessert skills. Let’s dive in!

- 1 cup Biscoff cookie butter - 1 cup crushed Biscoff cookies (plus extra for rolling) - 1 cup white chocolate chips - 1 tablespoon coconut oil - A pinch of sea salt The main star of this recipe is the Biscoff cookie butter. It has a rich, sweet flavor that makes these truffles special. The crushed Biscoff cookies add a crunchy texture and deep taste. White chocolate chips provide a creamy coating that perfectly balances the flavors. Coconut oil helps the chocolate melt smoothly and adds a hint of tropical taste. A pinch of sea salt enhances all the sweet notes. - Chopped nuts (hazelnuts or almonds) - Additional toppings (e.g., extra crushed Biscoff cookies) If you want to add a bit more crunch, toss in some chopped nuts like hazelnuts or almonds. They bring a nice contrast to the soft truffles. Extra crushed Biscoff cookies work well as toppings too. They give a fun look and extra flavor. You can mix and match these add-ins to make your truffles unique and fun! {{ingredient_image_1}} Start by mixing the Biscoff cookie butter and crushed Biscoff cookies in a bowl. Use a spatula or spoon to combine them well. You want a firm dough that holds together easily. Once mixed, cover the bowl with plastic wrap and chill it in the fridge for about 30 minutes. This step is key. Chilling makes the mixture easier to shape into truffles later. After chilling, take the mixture out of the fridge. Use your hands to scoop small amounts of the mixture. Aim for about 1 inch in diameter for each ball. Roll the mixture in your palms until smooth. Place each ball on a baking sheet lined with parchment paper. This keeps them from sticking. Next, grab a microwave-safe bowl. Add the white chocolate chips and coconut oil to it. Microwave in 30-second bursts. Stir between each burst until smooth. This keeps the chocolate from burning. Once melted, dip each truffle into the chocolate. Let the excess chocolate drip off. You can roll the truffles in extra crushed Biscoff cookies or chopped nuts for a fun finish. After coating, place the truffles back on the parchment paper. Let them set at room temperature for about 15-20 minutes until hard. If you want to add a drizzle of white chocolate, melt some more and use a fork to create patterns on top. This adds a nice touch and makes the truffles look extra special. Chilling the dough is key for smooth truffles. When you chill the mixture for about 30 minutes, it firms up. This makes rolling easier and helps the truffles hold their shape. If you skip this step, your truffles may turn out too soft and hard to manage. The coating chocolate needs to be just right. When melting the white chocolate, mix in some coconut oil. This helps the chocolate stay smooth and shiny. If it gets too thick, it will not coat the truffles well. Aim for a nice, even coating that hugs each truffle. If your mixture feels dry or crumbly, add a bit more Biscoff cookie butter. Start with one tablespoon at a time until the texture improves. You want the mixture to hold together without falling apart. Sometimes, the chocolate hardens too quickly when coating the truffles. To fix this, melt the chocolate in smaller batches. Dip a few truffles, then reheat the chocolate briefly. This keeps it smooth and easy to work with. Arranging truffles can be fun and creative. Use a nice plate to show off your treats. You can stack them in groups or place them in small paper cups for a cute touch. For serving, consider pairing them with coffee or tea. The rich flavors of Biscoff and white chocolate go great with warm drinks. You can also add a simple garnish, like a sprinkle of crushed cookies, on top of each truffle for extra flair. Pro Tips Chill for Easier Rolling: Ensure the cookie mixture is chilled for at least 30 minutes to make rolling into truffles easier and less sticky. Quality Chocolate Matters: Use high-quality white chocolate for melting to achieve a smoother and creamier coating on the truffles. Customize Your Coating: Feel free to experiment with different toppings, such as crushed nuts, sprinkles, or even a drizzle of dark chocolate for added flavor. Store Properly: Keep the truffles in an airtight container in the refrigerator to maintain their shape and freshness for up to a week. {{image_2}} You can change the taste of your Biscoff cookie butter truffles easily. One fun idea is to use dark chocolate instead of white chocolate. Dark chocolate adds a rich taste that pairs well with the sweet cookie butter. If you want to get creative, try adding a few drops of flavor extracts like vanilla or almond. This small change can give your truffles a unique twist. For those with dietary needs, I have options. To make these truffles gluten-free, simply use gluten-free Biscoff cookies. This keeps the deliciousness while meeting gluten-free diets. If you need a vegan version, substitute white chocolate with vegan chocolate chips. You can also swap regular butter for a plant-based butter. These adjustments keep the truffles tasty and suitable for more diets. Toppings can make your truffles stand out. You might try rolling them in crushed nuts like hazelnuts or almonds for added crunch. Another idea is to mix in different cookie types. For example, you can use chocolate cookies or even graham crackers for a fun flavor blend. Feel free to experiment with various toppings to make each batch unique and exciting! To keep your Biscoff cookie butter truffles fresh, store them in the fridge. They taste best cold and stay firm. If you plan to eat them within a week, you can keep them at room temperature. Just make sure they are in a cool, dry place. - Refrigeration: Store in an airtight container. This keeps moisture away and helps the truffles last longer. - Room Temperature: Use a sealed container, away from heat. Check for any signs of melting chocolate. To maintain freshness, avoid stacking the truffles. This prevents them from sticking together. If you want to add a nice touch, place a piece of parchment paper between layers. Freezing your truffles is a great option if you want to save some for later. Make sure to pack them properly before freezing. - Proper Packing: Place the truffles in a single layer in an airtight container. You can also wrap each truffle in plastic wrap before putting them in the container. This protects them from freezer burn. - Thawing Tips: When you are ready to enjoy them, take the truffles out of the freezer. Let them sit in the fridge for several hours or overnight. This keeps their taste and texture nice. Avoid thawing them at room temperature to prevent melting. Shelf life at room temperature: Biscoff cookie butter truffles can last for about 2 days at room temperature. Keep them in a cool, dry place. Refrigerated shelf life: If you store them in the fridge, they can last up to 1 week. This helps the chocolate stay firm and fresh. Yes, you can use other types of cookie butter. Brands like Trader Joe's or Speculoos offer great flavors. You can also try flavors like gingerbread or chocolate cookie butter for a twist. To make these truffles nut-free, simply skip the nuts in the recipe. Use crushed Biscoff cookies for rolling instead. Check that any cookie butter you use is nut-free. Always read labels to avoid allergens. Biscoff Cookie Butter Truffles are easy and fun to make. We explored key ingredients, like Biscoff cookie butter and white chocolate, guiding you step-by-step from mixing to coating. I shared tips to achieve the best texture and troubleshoot common problems. Remember, you can customize these truffles with fun flavors and toppings. Store them properly for the best taste. Enjoy making these sweet treats! They’re sure to impress anyone who tries them.

Why I Love This Recipe

  1. Simple to Make: This recipe requires minimal ingredients and only a few steps, making it accessible for bakers of all skill levels.
  2. Decadent Flavor: The combination of Biscoff cookie butter and white chocolate creates a rich, indulgent treat that is hard to resist.
  3. Customizable: You can easily add your favorite nuts or toppings, allowing for personalization to suit your taste.
  4. Perfect for Gifting: These truffles make an excellent homemade gift for friends and family, especially during the holidays!

Ingredients

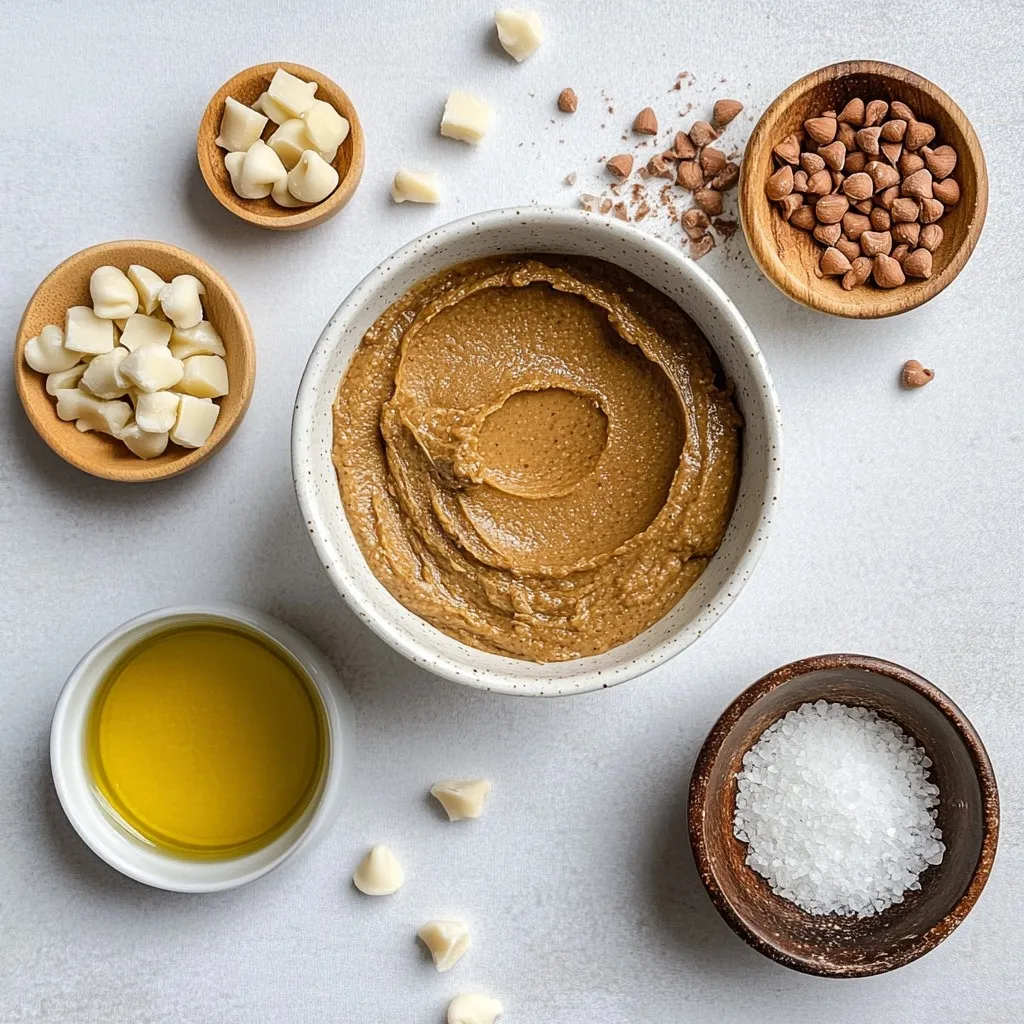
Key Ingredients for Biscoff Cookie Butter Truffles

– 1 cup Biscoff cookie butter

– 1 cup crushed Biscoff cookies (plus extra for rolling)

– 1 cup white chocolate chips

– 1 tablespoon coconut oil

– A pinch of sea salt

The main star of this recipe is the Biscoff cookie butter. It has a rich, sweet flavor that makes these truffles special. The crushed Biscoff cookies add a crunchy texture and deep taste. White chocolate chips provide a creamy coating that perfectly balances the flavors. Coconut oil helps the chocolate melt smoothly and adds a hint of tropical taste. A pinch of sea salt enhances all the sweet notes.

Optional Add-ins

– Chopped nuts (hazelnuts or almonds)

– Additional toppings (e.g., extra crushed Biscoff cookies)

If you want to add a bit more crunch, toss in some chopped nuts like hazelnuts or almonds. They bring a nice contrast to the soft truffles. Extra crushed Biscoff cookies work well as toppings too. They give a fun look and extra flavor. You can mix and match these add-ins to make your truffles unique and fun!

Step-by-Step Instructions

Preparation of Cookie Butter Mixture

Start by mixing the Biscoff cookie butter and crushed Biscoff cookies in a bowl. Use a spatula or spoon to combine them well. You want a firm dough that holds together easily. Once mixed, cover the bowl with plastic wrap and chill it in the fridge for about 30 minutes. This step is key. Chilling makes the mixture easier to shape into truffles later.

Rolling Truffles

After chilling, take the mixture out of the fridge. Use your hands to scoop small amounts of the mixture. Aim for about 1 inch in diameter for each ball. Roll the mixture in your palms until smooth. Place each ball on a baking sheet lined with parchment paper. This keeps them from sticking.

Melting and Coating the Chocolate

Next, grab a microwave-safe bowl. Add the white chocolate chips and coconut oil to it. Microwave in 30-second bursts. Stir between each burst until smooth. This keeps the chocolate from burning. Once melted, dip each truffle into the chocolate. Let the excess chocolate drip off. You can roll the truffles in extra crushed Biscoff cookies or chopped nuts for a fun finish.

Setting the Truffles

After coating, place the truffles back on the parchment paper. Let them set at room temperature for about 15-20 minutes until hard. If you want to add a drizzle of white chocolate, melt some more and use a fork to create patterns on top. This adds a nice touch and makes the truffles look extra special.

Tips & Tricks

Achieving Perfect Truffle Texture

Chilling the dough is key for smooth truffles. When you chill the mixture for about 30 minutes, it firms up. This makes rolling easier and helps the truffles hold their shape. If you skip this step, your truffles may turn out too soft and hard to manage.

The coating chocolate needs to be just right. When melting the white chocolate, mix in some coconut oil. This helps the chocolate stay smooth and shiny. If it gets too thick, it will not coat the truffles well. Aim for a nice, even coating that hugs each truffle.

Troubleshooting Common Issues

If your mixture feels dry or crumbly, add a bit more Biscoff cookie butter. Start with one tablespoon at a time until the texture improves. You want the mixture to hold together without falling apart.

Sometimes, the chocolate hardens too quickly when coating the truffles. To fix this, melt the chocolate in smaller batches. Dip a few truffles, then reheat the chocolate briefly. This keeps it smooth and easy to work with.

Presentation Tips

Arranging truffles can be fun and creative. Use a nice plate to show off your treats. You can stack them in groups or place them in small paper cups for a cute touch.

For serving, consider pairing them with coffee or tea. The rich flavors of Biscoff and white chocolate go great with warm drinks. You can also add a simple garnish, like a sprinkle of crushed cookies, on top of each truffle for extra flair.

Pro Tips

  1. Chill for Easier Rolling: Ensure the cookie mixture is chilled for at least 30 minutes to make rolling into truffles easier and less sticky.
  2. Quality Chocolate Matters: Use high-quality white chocolate for melting to achieve a smoother and creamier coating on the truffles.
  3. Customize Your Coating: Feel free to experiment with different toppings, such as crushed nuts, sprinkles, or even a drizzle of dark chocolate for added flavor.
  4. Store Properly: Keep the truffles in an airtight container in the refrigerator to maintain their shape and freshness for up to a week.

Variations

Flavor Variations

You can change the taste of your Biscoff cookie butter truffles easily. One fun idea is to use dark chocolate instead of white chocolate. Dark chocolate adds a rich taste that pairs well with the sweet cookie butter. If you want to get creative, try adding a few drops of flavor extracts like vanilla or almond. This small change can give your truffles a unique twist.

Dietary Adjustments

For those with dietary needs, I have options. To make these truffles gluten-free, simply use gluten-free Biscoff cookies. This keeps the deliciousness while meeting gluten-free diets. If you need a vegan version, substitute white chocolate with vegan chocolate chips. You can also swap regular butter for a plant-based butter. These adjustments keep the truffles tasty and suitable for more diets.

Additional Toppings

Toppings can make your truffles stand out. You might try rolling them in crushed nuts like hazelnuts or almonds for added crunch. Another idea is to mix in different cookie types. For example, you can use chocolate cookies or even graham crackers for a fun flavor blend. Feel free to experiment with various toppings to make each batch unique and exciting!

Storage Info

Best Practices for Storing Truffles

To keep your Biscoff cookie butter truffles fresh, store them in the fridge. They taste best cold and stay firm. If you plan to eat them within a week, you can keep them at room temperature. Just make sure they are in a cool, dry place.

Refrigeration: Store in an airtight container. This keeps moisture away and helps the truffles last longer.

Room Temperature: Use a sealed container, away from heat. Check for any signs of melting chocolate.

To maintain freshness, avoid stacking the truffles. This prevents them from sticking together. If you want to add a nice touch, place a piece of parchment paper between layers.

Freezing Instructions

Freezing your truffles is a great option if you want to save some for later. Make sure to pack them properly before freezing.

Proper Packing: Place the truffles in a single layer in an airtight container. You can also wrap each truffle in plastic wrap before putting them in the container. This protects them from freezer burn.

Thawing Tips: When you are ready to enjoy them, take the truffles out of the freezer. Let them sit in the fridge for several hours or overnight. This keeps their taste and texture nice. Avoid thawing them at room temperature to prevent melting.

FAQs

How long do Biscoff Cookie Butter Truffles last?

Shelf life at room temperature: Biscoff cookie butter truffles can last for about 2 days at room temperature. Keep them in a cool, dry place.

Refrigerated shelf life: If you store them in the fridge, they can last up to 1 week. This helps the chocolate stay firm and fresh.

Can I use other types of cookie butter?

Yes, you can use other types of cookie butter. Brands like Trader Joe’s or Speculoos offer great flavors. You can also try flavors like gingerbread or chocolate cookie butter for a twist.

How do I make these truffles nut-free?

To make these truffles nut-free, simply skip the nuts in the recipe. Use crushed Biscoff cookies for rolling instead. Check that any cookie butter you use is nut-free. Always read labels to avoid allergens.

Biscoff Cookie Butter Truffles are easy and fun to make. We explored key ingredients, like Biscoff cookie butter and white chocolate, guiding you step-by-step from mixing to coating. I shared tips to achieve the best texture and troubleshoot common problems. Remember, you can customize these truffles with fun flavors and toppings. Store them properly for the best taste. Enjoy making these sweet treats! They’re sure to impress anyone who tries the

- 1 cup Biscoff cookie butter - 1 cup crushed Biscoff cookies (plus extra for rolling) - 1 cup white chocolate chips - 1 tablespoon coconut oil - A pinch of sea salt The main star of this recipe is the Biscoff cookie butter. It has a rich, sweet flavor that makes these truffles special. The crushed Biscoff cookies add a crunchy texture and deep taste. White chocolate chips provide a creamy coating that perfectly balances the flavors. Coconut oil helps the chocolate melt smoothly and adds a hint of tropical taste. A pinch of sea salt enhances all the sweet notes. - Chopped nuts (hazelnuts or almonds) - Additional toppings (e.g., extra crushed Biscoff cookies) If you want to add a bit more crunch, toss in some chopped nuts like hazelnuts or almonds. They bring a nice contrast to the soft truffles. Extra crushed Biscoff cookies work well as toppings too. They give a fun look and extra flavor. You can mix and match these add-ins to make your truffles unique and fun! {{ingredient_image_1}} Start by mixing the Biscoff cookie butter and crushed Biscoff cookies in a bowl. Use a spatula or spoon to combine them well. You want a firm dough that holds together easily. Once mixed, cover the bowl with plastic wrap and chill it in the fridge for about 30 minutes. This step is key. Chilling makes the mixture easier to shape into truffles later. After chilling, take the mixture out of the fridge. Use your hands to scoop small amounts of the mixture. Aim for about 1 inch in diameter for each ball. Roll the mixture in your palms until smooth. Place each ball on a baking sheet lined with parchment paper. This keeps them from sticking. Next, grab a microwave-safe bowl. Add the white chocolate chips and coconut oil to it. Microwave in 30-second bursts. Stir between each burst until smooth. This keeps the chocolate from burning. Once melted, dip each truffle into the chocolate. Let the excess chocolate drip off. You can roll the truffles in extra crushed Biscoff cookies or chopped nuts for a fun finish. After coating, place the truffles back on the parchment paper. Let them set at room temperature for about 15-20 minutes until hard. If you want to add a drizzle of white chocolate, melt some more and use a fork to create patterns on top. This adds a nice touch and makes the truffles look extra special. Chilling the dough is key for smooth truffles. When you chill the mixture for about 30 minutes, it firms up. This makes rolling easier and helps the truffles hold their shape. If you skip this step, your truffles may turn out too soft and hard to manage. The coating chocolate needs to be just right. When melting the white chocolate, mix in some coconut oil. This helps the chocolate stay smooth and shiny. If it gets too thick, it will not coat the truffles well. Aim for a nice, even coating that hugs each truffle. If your mixture feels dry or crumbly, add a bit more Biscoff cookie butter. Start with one tablespoon at a time until the texture improves. You want the mixture to hold together without falling apart. Sometimes, the chocolate hardens too quickly when coating the truffles. To fix this, melt the chocolate in smaller batches. Dip a few truffles, then reheat the chocolate briefly. This keeps it smooth and easy to work with. Arranging truffles can be fun and creative. Use a nice plate to show off your treats. You can stack them in groups or place them in small paper cups for a cute touch. For serving, consider pairing them with coffee or tea. The rich flavors of Biscoff and white chocolate go great with warm drinks. You can also add a simple garnish, like a sprinkle of crushed cookies, on top of each truffle for extra flair. Pro Tips Chill for Easier Rolling: Ensure the cookie mixture is chilled for at least 30 minutes to make rolling into truffles easier and less sticky. Quality Chocolate Matters: Use high-quality white chocolate for melting to achieve a smoother and creamier coating on the truffles. Customize Your Coating: Feel free to experiment with different toppings, such as crushed nuts, sprinkles, or even a drizzle of dark chocolate for added flavor. Store Properly: Keep the truffles in an airtight container in the refrigerator to maintain their shape and freshness for up to a week. {{image_2}} You can change the taste of your Biscoff cookie butter truffles easily. One fun idea is to use dark chocolate instead of white chocolate. Dark chocolate adds a rich taste that pairs well with the sweet cookie butter. If you want to get creative, try adding a few drops of flavor extracts like vanilla or almond. This small change can give your truffles a unique twist. For those with dietary needs, I have options. To make these truffles gluten-free, simply use gluten-free Biscoff cookies. This keeps the deliciousness while meeting gluten-free diets. If you need a vegan version, substitute white chocolate with vegan chocolate chips. You can also swap regular butter for a plant-based butter. These adjustments keep the truffles tasty and suitable for more diets. Toppings can make your truffles stand out. You might try rolling them in crushed nuts like hazelnuts or almonds for added crunch. Another idea is to mix in different cookie types. For example, you can use chocolate cookies or even graham crackers for a fun flavor blend. Feel free to experiment with various toppings to make each batch unique and exciting! To keep your Biscoff cookie butter truffles fresh, store them in the fridge. They taste best cold and stay firm. If you plan to eat them within a week, you can keep them at room temperature. Just make sure they are in a cool, dry place. - Refrigeration: Store in an airtight container. This keeps moisture away and helps the truffles last longer. - Room Temperature: Use a sealed container, away from heat. Check for any signs of melting chocolate. To maintain freshness, avoid stacking the truffles. This prevents them from sticking together. If you want to add a nice touch, place a piece of parchment paper between layers. Freezing your truffles is a great option if you want to save some for later. Make sure to pack them properly before freezing. - Proper Packing: Place the truffles in a single layer in an airtight container. You can also wrap each truffle in plastic wrap before putting them in the container. This protects them from freezer burn. - Thawing Tips: When you are ready to enjoy them, take the truffles out of the freezer. Let them sit in the fridge for several hours or overnight. This keeps their taste and texture nice. Avoid thawing them at room temperature to prevent melting. Shelf life at room temperature: Biscoff cookie butter truffles can last for about 2 days at room temperature. Keep them in a cool, dry place. Refrigerated shelf life: If you store them in the fridge, they can last up to 1 week. This helps the chocolate stay firm and fresh. Yes, you can use other types of cookie butter. Brands like Trader Joe's or Speculoos offer great flavors. You can also try flavors like gingerbread or chocolate cookie butter for a twist. To make these truffles nut-free, simply skip the nuts in the recipe. Use crushed Biscoff cookies for rolling instead. Check that any cookie butter you use is nut-free. Always read labels to avoid allergens. Biscoff Cookie Butter Truffles are easy and fun to make. We explored key ingredients, like Biscoff cookie butter and white chocolate, guiding you step-by-step from mixing to coating. I shared tips to achieve the best texture and troubleshoot common problems. Remember, you can customize these truffles with fun flavors and toppings. Store them properly for the best taste. Enjoy making these sweet treats! They’re sure to impress anyone who tries them.

Biscoff Cookie Butter Truffles

Delicious truffles made with Biscoff cookie butter and white chocolate, rolled in crushed Biscoff cookies.
Prep Time 10 minutes
Cook Time 20 minutes
Total Time 1 hour
Course Dessert
Cuisine American
Servings 12
Calories 150 kcal

Ingredients
  

  • 1 cup Biscoff cookie butter
  • 1 cup crushed Biscoff cookies (plus extra for rolling)
  • 1 cup white chocolate chips
  • 1 tablespoon coconut oil (or vegetable oil)
  • a pinch sea salt
  • 2 tablespoons finely chopped nuts (hazelnuts or almonds)

Instructions
 

  • In a mixing bowl, combine the Biscoff cookie butter and crushed Biscoff cookies. Mix until well combined and a firm dough starts to form.
  • Chill the mixture in the refrigerator for about 30 minutes to firm up. This will make it easier to roll into truffles.
  • Once chilled, use your hands to scoop out small portions of the cookie mixture, rolling them into balls about 1 inch in diameter. Place them on a baking sheet lined with parchment paper.
  • In a microwave-safe bowl, combine the white chocolate chips and coconut oil. Microwave in 30-second intervals, stirring in between, until the chocolate is completely melted and smooth.
  • Dip each truffle into the melted white chocolate, allowing the excess to drip off, then roll them in the extra crushed Biscoff cookies or chopped nuts if using.
  • Place the coated truffles back on the parchment-lined sheet and let them set at room temperature or refrigerate until the chocolate is hardened, about 15-20 minutes.
  • Once set, you can drizzle more melted white chocolate over the truffles for added decoration if desired.

Notes

Drizzle more melted white chocolate over the truffles for added decoration if desired.
Keyword Biscoff, chocolate, dessert, truffles

WANT TO SAVE THIS RECIPE?