FREE DINNER EBOOK! Get your copy!
  • Cookie Policy
  • GDPR Policy
  • Disclaimer
  • Terms Of Use
  • Visit my other site: Fun Cookie Recipes
spicy fork kitchen
  • Home
  • Dinner
  • Desserts
  • Drinks
  • Appetizers
  • Contact
  • About
  • Privacy Policy
  • Home
  • Dinner
  • Desserts
  • Drinks
  • Appetizers
  • Contact
  • About
  • Privacy Policy
  • Cookie Policy
  • GDPR Policy
  • Disclaimer
  • Terms Of Use
Visit my other site: Fun Cookie Recipes

HOME / CATEGORIES /

Latest

- 2 salmon fillets (6 oz each) - 1/4 cup sweet chili sauce - 1 tablespoon soy sauce - 1 tablespoon olive oil - 1 cup cooked jasmine rice - 1 cup broccoli florets - 1 carrot, julienned - 1/2 cucumber, thinly sliced - 1 avocado, sliced - 2 green onions, chopped - Sesame seeds for garnish - Lime wedges for serving When you gather the ingredients, focus on freshness. The salmon should be bright and firm. Look for sweet chili sauce with a good balance of sweetness and heat. Jasmine rice adds a nice aroma and texture. Fresh veggies like broccoli and cucumber give crunch and color. Avocado adds creaminess, while lime brightens the dish. Prepare your kitchen with these ingredients, and you will create a delightful meal. Each item plays a role in flavor and presentation. The blend of sweet, savory, and fresh makes this bowl special. Enjoy the process and savor the taste! {{ingredient_image_1}} To make the marinade, mix 1/4 cup of sweet chili sauce with 1 tablespoon of soy sauce in a bowl. This blend gives the salmon a tasty kick. Place the 2 salmon fillets in a shallow dish and pour the marinade over them. Let them sit for at least 15 minutes. This time helps the flavors soak in. You can skip the skin for a cleaner look. Heat 1 tablespoon of olive oil in a non-stick skillet over medium heat. Take the salmon out of the marinade, but save the marinade for later. Place the salmon skin-side down in the skillet. Cook for about 4-5 minutes on each side. It’s done when it flakes easily with a fork. During the last minute, brush the reserved marinade over the salmon. This adds more flavor. While the salmon cooks, steam 1 cup of broccoli florets for 3-4 minutes. They should be tender but still bright green. Next, julienne one carrot by cutting it into thin strips. For the cucumber, slice it thinly. These veggies add crunch and color to your bowl. Start each bowl with a base of 1 cup of cooked jasmine rice. Place a piece of salmon on top. Add the steamed broccoli, julienned carrots, and cucumber slices. Finally, add sliced avocado for creaminess. Layering helps keep each bite balanced and tasty. Sprinkle chopped green onions and sesame seeds on top. Serve with lime wedges for a fresh squeeze of juice. Enjoy your meal! To check if your salmon is done, use the flaking test. Gently poke the fish with a fork. If it flakes easily, it's ready. If it’s still firm, give it more time. This helps ensure a perfect meal every time. When you cook the salmon, use the reserved marinade wisely. Brush it on the salmon in the last minute of cooking. This adds a burst of flavor and keeps the fish moist. You can boost flavor with extra seasonings. A pinch of garlic powder or ginger can add depth. Fresh herbs like cilantro or basil also work well. If you want to add heat, try red pepper flakes. Start with a small amount. You can always add more, but you can’t take it away if it’s too spicy. Not a fan of jasmine rice? You can use brown rice or quinoa. Both offer great texture and nutrition. For cooking rice, follow the package instructions. Rinse before cooking to remove excess starch. This makes your rice fluffy and nice. Pro Tips Marinate Longer for Depth of Flavor: For a more intense flavor, consider marinating the salmon for 30 minutes to an hour. This allows the sweet chili and soy sauce to penetrate the fish more thoroughly. Use Fresh Ingredients: Utilizing fresh vegetables like broccoli, carrots, and cucumber not only enhances the flavor but also adds a vibrant color to your bowls, making them more visually appealing. Don’t Overcook the Salmon: To achieve perfectly flaky salmon, avoid overcooking it. The fish is done when it flakes easily with a fork and has a slight translucency in the center. Experiment with Toppings: Feel free to customize your bowls with other toppings like pickled ginger, radishes, or even a drizzle of sriracha for an extra kick! {{image_2}} If you want to switch up the protein in your bowl, you have great choices. Chicken or tofu works well instead of salmon. For chicken, use boneless breasts or thighs. Cook chicken for about 6-7 minutes per side until it is fully cooked. Tofu takes less time, about 3-4 minutes per side. Just make sure to press the tofu first to remove excess water. This helps it absorb flavors better. You can change up the veggies to suit your taste. Try bell peppers, snap peas, or zucchini for a fresh crunch. Seasonal vegetables like asparagus in spring or squash in fall can add unique flavors. Mixing different colors in your bowl makes it look more appealing too. Want to kick up the flavor? You can explore spicy or tangy mixes. Add chili paste or a dash of lime juice for heat. If you prefer a different taste, try hoisin or teriyaki sauce instead of sweet chili sauce. These variations can make the dish your own while keeping it delicious. To store your sweet chili salmon bowls, place leftovers in airtight containers. Keep the salmon separate from the rice and veggies to maintain texture. The prepared meal lasts up to three days in the fridge. Always check for any off smells before eating. Yes, you can freeze these bowls! However, it's best to freeze the salmon and veggies separately from the rice. This helps keep everything fresh. Wrap each item tightly in plastic wrap and place them in freezer bags. For best quality, eat frozen bowls within one month. When ready to eat, thaw overnight in the fridge before reheating. To make this recipe gluten-free, swap soy sauce for tamari. Tamari is a gluten-free option that tastes similar. You can also check the sweet chili sauce for gluten. Some brands make gluten-free versions. Yes, you can use both fresh and frozen salmon. If you use frozen salmon, thaw it in the fridge overnight. Pat it dry before marinating. This helps the salmon absorb more flavor. A few simple sides pair nicely with the sweet chili salmon bowls. Try serving with: - Steamed asparagus - Quinoa salad - Sautéed green beans These sides add color and nutrition to your meal. Yes, you can cook salmon in the oven or on the grill. For the oven, place the salmon on a baking sheet. Bake it at 400°F for 12-15 minutes. For grilling, preheat your grill and cook the salmon for 4-6 minutes on each side. This blog post covered making delicious sweet chili salmon bowls. We explored key ingredients like salmon, jasmine rice, and fresh vegetables. I shared step-by-step cooking tips, including marinating and assembling the bowls for the best flavor. Remember, you can customize the recipe with different proteins and veggies. Don't forget to try various cooking methods and seasonings to make it your own. Enjoy creating this healthy and tasty meal!

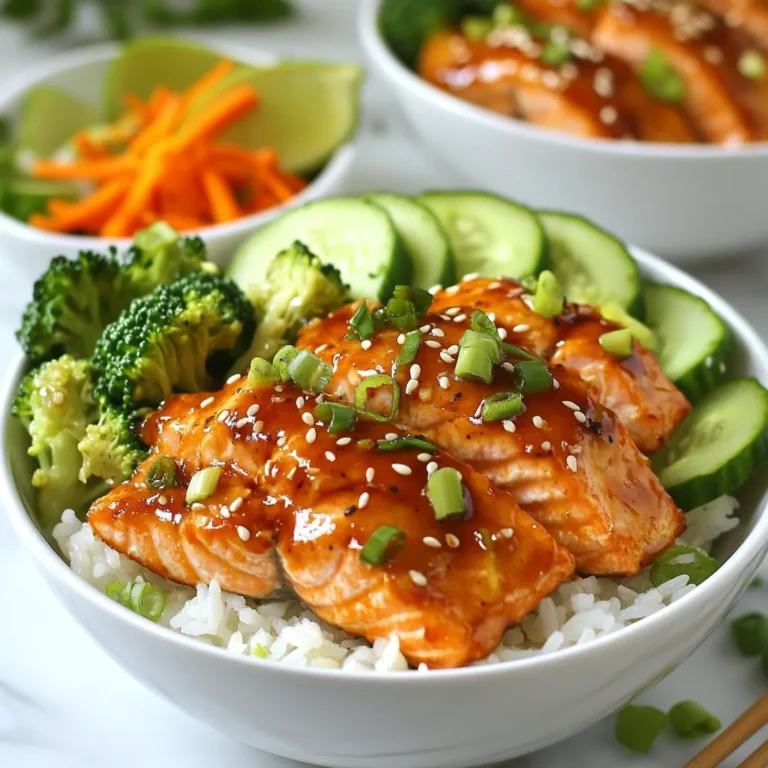
Sweet Chili Salmon Bowls Fresh and Flavorful Recipe

To make a tasty Cheesy Broccoli Rice Casserole, you will need: - 1 cup uncooked brown rice - 2 cups vegetable broth - 4 cups fresh broccoli florets - 1 cup sharp cheddar cheese, shredded - 1 cup cream of mushroom soup - 1/2 cup milk - 1/2 teaspoon garlic powder - 1/2 teaspoon onion powder - 1/4 teaspoon black pepper - 1/4 teaspoon salt - 1/2 cup breadcrumbs - 2 tablespoons olive oil - 1/4 cup Parmesan cheese, grated - Fresh parsley, chopped You can swap ingredients based on your taste or diet. Here are some ideas: - Use white rice if you don't have brown rice. - Chicken broth works well instead of vegetable broth. - Swap the cream of mushroom soup with cream of chicken soup for a different flavor. - For a dairy-free option, use a plant-based cheese and milk. - Whole wheat breadcrumbs can replace regular breadcrumbs for extra fiber. This casserole serves about six people. Each serving has: - Calories: approximately 350 - Protein: 12g - Carbohydrates: 45g - Fat: 15g - Fiber: 4g - Sodium: 400mg This dish is not only delicious but also offers good nutrition. You get fiber from the broccoli and rice, plus protein from the cheese. Enjoy this meal as a main dish or a side! {{ingredient_image_1}} 1. First, preheat your oven to 350°F (175°C). This helps get a nice crust. 2. Grease a 9x13 inch baking dish with olive oil or cooking spray. This keeps the casserole from sticking. 3. In a medium saucepan, bring 2 cups of vegetable broth to a boil. 4. Add 1 cup of uncooked brown rice to the boiling broth. Cover the pot and reduce the heat to low. Let it simmer for about 45 minutes. The rice should be tender and all the liquid absorbed. 5. While the rice cooks, steam 4 cups of fresh broccoli florets. Aim for 5-7 minutes until they turn bright green and tender. Set this aside for later. 1. In a large bowl, mix the cooked rice with the steamed broccoli. 2. Add 1 cup of shredded sharp cheddar cheese, 1 cup of cream of mushroom soup, and 1/2 cup of milk. 3. Sprinkle in 1/2 teaspoon of garlic powder, 1/2 teaspoon of onion powder, 1/4 teaspoon of black pepper, and 1/4 teaspoon of salt. 4. Stir everything together until well mixed. This blend gives the casserole a creamy texture. 1. Pour the rice and broccoli mixture into your greased baking dish. Spread it out evenly. 2. In a small bowl, mix 1/2 cup of breadcrumbs with 2 tablespoons of olive oil and 1/4 cup of grated Parmesan cheese. This will create a crunchy topping. 3. Sprinkle the breadcrumb mix over the casserole. 4. Bake in the preheated oven for 25-30 minutes. Look for a golden brown, bubbly top. 5. After baking, remove the dish from the oven. Let it cool for a few minutes. 6. Garnish with chopped fresh parsley for color and taste. Enjoy your delicious casserole! To make the best cheesy broccoli rice casserole, follow these tips: - Use fresh broccoli florets for better taste and texture. - Cook the brown rice until it is tender. This helps blend flavors. - Mix in the cheese while the rice is warm. It melts better this way. - Add a dash of hot sauce for an extra kick. Here are some common mistakes to watch out for: - Don’t overcook the broccoli. It should be tender but still bright green. - Avoid using too much liquid; too much can make the casserole mushy. - Don’t skip greasing the pan. It helps the casserole not stick. Here are some great ideas for serving your casserole: - Pair it with a simple green salad for freshness. - Serve with grilled chicken or fish for a protein boost. - Top each serving with fresh parsley for color and flavor. - Try adding a side of crusty bread to soak up the cheesy goodness. Pro Tips Use Fresh Broccoli: For the best flavor and texture, opt for fresh broccoli florets rather than frozen. Fresh broccoli retains its vibrant color and crispness after cooking. Experiment with Cheeses: While sharp cheddar adds a nice tang, feel free to mix in other cheeses like Monterey Jack or Gruyère for a unique flavor profile. Make It Ahead: This casserole can be prepared a day in advance. Simply assemble it, cover it tightly, and refrigerate. Bake it the next day, adding a few extra minutes to the cooking time. Add Protein: For a heartier dish, consider adding cooked chicken, turkey, or even chickpeas. This will elevate the casserole to a complete meal. {{image_2}} You can make this casserole vegetarian by using vegetable broth and cream of mushroom soup. If you want a vegan version, use plant-based cheese and plant-based milk. You can also swap the cream of mushroom soup for a vegan cream sauce made from cashews. This keeps the dish creamy and rich. To make this dish gluten-free, pick gluten-free breadcrumbs. Check that your cream of mushroom soup is gluten-free, or make your own using gluten-free flour. Also, ensure the vegetable broth is gluten-free. This way, everyone can enjoy this tasty meal! Try adding different cheeses like gouda or mozzarella for a twist. You can mix in cooked chicken or turkey for extra protein. Adding spices like paprika or cayenne can give it more flavor. Fresh herbs like thyme or basil can brighten the dish too. Just remember, keep it balanced so each flavor shines through! You can store leftovers in an airtight container. Make sure the casserole is cool before sealing it. The casserole can stay in the fridge for up to three days. If you want to enjoy it later, freezing is a better option. To freeze, let the casserole cool completely. Cut it into portions for easy thawing. Wrap each piece in plastic wrap and then in aluminum foil. This way, it keeps the taste and texture. The casserole can last in the freezer for up to three months. When you're ready to eat, thaw the casserole in the fridge overnight. To reheat, place it in the oven at 350°F (175°C) for about 20-25 minutes. Cover it with foil to keep it moist. You can also heat individual portions in the microwave for about 2-3 minutes. Enjoy your cheesy goodness! Yes, you can use frozen broccoli. Just thaw it first. This saves time and keeps the dish simple. Cooked frozen broccoli works well. It may be softer than fresh, but it still tastes good. Just be sure to drain any excess water before adding it to the mix. This will help keep your casserole from getting soggy. To add some heat, try these tips. You can mix in red pepper flakes. Start with a small amount and add more to taste. Another option is to add diced jalapeños or a splash of hot sauce. If you use spicy cheese, that can also help. Experiment with these options to find your perfect spice level. This casserole goes well with many sides. You can pair it with a fresh salad. A simple green salad adds great crunch and color. Grilled chicken is another tasty choice. It balances the creaminess of the casserole. For a lighter option, serve it with roasted vegetables. This makes a complete meal that everyone will enjoy. In this article, we covered the full journey of making a cheesy broccoli rice casserole. We looked at key ingredients, cooking methods, and tips to avoid errors. I shared how to store leftovers and offered ideas for variations to suit your taste. Final thoughts: Follow these steps for a tasty dish that everyone will enjoy. Keep experimenting with flavors and enjoy every bite!

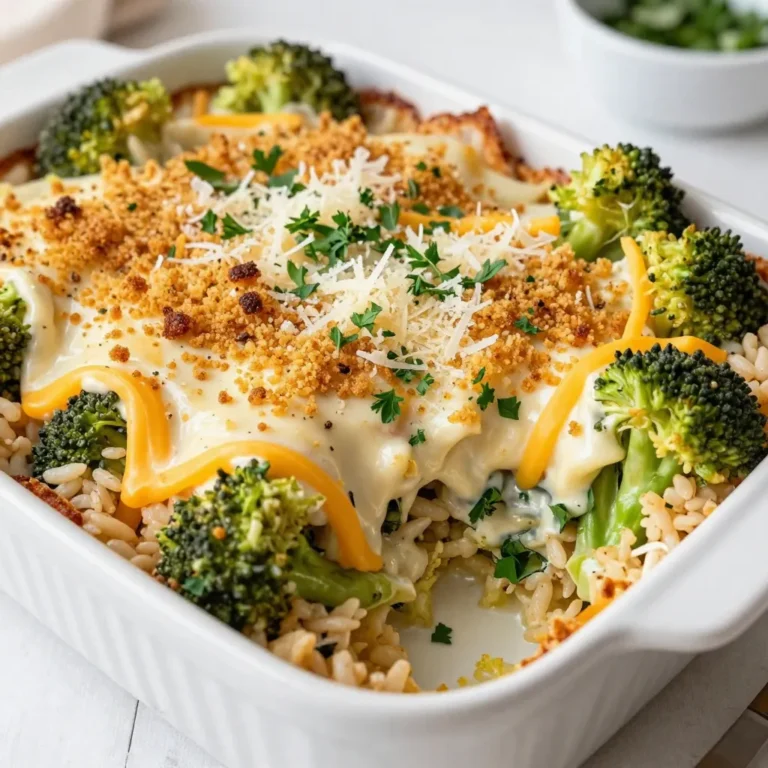
Cheesy Broccoli Rice Casserole Quick and Easy Meal

- 1 medium zucchini, grated - 1 cup all-purpose flour - 1/3 cup unsweetened cocoa powder - 1 teaspoon baking soda - 1/2 teaspoon baking powder - 1/4 teaspoon salt - 1/2 teaspoon cinnamon - 1/2 cup granulated sugar - 1/4 cup brown sugar, packed - 1/2 cup vegetable oil - 2 large eggs - 1 teaspoon vanilla extract - 1 cup semi-sweet chocolate chips - 1/4 cup chopped walnuts (optional) These ingredients come together to create moist and rich muffins. The zucchini adds moisture and nutrition without a strong taste. - You can use whole wheat flour for a healthier option. - Applesauce can replace the vegetable oil to cut fat. - Use maple syrup instead of granulated sugar for a natural sweetener. - Swap semi-sweet chocolate chips with dark chocolate for a richer flavor. - Omit walnuts if you prefer a nut-free version. These substitutions help you customize the muffins to your taste or dietary needs. - Muffin tin - Mixing bowls - Whisk - Grater for zucchini - Measuring cups and spoons - Clean kitchen towel - Spoon for batter - Toothpick for testing doneness Having the right equipment makes the baking process smooth and fun. You’ll be ready to whip up these treats in no time! {{ingredient_image_1}} 1. Preheat your oven to 350°F (175°C). Line a muffin tin with paper liners or grease it lightly. 2. Take a medium bowl and mix together: - 1 cup all-purpose flour - 1/3 cup unsweetened cocoa powder - 1 teaspoon baking soda - 1/2 teaspoon baking powder - 1/4 teaspoon salt - 1/2 teaspoon cinnamon Whisk these dry ingredients until they are well mixed. 3. In a large bowl, beat together: - 1/2 cup granulated sugar - 1/4 cup packed brown sugar - 1/2 cup vegetable oil - 2 large eggs - 1 teaspoon vanilla extract Mix until it is smooth. 4. Grate 1 medium zucchini. Squeeze it in a clean kitchen towel to remove extra moisture. Fold the zucchini into the wet mixture. 5. Gradually add the dry ingredients to the wet mixture. Stir gently until just combined. Do not overmix! 6. Fold in: - 1 cup semi-sweet chocolate chips - 1/4 cup chopped walnuts (optional) Make sure they are evenly mixed in. 7. Spoon the batter into the muffin tin. Fill each cup about 3/4 full. 8. Bake in your preheated oven for 18-20 minutes. Check doneness with a toothpick. Insert it into the center; it should come out clean. - Use a toothpick or cake tester. If it comes out clean, the muffins are done. - If you see wet batter, give them a few more minutes. Keep checking often to avoid overbaking. - Let the muffins cool in the pan for 5 minutes before moving them to a wire rack. This helps them maintain their shape. To keep your double chocolate zucchini muffins fresh, store them in an airtight container. They can last up to three days at room temperature. If you want to keep them longer, place them in the fridge. They stay good for about a week. Just remember to let them cool completely before storing. Freezing these muffins is easy and a great way to save some for later. Allow the muffins to cool first. Then, wrap each muffin in plastic wrap. Place them in a freezer bag or container. They will stay fresh for up to three months. When you're ready to eat one, just thaw it at room temperature or warm it in the microwave. These muffins are tasty on their own, but you can make them even better! Serve them warm, dusted with powdered sugar or cocoa powder. For a special touch, add a dollop of whipped cream or a scoop of vanilla ice cream. These little extras will make your treats feel gourmet! Pro Tips Use Fresh Zucchini: Fresh zucchini will give your muffins the best flavor and moisture. Look for ones that are firm and unblemished for optimal results. Don't Overmix: When combining the wet and dry ingredients, mix just until combined. Overmixing can lead to dense muffins instead of light and fluffy ones. Customize Your Add-ins: Feel free to experiment with different mix-ins like dried fruits, nuts, or even different types of chocolate to customize these muffins to your taste! Check for Doneness: Ovens can vary, so start checking your muffins a few minutes before the recommended baking time by inserting a toothpick into the center; it should come out clean or with a few moist crumbs. {{image_2}} You can make these double chocolate zucchini muffins gluten-free. Use a gluten-free all-purpose flour blend. This will keep the texture soft and moist. Check the blend contains xanthan gum or add it separately. This helps mimic the structure of regular flour. Mix-ins can add fun to your muffins. Try adding nuts, like walnuts or pecans, for extra crunch. You can also toss in some dried fruits, like cranberries or cherries, for a sweet twist. For a richer chocolate flavor, add more chocolate chips. Feel free to play with flavors. Swap the vanilla extract for almond extract for a nutty taste. You can also add a tablespoon of espresso powder for a deeper chocolate flavor. Spice it up with a pinch of cayenne pepper for a surprising kick. Each muffin has about 180 calories. This makes it a great snack. You can enjoy a sweet treat without too much guilt. These muffins pack a tasty punch of nutrients. Here’s what you’ll find in one muffin: - Carbohydrates: 25 grams - Protein: 3 grams - Fat: 8 grams - Fiber: 1 gram - Sugar: 10 grams This mix of carbs, fat, and protein gives you energy. The fiber helps keep your tummy happy. The ingredients in these muffins offer some nice health perks. - Zucchini: Full of water and low in calories. It adds moisture without many calories. - Cocoa Powder: Rich in antioxidants. It can boost heart health. - Eggs: Good for protein. They help keep you full longer. - Nuts (if used): Packed with healthy fats. They can support brain health. These muffins not only taste great, but they also bring some health benefits to your day. Enjoy them knowing they have some good stuff inside! Yes, you can use frozen zucchini. Just remember to thaw and drain it well. This step helps remove extra moisture. It keeps your muffins from getting soggy. Frozen zucchini works great in these muffins. The taste stays fresh and yummy. To make these muffins vegan, swap the eggs for flaxseed meal. Mix one tablespoon of flaxseed with three tablespoons of water. Let it sit for five minutes until it thickens. You can also use a plant-based oil instead of vegetable oil. Use a non-dairy milk like almond or soy to add moisture. Store your muffins in an airtight container. Keep them at room temperature for up to three days. If you want to keep them longer, freeze them. Wrap each muffin in plastic wrap, then place them in a freezer bag. They can last for up to three months in the freezer. Simply thaw them overnight before enjoying! You now have all the tools to make delicious zucchini muffins. We covered the needed ingredients, equipment, and gave you step-by-step guidance for baking. Remember to try different variations and make adjustments as needed. Store them well and enjoy their great taste. Your muffins can be healthy with the right ingredients. Use what you learned to bake with confidence. These muffins can fit any diet and make a great snack. Happy baking!

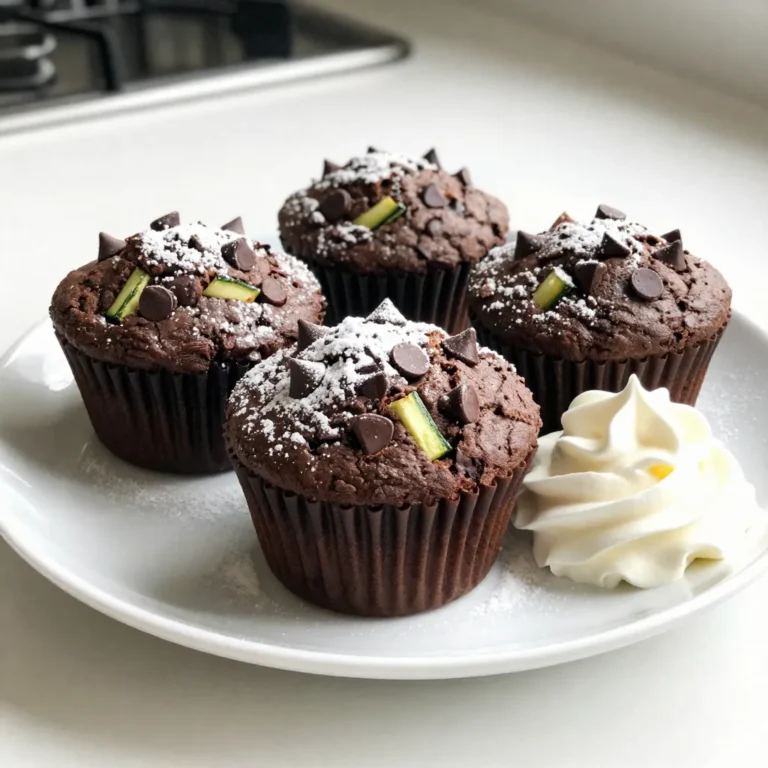
Double Chocolate Zucchini Muffins Irresistible Treat

- 2 boneless, skinless chicken breasts - 8 ounces fettuccine or linguine pasta - 1 cup heavy cream - 1 cup chicken broth - 2 tablespoons Cajun seasoning - Salt and pepper to taste - 1/2 cup grated Parmesan cheese - 1 red bell pepper - 1 yellow bell pepper - 1 small onion - 2 cloves garlic - Fresh parsley for garnish Cajun chicken pasta is a dish bursting with flavor. You need a few key ingredients to make it shine. First, the chicken breasts bring protein and heartiness. I like to slice them for more flavor. Use fettuccine or linguine to soak up the creamy sauce. The sauce is where the magic happens. Heavy cream gives it richness while chicken broth adds depth. Cajun seasoning is a must for that kick of spice. Adjust the salt and pepper to your taste. Fresh vegetables also play a big role. The sweet red and yellow bell peppers add crunch and color. Onions and garlic build a solid flavor base. Finally, garnish with parsley for a fresh touch. This blend of ingredients creates a dish that feels restaurant-worthy. Each bite is a flavor explosion. You’ll love how easy it is to recreate this at home! {{ingredient_image_1}} To start, take the sliced chicken breasts and place them in a bowl. Sprinkle two tablespoons of Cajun seasoning over the chicken. Toss it well to coat each piece. Let the chicken marinate for at least 20 minutes. This step is key for flavor. While the chicken marinates, heat a skillet over medium heat. Add the marinated chicken to the skillet and cook until it gets a nice brown color. This usually takes about 5 to 7 minutes. Make sure it cooks through, so it’s safe to eat. In a large pot, bring salted water to a boil. Once boiling, add 8 ounces of fettuccine or linguine pasta. Cook the pasta according to the package instructions until it is al dente. This means it should still be slightly firm. After cooking, drain the pasta but save half a cup of the pasta water. This water will help adjust the sauce later. Now it’s time to make the sauce. In the same skillet where you cooked the chicken, heat one tablespoon of olive oil over medium heat. Add one small chopped onion and both a sliced red and yellow bell pepper. Sauté these vegetables until they are softened, which should take about 5 minutes. Then, stir in two minced garlic cloves and cook for one more minute. This adds a nice aroma to your dish. Next, push the veggies to one side of the skillet. Add the browned chicken back in. Pour in one cup of chicken broth and one cup of heavy cream. Stir this mixture well and let it simmer. The sauce should thicken a bit. It’s time to combine everything. Add the drained pasta to the skillet and toss it gently with the sauce. If the sauce seems too thick, add some of the reserved pasta water until you reach the desired consistency. Finally, stir in half a cup of grated Parmesan cheese. This will make the sauce creamy and delicious. Season everything with salt and pepper to taste. Now, your Cajun Chicken Pasta is ready to serve! To get the best chicken, marinate it for at least 20 minutes. This helps the flavor soak in. You can check if the chicken is done by cutting it open. The meat should no longer be pink, and juices should run clear. This is key to a safe and tasty dish. The sauce should be creamy, not too thick. If it is too thick, add some reserved pasta water. This helps loosen it up while keeping the taste. Mix in the cheese at the end. Doing this helps the cheese melt into the sauce perfectly. For extra flavor, try adding a pinch of cayenne pepper or smoked paprika. These spices can boost the Cajun flavor. Garnish with fresh parsley for color and brightness. It adds a nice touch and makes your dish look restaurant-style. Pro Tips Marinate for Flavor: Allowing the chicken to marinate for longer than 20 minutes can intensify the flavor. If you have time, marinate it for up to 2 hours in the refrigerator. Reserve Pasta Water: Always reserve some pasta water before draining. The starchy water can help adjust the sauce consistency and help it cling to the pasta better. Adjust Spice Level: If you prefer a milder dish, reduce the amount of Cajun seasoning or add a bit of cream to balance the heat. Fresh Herbs for Garnish: Fresh parsley adds a pop of color and a fresh flavor. Consider adding fresh basil or cilantro for a different twist! {{image_2}} You can swap chicken for shrimp or sausage. Both add great flavor. If you choose shrimp, cook it until pink and firm. For sausage, cook until browned, then mix with veggies. Vegetarian options are easy too! Try using tofu or beyond meat. You can also use mushrooms for a meaty texture. They soak up the sauce well. While fettuccine is great, you can use other pasta types. Penne or rigatoni work well too. They hold sauce nicely, giving you more flavor in each bite. Looking for gluten-free? Try chickpea or brown rice pasta. They cook similarly and are tasty. Want more veggies? Bell peppers are just the start! Add zucchini, spinach, or broccoli for color and nutrition. They all work well with the sauce. Seasonal produce can brighten the dish. In summer, add fresh tomatoes or corn. In winter, consider kale or butternut squash. Each adds a unique twist to your meal. To store your Cajun chicken pasta, let it cool first. Use an airtight container. This keeps the dish fresh and tasty. Glass or plastic containers work well. Avoid using metal containers, as they might affect the flavors. Store in the fridge for up to three days. If you want to keep it longer, freezing is a great option. To reheat your pasta, the best method is using the stovetop. Add a splash of chicken broth or water. This keeps the pasta moist and helps with flavor. Heat over low to medium heat. Stir occasionally to warm it evenly. You can also use a microwave if you're short on time. Use a microwave-safe dish and cover it loosely. Yes, you can freeze Cajun chicken pasta! Just make sure it’s in a safe container. Use freezer bags or airtight containers. Label with the date, and it will stay good for up to three months. When you’re ready to eat, thaw it overnight in the fridge. Reheat on the stovetop or in the microwave. This helps keep the flavor and texture just right. Cajun chicken pasta is a creamy pasta dish. It combines spicy Cajun-seasoned chicken with pasta and colorful veggies. You can find this dish in many restaurants. Its bold flavors and creamy texture make it a favorite among many. The mix of spices and cream creates a flavor explosion in every bite. Yes, you can prepare Cajun chicken pasta ahead of time. Make everything except the pasta and sauce first. Store the cooked chicken and veggies in the fridge. When you are ready to eat, cook the pasta and heat the sauce. This helps keep the flavors fresh and delicious. Making Cajun seasoning at home is easy! Here's a simple recipe: - 1 tablespoon paprika - 1 teaspoon cayenne pepper - 1 teaspoon onion powder - 1 teaspoon garlic powder - 1 teaspoon dried thyme - 1 teaspoon dried oregano - 1 teaspoon black pepper - 1 teaspoon salt Mix all the spices together in a bowl. Use this mix to spice up your chicken and other dishes too! To complement Cajun chicken pasta, serve: - Garlic bread for dipping in the sauce - A fresh green salad with vinaigrette - Steamed veggies like broccoli or green beans These sides balance the rich flavors of the pasta and add freshness to your meal. In this blog post, we explored making Cajun chicken pasta. We covered main ingredients, seasonings, and fresh components. You learned step-by-step how to prepare the chicken, cook the pasta, and make the sauce. We discussed tips for perfecting the dish and offered variations. Storing and reheating methods were also shared. Try this flavorful dish soon. It’s easy to make and perfect for any table!

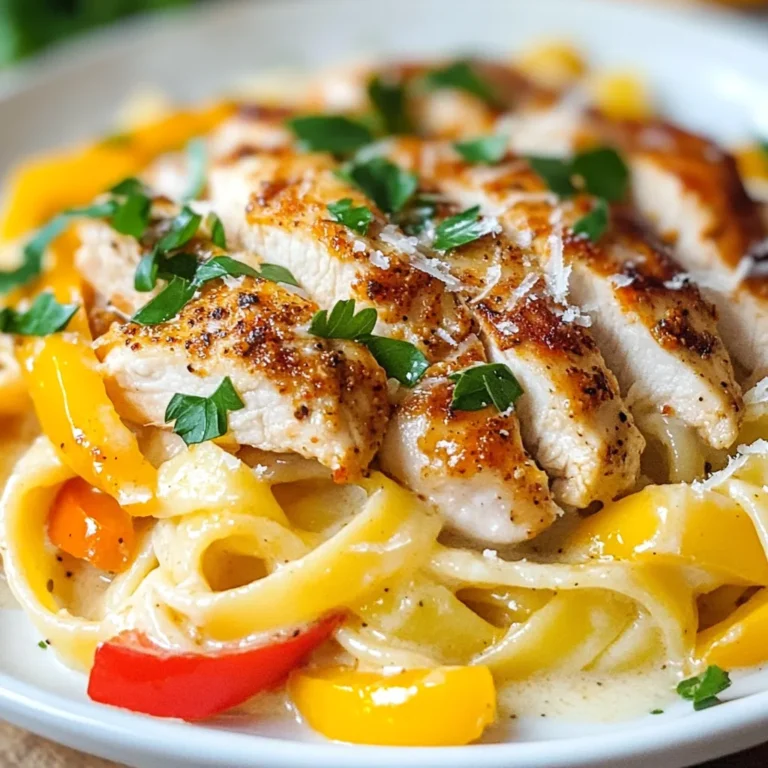
Cajun Chicken Pasta Restaurant Style Flavor Explosion

- 1 cup black beans, canned and rinsed - 1/2 cup unsweetened applesauce - 1/4 cup pure maple syrup - 1/4 cup cocoa powder - 1/4 cup almond flour - 1 teaspoon vanilla extract - 1/2 teaspoon baking soda - 1/4 teaspoon salt - 1/2 cup dark chocolate chips (dairy-free if desired) - Optional toppings: chopped nuts, coconut flakes, or extra chocolate chips Black beans are a great source of protein and fiber. They help keep you full. Applesauce adds natural sweetness and moisture without added sugar. Maple syrup gives a rich flavor and contains antioxidants. Cocoa powder is full of minerals and can improve heart health. Almond flour is lower in carbs and high in healthy fats. Dark chocolate chips can boost mood and provide antioxidants. If you cannot find black beans, use canned chickpeas or silken tofu. For applesauce, mashed banana works well. If you want a different sweetener, honey or agave syrup is a good choice. You can replace almond flour with oat flour or all-purpose flour. If you need a dairy-free option, use non-dairy chocolate chips or skip them entirely. {{ingredient_image_1}} Start by preheating your oven to 350°F (175°C). Grab an 8x8-inch baking dish and grease it. Next, rinse and drain 1 cup of canned black beans. Place the beans in a food processor and blend until smooth. This will make your brownies rich and fudgy. Now, add the following to the processor: - 1/2 cup unsweetened applesauce - 1/4 cup pure maple syrup - 1/4 cup cocoa powder - 1/4 cup almond flour - 1 teaspoon vanilla extract - 1/2 teaspoon baking soda - 1/4 teaspoon salt Blend all these ingredients until they form a smooth batter. The mixture should be thick and creamy. Use a spatula to scrape down the sides if needed. Then, gently fold in 1/2 cup of dark chocolate chips. This adds a delightful chocolatey burst. Pour the batter into your greased baking dish. Spread it out evenly. If you want, sprinkle some chopped nuts, coconut flakes, or more chocolate chips on top. This adds texture and flavor. Bake the brownies for 20 to 25 minutes. Stick a toothpick in the center. If it comes out mostly clean, your brownies are done. A few moist crumbs are okay. Once baked, take the brownies out of the oven. Let them cool in the pan for at least 10 minutes. This helps them set. After cooling, cut them into squares. For a nice touch, serve them on a rustic wooden board. A sprinkle of cocoa powder and some mint leaves can brighten the plate. Pair these brownies with almond or coconut ice cream for a healthy treat. Enjoy every fudgy bite! To get fudgy brownies, start with black beans. They add moisture and richness. Blend them until smooth. This helps create a creamy base. Mix in applesauce and maple syrup for natural sweetness. Use cocoa powder and almond flour for a deep flavor. Avoid over-blending the batter; a few lumps are okay. This keeps your brownies soft and chewy. Store your brownies in an airtight container. This keeps them moist and fresh. You can also place parchment paper between layers. This prevents sticking. Keep them at room temperature for up to three days. For longer storage, freeze them. Wrap each brownie in plastic wrap and place them in a freezer bag. They can last up to three months. Try serving your brownies warm. This makes them extra fudgy. Top with chopped nuts or coconut flakes for crunch. You can also add extra chocolate chips on top for a sweet treat. Pair them with almond or coconut ice cream for a tasty dessert. A sprinkle of cocoa powder adds a nice touch. Fresh mint leaves can brighten the plate for a pop of color. Pro Tips Use Fresh Ingredients: Always opt for fresh black beans and pure maple syrup for the best flavor in your brownies. Let Them Cool: Allow the brownies to cool completely before cutting to achieve clean, beautiful squares. Experiment with Flavors: Try adding a pinch of cinnamon or a splash of espresso powder to enhance the chocolate flavor. Storage Tips: Store leftovers in an airtight container at room temperature for up to 3 days or refrigerate for longer freshness. {{image_2}} You can make these brownies even better by adding nuts. Chopped walnuts or pecans give a nice crunch. If you like coconut, sprinkle some flakes on top. You can also add more chocolate chips for extra richness. Just remember to mix them in gently so they spread evenly. Want to try something new? Add a splash of mint extract for a fresh taste. A teaspoon of espresso powder gives a rich coffee flavor. You can also use almond or orange extract for a sweet twist. These small changes can take your brownies to the next level. If you need gluten-free brownies, stick to almond flour. It works great in this recipe. For a vegan option, make sure to use dairy-free chocolate chips. You can swap the maple syrup for agave syrup if you want. Both options keep your brownies delicious and guilt-free. To keep your fudgy healthy brownies fresh, store them in an airtight container. This keeps moisture in and prevents them from drying out. Place a piece of parchment paper between layers to avoid sticking. Make sure to store them at room temperature for the best taste. You can freeze these brownies for later enjoyment. First, let them cool completely. Next, cut them into squares. Wrap each square in plastic wrap and place them in a freezer-safe bag. Squeeze out as much air as possible before sealing. They will stay good for up to three months in the freezer. When stored at room temperature, these brownies last about five days. If kept in the fridge, their shelf life extends to about a week. Remember, the fresher the brownies, the better the taste! Always check for any signs of spoilage before eating. Yes, you can replace black beans. Use canned chickpeas for a different taste. You can also try cooked lentils. Both options keep the brownies moist. Just blend them until smooth. This will keep the texture fudgy. To lower the sugar, use less maple syrup. You can cut it in half. Use ripe bananas or mashed dates for sweetness instead. These natural options add flavor without too much sugar. You can also skip the chocolate chips or use dark chocolate with lower sugar. To reheat brownies, use the microwave. Place a brownie on a plate and cover it with a damp paper towel. Heat it for 10-15 seconds. This keeps the brownie moist. You can also warm them in the oven at 300°F for about 5 minutes. This makes them taste fresh again. In this post, I shared the key ingredients for tasty brownies and their health benefits. You learned how to prepare the batter, bake, and serve brownies perfectly. I offered tips to keep them fresh and shared fun variations and modifications. Remember, experimenting with flavors and mix-ins can elevate your brownies. Use the storage tips to keep them fresh longer. Enjoy making these brownies your way!

Fudgy Healthy Brownies That Everyone Will Love

- 1 ½ cups graham cracker crumbs - ½ cup unsalted butter, melted - ⅓ cup granulated sugar Graham cracker crumbs form the base. They give a nice crunch. Melted unsalted butter helps hold the crust together. Sugar adds sweetness to balance the flavors. - 2 (14-ounce) cans sweetened condensed milk - ½ cup key lime juice (freshly squeezed preferred) - 4 large egg yolks - Zest of 2 key limes - Pinch of salt The sweetened condensed milk gives the filling creaminess. Fresh key lime juice brings zesty flavor. Egg yolks help set the filling. Lime zest enhances the taste. A pinch of salt balances the sweetness. - Whipped cream - Key lime slices for garnish Whipped cream adds a light touch. Key lime slices can make it look pretty. These toppings are not just for looks; they enhance the taste, too. {{ingredient_image_1}} First, preheat your oven to 350°F (175°C). This step ensures your crust cooks evenly. In a medium bowl, mix 1 ½ cups of graham cracker crumbs, ½ cup of melted unsalted butter, and ⅓ cup of granulated sugar. Stir until everything combines well. Next, press the mixture firmly into the bottom of a 9x9-inch baking dish. Aim for an even layer. This crust will be the base for your tasty bars. Now, place the dish in your preheated oven. Bake the crust for about 10 to 12 minutes. Keep an eye on it! You want it to turn lightly golden. When it looks ready, take it out and let it cool slightly. This cooling time helps it firm up for the filling. In a large mixing bowl, whisk together 2 cans of sweetened condensed milk, ½ cup of key lime juice, 4 large egg yolks, the zest of 2 key limes, and a pinch of salt. Make sure to whisk until you achieve a smooth and creamy consistency. This will give the filling its rich flavor and texture. Next, pour the key lime filling over your cooled crust. Use a spatula to spread it evenly. This step ensures every bite is packed with flavor. Bake the bars in the oven again for 15 to 18 minutes. You want the filling to be set but still have a slight jiggle in the center. This means they are just right! After baking, remove the bars from the oven. Let them cool at room temperature for about 30 minutes. After this, refrigerate them for at least 2 hours to help them set fully. Once chilled, slice the bars into squares or rectangles. You can top each bar with whipped cream and a slice of key lime if you like. This adds a nice touch for serving! To make the crust firm, press the mixture tightly. Use a flat-bottomed cup to help. This helps it hold together when you cut the bars. If you want a fun twist, try using crushed vanilla wafers or oats instead of graham crackers. These can add a unique flavor. When using fresh key lime juice, taste for the right tartness. Fresh juice brings bright flavor. Always strain the juice to remove seeds and pulp for a smooth filling. To avoid a rubbery texture, do not overbake the filling. It should jiggle slightly when you take it out. For a fun touch, top your bars with whipped cream. You can also add key lime slices for decoration. Serve these bars chilled with iced tea or a fruity soda. They pair well with coconut water too, for a refreshing drink. Pro Tips Fresh Key Limes: For the best flavor, use freshly squeezed key lime juice instead of bottled juice. This will enhance the tartness and overall taste of your pie bars. Chill Properly: After baking, allow the bars to cool completely at room temperature before refrigerating. This helps them set properly and makes slicing easier. Perfectly Cut Bars: To achieve clean cuts, use a sharp knife dipped in warm water. Wipe the knife clean between cuts for neat edges. Garnish with Style: For an elegant presentation, add a sprinkle of lime zest and mint leaves along with whipped cream on top of each bar. {{image_2}} You can easily change up the flavor of your key lime pie bars. Adding coconut gives a fun tropical twist. Just mix in some shredded coconut into your graham cracker crust. This will add a nice chew and flavor. Adding berries is another great option. You can swirl in some fresh berries into the filling. Strawberries or blueberries work well for a fruity variation. It makes the bars colorful and tasty. If you need to make these bars gluten-free, swap the graham cracker crumbs for almond flour or gluten-free cookies. This will keep the crust tasty and soft. For those who want a vegan option, replace the sweetened condensed milk with coconut cream. You can also use flax eggs instead of regular eggs for the filling. These swaps can help everyone enjoy these delicious bars. How you serve your key lime pie bars can make a difference. For individual servings, use small cups. This way, each person gets their own treat. You can layer the crust and filling in each cup. For parties, try making miniature versions. Cut the bars into small squares and serve them on a platter. This makes it easy for guests to grab a bite and enjoy. To keep your key lime pie bars fresh, refrigeration is key. Place the bars in an airtight container. This helps keep them moist and tasty. If you don't have a container, cover the dish with plastic wrap. Ensure it seals well to lock in the flavor. For longer storage, you can freeze the bars. Cut the bars into squares first. Wrap each square in plastic wrap. Then, place them in a freezer-safe bag. This way, you can enjoy these treats even weeks later. Just remember to let them thaw in the fridge overnight before serving. In the fridge, the key lime pie bars last about five days. They should stay fresh if kept covered properly. If you freeze them, they can last for up to three months. Look for signs of spoilage. If you see any mold or a change in smell, it’s best to toss them. Fresh bars should smell bright and zesty, just like key limes. Enjoy your sweet treats while they are at their best! You can use regular limes, but the taste will change. Key limes are smaller and have a unique tartness. They add a floral note and a stronger lime flavor. Regular limes are more bitter and less sweet. This difference can affect the taste of your bars. If you want the true key lime pie flavor, stick with key limes. Look for a slight jiggle in the center. The edges should feel firm, but the middle should still move a little. This means they are set but not overcooked. If they are too firm, they might become rubbery. Trust your eyes and the feel of the filling. Yes, you can make these bars ahead of time. They store well in the fridge for up to three days. Just keep them in an airtight container. You can also freeze them for up to a month. If you freeze them, wrap each bar tightly. Thaw in the fridge before serving. Serve the bars chilled for the best taste. You can top them with whipped cream for extra creaminess. Add key lime slices for a nice touch. They pair well with iced tea or a light cocktail. For a fun twist, serve with fresh berries on the side. You learned how to make delicious key lime pie bars, step by step. From crafting the crust to making the filling, each part matters. Remember to chill your bars for the best flavor. Use fresh ingredients for a vibrant taste. Try adding berries or coconut for fun twists. Store them well to keep them fresh. Enjoy sharing this treat with friends and family. Good luck making your key lime pie bars!

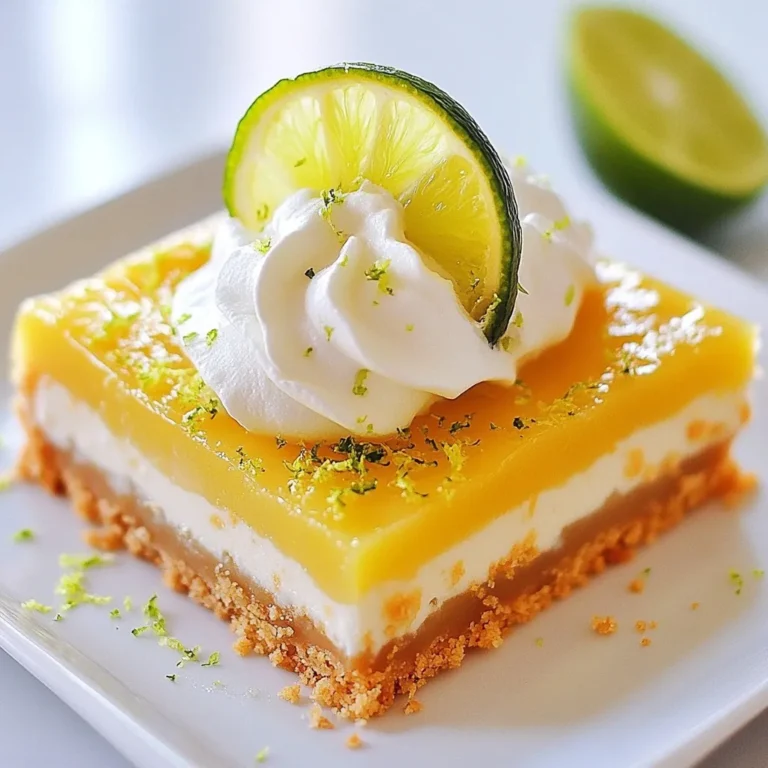
Key Lime Pie Bars Flavorful and Easy Dessert Recipe

- 8 oz (225g) penne pasta - 2 tablespoons olive oil - 1 small onion, diced - 3 cloves garlic, minced - 8 oz (225g) fresh mushrooms, sliced - 4 cups fresh spinach, roughly chopped - 1 cup vegetable broth - 1 cup heavy cream - 1 cup grated Parmesan cheese - Salt and pepper to taste - 1 teaspoon Italian seasoning - Fresh parsley, chopped Gathering the right ingredients makes cooking fun and easy. For this dish, I love using fresh spinach and mushrooms. They add great flavor and nutrition. The penne pasta gives a perfect base for our creamy sauce. Olive oil is essential for sautéing and adds a nice richness. Diced onion and minced garlic make your kitchen smell amazing. They create a solid flavor foundation in the skillet. Don’t forget the heavy cream and Parmesan cheese. They bring a luscious texture to the sauce. A touch of vegetable broth helps combine everything smoothly. Seasoning is key! Use salt, pepper, and Italian seasoning to enhance the taste. Finally, fresh parsley adds a pop of color and brightens the dish. With these ingredients, you’ll create a delicious meal in no time! {{ingredient_image_1}} First, boil a large pot of salted water. Add 8 oz of penne pasta. Cook it until al dente, following the package instructions. Drain the pasta and set it aside. Next, heat 2 tablespoons of olive oil in a large skillet over medium heat. Add the diced small onion and sauté for about 3 to 4 minutes until it softens. Then, stir in 3 minced garlic cloves and cook for another 30 seconds until it smells great. Now, add 8 oz of sliced mushrooms to the skillet. Cook them for 5 to 6 minutes. They should turn golden brown and release moisture. Next, stir in 4 cups of chopped spinach and 1 cup of vegetable broth. Cook for an additional 2 to 3 minutes until the spinach wilts. Reduce the heat to low. Pour in 1 cup of heavy cream and stir to mix. Add 1 cup of grated Parmesan cheese and stir until it melts and the sauce thickens. Season it with salt, pepper, and 1 teaspoon of Italian seasoning. Add the cooked penne pasta into the skillet. Toss everything together until the pasta is well-coated with the creamy sauce. Heat for another 2 minutes to warm it all through. Remove from heat and garnish with fresh parsley before serving. Enjoy your Spinach Mushroom Parmesan Pasta Skillet! To get that perfect bite, cook your penne pasta al dente. This means it should be firm when you bite into it. Follow the package instructions carefully. Start checking the pasta a minute or two before the time is up. Drain it right away and set it aside to keep it from cooking more. You can boost the taste by adding or swapping ingredients. For a twist, try sun-dried tomatoes or artichokes. Fresh herbs add a bright flavor. If you can't find fresh herbs, dried ones work too. Just remember, dried herbs are stronger, so use less! Sautéing is key for great flavor. Heat the olive oil in your skillet before adding onions. Keep the heat at medium to avoid burning. Stir often to cook evenly. When adding mushrooms, don't crowd the pan. This helps them brown nicely. Overcooking can make vegetables mushy. Cook mushrooms until golden and spinach just wilts. This keeps them vibrant and tasty. Pro Tips Use Fresh Ingredients: Fresh spinach and mushrooms enhance the flavor and texture of your pasta dish, making it more vibrant and delicious. Don’t Overcook the Pasta: Cook the penne pasta until al dente, as it will continue to cook slightly when combined with the sauce, ensuring the perfect texture. Season Gradually: Taste and adjust seasoning throughout the cooking process, especially with salt and pepper, to ensure a well-balanced flavor in your dish. Garnish for Freshness: Adding fresh parsley as a garnish not only adds color but also a fresh flavor that complements the creamy sauce beautifully. {{image_2}} You can make this dish heartier by adding protein. Chicken, shrimp, or tofu work well. For chicken, use cooked, diced pieces. For shrimp, add them raw to the skillet. Cook until they turn pink. If you prefer tofu, use firm tofu. Cut it into cubes, and sauté it until golden. Each option gives a unique flavor and texture. To switch things up, try different veggies or legumes. Bell peppers, zucchini, or broccoli add great taste. You can also use chickpeas or white beans for protein. They help make the dish filling while keeping it meat-free. Just sauté them with the mushrooms or add them at the end. If you need a gluten-free dish, replace the penne pasta. Use gluten-free pasta made from rice or corn. For the sauce, check if your broth and cream are gluten-free. Many brands offer gluten-free options. Always read labels to be sure. These swaps let you enjoy the dish without gluten. After you make this dish, let it cool first. Place leftovers in an airtight container. Store it in the refrigerator for up to three days. This keeps the pasta fresh and tasty. When you are ready to eat, just take it out and enjoy! You can freeze this pasta skillet for later. First, let it cool down completely. Then, transfer it to a freezer-safe container. It can last up to three months in the freezer. When you want to eat it, thaw it in the fridge overnight before reheating. To reheat, I recommend using a skillet. This way, you keep the flavors rich. Add a splash of vegetable broth or cream to help it stay creamy. Heat it over low to medium heat while stirring. You can also use a microwave, but be careful not to dry it out. Heat in short bursts, stirring in between. Enjoy your meal as if it was freshly made! Yes, you can use frozen spinach or mushrooms. Just make sure to thaw and drain them well. Frozen veggies may have more water, so adjust the broth slightly. This keeps your dish from getting too watery. You can try different cheeses like mozzarella or feta. Each cheese adds its own flavor. Goat cheese also works well for a tangy twist. Mix and match to find your favorite! To make this dish vegan, swap the heavy cream for coconut milk or cashew cream. Use nutritional yeast instead of Parmesan for a cheesy flavor. Ensure your vegetable broth is plant-based, and you’re all set! Yes, you can make this dish ahead. Cook it and let it cool before storing it in the fridge. It stays fresh for about 3 days. Reheat gently on the stove to keep it creamy and tasty. This blog post covers a creamy penne pasta recipe. We explored the ingredients, from fresh mushrooms to spinach, and went step-by-step through the cooking process. You learned how to enhance flavor and perfect your pasta. Consider variations like protein additions or gluten-free options to make this dish yours. Remember these tips for storage and reheating to enjoy it later. With a few tweaks, you can ensure this dish fits your taste and dietary needs. Happy cooking!

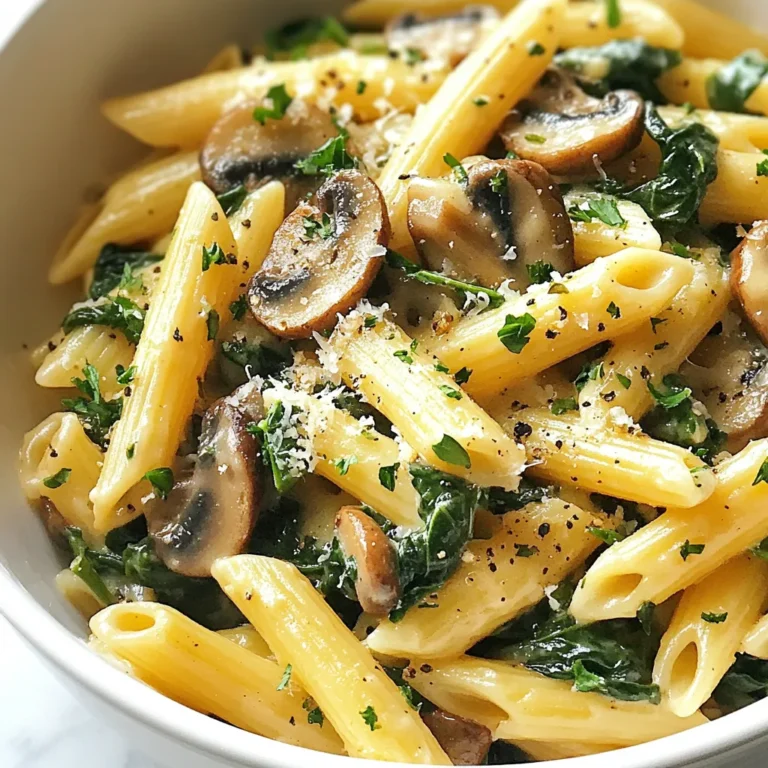
Spinach Mushroom Parmesan Pasta Skillet Delight

To create the best Nutella stuffed French toast, gather the following ingredients: - 4 slices of thick bread (brioche or challah recommended) - 1/2 cup Nutella - 2 large eggs - 1/4 cup milk - 1 teaspoon vanilla extract - 1/2 teaspoon ground cinnamon - 1 tablespoon butter (for frying) - Powdered sugar (for dusting) - Fresh strawberries or banana slices (for topping) - Maple syrup (for drizzling) Using thick bread, like brioche or challah, gives the French toast a soft and rich texture. Nutella is the star filling, adding a sweet and creamy touch. The egg mixture, made with eggs, milk, vanilla, and cinnamon, coats the bread and creates a delicious crust. You’ll want some powdered sugar to sprinkle on top for that perfect finish. Fresh fruit and maple syrup bring even more flavor and color to the dish. Enjoy crafting this delightful breakfast! {{ingredient_image_1}} - Start with two thick slices of bread. I recommend brioche or challah for the best flavor. - Spread a generous layer of Nutella on each slice. Use enough to make it rich and gooey. - Place the other two slices on top. Now you have your Nutella sandwiches ready. - In a bowl, whisk together 2 large eggs and 1/4 cup of milk. - Add 1 teaspoon of vanilla extract for a nice aroma. - Sprinkle in 1/2 teaspoon of ground cinnamon for warmth and flavor. - Mix until everything is well combined and smooth. - Preheat your skillet over medium heat. Add 1 tablespoon of butter to melt. - Dip each Nutella sandwich into the egg mixture. Make sure to coat both sides well. - Allow any excess egg mixture to drip off before frying. - Place the sandwiches in the skillet and cook for about 3-4 minutes on each side. - Look for a golden brown color and crispy edges. - When done, remove them from the skillet and place them on a plate. - Dust them with powdered sugar for a sweet finish. - Serve warm with fresh strawberries or banana slices on top, and drizzle with maple syrup. - Optimal skillet temperature: Keep your skillet at medium heat. If it’s too hot, the bread will burn. If it’s too cool, the bread will be soggy. A perfect temperature ensures a crispy outside and warm inside. - Avoiding soggy bread: When dipping the bread, do it quickly. Don’t soak the bread in the egg mixture. Let excess drip off before cooking. This keeps your French toast firm and delicious. - Suggested toppings combinations: Fresh strawberries, banana slices, and maple syrup are great. You can also try whipped cream or a sprinkle of nuts for crunch. - Spice variations: Add a pinch of nutmeg or cardamom to the egg mixture. This gives your French toast a warm, cozy flavor that pairs well with Nutella. - Ideal side dishes: Serve with crispy bacon or a fruit salad for a tasty balance. These add savory or refreshing notes. - Presentation tips: Stack your French toast high on a plate. Dust with powdered sugar for a sweet look. Add the fresh fruit on top for color. A drizzle of syrup makes it even more appealing. Pro Tips Use Stale Bread: Slightly stale bread holds up better when soaked in the egg mixture, preventing sogginess and ensuring a crispy exterior. Customize Fillings: Feel free to experiment with other spreads like peanut butter or fruit preserves alongside Nutella for a unique twist. Keep it Warm: If making multiple sandwiches, keep them warm in a low oven (200°F) while you finish cooking the rest. Perfectly Crispy: For extra crispiness, consider using a mix of butter and oil for frying, as this can help achieve a golden brown finish. {{image_2}} You can change the filling for fun. Try peanut butter and banana. Spread peanut butter on the bread, then add banana slices. This mix tastes great and adds a fruity twist. Another option is cream cheese and fruit. Use cream cheese on the bread, then top with berries. This adds a creamy and fresh flavor. Want to make it healthier? Use whole grain bread instead of white bread. Whole grain offers more fiber and nutrients. You can also swap regular syrup for sugar-free syrup. This way, you reduce sugar and still enjoy a sweet touch. If you want to mix it up, try flavored Nutella. You can find hazelnut spreads with different flavors like chocolate mint. This adds a new taste to your French toast. You can also sprinkle spices into the Nutella, like nutmeg or cinnamon. A little spice gives a warm, cozy flavor that everyone loves. To keep your Nutella stuffed French toast fresh, store it in an airtight container. Place a piece of parchment paper between each slice to prevent sticking. You can keep it in the fridge for up to three days. When you are ready to enjoy it again, reheat it in a skillet over low heat. This keeps the bread crispy and warm. You can also use a microwave, but it may make the bread soft. If you want to freeze Nutella stuffed sandwiches, wrap each one tightly in plastic wrap. Then, place them in a freezer-safe bag. They can stay frozen for up to three months. When you want to eat one, take it out and let it thaw in the fridge overnight. For the best results, reheat them in a skillet. This way, you get that nice crispy texture back. For the best French toast, I suggest using thick bread. Brioche or challah works great. Both types are soft and fluffy. They soak up the egg mixture well. This makes your toast rich and tasty. You can also try Texas toast or sourdough for a different flavor. Yes, you can easily make this recipe vegan. Use plant-based milk instead of regular milk. Almond or oat milk are good options. For eggs, use flaxseed meal or a store-bought egg replacer. Mix 1 tablespoon of flaxseed meal with 2.5 tablespoons of water. Let it sit for a few minutes until it thickens. This will work well in your egg mixture. To keep the Nutella inside, spread it evenly on the bread. Use a good amount, but not too much. Press the top slice of bread down gently. When cooking, keep the heat medium. This helps the outside cook before the inside gets too hot. Flip carefully to avoid spills. Yes, you can prepare this ahead of time. Make the Nutella sandwiches and store them in the fridge. Keep them in an airtight container. When ready, you can dip and cook them in the skillet. This is a great option for a quick breakfast on busy mornings. Making Nutella French toast is simple and fun. You start with thick bread and delicious Nutella. I shared the steps to prepare, dip, and fry the sandwiches. You learned tips on cooking, flavoring, and serving. There are many tasty variations and even ways to store leftovers. This dish is easy to make and loved by all. Enjoy every bite with your favorite toppings. Keep exploring new ideas and enjoy your cooking journey!

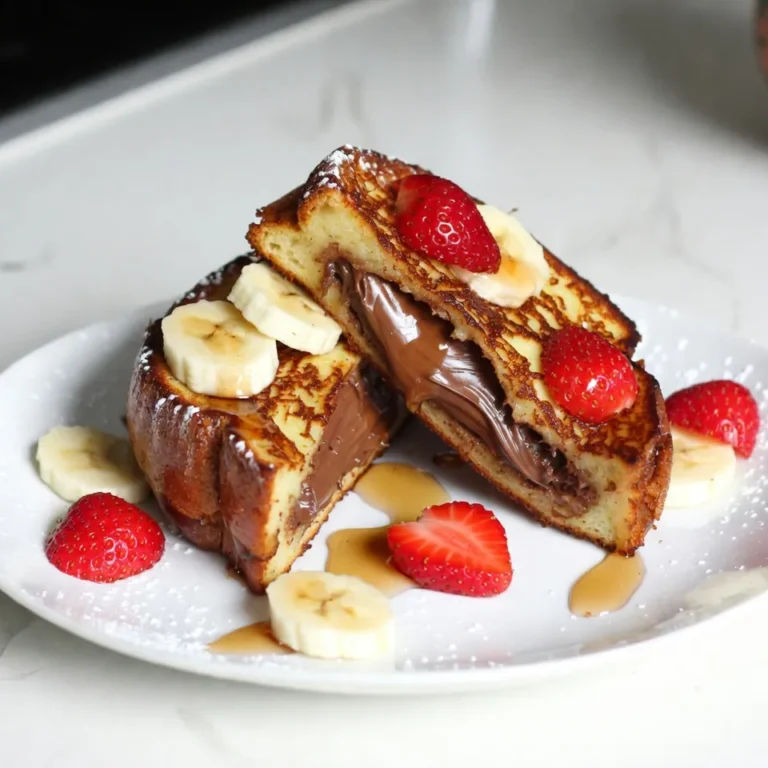
Nutella Stuffed French Toast Easy and Delicious Recipe

First, gather your fresh raspberries and passionfruits. In a blender, add: - 1 cup fresh raspberries - 2 ripe passionfruits, pulp scooped out - 3 tablespoons agave syrup - 1 tablespoon fresh lime juice - 1 teaspoon vanilla extract Blend everything until it is smooth. Next, strain the mixture through a fine sieve into a bowl. Use a spatula to press down on the mixture. This helps you get more juice while leaving behind the seeds. Now, take your strained raspberry-passionfruit mixture. In a large pitcher, combine it with: - 1 cup fresh orange juice Stir the mixture well to blend the flavors together. This step brings out the bright taste of the fruits. To serve, fill each glass with ice cubes. Then, pour the fruit mixture into the glasses until they are three-quarters full. Top each glass with: - 1 ½ cups sparkling water Gently stir to mix. Finally, garnish each drink with fresh mint leaves and a few whole raspberries. This adds a nice touch and makes the drink look vibrant. Enjoy your refreshing Raspberry Passionfruit Tequila Sour! To make a smooth Raspberry Passionfruit Tequila Sour, strain the mixture well. Use a fine sieve and press down with a spatula. This helps remove the seeds and pulp. You want only the juice. For sweetness, taste as you mix. If it’s too sweet, add a bit more lime juice. This balances the flavors nicely. Garnishing adds flair to your drink. Use fresh mint leaves to top each glass. You can also add a few whole raspberries for color. For a fun twist, place a slice of lime on the rim. This makes your drink look appealing and fresh. You can even float some passionfruit pulp on top for extra style. Choose tall glasses for serving your cocktail. They show off the vibrant colors well. This drink is perfect for parties or summer gatherings. Serve it during brunch or a festive evening with friends. The bright flavors will impress everyone. Enjoy the cheers as you share this simple delight! Pro Tips Fresh Ingredients: Use fresh raspberries and passionfruits for the best flavor. Frozen fruits can be used, but fresh will give a brighter taste and color. Adjust Sweetness: Taste the mixture before serving and adjust the agave syrup according to your sweetness preference. Some may prefer it less sweet depending on the fruit's natural sweetness. Chill Your Glasses: For an extra refreshing drink, chill your glasses in the freezer for about 10 minutes before serving. This keeps your drink colder for longer. Garnish Creatively: Get creative with your garnishes! Adding a slice of lime or a twist of orange peel can enhance the presentation and add an extra hint of flavor. {{image_2}} You can change up the fruit in this drink. Try using strawberries, blueberries, or even citrus fruits like lime or lemon. Each fruit adds a unique taste. For sweeteners, consider honey or maple syrup. These will change the flavor profile nicely. You can make this drink without tequila for a non-alcoholic version. Replace the tequila with soda or tonic water. This keeps the drink refreshing and fun. You can also try other spirits. Vodka or rum can create a different yet tasty drink. Adjust your ingredients based on the season. In summer, use fresh peaches or berries. In fall, try apples or pears. Adding spices like cinnamon or nutmeg can give your drink a warm twist. Fresh herbs like basil or rosemary also add an exciting flavor. To store leftovers of your Raspberry Passionfruit Tequila Sour, follow these steps: - Pour the leftover cocktail into an airtight container. - Keep it in the fridge. This keeps it fresh and tasty. - Consume within 2 days for best flavor. The main ingredients have different shelf lives: - Fresh raspberries last up to 3 days. - Passionfruit stays good for about 1 week if stored properly. - Agave syrup can last for months if sealed well. - Fresh lime and orange juice should be used within 3 days. You can prepare parts of this cocktail ahead of time. Here’s how: - Blend the fruit mixture and store it in the fridge for up to 2 days. - Mix the fruit blend with orange juice just before serving to keep it fresh. - For a party, double the recipe. This way, you have enough for everyone. Adjusting serving sizes is easy: - If you need 8 servings, simply double all the ingredients. - Use a large pitcher to hold the mix. This makes serving easier. With these tips, you can enjoy this delightful drink anytime! Yes, you can use frozen raspberries for this drink. However, the texture changes. Frozen raspberries may make the drink a bit thicker. The taste will still be fruity and sweet. Just blend them well, and strain as usual. If you use frozen fruit, the drink may be colder. This can be nice on a hot day! When choosing tequila, go for 100% agave. This type has a pure flavor and mixes well. I recommend brands like Patron, Espolon, or Don Julio. These brands taste great and add depth to your drink. Using a good quality tequila makes your cocktail better! Yes, you can skip agave syrup. You might try honey or simple syrup as a sweetener. Maple syrup also works well if you want a different flavor. Adjust the amount to your taste. Start with a little, then add more if needed. This blog post showed you how to make a refreshing cocktail using fresh ingredients. We discussed selecting fruits, mixing flavors, and serving tips to enhance presentation. Remember, you can tweak recipes by adding different fruits or sweeteners. Try to be creative with your drinks, and don’t hesitate to adjust ingredients based on the season. With these steps and tips, you're ready to impress friends with your cocktail skills! Enjoy your drink and feel proud of your mixology creations!

Raspberry Passionfruit Tequila Sour Simple Delight

- 1 can (15 oz) black beans, rinsed and drained - 1 cup corn kernels (fresh or frozen, thawed) - 1 red bell pepper, finely diced - 1/2 red onion, finely chopped - 1 jalapeño pepper, deseeded and minced (adjust for spice preference) - 1/4 cup fresh cilantro, chopped - 2 tablespoons lime juice - 2 tablespoons olive oil - 1 teaspoon cumin - 1 teaspoon chili powder - Salt and pepper to taste - Optional: 1 avocado, diced for creaminess You can add more flavor with these ingredients: - Diced tomatoes for extra juiciness - Corn chips for crunch - Cheese, like feta or queso fresco, for creaminess - A dash of hot sauce for heat Black beans are high in protein and fiber. They help keep you full. Corn adds sweetness and is a good source of carbs. Red bell peppers give vitamin C and a nice crunch. Jalapeños add spice and flavor. The olive oil provides healthy fats. Lime juice gives a fresh taste and vitamin C. Cumin and chili powder add depth and warmth to the salad. If you add avocado, it will bring healthy fats and a creamy texture. {{ingredient_image_1}} Start by gathering your ingredients. You will need black beans, corn, red bell pepper, red onion, jalapeño, and cilantro. 1. Rinse and drain the black beans. This step removes excess sodium and makes them taste fresh. 2. Thaw the corn if you use frozen. Fresh corn is great, too. 3. Dice the red bell pepper finely. This adds color and crunch. 4. Chop the red onion into small pieces. It gives a nice flavor kick. 5. Deseed and mince the jalapeño. Adjust it based on how spicy you want the salad. 6. Chop the cilantro. It brings a bright taste to the dish. Now, let’s make the dressing. It’s simple and tasty. 1. In a small bowl, whisk together the lime juice and olive oil. 2. Add cumin and chili powder. These spices give the salad a zesty flavor. 3. Season with salt and pepper. Taste it to check if it’s just right. Now it’s time to mix everything together. 1. In a large mixing bowl, combine the black beans, corn, bell pepper, onion, jalapeño, and cilantro. 2. Pour the dressing over the salad mixture. 3. Gently toss everything together. Make sure everything is coated well. 4. If you want, fold in diced avocado for some creaminess. Be careful not to mash it. 5. Taste the salad. You can add more salt, pepper, or lime juice if needed. 6. Cover the bowl and place it in the fridge for at least 30 minutes. This allows the flavors to mix and become even better. Now you have a fresh and zesty black bean corn salad ready to enjoy! You can control the heat in your salad. If you prefer less spice, skip the jalapeño or use just a little. For more heat, add more jalapeño or even a dash of hot sauce. Taste as you go. This way, you get the flavor you love. Chilling your salad is key. It helps the flavors mix and taste better. I suggest letting it chill for at least 30 minutes. If you have time, chill it longer. This makes the salad fresh and zesty when you serve it. Presentation makes a difference. Serve your salad in a bright bowl to catch the eye. Garnish with cilantro sprigs and lime wedges for color. You can also add a crunch by topping with tortilla chips right before serving. This makes it fun and tasty! Pro Tips Use Fresh Ingredients: Whenever possible, opt for fresh corn and vegetables for a vibrant flavor and texture. Adjust Spice Levels: If you're sensitive to spice, make sure to remove all seeds from the jalapeño or use a milder pepper. Chill for Flavor: Allow the salad to chill in the refrigerator for at least 30 minutes to enhance the flavors. Customize with Add-ins: Feel free to add other ingredients like diced tomatoes or cheese to personalize your salad. {{image_2}} You can boost this salad with protein. Grilled chicken adds a nice flavor. Cooked quinoa is a great option, too. It’s light and adds fiber. If you're vegan or vegetarian, try tofu. Just cube it and toss it in. This makes the salad more filling and nutritious. Plus, it’s easy to mix and match proteins based on what you like. Want to switch up the flavor? Use citrus! Lemon or orange juice can replace lime juice. It gives a fresh and bright taste. You can also play with herbs. Swap cilantro for parsley or basil. Each herb adds its unique flair. Experimenting with flavors is fun and lets you create a dish that fits your taste. Seasonal ingredients can change your salad's vibe. In summer, add diced tomatoes for juiciness. In fall, swap corn for roasted sweet potatoes. You can even throw in some diced apples for crunch. These changes keep the salad exciting year-round. Plus, using seasonal ingredients is often fresher and tastier. Enjoy the creativity! To keep your Zesty Black Bean Corn Salad fresh, store it in an airtight container. This step prevents air and moisture from ruining the flavors. Make sure to seal the container tightly. If you have any leftover dressing, keep it in a separate small jar. This way, you can dress the salad just before serving. Your salad will stay fresh in the fridge for about 3 to 5 days. However, the flavors will change over time. The salad may become soggy after a couple of days, especially if the avocado is in it. If you want the best taste, eat it within the first two days. I do not recommend freezing this salad. The texture of the beans and corn can change when frozen. Fresh ingredients like bell peppers and cilantro do not hold up well in the freezer either. If you want to make it ahead, prepare the salad without dressing. Store it in the fridge and add the dressing when you're ready to eat. This keeps everything fresh and crunchy. You can use pinto beans or kidney beans instead of black beans. Both have a similar texture. Chickpeas are another great option. They add a nice bite and flavor. You could even use lentils for a different twist. Just make sure to rinse and drain them well. To add heat, use more jalapeño peppers. You can also add diced serrano peppers for a kick. If you like it really spicy, try a dash of hot sauce. Another option is to sprinkle in some cayenne pepper. Taste as you go to find the perfect level for you. Yes, you can make this salad ahead. It tastes even better after chilling in the fridge. Just cover it and let it sit for at least 30 minutes. If you add avocado, do this right before serving. This keeps it fresh and green, not brown. This blog post shared key ingredients, clear steps, and helpful tips for your salad. We discussed how to adjust spice levels, chill for best taste, and serve with flair. You learned about tasty variations and smart storage methods to keep your salad fresh. Keep these tips in mind for great results every time. Now, you have everything you need to make a delicious salad that suits your taste. Enjoy your cooking and impress your friends with your skills!

Zesty Black Bean Corn Salad Fresh and Flavorful Dish

PREV 1 … 80 81 82 … 86 NEXT
spicy fork kitchen

explore

DessertsDinnerAppetizersDrinks

Our Policies

  • Cookie Policy
  • Copyright Policy
  • Disclaimer
  • GDPR Policy
  • Terms Of Use
Back to Top
  • About
  • Contact Us
  • Privacy Policy
© 2025 spicy fork kitchen