FREE DINNER EBOOK! Get your copy!
  • Cookie Policy
  • GDPR Policy
  • Disclaimer
  • Terms Of Use
  • Visit my other site: Fun Cookie Recipes
spicy fork kitchen
  • Home
  • Dinner
  • Desserts
  • Drinks
  • Appetizers
  • Contact
  • About
  • Privacy Policy
  • Home
  • Dinner
  • Desserts
  • Drinks
  • Appetizers
  • Contact
  • About
  • Privacy Policy
  • Cookie Policy
  • GDPR Policy
  • Disclaimer
  • Terms Of Use
Visit my other site: Fun Cookie Recipes

HOME / CATEGORIES /

Latest

For a great Instant Pot beef stew, you need key ingredients. Here’s what you will need: - 2 lbs beef chuck, cut into 1-inch cubes - 2 tablespoons olive oil - 1 onion, chopped - 3 cloves garlic, minced - 4 carrots, sliced - 3 potatoes, diced - 1 cup green peas (fresh or frozen) - 4 cups beef broth - 2 tablespoons tomato paste - 1 teaspoon dried thyme - 1 teaspoon dried rosemary - 1 bay leaf - Salt and pepper to taste - 2 tablespoons cornstarch (optional, for thickening) - Fresh parsley, chopped (for garnish) To boost flavor, consider adding a splash of red wine or a pinch of smoked paprika. These small tweaks can elevate your stew. When picking ingredients, go for fresh, vibrant veggies. Look for firm potatoes and bright green peas. For the beef, choose well-marbled chuck. This cut gives the stew great flavor and tenderness. Chop your veggies to similar sizes for even cooking. This helps every bite taste balanced. Wash all produce well. Freshness really shines in this comforting dish. {{ingredient_image_1}} Start by preparing your ingredients. First, cut the beef chuck into 1-inch cubes. This size helps the beef cook evenly. Next, chop the onion and mince the garlic. You will also slice the carrots and dice the potatoes. Now, heat the Instant Pot. Set it to the sauté function and add two tablespoons of olive oil. When the oil is hot, add the beef cubes in batches. Browning the beef adds deep flavor. Cook each batch for about four to five minutes until browned all over. Remove the beef and set it aside on a plate. In the same pot, add the chopped onion. Sauté for three minutes until it turns translucent. Then, stir in the minced garlic and cook for one more minute. This step builds a great base for your stew's flavor. After cooking the aromatics, it’s time to add the vegetables. Add the sliced carrots and diced potatoes into the pot. Stir to mix them with the onions and garlic. Now, return the browned beef to the pot. Pour in four cups of beef broth. Add two tablespoons of tomato paste, one teaspoon of dried thyme, one teaspoon of dried rosemary, and one bay leaf. Season with salt and pepper to taste. Seal the Instant Pot lid and set the vent to sealing. Cook on high pressure for thirty-five minutes. Once the time is up, let the pressure release naturally for about ten minutes. After that, perform a quick release for any remaining pressure. If you want a thicker stew, this is the time to thicken it. In a small bowl, mix two tablespoons of cornstarch with two tablespoons of cold water to create a slurry. Open the pot and stir in the slurry. Switch to sauté mode for a few minutes until the stew thickens to your liking. Finally, stir in one cup of green peas. Let them heat through for two to three minutes before serving. Before you serve, remember to remove the bay leaf. Ladle the beef stew into bowls and garnish with fresh parsley. Enjoy your delicious, homemade beef stew! When making beef stew in an Instant Pot, avoid these common mistakes: - Don't skip browning the beef. This adds rich flavor. - Use the right cut. Beef chuck works best; it becomes tender. - Don't overfill the pot. Leave space for pressure to build. For cooking times, follow these guidelines for different cuts of beef: - Beef chuck: 35 minutes on high pressure. - Brisket: 45 minutes for a tender finish. - Round: 30 minutes works well but can be tougher. Using frozen vegetables can save time. However, fresh veggies offer better flavor. If using frozen peas, add them at the end. They only need a few minutes to heat through. Prep can make your cooking easier. Here’s how to do it: - Chop onions, carrots, and potatoes a day ahead. Store them in the fridge. - Measure out spices and broth. This speeds up cooking time. Batch cooking is smart. Make a large pot of stew. You can freeze leftovers for future meals. Just make sure to cool it first before packing. Herbs and spices can elevate your stew. Here’s how to use them: - Add dried thyme and rosemary early in the cooking. This builds depth. - Fresh herbs, like parsley, should be added just before serving. If you don’t have cornstarch for thickening, use these alternatives: - Flour can work well. Mix it with water to create a slurry. - Mashed potatoes or pureed beans can also thicken the stew nicely. Pro Tips Brown the Beef Well: Ensuring you brown the beef cubes thoroughly before pressure cooking will enhance the flavor of the stew significantly. Season Gradually: Taste your stew before serving and adjust the seasoning if needed. Flavors can develop during cooking, so it's best to season towards the end. Use High-Quality Broth: A good quality beef broth will elevate the taste of your stew. Consider using homemade broth for the best results. Let it Rest: If you have time, let the stew rest for a while after cooking. It allows the flavors to meld together even more. {{image_2}} You can easily make beef stew fit your diet. For a low-carb option, swap potatoes for cauliflower. This change keeps the stew hearty without the carbs. You can also use zucchini or turnips for added texture and flavor. For a gluten-free version, check your beef broth for any gluten ingredients. Most brands are safe, but it's good to check. Feel free to add other vegetables too! Consider bell peppers, green beans, or mushrooms. Each adds a unique taste and texture. If you're feeling adventurous, try different proteins like chicken or pork. They cook well in the Instant Pot and absorb flavors nicely. Spice can transform your beef stew into a global dish. For a Mexican flair, add chili powder, cumin, and fresh cilantro. This will give your stew a warm, spicy kick. For an Italian twist, use oregano and basil. A splash of red wine can add depth. If you want a taste of the East, add ginger and soy sauce for an Asian-inspired stew. You can also use coconut milk for a creamy texture. Each of these spice combinations brings a new life to your beef stew. Making a plant-based stew is simple and delicious. Start with mushrooms as your base. They offer a rich, meaty flavor. Use vegetable broth instead of beef broth. Swap the beef for hearty beans or lentils for protein. You can still add all the same vegetables for flavor. Carrots, peas, and potatoes work great. Use the same herbs like thyme and rosemary. This keeps the comforting taste of stew without meat. Enjoy the same warm, hearty feel with a plant-based touch! To store beef stew, let it cool first. Use airtight containers to keep it fresh. Place the stew in the fridge within two hours of cooking. Beef stew will last for about 3 to 4 days in the fridge. When reheating, warm it gently on the stove or in the microwave. Stir it well to ensure even heating. Always check that it’s hot throughout before serving. Freezing beef stew is easy and a great way to save leftovers. Start by letting the stew cool completely. Then, use freezer-safe containers or bags. Leave some space at the top for expansion. Label them with the date. Beef stew can be frozen for up to 3 months. To thaw, move it to the fridge overnight. Reheat it on the stove or in the microwave. Stir it well during reheating to avoid hot spots. Beef stew is perfect for meal prep. You can use it for lunches or dinners throughout the week. Divide the stew into single-serving containers. This helps with portion control. You can also pair it with rice or bread for a complete meal. For best results, store the stew in glass containers. They are durable and microwave-safe. This way, you can enjoy tasty beef stew any time! How do I know when the beef is tender? You will know the beef is tender when it easily pulls apart with a fork. After cooking for 35 minutes in the Instant Pot, let it rest. A fork should glide through the meat without much effort. If it feels tough, it may need more time. Can I use a different type of meat? Yes, you can use other meats like chicken or pork. Just adjust the cooking times. Chicken thighs cook faster than beef, so reduce the time to about 15 minutes. What can I serve with beef stew? Beef stew pairs well with bread, rice, or mashed potatoes. You can also serve it with a fresh salad. A crusty loaf is great for soaking up the sauce. What should I do if the Instant Pot doesn’t come to pressure? Check the vent to ensure it’s set to sealing. Make sure the lid is on correctly. If it still doesn’t pressurize, check for any food blocking the sealing ring. How can I adjust cooking times for larger portions? For larger portions, you should not change the cooking time much. The Instant Pot adjusts for volume. However, make sure to add enough liquid. Always ensure the pot is not overfilled. Health benefits of the ingredients used Beef provides protein, iron, and zinc. Carrots and potatoes add fiber and vitamins. Peas are rich in protein and antioxidants. Olive oil offers healthy fats. Nutritional breakdown per serving Each serving of beef stew has about 350 calories. It contains 20 grams of protein, 15 grams of fat, and 30 grams of carbs. These values may vary based on portion sizes. This blog post covered all you need for making beef stew in an Instant Pot. You learned about essential ingredients, step-by-step cooking, and handy tips. We discussed recipe variations, storage methods, and common questions. Using these insights, you can create a delicious stew that's easy and quick. Remember, the right ingredients and techniques can make a great meal. Now, grab your Instant Pot and start cooking! Enjoy sharing your stew with friends and family.

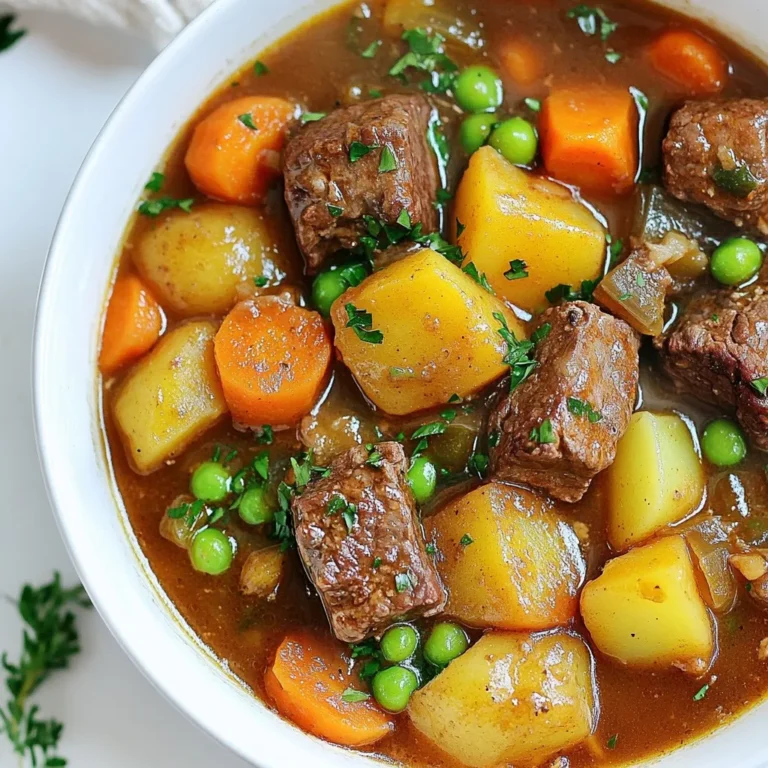
Instant Pot Beef Stew Savory and Simple Comfort Food

- 2 lbs boneless, skinless chicken thighs, cut into chunks - 4 medium carrots, sliced - 3 medium potatoes, diced - 1 onion, chopped - 3 cloves garlic, minced - 2 cups chicken broth - 1 teaspoon dried thyme - 1 teaspoon dried rosemary - 1 teaspoon paprika - Salt and pepper - 1 tablespoon cornstarch (for thickening) - Fresh parsley, chopped (for garnish) When I think about cozy meals, chicken stew comes to mind. It's warm, hearty, and easy to make. This dish uses simple, fresh ingredients that you can find in any kitchen. First, you will need chicken thighs. I prefer these because they stay juicy during cooking. You can cut them into bite-sized pieces. Next, grab some carrots, potatoes, onions, and garlic. These veggies add great flavor and texture. For the broth, I use chicken broth. It gives the stew a nice base. Then, I add thyme, rosemary, and paprika for flavor. You can adjust the salt and pepper to match your taste. If you want a thicker stew, cornstarch works well. Just mix it with water before adding it to the pot. Finally, I like to sprinkle fresh parsley on top before serving. It adds color and freshness to the dish. This stew is not just filling; it’s also a great way to enjoy nutritious ingredients. You can serve it with crusty bread for a complete meal. {{ingredient_image_1}} - Sautéing onions and garlic Start by heating 2 tablespoons of olive oil in a skillet over medium heat. Add 1 chopped onion and 3 minced garlic cloves to the pan. Cook them for about 3-4 minutes. You want them soft and fragrant. - Chopping chicken and vegetables While the onions and garlic cook, chop 2 lbs of boneless, skinless chicken thighs into chunks. Slice 4 medium carrots and dice 3 medium potatoes. Keep them all ready for the slow cooker. - Adding ingredients to the slow cooker Now, take a slow cooker and add the chicken chunks, sliced carrots, diced potatoes, and your sautéed onion and garlic mix. This combination will create a rich base for your stew. - Pouring in the broth and seasonings Pour in 2 cups of chicken broth. Then, add 1 teaspoon of dried thyme, 1 teaspoon of dried rosemary, and 1 teaspoon of paprika. Don’t forget to add salt and pepper to taste. Stir everything together so all ingredients mix well. - Adding frozen peas About 30 minutes before you plan to serve the stew, add 1 cup of frozen peas to the slow cooker. They will add a nice splash of color and sweetness to your dish. - Thickening the stew with cornstarch If you want a thicker stew, mix 1 tablespoon of cornstarch with a little water to make a slurry. Stir this into the stew during the last 30 minutes. This will give your stew a lovely, hearty texture. Ladle the finished stew into bowls and enjoy every warm, comforting bite! To make the best slow cooker chicken stew, follow these tips: - Choose the right cut of chicken. I like boneless, skinless thighs. They stay moist and tender. - Sear the chicken first. Brown it in a skillet. This adds flavor to your stew. - Layer ingredients wisely. Place root vegetables on the bottom for even cooking. - Keep the lid on. Opening the lid lets heat escape, slowing down cooking time. - Cook low and slow. This helps flavors meld together and keeps meat tender. To avoid mushy vegetables: - Cut veggies evenly. This helps them cook at the same rate. - Add delicate vegetables later. For example, toss in frozen peas during the last 30 minutes. - Avoid overcooking. Check the stew in the last hour. To boost flavor in your stew, consider these spices: - Dried thyme brings a warm, earthy note. - Rosemary adds pine-like flavors that complement chicken well. - Paprika gives a nice color and a bit of warmth. Adjusting seasoning is easy. Start with salt and pepper. After cooking, taste your stew. If it needs more, add gradually. You can also add a splash of lemon juice for brightness. For a lovely presentation, ladle the stew into deep bowls. Garnish with fresh parsley for a pop of color. Serve it with crusty bread on the side. The bread is perfect for dipping! Consider pairing your stew with: - A simple green salad. It adds freshness. - Crusty rolls or biscuits. They soak up broth nicely. - A side of roasted vegetables. They add texture and flavor. Pro Tips Brown the Chicken: For added depth of flavor, consider browning the chicken thighs in the skillet before adding them to the slow cooker. Customize Your Veggies: Feel free to swap in your favorite vegetables like green beans or bell peppers for a different twist on the stew. Herb Freshness: For a fresher taste, use fresh herbs instead of dried ones. Just increase the quantity accordingly. Make Ahead: This stew can be made ahead of time and stored in the refrigerator. It tastes even better the next day! {{image_2}} You can change up your slow cooker chicken stew using different proteins. Instead of chicken thighs, try chicken breast for a leaner option. Turkey works well too if you want a different taste. For veggies, you can swap in sweet potatoes for a sweet flavor. Parsnips add a nice touch too. Just keep in mind that different vegetables will change the taste and texture. Want to spice things up? Add some cayenne or crushed red pepper for a kick. You can also try adding some cumin or coriander for a warm flavor. If you like creamy stews, stir in some heavy cream or coconut milk. This will give your stew a rich and smooth texture. You can also sprinkle in some cheese for extra flavor. You can cook this stew on the stovetop if you are short on time. Just simmer on low heat until the chicken is tender. It will take about 1.5 to 2 hours. If you own an Instant Pot, you can make this stew faster. Use the sauté function for your onions and garlic. After that, add the other ingredients. Cook on high pressure for about 15 minutes. Be sure to release the pressure slowly for best results. To keep your chicken stew fresh, store it in an airtight container. Place it in the fridge. It can last for about three to four days. Make sure to let it cool before sealing the container. This helps to avoid steam buildup, which can make it soggy. If you want to save it for longer, freezing is a great option. Ladle the stew into freezer-safe bags or containers. Leave some space at the top for expansion. It will stay good for up to three months in the freezer. Remember to label each bag with the date. When it’s time to enjoy leftovers, you can reheat your stew in several ways. The best method is on the stove. Pour the stew into a pot and heat it over medium heat. Stir it often until it’s hot. This keeps the texture nice and smooth. You can also use the microwave. Place the stew in a microwave-safe bowl. Cover it loosely to avoid splatters and heat it in short bursts. Stir in between to ensure even heating. To keep the flavor and texture intact, avoid boiling the stew. Heat it gently just until warm. If the stew seems thick, add a splash of chicken broth or water to loosen it up. Enjoy! Cooking slow cooker chicken stew takes about 6 to 8 hours on low. If you are in a hurry, you can cook it on high for 3 to 4 hours. The low setting gives the chicken time to absorb flavors and become very tender. This long cook time allows the veggies to soften perfectly too. Yes, you can use frozen chicken thighs. Just add them directly to the slow cooker. You may need to increase the cooking time by about an hour. Be sure to check that the chicken reaches 165°F for safety. Frozen chicken works well in stews since it cooks slowly and stays juicy. Slow cooker chicken stew pairs well with crusty bread. This bread is great for dipping into the stew. You can also serve it with a fresh salad for a light side. If you want something warm, add rice or mashed potatoes. These sides soak up the rich flavors of the stew nicely. In this blog post, we explored a simple slow cooker chicken stew. We covered essential ingredients, like chicken, vegetables, and spices. I walked you through step-by-step instructions and offered tips for perfecting the dish. You learned variations and storage tips to keep your stew fresh. Remember, cooking should be enjoyable. Experiment with flavors and make this recipe your own. Happy cooking!

Slow Cooker Chicken Stew Hearty and Filling Meal

- 1 pound ground beef - 2 cups elbow macaroni - 4 cups beef broth - 1 small onion, diced - 3 cloves garlic, minced - 2 teaspoons Worcestershire sauce - 1 cup shredded cheddar cheese - 1/2 cup sour cream - Fresh parsley, chopped for garnish Homemade One-Pot Hamburger Helper starts with simple, fresh ingredients. The main star is ground beef, which gives the dish its savory flavor. I choose 80/20 beef for the right mix of fat and meat. This balance makes the dish juicy and delicious. Next, I add elbow macaroni. It cooks perfectly in the broth, soaking up all the flavor. The beef broth adds depth and richness. It is the base for the entire meal. To boost the flavor, I use a small onion and garlic. Diced onion adds sweetness and makes the dish aromatic. Minced garlic gives it a punch. Together, they create a savory base. Worcestershire sauce adds a unique tang. Just two teaspoons bring a lot of flavor. I also use diced tomatoes for freshness. They add a nice texture and a bit of acidity. For the creamy finish, I mix in shredded cheddar cheese and sour cream. The cheese melts into the dish, making it gooey. Sour cream adds a rich, tangy taste. Finally, I garnish with fresh parsley for a pop of color and freshness. Each ingredient plays a role in making this meal satisfying and tasty. {{ingredient_image_1}} Start by warming a large pot or Dutch oven over medium heat. Add 1 pound of ground beef, along with 1 small diced onion and 3 minced garlic cloves. Cook this mix until the beef is brown and the onion is clear. This should take about 5 to 7 minutes. Once the meat is cooked, drain any extra fat from the pot. This step keeps your dish from being greasy and helps the flavors shine. Now it's time to add the fun stuff. Toss in 2 cups of elbow macaroni, 4 cups of beef broth, and 1 cup of diced tomatoes. You can use either canned or fresh tomatoes, depending on what you have. Also, add in 2 teaspoons of Worcestershire sauce, 1 teaspoon of smoked paprika, and 1/2 teaspoon of black pepper. Stir everything well to mix all the flavors. Bring this mixture to a boil, then lower the heat. Cover the pot and let it simmer. This should take about 12 to 15 minutes. Stir occasionally to make sure the pasta cooks evenly. The macaroni should be tender and most of the liquid should be gone when you finish. Once the macaroni is ready, take the pot off the heat. Stir in 1 cup of shredded cheddar cheese and 1/2 cup of sour cream. This will make the dish creamy and cheesy. Mix until everything melts together. For a nice touch, sprinkle fresh chopped parsley on top before serving. This adds color and flavor. Serve this dish in bowls and feel free to add extra cheese on top. Garlic bread makes a great side to complete your meal. Best practices for browning beef To get the best flavor, use medium heat. Cook the ground beef in a large pot or Dutch oven. Break it up as it cooks. This helps it brown evenly. Stir in diced onion and minced garlic. Cook until the beef is brown and onions are soft. This usually takes about 5 to 7 minutes. If there is extra fat, drain it. This keeps the dish from being greasy. Tips for cooking macaroni perfectly Cook the elbow macaroni in the same pot as the other ingredients. This adds flavor and saves time. Stir the mixture often while it cooks. This helps the pasta cook evenly. Simmer until the macaroni is tender. It should absorb most of the liquid. Spice variations for extra zest You can easily change the flavor by adding spices. For a kick, try red pepper flakes or cayenne. For a smoky taste, add more smoked paprika. Experiment with Italian herbs like oregano or basil for a different twist. Using fresh versus canned tomatoes Fresh tomatoes add a bright flavor. If using fresh, chop them into small pieces. Canned tomatoes are great for convenience. They are easy to use and still tasty. Choose diced tomatoes for this recipe for a nice texture. Presentation tips for a beautiful dish Serve the Hamburger Helper in individual bowls. This makes it look special. Top each bowl with extra shredded cheese. A sprinkle of fresh parsley adds color and freshness. Complementary side dishes A side of garlic bread pairs well with this dish. It’s easy to make and adds a nice crunch. You can also serve a simple salad. A fresh salad helps balance the meal with some crunch and nutrients. Pro Tips Cook the Beef Thoroughly: Ensure that the ground beef is cooked all the way through to enhance flavor and texture in your dish. Cheese Variety: Experiment with different types of cheese, such as Monterey Jack or Gouda, for a unique flavor twist. Adjust Seasoning: Taste your dish before serving and adjust the seasoning as needed to suit your preferences. Make it Ahead: This dish can be made ahead of time and reheated, making it a great option for meal prep or busy weeknights. {{image_2}} You can change the protein in this dish easily. Ground turkey or chicken makes a great swap. They give you a leaner option without losing flavor. If you prefer plant-based meals, try using plant-based meat. It cooks just like ground beef and tastes great in this recipe. If you want to switch up the pasta, you can use different types. Any short pasta works well, like penne or shells. For those who need dairy-free options, look for dairy-free cheese or sour cream. These substitutes melt well and keep the dish creamy. To change the taste, try adding Italian spices. Oregano, basil, or even a hint of crushed red pepper can boost the flavor. For a Tex-Mex twist, add chili powder or cumin. This gives your meal a fun kick. You can even mix in some black beans for extra texture! To store leftovers, let the dish cool first. Then, place it in an airtight container. This way, you keep the flavors fresh. You can store it in the fridge for up to three days. If you notice any change in smell or color, it’s best to toss it out. For freezing portions, use freezer-safe containers. Let the dish cool completely before packing it. You can freeze it for up to three months. When you’re ready to eat, move it to the fridge for a night to defrost. For quicker defrosting, place the container under cold water. To reheat without drying out, use the stovetop on low heat. Add a splash of beef broth or water to keep it moist. Stir often to heat evenly. You can also use the microwave. Cover it with a lid or a damp paper towel. Heat in short intervals, stirring in between. This keeps the dish creamy and delicious. This dish takes about 30 minutes to make. You need 10 minutes for prep and 20 minutes for cooking. 1. Prep Time: 10 minutes 2. Cook Time: 20 minutes You’ll find it’s quick and easy. The whole family can enjoy it in no time! Yes, you can easily make this dish gluten-free. Use gluten-free elbow macaroni instead of regular pasta. Some brands offer great options. Look for rice or quinoa-based pasta. These choices work well and taste good. Adding vegetables is a great way to boost nutrition. Here are some ideas: - Spinach: Stir in fresh spinach towards the end of cooking. - Bell Peppers: Dice and sauté them with the beef. - Zucchini: Grate or chop and add to the pot. You can also swap out the beef. Try ground turkey or plant-based meat for variety. These swaps help make the meal lighter and healthier. In this blog post, we explored a delicious homemade Hamburger Helper recipe. We covered key ingredients like ground beef, pasta, and beef broth. We also shared cooking steps, tips for taste, and creative variations. Remember, you can customize this dish to match your diet or flavor needs. Enjoy making this comforting meal at home. It’s simple, tasty, and will impress your family or friends. Happy cooking!

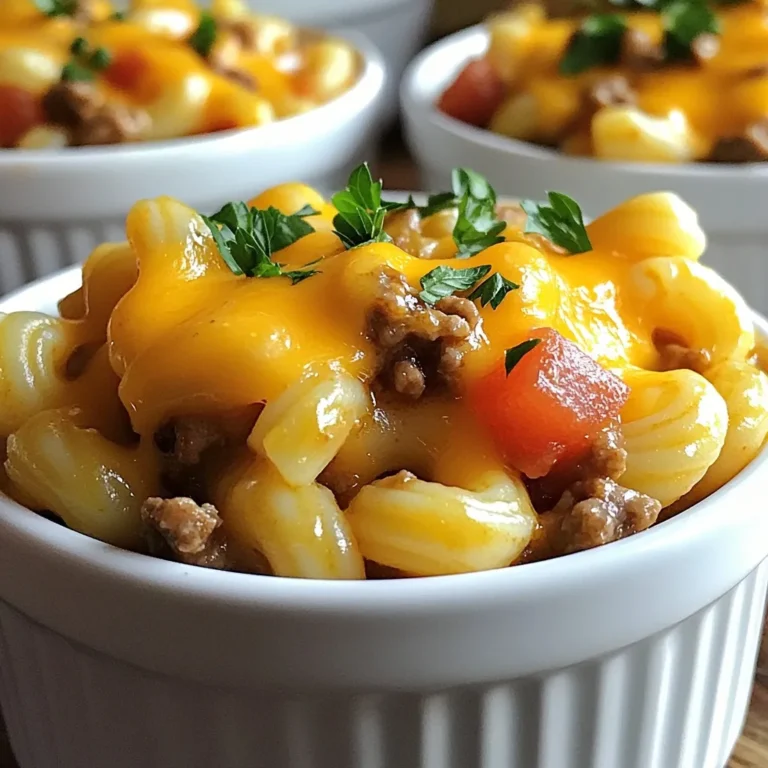
Homemade One-Pot Hamburger Helper Tasty Family Meal

- 8 cups apple cider - 2 apples, sliced (any variety) - 1 orange, sliced - 4 cinnamon sticks - 1 teaspoon whole cloves - 1 teaspoon allspice berries - 1 teaspoon grated nutmeg - 1/4 cup brown sugar (adjust to taste) - 1 tablespoon vanilla extract (optional) You can add extra flavors to your cider. Consider using: - Star anise for a warm, sweet taste. - Ginger slices for a spicy kick. - Cranberries for a tart touch. These options can make your cider even more special and unique. For the best flavor, use fresh spices. If you prefer a sweeter cider, add more brown sugar. Start with a little, then taste. Adjust to your liking! If you want a stronger spice flavor, increase the cloves and allspice to 1.5 teaspoons. The blend of flavors is up to you. Enjoy making it your own! {{ingredient_image_1}} To start, gather your ingredients for the spiced slow-cooker apple cider. You will need: - 8 cups apple cider - 2 apples, sliced (any variety) - 1 orange, sliced - 4 cinnamon sticks - 1 teaspoon whole cloves - 1 teaspoon allspice berries - 1 teaspoon grated nutmeg - 1/4 cup brown sugar (adjust to taste) - 1 tablespoon vanilla extract (optional) Now, pour the apple cider into your slow cooker. Next, add the sliced apples and orange. Then, it’s time to spice things up! Stir in your cinnamon sticks, whole cloves, allspice berries, and grated nutmeg. Gradually add the brown sugar. Stir until it dissolves. You can change the amount to fit your taste. If you want a little extra flavor, you can add the vanilla extract at this point. Cover your slow cooker and set it to low heat. You will need to cook the cider for 6 to 8 hours. This slow cooking lets the flavors blend perfectly. Make sure to check on it now and then. The longer you cook, the richer the taste. Once the cooking time is up, it's time to serve your cider! Use a ladle to pour the cider into mugs. If you prefer, you can strain out the spices and fruit slices. But leaving them in can give it a rustic look. For a fun touch, garnish each mug with a fresh cinnamon stick or a slice of apple. Enjoy the warm cider with friends or family. It’s a cozy drink perfect for chilly days! Using a slow cooker is easy and fun! Here are some best practices to get the most out of your spiced slow-cooker apple cider: - Layer the Ingredients: Start with the cider at the bottom. This helps heat circulate better. - Don’t Overfill: Keep your slow cooker less than two-thirds full. It cooks more evenly this way. - Keep It Covered: The lid holds in steam. This helps flavors blend and prevents drying out. To make your cider even more delicious, try these expert tips: - Use Fresh Ingredients: Fresh apples and oranges bring out the best flavors. Choose your favorites! - Experiment with Spices: Feel free to add more spices, like cardamom or star anise. This adds depth to the flavor. - Adjust Sweetness: Start with 1/4 cup of brown sugar. Taste after a few hours and adjust if needed. Avoid these common mistakes to ensure your cider turns out perfect: - Skipping the Straining: If you don’t strain the spices, your cider can taste too strong. Straining helps balance flavors. - Cooking on High: Slow cooking on high can make flavors too harsh. Stick to low heat for a smooth taste. - Not Tasting: Always taste your cider during cooking. This helps you decide if it needs more sweetness or spices. Pro Tips Adjust the Sweetness: Taste your cider before serving and adjust the brown sugar to suit your preference. You can always add more, but it’s harder to take it out once added! Experiment with Spices: Feel free to add or substitute spices like star anise or cardamom for a unique flavor twist. Just make sure to keep track of what you add! Use Fresh Ingredients: For the best flavor, use fresh, high-quality apples and oranges. Organic fruits can provide a more vibrant taste without the waxy coating. Keep it Warm: If you’re serving cider at a gathering, set your slow cooker to the warm setting to keep it at the perfect drinking temperature without cooking it further. {{image_2}} You can make your spiced cider even more festive by adding alcohol. A splash of rum or bourbon warms it up nicely. You can add about 1 cup of alcohol after cooking. This adds depth and enhances the flavors. Just remember to serve responsibly. If you want to change the sweetness, try different sweeteners. Honey, maple syrup, or agave can replace brown sugar. Each offers a unique taste. You can also add flavored extracts, like almond or maple, for extra fun. Adjust the amount to your liking for a perfect blend. This cider recipe is great for any season. In winter, add fresh cranberries for a bright touch. In spring or summer, try fresh berries or mint leaves. You can also mix in ginger slices for a spicy kick. These variations keep the recipe fresh and exciting. To store leftover cider, let it cool first. Pour the cider into a clean glass jar or a plastic container. Make sure to leave some space at the top. This allows for any expansion. Seal the container tightly. Store it in the fridge for best results. When you’re ready to enjoy your cider again, pour the desired amount into a pot. Heat it on low to avoid burning. Stir occasionally to mix the flavors. If you prefer it hot, you can use a microwave. Heat it in short bursts. Stir in between to get even warmth. Your spiced cider can last about 5-7 days in the fridge. If you want to keep it longer, consider freezing it. Pour it into an ice cube tray for smaller portions. Once frozen, transfer the cubes to a freezer bag. This way, you can enjoy cider anytime! The best apples for cider are a mix of sweet and tart. I love using Fuji, Honeycrisp, or Granny Smith apples. These types give the cider a nice balance of flavors. You can experiment with different apples to find your favorite taste. Mixing varieties will make your cider even more delicious. Yes, you can! If you don't have a slow cooker, use a large pot on the stove. Just follow the same steps. Bring the cider to a boil, then reduce the heat. Let it simmer for about an hour. This method will still give you that warm, spiced flavor. You can store the cider in the fridge for up to a week. Make sure to put it in an airtight container. If you want it to last longer, freeze it. Just pour it into freezer-safe bags or containers. Thaw it in the fridge when you're ready to enjoy more cider! In this post, we explored making spiced cider. We started with key ingredients and optional ones to boost flavor. Then, we outlined step-by-step cooking instructions, sharing tips for perfect results. You learned about serving ideas, variations, and storage info to extend enjoyment. Remember, great cider relies on both fresh ingredients and care in cooking. Enjoy your cider journey, and don’t hesitate to experiment with flavors!

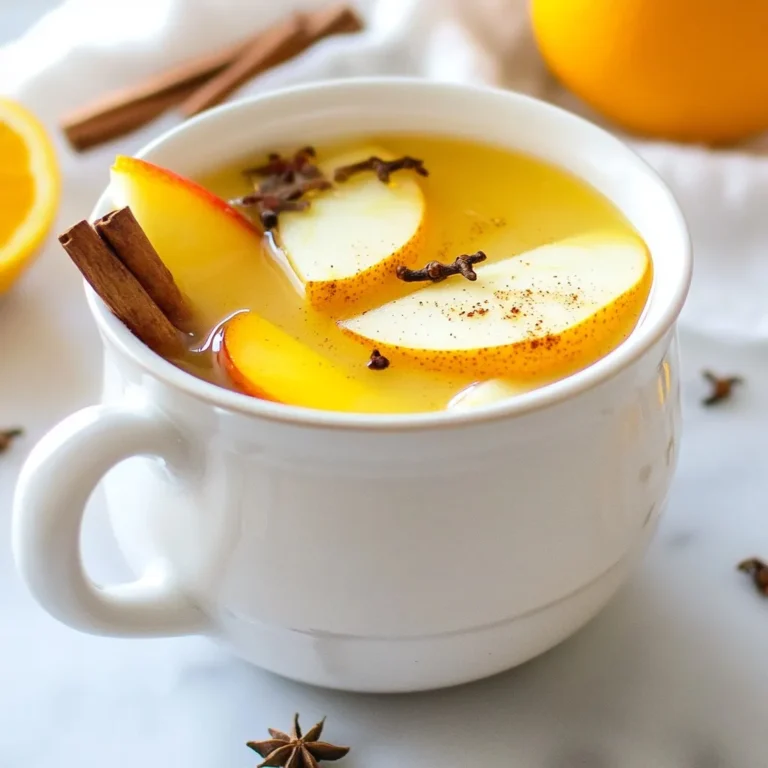
Spiced Slow-Cooker Apple Cider Delightful and Easy Recipe

- 1 lb ground beef or lamb - 1/2 cup breadcrumbs - 1/4 cup grated Parmesan cheese - 1/4 cup fresh parsley, chopped - 1 small onion, finely chopped - 2 cloves garlic, minced - 1 tsp dried oregano - 1/2 tsp salt - 1/2 tsp black pepper - 1 large egg, beaten - 1 cup chicken broth - 1/4 cup fresh lemon juice - Zest of 1 lemon - 2 tbsp olive oil - 1 tbsp cornstarch (optional, for thickening) Gathering these ingredients is key for tasty Greek meatballs. Each part plays a role in flavor. The meat, breadcrumbs, and cheese create a base. The herbs and spices add freshness. The lemon sauce brings bright notes that balance the dish. When using ground meat, I prefer beef or lamb. Both offer rich flavors. Breadcrumbs keep the meatballs tender. Parmesan adds a nice cheesy touch. Fresh parsley brightens the taste and looks great. Onions and garlic are vital. They give depth to the meatballs. Dried oregano, salt, and pepper round out the flavors. The beaten egg helps bind everything together. For the sauce, chicken broth forms a savory base. Fresh lemon juice and zest add a burst of acidity. Olive oil gives richness, and cornstarch can thicken the sauce if you like. Each ingredient adds something special to your meal. {{ingredient_image_1}} - In a large bowl, combine the ground beef (or lamb), breadcrumbs, Parmesan cheese, chopped parsley, onion, garlic, oregano, salt, pepper, and beaten egg. Mix until well combined. You want to blend all the flavors nicely. This blend gives your meatballs a rich taste. - Next, form small meatballs, about 1 inch in diameter. Make sure they are evenly sized. This helps them cook at the same rate. Place them on a baking sheet lined with parchment paper. - Preheat your oven to 400°F (200°C). This helps the meatballs cook evenly. While it heats, you can get your meatballs ready. - Bake the meatballs in the preheated oven for about 20 minutes. They should be browned and cooked through. You can check their doneness by cutting one open. It should not be pink inside. - While the meatballs bake, heat 2 tablespoons of olive oil in a large skillet over medium heat. Add the chicken broth, fresh lemon juice, and lemon zest. Stir to combine. Bring the mix to a gentle simmer. The lemon gives the sauce a fresh kick. - If you want a thicker sauce, mix 1 tablespoon of cornstarch with a little cold water. This creates a slurry. Gradually whisk it into the simmering sauce until it thickens. - Once the meatballs are done baking, carefully add them to the skillet with the lemon sauce. Make sure they are coated well. - Cook for an additional 5 minutes. Gently spoon the sauce over the meatballs. This helps each meatball soak up that zesty flavor. Enjoy the delicious aroma that fills your kitchen! To make great meatballs, start with the right meat. I suggest using ground beef or lamb. Both options bring rich flavor. You can also mix them for a unique taste. Mixing the meat well is key. Don't rush this step. A good mix ensures the meatballs hold together. It also helps blend the flavors nicely. You might want a thicker sauce. If so, use cornstarch to achieve that. Mix it with a bit of cold water first. Then stir it into the simmering sauce. Want more flavor? Consider adding herbs like dill or mint. A pinch of red pepper flakes can add warmth too. Garnish your meatballs with lemon slices and fresh parsley. This adds a nice touch. As for sides, serve them with rice or a fresh salad. Pita bread is also a great choice. You can even make a meatball sub with them! Pro Tips Use Fresh Herbs: Fresh parsley will enhance the flavor of your meatballs significantly compared to dried herbs. Control the Sauce Thickness: Adjust the amount of cornstarch based on your preference for sauce thickness; start with a little and add more if needed. Don’t Overmix the Meat: When combining the ingredients, mix just until combined to keep the meatballs tender. Experiment with Proteins: For a different flavor, try using ground turkey or chicken instead of beef or lamb. {{image_2}} You can change the meat in the recipe. Try using turkey or chicken instead of beef or lamb. These meats give a lighter taste. They also cut down on fat. For a vegetarian option, use lentils or chickpeas. These provide a great texture and flavor. Just mash them and mix with breadcrumbs and spices. Spices and herbs can change the flavor of your meatballs. Adding cumin or paprika gives a warm kick. Fresh herbs like mint or dill can add a fresh twist. For the sauce, you can swap lemon for lime. This adds a different zing. You might also try a yogurt sauce for creaminess. These meatballs are great with pasta or rice. Serve them over a bed of fluffy rice for a filling meal. You can also make a meatball sub. Just place the meatballs in a crusty roll. Top with tomato sauce and cheese for a tasty sandwich. To store leftovers, let the meatballs cool. Place them in an airtight container. You can also add the lemon sauce for extra flavor. Use a container that seals well to keep moisture in. This helps the meatballs stay fresh longer. You can freeze both uncooked and cooked meatballs. For uncooked meatballs, place them on a baking sheet. Once frozen solid, transfer them to a freezer bag. This keeps them from sticking together. For cooked meatballs, let them cool first. Then, store in a container with sauce. When ready to eat, you can thaw them using the fridge or a microwave. To preserve flavor, the best way to reheat meatballs is gently. Warm them on the stove over low heat. Add a splash of chicken broth or water for moisture. Cover the pan to keep steam in. If using the oven, heat to 350°F (175°C). Bake for about 15 minutes until heated through. Always check the center to make sure they are hot. To keep your meatballs juicy, use ground beef or lamb with some fat. The fat adds moisture. Mix the meat gently with the other ingredients. Over-mixing can make them tough. Adding breadcrumbs soaked in chicken broth also helps. This keeps them soft and moist. Yes! You can use ground turkey or chicken if you prefer. These meats are leaner, so consider adding a bit of olive oil. You can also try plant-based meat for a vegetarian option. The flavor changes, but it's still tasty. Serve these meatballs with warm pita bread or rice. A fresh Greek salad pairs well too. You can also try tzatziki sauce as a dip. It adds a nice cool contrast to the warm meatballs. Cooked meatballs last about three to four days in the fridge. Store them in an airtight container. Make sure they cool down before sealing. If you want them longer, freeze them. They can last up to three months in the freezer. This article covered how to make delicious meatballs with vibrant lemon sauce. We discussed key ingredients like ground beef and fresh herbs. You learned step-by-step instructions for preparing, baking, and pairing with sauce. I shared tips for perfecting your meatballs and creative variations to try. Remember to store leftovers properly and reheating methods to enjoy later. With these insights, you can create tasty meals that impress. Enjoy experimenting and savoring your cooking journey!

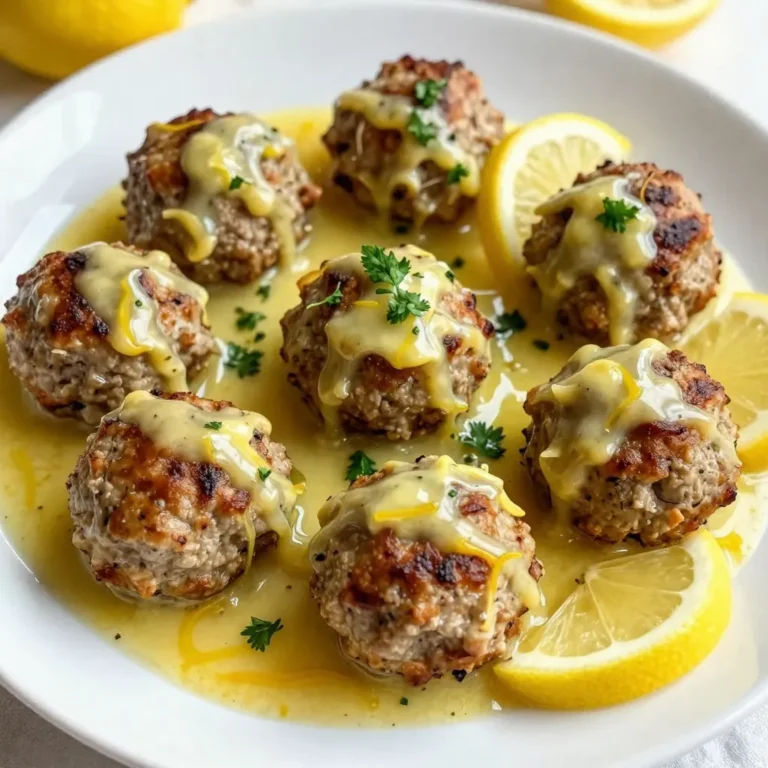
Greek Meatballs in Lemon Sauce Flavorful Delight

- 2 cups orzo pasta - 1 lb boneless, skinless chicken breasts, diced - 1 tablespoon olive oil - 1 medium onion, finely chopped - 3 cloves garlic, minced - 2 cups chicken broth - 1 cup heavy cream - 1 cup spinach, chopped - 1 cup cherry tomatoes, halved - 1 teaspoon dried oregano - 1 teaspoon garlic powder - Salt and pepper to taste - Fresh basil, for garnish - Grated Parmesan cheese, for serving (optional) You can swap orzo for other pasta types, like penne or fusilli. Use vegetable broth instead of chicken broth for a vegetarian option. If you prefer a lighter dish, substitute heavy cream with half-and-half. Feel free to use frozen spinach instead of fresh; just thaw and drain it before adding. Cherry tomatoes can be replaced with diced bell peppers for a sweet twist. I love using dried oregano for a warm flavor. Garlic powder adds depth without extra prep. Fresh basil gives a bright finish, while Parmesan cheese adds a rich kick. You can also try red pepper flakes for heat. If you want more zest, a squeeze of lemon juice works wonders. {{ingredient_image_1}} To make creamy chicken orzo, start by heating olive oil in a large pot over medium heat. Add diced chicken, season it with salt, pepper, garlic powder, and dried oregano. Cook the chicken for about 5 to 7 minutes. It should turn brown and be cooked through. Remove the chicken and set it aside. Next, add the finely chopped onion and minced garlic to the same pot. Sauté these for about 3 to 4 minutes until they soften. Then, add the orzo pasta and sauté for another minute. This step helps give the orzo a nice toast. Now, pour in 2 cups of chicken broth. Bring it to a simmer, then reduce the heat to low. Cover the pot and let it cook for about 10 minutes. Stir occasionally. You want the orzo to be tender and for most of the liquid to be absorbed. After that, stir in 1 cup of heavy cream, chopped spinach, and halved cherry tomatoes. Cook for another 2 to 3 minutes. This makes the dish creamy and delicious. Finally, return the cooked chicken to the pot. Stir everything together. Taste it and adjust the seasoning if necessary. To ensure your chicken is perfectly cooked, cut it into small, even pieces. This helps it cook faster and more evenly. Use a meat thermometer to check if the chicken reaches 165°F. This temperature keeps it safe to eat. Also, don’t overcrowd the pan when you cook the chicken. If you add too much at once, it may steam instead of brown. Cook it in batches if needed. Stirring is key during the cooking process. It helps prevent the orzo from sticking to the pot. Regular stirring also ensures even cooking and helps blend the flavors well. When you add the chicken broth, stir to mix the orzo and broth evenly. After adding the cream and veggies, stir again. This keeps everything combined and creamy. Remember, a good stir goes a long way in making your dish flavorful and smooth! To get a great creamy texture, use heavy cream. It adds richness and smoothness. Stir the cream in at the end of cooking. This helps it blend well without curdling. You can also add a splash of pasta water if needed. This water helps the sauce stick to the orzo better. One common mistake is overcooking the orzo. Cook it just until tender. If you cook it too long, it can become mushy. Another mistake is not stirring enough. Stirring helps the orzo cook evenly and prevents sticking. Lastly, don’t forget to season your chicken. A little salt and pepper make a big difference. To boost flavor, try adding herbs like thyme or rosemary. Fresh herbs brighten the dish. You can also add lemon juice for a tangy kick. For nutrition, toss in more veggies. Peas, carrots, or bell peppers add color and nutrients. If you want more protein, consider adding beans or chickpeas. They make the meal heartier and healthier. Pro Tips Tip 1: For extra flavor, marinate the chicken in olive oil, garlic, and herbs for at least 30 minutes before cooking. Tip 2: To prevent the orzo from getting mushy, be sure to stir occasionally while it cooks and keep an eye on the liquid level. Tip 3: Feel free to add other vegetables like bell peppers or zucchini for added nutrition and color. Tip 4: For a lighter version, substitute heavy cream with half-and-half or a non-dairy milk option. {{image_2}} You can change the protein in creamy chicken orzo. Shrimp works well. Just cook it in the pot until it turns pink. Tofu is another great choice. Use firm tofu, cut into cubes. Sauté the tofu until it is golden. Both options add unique flavors and textures. To make a vegetarian version, skip the chicken. Use more vegetables instead. You can add mushrooms for a meaty taste. Zucchini and bell peppers also work. These veggies keep the dish hearty and satisfying. Swap chicken broth for vegetable broth. This keeps the creaminess while making it plant-based. Get creative with vegetables in your orzo! Spinach is a great start, but you can add more. Try peas for a sweet touch. Broccoli florets add crunch and color. Carrots can bring a nice sweetness. Just chop them small and add them while cooking. The more veggies, the merrier! Storing creamy chicken orzo is simple. First, let the dish cool to room temperature. Then, transfer it to an airtight container. Make sure to seal it tightly. You can keep it in the fridge for up to three days. This way, you can enjoy it again without losing flavor! When you're ready to eat the leftovers, reheating is key. Place the creamy chicken orzo in a pot over low heat. Add a splash of chicken broth or water to keep it moist. Stir often to heat evenly. You can also use the microwave. Just cover the bowl with a lid or a paper towel. Heat it in short bursts, stirring in between. This will help prevent it from drying out. If you want to freeze creamy chicken orzo, it’s best to do it right after cooking. Use freezer-safe containers or bags. Make sure to leave some space for expansion. You can freeze it for up to three months. When you’re ready to eat, remove it from the freezer. Thaw it overnight in the fridge. Then, reheat it using the tips above. This keeps your dish tasty and fresh! Yes, you can use gluten-free orzo. Many brands offer gluten-free options made from rice or corn. They cook similarly to regular orzo. Just watch the cooking time, as it may vary. This way, everyone can enjoy creamy chicken orzo. Creamy chicken orzo pairs nicely with many sides. You can serve it with a crisp green salad. Garlic bread or crusty rolls also make great choices. If you want more veggies, consider steamed broccoli or roasted carrots. These sides balance the dish well and add color to your meal. To spice up creamy chicken orzo, add red pepper flakes while cooking. You can also include diced jalapeños for a fresh kick. If you like, mix in some hot sauce before serving. Adjust the spice to your taste for the perfect heat level. Creamy chicken orzo is easy and fun to make. We covered the right ingredients and helpful tips. You learned how to achieve that creamy texture and avoid common mistakes. I shared ways to customize this dish with different proteins and veggies. Don't forget about storing and reheating your leftovers properly. Dive into this dish and enjoy all its rich flavors. With practice, you'll make it perfectly every time. Have fun in the kitchen!

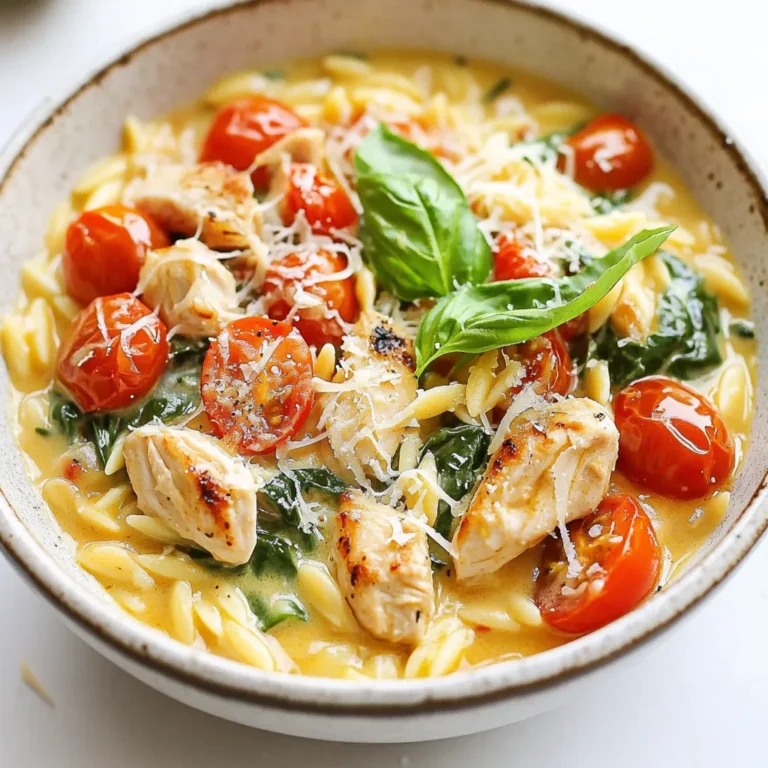
Creamy Chicken Orzo Tasty and Easy Comfort Food

For Keto Everything Bagel Bites, gather these items: - 1 ½ cups almond flour - 2 teaspoons baking powder - 1 teaspoon garlic powder - 1 teaspoon onion powder - 1 teaspoon everything bagel seasoning - 2 cups shredded mozzarella cheese - 1/2 cup cream cheese, softened - 2 large eggs - Sea salt, to taste - Extra everything bagel seasoning for topping Each ingredient plays a key role. Almond flour gives a nutty flavor and low carbs. Baking powder helps the bites rise. Garlic and onion powder add savory notes. Everything bagel seasoning gives that classic taste. The mozzarella and cream cheese make them gooey and rich. Eggs bind it all together. You can swap some ingredients if you need to: - Almond flour: Use coconut flour, but use less. Start with 1/2 cup. - Mozzarella cheese: Cheddar or provolone can work well, too. - Cream cheese: Use ricotta or Greek yogurt for a lighter option. - Eggs: Applesauce or flaxseed meal can replace eggs for a vegan version. These swaps help you stick to your diet while keeping flavor. Each serving of these bagel bites is packed with good nutrition: - Calories: About 130 - Carbohydrates: 4 grams - Fiber: 2 grams - Protein: 6 grams - Fat: 10 grams These bites are low in carbs and high in protein. They fit perfectly into a keto diet. Enjoy them as a snack or appetizer without guilt! {{ingredient_image_1}} To start, gather all your ingredients. You will need: - 1 ½ cups almond flour - 2 teaspoons baking powder - 1 teaspoon garlic powder - 1 teaspoon onion powder - 1 teaspoon everything bagel seasoning - 2 cups shredded mozzarella cheese - 1/2 cup cream cheese, softened - 2 large eggs - Sea salt, to taste - Extra everything bagel seasoning for topping First, preheat your oven to 350°F (175°C). Line a baking sheet with parchment paper to prevent sticking. In a large mixing bowl, combine the almond flour, baking powder, garlic powder, onion powder, and everything bagel seasoning. Mix these dry ingredients well. Next, take a microwave-safe bowl. Combine the shredded mozzarella and cream cheese. Heat them in the microwave for 30 seconds. Stir between each interval until the cheeses melt and blend together smoothly. Add this melted cheese mixture to your dry ingredients. Crack in the eggs and mix until a dough forms. The dough may feel sticky. If it does, wet your hands a bit to help with handling. Now, divide the dough into small pieces. Aim for pieces about the size of a golf ball. Roll each piece into a ball shape. Place these on your prepared baking sheet, giving them enough space. Sprinkle sea salt and extra everything bagel seasoning on top of each bagel bite. This adds flavor and crunch. Bake them in the preheated oven for 15 to 18 minutes. Keep an eye on them until they turn golden brown and feel firm to the touch. Once they are done, take the baking sheet out of the oven. Let the bagel bites cool for a few minutes before moving them to a cooling rack. This helps them firm up and makes them easier to handle. For the best bagel bites, ensure your cheese is fully melted before mixing. This helps create a smooth dough. If the dough feels too wet, add a bit more almond flour. This can help with the texture. Make sure to bake them until golden brown. This gives them a nice crust. Letting them cool slightly helps with the final texture too. Enjoy your tasty Keto Everything Bagel Bites! You can store these Keto Everything Bagel Bites in an airtight container. They stay fresh for about three days in the fridge. To reheat, place them in the oven at 350°F for about five minutes. This helps keep them crispy. You can also use a microwave, but they may get soft. You can prepare the dough a day ahead. Just keep it in the fridge. When ready to bake, let it sit at room temperature for 10 minutes. This makes it easier to handle. You can also freeze the shaped bagel bites. Just bake them straight from the freezer, adding a few extra minutes to the bake time. These bites pair well with cream cheese or avocado dip. You can also serve them with a side of marinara sauce for dipping. They make a great snack or appetizer. Try adding fresh herbs or spices to change the flavor. Kids love these bites too! Pro Tips Use Fresh Seasoning: For the best flavor, use fresh everything bagel seasoning. This enhances the aroma and taste of your bagel bites. Proper Cheese Melting: Make sure to melt the mozzarella and cream cheese gently to avoid burning. Stir frequently to achieve a smooth mixture. Experiment with Toppings: Feel free to add toppings like sesame seeds or poppy seeds for extra flavor and crunch. Store Properly: Keep any leftovers in an airtight container in the fridge to maintain freshness. Reheat in the oven for best results. {{image_2}} You can change the flavor of your bagel bites by using different seasonings. Instead of everything bagel seasoning, try Italian herbs for a pizza twist. You can use taco seasoning for a fun, spicy bite. You might also like a mix of smoked paprika and cumin for a smoky taste. Just remember to keep the seasonings low-carb! If you want to switch up the cheese, mozzarella is not the only choice. You can use cheddar for a sharper flavor. Cream cheese gives a rich, creamy vibe. Goat cheese adds a tangy twist. Mix and match to find your favorite combo! Dipping sauces can elevate your bagel bites. Try a simple ranch dressing for a creamy dip. A low-carb marinara sauce pairs well for a twist on pizza. You might also enjoy a spicy mustard for a kick. These sauces can make your snack even more enjoyable! To store your bagel bites, let them cool completely. Place them in an airtight container. Keep the container in the fridge. They stay fresh for about five days. If you want to enjoy them later, make sure they are well-sealed. This helps keep them soft and tasty. Yes, you can freeze these bagel bites! After they cool, place them in a freezer-safe bag. Make sure to remove as much air as possible. You can freeze them for up to three months. When you want to eat them, just take out how many you need. Heat them in the oven or microwave until warm. If you want to skip almond flour, you can use coconut flour. Use about one-third of the amount. For this recipe, that means about ½ cup of coconut flour. Be aware that coconut flour absorbs more moisture. You may need to add an extra egg or some water to get the right dough texture. The prep time for Keto Everything Bagel Bites is just 10 minutes. This quick setup means you can start enjoying your tasty bites in no time. These bites take about 15 to 18 minutes to bake. Keep an eye on them as they turn golden brown. This recipe makes around 12 bagel bites. Perfect for a snack or a party treat! This blog post gave you a detailed guide on making Keto Everything Bagel Bites. We covered the best ingredients, step-by-step baking instructions, and tips for the perfect texture. You learned how to store and reheat these bites, plus some fun variations to try. With this knowledge, you can enjoy a tasty snack that fits your diet. Try these tips, and enjoy your bagel bites whenever you want. They will surely impress your friends and family!

Keto Everything Bagel Bites Tasty and Easy Snack

- 1 loaf of challah or brioche bread, cut into cubes - 3 cups eggnog - 6 large eggs - 1 teaspoon vanilla extract - 1 teaspoon ground cinnamon - 1/2 teaspoon ground nutmeg - 1/4 cup brown sugar - 1/4 cup maple syrup (plus more for serving) - 1/2 cup chopped pecans (optional) - Powdered sugar for dusting When making Eggnog French Toast Bake, start with the right bread. Challah or brioche works best. They are soft and soak up the eggnog well. This makes every bite tasty. Next, use good eggnog. Look for rich and creamy eggnog. It adds flavor and a festive touch. The eggnog is the star of this dish. You will need eggs for this recipe too. Six large eggs create a rich custard. This custard helps bind the bread together and gives it a fluffy texture. Don't forget the spices! Ground cinnamon and nutmeg give warmth and depth. They turn the bake into a holiday treat. Add a teaspoon of vanilla for extra flavor. Brown sugar and maple syrup add sweetness. They balance the spices and eggnog. You can also add chopped pecans for a nice crunch. Lastly, powdered sugar is perfect for dusting. It gives a lovely finish. You can serve this dish warm with extra maple syrup on top. {{ingredient_image_1}} 1. Start by preheating your oven to 350°F (175°C). Grease a 9x13-inch baking dish with butter or cooking spray. This helps prevent sticking and makes cleanup easy. 2. In a large mixing bowl, whisk together the eggnog, eggs, vanilla extract, ground cinnamon, ground nutmeg, brown sugar, and maple syrup. Mix until smooth and well combined. This mixture will soak into the bread. 3. Next, add the cubed bread to the bowl. Gently toss the bread in the eggnog mix. Make sure each piece is coated. If you like, fold in the chopped pecans now for extra crunch. 1. Pour the mixture into the prepared baking dish. Spread it evenly and press down gently. This ensures all the bread gets the eggnog mix. 2. Cover the baking dish with foil. Place it in the fridge for at least 30 minutes. For best results, let it chill overnight. This soaking time helps the bread absorb all the flavors. 3. When you're ready to bake, remove the foil. Bake in the preheated oven for 30-35 minutes. The top should be golden brown, and the center should be set. 4. Once baked, allow the French toast bake to cool for a few minutes. Dust the top with powdered sugar. Serve it warm, drizzled with more maple syrup for that sweet touch. Soaking time is key for great texture. I recommend letting the bread sit in the eggnog mix for at least 30 minutes. For the best results, soak it overnight. This helps the bread absorb all the creamy goodness. Even baking is also important. Make sure to spread the bread evenly in the dish. Press it down gently. This ensures every piece gets cooked through. Check it halfway through baking. If the top is browning too fast, cover it with foil. To boost flavor, add extra spices. A pinch of ginger or cloves can elevate the taste. You can also mix in some vanilla extract for a sweeter note. For toppings, think about options that add texture. Chopped pecans give a nice crunch. You could also use fresh fruit like berries or bananas. Drizzle some maple syrup on top for extra sweetness. When serving, a dusting of powdered sugar makes it look lovely. Add a sprig of mint for color. These simple touches make your dish shine! Pro Tips Choose the Right Bread: Using challah or brioche will give your French toast bake a rich and buttery flavor. Avoid regular sandwich bread for a less indulgent result. Soak Time Matters: Allowing the bread to soak in the eggnog mixture for at least 30 minutes (or overnight) ensures that every piece absorbs the custard, leading to a creamy texture. Watch the Baking Time: Keep an eye on your bake as it cooks. If the top gets too dark before the center is set, cover it loosely with foil until fully cooked. Flavor Enhancements: For added depth, consider incorporating a splash of bourbon or rum into the eggnog mixture for a festive twist. {{image_2}} You can make this dish even better with some easy swaps. If you want a non-dairy version, use almond or coconut milk eggnog. These alternatives keep the creamy taste while cutting out dairy. For the bread, try sourdough or gluten-free bread. Each type brings a unique flavor and texture to the bake. Add a twist to your Eggnog French Toast Bake. Use pumpkin spice for a seasonal touch. Just swap out some cinnamon for pumpkin spice. You can also throw in fruity add-ins like sliced bananas or berries. If you're feeling adventurous, add chocolate chips for a sweet treat. These options let you customize the dish to your taste. To keep your Eggnog French Toast Bake fresh, store it in the fridge. Place it in a tight container or cover it with plastic wrap. This helps keep flavors locked in. Leftovers will stay good for about four days. If you want to save it longer, you can freeze it. Wrap individual slices in plastic wrap, then place them in a freezer bag. This method saves space and makes it easy to grab a piece. Frozen, it can last up to two months. When it's time to enjoy your leftovers, reheating is key. The best way is in the oven. Preheat your oven to 350°F (175°C). Place the slices on a baking sheet and cover them with foil. Heat for about 15-20 minutes. This keeps the texture nice and soft. You can also use a microwave if you're in a hurry. Heat a slice for 30-45 seconds. Just remember, it may not be as crisp as from the oven. Enjoy it warm with a drizzle of syrup for the best taste. Yes, you can prepare it the night before. After mixing everything, cover the dish. Keep it in the fridge overnight for best flavor. This helps the bread soak up the eggnog mix. To avoid sogginess, let the bread soak for the right time. If you soak too long, it might get too wet. Press the bread down gently into the mix to ensure even soaking. You can serve it with fresh fruit, like berries or bananas. A drizzle of maple syrup adds sweetness. A dollop of whipped cream also makes a great topping. Yes, you can use a vegan eggnog and flax eggs. For flax eggs, mix one tablespoon of ground flaxseed with three tablespoons of water. Let it sit for a few minutes before adding it to the mix. Leftovers can last up to three days in the fridge. Store them in an airtight container. You can reheat it in the oven for the best texture. This blog post covered how to create a delicious Eggnog French Toast Bake. We looked at key ingredients, like bread options and eggnog specs. You learned preparation steps, baking instructions, and tips for flavor and texture. We explored variations, including ingredient swaps for different diets. Lastly, I shared storage tips and answered common questions. Enjoy experimenting with this recipe. It’s a fun way to make breakfast special!

Eggnog French Toast Bake Delightful and Easy Recipe

- 1 pound large shrimp, peeled and deveined - 2 tablespoons unsalted butter - 1 tablespoon olive oil Large shrimp are the star of this dish. Their size gives a nice bite. Use fresh, high-quality shrimp for the best flavor. Unsalted butter adds richness. It helps create a creamy sauce. Olive oil keeps the shrimp from sticking and adds a light flavor. - 4 cloves garlic, minced - 1/2 teaspoon red pepper flakes (optional) - Salt and pepper to taste Garlic brings a strong taste that mixes well with the shrimp. I love using fresh garlic for the best aroma. Red pepper flakes add a hint of heat. Adjust the amount based on your spice level. Salt and pepper enhance all the flavors in the dish. - 1 cup cherry tomatoes, halved - 1 cup fresh spinach, chopped - 1/2 cup heavy cream - 1/4 cup grated Parmesan cheese - Fresh basil leaves for garnish Cherry tomatoes add a burst of sweetness. They soften nicely in the skillet. Fresh spinach adds color and nutrition. Heavy cream creates a rich sauce that coats the shrimp. Parmesan cheese adds depth and creaminess. Fresh basil completes the dish with a fragrant finish. This easy meal is packed with flavors. Each ingredient plays an important role in making it special. {{ingredient_image_1}} 1. Heating olive oil and butter: Start by taking a large skillet. Heat 1 tablespoon of olive oil and 1 tablespoon of unsalted butter over medium heat. This will create a rich base for your dish. 2. Sautéing garlic and red pepper flakes: Once the butter melts, add 4 cloves of minced garlic. If you like spice, add 1/2 teaspoon of red pepper flakes. Sauté for about 1 minute. This step fills your kitchen with a warm, inviting aroma. 1. Adding and seasoning shrimp: Now, add 1 pound of large shrimp to the skillet. Season them with salt and pepper. Mix well to ensure every shrimp gets flavor. 2. Cooking time and technique: Cook the shrimp for 2-3 minutes on each side. Watch for them to turn pink and opaque. This shows they are cooked perfectly. Once done, remove them from the skillet and set them aside. 1. Incorporating cherry tomatoes and spinach: In the same skillet, add 1 cup of halved cherry tomatoes. Cook them for about 2 minutes until they start to soften. Next, stir in 1 cup of chopped fresh spinach. Cook for another minute until the spinach wilts. 2. Adding cream and Parmesan cheese: Pour in 1/2 cup of heavy cream and stir well. Let it simmer for 2-3 minutes. Then, add 1/4 cup of grated Parmesan cheese. Mix until it melts and becomes smooth. 3. Combining shrimp with the sauce: Finally, return the cooked shrimp to the skillet. Toss them in the creamy sauce for about a minute to heat through. This step makes every bite rich and flavorful. To get the best shrimp, choose large ones. They cook evenly and stay juicy. Avoid overcooking by watching the color. Cook shrimp until they turn pink and opaque. This takes about 2-3 minutes on each side. If they get rubbery, you cooked them too long. You can customize spice levels. If you love heat, add more red pepper flakes. For a milder dish, skip them. Fresh herbs like basil elevate the taste. Dried herbs work too, but fresh gives a better flavor. Always taste and adjust as you cook. To make the meal complete, serve it with pasta or crusty bread. Both soak up the tasty sauce. For an elegant touch, sprinkle extra Parmesan on top. Add fresh basil leaves for color. This dish looks as good as it tastes! Pro Tips Perfectly Cooked Shrimp: Make sure not to overcook the shrimp. They should be pink and opaque, which usually takes about 2-3 minutes per side. Use Fresh Ingredients: Fresh garlic and spinach will enhance the flavor of your dish. Opt for ripe cherry tomatoes for the best taste. Adjust the Heat: If you like it spicy, feel free to increase the amount of red pepper flakes. You can also add a dash of cayenne for extra heat. Serving Suggestions: This dish pairs beautifully with a side of pasta or crusty bread to soak up the delicious garlic butter sauce. {{image_2}} You can easily modify this dish to fit your diet. If you need a gluten-free option, just make sure to check your cream and cheese labels. Most brands are gluten-free. You can also serve the shrimp over gluten-free pasta or rice. For a dairy-free version, try coconut milk in place of heavy cream. Nutritional yeast can replace Parmesan cheese for a savory flavor. Both options keep the dish rich and creamy without dairy. Want to change things up? You can use different vegetables based on what you have at home. Zucchini, bell peppers, or even asparagus work well in this dish. Just add them to the skillet with the tomatoes. If you prefer a different protein, chicken or scallops are great substitutes. Cook them the same way as the shrimp. This gives you new flavors while keeping the dish simple and quick. To make the dish unique, try adding different herbs and spices. Fresh parsley or thyme can add a lovely twist. For a bolder taste, consider adding smoked paprika or lemon zest. You can also switch up the sauces. A splash of white wine or a squeeze of lemon juice can brighten the flavors. Experimenting with different sauces adds your personal touch to this classic meal. After making Garlic Butter Tuscan Shrimp, you may have some leftovers. To keep them fresh: - Store leftovers in an airtight container. - Place the container in the fridge within two hours of cooking. - Use the leftovers within 2-3 days for the best taste. Reheating shrimp can be tricky. You want to keep it tasty and tender. Here are some tips: - Use a skillet over low heat. This helps to warm the shrimp gently. - Add a splash of cream or broth to keep moisture. - Stir often to heat evenly and avoid rubbery shrimp. You can freeze Garlic Butter Tuscan Shrimp, but keep in mind: - Use a freezer-safe container or bag. Remove as much air as possible. - Freeze for up to three months for best quality. When you're ready to eat: - Thaw in the fridge overnight. - Reheat gently in a skillet with a bit of cream to restore the sauce. To make Garlic Butter Tuscan Shrimp, follow these key steps: 1. Heat the skillet: Start by warming olive oil and one tablespoon of butter in a large skillet over medium heat. 2. Sauté garlic: Add minced garlic and red pepper flakes for one minute until fragrant. 3. Cook shrimp: Add peeled and deveined shrimp, season with salt and pepper, and cook for 2-3 minutes on each side until pink. Then, set them aside. 4. Add tomatoes: In the same skillet, toss in halved cherry tomatoes and cook for 2 minutes until they soften. 5. Add spinach: Stir in chopped spinach and let it wilt for about one minute. 6. Make the sauce: Pour in heavy cream, let it simmer, and then mix in grated Parmesan cheese until smooth. 7. Combine: Return the shrimp to the skillet, coat in the sauce, and heat through for one more minute. 8. Finish up: Stir in the last tablespoon of butter for extra richness and garnish with fresh basil. Yes, you can use frozen shrimp. Here are some pros and cons: - Pros: - Frozen shrimp are easy to find and often cheaper. - They are already cleaned and deveined, saving prep time. - Cons: - They may release excess water when cooking, which can affect the sauce. - Frozen shrimp can have a different texture than fresh shrimp. If using frozen shrimp, thaw them properly before cooking. This helps maintain the right texture. The total time to prepare Garlic Butter Tuscan Shrimp is about 20 minutes. Here’s the breakdown: - Prep time: 10 minutes for cleaning shrimp and chopping vegetables. - Cooking time: 10 minutes to cook everything together in the skillet. This recipe is quick and perfect for busy nights when you want something tasty! In this blog post, we explored making Garlic Butter Tuscan Shrimp, focusing on key ingredients and easy steps. We discussed the shrimp, seasonings, and vegetables. You learned how to prepare the skillet, cook shrimp, and make a creamy sauce. I shared tips for perfecting the dish and suggested variations for dietary needs. Lastly, I covered storage and reheating techniques. Enjoy crafting this delightful meal, and don’t hesitate to make it your own! Your kitchen adventures will be so rewarding.

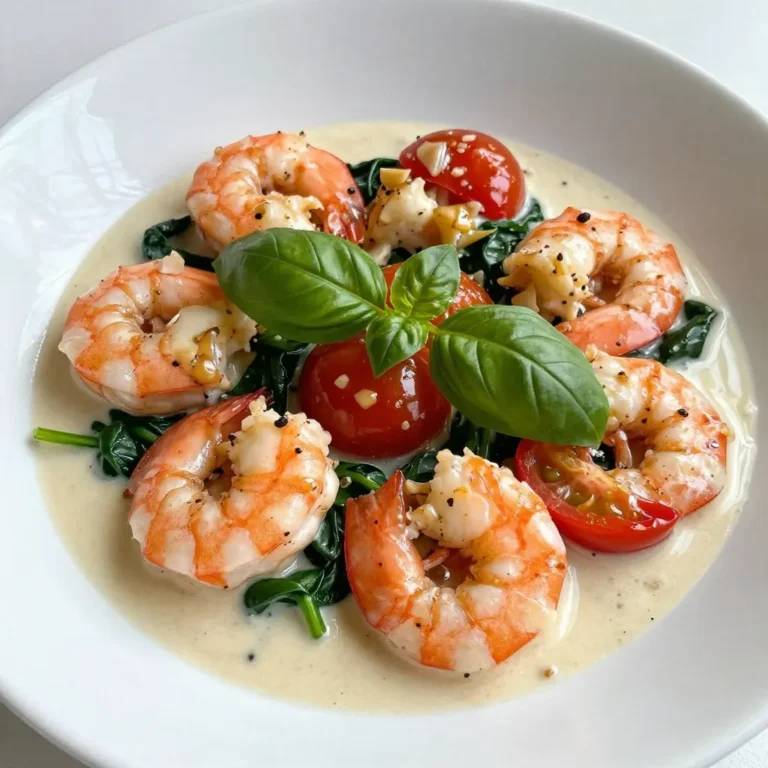
Garlic Butter Tuscan Shrimp Flavorful and Easy Meal

To make this soup, gather these must-have items: - 1 tablespoon coconut oil - 1 onion, finely chopped - 3 cloves garlic, minced - 1 tablespoon ginger, minced - 2 tablespoons red curry paste - 1 can (400ml) coconut milk - 4 cups vegetable broth - 1 tablespoon soy sauce (or tamari for gluten-free) - 1 tablespoon lime juice - 1 medium sweet potato, diced - 1 cup broccoli florets - 1 cup snap peas - 1 red bell pepper, sliced - Fresh cilantro, for garnish - Lime wedges, for serving - Salt and pepper, to taste These ingredients create a rich and creamy base, full of flavor. The coconut milk adds a nice sweetness that pairs well with the spicy red curry paste. You can add these items for an extra kick: - 1 tablespoon of peanut butter for creaminess - 1 can of chickpeas for protein - Fresh basil or mint for a fresh note - Sliced chili for heat Adding these ingredients can take your soup to the next level. They offer new textures and flavors that enhance the dish. If you’re missing something, try these swaps: - Use olive oil instead of coconut oil. - Swap sweet potato for regular potato or carrots. - Use any broth you have on hand. - Replace red bell pepper with yellow or green peppers. These substitutions work well and keep the soup tasty and enjoyable. They also help use what you already have in your kitchen. {{ingredient_image_1}} Before you start, gather your ingredients. You need coconut oil, onion, garlic, and ginger. Get your red curry paste, coconut milk, and vegetable broth ready too. Don’t forget the sweet potato, broccoli, snap peas, and red bell pepper. Have your lime juice, soy sauce, cilantro, and lime wedges nearby. This makes cooking smooth and fun. 1. Start by heating the coconut oil in a large pot on medium heat. 2. Add the chopped onion and cook for about 5 minutes. Wait until it turns translucent. 3. Next, stir in the minced garlic and ginger. Cook this for one minute. The smell will be great! 4. Now, add the red curry paste. Mix it well with the onion, garlic, and ginger. 5. Pour in the coconut milk and vegetable broth. Stir it all together and bring it to a gentle boil. 6. Once it starts boiling, add the diced sweet potato. Lower the heat and let it simmer for about 10 minutes. This will make the sweet potato tender. 7. Add the broccoli, snap peas, and red bell pepper to the pot. Cook for another 5 minutes until they are bright and tender-crisp. 8. Stir in the soy sauce and lime juice. Add salt and pepper to taste. 9. Remove the pot from heat and let it sit for a few minutes. This helps the flavors blend well. To get the best texture, make sure to chop your vegetables evenly. This helps them cook at the same rate. When adding the sweet potato, check it for tenderness after 10 minutes. If it’s not soft yet, give it a few more minutes. For the broccoli and snap peas, cook them just until they are bright. This keeps them crunchy and colorful. To make your Vegan Thai Coconut Curry Soup shine, focus on fresh herbs. Add fresh cilantro just before serving. A squeeze of lime brightens the dish. You can also try using more red curry paste if you like heat. One common mistake is overcooking the vegetables. Broccoli and snap peas should stay bright and crisp. Another mistake is not letting the soup sit after cooking. This waiting time helps the flavors blend well. Lastly, use good quality coconut milk. It makes a big difference in taste. Serve the soup in deep bowls for a cozy feel. Add fresh cilantro on top for a pop of color. A wedge of lime on the side gives a nice touch. You can also pair it with rice or crusty bread for a fulfilling meal. Pro Tips Use Fresh Ingredients: Fresh vegetables not only enhance the flavor but also add vibrant colors to your soup, making it more visually appealing. Adjust the Spice Level: Customize the heat by adding more or less red curry paste to suit your taste preferences. Let It Sit: Allowing the soup to sit for a few minutes after cooking helps meld the flavors together, resulting in a more delicious dish. Experiment with Toppings: Enhance your soup by adding toppings like sliced chili, toasted coconut, or a drizzle of sesame oil for added depth and flavor. {{image_2}} You can change the veggies in this soup. Try using carrots, zucchini, or cauliflower. These options give new flavors and textures. You can also add kale or spinach for green goodness. Just make sure to adjust cooking time for softer veggies. If you want a heartier soup, add protein. Tofu is a great choice. Use firm or extra-firm tofu and cube it. You can also use chickpeas for a nice boost. Both options add protein without changing the taste too much. Just add them in when you add the other veggies. Do you like spice? You can boost the heat with more red curry paste. A pinch of chili flakes will also add a kick. If you prefer mild flavors, use less curry paste and skip the extra spices. This way, the soup stays creamy and sweet with coconut milk. Adjust it to fit your taste! To keep your Vegan Thai Coconut Curry Soup fresh, store it in an airtight container. Let the soup cool down to room temperature before sealing it. This helps stop bacteria growth. You can keep it in the fridge for up to four days. If you want to enjoy it later, freezing is a great option. To reheat the soup, pour it into a pot over low heat. Stir it often to keep it from sticking to the bottom. Heat until it is warm but not boiling. You can also use a microwave. Place the soup in a microwave-safe bowl. Heat for one minute, stir, and check the temperature. If it is not hot enough, heat in 30-second bursts until warm. Freezing this soup is simple and effective. First, let it cool completely. Next, pour it into a freezer-safe container or a zip-top bag. Make sure to leave some space at the top, as liquids expand when frozen. The soup can last in the freezer for up to three months. When you are ready to eat, thaw it in the fridge overnight before reheating. Yes, you can make this soup ahead of time. The flavors blend well when it sits. Store it in the fridge for up to three days. Just reheat it on the stove when you are ready to eat. You might need to add a bit of broth if it thickens. Yes, this soup can be gluten-free. Use tamari instead of soy sauce. The rest of the ingredients are gluten-free. Always check labels if you buy pre-made sauces. This way, you ensure everything stays gluten-free. You can serve this soup with rice or quinoa for a filling meal. A side salad with fresh veggies pairs well too. You can add crusty bread for dipping. A refreshing drink like coconut water or iced tea makes a nice addition. This blog post covered the essential ingredients for Vegan Thai Coconut Curry Soup, including optional flavors and ingredient swaps. I outlined step-by-step cooking instructions and shared tips for perfect texture. You learned common mistakes to avoid and ideas for a festive presentation. We discussed fun variations with different veggies, proteins, and spice levels. Lastly, I shared how to store, reheat, and freeze leftovers. Enjoy making this soup your own, and remember, each bowl is packed with vibrant flavor and comfort. Happy cooking!

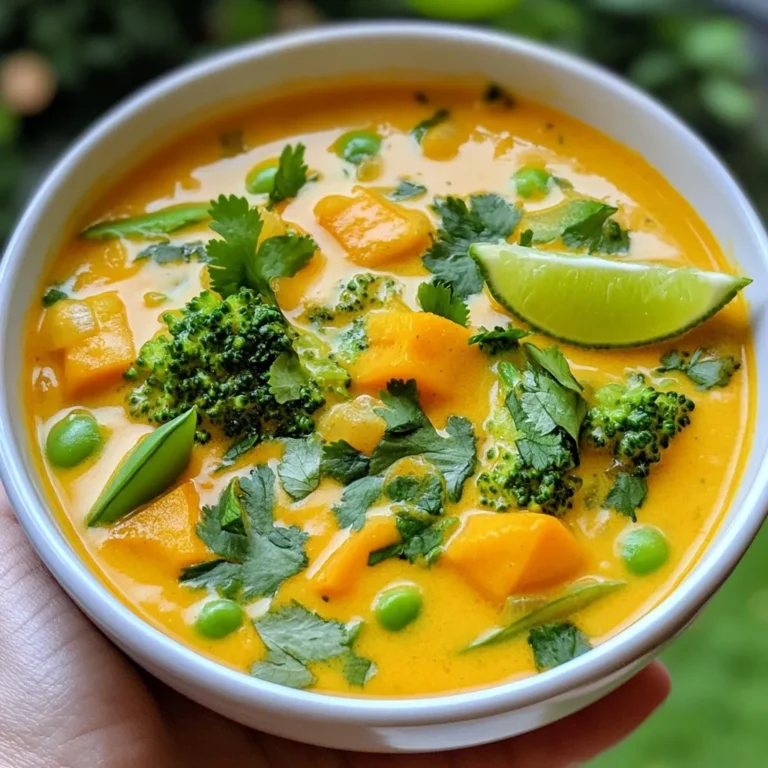
Vegan Thai Coconut Curry Soup Simple and Tasty Recipe

PREV 1 … 77 78 79 … 86 NEXT
spicy fork kitchen

explore

DessertsDinnerAppetizersDrinks

Our Policies

  • Cookie Policy
  • Copyright Policy
  • Disclaimer
  • GDPR Policy
  • Terms Of Use
Back to Top
  • About
  • Contact Us
  • Privacy Policy
© 2025 spicy fork kitchen