FREE DINNER EBOOK! Get your copy!
  • Cookie Policy
  • GDPR Policy
  • Disclaimer
  • Terms Of Use
  • Visit my other site: Fun Cookie Recipes
spicy fork kitchen
  • Home
  • Dinner
  • Desserts
  • Drinks
  • Appetizers
  • Contact
  • About
  • Privacy Policy
  • Home
  • Dinner
  • Desserts
  • Drinks
  • Appetizers
  • Contact
  • About
  • Privacy Policy
  • Cookie Policy
  • GDPR Policy
  • Disclaimer
  • Terms Of Use
Visit my other site: Fun Cookie Recipes

HOME / CATEGORIES /

Latest

- Salmon fillet details: Use 1 pound of skinless salmon. Cut it into bite-sized cubes. Fresh salmon gives the best taste. - Honey and soy sauce: Combine 3 tablespoons of honey and 3 tablespoons of soy sauce. This mix creates a sweet and salty flavor. - Garlic and ginger: Use 2 cloves of minced garlic and 1 tablespoon of grated fresh ginger. These add depth to the dish. - Green onions: Slice 2 green onions thinly. They add a nice crunch and fresh taste. - Sesame seeds: Use sesame seeds for garnish. They bring a nutty flavor and a beautiful look. - Salt and pepper: Add salt and pepper to taste. These simple seasonings enhance all the flavors. {{ingredient_image_1}} To start, you need to mix the marinade. In a bowl, whisk together three tablespoons of honey, three tablespoons of soy sauce, two minced garlic cloves, one tablespoon of grated ginger, and one tablespoon of sesame oil. This blend gives the salmon its sweet and savory taste. Marination time is key. Let the salmon cubes sit in this mixture for at least 15 minutes. If you can, marinate them for up to an hour in the fridge. This time allows the flavors to soak in, making each bite more delicious. Next, heat your skillet over medium-high heat. You want it hot, but not smoking. Once ready, add your marinated salmon pieces. Be sure to keep some marinade aside for later. Sear each side for about 2 to 3 minutes. You want a nice golden color and a cooked-through center. The salmon should feel firm but tender. Now, it's time to thicken the sauce. If you like, add the reserved marinade to the skillet. Cook it for an additional 1 to 2 minutes. This step helps create a richer flavor. Season with salt and pepper to taste. Finally, take the salmon off the heat. Garnish it with sliced green onions and sesame seeds. This adds a fresh look and crunch to your dish. Serve it hot and enjoy every bite! To get a great glaze on your honey garlic salmon bites, caramelization is key. Start with a hot skillet. This helps seal in the flavors. Sear each piece for 2-3 minutes. Look for a golden color on the outside. If you want to adjust the sweetness, add more honey or soy sauce. Balance is important. Taste as you go. For leftovers, let the salmon cool completely. Place it in an airtight container. This keeps it fresh. Store it in the fridge for up to three days. When reheating, a skillet is best. Heat it on medium. Add a splash of water or broth to keep it moist. Avoid microwaving, as it can dry out the salmon. You need a few tools for this recipe. A sharp knife makes cutting the salmon easier. Use a mixing bowl for the marinade. A whisk helps blend the ingredients well. A non-stick skillet is ideal for cooking. This prevents sticking and helps with even cooking. Have some toothpicks on hand for serving. They make eating the bites fun and easy! Pro Tips Marination Time: Allowing the salmon to marinate for at least 15 minutes enhances its flavor. For even more depth, marinate it in the refrigerator for up to 1 hour. Cooking Temperature: Make sure the skillet is preheated properly. A hot skillet ensures a good sear and caramelization, locking in the moisture of the salmon. Garnish for Appeal: Adding fresh green onions and sesame seeds not only enhances the presentation but also adds a fresh crunch that complements the dish. Serving Suggestion: Serve the salmon bites on a bed of fresh greens and drizzle with extra sauce for added flavor and visual appeal. Use toothpicks for easy serving! {{image_2}} You can spice up your honey garlic salmon bites. Adding a pinch of chili flakes gives heat. You can also mix in sriracha for a bold kick. For a fresh twist, try lemon or lime juice. Citrus adds a zesty note that brightens the dish. If you want a different protein, chicken works well. Cut chicken into small pieces and marinate just like the salmon. For a vegan option, use firm tofu. Press the tofu to remove extra water, then cut it into cubes. Tofu soaks up flavors wonderfully when marinated. Pair your salmon bites with fresh sides. A light salad or steamed veggies complements the dish. You can also serve them with a creamy dip like garlic aioli. For parties, arrange the bites on a colorful platter. Add toothpicks for easy serving. Drizzle extra sauce over the bites for flair and flavor. To keep your honey garlic salmon bites fresh, store them properly. Place them in an airtight container. Refrigerate within two hours of cooking. The salmon will stay good for 3 to 4 days in the fridge. If you want to store them longer, freezing is a great option. Lay the salmon bites on a tray and freeze them for about two hours. After they are firm, transfer them to a freezer-safe bag. They can last up to three months in the freezer. Cooked salmon bites last about 3 to 4 days in the fridge. Make sure to check for any signs of spoilage. If the salmon looks dull or has an off smell, it’s best to toss it. A slimy texture also indicates spoilage. Always trust your senses to keep your food safe. You can reuse the marinade, but do it safely. If you have leftover marinade, it should be cooked before using it again. This kills any bacteria from the raw fish. To be extra safe, simmer the marinade in a pan for a few minutes. Avoid using it directly after marinating the salmon. This ensures you enjoy every bite without worry. I recommend marinating the salmon for at least 15 minutes. This allows the flavors to soak into the fish. For a deeper flavor, you can marinate it for up to 1 hour in the refrigerator. Just remember to keep it covered to prevent any odors from affecting the taste. Yes, you can bake honey garlic salmon bites. Preheat your oven to 400°F (200°C). Place the marinated salmon bites on a lined baking sheet. Bake for about 12-15 minutes, or until they are cooked through. This method gives you a crispy finish without using a skillet. I love serving salmon bites with a fresh salad or steamed veggies. Here are some great options: - Steamed broccoli or asparagus - A light cucumber salad - Rice or quinoa for a hearty touch - Roasted sweet potatoes for sweetness These sides balance the rich flavor of the salmon and add freshness to your meal. In this post, we explored the key ingredients and steps to make delicious honey garlic salmon bites. You learned about marinating, cooking techniques, and how to achieve the perfect glaze. I shared tips for storage and variations to keep your dishes exciting. Remember, making meals can be fun and creative. With practice, you'll master these salmon bites. Enjoy cooking and sharing your tasty creations!

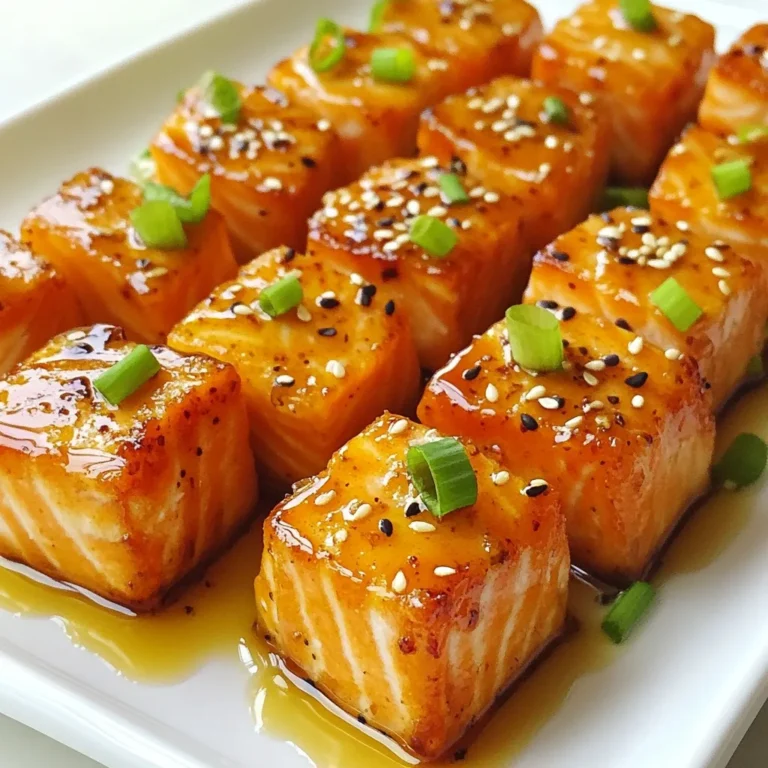
Honey Garlic Salmon Bites Irresistible Flavor Delight

- 1 lb ground beef or chicken - 1 tablespoon olive oil - 1 small onion, finely chopped - 2 cloves garlic, minced - 1 tablespoon chili powder - 1 teaspoon cumin - 1 teaspoon paprika - Salt and pepper to taste - 8 small corn tortillas - 1 cup chopped fresh cilantro - 1 cup diced tomatoes - 1 avocado, sliced - 1 cup crumbled queso fresco or feta cheese - Lime wedges for serving For a great taco, you need quality ingredients. Start with ground beef or chicken. They are easy to cook and full of flavor. Olive oil helps sauté the onion and garlic. This adds depth to your meat. The spices, like chili powder and cumin, give your tacos that authentic taste. Don't forget salt and pepper to bring everything together. Next, the tortillas are key. Small corn tortillas are perfect for street-style tacos. They should be warm and soft. When you add toppings, fresh vegetables like cilantro and tomatoes bring color and crunch. Avocado adds creaminess, and queso fresco gives a nice salty bite. Finally, squeeze lime on top for a fresh zing. - Freshly chopped onions - Sliced jalapeños - Salsa or pico de gallo - Hot sauce Tacos are fun because you can customize them. You can add freshly chopped onions for more bite. Sliced jalapeños can bring heat, if you like spice. Salsa or pico de gallo adds freshness and zest. A drizzle of hot sauce can make your tacos even more exciting. - Calories per serving: Approximately 400 - Breakdown of macros: - Protein: 25g - Carbohydrates: 30g - Fat: 20g These tacos are not just tasty; they can also fit into your meal plan. Each serving has around 400 calories. You get a good amount of protein from the meat. The carbs come from tortillas, which provide energy. Some healthy fats come from the avocado and cheese. Enjoying tacos can be both satisfying and nutritious! {{ingredient_image_1}} 1. In a large skillet, heat 1 tablespoon of olive oil over medium heat. 2. Add 1 small finely chopped onion and 2 minced garlic cloves to the skillet. 3. Sauté them for 3-4 minutes until they are soft and fragrant. 4. Next, add 1 pound of ground beef or chicken to the pan. 5. Break it up with a spatula and cook until it turns brown, about 5-7 minutes. 1. Once the meat is cooked, stir in 1 tablespoon of chili powder, 1 teaspoon of cumin, and 1 teaspoon of paprika. 2. Season with salt and pepper to taste. 3. Cook this mixture for an additional 2 minutes. This helps the spices blend well and become fragrant. 4. For the best flavor, taste your mixture and adjust the spices if needed. 1. While the meat cooks, heat 8 small corn tortillas in a separate pan over medium heat. 2. Warm each tortilla for about 30 seconds on each side. This keeps them soft and pliable. 3. If you want extra flavor, you can also add a little oil to the pan while warming. 4. This way, they won’t break when you fill them with the meat mixture. To make your tacos shine, use fresh herbs and spices. Fresh cilantro adds a bright taste. It brings a burst of flavor that dried herbs can't match. Always season your meat well. A mix of chili powder, cumin, and paprika gives depth. Salt and pepper enhance everything, making each bite pop. Assembling your tacos like a pro is key. Start with a warm tortilla. Add a scoop of the meat mixture. Be generous! Then, layer on the toppings: chopped cilantro, diced tomatoes, and avocado slices. Finish with crumbled queso fresco. For garnishing, serve lime wedges on the side. A squeeze of lime adds a nice zing and looks great on the plate. When cooking meat, both a skillet and a grill work well. A skillet gives you nice browning and keeps the meat juicy. A grill adds a smoky flavor but watch it closely to avoid overcooking. For tortillas, avoid sogginess by warming them quickly. Heat them for about 30 seconds per side until just pliable. This keeps your tacos crisp and tasty. Pro Tips Quality Meat Matters: Choose high-quality ground beef or chicken for the best flavor and texture in your tacos. Warm Tortillas: Always warm your tortillas before assembling; this makes them more pliable and enhances their flavor. Fresh Ingredients: Use fresh cilantro, ripe avocados, and juicy tomatoes to elevate the freshness of your tacos. Experiment with Toppings: Feel free to add other toppings like pickled onions or jalapeños for an extra kick! {{image_2}} You can switch up the meat in your tacos. Using fish or shrimp gives a fresh twist. Grilled or sautéed, these proteins bring a light flavor to your meal. If you want to skip meat, try lentils or mushrooms. Lentils cook quickly and soak up spices well. Mushrooms add a rich, savory taste. Both options keep your tacos hearty and satisfying. Mexico has many regions, each with its own flavors. For example, tacos from Oaxaca use rich cheese and smoky spices. Tacos from Yucatán are bright with citrus and herbs. You can customize your spices too. If you love heat, add more chili powder or fresh peppers. For a milder taco, use less spice. Adjusting flavors makes your tacos unique to your taste. Tortillas are classic, but you can be creative. Lettuce wraps make a healthy and crunchy shell. They are low in carbs and full of freshness. You can also experiment with flavored tortillas. Try spinach or tomato tortillas for a fun look and taste. Use different colors to make your taco feast more exciting. To keep your tacos fresh, store the ingredients separately. This helps maintain their texture and flavor. Place the meat in an airtight container. The same goes for chopped veggies and toppings. Use a different container for tortillas. Always label containers with the date. This helps you keep track of freshness. When storing in the fridge, ensure it is at or below 40°F. You can keep leftover meat for up to three days. Veggies like tomatoes and avocado may spoil faster. Use them within two days for the best taste. If you want to save tacos for later, freezing is a great option. You can freeze cooked meat and tortillas separately. Place the meat in a freezer-safe bag. Press out as much air as possible. For tortillas, stack them with parchment paper in between. This prevents them from sticking together. When ready to eat, thaw the meat overnight in the fridge. For tortillas, you can warm them in a dry skillet. To reheat meat, use a microwave or skillet. Heat until it's hot throughout, around 165°F. Cooked meat can last about three to four days in the fridge. Always check for any off smells. Fresh produce should be used quickly. Tomatoes may last up to a week, while avocado stays fresh for about two days once cut. Store veggies in a cool place, away from sunlight, to keep them crisp. Street-style tacos are simple, flavorful tacos found on streets in Mexico. They often use small corn tortillas and fresh ingredients. The filling can be meat or veggies, seasoned with spices. You can top them with fresh cilantro, diced tomatoes, and cheese. These tacos focus on bold flavors and easy assembly. To add heat to your tacos, use chili powder or fresh jalapeños. You can also try hot sauce or crushed red pepper. Another great tip is to mix in diced chipotle peppers while cooking the meat. This adds a smoky flavor and extra heat. Adjust the spice level to fit your taste. Yes, you can prepare tacos in advance! Cook the meat and store it in the fridge. You can heat it up when ready to serve. Keep the tortillas and toppings separate to maintain freshness. When reheating, warm the tortillas briefly so they stay soft. This way, your tacos taste fresh and delicious at gatherings. Street-style tacos are easy to make and fun to eat. We covered key ingredients like ground beef or chicken, fresh veggies, and the right spices. You learned how to prepare the meat and heat tortillas for soft tacos. Topping and presenting tacos makes them even better. Remember to explore variations and try different proteins or flavor profiles. With proper storage, you can save leftovers for later. Enjoy your taco nights, and feel confident making them unique each time!

Street Style Mexican Tacos Flavorful and Simple Recipe

- 2 ripe bananas, mashed - 1/2 cup unsalted butter, melted - 1/2 cup brown sugar - 1/4 cup granulated sugar - 2 large eggs - 1 teaspoon vanilla extract - 1 teaspoon baking soda - 1/2 teaspoon baking powder - 1/4 teaspoon salt - 1 1/2 cups all-purpose flour - 1/2 cup semi-sweet chocolate chips - 1/4 cup chopped walnuts (optional) To make these delightful muffins, you need just the right ingredients. The ripe bananas give natural sweetness and moisture. The butter adds richness to each bite. Using both brown and granulated sugar enhances the flavor and texture. The eggs bind the mixture and create a fluffy texture. The vanilla extract adds warmth and depth. Baking soda and baking powder help the muffins rise perfectly. Don't forget the salt; it balances the sweetness. All-purpose flour forms the base of the muffins. Semi-sweet chocolate chips melt slightly, adding delicious chocolate pockets. If you like, toss in walnuts for a crunchy twist. - Variations for health-conscious options - Alternative sweeteners If you want a healthier version, consider using whole wheat flour. This adds fiber and nutrients. You can swap the butter for coconut oil or applesauce to reduce fat. For sweeteners, try maple syrup or honey instead of sugar. These options keep the muffins tasty while making them a bit lighter. {{ingredient_image_1}} First, preheat your oven to 350°F (175°C). This step warms the oven and helps the muffins rise. Next, line your muffin tin with paper liners or grease it with cooking spray. This prevents the muffins from sticking. In a mixing bowl, combine the two ripe bananas and 1/2 cup of melted butter. Mix until smooth. The bananas add moisture and flavor. After that, add 1/2 cup of brown sugar and 1/4 cup of granulated sugar. Stir until everything blends well. Beat in two large eggs, one at a time. Follow with 1 teaspoon of vanilla extract for a sweet touch. In a separate bowl, sift together 1 1/2 cups of all-purpose flour, 1 teaspoon of baking soda, 1/2 teaspoon of baking powder, and 1/4 teaspoon of salt. Sifting helps to aerate the flour. Next, slowly add the dry mixture to the wet ingredients. Use a spatula to fold gently. Avoid over-mixing; this keeps the muffins soft and fluffy. Now, fold in 1/2 cup of semi-sweet chocolate chips. If you like, you can also add 1/4 cup of chopped walnuts for extra crunch. Spoon the batter into the prepared muffin tin. Fill each cup about 3/4 full. This allows room for the muffins to rise nicely. Bake for 18-20 minutes. To check for doneness, insert a toothpick into the center of a muffin. If it comes out clean, your muffins are ready. Let the muffins cool in the tin for about 5 minutes. Then, transfer them to a wire rack to cool completely. Enjoy the delightful smell as they cool! To get the best muffins, focus on even cooking and a nice rise. Start by preheating your oven to 350°F (175°C). This ensures the heat is just right. Use a light-colored muffin tin. Dark tins can cook the outside too fast. Fill each muffin cup about 3/4 full. This helps them rise evenly without spilling over. To keep your muffins moist, use ripe bananas. The riper, the better! They add more moisture and sweetness. Also, avoid over-mixing the batter. Mix until just combined, and your muffins will stay soft. Garnishing is key to a pretty muffin. Dust the cooled muffins with powdered sugar. This adds a sweet touch. You can serve them on a wooden platter. Add a few banana slices and chocolate chips around the muffins for flair. Pair these muffins with a warm cup of coffee or tea. The rich flavors of chocolate and banana go perfectly with both drinks. If your muffins are too dense, check how you mixed the batter. Over-mixing can make them heavy. If this happens, try folding the ingredients gently next time. For baking time, keep an eye on your muffins. Every oven is different. If your oven runs hot, start checking them at 15 minutes. Use a toothpick to test doneness. If it comes out clean, your muffins are ready. Pro Tips Use Overripe Bananas: The riper the bananas, the sweeter and more flavorful your muffins will be. Look for bananas with brown spots for the best results. Experiment with Mix-Ins: Feel free to customize your muffins! Try adding dried fruits, coconut flakes, or different nuts for varied textures and flavors. Don’t Overmix: When combining wet and dry ingredients, mix gently until just combined. Overmixing can lead to tough muffins. Check for Doneness: To ensure your muffins are perfectly baked, insert a toothpick into the center. It should come out clean or with a few moist crumbs, not wet batter. {{image_2}} You can easily change up your muffins with spices. Adding a teaspoon of cinnamon gives warmth. Nutmeg adds a nice touch too. You can also mix in dried fruits like raisins or cranberries. Want more chocolate? Use dark chocolate chips or white chocolate chunks instead. These small changes can make your muffins unique and fun. If you need gluten-free muffins, swap all-purpose flour for a gluten-free blend. Make sure the blend has a good taste. For a vegan version, replace eggs with flax eggs. Use a plant-based butter or oil in place of regular butter. These swaps keep your muffins tasty and light. You can adapt your muffins to the seasons. In summer, add fresh berries like strawberries or blueberries. For fall, try pumpkin puree or chopped apples with cinnamon. Winter is great for warm spices like ginger or cloves. Each season brings new flavors to enjoy. To keep your chocolate chip banana bread muffins fresh, store them in an airtight container. This helps to lock in moisture. I suggest using a container that fits the muffins well. You want them snug but not squished. You can also use a resealable plastic bag. Just make sure to remove as much air as possible before sealing. If you want to store muffins for a longer time, freezing is great. First, let the muffins cool completely. Then, wrap each muffin tightly in plastic wrap. Place them in a freezer bag or container. Label it with the date. To reheat, take out a muffin and unwrap it. Place it in the microwave for about 15-20 seconds. This keeps it soft and warm. If you want a crisp top, heat it in the oven for about 5 minutes at 350°F (175°C). When stored properly, these muffins last about 3-4 days at room temperature. In the fridge, they can stay fresh for about a week. Look for signs of spoilage like mold or an off smell. If they feel hard or dry, they are past their prime. Enjoy them while they are still soft and tasty! To help muffins rise well, use fresh baking powder and baking soda. These ingredients create bubbles in the batter. Also, avoid over-mixing. Mix just until you see no dry flour. Filling each muffin cup about 3/4 full also helps. This gives them room to grow. Yes, you can use frozen bananas. Just thaw them first and mash them well. Frozen bananas can add more moisture and sweetness to your muffins. They may also be easier to mash when soft. If you don't have brown sugar, use granulated sugar instead. You can add a little molasses if you have it. One tablespoon of molasses mixed with white sugar makes a quick brown sugar substitute. This gives your muffins a similar taste. To check if the muffins are done, insert a toothpick into the center. If it comes out clean, they are ready. You can also gently press the top. If it springs back, they are done. Yes, you can turn this recipe into a loaf. Pour the batter into a greased loaf pan. Bake for about 50-60 minutes at the same temperature. Check for doneness with a toothpick as you would with muffins. Enjoy your banana bread! In this post, we explored how to make perfect muffins. You learned about the key ingredients, step-by-step instructions, and helpful tips. Whether you want to add chocolate chips or try a healthy twist, there’s a muffin for everyone. Remember to store and reheat them properly for the best taste. With practice, you can avoid common problems and impress anyone with your baking skills. Enjoy your muffin-making journey, and don’t hesitate to try new flavors. Your kitchen can be a space of creativity and fun!

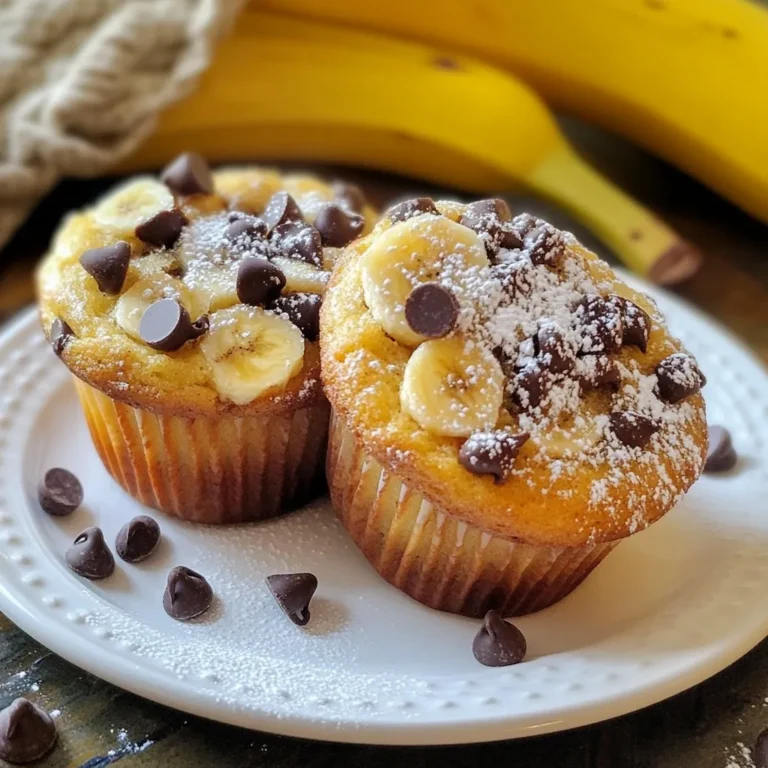
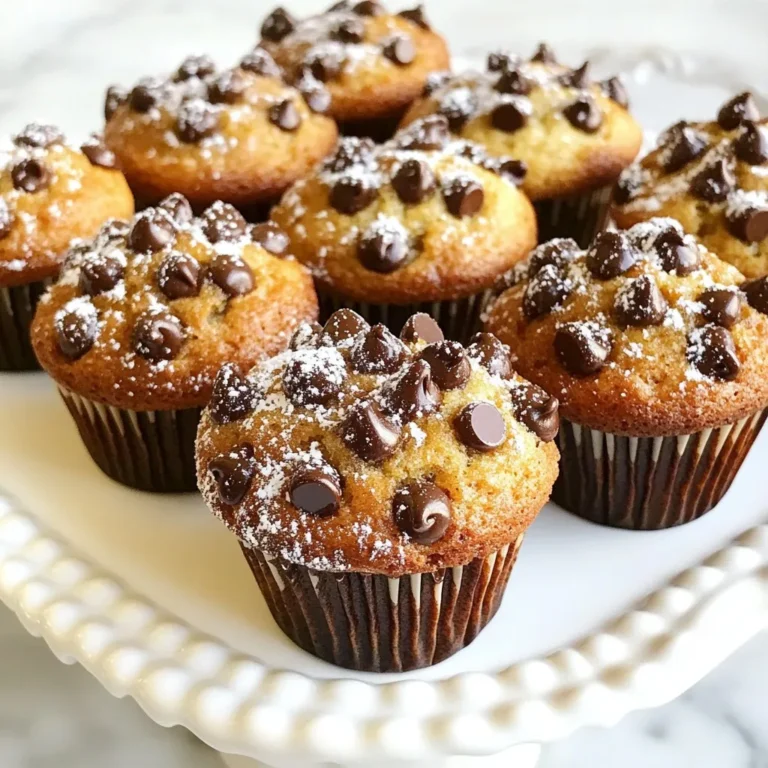
Chocolate Chip Banana Bread Muffins Delightful Treat

- 1 lb ground beef - 1 medium onion, chopped - 2 cloves garlic, minced - 1 cup breadcrumbs - 1 large egg The heart of this dish is the ground beef. It gives the meal its rich flavor. I like to use fresh beef for the best taste. The onion and garlic add depth and aroma. Chopping the onion finely helps it blend well. The minced garlic brings a strong kick. Breadcrumbs help bind the mixture, while the egg adds moisture. Together, these ingredients create a savory beef patty. - 1 teaspoon Worcestershire sauce - 1 teaspoon dried oregano - Salt and pepper, to taste - 1 cup shredded cheddar cheese - Fresh parsley, for garnish Worcestershire sauce adds a tangy twist to the beef. Dried oregano brings a classic herb flavor. I always add salt and pepper for balance. The cheese melts beautifully on top, making it extra tasty. Fresh parsley is not just for looks, it adds freshness too. - 4 large potatoes, thinly sliced - 2 cups beef broth Potatoes act as a hearty base for this dish. They soak up the broth's flavor, making them tender. I prefer using large potatoes for more texture. The beef broth is essential, giving moisture and richness. It helps cook the potatoes just right, ensuring they are soft and full of flavor. {{ingredient_image_1}} First, preheat your oven to 375°F (190°C). This step ensures even cooking. Next, take a large bowl and mix the ground beef, chopped onion, and minced garlic. Add breadcrumbs, the egg, Worcestershire sauce, and oregano. Don’t forget to add salt and pepper to taste. Mix everything until it is well blended. Form this mixture into four equal patties. Now, heat a skillet over medium heat. Sear each patty for about 3-4 minutes on each side. This step adds a nice brown crust. Once they are browned, remove them from the skillet and set them aside. In a greased 9x13 inch baking dish, layer the thinly sliced potatoes at the bottom. Season the potatoes with salt and pepper. Pour the beef broth over the potatoes. Make sure the potatoes are mostly submerged. Place the seared hamburger patties on top of the potato layer. Cover the baking dish with aluminum foil. Bake it in the preheated oven for 45 minutes. After 45 minutes, take off the foil. Sprinkle shredded cheddar cheese on top of the patties. Bake it for an additional 15 minutes. The cheese will melt and get bubbly, and the potatoes will be tender. When done, let it cool for a few minutes. Garnish with fresh parsley before serving. To make great patties, focus on texture. Use 80/20 ground beef for juiciness. Mix the beef gently with onions, garlic, breadcrumbs, egg, and seasonings. Don’t overwork the meat. This keeps your patties tender. Add flavor enhancements with Worcestershire sauce and dried oregano. These ingredients make each bite tasty. Adjust salt and pepper to your taste. For potatoes, I recommend using Yukon Gold or Russet. These types cook well and add creaminess. Slice them thinly for even cooking. This helps them become soft and tender in the bake. Layer the potatoes evenly at the bottom of the dish. This way, they soak up the beef broth flavor. Add salt and pepper before pouring on the broth. Serve Amish Hamburger Steak Bake with simple sides. Steamed green beans or a fresh salad work well. These sides add color and crunch to your plate. For garnishes, sprinkle chopped fresh parsley on top. It adds a nice pop of color and freshness. You can also serve with a dollop of sour cream for extra creaminess. Pro Tips Choose the Right Beef: Opt for ground beef with a higher fat content (around 80/20) for juicier patties that won't dry out during cooking. Season Generously: Don't skimp on seasoning your beef mixture. A well-seasoned patty is key to enhancing the overall flavor of the dish. Layering Potatoes: For even cooking, try to slice your potatoes uniformly. This ensures they cook through at the same rate and become perfectly tender. Let it Rest: After baking, let the dish rest for a few minutes before serving. This allows the juices to redistribute, making every bite more flavorful. {{image_2}} You can swap ground beef for turkey or chicken. This change makes the dish lighter. Ground turkey is leaner and still tasty. Ground chicken has a mild flavor that works well. For those who want a vegetarian option, try using lentils or black beans. Mash them to create a hearty base. You can even use a meat substitute like tempeh or tofu, crumbled to mimic the texture of meat. Spices can change the whole flavor of the dish. Try adding paprika for a smoky touch. A bit of cayenne can bring some heat if you like spice. Also, consider adding herbs like thyme or rosemary for a fresh twist. Seasonal vegetables can enhance the dish, too. In the fall, add carrots or parsnips for sweetness. In the summer, use zucchini or bell peppers for vibrant color. Cheddar cheese is classic, but you can explore other options. Try mozzarella for a creamy melt or pepper jack for a kick. If you want a sharper taste, go for gouda or gruyere. For non-dairy choices, use cashew cheese or almond-based cheese. These options can still provide that creamy texture. Always look for options that melt well to keep the dish satisfying. To keep your Amish Hamburger Steak Bake fresh, store leftovers in the fridge. Place the dish in an airtight container. It helps to cover it tightly with plastic wrap or foil. You can store it for up to three days. If you want to keep it longer, freezing is a great option. Use freezer-safe containers or bags. Make sure to label them with the date. This allows you to keep it for up to three months. When reheating, the best method is using the oven. Preheat your oven to 350°F (175°C). Place the bake in an oven-safe dish and cover it with foil. This keeps it from drying out. Heat for about 20-25 minutes. You can also use the microwave for quick reheating. Just cover the dish to keep moisture in, and heat in short bursts, checking often. This helps keep the dish flavorful and moist. In the fridge, your Amish Hamburger Steak Bake lasts about three days. If it’s frozen, it can stay good for about three months. Always check for signs of spoilage before eating. Look for any off smells, discoloration, or mold. If you see any of these signs, it’s best to throw it away. Keeping an eye on your food ensures you enjoy it safely. To make Amish Hamburger Steak Bake, start by gathering your ingredients. You will need: - 1 lb ground beef - 1 medium onion, chopped - 2 cloves garlic, minced - 1 cup breadcrumbs - 1 large egg - 1 teaspoon Worcestershire sauce - 1 teaspoon dried oregano - Salt and pepper, to taste - 4 large potatoes, thinly sliced - 2 cups beef broth - 1 cup shredded cheddar cheese - Fresh parsley, for garnish Steps: 1. Preheat your oven to 375°F (190°C). 2. In a large bowl, mix the ground beef, chopped onion, minced garlic, breadcrumbs, egg, Worcestershire sauce, oregano, salt, and pepper. 3. Form the mixture into 4 patties. 4. In a skillet, sear the patties on medium heat for 3-4 minutes on each side. 5. In a greased baking dish, layer the thinly sliced potatoes. Season the potatoes with salt and pepper. 6. Pour beef broth over the potatoes. 7. Place the seared patties on top of the potatoes. 8. Cover with foil and bake for 45 minutes. 9. Remove the foil, add cheese on top, and bake for another 15 minutes. 10. Once done, let it cool and garnish with parsley. Yes, you can prepare Amish Hamburger Steak Bake ahead of time. Here are some tips for meal prep: - Make the beef mixture: You can mix the ground beef and seasonings a day ahead. Store it in the fridge. - Slice the potatoes: Prepare and slice the potatoes in advance. Keep them in water to prevent browning. - Assemble and refrigerate: You can layer the dish with potatoes and beef broth in the baking dish. Cover it and keep it in the fridge. - Bake when ready: Just remember to add extra time for baking if starting from cold. Amish Hamburger Steak Bake pairs well with a variety of side dishes. Here are some great suggestions: - Green beans: Steamed or sautéed green beans add color and crunch. - Salad: A fresh garden salad balances the hearty dish. - Corn: Sweet corn complements the flavors nicely. - Biscuits: Soft biscuits are great for soaking up the juices. - Applesauce: A side of applesauce adds a sweet touch. These sides enhance your meal and make it even more comforting! This blog post covered the essentials for making a tasty Amish Hamburger Steak Bake. We discussed the key ingredients like ground beef and potatoes, and shared step-by-step cooking instructions. Tips on perfecting your patties and using various cheeses added extra flavor. Remember, you can customize the dish with different meats or veggies. Store leftovers properly to enjoy them later. Making this hearty meal is easy and rewarding, so gather your ingredients and start cooking!

Amish Hamburger Steak Bake Hearty and Comforting Dish

Let's get into what you need for these Chocolate Chip Banana Bread Muffins. The right ingredients make all the difference. Here’s my list for you: - 3 ripe bananas, mashed - 1/3 cup melted coconut oil (or vegetable oil) - 1/2 cup brown sugar - 1 large egg, beaten - 1 teaspoon vanilla extract - 1 teaspoon baking soda - Pinch of salt - 1 teaspoon ground cinnamon - 1 1/2 cups all-purpose flour - 1 cup semi-sweet chocolate chips - 1/2 cup chopped walnuts (optional) Each ingredient plays a key role. The ripe bananas add natural sweetness and moisture. Coconut oil keeps the muffins soft. Brown sugar gives a rich taste. The egg helps bind everything. Vanilla extract adds a warm flavor. Baking soda makes the muffins rise. Salt enhances all the tastes. Ground cinnamon adds a cozy spice. All-purpose flour gives structure, while chocolate chips provide that delightful chocolate burst. If you like, add walnuts for crunch and extra flavor. These ingredients come together to create a warm, comforting treat. Enjoy gathering them all to make this easy recipe! {{ingredient_image_1}} 1. Preheat your oven to 350°F (175°C). This step is key to even baking. 2. Prepare your muffin tin by lining it with paper liners or greasing it lightly. 3. In a large bowl, combine 3 ripe bananas and 1/3 cup of melted coconut oil. Mash them well. This mixture gives your muffins moisture. 4. Add 1/2 cup of brown sugar to the banana mix. Stir until it is smooth. 5. Beat in 1 large egg and 1 teaspoon of vanilla extract. This adds flavor and richness. 6. Sprinkle 1 teaspoon of baking soda, a pinch of salt, and 1 teaspoon of ground cinnamon over the mixture. Stir well to blend these dry ingredients. 7. Gradually mix in 1 1/2 cups of all-purpose flour. Do this gently to avoid over-mixing, which can make the muffins tough. 8. Now, fold in 1 cup of semi-sweet chocolate chips and 1/2 cup of chopped walnuts, if you like. This adds texture and a delicious crunch. 9. Divide the batter evenly into the prepared muffin cups, filling each about 3/4 full. 10. Bake in your preheated oven for 18-22 minutes. To check for doneness, insert a toothpick into the center. If it comes out clean, your muffins are ready. Enjoy your warm, fresh muffins! To get the best chocolate chip banana bread muffins, avoid over-mixing your batter. Mix until just combined. This keeps your muffins fluffy and light. Over-mixing makes them tough. Testing for doneness is easy. Stick a toothpick into the center of a muffin. If it comes out clean, your muffins are ready. If there’s wet batter, bake for a few more minutes. If you don’t have coconut oil, you can use vegetable oil. It works well and keeps the muffins moist. You can also use melted butter for a richer flavor. For sugar, you can swap out brown sugar for white sugar. This change makes muffins a bit less sweet. You can also try using honey or maple syrup for a fun twist. To present your muffins, arrange them on a nice platter. A sprinkle of powdered sugar adds a special touch. Serve them warm with butter or honey for extra flavor. This makes every bite delightful! Pro Tips Use Overripe Bananas: The riper your bananas, the sweeter and more flavorful your muffins will be. Look for bananas that are heavily speckled and soft to the touch. Don’t Overmix: Mix the batter just until the flour is incorporated. Overmixing can lead to dense muffins, so be gentle with your mixing. Customize Your Add-Ins: Feel free to experiment with different add-ins like dried fruits, chocolate chunks, or spices to create your own unique flavor combinations. Store Properly: To keep your muffins fresh, store them in an airtight container at room temperature for up to 3 days, or freeze them for longer storage. {{image_2}} You can easily change the taste of your muffins. Try adding spices like nutmeg or ginger. These spices give a warm, cozy flavor. You just need a little bit. Start with 1/4 teaspoon for a nice kick. Another fun twist is using dark chocolate chips. They add a rich taste that pairs well with bananas. Dark chocolate also has less sugar, making it a great choice for those who want a bit of bitterness with their sweet. If you need a gluten-free option, swap all-purpose flour for a gluten-free blend. Many brands work well and give great results. You can also check if they are safe for your needs. For a vegan adaptation, replace the egg with a flax egg. To make a flax egg, mix 1 tablespoon of ground flaxseed with 3 tablespoons of water. Let it sit for a few minutes until it thickens. You can also use a plant-based oil instead of coconut oil. This way, you can enjoy the muffins without any animal products. After baking, let the muffins cool in the tin for five minutes. This helps them set. Then, move them to a wire rack to cool fully. Cooling helps keep the muffins soft. To store them, place the muffins in an airtight container. Keep them at room temperature for up to three days. If you want to store them longer, follow the freezing instructions below. To freeze muffins, first, let them cool completely. Then, wrap each muffin in plastic wrap. After that, place them in a freezer-safe bag or container. Be sure to remove as much air as possible. This keeps them fresh and avoids freezer burn. When you're ready to eat a muffin, remove it from the freezer. You can thaw it in the fridge overnight or use the microwave. For the best texture, warm it in the microwave for 15-20 seconds. Enjoy your thawed muffin with a bit of butter or honey for a tasty treat! Can I use frozen bananas? Yes, you can use frozen bananas. Just let them thaw first. This adds sweetness and moisture to your muffins. Mash them well before mixing. How long do banana muffins last? Banana muffins can last up to five days at room temperature. Store them in an airtight container to keep them fresh. If you want them to last longer, refrigerate them for up to a week. Can I make mini muffins instead? Absolutely, you can make mini muffins! Just fill the mini muffin cups about halfway. Bake them for about 10-15 minutes. Check for doneness with a toothpick. What to do if muffins are dense? Dense muffins often mean too much flour or over-mixing. Make sure to measure flour correctly. Use the spoon and level method. Mix just until combined for a light texture. Fixing overly sweet muffins If your muffins taste too sweet, you can balance the sweetness. Add a pinch of salt to the batter. You can also reduce the sugar next time. Use less brown sugar for a better balance. This blog post walked you through making delicious banana muffins. We covered ingredients, step-by-step instructions, and handy tips to help you succeed. Remember, it's all about the right mix. Don't forget that using ripe bananas results in great flavor. You can also try variations for different tastes. Store your muffins well for freshness. If you have any questions, refer to the FAQs. Enjoy making and sharing these tasty treats!

Chocolate Chip Banana Bread Muffins Deliciously Simple

- 1 cup almond butter - 1/2 cup honey or maple syrup - 1 1/2 cups rolled oats - 1/2 cup unsweetened shredded coconut - 1/2 cup dark chocolate chips - 1/2 cup chopped almonds - 1/4 teaspoon sea salt - 1 teaspoon vanilla extract These ingredients create a tasty and filling snack. Almond butter gives a creamy base. Honey or maple syrup adds sweetness. Rolled oats provide fiber and bulk. Shredded coconut brings a tropical twist. Dark chocolate chips add rich flavor and fun. Chopped almonds give crunch. Sea salt balances sweetness. Vanilla extract enhances all the flavors. - Nut butter variations: You can swap almond butter for peanut butter or sunflower seed butter. Both work well in this recipe. - Sweetener options: If you prefer, use agave syrup or brown rice syrup instead of honey or maple syrup. They add sweetness and moisture. - Oat alternatives: For a gluten-free option, use gluten-free oats. You can also use puffed rice or quinoa flakes for a different texture. These swaps can help you tailor the bars to your taste or dietary needs. {{ingredient_image_1}} 1. Mixing the wet ingredients In a large mixing bowl, add 1 cup of almond butter and 1/2 cup of honey or maple syrup. Stir them together until smooth. This mix gives your bars a sweet and creamy base. 2. Incorporating the dry ingredients Next, add 1 teaspoon of vanilla extract and 1/4 teaspoon of sea salt. Mix well. Gradually stir in 1 1/2 cups of rolled oats, 1/2 cup of unsweetened shredded coconut, 1/2 cup of chopped almonds, and 1/2 cup of dark chocolate chips. Keep stirring until all ingredients blend nicely. 3. Preparing the baking dish Grab an 8x8 inch square baking dish. Line it with parchment paper, letting some paper hang over the sides. This makes it easy to lift the bars out later. Pour your mixture into the dish and press it down firmly. Use a spatula or your hands to create a flat layer. 1. Refrigeration process Cover the dish with plastic wrap and place it in the fridge. Chill for at least 1 hour. This helps the bars set and become firm. 2. Techniques for cutting After chilling, take the dish out. Use the parchment overhang to lift the bars out. Place the block on a cutting board. Use a sharp knife to slice it into squares or rectangles. 3. Tips for even-sized bars For even bars, measure your cuts carefully. You can mark lines with a knife before cutting. This way, each piece looks nice and uniform. Enjoy your homemade Almond Joy Energy Bars! To keep your Almond Joy Energy Bars fresh, use an airtight container. This helps maintain their taste and texture. You can store them in the fridge for up to two weeks. For longer storage, freeze them in a sealed bag. They will stay good for about three months in the freezer. You can boost the flavor of your bars with optional mix-ins. Try adding dried fruits like cranberries or raisins for a sweet touch. You can also toss in seeds like chia or flax for extra crunch. If you prefer a sweeter bar, adjust the honey or maple syrup. Add a little more to reach your desired sweetness. Pair your energy bars with drinks like almond milk or herbal tea. They make a great snack before or after a workout. You can also crumble them over yogurt or oatmeal for a tasty breakfast. Mixing them into smoothies adds a nice texture and flavor boost. Pro Tips Use Room Temperature Almond Butter: This helps in mixing the ingredients smoothly and evenly. Customize Your Sweetener: Feel free to adjust the honey or maple syrup amount based on your sweetness preference. Add a Protein Boost: Consider mixing in protein powder for an extra nutritional punch. Experiment with Mix-Ins: Try adding dried fruits, seeds, or different types of nuts for variety in texture and flavor. {{image_2}} You can play with flavors in your Almond Joy Energy Bars. Here are some ideas: - Coconut and almond variations: Use more shredded coconut or different nuts. You might try cashews or hazelnuts for a twist. - Adding dried fruits or seeds: Dried cranberries or raisins add sweetness. Pumpkin seeds or sunflower seeds bring crunch and nutrition. - Incorporating spices like cinnamon: A dash of cinnamon can warm up the flavor. It pairs well with chocolate and coconut. You can adapt this recipe for different diets. Here are some options: - Gluten-free adaptations: Use certified gluten-free oats. This ensures your bars are safe for those with gluten sensitivities. - Vegan options: Substitute honey with maple syrup. Make sure your chocolate chips are dairy-free for a fully vegan treat. To keep your Almond Joy Energy Bars fresh, store them properly. - Refrigeration Guidelines: Place your bars in an airtight container. They last for up to 2 weeks in the fridge. This cool environment helps maintain their texture and flavor. - Freezing Instructions: For longer storage, freeze the bars. Wrap each bar in plastic wrap and place them in a freezer-safe bag. They stay good for up to 3 months in the freezer. Just thaw them in the fridge before enjoying. You want to eat fresh bars, so watch for spoilage. - Signs of Spoilage: Look for any odd smells or changes in color. If the bars feel sticky or have a strange texture, it’s best to throw them away. - Best Practices for Freshness: Always use clean hands when handling the bars. This helps avoid germs. Keeping them in an airtight container also prevents moisture and air from ruining their taste. Almond Joy Energy Bars are a tasty and healthy treat. They mix almond butter, honey, oats, and chocolate. You get protein from nuts and energy from oats. These bars also have fiber from coconut. This snack is good for a quick bite or post-workout fuel. When we compare them to the original candy bar, the energy bars are much healthier. The candy bar has added sugars and fats. Almond Joy Energy Bars use natural sweeteners and wholesome ingredients. They give you the same great taste but with better nutrition. Yes! You can make Almond Joy Energy Bars without nuts. Instead of almond butter, use sunflower seed butter. This keeps the taste rich and creamy. You can also use pumpkin seed butter for a different flavor. Both options work well and keep the bars tasty. You can personalize Almond Joy Energy Bars many ways. Want more chocolate? Add extra dark chocolate chips. If you like fruit, try adding dried cranberries or raisins for a sweet twist. You can swap honey for maple syrup if you want a vegan option. For those with allergies, you can use gluten-free oats. This makes the bars safe for everyone. You can also change the nuts. Try hazelnuts or pecans for a new flavor. Just be sure to keep the main ingredients the same for best results. You now have a complete guide to making Almond Joy Energy Bars. We covered the main ingredients, step-by-step instructions, storage tips, and ways to customize your bars. Each step helps you create delicious, healthy snacks. Remember to experiment with flavors and storage for the best results. Enjoy your tasty creations, knowing they are good for you! Make your Almond Joy Energy Bars today and share them with family and friends. They’ll love them just as much as you do!

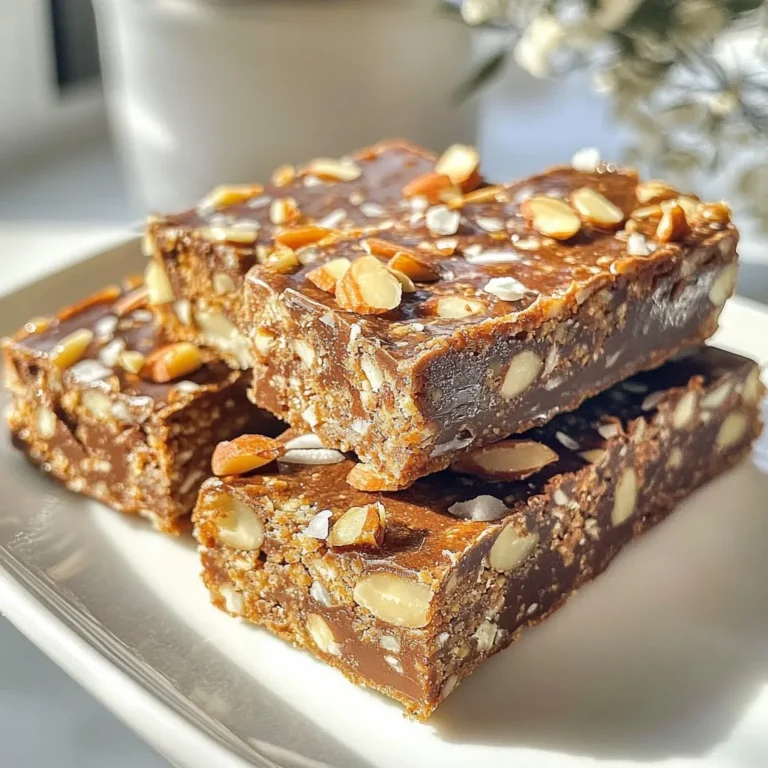
Almond Joy Energy Bars Simple and Delicious Recipe

To make blue cheese stuffed pears, gather these tasty items: - 4 ripe pears, halved and cored - 100g blue cheese, crumbled - 50g cream cheese, softened - 1 tablespoon honey - 1 tablespoon chopped walnuts (optional) - Fresh arugula leaves for garnish - Balsamic glaze for drizzling - Salt and pepper to taste - Use four ripe pears for sweetness. Halve and core them for easy stuffing. - Crumble 100 grams of blue cheese for a rich flavor. - Soften 50 grams of cream cheese for a creamy blend. - Add one tablespoon of honey to balance the cheese's sharpness. - If you like nuts, use one tablespoon of chopped walnuts for crunch. - Season with salt and pepper to enhance flavors. If you can’t find blue cheese, try goat cheese for a milder taste. Cream cheese can be swapped with mascarpone for a different texture. For sweetness, maple syrup works well instead of honey. If walnuts aren’t your thing, pecans or almonds can add a nice crunch. Use spinach or mixed greens if arugula isn’t available. {{ingredient_image_1}} To start, gather your ingredients: - 4 ripe pears, halved and cored - 100g blue cheese, crumbled - 50g cream cheese, softened - 1 tablespoon honey - 1 tablespoon chopped walnuts (optional) - Salt and pepper to taste 1. First, preheat your oven to 375°F (190°C). 2. Cut each pear in half lengthwise. 3. Use a spoon to scoop out a bit of the core. This makes room for the filling. 4. Next, in a bowl, mix the blue cheese, cream cheese, honey, and walnuts. 5. Stir until the mixture is creamy and smooth. 6. Add salt and pepper to the cheese mix to taste. 1. Now, fill each pear half with the cheese mixture. Pack it in well. 2. Place the stuffed pears on a baking sheet lined with parchment paper. 3. Bake in the oven for 15-20 minutes. Look for tender pears and bubbly cheese. 4. Once baked, remove the pears and let them cool slightly. 1. Arrange the warm pears on a nice platter. 2. Add fresh arugula leaves for a pop of color. 3. Drizzle balsamic glaze over the top just before serving. 4. These pears are perfect as a starter or light dessert. Enjoy! When choosing pears, look for ripe ones. They should feel slightly soft near the stem. I love using Bartlett or Anjou pears for this recipe. Both are sweet and juicy, perfect for stuffing with rich cheese. Avoid pears that are too hard. They won’t soften well in the oven. For a creamy filling, mix blue cheese with softened cream cheese. The cream cheese helps to mellow the strong flavor of blue cheese. Add honey for sweetness and balance. I recommend tasting the mixture before adding salt and pepper. You want it to be flavorful but not overpowering. If you like crunch, include chopped walnuts. They add a nice texture. Presentation matters! Arrange the stuffed pears on a pretty platter. Garnish with fresh arugula leaves for a pop of color. Drizzle balsamic glaze over the top for a touch of sweetness. This not only enhances the look but also boosts the flavor. Serve warm for the best taste experience. Pro Tips Choose the Right Pears: Opt for firm, ripe pears that will hold their shape during baking. Bartlett or Bosc varieties work particularly well. Mix Cheese to Taste: Adjust the ratio of blue cheese to cream cheese based on your preference for a stronger or milder flavor. Enhance with Spices: Consider adding a pinch of nutmeg or cinnamon to the cheese mixture for a warm, aromatic twist. Serve with a Side: Pair the stuffed pears with a light salad or crusty bread for a complete appetizer experience. {{image_2}} You can change the cheese for different tastes. Try goat cheese for a tangy flavor. It gives a creamy texture and is a great match for pears. Feta cheese offers a salty snap. Mix it with cream cheese for smoothness. If you want a milder taste, use ricotta. Ricotta is light and fluffy, making it a good base. Walnuts add crunch and flavor. If you want something else, try pecans. Pecans are sweet and work well with pears. Almonds are another option. They add a nice crunch and a hint of sweetness. You can chop them or use them whole, depending on your preference. If you want to make it nut-free, skip the nuts entirely. To make this dish vegan, use a plant-based cheese. Look for brands that mimic blue cheese. You can also mix cashew cream with nutritional yeast. This gives a cheesy flavor without dairy. Instead of honey, use maple syrup for sweetness. This keeps the dish sweet and vegan-friendly. The result is a tasty treat for all diets. To store blue cheese stuffed pears, keep them in an airtight container. Use parchment paper to separate layers if stacking. Place the container in the fridge. This keeps them fresh and safe to eat. They will last for about three days in the fridge. To reheat stuffed pears, preheat your oven to 350°F (175°C). Place the pears on a baking sheet. Heat for about 10 minutes or until warm. You can cover them with foil to prevent drying. Enjoy them warm for the best flavor. Freezing blue cheese stuffed pears is not ideal. The texture may change after thawing. If you must freeze them, place them in a freezer-safe container. They can stay frozen for up to a month. To serve, thaw in the fridge overnight and reheat as mentioned. Blue cheese stuffed pears stay fresh for about three days in the fridge. Keep them in an airtight container. After three days, the pears may lose their texture and flavor. Always check for any signs of spoilage before eating. Yes, you can make blue cheese stuffed pears ahead of time. Prepare the pears and fill them with the cheese mixture. Then, cover and store them in the fridge for up to a day. Bake them just before serving for the best taste. This method saves time and makes for easy entertaining. Blue cheese stuffed pears pair well with many foods. Here are some great options: - Walnuts: Their crunch adds texture. - Honey: A drizzle enhances sweetness. - Balsamic glaze: It gives a tangy kick. - Fresh arugula: The peppery taste balances the sweetness. - Red wine: A glass complements the flavors nicely. Try these pairings to create a delightful taste experience! In this article, we explored the essential ingredients for blue cheese stuffed pears, including measurements and substitutes. We provided detailed steps for preparation, baking, and serving. I shared tips for selecting the best pears and perfecting your cheese mix. Variations covered different cheese and nut options, plus a vegan version. Finally, we discussed storage tips and common questions. Blue cheese stuffed pears are easy and fun to make. Try your own twist!

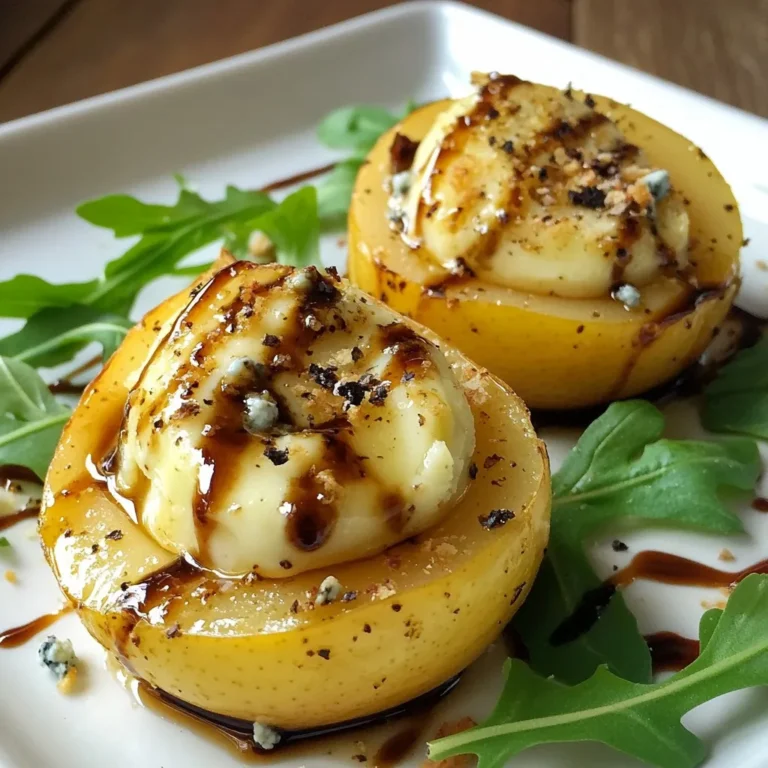
Blue Cheese Stuffed Pears Irresistible Flavor Delight

- 4 cups cranberry juice - 2 cups sparkling water - 1 cup fresh orange juice - 1/2 cup pomegranate seeds - 1/2 cup lime slices - 1/4 cup fresh mint leaves - 1/4 cup sugar (adjust to taste) - 1 tablespoon edible glitter (optional) - Ice cubes Using fresh ingredients makes your Pink Witch Punch taste great. Fresh orange juice gives a bright flavor. Pomegranate seeds add a pop of color and texture. Fresh mint leaves bring a lovely scent. When you use fresh items, your drink looks and tastes better. This makes it more fun for your guests. You can change some ingredients if you want. If you don’t have cranberry juice, try cherry juice. For sparkling water, you can use club soda for a similar fizz. If fresh orange juice isn’t available, bottled juice works too. You can also swap pomegranate seeds for blueberries or raspberries. These changes keep your punch fun and tasty! {{ingredient_image_1}} Start by grabbing a large punch bowl. Pour in 4 cups of cranberry juice. Next, add 1 cup of fresh orange juice. Sprinkle in 1/4 cup of sugar to taste. Stir well until the sugar dissolves completely. This forms the sweet base of your Pink Witch Punch. Now it’s time to add some fizz! Gently pour in 2 cups of sparkling water. Use a spoon to stir lightly. This keeps the bubbles intact. You want that refreshing sparkle! Next, add 1/2 cup of pomegranate seeds. They provide a burst of flavor and color. Then, toss in 1/2 cup of lime slices. They add a zesty kick! Finally, add 1/4 cup of fresh mint leaves for a nice aroma. If you want that magical touch, sprinkle 1 tablespoon of edible glitter on top. Fill glasses with ice cubes. Ladle the Pink Witch Punch over the ice. For a charming finish, garnish each glass with more mint leaves or a slice of lime. Enjoy your delightful drink! You can change the sweetness of Pink Witch Punch easily. Start with 1/4 cup of sugar. Stir it in until it dissolves. Taste the punch. If you want it sweeter, add more sugar. Always mix well. You can also try honey or agave syrup for a natural touch. These options give a unique flavor, too. A beautiful punch makes any party special. Use a clear punch bowl to show off the colors. Add ice cubes right before serving to keep it chilled. Garnish each glass with mint leaves or a lime slice. If you use edible glitter, sprinkle it on top for a sparkly effect. This adds a fun twist that guests will love. Serve your Pink Witch Punch in fun glasses. Use festive cups for Halloween or bright ones for summer. This drink suits many events, like parties or family gatherings. You can also create a punch station. Set out extra fruits, mint, and sugar for guests. Let them customize their drinks as they like. This makes the experience interactive and enjoyable. Pro Tips Chill Your Ingredients: For a refreshing punch, chill all your juice and sparkling water beforehand to keep the drink cool without diluting it with too much ice. Customize the Sweetness: Adjust the sugar according to your taste preferences and the tartness of the cranberry juice. Start with less and add more as needed. Garnish for Appeal: Use extra lime slices and mint leaves not only as a garnish but also to enhance the flavor profile of the punch. Make it a Mocktail: For a non-alcoholic version, this punch can be served as is, but you can also add a splash of your favorite non-alcoholic spirit for an adult twist. {{image_2}} For those who enjoy a kick, you can add alcohol to your Pink Witch Punch. A splash of vodka or gin works well. For a more fun twist, try adding rum for a tropical vibe. Use about 1 to 2 cups of your chosen spirit. This gives your punch a bold flavor and makes it perfect for parties. You can change the fruit in your punch to match the season or your taste. Try adding fresh strawberries or raspberries for a sweet touch. You can also mix in some diced apples or peaches for added texture. These fruits bring a burst of color and flavor. Play with different combinations until you find your favorite mix. Make your punch fit the season with a few simple changes. In fall, add some cinnamon sticks for warmth and spice. In winter, a splash of cranberry liqueur can give a festive feel. In summer, fresh berries and a bit of lemonade create a refreshing drink. You can even add seasonal herbs like rosemary for a unique flavor. To store leftover Pink Witch Punch, pour it into a clean jar or pitcher. Make sure to seal it tightly. This helps keep it fresh and fizzy. You can keep it in the fridge for up to three days. If you see any changes in color or smell, it’s best to toss it out. Always store the punch without ice. Ice melts and can water down the flavor. If you want to keep it fizzy, add the sparkling water just before serving. This keeps the bubbles alive and makes it a fun drink. Also, avoid mixing in the fresh fruit and mint until you serve it. This will help keep the flavors bright and fresh. You can freeze Pink Witch Punch for later use! Pour the punch into ice cube trays. This way, you can use it later in drinks. Just pop out a few cubes when you need them. You can also freeze it in a freezer-safe container. Remember to leave some space at the top, as liquids expand when frozen. Use the frozen punch within three months for the best taste. Yes, you can make Pink Witch Punch a few hours ahead. Mix the juices and sugar first. Then, add the sparkling water and fresh ingredients just before serving. This keeps the fizz and flavor fresh. If you don’t have edible glitter, try using colored sugar. You can also use star-shaped sprinkles for a fun look. Just remember, the goal is to add sparkle and fun to your drink. Absolutely! Pink Witch Punch is perfect for kids. It has no alcohol and uses fresh juices. The lovely color and fizz make it a hit at any party. Once made, Pink Witch Punch lasts about 2 to 3 hours. It may lose some fizz after that, but the taste remains good. Store it in the fridge to keep it cool. Yes! You can mix other juices like pineapple or apple. Feel free to experiment with flavors. Just keep the balance of sweet and tart for the best taste. In this post, I shared how to make Pink Witch Punch. We covered essential ingredients and fresh substitutes. I outlined steps to mix your punch and add fun elements. You learned tips for sweetness and best serving ideas. Variations allow you to switch flavors or add sparkle. Storing leftovers was also discussed. Making punch can be easy and fun. You can impress guests with colorful drinks. Enjoy experimenting with your favorite flavors! Happy mixing!

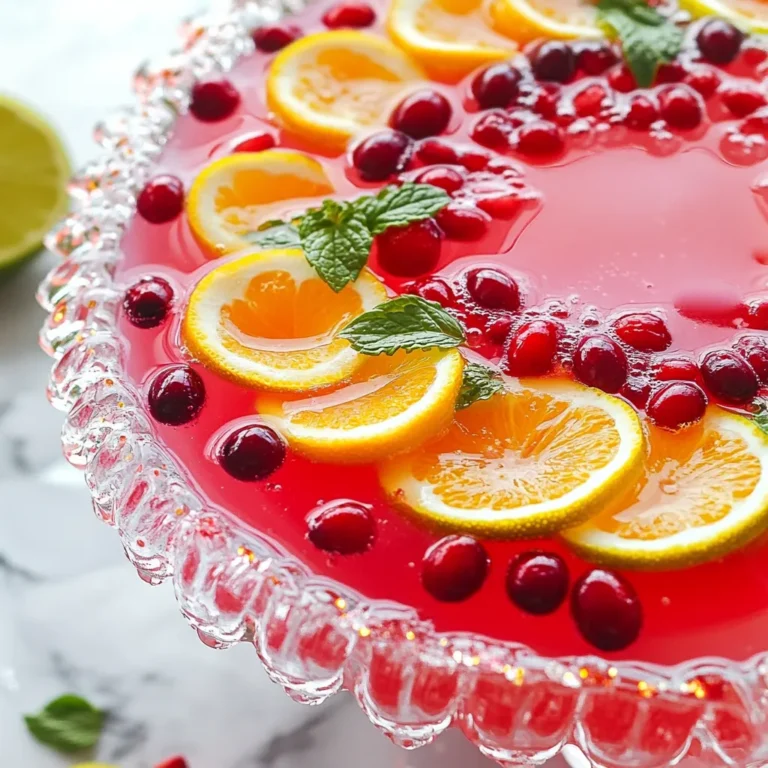
Pink Witch Punch Festive and Refreshing Drink Recipe

- 8 oz egg noodles - 1 lb boneless, skinless chicken breast - 1 bell pepper, sliced - 1 cup snap peas - 1 cup carrots, julienned - 3 green onions, sliced - 2 tablespoons soy sauce - 1 tablespoon oyster sauce - 1 tablespoon sesame oil - 1 tablespoon vegetable oil - 2 garlic cloves, minced - 1 inch ginger, grated - Salt and pepper to taste - Sesame seeds, for garnish (optional) To make Chicken Lo Mein, you need a few key ingredients. The egg noodles give it a nice chewy texture. Boneless chicken breast adds protein and flavor. For vegetables, I love adding bell pepper, snap peas, and carrots. These veggies not only add color but also crunch. The green onions add a fresh bite to the dish. The sauces are important for flavor. Soy sauce gives it a salty taste, while oyster sauce adds a hint of sweetness. Sesame oil brings a nutty aroma that makes it special. Aromatics like garlic and ginger create a lovely base. They make the dish fragrant and inviting. Finally, if you want, sprinkle sesame seeds on top for a nice finish. Gather all these ingredients, and you’re ready to cook a delicious Chicken Lo Mein! {{ingredient_image_1}} To start, cook the egg noodles. Follow the package instructions. Aim for al dente; they should be firm but not hard. Once cooked, drain the noodles in a colander. Set them aside to cool. For the chicken, you will need a few simple ingredients. Combine 2 tablespoons of soy sauce, 1 tablespoon of oyster sauce, and a pinch of salt in a bowl. Add 1 pound of thinly sliced chicken breast to the bowl. Mix well and let it marinate for 15 minutes. This step adds great flavor. Now, let’s get to the fun part. Heat 1 tablespoon of vegetable oil in a large skillet or wok over medium-high heat. Once hot, add the marinated chicken. Stir-fry for about 5 to 7 minutes until the chicken is fully cooked. Remove the chicken and set it aside. In the same skillet, add 2 minced garlic cloves and 1 inch of grated ginger. Toss in 1 sliced bell pepper and stir-fry for 2 to 3 minutes. These will make your kitchen smell amazing. Next, add 1 cup of snap peas and 1 cup of julienned carrots. Stir-fry for another 3 to 4 minutes until the veggies are tender-crisp. Now, it’s time to combine everything. Return the chicken to the skillet. Add the cooked noodles and 1 tablespoon of sesame oil. Toss everything together over medium heat for 2 to 3 minutes. Make sure all the flavors blend well. Adjust seasoning with salt and pepper as needed. Finish with sliced green onions and optional sesame seeds. Serve hot, and enjoy! To get crisp vegetables, heat your skillet well before adding them. Use high heat for a quick cook. This keeps veggies crunchy and bright. For optimal noodle texture, cook them until they are al dente. This means they should still have a slight bite. Drain them well and toss them with a bit of oil to prevent sticking. To boost the taste of your Chicken Lo Mein, try adding red pepper flakes or five-spice powder. These spices add warmth and depth. You can also use hoisin or chili sauce for a different flavor twist. Each sauce brings its own unique kick to the dish. Serve your Chicken Lo Mein in deep bowls for a nice presentation. Garnish with green onions and a sprinkle of sesame seeds for color. You can pair it with spring rolls or a light salad to round out the meal. These sides add crunch and freshness. Pro Tips Marinating Matters: Allow the chicken to marinate for at least 15 minutes to enhance its flavor and tenderness. Veggie Variations: Feel free to swap in your favorite vegetables like bok choy or mushrooms for a unique twist on this dish. Perfect Noodles: Make sure to cook the egg noodles just until al dente to ensure they hold their shape when stir-frying. Heat Control: Keep the skillet or wok at medium-high heat to achieve that perfect stir-fry sear without overcooking the ingredients. {{image_2}} You can switch up the protein in Chicken Lo Mein. Shrimp makes a great option. It cooks fast and adds a nice flavor. Tofu is perfect for a vegetarian choice. It soaks up all those tasty sauces. Beef is another alternative. Thinly sliced beef can give a hearty twist to this dish. Feel free to swap in different vegetables. Seasonal veggies can change the dish's flavor. Try using broccoli or bok choy in the spring. Zucchini or asparagus work well in summer. In fall, add butternut squash for sweetness. Winter calls for hearty greens like kale. Mixing your vegetables keeps the recipe fresh and exciting. If you need gluten-free options, use rice noodles. They taste great and keep the dish light. Low-sodium soy sauce is another smart choice. It helps cut down on salt without losing flavor. This way, you can enjoy Chicken Lo Mein while staying health-conscious! To keep Chicken Lo Mein fresh, cool it to room temperature first. Then, place it in an airtight container. Make sure to store it in the fridge. Properly stored, it lasts for about 3 to 4 days. This keeps the flavors intact and the chicken safe to eat. When you’re ready to eat your leftovers, reheat them on the stove. Add a splash of water or broth to help steam the noodles. Stir everything gently over medium heat. This helps keep the texture nice and the flavors bright. You can also use a microwave, but be careful not to overheat, as this can dry out the chicken. Yes, you can freeze Chicken Lo Mein! Just make sure it has cooled completely. Place it in a freezer-safe container, leaving some space for expansion. It stays good for about 2 to 3 months in the freezer. For best flavor, eat it sooner rather than later. When you're ready to eat, thaw it in the fridge overnight before reheating. Chicken Lo Mein lasts about 3 to 4 days in the fridge. Store it in an airtight container. This keeps it fresh longer. Check for any signs of spoilage before eating. Yes, you can make Chicken Lo Mein ahead of time. Prepare the dish, cool it, and store it in the fridge. This makes it easy for busy days. Just reheat it on the stove or in the microwave. To prevent noodles from sticking, rinse them under cold water after cooking. This cools them down and removes excess starch. You can also toss them with a bit of sesame oil to keep them separate. Absolutely! You can add more vegetables to Chicken Lo Mein. Consider adding broccoli, mushrooms, or baby corn. This not only boosts flavor but also adds color and nutrition. The main difference is in the noodle type and cooking method. Chow Mein uses crispy fried noodles, while Lo Mein uses soft, boiled noodles. Lo Mein is typically tossed in sauce after cooking, making it saucier. In this post, we explored how to make Chicken Lo Mein. We covered all the key ingredients and their roles, from egg noodles to the right sauces. I shared step-by-step cooking tips to help you stir-fry like a pro. Don't forget the options for protein and veggies to make it your own. Lastly, I provided storage advice to keep your leftovers fresh. Now, you can enjoy a delicious, homemade meal anytime. Enjoy your cooking adventure!

Chicken Lo Mein Flavorful Stir-Fry Recipe Today

To make a tasty Cheesy Hamburger Potato Casserole, you need these key ingredients: - 1 pound ground beef - 4 large potatoes, peeled and thinly sliced - 1 medium onion, diced - 2 cups shredded cheddar cheese - 1 cup sour cream - 1 cup beef broth - 2 cloves garlic, minced - 1 teaspoon paprika - Salt and pepper to taste - 2 tablespoons olive oil These ingredients come together to create layers of flavor and comfort. You can add some special touches to boost the taste: - 1 cup crushed crispy fried onions (for topping) These crispy onions add a fun crunch on top of the dish, making it even better. If you need to swap some items, here are some suggestions: - Use ground turkey instead of ground beef for a lighter option. - Swap sour cream with Greek yogurt for a tangy twist. - Try different cheeses like mozzarella or pepper jack for a unique flavor. - Use vegetable broth instead of beef broth for a vegetarian version. These swaps keep the dish tasty while fitting your needs. {{ingredient_image_1}} Start by gathering your ingredients. You will need: - 1 pound ground beef - 4 large potatoes, peeled and thinly sliced - 1 medium onion, diced - 2 cups shredded cheddar cheese - 1 cup sour cream - 1 cup beef broth - 2 cloves garlic, minced - 1 teaspoon paprika - Salt and pepper to taste - 2 tablespoons olive oil - 1 cup crushed crispy fried onions (optional for topping) This mix of ingredients creates a tasty base for our casserole. In a large skillet, heat the olive oil over medium heat. Add the diced onion and minced garlic. Sauté these for about five minutes, until the onion turns clear. Then, add the ground beef. Break it apart with a spatula as it cooks. Keep cooking until it turns brown and is cooked through. Season this mixture with paprika, salt, and pepper for flavor. Once done, remove it from heat. In a big bowl, combine the sliced potatoes, cooked beef mixture, sour cream, and beef broth. Stir well until the potatoes are fully coated. Next, grease a 9x13 inch baking dish. Layer half of the potato mixture at the bottom. Sprinkle half of the shredded cheddar cheese on top. Then, add the rest of the potato mix and finish with the remaining cheese. If you want, sprinkle some crushed crispy fried onions on top for crunch. Preheat your oven to 375°F (190°C). Cover the casserole with aluminum foil and bake it for 30 minutes. After that, take off the foil and bake for another 15-20 minutes. When done, the top should be golden, and the potatoes tender. Let it cool for a few minutes before serving. This will help the layers to set. Enjoy your cheesy hamburger potato casserole! To get the best potatoes, slice them thin. Thin slices cook evenly and absorb flavors well. Use a sharp knife or a mandoline for quick and even cuts. Soak the sliced potatoes in cold water for 20 minutes before cooking. This helps remove excess starch, leading to a creamier texture. Pat them dry with a towel to avoid excess moisture in the casserole. You can easily boost the taste of your casserole. Add some spices like cumin or chili powder for a kick. You can also mix in some sautéed bell peppers or mushrooms for extra veggies. For a creamy touch, swap out some sour cream with cream cheese. If you love heat, consider adding diced jalapeños or a dash of hot sauce. Serve this cheesy casserole hot from the oven for the best taste. For a fresh touch, top with chopped green onions or parsley. Pair it with a crisp salad or some steamed veggies to balance the richness. Fresh bread or rolls are also great for soaking up the tasty sauce. You can even serve it with a side of pickles for some tang! Pro Tips Use Fresh Ingredients: Always opt for fresh potatoes and ground beef for the best flavor and texture. Layering Technique: Make sure to evenly layer the potatoes and cheese to ensure every bite is cheesy and delicious. Adjusting Seasoning: Taste your beef mixture before combining it with the potatoes; adjust the seasoning according to your preference. Crispy Topping: For extra crunch, add the crispy fried onions in the last 10 minutes of baking to prevent them from burning. {{image_2}} You can make a tasty vegetarian version of this casserole. Instead of ground beef, use a mix of veggies. Try mushrooms, bell peppers, and zucchini. You can also add black beans for protein. Replace beef broth with vegetable broth. This keeps the flavor rich. Use the same amount of potatoes and cheese. The cooking time stays the same. This dish will be just as creamy and filling. Spice things up by adding jalapeños. Chop fresh jalapeños and mix them with the beef. If you want more heat, add them to the potato layer too. You can also use pepper jack cheese instead of cheddar. This adds a nice kick. Adjust the amount of salt and pepper to taste. This version is great for those who love heat in their meals. Cheese lovers can have fun mixing things up! Try using mozzarella, gouda, or even feta. Each cheese will give a different taste. For a richer flavor, combine different cheeses. Use half cheddar and half gouda, for example. You can also sprinkle some parmesan on top for an extra cheesy crust. Experimenting with cheese makes this casserole even more exciting. To store leftovers, let the casserole cool. Then, place it in an airtight container. You can keep it in the fridge for up to three days. If you want to keep it longer, consider freezing it. To reheat, take the casserole out of the fridge. Preheat your oven to 350°F (175°C). Cover the dish with foil to keep it moist. Bake for about 20-25 minutes, or until hot. You can also microwave individual portions for quick meals. To freeze the casserole, wrap it well in plastic wrap and then foil. Make sure it is sealed tight to prevent freezer burn. It can last up to three months. When you're ready to eat, thaw it in the fridge overnight before reheating. This makes it easy to have a tasty meal ready anytime. Cheesy Hamburger Potato Casserole lasts about 3 to 4 days in the fridge. Store it in an airtight container. To keep it fresh, ensure it cools down before sealing. Yes, you can make this casserole ahead of time. Prepare it up to the baking step. Cover it well and store it in the fridge for up to 24 hours. When ready, just bake it as usual. You can serve this casserole with a simple side salad. A fresh garden salad adds nice crunch and color. You can also pair it with steamed vegetables or garlic bread for a complete meal. This blog post covered all you need for a delicious Cheesy Hamburger Potato Casserole. We talked about ingredients, cooking steps, and tips to make it great. You learned about tasty variations and how to store leftovers. You can enjoy multiple meals from one dish while mixing in your favorite flavors. Remember, with a few changes, you can make it suit your taste. Happy cooking, and enjoy your new favorite casserole!

Cheesy Hamburger Potato Casserole Tasty and Simple Recipe

PREV 1 … 74 75 76 … 86 NEXT
spicy fork kitchen

explore

DessertsDinnerAppetizersDrinks

Our Policies

  • Cookie Policy
  • Copyright Policy
  • Disclaimer
  • GDPR Policy
  • Terms Of Use
Back to Top
  • About
  • Contact Us
  • Privacy Policy
© 2026 spicy fork kitchen