FREE DINNER EBOOK! Get your copy!
  • Cookie Policy
  • GDPR Policy
  • Disclaimer
  • Terms Of Use
  • Visit my other site: Fun Cookie Recipes
spicy fork kitchen
  • Home
  • Dinner
  • Desserts
  • Drinks
  • Appetizers
  • Contact
  • About
  • Privacy Policy
  • Home
  • Dinner
  • Desserts
  • Drinks
  • Appetizers
  • Contact
  • About
  • Privacy Policy
  • Cookie Policy
  • GDPR Policy
  • Disclaimer
  • Terms Of Use
Visit my other site: Fun Cookie Recipes

HOME / CATEGORIES /

Latest

To make creamy beef pasta, you need: - 8 oz (225 g) fettuccine or your pasta of choice - 1 lb (450 g) ground beef - 1 medium onion, finely chopped - 3 cloves garlic, minced - 1 cup heavy cream - 1 cup beef broth - 1 cup grated Parmesan cheese - 1 tablespoon olive oil - 1 teaspoon Italian seasoning - Salt and fresh ground black pepper, to taste - Fresh parsley, chopped (for garnish) Gathering these ingredients sets you up for a tasty meal. Each item plays a key role. The beef adds protein, while cream gives it that rich taste. While I often use fettuccine for this dish, you can choose other pasta types too. Here are some great options: - Penne - Rotini - Linguine - Farfalle Pasta shapes like penne or rotini hold the sauce well. This makes every bite creamy and flavorful. To make your creamy beef pasta even better, consider these add-ins and garnishes: - Sautéed mushrooms - Spinach or kale - Red pepper flakes for heat - Extra cheese on top These options let you customize your dish. You can add veggies or spice for more flavor. Garnishing with fresh parsley not only looks nice but adds freshness too! {{ingredient_image_1}} 1. First, bring a large pot of salted water to a boil. 2. Cook 8 oz of fettuccine until it is al dente. This takes about 8-10 minutes. 3. Drain the pasta and set it aside. 4. In a large skillet, heat 1 tablespoon of olive oil over medium heat. 5. Add 1 finely chopped onion to the skillet and cook for 2-3 minutes. 6. Next, add 1 lb of ground beef. Cook it until browned, about 5-7 minutes. 7. Break up the beef with a spoon as it cooks. Drain any excess fat if needed. 8. Now, add 3 minced garlic cloves and 1 teaspoon of Italian seasoning. Cook for 1 minute. 9. Pour in 1 cup of beef broth and stir. Let it simmer for 5 minutes on low heat. 10. Stir in 1 cup of heavy cream and 1 cup of grated Parmesan cheese. 11. Mix until the cheese melts and the sauce is smooth. 12. Add salt and fresh ground black pepper to taste. 13. Toss in the cooked pasta and coat it well with the creamy beef sauce. 14. Serve hot, garnished with fresh chopped parsley. - Always use plenty of water when boiling pasta. - Add salt to the water before cooking. This adds flavor. - Stir the pasta often to prevent sticking. - Check the package for cooking time. Start tasting a minute before the time is up. - Drain the pasta but do not rinse it. This helps sauce stick better. - Use a large skillet for more space. This helps with even cooking. - Brown the beef well to enhance the flavor. - Don’t rush the simmering stage. This lets the flavors blend. - Stir the sauce often to prevent burning. - Adjust salt and pepper as needed for taste. When cooking ground beef, start with a hot skillet. This helps the beef brown well. Break the meat into small pieces as it cooks. This ensures even cooking. If there is too much fat, drain it before adding other ingredients. This keeps your dish lighter. To boost flavor, use fresh garlic and onion. They add depth to the dish. Italian seasoning brings warmth and herbal notes. Don’t forget to taste your beef as you cook. Adjust salt and pepper to your liking. A little bit of spice can also heighten the flavor. For a smooth sauce, stir in the heavy cream slowly. Combine it with the beef broth first. This helps the flavors meld together. Grated Parmesan cheese adds richness and helps thicken the sauce. If the sauce is too thick, add a bit more broth. If it’s too thin, simmer it longer. Pro Tips Cook Pasta Al Dente: Ensure your pasta is cooked al dente for the best texture. This will prevent it from becoming mushy when combined with the sauce. Use Fresh Garlic: Freshly minced garlic brings a brighter flavor compared to pre-minced options. It adds a lovely aroma and enhances the dish's overall taste. Adjust the Creaminess: If you prefer a lighter sauce, you can reduce the amount of heavy cream or substitute half-and-half for a less rich alternative. Garnish Generously: Don't skip the fresh parsley garnish! It adds a pop of color and a fresh flavor that balances the richness of the creamy sauce. {{image_2}} You can switch out ground beef for other proteins. Ground turkey works well for a lighter dish. Chicken breast, diced and cooked, also fits nicely. If you want a punch, try chorizo. It adds great spice and flavor. Each option brings a unique taste to the creamy sauce. For a vegetarian twist, use mushrooms instead of meat. Finely chop them and sauté until tender. You can also add lentils for protein. They cook quickly and absorb flavors well. Another good choice is plant-based meat. Many brands offer tasty options that mimic beef. Cheese can change the whole dish. Instead of Parmesan, try mozzarella for a gooey texture. Cheddar gives a sharp flavor that pairs nicely with beef. For a tangy twist, add goat cheese. It melts well and adds creaminess. Mix and match your favorites to find the best combo. Store your creamy beef pasta in an airtight container. Let it cool to room temperature first. This helps keep the pasta fresh. Place it in the fridge for up to three days. Make sure to label the container with the date. If you have a lot, consider dividing it into smaller portions. This makes it easy to grab a quick meal later. To reheat your creamy beef pasta, use the stove or microwave. If using the stove, add a splash of beef broth or cream to the pan. Heat on low, stirring often, until warm. If using the microwave, place it in a safe dish. Heat in short bursts, stirring in between. This keeps the pasta from drying out. You can freeze creamy beef pasta for up to three months. Use a freezer-safe container or bag. Remove as much air as you can to prevent freezer burn. When ready to eat, thaw it overnight in the fridge. Reheat as mentioned before. The pasta may be softer after freezing, but the flavor stays great! Yes, you can use any pasta you like. Fettuccine works well, but penne, rigatoni, or spaghetti are great options too. Just make sure to cook the pasta until al dente. This way, it holds its shape well in the creamy sauce. To add spice, try using red pepper flakes. Start with a pinch, then add more to taste. You can also use spicy Italian sausage instead of ground beef. Another option is to add diced jalapeños or a dash of hot sauce to the beef mixture. This gives a nice kick without changing the dish too much. This creamy beef pasta goes well with many sides. A fresh green salad adds crunch and brightness. Garlic bread is a classic choice, perfect for soaking up sauce. Roasted vegetables like broccoli or asparagus also balance the richness of the dish. Try serving it with any of these for a complete meal. You learned about key ingredients and how to cook creamy beef pasta. I shared tips on perfecting the sauce and suggested variations for different diets. Remember to store your leftovers properly and reheat them for the best taste. This dish is easy to adapt, making it great for everyone. Enjoy cooking, and have fun exploring your own twists on this classic meal!

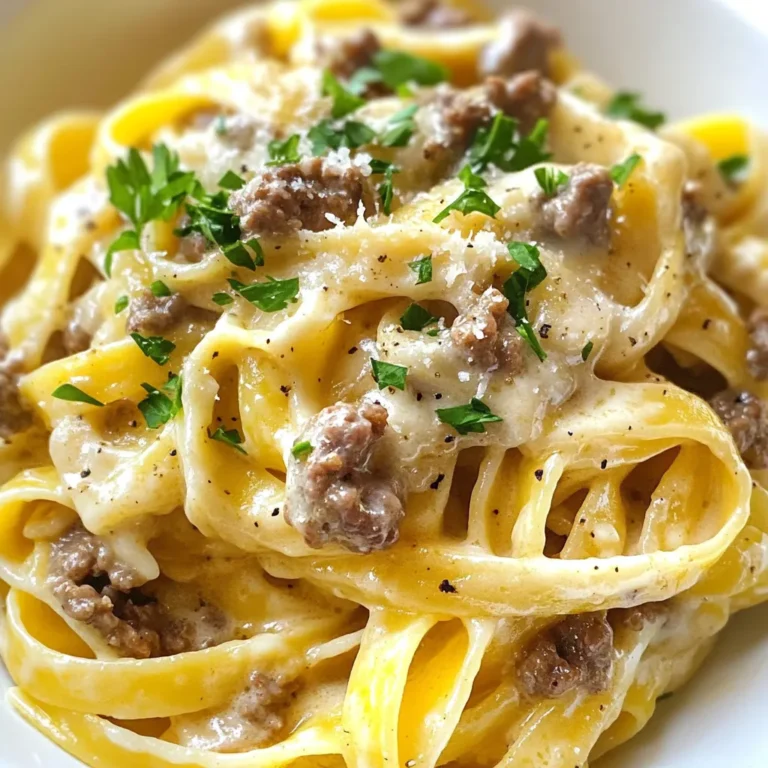
Creamy Beef Pasta Easy and Flavorful Recipe

- 2 ripe pears, thinly sliced - 1 cup mixed greens (arugula, spinach, and kale) - 1/2 cup walnuts, toasted - 1/4 cup crumbled goat cheese (or feta) - 1/4 cup dried cranberries - 3 tablespoons olive oil - 2 tablespoons apple cider vinegar - 1 tablespoon honey - Salt and pepper to taste When I choose pears, I look for ones that feel slightly soft. This means they are ripe and sweet. Use mixed greens that are fresh and vibrant. The greens bring color and crunch. For walnuts, toasting them enhances their flavor. Always pick high-quality cheese, whether goat or feta. It should be creamy and rich. Dried cranberries should be plump and sweet, adding a delightful pop of flavor. Use extra virgin olive oil for its rich taste. Opt for organic apple cider vinegar for a cleaner flavor. This salad is not just delicious; it's also good for you. Each serving packs a healthy dose of vitamins and minerals. Pears offer fiber and vitamin C. Greens provide iron and antioxidants. Walnuts add healthy fats, protein, and omega-3s. Goat cheese gives calcium and flavor. Dried cranberries add a touch of natural sweetness. The dressing, made with olive oil and vinegar, is heart-healthy too. Enjoy this salad guilt-free, knowing it's both nourishing and tasty! {{ingredient_image_1}} To make the Pear Walnut Bliss Salad, start by toasting your walnuts. Heat a dry skillet over medium heat. Add the walnuts and stir them for about 3 to 5 minutes. Watch them closely until they turn golden and smell great. This step brings out their rich flavor. Once done, remove them from heat and let them cool. Next, take a large salad bowl. Add mixed greens like arugula, spinach, and kale. Then, slice your ripe pears thinly and toss them into the bowl. Next, add in the toasted walnuts, crumbled goat cheese, and dried cranberries. Each ingredient adds a unique taste and texture. Now, let’s make the dressing. In a small bowl, whisk together 3 tablespoons of olive oil, 2 tablespoons of apple cider vinegar, and 1 tablespoon of honey. Add salt and pepper to taste. This dressing brings everything together with its sweet and tangy flavor. Drizzle the dressing over the salad. Gently toss the salad to coat all the ingredients. Let it sit for about 5 minutes. This allows the flavors to blend beautifully. Toasting walnuts is easy and crucial for flavor. Use a dry skillet for best results. Do not add oil; just the walnuts. Stir them frequently to prevent burning. Keep a close eye, as they can go from perfect to burnt quickly. You want them golden and fragrant. This step enhances their natural taste, making your salad even better. When assembling your salad, think about how it looks. Presenting it well makes it more appealing. Start with the mixed greens as a base. Layer the sliced pears on top for color. Then, sprinkle the toasted walnuts evenly over the salad. Add crumbled goat cheese and cranberries last for a nice touch. For an elegant finish, serve on individual plates or a large platter. Garnish with extra walnuts and pear slices. A drizzle of honey on top adds shine and sweetness. These simple steps make your salad not just tasty but also a feast for the eyes. To make your Pear Walnut Salad look stunning, serve it on individual plates or a large platter. This adds a personal touch. Garnish with extra walnuts and pear slices for an elegant look. A drizzle of honey on top adds sweetness and shine. This simple step makes your salad more inviting and fun. Feel free to mix up the greens. Instead of mixed greens, you can use only arugula or spinach. Both add a fresh taste. If goat cheese isn't your favorite, try feta or blue cheese. Each cheese brings its unique flavor. You can also add other fruits like apples or berries for more variety. For a flavor boost, add a pinch of cinnamon or nutmeg to the dressing. This adds warmth and depth. You can also toss in some sliced red onion for a savory bite. If you want more crunch, consider adding sunflower seeds or pumpkin seeds. These little changes can elevate your salad from good to great! Pro Tips Use Ripe Pears: Ensure your pears are ripe for optimal sweetness and flavor. A ripe pear will yield slightly when pressed and have a fragrant aroma. Toast the Walnuts: Toasting walnuts enhances their flavor and adds a delightful crunch. Keep an eye on them to prevent burning. Make Ahead: You can prepare the salad ingredients ahead of time. Just add the dressing right before serving to keep the greens fresh. Experiment with Cheeses: Feel free to substitute goat cheese with feta or blue cheese for a different flavor profile that pairs well with the sweet and tart notes of the salad. {{image_2}} You can change this salad with the seasons. In spring, try adding fresh strawberries. They add a sweet burst and color. In summer, peaches bring a juicy twist. Autumn is perfect for adding diced apples. They pair well with walnuts. In winter, pomegranate seeds add a pop of flavor and color. Each fruit brings its own taste, making this salad exciting all year. The dressing can change the whole salad. For a creamy touch, use yogurt or ranch dressing. A citrus vinaigrette with orange juice brightens the dish. If you want a bit of spice, try a chipotle vinaigrette. Mixing flavors keeps your taste buds happy. You can even try a balsamic glaze for a sweet and tangy kick. Adding proteins boosts the salad's nutrition. Grilled chicken is a great choice for a hearty meal. You can also try chickpeas for a plant-based option. Tofu or tempeh works well for a vegan twist. If you want more crunch, consider adding seeds like pumpkin or sunflower. These options make the salad filling and healthy. To store leftover salad, place it in an airtight container. This keeps the greens fresh. Make sure to keep the dressing separate. If you mix it all together, the salad gets soggy. You can store it this way for up to three days. The shelf life of the ingredients varies. Fresh pears last about one week in the fridge. Mixed greens stay fresh for about five days if stored properly. Walnuts can last for a month when kept in a cool, dark place. Goat cheese lasts about a week after opening. Dried cranberries can stay fresh for up to a year. I do not recommend freezing this salad. Freezing changes the texture of the greens and pears. However, you can freeze walnuts if you want. Just make sure to thaw them before adding to your salad. Refrigerating is the best way to keep your pear walnut salad fresh and tasty. I recommend using ripe Bartlett or Anjou pears. They are sweet and juicy. Their soft texture blends well with greens. You can also try Bosc pears for a firmer bite. Choose pears that give slightly when you press them. This shows they are ripe and ready to eat. You can prepare some parts ahead, but not all. I suggest slicing the pears just before serving. This keeps them from browning. You can mix the greens, walnuts, cheese, and cranberries earlier. Store them in the fridge. Just add the dressing right before eating. This will keep everything fresh and tasty. Yes, this salad is naturally gluten-free. All the ingredients are safe for gluten-free diets. Just confirm that any packaged items, like the cheese or nuts, are labeled gluten-free. This way, you can enjoy your salad worry-free. In this post, we explored the key ingredients for a delicious pear walnut salad. We discussed quality tips for each ingredient and gave an overview of the nutrition you can gain. I shared step-by-step instructions on how to prepare the salad, along with helpful tips for toasting walnuts and assembly techniques. You learned about presentation suggestions, flavor enhancements, and ways to customize your salad. We also highlighted seasonal variations, alternative dressings, and options for adding extra nutrition. Finally, I provided storage tips to keep your salad fresh. With these insights, you can easily create a tasty, healthy salad that meets your needs. Enjoy the flavors and share this with others!

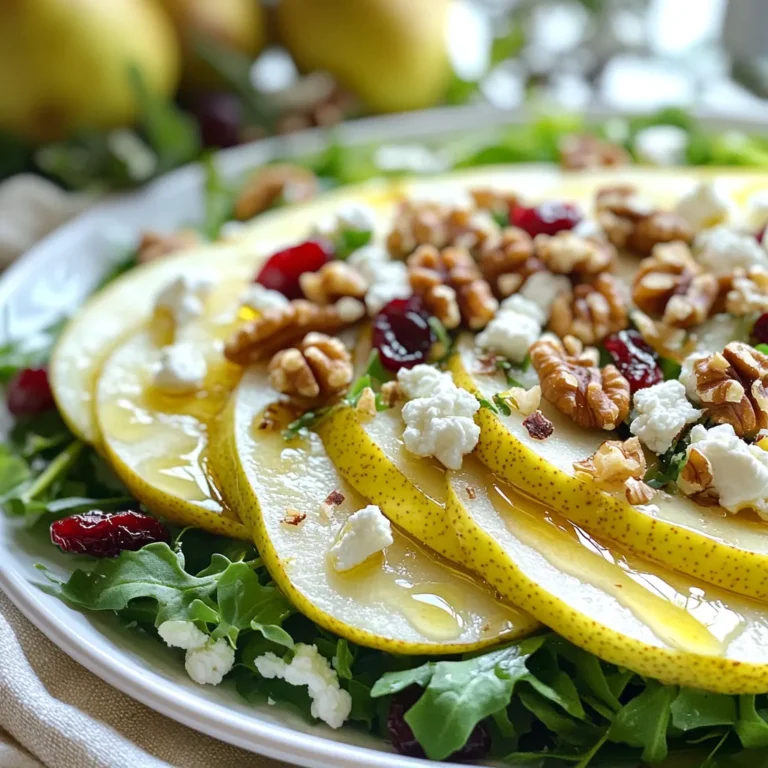
Pear Walnut Salad Fresh and Flavorful Delight

- 1 can (15 oz) chickpeas, drained and rinsed - 1 medium red bell pepper, roasted (store-bought or homemade) - 2 tablespoons tahini Chickpeas are the heart of hummus. They give it body and protein. Roasted red bell pepper adds a sweet, smoky taste. You can roast one at home or buy it from the store. Tahini gives hummus a rich, creamy feel. It comes from ground sesame seeds and adds depth. - 2 tablespoons olive oil - 2 tablespoons lemon juice - 1 garlic clove, minced Olive oil makes the hummus smooth and adds flavor. Lemon juice brightens the taste. The garlic gives a nice kick. You can adjust the amount of garlic to fit your taste. - 1/2 teaspoon ground cumin - Salt to taste - Paprika and parsley for garnish (optional) Ground cumin adds warmth and earthiness. Salt brings all the flavors together. For garnish, paprika adds color, and parsley gives a fresh touch. These make your hummus look as good as it tastes! {{ingredient_image_1}} 1. Preheat oven to 450°F. This helps the pepper cook well. 2. Roast and peel the pepper. Cut the red bell pepper in half. 3. Remove the seeds and place it cut-side down on a baking sheet. 4. Roast for about 20 minutes, until the skin is charred and blackened. 5. Let it cool for a bit. The skin will come off easier once it’s cool. 6. Peel the skin off the roasted pepper. Set it aside for later. 1. Combine ingredients in food processor. In the food processor, add the chickpeas, roasted red bell pepper, tahini, olive oil, lemon juice, minced garlic, ground cumin, and a pinch of salt. 2. Adjusting consistency with water. Blend the mixture until it’s smooth. If it’s too thick, slowly add water. Blend again until you reach your desired creaminess. Scrape down the sides of the bowl as needed. 1. Season to taste. Taste your hummus and add more salt, lemon juice, or garlic if you want. 2. Garnish before serving. Transfer your hummus to a bowl. Drizzle with olive oil and sprinkle paprika and chopped parsley on top for a nice look. Enjoy with pita or veggies! To get the best hummus, blending is key. The smoother the blend, the creamier the dip. I recommend using a food processor for this task. If your hummus is too thick, add water slowly. Start with a tablespoon, then blend again. Keep adding until you reach your desired creaminess. You can amp up the flavor with spices and herbs. Try adding smoked paprika or fresh herbs like cilantro. Each spice changes the taste and makes it unique. Feel free to play with the amounts. Sometimes, a little more garlic or lemon juice can make a big difference. To enjoy your hummus, pair it with fresh veggies or pita chips. Carrots, cucumbers, and bell peppers are great choices. For a fun twist, use it as a spread on sandwiches. You can also create a hummus platter with olives and cheese for a delightful snack. Pro Tips Roast Your Own Peppers: Roasting your own red bell peppers can enhance the flavor of your hummus. Just remember to let them cool before peeling off the skin for the best texture. Adjusting Consistency: If your hummus is too thick, gradually add water while blending until you reach your desired smoothness. This ensures a creamy texture that’s easy to dip. Storage Tips: Store leftover hummus in an airtight container in the refrigerator. It can last up to a week and often tastes even better the next day as the flavors meld. Creative Variations: Experiment with different spices or add-ins like roasted garlic, sun-dried tomatoes, or even a pinch of cayenne for a spicy kick to customize your hummus. {{image_2}} You can easily switch up your roasted red pepper hummus. Here are two tasty ideas: - Spicy Roasted Red Pepper Hummus: Add a sliced jalapeño or a dash of cayenne pepper. This gives your hummus a nice kick. Start with a little spice, then taste and add more if needed. - Sun-Dried Tomato or Olive Hummus: Blend in sun-dried tomatoes or olives for a rich flavor. This adds a Mediterranean twist. Just chop them finely before mixing. Hummus can fit various diets with simple swaps: - Vegan Alternatives: The basic recipe is already vegan. You can add extra veggies or nuts for more flavor. - Low-FODMAP Options: Use garlic-infused oil instead of fresh garlic. This keeps the taste strong without the FODMAPs. You can serve hummus in many fun ways: - Dips, Spreads, or Salad Additions: Use it as a dip with fresh veggies or pita chips. Spread it on sandwiches for extra flavor. You can even mix it into salads for creaminess. - Serving with Different Cuisines: Pair it with Middle Eastern dishes like falafel or serve it with fresh bread. Hummus also goes well with grilled meats or roasted vegetables. These variations make the roasted red pepper hummus fun and flexible. Enjoy exploring different tastes! To keep your roasted red pepper hummus fresh, store it in the refrigerator. Place it in an airtight container. This helps keep air out and prevents drying. If you have leftovers, this method is best. The hummus stays creamy and tasty for days. You can freeze hummus if you want to save it for later. To do this, spoon it into a freezer-safe container. Leave some space at the top for expansion. When you want to eat it, take it out and thaw it overnight in the fridge. To reheat, simply blend it again. Add a little water if needed to make it smooth. The ideal time for freshness is about 5 to 7 days in the fridge. If you freeze it, it can last up to 3 months. Always check for signs of spoilage. Look for changes in color or smell. If it smells off or has mold, it's best to throw it away. To roast red peppers at home, follow these steps: - Preheat your oven to 450°F (230°C). - Cut the bell pepper in half and remove the seeds. - Place the pepper cut-side down on a baking sheet. - Roast for about 20 minutes or until the skin is charred. - Let it cool, then peel off the skin. This simple roasting technique brings out the sweet flavors of the pepper. Roasting adds a smoky taste that makes the hummus special. Yes, you can use canned roasted red peppers. Here are the pros and cons: - Pros: They save time and are ready to use. They have a similar taste to fresh ones. - Cons: They may contain added salt or preservatives. They can be less fresh than homemade. If you choose canned peppers, rinse them to remove excess salt. This can help keep your hummus balanced and flavorful. To make your hummus creamier, try these tips: - Blend the mixture longer for a smooth texture. - Add water gradually if it seems too thick. - Use high-quality tahini for a richer taste. You can also try adding a bit more olive oil. This adds creaminess and enhances the flavor. Adjusting the texture and flavor makes your hummus even more delicious! This blog post covered the key ingredients and steps to make delicious hummus. You learned about the main ingredients like chickpeas, roasted red bell pepper, and tahini. I shared tips for perfecting texture and flavor. You can also explore variations and storage tips for your hummus. In my opinion, making hummus at home is fun and rewarding. Experimenting with flavors makes your dish unique. Enjoy your hummus in healthy meals or snacks.

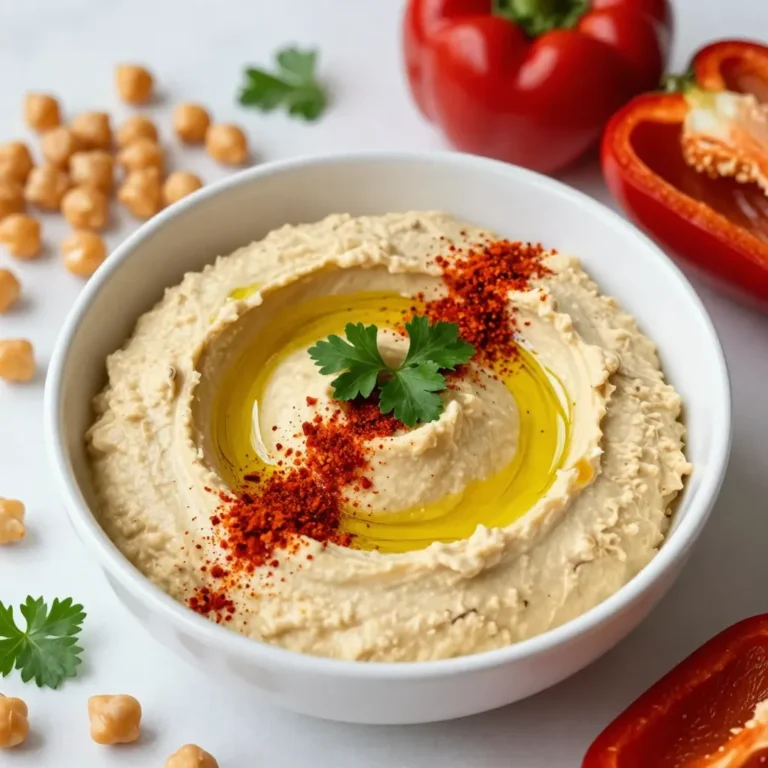
Roasted Red Pepper Hummus Tasty and Creamy Dip

To make this tasty dish, you need a few key items. Here’s what you’ll need: - 2 lbs boneless, skinless chicken thighs - 1/2 cup soy sauce - 1/4 cup pure maple syrup - 1 tablespoon fresh ginger, grated - 4 cloves garlic, minced - 1/4 cup apple cider vinegar - 1 teaspoon sesame oil - 1/2 teaspoon black pepper - 1 teaspoon onion powder These ingredients come together to create a sweet and savory flavor. The chicken thighs are juicy and tender. The soy sauce adds saltiness, while the maple syrup brings sweet depth. Ginger and garlic give it a warm kick. If you want to spice things up, consider adding these optional ingredients: - 1 teaspoon crushed red pepper flakes (for heat) - 2 green onions, sliced (for garnish) These additions can make your bourbon chicken even more exciting. The red pepper flakes add a nice kick, while the green onions brighten up the dish. When it’s time to serve, you have tasty options. Spoon the chicken and sauce over cooked rice or quinoa. This pairing soaks up the flavors and makes the meal filling. You can also sprinkle sliced green onions on top for a fresh touch. Serve with a side of steamed veggies for a balanced plate. {{ingredient_image_1}} To start, gather a medium bowl. In this bowl, mix together the soy sauce, maple syrup, grated ginger, minced garlic, apple cider vinegar, sesame oil, black pepper, onion powder, and optional red pepper flakes. Whisk these ingredients well until they blend into a smooth sauce. This marinade is key. It adds rich, sweet, and savory flavors to the chicken. Next, take your boneless, skinless chicken thighs and place them in the crock pot. This is where the magic happens! Pour your freshly made marinade over the chicken, ensuring each piece is coated. Use a spoon to make sure all the chicken is covered. This helps the flavors soak in during cooking. Now, it's time to cook! Cover the crock pot and set it to cook on low for 6 to 8 hours. If you’re in a hurry, you can set it to high for 3 to 4 hours. The chicken is done when it becomes tender and shreds easily with a fork. About 30 minutes before serving, use two forks to shred the chicken right in the pot. Stir the shreds back into the sauce for extra flavor. If the sauce seems thin, leave the lid off and cook on high for the last 30 minutes. This helps thicken the sauce nicely. When you’re ready to serve, spoon the chicken and sauce over cooked rice or quinoa. Garnish with sliced green onions for a fresh touch. Enjoy your flavorful family delight! To shred chicken, wait until it cooks fully. Use two forks to pull apart the meat. Start at the thicker end and work your way to the thinner parts. Shredding works best when the chicken is hot. If you find it tough, let it cook longer. You want it tender and easy to pull apart. If your sauce is too thin, remove the lid and cook on high. This helps steam escape and thickens the sauce. Stir it a bit every 10 minutes. If it’s still not thick enough, you can mix a cornstarch slurry. Just combine one tablespoon of cornstarch with two tablespoons of cold water. Stir this into the sauce, and let it cook for a few minutes. To boost the flavor, add more ginger or garlic. You can also try using honey instead of maple syrup for a different taste. If you like heat, increase the crushed red pepper flakes. Fresh herbs like cilantro or basil can brighten the dish. Taste the sauce before serving and adjust seasoning with salt or pepper. Pro Tips Marinating Time: For deeper flavor, marinate the chicken for at least 1 hour or overnight in the refrigerator. Thickening the Sauce: If you prefer a thicker sauce, mix 1 tablespoon of cornstarch with 2 tablespoons of water and stir it into the sauce during the last 30 minutes of cooking. Spice Level: Adjust the crushed red pepper flakes according to your heat preference. Start with less if you're unsure! Serving Suggestions: This dish pairs wonderfully with steamed broccoli or a fresh salad for added nutrition and color. {{image_2}} You can add veggies to your bourbon chicken for more color and taste. Try adding bell peppers, carrots, or snap peas. These veggies cook well in the crock pot. Chop them into bite-sized pieces. Mix them in with the chicken before you pour in the sauce. The vegetables will soak up the flavors and add nutrition to your meal. Want a kick? You can spice up your bourbon chicken. Just add more crushed red pepper flakes. Start with one teaspoon and adjust to your taste. If you love heat, add some diced jalapeños. They bring a fresh flavor and lots of spice. Mix the spices into the marinade for a bold taste. Your family will love this spicy twist! While rice is classic, try other grains too! Quinoa is a great choice. It’s high in protein and has a nice texture. You could also use farro or barley. These grains will soak up the sauce and make your meal heartier. Cook them according to the package directions. Serve the bourbon chicken on top for a filling dish. Storing leftovers is easy. First, let the bourbon chicken cool down. Then, place it in an airtight container. Make sure to store it in the fridge. It will stay fresh for up to three days. If you want to keep it longer, consider freezing. Reheating is simple and quick. You can use the microwave, stovetop, or oven. If using the microwave, put the chicken in a bowl. Add a splash of water to keep it moist. Heat it for one to two minutes. Stir halfway through to warm it evenly. If you choose the stovetop, warm it in a pan over low heat. Stir until hot. For the oven, cover the chicken with foil and heat at 350°F for about 10-15 minutes. Freezing is a great way to save leftovers. Use a freezer-safe container or a zip-top bag. Make sure to remove as much air as possible. Label the bag with the date. Bourbon chicken can last up to three months in the freezer. To use it later, thaw in the fridge overnight. Then, reheat as mentioned above. Enjoy your meal anytime! Yes, you can use chicken breasts. They cook well, but they may dry out faster. Thighs stay juicier due to more fat. If using breasts, check for doneness sooner. Cook for about 4-6 hours on low or 2-3 hours on high. This keeps them tender and moist. Each slow cooker is unique. Some cook hotter or cooler than others. If your cooker runs hot, start checking your chicken at the lower end of the time. For cookers that run cool, add an extra hour. The chicken should shred easily when done. Crock Pot Bourbon Chicken pairs great with cooked rice or quinoa. The sauce soaks into the grains well. You can also add steamed veggies for color and nutrition. Broccoli or green beans work nicely. Top with sliced green onions for a fresh touch. Crock Pot Bourbon Chicken blends easy steps with tasty flavors. You learned about key ingredients and how to prepare the dish. I shared tips for perfecting your chicken and enhancing flavors. Consider the variations to keep meals fun and interesting. Lastly, I covered smart storage and reheating methods. Enjoy experimenting with this recipe and make it your own! Your kitchen will fill with delightful aromas, making mealtime special.

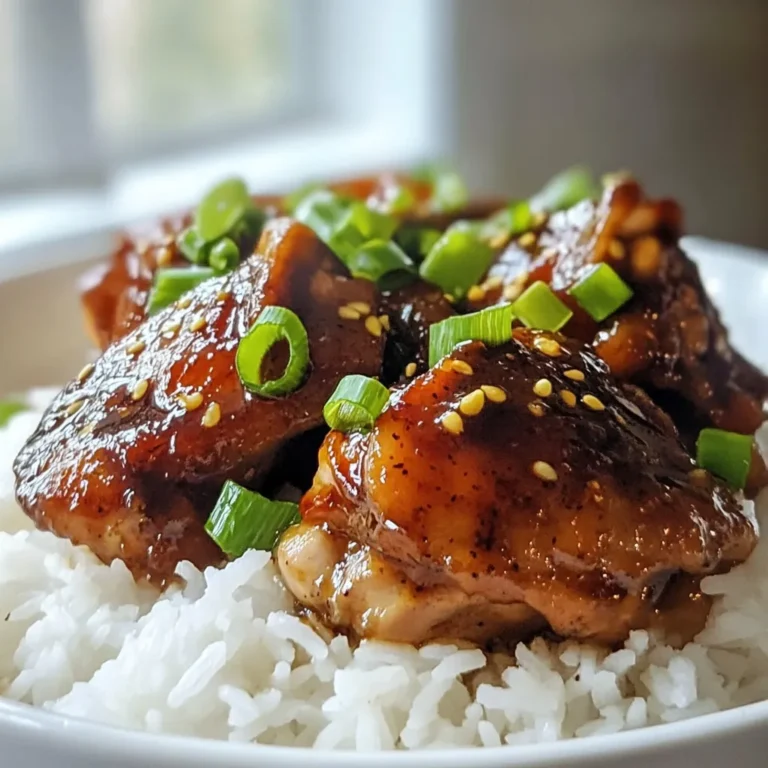
Crock Pot Bourbon Chicken Flavorful Family Delight

To make Garlic Herb Butter Roasted Chicken, gather these simple items: - 1 whole chicken (about 4-5 lbs) - 1/2 cup unsalted butter, softened - 6 cloves garlic, minced - 2 tablespoons fresh rosemary, chopped - 2 tablespoons fresh thyme, chopped - 1 tablespoon fresh parsley, chopped - 1 lemon, halved - Salt and pepper to taste - 1 onion, quartered - 4 carrots, cut into large chunks - 3 potatoes, cut into wedges - Olive oil for drizzling If you cannot find fresh herbs, don’t worry! You can use dried herbs instead. Use 1 teaspoon of dried herbs for every tablespoon of fresh herbs. Here are some good swaps: - Thyme: Use dried thyme. - Rosemary: Use dried rosemary. - Parsley: Use dried parsley. The flavor may change slightly, but it will still taste great! Feel free to add your twist to the chicken! Here are some fun ideas: - Spicy Kick: Add a pinch of red pepper flakes to the herb butter. - Smoky Flavor: Mix in some smoked paprika for a deeper taste. - Citrus Burst: Add zest from the lemon before juicing for extra brightness. These options will make your Garlic Herb Butter Roasted Chicken even more special! {{ingredient_image_1}} To make Garlic Herb Butter Roasted Chicken, gather your ingredients first. You will need a whole chicken, garlic, butter, and fresh herbs. The prep takes about 15 minutes. Preheat your oven to 425°F (220°C) while you prepare. 1. In a bowl, mix softened butter with minced garlic, rosemary, thyme, parsley, salt, and pepper. This makes a tasty herb butter. 2. Pat the chicken dry using paper towels. Place it in a roasting pan. 3. Lift the skin on the chicken breast and thighs gently. Spread half of the herb butter mixture under the skin. 4. Rub the rest of the herb butter all over the chicken's outside. Make sure you coat it well. 5. Squeeze the juice from one lemon half inside the chicken's cavity. Place the two lemon halves and quartered onion inside the cavity. 6. Put the carrots and potatoes around the chicken in the pan. Drizzle them with olive oil and add salt and pepper. 7. Roast the chicken for about 1 hour and 15 minutes. Check if the internal temperature hits 165°F (75°C) and the skin is golden brown. Baste with pan juices halfway through if you want more flavor. 8. After roasting, let the chicken rest for 10-15 minutes before carving. To ensure your chicken roasts perfectly, here are some tips: - Make sure to dry the chicken well. This helps the skin get crispy. - Use a meat thermometer to check the temperature. This guarantees safe cooking. - Basting adds moisture and flavor but do it quickly to keep the heat in. - Let the chicken rest after cooking. This keeps it juicy when you carve it. With these steps and tips, your Garlic Herb Butter Roasted Chicken will be a flavorful delight! When making garlic herb butter roasted chicken, avoid common errors. First, do not skip drying the chicken. If it's wet, the skin won't crisp. Second, do not rush the herb butter mixing. Blend well for full flavor. Lastly, don’t forget to season inside the cavity. This adds flavor to every bite. To ensure juicy chicken, use a whole bird, about 4-5 lbs. This size cooks evenly. Always let the chicken rest after roasting. Resting allows juices to settle. Another tip is to use a meat thermometer. Check the thickest part of the thigh. It should reach 165°F for safe eating. Basting adds moisture and boosts flavor. Halfway through roasting, open the oven carefully. Use a spoon or baster to scoop up pan juices. Drizzle this over the chicken. Repeat every 20 minutes for best results. This keeps the skin golden and crisp while enhancing taste. Pro Tips Choose the Right Chicken: Opt for an organic or free-range chicken for a more flavorful and juicy roast. Let it Rest: Allow the chicken to rest after roasting to let the juices redistribute, ensuring a moist and tender meat. Use a Meat Thermometer: To ensure perfect cooking, use a meat thermometer to check that the internal temperature reaches 165°F (75°C). Baste for Flavor: Basting the chicken with its pan juices halfway through cooking helps enhance the flavor and achieve a crispy skin. {{image_2}} You can change the herbs to suit your taste. Try using sage or dill. Fresh basil adds a nice twist too. You can mix and match to find your favorite blend. Each herb brings its own unique flavor. You might discover a new favorite by trying different combinations. Want to add a zesty kick? Try adding lemon zest to the butter mixture. The zest gives a bright taste that pairs well with chicken. You can also add more garlic for a stronger flavor. Just remember, balance is key. Too much can overpower the dish. If you prefer quick cooking, consider using an air fryer. It cooks the chicken faster and keeps it juicy. A slow cooker is also a great option. It allows the flavors to meld beautifully over time. Both methods can give you a delicious chicken with less fuss. After enjoying your garlic herb butter roasted chicken, let the leftovers cool. Place them in an airtight container. Store the chicken in the fridge for up to four days. Make sure to seal it well to keep the flavors fresh. If you have leftover veggies, store them in the same way. Keeping everything sealed helps prevent drying out. When it's time to reheat, preheat your oven to 350°F (175°C). Place the chicken in an oven-safe dish. Cover it with foil to keep it moist. Heat for about 20-25 minutes. Check that it’s warm all the way through. You can also add a splash of chicken broth for extra moisture. For veggies, toss them in a pan over medium heat for about 5-10 minutes. If you want to save the chicken for later, freezing is a great option. Cut the chicken into pieces for easier storage. Wrap each piece in plastic wrap, then place them in a freezer bag. Be sure to remove as much air as possible. Label the bags with the date. You can freeze the chicken for up to three months. When ready to eat, thaw it overnight in the fridge. Then follow the reheating instructions to bring back that tasty flavor. The best way to cook a whole chicken is by roasting it. Roasting gives you crispy skin and juicy meat. Start by preheating your oven to 425°F (220°C). Use a good amount of seasoning, like garlic herb butter. This mix makes the chicken flavorful. Place the chicken in a roasting pan. Add veggies around it for extra taste. Roast it until the skin is golden brown and the meat is cooked through. To check if your chicken is fully cooked, use a meat thermometer. Insert it into the thickest part of the thigh. The internal temperature should reach 165°F (75°C). If you don’t have a thermometer, check the juices. They should run clear, not pink. Also, the skin should be crispy and golden. This means your chicken has cooked well. Yes, you can prepare the chicken in advance. Season it with the herb butter and stuff it the night before. Cover it and keep it in the fridge. This lets the flavors soak in. When you are ready to cook, just take it out and roast it. This method saves you time on busy days and makes for a tasty meal. This blog post showed you how to prepare a whole chicken perfectly. We covered ingredients, step-by-step instructions, and useful tips. You learned about common mistakes and the best ways to roast chicken. I shared variations for flavors and cooking methods, plus storage tips for leftovers. Overall, cooking chicken can be simple and enjoyable. With these insights, you can create tasty dishes that impress. Using these steps makes cooking fun and rewarding. Enjoy your delicious meals!

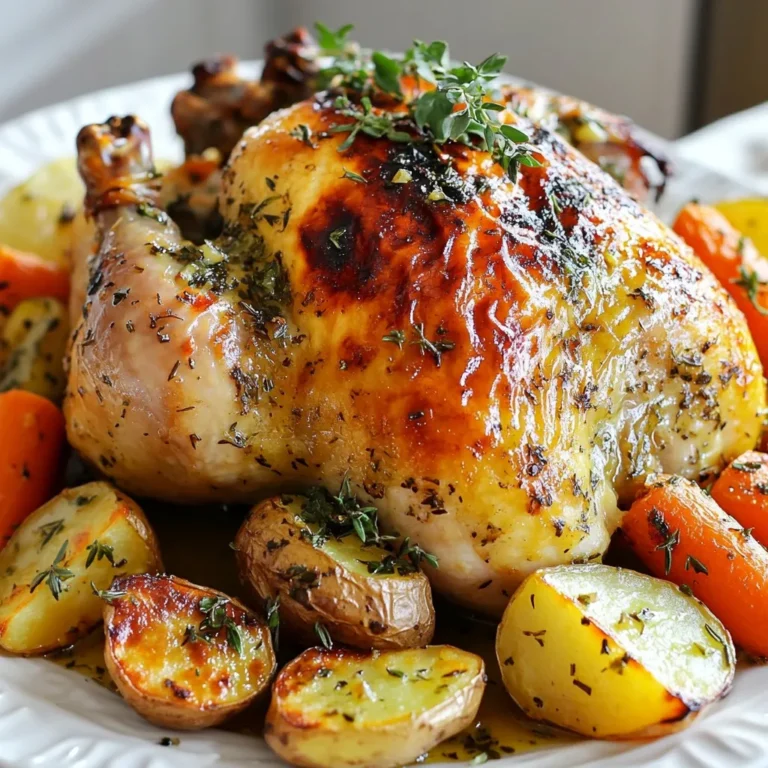
Garlic Herb Butter Roasted Chicken Flavorful Delight

To make spinach stuffed chicken breasts, gather these simple ingredients: - 4 boneless, skinless chicken breasts - 2 cups fresh spinach, chopped - 1 cup ricotta cheese - 1/2 cup mozzarella cheese, shredded - 1/4 cup Parmesan cheese, grated - 2 cloves garlic, minced - 1 teaspoon dried oregano - 1/2 teaspoon salt - 1/4 teaspoon black pepper - Olive oil for cooking - Toothpicks or kitchen twine (for securing) Each ingredient plays a key role in the flavor and texture of the dish. The chicken gives a hearty base, while the fresh spinach adds a burst of color and nutrients. The mix of ricotta, mozzarella, and Parmesan brings creaminess and depth. Garlic and oregano provide a fragrant touch. A dash of salt and pepper rounds out the flavors, making every bite delicious. Choose quality ingredients for the best results. Fresh spinach will taste brighter than frozen. For the cheese, select a good brand for the creamiest filling. This dish is not only tasty but also a great way to impress friends and family with your cooking skills. {{ingredient_image_1}} 1. Preheat the oven and sauté garlic: Set your oven to 375°F (190°C). This helps the chicken cook evenly. In a medium skillet, heat 1 tablespoon of olive oil over medium heat. Add 2 cloves of minced garlic. Sauté for about 30 seconds until it smells great. 2. Cooking spinach and mixing the stuffing: Next, add 2 cups of chopped fresh spinach to the skillet. Cook for 2-3 minutes until the spinach wilts. Turn off the heat and let it cool a bit. In a bowl, mix the cooked spinach with 1 cup of ricotta cheese, 1/2 cup of shredded mozzarella cheese, 1/4 cup of grated Parmesan cheese, 1 teaspoon of dried oregano, 1/2 teaspoon of salt, and 1/4 teaspoon of black pepper. Stir well until everything blends together. 3. Stuffing the chicken breasts: Take 4 boneless, skinless chicken breasts and carefully slice a pocket into each one. Make sure not to cut all the way through. Spoon the spinach and cheese mix into each pocket. Use toothpicks or kitchen twine to seal the openings. 1. Searing chicken in skillet: Heat a couple of tablespoons of olive oil in an oven-safe skillet. Once the oil is hot, add the stuffed chicken breasts. Sear each side for 3-4 minutes until they turn golden brown. This adds flavor and keeps the juices inside. 2. Baking instructions in the oven: After searing, transfer the skillet to the preheated oven. Bake for 25-30 minutes. Make sure the chicken reaches an internal temperature of 165°F (75°C) for safe eating. 1. Resting time and presentation tips: After baking, let the chicken rest for about 5 minutes. This helps the juices settle. Remove toothpicks or twine before serving. For a great look, garnish with fresh herbs like basil or parsley. Serve on a bed of sautéed veggies or alongside a light salad for a colorful plate. - Securing the chicken properly To keep the filling inside, use toothpicks or kitchen twine. After stuffing, seal the pocket well. This helps the flavors blend and prevents any spills while cooking. - Ensuring the chicken is cooked through Check that the chicken reaches an internal temperature of 165°F (75°C). Use a meat thermometer for accuracy. This ensures your chicken is safe to eat and perfectly juicy. - Adding spices or herbs to the stuffing Experiment with spices like paprika or fresh herbs like basil. These can elevate the dish. Adding a pinch of nutmeg also brings depth to the flavors of the spinach and cheese. - Pairing suggestions with sides and sauces Serve with a fresh salad or roasted vegetables for balance. A drizzle of balsamic glaze or lemon sauce adds a bright kick that complements the rich stuffing. Pro Tips Use Fresh Spinach: Fresh spinach will provide the best flavor and texture for your stuffed chicken. If using frozen spinach, make sure to thoroughly drain any excess moisture to avoid a watery filling. Experiment with Cheeses: Feel free to mix different types of cheese in the filling, such as feta or goat cheese, for a unique flavor twist. Just keep the ratios similar to maintain the consistency. Secure the Filling: Ensure the chicken pockets are well-sealed with toothpicks or kitchen twine, as this will prevent the filling from leaking out during cooking. It also helps the chicken cook evenly. Check Chicken Temperature: Use a meat thermometer to check that the chicken has reached an internal temperature of 165°F (75°C) for safe consumption. This ensures that the chicken is juicy and fully cooked. {{image_2}} You can change the cheese in this recipe for more flavor. Feta cheese adds a tangy taste. Cream cheese makes the filling richer and creamier. Both options work well with spinach. If you want a lighter dish, try ricotta cheese. Each cheese brings a unique twist to the stuffed chicken, so feel free to experiment. Want to make the stuffing more exciting? Add sun-dried tomatoes for sweetness and texture. They give a nice contrast to the spinach. Artichokes also add a nice flavor and a bit of crunch. You can mix in other greens, too. Kale or Swiss chard can replace spinach for a different taste and texture. This way, you can create your own special version of spinach stuffed chicken. To store leftover spinach stuffed chicken breasts, let them cool first. Place the chicken in an airtight container. This keeps the chicken fresh. You can store it in the fridge for up to three days. When reheating, make sure it is hot throughout. You can use a microwave or an oven. If using the oven, cover the dish to keep it moist. You can freeze spinach stuffed chicken breasts for longer storage. First, let them cool completely. Wrap each stuffed chicken breast tightly in plastic wrap. Then, place them in a freezer-safe bag or container. Make sure to remove as much air as possible. They will stay good in the freezer for about three months. To reheat, first, thaw the chicken overnight in the fridge. Then, bake it in the oven at 350°F (175°C) until heated through. This method keeps the chicken juicy and tasty. Enjoy your flavorful meal anytime! You can serve many tasty sides. Roasted vegetables work well. A light salad adds freshness. Rice or quinoa makes it hearty. Garlic bread is always a hit too! Use a meat thermometer for best results. The chicken should reach 165°F (75°C) inside. You can also cut into it. The meat should be white, not pink. Juices should run clear. Yes, you can use frozen spinach! Just thaw it first. Squeeze out extra water before mixing it in. This keeps your stuffing from being watery. It’s a great time-saver too! This blog post covered how to make delicious spinach-stuffed chicken breasts. You learned about the key ingredients, preparation steps, and cooking methods. I shared tips for flavor and storage, plus variations for even more taste. In summary, cooking can be simple and fun! With the right techniques, you can impress anyone. Try out these ideas, and enjoy your tasty meals!

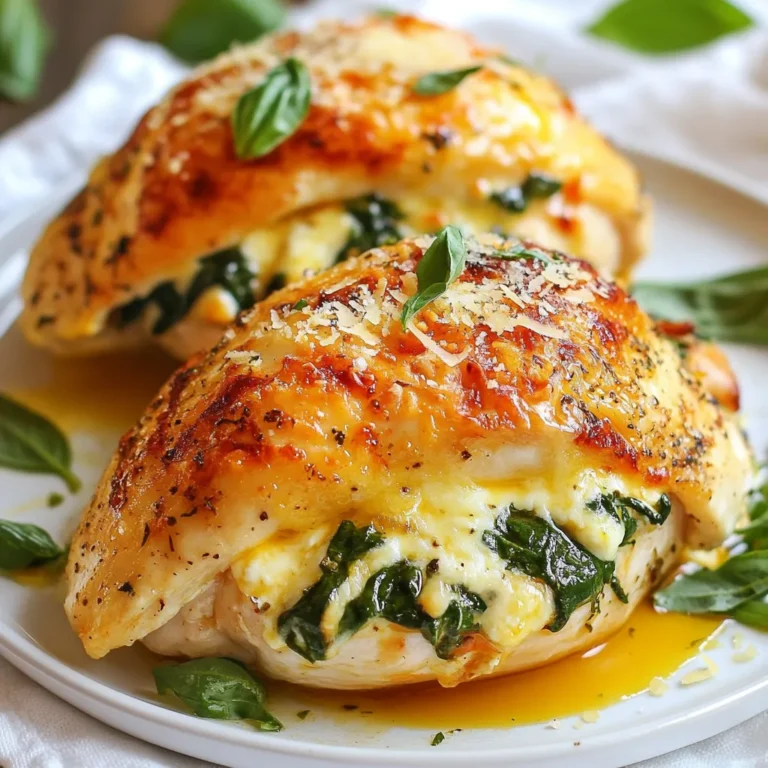
Spinach Stuffed Chicken Breasts Flavorful and Easy Recipe

- 3 tablespoons olive oil - 1 large onion, diced - 2 cloves garlic, minced - 4 medium carrots, sliced - 2 medium potatoes, diced - 1 cup parsnips, diced - 1 cup green beans, trimmed and cut into 2-inch pieces - 1 cup celery, sliced - 4 cups vegetable broth - 1 tablespoon tomato paste - 2 teaspoons thyme (fresh or dried) - 1 teaspoon rosemary (fresh or dried) - Salt and pepper to taste - 1 cup frozen peas - Fresh parsley and lemon zest for garnish Gathering fresh ingredients makes this Irish vegetable stew special. I love using vibrant vegetables, as they add color and depth. The olive oil serves as the base for sautéing, while the onion and garlic provide a fragrant start. Carrots and potatoes bring sweetness and heartiness. Parsnips add a unique flavor, while green beans give a nice crunch. Celery adds a lovely aroma, and vegetable broth ties all the flavors together. Tomato paste boosts the stew's richness, while thyme and rosemary add earthy notes. Season with salt and pepper for balance. Frozen peas are a great last-minute addition, offering a pop of color and sweetness. Garnishing with fresh parsley and lemon zest brightens the dish and enhances the flavors. Prepare to enjoy a warm, comforting bowl of this delightful stew! {{ingredient_image_1}} Start by heating 3 tablespoons of olive oil in a large pot over medium heat. Once hot, add the diced onion. You want to sauté the onion for about 5 minutes. It should become soft and translucent. Next, stir in 2 minced cloves of garlic. Cook this mixture for about 1 minute until the garlic smells fragrant. This step builds a nice flavor base for the stew. Now it’s time to add the veggies! Toss in 4 sliced carrots, 2 diced potatoes, 1 cup of diced parsnips, 1 cup of trimmed and cut green beans, and 1 cup of sliced celery. Stir well to combine. Cook this vegetable mixture for about 5 minutes. You want the veggies to slightly soften and mix well together. Pour in 4 cups of vegetable broth and add 1 tablespoon of tomato paste. Stir to dissolve the tomato paste into the broth completely. Season your stew with 2 teaspoons of thyme, 1 teaspoon of rosemary, salt, and pepper to taste. Bring the stew to a gentle boil. Then, reduce the heat to low and cover the pot. Let it simmer for 25 to 30 minutes. This will make the vegetables tender and full of flavor. In the last few minutes of cooking, stir in 1 cup of frozen peas. Cook just until heated through. Adjust the seasoning as needed. To make your Irish vegetable stew even tastier, adjust the seasonings. Start with salt and pepper. A pinch of salt can brighten the dish. If it tastes too bland, add more herbs. Fresh thyme and rosemary work great here. You can also use dried herbs if that's what you have. Feel free to add extra spices for depth. A dash of paprika adds warmth. You might like a bit of cumin for earthiness. For a kick, try red pepper flakes. Just remember to start small and taste as you go. Sautéing vegetables well is key to great flavor. Use medium heat and let the onions cook until they're soft and clear. This takes about five minutes. Don't rush this step; it's where the flavor begins. Add garlic next, cooking just until fragrant. This should only take a minute. To get the perfect stew consistency, keep an eye on your broth. If it looks too thick, add a little water or broth. If it's too thin, let it simmer uncovered for a while. This helps it thicken up nicely. The goal is tender veggies in a rich, flavorful broth. Pro Tips Enhance Flavors: Allow the stew to rest for a few hours or overnight in the refrigerator. This will deepen the flavors as the ingredients meld together. Vegetable Variations: Feel free to substitute any seasonal vegetables you have on hand, such as bell peppers or zucchini, for a unique twist on the classic stew. Thickening the Stew: If you prefer a thicker stew, mash a few of the cooked potatoes against the side of the pot to create a creamy texture without needing additional thickeners. Serving Suggestions: Pair the stew with a side of crusty whole-grain bread or serve it over a bed of fluffy quinoa for a hearty meal. {{image_2}} You can change up your Irish vegetable stew easily. Try different veggies based on what you like or have. Here are some great swaps: - Sweet Potatoes: Use these instead of regular potatoes for a sweet twist. - Turnips: They add a nice bite and flavor. - Bell Peppers: These can bring color and a slight crunch. - Zucchini: A great way to add more texture. For herbs, you can mix it up too. Instead of thyme, try: - Oregano: It adds a warm flavor. - Basil: This gives a fresh taste. - Dill: A unique touch for something different. This stew is easy to adapt for different diets. If you want a vegan option, just check your broth. Most vegetable broths are vegan, but some may have animal products. If you are gluten-free, use a gluten-free broth. The stew is naturally gluten-free, so no worries here. Want to add protein? Here are some ideas: - Chickpeas: They add protein and fiber. - Lentils: These cook nicely in the stew and fill you up. - Tofu: Add cubed firm tofu for a hearty option. Feel free to mix and match these ideas to suit your taste! To store leftover stew in the fridge, first let it cool. Pour the stew into an airtight container. Seal it tightly to keep it fresh. Store it in the fridge for up to three days. When you want to eat it again, just reheat what you need. You can use a pot on the stove or a microwave. Stir well to make sure it heats evenly. If you have more stew than you can eat, freezing is a great option. Use a freezer-safe container or bag for the stew. Leave some space at the top, as the stew will expand when frozen. You can freeze it for up to three months. When you are ready to eat it, move it to the fridge overnight to thaw. Reheat it in a pot on the stove. Stir it frequently so that it heats well. Enjoy your warm, comforting stew! Irish Vegetable Stew lasts about 3 to 5 days in the fridge. To keep it fresh, store it in an airtight container. Let the stew cool before sealing it. If you want to enjoy it later, label the container with the date. This way, you won’t forget when you made it! Yes, you can make Irish Vegetable Stew in a slow cooker. Start by sautéing the onions and garlic in a pan. Then, add them to the slow cooker. Next, add the rest of the ingredients, including the diced vegetables and broth. Cook on low for 6 to 8 hours or on high for about 3 to 4 hours. This method will give the stew a deep flavor. Irish Vegetable Stew pairs nicely with crusty bread. It’s perfect for dipping! You can also serve it with a side salad for a fresh touch. If you want something heartier, try it with mashed potatoes. The creamy texture complements the stew well! This blog post covered making a hearty Irish vegetable stew. You learned about key ingredients and how to prepare your base. We detailed steps to simmer the stew to perfection and shared tips to enhance flavor. You also discovered variations to suit your tastes and dietary needs, plus storage and reheating tips. Remember, cooking should be fun. Experiment with ingredients and enjoy your delicious creation!

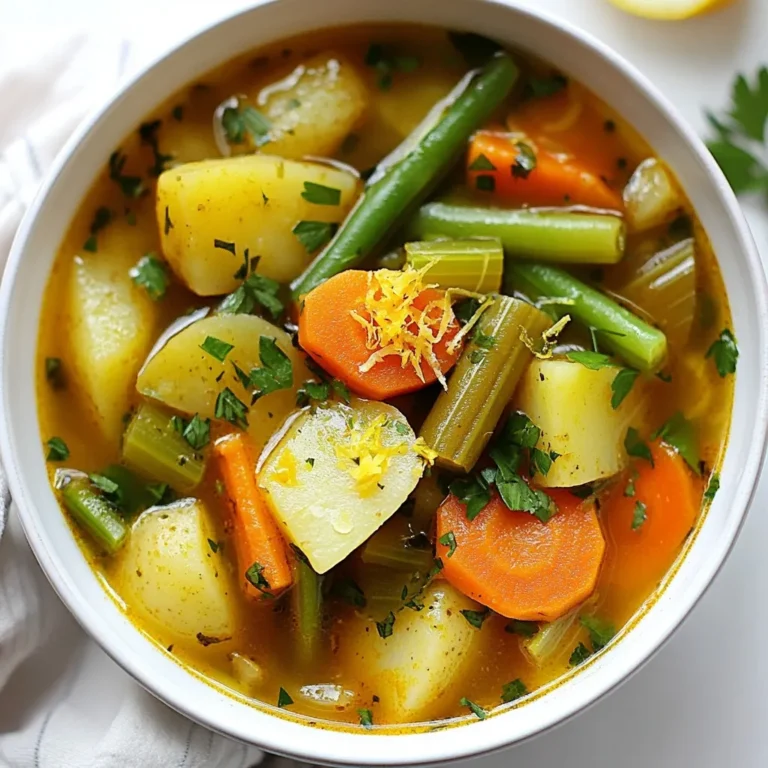
Irish Vegetable Stew Flavorful Comfort Food Recipe

- 2 boneless, skinless chicken breasts - 8 ounces cheese tortellini - 1 cup heavy cream - 1 cup chicken broth - 1 tablespoon olive oil - Salt and pepper to taste - 2 cloves garlic, minced - 1 teaspoon Italian seasoning - 1 cup cherry tomatoes, halved - 1 cup baby spinach - ½ cup grated Parmesan cheese - Fresh basil leaves for garnish This dish combines tasty chicken, creamy sauce, and cheesy tortellini. The chicken gives the meal a hearty feel. Each bite of this dish feels special. The cheese tortellini adds a fun twist to this classic recipe. I love using heavy cream in the sauce. It makes everything rich and smooth. The chicken broth adds depth to the flavor. The mix of garlic and Italian seasoning makes your kitchen smell amazing. Fresh cherry tomatoes burst with flavor. They add a nice sweetness. Baby spinach brings a pop of color and nutrients. Topping with Parmesan cheese gives a salty finish. Fresh basil leaves add a bright touch to each plate. These ingredients come together to create a meal that is hard to resist. You will want to share it with friends and family. Each bite feels like a celebration! {{ingredient_image_1}} - First, season the chicken breasts with salt and pepper. - Heat the olive oil in a large skillet over medium heat. - Add the chicken breasts and cook for about 6-7 minutes on each side. - Look for a nice golden brown color and ensure they are cooked through. - Once done, remove the chicken and let it rest before slicing. - In the same skillet, add the minced garlic. - Sauté for about 30 seconds until it smells amazing. - Next, stir in the halved cherry tomatoes. - Cook them for 2-3 minutes until they soften and release their juices. - Pour in the heavy cream and chicken broth into the skillet. - Add the Italian seasoning and stir well. - Bring this mixture to a gentle simmer for a few minutes. - Add the tortellini to the skillet. - Cook according to the package instructions, about 3-5 minutes. - Check for the al dente texture, which means it's firm but not hard. - Stir in the baby spinach and grated Parmesan cheese. - Keep mixing until the spinach wilts and the cheese melts into the sauce. - Slice the cooked chicken and add it back to the skillet. - Gently mix everything together to combine well. - Allow the dish to heat through for one more minute. - For a pretty finish, garnish with fresh basil leaves. - Serve it hot and enjoy this delightful dish! To make the chicken shine, season it with salt and pepper. This simple step adds a lot of flavor. Heat olive oil in a large skillet over medium heat. Place the chicken breasts in the skillet and cook for 6-7 minutes on each side. Look for a golden brown color. The chicken should be cooked through and no longer pink inside. Use a meat thermometer if you want to check; the internal temperature should be 165°F (75°C). After cooking, let the chicken rest for a few minutes before slicing. This keeps it juicy. For a creamy sauce, you want the right thickness. If the sauce is too thin, let it simmer longer. This will help it thicken naturally. You can also add more cheese for extra richness. If you want a lighter option, consider using half-and-half instead of heavy cream. It still adds creaminess but with fewer calories. You can also use a plant-based cream for a dairy-free version, if you prefer. When cooking tortellini, follow the package instructions closely. This usually takes about 3-5 minutes for al dente texture. Make sure to stir gently so they don’t stick together. Overcooking can make them mushy. To pick the best tortellini, choose fresh ones from the deli or frozen varieties. They often taste better than the dry ones. Fresh tortellini will add a nice touch to your dish. Pro Tips Use Fresh Ingredients: Fresh garlic, tomatoes, and basil can enhance the flavors significantly, making your dish more vibrant and delicious. Adjust Creaminess: For a lighter sauce, you can substitute half of the heavy cream with low-fat milk or broth, while still achieving a creamy texture. Perfectly Cooked Tortellini: To prevent overcooking, add the tortellini to the sauce only after it has reached a simmer, ensuring they stay al dente. Rest the Chicken: Letting the chicken rest after cooking helps retain its juices, resulting in a more tender and flavorful protein in your dish. {{image_2}} You can make Marry Me Chicken Tortellini your own with easy swaps. - Alternative proteins: Instead of chicken, try shrimp or tofu. Both give a different taste. - Different pasta shapes: If you can't find tortellini, use any pasta you like. Shells or fettuccine work great too! Adding new flavors can make this dish even better. - Adding spices for heat: Sprinkle in red pepper flakes or cayenne pepper. This gives the dish a nice kick. - Incorporating additional vegetables: Toss in bell peppers or zucchini. They add color and nutrients without changing the dish much. You can adjust the recipe to fit dietary needs. - Gluten-free tortellini options: Many brands offer gluten-free pasta. Look for it in stores or online. - Dairy-free cream alternatives: Use coconut cream or almond milk for a dairy-free sauce. It keeps the dish creamy without dairy. To store leftover Marry Me Chicken Tortellini, let it cool first. Place the tortellini in an airtight container. This helps keep it fresh. I recommend using glass containers or high-quality plastic ones. These types prevent spills and keep flavors intact. The best methods for reheating are on the stove or in the microwave. If using a stove, add a splash of chicken broth to keep it moist. Stir it often until warm. If you use the microwave, heat in short bursts. Stir in between to avoid hot spots. Add fresh basil leaves just before serving for extra flavor. To freeze Marry Me Chicken Tortellini, store it in a freezer-safe container. This helps keep it fresh for up to three months. Remember to label your container with the date. For thawing, place it in the fridge overnight. Once thawed, reheat on the stove or microwave. Be sure to check if you need to add more cream or broth for a creamy texture. Marry Me Chicken Tortellini is a creamy pasta dish featuring tender chicken and cheese tortellini. This dish combines Italian flavors with a rich sauce made from heavy cream and chicken broth. I love the bright taste of cherry tomatoes and fresh spinach in this recipe. The name comes from its deliciousness—many say it’s a dish worth proposing over! Marry Me Chicken Tortellini will last in the fridge for about three to four days. To keep it fresh, store it in an airtight container. This helps to maintain its creamy texture and flavor. Always check for any off smells or changes in texture before eating leftovers. Yes, you can make Marry Me Chicken Tortellini ahead of time. Prepare the dish completely, then let it cool. Store it in the fridge until you are ready to serve. When you are ready, simply reheat it on the stove over low heat. Add a splash of cream if it seems too thick. Marry Me Chicken Tortellini pairs well with a fresh garden salad. A simple arugula salad with a lemon vinaigrette adds brightness. Garlic bread is another great option to soak up the creamy sauce. Roasted vegetables like asparagus or broccoli also complement the dish nicely. Marry Me Chicken Tortellini combines rich flavors with simple steps. You learned about key ingredients, from chicken to tortellini, and how to make a creamy sauce. I shared tips to perfect your dish and variations for added excitement. This dish is a must-try for any meal. Embrace your creativity in the kitchen and enjoy a delightful dish that impresses everyone. Cook with confidence, and you'll love the results!

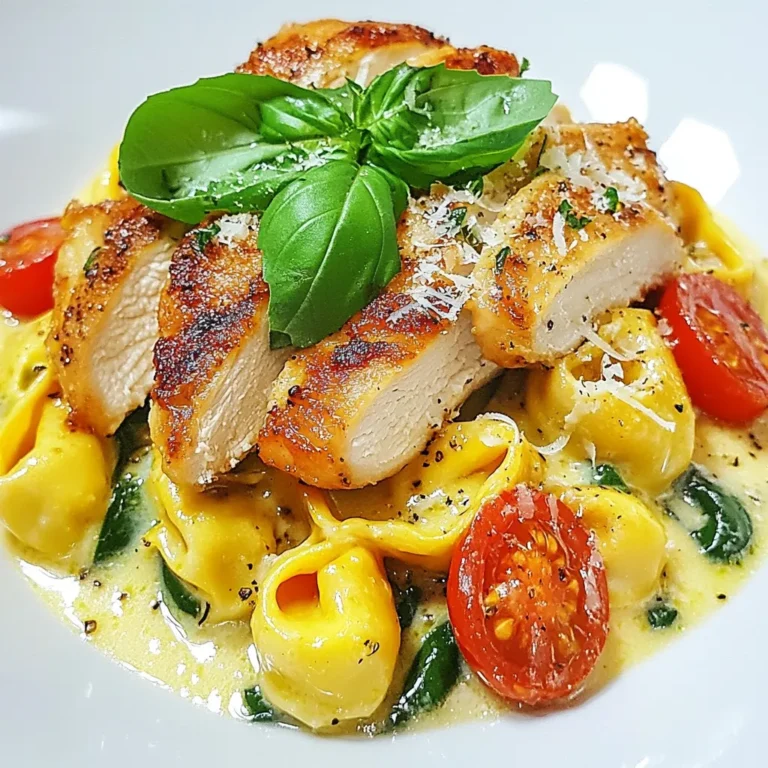
Marry Me Chicken Tortellini Irresistible Dinner Recipe

To make the best apple cinnamon rolls, you need simple and fresh ingredients. Here’s what you will need: - 2 cups all-purpose flour - 1/2 cup granulated sugar - 1/2 teaspoon salt - 1 tablespoon baking powder - 1/2 teaspoon baking soda - 1/4 cup unsalted butter, softened - 3/4 cup buttermilk - 1 cup apples, peeled and chopped (preferably Granny Smith) - 2 teaspoons ground cinnamon - 1/4 teaspoon nutmeg - 1/4 cup brown sugar - 1 cup powdered sugar (for glaze) - 2 tablespoons milk (for glaze) Each ingredient plays a key role in making your rolls soft and fluffy. The flour provides structure, while sugar adds sweetness. Salt enhances all the flavors. Baking powder and baking soda give the rolls lift. Butter and buttermilk make them rich and moist. Apples bring natural sweetness and a nice texture, while cinnamon and nutmeg offer warmth. The glaze adds a sweet finish. {{ingredient_image_1}} 1. Preheat your oven to 375°F (190°C). Grease a 9-inch round baking pan. This helps prevent sticking. 2. In a large bowl, mix the dry ingredients. Combine 2 cups of flour, 1/2 cup of sugar, 1/2 teaspoon of salt, 1 tablespoon of baking powder, and 1/2 teaspoon of baking soda. Whisk until blended. 3. Add the wet ingredients to the bowl. Include 1/4 cup of softened butter and 3/4 cup of buttermilk. Mix until a soft dough forms. 4. Knead the dough on a floured surface for about 1 minute. You want it smooth and soft. 1. Roll the dough into a rectangle. Aim for about 12x8 inches and 1/4 inch thick. This shape helps with even filling. 2. Prepare the apple and spice filling in a small bowl. Mix 1/4 cup of brown sugar, 2 teaspoons of cinnamon, and 1/4 teaspoon of nutmeg. Sprinkle this mix evenly over the rolled-out dough. 3. Spread the chopped apples across the dough. Use 1 cup of peeled and chopped apples for the best flavor. 4. Starting from the longer side, carefully roll the dough into a tight log. Slice it into 1-inch pieces, creating perfect rolls. 1. Place the rolls upright in the prepared baking pan. This helps them rise nicely. 2. Cover the rolls and let them rise for 30 minutes. This step is key for soft and fluffy rolls. 3. Bake in the preheated oven for 20-25 minutes. Check for a golden brown color. This indicates they are ready. Kneading is key to soft, fluffy rolls. It helps develop gluten. This gives the dough strength and structure. Knead the dough for about one minute. It should feel smooth and elastic. To check if it's ready, poke it with your finger. If it springs back, it’s good to go. If it stays dented, knead a bit more. Choosing the right apple makes a big difference. I love using Granny Smith apples. They add a nice tartness. You can also try Fuji or Honeycrisp for sweetness. For extra texture, add nuts like walnuts or pecans. Raisins or dried cranberries can also bring more flavor. Mix your choices to create a delicious filling. A smooth glaze makes your rolls shine. Mix powdered sugar with milk until smooth. If it’s too thick, add a splash more milk. The best time to apply the glaze is when the rolls are warm. This helps the glaze soak in and create a delicious finish. Pro Tips Use Fresh Apples: For the best flavor and texture, opt for tart, crisp apples like Granny Smith, which hold their shape well during baking. Don’t Overmix the Dough: Mix just until the ingredients come together. Overworking the dough can lead to tough rolls, so knead gently. Adjust Glaze Consistency: If the glaze is too thick, add a little more milk until you achieve a drizzle-able consistency, perfect for coating the rolls. Let Them Rise: Allow the rolls to rise in a warm place. This helps them become fluffy and light, enhancing the overall texture. {{image_2}} You can change the taste of your apple cinnamon rolls in fun ways. Here are two great ideas: - Caramel apple cinnamon rolls: Add caramel sauce to your filling. Mix it with the apples for a sweet surprise. - Maple pecan apple cinnamon rolls: Swap brown sugar with maple syrup. Add chopped pecans for a crunchy twist. These additions make each bite special and unique. If you need to change the recipe for diets, you have options. - Gluten-free version: Use a gluten-free flour mix. Make sure it has a binding agent like xanthan gum for the best texture. - Vegan options: Substitute butter with coconut oil. Use almond or soy milk instead of buttermilk. This keeps the rolls tasty and friendly for all. You can enjoy these rolls no matter your diet! Changing up flavors with the seasons makes these rolls even better. - Incorporating seasonal spices: Try adding pumpkin spice in fall. In winter, nutmeg and ginger give warmth. - Holiday-themed variations: For Christmas, mix in dried cranberries. Easter can have a hint of lemon zest for freshness. These fun ideas keep your apple cinnamon rolls exciting all year round! To keep your apple cinnamon rolls fresh, store them in an airtight container. This helps lock in moisture and flavor. You can keep them at room temperature for up to two days. If you want to save them longer, consider refrigerating them. Just make sure to seal them well. For long-term storage, you can freeze apple cinnamon rolls. First, let them cool completely. Then, wrap each roll tightly in plastic wrap. Place them in a freezer bag, removing as much air as you can. They can last up to three months in the freezer. When you're ready to enjoy them, reheat the rolls from frozen. You can thaw them overnight in the fridge. Then, warm them in the oven at 350°F (175°C) for about 10 minutes. This restores their soft, fluffy texture. Apple cinnamon rolls last about two days at room temperature. If stored in the fridge, they can last up to a week. However, freezing them is best for longer storage. They stay fresh for up to three months in the freezer. Always check for any signs of spoilage before enjoying them again. Can I make apple cinnamon rolls ahead of time? Yes, you can prepare the dough a day early. After you knead it, wrap it tightly and place it in the fridge overnight. In the morning, let it warm up before rolling it out. This saves time and gives you soft rolls. What type of apples are best for this recipe? Granny Smith apples work best. They are tart and hold their shape well when baked. You can also use Honeycrisp or Fuji for a sweeter touch. Can I use pre-made dough for these rolls? Absolutely! Pre-made dough can save you time. Just roll it out, add the filling, and follow the rest of the steps. This makes your baking much easier. What to do if the rolls don’t rise? Check your yeast or baking powder. They must be fresh. If your kitchen is cold, let the rolls rise in a warm spot. You can place them in the oven with just the light on to help them rise. Why are my rolls dry or crumbly? Too much flour can cause dryness. Make sure to measure accurately. Adding more buttermilk can help create a softer dough. You want it moist but not sticky. How can I make my rolls softer? Knead your dough properly and avoid overbaking. Use room temperature butter and buttermilk for better texture. You can also add an extra egg for richness. You learned how to make delicious apple cinnamon rolls step by step. We covered all the ingredients, preparation, baking, and ways to enhance flavors. With tips for perfect dough and storage, you can enjoy these treats anytime. Whether you want to try new flavors or make dietary changes, there are options for you. Remember to have fun and experiment in the kitchen. Enjoy your fresh apple cinnamon rolls!

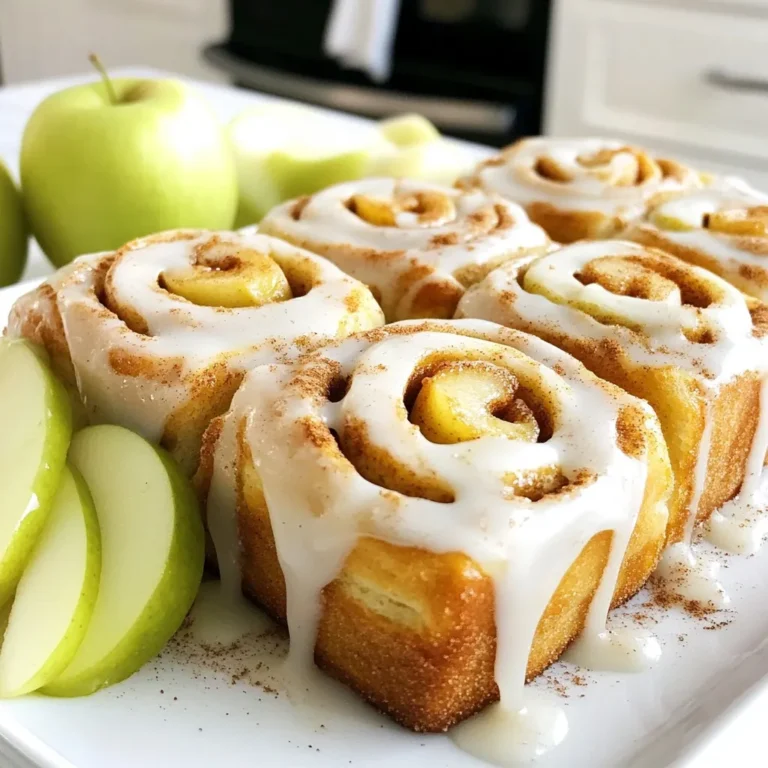
Apple Cinnamon Rolls Irresistibly Soft and Fluffy

- 1 pound ground turkey - 2 cups fresh spinach, finely chopped - 1/2 cup breadcrumbs (preferably whole wheat) - 1/4 cup grated Parmesan cheese - 1 small onion, finely chopped - 2 cloves garlic, minced - 1 teaspoon dried oregano - 1 teaspoon salt - 1/2 teaspoon black pepper - 1/4 teaspoon red pepper flakes (optional) - 1 tablespoon olive oil (for cooking) - 1 jar (about 24 ounces) marinara sauce (for serving) The main stars of this recipe are ground turkey and fresh spinach. Ground turkey is lean and healthy. It packs protein without too much fat. Fresh spinach adds nutrients and flavor. You can also use frozen spinach if needed, but fresh tastes best. Breadcrumbs help bind the meatballs. I love using whole wheat for added fiber. Parmesan cheese gives a rich taste. Chopped onion and minced garlic add depth to the flavor. For seasoning, dried oregano brings a warm, earthy taste. Salt and black pepper enhance all the flavors. If you like a bit of heat, add red pepper flakes. Usually, I leave this out for kids. You need olive oil to cook the meatballs and marinara sauce to serve them. The sauce adds moisture and flavor to the dish. You can use store-bought sauce or make your own if you have time. Gather these ingredients, and you are ready to make tasty and healthy spinach turkey meatballs! {{ingredient_image_1}} - In a large mixing bowl, combine: - 1 pound ground turkey - 2 cups fresh spinach, finely chopped - 1/2 cup breadcrumbs - 1/4 cup grated Parmesan cheese - 1 small onion, finely chopped - 2 cloves garlic, minced - 1 large egg - 1 teaspoon dried oregano - 1 teaspoon salt - 1/2 teaspoon black pepper - 1/4 teaspoon red pepper flakes (optional) - Mix all the ingredients well using your hands. Be careful not to over-mix. Over-mixing makes meatballs tough. Aim for a gentle touch to keep them tender. - Preheat your oven to 400°F (200°C). - Line a baking sheet with parchment paper for easy cleanup. - Wet your hands before forming meatballs. Shape them into balls about 1 to 1.5 inches in diameter. Place them on the baking sheet. - While the meatballs bake for about 20 minutes, heat 1 tablespoon of olive oil in a large skillet over medium heat. - Add 1 jar of marinara sauce to the skillet. Let it simmer until warm. - Once the meatballs are golden brown, add them to the skillet. Gently toss to coat them in the sauce. Let them simmer together for about 5 minutes. - Serve the meatballs hot, adding extra Parmesan if you like. To get great meatballs, don’t overwork the mixture. When you mix the ground turkey and spinach, do so gently. After adding the breadcrumbs, cheese, and spices, use your hands to combine. Make sure everything is mixed well, but stop once it feels uniform. Over-mixing can make your meatballs tough instead of tender. When forming the meatballs, wet your hands first. This helps the mixture come together without sticking too much. Aim for meatballs about 1 to 1.5 inches in size. This helps them cook evenly. You can choose to bake or pan-fry your meatballs. Baking is easier and cuts down on added oil. To bake, preheat your oven to 400°F (200°C). Line a baking sheet with parchment paper and place your meatballs on it. Bake for about 20 minutes until they're cooked through and golden brown. If you prefer pan-frying, use a bit of olive oil in a skillet over medium heat. Cook the meatballs for about 10 minutes, turning them often. This gives them a nice brown crust. Garnish your meatballs with extra grated Parmesan and some fresh basil for a nice touch. Serve them with marinara sauce for a classic flavor. You can also pair them with whole wheat pasta, rice, or a fresh salad for a balanced meal. Want to switch it up? Try serving them in a sub with melted cheese. Pro Tips Use Fresh Spinach: Fresh spinach not only adds flavor but also enhances the nutritional value of your meatballs. Be sure to chop it finely for a better texture. Keep It Tender: Avoid over-mixing the meatball mixture. This will help maintain a tender, juicy texture. Mix just until combined. Adjust Seasoning: Feel free to modify the spices based on your taste. Adding herbs like basil or parsley can elevate the flavor profile. Perfect Baking: For a crispy exterior, broil the meatballs for the last 1-2 minutes of baking. Just keep an eye on them to prevent burning! {{image_2}} You can easily change the protein in this recipe. Ground chicken or beef are great options. You can also try plant-based meat for a vegetarian dish. For greens, swap spinach with kale or Swiss chard. You can even add finely chopped bell peppers or carrots for extra flavor and nutrients. Spices and herbs can boost the taste. Try adding basil, thyme, or parsley. You can also add a pinch of cumin for warmth. Different cheeses can change the flavor too. Use feta for a tangy taste or mozzarella for a creamy touch. Experiment with what you like best! Meatball subs are a fun option. Just place the meatballs in a sub roll and add marinara sauce. Top with cheese and bake for a melty finish. You can also serve the meatballs with pasta or rice. The marinara sauce pairs well with both. Serve with a sprinkle of cheese on top for extra yum! To store your spinach turkey meatballs, let them cool first. Place them in an airtight container. They can last in the fridge for 3 to 4 days. Make sure to cover them well to keep moisture in. If you want to enjoy them later, refrigeration is your best choice. You can freeze these meatballs for up to 3 months. First, let them cool completely. Then, arrange them in a single layer on a baking sheet. Freeze until firm, about 1 hour. After that, transfer them to a freezer bag. Remove any air from the bag to prevent freezer burn. When you want to eat them, it’s easy! Take the meatballs out and let them thaw in the fridge overnight. There are a few great ways to reheat your meatballs. You can use the oven, stovetop, or microwave. If using the oven, preheat to 350°F (175°C). Place the meatballs on a baking sheet and heat for 15-20 minutes. For stovetop reheating, add a little marinara sauce to a skillet. Heat the sauce over medium heat, then add the meatballs. Simmer gently until warm. If you’re in a hurry, the microwave works too. Place the meatballs on a plate and cover them with a damp paper towel. Heat in short bursts, checking often to keep them moist. No matter how you reheat them, keep the meatballs juicy. This helps them stay tasty and full of flavor. You can swap ground turkey for several meats. Here are some good options: - Ground chicken - Lean ground beef - Ground pork - Ground lamb - Plant-based meat substitutes Each option gives a different flavor. Ground chicken is similar in taste. Lean ground beef brings a richer taste. Ground pork adds moisture. Plant-based options are great for vegans. Yes, you can use frozen spinach! Here are some tips: - Thaw the spinach first. - Squeeze out excess water. - Use about 1 cup of thawed spinach. Frozen spinach is convenient and saves time. It also packs good nutrients. Just be sure to drain it well, or your meatballs may become soggy. These meatballs last about 3 to 4 days in the fridge. Here are some safety tips: - Store in an airtight container. - Cool them down before sealing. - Reheat to at least 165°F (74°C). This way, you can enjoy your leftovers safely. If you want to keep them longer, consider freezing them! This blog post covered how to make delicious meatballs with ground turkey and fresh spinach. We discussed the key ingredients, step-by-step instructions, expert tips, and variations to keep meals fresh. Remember, using the right techniques ensures tasty and moist meatballs every time. Feel free to adapt the recipe by swapping ingredients or trying different styles. With the right storage methods, you can enjoy them later. Happy cooking, and may your meatballs always be a hit!

Spinach Turkey Meatballs Healthy and Tasty Recipe

PREV 1 … 73 74 75 … 86 NEXT
spicy fork kitchen

explore

DessertsDinnerAppetizersDrinks

Our Policies

  • Cookie Policy
  • Copyright Policy
  • Disclaimer
  • GDPR Policy
  • Terms Of Use
Back to Top
  • About
  • Contact Us
  • Privacy Policy
© 2026 spicy fork kitchen