FREE DINNER EBOOK! Get your copy!
  • Cookie Policy
  • GDPR Policy
  • Disclaimer
  • Terms Of Use
  • Visit my other site: Fun Cookie Recipes
spicy fork kitchen
  • Home
  • Dinner
  • Desserts
  • Drinks
  • Appetizers
  • Contact
  • About
  • Privacy Policy
  • Home
  • Dinner
  • Desserts
  • Drinks
  • Appetizers
  • Contact
  • About
  • Privacy Policy
  • Cookie Policy
  • GDPR Policy
  • Disclaimer
  • Terms Of Use
Visit my other site: Fun Cookie Recipes

HOME / CATEGORIES /

Latest

- 1 lb (450g) boneless, skinless chicken thighs, cut into bite-sized pieces - 2 cups fresh spinach, washed and trimmed - 1 cup cherry tomatoes, halved - 2 tablespoons olive oil - 3 cloves garlic, minced - 1 teaspoon dried oregano - 1 teaspoon smoked paprika - Salt and pepper to taste - ¼ cup heavy cream - ½ cup grated Parmesan cheese - Fresh basil leaves for garnish (optional) When choosing your chicken, look for thighs that are pink and firm. The skin should be smooth and free of blemishes. For spinach, choose bright green leaves with no yellow or brown spots. Cherry tomatoes should be plump and shiny. A good olive oil should smell fresh and fruity. Always check the expiration date on your cream and cheese to ensure freshness. If you want a leaner option, swap chicken thighs for chicken breasts. For a dairy-free version, replace heavy cream with coconut cream and use nutritional yeast instead of cheese. If you need a low-sodium meal, use salt-free seasoning blends and fresh herbs. You can also add more veggies like zucchini or bell peppers for extra nutrients. {{ingredient_image_1}} 1. Heat 2 tablespoons of olive oil in a large skillet over medium heat. 2. Add 1 pound of bite-sized chicken thighs. Season with salt, pepper, 1 teaspoon of oregano, and 1 teaspoon of smoked paprika. 3. Sauté the chicken until it is golden brown and cooked through. This should take about 7-10 minutes. 4. Next, add 3 minced garlic cloves to the skillet. Sauté for another 1-2 minutes until you smell the garlic. 5. Then, stir in 1 cup of halved cherry tomatoes. Cook for 3-4 minutes until they start to soften. 6. Lower the heat and add ¼ cup of heavy cream. Stir well and let it simmer for 2-3 minutes until it thickens slightly. 7. Fold in 2 cups of fresh spinach and cook for 1-2 minutes until it wilts. 8. Remove the skillet from the heat and mix in ½ cup of grated Parmesan cheese until it melts into a creamy sauce. 9. Taste your dish and adjust the seasoning if needed. - Prep Time: 10 minutes - Cook Time: 20 minutes - Total Time: 30 minutes - Servings: 4 - Large skillet - Wooden spoon or spatula - Knife and cutting board - Measuring cups and spoons - Serving dish or plates This quick dinner recipe is simple and full of flavor. Enjoy making it tonight! Each serving of this Keto Chicken Spinach Tomato Skillet has about: - Calories: 400 - Protein: 30g - Fat: 30g - Carbohydrates: 8g - Fiber: 2g - Net Carbs: 6g - Chicken Thighs: High in protein, they help build muscle and keep you full. - Spinach: Packed with vitamins A and K, it supports eye health and bone strength. - Cherry Tomatoes: Rich in antioxidants, they may lower the risk of heart disease. - Olive Oil: A healthy fat, it helps reduce inflammation and improve heart health. - Heavy Cream: Adds creaminess and provides healthy fats for energy. This dish fits perfectly into a keto diet. It has low carbs and high fat. The net carbs are only 6g per serving. This allows you to enjoy a rich meal while staying within your carb limit. The protein keeps you full longer, reducing cravings. Plus, the tasty flavors make it a satisfying choice for any dinner. Pro Tips Use Thighs for Flavor: Chicken thighs are more flavorful and juicier than chicken breasts, making them perfect for this dish. Fresh Herbs Matter: Using fresh basil as a garnish not only enhances the flavor but also adds a beautiful touch to the presentation. Adjust Creaminess: For a richer sauce, you can increase the amount of heavy cream or add a splash of chicken broth for extra depth. Perfectly Seasoned: Always taste your dish before serving; adjust the seasoning with salt and pepper to ensure the best flavor. {{image_2}} When making Keto Chicken Spinach Tomato Skillet, avoid these common errors: - Overcrowding the skillet: This can steam the chicken instead of browning it. Cook in batches if needed. - Not seasoning enough: Season the chicken well to enhance the flavor. Don't skip the salt and pepper! - Adding spinach too early: Add spinach at the end to keep it bright and fresh. To cook chicken perfectly, follow these steps: 1. Choose the right cut: Boneless, skinless thighs work well. They stay juicy and tender. 2. Preheat the skillet: Heat the olive oil until it's hot before adding chicken. 3. Don’t rush it: Let the chicken cook without stirring for a few minutes. This helps achieve a nice brown color. 4. Use a meat thermometer: Cook to an internal temperature of 165°F (75°C). This ensures it’s safe to eat. For a great meal, try these serving ideas: - Serve it straight from the skillet for a rustic look. - Pair with cauliflower rice for extra fiber without the carbs. - Top with fresh basil for a pop of color and flavor. - Add a side salad for crunch and freshness. You can switch up the chicken in this dish. Try using shrimp or tofu for a new taste. Both options cook quickly and add a unique flavor to the skillet. You can also change the spices. Instead of smoked paprika, try curry powder or chili flakes for extra heat. For a twist, add sun-dried tomatoes or olives to deepen the flavor. For a vegetarian version, skip the chicken. Use mushrooms instead; they add a nice texture. You can replace the heavy cream with coconut milk. It gives a rich taste without dairy. Also, try nutritional yeast instead of Parmesan cheese for a cheesy flavor without dairy. Add some chopped bell peppers or zucchini for more veggies. They cook well and add color. You could also toss in some cooked quinoa or lentils for added fiber and protein. A handful of nuts, like walnuts or pine nuts, can add crunch and healthy fats. These add-ins make your meal more filling and nutritious. To store leftovers, let the dish cool first. Then place it in an airtight container. Store it in the fridge for up to three days. You can also freeze it for up to one month. Just make sure to reheat it well before serving. Yes, you can make this dish in advance. Cook it fully, then cool it down. Store it in the fridge for up to three days. When ready to eat, just reheat it on the stove until hot. This method keeps the flavors fresh. Absolutely! This recipe is great for meal prep. You can portion it into containers after cooking. It reheats well, making it perfect for busy days. Plus, it’s low-carb and fits into a keto diet nicely. Enjoy a healthy meal whenever you want! This post explained how to create a tasty Keto Chicken Spinach Tomato Skillet. We covered the ingredients you'll need, tips for picking fresh ones, and how to substitute ingredients for dietary needs. I gave you step-by-step cooking instructions, tools, and time needed. We explored the dish’s health benefits and nutritional value. Plus, I shared tips to help you avoid common mistakes. You can try variations for more flavors and answers to your common questions. With these steps, you'll cook delicious meals confidently every time.

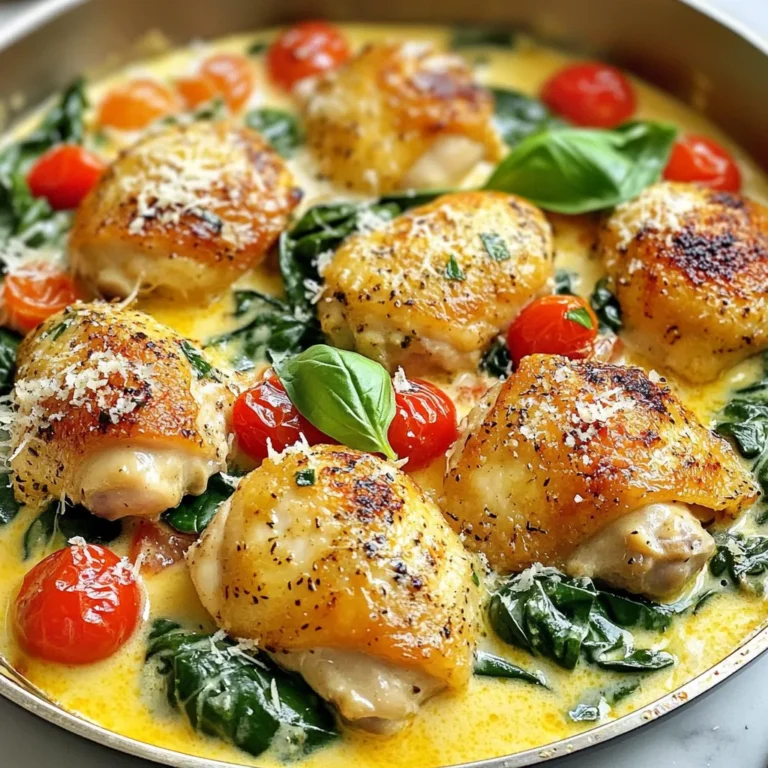
Keto Chicken Spinach Tomato Skillet Quick Dinner Recipe

For this cozy soup, you will need: - 1 lb ground beef - 1 lb ground pork - 1 cup breadcrumbs - 1/2 cup milk - 1 small onion, finely chopped - 2 cloves garlic, minced - 4 cups beef broth - 2 cups baby carrots, chopped - 1 cup potatoes, diced - 1 cup fresh spinach - 1 cup heavy cream These ingredients create a rich base for the soup. The ground beef and pork form the meatballs, while the vegetables add texture and flavor. The broth brings everything together in a warm, hearty embrace. To enhance flavor, you’ll need: - 1 tsp nutmeg - 1 tsp allspice - Salt and pepper to taste Nutmeg and allspice give the soup its signature warmth. They blend well with the meat and add depth to the dish. Be sure to taste as you go, adjusting salt and pepper for your liking. For a finishing touch, consider adding: - Fresh dill for garnish Dill brightens the soup and adds a fresh note. It pairs perfectly with the creamy base and the savory meatballs. A sprinkle on top makes the dish look inviting and colorful. {{ingredient_image_1}} First, grab a large bowl. In the bowl, mix 1 lb of ground beef and 1 lb of ground pork. Add 1 cup of breadcrumbs and 1/2 cup of milk. Then, include half of the finely chopped onion and 2 minced garlic cloves. Don’t forget the spices! Sprinkle in 1 teaspoon of nutmeg and 1 teaspoon of allspice. Add salt and pepper to taste. Mix everything gently until it is just combined. Be careful not to over-mix, as this can make the meatballs tough. Now, shape the mixture into small meatballs, about 1 inch wide. Set them aside on a plate. Next, heat a large pot over medium heat. Add a splash of oil to the pot. When the oil is hot, add the rest of the chopped onion. Sauté it for about 2-3 minutes until it is soft and translucent. Now, carefully add the meatballs to the pot. Brown them on all sides for about 5-7 minutes. If your pot is small, you might want to do this in batches. Browning gives the meatballs a nice flavor and color. Once your meatballs are browned, pour in 4 cups of beef broth. Bring the broth to a gentle boil. Now it’s time to add some veggies! Toss in 2 cups of chopped baby carrots and 1 cup of diced potatoes. Turn the heat down to a simmer and let it cook for about 15-20 minutes. You want the vegetables to become tender. After that, stir in 1 cup of fresh spinach and 1 cup of heavy cream. Let it simmer for an extra 5 minutes. Before serving, taste the soup and adjust the seasoning with salt and pepper as needed. To make great meatballs, use a mix of beef and pork. The beef gives flavor, and pork adds moisture. Use breadcrumbs to hold everything together. Soak them in milk for a few minutes before mixing. This helps the meatballs stay soft. Don’t over-mix the meat; just combine the ingredients until they are blended. Shape them gently into balls about one inch wide. This size helps them cook evenly. Flavor is key to a tasty soup. Use fresh garlic and onion for the best taste. Nutmeg and allspice add warmth and depth. Don’t skip the salt and pepper; they bring all the flavors together. After you brown the meatballs, save those tasty bits on the bottom of the pot. They add extra flavor when you pour in the beef broth. Stir well to mix everything. You can add a squeeze of lemon juice for a touch of brightness at the end. Serve the soup hot in big bowls. Top with fresh dill for a nice pop of color. It also adds a fresh taste. Pair it with crusty bread for dipping. This makes the meal feel even more cozy. If you want, you can also add a dollop of sour cream on top for creaminess. Enjoy a warming bowl that feels like a hug on a chilly day! Pro Tips Use Fresh Herbs: Fresh dill adds a bright flavor to the soup; consider adding it at the end for the best taste. Make Ahead: This soup can be made in advance and stored in the refrigerator for up to three days; the flavors will deepen over time. Perfect Meatballs: Ensure even cooking by making meatballs of uniform size; this will help them cook evenly in the soup. Add a Kick: For a spicy twist, consider adding a pinch of red pepper flakes or a dash of hot sauce to the broth. {{image_2}} You can easily make this soup gluten-free. Use gluten-free breadcrumbs instead of regular ones. This small swap keeps the meatballs soft. You can also use a gluten-free beef broth. Always check labels to be sure. This way, everyone can enjoy a warm bowl of soup. To make a vegetarian version, swap the meat for plant-based meat. Use lentils or mushrooms for texture. These options add great flavor and heartiness. Instead of beef broth, use vegetable broth. Add in more veggies like zucchini or bell peppers for extra nutrients. Experiment with different herbs and spices to find your favorite. Try adding thyme or rosemary for a fresh twist. A pinch of smoked paprika can add depth to the flavor. You can also increase the nutmeg or allspice for a more robust taste. Fresh parsley or chives make great garnishes too. You can store leftover Swedish meatball soup in a safe container. Let the soup cool down first. Once cool, transfer it to an airtight container. This helps keep the flavors fresh. The soup will last in the fridge for about three days. Make sure to label the container with the date for easy tracking. To reheat, pour the soup into a pot. Heat it over medium heat. Stir often to ensure even warming. You may need to add a little beef broth or water if the soup thickens too much. This keeps it creamy and delicious. You can also use the microwave. Place it in a microwave-safe bowl and heat in short bursts. Stir in between to prevent hot spots. If you want to freeze the soup, do it after it cools completely. Use freezer-safe containers or bags. Leave some space at the top, as soup expands when frozen. The soup will keep well for about three months. When you’re ready to eat, thaw it in the fridge overnight. Reheat as mentioned above. Enjoy a warm bowl of comfort anytime! If you don’t have beef broth, you can use chicken broth. The flavor will change a bit but will still be tasty. Vegetable broth is another good option. You can even make a broth using water and seasoning. Just add salt, pepper, and herbs to boost the taste. Yes, you can make Swedish meatball soup in advance. This soup tastes even better the next day. Just store it in the fridge after it cools. When you're ready to eat, heat it on the stove until hot. You may want to add a splash of cream for extra richness. To check if the meatballs are cooked, cut one in half. The center should be brown with no pink. You can also use a meat thermometer. The meatballs should reach a safe temperature of 160°F. Cooking them until they are nicely browned also adds flavor. This blog post covered how to make a tasty Swedish meatball soup. We explored key ingredients, from traditional meatballs to spices. I shared step-by-step instructions for preparing and cooking the dish, plus tips for perfect texture and flavor. You learned about gluten-free and vegetarian options. Lastly, we discussed how to store and reheat leftovers. Remember, this soup is versatile and fun to make. Enjoy your cooking adventure!

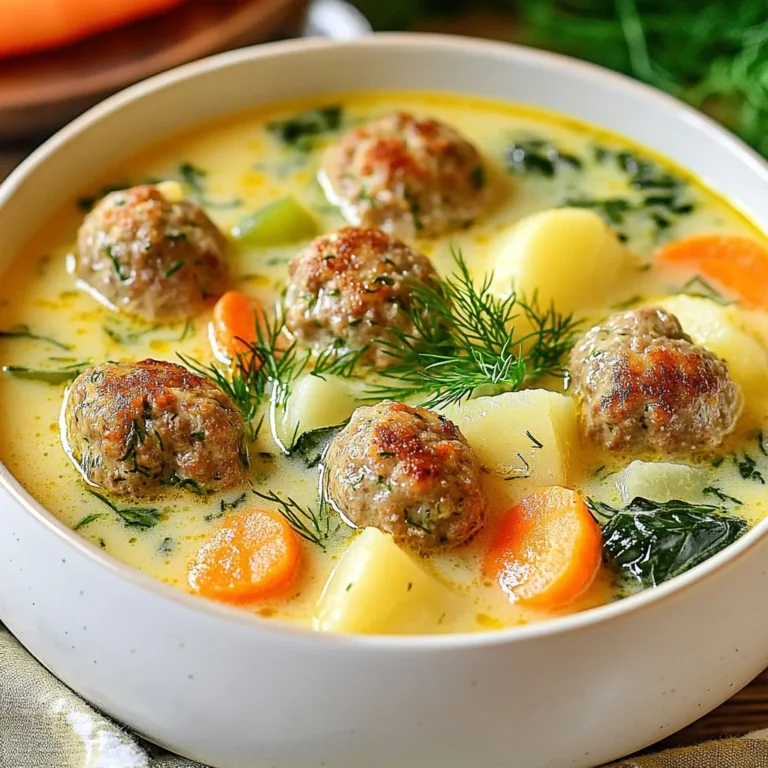
Savory Swedish Meatball Soup Comforting and Hearty Recipe

To make this warm and hearty soup, gather these ingredients: - 1 medium head of green cabbage, chopped - 1 lb ground beef (or turkey for a lighter option) - 1 cup cooked rice (white or brown) - 1 large onion, diced - 3 cloves garlic, minced - 1 can (14 oz) crushed tomatoes - 4 cups beef broth (or vegetable broth) - 1 tablespoon Worcestershire sauce - 2 teaspoons dried oregano - 1 teaspoon dried thyme - Salt and pepper to taste - 1 tablespoon olive oil - Fresh parsley for garnish You can make this soup your own. Here are some easy swaps: - Use ground chicken or pork instead of beef. - Swap cooked rice for quinoa or barley. - If you’re out of beef broth, try vegetable broth or chicken broth. - For a vegan version, use lentils or beans instead of meat and skip the broth. - Fresh herbs can replace dried ones. Use three times the amount of fresh herbs. This soup is not only tasty but also good for you. Here’s a quick look at the nutrition: - Calories: Approximately 250 - Protein: 18g - Carbohydrates: 30g - Fat: 8g - Fiber: 4g Each bowl of this cabbage roll soup gives you a great blend of flavors and nutrients. Enjoy every cozy bite! {{ingredient_image_1}} To make cabbage roll soup, gather all your ingredients first. This helps you stay organized. You need a medium head of green cabbage, ground beef, cooked rice, onion, garlic, crushed tomatoes, broth, Worcestershire sauce, herbs, salt, and pepper. Chopping the cabbage and dicing the onion ahead of time saves time. 1. Heat the Oil: Start by heating the olive oil in a large pot over medium heat. 2. Sauté the Aromatics: Add the diced onion and minced garlic. Cook them for about 5 minutes, until they smell great and soften. 3. Brown the Meat: Next, add the ground beef. Cook it until it turns brown. Use a spoon to break the meat apart. If there’s extra fat, drain it. 4. Add Cabbage: Now, stir in the chopped cabbage. Cook for 5-7 minutes until it starts to wilt. 5. Combine Ingredients: Mix in the cooked rice, crushed tomatoes, broth, Worcestershire sauce, oregano, thyme, salt, and pepper. Stir everything well. 6. Simmer: Bring the soup to a boil. Then, lower the heat and let it simmer without a lid for 20-30 minutes. This time lets all the flavors blend and the cabbage gets tender. 7. Taste and Adjust: After simmering, taste the soup. Adjust the seasoning if you need to. Ladle the soup into bowls. For a nice touch, sprinkle fresh parsley on top. This adds color and a fresh taste. Serve the soup hot with some crusty bread for dipping. The bread complements the soup nicely and makes it even more comforting. Enjoy this warm dish on a chilly day! To boost flavor, use fresh herbs. Fresh parsley adds brightness. You can also try adding a bay leaf while cooking. It adds depth to the broth. If you love spice, add a pinch of red pepper flakes. This brings warmth without overpowering the dish. One mistake is overcooking the cabbage. You want it tender, not mushy. Another error is not draining excess fat from the meat. Fat can make the soup greasy. Always taste your soup before serving. Adjust the salt and pepper to your liking. For a thicker soup, add more rice. You can also blend a portion of the soup. This gives a creamy texture without added dairy. Ensure all ingredients are cut evenly for even cooking. Stir the soup occasionally while it simmers to prevent sticking. Pro Tips Use Fresh Herbs: Fresh parsley not only adds color but also enhances the flavor profile of the soup. Consider adding basil or dill for an extra layer of freshness. Adjust the Broth: Customize the soup's richness by using a combination of beef and vegetable broth, or opt for low-sodium broth to control the saltiness. Make It Ahead: This soup tastes even better the next day! Prepare it in advance and store it in the fridge to allow the flavors to meld together overnight. Vegetarian Option: Substitute the ground beef with lentils or a meat substitute for a delicious vegetarian version of this comforting soup. {{image_2}} You can make a tasty vegetarian version of this soup. Start by using a mix of veggies. You can use mushrooms, bell peppers, and zucchini. Instead of meat, use 1 cup of lentils or chickpeas for protein. Replace beef broth with vegetable broth to keep it vegetarian. This soup stays rich and full of flavor. Add more spices like smoked paprika for depth. If you love spice, try adding red pepper flakes. Start with half a teaspoon and adjust to your taste. You can also add diced jalapeños for a fresh kick. For a smoky flavor, include a chipotle pepper in adobo sauce. This will add both heat and a nice smoky taste. Spice up your soup to warm you right up! You can switch the ground beef for other proteins. Ground turkey is a leaner option that works well. You can also use ground chicken if you prefer. For a plant-based choice, try crumbled tempeh or tofu. Both provide great texture and soak up the soup's flavors. Choose what you like best for your meal! To store your leftover cabbage roll soup, let it cool down first. Then, scoop it into an airtight container. This keeps the soup fresh. You can keep it in the fridge for about three to four days. If you plan to eat it later, store it in smaller portions. This way, you can take out just what you need. For long-term storage, freezing is best. Pour the cooled soup into freezer-safe containers. Leave some space at the top, as the soup will expand when frozen. You can freeze it for up to three months. Make sure to label the containers with the date. This helps you keep track of how long it has been frozen. When you're ready to eat, thaw the soup overnight in the fridge. If you need it faster, you can use the microwave. Heat on medium power until warm. Stir it a few times to help it heat evenly. You can also reheat it on the stove. Just put it in a pot over low heat. Stir often until it is hot throughout. Enjoy your delicious cabbage roll soup again! Cabbage roll soup is a warm, tasty dish inspired by traditional cabbage rolls. It combines ground meat, rice, and cabbage in a rich broth. You enjoy all the flavors of cabbage rolls without the fuss of rolling them. The soup is hearty and satisfying, perfect for chilly days. Plus, it uses simple ingredients you likely have at home. Yes, you can make cabbage roll soup in a slow cooker! Just brown the meat and onions first. Then, add all ingredients to the slow cooker. Cook on low for about 6-8 hours or high for 3-4 hours. This method allows the flavors to mix well over time. You will enjoy a delicious and easy meal with minimal effort. Cabbage roll soup lasts about 3-4 days in the fridge. Store it in an airtight container to keep it fresh. When you want to enjoy it again, just heat it on the stove or in the microwave. The flavors may deepen as it sits. This makes it even more tasty for your next meal! Cabbage roll soup is a hearty dish packed with flavor and nutrients. We explored its ingredients, preparation steps, and tips for cooking success. I shared how to enhance flavor and avoid common mistakes. This soup has adaptable variations, including vegetarian and spicy options. Proper storage helps keep it fresh, ensuring you enjoy it longer. Remember, this soup is versatile and can fit your taste. With these insights, you can make delicious cabbage roll soup each time. Enjoy your cooking journey!

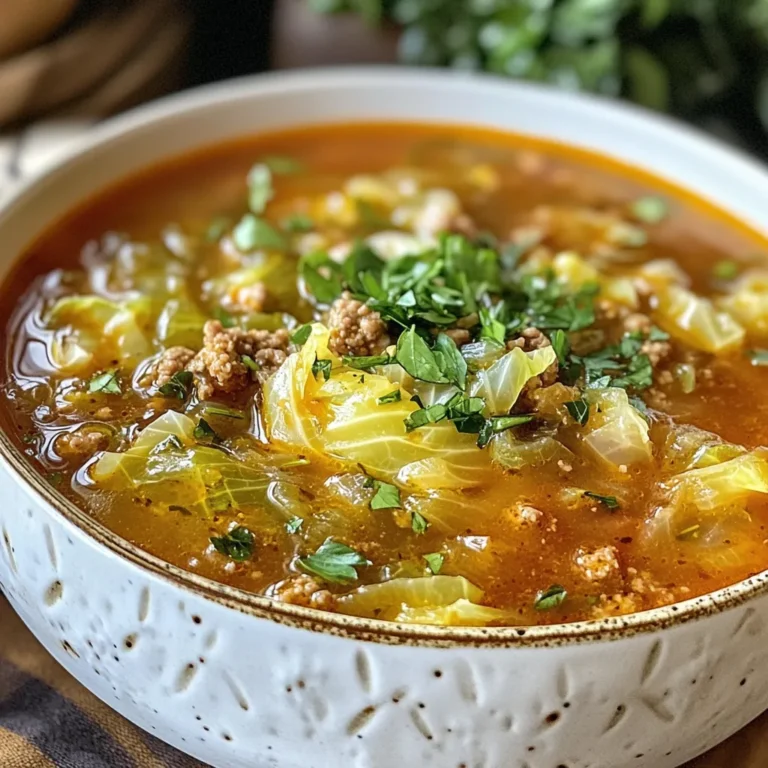
Cabbage Roll Soup Easy and Delicious Comfort Dish

- 8 ounces linguine pasta - 1 pound large shrimp, peeled and deveined - 4 tablespoons unsalted butter - 3 cloves garlic, minced - 1/4 teaspoon red pepper flakes - 2 tablespoons lemon juice - 1 tablespoon lemon zest - 1/4 cup fresh parsley, chopped - Salt and pepper to taste To make Shrimp Scampi Linguine, you need fresh ingredients. Start with linguine pasta. This type of pasta is perfect for catching the sauce. Use large shrimp that are peeled and deveined. These shrimp cook quickly and taste great. Garlic and butter add rich flavor. The red pepper flakes give a nice kick. - Grated Parmesan cheese - Extra parsley for garnish For a tasty finish, add grated Parmesan cheese. It melts beautifully over the hot linguine. Extra parsley adds color and freshness. These toppings make the dish even better. - Salt, pepper, and red pepper flakes - Lemon juice and zest Don't forget to have salt and pepper ready. They enhance the taste. Red pepper flakes add heat, so adjust to your liking. Lemon juice and zest brighten the dish. The acidity cuts through the richness, making each bite refreshing. {{ingredient_image_1}} To cook the linguine, first, get a large pot. Fill it with water and add salt. The salt makes the pasta taste better. Bring the water to a boil. Once boiling, add the linguine. Cook it according to the package instructions. You want it to be al dente, which means it should be firm but not hard. This usually takes about 8 to 10 minutes. After cooking, drain the linguine but keep about half a cup of the pasta water. This water can help the sauce later. Now, let’s prepare the shrimp. Take a large skillet and place it over medium heat. Add the unsalted butter and let it melt. Then, add the minced garlic. Stir it for about one minute until it smells good, but don’t let it burn. Next, add the shrimp to the skillet. Season them with salt, pepper, and red pepper flakes. Cook the shrimp for about 2 to 3 minutes on each side. They should turn pink and opaque when done. This shows they are cooked through. Once the shrimp are ready, it's time to combine everything. Stir in the lemon juice and lemon zest. Then, add the cooked linguine to the skillet. Toss everything together. If the sauce looks too dry, add some of the reserved pasta water. Do this a little at a time until you reach the sauce consistency you like. Finally, remove the skillet from heat and fold in the chopped parsley. Taste and adjust the seasoning with more salt or pepper if needed. Enjoy your delicious shrimp scampi linguine! To avoid rubbery shrimp, cook them just right. Shrimp cook fast. They only need about 2-3 minutes on each side. When they turn pink and opaque, they are done. Overcooking makes them tough. Keep an eye on them while they cook. For the best seasoning, use fresh garlic and herbs. Add salt and pepper to taste. Red pepper flakes bring a nice kick. If you want more flavor, try adding lemon juice or zest. These brighten the dish. To boost the flavor, consider adding fresh herbs. Basil, thyme, or dill work well in shrimp scampi. They add depth and freshness. You can also use white wine or broth for more complexity. A splash of white wine adds a nice touch. It enhances the sauce and pairs well with shrimp. Using a skillet is great for shrimp scampi. It allows even cooking and quick preparation. The heat from the skillet helps blend the flavors fast. If you have a non-stick skillet, use it. It makes clean-up easier. Timing is key in preparation. Have all your ingredients ready before starting. This way, you can cook everything smoothly. The quicker you combine the shrimp and pasta, the better the dish will taste. Pro Tips Use Fresh Shrimp: For the best flavor and texture, opt for fresh shrimp instead of frozen. If using frozen, ensure they are properly thawed before cooking. Don’t Overcook the Shrimp: Shrimp cook quickly; overcooking can make them tough. Look for them to turn pink and opaque, which usually takes 2-3 minutes per side. Adjust the Spice Level: Feel free to modify the amount of red pepper flakes based on your spice preference. You can also add a pinch of cayenne for extra heat! Save Pasta Water: The reserved pasta water is starchy and will help to thicken your sauce. Add it gradually until you reach the desired consistency. {{image_2}} You can switch the shrimp for scallops or chicken. Scallops offer a sweet, tender bite. They cook quickly, just like shrimp. If you use chicken, cut it into small pieces. Cook until golden brown. This keeps it juicy. For a vegetarian twist, try using mushrooms or zucchini. Both soak up flavors well. You can also use plant-based shrimp for a similar taste and texture. These options make the dish fun for everyone. To enhance the taste, add spices or different herbs. A pinch of smoked paprika adds warmth. Fresh basil can bring a bright flavor. Try using thyme for a woodsy touch. Each herb changes the dish’s vibe. You can also swap linguine for other pasta types. Fettuccine or penne works well, too. Gluten-free pasta is also an option. Use what you like best. This keeps the meal exciting. Pair your shrimp scampi linguine with side dishes. A simple green salad adds a nice crunch. Garlic bread makes a great side, too. It’s perfect for soaking up extra sauce. For plating, twirl the pasta into a nest. This gives it a nice look. Top with shrimp and a sprinkle of parsley. Add a light dusting of cheese for extra flair. A slice of lemon on the side looks great and adds freshness. After enjoying your shrimp scampi linguine, store any leftovers right away. Place it in an airtight container. This keeps it fresh. You can refrigerate the dish for up to three days. If you want to save it longer, freeze it. Wrap it tightly in plastic wrap, then put it in a freezer bag. It can last for up to three months in the freezer. When it's time to eat leftovers, you want them to taste great. The best way to reheat shrimp scampi linguine is on the stove. Heat it in a skillet over medium heat. Add a splash of water or broth to keep it moist. Stir often to avoid burning. If you use a microwave, heat it in short bursts. Check often to prevent overcooking. In the fridge, shrimp scampi linguine stays good for three days. If you freeze it, it can last for up to three months. Signs that your dish is no longer good are off smells, discoloration, or a slimy texture. If you notice any of these, it’s best to toss it out. It takes about 10 minutes to prep and 20 minutes to cook. In total, you need about 30 minutes. This quick time makes it perfect for a weeknight meal. Yes, you can use frozen shrimp. Just thaw them before cooking. Frozen shrimp are often convenient and can taste great. Fresh shrimp do have a better texture and flavor, but both options work well. If you use frozen shrimp, make sure to pat them dry before adding to the skillet. You can use spaghetti, fettuccine, or penne instead of linguine. These pastas will hold the sauce well. For a gluten-free option, you can use rice noodles or gluten-free pasta. These choices will still give you a tasty dish. Shrimp scampi linguine is a tasty dish made with simple ingredients. You learned about cooking linguine, preparing shrimp, and combining flavors. Remember to use fresh herbs and lemon for a pop of taste. You can also try different proteins or pasta types for variety. Store leftovers wisely to keep them fresh longer. Enjoy this dish with friends or family, and get creative with your own twist! Try it out and savor every bite.

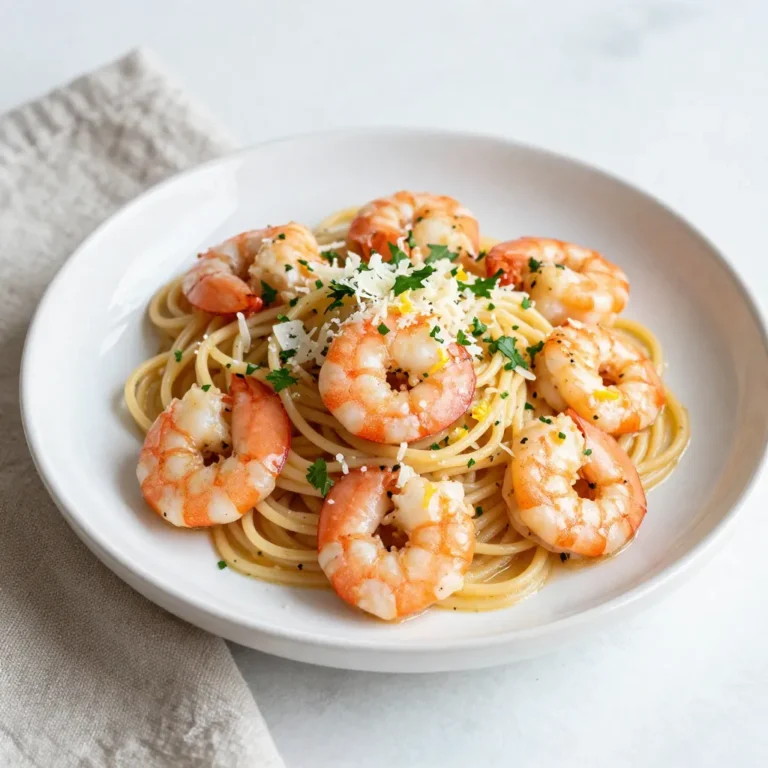
Scrumptious Shrimp Scampi Linguine Easy Weeknight Meal

To make a tasty Chicken Fajita Casserole, gather these ingredients: - 2 cups cooked chicken, shredded - 1 bell pepper (any color), sliced - 1 medium onion, sliced - 2 cups cooked rice (white or brown) - 1 can (15 oz) black beans, drained and rinsed - 1 can (10 oz) diced tomatoes with green chilies - 1 cup corn (fresh, frozen, or canned) - 1 teaspoon chili powder - 1 teaspoon cumin - 1 teaspoon garlic powder - 1 teaspoon smoked paprika - 2 cups shredded cheese (cheddar or Mexican blend) - Salt and pepper to taste - Fresh cilantro, chopped (for garnish) - Sour cream or Greek yogurt (for serving) You can add a few extras to make your casserole even better: - 1 jalapeño, minced for heat - 1 cup sliced mushrooms for earthiness - 1 cup black olives for a briny taste - Lime juice for a fresh kick These options can boost the flavor and make it your own. If you are missing some items, here are some swaps: - Use rotisserie chicken instead of cooking your own. - Swap out black beans for pinto or kidney beans. - Try quinoa instead of rice for a healthy twist. - Use vegan cheese if you want a dairy-free option. These substitutions work well without losing the dish's charm. {{ingredient_image_1}} First, preheat your oven to 375°F (190°C). This step is key for even cooking. While it warms up, grab a 9x13 inch casserole dish. Grease it with cooking spray or a little oil. This helps the casserole come out easily after baking. In a large mixing bowl, add the following items: - 2 cups cooked chicken, shredded - 1 bell pepper, sliced - 1 medium onion, sliced - 2 cups cooked rice - 1 can (15 oz) black beans, drained and rinsed - 1 can (10 oz) diced tomatoes with green chilies - 1 cup corn - 1 teaspoon chili powder - 1 teaspoon cumin - 1 teaspoon garlic powder - 1 teaspoon smoked paprika - Salt and pepper to taste Mix all these ingredients well. You want everything to blend together for great flavor. Make sure each bite has a bit of everything. Now it’s time to layer your casserole. Start by spreading half of the chicken and vegetable mix in the bottom of the greased dish. This creates a nice base. Next, sprinkle one cup of shredded cheese on top. Then, add the rest of the chicken mix over the cheese. Press it down gently to keep it compact. Finally, sprinkle the last cup of cheese on top. Cover the dish with aluminum foil and bake for 25 minutes. After 25 minutes, take off the foil. Bake for an extra 10-15 minutes. You want to see the cheese bubbling and turning golden. When done, take it out and let it cool for a few minutes. This helps the layers set before serving. To get the best flavor, use fresh spices. I love using chili powder, cumin, and smoked paprika. These spices add warmth and depth. You can adjust the amount based on your taste. For more heat, add cayenne pepper or fresh jalapeños. Fresh lime juice gives a bright kick. Just squeeze some over the top before serving. Cheese is key to making this casserole creamy and rich. I recommend shredded cheddar or a Mexican blend. These cheeses melt well and add great flavor. You can mix different types too! Try pepper jack for a spicy twist. Remember to sprinkle cheese on two layers for extra gooeyness. This casserole is great on its own. But you can add sides for a full meal. Serve it with a fresh salad or some tortilla chips. Guacamole and salsa bring a fresh taste too. For a creamy touch, offer sour cream or Greek yogurt. Don’t forget to garnish with cilantro for color and flavor! Pro Tips Choose Your Cheese: Opt for a blend of cheeses for added flavor and creaminess. Cheddar, Monterey Jack, and Pepper Jack all work well together. Make It Spicier: If you like heat, add some diced jalapeños or a dash of hot sauce to the mixture before baking. Bulk It Up: For extra nutrition and texture, consider adding vegetables like zucchini or mushrooms to the casserole. Storage Tips: This casserole stores well in the refrigerator for up to 3 days. Reheat in the oven for best results, rather than the microwave. {{image_2}} You can make a tasty vegetarian version of this casserole. Just swap out the chicken for a mix of hearty veggies. Try using: - 1 can (15 oz) black beans, drained and rinsed - 1 cup of sliced mushrooms - 1 cup of zucchini, diced - 1 cup of bell peppers, any color - 1 cup of corn Mix these veggies with the other ingredients in the recipe. You’ll still enjoy that great fajita flavor without meat. If you love heat, add jalapeños to the mix. Slice fresh jalapeños and mix them in with the other veggies. You can use: - 1-2 fresh jalapeños, sliced or diced You might also add extra chili powder or cayenne pepper. This will kick up the spice and make your taste buds dance. For a low-carb option, replace rice with cauliflower rice. Here’s what to do: - 2 cups of cauliflower rice instead of cooked rice This change keeps your casserole filling while lowering carbs. You can also skip the black beans to cut more carbs. The taste will still be delicious and satisfying! To store your chicken fajita casserole, let it cool first. Then, cover it tightly with plastic wrap or aluminum foil. You can also use an airtight container. This will keep the flavors fresh. Store it in the fridge for up to three days. If you want it to last longer, consider freezing it. When you are ready to eat the leftovers, preheat your oven to 350°F (175°C). Place the casserole in an oven-safe dish. Cover it with foil to prevent drying out. Heat for about 20-30 minutes, or until it is hot all the way through. Stir halfway to help it warm evenly. You can also use a microwave for quick reheating. Just put a portion on a microwave-safe plate and heat for 1-2 minutes. To freeze your chicken fajita casserole, make sure it is completely cooled. Portion it into smaller containers for easy use. Label each container with the date. This way, you will know how long it has been in the freezer. It can last up to three months. When you are ready to eat, thaw it in the fridge overnight before reheating. This method keeps the texture and taste intact. Enjoy your delicious meal anytime! No, using raw chicken is not safe for this recipe. Cooked chicken ensures your dish is ready quickly. Raw chicken needs longer cooking time. It can lead to uneven cooking. Always use cooked chicken for best results. Many sides pair well with Chicken Fajita Casserole. Here are some great options: - Mexican rice: This adds more flavor and texture. - Guacamole: Creamy and cool, it balances the spices. - Refried beans: They add protein and richness. - Fresh salad: A light salad can refresh your meal. - Cornbread: This sweet bread complements the savory casserole. To add heat, try these tips: - Add jalapeños: Fresh or pickled jalapeños can spice up your dish. - Use hot salsa: Mix in salsa with a kick for more flavor. - Increase chili powder: Add more to the mix for extra spice. - Use spicy cheese: Opt for pepper jack cheese instead of regular cheese. These steps will make your Chicken Fajita Casserole more exciting! Enjoy your meal! We covered a lot about making a delicious Chicken Fajita Casserole. You learned about the right ingredients and how to prep them. I shared tips for flavor and cheese options. We even explored fun variations and storage tips. In the end, enjoy this dish your own way. Mix and match ingredients to suit your taste. With these steps, you're ready to create a tasty meal that everyone will love.

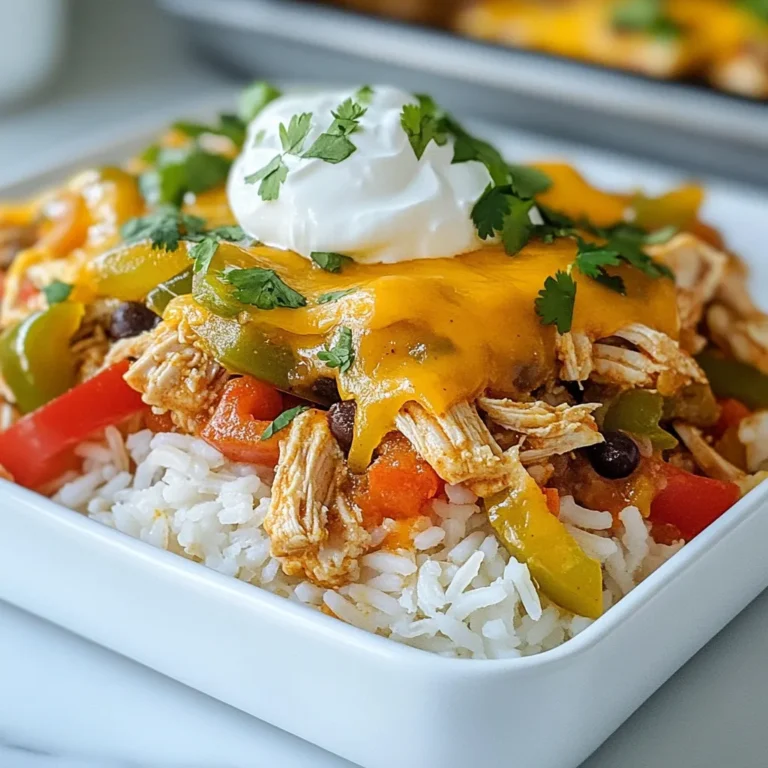
Satisfying Chicken Fajita Casserole Recipe Tonight

To make delicious ground chicken meatballs, gather these key items: - 1 lb ground chicken - 1/2 cup breadcrumbs - 1/4 cup grated Parmesan cheese - 1/4 cup fresh parsley, chopped - 2 cloves garlic, minced - 1 egg - 1 tablespoon Dijon mustard - 1 teaspoon onion powder - 1 teaspoon smoked paprika - Salt and pepper to taste - 2 tablespoons olive oil (for cooking) These ingredients come together to create a tasty meatball that is juicy and full of flavor. Feel free to play with these extras to make your meatballs unique: - Spicy marinara sauce for serving - Red pepper flakes for heat - Fresh herbs like basil or oregano - Different cheeses, like mozzarella or feta These options let you adjust the flavor to match your taste. Each serving of these meatballs offers balanced nutrition: - Calories: 250 - Protein: 20g - Fat: 12g - Carbohydrates: 15g - Fiber: 1g - Sodium: 300mg This meal is not only tasty but also gives good nutrition. Enjoy making these ground chicken meatballs! {{ingredient_image_1}} To start, gather your ingredients. In a large bowl, combine 1 pound of ground chicken, 1/2 cup of breadcrumbs, and 1/4 cup of grated Parmesan cheese. Next, add 1/4 cup of fresh parsley, chopped, and 2 cloves of minced garlic. Crack in 1 egg, then stir in 1 tablespoon of Dijon mustard, 1 teaspoon of onion powder, and 1 teaspoon of smoked paprika. Finally, season with salt and pepper to taste. Mix everything until just combined. Be careful not to overmix. This can make your meatballs tough. Now it’s time to shape your meatballs. Use your hands to form small balls, about 1 to 1.5 inches in size. You should get around 20 meatballs from this mix. Next, heat 2 tablespoons of olive oil in a large oven-safe skillet over medium heat. Once hot, add your meatballs. Brown them for about 2 to 3 minutes on each side until they look golden. After browning, it’s time to bake. Preheat your oven to 400°F (200°C). Once the meatballs are golden, transfer the skillet to the oven. Bake for 12 to 15 minutes. Use a meat thermometer to check for doneness; they should reach 165°F (74°C) inside. Once cooked, remove them from the oven. Serve hot, perhaps with a drizzle of spicy marinara sauce, or enjoy them plain! To boost flavor, add herbs like basil or thyme. Spices like cumin or chili flakes work well too. You can mix in grated carrots or zucchini for extra moisture. Using fresh garlic makes a big difference. Overmixing makes meatballs tough. Mix just until the ingredients combine. Use ground chicken with some fat for juiciness. Adding an egg helps bind without making them dense. Keep your hands wet when shaping to prevent sticking. These meatballs pair well with spicy marinara sauce. Try serving them over pasta or in a sub. For a lighter option, serve with a salad or roasted veggies. They also taste great in a wrap with fresh greens. Pro Tips Use Fresh Herbs: Fresh parsley not only adds flavor but also enhances the dish’s appearance. Feel free to mix in other herbs like basil or cilantro for a unique twist. Don’t Overmix: When combining ingredients, mix just until combined. Overmixing can lead to tough meatballs, so handle the mixture gently. Perfect Size: Aim for uniform meatballs around 1-1.5 inches in diameter for even cooking. Use a cookie scoop for consistent sizing. Check for Doneness: Always use a meat thermometer to ensure your meatballs are fully cooked. They should reach an internal temperature of 165°F (74°C) for safety. {{image_2}} You can easily change the flavor of your meatballs. For an Italian twist, add herbs like basil, oregano, and a bit of red pepper flakes. Use marinara sauce for serving. If you want an Asian flavor, mix in ginger, scallions, and sesame oil. Serve with soy sauce or a sweet chili sauce for a fun dip. Ground chicken is very versatile. You can use it in meatloaf for a lighter option. Just swap it in your favorite meatloaf recipe. You can also add ground chicken to stir-fry dishes. It cooks quickly and absorbs flavors well. Toss it with veggies and your favorite sauce for a quick meal. You can cook your meatballs in different ways. Grilling adds a smoky flavor. Just form the meatballs and place them on a preheated grill. Air frying is another great option. It cooks them evenly and keeps them crispy outside. Set your air fryer to 375°F (190°C) and cook for about 10-12 minutes. Both methods give tasty results! To keep your meatballs fresh, store them in an airtight container. Let them cool first. Place parchment paper between layers if stacking. This helps prevent sticking. Store them in the fridge for up to three days. You can freeze cooked meatballs for later use. Place them on a baking sheet and freeze until solid. Then transfer them to a freezer-safe bag. Label the bag with the date. They can last up to three months in the freezer. To reheat, bake them in the oven at 350°F (175°C) for about 15 minutes. Cooked meatballs last three days in the fridge. Uncooked meatballs can stay fresh for one day. For longer storage, freeze them right away. This way, you can enjoy them later without losing flavor. Yes, you can use other meats. Ground turkey works well too. You can also try beef or pork. Each type of meat will add a different flavor. Just keep in mind that cooking times may change slightly. To check if the meatballs are done, use a meat thermometer. The internal temperature should reach 165°F (74°C). If you don’t have a thermometer, cut one meatball in half. The meat should be white and not pink. Ground chicken meatballs go well with many sides. Try serving them with spaghetti and marinara sauce. You can also pair them with a fresh salad or roasted veggies. For a fun twist, serve them in a sub sandwich with cheese. We covered essential ingredients and how to make tasty ground chicken meatballs. You learned step-by-step instructions for mixing, forming, and cooking them perfectly. Tips helped you avoid tough meatballs, and we explored fun variations and storage methods. Now, you have the tools to create flavorful meals and share them with others. Enjoy your cooking journey and don't hesitate to try new flavors and ideas.

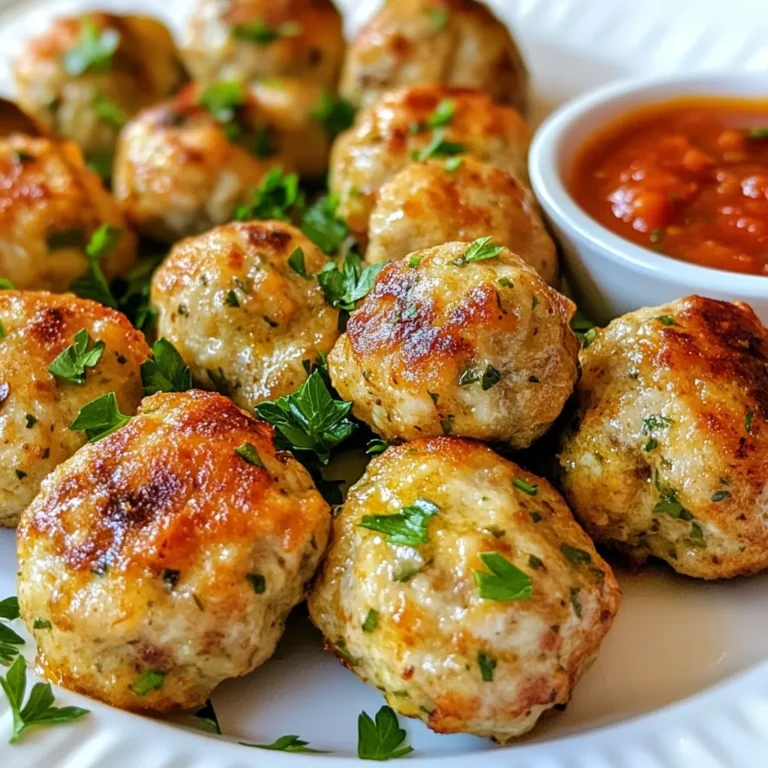
Ground Chicken Meatballs Flavorful and Easy Recipe

- 1 lb carrots, trimmed and peeled - 2 tablespoons olive oil - Salt and pepper to taste - 1 cup ricotta cheese - 2 tablespoons honey - 1 teaspoon red pepper flakes - 1 tablespoon lemon juice - Fresh herbs (such as chives or parsley) for garnish - Additional spices for flavor - Extra olive oil for presentation - Alternative sweeteners for variation The main ingredients for this dish are simple yet impactful. Carrots bring a natural sweetness when roasted. Olive oil helps them caramelize. Salt and pepper enhance their flavors. Ricotta cheese adds creaminess. Honey contributes a sweet touch, while red pepper flakes give a nice kick. Lemon juice brightens the dish. Fresh herbs add a pop of color and taste. You can play with optional ingredients. Trying different spices can add new flavors. Extra olive oil makes the dish look even better. You can also swap honey for maple syrup or agave for a twist. These choices let you customize the dish to your liking. When you gather these ingredients, think about freshness. Choose firm carrots with vibrant colors. High-quality olive oil makes a difference. Fresh ricotta will enhance the creaminess. Each ingredient adds to the overall taste, so choose wisely. This dish is not just food; it’s a chance to explore flavors and textures. {{ingredient_image_1}} - Preheat the oven to 425°F (220°C). - Cut the carrots into even-sized pieces, about 2-3 inches long. I like to trim and peel the carrots first. This makes them look nice and bright. Cutting them evenly helps them cook at the same rate. - Toss the carrots with olive oil, salt, and pepper. - Spread on a baking sheet and roast for 25-30 minutes. Coat the carrots well. The olive oil helps to caramelize them. Roast until they are tender and a bit golden. Turn them halfway through for even cooking. - Blend ricotta, lemon juice, and salt in a food processor. - Achieve a smooth and creamy texture. Using a food processor makes this step easy. Blend until the ricotta is creamy. The lemon juice adds a nice touch of brightness. - Heat honey with red pepper flakes in a small saucepan. - Remove from heat when warm and infused. This step adds a spicy kick. The honey warms up and absorbs the heat from the flakes. Stir often to mix the flavors well. - Spread whipped ricotta on a serving platter. - Arrange roasted carrots on top and drizzle with honey. The whipped ricotta serves as a creamy base. Lay the roasted carrots on top for color and flavor. Finish with a drizzle of hot honey for sweetness and spice. - Selecting the right carrot size: Choose medium-sized carrots. They cook evenly and have great flavor. If you use larger carrots, cut them into smaller pieces. Small carrots can stay whole for a nice presentation. - How to achieve even roasting: Cut all carrots to about 2-3 inches long. This size helps them roast perfectly. Spread them on a baking sheet in a single layer. Turn them halfway through cooking to avoid burning. - Tips to make the ricotta fluffier: Use a food processor for blending. Add a little lemon juice to help create a creamy texture. Blend until smooth, then taste and adjust salt as needed. - Flavor additions for customization: Try adding herbs like chives or basil. A bit of garlic powder can add depth. You can even mix in some grated Parmesan for a savory twist. - Ideas for side dishes to complement: Pair with a fresh green salad or roasted potatoes. Quinoa or couscous also works well. The flavors of the dish blend nicely. - Pairing with proteins or grains: Serve alongside grilled chicken or fish. For a plant-based meal, try it with lentils or chickpeas. These options enhance the meal and add protein. Pro Tips Choose the Right Carrots: Opt for fresh, vibrant carrots for the best flavor and texture. Look for firm carrots with a smooth surface and bright color. Even Cutting: Cut the carrots into uniform pieces to ensure they roast evenly. This helps achieve the perfect caramelization and tenderness. Customize the Heat: Adjust the amount of red pepper flakes in the hot honey to suit your spice preference. Start with less and add more if desired. Herb Variations: Experiment with different fresh herbs like dill or basil for a unique twist in flavor. Each herb brings its own character to the dish. {{image_2}} You can change the spices in this dish to match your taste. Instead of red pepper flakes, try smoked paprika for a warm, smoky touch. You could also use cumin for an earthy flavor. If you want a sweeter kick, cinnamon pairs well with honey too. For the whipped ricotta, you can experiment with other cheeses. Cream cheese or goat cheese can add a tangy twist. Mixing in herbs like basil or dill can also give it a fresh taste. If you need gluten-free options, this recipe is already perfect. All the ingredients are naturally gluten-free. For a vegan version, swap ricotta with cashew cream. You can make this by blending soaked cashews with lemon juice and a pinch of salt. For sweeteners, if you're watching calories, use agave syrup or stevia in place of honey. Both options will still give you that sweet and spicy flavor. While carrots are great, you can try other veggies based on the season. In spring, use asparagus or radishes for a fresh taste. Summer brings zucchini or bell peppers, adding a pop of color. For fall, sweet potatoes or butternut squash work beautifully with the honey. In winter, root veggies like parsnips or turnips can add depth to the dish. Adjust the spices to match the season for even more flavor. To keep your roasted carrots fresh, let them cool first. Place them in an airtight container. You can store them in the fridge for up to four days. For the whipped ricotta, also use a separate airtight container. It will stay creamy for about three days. The best way to reheat the carrots is in the oven. Set it to 350°F (175°C). Heat for about 10-15 minutes. This keeps them tender. For the whipped ricotta, use a microwave. Heat in short bursts of 10 seconds. Stir often to keep it creamy. You can freeze roasted carrots, but they may lose some texture. Place them in a freezer-safe bag. Remove as much air as possible. They can last up to three months. For whipped ricotta, freezing is not ideal. It may change the texture when thawed. Instead, make fresh whipped ricotta when you want to enjoy your dish again. Yes, you can use other veggies. Good options include: - Parsnips - Sweet potatoes - Beets - Zucchini These veggies will roast well and taste great with whipped ricotta and hot honey. To add more heat, try these tips: - Use more red pepper flakes. - Add diced fresh chili peppers. - Drizzle extra hot honey on top. These changes will kick up the spice level and enhance the flavor. This dish pairs well with: - Grilled chicken - Roasted pork - Quinoa salad - Garlic bread These sides balance the sweetness of the carrots and the creaminess of the ricotta. Leftovers stay fresh for about 3-4 days. - Store them in an airtight container. - Keep the ricotta separate if possible. This helps maintain the texture of the dish. To sum up, this recipe blends sweet roasted carrots with smooth ricotta and spicy honey. Start by prepping and roasting the carrots, then whip up the ricotta. You can adjust flavors and enjoy variations for every season. This dish is easy to make and looks great on a plate. Try it as a side or a main. With just a few simple tips, you’ll impress anyone at your table. Enjoy crafting this delicious meal!

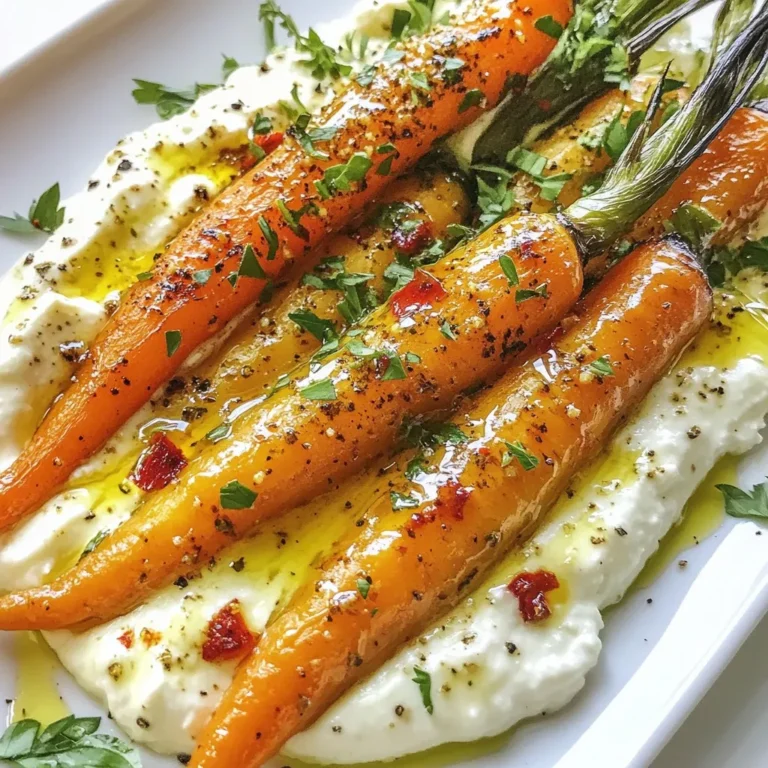
Roasted Carrots with Whipped Ricotta & Hot Honey Delight

- 3 medium-sized beets - 4 oz feta cheese, crumbled - 2 cups arugula or mixed salad greens - 1/4 cup walnuts, toasted and roughly chopped - 1/4 cup red onion, thinly sliced - 3 tablespoons olive oil - 2 tablespoons balsamic vinegar - 1 tablespoon honey - Salt and black pepper to taste When I make Fresh Beet Feta Salad, I love using fresh, colorful ingredients. The beets are the star of the show. I choose medium-sized beets for the best taste and texture. They roast well and become sweet and tender. I use feta cheese for a salty kick. Crumbled feta adds a creamy touch that balances the beets. For greens, I prefer arugula. Its peppery taste lifts the salad. Mixed salad greens work too, for extra crunch. I always add walnuts for a nice crunch. Toasted walnuts bring out the flavor and add richness. Red onion gives the salad a sharp taste. I slice it thinly, so it blends well with the other ingredients. To dress the salad, I mix olive oil, balsamic vinegar, and honey. This dressing is simple yet bright. It adds depth to the salad. Don't forget salt and black pepper for flavor. Adjust to your taste, and enjoy! {{ingredient_image_1}} Roasting Beets First, preheat your oven to 400°F (200°C). Wash and dry the beets. Wrap each beet in aluminum foil. Place them on a baking sheet. Roast them for 45-60 minutes. They should be fork-tender when done. Cooling and Peeling Once cooked, take the beets out of the oven. Let them cool slightly. Use your hands or a paper towel to peel off the skin. It should come off easily. Slicing Techniques Now, slice the beets into thin rounds or half-moons. This will help them blend well in the salad. Whisking the Dressing In a large bowl, combine olive oil, balsamic vinegar, honey, salt, and black pepper. Whisk these ingredients together until you achieve a smooth mixture. Adjusting Seasoning Taste your dressing and adjust the seasoning if needed. You want it to be just right. Combining Greens and Onions In a separate bowl, mix the arugula or mixed greens with sliced red onion. Drizzle a bit of the dressing over the greens. Toss gently to coat every leaf. Layering Ingredients On a serving platter, place the dressed greens. Next, arrange the beet slices on top. Sprinkle the crumbled feta and chopped walnuts over everything. Final Touches Drizzle more dressing over the salad if you like. Finish with a sprinkle of black pepper for extra flavor. Enjoy your fresh beet feta salad! How to Select Fresh Beets When picking beets, choose ones that feel firm and heavy. Look for smooth skin with no soft spots. The leaves should be fresh and green, showing the beet is young. Smaller beets are often sweeter and more tender. Alternative Cooking Methods While roasting beets is popular, you can boil or steam them too. Boiling takes about 30 minutes. Just place them in water and simmer until tender. Steaming is quicker and keeps more nutrients. Use a steamer basket over simmering water for about 20 minutes. Serving Suggestions For a rustic look, serve your salad on a large wooden platter. If you want a more refined touch, use individual bowls. This allows each guest to enjoy their own portion. Garnishing Ideas Add extra chopped walnuts for crunch and a sprinkle of feta for color. You can also use fresh herbs like parsley or dill to brighten the dish. A few edible flowers can add a beautiful touch as well. Best Accompaniments for Beet Feta Salad This salad pairs well with grilled chicken or fish. It also goes great with quinoa or lentils for more protein. Serve it next to a warm crusty bread for a complete meal. Recommended Dressings The dressing made from olive oil and balsamic vinegar is perfect. You can also try lemon juice for a zesty twist. A creamy dressing like tahini or yogurt adds richness and balance. Pro Tips Use Fresh Beets: Fresh, unblemished beets will yield the best flavor and texture. Look for beets that are firm and vibrant in color. Toast Your Walnuts: Toasting walnuts enhances their flavor and adds a delightful crunch to your salad. Simply place them in a dry skillet over medium heat for a few minutes. Adjust the Dressing: Feel free to tweak the dressing ingredients to suit your taste. Add more honey for sweetness or a splash of lemon juice for acidity. Serve Fresh: For the best taste and texture, serve the salad immediately after assembling. This ensures the greens remain crisp and vibrant. {{image_2}} Vegan Alternatives You can make a vegan version of this salad by swapping feta cheese for a plant-based option. Try using crumbled tofu or cashew cheese. These alternatives will give you a similar creamy texture without dairy. Nut-Free Options If you have nut allergies, simply leave out the walnuts. You can replace them with seeds like pumpkin or sunflower seeds. They add crunch and flavor without any nuts. Other Cheeses to Use Feta cheese brings a tangy taste to the salad. If you want a different flavor, try goat cheese, blue cheese, or even ricotta. Each cheese gives a unique twist to your Beet Feta Salad. Different Types of Greens While arugula is a favorite, you can use other greens. Spinach, kale, or mixed salad greens work well too. Each green adds its own flavor and texture, allowing you to customize your salad. Summer Freshness In summer, use fresh herbs like basil or mint for a refreshing touch. You can also add ripe tomatoes or cucumbers to enhance the lightness of the dish. Winter Heartiness For winter, add roasted root vegetables like carrots or sweet potatoes. These ingredients will add warmth and richness to your salad, making it hearty and satisfying. - Storing Leftovers in the Fridge: After enjoying your Fresh Beet Feta Salad, store leftovers in an airtight container. This keeps the salad fresh for about three days. Make sure to keep the dressing separate. This helps prevent the greens from wilting. - How to Keep Ingredients Fresh: If you have extra beets, wrap them in a damp cloth and place them in the fridge. Store the feta cheese in its brine or in a covered container. Keep walnuts in a cool, dark place to maintain their crunch. - Making Ahead of Time: You can roast the beets a day in advance. Once cooled, slice them and store them in the fridge. Prepare the dressing ahead too. This saves time on busy days! - Ideal Serving Timeframes: Serve the salad within 24 hours for the best taste. The flavors blend well, but the greens stay crispest within that time. Enjoy it fresh for a vibrant meal! Can I use canned beets instead of fresh? Yes, you can use canned beets. They are ready to eat. Just rinse them well. Fresh beets give a better flavor and texture. How do I know when beets are fully cooked? Beets are cooked when they are fork-tender. Insert a fork or knife into the beet. If it goes in easily, they are done. Can I use a different type of vinegar? Absolutely! You can try apple cider vinegar or red wine vinegar. Each will add its own unique flavor. What are the health benefits of beets? Beets are rich in vitamins and minerals. They are high in fiber. Beets may help lower blood pressure and improve stamina. How many calories are in the Fresh Beet Feta Salad? This salad has about 200 calories per serving. The calories come from beets, feta, and walnuts. What goes well with Beet Feta Salad? Grilled chicken or fish pairs well. You can also serve it with crusty bread. A light soup can be a nice side. How to serve for a crowd? Make a big bowl of salad. Arrange it on a large platter. Let guests serve themselves for a fun, casual vibe. In this blog post, we explored the delightful Fresh Beet Feta Salad. We covered key ingredients like beets, feta cheese, and walnuts. You learned how to prepare, dress, and assemble this tasty dish step by step. I shared helpful tips on cooking, presentation, and variations for different diets. We also discussed proper storage and answered common questions. This salad is not just delicious; it's healthy, too. Enjoy making it your own, and remember, the joy of cooking comes from experimenting with flavors!

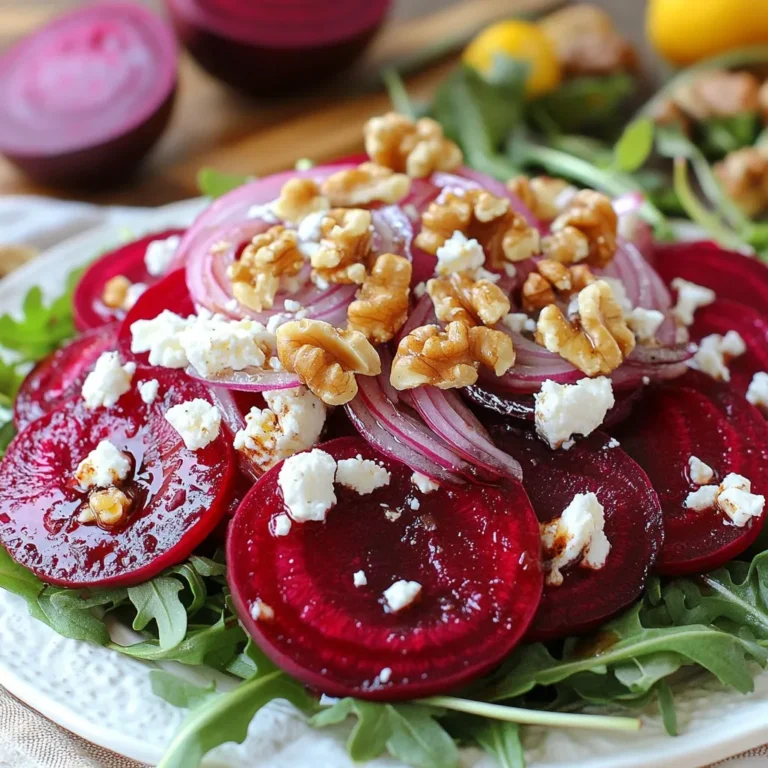
Fresh Beet Feta Salad Vibrant and Healthy Delight

- 1 lb ground beef or turkey - 1/2 cup breadcrumbs - 1 egg - 1 teaspoon garlic powder - 1 teaspoon onion powder - 1/2 teaspoon paprika - Salt and pepper to taste - 1/2 cup shredded cheddar cheese - 1/4 cup ketchup - 1/4 cup mustard - Mini burger buns (about 12) - Fresh parsley leaves (for garnish) - Optional: pickle slices and lettuce I love the simple mix of these ingredients. Ground beef or turkey gives the burgers a nice base. The breadcrumbs help hold the patties together. An egg binds everything well. Seasonings like garlic powder and onion powder add flavor. Paprika gives a bit of warmth. Salt and pepper balance the taste. Cheddar cheese melts beautifully on the patties. Ketchup and mustard add zest. Mini buns are perfect for these fun shapes. Fresh parsley leaves not only look great, but they also add a touch of green. You can also add pickle slices and lettuce for extra crunch. This mix creates a tasty bite-sized treat. I enjoy how each ingredient plays a role in the final dish. {{ingredient_image_1}} To start, gather your ingredients. In a large bowl, mix together the ground beef or turkey, breadcrumbs, and egg. Add garlic powder, onion powder, paprika, salt, and pepper. Use your hands to mix until all the ingredients combine well. For the perfect consistency, aim for a moist, but not sticky, mixture. If it feels too wet, add a bit more breadcrumbs. If it's too dry, add a touch more egg. Now, let’s shape our patties. Take a small amount of the meat mixture. Roll it into a ball and then flatten it slightly. Aim for a shape similar to a medium lemon. To create the pumpkin shape, use your fingers to press ridges along the sides. This will give it that fun pumpkin look. Don’t forget to press a small indent in the center of each patty. This helps them cook evenly. Next, heat a non-stick skillet or grill over medium-high heat. Place the patties on the hot surface. Cook them for about 4-5 minutes on each side. You want them fully cooked through. The internal temperature should be 165°F for turkey or 160°F for beef. During the last minute of cooking, add cheese on top of each patty. This will melt nicely and add great flavor. Now it’s time to build your burgers. Take the bottom half of each mini bun. Spread ketchup and mustard on it. Place a pumpkin-shaped patty on top, then add optional pickle slices and lettuce if you like. Finally, add the top half of the bun. For a fun touch, use fresh parsley leaves to create a little stem on each burger. This makes them look extra cute! To boost flavor, add spices like cumin or chili powder. They give a warm kick. For cheese, use sharp cheddar or pepper jack. Both melt well and add rich taste. You can grill or bake these mini burgers. Grilling adds a smoky flavor. Baking keeps them juicy. For a good sear, preheat your skillet. Cook for 4-5 minutes per side. Don't flip too soon; let them brown first. Serve these burgers on a pumpkin-themed platter. Add small pumpkins for a festive touch. You can stack them high for a fun display. Use fresh parsley on top to mimic pumpkin stems. For parties, make mini flags to label each burger. Pro Tips Choose Your Meat Wisely: Opt for ground turkey for a leaner burger, or stick with ground beef for a richer flavor. Shape Matters: Make sure to create ridges on the sides of the patties to give them a distinct pumpkin shape and help them cook evenly. Cheese Melting Tip: Add cheese during the last minute of cooking to ensure it's perfectly melted without overcooking the patties. Garnish for Effect: Use fresh parsley as a stem on top of the burgers for that adorable pumpkin look, making them perfect for a festive presentation. {{image_2}} Turkey vs. beef: flavor differences When you choose meat for these mini burgers, turkey offers a lighter taste. Beef gives a rich and hearty flavor. Both options work well, but they change the overall feel of the dish. If you want a more festive flavor, try beef. For a healthier twist, go for turkey. Gluten-free options You can easily make this recipe gluten-free. Just swap regular breadcrumbs for gluten-free ones. This simple change ensures everyone can enjoy these tasty burgers. Look for certified gluten-free products to avoid cross-contamination. Adding herbs or spices for different profiles You can mix in herbs like basil or thyme to change the flavor. Try adding cayenne for heat or smoked paprika for a deep taste. These small tweaks make your burgers unique and special. Creative topping ideas Don't limit yourself to ketchup and mustard. Try avocado slices or spicy aioli. You can also add caramelized onions for a sweet touch. These toppings can elevate your mini burgers into something truly amazing. Adapting for different holidays You can adapt these mini burgers for various holidays. For Halloween, add orange cheese and use cute toothpicks with ghosts. For Thanksgiving, add cranberry sauce as a topping. These small changes make them festive and fun. Pairing with fall-themed cocktails These burgers pair well with seasonal drinks. Try apple cider cocktails or pumpkin spice lattes. The flavors mix well with the fall vibe, making your meal feel complete. Enjoying a themed drink can make the experience even more special. To keep your pumpkin-shaped mini burgers fresh, follow these best practices for refrigeration. First, let the burgers cool down to room temperature. Next, place them in an airtight container. This method prevents moisture loss and keeps them tasty. In the fridge, these mini burgers last about 3 to 4 days. Make sure to label your container with the date. This way, you won’t forget when you made them! For long-term storage, you can freeze both the patties and the assembled burgers. To freeze the patties, lay them flat on a baking sheet. Once frozen, transfer them to a freezer bag. This method helps prevent them from sticking together. If you prefer freezing the assembled burgers, wrap each one in plastic wrap, then place them in a freezer bag. They can last up to 3 months in the freezer. When you’re ready to eat, simply reheat the patties in a skillet over medium heat for about 7-10 minutes. Ensure they reach an internal temperature of 165°F. If you froze the assembled burgers, unwrap them and warm them in the oven at 350°F for about 15 minutes. This keeps the buns nice and soft while the patties heat through. You can make these burgers vegetarian by using plant-based proteins. Try using cooked lentils or black beans as a base. You can also use chickpeas for a tasty twist. Add breadcrumbs and spices just like in the meat version. This adds flavor and binds the mixture well. Yes, you can prepare these burgers ahead of time. Mix the meat or veggie mixture and form the patties. Store them in the fridge for up to one day. You can also freeze them. Just cook them straight from the freezer when you're ready to eat. These mini burgers go well with many sides. Try sweet potato fries or a crisp salad. Apple slices with cheese also make a nice pair. You can serve these with a warm bowl of soup for a comforting meal. This recipe has common allergens like eggs and dairy. If you're allergic to eggs, try a flaxseed egg as a substitute. For dairy, use a dairy-free cheese. Always check labels to ensure safety for those with allergies. These pumpkin-shaped mini burgers are fun and tasty. We covered key ingredients like ground meat, cheese, and seasonings. You learned how to mix, shape, and cook your patties perfectly. We even explored fun variations, cooking methods, and storage tips. Try these burgers at your next gathering. With easy adjustments, you can fit any theme or taste. Enjoy your cooking adventure, and impress your friends with something unique. Delicious food brings joy, and these burgers are sure to please!

Pumpkin-Shaped Mini Burgers Tasty Fall Delight

You need fresh, colorful ingredients to make this dish shine. Here’s what you’ll need: - 2 boneless, skinless chicken breasts, cut into bite-sized pieces - 1 cup bell peppers (red, yellow, and green), sliced - 1 medium zucchini, sliced - 1 medium red onion, sliced - 2 cloves garlic, minced - 1 can (15 oz) black beans, rinsed and drained - 1 tablespoon olive oil These main ingredients bring great flavor and nutrition to your skillet. The right spices can turn a simple dish into something special. Here’s what I use: - 1 teaspoon smoked paprika - 1 teaspoon cumin - 1 teaspoon chili powder - Salt and pepper to taste These spices add depth and warmth to the chicken and veggies. They blend perfectly with the ingredients. Garnishes can elevate your meal. Here are some tasty options: - Fresh cilantro, chopped (for garnish) - 1 avocado, diced (for serving) - Lime wedges (for serving) These add freshness and a burst of flavor. Serve the dish directly from the skillet or on plates for a nice touch. Enjoy the vibrant colors and flavors! {{ingredient_image_1}} Start by cutting the chicken breasts into small, bite-sized pieces. This helps them cook evenly. Heat one tablespoon of olive oil in a large skillet over medium heat. Once the oil is hot, add the chicken pieces to the skillet. Season them with smoked paprika, cumin, chili powder, salt, and pepper. Make sure to mix well so each piece is coated. Cook the chicken for about 7 to 8 minutes. It should be browned and cooked all the way through. Next, it's time to add flavor with the vegetables. Mince two cloves of garlic and add them to the skillet. Cook the garlic for 1 to 2 minutes until it smells nice. Then, add your sliced bell peppers, zucchini, and red onion to the skillet. Stir-fry the veggies with the chicken for 5 to 6 minutes. You want them to be tender but still a bit crisp. Now, mix in one can of rinsed and drained black beans. Cook everything for an additional 2 to 3 minutes until it is all hot. Taste the dish and adjust any seasonings if needed. Once everything is cooked, remove the skillet from the heat. Serve hot, and don't forget to top it with diced avocado and fresh cilantro. Add lime wedges on the side for a zesty touch. Enjoy your colorful and tasty meal! To cook chicken perfectly, cut it into small pieces. This helps it cook evenly. Heat your skillet on medium heat and add olive oil. Once hot, add the chicken. Season it well with smoked paprika, cumin, chili powder, salt, and pepper. Cook the chicken for about 7-8 minutes. You want it to turn golden brown and reach an internal temperature of 165°F. Use a meat thermometer to check. If you don't have one, cut a piece to see if it's no longer pink inside. Feel free to swap in any veggies you like. Broccoli, carrots, or even corn work great. You can also use kale or spinach for a green boost. Just remember to adjust the cooking time based on the veggie type. For example, carrots may need a few more minutes to soften. Mixing different colors adds a nice touch and makes the dish pop visually. Seasoning is key to a great dish. If you love heat, add more chili powder or a pinch of cayenne pepper. For a zestier flavor, squeeze fresh lime juice over the finished dish. You can also play with herbs. Adding dried oregano or thyme can give a new twist. Taste as you go, and adjust the salt and pepper to suit your liking. This dish should reflect your tastes, so make it your own! Pro Tips Tip Title: Use Fresh Ingredients: Fresh vegetables and high-quality chicken will enhance the flavor and texture of your dish. Tip Title: Adjust Spice Levels: Feel free to adjust the amount of chili powder based on your heat preference. You can also add a pinch of cayenne for extra kick! Tip Title: Meal Prep Friendly: This dish is perfect for meal prep. Cook a double batch and portion it out for easy lunches throughout the week. Tip Title: Serve with Sides: Consider pairing with rice, quinoa, or tortillas to make a more filling meal. {{image_2}} You can add heat to your Chicken and Vegetables Skillet. Start by mixing in some sliced jalapeños or a dash of red pepper flakes. This will give your dish a spicy kick. You might also want to add hot sauce when you serve it. The spicy flavors blend well with the smoky paprika. For a fresh twist, try adding feta cheese and olives. Feta adds creaminess and a salty bite. Olives bring a briny flavor that pairs well with the chicken. Just sprinkle the feta on top before serving. Toss in a handful of pitted olives while cooking. This makes your dish feel like a sunny Mediterranean meal. You can easily swap chicken for other proteins. Shrimp cooks fast and adds a sweet taste. Just sauté it for a few minutes until pink. Tofu is a great option for a plant-based meal. Press and cube the tofu, then brown it in the skillet. Both options keep the dish tasty and fun, allowing you to customize based on what you have. Store any leftovers in an airtight container. Make sure the dish cools down first. Place the container in the fridge. Use within three to four days for best taste. Label the container with the date. This helps you keep track of freshness. To reheat, use a skillet over medium heat. Add a splash of water or oil to keep it moist. Stir occasionally until hot. You can also use a microwave. Heat in short bursts to avoid overcooking. Cover it to keep moisture in. You can freeze leftovers, too. Use freezer-safe bags or containers. Make sure to remove as much air as possible. This helps prevent freezer burn. Freeze for up to three months. When ready to eat, thaw overnight in the fridge. Reheat as mentioned above for best flavor. Yes, you can use frozen vegetables. They save time and are easy to find. Just add them to the skillet directly. Cook them a bit longer until they are hot and tender. Frozen veggies can taste great in this dish! This dish takes about 25 minutes total. You’ll spend about 10 minutes prepping the ingredients. Cooking the chicken and veggies takes about 15 minutes. It’s a quick meal for busy days! You can serve this dish with rice, quinoa, or a fresh salad. Tortillas also work well for a fun twist. You could even add some chips for crunch. Don’t forget the lime wedges and diced avocado for extra flavor! Yes, you can make it ahead. Just cook and cool the dish, then store it in the fridge. It keeps well for 3 to 4 days. Reheat it on the stove or in the microwave. Absolutely! This dish has lean protein, colorful veggies, and healthy spices. It is low in carbs if you skip the grains. Plus, it’s full of fiber from the beans and veggies. Enjoy a tasty and nutritious meal! Yes! Feel free to adjust the spices to your taste. You can add more chili powder for heat or try herbs like oregano. Experimenting with spices makes the dish more exciting! This blog post covered making a tasty Chicken and Vegetables Skillet. We looked at essential ingredients, spices, and tasty garnishes. Then, I laid out step-by-step cooking tips to ensure your chicken is perfect and your veggies are flavorful. I also shared fun variations, storage tips, and common questions. Try these tips to make this dish yours. Enjoy the process and explore flavors you love! Happy cooking!

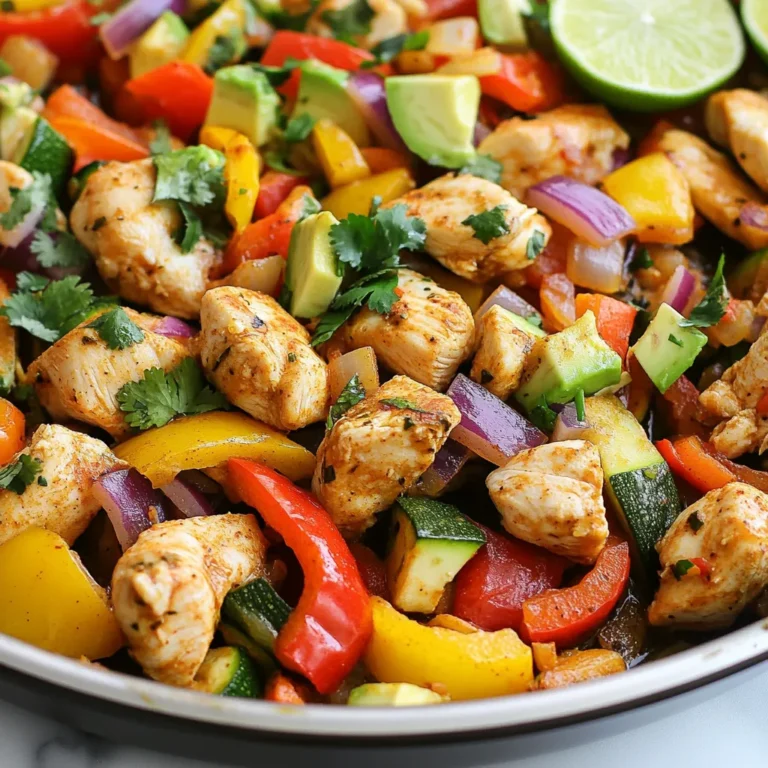
Chicken and Vegetables Skillet Flavorful Easy Dish

PREV 1 … 71 72 73 … 86 NEXT
spicy fork kitchen

explore

DessertsDinnerAppetizersDrinks

Our Policies

  • Cookie Policy
  • Copyright Policy
  • Disclaimer
  • GDPR Policy
  • Terms Of Use
Back to Top
  • About
  • Contact Us
  • Privacy Policy
© 2026 spicy fork kitchen