FREE DINNER EBOOK! Get your copy!
  • Cookie Policy
  • GDPR Policy
  • Disclaimer
  • Terms Of Use
  • Visit my other site: Fun Cookie Recipes
spicy fork kitchen
  • Home
  • Dinner
  • Desserts
  • Drinks
  • Appetizers
  • Contact
  • About
  • Privacy Policy
  • Home
  • Dinner
  • Desserts
  • Drinks
  • Appetizers
  • Contact
  • About
  • Privacy Policy
  • Cookie Policy
  • GDPR Policy
  • Disclaimer
  • Terms Of Use
Visit my other site: Fun Cookie Recipes

HOME / CATEGORIES /

Latest

- 1 lb (450g) shrimp, peeled and deveined - 4 cloves garlic, minced - 2 tablespoons olive oil - 1 teaspoon chili powder - 1 teaspoon cumin - Salt and pepper, to taste - 8 small corn tortillas - 1 cup shredded red cabbage - 1 avocado, sliced - 1 lime, cut into wedges - Fresh cilantro for garnish When choosing shrimp, look for firm, shiny shells. They should smell like the ocean, not fishy. Fresh shrimp should have a slight bounce when pressed. Avoid any that feel mushy. If you can, buy shrimp from local sources. This helps support your community and ensures quality. If you can't find shrimp, try using chicken or tofu instead. Both work well with the spices. For garlic, you can use garlic powder in a pinch. If you want a different crunch, swap red cabbage for lettuce or slaw mix. Lime juice can be replaced with lemon juice for a slight twist. {{ingredient_image_1}} Start with 1 pound of shrimp. Make sure they are peeled and deveined. Pat them dry with paper towels. This step is key for a good sear. In a bowl, combine the shrimp with minced garlic, chili powder, cumin, salt, and pepper. Toss well to coat the shrimp evenly. Each shrimp should be covered in flavor. This simple mix brings out the taste of the shrimp. Next, heat 2 tablespoons of olive oil in a large skillet. Use medium-high heat for best results. Once the oil is hot, add the shrimp. Arrange them in a single layer in the pan. Cook the shrimp for 1 to 2 minutes on each side. They should turn pink and opaque as they cook. Be careful not to overcook them. Overcooked shrimp can become tough and chewy. While the shrimp cook, warm 8 small corn tortillas. You can do this in a separate skillet or on a grill. Heat them for about 30 seconds on each side. This makes them soft and easy to fold. To build your tacos, start with a generous scoop of shredded red cabbage on each tortilla. Then, add a few pieces of garlic shrimp on top. Finish with slices of avocado for creaminess. Garnish each taco with fresh cilantro and a squeeze of lime juice. Serve lime wedges on the side for extra zing. Enjoy your Minute Garlic Shrimp Tacos! To cook shrimp just right, start by patting them dry. This helps them sear and brown better. Toss the shrimp with garlic, chili powder, and cumin. Ensure they get a nice coat. Heat olive oil in a skillet until hot. Add the shrimp in one layer. Cook for 1-2 minutes on each side. Watch for them to turn pink and opaque. If you overcook shrimp, they become tough and rubbery. Aim for that perfect tender bite! These tacos shine with fresh flavors. Serve them with a side of lime wedges. The lime juice brings brightness to the dish. Add slices of avocado for creaminess. Shredded cabbage gives a nice crunch. Fresh cilantro adds a pop of color and taste. You can also pair the tacos with a light salad or rice. For extra fun, serve with hot sauce for those who like spice! Warming tortillas is key for a great taco. You can use a skillet, grill, or even the microwave. If using a skillet, heat it on medium. Place each tortilla in the skillet for about 30 seconds. Flip and warm the other side for the same time. The goal is to make them pliable and soft. If you use the microwave, wrap the tortillas in a damp paper towel. Heat them for 15-20 seconds. Just be careful not to dry them out! Pro Tips Dry the Shrimp: Patting the shrimp dry before cooking ensures they sear properly and develop a nice crust. Don’t Overcook: Cook the shrimp just until they turn pink and opaque to maintain their tenderness; about 1-2 minutes per side is ideal. Warm Tortillas: Warming the corn tortillas makes them pliable and enhances their flavor, making for a better taco experience. Fresh Garnishes: Use fresh cilantro and lime juice to brighten the flavors and add a refreshing touch to your tacos. {{image_2}} You can switch out shrimp for other proteins. Chicken works well. You can also use fish like tilapia or salmon. For a vegetarian option, try black beans or chickpeas. Both add protein and flavor. You can sauté them with the same spices for great taste. Feel free to mix in new spices. For a kick, use smoked paprika or cayenne pepper. If you want a fresh taste, try adding lime zest and fresh herbs. You can also use taco seasoning for a quick flavor boost. Each blend brings new life to your tacos. Toppings can change your taco game. Instead of red cabbage, try shredded carrots or radishes for crunch. You can add fresh salsa or mango salsa for a sweet touch. Feta cheese adds a salty bite. Don’t forget about pickled onions for zing. These changes let you create a taco that suits your taste. If you have leftover tacos, wrap them tightly in foil or plastic wrap. You can also place them in an airtight container. Store them in the fridge. They will stay fresh for 1-2 days. To reheat shrimp, avoid the microwave if possible. Instead, warm them on the stovetop over low heat. Add a splash of olive oil to keep them moist. Heat for just a few minutes until warm. Take care not to overcook them again. Store shrimp, tortillas, and toppings separately. This keeps everything fresh longer. Place shrimp in a sealed bag. Keep tortillas wrapped in a cloth or in a container. Store toppings like cabbage and avocado in airtight containers. This method helps maintain their taste and texture. Yes, you can use frozen shrimp. Just thaw them first. Place them in cold water for about 15 minutes. After thawing, pat them dry with paper towels. This step helps them sear nicely. Follow the same steps in the recipe for seasoning and cooking. The flavor will still shine through! You can get creative with toppings! Here are some favorites: - Shredded lettuce - Diced tomatoes - Chopped onions - Sliced jalapeños - Fresh salsa - Crumbled feta cheese These toppings add flavor and texture. Try a mix of them for a fun twist! To add spice, you have options. Here are some ideas: - Use more chili powder. - Add crushed red pepper flakes. - Top with spicy salsa or hot sauce. Adjust the spice level based on your taste. Enjoy the heat! In this blog post, we covered key ingredients for shrimp tacos, including tips for picking fresh shrimp and substitutes. We laid out detailed steps for preparing and cooking shrimp perfectly, and shared helpful advice on serving and storing. You can explore variations with different proteins, spices, and toppings for unique tastes. Now, armed with these insights, you're ready to whip up delicious shrimp tacos that impress, using the freshest ingredients and smart techniques. Enjoy your cooking journey and savor every bite!

Minute Garlic Shrimp Tacos Quick and Easy Recipe

To make these delightful caramel macchiato cupcakes, gather the following ingredients: - 1 ½ cups all-purpose flour - 1 cup granulated sugar - ½ cup unsalted butter, softened - 2 large eggs - 1 cup brewed coffee, cooled - ¼ cup milk - 1 teaspoon vanilla extract - 1 tablespoon baking powder - ½ teaspoon salt - ½ cup caramel sauce (plus extra for drizzling) - 1 cup heavy whipped cream - 2 tablespoons powdered sugar - 1 teaspoon espresso powder Using high-quality ingredients makes a big difference. Here are some brands I trust: - Flour: King Arthur Flour for its consistency and quality. - Sugar: Domino Sugar for its pure flavor. - Butter: Kerrygold for a rich, creamy taste. - Coffee: Peet’s Coffee for a bold flavor that shines through. - Caramel Sauce: Ghirardelli for a smooth, sweet finish. - Whipping Cream: Organic Valley for a fresh, luscious cream. You can easily adjust the recipe for different diets: - Dairy-Free: Use coconut milk and vegan butter instead. - Gluten-Free: Swap all-purpose flour with a gluten-free blend. - Sugar-Free: Substitute sugar with a sugar alternative like erythritol. Feel free to mix and match these options to suit your taste! {{ingredient_image_1}} 1. Preheat your oven to 350°F (175°C). This step is key for even baking. 2. Line a 12-cup muffin pan with cupcake liners. This helps with easy removal. 3. In a large mixing bowl, cream the softened butter and granulated sugar. Beat until light and fluffy. This adds air for a nice texture. 4. Add the eggs one at a time. Mix well after each addition. Then, mix in the vanilla extract for added flavor. 5. In a separate bowl, combine the flour, baking powder, espresso powder, and salt. This helps with even mixing later. 6. Gradually add the dry ingredients to the creamed mixture. Alternate with the brewed coffee and milk. Mix until just combined. This keeps the cupcakes light. 7. Gently fold in the caramel sauce. Make sure it spreads evenly throughout the batter. 1. Divide the batter evenly among the cupcake liners. Fill each about 2/3 full. This gives them room to rise. 2. Bake in the preheated oven for 18-20 minutes. Check for doneness by inserting a toothpick into the center. It should come out clean. 3. If the toothpick has batter on it, bake for a few more minutes. Avoid opening the oven too soon. This can cause the cupcakes to sink. 4. Let the cupcakes cool in the pan for 5 minutes. Then, transfer them to a wire rack to cool completely. This step is important for the frosting later. 1. In a medium bowl, whip the heavy cream with powdered sugar. Beat until soft peaks form. This makes a great topping. 2. Once the cupcakes are cool, top each with a generous dollop of whipped cream. This adds a nice touch. 3. Drizzle additional caramel sauce on top of the whipped cream. This makes each bite extra special. Enjoy your delicious treats! To make the best caramel macchiato cupcakes, follow these steps: - Use fresh coffee: Brew your coffee just before using it. Fresh coffee gives the best flavor. - Room temperature ingredients: Let your butter and eggs sit out before baking. This helps create a smooth batter. - Measure flour correctly: Spoon flour into your measuring cup and level it off with a knife. Too much flour can make cupcakes dense. - Don't overmix: Mix until just combined. Overmixing can lead to tough cupcakes. Once your cupcakes are cool, it’s time to get creative: - Whipped cream topping: Use a piping bag for a beautiful swirl of whipped cream. - Caramel drizzle: Drizzle extra caramel sauce over the whipped cream for a sweet touch. - Garnish: Top with coffee beans or a sprinkle of cocoa powder. This adds a nice visual and flavor element. - Presentation: Serve on a pretty platter to impress your guests. Here are some pitfalls to watch for: - Not preheating the oven: Always preheat your oven. This ensures your cupcakes bake evenly. - Filling liners too full: Fill each liner only 2/3 full. They need room to rise. - Skipping the cooling step: Letting cupcakes cool completely before frosting is key. Frosting on warm cupcakes can melt and slide off. - Using expired baking powder: Always check your baking powder for freshness. Old baking powder can lead to flat cupcakes. Pro Tips Use Freshly Brewed Coffee: For the best flavor, always use freshly brewed coffee that has cooled. This enhances the coffee taste in your cupcakes. Check Oven Temperature: Ensure your oven is calibrated correctly. An oven thermometer can help you achieve the perfect baking temperature for even results. Whip the Cream Properly: Be careful not to over-whip the heavy cream, as it can turn into butter. Stop whipping once soft peaks form for a light and fluffy topping. Caramel Sauce Alternatives: If you’re short on time, store-bought caramel sauce works perfectly, but homemade caramel can elevate the flavor of your cupcakes. {{image_2}} You can make these cupcakes even more fun. Here are some ideas: - Chocolate: Add chocolate chips for a rich twist. - Nuts: Walnuts or pecans give a crunchy texture. - Spices: A pinch of cinnamon or nutmeg adds warmth. Mix and match to find your favorite flavor! Want a vegan or paleo version? Here’s how: - Vegan: Use flax eggs instead of regular eggs. Replace butter with coconut oil. - Paleo: Swap all-purpose flour with almond or coconut flour. Use honey instead of sugar. These changes still keep the cupcakes tasty and satisfying. Cupcakes can come in many sizes. Here are some ideas: - Mini Cupcakes: Perfect for bite-sized treats. Adjust baking time to 12-15 minutes. - Larger Formats: Bake in a cake pan. Check for doneness around 25-30 minutes. Serving is key! Use a pretty platter and add coffee beans for a nice touch. Enjoy! To keep your caramel macchiato cupcakes fresh, store them in an airtight container. This helps lock in moisture and flavor. You can leave them at room temperature for up to two days. If you want to keep them longer, place them in the fridge. Just be sure to let them come back to room temperature before serving. This keeps the taste and texture at their best. Freezing cupcakes is simple. First, let your cupcakes cool completely. Wrap each cupcake tightly in plastic wrap. Then, place them in a freezer-safe bag or container. This will help avoid freezer burn. You can freeze them for up to three months. To thaw, take them out and leave them in the fridge overnight. When you’re ready to enjoy, add your whipped cream and caramel drizzle. Caramel macchiato cupcakes can last up to four days at room temperature. If stored in the fridge, they can stay fresh for about a week. To tell if they are no longer good, check for any off smells or mold. If they look or smell strange, it’s best to throw them away. Keeping an eye on freshness ensures you enjoy the best flavors in every bite. To boost the coffee taste in your cupcakes, use strong brewed coffee. You can also add espresso powder to the batter. Mix in about one teaspoon for a nice kick. Another option is to replace some milk with coffee. This adds depth without changing the texture. - Use strong brewed coffee. - Add 1 teaspoon of espresso powder. - Replace some milk with coffee. Yes, you can use instant coffee as a substitute for brewed coffee. To do this, mix 2 tablespoons of instant coffee with 1 cup of hot water. This will give you a strong coffee flavor. Just make sure it cools before adding it to your batter. - Mix 2 tablespoons instant coffee with 1 cup hot water. - Let it cool before using. If your cupcakes sink in the middle, it could be due to overmixing the batter. Make sure you mix just until combined. Another reason is underbaking. Always check with a toothpick. If it comes out wet, they need more time. Lastly, make sure your oven is at the right temperature. - Avoid overmixing the batter. - Check doneness with a toothpick. - Preheat your oven to the right temperature. You’ve learned about the key ingredients and how to make delicious cupcakes. We covered preparation, baking, and frosting in detail. With helpful tips, you can avoid common mistakes and decorate beautifully. Explore flavor and dietary variations to suit your taste. You also know how to store and freeze your treats for later. Trust these steps and tips to create delightful cupcakes every time. Now, you’re ready to impress everyone with your baking skills! Enjoy your cupcake journey.

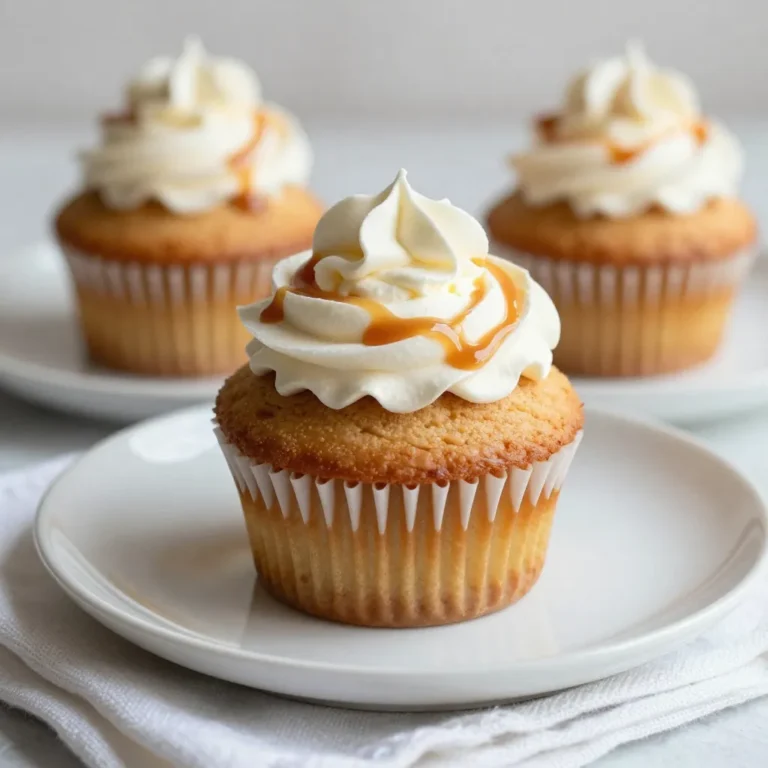
Caramel Macchiato Cupcakes Delightful Coffee Treat

- Large shrimp (1 pound, peeled and deveined) - Jasmine rice (1 cup) - Vegetable broth or water (3 cups) - Unsalted butter (4 tablespoons) - Garlic (4 cloves, minced) - Lemon juice (1 tablespoon) - Smoked paprika (1 teaspoon) - Red pepper flakes (1/2 teaspoon, optional) - Salt and pepper to taste - Green onions (2 thinly sliced) - Fresh parsley (chopped) Garlic Butter Shrimp Rice Bowl is all about fresh flavors. The large shrimp give a sweet taste and a satisfying bite. Jasmine rice is my go-to because it cooks beautifully and adds a lovely aroma. Cooking it with vegetable broth makes it rich and tasty. The unsalted butter is key. It melts into the shrimp, making everything rich. I love using fresh garlic, too. It adds a strong, lovely flavor. A splash of lemon juice brightens the dish and adds a zing. Seasoning is where you can get creative. Smoked paprika adds warmth and depth. Red pepper flakes bring heat, but you can skip them if you like milder food. Always taste and adjust with salt and pepper to make it just right. Don’t forget the garnishes! Sliced green onions add crunch and color. Fresh parsley gives a nice pop of green and freshness. Together, they make this dish not just tasty but beautiful, too. {{ingredient_image_1}} - Rinse and drain jasmine rice until water runs clear. - In a medium saucepan, combine the rinsed rice with 3 cups of vegetable broth or water. Bring it to a boil over high heat. Then, reduce to a simmer. Cover and cook for about 15 minutes until the rice is tender and all the liquid is absorbed. Remove from heat and let it sit covered for another 5 minutes. Fluff with a fork. - While the rice cooks, melt 4 tablespoons of unsalted butter in a large skillet over medium heat. - Add 4 cloves of minced garlic to the skillet. Sauté for about 1 minute until fragrant. Be careful not to burn it. - Increase the heat to medium-high and add 1 pound of peeled and deveined shrimp. Season with 1 teaspoon of smoked paprika, salt, and pepper. If you like heat, add 1/2 teaspoon of red pepper flakes. Cook the shrimp for 2-3 minutes until they turn pink and opaque, stirring occasionally. - Drizzle 1 tablespoon of lemon juice over the shrimp and stir to combine. Remove from heat. - Divide the cooked jasmine rice into bowls. Top each bowl with the garlic butter shrimp. - Garnish with 2 thinly sliced green onions and chopped fresh parsley for a pop of color. Enjoy your delicious meal! Rinsing jasmine rice helps remove extra starch. This keeps the rice from being sticky. Rinse the rice under cold water until the water runs clear. It only takes a minute. After rinsing, drain the rice well. To cook the rice, use three cups of vegetable broth or water. Bring it to a boil in a medium pot. Once boiling, add the rinsed rice. Reduce the heat to a simmer. Cover the pot and cook for about 15 minutes. The rice should be tender and the liquid should be gone. Let the rice sit for five minutes after cooking. This helps it get fluffy. Fluff it with a fork before serving. To avoid overcooking shrimp, watch the color closely. Shrimp cook quickly. They turn pink and opaque as they cook. This usually takes about 2-3 minutes. Stir the shrimp often to help them cook evenly. I recommend using large shrimp for this dish. They have a great taste and texture. You can also use extra-large shrimp if you want. Just adjust the cooking time slightly. Fresh shrimp is best, but frozen shrimp works too. Just make sure to thaw them before cooking. To boost the flavor, consider adding extra spices. A pinch of cayenne pepper adds heat. You can also try adding some fresh herbs. Chopped basil or cilantro can bring a fresh taste. For accompaniments, serve the rice bowl with a lemon wedge. The juice adds brightness to the dish. You might also enjoy adding some sautéed veggies, like bell peppers or snap peas. They add color and crunch. Pro Tips Perfectly Cooked Rice: Rinse the jasmine rice thoroughly until the water runs clear to remove excess starch, ensuring each grain is fluffy and separate. Butter Flavor Boost: For an extra depth of flavor, consider using a mixture of unsalted butter and olive oil to sauté the garlic and shrimp. Freshness Matters: Use fresh shrimp whenever possible for the best taste and texture. If using frozen shrimp, ensure they are fully thawed before cooking. Garnish for Color: Don't skip the green onions and parsley! They not only add a pop of color but also enhance the dish's freshness and flavor profile. {{image_2}} You can switch the shrimp for chicken. Use one pound of boneless chicken breasts. Cut them into bite-sized pieces. Cook them the same way you cook shrimp. Tofu is another great option. Use firm or extra-firm tofu. Press it to remove excess water. Cut it into cubes, then sauté it until golden brown. For a veggie-based twist, you can try chickpeas. They add a nice texture and protein. Quinoa is a tasty and healthy swap. Cook it with the same amount of broth. You’ll get a nutty flavor and more protein. Cauliflower rice is a low-carb choice. Just pulse cauliflower florets in a food processor. Sauté it for a few minutes until tender. You can also use brown rice. It has more fiber and a nutty taste. Just increase the cooking time by about 10 minutes. Add vegetables to your bowl. Bell peppers, peas, or spinach work well. Sauté them with the shrimp for added color and nutrition. Don’t be afraid to mix herbs and spices. Try adding basil or cilantro for fresh flavor. A dash of curry powder can bring a new twist. Experiment to find your favorite combination! To keep your garlic butter shrimp rice bowl fresh, follow these best practices: - Cool before storing: Let the shrimp and rice cool to room temperature. - Use airtight containers: Choose containers that seal tightly to prevent air from entering. - Refrigerate: Store your leftovers in the fridge for up to three days. - Freeze for longer: If you want to save it longer, you can freeze it for up to three months. When it’s time to enjoy your leftovers, here are some methods to reheat your shrimp rice bowl: - Microwave: Place the bowl in the microwave. Heat on medium power for 1-2 minutes. Stir halfway through to ensure even heating. - Stovetop: Warm a skillet over medium heat. Add a splash of water or broth. Stir in the shrimp and rice until hot. - Oven: Preheat the oven to 350°F (175°C). Place the bowl in an oven-safe dish. Cover with foil and heat for about 15 minutes. To keep the flavor and texture intact: - Add moisture: A little broth or water helps prevent drying out during reheating. - Avoid high heat: Reheating on high can make the shrimp tough. Always go low and slow! It takes about 30 minutes to make this dish. You can prep the ingredients in 10 minutes. Cooking the rice and shrimp takes the remaining 20 minutes. This quick meal is perfect for busy nights. Yes, you can use frozen shrimp! Just thaw them before cooking. Place them in cold water for about 15-20 minutes. This way, you still get fresh shrimp taste in your bowl. If you don't have jasmine rice, you can use basmati rice or white rice. Both options will work well in this dish. Just adjust the cooking time as needed to ensure they cook properly. Yes, the Garlic Butter Shrimp Rice Bowl is gluten-free! All the ingredients are safe for gluten-free diets. Just make sure your vegetable broth is also gluten-free if you use it. To add heat, increase the red pepper flakes. You can also add chopped fresh chili or a dash of hot sauce. Adjust the spice level to match your taste buds. You can prepare some parts in advance. Cook the rice and shrimp separately, then store them in the fridge. Reheat them when you are ready to eat. This will save you time during busy days. This article covered a simple and tasty Garlic Butter Shrimp Rice Bowl. We looked at key ingredients like shrimp, jasmine rice, and flavorful seasonings. I shared step-by-step instructions for cooking the rice and shrimp, plus tips for perfect texture and flavor. You can try different protein or rice options for variety. Remember to store leftovers properly for the best taste. Enjoy making this dish, and feel free to personalize it to your liking!

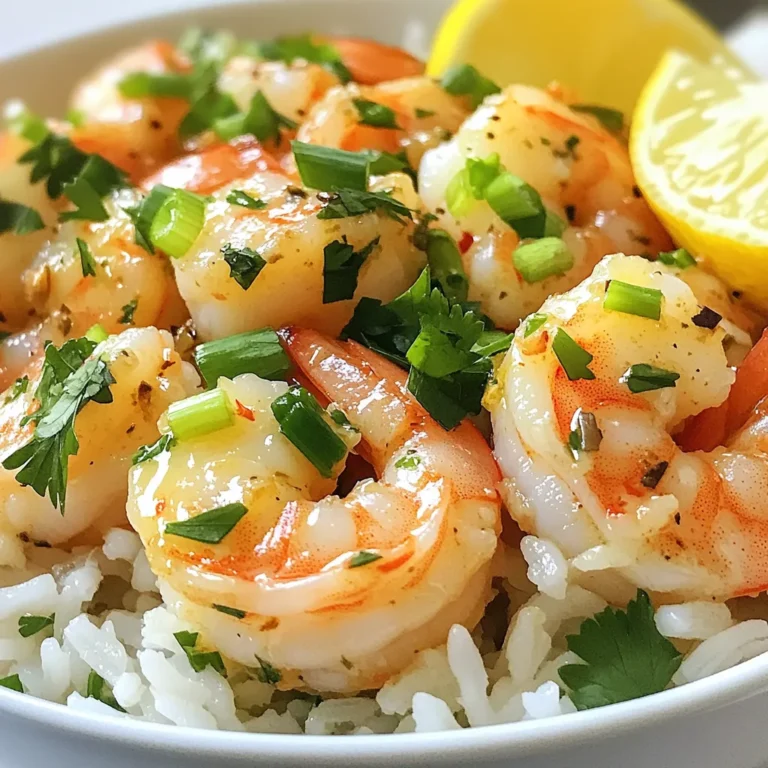
Garlic Butter Shrimp Rice Bowl Quick and Flavorful Meal

- 1 ½ cups warm water (110°F to 115°F) - 1 packet (2 ¼ teaspoons) active dry yeast - 1 tablespoon granulated sugar - 4 cups all-purpose flour - 1 teaspoon salt - ½ cup baking soda - 1 large egg (beaten for egg wash) - ½ cup unsalted butter, melted - ½ cup granulated sugar (for coating) - 2 teaspoons ground cinnamon You can swap active dry yeast with instant yeast. Use the same amount for instant yeast. If you need a gluten-free option, try a gluten-free flour mix. For a dairy-free version, use a plant-based butter instead of unsalted butter. You can also replace granulated sugar with coconut sugar for a less processed sweetener. Always use fresh yeast for the best rise. Check the expiration date on the packet. For flour, choose a high-quality all-purpose flour for a better texture. When selecting cinnamon, look for ground cinnamon from a reputable brand to ensure a strong flavor. Use real butter for a rich taste in your pretzel bites. {{ingredient_image_1}} To make the dough, start by mixing warm water, yeast, and sugar in a bowl. Let it sit for about 5 minutes. You will see bubbles form on top. This means your yeast is alive! In a larger bowl, combine flour and salt. Pour the yeast mix into the flour. Stir until it forms a dough. Next, knead the dough on a floured surface for 5 to 7 minutes. It should feel smooth and elastic. Now, place the dough in a greased bowl. Cover it and let it rise for 1 hour in a warm spot. It should double in size. After the dough rises, preheat your oven to 425°F. Line a baking sheet with parchment paper. In a large pot, bring 10 cups of water and baking soda to a boil. Punch down the dough and divide it into 8 pieces. Roll each piece into a long rope, about 10 to 12 inches. Cut each rope into 1-inch bites. Carefully drop the bites into the boiling water for 30 seconds. Use a slotted spoon to remove them and place them on your baking sheet. Brush the tops with the beaten egg. Bake for 8 to 10 minutes or until they turn a nice golden brown. Once your pretzel bites are baked, it's time for the sweet part. In a small bowl, mix granulated sugar and cinnamon. Brush the warm bites with melted butter. Then, toss them in the cinnamon sugar mix until fully coated. This adds a delightful sweetness and flavor. Enjoy your warm cinnamon sugar pretzel bites right away! To make great pretzel bites, you need the right dough. Start with warm water, about 110°F to 115°F. This helps the yeast wake up. Mix the yeast with sugar and let it foam. This shows the yeast is alive. When you mix the flour and salt, add the yeast mixture. Stir until a dough forms. Knead the dough for 5-7 minutes. It should be smooth and elastic. If it's too sticky, add a little more flour. If it’s too dry, add a splash of water. The perfect color makes your pretzel bites look yummy. Bake them at 425°F (220°C) for 8-10 minutes. Keep an eye on them. They should turn golden brown, not dark brown. If they bake too long, they can taste burnt. Brush the tops with egg wash before baking. This helps them get that nice golden color. Avoid rushing the dough rising. Let it sit in a warm place for about an hour. This helps the dough grow and become fluffy. Don’t skip the boiling step. Boiling the pretzel bites in baking soda water gives them a unique flavor. Also, make sure to coat them in the cinnamon sugar right after baking. If you wait too long, the butter will cool, and the sugar won't stick. Keep these tips in mind for the best pretzel bites! Pro Tips Use the Right Temperature: Ensure your water is between 110°F to 115°F to activate the yeast effectively without killing it. Knead Thoroughly: Knead the dough until it's smooth and elastic to develop the gluten, which gives the pretzels their chewy texture. Boiling is Key: Boiling the pretzel bites in baking soda water before baking enhances their flavor and gives them a classic pretzel crust. Serve Warm: Pretzel bites are best enjoyed warm, so serve them straight from the oven for the ultimate taste experience. {{image_2}} You can make gluten-free pretzel bites. Use a gluten-free flour blend. Ensure it has xanthan gum for structure. Follow the same steps as the original recipe. The result will be just as tasty! Want to mix up the flavor? Add toppings like chocolate chips or crushed nuts. For a savory twist, try adding cheese. You can sprinkle garlic powder for a unique taste. These changes create exciting new snacks. The classic cinnamon sugar is great, but don't stop there! Try coating your bites in powdered sugar or even crushed candy. For dips, go for caramel sauce or a spicy mustard. Explore these fun options to keep your snack time interesting! To keep your pretzel bites fresh, store them in an airtight container. This helps maintain their soft texture. If you want to keep them longer, place a paper towel in the container. The towel absorbs moisture and helps prevent sogginess. You can store them at room temperature for up to two days. For longer storage, consider refrigeration. Just remember to let them cool completely before sealing. When you want to enjoy your pretzel bites again, reheating is easy. Preheat your oven to 350°F (175°C). Place the pretzel bites on a baking sheet. Bake them for about 5-7 minutes. This warms them up and keeps them soft. Avoid using a microwave, as it can make them chewy and tough. Freezing pretzel bites is a smart way to save them for later. First, let them cool completely. Then, place them in a single layer on a baking sheet. Freeze them for about an hour until firm. Once frozen, transfer them to a freezer-safe bag. They can last up to three months in the freezer. When you're ready to eat, reheat them directly from frozen. Enjoy warm, fresh bites any time! Yes, you can use instant yeast. It works well in this recipe. Instant yeast does not need proofing like active dry yeast. Just mix it directly with the flour. Use the same amount, 2 ¼ teaspoons, for best results. This can save you time and make the process easier. Look for a golden brown color. The bites should rise and puff up nicely. If they are firm to the touch and golden on top, they are done. You can also use a toothpick to check the center. If it comes out clean, your pretzel bites are ready. I love serving pretzel bites with a few tasty dips. Here are some great options: - Cream cheese dip - Melted chocolate sauce - Spicy mustard - Cheese sauce - Caramel sauce These dips add fun flavors and make your snack even better! Making cinnamon sugar pretzel bites is simple and fun. We covered ingredients, preparation, and tips to enhance your bites. Remember the key steps: prepare the dough, boil and bake, then coat with cinnamon sugar. Consider variations for gluten-free options or new flavors. Store extras for later enjoyment or freeze them for future snacks. By avoiding common mistakes, you can achieve that perfect golden color. Enjoy making these treats and tasting that sweet crunch!

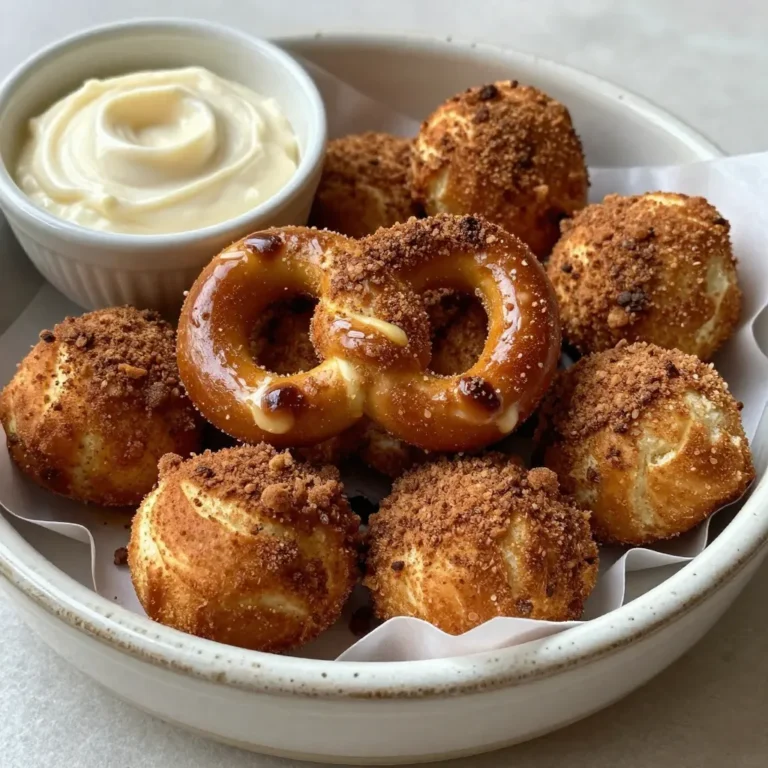
Cinnamon Sugar Pretzel Bites Sweet and Simple Snack

- 4 boneless, skinless chicken breasts - 1 cup marinara sauce - 1 cup shredded mozzarella cheese I love using simple, fresh ingredients for this dish. The chicken breasts are the base of the recipe. They should be boneless and skinless for easy cooking. I always choose high-quality chicken for the best flavor. Next, the marinara sauce adds that Italian flair. Look for a sauce that is rich and flavorful. Finally, the shredded mozzarella cheese melts beautifully and gives a lovely finish. This recipe serves four people, making it perfect for a family dinner. Each person gets one chicken breast, topped with sauce and cheese. If you want seconds, you can easily double the recipe. When picking ingredients, go for fresh or organic when possible. They enhance the taste of your meal. For this dish, you can use olive oil to enhance the flavor. Olive oil is a staple in Italian cooking. Drizzle a little over the chicken before adding sauce and cheese. It adds richness and depth to the dish. You can also use avocado oil for a different but tasty twist. {{ingredient_image_1}} First, take the chicken breasts from the package. Rinse them under cold water. Pat them dry with paper towels. This helps remove any bacteria. Place the chicken in a baking dish. Arrange them side by side. Make sure they are in a single layer. This step helps them cook evenly. Now it’s time for the fun part! Pour the marinara sauce over the chicken. Spread it evenly. You want each piece to be covered well. Use a spatula if needed. Next, sprinkle the shredded mozzarella cheese on top. Be generous but don’t overdo it. You want the cheese to melt evenly. Set your oven to 375°F (190°C). This is the perfect temperature for baking. Bake the dish for 25-30 minutes. To check for doneness, use a meat thermometer. The chicken should reach 165°F (75°C). If you want a crispy cheese top, broil it for 2-3 minutes. After cooking, let the chicken rest for 5 minutes. This step helps keep it juicy. Every oven is a bit different. If your oven runs hot, check the chicken early. A good rule is to aim for about 25 minutes. If you have a slower oven, it may need a few extra minutes. Always check the chicken's internal temperature. It should reach 165°F (75°C) for safe eating. This ensures your meal is both safe and juicy. To give your dish a boost, add spices and herbs. Consider basil, oregano, or garlic powder. These herbs pair well with marinara and chicken. For more depth, try adding red pepper flakes for a mild kick. When you pour the marinara, mix in some of these spices. It helps the flavors blend beautifully. Make your dish pop on the plate. Serve the chicken on a bed of pasta or next to a fresh salad. This adds color and makes it more inviting. For garnish, sprinkle fresh basil or add extra mozzarella on top. This simple touch enhances the look and shows off your cooking skills. Pro Tips Marinara Sauce Quality: Use a high-quality marinara sauce for the best flavor. A homemade sauce can elevate this dish even further. Cheese Options: Experiment with different cheeses like provolone or parmesan for a unique twist on the classic mozzarella topping. Chicken Thickness: If your chicken breasts are thick, consider pounding them to an even thickness to ensure they cook evenly. Resting Time: Allow the chicken to rest for a few minutes after baking to retain its juices and enhance the overall texture. {{image_2}} You can switch the marinara sauce with other sauces. Try pesto for a fresh twist. Alfredo sauce adds creaminess and richness. You can also use a spicy arrabbiata for some heat. Each sauce brings its own flavor. For cheese, mozzarella is a classic choice. However, you can use provolone for a sharper taste. Cheddar gives a bold flavor too. If you want a lower-fat option, use part-skim mozzarella. It still melts well and tastes great. You can cook this dish on the stovetop. Heat a skillet over medium heat. Brown the chicken for a few minutes on each side. Then, add the sauce and cover. Let it simmer until cooked through. This method saves time and keeps the chicken juicy. A slow cooker is another great option. Simply place the chicken, sauce, and cheese in the pot. Cook on low for 4-6 hours. This method makes the chicken very tender and full of flavor. Grilling is a fun idea too. Marinate the chicken in the sauce first. Then, grill it over medium heat until done. Add cheese in the last few minutes to melt it. Grilled chicken has a nice smoky flavor. If you need a gluten-free option, check the marinara sauce. Some brands add gluten, so read the label. Most cheese is gluten-free, making it easy to enjoy. For low-carb options, skip the pasta. Serve the chicken with a side of veggies instead. Broccoli or zucchini pairs well. You can also use cauliflower rice for a filling side. These swaps help keep the meal healthy and satisfying. To keep your Three-Ingredient Italian Chicken fresh, store it in an airtight container. Make sure it cools down first. Place it in the fridge for up to three days. If you want to save it longer, put it in the freezer. Wrap it tightly in plastic wrap and foil. This helps avoid freezer burn. To reheat the chicken, use the oven for the best results. Preheat your oven to 350°F (175°C). Place the chicken in a baking dish. Cover it with foil to keep moisture in. Heat for about 15-20 minutes or until warm. You can also use a microwave, but it may dry out the chicken. If you choose the microwave, cover the dish with a lid or damp paper towel. This keeps it moist. In the fridge, the cooked chicken lasts about three days. When frozen, it can last up to three months. Always label your containers with the date. This helps you keep track of how long it’s been stored. When ready to eat, remember to check for any off smells or changes in texture. Yes, you can use frozen chicken. Just keep a few things in mind. First, you need to adjust your cooking time. Frozen chicken takes longer to cook. I recommend baking it for 40-50 minutes instead of 25-30. Make sure to check the internal temperature. It must reach 165°F (75°C) for safety. This way, you can enjoy this dish even when you forget to thaw the chicken! Pairing this chicken with the right sides makes the meal better. Here are some great ideas: - Pasta: Serve it over spaghetti or penne. It soaks up the sauce well. - Salad: A fresh green salad adds crunch and balance. - Garlic Bread: This is perfect for soaking up any extra sauce. - Roasted Vegetables: Broccoli, zucchini, or bell peppers complement the flavors. These sides will make your dinner feel complete and satisfying. Making this dish ahead is easy and smart! You can prep the chicken and sauce the day before. Here’s how: - Marinate the Chicken: Place the chicken in a dish with marinara sauce. Cover it and let it sit in the fridge. - Layer Everything: You can layer the chicken and cheese the night before. Just cover it with foil. - Bake When Ready: When it’s time to eat, just pop it in the oven. This saves time and makes dinner stress-free. With these tips, you can enjoy a delicious meal with less hassle! This blog post covered how to make a simple and tasty Three-Ingredient Italian Chicken. You learned about key ingredients like chicken, marinara sauce, and mozzarella cheese. I shared tips on preparing, cooking, and enhancing flavors, plus storage guidance. In the end, this dish is quick, easy, and perfect for any meal. So gather your ingredients and enjoy this delightful recipe!

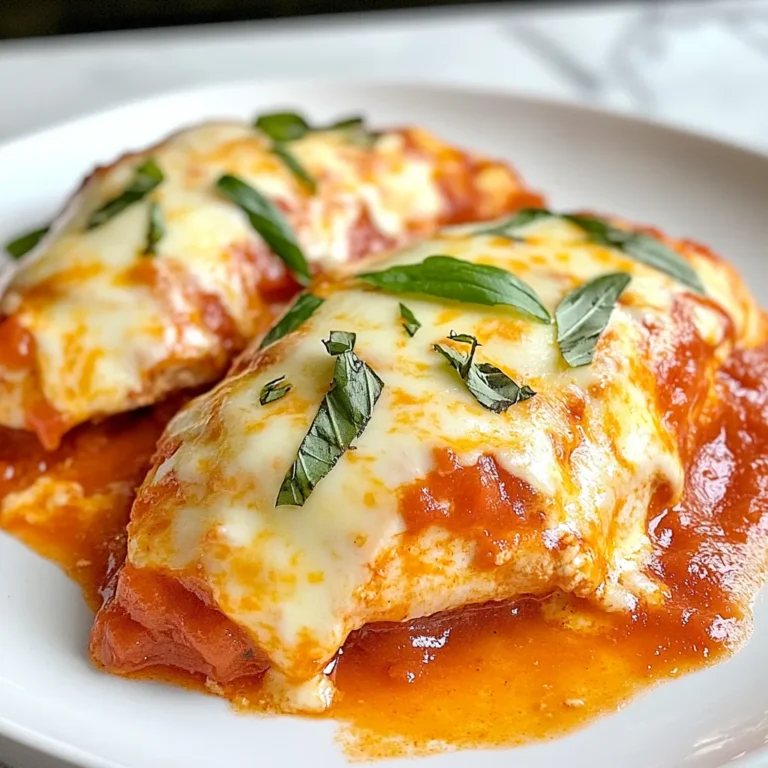
Three-Ingredient Italian Chicken Easy Dinner Delight

To make Minute Creamy Garlic Shrimp, you will need the following fresh and simple ingredients: - 1 pound large shrimp, peeled and deveined - 4 cloves garlic, minced - 1 cup heavy cream - 1 cup chicken or vegetable broth - 2 tablespoons olive oil - 1 teaspoon smoked paprika - Salt and pepper to taste - 2 tablespoons fresh parsley, chopped (for garnish) - Zest of 1 lemon - Optional: ½ cup grated Parmesan cheese Each ingredient plays a key role. The shrimp gives the dish its main protein. Garlic adds rich flavor, while heavy cream creates that luscious sauce. Broth adds depth, and smoked paprika gives a nice smokiness. I love using fresh parsley to brighten the dish. A little lemon zest lifts all the flavors. If you want extra creaminess, Parmesan is a great choice. Gather these ingredients, and you are ready to create a delicious meal in no time! {{ingredient_image_1}} First, rinse the shrimp under cold water. This step helps to remove any grit. Next, pat them dry with paper towels. This keeps the shrimp from steaming when you cook them. For flavor, season the shrimp lightly with salt, pepper, and smoked paprika. The smoked paprika adds a nice depth. Use a large skillet for this step. Heat the olive oil over medium heat. Once hot, add the minced garlic. Sauté for about 1 minute. Watch closely to avoid burning. When it becomes fragrant, it’s ready for the next step. Now, add the seasoned shrimp to the skillet. Cook for 2 minutes on each side. Look for a pink and opaque color. This shows they are done. After cooking, remove the shrimp and set them aside. In the same skillet, pour in the chicken or vegetable broth. Scrape any brown bits from the bottom. This adds flavor to the sauce. Bring it to a simmer and let it reduce for about 3-4 minutes. This thickens the broth nicely. Then, lower the heat and stir in the heavy cream. If you want extra creaminess, add grated Parmesan cheese. Stir until it melts. Return the cooked shrimp to the skillet. Mix them into the creamy sauce. Heat everything through for about 1-2 minutes. Adjust the seasoning with more salt and pepper if needed. For a fresh twist, add lemon zest. This brightens the dish and enhances the flavor. Enjoy your creamy garlic shrimp! To cook shrimp just right, watch for a few signs. When shrimp turns pink and opaque, it's ready. This takes about 2 minutes per side. Overcooking makes shrimp tough and rubbery. If they curl tightly, they are likely overdone. Remove them from heat when they look perfect. To boost flavor, consider adding fresh herbs. Basil, dill, or thyme work well. You can also try a dash of cayenne for heat. For a zesty note, add lemon juice or zest. These small tweaks can make your dish stand out. Don't be afraid to experiment with spices you love. Pair your creamy garlic shrimp with a variety of sides. Serve it over pasta or rice for a filling meal. You can also add steamed veggies for color and nutrition. A fresh salad with lemon vinaigrette complements the dish well. For a hearty option, try crusty bread to soak up the sauce. Pro Tips Use Fresh Shrimp: Always opt for fresh shrimp whenever possible; it enhances the flavor and texture of the dish. Don’t Overcook: Be careful not to overcook the shrimp; they should be pink and opaque, which usually takes just 2 minutes per side. Adjust Creaminess: If you prefer a richer sauce, add more Parmesan cheese or even a splash of white wine for depth. Garnish for Flavor: Don’t skip the garnish! Fresh parsley and lemon zest add brightness and elevate the dish visually. {{image_2}} You can easily swap shrimp for chicken or tofu. Chicken thighs work well. Cut them into bite-sized pieces. Cook them the same way as shrimp, but add a few more minutes to ensure they cook through. Tofu is also tasty. Use firm or extra-firm tofu for the best texture. Just cube it and sauté until golden before adding to the sauce. If you want a spicy kick, try adding red pepper flakes. Start with a pinch and taste as you go. This small change can make a big difference! You can also mix in a splash of hot sauce for a different heat profile. This adds depth and excitement to the dish. For a dairy-free version, substitute heavy cream with coconut milk. It adds a nice creaminess without dairy. If you are gluten-free, ensure your broth is gluten-free. You can also use gluten-free pasta as a base to serve the dish. These swaps keep the dish delicious while fitting your needs. To store your creamy garlic shrimp, place it in an airtight container. Ensure the dish cools to room temperature before sealing it. This prevents steam buildup, which can make the shrimp soggy. Keep it in the fridge for up to three days. When you're ready to eat, just reheat it on low heat. Stir occasionally to keep the sauce creamy. If you want to save the dish for later, freezing is a great option. First, let the shrimp cool completely. Then, transfer it to a freezer-safe container. Make sure to leave space at the top, as liquids expand when frozen. You can freeze it for up to two months. To reheat, thaw it in the fridge overnight and warm it gently on the stove. This keeps the shrimp from becoming rubbery. In the fridge, creamy garlic shrimp lasts for about three days. If frozen, it stays good for two months. Always check for signs of spoilage before eating leftovers. If it smells off or looks strange, it's best to toss it. Storing your shrimp properly ensures it stays fresh and tasty for your next meal. It takes about 20 minutes to make this dish. You will spend 10 minutes prepping the ingredients. Cooking the shrimp and sauce takes about 10 minutes. This quick time means you can enjoy a tasty meal without much hassle. Yes, you can use frozen shrimp. Just make sure to thaw them first. Place the shrimp in a bowl of cold water for about 15-20 minutes. This method is quick and helps keep the shrimp tender. I suggest pairing the shrimp with rice or pasta. A fresh salad also works great. You can serve it with garlic bread to soak up the sauce. These sides make for a complete and satisfying meal. To thicken the sauce, let it simmer longer. This helps reduce the liquid. You can also add a bit of cornstarch mixed with water. If you prefer, stir in more grated Parmesan cheese for extra creaminess. This blog post covers how to make creamy garlic shrimp. You learned about the key ingredients, from shrimp to garlic to cream. I provided step-by-step instructions, cooking tips, and variations to suit your taste. Now you have the know-how to impress your family and friends with a delicious meal. Enjoy experimenting with flavors and substitutes. May your creamy garlic shrimp always be a hit!

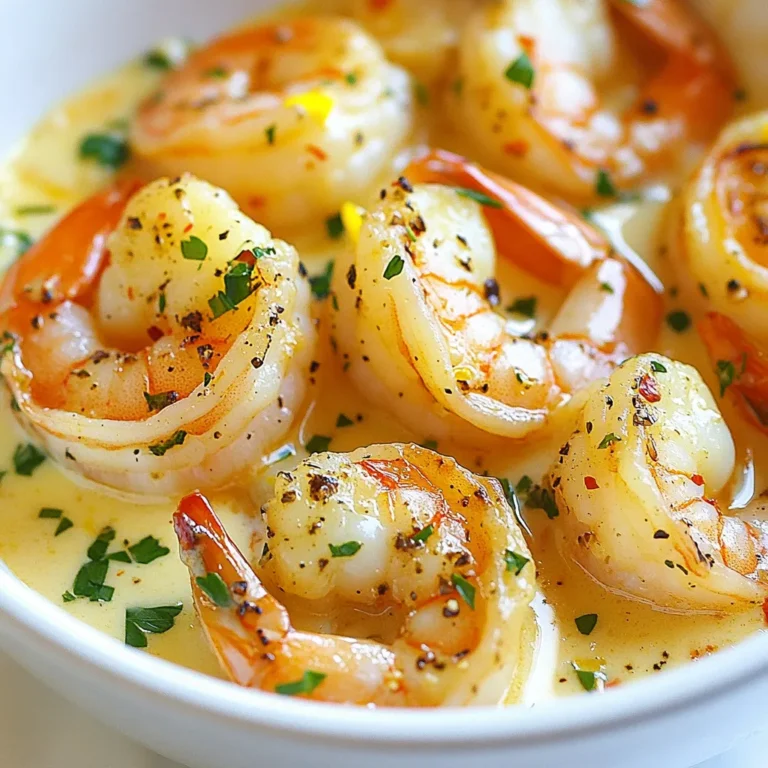
Minute Creamy Garlic Shrimp Quick and Tasty Recipe

To make a delicious garlic herb butter roasted chicken, you will need these key ingredients: - 1 whole chicken (around 4-5 lbs) - 1 cup unsalted butter, softened - 10 cloves garlic, minced - 1 lemon, quartered - 1 onion, quartered (for stuffing) These ingredients create a juicy chicken with a rich flavor profile. The butter adds moisture and richness, while the garlic gives a fragrant punch. The right herbs and seasonings make this dish shine. You should gather: - 2 tablespoons fresh rosemary, chopped - 2 tablespoons fresh thyme, chopped - 2 tablespoons fresh parsley, chopped - Salt and pepper to taste - 1 teaspoon paprika These herbs bring freshness to the chicken. Rosemary and thyme add an earthy taste, while parsley brightens the dish. Paprika gives a lovely color and a hint of warmth. While the main ingredients are essential, you can add more for extra flavor. Consider these options: - Additional garlic cloves for deeper flavor - A splash of white wine for a deeper sauce - Carrots and celery in the roasting pan for added sweetness These optional ingredients can elevate your dish. They add layers of taste and complexity, making your roast chicken even more special. {{ingredient_image_1}} Start by preheating your oven to 425°F (220°C). This gets the oven hot enough for a great roast. Next, take your whole chicken, about 4-5 lbs, and pat it dry with paper towels. Drying the chicken helps the skin get crispy. Now, loosen the skin over the breast and thighs gently. Use your fingers to do this. Be careful not to tear the skin. Once loosened, you can add flavor by putting some of the garlic herb butter mixture under the skin. In a mixing bowl, combine 1 cup of softened unsalted butter, 10 cloves of minced garlic, and fresh herbs like: - 2 tablespoons rosemary, chopped - 2 tablespoons thyme, chopped - 2 tablespoons parsley, chopped Add 1 teaspoon of paprika, and a pinch of salt and pepper. Mix everything well. This mixture is key to adding flavor to the chicken. You want it to be smooth and well-blended. Take half of your garlic herb butter and spread it under the skin. Rub it into the meat for a burst of flavor. Then, take the rest of the butter and rub it all over the outside of the chicken. Make sure it is well-coated. Next, stuff the chicken’s cavity with quartered lemon and onion. This adds even more flavor. Place the chicken on a roasting rack in a pan, breast side up. Roast it for about 1 hour and 15 minutes. Use a meat thermometer to check when it hits 165°F (75°C). Halfway through, baste the chicken with its own drippings for extra juiciness. When it’s golden brown and done, let it rest for about 10-15 minutes before carving. This helps keep the juices in the meat. Enjoy your delicious garlic herb butter roasted chicken! To get that crispy skin, start by drying your chicken well. Use paper towels to pat it dry. This helps remove any moisture. Next, loosen the skin gently with your fingers. Be careful not to tear it. Then, use half of your garlic herb butter mixture under the skin. This adds flavor and helps the skin crisp up nicely. Finally, rub the remaining butter all over the outside. Make sure to season it well with salt and pepper. For extra flavor, you can try a few techniques. First, add lemon and onion inside the chicken. This gives a nice aroma and taste. You can also use more herbs, like sage or oregano, to switch things up. Another tip is to baste your chicken halfway through cooking. Use the drippings from the pan. This keeps the meat juicy and adds more flavor. Lastly, don’t skip the resting time. Let the chicken sit after cooking. This helps the juices spread throughout the meat. Using the right tools makes cooking easier. Here’s what I recommend: - Roasting pan: A sturdy pan helps catch the drippings. - Roasting rack: This keeps the chicken elevated for even cooking. - Meat thermometer: This ensures your chicken is safely cooked to 165°F. - Basting brush: Use this to apply drippings for extra flavor. - Sharp carving knife: This helps carve the chicken easily. These tools will help you achieve the best results with your garlic herb butter roasted chicken. Pro Tips Dry the Chicken: Patting the chicken dry before applying the butter helps achieve a crispy skin during roasting. Use a Meat Thermometer: To ensure the chicken is cooked perfectly, use a meat thermometer to check that the internal temperature reaches 165°F (75°C). Let it Rest: Allowing the chicken to rest after cooking is crucial; it helps the juices redistribute, keeping the meat moist. Baste for Extra Flavor: Basting the chicken with its own drippings halfway through roasting enhances the flavor and moisture of the meat. {{image_2}} You can change the herbs to make this dish your own. If you want a bolder taste, try using sage or dill instead of rosemary. Oregano also works well for a Mediterranean twist. Just remember, fresh herbs give the best flavor. Dried herbs can be used, but they are less strong. Use about one-third of the amount if you choose dried. You can roast the chicken in different ways. If you own an air fryer, it cooks faster and gives a crispy skin. Set it to 360°F and cook for about 60 minutes. A slow cooker is another great option. It makes the chicken very tender. Cook on low for 6-8 hours. Just skip the browning step and add the butter mixture directly. Pair your chicken with tasty sides for a full meal. Roasted vegetables like carrots and potatoes are great. A fresh salad with mixed greens and a light vinaigrette is refreshing. You can also serve it with rice or creamy mashed potatoes. These sides soak up the chicken's juices and balance the flavors. To keep your leftover roasted chicken fresh, let it cool first. Once it’s cool, place it in an airtight container. You can also wrap it tightly in plastic wrap or aluminum foil. Store it in the fridge for up to four days. If you see any signs of spoilage, like an off smell or slimy texture, throw it away. If you want to keep your chicken longer, freezing is a great option. First, make sure the chicken is fully cooled. Cut it into pieces for easier storage. Place the pieces in freezer bags, removing as much air as possible. Label the bags with the date. You can freeze the chicken for up to three months. When you’re ready to eat it, simply thaw it in the fridge overnight. To reheat your chicken and keep it juicy, preheat your oven to 350°F (175°C). Place the chicken pieces in a baking dish. Add a splash of broth or water to keep it moist. Cover the dish with foil to prevent it from drying out. Heat for about 20-30 minutes, or until it’s warmed through. For crispy skin, uncover the dish for the last 5-10 minutes. Enjoy your delicious chicken just as if it were fresh! Roast a 5 lb chicken for about 1 hour and 15 minutes. Check the internal temperature. It should reach 165°F (75°C). The skin will be golden brown and crispy. You should not use frozen chicken for this recipe. Thaw the chicken first. It cooks best when it is fresh or fully thawed. If you lack fresh herbs, use dried herbs. Use about one-third of the amount. For example, use 1 tablespoon of dried herbs for every 3 tablespoons of fresh herbs. Dried herbs can still add great flavor! This article covered all you need for Garlic Herb Butter Roasted Chicken. We discussed the main and optional ingredients, plus step-by-step instructions for prep and roasting. I shared tips for crispy skin and flavor boosts. You learned about tasty variations and storage tips for leftovers. By following these steps, you can enjoy a delicious meal. Keep experimenting and have fun in the kitchen! Your cooking skills will grow with each recipe. Enjoy every bite, and share your creations with loved ones!

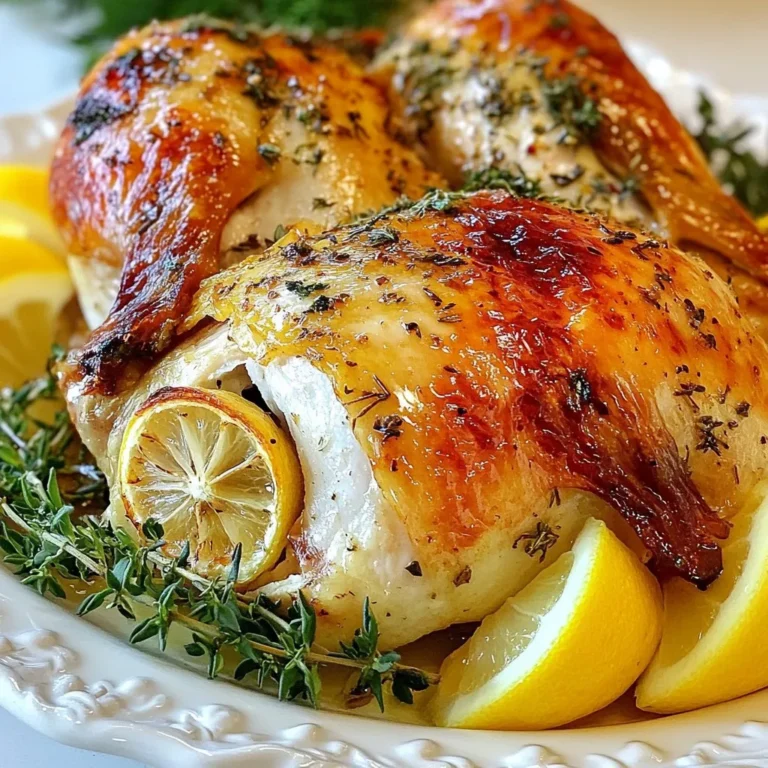
Garlic Herb Butter Roasted Chicken Flavorful Dish

- 8 oz pasta of your choice (e.g., spaghetti or fusilli) - 2 ripe avocados - 1 cup fresh basil leaves - 1 cup fresh spinach leaves - 1 clove garlic - 2 tablespoons fresh lime juice - 1 tablespoon olive oil - 1 tablespoon nutritional yeast (optional for a cheesy flavor) - Salt and pepper to taste - Cherry tomatoes, halved (for garnish) - Toasted pine nuts or chopped walnuts (for garnish) For this dish, fresh ingredients shine. Start with pasta, which holds the sauce well. I love using spaghetti or fusilli for this recipe. The shape impacts how the sauce clings. Next, ripe avocados offer creaminess and flavor. Choose avocados that yield slightly when pressed. Fresh basil and spinach add vibrant green color and nutrients. Garlic brings depth and warmth to the sauce. The lime juice brightens the dish. Its tang cuts through the richness of the avocados. Olive oil adds smoothness and helps blend the sauce. Nutritional yeast gives a cheesy taste, but it’s optional. Salt and pepper enhance all the flavors. For garnishes, I recommend halved cherry tomatoes for sweetness and toasted nuts for crunch. Each ingredient plays a role in making this pasta fresh and healthy. {{ingredient_image_1}} First, bring a large pot of salted water to a boil. You want it to taste like the sea. Add your pasta of choice, like spaghetti or fusilli. Cook it according to the package instructions until it’s al dente, which means it should still have a bit of bite. This usually takes about 8 to 10 minutes. Once done, drain the pasta but save about 1 cup of that starchy pasta water. This water will help your sauce stick later. Now, let’s make the sauce. Gather your ingredients: - 2 ripe avocados - 1 cup fresh basil leaves - 1 cup spinach leaves - 1 clove garlic - 2 tablespoons fresh lime juice - 1 tablespoon olive oil - 1 tablespoon nutritional yeast (optional) - Salt and pepper to taste In a food processor, add the avocado, basil, spinach, garlic, lime juice, olive oil, and nutritional yeast if you want that cheesy flavor. Blend everything until it’s smooth. If the sauce looks too thick, add a bit of the reserved pasta water until it’s just right. Don’t forget to season with salt and pepper! Time to mix it all together. In the pot you used for the pasta, add the drained pasta and pour in the Green Goddess sauce. Toss gently to coat the pasta evenly. If the sauce seems too thick, add more of the reserved pasta water a little at a time. This will help the sauce stick and make it creamy. Now, it’s time to serve! Divide the pasta among your favorite bowls. Top each bowl with halved cherry tomatoes for a pop of color and a sprinkle of toasted pine nuts or chopped walnuts for some crunch. For an extra zing, you can drizzle a bit more lime juice over the top before serving. Enjoy your fresh and healthy dish! For the best sauce, aim for a creamy yet smooth texture. If your sauce is too thick, add a splash of the reserved pasta water. This will help you get the perfect consistency. Taste as you go to balance flavors. A little lime juice brightens the dish and cuts through the creaminess of the avocados. Adjust the lime juice to your liking for the best flavor. To avoid mushy pasta, use a large pot with plenty of boiling water. Salt the water well before adding the pasta for flavor. Follow the package instructions and cook until al dente. This keeps the pasta firm and chewy. I recommend using spaghetti or fusilli. These shapes hold the sauce well and add a fun twist to your dish. Pair this pasta with grilled chicken or shrimp for added protein. You can also serve it with a fresh salad for a light meal. For gatherings, consider serving it in a large bowl. Top each serving with halved cherry tomatoes and a sprinkle of nuts for crunch. A drizzle of lime juice before serving adds a bright touch that impresses guests. Pro Tips Use Ripe Avocados: Ensure your avocados are perfectly ripe for a creamy sauce. A ripe avocado will yield slightly to pressure and have a richer flavor. Add Fresh Herbs: Experiment with different herbs like cilantro or parsley along with basil for a unique flavor twist in your Green Goddess sauce. Reserve Pasta Water: Always save some pasta water before draining. It helps adjust the sauce consistency and allows it to better cling to the pasta. Make It Vegan: The nutritional yeast is optional, but using it adds a cheesy flavor without dairy. This makes the dish entirely vegan while still being delicious. {{image_2}} You can switch up the greens in this dish. Try using kale or arugula instead of spinach and basil. Both give a nice twist to the flavor. If you want a vegan option, you can skip the nutritional yeast. Instead, add a bit more lime juice for a zesty taste. This recipe works well with many pasta types. If you need gluten-free, use brown rice pasta or chickpea pasta. Whole grain pasta adds a nutty flavor. You can also use different shapes like penne or farfalle. This makes it fun and visually appealing. To add more flavor, include seasonal veggies. Cherry tomatoes, zucchini, or bell peppers work nicely. You can also spice it up with red pepper flakes or cumin. These spices give the pasta a kick that makes each bite exciting. To store your leftovers, place the pasta in an airtight container. Make sure the container seals tightly to keep the moisture in. I recommend using glass containers, as they prevent any unwanted smells. Store in the fridge for up to three days. After that, the freshness may fade. If you want to prepare a batch for later, freezing is a great option. First, let the pasta cool completely. Then, place it in a freezer-safe container. Leave some space at the top, as the pasta will expand when frozen. You can freeze it for up to a month. When you're ready to eat, thaw the pasta overnight in the fridge. For reheating, add it to a pan over low heat with a splash of water. Stir until warmed through. You can also reheat in the microwave. Just cover the dish and heat in short intervals, stirring in between. This keeps the pasta moist and tasty. Yes, you can prepare this dish ahead. Cook the pasta and make the sauce. Store each in separate containers. Keep the pasta in the fridge for up to three days. The sauce lasts about two days. Before serving, mix them together. Add a splash of pasta water to keep it creamy. This way, your meal stays fresh and tasty. If you do not want to use nutritional yeast, try using grated parmesan cheese. It adds a nice, cheesy taste. For a non-dairy option, use ground cashews or sunflower seeds. These can mimic the texture and taste well. Each option changes the flavor slightly, so choose based on what you like best. This recipe is great for meal prep. Cooked pasta and sauce store well. Divide portions into meal containers. You can grab them for lunch or dinner. When ready to eat, just warm them up. You might want to add fresh toppings like tomatoes or nuts. This adds a nice crunch and flavor. Enjoy your easy meal! This recipe for Avocado Lime Green Goddess Pasta uses fresh ingredients to create a tasty dish. You learned about making a creamy sauce, cooking pasta perfectly, and adding fun toppings. Remember, you can customize it with different greens or pasta types. Store leftovers safely for later enjoyment, and don't forget the meal prep tips! Enjoy experimenting with your own flavors and variations. Make this wholesome meal a hit at your next gathering!

Avocado Lime Green Goddess Pasta Fresh and Healthy Dish

- 1 lb baby carrots (or regular carrots, peeled and cut into sticks) - 3 tablespoons honey - 2 tablespoons olive oil - 4 garlic cloves, minced - 1 teaspoon ground cumin - 1 teaspoon paprika - Salt and pepper to taste - Fresh parsley, chopped for garnish - Additional spices (e.g., cayenne pepper for heat) - Sesame seeds for garnish - Lemon juice for a citrus touch Using the right ingredients makes all the difference. The main ingredients are simple but tasty. Baby carrots are sweet and tender. If you cannot find baby carrots, regular carrots work well too. Just peel and cut them into sticks. Honey adds a natural sweetness. It helps caramelize the carrots. Olive oil keeps everything moist and helps with roasting. Garlic gives a bold flavor. Minced garlic adds a punch that pairs beautifully with the sweet honey. Cumin and paprika are key spices. Cumin has a warm, earthy taste. Paprika adds color and a slight smokiness. Salt and pepper enhance all the flavors. Fresh parsley gives a bright touch when you garnish the dish. Optional ingredients can take this dish to the next level. A pinch of cayenne pepper adds heat for those who like spice. Sesame seeds give a nice crunch and look great on the plate. A squeeze of lemon juice can add a fresh, zesty flavor. You can mix and match these extras for your own twist. {{ingredient_image_1}} 1. Preheat the oven to 425°F (220°C). This step warms up your oven, helping the carrots cook fast and evenly. 2. Make the honey garlic mixture. In a large bowl, mix together: - 3 tablespoons honey - 2 tablespoons olive oil - 4 minced garlic cloves - 1 teaspoon ground cumin - 1 teaspoon paprika - Salt and pepper to taste Stir until everything blends well. 3. Coat the carrots. Add 1 pound of baby carrots (or regular carrots, cut into sticks) to the bowl. Toss them in the honey garlic mix until they are all covered. 1. Spread the carrots on a baking sheet. Line the sheet with parchment paper to prevent sticking. 2. Roast the carrots. Place them in the oven for 25 to 30 minutes. Toss the carrots halfway through roasting. This helps them cook evenly and get that lovely caramelized look. 1. Let the carrots cool slightly. This takes just a few minutes. 2. Garnish before serving. Transfer the roasted carrots to a serving dish. Sprinkle with freshly chopped parsley for a pop of color and flavor. To get perfect roasted carrots, start by tossing them well. Use a large bowl for mixing. Make sure each carrot gets coated in the honey garlic mix. This helps them cook evenly. Avoid sogginess by following a few key tips. First, do not overcrowd the baking sheet. Give the carrots space to roast. This allows hot air to circulate around them. Second, make sure your oven is hot enough. Preheating to 425°F (220°C) is important. Finally, toss the carrots halfway through roasting. This helps them brown nicely. For a great presentation, serve your roasted carrots on a wooden platter. Drizzle some extra honey over them for shine. Sprinkle sesame seeds on top for crunch. These carrots pair well with many main dishes. Try them alongside roast chicken or grilled fish. They also go great with a fresh salad. The sweet and savory flavors complement many meals. Pro Tips Even Sizing: Cut your carrots into uniform sizes to ensure even roasting and cooking. Honey Substitute: If you want a vegan option, use maple syrup instead of honey for a similar sweetness. Fresh Herbs: Experiment with different herbs like thyme or rosemary for added flavor in your roasted carrots. Storage: Store any leftovers in an airtight container in the fridge for up to 3 days. Reheat in the oven for the best texture. {{image_2}} To keep your roasted carrots fresh, store them in the fridge. Place them in an airtight container. They will stay good for about 3 to 5 days. If you want to keep them longer, freezing is a great option. First, let the carrots cool completely. Then, spread them out on a baking sheet. Freeze for about an hour until solid. After that, transfer them to a freezer bag. They can last up to 3 months in the freezer. When it’s time to enjoy your leftovers, reheating them right is key. The best method is to use the oven. Preheat it to 350°F (175°C). Place the carrots on a baking sheet and cover with foil. Heat for about 10-15 minutes, or until warm. You can also use the microwave. Place the carrots in a microwave-safe dish. Cover and heat for 1 to 2 minutes. Stir halfway through to ensure even warming. Enjoy them with your favorite meal! Can I use regular carrots instead of baby carrots? Yes, you can use regular carrots. Just peel and cut them into sticks. This way, they will roast evenly like baby carrots. What to do if I don't have honey? If you lack honey, try maple syrup or agave nectar. Both will add sweetness and flavor, making your dish still tasty. Are roasted carrots healthy? Yes, roasted carrots are very healthy! They are full of vitamins, minerals, and fiber. Honey adds flavor but not too many calories. How can I make this dish vegan-friendly? To make it vegan, replace honey with maple syrup. This keeps the sweetness while ensuring the dish is plant-based. The blog post covered how to make delicious honey garlic roasted carrots. We discussed ingredients, step-by-step instructions, and tips for perfecting the dish. You can easily customize flavors using optional spices and cooking methods. Don't forget how to store leftovers for future meals. Roasted carrots are an easy side dish that can impress anyone. Try out these tips and enjoy great flavors in your kitchen. Happy cooking!

Honey Garlic Roasted Carrots Nourishing Flavor Boost

To make Irish Chicken Dhansak, you need a few simple ingredients. Each one contributes to the rich flavor of this dish. Here’s what you’ll need: - Chicken thighs and lentils - 500g boneless chicken thighs, cut into bite-sized pieces - 1 cup red lentils, rinsed - Vegetables and spices - 1 tablespoon vegetable oil - 1 large onion, finely chopped - 3 cloves garlic, minced - 1-inch piece of ginger, grated - 2 green chilies, slit lengthwise - 1 teaspoon mustard seeds - 1 teaspoon cumin seeds - 1 teaspoon turmeric powder - 2 teaspoons garam masala - 1 teaspoon coriander powder - 2 medium potatoes, diced - 1 carrot, diced - Salt to taste - 4 cups chicken stock - Garnishing ingredients - Fresh cilantro for garnish These ingredients come together to create a dish that is both hearty and comforting. Each spice adds depth, while the chicken and lentils provide protein and texture. The fresh cilantro on top gives a pop of color and freshness. Enjoy gathering these ingredients to start cooking this delightful meal! {{ingredient_image_1}} 1. Heating oil and cooking spices Start by heating 1 tablespoon of vegetable oil in a large pot over medium heat. Add 1 teaspoon of mustard seeds and 1 teaspoon of cumin seeds. Let them sizzle for a few seconds. This step wakes up the spices and fills your kitchen with great smells. 2. Adding and cooking chicken Next, add 500g of boneless chicken thighs, cut into bite-sized pieces. Cook the chicken for about 5 minutes. Make sure it is no longer pink. Stir the chicken so it cooks evenly and soaks up the spices. 3. Incorporating lentils and vegetables Once the chicken is ready, add 1 cup of rinsed red lentils, 2 medium diced potatoes, and 1 diced carrot. Pour in 4 cups of chicken stock. Bring this mix to a boil, then reduce the heat to a gentle simmer. This helps the lentils and veggies soften. 4. Final simmering and seasoning Cover the pot and let it cook for about 25-30 minutes. Stir occasionally. The lentils should become soft, and the chicken should be fully cooked. Finally, season with salt to taste. If needed, simmer for an extra 5 minutes. Garnish with fresh cilantro before serving. Enjoy your warm, hearty dish! Ingredient freshness is key. Fresh chicken and spices make a big difference in taste. Always choose bright vegetables. They add color and flavor. Adjust spice levels to suit your taste. You can add more green chilies for heat or reduce them for mildness. Taste as you cook. This way, you can find the right balance. Perfect lentil texture is vital. Rinse the lentils well before cooking. This removes dust and helps them cook evenly. Stir them gently while they simmer. This prevents them from becoming mushy. Serve in deep bowls for a nice look. Garnish with fresh cilantro for a pop of color. It also adds a fresh taste. Pair with naan or rice. These sides soak up the tasty sauce. They make your meal more filling. You can also serve a green salad for crunch. Pro Tips Fresh Ingredients: Always use fresh herbs and spices for the best flavor in your Dhansak. It makes a significant difference in taste. Cooking Lentils: Rinse the lentils well before cooking to remove any impurities and achieve a smoother texture. Adjusting Spice Levels: Modify the number of green chilies based on your spice tolerance. You can also remove the seeds for a milder dish. Leftover Variations: Use leftover Dhansak as a filling for wraps or serve it with different types of bread for a tasty twist. {{image_2}} For your Irish Chicken Dhansak, feel free to play with the ingredients! - Alternatives for chicken: You can use turkey or firm tofu. Both options work well and keep the dish tasty. - Different lentil varieties: While red lentils are great, yellow or green lentils can also be used. Just check their cooking times, as they may need more time. - Adding other vegetables: Try adding bell peppers, peas, or spinach. They add color and nutrition to the dish. You can serve Irish Chicken Dhansak in many fun ways! - Ways to serve as a main dish: Serve it in deep bowls, topped with fresh cilantro. Pair it with naan or steamed rice for a hearty meal. - Incorporating into other meals: Use the leftovers for wraps or sandwiches. You can also turn it into a filling for tacos or quesadillas. To store your Irish Chicken Dhansak, let it cool to room temperature first. Place the leftovers in an airtight container. This helps keep the flavors fresh. You can store it in the fridge for up to three days. If you want it to last longer, consider freezing. For freezing, use freezer-safe containers or zip-top bags. Make sure to remove as much air as possible. This prevents freezer burn and keeps it tasty. You can freeze the dish for up to three months. To reheat, simply thaw it overnight in the fridge. Then, warm it on the stove until hot. Stir occasionally to avoid sticking. Enjoy your meal without losing any flavor! Irish Chicken Dhansak blends Indian and Irish cooking styles. Dhansak comes from India, where it is a popular dish. It combines lentils and meat with spices. The Irish twist uses chicken thighs for a hearty meal. This dish reflects cultural flavors and creativity, making it unique. To make your Irish Chicken Dhansak spicier, add more green chilies. You can also use red chili powder for heat. For a milder dish, reduce the number of chilies. You can also omit the green chilies altogether. Adding coconut milk can cool the spice level, too, giving a nice balance. Yes, you can prepare Irish Chicken Dhansak ahead of time. Cook it fully and let it cool before storing. Place it in an airtight container in the fridge. It can last up to three days. Reheat it gently on the stove or in the microwave before serving. This can enhance the flavors, making it even better! This blog post shared a simple way to make Irish Chicken Dhansak with chicken thighs, lentils, and fresh veggies. You learned important cooking tips, like using fresh ingredients and adjusting spice levels. I also covered how to store leftovers and freeze the dish. As you try this recipe, think about your own twists and flavors. Enjoy experimenting with ingredient swaps and presentations. Cooking is fun, and I hope you’ll love this dish as much as I do. Happy cooking!

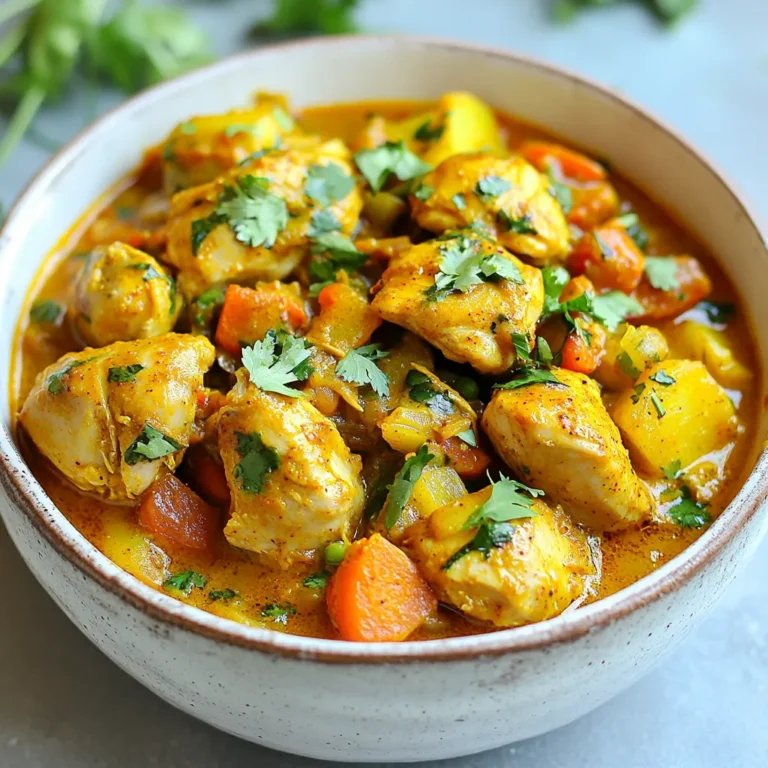
Irish Chicken Dhansak Flavorful and Simple Recipe

PREV 1 … 68 69 70 … 86 NEXT
spicy fork kitchen

explore

DessertsDinnerAppetizersDrinks

Our Policies

  • Cookie Policy
  • Copyright Policy
  • Disclaimer
  • GDPR Policy
  • Terms Of Use
Back to Top
  • About
  • Contact Us
  • Privacy Policy
© 2026 spicy fork kitchen