FREE DINNER EBOOK! Get your copy!
  • Cookie Policy
  • GDPR Policy
  • Disclaimer
  • Terms Of Use
  • Visit my other site: Fun Cookie Recipes
spicy fork kitchen
  • Home
  • Dinner
  • Desserts
  • Drinks
  • Appetizers
  • Contact
  • About
  • Privacy Policy
  • Home
  • Dinner
  • Desserts
  • Drinks
  • Appetizers
  • Contact
  • About
  • Privacy Policy
  • Cookie Policy
  • GDPR Policy
  • Disclaimer
  • Terms Of Use
Visit my other site: Fun Cookie Recipes

HOME / CATEGORIES /

Latest

- 1 pre-made pie crust - 2 cups broccoli florets, blanched - 1 cup shredded sharp cheddar cheese - 4 large eggs - 1 cup whole milk - 1/2 cup grated Parmesan cheese - 1/2 teaspoon garlic powder - 1/2 teaspoon onion powder - 1/4 teaspoon nutmeg - Fresh parsley for garnish (optional) For this Broccoli Cheddar Quiche, I love using fresh ingredients. The pre-made pie crust saves time. You can find it in the store. It makes this dish easy for everyone. Blanch the broccoli to keep its bright color. This step gives it a nice crunch. I use sharp cheddar because it adds great flavor. The eggs and milk create a smooth filling. Whole milk gives a rich taste. Parmesan cheese adds a salty kick. Don't forget the spices! Garlic powder and onion powder boost the flavor. A little nutmeg makes it unique. Finally, fresh parsley adds color and freshness. It’s optional, but I recommend it. This ingredient list combines well for a tasty quiche. Enjoy these simple yet flavorful ingredients in your cooking! {{ingredient_image_1}} First, preheat your oven to 375°F (190°C). This ensures the quiche cooks evenly. Next, heat 1 tablespoon of olive oil in a skillet over medium heat. Add 2 cups of blanched broccoli florets. Sauté them for about 3-4 minutes until they are lightly cooked. Once done, set the broccoli aside to cool. In a large mixing bowl, crack open 4 large eggs. Pour in 1 cup of whole milk. Add 1/2 teaspoon of garlic powder, 1/2 teaspoon of onion powder, and 1/4 teaspoon of nutmeg. Don’t forget to sprinkle in salt and pepper to taste. Whisk all these ingredients together until well combined. Now, stir in 1 cup of shredded sharp cheddar cheese and 1/2 cup of grated Parmesan cheese. This will create a creamy and cheesy base for your quiche. Gently fold the sautéed broccoli into the egg and cheese mixture. Be careful not to break the broccoli too much. Next, pour this mixture into your pre-made pie crust, spreading it out evenly. Place the quiche in the oven and bake for 35-40 minutes. You’ll know it’s done when the quiche is set and the top turns lightly golden. After baking, remove it from the oven and let it cool for about 10 minutes before slicing. Enjoy your delicious Broccoli Cheddar Quiche! To make a great quiche, start with a flaky crust. Use a pre-made pie crust for ease. If you prefer homemade, chill the dough well before rolling it out. This helps prevent shrinkage while baking. Next, avoid a watery filling. Blanch the broccoli before adding it. This step removes excess moisture. After blanching, sauté the broccoli briefly in olive oil. This adds flavor and ensures it is tender yet firm. Garnish the quiche with fresh parsley. It adds a pop of color and freshness. You can also serve it with a light side salad. A simple green salad pairs well, adding crunch and brightness to your meal. One common mistake is overbaking the quiche. Keep an eye on it in the oven. The quiche is done when the center is set but still slightly jiggly. Let it cool for about ten minutes before slicing. Another mistake is not blanching the broccoli. This step helps keep the texture right. Raw broccoli can lead to a soggy quiche. Always take the time to blanch for better results. Pro Tips Use Fresh Broccoli: For the best flavor and texture, opt for fresh broccoli florets instead of frozen ones. Fresh broccoli retains its crunch and vibrant color in the quiche. Customize Your Cheese: Experiment with different cheese varieties, such as Gruyère or feta, to add unique flavors to your quiche. Mixing cheeses can elevate the taste profile significantly. Let It Rest: Allow the quiche to cool for about 10 minutes before slicing. This helps it set better and makes for cleaner slices when serving. Make It Ahead: This quiche can be prepared a day in advance. Just reheat in the oven before serving, making it a perfect option for brunch or gatherings. {{image_2}} You can easily mix in other veggies to your quiche. Adding spinach gives it color and nutrition. Simply chop fresh spinach and fold it into the egg mix. Bell peppers also work well. They add a sweet crunch. Dice them small and sauté with the broccoli for a few minutes. This way, all the flavors blend nicely. If you want to try different cheeses, consider Swiss cheese. It melts well and has a mild taste. Feta cheese is another great option. It adds a tangy flavor to each bite. Just crumble it into the egg mixture. Mixing different cheeses can make your quiche unique and tasty. You can choose how to make the crust. A homemade crust can be flaky and fresh. Use flour, butter, and water to make it from scratch. If you need a gluten-free option, look for pre-made gluten-free crusts. They are easy to find and save time. These options let you enjoy quiche your way! To store your leftover quiche, let it cool completely. Cover it tightly with plastic wrap or foil. Place it in the fridge. It will stay fresh for up to three days. If you think you won’t eat it all, consider freezing some. You can reheat quiche in the oven or microwave. The oven method is best for taste. Preheat your oven to 350°F (175°C). Place the quiche on a baking sheet and heat it for 15-20 minutes. This keeps the crust crispy. If you use a microwave, heat it for 1-2 minutes. The crust may get a bit soggy, but it works in a pinch. If you want to freeze quiche, wrap it well in plastic wrap. Then, put it in a freezer bag. It can last for up to three months. When you're ready to eat it, take it out of the freezer. Thaw it in the fridge overnight. To reheat, follow the oven method mentioned above. This keeps the quiche tasty and fresh. Yes, you can prepare this quiche ahead of time. This makes it great for busy days. Just assemble the quiche and cover it well. You can store it in the fridge for up to 24 hours before baking. This way, you save time on the day you want to serve it. When you are ready, bake it as directed. Reheating quiche is easy. The best way is to use the oven. Preheat your oven to 350°F (175°C). Place the quiche on a baking tray. Cover it with foil to keep it moist. Heat for about 15-20 minutes or until warm. If you use a microwave, do it for short bursts. This helps to avoid a soggy crust. Yes, you can use frozen broccoli. It’s a great time-saver. Just thaw and drain it well before use. This keeps excess water out of your quiche. You can skip the blanching step if you use frozen broccoli. Just sauté it for a few minutes to warm it up. This ensures your quiche stays flavorful and creamy. In this blog post, we explored how to make a tasty broccoli cheddar quiche. We covered the main ingredients, like eggs, cheese, and broccoli, which make this dish special. I shared easy steps to mix and bake the quiche and tips for the perfect texture. You can also try various veggies and cheeses for different flavors. Remember, storing leftovers well helps keep it fresh. With these tips, you can create a quiche that impresses your family and friends. Enjoy making this dish again and again!

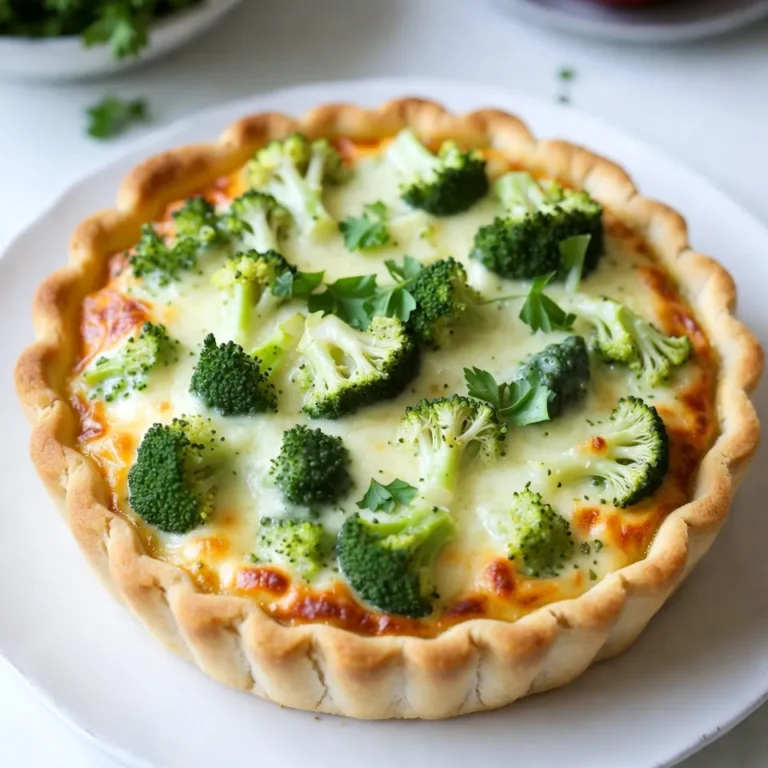
Broccoli Cheddar Quiche Easy and Flavorful Recipe

- 2 lbs beef chuck - 3 tablespoons olive oil - 1 large onion - 3 cloves garlic - 4 large carrots - 3 medium potatoes - 2 cups beef broth - 1 cup water - 2 tablespoons tomato paste - 1 teaspoon dried thyme - 1 teaspoon dried rosemary - 2 bay leaves - Salt and pepper to taste - 1 cup frozen peas - Fresh parsley for garnish For a hearty old-fashioned beef stew, you need solid ingredients. First, choose beef chuck for its rich flavor. This cut has enough fat to make the stew tender and tasty. You also want olive oil for browning the beef. Next, chop one large onion and mince three cloves of garlic. They add a strong base flavor. Then, slice four large carrots and dice three medium potatoes. These veggies bring texture and heartiness. You’ll need two cups of beef broth and one cup of water. This combo creates the stew's liquid base. For flavor, mix in two tablespoons of tomato paste. Add one teaspoon of dried thyme and one teaspoon of dried rosemary for that herb touch. Include two bay leaves to deepen the flavor. Lastly, season with salt and pepper to make it pop. If you want to serve it with a twist, add one cup of frozen peas for color and sweetness. Garnish with fresh parsley for a nice finish. With these ingredients, you are set to create a comforting meal that warms the heart. {{ingredient_image_1}} - Heat 3 tablespoons of olive oil in a large heavy pot over medium-high heat. - Season 2 lbs of beef chuck with salt and pepper. Brown the beef cubes in batches, about 5-7 minutes. Transfer the browned beef to a plate. - In the same pot, add 1 large chopped onion and 3 minced cloves of garlic. - Sauté until the onion is soft and clear, about 3 minutes. - Add 2 tablespoons of tomato paste and stir to mix, cooking for one more minute. - Return the browned beef to the pot. - Add 4 sliced carrots, 3 diced potatoes, 2 cups of beef broth, 1 cup of water, 1 teaspoon dried thyme, 1 teaspoon dried rosemary, and 2 bay leaves. - Stir everything well, then bring to a boil. Reduce the heat to low, cover, and let it simmer for about 2 hours. Stir from time to time until the beef is tender. - During the last 15 minutes of cooking, add 1 cup of frozen peas. - Before serving, remove the bay leaves and adjust the seasoning with more salt and pepper if needed. Browning the beef is key to great flavor. It adds depth and richness to the stew. Use medium-high heat for this step. A hot pot seals in juices and creates a nice crust. Only add a few pieces at a time. This way, they brown evenly. If you crowd the pan, the beef will steam instead of brown. A slow simmer is vital for tender beef. After boiling, turn the heat down low. Cover the pot to keep moisture in. Stir the stew every 30 minutes. This helps flavors blend and prevents sticking. A good simmer cooks the beef and softens the veggies. Serve your stew with crusty bread. It soaks up the rich broth perfectly. You can also pair it with a side salad for freshness. For a pop of color, sprinkle fresh parsley on top. It looks nice and adds a bit of flavor. Enjoy your hearty bowl of comfort! Pro Tips Brown the Beef Properly: Ensure the beef is well-browned on all sides to develop a rich flavor in the stew. Use Fresh Herbs: If possible, substitute dried herbs with fresh ones for a more vibrant flavor profile. Thicken the Stew: For a thicker consistency, remove a cup of the stew, blend it, and return it to the pot before serving. Let It Rest: Allow the stew to sit for about 30 minutes after cooking; it will taste even better as the flavors meld. {{image_2}} You can add more veggies to your beef stew. Try turnips or parsnips for extra flavor. These root vegetables add a sweet touch. You can also toss in green beans or mushrooms. They cook well and add nice texture. Don’t be afraid to experiment with your favorites. If you want a change, swap beef for chicken or pork. Chicken thighs work best since they stay juicy. Pork shoulder can add a different taste and tenderness. Adjust the cooking time to ensure the meat is tender. Both choices can make your stew fresh and exciting. You have options when cooking your stew. The slow cooker method is easy. Just brown the meat first, then add everything to the slow cooker. Set it on low for 6-8 hours. This method allows flavors to deepen. For a faster option, use an Instant Pot. Brown the meat, then add all ingredients. Cook on high pressure for 35 minutes. Let it naturally release pressure for 10 minutes. This method saves time while keeping your stew delicious. To keep your beef stew fresh, store it in the fridge. Use airtight containers. This helps prevent odors and keeps moisture in. Let the stew cool before sealing it. Avoid stacking containers too tightly; airflow is key. To freeze your stew, let it cool completely. Pour it into freezer-safe bags or containers. Remove as much air as possible to avoid freezer burn. When ready to eat, thaw it in the fridge overnight. For quick thawing, place it in cold water. Reheat on the stove or in the microwave. Stir often for even heating. In the fridge, beef stew lasts about 3 to 4 days. In the freezer, it can stay good for up to 3 months. Always check for signs of spoilage before eating. If it smells off or looks strange, toss it out. Yes, you can use other cuts of beef for this stew. Here are some great options: - Brisket: This cut offers a rich flavor and tender texture. - Round: This cut is lean and works well if cooked low and slow. - Chuck roast: This is a classic choice, known for its marbling. Using these cuts can give you different flavors and textures. There are a few easy ways to thicken your beef stew. Here are some methods: - Use a slurry: Mix cornstarch with cold water, then stir it into the stew. - Add mashed potatoes: Mix in some mashed potatoes for a creamy texture. - Let it simmer: Simmer the stew longer to reduce the liquid naturally. Choose any of these methods to achieve the thickness you want. Yes, you can make this stew gluten-free. Here are some options: - Use gluten-free beef broth: Check the label to ensure it is gluten-free. - Skip the flour: This stew doesn’t need flour to be tasty. - Choose gluten-free tomato paste: Most tomato paste is gluten-free, but always check labels. Using these tips makes the stew safe for those with gluten sensitivities. This blog post has guided you through making a classic beef stew, from ingredients to serving. You learned about essential items like beef chuck, fragrant herbs, and hearty vegetables. I shared tips to enhance flavor and discussed variations to suit your taste. Now, you’re ready to make a delicious stew. Remember, cooking is about finding joy in every step. Enjoy your warm, tasty creation.

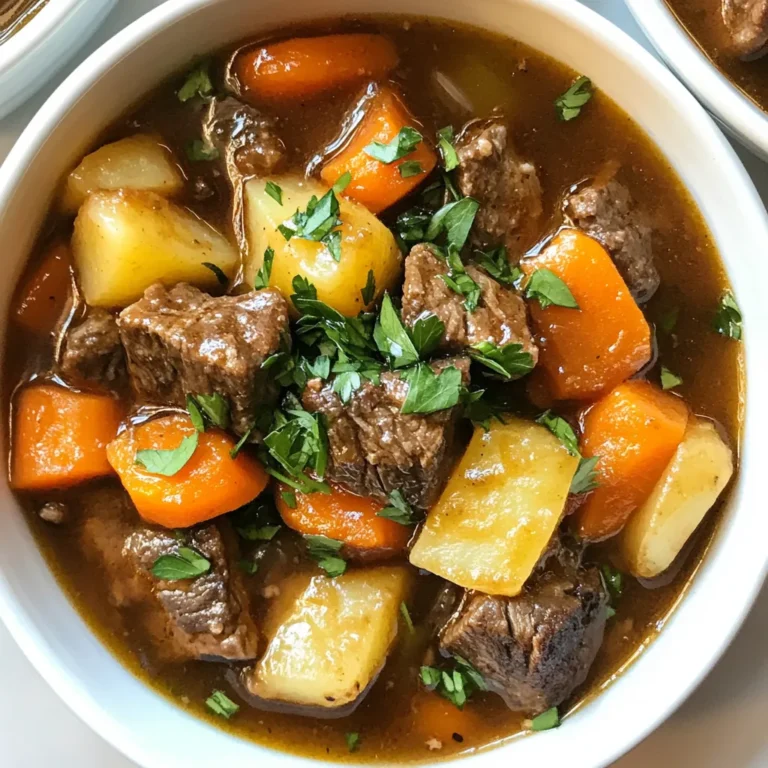
Old Fashioned Beef Stew Hearty and Comforting Meal

- 1 lb ground beef - 4 medium potatoes, peeled and diced - 1 medium onion, chopped - 2 cloves garlic, minced Ground beef gives this soup its hearty base. I love using one pound for a rich flavor. Potatoes add a nice texture and make the soup filling. Four medium potatoes are perfect, but you can adjust based on your taste. The onion brings sweetness, while garlic adds a lovely aroma. - 4 cups beef broth - 1 cup milk - 1 cup sharp cheddar cheese, shredded Beef broth is key for depth in this soup. It adds flavor and helps blend all the ingredients. I recommend four cups for a perfect balance. Milk creates creaminess, making the soup smooth. Adding one cup of shredded sharp cheddar cheese takes it to another level. It melts beautifully, making the soup rich and cheesy. - 1 teaspoon dried thyme - 1 teaspoon smoked paprika - Fresh parsley, chopped (for garnish) Seasonings are vital for flavor. Thyme adds an earthy note, while smoked paprika gives warmth and a hint of smoke. Just one teaspoon of each works well. Fresh parsley adds a pop of color and a fresh taste when you serve the soup. A little garnish makes it look nice and inviting. {{ingredient_image_1}} 1. Heat olive oil in a large pot over medium heat. 2. Add the chopped onion and cook until soft, about 5 minutes. 3. Add minced garlic and cook for another minute. The smell will be amazing! 4. Increase heat to medium-high and add the ground beef. 5. Cook until browned, breaking it apart with a spoon. This takes about 5-7 minutes. 6. If there’s excess fat, drain it out. 1. Stir in the diced potatoes along with the beef broth. 2. Add dried thyme, smoked paprika, salt, and pepper. 3. Bring the mixture to a boil. Watch it bubble! 4. Reduce heat to low, cover, and let it simmer. 5. Cook for 15-20 minutes or until the potatoes are tender. 1. Once the potatoes are soft, stir in the milk and shredded cheese. 2. Keep stirring until the cheese melts. The soup should be creamy now! 3. Taste the soup and adjust the seasoning if needed. 4. Serve hot and sprinkle fresh parsley on top. Enjoy your warm bowl of goodness! To make your soup creamy, always add the milk and cheese at the end. This keeps the cheese from clumping. Stir well once you add them. If you want an even creamier soup, mash some of the potatoes before adding the milk. This adds a nice thickness. To avoid lumps, stir the soup gently while it cooks. If you see lumps forming, a whisk can help smooth things out. Always keep the heat low when adding dairy to prevent curdling. For extra flavor, try adding spices like garlic powder or onion powder. Fresh herbs like thyme and parsley work wonders too. A splash of Worcestershire sauce can bring out the beef flavor. When it comes to toppings, consider adding crispy bacon bits or extra cheese. A dollop of sour cream adds a nice tang. Chopped green onions or fresh herbs also make great garnishes. A heavy-bottomed pot is best for making soup. It heats evenly and prevents burning. Look for pots with a lid, as this helps keep the heat in while simmering. For easy prep, a good chef’s knife will save you time when cutting. A sturdy cutting board is also helpful. Have a whisk and measuring cups handy for smooth mixing and accurate measurements. Pro Tips Brown the Beef Well: Ensure the ground beef is nicely browned to enhance the flavor of the soup. Use Starchy Potatoes: Opt for Yukon Gold or Russet potatoes for a creamier texture when cooked. Cheese Variations: Experiment with different types of cheese like gouda or pepper jack for a unique twist. Garnish for Freshness: Fresh herbs like chives or thyme can elevate the flavor and presentation of the soup. {{image_2}} You can change the protein in this soup to suit your taste. If you want a leaner option, try using ground turkey or chicken. These meats will still give you great flavor but with less fat. You might find the soup a bit lighter, but it will still be rich and tasty. For a vegetarian option, replace the meat with a mix of beans or lentils. This adds protein and a nice texture. Use vegetable broth instead of beef broth to keep the flavor balanced. You can also add some mushrooms for a hearty bite. Cheddar cheese is the star of this recipe, but you can experiment with other cheeses too. Try using Monterey Jack for a milder taste or Gouda for a smoky twist. Each cheese brings a unique flavor and texture. If you want a creamier soup, consider adding cream cheese or even a bit of cream. These options will make the soup velvety and rich. Mixing cheeses can also create a complex flavor profile that surprises your taste buds. Dietary restrictions can be easily addressed in this soup. If you need a gluten-free version, just ensure your beef broth and any added seasonings are gluten-free. This keeps everyone safe and happy. You can also add more vegetables to boost nutrition. Carrots, celery, or spinach work well. Just chop them up and add them along with the potatoes. This adds color and extra vitamins, making your soup even more wholesome. To store leftovers, let the soup cool first. Pour it into airtight containers. I recommend using glass or BPA-free plastic containers. This keeps your soup fresh and safe. Store the soup in the fridge for up to three days. For freezing, let the soup cool completely. Use freezer-safe containers or heavy-duty freezer bags. Leave some space at the top of the containers. This allows for expansion as the soup freezes. When you're ready to eat it, thaw it overnight in the fridge. To reheat, warm it gently on the stove or in the microwave. Stir well to combine. In the fridge, this soup lasts for about three days. If you freeze it, it can last up to three months. Always check for signs that the soup has gone bad. Look for changes in smell or color. If it smells sour or has mold, it’s best to toss it. You can use frozen potatoes in this soup. They save time and reduce prep work. However, frozen potatoes may have a softer texture after cooking, which changes the soup's consistency. Fresh potatoes give a better bite, but frozen ones can still taste great. To make this soup gluten-free, use gluten-free beef broth. Many brands offer gluten-free options. Also, check your cheese label to ensure it’s gluten-free. Avoid using wheat-based thickeners. Instead, you can blend some of the soup to thicken it naturally. Yes, this soup works well in a slow cooker. Start by browning the beef and cooking the onion and garlic. Then, combine all ingredients in the slow cooker. Cook on low for 6-8 hours or high for 3-4 hours. Add cheese and milk just before serving for a creamy finish. This blog post covered a tasty soup recipe, from ingredients to storage tips. You learned about the key components like beef, potatoes, and cheese. I shared step-by-step instructions to make it creamy and flavorful. You now have tips to avoid lumps and suggested variations for special diets. Remember, the right tools make cooking easier. Finally, knowing how long to store leftovers helps you enjoy this soup safely. Dive in and enjoy creating your own delicious version!

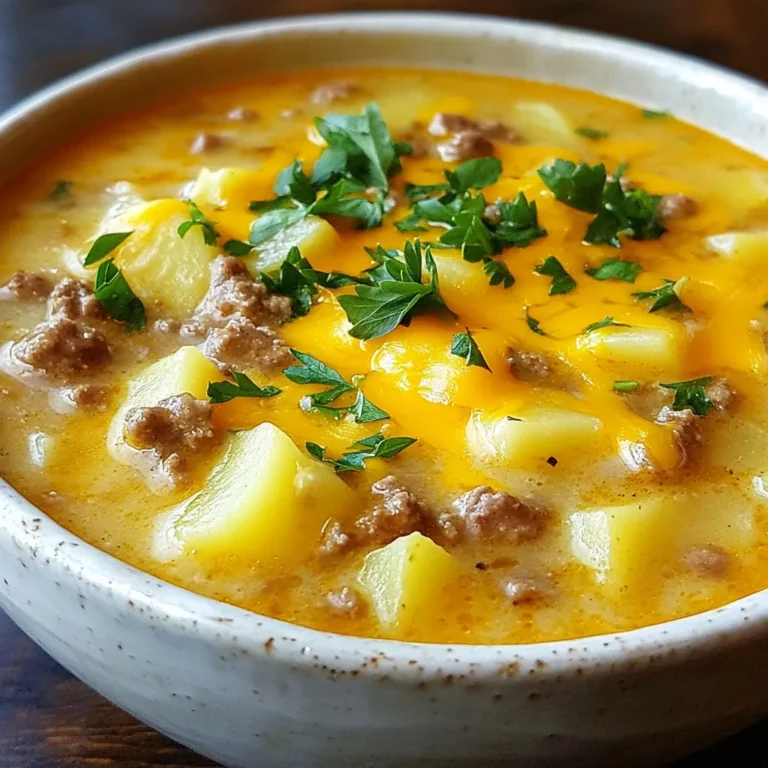
Cheesy Beef & Potato Soup Rich and Comforting Flavor

Here are the ingredients you need to make a Chocolate Praline Yule Log. Each item plays a key role in creating this sweet treat. - 4 large eggs - 1 cup granulated sugar - 1 teaspoon vanilla extract - 1 cup all-purpose flour - 1/3 cup unsweetened cocoa powder - 1 teaspoon baking powder - 1/2 teaspoon salt - 1/2 cup unsalted butter, melted - 1 cup heavy cream - 1 cup dark chocolate, chopped - 1/2 cup caramel sauce - 1/2 cup crushed praline pecans - Powdered sugar for dusting I love using fresh eggs for the best texture. The sugar adds sweetness and helps the cake rise. Vanilla extract brings a warm flavor that complements the chocolate. All-purpose flour and cocoa powder create a rich, soft cake. Baking powder helps it rise, while salt balances the sweetness. Melted butter makes the cake moist and rich. For the filling, heavy cream and dark chocolate create a smooth ganache. Caramel sauce adds a nice touch of sweetness. Crushed praline pecans offer a crunchy contrast. Finally, a dusting of powdered sugar gives it a festive touch. Enjoy baking this delightful holiday treat! {{ingredient_image_1}} - Preheat your oven to 350°F (175°C) and line a 15x10 inch jelly roll pan with parchment paper. Lightly grease it. - In a large bowl, beat 4 large eggs and 1 cup of granulated sugar. Use an electric mixer on high speed until thick and pale, about 5-7 minutes. Add 1 teaspoon of vanilla extract and mix until combined. - In another bowl, sift together 1 cup of all-purpose flour, 1/3 cup of unsweetened cocoa powder, 1 teaspoon of baking powder, and 1/2 teaspoon of salt. Gradually fold the dry ingredients into the egg mixture until just combined. - Carefully fold in 1/2 cup of melted unsalted butter. Mix until the batter is smooth, but don’t over mix. - Pour the batter into the prepared pan and spread it evenly. Bake for 12-15 minutes. The surface should spring back when touched. - While the cake bakes, prepare a clean kitchen towel. Dust it with powdered sugar. Once the cake is done, invert it onto the towel. Peel off the parchment paper. Roll the cake up tightly in the towel from the short end. Let it cool completely while rolled up. - For the filling, heat 1 cup of heavy cream in a saucepan over medium heat until it simmers. Remove it from heat and add 1 cup of chopped dark chocolate. Stir until smooth. - Let it cool slightly before whisking it to soft peaks. This makes a rich chocolate ganache. - Gently unroll the cooled cake. Spread a layer of the chocolate ganache evenly over the surface. Add a drizzle of 1/2 cup of caramel sauce and a sprinkle of 1/2 cup of crushed praline pecans. - Roll the cake back up, this time without the towel. Place it seam-side down on a serving platter. - For the frosting, reheat the remaining chocolate ganache until it is pourable. Pour it over the Yule log, allowing it to drip down the sides. - Decorate with more crushed praline pecans and dust with powdered sugar for a snowy effect. This adds a festive touch to your Yule log. Using high-quality chocolate is important for the best taste. Look for chocolate with at least 70% cocoa. This gives your ganache a deep flavor. When melting chocolate, add your hot cream slowly. This helps you achieve a smooth and shiny finish. If your ganache is too thick, add a bit more cream. If it’s too thin, let it cool down a bit. To avoid cracking, be gentle when rolling the cake. Roll it while it’s hot, using a clean kitchen towel dusted with powdered sugar. This keeps the cake moist and flexible. Make sure your oven is at the right temperature. An oven that is too hot can bake unevenly and cause cracks. Always check the cake at the minimum baking time. You can add extra flavors to your Yule log. A splash of coffee or orange zest will brighten the taste. You can also mix in spices like cinnamon or nutmeg for warmth. If you want crunch, try different nuts in your filling. Pecans or hazelnuts work great with chocolate. Pro Tips Chill the Ganache: Allow the chocolate ganache to cool completely before whipping; this will create a lighter, fluffier filling for your Yule log. Use Quality Chocolate: Opt for high-quality dark chocolate for the ganache; it enhances the flavor and richness of the dessert. Even Baking: Ensure your oven is properly preheated and rotate the pan halfway through baking for even cooking. Rolling Technique: When rolling the cake, do it while it's still warm in the towel to help retain its shape and prevent cracking. {{image_2}} You can easily change the taste of your Chocolate Praline Yule Log. For a rich flavor, add a bit of coffee. Just mix in a tablespoon of brewed coffee into your filling. It enhances the chocolate beautifully. If you prefer a zesty twist, add orange zest. A teaspoon of fresh zest brightens the flavors. You can also switch up the nuts. Use hazelnuts or almonds instead of pecans. Each nut brings a unique crunch and taste. If you want a lighter option, consider using whipped cream. Just whip heavy cream with a bit of sugar until soft peaks form. For a different ganache, use milk chocolate instead of dark. This makes a sweeter frosting that many enjoy. If you need a dairy-free option, try coconut cream. Chill a can of coconut milk overnight, scoop the cream, and whip it. It gives a lovely flavor and texture. Make your Yule Log festive with fun decorations. Use fresh mint leaves for a pop of color. They pair well with chocolate. You can also add chocolate shavings or sprinkles. They create a nice visual. For a wintery look, dust the log with powdered sugar. It resembles fresh snow. Consider adding small edible ornaments or berries for extra flair. These little touches make your Yule Log a showstopper. To keep your Chocolate Praline Yule Log fresh, follow these simple steps. First, place the Yule Log in an airtight container. This helps prevent it from drying out. If you don’t have a container, wrap it tightly in plastic wrap. Make sure it is sealed well to keep the moisture in. For refrigerator storage, your Yule Log will stay tasty for about 3 to 5 days. Just remember to keep it away from strong-smelling foods. You want to keep that chocolatey aroma intact! If you want to store it for a longer time, you can freeze the Yule Log. Wrap it well in plastic wrap and then in aluminum foil. This double wrap protects it from freezer burn. The Yule Log can last up to 3 months in the freezer. When you’re ready to eat it, move it to the fridge overnight to defrost. The shelf life of your Yule Log depends on how you store it. In the fridge, it lasts about 3 to 5 days. If you freeze it, it can last up to 3 months without losing its flavor. Always check for any signs of spoilage, like strange smells or textures, before serving. Enjoy this delightful treat while it’s fresh! To stop the Yule Log from sticking, use powdered sugar. Dust a clean kitchen towel with a good layer of powdered sugar before rolling the cake. This creates a barrier. It helps the cake slide out easily when you unroll it. Also, work quickly after baking. The longer the cake sits, the more it may stick. Yes, you can prep this Yule Log a day ahead. Bake the cake and roll it up in the towel. Then, let it cool completely. After cooling, you can store it in the fridge. Just remember to wrap it well to keep it fresh. You can also prepare the filling a day before. This helps save time on the big day. The Yule Log has roots in ancient traditions. People once burned logs to celebrate the winter solstice. Today, it symbolizes warmth and family gathering. The cake form of the Yule Log represents the same joy and togetherness. It has become a sweet treat for holiday feasts and celebrations. Enjoying a Yule Log is now a way to connect with loved ones during the festive season. Making a Chocolate Praline Yule Log is a fun and tasty project. You have learned about the key ingredients, step-by-step instructions, and storage tips. Each step is vital to creating a perfect dessert. Remember to use high-quality chocolate and avoid over-baking. Feel free to explore flavor variations and unique toppings to make it your own. A Yule Log can be a festive centerpiece for any celebration. Enjoy this delicious treat and share it with friends and family. Happy baking!

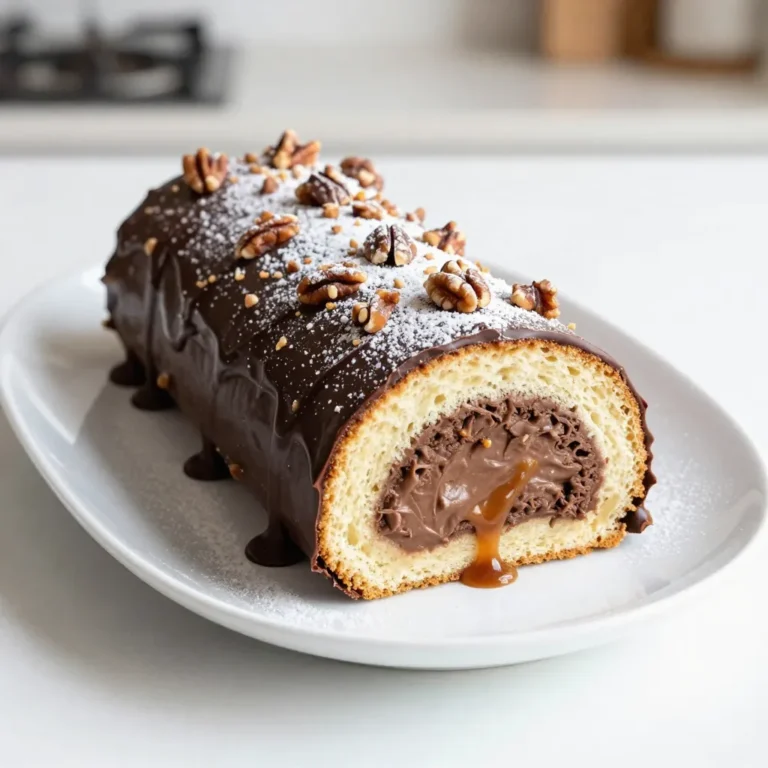
Chocolate Praline Yule Log Delightful Holiday Treat

To make loaded bread dipping oil, you need some key ingredients that come together for a tasty treat. Here’s what you will need: - 1 cup extra virgin olive oil - 2 tablespoons balsamic vinegar - 1 teaspoon garlic powder - 1 teaspoon onion powder - 1 teaspoon red pepper flakes - 1 tablespoon fresh rosemary, finely chopped - 1 tablespoon fresh parsley, finely chopped - 1 tablespoon sun-dried tomatoes, chopped - 1 teaspoon sea salt - Freshly cracked black pepper to taste Each ingredient brings its own flavor to the oil. Extra virgin olive oil is rich and smooth. Balsamic vinegar adds a sweet and tangy kick. Garlic powder and onion powder give depth and warmth. Red pepper flakes add a bit of spice. Fresh rosemary and parsley bring a green, earthy taste. Sun-dried tomatoes add a chewy texture and sweet flavor. Sea salt and black pepper enhance all the other tastes. You can mix and match these ingredients to find your perfect blend. This recipe is easy to adjust based on what you like. So have fun and get creative in your kitchen! {{ingredient_image_1}} 1. Mixing the olive oil and balsamic vinegar Start by taking a medium bowl. Pour in 1 cup of extra virgin olive oil. Add 2 tablespoons of balsamic vinegar. Whisk them together until they blend well. 2. Incorporating spices and herbs Next, add 1 teaspoon of garlic powder and 1 teaspoon of onion powder to the bowl. Stir to mix these spices into the oil. This step adds depth to your flavor. 3. Adding sun-dried tomatoes Now, it's time for a burst of flavor. Fold in 1 tablespoon of chopped sun-dried tomatoes. Make sure they are evenly mixed in the oil. They add a nice tangy touch. 4. Seasoning to taste Sprinkle in 1 teaspoon of sea salt and freshly cracked black pepper to taste. Adjust it to your liking. This step brings balance to the oil. 5. Allowing the flavors to meld Let your mixture sit at room temperature for at least 30 minutes. This waiting time allows all the flavors to blend together beautifully. 6. Serving suggestions Transfer the dipping oil to a rustic bowl for serving. Pair it with slices of crusty bread. You can also add some torn basil leaves or olives on the side for a lovely touch. Enjoy! - Using different herbs and spices: You can switch up the herbs. Try thyme or oregano. Each herb gives a new taste. Fresh herbs make the oil bright and fresh. Dried herbs work too, but fresh is best. - Alternative oils: Extra virgin olive oil is great, but don't stop there. Avocado oil or nut oils can add fun flavors. Each oil has its own taste, so experiment to find your favorite. - Adjusting heat levels: Like it spicy? Add more red pepper flakes or try chili oil. Want it mild? Cut back on the heat. Tweak to match your taste buds. - Rustic serving suggestions: Serve the dipping oil in a simple pottery bowl. You can also use a wooden board for a rustic look. Pair it with crusty bread or breadsticks for a nice touch. - Creative garnish options: Add small bowls of olives or fresh herbs on the side. Drizzle more olive oil on top for shine. A sprinkle of sea salt makes it pretty and tasty. Pro Tips Use High-Quality Olive Oil: The flavor of your dipping oil heavily depends on the quality of olive oil used. Opt for extra virgin olive oil for the best taste. Let It Marinate: Allowing the oil to sit for at least 30 minutes enhances the flavors. For an even richer taste, consider letting it sit for a few hours or overnight. Customize Your Herbs: Feel free to experiment with different herbs like thyme or basil based on your taste preferences. Fresh herbs will elevate the flavor profile. Perfect Pairings: This dipping oil pairs wonderfully with toasted baguette slices, but also try it with grilled vegetables or as a salad dressing for a delightful twist. {{image_2}} You can change up the flavors in your loaded bread dipping oil. Here are some fun ideas: - Italian-inspired with oregano and basil: Add dried oregano and fresh basil. These herbs give a classic Italian taste that pairs well with crusty bread. - Mediterranean twist with kalamata olives: Chop up some kalamata olives and mix them in. The olives add a salty, rich flavor that enhances the oil. - Spicy version with added chili oil: If you love heat, drizzle in some chili oil. It brings a fiery kick that will warm your taste buds. Changing some ingredients can create new flavors. - Substituting vinegar types: You can swap balsamic vinegar for red wine vinegar or apple cider vinegar. Each type adds a different tang to the oil. - Using different types of oil: Try using avocado oil or nut oils for a unique twist. Each oil has its own taste and can change the overall flavor. Get creative with these variations! Each change can lead to a new favorite. To store leftover dipping oil, pour it into a clean glass jar. Make sure to seal it tightly. Keep the jar in a cool, dark place. This helps keep the oil fresh. You can store it in the fridge, but it may thicken. Your dipping oil stays fresh for about one week. After that, check for any off smells or changes in color. If it looks or smells strange, throw it out. I recommend using glass jars or bottles for storage. They do not react with the oil. Look for jars with tight-sealing lids to keep air out. This keeps your oil fresh longer. Label your jar with the date you made the oil. This way, you’ll know how long it has been stored. You can also write down the main ingredients. This helps you remember what’s inside. How long can I store bread dipping oil? You can store bread dipping oil for up to two weeks. Keep it in a sealed glass jar. Store it in a cool, dark place. The flavors will get stronger over time. Can I make this recipe vegan? Yes, this recipe is already vegan! All the ingredients are plant-based. Enjoy this tasty dip with no worries. What types of bread pair well with this dipping oil? Crusty bread works best. I love using baguettes or ciabatta. Sourdough also adds a nice tang. You can even use pita or focaccia for a fun twist. What is the purpose of balsamic vinegar in this recipe? Balsamic vinegar adds a rich, tangy flavor. It balances the oil and spices. The acidity brightens the overall taste of the dip. It makes every bite more exciting. Are sun-dried tomatoes necessary for flavor? While sun-dried tomatoes add depth, they are not a must. You can skip them if you prefer. However, they do give a nice umami flavor. Try adding chopped olives or roasted red peppers instead for a different taste. This blog post explored how to make a tasty loaded bread dipping oil. We listed key ingredients like olive oil, herbs, and spices. Then, we shared easy steps to mix and serve. We added tips for flavor and presentation, plus variations to try. Finally, we covered storage and answered common questions. Dipping oil brings joy to meals. Use this guide to create your own unique blend!

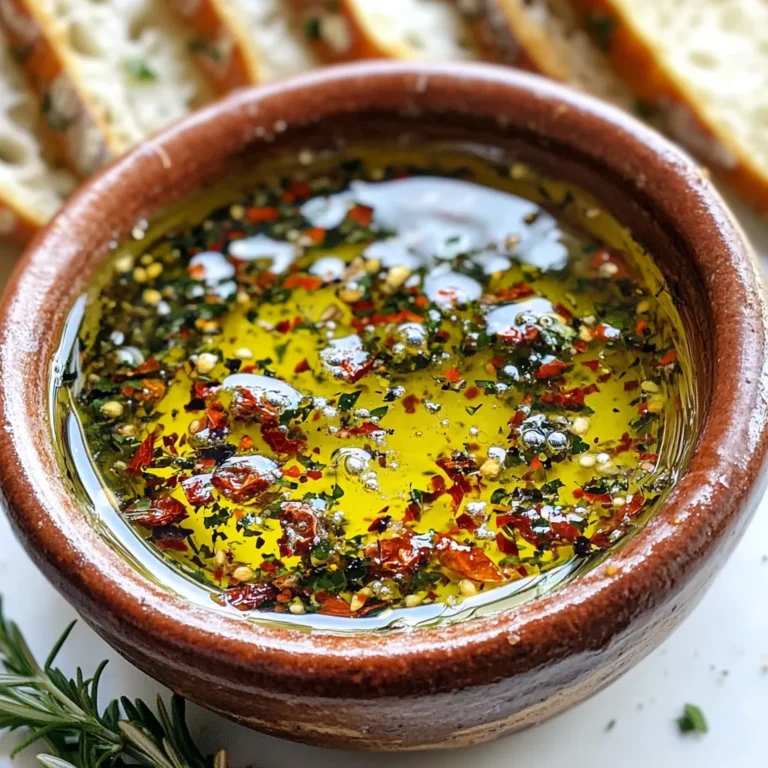
Loaded Bread Dipping Oil Flavorful and Easy Recipe

- 500g chicken breast, cut into bite-sized cubes - 1 cup coconut milk - Zest and juice of 2 limes - 2 tablespoons honey - 2 cloves garlic, minced - 1 teaspoon ground ginger - 1 teaspoon salt - 1/2 teaspoon black pepper - Bamboo skewers (soaked in water for 30 minutes) - Fresh cilantro, for garnish These main ingredients create a flavorful base for your skewers. The coconut milk adds creaminess, while lime gives a refreshing zing. Honey brings sweetness, and garlic gives a savory kick. - Bell peppers, cut into squares - Pineapple chunks - Red onion, cut into pieces Adding these options can boost the flavor and color of your skewers. They also add a nice texture. Feel free to mix and match based on your taste. - Mixing bowl - Whisk - Grill or grill pan - Meat thermometer - Plastic wrap - Knife and cutting board These tools help you prepare and cook the skewers easily. A meat thermometer is key to ensure the chicken cooks to the right temperature. This keeps the meat safe and juicy. {{ingredient_image_1}} To start, grab a mixing bowl. You will want to blend the marinade. Combine one cup of coconut milk with the zest and juice of two limes. Add two tablespoons of honey for sweetness. Then, mix in two cloves of minced garlic and one teaspoon of ground ginger. Don't forget to add one teaspoon of salt and half a teaspoon of black pepper. Whisk everything together until it is smooth and well mixed. This marinade gives the chicken a bright and tropical flavor. Next, take your chicken breast and cut it into bite-sized cubes. Add these pieces to your marinade. Use a spoon or spatula to coat every piece of chicken. This step is key for flavor. Once coated, cover the bowl with plastic wrap. Place the bowl in the fridge for at least one hour. For the best taste, let it marinate overnight. The longer it sits, the more taste it will absorb. Now, it is time to grill! First, preheat your grill or grill pan over medium-high heat. While it heats, take soaked bamboo skewers and thread the marinated chicken onto them. Leave a bit of space between each piece. This helps the chicken cook evenly. Grill the skewers for 10 to 12 minutes. Turn them occasionally to get that nice char. Use a meat thermometer to check for safety; the chicken should reach 75°C (165°F). Once done, take them off the grill and let them rest for a couple of minutes. Garnish with fresh cilantro and serve with lime wedges for extra zing! To grill chicken skewers well, you need the right heat. Medium-high heat works best. This gives the chicken a nice sear and helps it cook evenly. If the grill is too hot, the outside burns before the inside cooks. A good tip is to hold your hand above the grill. If you can keep it there for 3-4 seconds, the heat is just right. Juicy chicken is all about the marinade and cooking time. The coconut milk in the marinade keeps the chicken moist. Make sure the chicken pieces are not too big. Bite-sized cubes cook better and stay juicy. Overcooking makes chicken dry. Use a meat thermometer to check for doneness. The chicken should reach 75°C (165°F). For the best flavor, marinate the chicken for at least 1 hour. If you can, let it sit overnight. This gives the chicken time to soak in the flavors of lime and coconut. Always keep the marinade in the fridge. This helps keep the chicken fresh and safe to eat. Pro Tips Marinate Longer for Better Flavor: For the best results, marinate the chicken overnight. This allows the flavors to penetrate deeply into the meat, making it more flavorful and tender. Use Fresh Lime Juice: Always opt for fresh lime juice instead of bottled. The fresh juice gives a brighter, more vibrant flavor that enhances the overall dish. Check the Grill Temperature: Make sure your grill is preheated properly before adding the skewers. A hot grill will create a nice char on the chicken and prevent it from sticking. Rest Before Serving: Allow the skewers to rest for a few minutes after grilling. This helps the juices redistribute, ensuring juicy and tender chicken when you serve it. {{image_2}} You can switch up the chicken for shrimp or tofu. Both options work great. For shrimp, use large, peeled shrimp. Marinate them just like the chicken. Grill for about 5-7 minutes. Tofu is also a fun choice. Press firm tofu to remove extra water. Cut it into cubes and marinate. Grill for around 10 minutes, flipping carefully. Want a kick? Add chili flakes or hot sauce to the marinade. This makes it spicy and fun! You can also go tropical. Add mango or pineapple juice instead of lime juice. This will give your skewers a sweet twist. Experiment with flavors until you find your favorite! Add colorful veggies to your skewers for extra taste. Bell peppers, zucchini, and red onion are great choices. Cut them into bite-sized pieces. Toss them in the same marinade. Thread them onto the skewers with the chicken. Grill everything together for about 10-12 minutes. This adds a nice crunch and flavor to your meal. After enjoying your coconut lime chicken skewers, store any leftovers in an airtight container. Place them in the fridge. They stay fresh for about 3 to 4 days. Make sure to let the skewers cool down before sealing. This helps keep the flavors intact. If you want to keep them longer, consider freezing. To reheat your chicken skewers, use an oven or a skillet. If using an oven, preheat it to 180°C (350°F). Place the skewers on a baking sheet and cover with foil. Heat for about 10 to 15 minutes until warm. If using a skillet, heat on medium. Add a little oil and warm them gently for about 5 minutes, turning often. This keeps them juicy and tasty. You can freeze the chicken skewers if you have extra. Wrap them tightly in plastic wrap, then place them in a freezer bag. This helps prevent freezer burn. They can last for up to 3 months in the freezer. When ready to eat, thaw them in the fridge overnight before reheating. Enjoy! You should marinate the chicken for at least 1 hour. This time helps the chicken soak up the coconut lime flavor. For the best taste, marinate overnight. The longer the chicken sits, the more flavor it gains. Yes, you can bake these skewers! Preheat your oven to 200°C (400°F). Place the skewers on a baking sheet lined with parchment paper. Bake for 15-20 minutes, turning halfway. Make sure the chicken reaches 75°C (165°F) for safety. Serve these skewers with coconut rice or a fresh salad. You can also add lime wedges for extra zing. Fresh cilantro adds a nice touch too. Pairing with grilled veggies makes a colorful plate. This blog post covered everything you need for delicious coconut lime chicken skewers. We explored the main ingredients, optional add-ins, and necessary tools. I shared step-by-step instructions for making the marinade, marinating the chicken, and grilling it just right. You learned tips for grilling, how to keep the chicken juicy, and different ways to vary the dish. Lastly, we discussed storing leftovers and answered your common questions. Enjoy trying this recipe and feel free to experiment with your favorite flavors!

Coconut Lime Chicken Skewers Easy Grilling Recipe

To make a delicious Shepherd's Pie Casserole, gather these ingredients: - 1 lb ground beef or lamb - 1 large onion, diced - 2 carrots, diced - 2 cloves garlic, minced - 1 cup frozen peas - 2 tablespoons tomato paste - 1 tablespoon Worcestershire sauce - 1 teaspoon dried thyme - 1 teaspoon dried rosemary - Salt and pepper to taste - 4 cups mashed potatoes (prepared with butter and milk) - 1 cup shredded cheddar cheese - Fresh parsley for garnish Choosing the right ground meat is key. Beef gives a rich flavor, while lamb adds a unique taste. Diced onion, carrots, and garlic create a savory base. Frozen peas add sweetness and color to the dish. Tomato paste and Worcestershire sauce enhance the flavors. For seasoning, dried thyme and rosemary bring warmth. Salt and pepper balance everything out. The mashed potatoes are creamy and comforting. I like to use butter and milk for the best taste. Finally, shredded cheddar cheese on top adds a golden, bubbly finish. Fresh parsley is perfect for a pop of color. It makes the dish look nice and fresh. With these ingredients, you are ready to create a comforting meal that everyone will love. {{ingredient_image_1}} First, preheat your oven to 400°F (200°C). This step warms the oven for the casserole. Next, in a large skillet, add 1 pound of ground beef or lamb. Cook this over medium heat. Brown the meat while breaking it up with a spatula. If there is too much fat, drain it from the skillet. Now, add 1 large diced onion, 2 diced carrots, and 2 minced garlic cloves to the skillet. Sauté these for 5 to 7 minutes. You want the vegetables to be tender and fragrant. After that, stir in 1 cup of frozen peas, 2 tablespoons of tomato paste, and 1 tablespoon of Worcestershire sauce. Add 1 teaspoon each of dried thyme and dried rosemary, along with salt and pepper to taste. Cook for another 3 to 5 minutes. This lets all the flavors blend together nicely. Take the meat mixture and transfer it to a greased 9x13 inch casserole dish. Spread it evenly across the bottom. Next, take 4 cups of prepared mashed potatoes and spoon them over the meat. Use a spatula to spread them out smoothly. Finally, sprinkle 1 cup of shredded cheddar cheese on top of the mashed potatoes. This will give it a nice, cheesy crust. Put the casserole in your preheated oven. Bake it for 20 to 25 minutes. Look for bubbly and golden cheese on top. Once it is done, let it cool for a few minutes before serving. Add some fresh parsley on top for a pop of color. Using fresh herbs can make a big difference. Fresh thyme and rosemary give bright flavors. Dried herbs work well too, but fresh adds a pop. If you want more flavor, adjust seasoning to your liking. Taste as you go. Sometimes, a pinch more salt or pepper makes all the difference. You can prep this dish in advance. Cook the meat and veggie mix ahead of time. Store it in the fridge for up to two days. When ready to bake, just top it with mashed potatoes and cheese. If you want to freeze it, do so after assembling. Wrap it tightly. It can last up to three months. Just thaw overnight in the fridge before baking. Serve your casserole in the dish for a rustic look. You can also scoop servings onto plates for a classy touch. A sprinkle of fresh parsley on top adds color and freshness. If you want to impress, drizzle a little olive oil around the edges. It looks great and adds flavor too. Pro Tips Use Fresh Herbs: For an extra layer of flavor, consider using fresh thyme and rosemary instead of dried. Add them towards the end of cooking to preserve their vibrant taste. Customize Your Veggies: Feel free to add other vegetables like corn or bell peppers to the meat mixture based on your preference. This adds color and nutrition. Make-Ahead Option: This casserole can be made ahead of time and refrigerated. Just bake it when you're ready to serve for a quick dinner option. Perfect Mashed Potatoes: For creamy mashed potatoes, ensure they are well-seasoned and include enough butter and milk. This will enhance the overall taste of the casserole. {{image_2}} You can make a tasty vegetarian version of Shepherd’s Pie. For meat, use lentils or mushrooms. These options give you a hearty texture. For a vegan option, skip the cheese and use plant-based milk in the mashed potatoes. You can use coconut milk or almond milk for a creamy base. Shepherd’s Pie has many styles around the world. In Ireland, they often use lamb and add root veggies. In the UK, you might find it made with beef, known as Cottage Pie. You can also swap in unique ingredients like sweet potatoes or butternut squash for the topping. Each twist adds its own charm. Get creative with flavors! Add a splash of BBQ sauce for a smoky taste. Hot sauce can give it a spicy kick. You can mix in extra veggies like corn or bell peppers for more color and nutrition. These little changes can turn a classic into something new and exciting. To keep your Shepherd’s Pie Casserole fresh, store leftovers properly. First, let it cool down. Then, transfer it to an airtight container. This keeps the flavors and moisture locked in. If you do not have an airtight container, cover the dish tightly with plastic wrap or foil. Always label your storage with the date to track freshness. When you want to enjoy your casserole again, reheating is key. The oven is best for this dish. Preheat it to 350°F (175°C). Place the casserole in the oven, covered with foil, for about 20 minutes. This helps keep the top from burning. You can also use a microwave for quick reheating. Just make sure to cover the dish to avoid a dry texture. Stir the casserole halfway through for even warmth. In the fridge, your Shepherd's Pie Casserole lasts about 3 to 4 days. If you want to store it longer, freezing is a great option. Wrap it well in plastic wrap, then foil. This helps prevent freezer burn. It will stay good for up to three months in the freezer. When ready to eat, thaw it overnight in the fridge before reheating. Shepherd's Pie uses ground lamb, while Cottage Pie uses ground beef. Both dishes have a similar look and texture but differ mainly in the meat. This small change makes each pie unique in flavor. Yes, you can. Prepare the casserole up to the baking step. Cover it tightly and store it in the fridge for up to 24 hours. When ready to bake, just pop it in the oven. If you want to store it longer, freeze it instead. This way, you can enjoy it later with no hassle. To get creamy mashed potatoes, use hot milk and butter. Start with well-cooked potatoes. Mash them until smooth, then mix in the hot dairy. Avoid over-mixing; this keeps them fluffy. Season with salt and pepper for added taste. You have options! Ground turkey or chicken can work well. For a plant-based choice, try lentils or mushrooms. These options can still provide great flavor without meat. You can also use tofu or tempeh for a protein-rich dish. We covered the key steps to create a delicious Shepherd’s Pie. From choosing the right ingredients to preparing a flavorful filling, every part matters. Remember to enjoy the process, and feel free to customize your pie with unique flavors or variations. Proper storage methods will keep leftovers fresh for later enjoyment. With these tips, you’ll create a dish that warms both the heart and the stomach. Happy cooking!

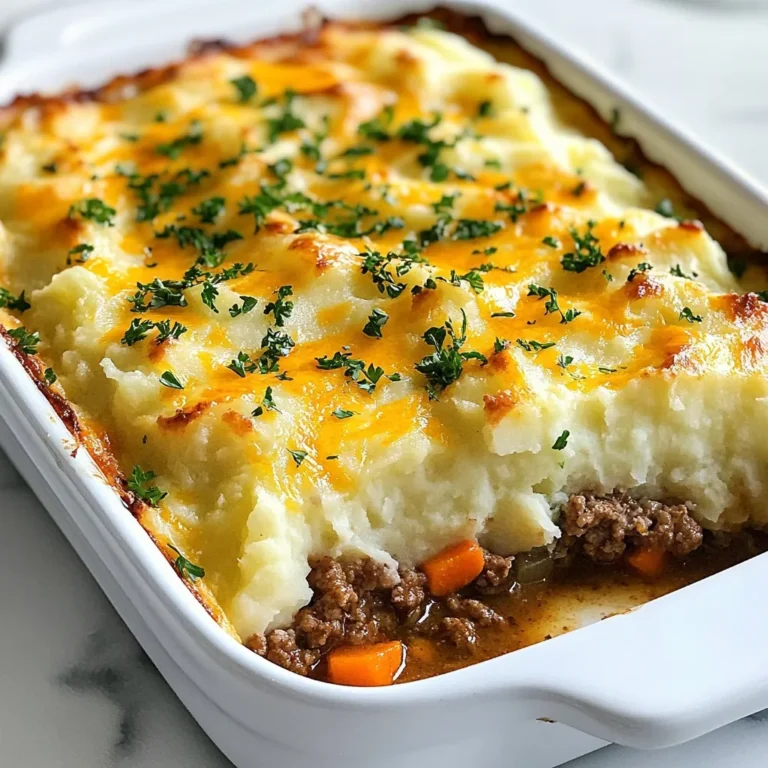
Shepherd’s Pie Casserole Flavorful Comfort Food Dish

Fresh corn kernels are the star of this dish. I use 2 cups of kernels. You can use sweet summer corn or frozen corn if fresh isn't available. Fresh corn gives a bright taste that's key to this salad. Next, we need colorful veggies. Grab 1 cup of halved cherry tomatoes for sweetness. A bell pepper, any color, adds crunch and flavor. You’ll also need ½ red onion, finely chopped, and 1 jalapeño, seeded and diced. The jalapeño brings a little heat, but you can skip it if you prefer mild flavors. Finally, add ½ cup of chopped cilantro for a fresh kick. The dressing makes this salad pop. Mix the juice of 2 limes with 2 tablespoons of olive oil. Add salt and pepper to taste. For depth, include ½ teaspoon of cumin and ¼ teaspoon of smoked paprika. These spices give the salad a warm, earthy base. Want to make it richer? You can add ½ cup of crumbled feta cheese. It brings a salty flavor that pairs well with the sweet corn. If you want a twist, feel free to customize with your favorite herbs or nuts. {{ingredient_image_1}} First, grab a large mixing bowl. You will need 2 cups of fresh corn kernels. If fresh corn is out of season, use frozen corn instead. Next, cut 1 cup of cherry tomatoes in half. Dice 1 bell pepper of any color, and finely chop ½ of a red onion. Then, take 1 jalapeño, seed it, and dice it. Combine all these veggies in the bowl. Don’t forget to add ½ cup of chopped cilantro for a fresh touch. In a small bowl, whisk together the juice of 2 limes and 2 tablespoons of olive oil. Then, add salt and pepper to taste. For extra flavor, mix in ½ teaspoon of cumin and ¼ teaspoon of smoked paprika. This dressing will brighten up your salad and tie all the flavors together. Now, pour the dressing over your vegetable mixture. Toss everything gently until all the veggies are well coated. If you like, sprinkle ½ cup of crumbled feta cheese on top for extra creaminess. This step adds a nice salty kick and a bit of texture. Let your salad sit for about 15 to 20 minutes. This wait allows the flavors to meld nicely. Serve it chilled or at room temperature. This Fiesta Corn Salad is colorful, fresh, and perfect for any gathering. Enjoy your delicious creation! Fresh corn makes this salad shine. Look for bright yellow kernels. They should feel firm and sweet. If fresh corn is not an option, frozen corn works too. Just thaw it and drain well before using. Want more heat? Add more jalapeño or a dash of hot sauce. For a milder taste, use less jalapeño or skip it altogether. Always taste as you go, so you can get the spice just right for your family. To boost flavor, try adding lime zest along with the lime juice. A sprinkle of fresh herbs like parsley or mint adds freshness. You can also swap smoked paprika for regular paprika for a different taste. Serve this salad chilled for the best flavor. Let it sit for about 15-20 minutes before serving. This time allows the flavors to mix well. For a pop of color, add some extra cherry tomatoes or cilantro on top right before serving. Pro Tips Use Fresh Corn: For the best flavor and texture, use fresh corn kernels when they are in season. If using frozen, make sure they are thawed and drained properly. Customize Your Heat: Adjust the amount of jalapeño to control the spice level of your salad. If you prefer a milder flavor, consider omitting the seeds or using a less spicy pepper. Let It Marinate: Allow the salad to sit for 15-20 minutes before serving. This resting period enhances the flavors as the ingredients meld together. Experiment with Add-ins: Feel free to add other ingredients like black beans, avocado, or corn chips for added texture and flavor. This salad is versatile and can be tailored to your taste. {{image_2}} You can boost the Fiesta Corn Salad by adding proteins. Grilled chicken or shrimp works great. Simply chop cooked chicken or shrimp and mix it in. You can also use black beans for a hearty touch. They add texture and a nice flavor. Tofu is another option if you want a plant-based protein. For a vegan version, skip the feta cheese. Instead, try adding avocado for creaminess. You can also use nutritional yeast to give a cheesy flavor without dairy. Another good choice is to add chickpeas. They add protein and a nice bite to the salad. To change up the flavor, consider adding diced avocado or mango. These fruits add sweetness and creaminess. You can also mix in some corn salsa for a spicy kick. If you like heat, try adding more jalapeños or a dash of hot sauce. Fresh herbs like basil or mint can add a fresh twist too. To keep your Fiesta Corn Salad fresh, place leftovers in an airtight container. Make sure to seal it tightly to lock in flavor. If you use a bowl, cover it with plastic wrap. The salad tastes best when you eat it within three days. I recommend glass or plastic containers with tight lids. These containers keep moisture in and air out. Glass is great for easy reheating too. If you have smaller portions, use smaller containers. This helps prevent waste and keeps flavors fresh. You can enjoy Fiesta Corn Salad cold or at room temperature. If you prefer it warm, heat it gently in a pan. Add a splash of olive oil to help it heat evenly. Avoid using the microwave, as it can make the salad soggy. Always taste before serving again; the flavors may change. Yes, you can use canned corn. It’s quick and easy. Just drain and rinse it first. Fresh corn tastes sweeter, but canned corn works well in a pinch. Fiesta Corn Salad lasts about 3 days in the fridge. The veggies still taste fresh. However, the flavors may change a bit over time. Yes, you can make it ahead. Just prepare it a few hours before serving. Letting it sit helps the flavors blend. It’s best to add cheese right before serving. Yes, Fiesta Corn Salad is gluten-free. All the ingredients are safe for gluten-free diets. Enjoy it without worry! This blog post covered how to make Fiesta Corn Salad with fresh corn and other veggies. You learned to prepare ingredients, make a tasty dressing, and combine everything well. I shared tips on choosing corn and adjusting spice levels, plus ideas for variations and storing leftovers. Fiesta Corn Salad is fun and easy to customize. Whether you prefer it spicy, vegan, or packed with protein, you can adapt it to your taste. Enjoy making and sharing this delicious salad!

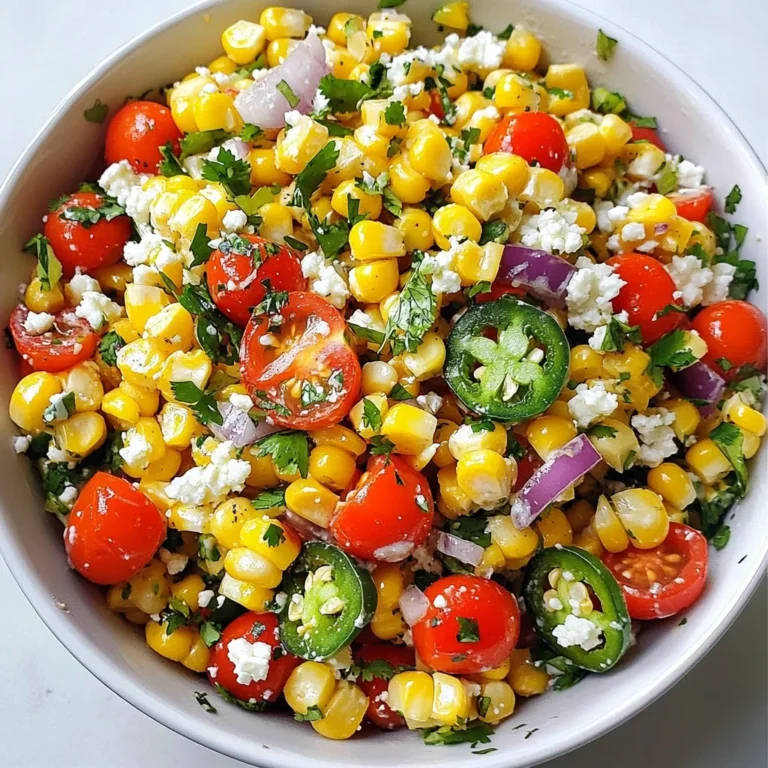
Fiesta Corn Salad Flavorful and Fresh Side Dish

- 2 cups cooked chicken, shredded - 1 can (15 oz) green enchilada sauce - 4 cups chicken broth - 1 cup corn (canned or frozen) - 1 can (14 oz) black beans, rinsed and drained - 1 medium onion, diced - 3 cloves garlic, minced - 1 teaspoon cumin - 1 teaspoon smoked paprika - Salt and pepper to taste - 1 cup shredded cheese (like Monterey Jack or Mexican blend) - 1/4 cup fresh cilantro, chopped (for garnish) - 2 avocados, diced (for topping) - Tortilla chips (for serving) You can switch out chicken for turkey or even tofu for a vegetarian twist. If you want a different flavor, try a red enchilada sauce. For a vegan version, use vegetable broth and skip the cheese. You can also use fresh corn instead of canned or frozen. If you can’t find black beans, pinto beans work just as well. Always choose fresh herbs for the best flavor. Look for bright green cilantro with no brown spots. When picking avocados, choose ones that are slightly soft but not mushy. Fresh garlic should feel firm. Use a whole onion instead of pre-diced for a stronger taste. When selecting chicken, rotisserie chicken saves time and adds great flavor. {{ingredient_image_1}} Start by gathering all your ingredients. You will need: - 2 cups cooked chicken, shredded - 1 can (15 oz) green enchilada sauce - 4 cups chicken broth - 1 cup corn (canned or frozen) - 1 can (14 oz) black beans, rinsed and drained - 1 medium onion, diced - 3 cloves garlic, minced - 1 teaspoon cumin - 1 teaspoon smoked paprika - Salt and pepper to taste - 1 cup shredded cheese (like Monterey Jack or Mexican blend) - 1/4 cup fresh cilantro, chopped (for garnish) - 2 avocados, diced (for topping) - Tortilla chips (for serving) Chop the onion and mince the garlic. This step adds great flavor to your soup. Heat a drizzle of olive oil in a large pot over medium heat. Add the diced onion and sauté for about 5 minutes. You want it to be soft and clear. Next, add the minced garlic. Cook for one more minute. You will smell a nice aroma! Now it’s time to add the chicken broth. Bring it to a simmer. Pour in the green enchilada sauce. Then, add the shredded chicken, corn, and black beans. Stir in the cumin, smoked paprika, salt, and pepper. Mix everything well and let it simmer for about 15-20 minutes. This helps all the flavors blend together. After simmering, taste the soup. Adjust the seasoning if needed. Serve the soup hot. Top it with shredded cheese, diced avocados, and chopped cilantro. This adds a fresh touch! Don’t forget the tortilla chips for dipping. They add a nice crunch and flavor. Enjoy your meal! To boost flavor in your green enchiladas chicken soup, use fresh herbs. Fresh cilantro adds a bright touch. You can also squeeze lime juice for extra zest. Consider roasting the garlic before adding it to the pot. Roasting makes it sweet and rich. For a little heat, add jalapeños or chipotle peppers. They give the soup a nice kick. Don’t forget to taste as you go. Adjust the salt and pepper for the best results. One common mistake is not sautéing the onion long enough. The onion should be soft and sweet. If you skip the simmering time, the flavors won't blend well. Be sure to let the soup simmer for at least 15 minutes. Also, do not skip the seasoning. A little salt and pepper can make a big difference. Lastly, avoid using pre-shredded cheese. It often has anti-caking agents that can affect melting. You need a large pot for this recipe. A sturdy wooden spoon helps in mixing without scratching the pot. A sharp knife makes dicing the onion and garlic easier. Measuring cups and spoons ensure you use the right amounts. A ladle is helpful for serving the soup. If you love garnishes, have a cutting board ready for the avocado and cilantro. Pro Tips Use Rotisserie Chicken: For a quicker option, use store-bought rotisserie chicken to save time on cooking and shredding the chicken. Customize Your Heat: Adjust the spiciness of the soup by using a spicier green enchilada sauce or adding diced jalapeños for extra heat. Fresh Herbs Matter: Adding fresh cilantro right before serving enhances the flavor of the soup; consider also adding lime juice for a bright touch. Make It Creamy: For a creamier soup, stir in a dollop of sour cream or cream cheese just before serving. {{image_2}} You can easily make a vegetarian version of this soup. Just swap the chicken for extra vegetables. Use mushrooms, zucchini, or bell peppers for great taste. You can also add more beans, like pinto or kidney beans. This will give you protein and fiber. Use vegetable broth instead of chicken broth. It will keep the flavor rich and tasty. If you like heat, try adding jalapeños or green chilies. Chop them up and throw them in during cooking. You can also use spicy green enchilada sauce. This will kick up the spice level. If you want even more heat, add a dash of hot sauce before serving. It will make your soup extra exciting! You can personalize your soup with more ingredients. Try adding a cup of diced tomatoes for freshness. Fresh corn adds sweetness, and you can use it instead of canned corn. If you love cheese, mix in different types like queso fresco or pepper jack. For crunch, top your soup with tortilla strips or crushed tortilla chips. Each addition will make your soup unique and tasty! To keep your green enchiladas chicken soup fresh, let it cool. Then, pour it into an airtight container. Store it in the fridge for up to three days. If you want to keep it longer, consider freezing it. When you’re ready to enjoy your soup again, grab a pot. Pour the soup in and heat it over medium heat. Stir often to avoid sticking. You can also use the microwave. Place the soup in a microwave-safe bowl. Heat it for one to two minutes, stirring halfway through. Ensure it’s hot all the way through before eating. Freezing this soup is easy! After cooking, let it cool completely. Then, ladle it into freezer-safe bags or containers. Remove as much air as you can before sealing. You can freeze it for up to three months. When you want to eat it, thaw it in the fridge overnight. Reheat it on the stove or in the microwave. You’ll have a warm meal ready to go! Yes, you can make this soup in advance. Just follow the recipe and let it cool. Store it in the fridge for up to three days. When you’re ready to eat, heat it on the stove. This helps the flavors blend more. You might need to add a splash of broth if it thickens. To spice it up, add diced jalapeños or chili powder. You can also try hot sauce. Start with a small amount and taste as you mix. This way, you can find the right heat for your taste. Adjusting the spice level makes this soup fun to customize. I love to serve this soup with tortilla chips. They add a nice crunch. You can also pair it with a fresh salad or some warm bread. These sides balance the meal and add more flavors. Enjoying it with family or friends makes it even better. This blog post covered essential ingredients and tips for making a great soup. We explored substitutions, preparation steps, cooking methods, and serving ideas. Tips helped enhance flavor and avoid mistakes. Variations like a spicy option or a vegetarian version offer fun twists. Finally, we discussed storage and reheating for leftovers. With these insights, you now have the tools to create, adapt, and enjoy your soup! Cooking can be fun and rewarding. Give it a try!

Green Enchiladas Chicken Soup Flavorful and Easy Recipe

For a fantastic dish, gather these main ingredients: - 8 oz lo mein noodles - 1 lb boneless, skinless chicken breast, thinly sliced - 1 cup broccoli florets - 1 bell pepper, sliced (red or green) - 1 cup snap peas These ingredients form the backbone of your chicken lo mein. The lo mein noodles provide a chewy base. The chicken adds protein, while the veggies bring in color and crunch. Now, let's talk about the seasonings and oils that make this dish pop: - 3 tablespoons soy sauce - 2 tablespoons oyster sauce (or vegetarian substitute) - 1 tablespoon sesame oil - 3 cloves garlic, minced - 2 tablespoons ginger, minced These flavors meld together beautifully. Soy sauce gives that salty depth. Oyster sauce adds a sweet touch, while sesame oil offers a nutty aroma. Garlic and ginger provide warmth and spice, making the dish more aromatic. To finish off your chicken lo mein, consider these optional garnishes: - Green onions, chopped, for freshness - Suggestions for other toppings like sesame seeds or crushed peanuts Green onions add a crisp bite and a splash of color. Other toppings can enhance flavor and texture. Feel free to get creative! {{ingredient_image_1}} Start by filling a large pot with water. Bring the water to a boil over high heat. Once boiling, add 8 oz of lo mein noodles. Cook them according to the package instructions until they are al dente. This means they should be firm but not hard. After cooking, drain the noodles in a colander and set them aside. This step ensures the noodles have a nice texture. To cook the chicken perfectly, use a large skillet or wok. Heat 1 tablespoon of vegetable oil over medium-high heat. Add 1 lb of thinly sliced boneless, skinless chicken breast. Season it with salt and pepper. Cook the chicken for about 5-7 minutes. It should turn golden brown and be fully cooked. Once done, remove the chicken from the skillet and set it aside. This keeps it juicy and flavorful. In the same skillet, add 1 tablespoon of vegetable oil. Then, add 3 cloves of minced garlic and 2 tablespoons of minced ginger. Stir quickly to avoid burning. After that, toss in 1 cup of broccoli florets, sliced bell pepper, and 1 cup of snap peas. Stir-fry these for about 3-4 minutes. You want them to be tender-crisp, which means they should still have a little bite. This step keeps the veggies vibrant and fresh. Now it’s time to bring everything together. Return the cooked chicken to the skillet with the veggies. Add the drained lo mein noodles. Pour in 3 tablespoons of soy sauce, 2 tablespoons of oyster sauce, and 1 tablespoon of sesame oil. Toss everything together well. Heat it through for about 2-3 minutes. This ensures all the flavors mix nicely. To serve, transfer the chicken lo mein to bowls. For a professional touch, garnish with chopped green onions. This adds color and freshness to your dish. Arrange everything nicely on the plate. A good presentation makes your meal more inviting. Enjoy your easy chicken lo mein! To keep your chicken lo mein tasty, avoid overcooking the chicken. Cook the chicken until golden, about 5-7 minutes. Use high heat for a quick cook. This keeps it juicy. When cooking the veggies, stir-fry them for 3-4 minutes. They should be tender but still crisp. This method locks in their flavor. You can easily make this dish vegetarian or vegan. Just swap the chicken for tofu or seitan. Use a vegetarian oyster sauce or skip it entirely. For noodles, you can use rice noodles or even zucchini noodles. These options fit different diets and still taste great. To store your lo mein, place it in an airtight container. Keep it in the fridge for up to three days. Reheat it in a pan over low heat. Add a splash of water or soy sauce to revive the flavors. You can also use the microwave, but keep an eye on it to avoid drying out. Pro Tips Prep Your Ingredients: Have all your ingredients prepped and ready to go before you start cooking. This makes the cooking process smoother and faster. High Heat for Stir-Frying: Use high heat when stir-frying to achieve that perfect char and quick cooking that keeps vegetables crisp. Customize Your Veggies: Feel free to swap in your favorite vegetables or whatever you have on hand to personalize the dish. Leftovers are Great: This dish stores well in the fridge and can be reheated for a quick meal the next day! {{image_2}} You can easily switch up the protein in your lo mein. Instead of chicken, try shrimp or tofu. Shrimp cooks fast and adds a nice flavor. Just sauté it until it turns pink. Tofu is a great choice for a vegetarian meal. Use firm tofu and press it to remove excess water. Then cut it into cubes and stir-fry until golden. These swaps keep your meal fun and fresh. Feel free to mix in different veggies based on what you like or what's in season. Carrots, bok choy, or mushrooms can add great taste and color. You can also use frozen mixed vegetables for a quick option. Just remember to cook them until crisp but tender. This way, you keep the crunch and the nutrients. Want to kick up the flavor? There are many ways to do this! Try adding hoisin sauce for a sweet twist. A bit of chili sauce can bring some heat. You can also sprinkle sesame seeds on top for extra crunch. Each sauce or spice will change the taste, making your meal unique every time. To keep your Easy Chicken Lo Mein fresh, store it in an airtight container. Place the container in the fridge if you plan to eat it in a few days. For long-term storage, use a freezer-safe container. This method preserves taste and texture. Leftovers can last in the fridge for about 3 to 4 days. In the freezer, they can stay good for up to 3 months. Mark the container with the date so you can track how long it has been stored. Always check for signs of spoilage before eating. For the best taste and texture, reheat your Chicken Lo Mein on the stove. Add a splash of water or soy sauce to keep it moist. Heat over medium heat until warm. You can also use the microwave but stir halfway through to ensure even warming. Enjoy your meal just as much as when it was freshly made! Making Easy Chicken Lo Mein takes about 25 minutes. This includes 10 minutes for prep and 15 minutes for cooking. You can easily fit this into a busy weeknight dinner. Yes, you can use gluten-free noodles. Look for rice noodles or other gluten-free options. Just cook them according to the package instructions. This way, everyone can enjoy the dish. You can try different sauces to change the flavor. Some good options are teriyaki sauce or hoisin sauce. You can also add a little chili sauce for some heat. Yes, you can make this dish ahead of time. Store it in an airtight container in the fridge for up to three days. To reheat, just warm it on the stove or in the microwave until hot. Easy Chicken Lo Mein is a simple dish packed with flavor. We covered main ingredients like noodles, chicken, and fresh vegetables. You learned about key seasonings and how to elevate the dish with garnishes. I gave you detailed instructions on cooking, combining, and presenting the meal. Plus, I shared helpful tips for variations, storage, and reheating. This dish is perfect for busy nights, offering flexibility and deliciousness. You can adapt it to fit your tastes and dietary needs. Enjoy making it your own!

Easy Chicken Lo Mein Quick and Tasty Dinner Option

PREV 1 … 67 68 69 … 86 NEXT
spicy fork kitchen

explore

DessertsDinnerAppetizersDrinks

Our Policies

  • Cookie Policy
  • Copyright Policy
  • Disclaimer
  • GDPR Policy
  • Terms Of Use
Back to Top
  • About
  • Contact Us
  • Privacy Policy
© 2026 spicy fork kitchen