FREE DINNER EBOOK! Get your copy!
  • Cookie Policy
  • GDPR Policy
  • Disclaimer
  • Terms Of Use
  • Visit my other site: Fun Cookie Recipes
spicy fork kitchen
  • Home
  • Dinner
  • Desserts
  • Drinks
  • Appetizers
  • Contact
  • About
  • Privacy Policy
  • Home
  • Dinner
  • Desserts
  • Drinks
  • Appetizers
  • Contact
  • About
  • Privacy Policy
  • Cookie Policy
  • GDPR Policy
  • Disclaimer
  • Terms Of Use
Visit my other site: Fun Cookie Recipes

HOME / CATEGORIES /

Latest

- 2 boneless, skinless chicken breasts - 1/4 cup honey - 2 tablespoons sriracha (adjust for spice preference) - 1 tablespoon soy sauce - 1 tablespoon apple cider vinegar - 1 teaspoon garlic powder - 1 teaspoon ginger powder - Salt and black pepper, to taste For the Spicy Honey Chicken, I love using fresh chicken breasts. They cook evenly and stay juicy. The sauce combines honey, sriracha, soy sauce, and apple cider vinegar. This mix gives a sweet and spicy kick to the chicken. Seasonings like garlic powder, ginger powder, salt, and pepper elevate the flavors. - 1 cup macaroni pasta - 1 cup heavy cream - 1 cup shredded sharp cheddar cheese - 1/4 cup grated Parmesan cheese The macaroni is simple yet tasty. I prefer elbow macaroni for its shape. Cooking it al dente keeps it firm. The cheese sauce uses heavy cream, cheddar, and Parmesan. It creates a creamy and rich texture that pairs well with the chicken. - 2 tablespoons chopped green onions (for garnish) I love to finish the dish with chopped green onions. They add a fresh crunch and bright color. This little touch makes the meal pop visually and tastefully. {{ingredient_image_1}} Start by seasoning the chicken breasts. Use salt, black pepper, garlic powder, and ginger powder. Make sure to coat them evenly. Let the chicken marinate for about 15 minutes. This helps the flavors soak in. Next, heat a skillet over medium heat. Add a drizzle of olive oil and wait for it to warm. Once hot, place the marinated chicken breasts in the skillet. Cook them for about 5-6 minutes on each side. The chicken should turn golden brown and cook fully. If your chicken is thick, adjust the cooking time to ensure it’s done. For the sauce, grab a small bowl. Whisk together the honey, sriracha, soy sauce, and apple cider vinegar. Mix until everything is well combined. This creates a sweet and spicy sauce. Once the chicken is cooked, pour the honey sriracha mixture over it in the skillet. Let it simmer for 2-3 minutes. This allows the sauce to thicken. Turn the chicken to coat it evenly in the sauce. This step makes your chicken extra tasty. While the chicken cooks, bring a pot of salted water to a boil. Add the macaroni pasta and follow the package instructions. Once cooked, drain the macaroni and set it aside. In a separate saucepan, heat the heavy cream over medium-low heat. Gradually stir in the shredded cheddar and grated Parmesan cheese. Keep stirring until the cheese melts and the sauce is creamy. If the sauce is too thick, add a splash of milk to adjust the consistency. This creamy cheese sauce will make your macaroni delicious. Now, mix the cheese sauce with the cooked macaroni. Stir until the pasta is well-coated. Season with salt and black pepper to taste. This simple step elevates the flavor of the dish. Adjusting spice levels with sriracha is key to your taste. If you like it hot, add more sriracha. For a milder flavor, use less. Always taste the sauce before pouring it on the chicken. Marinating chicken for at least 15 minutes is vital. This short time helps the spices soak in. If you have more time, let it marinate longer for a richer taste. Even a few hours can boost the flavor. To get the right cheese sauce consistency, heat the cream slowly. Stir as you add the cheeses. If the sauce is thick, add a splash of milk. This keeps the sauce smooth and creamy. Adding seasonings can enhance flavor. Try a pinch of garlic powder or a dash of paprika. These can elevate your cheese sauce to a new level. Always taste and adjust the seasonings to your liking. Serving suggestions can make your dish pop. Slice the spicy honey chicken into strips for easy eating. Pair it with a generous scoop of macaroni. Garnishing with chopped green onions adds color and freshness. A sprinkle on top gives a nice crunch too. Presenting your meal well makes it even more inviting. Pro Tips Marinate for Maximum Flavor: Allow the chicken to marinate for at least 15 minutes to enhance its flavor profile. For even better results, marinate it for a few hours or overnight in the refrigerator. Adjust Spice Levels: The amount of sriracha can be adjusted based on your spice tolerance. Start with less and add more if you prefer a spicier kick. Perfectly Cooked Chicken: Use a meat thermometer to ensure the chicken is cooked to an internal temperature of 165°F (75°C). This will help prevent overcooking and keep the chicken juicy. Cheese Sauce Consistency: If the cheese sauce is too thick, add a splash of milk or chicken broth to achieve your desired consistency. Stir continuously to ensure a smooth and creamy sauce. {{image_2}} You can use different cuts of chicken for this dish. Chicken thighs offer more flavor and tenderness. If you prefer turkey, it works well too. Just adjust the cooking time as needed. For a vegetarian option, tofu is fantastic. Press it to remove extra water, then marinate it like chicken. This adds great flavor to your meal. Spice up your dish with different spices. Try adding paprika, cayenne, or even some cumin. You can also switch up the sauces. Experiment with teriyaki or barbecue sauce for a unique twist. Adding vegetables to the macaroni can boost nutrition. Peas, spinach, or broccoli can create a colorful and healthy mix. Change things up with different cheese types. Gouda or Monterey Jack can add new flavors. For a sharper taste, try using aged cheddar instead. You can mix cheeses for extra creaminess. This keeps the cheese sauce exciting and rich. Store leftovers in the fridge. Use airtight containers to keep them fresh. Make sure the chicken and macaroni are cooled before putting them away. This helps prevent sogginess. To reheat, use the microwave or oven. For the microwave, heat in short bursts. Stir in between to ensure even warming. If using an oven, cover the dish with foil to keep moisture in. This helps maintain the chicken's texture and the creaminess of the macaroni. To freeze, let the dish cool completely. Place the chicken and macaroni in freezer-safe containers. Label them with the date to track freshness. When ready to eat, thaw in the fridge overnight. Reheat using the microwave or oven, as described above. Enjoy that delicious flavor blast again! Yes, you can use chicken thighs instead of breasts. Thighs are juicy and flavorful. They can handle more heat without drying out. Just adjust the cooking time based on thickness. Cook them until the inside reaches 165°F. This way, you get tender meat that pairs well with the sauce. The spice level depends on how much sriracha you add. The recipe uses 2 tablespoons, giving it a nice kick. If you prefer less heat, start with 1 tablespoon. You can also add more honey to balance the spice. For more heat, try adding red pepper flakes or extra sriracha. Yes, you can make the macaroni ahead of time. Cook the pasta and cheese sauce, then mix them. Store the mixture in an airtight container in the fridge. Reheat it in a pot over low heat, adding a splash of milk to restore creaminess. This makes meal prep easy and quick! This blog post covered how to make Spicy Honey Chicken with Mac and Cheese. You learned about the ingredients for both dishes and how to prepare them step by step. I shared tips for perfecting the chicken and macaroni. You can also customize flavors and store leftovers properly. Cooking can be fun and rewarding. Enjoy trying this dish and make it your own! Your kitchen can be a great place for creativity and taste.

Spicy Honey Chicken with Mac Irresistible Flavor Blast

- 3 cups all-purpose flour - 1 cup warm milk (about 110°F/45°C) - 1/4 cup granulated sugar - 1/4 cup unsalted butter, melted These main ingredients are the heart of your milk bread. All-purpose flour gives the bread its structure. Warm milk helps activate the yeast. Granulated sugar adds a hint of sweetness. Unsalted butter brings moisture and rich flavor. - 1 large egg - Extra milk for brushing The egg adds richness and helps with browning. Brushing the top with milk gives a nice golden finish. These optional items can enhance the taste and look. - Mixing bowls - Measuring cups and spoons - Whisk - 9x5-inch loaf pan Having the right tools makes cooking easier. Mixing bowls are great for combining ingredients. Measuring cups and spoons ensure accuracy. A whisk helps mix wet ingredients well. Finally, a 9x5-inch loaf pan shapes your bread perfectly. With these ingredients and tools, you can make fluffy milk bread with ease. {{ingredient_image_1}} To start, you need to mix warm milk and sugar. Use one cup of warm milk, about 110°F (45°C). Stir in 1/4 cup of granulated sugar. This step helps the sugar dissolve and wakes up the yeast. Next, sprinkle 1 tablespoon of instant yeast on top of the warm milk mixture. Let it sit for 5 minutes until it gets frothy. This shows the yeast is active. In a large bowl, whisk together 3 cups of all-purpose flour and 1 teaspoon of salt. Make a well in the center of the flour. Pour the yeast mixture into this well. Add 1/4 cup of melted unsalted butter and 1 large egg. Mix until a dough begins to form. Now, transfer the dough to a lightly floured surface. Knead the dough for about 10 minutes. You want it smooth and elastic. This step builds the dough's structure. Place the kneaded dough in a greased bowl. Cover it with a clean kitchen towel. Let it rise in a warm place for about 1 hour. It should double in size. Once the dough has risen, punch it down to release the air. This step is key for a good texture. Next, shape the dough into a loaf. Flatten it out and roll it tightly from one end. Place the shaped loaf in a greased 9x5-inch loaf pan. Cover the loaf again and let it rise for another 30-45 minutes. It should puff up nicely. While the dough is rising, preheat your oven to 350°F (175°C). Brush the top of the dough with extra milk. This gives it a golden finish. Bake the loaf in the preheated oven for 25-30 minutes. It should be golden and sound hollow when tapped. After baking, remove the loaf from the oven. Let it cool in the pan for about 10 minutes. Then, transfer it to a wire rack to cool completely. Enjoy your fluffy milk bread! To ensure your yeast is active, check the temperature of your milk. The milk should feel warm, around 110°F (45°C). Mix the warm milk with sugar and sprinkle the yeast on top. Wait about 5 minutes until it looks frothy. This shows the yeast is alive and ready to work. Kneading is key to great bread. After mixing your dough, place it on a lightly floured surface. Knead it firmly for about 10 minutes. The dough should feel smooth and elastic. This helps form gluten, which gives your bread that soft texture we love. For that golden top, brush the dough with a little extra milk before baking. Use a pastry brush for even coverage. This small step adds color and shine to your bread. Baking your milk bread at the right temperature is important. Preheat your oven to 350°F (175°C). Bake for 25-30 minutes until golden and hollow-sounding when tapped. This ensures a soft inside and a nice crust. When slicing your milk bread, use a serrated knife for clean cuts. This helps keep the soft texture intact. Aim for even slices, about 1 inch thick. For serving, warm slices with a pat of butter or your favorite jam. You can also wrap the bread in a nice cloth for a rustic look. This adds charm when you serve it at the table. Enjoy the fluffy happiness of your homemade milk bread! Pro Tips Use Fresh Yeast: Ensure your instant yeast is fresh for optimal rising. Check the expiration date to avoid dense bread. Kneading Technique: Knead the dough until it’s smooth and elastic. This develops gluten, giving the bread its fluffiness. Perfect Rising Environment: Let the dough rise in a warm, draft-free area. A turned-off oven with a bowl of hot water works well. Cooling Process: Allow the bread to cool completely on a wire rack to maintain its soft texture and prevent sogginess. {{image_2}} You can spice up your milk bread in many ways. Incorporating herbs adds a fresh taste. Try rosemary or thyme for a savory twist. Just mix in a teaspoon or two of dried herbs when you add the flour. Adding dried fruits or nuts brings sweetness and crunch. Consider raisins, cranberries, or walnuts. Toss in about half a cup of your favorite dried fruit or nuts into the dough. This makes for a delicious surprise in every bite. Want to change how your bread looks? You can make rolls instead of a loaf. Simply divide the dough into smaller pieces and shape them into balls. Place them close together on a baking sheet. This makes soft, pull-apart rolls that are perfect for any meal. Braiding the bread is another fun option. After the first rise, divide the dough into three equal parts. Roll each part into long strands. Then, braid them together and place in a loaf pan. This not only looks beautiful but also gives a nice texture. If you need a gluten-free option, it’s easy to adapt this recipe. Use a good gluten-free flour blend in place of all-purpose flour. Make sure it has xanthan gum for the right texture. For a vegan version, swap out the milk for plant-based milk like almond or oat milk. Replace the egg with a flax egg. Just mix one tablespoon of ground flaxseed with three tablespoons of water and let it sit for a few minutes. This keeps your bread light and fluffy without using animal products. To store your Easy Milk Bread at room temperature, wrap it in plastic wrap. Place it in a cool, dry area. This keeps the bread soft for about 2 to 3 days. Avoid storing it in the fridge, as that can make it dry out faster. For long-term storage, you can freeze your bread. Slice the loaf into pieces for easy use. Wrap each slice tightly in plastic wrap. Then, put the wrapped slices in a freezer bag. This method helps keep the bread fresh for up to 3 months. When you're ready to eat, simply take out the slices you need. Place them in the fridge overnight or let them thaw at room temperature for about an hour. To reheat your bread, use an oven or a microwave. For the oven, preheat to 350°F (175°C). Wrap the bread in foil to stay soft. Heat for about 10-15 minutes. In the microwave, place a slice on a plate. Cover it with a damp paper towel. Heat for 10-15 seconds. This method helps keep the bread moist and soft. Enjoy your warm, fluffy milk bread! Easy milk bread can last about 2-3 days at room temperature. Store it in a bread box or a sealed bag. If you want it fresh for longer, freeze it. Wrap the bread tightly in plastic wrap or foil. It can stay good for up to 3 months in the freezer. When you want to eat it, just thaw and reheat to enjoy that soft texture. Yes, you can use bread flour instead of all-purpose flour. Bread flour has more protein. This helps the bread rise higher and gives it a chewier texture. Just replace the all-purpose flour with bread flour in the same amount. You might need to adjust the water slightly. Keep an eye on the dough's texture as you mix. If the dough doesn’t rise, check the yeast. It may not be active. Always use warm milk, not hot. Hot milk can kill the yeast. If you think your yeast is old, test it. Add a little yeast to warm water and sugar. If it bubbles in 5-10 minutes, it’s good. - Common issues and solutions: - Dough too cold: Find a warm spot for rising. - Dough too dry: Add a little warm milk to hydrate it. - Troubleshooting tips for yeast-based recipes: - Knead the dough well for elasticity. - Use a clean bowl and towel to cover the dough. - If problems persist, try a different yeast brand next time. In this guide, we explored how to make easy milk bread from scratch. We covered essential ingredients and tools you need, along with clear steps for mixing, kneading, and baking. I shared tips for perfecting your bread and talked about fun variations and storage options. My final thought is simple: enjoy the process of making bread. It’s satisfying and rewarding to create something delicious from just a few ingredients. Happy baking!

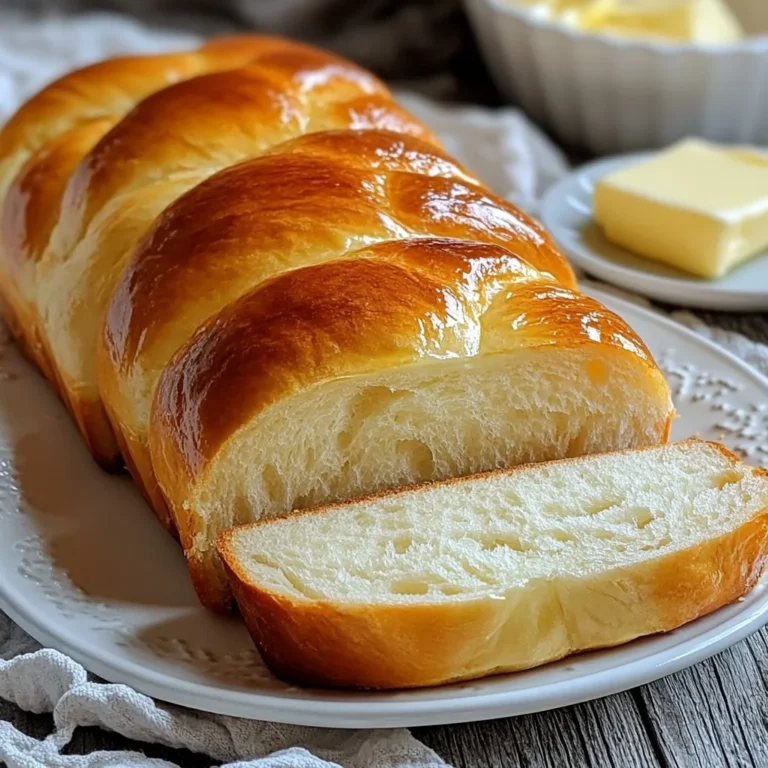
Easy Milk Bread Simple and Tasty Homemade Recipe

For this salad, I recommend using 8 oz. of pasta. Fusilli or rotini works best. These shapes hold the dressing and chunky veggies well. You can also try other pasta types. Just make sure to cook it al dente for the best texture. Fresh veggies add color and crunch to your salad. You will need: - 1 cup cherry tomatoes, halved - 1 cup cucumber, diced - 1 bell pepper (red or yellow), diced - 1 avocado, diced - 1/4 cup red onion, finely chopped These choices bring sweetness, freshness, and a nice bite. Feel free to mix in other favorites like radishes or peas. The dressing gives the salad its name and flavor. For the Green Goddess dressing, gather these ingredients: - 1/2 cup Greek yogurt - 1/4 cup olive oil - 2 tablespoons lemon juice - 1 clove garlic, minced - 1/2 cup fresh basil leaves, chopped - 1/4 cup fresh parsley leaves, chopped - Salt and pepper to taste Blend these ingredients until smooth. The yogurt adds creaminess, while the herbs boost freshness. Adjust salt and lemon to match your taste. This dressing is key to making your salad stand out! {{ingredient_image_1}} Start by boiling a large pot of salted water. This adds flavor to the pasta. Once the water boils, add 8 oz. of pasta. Fusilli or rotini works well. Cook it according to the package instructions. You want it to be al dente, which means firm to the bite. After cooking, drain your pasta. Rinse it with cold water to cool it down. This stops the cooking process and keeps the pasta from getting mushy. In a blender or food processor, put in 1/2 cup of Greek yogurt. Add 1/4 cup of olive oil and 2 tablespoons of lemon juice. Next, add 1 clove of minced garlic, 1/4 cup of chopped basil, and 1/4 cup of chopped parsley. Season with salt and pepper to taste. Blend all these ingredients until smooth and creamy. You can taste it to see if you want more salt or lemon juice. In a large mixing bowl, add the cooled pasta. Now, toss in 1 cup of halved cherry tomatoes, 1 cup of diced cucumber, 1 diced bell pepper, 1 diced avocado, and 1/4 cup of finely chopped red onion. Pour the Green Goddess dressing over this mix. Toss everything gently to coat all the ingredients well. Cover the bowl with a lid or plastic wrap. Chill it in the fridge for at least 30 minutes. This lets the flavors blend together nicely. To make great pasta, start with a big pot. Fill it with water and add salt. The water should taste like the sea. Boil the water before adding your pasta. Cook the pasta until it is al dente, or firm to the bite. This usually takes about 8 to 10 minutes, but check the package for exact times. Once cooked, drain the pasta and rinse it with cold water. This stops the cooking and cools it down. Perfect pasta will soak in the dressing better. The dressing should be creamy but not too thick. Start with Greek yogurt and add olive oil for richness. Blend them until smooth. Next, add lemon juice, garlic, basil, and parsley for taste. If the dressing is too thick, add a bit more olive oil or water. Taste as you go! You want it to balance well with the pasta and veggies. A good dressing makes all the difference in this salad. Presentation matters! Use a colorful bowl to show off your salad. Before serving, give it a gentle stir to mix the flavors. If you want, add more herbs or avocado on top for a pretty finish. Always taste it again before serving. You might need a pinch of salt or a squeeze of lemon juice to brighten it up. Keep it cool until you are ready to serve. Enjoy your fresh and flavorful Green Goddess Pasta Salad! Pro Tips Cook Pasta Al Dente: Be sure to cook the pasta just until al dente for the best texture in your salad. It will continue to soften slightly as it chills. Fresh Ingredients Matter: Use fresh, high-quality vegetables and herbs for maximum flavor. This salad shines with the bright taste of fresh basil and parsley. Adjust the Dressing: Feel free to adjust the consistency of the dressing by adding a splash of water or more lemon juice if it's too thick for your liking. Garnish for Presentation: Enhance the visual appeal of your salad by garnishing with additional herbs and a few slices of avocado right before serving. {{image_2}} You can easily change ingredients based on what you have. If you don’t have fusilli or rotini, penne or farfalle also work well. Swap cherry tomatoes for grape tomatoes or even diced sun-dried tomatoes. Cucumber can be replaced by zucchini or bell pepper, giving a nice crunch. For a creamier dressing, you might use sour cream instead of Greek yogurt. If you want a dairy-free option, try cashew cream or a plant-based yogurt. To make this salad filling, add proteins like grilled chicken, shrimp, or chickpeas. These options add taste and nutrition. Grilled chicken provides a nice smoky flavor. If you prefer plant-based, chickpeas work well and are packed with protein. You can even add diced hard-boiled eggs for extra richness. This pasta salad shines at any gathering. For picnics or potlucks, serve it in a large bowl. Add colorful herbs on top for a fresh look. If you’re hosting a dinner party, serve it as a side dish. Pair it with grilled meats or a light fish for a complete meal. For casual lunches, pack it in a mason jar for easy transport. Everyone will love its bright colors and fresh flavors! To keep your Green Goddess Pasta Salad fresh, store it in an airtight container. This helps to lock in flavor and keep ingredients crisp. If you have extra dressing, store it separately. This way, it won't make the pasta soggy. When stored properly, your pasta salad will last about 3 to 5 days in the fridge. Check for any signs of spoilage before eating. If the veggies look dull or the dressing separates, it's time to toss it. I do not recommend freezing this salad. Freezing can change the texture of fresh veggies and avocado. If you must freeze it, use only the pasta. Reheat pasta in a pot with a splash of water until warm, then mix in fresh veggies and dressing. This keeps the salad tasty and vibrant. Yes, you can make this salad ahead of time. It tastes even better after chilling. I suggest preparing it a few hours before serving. This allows the flavors to mix well. Just store it in the fridge until you are ready to serve. Green Goddess Pasta Salad offers many benefits. It has fresh veggies like tomatoes and cucumbers. These provide vitamins and minerals. The Greek yogurt adds protein and healthy fats. Avocado gives you good fats too. Overall, this salad is a balanced meal. It’s tasty and healthy for everyone. Absolutely! If you are short on time, you can use a store-bought dressing. Look for one labeled "Green Goddess." Make sure it has natural ingredients. You can still add fresh herbs for extra flavor. This keeps the salad fresh and vibrant. You can mix in other herbs for a new twist. Try dill, chives, or cilantro. Each herb adds its own flavor. Experiment to find your favorite mix. Fresh herbs bring life to your dressing and make it unique. This article explored how to make a delicious Green Goddess Pasta Salad. We covered choosing pasta, fresh veggies, and the right dressing. I shared step-by-step instructions for cooking and combining ingredients. You learned tips for perfect pasta and serving options. We even discussed storage and helpful FAQs. In conclusion, making this pasta salad is easy and fun. With fresh ingredients and simple steps, you can impress anyone. Enjoy your salad, and don’t be afraid to try new flavors!

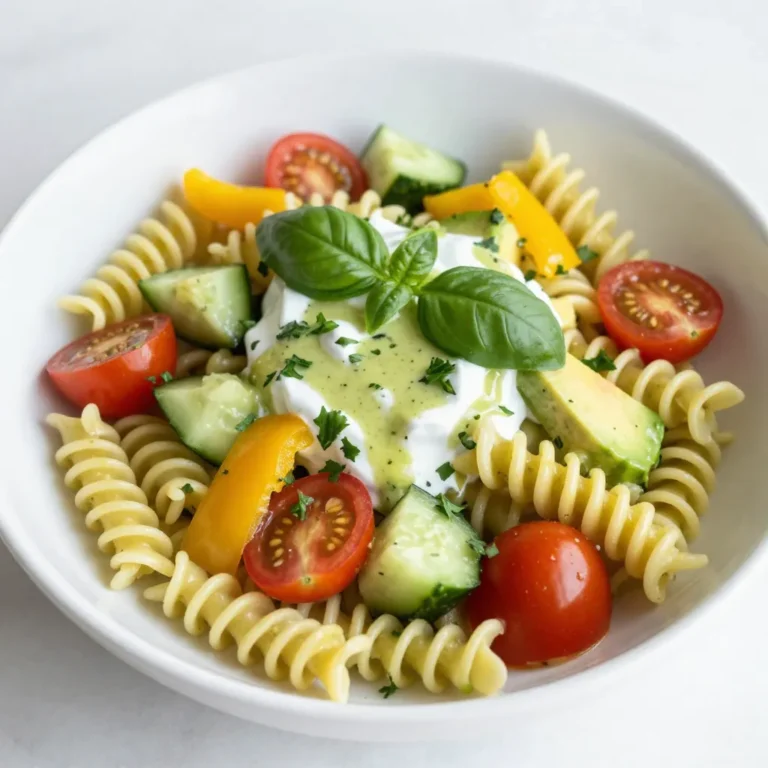
Green Goddess Pasta Salad Fresh and Flavorful Dish

For this meatloaf, I use 1 1/2 lbs of ground beef. Ground beef gives the meatloaf a rich flavor. You can mix in other meats like pork or turkey to change the taste. Just make sure the total weight stays the same. This helps the meatloaf keep its shape and texture. You need 1 cup of breadcrumbs for binding. Breadcrumbs help hold the meatloaf together. I like to use plain or seasoned crumbs. You will also need 1/2 cup of milk and 1 large egg. The milk adds moisture, and the egg acts like glue. These two ingredients make the meatloaf soft and tender. Flavor is key! You will use a few simple seasonings. First, add 1/4 cup of ketchup for sweetness. Then, chop 1 small onion and mince 2 cloves of garlic. These will boost the flavor. For seasoning, use 2 tablespoons of Worcestershire sauce, 1 teaspoon of dried thyme, 1 teaspoon of salt, and 1/2 teaspoon of black pepper. These ingredients layer flavors and enhance the overall taste. Finally, add 1 tablespoon of olive oil for richness. {{ingredient_image_1}} Start by preheating your oven to 350°F (175°C). In a large bowl, mix the ground beef, breadcrumbs, and milk. Add ketchup, finely chopped onion, minced garlic, and a large egg. Then, pour in Worcestershire sauce, dried thyme, salt, and black pepper. Mix everything until just combined. Don’t overmix; this keeps the meatloaf soft. Once mixed, shape the meat into a loaf. Place it in a greased baking dish or on a lined baking sheet. Bake the meatloaf in the preheated oven for about 1 hour. Use a meat thermometer to check if it reaches 160°F (70°C). This step is key for safe eating. While it bakes, the kitchen fills with a lovely aroma. After baking, let the meatloaf rest for 10 minutes. This helps it keep its juices. Slice it carefully for the best presentation. While the meatloaf bakes, prepare the brown gravy. In a saucepan, melt 2 tablespoons of butter over medium heat. Stir in 2 tablespoons of all-purpose flour. Cook for 1-2 minutes until it turns a nice golden brown. Gradually whisk in 2 cups of beef broth. Bring this mixture to a simmer. Cook for about 5-7 minutes, stirring often, until the gravy thickens. Season with salt and pepper to taste. Once your meatloaf is ready, serve it warm. Drizzle the brown gravy over the top for a comforting touch. Enjoy every bite! To get the best meatloaf texture, mix the meat gently. Overmixing can make it tough. Use a light touch when combining ingredients. The right amount of moisture is key. Breadcrumbs and milk help hold it together. You want it moist but not soggy. A good rule is to shape the loaf into a nice, firm shape. This helps it hold together while baking. To boost the flavor, add your favorite veggies or spices. Diced bell peppers or carrots can add sweetness and crunch. You can also mix in some herbs like parsley or basil. For a kick, try adding a bit of hot sauce. You can even use different cheeses for extra richness. This is your chance to make the meatloaf your own. Just make sure not to add too much, or it could affect the texture. The gravy should be smooth and rich. To get this, whisk the flour well with the butter. Cook it until it turns a light brown color. This gives the gravy depth. Gradually add the beef broth while whisking. This helps avoid lumps. If the gravy is too thick, add more broth or water. For a thinner gravy, keep stirring until you reach the right consistency. Taste and adjust the salt and pepper to fit your liking. Pro Tips Use a Meat Thermometer: To ensure your meatloaf is cooked perfectly, use a meat thermometer. The internal temperature should reach 160°F (70°C) for safe consumption. Add Moisture: If your meatloaf mixture seems dry, consider adding more milk or even a bit of beef broth. This will help keep the meatloaf tender and juicy. Let it Rest: After baking, let the meatloaf rest for about 10 minutes before slicing. This allows the juices to redistribute, making for a more flavorful and moist slice. Customize Your Seasonings: Feel free to experiment with different herbs and spices in the meat mixture. Adding herbs like parsley or Italian seasoning can elevate the flavor profile. {{image_2}} You can add veggies to your meatloaf for extra flavor and nutrition. Carrots, bell peppers, and zucchini work well. Chop them finely so they blend in nicely. You can also use frozen mixed veggies. Just thaw and drain them before adding. This makes each bite colorful and tasty. If you want to switch up the meat, try using ground turkey or chicken. These options can make the dish lighter. You can also use plant-based proteins, like lentils or chickpeas, for a vegetarian version. Just mash them well and mix with the other ingredients for great results. The brown gravy is classic, but you can try other flavors. For a mushroom gravy, add sautéed mushrooms and onions to your broth. For a tangy twist, mix in some BBQ sauce. You can also try a spicy gravy with hot sauce or chili powder. Each variation gives the meatloaf a new taste. To store leftover meatloaf, let it cool first. Wrap it tightly in plastic wrap or aluminum foil. You can also place it in an airtight container. Store it in the fridge for up to four days. This keeps it fresh and tasty for later meals. When you’re ready to enjoy your meatloaf again, preheat your oven to 350°F (175°C). Place slices on a baking dish. Cover them with foil to keep them moist. Heat for about 20 minutes or until warm. You can also microwave slices on a plate. Heat for 1-2 minutes, checking often to avoid overcooking. Freezing meatloaf is a great way to save it for later. After it cools, slice it into portions. Wrap each slice in plastic wrap, then place them in a freezer bag. Remove as much air as possible. Store meatloaf in the freezer for up to three months. For the gravy, let it cool, then transfer it to a freezer-safe container. It can also last up to three months. When you’re ready, thaw both overnight in the fridge before reheating. Yes, you can use other meats for meatloaf. Ground turkey, chicken, or pork work well. Each meat gives a different flavor and look. Mixing meats can add depth. For a leaner option, turkey is great. Just remember, cooking times may vary with different meats. You can substitute breadcrumbs with crushed crackers or oats. Both options work well in meatloaf. If you want a gluten-free choice, try almond flour. All these options hold moisture and help bind the meat. Just keep the same amount as breadcrumbs for best results. The meatloaf is done when it reaches 160°F (70°C) inside. Use a meat thermometer to check the temperature. If you don't have one, look for clear juices when you cut into it. Let it rest for 10 minutes before slicing. This helps keep it juicy and tender. This blog post covered how to make a great meatloaf from start to finish. You learned about key ingredients, step-by-step instructions, and useful tips for the best texture and flavor. We also explored fun variations and safe storage methods, plus answered common questions. Meatloaf is easy to adapt, making it a dish everyone can enjoy. With practice, you’ll create your perfect meatloaf meal every time. Happy cooking!

Brown Gravy Meatloaf Easy Comfort Food Recipe

- 2 cans (15 oz each) chickpeas, drained and rinsed - 1 medium onion, diced - 2 cloves garlic, minced - 2 carrots, chopped - 2 celery stalks, chopped - 1 can (14 oz) diced tomatoes - 2 cups fresh spinach, chopped - 1 teaspoon dried oregano - 1 teaspoon dried thyme - 1 teaspoon paprika - 1 bay leaf - Salt and pepper to taste - Fresh parsley, chopped (for garnish) Tuscan chickpea soup shines with its main ingredients. Canned chickpeas provide a hearty base. They are soft and full of protein. Next, we use fresh vegetables like onion, garlic, carrots, and celery. Each adds flavor and nutrition. The diced tomatoes bring a nice sweetness and a bit of acidity. Spinach adds color and health benefits. We also use dried herbs like oregano and thyme. They enhance the soup’s depth. Paprika adds a touch of warmth, while the bay leaf gives an earthy taste. Don't forget the salt and pepper to bring everything together! - 2 tablespoons olive oil - 4 cups vegetable broth Olive oil is key for sautéing the onions and garlic. It adds richness and flavor. Vegetable broth forms the soup's heart. It keeps the dish light yet full of flavor. With these ingredients ready, you can make a cozy bowl of Tuscan chickpea soup that feels like a warm hug on a chilly day. Enjoy the mix of fresh and pantry staples, and get ready for a delightful cooking experience! {{ingredient_image_1}} 1. First, grab a large pot. Heat the olive oil over medium heat. 2. Add the diced onion and sauté it until it turns translucent, about 5 minutes. 3. Next, stir in the minced garlic. Cook for another minute until it smells great. 4. Now, add the chopped carrots and celery. Stir them around and cook for 5 to 7 minutes until they start to soften. 1. It’s time to incorporate the chickpeas. Add the drained chickpeas, diced tomatoes, and vegetable broth to the pot. 2. Sprinkle in the dried oregano, thyme, paprika, and add the bay leaf. Mix everything well. 3. Bring the mixture to a boil. Once it boils, reduce the heat to a simmer. Cover it and let it simmer for 20 minutes to blend the flavors. 1. After 20 minutes, add the chopped spinach. Cook for an additional 5 minutes until the spinach wilts. 2. Remove the bay leaf and season the soup with salt and pepper to taste. 3. Serve hot. Garnish each bowl with freshly chopped parsley for a burst of flavor. Sautéing is key for great taste. I start by heating olive oil in a pot. Then, I add diced onion and cook it until soft. This process brings out the onion's sweet flavor. Next, I add minced garlic for a fragrant boost. The smell fills my kitchen! When it comes to herbs, always use fresh when you can. Fresh herbs add a bright taste. If you must use dried, use less. Dried herbs are more potent. I often use dried oregano and thyme in this soup. They give it depth and warmth. Adjusting seasoning is essential for a tasty soup. After simmering, taste your soup. Add salt and pepper slowly. This way, you avoid over-seasoning. I like to keep it simple, letting the ingredients shine. If you prefer a creamier texture, try blending part of the soup. Use an immersion blender for a smooth finish. This adds richness without heavy cream. You can also stir in a splash of coconut milk for a different flair. Each method brings a unique twist to this dish. Pro Tips Use Fresh Herbs: Fresh herbs like basil or thyme can elevate the flavor profile of your soup. Add them just before serving for a burst of freshness. Customize Your Veggies: Feel free to add other vegetables like zucchini or bell peppers to the mix for added nutrition and flavor. Check for Seasoning: Always taste your soup before serving. Adjust salt and pepper accordingly to enhance the overall taste. Make it Creamy: For a creamier texture, blend a portion of the soup and then mix it back in, or add a splash of coconut milk for richness. {{image_2}} You can change the protein in your Tuscan chickpea soup. Adding sausage gives it a hearty touch. Use mild Italian sausage for a bit of spice. Simply cook the sausage in the pot before adding the veggies. This will add a rich flavor. If you prefer chicken, you can use shredded rotisserie chicken. This option makes the soup quick and easy. Just add the chicken with the chickpeas and broth. For a vegan version, skip the meat. You can add extra chickpeas or lentils instead. This keeps the soup filling and delicious while staying plant-based. Using seasonal vegetables makes this soup even better. In spring, add fresh peas or asparagus. In fall, consider squash or sweet potatoes. These changes keep the dish fresh and exciting. You can also adjust the spices based on what you like. Try adding a pinch of red pepper flakes for heat. If you want a milder soup, leave them out. Experiment with flavors to make the soup your own. To keep your Tuscan chickpea soup fresh, follow these easy steps: - Refrigeration guidelines: Place the cooled soup in an airtight container. It will last up to 4 days in the fridge. Always let it cool first to avoid condensation. - Freezing instructions: For longer storage, freeze the soup in a freezer-safe container. It can stay good for up to 3 months. Leave some space for expansion as it freezes. When it's time to enjoy your soup again, here’s how to reheat it: - Best methods for reheating: The best way to reheat the soup is on the stove. Pour it into a pot and heat over medium-low heat, stirring often. You can also use a microwave. Place the soup in a microwave-safe bowl and cover it. Heat it in short bursts, stirring in between. - Maintaining flavor and texture: To keep the soup tasty, add a splash of vegetable broth or water if it seems thick. This will help maintain its texture. Always taste and adjust the seasoning after reheating. Can I use dried chickpeas? Yes, you can use dried chickpeas. Just soak them overnight. After soaking, cook them until soft. This might take one to two hours. Use about one cup of dried chickpeas to replace two cans. What can I serve with this soup? This soup pairs well with crusty bread. You can also serve it with a fresh salad. A sprinkle of parmesan cheese adds a nice touch too. Is this soup healthy? Yes, this soup is very healthy. It has lots of fiber from the chickpeas. The fresh veggies add vitamins and minerals. It's low in fat and provides a hearty meal. Caloric content per serving Each serving has about 180 calories. This can vary based on how much olive oil you use. It’s a filling dish that won’t weigh you down. This blog covers the simple steps to make Tuscan Chickpea Soup. You learned about the key ingredients, like canned chickpeas, fresh veggies, and herbs. I shared tips on how to prepare the soup, adjust its flavor, and use different proteins. You can even store leftovers easily. In making this soup, you create a warm meal that's healthy and easy. I hope you feel inspired to try it in your kitchen. Enjoy your cooking!

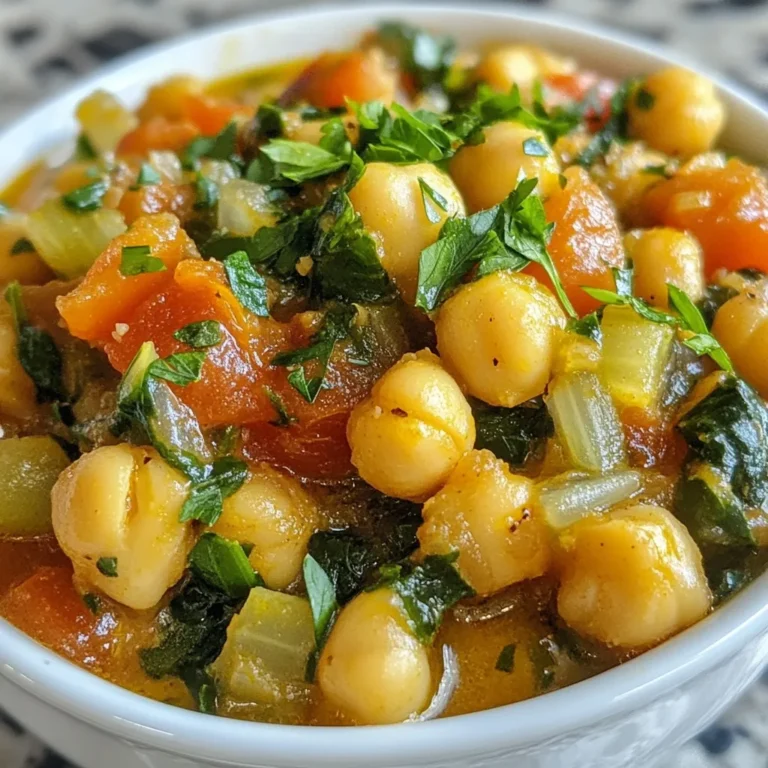
Tuscan Chickpea Soup Hearty and Flavorful Dish

To make Funfetti Sugar Cookie Bars, you will need: - 2 ½ cups all-purpose flour - 1 teaspoon baking soda - ½ teaspoon baking powder - 1 teaspoon salt - 1 cup unsalted butter, softened - 1 ½ cups granulated sugar - 2 large eggs - 1 teaspoon vanilla extract - ½ teaspoon almond extract - ½ cup rainbow sprinkles (plus more for topping) - 1 cup powdered sugar (for icing) - 2 tablespoons milk (for icing) - 1 teaspoon vanilla extract (for icing) When measuring, use dry measuring cups for flour and sugar. Spoon flour into the cup, then level it off with a knife. For liquids, use a clear measuring cup with markings. Always check at eye level. This ensures you get the right amount. Accurate measuring helps your bars bake perfectly every time. Use high-quality butter for rich flavor. Unsalted butter gives you control over saltiness. I prefer pure vanilla extract over imitation. It adds depth to your bars. Choose vibrant, fresh sprinkles for the best look and taste. For icing, use fine powdered sugar to ensure a smooth finish. These choices make your Funfetti Sugar Cookie Bars not just tasty, but also a feast for the eyes! {{ingredient_image_1}} First, you need to prepare your baking pan. Preheat your oven to 350°F (175°C). Grab a 9x13 inch baking pan. Line it with parchment paper. Leave some paper hanging over the edges. This makes it easy to lift out your cookie bars later. Next, let’s mix our ingredients. In a bowl, whisk together 2 ½ cups of all-purpose flour, 1 teaspoon of baking soda, ½ teaspoon of baking powder, and 1 teaspoon of salt. Set this bowl aside. In a large bowl, cream 1 cup of softened unsalted butter and 1 ½ cups of granulated sugar. Use an electric mixer at medium speed. Mix for about 3-4 minutes until it looks light and fluffy. Now, add 2 large eggs, one at a time. Mix well after each egg. Then, add 1 teaspoon of vanilla extract and ½ teaspoon of almond extract. Mix until everything is combined. Gradually add the dry mixture to the wet mixture. Mix on low speed until it is just combined. Be careful not to overmix. Finally, gently fold in ½ cup of rainbow sprinkles. Now it’s time to bake! Spread the cookie dough into your prepared pan. Smooth the top with a spatula. Bake in your preheated oven for 20-25 minutes. The edges should be lightly golden. A toothpick should come out clean when inserted into the center. After baking, let the bars cool in the pan on a wire rack. Make sure they cool completely before you ice them. To get soft and chewy Funfetti Sugar Cookie Bars, make sure not to overmix the dough. After adding the dry ingredients, mix on low just until you see no flour. This keeps the bars tender. Use softened butter for a creamy mix. If the butter is too cold, the bars can turn out hard. One common mistake is not measuring flour correctly. Use a spoon to fluff the flour, then scoop it into your measuring cup. Level it off with a knife. Another mistake is baking too long. Check your bars at 20 minutes. They should look slightly golden at the edges. If you bake them too long, they'll become dry. These cookie bars are great warm or chilled. For a fun twist, serve with ice cream on top. You can also cut them into fun shapes using cookie cutters. Add a drizzle of extra icing and more sprinkles for a festive touch. These treats are perfect for parties or just a fun family snack! Pro Tips Chill the Dough: For thicker bars, chill the dough in the refrigerator for 30 minutes before spreading it in the pan. This helps prevent spreading while baking. Use Fresh Sprinkles: Make sure your rainbow sprinkles are fresh, as older sprinkles can lose their color and texture, affecting the look of your cookie bars. Custom Icing Flavors: Experiment with different extracts in your icing, such as lemon or coconut, to give your cookie bars a unique twist. Storage Tips: Store the bars in an airtight container at room temperature for up to a week, or refrigerate to keep them fresh longer. {{image_2}} You can use many types of sprinkles in your Funfetti Sugar Cookie Bars. Classic rainbow sprinkles add color and fun. You can also try chocolate sprinkles for a richer taste. For a holiday twist, use themed sprinkles like hearts or stars. Mix and match them to create your own unique look! While the recipe calls for vanilla and almond extracts, feel free to experiment. You can swap almond for coconut extract for a tropical vibe. Lemon or orange zest can also brighten the bars. If you enjoy spices, try adding a pinch of cinnamon for warmth. The options are endless! Making these bars gluten-free is easy! Use a 1:1 gluten-free flour blend instead of all-purpose flour. For a dairy-free version, replace the butter with coconut oil or a vegan butter substitute. You can also use non-dairy milk for the icing. These swaps let everyone enjoy the fun! To keep your Funfetti Sugar Cookie Bars fresh, store them in an airtight container. This helps to lock in moisture and flavor. Place a piece of wax paper between layers to avoid sticking. Keep the bars at room temperature for easy access. If you have extra cookie bars, freezing is a great option. First, let the bars cool completely. Then, cut them into squares. Wrap each piece in plastic wrap and place them in a freezer bag. This will help prevent freezer burn. You can store them in the freezer for up to three months. When you're ready to enjoy, let them thaw on the counter. These cookie bars will stay fresh for about a week at room temperature. If stored properly in an airtight container, they can last a bit longer. However, for the best taste and texture, eat them within the first few days. The sprinkles may lose some color over time, but they will still taste great! Yes, you can make these bars ahead of time! They stay fresh for several days. Just store them in an airtight container at room temperature. If you want to keep them longer, freeze them. Cut them into squares and wrap each piece in plastic wrap. Place the wrapped bars in a zip-top bag. They last for up to three months in the freezer. To check if the bars are done, look for a light golden edge. Insert a toothpick into the center. If it comes out clean or with a few crumbs, they are ready. Keep an eye on the timer; they usually bake for 20-25 minutes. Don't overbake, or they might turn dry. Absolutely! You can swap out a few ingredients. Use gluten-free flour if you have a gluten allergy. For dairy-free options, use vegan butter. You can also replace eggs with unsweetened applesauce or flaxseed meal mixed with water. Just be sure to adjust the measurements accordingly. In this blog post, I covered the key steps to making Funfetti Sugar Cookie Bars. We explored ingredients, measuring tips, and quality suggestions to ensure the best results. You learned how to prep your baking pan, mix ingredients, and avoid common mistakes. Plus, I shared variations and storage tips to keep your treats fresh. Always remember, baking is fun! With practice, you’ll master these cookie bars in no time. Enjoy creating and sharing them with friends and family!

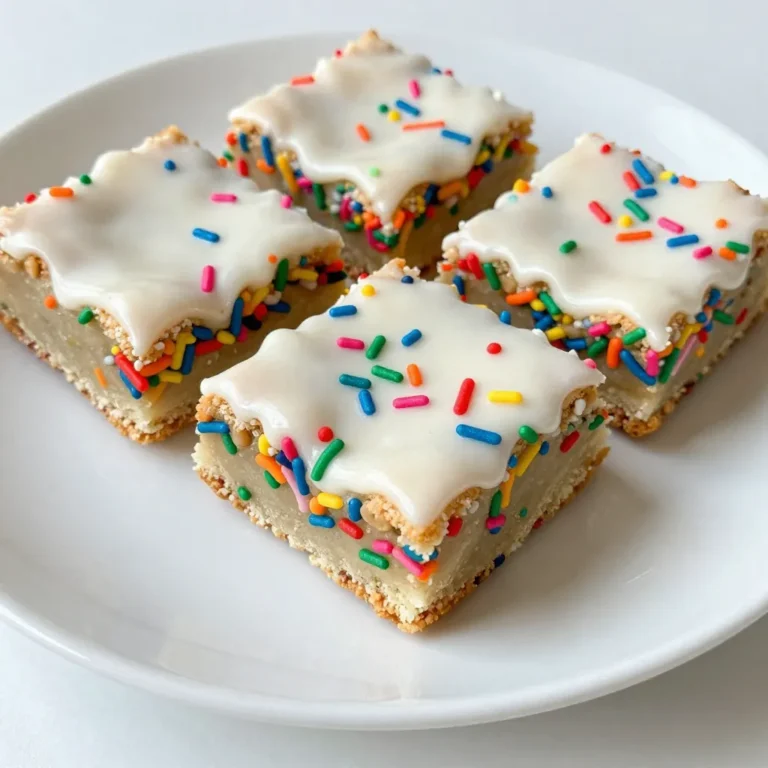
Funfetti Sugar Cookie Bars Delightful and Easy Treat

- 1 ½ cups all-purpose flour - 1 cup granulated sugar - ½ cup brown sugar, packed - 1 tsp baking powder - 1 tsp baking soda - 1 tsp ground cinnamon - ½ tsp ground nutmeg - ½ tsp ground ginger - ¼ tsp ground cloves - ½ tsp salt These dry ingredients create the base for our cupcakes. The flour gives structure, while sugars add sweetness. Spices like cinnamon and nutmeg bring that warm, cozy flavor. Baking powder and baking soda help the cupcakes rise and become fluffy. - ½ cup unsalted butter, melted - 3 large eggs - 1 cup pumpkin puree - ½ cup brewed espresso or strong coffee, cooled - 1 tsp vanilla extract The wet ingredients keep our cupcakes moist and rich. The butter adds flavor, while eggs help bind everything together. Pumpkin puree gives the cupcakes their signature taste and color. Brewed espresso adds a nice coffee kick, making it a true pumpkin spice latte experience. - 1 cup heavy cream - 2 tbsp powdered sugar - Additional cinnamon for dusting Toppings are the finishing touch for these cupcakes. Whipped cream adds a light and airy texture. A sprinkle of cinnamon on top not only looks nice, but it also enhances the flavor. You can also adjust the sweetness by adding more powdered sugar to the cream if you like. {{ingredient_image_1}} - Preheat the oven to 350°F (175°C). - Line the muffin tin with cupcake liners. - In a large bowl, combine all the dry ingredients. - Whisk the flour, granulated sugar, brown sugar, baking powder, baking soda, cinnamon, nutmeg, ginger, cloves, and salt. - In another bowl, whisk the wet ingredients together. - Mix the melted butter, eggs, pumpkin puree, cooled espresso or coffee, and vanilla extract until smooth. - Pour the wet mixture into the dry ingredients. - Gently fold until just combined. - Do not overmix; a few lumps are fine! - Fill the cupcake liners about two-thirds full with the batter. - Bake for 18-20 minutes. - Check with a toothpick. It should come out clean. - Let the cupcakes cool in the pan for 5 minutes. - Transfer them to a wire rack to cool completely. - In a chilled bowl, whip the heavy cream and powdered sugar together. - Whip until soft peaks form. - Once the cupcakes are cool, frost them with the whipped cream. - Dust the tops with additional cinnamon for a lovely touch. To make perfect cupcakes, you must avoid overmixing. Overmixing can lead to dense cupcakes. Gently fold the wet and dry ingredients until just combined. A few lumps are okay. This ensures a light and fluffy texture. Identifying the right baking time is also key. Bake your cupcakes for 18 to 20 minutes. Check them with a toothpick. If it comes out clean, they are done! Let them cool for a few minutes in the pan before moving them to a wire rack. This helps keep the texture just right. You can easily add more flavor to your cupcakes. Chocolate chips work well in the batter. They add a rich taste that pairs well with pumpkin. You could also try adding a pinch of cayenne pepper for a spicy kick. Incorporate seasonal toppings to make your cupcakes fun and festive. Chopped nuts or candied ginger can add a nice crunch. Dried cranberries also give a sweet-tart flavor that is perfect for fall. Frosting your cupcakes can be creative and fun! Use a piping bag to make swirls and peaks. This adds a nice touch that looks great. You can also use a spatula for a more rustic look. Using edible decorations can make your cupcakes pop! Consider adding sprinkles or chocolate shavings. You could even use small pumpkin candies for a festive touch. These little details make your cupcakes stand out and make them even more enjoyable to eat. Pro Tips Use Fresh Spices: Freshly ground spices enhance the flavor of your cupcakes. If possible, grind your own cinnamon, nutmeg, and ginger for a more vibrant taste. Cool Espresso: Ensure your brewed espresso or coffee is cooled before adding it to the mixture. This prevents the melted butter from cooking the eggs in the batter. Avoid Overmixing: When combining wet and dry ingredients, mix just until combined. Overmixing can lead to dense cupcakes, so a few lumps are perfectly fine. Chill Your Whipping Bowl: For perfectly whipped cream, chill your mixing bowl and beaters in the freezer for about 10 minutes before whipping the cream. {{image_2}} If you want to switch up the frosting, try cream cheese frosting. It adds a rich and tangy touch. Just blend cream cheese with powdered sugar and a splash of vanilla. This mix pairs well with the pumpkin flavors. You can also use alternative whipped frostings. For a lighter option, try a whipped coconut cream. Simply chill coconut milk, scoop out the solid part, and whip it with a bit of sugar. This gives a nice, dairy-free twist to your cupcakes. For those needing gluten-free options, use almond flour or a gluten-free blend. These swaps work well and keep the cupcakes moist. Just remember to adjust baking time slightly. Dairy-free substitutions are easy, too! You can replace the butter with coconut oil or vegan butter. Use almond or oat milk instead of heavy cream for the frosting. These alternatives keep the cupcakes delicious while meeting dietary needs. To make your cupcakes even more special, try adding other spices. A pinch of cardamom or allspice can enhance the flavor. This makes each bite more exciting and festive. You might also want to top your cupcakes with seasonal fruits or nuts. Chopped pecans or walnuts add a nice crunch. Fresh cranberries can give a tart balance to the sweetness. These additions make your cupcakes stand out at any fall gathering. To keep your Pumpkin Spice Latte Cupcakes fresh, store them in an airtight container. This helps to keep the moisture in and prevents them from drying out. You can keep them at room temperature for up to three days. If you want to store them longer, place them in the fridge. Just remember, cold storage can change the texture a bit. If you have leftover whipped cream, store it in a separate container. Make sure to cover it tightly. It should last for up to two days in the fridge. If your cupcakes are frosted, eat them within a day for the best taste. Unfrosted cupcakes can last longer, around three to four days. To freeze cupcakes, place them in a single layer on a baking sheet. Once frozen, transfer them to a freezer-safe bag. They can stay frozen for up to three months. To thaw, just let them sit at room temperature for about an hour. If you want to warm them, pop them in a microwave for a few seconds. Enjoy your delightful fall treat anytime! To make these cupcakes gluten-free, swap the all-purpose flour for a gluten-free blend. Look for a blend that has xanthan gum. This will help the cupcakes rise and stay fluffy. Follow the same measurements as the regular flour. Enjoy a tasty treat without gluten! Yes! You can bake these cupcakes a day before. Just cool them completely and store them in an airtight container. Frost them on the day you plan to serve. This keeps the whipped cream fresh and fluffy. You can use strong brewed coffee instead of espresso. If you want a caffeine-free option, try using decaf coffee. For a different flavor, use brewed chai tea. This adds a nice spice and still keeps it special. To make the batter less sweet, reduce the granulated sugar by a few tablespoons. For the frosting, you can use less powdered sugar. Taste as you go, and find the right balance for your sweet tooth. Yes, it's best to refrigerate the cupcakes after frosting. This keeps the whipped cream fresh and safe. Just cover them lightly with plastic wrap. Enjoy them cold or let them sit for a few minutes before eating! You now know how to make Pumpkin Spice Latte Cupcakes. We covered the key ingredients, from flour to frosting. I shared step-by-step instructions to guide your baking. You learned tips for perfect texture and fun variations to try. Remember to store your cupcakes properly to keep them fresh. Baking can be a joyful experience. Enjoy every bite of your cupcakes!

Pumpkin Spice Latte Cupcakes Delightful Fall Treat

- Ground chicken: This is the star of the dish. It cooks quickly and absorbs flavors well. - Sesame oil and aromatics: Use sesame oil for a nutty taste. Minced garlic and grated ginger add warmth and depth. - Vegetables and herbs: Fresh red bell pepper and shredded carrots provide color and crunch. Green onions and cilantro add freshness. - Soy sauce, peanut butter, lime juice, and honey: These create a creamy, tangy, and slightly sweet sauce. Soy sauce adds saltiness, while peanut butter gives richness. - Seasoning essentials: A pinch of salt and pepper balance the flavors to perfection. - Types of lettuce to use: Use butter lettuce or iceberg lettuce. Both are sturdy and crisp, perfect for wraps. - How to prepare the lettuce leaves: Gently separate the leaves and rinse them. Pat dry to ensure they hold the filling well. {{ingredient_image_1}} To start, heat 1 tablespoon of sesame oil in a large skillet over medium heat. Add 2 cloves of minced garlic and 1 tablespoon of grated ginger. Sauté these for about 1 minute until they smell great. Next, add 1 pound of ground chicken to the skillet. Break it apart as it cooks. Cook until the chicken is browned, which should take about 7 to 8 minutes. After that, stir in 1 finely diced red bell pepper and 1 cup of shredded carrots. Cook for 3 to 4 more minutes. You want the veggies to soften just a bit. In a small bowl, whisk together 2 tablespoons of soy sauce, 2 tablespoons of peanut butter, 1 tablespoon of lime juice, and 1 teaspoon of honey. Mix these until smooth. Pour the sauce over the chicken mix and stir well. Let it simmer for a couple of minutes. This helps the flavors blend together. Add salt and pepper to taste. Remove from heat and stir in 1/4 cup of chopped green onions, 1/4 cup of chopped cilantro, and 1/4 cup of roughly chopped unsalted peanuts for crunch. Now, it’s time to assemble your wraps! Spoon the chicken mixture into leaves from a head of butter or iceberg lettuce. Wrap them up like tacos. For serving, you can place them on a platter. Add lime wedges and more chopped peanuts or cilantro for a nice touch. Enjoy your tasty Thai Peanut Chicken Lettuce Wraps! - Ensuring the chicken is fully cooked: Cook the chicken until it's no longer pink. This usually takes about 7-8 minutes. Use a meat thermometer to check that it reaches 165°F for safety. - How to achieve maximum flavor in the sauce: Mix the soy sauce, peanut butter, lime juice, and honey well. This blend gives a rich taste. Let it simmer with the chicken for a few minutes. This allows the flavors to blend and soak into the meat. - Garnishing ideas for an appealing look: Use extra chopped peanuts and cilantro on top. You can also add lime wedges for a fresh touch. A sprinkle of chili flakes adds color and spice. - Plating suggestions for serving: Arrange the lettuce wraps on a large platter. Place lime wedges and garnishes around them. This makes your dish pop and invites everyone to dig in. - Overcooking the veggies: Sauté red bell peppers and carrots for only 3-4 minutes. They should be tender but still crisp. Overcooked veggies lose their color and crunch. - Choosing the wrong type of lettuce: Use butter or iceberg lettuce. These types are sturdy and hold the filling well. Avoid using delicate leaves like spinach, as they may tear easily. Pro Tips Use Fresh Ingredients: Fresh garlic and ginger will enhance the flavors of your dish. Try to use organic produce for the best taste. Add Spice for Heat: If you enjoy a little kick, consider adding some red pepper flakes or chopped chili peppers to the chicken mixture. Customize Your Wraps: Feel free to add other vegetables like cucumber or bean sprouts for extra crunch and flavor in your lettuce wraps. Meal Prep Friendly: This filling can be made ahead and stored in the fridge for up to 3 days. Just reheat before serving. {{image_2}} You can switch up the protein in these wraps. Try using ground turkey for a leaner option. Tofu is a great choice for a vegetarian meal. Just chop the tofu into small cubes and sauté it until golden. You can also use canned beans, like black beans or chickpeas, for a hearty vegetarian option. They add protein and a nice texture. To change the flavor, you can add some chili sauce for a kick. This will give your wraps a spicy twist. If you prefer a sweeter sauce, add more honey. For a tangy taste, squeeze in some extra lime juice. Play around with the sauce to find what you like best! Crunch is key in these wraps. You can add shredded carrots, bean sprouts, or even crispy wontons for extra texture. Fresh herbs like mint or basil can brighten up the dish. They add a burst of flavor that makes each bite special. Don’t be afraid to mix and match toppings to find your favorite combination! To keep your wraps fresh, store them in an airtight container. Place the chicken mixture separately from the lettuce. This keeps the lettuce crisp. Leftovers can last in the fridge for up to three days. After that, the chicken may lose its flavor and texture. When you’re ready to eat, reheat the chicken mixture on the stove. Use a low heat to avoid drying it out. Stir it often for even heating. You can also use a microwave. Place it in a microwave-safe dish and cover it. Avoid reheating the lettuce, as it wilts quickly. Yes, you can freeze the chicken mixture! Place it in a freezer-safe container. Make sure to leave some space for expansion. It can last up to three months in the freezer. To thaw, place it in the fridge overnight before reheating. This keeps the flavor intact. You can use several alternatives for ground chicken. Here are some options: - Ground turkey: It has a similar texture and taste. - Tofu: Press and crumble firm tofu for a plant-based choice. - Ground beef: This adds a different flavor profile. - Chickpeas: Mash them for a hearty vegetarian option. Each substitute will change the taste, but they all work well in lettuce wraps. Yes, you can make the sauce ahead of time. Here are some tips: - Storing: Keep the sauce in an airtight container in the fridge. It lasts about one week. - Reheating: Warm it gently on the stove or in the microwave. Stir well before using. Making the sauce ahead saves time on busy days. Yes, you can make them gluten-free. Here’s how: - Soy sauce: Use gluten-free soy sauce or tamari. - Peanut butter: Check the label to ensure it is gluten-free. With these simple swaps, you can enjoy a gluten-free version of this tasty meal. This blog post covered how to make flavorful Thai peanut chicken lettuce wraps. We explored key ingredients, from ground chicken to fresh veggies, and crafted a tasty sauce. I shared step-by-step instructions for cooking and assembling the wraps. You learned cooking tips, common mistakes to avoid, and fun variations to try. Embrace your creativity with this dish. Enjoy fresh flavors and personal touches with each wrap. Get ready to delight your taste buds and impress your friends!

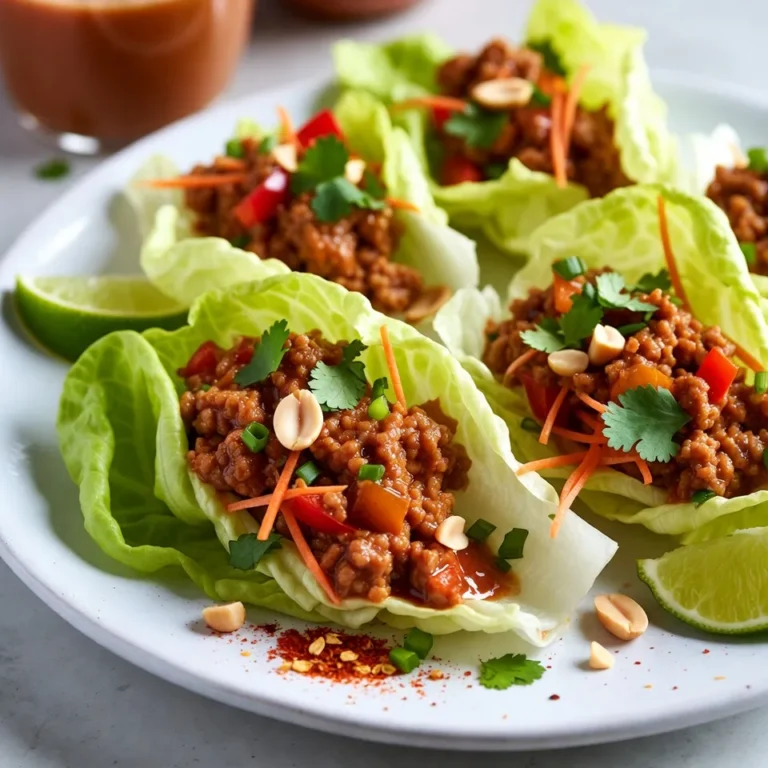
Thai Peanut Chicken Lettuce Wraps Quick and Tasty Meal

For this tasty dish, you need: - 1 pound ground beef (or turkey) - 1 medium onion, diced - 2 cloves garlic, minced - 1 can (15 oz) black beans, rinsed and drained - 1 can (15 oz) diced tomatoes with green chilies - 1 tablespoon chili powder - 1 teaspoon cumin - 1 teaspoon smoked paprika - Salt and pepper to taste - 1 cup corn kernels (fresh, frozen, or canned) - 1 package (8.5 oz) cornbread mix - 1 cup milk - 1 large egg - 1 cup shredded cheddar cheese (plus extra for topping) - 1/2 cup sliced jalapeños (for topping, optional) - Fresh cilantro, for garnish You can easily swap some ingredients: - Use ground turkey for a leaner option. - Replace black beans with pinto or kidney beans. - If you dislike heat, skip the jalapeños. - Use vegetable broth instead of milk for a dairy-free option. - Try a different cheese like Monterey Jack for a unique flavor. Toppings make this dish pop! Here are my favorites: - Extra shredded cheddar cheese for a cheesy crust. - Sliced jalapeños for added heat. - Fresh cilantro for a bright, herbal note. - A dollop of sour cream for creaminess. - Sliced green onions for a fresh crunch. These toppings add more flavor and texture to your casserole, making each bite a delight! {{ingredient_image_1}} Start by gathering all your ingredients. You will need: - 1 pound ground beef (or turkey) - 1 medium onion, diced - 2 cloves garlic, minced - 1 can (15 oz) black beans, rinsed and drained - 1 can (15 oz) diced tomatoes with green chilies - 1 tablespoon chili powder - 1 teaspoon cumin - 1 teaspoon smoked paprika - Salt and pepper to taste - 1 cup corn kernels (fresh, frozen, or canned) - 1 package (8.5 oz) cornbread mix - 1 cup milk - 1 large egg - 1 cup shredded cheddar cheese (plus extra for topping) - 1/2 cup sliced jalapeños (for topping, optional) - Fresh cilantro, for garnish Preheat your oven to 375°F (190°C). In a large skillet, brown the ground beef or turkey over medium heat. This will take about 5-7 minutes. Drain any extra fat after cooking. Then, add the diced onion and minced garlic to the skillet. Sauté them until the onion is soft, which takes about 3-4 minutes. Next, stir in the black beans and diced tomatoes. Add the chili powder, cumin, smoked paprika, salt, and pepper. Cook this mixture for another 5-7 minutes until everything is hot. After that, mix in the corn kernels, making sure they are evenly spread. Remove the skillet from heat. In a separate mixing bowl, combine the cornbread mix, milk, egg, and 1 cup of cheddar cheese. Stir until just mixed. Do not over-mix, or your cornbread may become tough. Now, it's time to assemble your casserole. Spread the meat and bean mixture evenly in a greased casserole dish. Then, pour the cornbread mix over the top. Use a spatula to spread it gently to cover the filling completely. Sprinkle more cheddar cheese and sliced jalapeños on top if you like some spice. Bake in the preheated oven for 25-30 minutes. The cornbread should look golden brown, and a toothpick should come out clean when inserted into the center. Let the casserole cool for a few minutes before serving. Garnish with fresh cilantro for a pop of color and flavor! To make the best Texas Tamale Pie Casserole, start with good meat. I often use ground beef or turkey. Both options work well. Brown the meat in a skillet first. This adds flavor. Don't rush this step, as it helps develop taste. When you add the onion and garlic, cook them until they become soft. This step is key for a tasty filling. Mix in black beans and diced tomatoes next. Make sure to rinse the beans first to remove extra sodium. Spices bring life to your dish. Use chili powder, cumin, and smoked paprika. These spices add depth. Adjust the amount to your taste. Don’t forget salt and pepper to balance the flavors. For the cornbread topping, follow the package directions closely. Mix it well, but don’t overdo it. Just combine the ingredients until smooth. This keeps the cornbread light. Finally, let it cool before serving. This helps the dish set. Garnish with fresh cilantro for a pop of flavor. One common mistake is not browning the meat enough. This step is vital for flavor. Another mistake is using too much liquid. Keep your filling thick for the best texture. Don’t skip the step of rinsing the beans. This helps remove extra salt and keeps the dish from being too salty. When mixing the cornbread, avoid overmixing. Overmixing makes the cornbread dense. You want it fluffy and light. Finally, do not forget to check if the cornbread is fully cooked. Use a toothpick to test for doneness. If it comes out clean, it’s ready! To store leftovers, let the casserole cool to room temperature first. This helps prevent sogginess. Transfer it to an airtight container. It keeps well in the fridge for about three days. When reheating, use the oven if possible. This keeps the cornbread crispy. Preheat the oven to 350°F (175°C) and bake until heated through. You can also freeze leftovers for longer storage. Cut into portions and wrap them well. This helps keep flavors intact. To reheat, thaw overnight in the fridge and then bake. Enjoy your delicious Texas Tamale Pie Casserole! Pro Tips Choose Your Protein: You can use ground beef or turkey in this recipe, but for a vegetarian option, consider substituting with lentils or mushrooms for a hearty texture. Customize Your Spice Level: Adjust the amount of chili powder and jalapeños according to your preference. For a milder dish, reduce the spices or opt for mild diced tomatoes. Make It Ahead: This casserole can be prepared ahead of time. Assemble it, cover, and refrigerate for up to 24 hours before baking. Just add a few extra minutes to the baking time. Garnish for Freshness: Don't skip the cilantro garnish! It adds a fresh flavor that balances the richness of the casserole. You can also add avocado or sour cream for extra creaminess. {{image_2}} You can easily make a vegetarian version of this dish. Start by using plant-based ground meat or skip it entirely. Replace the ground beef or turkey with extra black beans or lentils. You can add more veggies, like bell peppers or zucchini, for texture and taste. This option still packs a delicious punch and suits many diets. If you love heat, this spicy version is for you. Add more sliced jalapeños to the meat mixture and top the casserole with even more. You can also use spicy diced tomatoes with green chilies. This adds more flavor and heat, making it a fun twist on the classic dish. For a gluten-free version, swap the cornbread mix with a gluten-free alternative. Many brands offer great options that taste delicious. Just check the package for the right measurements. Your casserole will still be hearty and filling, making it perfect for everyone at the table. When I enjoy Texas Tamale Pie Casserole, I love to have sides that match its bold taste. Here are my favorite options: - Mexican Rice: This fluffy rice adds a nice texture. - Refried Beans: Creamy beans complement the casserole well. - Corn Salad: A fresh corn salad gives a crunchy contrast. - Guacamole: The creamy avocado dip pairs perfectly with the spices. Garnishes can elevate your dish. Here are the best ones for your casserole: - Fresh Cilantro: Sprinkle it on top for a burst of freshness. - Sour Cream: A dollop adds creaminess and cools the spice. - Sliced Jalapeños: For heat lovers, these add extra kick. - Chopped Green Onions: They provide a nice crunch and flavor. To wash down this flavorful dish, choose drinks that match its zest: - Iced Tea: A classic choice that cools and refreshes. - Light Beer: A crisp beer balances the rich flavors. - Margarita: A fruity margarita enhances the Tex-Mex vibe. - Sparkling Water: For a non-alcoholic option, this adds a refreshing fizz. Texas Tamale Pie Casserole is a layered dish that combines meat, beans, and cornbread. You start with a hearty mix of ground beef, black beans, and diced tomatoes. Then, you top it with a cornbread batter. This dish offers a warm, comforting meal with rich flavors and textures. It’s like a tamale, but in a simple casserole form. You can serve it with toppings like cheese, jalapeños, and cilantro for extra flavor. Baking the Texas Tamale Pie Casserole takes about 25 to 30 minutes. First, preheat your oven to 375°F (190°C). Then, let it bake until the cornbread is golden brown. To check for doneness, insert a toothpick into the center. If it comes out clean, your casserole is ready. This short baking time makes it a perfect option for busy days. Yes, you can make Texas Tamale Pie Casserole ahead of time. Prepare the meat and bean mixture and let it cool. Then, cover it and store it in the fridge for up to a day. You can also assemble the entire casserole in advance. Just cover and refrigerate until you’re ready to bake. If you do this, add a few extra minutes to the baking time to ensure it's heated through. This blog post covered everything you need for Texas Tamale Pie Casserole. I shared the main ingredients, offered substitutions, and suggested toppings. You learned step-by-step how to prepare and cook it perfectly. We discussed tips, common mistakes, and storage ideas to enjoy leftovers. You also discovered variations like vegetarian and gluten-free options. Lastly, I shared great side dishes and drinks to pair with your meal. Enjoy making this dish your own, and happy cooking!

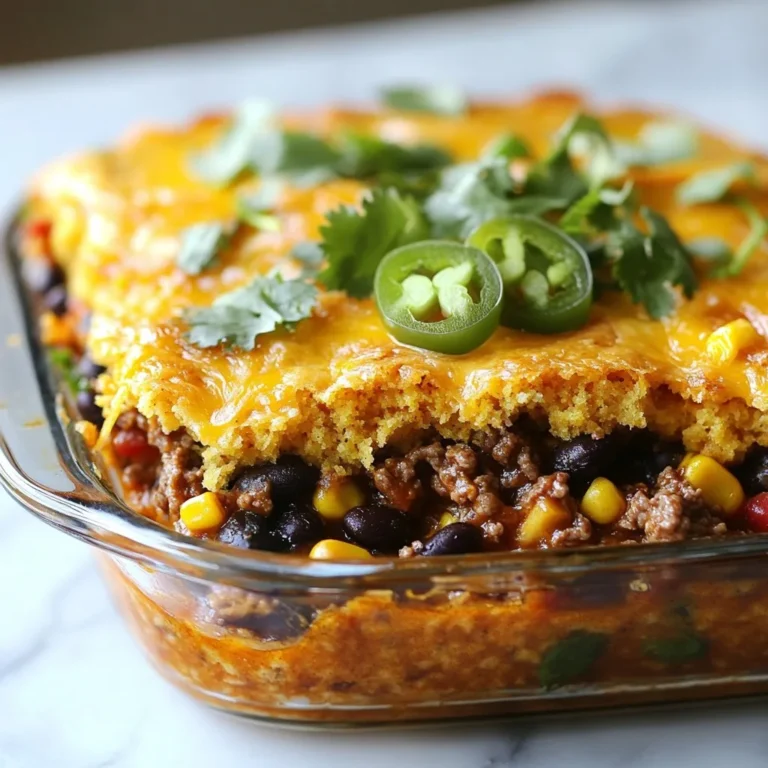
Texas Tamale Pie Casserole Flavorful and Simple Dish

- 1 lb ground beef - 1/2 lb ground pork - 1/2 cup breadcrumbs - 1/4 cup grated Parmesan cheese - 1 large egg - 2 cloves garlic, minced - 1 teaspoon dried oregano - 1 teaspoon dried basil - Salt and pepper, to taste - 8 cups beef broth - 1 can (14 oz) diced tomatoes (with juice) - 2 cups sliced carrots - 2 cups chopped kale or spinach - 1 cup small pasta (like ditalini or orzo) - 2 tablespoons olive oil - Fresh basil leaves for garnish The heart of my Hearty Italian Meatball Soup lies in its main ingredients. I start with proteins: ground beef and pork. They blend well, offering rich flavors and moisture. The breadcrumbs and egg help bind the meatballs and keep them juicy. Garlic, oregano, and basil add depth and warmth to every bite. The beef broth and diced tomatoes create a savory base for the soup, while carrots and greens bring freshness and color. - Additional seasonings - Vegetarian substitutes - Garnishes You can add extra seasonings for more flavor. A pinch of red pepper flakes can spice things up. If you want a meatless option, try using lentils or chickpeas instead of meat. For garnishes, fresh basil leaves or a sprinkle of Parmesan cheese can make your soup look and taste amazing. - Large pot - Mixing bowl - Plate for meatballs - Ladle or serving spoon For this recipe, you will need a large pot to cook the soup and a mixing bowl for the meatballs. A plate helps hold the formed meatballs before cooking. A ladle or serving spoon is handy for serving. Having these tools ready will make your cooking easier and more fun. {{ingredient_image_1}} Mixing ingredients Start by taking a large mixing bowl. Add 1 pound of ground beef and 1/2 pound of ground pork. Next, mix in 1/2 cup of breadcrumbs and 1/4 cup of grated Parmesan cheese. Crack 1 large egg into the bowl. Then, add 2 minced garlic cloves, 1 teaspoon of dried oregano, and 1 teaspoon of dried basil. Season with salt and pepper to taste. Use your hands to mix everything until it is well combined. Forming meatballs Once your mixture is ready, take small portions and roll them into balls. Aim for about 1 inch in diameter. Place the formed meatballs on a plate. This step is fun and helps you feel connected to your food. Browning meatballs Heat 2 tablespoons of olive oil in a large pot over medium heat. Once the oil is hot, gently add the meatballs to the pot. Brown them on all sides for about 5 minutes. This adds great flavor and texture. After browning, remove the meatballs and set them aside. Building the soup base In the same pot, add 2 cups of sliced carrots. Cook them for about 3 minutes until they start to get soft. Then, pour in 8 cups of beef broth and a can of diced tomatoes (14 oz) with their juice. Bring this mixture to a simmer. The aroma will fill your kitchen and excite your taste buds. Adding vegetables and pasta After the soup base simmers, return the browned meatballs to the pot. Let them simmer for 15 minutes. Then, stir in 2 cups of chopped kale or spinach and 1 cup of small pasta, like ditalini or orzo. This adds color and nutrition to your soup. Simmering times Cook everything for an additional 10 to 12 minutes, or until the pasta is al dente. Taste the soup and adjust the seasoning with more salt and pepper if needed. This final step ensures every bite is packed with flavor. To make great meatballs, start with the right mix. I use both ground beef and ground pork. This blend adds depth and flavor. The pork keeps the meatballs moist, which is key for tenderness. - Techniques for flavor: - Add minced garlic and dried herbs like oregano and basil. These give your meatballs a tasty kick. - Grated Parmesan cheese adds a nice umami flavor. - Ensuring tenderness: - Don't overmix the meat. Mix until just combined. - Use a light hand when forming meatballs. Aim for about one inch in size. When cooking the soup, you want the right thickness and flavor. - Adjusting for thickness: - If you like a thicker soup, add less broth. You can also let it simmer longer to reduce it. - Use small pasta like ditalini or orzo to help thicken the soup as well. - Flavor enhancing tips: - Sauté the carrots before adding broth. This builds a richer flavor base. - Don’t forget to taste! Add salt and pepper to enhance the soup's taste. How you serve this soup can make it even better. - Best accompaniments: - Pair it with crusty bread. It’s perfect for dipping! - A simple salad on the side adds freshness. - Presentation ideas: - Garnish each bowl with fresh basil leaves. This adds a pop of color. - Serve in large bowls to show off the hearty meatballs and veggies. Pro Tips Use Fresh Herbs: Fresh basil adds a bright flavor to the soup. Consider adding it at the end of cooking to preserve its vibrant taste. Customize the Meatballs: Feel free to mix in other meats like turkey or chicken, or add spices such as red pepper flakes for a kick. Make it Ahead: This soup tastes even better the next day! Make a big batch and store leftovers in the refrigerator for easy meals. Perfect Pasta Cooking: To avoid mushy pasta, add it to the soup during the last 10-12 minutes of cooking so it remains al dente. {{image_2}} You can change the meat in the meatballs. Try turkey or chicken instead of beef and pork. These options make the soup leaner. They still taste great! You can also make meatless meatballs. Use lentils or chickpeas. You can blend them with spices. This will give you a hearty flavor without meat. If you need gluten-free options, use gluten-free breadcrumbs. They work just as well in the meatballs. You can also skip the pasta or use gluten-free pasta. This way, everyone can enjoy the soup. For low-carb diets, replace the pasta with zucchini noodles. You can spiralize zucchini into thin strips. This keeps the soup light yet filling. Want some heat? Add red pepper flakes to the soup. This gives it a nice kick. You can also try different herbs and spices. Swap basil for thyme or rosemary. Each one will change the flavor in a fun way. You can even mix and match herbs. This way, you create your own unique taste. To store leftovers, let the soup cool first. Then, place it in a container with a lid. Make sure to seal it tightly. You can keep the soup in the fridge for about three to four days. This way, you can enjoy it later. For freezing, pour the cooled soup into freezer-safe bags or containers. Leave some space at the top for expansion. Label your containers with the date. The soup stays good for about three months in the freezer. When you're ready to eat, remember to thaw it in the fridge overnight. When you reheat the soup, do it slowly over low heat. This keeps the flavors rich and the texture smooth. Stir often to avoid sticking. You can also use the microwave, but do it in short bursts. Always check the temperature to ensure it's hot throughout. Enjoy your comforting bowl of soup again! To boost flavor in your meatballs, use good seasoning. Salt and pepper are key. Add garlic for zest. You can also mix in grated cheese for richness. Try using fresh herbs like parsley or thyme for brightness. - Suggestions for seasoning: - Salt - Black pepper - Minced garlic - Additional herbs: - Fresh parsley - Thyme - Chopped basil Yes, you can use frozen meatballs. They save time and still taste good. Just add them directly to the soup. You may need to cook them a bit longer. - Recommendations and adjustments: - Add frozen meatballs straight to the soup. - Adjust cooking time by 5-10 minutes. - Cooking times for frozen meatballs: - Simmer for 20-25 minutes or until cooked through. You can pair this soup with bread or salads. A simple green salad adds freshness. Garlic bread makes a great side too. Top your soup with extra cheese for a nice touch. - Suggested side dishes: - Garlic bread - Green salad - Complementary toppings: - Grated Parmesan cheese - Fresh basil leaves This article shared how to create a tasty Italian meatball soup. We covered key ingredients, cooking steps, and helpful tips. I also included ways to vary the recipe and store leftovers properly. Remember, the right flavor and texture can make your soup shine. Use fresh herbs and adjust spices to fit your taste. Enjoy the warmth and comfort of your homemade creation. Cooking is fun, so explore and make it your own!

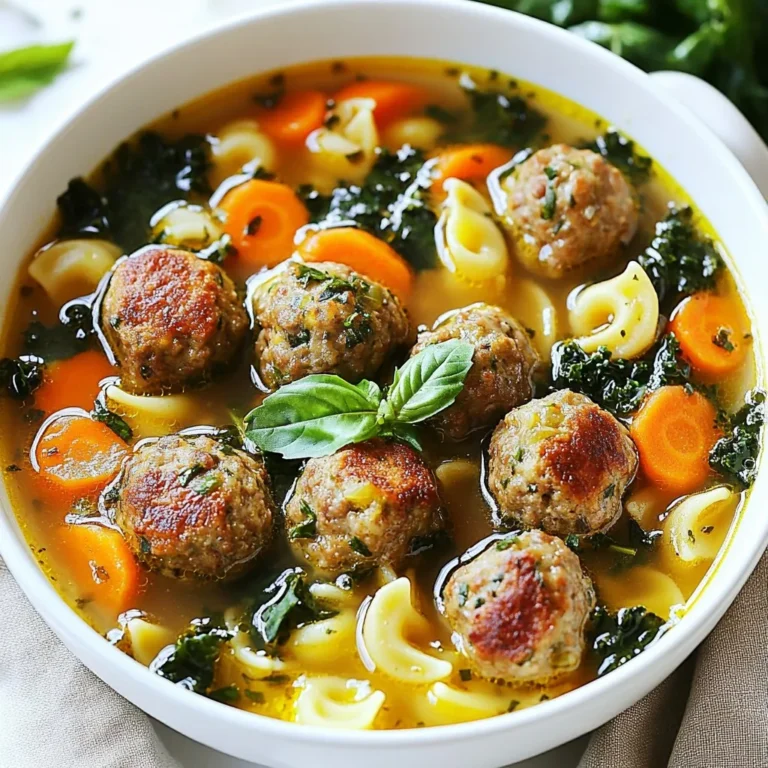
Hearty Italian Meatball Soup Flavorful Comfort Dish

PREV 1 … 65 66 67 … 86 NEXT
spicy fork kitchen

explore

DessertsDinnerAppetizersDrinks

Our Policies

  • Cookie Policy
  • Copyright Policy
  • Disclaimer
  • GDPR Policy
  • Terms Of Use
Back to Top
  • About
  • Contact Us
  • Privacy Policy
© 2026 spicy fork kitchen