FREE DINNER EBOOK! Get your copy!
  • Cookie Policy
  • GDPR Policy
  • Disclaimer
  • Terms Of Use
  • Visit my other site: Fun Cookie Recipes
spicy fork kitchen
  • Home
  • Dinner
  • Desserts
  • Drinks
  • Appetizers
  • Contact
  • About
  • Privacy Policy
  • Home
  • Dinner
  • Desserts
  • Drinks
  • Appetizers
  • Contact
  • About
  • Privacy Policy
  • Cookie Policy
  • GDPR Policy
  • Disclaimer
  • Terms Of Use
Visit my other site: Fun Cookie Recipes

HOME / CATEGORIES /

Latest

- 1 cup orzo pasta - 2 cups broccoli florets - 2 tablespoons olive oil - 1 small onion, finely chopped - 2 cloves garlic, minced - 3 cups vegetable broth - 1 cup sharp cheddar cheese, shredded - ½ cup grated Parmesan cheese - ½ cup heavy cream - Salt and pepper to taste - ¼ teaspoon crushed red pepper flakes (optional) - Fresh parsley for garnish Orzo pasta is a small, rice-shaped pasta. It cooks quickly and soaks up flavors well. Broccoli florets add color and nutrients. They bring a nice crunch too. Olive oil helps to sauté the onion and garlic. It adds a rich flavor base. Onion and garlic create a fragrant mix. They form the heart of many dishes. Sharp cheddar cheese makes the dish creamy and tasty. Parmesan adds a salty kick, enhancing the overall cheese flavor. Heavy cream adds richness. It makes every bite smooth and indulgent. You can swap orzo with any small pasta, like ditalini. If you want a gluten-free option, use rice or quinoa. For a lighter dish, you can use less cheese or low-fat cream. If broccoli isn’t your favorite, try spinach or kale. They both cook quickly and mix well. For a plant-based option, use vegan cheese and plant-based cream. You can also use water or vegetable stock instead of broth for a lighter flavor. {{ingredient_image_1}} Start by boiling salted water in a large pot. Once it boils, add 1 cup of orzo pasta. Cook according to the package instructions until the orzo is al dente. This usually takes about 8 to 10 minutes. When done, drain the orzo and set it aside for later. In the same pot, pour in 2 tablespoons of olive oil over medium heat. Add 1 small onion, finely chopped, and sauté it until it turns translucent, which takes about 3 to 4 minutes. Next, stir in 2 cloves of minced garlic and cook for 1 minute. The garlic should smell fragrant but not brown. Now, add 2 cups of broccoli florets. Sauté them for 2 to 3 minutes until they start to soften. Pour in 3 cups of vegetable broth and let it come to a gentle boil. Once it boils, reduce the heat to low. Simmer the mixture for about 5 minutes. This helps the broccoli get tender. After that, add ½ cup of heavy cream, 1 cup of sharp cheddar cheese, and ½ cup of grated Parmesan cheese. Stir the mixture until the cheeses melt and create a creamy sauce. Now, it's time to bring everything together! Add the cooked orzo back into the pot. Mix well to ensure the orzo is coated in the creamy sauce. Season it with salt and pepper to taste. If you like a little heat, add ¼ teaspoon of crushed red pepper flakes. Stir everything until well combined and heated through. Let it sit for a couple of minutes, then serve warm. Don’t forget to garnish with fresh parsley for a pop of color! To get that creamy texture in your broccoli cheddar orzo, use heavy cream. It adds richness. Mix in sharp cheddar and Parmesan cheese for a smooth finish. Stir the cheese in slowly. This helps it melt evenly. If you want it creamier, add more cheese or cream. Cook over low heat to keep the sauce from separating. Cooking broccoli perfectly makes a big difference. Start with fresh florets. Cut them into small, even pieces. This helps them cook evenly. Add the broccoli to the pot after the onion and garlic. Cook for just a few minutes. You want it tender but still bright green. If you overcook it, the color fades and the taste changes. Seasoning is key for flavor. Use salt and pepper for the base. Add crushed red pepper flakes for a bit of heat. Taste as you go to find the right balance. You can also try adding garlic powder or onion powder for extra flavor. Fresh herbs like parsley on top add freshness. Don't skip the seasoning; it makes your dish shine. Pro Tips Choose the Right Cheese: Opt for a high-quality sharp cheddar for a richer flavor profile. Aged cheddar will provide a deeper taste. Perfectly Cooked Broccoli: To retain a vibrant green color and crunch, avoid overcooking the broccoli. It should be tender but still firm. Texture Matters: If you prefer a creamier consistency, add more heavy cream or a splash of milk gradually until the desired creaminess is achieved. Garnish for Flavor: Don’t skip the fresh parsley! It adds a pop of color and a fresh flavor that balances the richness of the cheese and cream. {{image_2}} You can easily add protein to your Broccoli Cheddar Orzo. Chicken and shrimp work great. For chicken, try using cooked, diced breast. Just mix it in when you combine the orzo and sauce. For shrimp, sauté them in the olive oil first. Then, add them after you cook the broccoli. This adds flavor and makes the dish more filling. To make a vegan version, swap the cheese and cream. Use plant-based cheese and coconut cream. For the broth, opt for vegetable broth. This keeps the rich taste without dairy. You can also add nuts, like cashews, for creaminess. Blend them with the broth for extra smoothness. This way, you still enjoy the creamy texture. Cheese lovers can have fun with this dish. Besides cheddar, try using gouda or mozzarella. Each type of cheese brings its own flavor. For a sharper taste, choose aged cheddar. If you like a mild taste, mozzarella is perfect. Feel free to mix cheeses too. Combining them can create a unique flavor that you’ll love. To store leftover Broccoli Cheddar Orzo, let it cool first. Use an airtight container to keep it fresh. You can store it in the fridge for up to three days. Make sure to label the container with the date. When ready to eat, take out your orzo. Place it in a pot over low heat. Add a splash of vegetable broth or cream to help it warm up. Stir gently until heated through. You can also use the microwave. Heat it in short bursts, stirring in between. If you want to freeze Broccoli Cheddar Orzo, cool it completely first. Use a freezer-safe container or bag. It can last up to three months in the freezer. When you’re ready to eat, thaw it overnight in the fridge. Reheat it as noted above. Yes, you can use other pasta types. Penne or fusilli work well. These shapes hold sauce nicely. Just adjust the cooking time based on the package instructions. You can store it for up to three days. Keep it in an airtight container. This keeps it fresh and tasty. If you want to enjoy it later, make sure it cools down before you store it. Broccoli Cheddar Orzo pairs well with many sides. Try serving it with a fresh salad or garlic bread. You could also add some grilled chicken or shrimp for extra protein. Yes, this recipe is great for meal prep. Make a big batch and divide it into portions. You can easily grab a serving for lunch or dinner during the week. Just reheat before serving, and enjoy! This blog post covered all the essential steps to make Broccoli Cheddar Orzo. We looked at the ingredients, detailed key components, and offered substitutions. I guided you through cooking, making the sauce, and combining everything. Tips helped you achieve a creamy texture and cook the broccoli right. We also explored protein options and storage methods. In summary, this dish is easy to make and adaptable. Enjoy your cooking journey and share it with others!

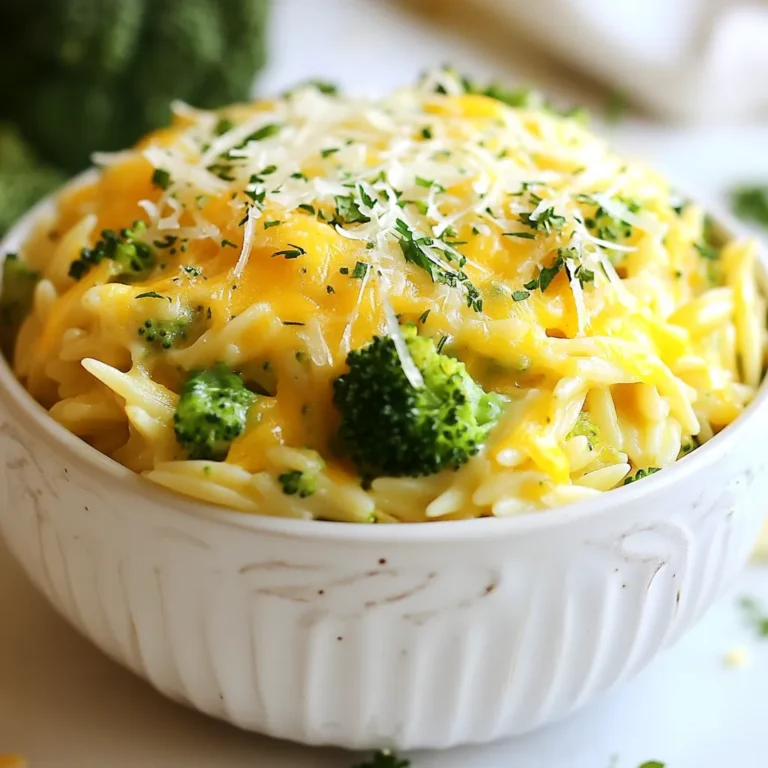
Broccoli Cheddar Orzo Creamy and Easy Comfort Dish

To make delicious sticky orange chicken, you need simple ingredients. Here’s what you will need: - 1 lb (450g) boneless chicken thighs, cut into bite-sized pieces - 1/2 cup cornstarch - 1/4 cup vegetable oil (for frying) - 1/4 cup honey - 1/2 cup orange juice (freshly squeezed for best flavor) - Zest of 1 orange - 3 tablespoons soy sauce (low sodium) - 1 tablespoon rice vinegar - 2 cloves garlic, minced - 1 inch fresh ginger, minced - 1 teaspoon sesame oil These ingredients create a sweet and tangy flavor that makes this dish stand out. Adding garnishes makes your sticky orange chicken look great. You can use: - 1 tablespoon sliced green onions - Sesame seeds These garnishes add color and texture to your dish. They make it more appealing and tasty. You might not have every ingredient at home. Here are some easy swaps: - Replace chicken thighs with chicken breasts for a leaner option. - Use agave syrup instead of honey for a vegan choice. - If you lack fresh ginger, try using ground ginger. Just use less! - For a gluten-free option, choose tamari instead of soy sauce. These substitutions keep the flavor while meeting different needs. {{ingredient_image_1}} First, start with boneless chicken thighs. Cut them into bite-sized pieces. In a large bowl, add the chicken and toss it with cornstarch. Make sure every piece is well coated. This step is key for a crispy result. Coating the chicken helps it fry better and adds texture. Next, heat the vegetable oil in a large skillet or wok. Use medium-high heat until the oil shimmers. Carefully add the chicken in batches. Don’t overcrowd the pan; this keeps the chicken crispy. Fry each piece for about 4 to 5 minutes per side. Look for a golden-brown color. Once done, remove the chicken and let it drain on paper towels. For the sauce, grab a separate bowl. Whisk together honey, orange juice, and orange zest. Add soy sauce, rice vinegar, minced garlic, and ginger. Mix well until smooth. This sauce gives the dish its sticky and sweet flavor. Now, pour the sauce mixture into the same skillet used for frying. Bring it to a simmer over medium heat. Add the fried chicken and stir gently. Cook for 2 to 3 more minutes to let the sauce thicken. Finish by drizzling sesame oil over the chicken for extra flavor. To get crispy orange chicken, start with cornstarch. Coat each chicken piece well. This helps form a crunchy crust. Heat the oil until it shimmers. Fry the chicken in small batches. This way, it cooks evenly and gets crispy. Don’t overcrowd the pan. Let the chicken rest on paper towels to drain excess oil. This keeps it crispy. To boost the sauce flavor, use fresh ingredients. Fresh orange juice gives the best taste. Don’t skip the orange zest; it adds great aroma. Garlic and ginger bring warmth and depth. For extra spice, add a pinch of red pepper flakes. You can also mix in a splash of lime juice for a tangy twist. This makes the sauce even more lively. One common mistake is not coating the chicken well. Make sure every piece is covered in cornstarch. Another mistake is cooking at too low a heat. This can lead to soggy chicken. Always heat the oil before adding the chicken. Lastly, avoid stirring too much while frying. Let the chicken brown nicely before flipping. This ensures a great texture and flavor. Pro Tips Coat the Chicken Well: Ensure the chicken pieces are thoroughly coated in cornstarch for a perfect crispy texture when fried. Control the Heat: Maintain medium-high heat when frying to achieve a golden brown crust without burning the chicken. Use Fresh Ingredients: Freshly squeezed orange juice and zest elevate the flavor of the sauce, making it more aromatic and delicious. Let the Sauce Thicken: Allow the sauce to simmer with the chicken for a few minutes to enhance the sticky texture and flavor. {{image_2}} To make a spicy version, add red pepper flakes or sriracha to the sauce. Start with 1 teaspoon of red pepper flakes. Mix this into the sauce when you whisk together the honey, orange juice, and other ingredients. Taste and adjust as needed. The heat will balance well with the sweetness of the honey and orange. This twist adds a fun kick to your dish. You can make a baked version for a lighter meal. Instead of frying the chicken, coat it in cornstarch. Place the chicken on a baking sheet lined with parchment paper. Bake at 400°F (200°C) for about 20-25 minutes. Flip the chicken halfway through for even cooking. Then, toss the baked chicken in the sauce just like before. This keeps the flavor while reducing the oil. If you prefer a vegetarian option, swap the chicken with tofu or tempeh. Cut the tofu into bite-sized cubes and press to remove excess moisture. Coat the tofu in cornstarch and fry or bake it until crispy. Use the same delicious orange sauce to coat the tofu. This option gives you all the flavor without meat, making it perfect for vegetarians. After cooking your sticky orange chicken, let it cool first. Store leftovers in an airtight container. Keep the chicken in the fridge for up to three days. Make sure to separate any sauce to keep the chicken crispy. If you mix it with the sauce, the chicken will get soggy. To reheat, use a skillet over medium heat. Add a touch of oil to keep it moist. Heat the chicken for about five minutes. Stir it often until it's warm all the way through. You can also microwave it, but the chicken may not stay crispy. Cover it with a damp paper towel and heat in 30-second bursts. You can freeze sticky orange chicken for up to three months. Place it in a freezer-safe container. Make sure to label it with the date. To thaw, move it to the fridge overnight before reheating. This keeps the chicken juicy and flavorful. Just remember, freezing may change its texture slightly. To reduce the sweetness, cut back on honey. Use just 2 tablespoons instead of 1/4 cup. You can also add more soy sauce to balance the flavors. Try adding a splash of extra vinegar for some tang. This will help create a more savory dish without losing its flavor. Yes, you can prepare parts of the recipe in advance. Cook the chicken and make the sauce ahead of time. Store them separately in the fridge. When ready to eat, reheat the chicken and mix it with the sauce. This way, the chicken stays crispy and the sauce remains fresh. Sticky Orange Chicken tastes great with various sides. Here are some ideas: - Steamed white rice or jasmine rice - Fried rice with veggies - Stir-fried broccoli or green beans - Asian-style slaw for a crunchy bite These sides complement the chicken and enhance your meal experience! You learned how to make sticky orange chicken from scratch. We covered key ingredients and helpful tips for perfect results. You also discovered tasty variations and proper storage methods. Keeping these steps in mind will help you cook a meal that impresses everyone. Use this recipe to master sticky orange chicken and enjoy cooking! The best food brings joy, so get started today.

Sticky Orange Chicken Flavorful and Easy Recipe

To make a delicious No-Bake Strawberry Banana Pudding, gather these simple ingredients: - 1 cup strawberries, hulled and sliced - 1 cup bananas, sliced - 2 cups vanilla pudding (store-bought or homemade) - 1 cup whipped cream (store-bought or homemade) - 1 package (about 10 oz) graham crackers, crushed - 1 teaspoon vanilla extract - Optional: fresh mint leaves for garnish Each ingredient brings its own flavor and texture. The strawberries add a sweet and tart burst, while the bananas bring a creamy sweetness. Vanilla pudding creates a rich base, and whipped cream adds lightness. The crushed graham crackers give a satisfying crunch. Don't forget the mint for a pop of color and freshness! Feel free to mix things up with your favorite fruits. This recipe is all about creativity and fun. Enjoy each step as you create this easy and tasty dessert! {{ingredient_image_1}} Start by mixing the vanilla pudding with the vanilla extract. Use a large mixing bowl for this. Stir the two together until they blend well. This helps to get a smooth and tasty pudding. Next, gently fold in the whipped cream. This makes the pudding light and fluffy. Be careful not to stir too hard. You want to keep that airy texture. Now, it's time to layer your ingredients. Grab a rectangular dish or some pretty glasses. Begin with a layer of crushed graham crackers at the bottom. This adds a nice crunch. Then, spread a layer of the vanilla pudding mixture on top. After that, add a layer of sliced bananas. Follow with a layer of sliced strawberries. Keep repeating these layers until you run out of ingredients. Finish with a layer of pudding on top for a great look. Once you finish layering, cover the dish with plastic wrap. Place it in the fridge for at least 2 hours. This helps the flavors mix together and the graham crackers to soften. When you are ready to serve, take the pudding out of the fridge. Garnish the top with more whipped cream, fresh strawberry slices, and banana slices. Adding mint leaves gives a lovely touch too. Enjoy your delicious creation! To make the best no-bake strawberry banana pudding, start by choosing your pudding base. You can use homemade or store-bought vanilla pudding. Homemade pudding often has a creamier texture. It can enhance the flavor. However, store-bought saves you time and effort. Both options work well, so pick what suits you best. Chilling the pudding is key. After you layer the ingredients, cover the dish and refrigerate it for at least 2 hours. This time lets the flavors blend. It also softens the graham crackers, making them easier to enjoy. Garnishing your pudding makes it look amazing. Use extra whipped cream on top for a fluffy finish. Add fresh slices of strawberries and bananas for color and taste. Fresh mint leaves can add a nice touch too. They give a burst of green and freshness. When choosing fruits for your topping, stick with what complements strawberries and bananas. Other berries like blueberries or raspberries can add variety. You can even try peaches for a twist. The key is to have fun with it and make it look pretty! Pro Tips Use Ripe Fruits: Ensure your strawberries and bananas are perfectly ripe for the best flavor and sweetness in your pudding. Chill the Pudding: Allowing the pudding to chill for at least 2 hours helps the flavors meld and the texture to set beautifully. Customize Your Layers: Feel free to add other fruits like blueberries or peaches for a unique twist on this classic dessert. Graham Cracker Alternatives: For a gluten-free option, substitute graham crackers with crushed gluten-free cookies or use crushed nuts for added crunch. {{image_2}} You can change the fruit in your pudding. Other berries work great too. Try using blueberries or raspberries for a twist. If you want to add even more flavor, think about peaches or kiwi. These fruits add a bright taste and nice color. Just make sure to slice them thinly so they mix well. Want to take your pudding to the next level? Add chocolate or caramel for a sweet surprise. You can drizzle these over the layers for extra richness. If you prefer less sugar, use honey or agave. Just a spoonful can adjust the sweetness to your liking. These simple swaps keep your dessert exciting and tasty! To keep your No-Bake Strawberry Banana Pudding fresh, refrigeration is key. After you layer the pudding, cover it tightly with plastic wrap. This prevents air from getting in and keeps the flavors intact. Store it in the fridge until you are ready to serve. For leftovers, scoop the pudding into smaller containers. This makes it easy to grab and enjoy later. Your pudding will stay fresh in the fridge for about three days. After that, the texture and flavor may change. Look for signs that the pudding has gone bad. If you see any liquid separation or an off smell, it’s best to toss it. Always trust your senses; they are your best guide! Yes, you can make this pudding a day in advance. Just layer all the ingredients and chill it. The longer it sits, the better the flavors blend. You will love how easy it is! If you want a change, try using vanilla wafers or digestive biscuits. These will add a nice twist to the texture. You can also use crushed cookies for a unique flavor. You can store leftover pudding in the fridge for about three days. Make sure to cover it well. This keeps it fresh and tasty for your next snack! Freezing is not the best for this pudding. The texture may change when thawing. It is best enjoyed fresh or refrigerated. Yes, you can make this pudding gluten-free! Just use gluten-free graham crackers or any gluten-free cookie. This way, everyone can enjoy it without worry. This blog post walks you through making a delicious no-bake strawberry banana pudding. You learned the key ingredients, simple steps, and helpful tips. With options to change up fruits or flavors, the recipe is easy to adapt. Storing tips ensure your pudding stays fresh. Enjoy making this treat—it's fun and ideal for sharing! I hope you try it and impress your family and friends. Dive into this tasty dessert and make it your own!

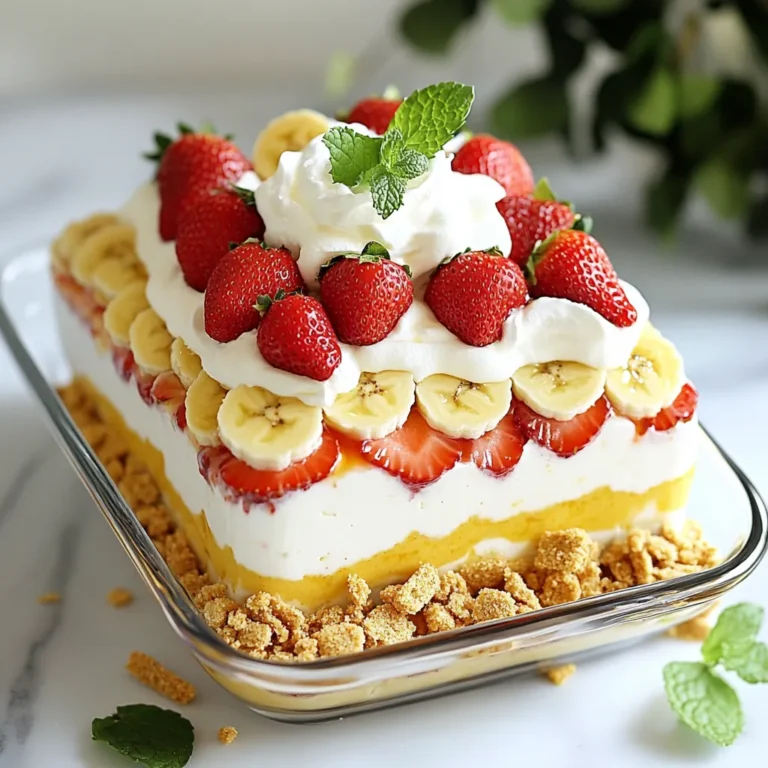
No-Bake Strawberry Banana Pudding Easy and Delicious

- 1 cup orzo pasta - 1 can (15 oz) chickpeas, drained and rinsed - 1 cup cherry tomatoes, halved - 1 cucumber, diced - 1/4 red onion, finely chopped - 1/4 cup fresh parsley, chopped - 1/4 cup bell pepper (any color), diced - 1/4 cup crumbled feta cheese (optional) - 3 tablespoons olive oil - 2 tablespoons lemon juice - 1 teaspoon lemon zest - 1 teaspoon dried oregano - Salt and pepper to taste When I make Lemony Chickpea Orzo Salad, I love how fresh and bright it feels. The orzo pasta serves as a great base. It cooks quickly and soaks up all the flavors. Chickpeas add protein and a nice texture. They are also simple to use, just drain and rinse them. The cherry tomatoes bring a pop of color and sweetness. I like to cut them in half for better bites. Cucumber adds crunch and coolness. Dice it small to mix well with the other veggies. Red onion gives a sharp taste that brightens the salad. I chop it finely so it blends well. Fresh parsley adds a lovely herb flavor. I always recommend using fresh herbs for the best taste. Bell pepper adds more color and sweetness. You can use any color you like. I often add feta cheese for creaminess, but it's optional. It makes the salad richer and savory. For the dressing, I mix olive oil, lemon juice, and lemon zest. This dressing is zesty and bright. The dried oregano gives a nice herbal note. I always add salt and pepper to taste, as it brings out the flavors. This salad is easy to make. You can customize it as you like. The mix of flavors makes it a favorite for warm days or picnics. {{ingredient_image_1}} To start, bring a pot of salted water to a boil. This step helps flavor the orzo. Once the water boils, add 1 cup of orzo pasta. Cook it for about 8 to 10 minutes until it is al dente. This means it should be firm but not hard. After cooking, drain the orzo in a colander. Rinse it with cold water to stop the cooking. Set the orzo aside for later. While the orzo cooks, prepare the salad base. In a large mixing bowl, combine the following ingredients: - 1 can (15 oz) chickpeas, drained and rinsed - 1 cup cherry tomatoes, halved - 1 cucumber, diced - 1/4 red onion, finely chopped - 1/4 cup fresh parsley, chopped - 1/4 cup bell pepper, diced Make sure to mix these well. The chickpeas add protein, and the veggies bring color and crunch. Next, you will make the dressing. In a small bowl, whisk together: - 3 tablespoons olive oil - 2 tablespoons lemon juice - 1 teaspoon lemon zest - 1 teaspoon dried oregano - Salt and pepper to taste This dressing ties all the flavors together. The lemon juice gives it a bright taste, while oregano adds depth. Now, it’s time to combine everything. Add the cooked orzo to the bowl with the salad base. Pour the dressing over the salad and mix gently. If you like, sprinkle in 1/4 cup of crumbled feta cheese. Toss everything lightly to coat the ingredients evenly. Lastly, let the salad chill in the refrigerator for about 15 minutes. This step allows the flavors to meld beautifully. Chilling also makes the salad refreshing and cool for serving. To make orzo just right, start by boiling salted water. Add the orzo once the water bubbles. Cook it for about 8 to 10 minutes. You want it to be al dente, which means it should have a slight bite when you chew it. After cooking, drain the orzo in a colander. Rinse it under cold water to stop the cooking process and prevent clumping. This step is key for keeping your salad light and fresh. To boost flavors, think about adding fresh herbs. Basil or mint can add a nice twist. You can also try spices like cumin or smoked paprika for a warm touch. When it comes to balancing flavors, use lemon juice for acidity. If it's too sharp, add a hint of honey or maple syrup. This will calm the flavors while keeping the dish bright and zesty. Presentation matters! Serve your salad in a large, colorful bowl. This draws the eye and makes it look appetizing. For garnish, sprinkle some extra parsley on top. You can also add lemon wedges on the side. This adds a pop of color and gives guests the option for more lemony flavor. Use a clear bowl to show off those vibrant colors! Pro Tips Cook Orzo Perfectly: Keep an eye on the orzo while cooking to ensure it doesn't get mushy. Aim for al dente for the best texture in the salad. Fresh Ingredients Matter: Use fresh vegetables and herbs for the best flavor. This salad is all about bright, fresh tastes! Chill for Flavor: Allow the salad to chill for at least 15 minutes before serving. This resting time helps the flavors meld together beautifully. Customize it: Feel free to add other veggies or proteins like grilled chicken or avocado to make it your own! {{image_2}} You can easily add protein to this salad. Grilled chicken or shrimp works great. These proteins enhance flavor and make the dish more filling. You could also try other beans, like black beans or kidney beans. They add a fun texture and extra nutrients. This salad is very flexible with veggies. You can swap in bell peppers or zucchini for a different taste. Try using seasonal vegetables too, like asparagus in spring or squash in fall. This way, you can always enjoy fresh flavors. If you want a vegan version, you can skip the feta cheese. Use a hormone-free substitute like tofu or vegan feta for creaminess. For the dressing, try using tahini or a simple vinaigrette. Both options keep the salad zesty and bright without dairy. To keep your Lemony Chickpea Orzo Salad fresh, use airtight containers. Glass containers work great, as they do not stain or absorb smells. If you plan to eat it later, keep the dressing separate. This helps keep the salad crisp and bright. Store the salad in the fridge and enjoy it within a few days. In the fridge, this salad lasts about 3 to 5 days. Always check for signs of spoilage. If the salad smells sour or looks slimy, it is best to throw it away. Freshness is key to enjoying this dish. To prepare this salad for lunches, cook the orzo and chop the veggies ahead of time. Layer cooked orzo, chickpeas, and veggies in meal prep containers. Keep the dressing in a small container. This way, the salad stays fresh until you are ready to eat. When packed correctly, it makes for a quick and healthy lunch option! Yes, you can make this salad ahead of time. To prepare it in advance, follow these steps: - Cook the orzo and let it cool completely. - Mix the chickpeas, vegetables, and dressing in a bowl. - Add the orzo just before serving to keep it fresh. - If you include feta cheese, add it right before serving too. This way, the salad stays crisp and tasty. This salad packs a nutritious punch. Here's the breakdown per serving: - Calories: About 320 - Protein: 12 grams - Carbs: 44 grams - Fats: 12 grams These values can vary based on the exact ingredients you use. To make this salad gluten-free, swap out the orzo. Here are some options: - Use gluten-free orzo made from rice or quinoa. - Substitute with gluten-free pasta, like brown rice pasta. - You can also use quinoa for a different texture. These options will keep your salad delicious and gluten-free! Absolutely! This salad is great for meal prep. Here are some tips: - Store the salad in airtight containers. - Keep the dressing separate until you're ready to eat. - The salad lasts up to four days in the fridge. This makes it easy to grab a healthy meal on the go! This salad combines fresh ingredients and simple steps for a tasty dish. We used orzo, chickpeas, and veggies, topped with a delicious dressing. Feel free to change it up with different proteins or veggies to suit your taste. Store leftovers properly for future meals. Enjoy this easy and healthy recipe any time!

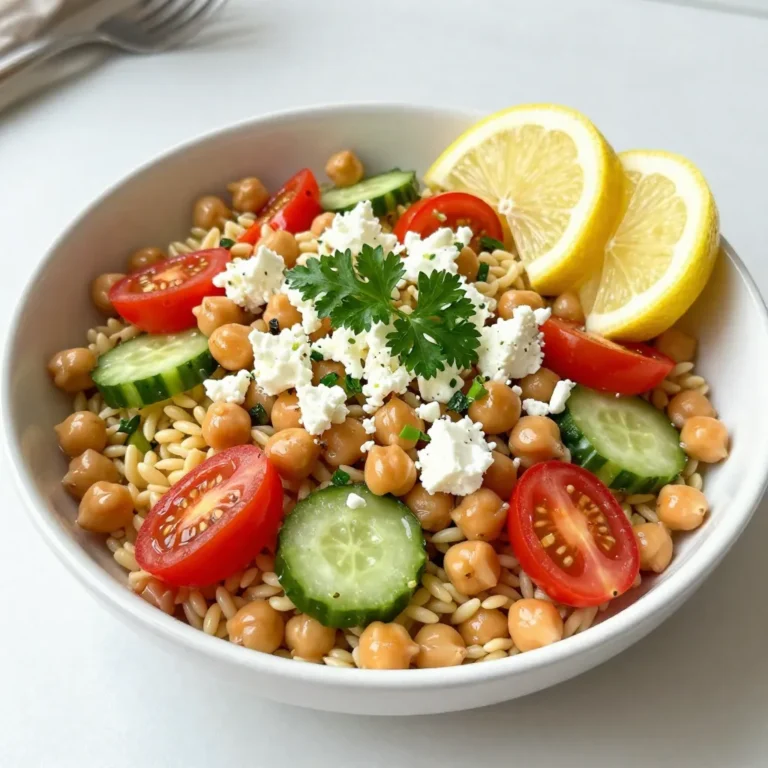
Lemony Chickpea Orzo Salad Refreshing and Bright Dish

- 1 pound Italian sausage - 1 medium onion, diced - 6 cups chicken broth - 1 cup heavy cream - 3 cloves garlic, minced - 3 medium carrots, diced - 2 celery stalks, diced - 1 (14.5 oz) can diced tomatoes - 1 (15 oz) can cannellini beans - 1 cup ditalini pasta - Italian seasoning, salt, and pepper - Fresh parsley, chopped - Grated Parmesan cheese When I set out to create the perfect creamy sausage ditalini soup, I knew the ingredients had to shine. Each one plays a key role in building the soup's rich flavor. The main ingredient is Italian sausage. You can choose mild or spicy sausage. It adds depth and warmth. Next, the onion adds sweetness and aroma when sautéed. Combine that with garlic, and you start to build a lovely base. The broth is crucial. I use chicken broth for its rich taste. It holds the soup together and gives it body. Then, the heavy cream adds a smooth, luscious texture. Moving on to the additional ingredients, carrots and celery bring freshness. They add a nice crunch that contrasts with the creamy broth. Diced tomatoes give brightness and a slight tang. Cannellini beans add protein and heartiness, making the soup filling. Ditalini pasta is the perfect choice. It holds the soup well, so each bite is satisfying. For seasoning, I use Italian seasoning, salt, and pepper. They enhance all the flavors without overpowering them. Finally, when serving, I recommend garnishing with fresh parsley and grated Parmesan. They add color and extra flavor. This soup is not just a meal; it’s a warm embrace in a bowl. Each ingredient plays a part in making it hearty and flavorful. {{ingredient_image_1}} Start by heating a splash of olive oil in a large pot over medium heat. Add 1 pound of Italian sausage to the pot. Cook it until it turns brown and crispy. Use a spoon to break it apart as it cooks. Once done, transfer the sausage to a plate and set it aside. This gives the sausage time to rest and keeps it juicy. In the same pot, add the diced onion, carrots, and celery. Stir them well and sauté for about 5 minutes. You want the vegetables to soften a bit. Next, stir in 3 cloves of minced garlic. Cook this for another minute until you smell that great garlic aroma. This step builds a solid flavor base for your soup. Now, pour in 6 cups of chicken broth. Add the can of diced tomatoes, making sure you include the juice, along with 1 can of rinsed and drained cannellini beans. Stir everything together well. Bring the mixture to a boil. Once boiling, add in 1 cup of ditalini pasta. Lower the heat and let it simmer for about 10 to 12 minutes. Check the pasta to ensure it's al dente. Finally, return the cooked sausage to the pot. Stir in 1 cup of heavy cream and 1 teaspoon of Italian seasoning. Season with salt and pepper to taste. Let everything simmer for another 3 to 5 minutes to heat through. This step blends all the flavors together and makes the soup creamy and rich. To avoid overcooking the pasta, add it when the soup boils. Set a timer for the ditalini. Cook it just until it's firm, or al dente. This way, it won't turn mushy in your soup. If you like a creamier soup, add more heavy cream. Start with half a cup and adjust to your taste. You can also use half-and-half if you want a lighter option. For extra flavor, consider adding fresh herbs like basil or oregano. A pinch of red pepper flakes can add warmth without overpowering. I love using mild Italian sausage for a classic taste. But spicy sausage adds a fun kick. Try chicken sausage for a lighter dish, too! Each type brings its own flavor, so choose what you enjoy most. Serve your soup with a fresh side salad or some roasted veggies. These add freshness and crunch. You can't go wrong with crusty bread. A warm baguette or sourdough pairs perfectly. Dip it into the soup for a delightful bite. Don't forget to sprinkle fresh parsley and Parmesan on top for a beautiful finish! Pro Tips Use Quality Sausage: Opt for high-quality Italian sausage for a richer flavor. If possible, buy fresh sausage from a local butcher for the best taste. Customize the Veggies: Feel free to add or substitute vegetables based on what you have on hand, such as bell peppers or spinach, for added nutrition and flavor. Adjust Creaminess: For a lighter soup, reduce the amount of heavy cream or replace it with half-and-half or a plant-based cream alternative. Let It Rest: Allow the soup to sit for a few minutes after cooking. This resting time helps the flavors meld together, enhancing the overall taste. {{image_2}} You can change up this soup with different beans. White beans are great, but you can also use black beans. They add a nice color and taste. If you want a lighter meal, try turkey sausage instead of Italian sausage. This swap keeps the flavor but cuts down the fat. To make Creamy Sausage Ditalini Soup gluten-free, use gluten-free pasta. Many brands offer great options. For a dairy-free version, swap heavy cream with coconut milk. It keeps the soup creamy while adding a hint of sweetness. Adding Italian greens like kale or spinach gives extra nutrients. You can stir them in near the end of cooking. For those who like heat, add crushed red pepper flakes. This gives the soup a spicy kick, perfect for chilly days. Adjust the amount based on your taste. To keep your Creamy Sausage Ditalini Soup fresh, store it in an airtight container. Let the soup cool to room temperature before sealing. Place it in the fridge for up to four days. If you want to freeze it, pour the soup into freezer-safe bags. Remove as much air as possible to prevent freezer burn. Lay the bags flat for easy stacking. When ready to eat, thaw it overnight in the fridge. Reheat it on the stove over low heat, stirring often to warm evenly. Creamy Sausage Ditalini Soup can last in the fridge for about four days. If frozen, it can stay good for three months. Always check for signs of spoilage. If the soup smells sour or shows mold, discard it. Changes in color or texture can also mean it’s time to toss it out. You can make this soup ahead of time for busy weeknights. It’s easy to prepare in large batches. Store it in single-serving containers for quick meals. Pair it with a slice of crusty bread or a simple salad for a complete meal. This soup also tastes great the next day, as the flavors deepen overnight. Yes, you can make Creamy Sausage Ditalini Soup ahead of time. To do this, follow these best practices: - Prepare the soup as directed, but do not add the cream. - Allow the soup to cool completely. - Store it in an airtight container in the fridge for up to three days. - When ready to eat, reheat the soup on the stove. Add cream slowly while stirring to keep it smooth. Making it this way helps the flavors blend well. You can also freeze the soup for up to three months. Just remember to leave out the cream before freezing. This soup pairs well with several sides. Here are some great options: - Crusty bread for dipping. - A fresh green salad for a light touch. - Garlic knots for a tasty bite. - Grilled cheese sandwiches for a comforting combo. These sides will enhance your meal and provide a satisfying experience. If you want to add heat, there are some easy tips to follow: - Use spicy Italian sausage instead of mild. - Add red pepper flakes when cooking the sausage. - Stir in some diced jalapeños or a splash of hot sauce before serving. - For a smoky touch, add a chipotle pepper in adobo sauce. These methods will give your soup the kick you crave! Yes, you can use different pasta types in this soup. Here are some alternatives: - Small shells or macaroni can be great substitutes. - Orzo adds a nice texture and cooks quickly. - Gluten-free pasta works well for those with dietary needs. Choose any pasta you enjoy. Just adjust cooking time based on the type you use. You learned how to create a delicious Creamy Sausage Ditalini Soup. We covered main ingredients like Italian sausage, cream, and chicken broth. I shared step-by-step instructions to help you cook it right. Tips and variations let you tweak the recipe to suit your taste. Remember, fresh herbs and the right sides can make it even better. Enjoy trying this recipe; it’s simple and very tasty. You’ll impress everyone at your table!

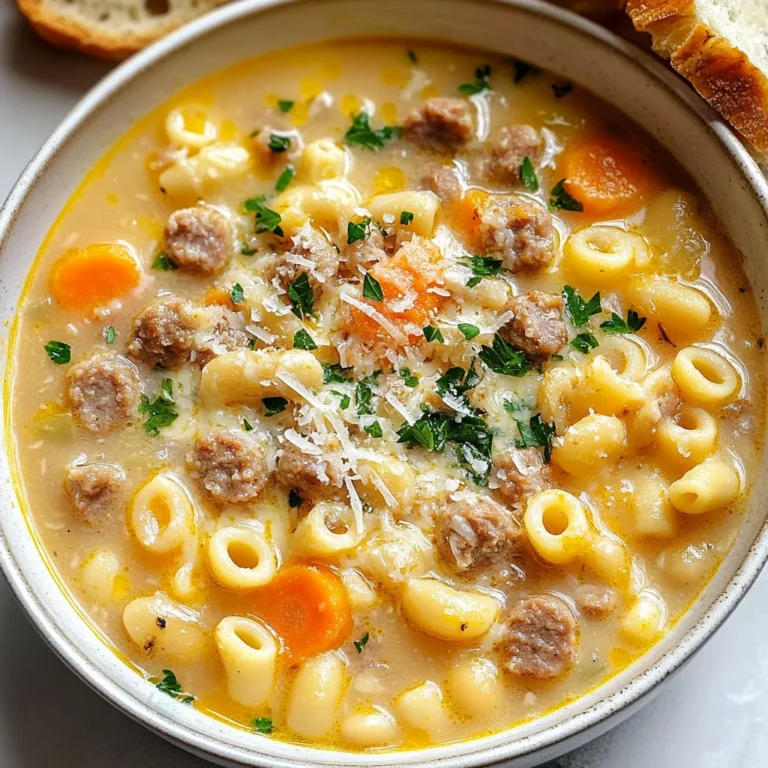
Creamy Sausage Ditalini Soup Hearty and Flavorful Dish

- 12 ounces rigatoni pasta - 1 (5.2-ounce) package of Boursin cheese (garlic and herbs flavor) - 1 cup heavy cream - 1 cup cherry tomatoes, halved - 1 cup baby spinach, roughly chopped - 1/2 cup grated Parmesan cheese - 2 tablespoons olive oil - 3 cloves garlic, minced - Salt and pepper to taste - Fresh basil leaves for garnish The first step in making Boursin creamy rigatoni is gathering your ingredients. Each item plays a key role in creating flavors that dance on your tongue. Start with 12 ounces of rigatoni pasta. This shape holds sauce well, making every bite satisfying. You’ll need a 5.2-ounce package of Boursin cheese with garlic and herbs. This cheese adds a creamy and rich taste that makes the dish special. Next, grab 1 cup of heavy cream. This helps create that luxurious sauce texture. For freshness, use 1 cup of cherry tomatoes, halved. They will burst with sweetness when cooked. You also want 1 cup of baby spinach, roughly chopped. It adds color and nutrients. Don’t forget 1/2 cup of grated Parmesan cheese. This cheese adds a nice salty kick. You’ll also need 2 tablespoons of olive oil to sauté the garlic. Speaking of garlic, use 3 cloves, minced. It brings a warm aroma to the dish. Season with salt and pepper to taste. Finally, fresh basil leaves make the perfect garnish. They add a pop of color and a fresh taste. Enjoy gathering these ingredients; they will come together to create a delightful meal! {{ingredient_image_1}} To start, bring a large pot of salted water to a boil. Add 12 ounces of rigatoni pasta. Cook it according to the package instructions until it is al dente, which means it should still have a little bite. This should take about 10-12 minutes. When it's ready, reserve 1/2 cup of the pasta water. This water will help make the sauce creamy later. Then, drain the pasta in a colander and set it aside. In a large skillet, heat 2 tablespoons of olive oil over medium heat. Add 3 minced cloves of garlic and sauté for about 1 minute. You want the garlic to be fragrant but not burnt. Next, add 1 cup of halved cherry tomatoes to the skillet. Cook them for about 3-4 minutes until they are soft and juicy. Lower the heat and stir in 1 package of Boursin cheese and 1 cup of heavy cream. Mix everything together until the cheese melts and the sauce becomes creamy. Now, it’s time to bring it all together. Slowly add the cooked rigatoni to the skillet. Pour in some of the reserved pasta water if the sauce seems too thick. Stir gently to coat the pasta with the sauce. Add in 1 cup of roughly chopped baby spinach, stirring until it wilts. Finally, mix in 1/2 cup of grated Parmesan cheese. Season with salt and pepper to taste. Serve it right away, garnished with fresh basil leaves for a touch of flavor. To adjust the sauce's consistency, use reserved pasta water. Start with a little, then add more if needed. This water helps make the sauce creamy and blends well with the pasta. You want a smooth, rich texture that coats your rigatoni perfectly. Prevent burning garlic by cooking it on medium heat. Stir it often and keep an eye on it. Garlic cooks quickly, and burnt garlic can ruin the flavor. If it starts to brown too fast, lower the heat. For extra flavor, infuse your sauce with fresh herbs. Basil, thyme, or parsley can elevate your dish. Chop them finely and stir them in just before serving. Fresh herbs add a bright taste that pairs well with Boursin cheese. Using fresh ingredients is key for the best taste. Choose ripe cherry tomatoes and fresh spinach. Fresh produce enhances the dish's color and flavor. It makes your rigatoni feel special and vibrant. Pair your creamy rigatoni with a light wine. A white wine like Pinot Grigio complements the dish well. It balances the richness of the sauce. You can also serve it with a simple salad for a fresh crunch. For garnishing, fresh basil leaves work wonders. They add a pop of color and flavor. You can also sprinkle extra Parmesan on top for a cheesy finish. This small touch makes your dish look and taste gourmet. Pro Tips Perfect Pasta: Always cook your rigatoni until al dente to ensure it maintains a good texture when mixed with the sauce. Reserve Pasta Water: Don’t forget to reserve some pasta water before draining; it helps in achieving the perfect creamy consistency. Fresh Ingredients: Using fresh cherry tomatoes and baby spinach will enhance the flavor and nutritional value of your dish. Cheese Variations: If you want to experiment, try adding different flavors of Boursin cheese or mixing in some goat cheese for extra tang. {{image_2}} You can switch up the cheese for fun twists. Try creamy goat cheese for a tangy kick. Ricotta adds a light texture, and cream cheese can work too. If you want a plant-based option, look for vegan cream cheese or cashew cheese. These give you a similar creaminess without dairy. Adding veggies makes this dish even better. You can toss in bell peppers or zucchini for more color. Mushrooms offer a nice earthiness. If you want a fresh touch, add peas or asparagus. For seasonal choices, use squash in fall or fresh peas in spring. These changes keep your dish exciting and healthy. Want to make it heartier? Add protein! Grilled chicken or shrimp bring great flavor. Sausage adds a spicy kick. If you prefer vegetarian options, try chickpeas or lentils. These options are filling and tasty, making your meal more satisfying. To keep your creamy rigatoni fresh, store it in an airtight container. This helps seal in flavor and moisture. Place the container in the fridge. Your pasta will stay good for about 3 to 4 days. If you want to enjoy it later, refrigerate it right after it cools. If you want to freeze your creamy rigatoni, use a freezer-safe container. Make sure to leave some space at the top. The pasta may expand when it freezes. It can last up to 2 months in the freezer. To reheat, let it thaw in the fridge overnight. Heat it gently on the stove with a splash of cream or milk. This keeps the texture creamy and smooth. Stir often to avoid any sticking. Enjoy your pasta as if it were fresh! Yes, you can prepare it ahead of time. Cook the rigatoni and make the sauce. Store them separately in the fridge. When ready to eat, combine them and reheat. This keeps the pasta fresh and the sauce creamy. If you need a substitute for Boursin cheese, try cream cheese mixed with garlic and herbs. Goat cheese or ricotta can also work. These cheeses will give you a rich and creamy flavor. To reheat, use low heat on the stove. Add a splash of cream or pasta water. Stir gently until warm. This helps keep the dish creamy and tasty. Avoid the microwave, as it may dry out the pasta. In this blog post, we explored how to make creamy rigatoni with a rich Boursin sauce. You learned key ingredients, cooking steps, and helpful tips for a perfect dish. We also discussed tasty variations and storage options. With these steps, you can create a delightful meal that pleases anyone. Enjoy experimenting with flavors, and don't hesitate to make this recipe your own. Happy cooking!

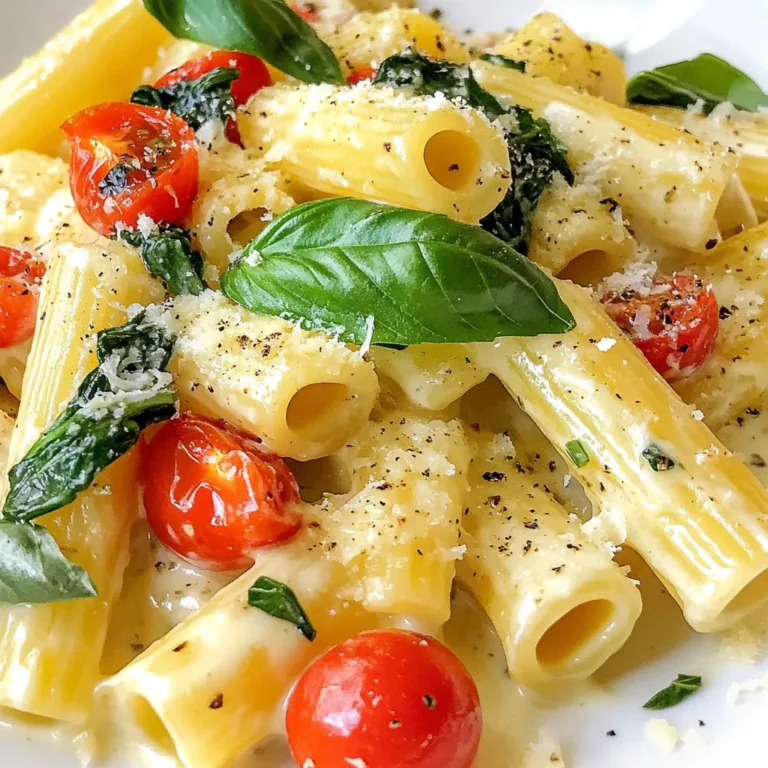
Boursin Creamy Rigatoni Delightful and Easy Recipe

- 1 pound ground beef - 1/2 pound ground pork (optional) - 1 cup breadcrumbs - 8 ounces mozzarella cheese, cut into small cubes - 2 cloves garlic, minced - 1 teaspoon dried oregano - 1 teaspoon dried basil - 1/2 cup grated Parmesan cheese - 1 cup marinara sauce - Fresh basil leaves - Salt and pepper to taste These ingredients create a rich flavor in your mozzarella stuffed meatballs. Ground beef is the main star, making the meatballs juicy and tender. Adding ground pork gives a nice flavor boost, but you can skip it if you prefer. Breadcrumbs help bind everything together, giving you that perfect texture. The mozzarella cheese is the best part. When you bite into the meatball, the gooey cheese oozes out, creating a delightful surprise. Use fresh mozzarella for the best results. Garlic, oregano, and basil add a nice Italian touch. Parmesan cheese rounds off the flavor nicely, adding depth. Don’t forget the marinara sauce! It ties everything together when you serve the meatballs. For garnishes, fresh basil leaves add brightness and color to your dish. Salt and pepper enhance the flavors, so season to your taste. With these ingredients, you will create a dish that’s both easy and delicious. {{ingredient_image_1}} In a large bowl, combine the ground beef, ground pork, breadcrumbs, grated Parmesan cheese, egg, minced garlic, oregano, basil, salt, and pepper. Mix well until you blend all the ingredients. You want a smooth, even mixture. Use your hands to mix. This helps break up any lumps and ensures even flavor throughout. Next, take a portion of the meat mixture, about 2 tablespoons. Flatten it in your hand. Place a cube of mozzarella in the center. Fold the meat around the cheese and roll it into a ball. Make sure the cheese is fully enclosed. Repeat this until you use all the mixture. Place the meatballs on a baking sheet lined with parchment paper. Preheat your oven to 400°F (200°C). Bake the meatballs for 20-25 minutes. They should be golden brown and cooked through. While the meatballs bake, heat the marinara sauce in a saucepan over medium heat. Once the meatballs are done, gently add them to the warm sauce. Let them simmer for 5 minutes. This helps the meatballs soak up the sauce. Serve the cheesy meatballs hot, garnished with fresh basil leaves. Enjoy the burst of flavor! To keep the cheese melted and gooey, choose fresh mozzarella. Fresh mozzarella stretches better than pre-shredded cheese. Cut the cheese into small cubes, about one inch. This size melts well inside the meatballs. Avoid overcooking the meatballs. They should bake just until golden brown. If you cook them too long, the cheese can leak out. For a golden crust, use a hot oven. Preheat your oven to 400°F (200°C). Place the meatballs on a lined baking sheet without crowding them. This helps with even cooking. If you have multiple trays, place one in the middle and one on top. Rotate the trays halfway through cooking for the best color. Pair these meatballs with pasta or garlic bread for a hearty meal. A simple salad adds freshness. Serve the warm marinara sauce either on the side or under the meatballs. This keeps them moist and flavorful. Garnish with fresh basil for a nice touch. Pro Tips Use Fresh Herbs: Fresh basil and oregano can elevate the flavor profile of your meatballs compared to dried herbs. Mix Meats for Flavor: Combining ground beef with ground pork adds depth and a richer taste to your meatballs. Rest Before Serving: Letting the meatballs rest for a few minutes after cooking allows the juices to redistribute for a juicier bite. Experiment with Cheese: Try using different types of cheese like cheddar or pepper jack for a unique twist on traditional mozzarella meatballs. {{image_2}} You can easily swap out ground beef for other meats. Try ground turkey or chicken for a lighter option. If you want a richer flavor, use lamb. You can also go fully plant-based with ground meat alternatives, like lentils or chickpeas. For breadcrumbs, use gluten-free options if needed. Crushed gluten-free crackers work well. You can also use cornmeal or ground oats to bind your meatballs while keeping them gluten-free. Add fresh herbs to boost flavor. Chopped parsley or cilantro can brighten the dish. You might also try adding spices like smoked paprika or red pepper flakes for a kick. Incorporate vegetables for extra nutrition. Finely chopped spinach, bell peppers, or mushrooms mix in well. Just make sure to adjust the moisture, so your meatballs hold their shape. Using a slow cooker is a great option. Shape your meatballs and place them in the slow cooker. Pour marinara sauce over them and cook on low for 6-8 hours. This method keeps them tender and full of flavor. If you own an air fryer, you can cook your meatballs in just 12-15 minutes at 375°F (190°C). This gives them a nice crispy outside while keeping the inside gooey and cheesy. After cooking your mozzarella stuffed meatballs, let them cool down. Place them in an airtight container. This keeps them fresh and tasty. Stored this way, they last in the fridge for about 3 to 4 days. Always check for any off smells or changes in texture before eating. If you want to store them longer, freezing is a great option. First, let the meatballs cool completely. Then, place them on a baking sheet, ensuring they don’t touch each other. Freeze them for a few hours until solid. After that, transfer them to a freezer-safe bag or container. They can last up to 3 months in the freezer. To reheat, take out the meatballs and let them thaw in the fridge overnight. Then, bake them at 350°F (175°C) for about 15 minutes. You can also warm them in marinara sauce on the stove for a nice, saucy finish. Mozzarella stuffed meatballs make meal prep easy and fun. You can cook a big batch on the weekend. Store them in the fridge or freezer for quick meals. Pair them with pasta, rice, or veggies for a full dish. You can also prep them uncooked. Shape the meatballs and freeze them. This lets you bake fresh meatballs anytime you want. Just remember to adjust the cooking time if they are still frozen! Yes, you can try different cheeses! Here are some tasty options: - Cheddar: Sharp flavor and melts well. - Provolone: Nice smokiness and stretchy texture. - Gouda: Creamy and rich, adds a unique taste. - Fontina: Soft, melts nicely for a gooey center. These cheeses work great if you want a twist on the classic mozzarella stuffed meatballs. Just remember to cut them into small cubes, like you would with mozzarella. The best way to check is by using a meat thermometer. The safe internal temperature for cooked meatballs is 160°F (71°C). You can also cut one open; the center should not be pink, and juices should run clear. Cooking them until they are golden brown on the outside also means they are likely done. This ensures they are both safe to eat and delicious! You have lots of tasty choices! Here are some great sides: - Spaghetti: A classic pairing with marinara sauce. - Garlic bread: Perfect for dipping in sauce. - Salad: A fresh green salad adds crunch. - Zucchini noodles: A low-carb option that’s light and healthy. - Roasted vegetables: Adds color and flavor to your meal. These sides will help balance the rich flavors of the meatballs and make your meal even more enjoyable! You learned how to make delicious mozzarella-stuffed meatballs, from choosing the right ingredients to cooking and storage. Each step helps you create a tasty meal. Don't forget tips for gooey cheese and cooking methods. Feel free to try variations that suit your taste. With proper storage, you can enjoy them later. Cooking can be fun and rewarding. Enjoy your meatballs with your favorite sides and share with friends!

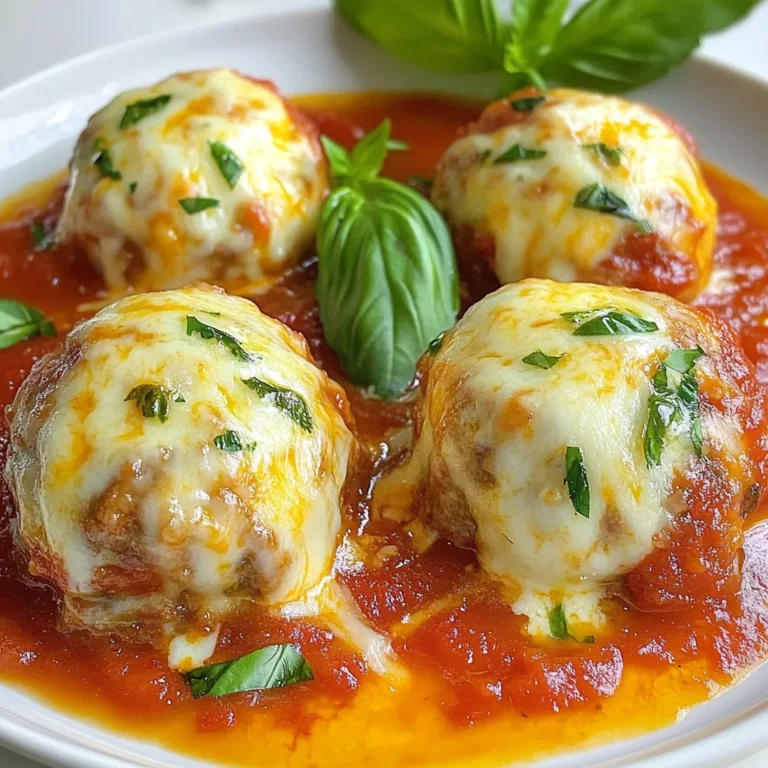
Savory Mozzarella Stuffed Meatballs Easy and Flavorful

- 2 oz fresh-pressed apple juice - 1 oz fresh lemon juice - 1 oz maple syrup - 1 dash of ginger bitters - 1 egg white (optional) The main ingredients in this cocktail create a bright and tasty drink. The fresh-pressed apple juice gives a crisp flavor, while lemon juice adds a nice tang. Maple syrup brings a hint of sweetness, making the drink smooth. Ginger bitters add warmth and depth. If you want a frothy texture, consider using egg white. - Apple slices - Cinnamon stick Garnishing your drink makes it look special. Thin apple slices give a lovely touch, and a cinnamon stick adds a warm spice. Both garnishes enhance the flavors and make the drink more inviting. - Cocktail shaker - Strainer - Chilled glass To make this cocktail, you need a few tools. A cocktail shaker mixes the ingredients well. A strainer helps pour the drink into your glass without any bits. A chilled glass keeps your cocktail cool and refreshing. These tools help you create the best Autumn Gin Sour. {{ingredient_image_1}} Start by grabbing a cocktail shaker. Pour in 2 oz of fresh-pressed apple juice. Next, add 1 oz of fresh lemon juice. The lemon juice gives a nice tang to the drink. Then, pour in 1 oz of maple syrup. This adds a lovely sweetness. Finally, add 1 dash of ginger bitters. This will give your drink a warm spice. If you want a frothy feel, crack an egg and add the egg white to the mix. Now it's time to shake! First, do a dry shake. This means shake the ingredients without ice. Shake it hard for about 10 seconds. This helps mix everything well, especially the egg white. After that, add ice cubes to the shaker. Shake again for 15-20 seconds. This will chill your drink nicely. Next, you need to strain the cocktail into a chilled glass. This helps keep the drink smooth. For a pretty touch, garnish with a thin slice of apple and a cinnamon stick. This not only looks nice but also adds aroma. Enjoy your refreshing drink! To get a nice foam in your Autumn Gin Sour, dry shaking is key. Dry shaking means shaking the drink without ice first. This mixes the egg white well and creates froth. Shake it hard for about 10 seconds. If you add the egg white, make sure to use fresh and safe eggs. You can change the sweetness of your drink by using different syrups. Try honey or agave syrup for a twist. Adding spices like cinnamon or nutmeg can give more depth to the flavor. A dash of cardamom can also enhance the drink's taste. Use fun glassware to serve your cocktail. A coupe glass or a mason jar can add charm. For garnishes, thin apple slices and a cinnamon stick work great. You can also sprinkle a bit of cinnamon powder on top for extra flair. These small touches make your drink look beautiful and inviting. Pro Tips Use Fresh Ingredients: Always opt for fresh-pressed apple juice and freshly squeezed lemon juice for the best flavor. Egg White for Texture: If you want a frothy and smooth texture, include the egg white, but ensure it's fresh and from a reliable source. Chill Your Glass: Pre-chill your glass in the freezer for a few minutes to keep your cocktail colder for longer. Experiment with Garnishes: Don’t be afraid to get creative with garnishes! Try adding a twist of lemon peel or a sprig of mint for a pop of color and flavor. {{image_2}} You can change up the flavors in your Autumn Gin Sour by using different fruit juices. Try pear juice for a sweeter taste, or pomegranate juice for a tart twist. Both options add a fun flair to the drink. When it comes to sweeteners, you can swap maple syrup for honey or agave syrup. Each sweetener brings its own unique flavor and sweetness level. This way, you can find the right balance for your taste buds. Want a refreshing mocktail? You can easily create an alcohol-free version of the Autumn Gin Sour. Simply leave out the gin and add more fresh-pressed apple juice. You could also add sparkling water for a fizzy touch. This way, you still get a delicious drink without the alcohol. If you love new flavors, try using flavored or infused gins. A gin infused with herbs like rosemary or thyme can add depth to your drink. Berry-flavored gin can bring a sweet and fruity taste, perfect for the fall season. Experiment with different gins to find your favorite combination! Store fresh-pressed apple juice in an airtight container. Keep it in the fridge. This keeps it cold and fresh for up to three days. For maple syrup, store it in a cool, dark place. You can keep it in the fridge too. It lasts for months if sealed well. If you have leftover cocktail, store it in the fridge. Use a sealed jar or bottle. This keeps the drink fresh for a day or two. Shake it again before serving to mix the flavors. The froth may not be the same, but it will taste great! Fresh juice lasts about three days in the fridge. Bottled juice may last longer, but it often has added sugars. Always check the date on the bottle. Maple syrup is good for months if sealed. For egg whites, use them fresh, but they can stay in the fridge for about four days. Yes, you can make the Autumn Gin Sour ahead of time. Here are some tips for pre-preparation: - Juice Prep: Press your apple and lemon juice a few hours before. Store them in the fridge. - Syrup Ready: You can mix maple syrup with ginger bitters in advance. Keep it chilled. - Egg White Caution: If using egg white, add it just before serving. This keeps the foam fresh. - Shaking and Serving: When ready, shake with ice and serve. This keeps flavors bright. Egg whites can pose a risk of salmonella. However, many enjoy the froth they add. Here’s what you should know: - Risk: Raw eggs can carry bacteria. It’s important to use fresh eggs. - Alternatives: You can skip the egg white. Use aquafaba instead. This is the liquid from canned chickpeas. It froths well and is safe. - Whisking Well: If you use egg whites, dry shake first. This helps create foam. If you want to swap gin, here are some great alternatives: - Vodka: This spirit has a smooth taste and mixes well with flavors. - Rum: Light rum adds sweetness and pairs nicely with apple juice. - Whiskey: Use a mild whiskey for a richer flavor profile. - Tequila: A light tequila can give your drink a fun twist. Feel free to experiment and find your favorite mix! This post covered the essential elements for crafting a perfect cocktail. We explored the main ingredients like fresh apple juice and lemon juice, as well as how to achieve that lovely foam with dry shaking. I shared tips on garnishing and presentation to impress your guests. You can enjoy variations and even create an alcohol-free version. With these insights, you can mix, serve, and store your drinks with confidence. Now it's time for you to try it out and make your gathering memorable.

Autumn Gin Sour Cocktail Refreshing Seasonal Delight

To make a tasty vegan meatloaf, you'll need the following main ingredients: - 1 cup cooked lentils (green or brown) - 1 cup quinoa, cooked - 1 medium onion, finely chopped - 2 cloves garlic, minced - 1 carrot, grated - 1 celery stalk, finely chopped - 1 cup breadcrumbs (or gluten-free alternative) - 1/4 cup ground flaxseed mixed with 1/2 cup water (flax egg) - 3 tablespoons soy sauce or tamari - 2 tablespoons nutritional yeast - 1 teaspoon dried thyme - 1 teaspoon smoked paprika - Salt and black pepper to taste - 2 tablespoons olive oil These ingredients mix together to create a hearty and satisfying dish. The lentils provide protein, while quinoa adds texture. The flax egg binds everything together, making it easy to slice. For the rich gravy, gather these ingredients: - 1 cup vegetable broth - 2 tablespoons soy sauce or tamari - 1 tablespoon cornstarch mixed with 2 tablespoons water (slurry) - 1 teaspoon onion powder - 1 teaspoon garlic powder - Black pepper to taste This gravy adds a savory finish that complements the meatloaf perfectly. The cornstarch helps thicken the gravy, giving it a smooth texture. You can easily swap some ingredients to fit different diets: - For gluten-free, use gluten-free breadcrumbs. - Instead of lentils, try mashed chickpeas for a different flavor. - If you want to avoid soy, use coconut aminos instead of soy sauce. - You can replace quinoa with brown rice if you prefer. These substitutions keep the recipe flexible while still tasting great. Adjusting ingredients allows everyone to enjoy this comfort food! {{ingredient_image_1}} Start by preheating your oven to 350°F (175°C). Grease a loaf pan or line it with parchment paper. In a large bowl, mix 1 cup of cooked lentils and 1 cup of cooked quinoa. Use a fork to mash the lentils a bit. This helps with texture. Next, heat 2 tablespoons of olive oil in a pan over medium heat. Add in 1 finely chopped onion, 2 minced garlic cloves, 1 grated carrot, and 1 finely chopped celery stalk. Sauté these veggies until soft, about 5 minutes. Once soft, add this mixture to the bowl with lentils and quinoa. Stir well. Now, it's time to add the dry ingredients. Mix in 1 cup of breadcrumbs, 1/4 cup of ground flaxseed mixed with 1/2 cup of water, 3 tablespoons of soy sauce, 2 tablespoons of nutritional yeast, 1 teaspoon of dried thyme, 1 teaspoon of smoked paprika, and salt and black pepper to taste. Make sure everything is combined well. Once your mixture is ready, transfer it to the prepared loaf pan. Pack it down firmly. Smooth the top with a spatula. Bake in the preheated oven for 45 minutes. The meatloaf should be firm and slightly crispy on the edges. After baking, let it sit for about 10 minutes before slicing. This makes it easier to cut and serve. While the meatloaf is baking, let’s make the gravy. In a saucepan over medium heat, combine 1 cup of vegetable broth, 2 tablespoons of soy sauce, 1 teaspoon of onion powder, 1 teaspoon of garlic powder, and black pepper to taste. Bring this mixture to a simmer. Now, in a small bowl, mix 1 tablespoon of cornstarch with 2 tablespoons of water. This is your slurry. Gradually add this slurry to the simmering broth. Stir constantly until the gravy thickens, which should take about 2 minutes. Once thickened, remove from heat and set aside. Serve the warm meatloaf with the rich gravy drizzled over the top. Enjoy this tasty comfort food! To get the best texture, mash your lentils lightly. This helps bind the mixture. Use cooked lentils that are firm, not mushy. Cooked quinoa adds a nice chew. Mix in breadcrumbs for a bit of crunch. If you want a softer loaf, add more veggies like mushrooms or bell peppers. Serve your meatloaf with creamy mashed potatoes or steamed green beans. A fresh salad adds a nice crunch. Try it with a tangy barbecue sauce for a twist. You can also pair it with roasted veggies for a hearty meal. For a quick side, warm up some bread or rolls. To keep your meatloaf moist, do not skip the flax egg. It helps hold moisture in. Baking at the right temperature is key too. If you notice it getting dry, cover it with foil for part of the baking time. Let it rest after baking; this helps the flavors meld and keeps it juicy. Pro Tips Choose Your Lentils Wisely: Green or brown lentils work best for this recipe as they hold their shape better and provide a hearty texture. Customize Your Vegetables: Feel free to add other vegetables like bell peppers or mushrooms to enhance flavor and nutrition according to your taste preferences. Let It Rest: Allow the meatloaf to rest for about 10 minutes after baking. This helps it firm up and makes it easier to slice without falling apart. Gravy Thickness Tip: If you prefer a thicker gravy, simply add a bit more cornstarch to the slurry. For a thinner consistency, add more vegetable broth. {{image_2}} You can boost the taste of your vegan meatloaf in many ways. Try adding chopped nuts for crunch and richness. Walnuts or pecans work well. Diced bell peppers add a nice sweetness. You might also like to mix in some spinach or mushrooms for extra nutrition. Fresh herbs like parsley or basil can brighten the flavor too. If you need a gluten-free meatloaf, swap regular breadcrumbs for gluten-free ones. You can also use oats or ground almond flour. These options help maintain texture while keeping the dish safe for those with gluten sensitivities. Always check labels to ensure there are no hidden gluten ingredients. While the rich gravy is a hit, you can try other sauces. A sweet and tangy barbecue sauce adds a fun twist. You might prefer a creamy cashew sauce for a nutty taste. A zesty tomato sauce can also be delicious. Experiment to find your favorite pairing! To keep your leftover vegan meatloaf fresh, let it cool completely. Once cooled, wrap it tightly in plastic wrap or foil. You can also place it in an airtight container. Store it in the fridge for up to four days. This way, you can enjoy it later without losing flavor. Freezing is a great option if you want to save your meatloaf for later. First, cool the meatloaf completely. Then, slice it into portions for easy use. Wrap each piece tightly in plastic wrap and place them in a freezer-safe bag. You can freeze it for up to three months. When you're ready to eat it, just thaw it in the fridge overnight. Reheating your vegan meatloaf is simple. For the best results, use the oven. Preheat it to 350°F (175°C). Place the meatloaf in a baking dish and cover it with foil. Heat for about 20 minutes or until warmed through. If you're in a hurry, you can use the microwave. Heat it for 1-2 minutes, checking to avoid overheating. Drizzle with gravy for extra flavor! Yes, you can make this vegan meatloaf ahead of time. Simply prepare the mixture and place it in the loaf pan. Cover it with plastic wrap and refrigerate for up to 24 hours. When you are ready to bake, remove the wrap and bake as directed. This saves time and makes meal prep easier. If you want a different base, you can use black beans or chickpeas. Both provide a great texture and flavor. Just mash them well before mixing with the other ingredients. You can also use cooked mushrooms for a more earthy taste. Absolutely! This vegan meatloaf is perfect for meal prep. You can slice it into portions and store them in airtight containers. It keeps well in the fridge for about a week. Reheat slices in the oven or microwave for a quick meal. To check if the meatloaf is done, look for a firm texture. It should be slightly crispy on the edges. You can insert a toothpick in the center. If it comes out clean, the meatloaf is ready. Let it cool for about 10 minutes before slicing for the best results. You learned how to make tasty Vegan Meatloaf and gravy. This dish is easy for dinner and healthier too. You can mix and match ingredients to fit your needs. Remember, keep the meatloaf moist with our tips and tricks. Use different flavors for fun variations. Store leftovers right to enjoy later. With these steps, you’ll have a meal that’s good for you and delicious. Enjoy your cooking!

Vegan Meatloaf with Gravy Tasty Comfort Food Recipe

- 4 chicken breasts - 1 cup fresh cranberries - 1/2 cup orange juice - Zest of 1 orange - 2 tablespoons honey - 1 tablespoon olive oil - 2 cloves garlic, minced - 1 teaspoon fresh thyme leaves (or 1/2 teaspoon dried thyme) - Salt and pepper to taste For this recipe, the main ingredients shine. The chicken breasts are the hearty base. Fresh cranberries add a tart burst. Orange juice brings brightness. The zest adds depth. Honey adds sweetness. Olive oil helps to sear the chicken. Garlic gives it a nice kick. Thyme adds a touch of earthiness. Salt and pepper enhance all the flavors. - Additional herbs - Spices for extra heat - Other fruits for the sauce You can customize this dish to suit your taste. Add more herbs like rosemary or sage. If you like heat, consider red pepper flakes. Want to mix it up? Try adding chopped apples or pears to the sauce. These small changes can make your dish unique and exciting. {{ingredient_image_1}} To start, gather your ingredients for the sauce. In a medium saucepan, mix: - 1 cup fresh cranberries - 1/2 cup orange juice - Zest of 1 orange - 2 tablespoons honey - 2 cloves garlic, minced - 1 teaspoon fresh thyme leaves - Salt and pepper to taste Turn the heat to medium and bring this mix to a simmer. Stir occasionally. You will cook the sauce for about 10 minutes. The cranberries will burst, and the sauce will thicken. If you want a thicker sauce, let it cook a bit longer. You can also mash some cranberries with a spoon for a smoother texture. While the sauce is cooking, take 4 chicken breasts and season them with salt and pepper. Heat 1 tablespoon of olive oil in a large oven-safe skillet over medium heat. Once hot, add the chicken. Sear the chicken for 4-5 minutes on each side. You want a nice golden-brown crust. This step adds great flavor and locks in moisture. Now, it’s time to bake! Preheat your oven to 400°F (200°C). After searing, pour the cranberry sauce over the chicken in the skillet. Make sure each piece is well-coated with the sauce. Transfer the skillet to the oven and bake for 20-25 minutes. The chicken should reach an internal temperature of 165°F (74°C). To check for doneness, you can use a meat thermometer or cut into a piece to see if it’s no longer pink. Enjoy this delicious dish! To get the best flavor in your dish, balance sweetness with acidity. Use fresh cranberries for a tart taste. The orange juice adds a bright note. If you prefer a sweeter sauce, add a bit more honey. Fresh ingredients enhance the dish's flavor. Canned cranberries can work, but they may lack freshness. You can swap chicken for turkey or tofu. Both options work well with the sauce. Tofu provides a tasty, plant-based choice. For gluten-free meals, ensure your chicken broth is gluten-free. If you want a low-carb option, skip honey or use a sugar substitute. Garnish your dish with freshly chopped parsley. It adds color and freshness to the plate. Serve the chicken over rice or quinoa to soak up the sauce. Plating with whole cranberries can make it visually appealing. Pair it with a side salad for a complete meal. Pro Tips Use Fresh Ingredients: Fresh cranberries and freshly squeezed orange juice will enhance the flavor of your dish significantly. Don't Overcook the Chicken: To ensure the chicken remains juicy, use a meat thermometer to check for an internal temperature of 165°F (74°C). Add Depth with Spices: Consider adding a pinch of cinnamon or allspice to the cranberry sauce for an extra layer of flavor. Rest the Chicken: Allowing the chicken to rest for a few minutes after baking helps the juices redistribute for a more tender bite. {{image_2}} You can add new flavors to your festive cranberry orange chicken. Try adding different fruits. Apples or pears can give a sweet touch. You might also try cherries for a tart kick. Each fruit brings its own taste. Spices and herbs can change the dish too. For a warm flavor, add cinnamon or nutmeg. These spices work well with cranberries. You can also experiment with fresh herbs like rosemary or sage. They add depth to the dish. Pairing side dishes with your cranberry orange chicken can enhance your meal. Roasted Brussels sprouts or green beans bring color and crunch. They balance the sweet chicken well. You can serve a fresh salad with mixed greens and nuts. A simple vinaigrette will keep it light. For appetizers, consider a cheese platter. Soft cheeses with crackers can start your meal perfectly. To keep your Festive Cranberry Orange Chicken fresh, store it properly. Place leftovers in an airtight container. For the best taste, put them in the fridge. They can stay fresh for up to four days. If you want to keep them longer, consider freezing them. In the freezer, they last about three months. Just label your container with the date to track freshness. When it's time to enjoy your leftovers, you want them warm without drying out. The best way is to use the oven. Preheat it to 350°F (175°C). Place the chicken in a baking dish, cover with foil, and heat for about 15-20 minutes. This keeps the chicken moist. If you have leftover cranberry sauce, you can warm it on the stove. Just heat it gently until it bubbles. You can also add it to new dishes. Try it over rice or mixed into a salad for a fresh twist. Enjoy your festive flavors in new ways! If you want to swap out honey, try using maple syrup or agave nectar. Both options bring sweetness and a unique flavor. You can also use brown sugar dissolved in a bit of warm water. Adjust the amount based on your taste. Remember, honey is sweet, so start with less and add more if needed. Yes, you can make this dish ahead of time. You can prepare the cranberry sauce a day before and store it in the fridge. Just warm it up before pouring it on the chicken. You can also season and sear the chicken in advance. Then, bake it just before serving for fresh flavors. To check if the chicken is cooked, use a meat thermometer. The inside should reach 165°F (74°C). If you don’t have a thermometer, look for clear juices when you cut into it. The meat should not look pink. This means it is ready to serve. This blog shared a delicious recipe for cranberry orange chicken. You learned about key ingredients, cooking steps, and tips to make it your own. Customizations, like herbs and spices, add your personal touch. With proper storage and reheating methods, leftovers remain enjoyable. Remember, cooking is about creativity. Experimenting can lead to wonderful flavors. Enjoy your kitchen time and make this dish yours!

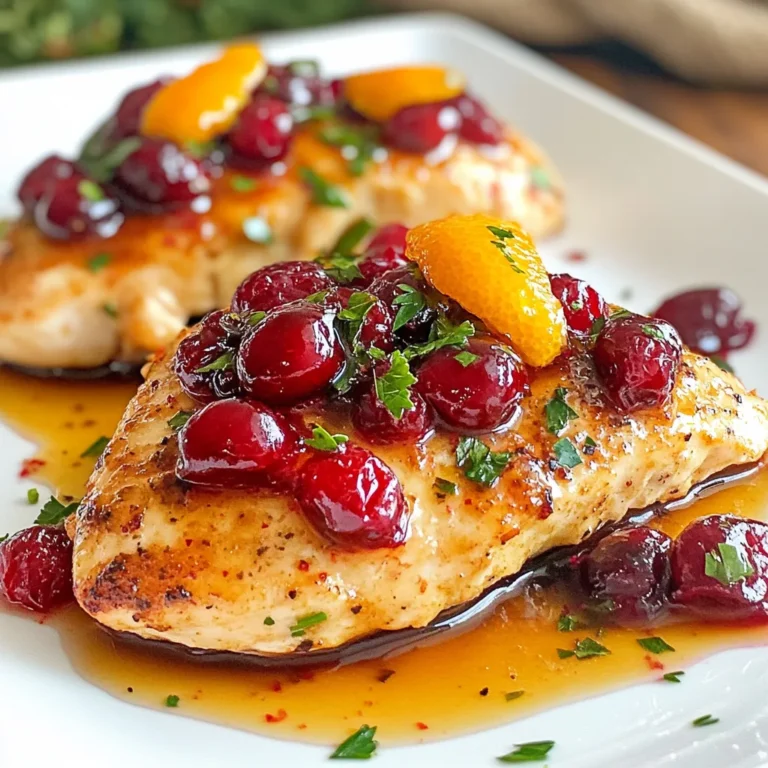
Festive Cranberry Orange Chicken Flavorful Holiday Dish

PREV 1 … 59 60 61 … 86 NEXT
spicy fork kitchen

explore

DessertsDinnerAppetizersDrinks

Our Policies

  • Cookie Policy
  • Copyright Policy
  • Disclaimer
  • GDPR Policy
  • Terms Of Use
Back to Top
  • About
  • Contact Us
  • Privacy Policy
© 2026 spicy fork kitchen