FREE DINNER EBOOK! Get your copy!
  • Cookie Policy
  • GDPR Policy
  • Disclaimer
  • Terms Of Use
  • Visit my other site: Fun Cookie Recipes
spicy fork kitchen
  • Home
  • Dinner
  • Desserts
  • Drinks
  • Appetizers
  • Contact
  • About
  • Privacy Policy
  • Home
  • Dinner
  • Desserts
  • Drinks
  • Appetizers
  • Contact
  • About
  • Privacy Policy
  • Cookie Policy
  • GDPR Policy
  • Disclaimer
  • Terms Of Use
Visit my other site: Fun Cookie Recipes

HOME / CATEGORIES /

Latest

- 1 lb (450g) boneless chicken thighs, cut into bite-sized pieces - 1/2 cup sweet chili sauce - 2 tablespoons soy sauce - 1 tablespoon rice vinegar - 1 tablespoon honey - 2 garlic cloves, minced - 1 teaspoon fresh ginger, grated - 1 bell pepper (red or yellow), sliced - 1 small zucchini, sliced - 1 tablespoon vegetable oil - 1 teaspoon sesame oil - Salt and pepper to taste - 2 green onions, chopped (for garnish) - Sesame seeds (for garnish) When choosing chicken, look for bright pink meat. It should feel firm to the touch. For bell peppers, pick ones with smooth skin and vibrant color. Zucchini should be firm, not soft. Fresh garlic should smell strong and have tight skins. Always check the date on sauces to ensure freshness. If you can’t find chicken thighs, use boneless chicken breasts. They work well too. Instead of sweet chili sauce, try teriyaki sauce for a different taste. If you're out of rice vinegar, apple cider vinegar is a good swap. For a healthier option, use agave syrup instead of honey. {{ingredient_image_1}} First, gather all your ingredients. You will need boneless chicken thighs, sweet chili sauce, soy sauce, rice vinegar, honey, garlic, ginger, bell pepper, zucchini, vegetable oil, sesame oil, salt, pepper, green onions, and sesame seeds. This recipe takes about 40 minutes from start to finish. In a large bowl, mix the sweet chili sauce, soy sauce, rice vinegar, honey, minced garlic, and grated ginger. This mix gives the chicken lots of flavor. Now, add the chicken pieces and toss well to coat every piece. Cover the bowl and let it marinate for at least 30 minutes. If you have time, let it sit overnight in the fridge. This makes the chicken even tastier. Heat the vegetable oil in a large skillet or wok over medium-high heat. Once hot, add the chicken, discarding any extra marinade. Stir-fry the chicken for about 5 to 7 minutes. Look for a golden brown color and ensure it’s fully cooked. Next, add the sliced bell pepper and zucchini. Continue to stir-fry for another 3 to 4 minutes, until the veggies are tender but still a bit crisp. Drizzle sesame oil over the chicken and veggies, then season with salt and pepper. Mix everything well and remove it from the heat. Transfer your Sweet Chili Chicken to a serving dish and garnish with chopped green onions and sesame seeds. Enjoy this delicious meal with family or friends! To get the best sauce on your chicken, start with a good marinade. Mix sweet chili sauce, soy sauce, rice vinegar, honey, garlic, and ginger well. Marinate the chicken for at least 30 minutes. This helps the flavors soak in. For even more taste, marinate overnight. After cooking, drizzle some sesame oil over the dish to enhance the flavor. Using the right tools makes cooking easier. Here’s what I recommend: - A large mixing bowl for marinating the chicken. - A large skillet or wok for stir-frying. - A spatula for flipping and mixing. - A sharp knife for slicing vegetables. - Measuring cups and spoons for accuracy. These tools help you cook like a pro. Avoid these common mistakes when making sweet chili chicken: - Don’t skip marinating. It adds lots of flavor. - Make sure your skillet is hot before adding the chicken. This helps it cook evenly. - Don’t crowd the pan. Cook in batches if needed. This keeps the chicken from steaming and helps it brown. - Lastly, be careful not to overcook the chicken. It should be juicy, not dry. By following these tips, you’ll create a delicious sweet chili chicken every time! Pro Tips Marinate for Maximum Flavor: For the best taste, marinate the chicken overnight. This allows the flavors to penetrate deeply into the meat. Use Fresh Ingredients: Fresh garlic and ginger will enhance the flavor profile significantly. Try to avoid pre-minced or jarred options. Customize Your Veggies: Feel free to substitute or add other vegetables like broccoli or snap peas based on your preference or what you have on hand. Adjust the Heat: If you like a bit of spice, add some red pepper flakes or sliced fresh chili to the stir-fry for an extra kick. {{image_2}} You can easily add more veggies for color and nutrition. Bell peppers and zucchini work great. Just slice them up and toss them in during cooking. This addition makes your dish look vibrant. It also adds crunch and flavor. Stir-fry the veggies for just a few minutes. This way, they stay crisp and fresh. You can use other veggies like broccoli or snap peas too. They all go well with sweet chili sauce. If you love heat, try adding chili flakes or fresh chilies. This will kick your dish up a notch. Mix them in with the marinade for a spicy blend. You can also add sriracha sauce for an extra kick. Adjust the heat level to your taste. Remember, a little goes a long way! This spicy twist offers a new flavor that many will enjoy. If you need a gluten-free meal, choose gluten-free soy sauce. Many brands offer this option, so it’s easy to find. Just swap it in for regular soy sauce in the recipe. You can also check the sweet chili sauce label. Some brands contain gluten. Select a gluten-free version to keep your dish safe. By making these small changes, you can enjoy sweet chili chicken without worry. To keep your sweet chili chicken fresh, let it cool first. Place it in an airtight container. Store it in the fridge for up to three days. This way, you keep the flavors intact. If you want to keep it longer, consider freezing it. When you are ready to enjoy your leftovers, simply reheat them. You can use the microwave or a skillet. If using a microwave, heat for 1-2 minutes. Stir halfway to ensure even warmth. If using a skillet, add a splash of water to keep it moist. Heat over medium until hot. To freeze sweet chili chicken, pack it in a freezer-safe container. Make sure to remove as much air as possible. It can last up to three months in the freezer. When ready, thaw it overnight in the fridge before reheating. This keeps the dish tasty and safe to eat. You can pair Sweet Chili Chicken with many sides. Here are some great options: - Steamed rice - Fried rice - Noodles - Stir-fried vegetables - A fresh salad These sides will balance the sweet and spicy flavors of the chicken. You can marinate the chicken for at least 30 minutes. This time helps the chicken soak up the flavors. For the best taste, marinate it overnight. This longer time gives the chicken a richer flavor. Yes, you can prepare this recipe ahead of time. Cook the chicken and veggies and store them in the fridge. Just reheat them on the stove or in the microwave when you are ready to eat. This makes meal prep easy! This post covered the key ingredients for sweet chili chicken, from fresh choices to handy substitutions. We explored easy, step-by-step cooking instructions, including marinating and stir-frying. I shared tips for the perfect sauce and tools to use, along with common mistakes to avoid. We discussed tasty variations and crucial storage tips. All these insights will help you make a great dish. Enjoy your sweet chili chicken and share your experiences!

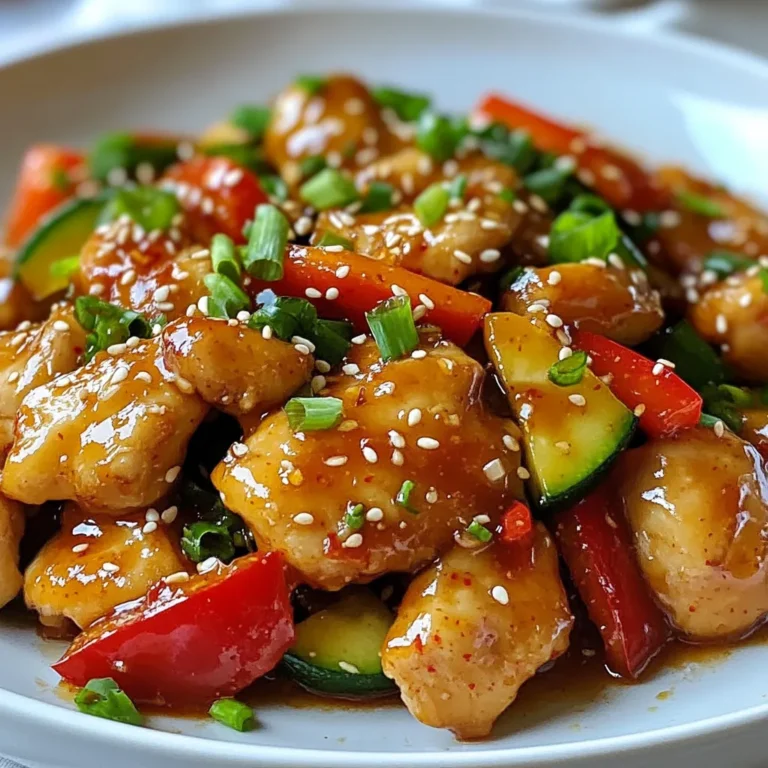
Sweet Chili Chicken Flavorful and Easy Recipe Guide

To make a tasty Mango Avocado Salsa, gather these fresh ingredients: - 1 ripe mango, diced - 2 ripe avocados, diced - 1 small red onion, finely chopped - 1 red bell pepper, diced - 1 jalapeño, deseeded and minced - 1/4 cup fresh cilantro, chopped - 2 tablespoons lime juice - 1 tablespoon olive oil - Salt and pepper to taste You can also add optional ingredients for extra flavor. Consider these: - A pinch of garlic powder - A splash of orange juice - Diced cucumber for crunch Using fresh ingredients is key. They bring bright colors and bold flavors. Ripe mangoes and avocados are sweet and creamy. Red onion and bell pepper add crunch. The jalapeño gives a little kick. Cilantro adds freshness. Lime juice brightens the dish. Olive oil adds richness. Salt and pepper help balance everything. Enjoy this salsa with chips, tacos, or grilled meats. {{ingredient_image_1}} 1. In a large mixing bowl, combine the diced mango and avocado. You want big chunks for texture. 2. Next, add the finely chopped red onion, diced red bell pepper, and minced jalapeño. This mix adds color and heat. 3. Gently mix in the chopped cilantro. The cilantro gives a fresh taste. 4. In a small bowl, whisk together the lime juice, olive oil, salt, and pepper. This dressing pulls it all together. 5. Pour the dressing over the salsa mixture. Stir gently until everything is well-coated. Don't stir too hard; you want the avocado to stay whole. 6. Taste the salsa. Adjust with more salt, pepper, or lime juice if needed. Balance is key. 7. Let the salsa sit for about 10-15 minutes before serving. This time allows the flavors to meld together. - Avoid mashing the avocados. Use a gentle touch when mixing. You want those creamy pieces intact. - Achieving a balanced flavor is important. The sweet mango, creamy avocado, and spicy jalapeño should all shine. Taste as you go! When you pick a mango, look for a skin that is yellow and a bit soft. Gently squeeze it. If it gives slightly, it is ripe. A ripe mango smells sweet at the stem. For avocados, choose ones that feel firm but yield to gentle pressure. They should have a dark green color. If they feel too soft, they may be overripe. To keep your ingredients fresh, store them at room temperature until you are ready to use them. Once cut, store any leftovers in the fridge in an airtight container. This helps to keep the flavors bright and fresh. To make your salsa even better, add a pinch of cumin or chili powder. These spices add warmth and depth. Fresh herbs like basil or mint can also change the flavor. They bring a nice twist to the dish. Acidity is key! Try adding a splash of vinegar or more lime juice. It brightens the salsa and balances the sweetness of the mango. Feel free to taste and adjust as you mix. Cooking is all about finding what you love. Pro Tips Choose Ripe Ingredients: Make sure your mangoes and avocados are perfectly ripe for the best flavor and texture. A ripe mango should yield slightly to pressure, while ripe avocados will feel slightly soft but not mushy. Balancing Flavors: Adjust the lime juice and salt to your taste preference. A little extra lime can brighten the flavors, while salt enhances the overall taste of the salsa. Fresh Herbs Matter: Use fresh cilantro for the best aroma and flavor. If you're not a fan of cilantro, try substituting with fresh parsley or mint for a different twist. Serving Suggestions: This salsa pairs wonderfully with grilled chicken, fish tacos, or as a topping for nachos. Get creative and enjoy it with your favorite dishes! {{image_2}} You can make Mango Avocado Salsa even more exciting by adding different fruits or veggies. Try including: - Pineapple for a sweet twist. - Mango with diced cucumber for crunch. - Cherry tomatoes for a burst of color. You can also add proteins to make the salsa heartier. Grilled chicken or shrimp adds a nice flavor. Black beans can provide a tasty vegetarian option. Mango Avocado Salsa pairs well with many dishes. Serve it with tortilla chips for a fun snack. It also tastes great on grilled fish or chicken. For a creative touch, serve it in a colorful bowl. Add tortilla chips on the side. Garnish with extra cilantro and lime wedges for a fresh look. This salsa is perfect for parties or casual family meals. To keep your mango avocado salsa fresh, refrigerate it right away. Place it in an airtight container. This helps keep air out, which can cause spoilage. Your salsa will stay good in the fridge for about 2 to 3 days. If you want to freeze it, use freezer-safe bags. Leave some space in the bag for expansion. Salsa can last in the freezer for up to 3 months. However, the texture may change once thawed. To use frozen salsa, thaw it in the fridge overnight. Mango avocado salsa lasts about 2 to 3 days in the fridge. After that, it may spoil. Signs of spoilage include an off smell or discoloration. If the salsa looks brown and mushy, it’s best to toss it. Always trust your senses; if it doesn’t smell or look right, don’t eat it. Yes, you can make Mango Avocado Salsa ahead. I recommend storing it in the fridge for up to one day. To keep it fresh, store it in an airtight container. This helps keep the colors bright and the flavors sharp. To retain the flavors, wait to add lime juice until just before serving. Lime juice can make the avocado brown faster. If you do add it early, stir gently to coat, and enjoy it within a few hours. Absolutely! Mango Avocado Salsa is easy to customize. If you want a spicy kick, add more jalapeño or some hot sauce. You can swap out ingredients based on your taste or diet. Try using different herbs like mint or parsley instead of cilantro. If you're allergic to avocados, use diced cucumber for a crisp texture. You can make this salsa fit any need. You can serve this salsa with many snacks and meals. It pairs well with tortilla chips for a great appetizer. Use it as a topping on tacos or grilled chicken for extra flavor. You can also spoon it over fish or shrimp. It makes a refreshing side dish at barbecues or picnics. The bright flavors make any meal feel special. Enjoy exploring all the ways to use this salsa! Mango Avocado Salsa combines fresh produce and simple steps for a tasty dish. You learned how to select ripe fruits, mix them just right, and add fun variations. Remember to store leftovers properly to keep them fresh. It's easy to customize this recipe to suit your taste. Enjoy pairing this salsa with your favorite meals or snacks. With these tips, you can make a vibrant and delicious salsa that impresses everyone. Dive into your own kitchen adventure and savor every bite!

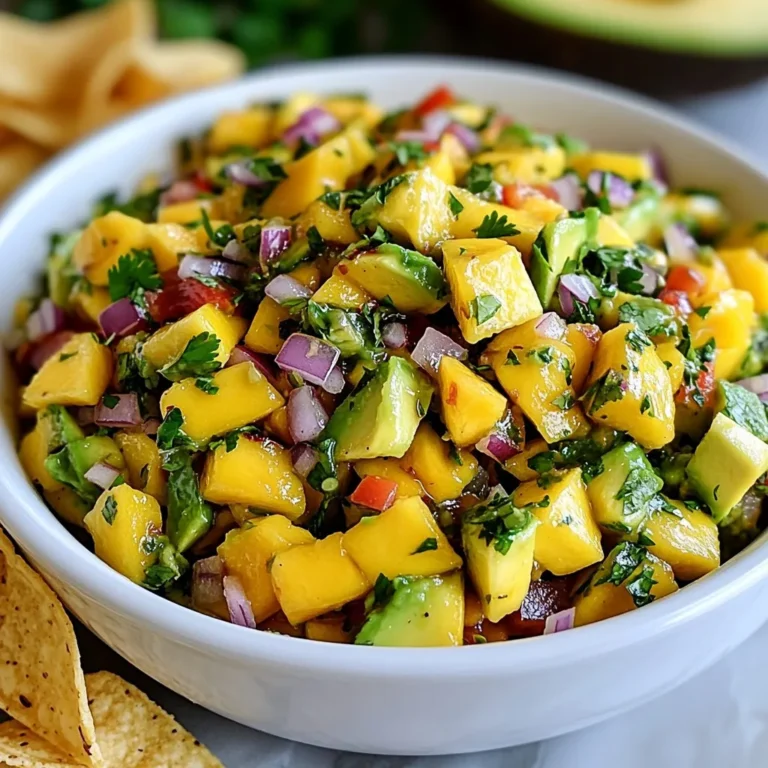
Mango Avocado Salsa Flavorful and Fresh Delight

- 2 cups cooked chicken, shredded - 2 cups fresh spinach, roughly chopped - 8 oz cream cheese, softened - 1/2 cup sour cream - 1 cup shredded mozzarella cheese - 1/2 cup grated Parmesan cheese - 1/2 teaspoon garlic powder - 1/2 teaspoon onion powder - 1/2 teaspoon dried Italian herbs (oregano, basil) - Salt and pepper to taste - 1 cup cooked pasta (penne or rotini) - 1/2 cup breadcrumbs (optional for topping) - 2 tablespoons olive oil The main star is the chicken. It adds protein and heartiness. You can use rotisserie chicken for ease. Spinach brings color and nutrition. It adds vitamins and a fresh taste. Cream cheese makes the casserole creamy and rich. Sour cream adds tang and depth. Mozzarella and Parmesan create a delicious cheesy top. The herbs add flavor and aroma, making each bite special. You can swap chicken for turkey or tofu for a vegetarian option. Use Greek yogurt instead of sour cream for a healthier choice. If you don't have mozzarella, try cheddar or gouda for a different flavor. For gluten-free options, use gluten-free pasta and breadcrumbs. You can also skip the breadcrumbs if you want a lighter dish. {{ingredient_image_1}} To start, gather all your ingredients. You need cooked chicken, fresh spinach, and cream cheese. Make sure your cream cheese is softened for easy mixing. Measure out the sour cream, mozzarella, and Parmesan cheese. Don't forget the garlic powder, onion powder, and Italian herbs. Lastly, cook your pasta, like penne or rotini, until it's just right. In a large bowl, mix the softened cream cheese and sour cream. Add the garlic powder, onion powder, and dried herbs. Stir until everything blends smoothly. Now, fold in the shredded chicken, chopped spinach, and cooked pasta. Sprinkle in half the mozzarella and Parmesan cheese. Mix gently until all the ingredients are coated well. Next, preheat your oven to 375°F (190°C). Take a greased 9x13 inch baking dish and transfer your mixture into it. Spread it out evenly. Top with the remaining mozzarella and Parmesan cheese. If you like, add breadcrumbs for a crunchy topping. Drizzle some olive oil over the breadcrumbs. Bake for 25 to 30 minutes. Look for bubbly edges and golden cheese on top. Once done, let it cool for a few minutes before you serve it. To keep your casserole moist, use plenty of cream cheese and sour cream. They add creaminess and flavor. Make sure to mix well so every bite has a bit of sauce. If you bake it too long, the dish may dry out. Keep an eye on the time. Bake at 375°F for 25 to 30 minutes. The casserole should be bubbly and golden on top. For a rich, creamy texture, mozzarella and Parmesan work great. Mozzarella melts well and gives a stretchy feel. Parmesan adds a nice salty kick. If you love more cheese, feel free to add extra mozzarella. Other good options include cheddar or gouda. These can give a different flavor and texture. Serve your casserole warm and fresh from the oven. A sprinkle of fresh parsley or basil on top makes it look great. Pair it with a light salad or some crusty bread for a complete meal. You can also add a squeeze of lemon for brightness. This simple touch can elevate the whole dish. Enjoy your meal with family or friends for the best experience! Pro Tips Perfectly Shredded Chicken: For the best texture, use leftover rotisserie chicken or poach chicken breasts until fully cooked, then shred them with two forks. Fresh Spinach Tip: If using frozen spinach, make sure to thaw and drain it well to avoid excess moisture in the casserole. Cheese Variations: Feel free to experiment with different cheeses like cheddar or gouda for unique flavors, or use a blend of cheeses for added depth. Make-Ahead Option: This casserole can be assembled a day in advance and stored in the refrigerator. Just bake it when you’re ready to serve! {{image_2}} You can switch out the chicken for other proteins. Try turkey for a leaner option. Shrimp can add a nice seafood twist. For a heartier bite, use ground beef or sausage. Just make sure to cook these proteins first. They should blend well with the creamy mix. To make this dish vegetarian, skip the chicken. Use more spinach or add mushrooms. Zucchini or bell peppers can also work well. For extra protein, consider adding chickpeas or quinoa. These swaps keep the dish filling and tasty. You can boost the flavor in many ways. Add crushed red pepper for some heat. A splash of lemon juice brightens the mix. Fresh herbs like basil or thyme add freshness. If you love cheese, try adding feta or goat cheese for a tangy kick. To keep your Chicken and Spinach Cream Cheese Casserole fresh, store it in an airtight container. Place it in the fridge within two hours of cooking. This helps prevent bacteria growth. It will last for about three to four days in the fridge. If you have leftovers, be sure to label the container with the date. When reheating, you want to keep it moist. Place the casserole in a baking dish. Add a splash of water or broth to avoid dryness. Cover it with foil to trap steam. Heat in the oven at 350°F (175°C) for 20-25 minutes. You can also use the microwave. Heat in short bursts, stirring in between, until hot. To freeze, let the casserole cool completely. Cut it into portions for easier thawing. Wrap each piece tightly in plastic wrap, then place it in a freezer bag. It can last up to three months in the freezer. When ready to eat, thaw it in the fridge overnight. Reheat as mentioned above for the best results. Yes, you can make this casserole ahead. Just prepare it as the recipe states. After mixing, cover the dish and put it in the fridge. You can keep it there for up to 24 hours. When ready to bake, take it out and let it sit for a bit. This helps it cook more evenly. Preheat your oven and bake as directed. This casserole pairs well with several sides. Here are some great ideas: - A light salad with vinaigrette - Steamed veggies like broccoli or green beans - Crusty bread for dipping - Garlic bread for a tasty twist These sides add freshness and balance to the creamy dish. To check if your casserole is done, look for a few signs. First, the cheese on top should be golden brown. Second, the edges should bubble. Lastly, insert a knife in the center. If it comes out hot, it’s ready. Let it cool for a few minutes before you serve. This helps the flavors settle and makes it easier to slice. This blog covered all the key parts of making a tasty casserole. We talked about the ingredients, from key items to easy swaps. You learned simple, step-by-step instructions for preparing your dish. I shared valuable tips to avoid dryness and enhance flavors. We also explored storage methods and answered common questions. Casseroles are fun, easy meals to make. With practice, you can create many tasty variations. Enjoy cooking!

Chicken and Spinach Cream Cheese Casserole Delight

- 2 ripe pear halves (Bartlett or Bosc work well) - 100g blue cheese, crumbled - 2 tablespoons cream cheese, softened - 1 tablespoon honey - 1 tablespoon chopped walnuts or pecans - 1 teaspoon fresh thyme leaves - Balsamic glaze for drizzling - Salt and pepper to taste - Mixed greens for serving For this easy and tasty appetizer, you need simple, fresh ingredients. Start with two ripe pear halves. I suggest using Bartlett or Bosc pears for their sweet, juicy flavor. Next, grab your cheeses. You will need 100 grams of blue cheese, crumbled. This cheese gives a strong, rich taste. Mix it with two tablespoons of softened cream cheese. The cream cheese adds a nice, creamy texture. Then, add some sweetness with one tablespoon of honey. This balances the tangy cheese. You can also include one tablespoon of chopped walnuts or pecans. They add crunch and nutty flavor. Fresh thyme leaves bring in a herbal note. Use one teaspoon for a fresh taste. If you want to enhance flavors, add salt and pepper to taste. For an extra touch, drizzle with balsamic glaze. This adds a sweet, tart contrast. Serve on a bed of mixed greens for a beautiful look and added freshness. These ingredients create a delightful blend in every bite. {{ingredient_image_1}} Preheating the oven Start by preheating your oven to 375°F (190°C). This step is key for even baking. Preparing the pears Next, cut the pears in half lengthwise. Use a spoon to scoop out a bit of the core. This creates a nice space for the filling. Make sure you don’t cut too deep; you want to keep the shape of the pear. Mixing cheese, honey, nuts, and herbs In a mixing bowl, combine the crumbled blue cheese and cream cheese. Add the honey, chopped nuts, and thyme. Season with salt and pepper. Mix everything until it is well combined. The mixture should be creamy and smooth. Filling the pears Generously fill each pear half with the cheese mixture. Make sure to pack it in, so every bite is cheesy and delicious. Baking time and serving suggestions Place the stuffed pears on a baking sheet lined with parchment paper. Bake them for about 15-20 minutes. You want the pears to be tender, and the cheese should be slightly melted. Once done, let them cool for a few minutes. Serve the pears on a bed of mixed greens. For extra flavor, drizzle some balsamic glaze on top if you like. Choose ripe pears that are soft but not mushy. Bartlett and Bosc are my favorites. They have a sweet taste that pairs well with blue cheese. Look for pears that are slightly fragrant. This means they are ripe and ready to eat. Avoid pears that have blemishes or dark spots. The best pears will hold their shape while baking. You can change the filling to match your taste. Try goat cheese or feta for a different flavor. Add dried fruits like cranberries or apricots for sweetness. A pinch of cinnamon can add warmth to the dish. For texture, consider adding sunflower seeds or pumpkin seeds. They add a nice crunch. Always taste the mixture before stuffing. Adjust salt and pepper to fit your preference. Bake the stuffed pears at 375°F (190°C). This temperature helps the pears soften while the cheese melts. Set a timer for 15-20 minutes. Check for tenderness by poking with a fork. If they are still firm, bake a few more minutes. Let them cool for a few minutes after baking. This makes them easier to handle when serving. Pro Tips Choose the Right Pear: Use ripe Bartlett or Bosc pears for the best flavor and texture. They should be slightly soft to the touch but not overly mushy. Mixing Cheese: Blend the blue cheese with cream cheese for a creamier texture and milder flavor, making it more palatable for those who may not enjoy strong blue cheese. Add a Crunch: Incorporating walnuts or pecans not only adds a delightful crunch but also enhances the overall flavor of the dish. Balsamic Glaze: Drizzle balsamic glaze over the finished dish for an extra layer of sweetness and acidity that complements the pears beautifully. {{image_2}} You can swap blue cheese for other cheeses. Goat cheese adds a creamy texture. Feta cheese gives a nice salty bite. Both are great choices. Each cheese brings its own flavor. Experiment to find your favorite. Want to add more flavor? Try adding dried fruits like cranberries or figs. They add sweetness and chewiness. You can also sprinkle in spices like cinnamon or nutmeg. These spices give a warm twist to the dish. Don't be afraid to get creative! When serving, think about pairing. A nice white wine, like Sauvignon Blanc, works well. It balances the richness of the cheese. You can also serve with crusty bread or crackers. They add texture and make it more filling. Enjoy your tasty bites with good company! To store leftover blue cheese stuffed pears, place them in an airtight container. Keep them in the fridge. They will stay fresh for up to three days. When you want to enjoy them again, reheat in the oven. Set your oven to 350°F (175°C). Bake for about 10 minutes until warm. This helps keep their tasty flavor and nice texture. You can freeze stuffed pears, but they may change texture. First, let them cool completely. Then, wrap each pear tightly in plastic wrap. Place them in a freezer-safe bag or container. They will last about three months in the freezer. When you’re ready to eat, thaw them in the fridge overnight. Reheat in the oven as mentioned above. The ingredients for blue cheese stuffed pears have different lifespans. Here’s a quick guide: - Pears: Ripe pears last about 3-5 days in the fridge. - Blue cheese: This cheese stays fresh for about 1-2 weeks after opening. - Cream cheese: It lasts about 1-2 weeks once opened. - Honey: Honey can last for years if stored properly. - Nuts: Chopped walnuts or pecans last about 1 month in the fridge. - Fresh thyme: This herb stays fresh for about 1 week in the fridge. Keeping these guidelines in mind helps you enjoy your delicious appetizer fresh and safe! Yes, blue cheese stuffed pears can be served cold. They taste great warm or at room temperature. If you want to serve them cold, let them cool after baking. Then, place them in the fridge for an hour. This makes a nice, refreshing bite. You can drizzle balsamic glaze on top when ready to serve. The best way to slice pears is to cut them in half lengthwise. Use a sharp knife for clean cuts. After slicing, scoop out a bit of the core. This creates space for the filling. Make sure to leave some flesh around the edge so the pears stay sturdy. This helps hold the filling well. You can make blue cheese stuffed pears ahead in several steps. First, prepare the filling and stuff the pears. Place the stuffed pears on a baking sheet. Cover them with plastic wrap and store them in the fridge. When you are ready to bake them, remove the wrap. Preheat your oven and bake as directed. If they are cold, they may need a few extra minutes to heat through. In this post, we explored how to make blue cheese stuffed pears. We discussed the main and optional ingredients, along with step-by-step instructions. I shared tips on selecting the right pears and enhancing flavors. We also covered storage options, so you can enjoy your treats later. Blue cheese stuffed pears are delicious and easy to make. Whether for a cozy night or a dinner party, they impress every time. Try these tips to create a dish that stands out. Happy cooking!

Blue Cheese Stuffed Pears Tasty and Easy Appetizer

- 1 pound ground beef - 4 medium potatoes, thinly sliced - 1 cup onion, finely chopped - 2 cloves garlic, minced - 1 cup cream of mushroom soup The main ingredients create the heart of this dish. Ground beef gives it a rich flavor. Potatoes add a comforting texture. Onion and garlic bring out the savory notes. Cream of mushroom soup ties everything together with a creamy touch. - 1 cup sour cream - 1 cup shredded cheddar cheese The dairy ingredients enhance the creaminess. Sour cream adds a tangy flavor, while cheddar cheese melts beautifully. Together, they create a luscious topping that makes each bite delightful. - 1 teaspoon dried thyme - 1 teaspoon paprika - 2 tablespoons olive oil - Salt and pepper to taste Seasonings and oils are key to flavor. Dried thyme offers a hint of earthiness. Paprika adds warmth and color. Olive oil helps to sauté the onions and garlic. Always use salt and pepper to adjust taste, bringing out all the flavors. {{ingredient_image_1}} First, preheat your oven to 375°F (190°C). This step warms the oven so your casserole cooks evenly. While the oven heats, grab a large skillet. Pour in two tablespoons of olive oil and turn the heat to medium. Add one cup of finely chopped onion and two cloves of minced garlic. Sauté them for about 3 to 4 minutes. You want the onion to be soft and clear, which adds a nice flavor. Next, add one pound of ground beef to the skillet. Use a spatula to break it apart. Cook the beef for about 5 to 7 minutes. You want it to turn a nice brown color. If there’s too much fat in the pan, drain it out. This keeps your casserole from being greasy. Now, it’s time to layer your ingredients. In a large bowl, mix one cup of cream of mushroom soup, one cup of sour cream, one teaspoon of dried thyme, one teaspoon of paprika, and salt and pepper to taste. Stir it well until it’s smooth. In a greased 9x13-inch baking dish, start with half of the sliced potatoes. Lay them flat at the bottom. Next, add half of the beef mixture. Follow that with half of your creamy mix. Sprinkle on half a cup of shredded cheddar cheese. Repeat these layers with the remaining potatoes, beef mixture, and creamy mix. Finish with a layer of cheddar cheese on top. Finally, pour one cup of beef broth over the entire casserole. This keeps everything moist while baking. Cover the dish with aluminum foil and bake it for 45 minutes. After that, remove the foil. Bake for another 15 to 20 minutes until the potatoes are soft and the top is golden brown. Let it cool for a few minutes before serving. Enjoy your delicious creamy beef and potato casserole! To make sure your casserole cooks evenly, slice the potatoes thin. This helps them cook at the same rate as the beef. When you layer the ingredients, spread them out evenly. This way, each bite has the same flavor. For a tasty topping, add extra cheese before the final bake. This will give your casserole a nice, golden crust. You can also mix in breadcrumbs for added crunch. Garnish your casserole with fresh parsley. It adds color and flavor. Serve it with a light salad for a balanced meal. For portion sizes, a square cut works well. Each serving should be about one-sixth of the dish. This keeps everyone happy and full. One common mistake is overcooking the potatoes. Check them at the 45-minute mark. They should be tender, but not mushy. Another mistake is skipping the layering technique. Layering helps the flavors mix well. It also keeps the dish from being too dry or too soggy. Follow the steps closely for the best results. Pro Tips Use Fresh Herbs: Fresh thyme can enhance the flavor of the casserole significantly. If possible, replace dried thyme with fresh for a more vibrant taste. Layering Technique: Ensure that the layers are even and well-distributed for consistent cooking. This helps prevent some areas from being overcooked while others remain undercooked. Cheese Variations: Experiment with different cheeses like pepper jack or mozzarella for a unique twist. Mixing cheeses can add depth to the flavor profile. Rest Before Serving: Allow the casserole to rest for about 10 minutes after baking. This will help the layers set and make serving easier. {{image_2}} You can change the meat in this dish. Try using turkey or chicken instead of beef. This option lowers fat and gives a lighter taste. Both meats pair well with potatoes and creamy sauce. Adding vegetables makes this dish even better. You can include carrots, peas, or green beans. These veggies add color and nutrients to your casserole. If you need gluten-free options, use gluten-free cream of mushroom soup. You can also pick gluten-free broth. This way, you keep the flavor without the gluten. For low-fat alternatives, choose lean ground beef or ground turkey. Low-fat sour cream and cheese can also work well. These swaps help cut calories while keeping the dish creamy and delicious. You can boost the flavor by adding spices. Try garlic powder, onion powder, or Italian seasoning. These spices add depth and warmth to your casserole. Different cheese options can change the taste too. Swap cheddar for Monterey Jack or pepper jack cheese. These cheeses melt well and add a fun kick. After enjoying your creamy beef and potato casserole, store your leftovers right away. Keep them safe in the fridge. Use airtight containers to keep the flavors fresh and prevent smells from mixing. Glass or plastic containers work well. Make sure to let the casserole cool before sealing it up. This helps keep the texture just right. Freezing is a great option if you want to save some for later. First, let the casserole cool completely. Then, wrap it tightly in plastic wrap or aluminum foil. You can also use freezer-safe containers. This keeps it safe from freezer burn. When you're ready to eat, take it out and thaw it in the fridge overnight. If you're in a hurry, you can thaw it in the microwave. To reheat, bake it in the oven at 350°F (175°C) until heated through. This usually takes about 30 to 40 minutes. How long does it last? In the fridge, your casserole stays good for about 3 to 4 days. If frozen, it can last for up to 3 months. Just remember to label your containers with the date. This helps you keep track of how long it’s been stored. Enjoy your creamy beef and potato casserole without worry! You can prepare this casserole the night before. Here’s how: - Cook the beef and onions as stated in the recipe. - Mix the creamy ingredients in a bowl. - Layer the potatoes, beef, and creamy mix in a dish. - Cover and store it in the fridge overnight. When you are ready to bake, preheat the oven and add the beef broth. Bake as instructed. This method saves time and makes dinner easy. Yes, you can change up the cheese. Here are some good options: - Monterey Jack for a mild taste. - Gouda for a rich flavor. - Mozzarella for a stretchy cheese. Feel free to mix different cheeses for a unique taste. Just remember to keep the amount around one cup. Reheating leftovers should be done carefully. Here are some tips: - Use the oven for best results. Preheat it to 350°F (175°C). - Cover the casserole with foil to keep it moist. - Heat for about 20-25 minutes or until warm. You can also use the microwave, but it may not warm evenly. If using the microwave, heat in short bursts and stir in between. This casserole combines ground beef, creamy soup, and tasty spices. It’s easy to make and great for busy days. You can swap ingredients to suit your taste. Remember to layer well and avoid overcooking the potatoes. Store leftovers properly for future meals. Adjust recipes for dietary needs and enjoy new flavors. With these tips, you’ll create a dish that everyone loves. Happy cooking!

Creamy Beef and Potato Casserole Comfort Dish Delight

To create tasty Mexican stuffed peppers, you need the following fresh and healthy ingredients: - 4 large bell peppers (red, yellow, or green) - 1 cup quinoa, rinsed - 2 cups vegetable broth - 1 cup black beans, drained and rinsed - 1 cup corn kernels (fresh or frozen) - 1 cup diced tomatoes (canned or fresh) - 1 teaspoon ground cumin - 1 teaspoon chili powder - 1 teaspoon garlic powder - ½ teaspoon onion powder - Salt and pepper to taste - 1 cup shredded cheese (cheddar or Mexican blend) - Fresh cilantro, chopped (for garnish) - 1 avocado, diced (for topping) These ingredients bring together a mix of flavors and textures. The bell peppers form a colorful base. Quinoa adds protein and a nutty taste. Black beans and corn add heartiness and sweetness. The spices give depth and warmth. I love using fresh cilantro and avocado as toppings. They add a refreshing touch that makes each bite special. Enjoy gathering these ingredients! {{ingredient_image_1}} - First, preheat your oven to 375°F (190°C). - Next, cut the tops off the bell peppers. Remove all seeds and membranes. Set them aside. - Now, in a medium saucepan, combine the quinoa and vegetable broth. Bring this to a boil over medium heat. - Once it boils, reduce the heat to low. Cover it and simmer for about 15 minutes. The quinoa should be fluffy when done. - In a large mixing bowl, mix the cooked quinoa, black beans, corn, diced tomatoes, and your spices. Stir until everything blends well. - Carefully spoon this mixture into each bell pepper. Pack them tightly for a good fit. - Place the stuffed peppers upright in a baking dish. If they wobble, slice a bit off the bottom. This helps them stand. - Cover the baking dish with foil. Bake for 25 minutes, allowing the flavors to meld. - After 25 minutes, remove the foil. Sprinkle shredded cheese on top of each pepper. Return them to the oven. Bake for an additional 10 minutes. This melts the cheese perfectly. - Once done, take them out and let cool for a few minutes. - Garnish each stuffed pepper with diced avocado and chopped cilantro. This adds freshness. - For side dishes, consider serving with a simple green salad or tortilla chips. These pair nicely with the peppers. To keep your peppers stable while baking, slice a thin layer off the bottom. This helps them stand upright and look great on the plate. Always rinse the quinoa before cooking. This removes the bitter coating called saponin. When cooking quinoa, use two cups of vegetable broth for every cup of quinoa. Bring it to a boil, then lower the heat and cover. Let it simmer for about 15 minutes until fluffy. If you want a different taste, try using smoked paprika instead of chili powder. It adds a deep flavor without extra heat. To make the dish spicier, add a pinch of cayenne pepper or a chopped jalapeño to the filling. Always taste your mixture before stuffing the peppers. Adjust the spices based on your preference. For a fun twist, serve your peppers on a colorful platter. Use red, yellow, and green peppers for a vibrant look. You can also add a side of sour cream or yogurt for dipping. Top the peppers with diced avocado and fresh cilantro. This adds color and freshness, making each bite more delightful! Pro Tips Choose Colorful Peppers: Using a mix of red, yellow, and green bell peppers not only makes the dish visually appealing but also adds a variety of flavors. Perfectly Cooked Quinoa: Make sure to rinse the quinoa before cooking to remove any bitterness and ensure it cooks up fluffy. Customize Your Filling: Feel free to add your favorite vegetables or proteins to the quinoa mixture for an extra twist. Ground turkey or chopped zucchini work great! Serve with a Side: Pair your stuffed peppers with a fresh side salad or some tortilla chips and salsa for a complete meal. {{image_2}} You can switch up the protein in stuffed peppers. Ground chicken, beef, or turkey works well. They add a hearty bite. If you prefer to keep it meatless, try black beans, lentils, or tofu. These options are filling and tasty. They fit right into the mix. Quinoa is great, but you can swap it out. Rice or couscous can take its place. They will change the texture but keep it yummy. You might also explore lentils or other legumes. These can add protein and unique flavors. Feel free to add different vegetables for extra flavor. Zucchini, spinach, or mushrooms can enhance your dish. Experiment with spices from around the world. Adding cumin or smoked paprika can elevate the taste. Don't be afraid to mix and match! To keep your stuffed peppers fresh, use an airtight container. This helps to seal in flavor. You can store them in the fridge for about 3 to 5 days. Make sure they cool down before sealing. This way, they won't turn soggy. If you want to freeze your stuffed peppers, wrap them well. Use plastic wrap first, then place them in a freezer bag. This method prevents freezer burn. They can last up to 3 months in the freezer. To reheat frozen peppers, let them thaw in the fridge overnight. You can also bake them straight from the freezer. Just add 10 to 15 minutes to the baking time. Check for warmth in the center before serving. Can I make stuffed peppers in advance? Yes, you can prepare stuffed peppers ahead of time. You can stuff the peppers and store them in the fridge. Just cover them with plastic wrap or foil. They stay good for about two days. When ready, bake them as directed. What can I substitute for quinoa? If you don't have quinoa, you can use rice or couscous. These grains work well in this recipe. You can also try lentils for a different flavor and texture. How can I make these stuffed peppers spicier? To add heat, you can use jalapeños or hot sauce. Red pepper flakes also give that nice kick. Adjust the spice level to match your taste. Each stuffed pepper contains about 300 calories. They are high in fiber and protein. This recipe is a great source of vitamins A and C. If you want fewer calories, use less cheese or skip it. If you can't find bell peppers, zucchini or large tomatoes work well. You can also mix in seasonal veggies like squash or spinach. These can add color and flavor to your dish. You can create tasty stuffed peppers with ease. We covered the essential ingredients and clear steps for baking. Don’t forget the tips to enhance flavor and presentation. Feel free to try different protein and grain options to mix it up. For storage, keep leftovers safe and know how to freeze them. Experiment with spices and veggies to suit your taste. Enjoy making this dish again and again!

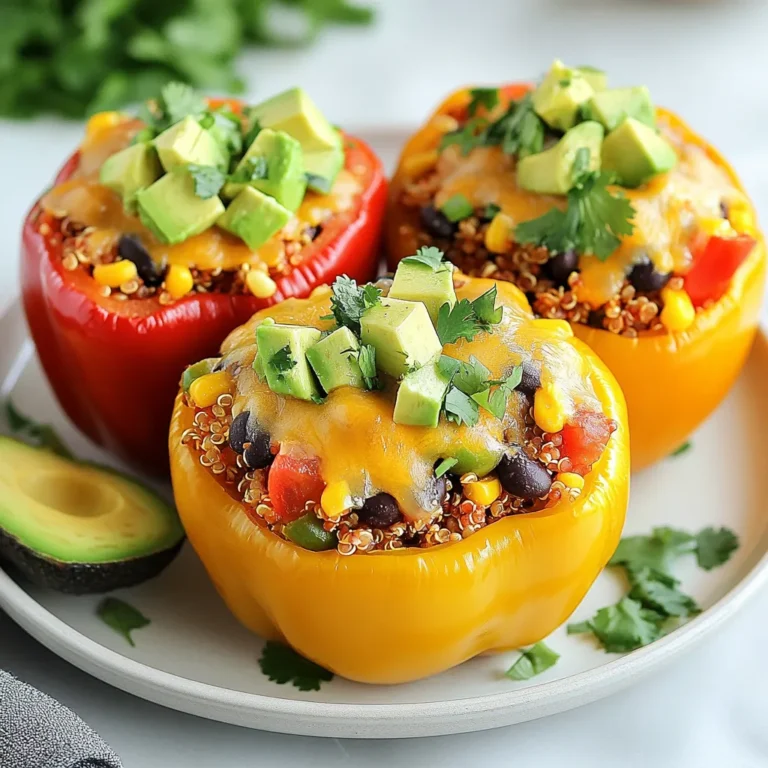
Mexican Stuffed Peppers Flavorful and Easy Recipe

- 1 cup ditalini pasta - 2 tablespoons olive oil - 1 medium onion, diced - 3 cloves garlic, minced - 2 medium carrots, diced - 2 celery stalks, diced - 4 cups vegetable broth - 1 cup heavy cream (or coconut cream for a vegan option) - 1 cup frozen peas - 1 teaspoon dried thyme - Salt and pepper to taste - Fresh parsley, chopped (for garnish) You can change this soup to fit your taste. Add cooked chicken for protein. Use kale or spinach for greens. Replace peas with corn for a sweeter flavor. If you like heat, toss in some red pepper flakes. Always pick bright, firm vegetables. Look for onions that feel heavy for their size. Garlic should be dry and plump. When choosing broth, aim for low-sodium options. This helps you control salt levels. Fresh parsley should smell bright and look vibrant. Using quality ingredients makes your soup better. {{ingredient_image_1}} Start by gathering all your ingredients. You will need ditalini pasta, olive oil, onion, garlic, carrots, and celery. Dice the onion, carrots, and celery into small pieces. Mince the garlic cloves. This prep makes cooking easy and fast. In a large pot, heat the olive oil over medium heat. Add the diced onion. Cook it for about 5 minutes until it is soft and clear. Next, add the minced garlic, diced carrots, and diced celery. Stir and cook for 5 more minutes. Now, pour in the vegetable broth and bring it to a boil. Once it bubbles, add the ditalini pasta and dried thyme. Lower the heat and let it simmer. Cook according to the pasta package, about 8 to 10 minutes, until the pasta is tender but firm. After the pasta is ready, stir in the heavy cream or coconut cream and frozen peas. Let it simmer for an extra 5 minutes. This step helps all the flavors mix together. Now, taste your soup and add salt and pepper as needed. If you want it creamier, add more broth or cream. Once done, remove the pot from the heat. Allow the soup to cool for a few minutes. Ladle the soup into bowls. Don’t forget to sprinkle some fresh parsley on top for a pop of color. For a cozy feel, serve it with warm crusty bread. Enjoy your warm and creamy ditalini soup! To make your soup super creamy, choose heavy cream or coconut cream. Both add rich flavor. When you stir in the cream, make sure the soup is on low heat. This way, the cream won’t curdle. If you want it even creamier, add a bit more cream. You can also blend a portion of the soup and mix it back in. This gives a smooth texture that feels cozy. One common mistake is overcooking the pasta. Ditalini should be al dente, so check it a minute early. If you add the cream too soon, it might curdle. Always let the heat lower before mixing it in. Another mistake is not seasoning enough. Taste your soup before serving. Adjust the salt and pepper to make the flavors pop. Serve your Cozy Creamy Ditalini Soup in rustic bowls. This adds charm to your meal. For a special touch, sprinkle fresh parsley on top. A drizzle of olive oil can enhance the look and taste. Pair it with warm, crusty bread for dipping. You can also add a side salad for balance. Enjoy every warm, comforting spoonful! Pro Tips Use Fresh Herbs: Fresh thyme or parsley can enhance the flavor of your soup significantly compared to dried herbs. Adjust Creaminess: For a lighter soup, substitute half of the heavy cream with additional vegetable broth. Cook Pasta Separately: If you prefer your pasta less soggy, cook it separately and add it to the soup just before serving. Freeze Leftovers: This soup freezes well, so make a double batch and store individual portions for quick meals later. {{image_2}} To make a vegan version of Cozy Creamy Ditalini Soup, swap the heavy cream for coconut cream. This change keeps the soup rich and creamy while adding a hint of sweetness. Use vegetable broth to enhance the flavor. You can also add more veggies, like spinach or kale, for extra nutrients. You won’t miss the dairy at all! If you want a gluten-free soup, choose gluten-free ditalini pasta. Many brands offer great options that taste just as good. Check for gluten-free vegetable broth too. This way, you keep the soup delicious and safe for those with gluten allergies. You can still enjoy its creamy texture without worry. Using seasonal ingredients can change up the flavors in your soup. In spring, add fresh peas and asparagus. In summer, try zucchini or tomatoes for a bright taste. Fall brings squash and sweet potatoes, while winter can include root veggies like parsnips and turnips. These swaps not only add flavor but also keep your soup fresh and fun. To keep your Cozy Creamy Ditalini Soup fresh, store it in an airtight container. Make sure to let the soup cool before sealing it. This helps prevent moisture build-up. Place the container in the fridge if you plan to eat it within three days. Remember to label the container with the date. This way, you’ll know when to use it. If you want to save the soup for longer, freezing is a great option. First, let the soup cool completely. Pour it into freezer-safe containers, leaving some space at the top for expansion. Seal tightly and label with the date. You can freeze the soup for up to three months. For best taste and texture, avoid freezing the soup with cream. It may change when thawed. When you're ready to enjoy your soup again, take it out of the fridge or freezer. If frozen, let it thaw in the fridge overnight. For quick reheating, use a pot on the stove. Heat it over medium heat, stirring often. If the soup seems thick, add a splash of vegetable broth or water. This will help bring it back to a nice creamy consistency. You can also microwave it in a bowl, covered loosely, stirring every minute until hot. Enjoy feeling cozy once again! Cozy Creamy Ditalini Soup lasts about three to four days in the fridge. Store it in a sealed container. This keeps it fresh and safe to eat. Always check for any signs of spoilage before you dig in. If you see any changes in smell or color, it’s best to toss it. Yes, you can make this soup ahead of time. It tastes even better the next day! Just cook the soup and let it cool. Then, store it in the fridge. When you are ready to eat, gently reheat it on the stove. If the soup seems thick, add a bit of broth to loosen it. You can serve ditalini soup with warm crusty bread. A simple green salad pairs well too. For a heartier meal, add a grilled cheese sandwich on the side. These options balance the creamy soup and make your meal even cozier. Enjoy your warm and comforting meal! We covered the key parts of making Cozy Creamy Ditalini Soup. You know the best ingredients to use and how to cook them step by step. We also shared tips to make your soup creamy and avoid common mistakes. Plus, I offered variations for vegan and gluten-free diets. Finally, I went over storage tips and answered common questions. Keep this guide handy for your next soup night. Enjoy your cooking and the cozy flavors!

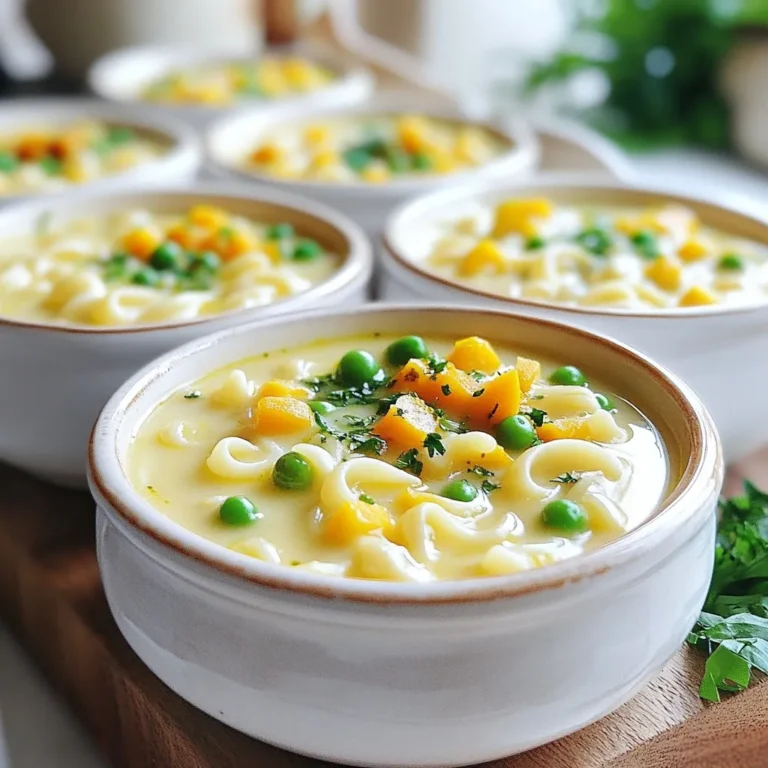
Cozy Creamy Ditalini Soup Comforting and Warm Dish

- 1 cup sugar-free dark chocolate chips - 1 cup sugar-free white chocolate chips - 1 teaspoon peppermint extract - ¼ cup crushed sugar-free peppermint candies - A pinch of sea salt To make keto peppermint bark, you need a few simple ingredients. First, I use sugar-free dark chocolate chips. They give the bark a rich, deep flavor. Next, I add sugar-free white chocolate chips for a sweet contrast. Peppermint extract is key to that refreshing taste. Just a teaspoon adds a lot of flavor. The crushed sugar-free peppermint candies give a nice crunch and a festive look. Finally, a pinch of sea salt helps bring out the sweetness in the chocolate. These ingredients come together to make a treat that is both tasty and low in carbs. You can find sugar-free options at most grocery stores. It's fun to mix these flavors and create something special. {{ingredient_image_1}} 1. First, line an 8x8 inch baking dish with parchment paper. Make sure it hangs over the edges to help with lifting later. 2. Next, take a microwave-safe bowl and add 1 cup of sugar-free dark chocolate chips. Melt them in 30-second bursts. Stir in between until smooth. 3. Once melted, pour the dark chocolate into the lined dish. Spread it evenly with a spatula. Place the dish in the fridge for about 10-15 minutes. This helps it set well. 4. Now, let’s make the white chocolate layer. In another microwave-safe bowl, add 1 cup of sugar-free white chocolate chips. Use the same melting method: 30 seconds at a time, stirring until smooth. 5. Stir in 1 teaspoon of peppermint extract into the melted white chocolate. This gives it a nice minty flavor. 6. Carefully pour the white chocolate over the set dark chocolate. Use a spatula to spread it evenly. 7. Time for the fun part! Add ¼ cup of crushed sugar-free peppermint candies on top of the white chocolate layer. Press them in gently so they stick well. 8. Sprinkle a pinch of sea salt over the top. This will enhance the flavors. 9. Place the whole dish back into the fridge. Let it chill for another 30-60 minutes until fully set. 10. Once set, lift the bark out using the parchment paper. Cut it into squares or break it into pieces. Enjoy your tasty keto treat! To make great keto peppermint bark, melting chocolate is key. Use a microwave-safe bowl. Melt sugar-free dark chocolate chips in 30-second bursts. Stir after each time until it is smooth. This method helps avoid burning. Next, pour the melted dark chocolate into your lined baking dish. Spread it evenly with a spatula. Refrigerate this layer for about 10-15 minutes. You want it firm but not too hard. Once set, repeat the same melting method for the white chocolate chips. After melting, mix in peppermint extract. This gives the white chocolate a nice flavor. Pour it over the dark chocolate layer. The final step is to refrigerate the whole dish for another 30-60 minutes. This ensures the bark sets well. For the best flavor, use high-quality chocolate. Low-quality chocolate can taste waxy. Look for brands that use real cocoa. This makes a big difference in taste. Adjusting the peppermint strength is also important. Start with one teaspoon of peppermint extract. You can add more if you like a stronger mint flavor. Just be careful; too much can overwhelm the sweetness. When serving, make it festive! Arrange bark pieces on a nice platter. You can also garnish with whole sugar-free peppermint candies. This adds color and extra flair. Another idea is to cut the bark into fun shapes. Use cookie cutters for holiday cheer. This way, your keto peppermint bark will look as good as it tastes! Pro Tips Use Quality Chocolate: Selecting high-quality sugar-free chocolate chips can significantly enhance the flavor of your peppermint bark. Cool Between Layers: Ensure each chocolate layer is completely set before adding the next to prevent mixing and maintain distinct layers. Crush Peppermints with Care: When crushing the peppermint candies, use a zip-top bag and a rolling pin to achieve uniform pieces without making a mess. Store Properly: Keep the peppermint bark in an airtight container in the refrigerator to maintain its freshness and prevent it from melting. {{image_2}} You can play with chocolate types in this recipe. Dark chocolate is rich and deep. It adds a bold taste. Milk chocolate is sweeter and creamier. It can soften the flavor. If you prefer white chocolate, choose sugar-free options. Look for brands that use natural sweeteners. This gives a lovely contrast to the peppermint. Want to change up the taste? You can add vanilla extract. Just a few drops can enhance the flavor. You can also try other holiday spices. A pinch of cinnamon or nutmeg adds warmth. These flavors bring a new twist to your bark. Toppings can make your bark unique. Chopped nuts or seeds add crunch and nutrition. Almonds or walnuts work well. You can also use other sugar-free candies. Look for options like sugar-free chocolate chips or dried fruit. These can add fun textures and flavors. Store your keto peppermint bark in an airtight container. This keeps it fresh. If you plan to eat it soon, room temperature is fine. However, for long-term storage, refrigeration is best. The cold helps maintain its texture and flavor. How long does it last? When stored properly, your peppermint bark can last up to two weeks. Keep an eye on it. If it looks or smells off, it’s best to toss it. Can you freeze peppermint bark? Yes, you can! Freezing is a great option if you want to save some for later. Wrap the bark tightly in plastic wrap, then place it in a freezer-safe container. Thawing tips: To thaw, just take it out and leave it at room temperature for about an hour. This keeps its texture nice and smooth. Enjoy your sweet treat! Keto peppermint bark offers many benefits. First, it has low-carb content. This makes it ideal for keto diets. Second, you can use sugar-free alternatives. These options let you enjoy sweets without added sugars. You can satisfy your sweet tooth while staying healthy. You can make keto peppermint bark dairy-free with the right chocolate. Look for dairy-free chocolate brands like Enjoy Life or Pascha. These brands offer great taste without dairy. This way, you can still enjoy the bark if you have dairy allergies. Yes, you can adjust the sweetness level. Use different sweeteners like stevia or erythritol. You can also add less peppermint extract if it’s too strong. Taste as you go to find what works for you. Enjoy your perfect level of sweetness! Making keto peppermint bark is simple and fun. You learned about the ingredients, like sugar-free chocolate and peppermint. I shared step-by-step instructions for a smooth process. Tips helped you achieve the perfect taste and texture. We explored variations for different flavors and toppings, ensuring everyone enjoys this treat. Finally, storage options keep your bark fresh. Now, you have all you need to create this festive snack. Enjoy your keto peppermint bark, and share it with family and friends!

Keto Peppermint Bark Simple Sweet Treat Recipe

To make a delicious Bruschetta Chicken Casserole, you need the right ingredients. Here is the list of what you will need: - 2 cups cooked chicken, shredded - 1 can (14.5 oz) diced tomatoes, drained - 1 cup fresh basil leaves, chopped - 1 cup mozzarella cheese, shredded - 1/2 cup grated Parmesan cheese - 1/2 cup balsamic glaze - 1 teaspoon garlic powder - 1/2 teaspoon onion powder - Salt and pepper to taste - 4 slices of baguette, toasted and cut into cubes - Olive oil for drizzling Each ingredient brings a unique flavor. The chicken serves as a hearty base. Diced tomatoes add moisture and a fresh taste. Chopped basil gives a bright, herbal note. The cheeses melt into a creamy layer, adding richness. Balsamic glaze adds a sweet tang that ties it all together. When selecting your ingredients, use fresh basil for the best flavor. Opt for high-quality mozzarella to achieve that gooey texture. Toasting the baguette cubes adds crunch, making each bite delightful. Remember, these ingredients work together to create a comforting, flavorful dish. Enjoy gathering them and let your kitchen come alive with these vibrant flavors! {{ingredient_image_1}} - Preheating the Oven Start by preheating your oven to 375°F (190°C). This step ensures your casserole cooks evenly. - Combining Ingredients In a large bowl, mix 2 cups of shredded chicken, 1 can of drained diced tomatoes, and 1 cup of chopped basil. Add 1 teaspoon of garlic powder, 1/2 teaspoon of onion powder, and salt and pepper to taste. Stir until everything is well blended. - Layering the Casserole Grease a 9x13-inch casserole dish. Spread half of the chicken mixture on the bottom. Next, layer half of the toasted baguette cubes over the chicken. Sprinkle half of the mozzarella and Parmesan cheeses on top. Repeat these layers with the remaining ingredients. - Adding the Balsamic Glaze Drizzle 1/2 cup of balsamic glaze over the top layer of cheese. This adds a sweet and tangy flavor that enhances the dish. - Baking Process Place the casserole in the preheated oven. Bake for 25-30 minutes. You want it to be hot, and the cheese should be melted and bubbly. - Broiling for Crispiness For a crispy top, switch to the broil setting for the last 3-5 minutes. Watch closely to prevent burning. This final touch gives your casserole that perfect golden crust. Choosing the Right Chicken For this dish, use cooked chicken. Shredded chicken works best. You can use leftover chicken or rotisserie chicken. This saves time and adds great flavor. Adjusting Flavor with Seasonings Season your mixture well. Garlic powder adds depth, while onion powder gives sweetness. Salt and pepper make everything pop. Feel free to add more herbs, like oregano or thyme, if you like. Ensuring Cheese Melts Perfectly Use fresh mozzarella for a gooey texture. Shredded mozzarella also melts well. Mix in grated Parmesan for a rich flavor. Layer the cheeses evenly to ensure they melt perfectly during baking. Best Side Dishes to Pair Serve this casserole with a green salad. A fresh arugula salad adds crunch. Garlic bread is also a great choice. It complements the flavors nicely. Presentation Ideas Garnish with fresh basil leaves for color. Drizzle extra balsamic glaze for flair. Serve in the casserole dish for a rustic look. Everyone will love the tasty, warm dish. Pro Tips Use Fresh Ingredients: Fresh basil and high-quality tomatoes elevate the dish's flavor. Opt for vine-ripened tomatoes if available. Customize the Cheese: Feel free to mix different cheeses like provolone or fontina for a unique flavor profile. Make Ahead: Prepare the casserole a day in advance and refrigerate. Just bake it when ready to serve for a quick meal. Add a Crunch: For extra texture, sprinkle some panko breadcrumbs on top before baking for a delightful crunch. {{image_2}} Different Cheese Options You can change the cheese for more flavor. Try using goat cheese for a tangy twist. Feta cheese also adds a nice touch. If you like sharp flavors, use aged cheddar. Adding Vegetables Feel free to sneak in some veggies. Spinach or bell peppers work well. You can also add zucchini or mushrooms for extra nutrition and taste. Just chop them small and mix in. Using Different Baguette Types Switch up the baguette for more fun. A sourdough baguette gives a nice tang. Whole grain bread adds fiber and flavor. You can even use focaccia for a soft, herby base. Gluten-Free Version To make this dish gluten-free, use gluten-free bread. You can find many tasty options in stores. Check the label to ensure it is truly gluten-free. Low-Carb Option If you want a low-carb meal, skip the bread. Replace it with cauliflower rice or zucchini noodles. These keep the dish light but still filling and yummy. Refrigeration Guidelines You can store leftover Bruschetta Chicken Casserole in the fridge. Place it in an airtight container. It will stay fresh for about 3 to 5 days. When you want to eat it again, just take it out and reheat. Freezing for Future Meals If you have more leftovers, you can freeze the casserole. Wrap it tightly in plastic wrap and then in aluminum foil. This helps keep it safe for about 2 to 3 months. When you want to use it, let it thaw in the fridge overnight before reheating. Best Methods to Reheat Casserole To reheat, you can use the oven or microwave. If using the oven, preheat it to 350°F (175°C). Place the casserole in a baking dish and cover it with foil. Bake for about 20 minutes or until it’s hot inside. If you use the microwave, heat it in 1-minute intervals. Check after each minute to avoid overheating. Enjoy your meal! How long can I store Bruschetta Chicken Casserole? You can store Bruschetta Chicken Casserole in the fridge for up to three days. Make sure to cover it tightly. This keeps the flavor fresh and tasty. Can I use rotisserie chicken for this recipe? Yes, rotisserie chicken is great for this dish! It saves time and adds a nice flavor. Just shred the chicken and mix it in. Is it possible to make this recipe ahead of time? Absolutely! You can prepare the casserole a day ahead. Just cover it and store it in the fridge. Bake when you're ready to eat. What can I do if the casserole is too dry? If your casserole is dry, drizzle some olive oil or extra balsamic glaze on top. This adds moisture and enhances the flavor. How to get the right balance of flavors? To balance flavors, taste the mixture before baking. Adjust salt, pepper, or garlic powder as needed. Fresh basil adds a bright taste, too. How to make it more saucy? To make it saucy, add more diced tomatoes or balsamic glaze. You can also stir in a little chicken broth for extra moisture. In this post, I covered how to make a delicious Bruschetta Chicken Casserole. We explored the key ingredients, step-by-step instructions, and tips for perfecting your dish. I also shared variations and storage options to help you enjoy this meal later. In conclusion, this casserole is a tasty and easy choice for any meal. You can customize it to fit your taste and dietary needs. Enjoy making it your own and savor every bite!

Bruschetta Chicken Casserole Flavorful and Easy Dish

To make a great spiced cranberry holiday punch, gather these simple ingredients: - 4 cups cranberry juice - 2 cups apple cider - 1 cup orange juice - 1/4 cup fresh lemon juice - 2 tablespoons honey or maple syrup (to taste) - 1 cinnamon stick - 6 whole cloves - 4-5 star anise - 1 orange, sliced (for garnish) - Fresh cranberries (for garnish) - 1 liter sparkling water (optional for fizz) These ingredients blend well together. Each one adds a layer of taste. You can enjoy this punch warm or chilled. Using fresh ingredients makes your punch taste better. Fresh juices add brightness and flavor. However, if you can't find fresh, frozen options work too. Frozen cranberries and juices can be a great backup. Just remember to thaw them before use. If you need swaps, here are some ideas: - For cranberry juice, try pomegranate juice for a different flavor. - Apple juice can replace apple cider if you want a sweeter taste. - Use lime juice instead of lemon juice for a zesty twist. - Maple syrup can be switched for agave nectar if you prefer. These substitutes keep the spirit of the punch while adding your own flair. {{ingredient_image_1}} To start, gather your ingredients. You need cranberry juice, apple cider, orange juice, lemon juice, and honey or maple syrup. In a large pot, mix these juices over medium heat. Stir well to blend the flavors. Next, heat the mixture until it starts to simmer. This step is key; it helps the flavors come alive. After it simmers, reduce the heat to low. Let it steep for 15 to 20 minutes. This allows the juices to meld together perfectly. Now it’s time to add the spices. Toss in the cinnamon stick, whole cloves, and star anise. Stir them into the mixture, letting the warm scent fill the air. The spices will deepen the flavor of the punch. Keep the pot on low heat and let it sit. After 15 to 20 minutes, remove the pot from heat. Strain the mixture using a fine strainer to catch all the whole spices. This leaves you with a smooth, flavorful punch. When serving, you can choose to add sparkling water for a fizzy twist. If you do this, let the punch cool slightly first. Gently mix in the sparkling water to keep the bubbles. For a festive touch, pour the punch into colorful mugs or clear glasses. Garnish each drink with orange slices and a few fresh cranberries. This adds a lovely pop of color. Your guests will be impressed by the beautiful presentation! To get the best taste, start with the juices. Use fresh juice when you can. Mix cranberry, apple, orange, and lemon juice. Each juice adds its own spark. Taste as you go. Add honey or maple syrup to sweeten. If it's too sweet, add more lemon juice. This mix needs balance. You want sweet, tart, and spice all together. You can prepare this punch a day early. Just follow the steps, but skip the sparkling water. Let it cool and store it in the fridge. When you’re ready to serve, heat it gently. Then, add the sparkling water for fizz. This saves time during your holiday party. Garnishes make your punch shine. Slice an orange and add it to each glass. Fresh cranberries bring color and fun. You can also add some cinnamon sticks for a warm touch. If you want, try herbs like mint for a twist. These extras make your drink look fancy and festive. Pro Tips Sweetness Adjustment: Taste the punch before serving and adjust sweetness with additional honey or maple syrup to suit your preference. Spice Variation: Feel free to experiment with spices such as nutmeg or ginger for a unique flavor twist in your punch. Chill It Down: If serving chilled, allow the punch to cool completely before adding sparkling water to maintain its fizz. Garnish Ideas: Enhance presentation with additional garnishes like mint leaves or pomegranate seeds for a festive touch. {{image_2}} You can enjoy this punch as a non-alcoholic drink or add some fun with alcohol. For a non-alcoholic option, just serve the spiced mixture as is. It tastes great warm or chilled. If you want to make it boozy, add some vodka or rum. Start with a cup of alcohol for a batch. Adjust based on your taste. Fruits add color and taste to your punch. You can use fresh slices of apples, pears, or pomegranate seeds. Add these fruits when you heat the juices. They will soak up the flavors and make the drink look festive. You can also freeze cranberries or orange slices and use them as ice cubes. This keeps your punch cold without watering it down. You can change the spice levels to fit your taste. If you love cinnamon, add two sticks instead of one. For more warmth, include extra cloves or star anise. If you want a milder taste, use fewer spices. Remember to start with small amounts and taste as you go. This way, you can find your perfect balance. To store leftover Spiced Cranberry Holiday Punch, follow these steps. First, let the punch cool down completely. Pour it into an airtight container. Glass or plastic containers work well. Seal the container tightly to keep out air. You can store the punch in the fridge for up to three days. If you want to keep it longer, consider freezing. Freezing Spiced Cranberry Holiday Punch is easy. Use freezer-safe containers or heavy-duty bags. Leave some space in the container for expansion. The punch will last in the freezer for up to two months. To thaw, place the container in the fridge overnight. For quicker thawing, run the bag under cold water. Once thawed, stir well before serving. When it’s time to enjoy your punch again, reheat it gently. Pour the punch into a pot and warm it on low heat. Stir occasionally to prevent burning. If you want it fizzy, add sparkling water after heating. Serve warm in festive mugs, garnished with orange slices and cranberries for extra flair. Enjoy! Yes, you can make Spiced Cranberry Holiday Punch ahead of time. This punch tastes even better after sitting. I suggest making it a day before your event. Store the punch in the fridge after it cools. Just remember to add sparkling water right before serving for that fizz. You can use pear juice or white grape juice. Both options add a nice sweetness. If you prefer something less sweet, use unsweetened cranberry juice. This will keep the punch tart and flavorful. Play around with these options to find your favorite mix. Yes, this recipe is great for kids! It has no alcohol and is filled with fruit flavors. The spices are mild and safe for all ages. Just make sure to adjust the sweetness to your taste. Kids will love the warm, festive taste of this drink. In this blog post, we explored the key ingredients and preparation steps for Spiced Cranberry Holiday Punch. You learned how to choose fresh or frozen ingredients and suggested substitutes to enhance your drink. I shared tips for perfect flavor and presentation, along with variations for all tastes. Remember, this punch can be made ahead and stored easily. Experiment with seasonal fruits and spice levels to make it your own. With these guidelines, you can create a delightful drink that fits every occasion. Enjoy making it and impressing your guests!

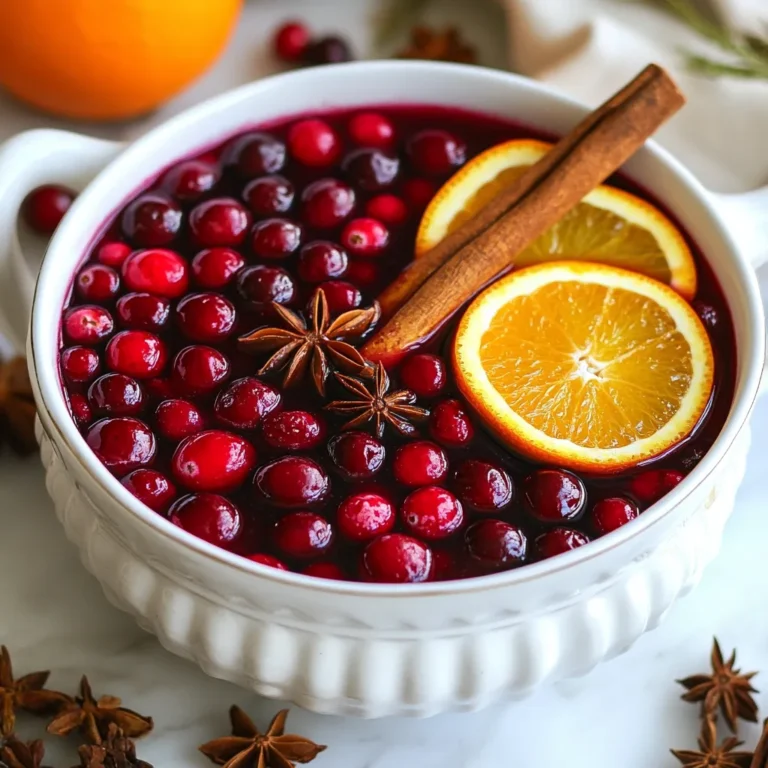
Spiced Cranberry Holiday Punch Festive and Flavorful Drink

PREV 1 … 57 58 59 … 86 NEXT
spicy fork kitchen

explore

DessertsDinnerAppetizersDrinks

Our Policies

  • Cookie Policy
  • Copyright Policy
  • Disclaimer
  • GDPR Policy
  • Terms Of Use
Back to Top
  • About
  • Contact Us
  • Privacy Policy
© 2026 spicy fork kitchen