FREE DINNER EBOOK! Get your copy!
  • Cookie Policy
  • GDPR Policy
  • Disclaimer
  • Terms Of Use
  • Visit my other site: Fun Cookie Recipes
spicy fork kitchen
  • Home
  • Dinner
  • Desserts
  • Drinks
  • Appetizers
  • Contact
  • About
  • Privacy Policy
  • Home
  • Dinner
  • Desserts
  • Drinks
  • Appetizers
  • Contact
  • About
  • Privacy Policy
  • Cookie Policy
  • GDPR Policy
  • Disclaimer
  • Terms Of Use
Visit my other site: Fun Cookie Recipes

HOME / CATEGORIES /

Latest

To make tasty honey lemon pepper wings, you need the following main ingredients: - 2 pounds chicken wings - 1/4 cup honey - 2 tablespoons lemon juice (freshly squeezed) - 1 tablespoon lemon zest - 1 teaspoon black pepper - 1 teaspoon garlic powder - 1 teaspoon onion powder - 1/2 teaspoon smoked paprika - Salt to taste These ingredients work together to make the wings sweet, tangy, and spicy. The honey adds a lovely sweetness, while the lemon juice gives a fresh kick. Black pepper and the spices bring warmth and depth to every bite. You can enhance your wings with garnishes and sauces. Here are some great options: - Fresh parsley, chopped (for garnish) - Ranch dressing - Blue cheese dressing - Celery sticks Adding a sprinkle of fresh parsley makes the dish look fancy. Dipping sauces like ranch or blue cheese can take the flavor to the next level. Celery sticks are a crunchy side that pairs well with wings. Using fresh and high-quality ingredients is key. Fresh chicken wings cook up juicy and tender. Fresh lemon juice and zest give the best flavor. Cheap or old spices won't have the same taste. When you use quality ingredients, you get a meal that tastes great and feels special. So, choose wisely at the store and treat yourself! {{ingredient_image_1}} To start, you must prep the chicken wings. First, take out 2 pounds of chicken wings. Then, pat them dry with paper towels. This helps remove excess moisture. Dry wings will get crispier when cooked. Next, let’s marinate the wings. In a large bowl, mix 1/4 cup of honey, 2 tablespoons of lemon juice, and 1 tablespoon of lemon zest. Add 1 teaspoon of black pepper, garlic powder, and onion powder. Don’t forget 1/2 teaspoon of smoked paprika and salt. Whisk all of these ingredients well. Now, add the dry chicken wings to the bowl. Make sure every wing is coated in the marinade. Cover the bowl and place it in the fridge. Let it marinate for at least 30 minutes to an hour. This step infuses great flavor into the wings. Now, it’s time to bake the wings. First, preheat your oven to 400°F (200°C). Line a baking sheet with parchment paper. Place a wire rack on top of the sheet. This rack helps air circulate around the wings. Lay the marinated wings on the rack in a single layer. Bake for 30 to 35 minutes. Flip the wings halfway for even cooking. When they are golden and crispy, they are ready. Enjoy the tasty wings right away! To get your wings crispy, start with dry skin. Pat the chicken wings with paper towels before marinating. This helps remove extra moisture. Next, use a wire rack for baking. The rack allows hot air to circulate. This method cooks the wings evenly and crispier. Flipping them halfway through baking also helps. Bake them at 400°F (200°C) for 30-35 minutes. One common mistake is not marinating long enough. Marinate your wings for at least 30 minutes. This lets the flavors blend into the meat. Another mistake is overcrowding the baking sheet. Wings need space to crisp up. If they are too close, they can steam instead of bake. Lastly, do not skip the salt. It enhances all the flavors in your wings. You can easily change the flavor of your wings. Want more spice? Add cayenne pepper or hot sauce to the marinade. For a smoky taste, increase the smoked paprika. You can also mix in herbs like thyme or rosemary. If you love sweetness, add more honey or some brown sugar. Get creative with your flavors to suit your taste! Pro Tips Pat Dry for Crispiness: Make sure to thoroughly dry the chicken wings before marinating. This step is crucial for achieving a crispy texture when baked. Use Fresh Ingredients: For the best flavor, opt for freshly squeezed lemon juice and freshly grated lemon zest. The brightness of fresh ingredients can elevate the dish. Let Them Marinate: Allow the wings to marinate for at least 30 minutes, but for even better flavor, consider marinating them overnight in the refrigerator. Monitor Cooking Time: Keep an eye on the wings as they bake. Ovens can vary, so check for doneness and adjust the cooking time as needed to prevent overcooking. {{image_2}} You can make spicy honey lemon pepper wings by adding heat. Use 1 to 2 teaspoons of cayenne pepper or hot sauce. Mix it in with the marinade. The heat will balance nicely with the sweet honey and tangy lemon. These wings pack a punch and are perfect for those who love spice. For grilled honey lemon pepper wings, marinate the wings as usual. Heat your grill to medium-high. Place the wings on the grill and cook for 15-20 minutes. Turn them often to avoid burning. The smoky flavor from the grill will add depth to your dish. Don’t forget to baste with extra marinade for more flavor. You can use an air fryer for a quicker option. Preheat the air fryer to 380°F (193°C). Place the wings in a single layer and cook for 25-30 minutes. Shake the basket halfway through for even cooking. For deep frying, heat oil in a large pot to 350°F (175°C). Fry the wings in batches for 8-10 minutes. They will turn out crispy and delicious! To store leftover honey lemon pepper wings, let them cool first. Place them in an airtight container. You can keep them in the fridge for up to three days. Use parchment paper between layers for easier access. This helps keep the wings from sticking together. When reheating wings, I recommend using the oven. Preheat your oven to 350°F (175°C). Place the wings on a baking sheet. Heat them for about 10 to 15 minutes. This keeps the wings crispy. You can also use an air fryer for a quick and crisp result. Set it to 350°F and cook for about 5 to 7 minutes. If you want to freeze the wings, do this before cooking. Place the marinated wings in a freezer bag. Remove as much air as possible to prevent freezer burn. You can freeze them for up to three months. When ready to cook, thaw them in the fridge overnight. Then bake as normal for a tasty treat! If you don’t have fresh lemon juice, you can use bottled lemon juice. Just keep in mind, fresh juice adds the best flavor. If you want, you can mix in a bit of lemon zest. This gives you a nice lemon taste, even if it’s not fresh. Yes, you can use frozen chicken wings. Just make sure to thaw them first. You can leave them in the fridge overnight or use cold water. Once thawed, dry them well with paper towels before marinating. This helps them cook better and get crispy. To check if the wings are done, look for a few signs. The skin should be golden and crispy. You can also check the internal temperature. It should reach at least 165°F (74°C). If you have a meat thermometer, this is the best way to tell. If you don’t, cut one wing open to see if the meat is no longer pink. You learned how to make delicious honey lemon pepper wings. We covered every step, from quality ingredients to cooking methods and storage tips. Remember, crispy wings start with proper prep and marination. You can spice things up or try grilling them for a new twist. Don’t worry about leftover wings; store them well for another tasty meal. Enjoy the process and have fun customizing your flavors. Now, it’s time to gather your ingredients and start creating your own flavor-filled wings!

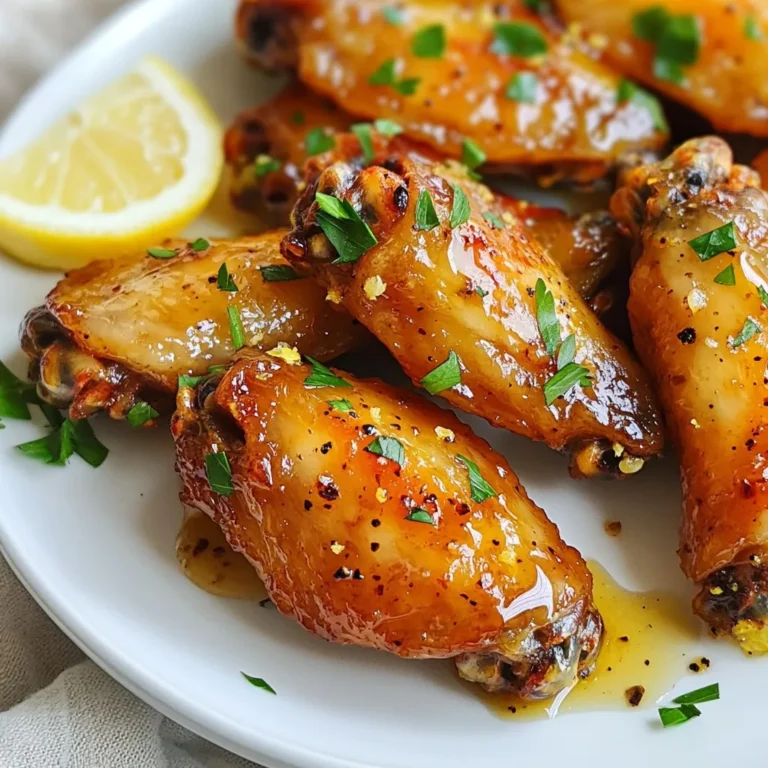
Honey Lemon Pepper Wings Tasty and Easy Recipe

- 2 boneless, skinless chicken breasts - 8 oz penne pasta - 1 cup cherry tomatoes, halved - 1/2 cup fresh basil, chopped - 2 cloves garlic, minced - 1/4 cup balsamic glaze - 1 tablespoon olive oil - 1/2 teaspoon salt - 1/2 teaspoon black pepper - 1/4 cup grated Parmesan cheese - Optional: 1/4 teaspoon red pepper flakes for heat To make bruschetta chicken pasta, you need fresh, quality ingredients. Start with boneless, skinless chicken breasts. They cook quickly and stay tender. Next, choose penne pasta. Its shape holds sauce well. Cherry tomatoes add a sweet burst of flavor. Fresh basil brings a fragrant herb note. Garlic adds depth and aroma to your dish. Balsamic glaze gives it a sweet and tangy finish. Olive oil helps cook the chicken and adds richness. For seasoning, use salt and black pepper. They enhance each ingredient's natural taste. Grated Parmesan cheese adds a creamy, salty touch. If you like heat, add red pepper flakes. They bring a nice kick without overpowering the dish. Gather these ingredients, and you're ready to create a savory and simple delight! {{ingredient_image_1}} To start, bring a large pot of water to a boil. Add salt to the water. This helps flavor the pasta. Once the water boils, add 8 ounces of penne pasta. Cook the pasta according to the package instructions. You want it to be al dente. This means it should be firm but not hard. It usually takes about 10-12 minutes. After cooking, drain the pasta and set it aside. While your pasta cooks, it’s time to prep the chicken. Take 2 boneless, skinless chicken breasts. Season them with 1/2 teaspoon of salt, 1/2 teaspoon of black pepper, and a pinch of red pepper flakes if you like some heat. Heat 1 tablespoon of olive oil in a large skillet over medium heat. Add the chicken breasts to the pan. Cook each side for about 6-7 minutes. You want the chicken to reach an internal temperature of 165°F (75°C). Once done, take the chicken out and let it rest for a few minutes. Then, slice it into thin strips. In the same skillet, add 2 cloves of minced garlic. Sauté it for about 30 seconds. You want it to be fragrant but not burnt. Next, add 1 cup of halved cherry tomatoes to the skillet. Cook the tomatoes for about 3-4 minutes. They should start to soften. Now, stir in 1/2 cup of chopped fresh basil and the cooked penne pasta. Drizzle the mixture with 1/4 cup of balsamic glaze. Toss everything together until well mixed. This ensures every bite is full of flavor. To ensure you have perfectly cooked chicken, start by seasoning each breast with salt and pepper. Heat olive oil in the skillet over medium heat. Cook each side for 6-7 minutes. The chicken is done when the internal temperature reaches 165°F. Let it rest before slicing. Timing is key for sautéing garlic and tomatoes. After cooking the chicken, add minced garlic to the skillet for about 30 seconds. You want it fragrant but not burnt. Then, add halved cherry tomatoes and sauté for 3-4 minutes until they soften. For plating, I recommend using large bowls. Serve the bruschetta chicken pasta in the center, making it the star of the meal. Garnish with fresh basil leaves for a pop of color. An extra sprinkle of grated Parmesan cheese adds a nice touch. Drizzle some balsamic glaze around the plate for elegance. To boost the flavor, consider using additional balsamic glaze. Drizzle it over the chicken and pasta before serving. This adds a sweet tang that elevates the dish. For side dishes, think about a simple green salad or garlic bread. Both pair well with the pasta and add more textures to your meal. Pro Tips Let the Chicken Rest: After cooking, allow the chicken to rest for a few minutes before slicing. This helps retain its juices, making it more tender and flavorful. Use Fresh Ingredients: For the best flavor, opt for fresh basil and ripe cherry tomatoes. They will elevate the dish and provide a burst of freshness. Customize Your Pasta: Feel free to substitute penne with your favorite pasta shape, such as fusilli or farfalle, for a fun twist on this classic recipe. Add a Kick: If you enjoy heat, increase the amount of red pepper flakes or add a splash of crushed red pepper sauce to the pasta mixture for an extra kick. {{image_2}} You can switch up the pasta type if you want. Try using spaghetti, fettuccine, or even whole wheat pasta. Each choice brings a new taste and texture. If you want to try a different protein, shrimp works great. It cooks fast and adds a nice flavor. Tofu is an excellent choice for a vegan meal. It soaks up the sauce well and keeps the dish filling. Adding veggies can make this dish even better. Spinach is a good choice; it wilts nicely and adds color. Bell peppers bring sweetness and crunch. You can mix and match based on what you have at home. If you like heat, add more red pepper flakes. You can also try a pinch of cayenne pepper for a different kick. Adjusting the spice lets you control how bold the dish tastes. For those needing gluten-free options, choose gluten-free pasta made from rice or chickpeas. They cook well and taste great too. If you want a vegan meal, skip the chicken and Parmesan. Use a plant-based cheese, or leave it out completely. The balsamic glaze adds enough flavor to keep it tasty. To keep your bruschetta chicken pasta fresh, store it properly. First, let it cool to room temperature. This step helps avoid condensation in the container. Then, place the pasta in an airtight container. Use glass or BPA-free plastic containers for best results. Label the container with the date to track freshness. - Store in the fridge for up to 3 days. - If you freeze it, use a freezer-safe container. It can last up to 2 months. When it's time to enjoy your leftovers, reheating is key. The best method is to use a skillet. Heat it on medium-low heat to warm without drying out. Add a splash of water or stock to keep it moist. - Stir occasionally to heat evenly. - You can also use a microwave. Place the pasta in a microwave-safe bowl, cover, and heat in 30-second intervals, stirring in between. For the best taste, add a bit more balsamic glaze or olive oil before serving. This tip helps maintain the flavor and texture of your delicious meal. To make Bruschetta Chicken Pasta from scratch, follow this simple guide: 1. Cook the Pasta: Boil salted water in a large pot. Add 8 oz of penne pasta. Cook until al dente, about 10-12 minutes. Drain and set aside. 2. Prepare the Chicken: Season 2 boneless, skinless chicken breasts with salt, pepper, and red pepper flakes if you like heat. Heat 1 tablespoon of olive oil in a skillet over medium heat. 3. Cook the Chicken: Add the chicken to the skillet. Cook for 6-7 minutes on each side. Make sure the internal temperature reaches 165°F (75°C). Remove from the heat and slice thin. 4. Sauté the Garlic: In the same skillet, add 2 minced cloves of garlic. Sauté for about 30 seconds until fragrant. 5. Combine Ingredients: Add 1 cup of halved cherry tomatoes to the skillet. Cook for 3-4 minutes until soft. Stir in 1/2 cup of chopped fresh basil and the cooked penne. Drizzle with 1/4 cup of balsamic glaze and mix well. 6. Serve: Plate the pasta, top with sliced chicken, and sprinkle with 1/4 cup of grated Parmesan cheese. Drizzle more balsamic glaze on top for extra flavor. Yes, you can make Bruschetta Chicken Pasta ahead of time. Here are some tips: - Storage: Allow the dish to cool completely. Store it in an airtight container in the fridge for up to 3 days. - Meal Prep: You can cook the chicken and pasta ahead of time. Mix them together with the sauce just before serving. - Freezing: If you want to freeze it, store in a freezer-safe container for up to 2 months. Thaw in the fridge overnight before reheating. Bruschetta Chicken Pasta pairs well with several side dishes: - Garlic Bread: Perfect for soaking up sauce. - Green Salad: A light salad with vinaigrette adds freshness. - Roasted Vegetables: Carrots, zucchini, or bell peppers can enhance your meal. - Wine: A nice white wine, like Pinot Grigio, complements the dish well. Bruschetta Chicken Pasta can be a healthy choice. Here’s why: - Lean Protein: Chicken breasts provide lean protein for muscle health. - Fresh Ingredients: Cherry tomatoes and basil add vitamins and antioxidants. - Portion Control: Keep portions moderate to manage calorie intake. - Balance: Pair with a salad to increase fiber and fill you up with fewer carbs. This dish can fit well into a balanced diet when enjoyed in moderation. Bruschetta Chicken Pasta is a tasty dish that combines chicken, pasta, and fresh flavors. You learned about key ingredients and how to cook them perfectly. We explored tips for great results and fun variations to suit your taste. Don't forget to store leftovers right and reheat them well. Try this meal for an easy, delicious dinner. Embrace your creativity and enjoy this dish your way!

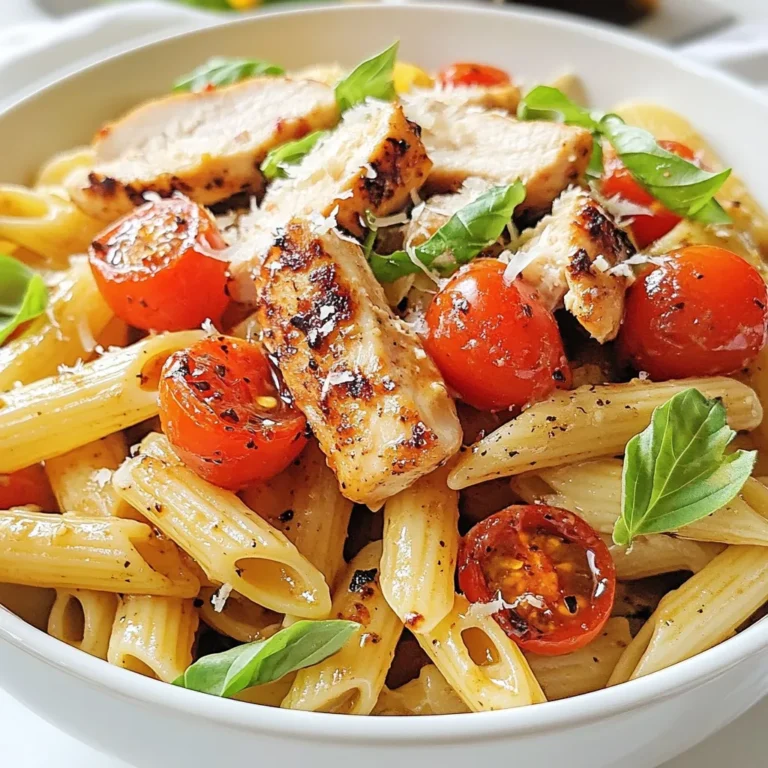
Bruschetta Chicken Pasta Savory and Simple Delight

- 4 boneless, skinless chicken breasts - 2 cups cherry tomatoes, halved - 1 cup fresh mozzarella balls - 1 cup fresh basil leaves, torn - 1 tablespoon olive oil - 2 cloves garlic, minced - 1 teaspoon dried oregano - 1 teaspoon salt - ½ teaspoon black pepper - 2 tablespoons balsamic glaze - Extra basil for serving For this One-Pan Caprese Chicken Skillet, I use simple yet fresh ingredients. The chicken breasts form a tasty base. Cherry tomatoes add natural sweetness. Fresh mozzarella brings creaminess. Torn basil leaves give that vibrant flavor. In the seasoning part, I start with olive oil for cooking. Minced garlic adds depth. Dried oregano pairs well with the chicken. A sprinkle of salt and black pepper rounds it all out. If you want a special touch, drizzle balsamic glaze on top. Add a few extra basil leaves for a pop of green. These ingredients come together to create a dish that's not just easy to make but also delicious. {{ingredient_image_1}} To start, I heat olive oil in a large skillet over medium heat. I season the chicken breasts with dried oregano, salt, and black pepper. I make sure to coat both sides well. This adds great flavor to the chicken. Once the oil is hot, I place the chicken in the skillet. I cook each side for about 6-7 minutes. I know the chicken is ready when it turns golden brown and has an internal temperature of 165°F (75°C). After the chicken cooks, I add minced garlic to the skillet. I sauté it for about a minute. This step fills the kitchen with a lovely smell. Next, I toss in halved cherry tomatoes. I let them cook for about 3-4 minutes until they soften. The tomatoes add a sweet and juicy touch. Now comes the fun part! I sprinkle fresh mozzarella balls over the chicken and tomatoes. Then, I cover the skillet with a lid. I let it sit for 3-5 minutes. This helps the cheese melt perfectly. When I remove the lid, I see the gooey mozzarella ready to be enjoyed. Finally, I toss in torn basil leaves and drizzle balsamic glaze on top. This adds a fresh and tangy finish. To ensure your chicken is cooked just right, check its internal temperature. It should reach 165°F (75°C). Use a meat thermometer for accuracy. This step keeps your chicken juicy and safe to eat. For a golden brown color, pat the chicken dry before seasoning. This helps it sear better. Make sure your skillet is hot enough before adding the chicken. Let it cook without moving it for the first few minutes. This helps form a nice crust. Fresh herbs can boost the flavor of your dish. Try adding thyme or rosemary along with the basil. Each herb offers a unique taste. You can mix and match to find your favorite. Cheese can also change the dish's taste. If you want a sharper flavor, use aged cheddar instead of mozzarella. Goat cheese adds a creamy tang, while feta can bring a salty kick. Feel free to experiment! This dish pairs well with many sides. A fresh green salad adds crunch. You can also serve it with garlic bread for a fun twist. For a heartier meal, try it with pasta. Toss the pasta with olive oil and herbs for a nice touch. Don’t forget to serve with crusty bread! It’s perfect for soaking up the delicious sauce. Enjoy every bite! Pro Tips Use Fresh Ingredients: The fresher your ingredients, especially the basil and mozzarella, the more vibrant the flavors will be in your dish. Check Chicken Doneness: Always use a meat thermometer to ensure your chicken is cooked to an internal temperature of 165°F (75°C) for safe consumption. Customize the Veggies: Feel free to add other vegetables like bell peppers or zucchini for additional flavor and nutrients. Serve with Sides: Pair this dish with a side of pasta, rice, or a fresh salad to complete your meal. {{image_2}} If you want to make this dish fit your diet, there are easy swaps. For gluten-free options, this recipe is already safe! Just ensure your balsamic glaze is gluten-free. For low-carb variations, skip the tomatoes or use a smaller amount. You can also serve the chicken over a bed of leafy greens instead of rice or pasta. You can switch the chicken for shrimp or tofu. Shrimp cooks quickly and adds a nice taste. Tofu is great for a plant-based option. Feel free to use different vegetables too. Spinach adds color and nutrients, while zucchini adds a nice texture. Both options keep the dish fresh and exciting! Try using different balsamic glazes. Some glazes are sweeter, while others are tangy. Experiment until you find your favorite. You can also add spices for a kick. Red pepper flakes, paprika, or even cayenne pepper can spice things up. Test a little at a time to find the heat level you enjoy! To keep your One-Pan Caprese Chicken fresh, use an airtight container. Glass or plastic containers work well. Make sure the chicken cools down before sealing. Store it in the fridge for up to three days. This helps keep the flavors intact. For reheating, the stovetop is best. Heat it over low heat for about 5-7 minutes. This keeps the chicken juicy. If you use a microwave, warm it for 1-2 minutes. Check to make sure it heats evenly. You can freeze leftover Caprese Chicken for later. Use freezer-safe containers or bags. It will stay good for up to three months. To thaw, place it in the fridge overnight. Reheat it using the stovetop or microwave as mentioned above. Always check that it's heated through before eating. This dish takes about 30 minutes in total. You’ll spend 10 minutes prepping the ingredients. Cooking the chicken and other items takes around 20 minutes. Yes, you can prep the chicken and chop the veggies ahead. Keep them in the fridge for up to two days. Cook the dish fresh when you're ready to eat. This way, you save time and enjoy the best flavors. If you need a different cheese, try these options: - Feta cheese for a tangy taste. - Goat cheese for creaminess. - Vegan cheese for plant-based diets. These choices keep the dish tasty while meeting your needs. This blog post covered a delicious One-Pan Caprese Chicken Skillet recipe. We explored the main ingredients, seasonings, and optional garnishes. I shared step-by-step cooking instructions, tips for perfect chicken, and ways to customize the dish. You can store leftovers easily and reheat them without losing flavor. Finally, I answered common questions about preparation and ingredient swaps. This meal is simple, flavorful, and fun to make. Enjoy creating your own version!

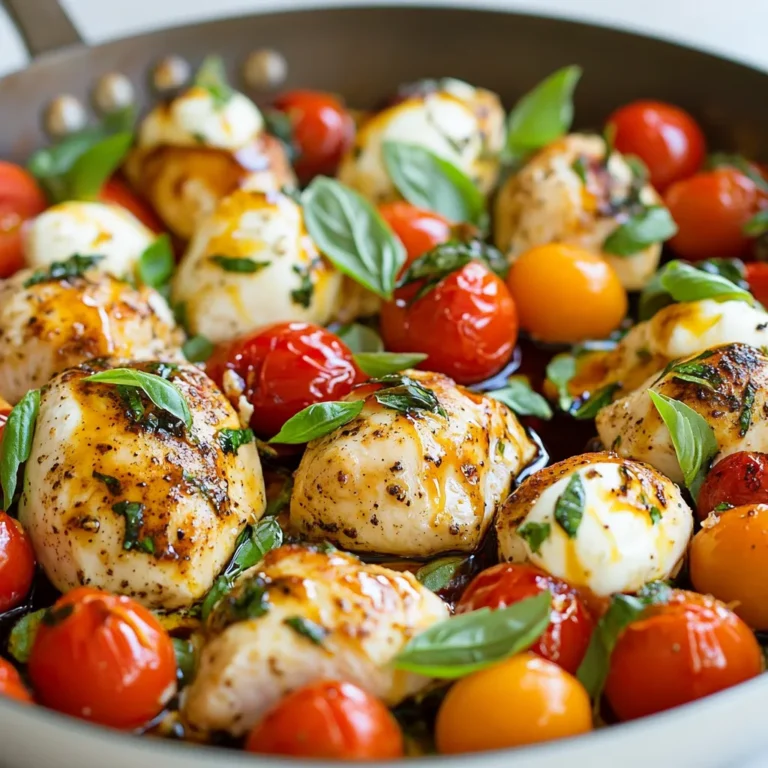
One-Pan Caprese Chicken Skillet Quick and Easy Meal

- 2 cups cooked and shredded chicken breast - 8 oz cream cheese, softened - 1 cup shredded sharp cheddar cheese - ½ cup ranch dressing - ½ cup buffalo wing sauce (adjust to taste) For this dip, cooked and shredded chicken breast is key. It gives the dip its hearty base. Cream cheese adds smoothness. Ranch dressing brings a cool flavor that balances the heat. Buffalo wing sauce gives it that spicy kick. Don't forget the shredded cheddar; it melts beautifully on top. - ½ cup crumbled blue cheese - 1 tablespoon chopped green onions (for garnish) You can add blue cheese for a stronger flavor. It gives a nice twist to the dip. Garnishing with chopped green onions adds color and a fresh bite. - Tortilla chips - Vegetable sticks Serve this dip warm with crunchy tortilla chips. They scoop up the dip well. Vegetable sticks are a great option too. Carrots and celery add a nice crunch and freshness. {{ingredient_image_1}} First, preheat your oven to 350°F (175°C). This step warms your oven for baking. Next, grab a mixing bowl. Add the softened cream cheese, ranch dressing, and buffalo wing sauce. Mix these until smooth and blended. You want a creamy base for your dip. Now, it’s time to add more flavor. Stir in the cooked and shredded chicken. Then, add half of the shredded cheddar cheese. Make sure everything is evenly mixed. Once combined, transfer the mixture to a baking dish. Spread it out so it cooks evenly. Place your baking dish in the preheated oven. Bake for 20-25 minutes. Look for a bubbly and golden top. This means it’s ready! After baking, take it out and let it cool for a few minutes. Garnish with chopped green onions before serving. Your dip is now ready! Serve it warm with tortilla chips or vegetable sticks. To make your buffalo chicken dip creamy, use softened cream cheese. It blends well with other ingredients. If you want more heat, adjust the buffalo sauce to your liking. Start with half a cup, then taste and add more if needed. Pair your dip with tortilla chips or fresh vegetable sticks. Both options offer a great crunch. For parties, try serving it in a bread bowl. It adds flair and makes for easy dipping. You can also make mini servings in individual cups for a fun touch. You can prep this dip in advance. Mix all the ingredients and store them in the fridge until you're ready to bake. It saves time on busy days. When reheating, keep the oven at 350°F. Bake for about 15 minutes or until hot and bubbly. This way, you keep all the flavors fresh and delicious. Pro Tips Choose the Right Chicken: Using rotisserie chicken can save you time and add extra flavor to your dip. Adjust the Heat: Feel free to modify the amount of buffalo wing sauce to suit your spice tolerance. Make it Creamy: For an extra creamy texture, mix in a little sour cream along with the cream cheese. Serve Immediately: This dip is best enjoyed warm, so serve it right after baking for maximum flavor. {{image_2}} To make a lighter version of Buffalo Chicken Dip, consider using low-fat cream cheese. This swap cuts down on fat but keeps the creamy texture. You can also replace ranch dressing with Greek yogurt. Greek yogurt adds protein and tang without the extra calories. Want to spice things up? Add extra spices like cayenne pepper or smoked paprika for more heat. You can also mix in veggies. Chopped bell peppers or spinach bring color and nutrition. They add crunch and balance the creamy dip. For a fun twist, serve your dip in a bread bowl. This makes for easy scooping and adds flavor. You can also layer the dip in a trifle dish. This creates a beautiful, colorful display that impresses your guests. To keep your buffalo chicken dip fresh, use airtight containers. First, let the dip cool completely. Then, scoop the dip into the container. Seal it tightly to keep air out. This helps prevent spoilage. Store the dip in the fridge. It stays fresh for up to four days. You can freeze buffalo chicken dip for later! First, let it cool completely. Next, transfer it to a freezer-safe container. Leave some space at the top for expansion. Seal the container tightly. The dip can last up to three months in the freezer. When you’re ready to eat, thaw it in the fridge overnight. To reheat, place it in a baking dish and warm it in the oven at 350°F (175°C) until hot. Buffalo chicken dip stays fresh in the fridge for about four days. After that, it may start to spoil. Look for signs like a change in color or a sour smell. If it smells off or has mold, throw it away. Always trust your senses when it comes to food safety! Yes, you can make buffalo chicken dip ahead of time. It saves you stress on busy days. Here are my tips for preparing it in advance: - Prepare the dip: Mix all your ingredients and place them in a baking dish. - Cover and refrigerate: Seal the dish tightly with plastic wrap. This keeps it fresh. - Bake when ready: When you want to serve, just pop it in the oven. Bake at 350°F (175°C) for about 30 minutes. - Check for warmth: Ensure it's bubbly and hot all the way through. If you want a vegetarian or vegan option, you have choices. Here are some great substitutes: - Shredded jackfruit: This gives a similar texture to chicken. - Chickpeas: Mash them slightly for a hearty dip. - Cauliflower: Roast and shred it for a tasty swap. - Tofu: Use firm tofu, and crumble it into the mix. These options keep the dip tasty and fun! Buffalo chicken dip can be spicy, but you can adjust it to your taste. Here’s how to manage the heat: - Start with less sauce: Use only a little buffalo wing sauce first. - Taste and add: Mix, then taste. If you want more heat, add more sauce. - Use mild sauce: Look for milder buffalo sauces if you prefer less spice. - Add dairy: More cream cheese or ranch dressing cools down the heat. These tips let you enjoy the dip just how you like it! Buffalo chicken dip combines simple ingredients for a crowd-pleasing snack. You learned the basics, from prepared chicken to the right cheese blend. We covered tips to enhance texture and spice levels, along with fun ways to serve it. Consider healthier options and cool presentations for a fresh twist. Store leftovers correctly for later enjoyment. This dish is versatile and easy to customize to your taste. Enjoy making this tasty dip at your next gathering!

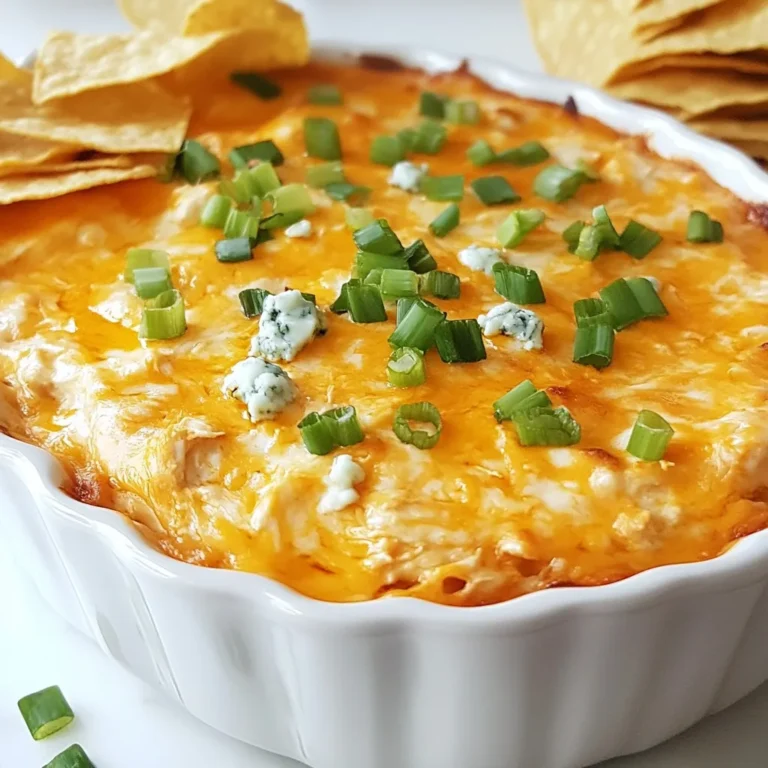
Buffalo Chicken Dip Modern Proper Flavorful Delight

To make Lemon Garlic Shrimp Scampi, you will need the following ingredients: - Large shrimp (1 pound) - Unsalted butter (4 tablespoons) - Olive oil (2 tablespoons) - Garlic (4 cloves, minced) - Lemons (2, zested and juiced) - Red pepper flakes (1/4 teaspoon, adjust per heat preference) - Salt and pepper (to taste) - Linguine or spaghetti (8 ounces) - Fresh parsley (for garnish) - Grated Parmesan cheese (optional) Each ingredient plays a key role in the dish. The shrimp provide a sweet and tender bite. The butter adds richness, while the olive oil ensures a nice sauté. Garlic gives a savory depth that pairs well with the bright lemon. Lemon zest and juice brighten the dish, making it fresh and zesty. Red pepper flakes add a touch of heat. Salt and pepper help enhance all the flavors. Linguine or spaghetti serves as the perfect base, soaking up the sauce. Fresh parsley adds a pop of color and freshness. Lastly, Parmesan cheese can add a delightful savory layer, enhancing the dish's overall appeal. These ingredients combine to create a vibrant and tasty meal that’s easy to prepare. {{ingredient_image_1}} - Start by boiling a large pot of salted water. - Add 8 ounces of linguine or spaghetti. - Cook according to package directions for about 8-10 minutes until al dente. - Reserve 1/2 cup of pasta water before draining. - In a large skillet, melt 2 tablespoons of butter with 2 tablespoons of olive oil over medium heat. - Once the butter is melted and the oil is hot, add 4 cloves of minced garlic. - Sauté the garlic for about 1 minute until it smells great. Be careful not to burn it. - Add 1 pound of shrimp, 1/4 teaspoon of red pepper flakes, and salt and pepper to taste. - Cook the shrimp for 2-3 minutes on each side until they turn pink and opaque. - Once the shrimp are cooked, add the zest and juice of 2 lemons to the skillet. - Stir to mix everything well. If it seems dry, add a few tablespoons of the reserved pasta water. - Add the drained pasta to the skillet and gently toss it in the lemon garlic sauce. - Stir in the remaining 2 tablespoons of butter until it melts. Adjust the seasoning if needed. To cook shrimp perfectly, look for a pink color. Shrimp cook fast, so watch them closely. Cook them for about 2-3 minutes on each side. If you overcook shrimp, they can get tough and rubbery. For great flavor, season them well with salt and pepper. Add red pepper flakes for a mild kick. The lemon juice will also bring out the shrimp's taste. To achieve al dente pasta, cook it for a shorter time than the package says. Start checking it a minute or two early. You want it to be firm but not hard. Always reserve pasta water before you drain it. This water is starchy and can help bind your sauce later. If the sauce needs some thinning, add a splash of the reserved water. Pair Lemon Garlic Shrimp Scampi with a crisp salad or garlic bread. A fresh green salad adds nice crunch and balance. For garnishing, sprinkle fresh parsley on top. You can also add grated Parmesan cheese for extra flavor. Use lemon slices as a pretty garnish, too. This dish looks great on any table! Pro Tips Use Fresh Shrimp: Fresh shrimp will provide the best flavor and texture in your dish. If using frozen shrimp, be sure to thaw them properly before cooking. Adjust Garlic to Taste: If you're a garlic lover, feel free to add more minced garlic for an extra punch of flavor. Just be careful not to burn it while sautéing. Perfect Pasta Cooking: Make sure to cook your pasta al dente, as it will continue to cook slightly when mixed with the shrimp and sauce. Lemon Zest is Key: Don't skip the lemon zest! It adds a bright, aromatic flavor that elevates the dish significantly. {{image_2}} You can easily swap shrimp for chicken if you prefer. Just cut the chicken into bite-sized pieces. Cook it the same way you do with shrimp. If you want to try different pasta, you can use penne or fettuccine instead of linguine. Each type brings its own feel to the dish. Adding fresh herbs can really boost the taste. Consider using basil or thyme for a fresh twist. You can also add spinach or cherry tomatoes for some color and nutrition. Just toss them in with the shrimp to cook until tender. If you're gluten-free, look for gluten-free pasta options. Many brands make great alternatives. For a low-fat version, you can cut the butter in half and use more olive oil. This still keeps the dish tasty without the extra fat. To keep your Lemon Garlic Shrimp Scampi fresh, first let it cool. Place it in an airtight container. Store it in the fridge. The leftovers will stay good for up to three days. Make sure to check for any off smells before eating. When reheating, use a skillet over low heat. This method warms the dish evenly. You can add a splash of water or broth to keep it moist. Stir occasionally to avoid burning. If you prefer the microwave, use a microwave-safe dish and cover it. Heat in short intervals to maintain the flavor and texture. If you want to freeze it, portion the dish first. Use freezer-safe containers or bags. Label them with the date. Shrimp scampi can last up to three months in the freezer. To thaw, move it to the fridge overnight. For quick thawing, place it in cold water. Avoid using hot water, as this can cook the shrimp. Making Lemon Garlic Shrimp Scampi takes about 25 minutes in total. You will spend 10 minutes prepping the ingredients. The cooking part takes about 15 minutes. Yes, you can use frozen shrimp. If you choose frozen, thaw them first. To thaw shrimp, place them in cold water for about 15-20 minutes. This helps keep their texture nice. Fresh shrimp have a better taste, but frozen works well too. There are many great sides to pair with your dish. Here are a few ideas: - Garlic bread for dipping in the sauce. - A fresh salad with greens and a light dressing. - Steamed asparagus or broccoli for a healthy touch. - Rice or quinoa to soak up that zesty sauce. These options will enhance your meal and keep it light and tasty! This blog post covered making a tasty Lemon Garlic Shrimp Scampi. You learned about the key ingredients, cooking steps, and handy tips to make it perfect. I shared ideas for variations and storage tips too. Remember, cooking is fun and a great way to experiment. Feel free to switch ingredients based on what you like. Enjoy your meal and happy cooking!

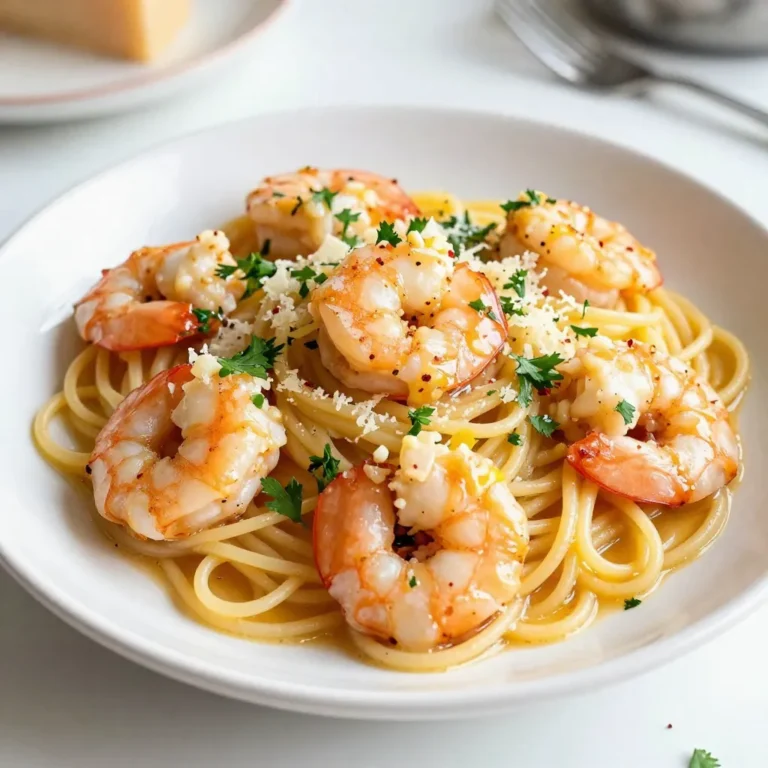
Lemon Garlic Shrimp Scampi Flavorful and Easy Recipe

- 1 lb ground beef (or ground turkey) - 3 tablespoons soy sauce (low sodium) - 2 tablespoons brown sugar - 1 tablespoon sesame oil - 1 tablespoon fresh ginger, grated - 3 cloves garlic, minced - 1 teaspoon red pepper flakes (adjust to taste) - 1 cup cooked jasmine rice - 1 cup broccoli florets (steamed) - 1 carrot, julienned - 2 green onions, sliced - Sesame seeds for garnish - Optional: kimchi for serving You can swap ground beef for ground turkey for a leaner option. If you need a gluten-free version, use tamari instead of soy sauce. Brown sugar can be replaced with honey or coconut sugar. For a nutty flavor, try using avocado oil instead of sesame oil. If ginger is not available, use ground ginger but cut the amount in half. - Meat: Look for ground beef with a bright red color. Avoid any with brown spots. - Vegetables: Choose broccoli that is vibrant and firm. The florets should not be wilted. - Rice: Jasmine rice should smell fragrant. If it smells off, do not buy it. - Ginger and Garlic: Pick ginger that is firm and smooth. For garlic, choose bulbs with tight skin. - Green Onions: Look for ones with crisp green tops. Avoid any that are wilting or turning yellow. Using fresh ingredients makes your Korean Ground Beef Bowl taste amazing! {{ingredient_image_1}} Gather your ingredients first. This makes cooking easier and faster. You need: - 1 lb ground beef (or ground turkey) - 3 tablespoons low sodium soy sauce - 2 tablespoons brown sugar - 1 tablespoon sesame oil - 1 tablespoon fresh ginger, grated - 3 cloves garlic, minced - 1 teaspoon red pepper flakes (adjust to taste) - 1 cup cooked jasmine rice - 1 cup broccoli florets (steamed) - 1 carrot, julienned - 2 green onions, sliced - Sesame seeds for garnish - Optional: kimchi for serving 1. Heat the oil: In a large skillet, pour in the sesame oil. Heat it over medium-high heat. 2. Sauté the aromatics: Add the minced garlic and grated ginger. Cook for about 1 minute until you smell a nice aroma. 3. Cook the beef: Add the ground beef to the skillet. Break it up with a wooden spoon. Cook until it is browned, about 5 to 7 minutes. 4. Drain excess fat: If there is too much fat in the skillet, drain it. Then, lower the heat to medium. 5. Add sauces and spices: Stir in the soy sauce, brown sugar, and red pepper flakes. Let it simmer for 2 to 3 minutes. This helps the flavors mix well. 6. Steam the broccoli: While the beef simmers, steam the broccoli florets until they are bright green and tender. This takes about 3 to 4 minutes. In serving bowls, start with a scoop of jasmine rice. Then, add the cooked ground beef mixture on top. Next, place the steamed broccoli and julienned carrots on the side. Finally, garnish with sliced green onions and a sprinkle of sesame seeds. If you like spice, serve with kimchi on the side. Enjoy your Korean Ground Beef Bowl! To make your Korean ground beef bowl shine, focus on the seasoning. Use low-sodium soy sauce for a balanced taste. Brown sugar adds sweetness and depth. Adjust red pepper flakes to match your spice level. Mix these ingredients well to ensure every bite is flavorful. Taste as you go, and feel free to tweak the seasonings. The right blend creates a tasty dish. Meal prep can save you time. Cook the jasmine rice ahead of time. Store it in the fridge so it’s ready to go. You can also chop the broccoli and carrots in advance. Keep them in airtight containers. This way, you can whip up the meal quickly on busy nights. You can even prepare the beef mixture a day before. Just reheat it when you're ready to serve. Pair your Korean ground beef bowl with fresh sides. Steamed broccoli adds color and nutrition. You can also serve it with pickled vegetables for a nice crunch. Kimchi is a great spicy option if you like heat. For a refreshing drink, try iced green tea. These sides complement the flavors in your bowl and enhance the meal experience. Pro Tips Choosing the Meat: Ground beef is traditional, but ground turkey is a healthier alternative that still retains flavor. Flavor Adjustments: Feel free to adjust the amount of red pepper flakes based on your spice preference for a milder or spicier dish. Vegetable Variations: Substitute or add other vegetables like bell peppers or snap peas for extra nutrition and color. Meal Prep Friendly: This dish stores well in the fridge for up to 3 days, making it perfect for meal prepping! {{image_2}} You can easily make this dish meatless. Use 1 lb of lentils instead of beef. Cook the lentils until tender, about 20 minutes. Replace soy sauce with tamari for a gluten-free option. You can add tofu for more protein. Crumble extra-firm tofu into the pan with ginger and garlic. Let it brown for a few minutes. This gives a nice texture and flavor. To keep this dish gluten-free, use tamari instead of soy sauce. Tamari has a rich flavor and works well in many recipes. You can also use coconut aminos as an alternative. It is slightly sweeter but still delicious. Check labels on other ingredients, like sesame oil and red pepper flakes, to ensure they are gluten-free. Get creative with your toppings! Try adding sliced avocado for creaminess. You can also use pickled radishes for a zesty twist. For a crunch, sprinkle crispy fried onions on top. You might also swap jasmine rice for quinoa or cauliflower rice. These options add unique flavors and textures to your bowl. Don't be afraid to experiment! Store any leftover Korean ground beef in an airtight container. It stays fresh for about 3 to 4 days in the fridge. Always let the dish cool down before sealing it. This helps keep moisture in check. If you want to save it for later, freezing works well. Put the cooled beef in a freezer-safe container. It can last up to 3 months. Make sure to label it with the date. This way, you know when to use it. To reheat, you can use the microwave or stovetop. If using the microwave, heat it in short bursts to avoid drying it out. On the stovetop, warm it gently over low heat. Stir often to keep it moist. Add a splash of water or soy sauce if it seems dry. Enjoy your meal just like the first time! You can pair this dish with several tasty sides. Here are some ideas: - Steamed broccoli - Sliced cucumbers - Kimchi - Pickled radish - Edamame These sides add color and texture. Plus, they balance the rich flavor of the beef. Yes, you can switch the meat. Ground turkey works well. You might also try ground chicken. Just keep the cooking time similar for best results. The spice level depends on the red pepper flakes. If you like heat, use more flakes. For a milder taste, reduce the amount. You can also skip them if you prefer no spice. To boost flavor, consider these additions: - A splash of rice vinegar - A drizzle of hoisin sauce - Chopped fresh herbs like cilantro or basil These options can enhance the dish and give it a unique twist. In this blog post, we explored key ingredients for a Korean Ground Beef Bowl, including how to choose fresh options. I shared step-by-step cooking steps, serving ideas, and tips for seasoning. We discussed variations like vegetarian and gluten-free adaptations, plus storage and reheating tips. Lastly, I answered common questions about sides and spiciness. Embrace these ideas and make this dish your own. Cooking can be fun and easy with the right approach!

Korean Ground Beef Bowl Flavorful and Simple Recipe

To make your creamy carbonara, gather these key ingredients: - 400g spaghetti - 150g pancetta (or guanciale), diced - 3 large eggs - 100g Parmesan cheese, grated - 2 cloves garlic, minced - 1 tablespoon olive oil - Salt and freshly ground black pepper to taste These ingredients create a rich and satisfying dish. The pancetta adds a nice salty bite, while the eggs and cheese give it that creamy texture. For extra flavor and color, consider these garnishes: - Fresh parsley, chopped - Extra grated Parmesan cheese - Freshly cracked black pepper These garnishes not only enhance the dish but also make it more appealing on the plate. If you can't find pancetta or guanciale, you can use these options: - Bacon for a similar taste - Turkey bacon for a lighter choice For cheese, try Pecorino Romano instead of Parmesan. It adds a sharper flavor. If you're out of fresh parsley, feel free to skip it. The dish will still taste great! {{ingredient_image_1}} First, boil a large pot of water. Add a good amount of salt. When the water is boiling, add 400g of spaghetti. Cook until it is al dente, which takes about 8-10 minutes. This means it should be firm but not hard. Remember to stir the pasta occasionally. When it’s ready, save 1 cup of the pasta water. Then, drain the spaghetti in a colander. In a mixing bowl, crack 3 large eggs. Add 100g of grated Parmesan cheese. Sprinkle in a pinch of salt and a lot of black pepper. Whisk everything until it blends well. This mixture will make your sauce creamy and rich. Set the bowl aside while you work on the next step. Grab a large skillet and heat 1 tablespoon of olive oil over medium heat. Add 150g of diced pancetta or guanciale to the hot oil. Cook it for about 5-7 minutes, until it gets crispy. Then, add 2 minced garlic cloves. Cook for another minute, just enough to make the garlic fragrant. Be careful not to burn it. Now, turn the heat down to low. Add the drained spaghetti to the skillet with the pancetta and garlic. Mix everything well. Remove the skillet from the heat. Next, pour the egg and cheese mixture over the hot pasta. Toss gently to coat the spaghetti. The heat will cook the eggs and create a creamy sauce. If it seems too thick, add some reserved pasta water until it’s just right. Divide the creamy carbonara onto plates. For a finishing touch, add more grated Parmesan cheese on top. Sprinkle fresh black pepper and chopped parsley for color. Serve it hot, and watch everyone enjoy your delicious dish! To get the right texture in creamy carbonara, focus on pasta cooking. Boil spaghetti until it is al dente. This means it should be firm but not hard. Save some pasta water before draining. The hot pasta water helps adjust the sauce's creaminess later. When you mix in the egg and cheese, keep the heat low. This step avoids scrambling the eggs and keeps the sauce smooth. Flavor makes carbonara shine. Use good-quality pancetta or guanciale for the best taste. The fat from these meats adds depth. Freshly cracked black pepper is key too. It gives a nice kick. For extra umami, try adding more Parmesan cheese. You can also sprinkle in some chopped parsley for a fresh touch. Garlic adds a lovely aroma, so don’t skip it! Watch out for common errors that can ruin your dish. Don’t rush the cooking of your pasta; undercooked spaghetti can ruin the meal. Avoid using heavy cream; authentic carbonara is creamy from eggs, not cream. Don’t forget to remove the skillet from heat before adding the egg mixture. This simple step prevents a scrambled egg mess. Lastly, remember to toss everything well to coat the pasta evenly. Pro Tips Use Fresh Ingredients: Always opt for fresh eggs and high-quality pancetta or guanciale for the best flavor and texture in your carbonara. Timing is Key: Make sure to mix the egg mixture with the pasta promptly off the heat to prevent scrambling the eggs while still achieving a creamy consistency. Customize the Cheese: While Parmesan is traditional, feel free to experiment with Pecorino Romano for a sharper taste or mix both for a unique flavor profile. Reserve Pasta Water: Always reserve some pasta water before draining. It can help adjust the sauce's consistency and adds starchiness for better adherence to the pasta. {{image_2}} To make a vegetarian carbonara, swap pancetta for veggies. Try using mushrooms or zucchini. Both add a nice texture. You can also use smoked salt to mimic that savory flavor. Add some spinach for extra greens. This twist keeps the dish light yet satisfying. If you want a different protein, bacon is a great choice. It adds a smoky flavor that pairs well with the cheese. Turkey bacon can also work for a leaner option. Just cook it until crispy, similar to the pancetta. You still get that wonderful crunch. For a gluten-free version, use gluten-free spaghetti. Many brands offer great texture and taste. You can also use zucchini noodles or spaghetti squash. Both options are healthy and add a fresh element. Just remember to adjust cooking times to avoid mushiness. To keep your creamy carbonara fresh, store it in an airtight container. This helps to lock in the flavor and moisture. Place the leftovers in the fridge right after serving. They can last for up to three days. When reheating, avoid the microwave if possible. The heat can make the sauce too thick. Instead, use a pan over low heat. Add a splash of reserved pasta water to keep it creamy. Stir gently until warmed through. Freezing carbonara is not ideal, but you can do it. If you freeze it, use a freezer-safe container. It can last for about one month. When ready to eat, thaw it overnight in the fridge. Then, reheat using the tips above for the best results. The secret lies in using eggs and cheese. When you mix them with hot pasta, they create a rich, creamy sauce. You want to toss everything quickly so the heat cooks the eggs but does not scramble them. Traditional carbonara does not use heavy cream. It relies on the creaminess from eggs and cheese. Using cream changes the flavor and texture. If you want a richer sauce, use more cheese instead. You can prepare the pasta and sauce separately. Cook the pasta and cool it. Whisk the egg and cheese mix but don’t combine them yet. When ready to serve, reheat the pasta and mix in the sauce. Spaghetti is the classic choice for carbonara. Its long strands hold the sauce well. You can also use fettuccine or bucatini if you like. Choose what you enjoy most. You can make a version without eggs. Try using silken tofu or a starch-based sauce. However, it will not taste like traditional carbonara. The eggs give it that unique flavor and creaminess. We explored how to make authentic carbonara from start to finish. You learned about essential ingredients, step-by-step cooking, and tips to avoid mistakes. We also discussed variations and storage information to keep your carbonara fresh. Remember, the secret to a creamy dish lies in technique, not cream. Enjoy the process, and your carbonara will impress everyone. Happy cooking!

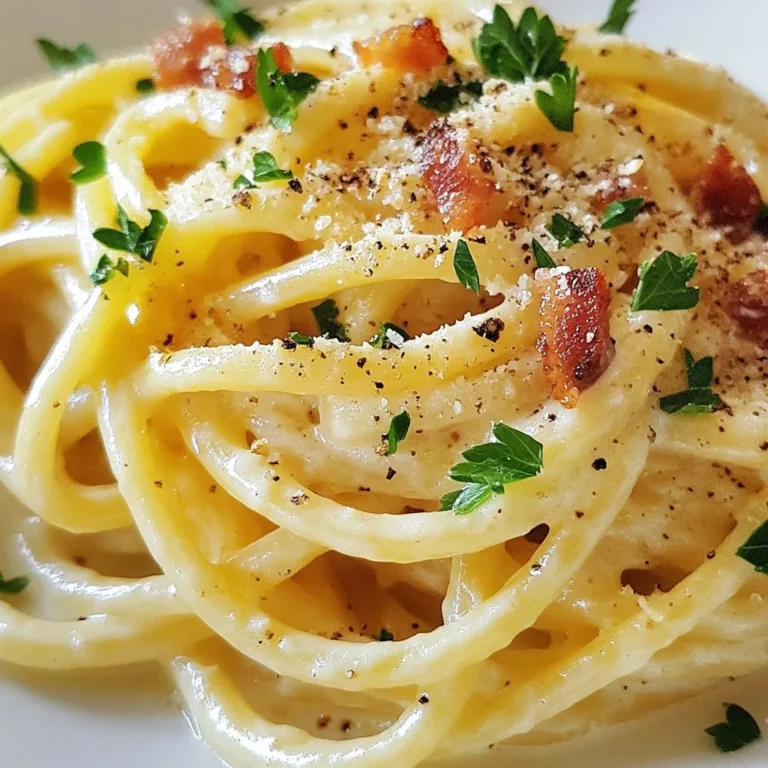
Authentic Creamy Carbonara Simple and Delicious Dish

- 2 medium sweet potatoes - 1/2 cup natural almond butter - 1/2 cup honey or maple syrup - 3 large eggs - 1 tablespoon fresh ginger - 1 teaspoon vanilla extract - 1 teaspoon baking soda - 1/2 teaspoon cinnamon - 1/4 teaspoon nutmeg - 1/4 teaspoon salt - 1/4 cup chopped walnuts or pecans (optional) You can swap almond butter for any nut butter you like. Peanut butter works great too. For sweeteners, maple syrup or agave nectar can replace honey. If you want to skip eggs, use flaxseed meal mixed with water. This mix works well as a binding agent. Use 1 tablespoon of flaxseed meal and 2.5 tablespoons of water for each egg. You can also use applesauce or silken tofu as other egg replacements. {{ingredient_image_1}} 1. Preheat your oven to 350°F (175°C). Grease an 8-inch round cake pan. You can use cooking spray or line it with parchment paper. 2. Roast and mash your sweet potatoes. You will need two medium sweet potatoes, about one pound. Bake them until they are soft. Once cool, peel them and mash in a bowl. 3. Combine your wet ingredients in a large bowl. Add the mashed sweet potatoes, almond butter, honey or maple syrup, eggs, grated ginger, and vanilla extract. Mix well until smooth. 4. Mix your dry ingredients in a separate bowl. Whisk together baking soda, cinnamon, nutmeg, and salt. This helps to evenly distribute the baking soda and spices. 5. Pour the batter into the prepared cake pan. Spread it evenly with a spatula. 6. Bake for 30-35 minutes. Check for doneness by inserting a toothpick into the center. If it comes out clean, the cake is ready. Let it cool in the pan for about 10 minutes. Then, transfer it to a wire rack to cool completely. To make the best Flourless Sweet Potato Ginger Cake, use roasted sweet potatoes. Their natural sweetness adds moisture. Be sure to mash them well. This creates a smooth texture in your batter. Room temperature eggs are also key. They mix better and help the cake rise. One big mistake is overmixing the batter. Mix just until combined. This keeps the cake light and fluffy. Another mistake is not measuring ingredients accurately. Use a kitchen scale or measuring cups. This ensures you get the right taste and texture. For a lovely look, dust the cooled cake with powdered sugar. You can also add a dollop of whipped coconut cream. This adds a rich touch. Garnish with thin slices of fresh ginger or a sprinkle of cinnamon. These details make your cake stand out at any gathering. Pro Tips Choose Sweet Potatoes Wisely: Select sweet potatoes that are firm and smooth to ensure the best flavor and texture in your cake. Adjust Sweetness to Taste: Depending on your preference, you can use more or less honey or maple syrup for a sweeter or less sweet cake. Don't Overmix: Mix the batter just until combined to keep the cake light and fluffy; overmixing can lead to a denser texture. Experiment with Spices: Feel free to add other spices like cardamom or cloves for a unique flavor profile that complements the ginger. {{image_2}} You can spice up your cake with new flavors. Adding cardamom or cloves brings warmth and depth. These spices pair well with the sweet potatoes. You can also add chocolate or cocoa powder for a rich twist. Chocolate adds a dessert-like quality that many love. If you want to make this cake vegan, you can swap the eggs. Use flaxseed meal mixed with water instead. This keeps the texture smooth and moist. You can also find gluten-free alternatives for the nut butter. Just check labels to ensure no gluten sneaks in. Adding fruits like grated apples or pears gives the cake a juicy bite. This makes each piece moist and tasty. You can also change up the nuts. Try using pecans or hazelnuts for different flavors. Each nut adds its own unique crunch and taste. To keep your cake fresh, wrap it tightly in plastic wrap. You can also place it in an airtight container. This helps prevent it from drying out. Store it in the fridge for best results. The cake will last up to five days in the fridge. If you want to save some cake for later, freezing is a great option. First, let the cake cool completely. Then, slice it into pieces. Wrap each slice in plastic wrap, and place them in a freezer-safe bag. Make sure to remove as much air as possible. The cake can stay in the freezer for up to three months. To defrost, take the slices out and place them in the fridge overnight. You can also leave them at room temperature for a few hours. This will help the cake keep its taste and texture. When you want to enjoy a slice of cake, reheating is easy. The best method is to use a microwave. Heat a slice on medium power for about 15-20 seconds. Check if it is warm enough, and add more time if needed. If you prefer a crispy edge, use an oven. Preheat the oven to 350°F (175°C). Place the cake on a baking sheet and heat for about 10 minutes. This method keeps the cake soft while giving it a nice texture. Enjoy your delicious cake just like fresh! A flourless cake is a cake made without any flour. Instead of flour, it uses ingredients like sweet potatoes, nut butter, or eggs to provide structure. This type of cake is often moist and rich. It is perfect for those who want to avoid gluten or need a different texture. Flourless cakes can be just as tasty as traditional ones. Yes, you can swap sweet potatoes for other veggies. Carrots or pumpkin can work well too. Both will give a sweet flavor and moist texture. Just make sure to cook and mash them first. This will keep the cake soft and delicious. To lower the sugar, use less honey or maple syrup. You can replace some sweetener with mashed bananas. They add natural sweetness without extra sugar. Another option is to use a sugar substitute like stevia. Just be sure to adjust based on the product's sweetness level. Many toppings go well with this cake. A dusting of powdered sugar adds sweetness. Whipped coconut cream gives a rich touch. Fresh ginger slices or cinnamon make lovely garnishes too. You might also try a drizzle of chocolate sauce for a fun twist. Yes, you can make the cake nut-free. Simply replace almond butter with sun butter or soy nut butter. These options provide similar creaminess without nuts. Check for nut allergies if you serve it to others. This way, everyone can enjoy the cake! This blog post covered how to make a flourless sweet potato ginger cake. I shared the ingredient list and great substitutes. You learned step-by-step instructions for baking, along with tips to get it just right. Plus, I offered ideas for variations, storing leftovers, and answering common questions. Baking this cake can be a fun adventure. It’s healthy and delicious, making it perfect for any occasion. Try it, and enjoy the unique flavors!

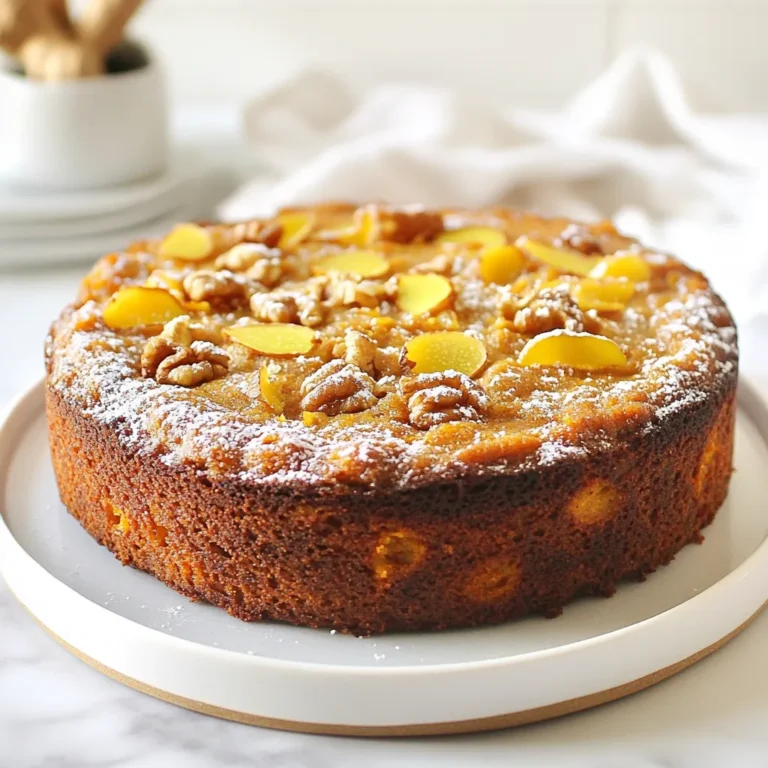
Flourless Sweet Potato Ginger Cake Rich and Flavorful

- 1 large head of cauliflower, cut into florets - 4 cloves of garlic, peeled - 3 tablespoons olive oil The main star of this dish is the cauliflower. It gives a light and fluffy base. I love using fresh cauliflower florets. They hold flavor well and mash up nicely. The garlic adds a punch of flavor. I use four cloves for a bold taste. Olive oil brings richness and a smooth texture. It helps to keep the mash creamy and delightful. - 1/2 cup unsweetened almond milk (or any milk of choice) - Optional: 1 tablespoon nutritional yeast for a cheesy flavor Unsweetened almond milk is my go-to for a creamy base. It adds a mild flavor without overpowering the dish. You can use any milk you like, but almond milk keeps it light. If you want a cheesy taste without dairy, try nutritional yeast. It adds a savory touch and makes the dish feel rich. - 1/4 cup fresh chives, chopped - 1/4 cup fresh parsley, chopped - Salt and pepper to taste Fresh chives and parsley brighten up the mash. They add color and a fresh flavor. I chop them finely so they mix well. Salt and pepper are key for balancing the flavors. Taste as you go to find the right seasoning for your palate. {{ingredient_image_1}} To start, you need to boil the cauliflower and garlic. First, fill a large pot with water and bring it to a boil. Once the water is bubbling, add the cauliflower florets and the peeled garlic cloves. Cook them for about 10 to 12 minutes. You want the cauliflower to be tender but not mushy. A fork should easily pierce through the florets. When the time is up, drain the cooked cauliflower and garlic in a colander. Now the fun begins with the mashing process. Transfer the drained cauliflower and garlic into a large mixing bowl. Add three tablespoons of olive oil and half a cup of unsweetened almond milk. If you want a cheesy kick, toss in a tablespoon of nutritional yeast. Next, sprinkle in the chopped fresh chives and parsley. Using a potato masher or an electric mixer, mash the mixture until it is smooth and creamy. If it feels too thick, add more almond milk until you reach a silky texture. For the final touches, season the mashed cauliflower with salt and pepper. Mix well to ensure the flavors blend throughout. You can taste and adjust the seasoning as needed. Serve the dish warm, either right away or keep it warm until your guests arrive. This dish pairs well with grilled meats or can stand alone as a tasty vegetarian option. Enjoy your creamy comfort dish! To make your garlic herb mashed cauliflower creamy, you can adjust the almond milk. Start with half a cup and mix it in. If you want it smoother, add more almond milk slowly. This way, you control the texture. Some prefer it thick, while others like it lighter. Find what works best for you. Spices and herbs can make a big difference in flavor. You could add paprika for warmth or a pinch of cayenne for heat. Fresh herbs like thyme or rosemary can also boost taste. If you want a cheesy flavor without real cheese, add a tablespoon of nutritional yeast. It gives a nice umami kick. Don’t be afraid to mix and match! The right tools make mashing easier. A simple potato masher works well for a chunky texture. If you want it super smooth, try an electric mixer. You could also use a food processor for quick blending. Just don’t overmix; you want it fluffy! Keep your tools ready for a fun cooking experience. Pro Tips Choose the Right Cauliflower: Opt for a cauliflower that is firm and free from blemishes for the best texture and flavor. Don't Skip the Garlic: Roasting the garlic along with the cauliflower can enhance its sweetness and depth of flavor. Adjust Consistency: If you prefer a creamier texture, feel free to add more almond milk or a splash of vegetable broth. Herb Variations: Experiment with different herbs like thyme or rosemary for a unique twist on the traditional flavor. {{image_2}} You can add cheese alternatives for a creamy twist. Nutritional yeast offers a cheesy taste without dairy. You can also try vegan cream cheese for an even richer flavor. If you like, add a splash of your favorite cheese sauce for extra richness. These options keep the dish smooth and tasty. Feel free to swap herbs based on your taste. Basil or thyme can add a fresh twist. You might also try dill for a unique flavor. If you want a bit of kick, add some red pepper flakes. Each herb brings its own personality to the dish. This recipe can easily fit various diets. For a vegan option, stick with almond milk and skip the cheese. It’s also gluten-free, as long as you check your milk choice. For low-carb needs, cauliflower is a great base. You can enjoy this dish guilt-free while still savoring every bite. To store leftovers of Garlic Herb Mashed Cauliflower, let it cool first. Place it in an airtight container. Store it in the fridge for up to three days. Make sure to label the container with the date. This way, you’ll know when to use it. If you want to freeze this dish, use a freezer-safe container. Portion out the mashed cauliflower for easy use later. It can last up to three months in the freezer. To avoid freezer burn, press plastic wrap against the surface before sealing. To reheat, you have a few good options. The microwave is fast but may dry it out. Stir in a bit of almond milk or water to keep it creamy. You can also use the stovetop. Heat it in a pan over low heat, stirring slowly. This method helps keep the flavor intact. Garlic Herb Mashed Cauliflower is a creamy, tasty side dish. It uses cauliflower, garlic, and fresh herbs. This dish is low in carbs and full of flavor. It is a great alternative to mashed potatoes. The healthy fats from olive oil add richness. The garlic gives a nice punch. Chives and parsley bring a fresh taste. This dish is also dairy-free if you use almond milk. Yes, you can make Garlic Herb Mashed Cauliflower ahead of time. Cook it, then let it cool. Store it in an airtight container in the fridge. It will stay fresh for about three days. To reheat, put it in a pot on low heat. Stir in a splash of almond milk to bring back the creaminess. You can also microwave it, but watch it closely. This recipe is perfect for meal prep. You can portion it into single servings. Use small containers for easy reheating. This makes it simple to grab for lunch or dinner. It keeps well in the fridge or freezer. If freezing, use a freezer-safe container. Just remember to let it cool before you seal it. For best taste, use it within a month. This blog post covers how to make Garlic Herb Mashed Cauliflower. We explored the main ingredients like cauliflower and garlic, plus dairy alternatives and fresh herbs. I shared step-by-step instructions to help you prepare and mash the dish perfectly. Remember to adjust the almond milk for creaminess and try different herbs for flavor. This dish works for various diets and stores well. Enjoy this healthy, tasty option for any meal! Your kitchen adventures await with this easy recipe.

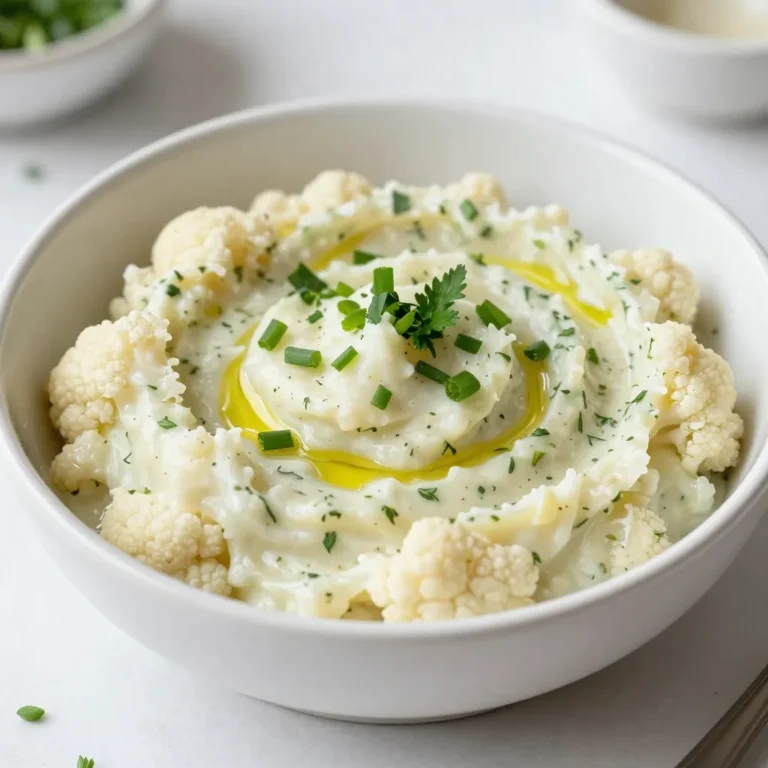
Garlic Herb Mashed Cauliflower Creamy Comfort Dish

- 1 can (14 oz) diced tomatoes - 1 can (15 oz) white beans (e.g., cannellini or navy beans), drained and rinsed - 1 medium onion, diced - 3 cloves garlic, minced - 1 medium carrot, diced - 1 stalk celery, diced - 4 cups vegetable broth - 1 cup coconut milk (full fat for creaminess) - 2 tablespoons olive oil - 1 teaspoon dried thyme - 1 teaspoon smoked paprika - Salt and pepper to taste - Fresh basil leaves for garnish I love using canned tomatoes for this stew. They bring a rich flavor and save time. When choosing white beans, cannellini or navy beans work best. They are creamy and hold up well. Use a medium onion for the right amount of sweetness. Fresh veggies like carrot and celery add crunch. A full cup of coconut milk gives the stew that creamy texture you crave. You can swap the white beans for chickpeas or kidney beans if you prefer. For a lower-fat option, use light coconut milk. If you don't have fresh basil, try using parsley or even spinach for a different twist. You can also use fresh tomatoes if you have them. Just chop about four medium-sized ones. {{ingredient_image_1}} 1. Start by grabbing a large pot. Heat 2 tablespoons of olive oil over medium heat. This oil adds great flavor. 2. Dice 1 medium onion, 1 medium carrot, and 1 stalk of celery. Toss them into the pot. Cook for 5-7 minutes. Stir them often until they soften. 3. Mince 3 cloves of garlic. Add them to the pot and cook for 1-2 minutes. This will make your kitchen smell amazing. 4. Now, grab 1 can of diced tomatoes and 1 can of white beans. Drain and rinse the beans first. Add both to the pot. 5. Pour in 4 cups of vegetable broth. Sprinkle in 1 teaspoon of dried thyme and 1 teaspoon of smoked paprika. Add salt and pepper to taste. Stir everything well. 6. Bring the mix to a boil. Then, lower the heat and cover the pot. Let it simmer for about 20 minutes. This helps blend the flavors. 7. After 20 minutes, stir in 1 cup of coconut milk. Cook for another 5 minutes. Taste the stew and adjust the seasoning if needed. 8. Serve hot. Garnish with fresh basil leaves for a lovely finish. - Keep an eye on your veggies. Cooking them too long can make them mushy. - Simmering for 20 minutes is key. It allows the flavors to come together. - Always taste your stew before serving. You might want to add more salt or spices. - Serve this stew with crusty bread for a hearty meal. - Pair it with a fresh salad for a light side. - You can also sprinkle some nutritional yeast on top for a cheesy flavor. To boost flavor, use fresh herbs. Fresh basil adds a bright taste. You can also add a splash of lemon juice for a nice kick. If you like heat, sprinkle in some red pepper flakes. They give a nice warmth without overpowering the dish. Smoke can add depth too. Use smoked paprika for a rich, warm flavor. For creaminess, use full-fat coconut milk. It makes the stew thick and rich. If you want it even creamier, try blending a portion of the stew. Just take out some of the beans and tomatoes, blend them, then stir them back in. This gives a smooth texture while keeping the hearty bits. One mistake is not letting the stew simmer long enough. This step melds the flavors. If you skip it, your stew may taste flat. Another mistake is overcooking the garlic. Burnt garlic can make your dish bitter. Lastly, remember to season well. Taste as you go. Adjusting salt and pepper can make a big difference. Pro Tips Use Fresh Herbs: Adding fresh basil or parsley right before serving enhances the flavor profile and adds a burst of freshness. Adjust Consistency: If you prefer a thicker stew, let it simmer longer or mash some of the beans to create a creamier texture. Flavor Boost: Consider adding a splash of balsamic vinegar or lemon juice before serving for an extra layer of flavor. Meal Prep Friendly: This stew stores well in the fridge for up to 3 days, making it perfect for meal prep or leftovers. {{image_2}} You can easily boost the nutrition of your stew. Try adding spinach or kale for a green touch. They add vitamins and minerals. You can toss in some chopped bell peppers for extra crunch and flavor. If you want more protein, add cooked quinoa or lentils. These ingredients make the dish heartier and even more filling. Changing the flavors can make this stew exciting. For a spicy kick, add red pepper flakes or diced jalapeños. If you prefer a sweeter taste, try carrots or even a splash of maple syrup. You can also use fresh herbs like parsley or rosemary for a different aroma. Each change can give you a new, tasty experience in every bite. While white beans are great, you can switch them out. Black beans or kidney beans work well, too. Each type brings its own taste and texture. If you want a creamier stew, try using mashed beans. You can also mix different beans for a fun twist. This way, you can make the stew your own and keep it fresh! After you enjoy your Creamy Vegan Tomato White Bean Stew, save the leftovers! Let the stew cool down to room temperature. Use airtight containers to keep it fresh. You can store it in the fridge for up to 4 days. Make sure to label the containers with the date. When you're ready to enjoy your stew again, reheating is easy. Pour the stew into a pot. Heat it on medium over the stove. Stir it often to prevent sticking. If it looks too thick, add a splash of vegetable broth or water. Heat until it's warm throughout, about 5 to 10 minutes. You can also use a microwave. Place the stew in a microwave-safe bowl, cover it, and heat for 2 to 3 minutes. Stir halfway for even heating. If you want to save your stew for later, freezing works well. Use freezer-safe containers or bags. Leave some space at the top because the stew will expand as it freezes. Label each container with the date. You can freeze it for up to 3 months. When you’re ready to eat, thaw it overnight in the fridge. Reheat it as mentioned above. This way, you’ll always have a tasty meal waiting for you! Yes, you can make this stew in advance. It tastes even better the next day! Just let it cool and store it in the fridge. You can keep it for about three days. When you want to eat it, just reheat it on the stove. You might need to add a splash of broth or water to thin it out. This stew pairs well with many sides. Try serving it with crusty bread or a fresh salad. You could also enjoy it with brown rice or quinoa for a heartier meal. For a fun twist, serve it with avocado slices on top. These options add flavor and texture to your meal. Yes, this recipe is gluten-free. All the ingredients you use are naturally gluten-free. Just make sure to check your vegetable broth for any gluten. Choosing certified gluten-free broth ensures you stay safe if you have gluten sensitivities. Enjoy this stew without worry! This article covered a delicious creamy vegan tomato white bean stew. We explored the key ingredients and their measurements, along with tasty substitutes. You learned step-by-step cooking, plus tips for the best flavor and texture. We also discussed healthy add-ins and variations to keep the stew exciting. Finally, I shared storage tips to keep leftovers fresh. By following these steps, your stew will shine. Enjoy creating this dish, and make it your own!

Creamy Vegan Tomato White Bean Stew Simple Delight

PREV 1 … 56 57 58 … 86 NEXT
spicy fork kitchen

explore

DessertsDinnerAppetizersDrinks

Our Policies

  • Cookie Policy
  • Copyright Policy
  • Disclaimer
  • GDPR Policy
  • Terms Of Use
Back to Top
  • About
  • Contact Us
  • Privacy Policy
© 2026 spicy fork kitchen