FREE DINNER EBOOK! Get your copy!
  • Cookie Policy
  • GDPR Policy
  • Disclaimer
  • Terms Of Use
  • Visit my other site: Fun Cookie Recipes
spicy fork kitchen
  • Home
  • Dinner
  • Desserts
  • Drinks
  • Appetizers
  • Contact
  • About
  • Privacy Policy
  • Home
  • Dinner
  • Desserts
  • Drinks
  • Appetizers
  • Contact
  • About
  • Privacy Policy
  • Cookie Policy
  • GDPR Policy
  • Disclaimer
  • Terms Of Use
Visit my other site: Fun Cookie Recipes

HOME / CATEGORIES /

Latest

- 1 cup quinoa, rinsed - 2 cups vegetable broth (or water) - 1 can (15 oz) black beans, drained and rinsed - 1 cup cherry tomatoes, halved - 1 red bell pepper, diced - 1 cup corn (fresh, frozen, or canned) - 1 avocado, diced - 1/4 cup red onion, finely chopped - 1/4 cup cilantro, chopped - 2 tablespoons lime juice - 2 tablespoons olive oil - 1 teaspoon cumin - 1/2 teaspoon smoked paprika - Salt and pepper to taste Gathering the right ingredients is key to making your Southwest Quinoa Salad shine. Start with 1 cup of quinoa. Rinse it well to remove any bitter flavors. You will need 2 cups of vegetable broth for cooking. If you prefer, you can use water. Next, grab a 15 oz can of black beans. Rinse and drain these to keep them fresh. You’ll also need 1 cup of cherry tomatoes. Halve them for a nice pop of color. A red bell pepper adds crunch and sweetness. Dicing it will help it mix well. Toss in 1 cup of corn. Fresh, frozen, or canned works great here. Don’t forget the avocado! Dice it just before serving to keep it fresh. You’ll also need 1/4 cup of red onion for a sharp bite and 1/4 cup of cilantro for freshness. For the dressing, you will need 2 tablespoons of lime juice and 2 tablespoons of olive oil. Spice it up with 1 teaspoon of cumin and 1/2 teaspoon of smoked paprika. Finally, season with salt and pepper to taste. These ingredients come together to create a salad that is both flavorful and healthy. Each item plays a role in balancing taste and texture. {{ingredient_image_1}} To start, rinse the quinoa well. This helps remove any bitter taste. Use a fine mesh strainer and run cold water over it for about a minute. Next, in a medium pot, combine the rinsed quinoa and 2 cups of vegetable broth. This broth adds flavor. Bring it to a boil over medium-high heat. Once it boils, reduce the heat to low. Cover the pot and cook for about 15 minutes. The quinoa should absorb the liquid and become fluffy. Use a fork to fluff it up and let it cool a bit. For the dressing, gather these ingredients: - 2 tablespoons olive oil - 2 tablespoons lime juice - 1 teaspoon cumin - 1/2 teaspoon smoked paprika - Salt and pepper to taste In a small bowl, add the olive oil and lime juice. Then, add the cumin and smoked paprika. Sprinkle some salt and pepper in too. Whisk everything together until it blends nicely. This dressing packs a punch and ties everything together. Now, let’s combine all the ingredients. In a large bowl, mix together: - 1 can black beans, drained and rinsed - 1 cup cherry tomatoes, halved - 1 red bell pepper, diced - 1 cup corn - 1 avocado, diced - 1/4 cup red onion, finely chopped - 1/4 cup cilantro, chopped Once your quinoa has cooled, add it to the bowl with the veggies. Pour the dressing over the salad. Gently toss everything together. Be careful not to mash the avocado. Taste your salad to see if it needs more salt, pepper, or lime juice. After mixing, it’s best to refrigerate the salad for at least 30 minutes. This helps the flavors meld together. Enjoy the fresh taste of your Southwest Quinoa Salad! To get the best taste, always adjust your seasoning. Start with the basics: salt and pepper. After mixing in the dressing, taste your salad. If it needs more flavor, add lime juice or salt. This step helps you create a salad that suits your taste perfectly. Tasting while you cook is key. You want to enjoy the flavor at every step. Choose a ripe avocado. It should feel soft but not mushy. This adds creaminess to the salad. To keep your quinoa fluffy, rinse it well before cooking. This removes the bitter coating called saponin. Cook it in vegetable broth for added flavor. Always fluff the quinoa with a fork after cooking. This keeps the grains separate and light. Using canned beans and corn saves time. They are ready to go. Just rinse and add them to your salad. For meal prep, make the salad ahead of time. Store it in the fridge for at least 30 minutes before serving. This allows the flavors to blend. You can also chop your veggies in advance. Just keep them in an airtight container. Pro Tips Cooking Quinoa Perfectly: Rinse the quinoa thoroughly before cooking to remove its natural coating, called saponin, which can make it taste bitter. Enhancing Flavor: Toast the quinoa in a dry pan for a few minutes before adding the broth; this brings out a nutty flavor that adds depth to your salad. Substituting Ingredients: Feel free to substitute the beans or vegetables based on what you have on hand; chickpeas or diced cucumbers work great too! Meal Prep Tip: This salad keeps well in the fridge for up to 3 days, making it a perfect option for meal prep or make-ahead lunches! {{image_2}} You can easily change up the proteins in this salad. Adding grilled chicken or shrimp can make it heartier. Each option boosts protein and adds flavor. Feel free to experiment with different veggies, too. Zucchini is a great choice for extra crunch. You can also swap in different bell pepper colors for a vibrant look. Try yellow or orange for a sweet twist. Switching up the dressing can give your salad a new vibe. Use fresh orange juice instead of lime for a sweeter taste. Lemon juice also works well for a bright, tangy kick. You can explore spices to add depth. Try chili powder for heat or oregano for an earthy note. Mixing in some garlic powder can also enhance the flavor. This salad pairs well with tortilla chips for a fun snack. You can serve it as a side dish next to grilled meats. If you want to make it a main dish, add proteins like chicken or shrimp. This will turn your salad into a filling meal. This Southwest Quinoa Salad lasts about 3 to 5 days in the fridge. To store it well, place it in an airtight container. Make sure to keep it covered to keep the flavors fresh. Yes, you can freeze this salad! However, the texture of the avocado may change. To freeze, put the salad in a freezer-safe container. When you are ready to eat it, thaw it overnight in the fridge. For the best taste and texture, avoid refreezing it. To refresh the salad after refrigeration, give it a good stir. You can add a splash of lime juice or a drizzle of olive oil to perk it up. For serving leftovers, consider topping it with fresh cilantro or extra diced avocado for a tasty touch. Quinoa is a tiny seed, but we eat it like a grain. It has a nutty flavor and a fluffy texture. Quinoa is full of protein and fiber, making it a great choice for meals. It has all nine essential amino acids, which is rare for plants. This makes quinoa a complete protein. It also has vitamins and minerals, like magnesium and iron. Eating quinoa can help keep your heart healthy and your body strong. Yes, you can make this salad ahead of time! It tastes even better after sitting for a bit. The flavors mix well when it chills. You can prepare the salad and store it in the fridge. Just cover it tightly with plastic wrap or a lid. It's best to eat it within three days for freshness. If you make it too early, the avocado may brown, which we can prevent. Southwest Quinoa Salad is packed with nutrients. It has protein from quinoa and black beans. The veggies add vitamins and minerals. Here are some key benefits: - Quinoa: High in protein, fiber, and B vitamins. - Black Beans: Full of fiber and iron, good for digestion. - Cherry Tomatoes: Rich in vitamin C and antioxidants. - Red Bell Pepper: High in vitamin A and C. - Avocado: Contains healthy fats and potassium. - Cilantro: Has vitamins and can help detox the body. This salad is a tasty way to get healthy! To keep avocado from browning, use fresh lime juice. Lime juice slows down the browning process. Here are some tips to keep it bright: - Add lime juice: Toss the diced avocado in lime juice right away. - Cover tightly: If you have leftovers, cover the salad well. - Store separately: You can store the avocado and mix it in just before serving. These steps will help keep your salad looking fresh and tasty! In this post, we covered how to make a tasty Southwest Quinoa Salad. We went through ingredients, step-by-step cooking, and dressing tips. I shared ways to enhance flavor and texture and offered storage advice. Remember, this salad is flexible! You can add proteins or use different veggies. Enjoy making it and feel free to experiment. Cooking should be fun and easy, so let your creativity shine!

Southwest Quinoa Salad Flavorful and Healthy Delight

- 2 boneless, skinless chicken breasts - 1 cup orzo pasta - 1 medium onion, finely chopped - 3 cloves garlic, minced - 1 cup mushrooms, sliced (cremini or button) - 1 cup chicken broth - 1 tablespoon balsamic vinegar - 1 teaspoon dried thyme - 1 teaspoon paprika - 1 tablespoon olive oil - 1 cup baby spinach - Salt and pepper to taste - Fresh parsley, chopped (for garnish) To make Marsala Chicken Orzo, gather these tasty ingredients. The chicken gives a hearty flavor. Orzo pasta adds a nice texture. Choose fresh vegetables to boost nutrition and taste. I like using mushrooms and onions for depth of flavor. Seasonings are key to this dish. Dried thyme and paprika give warmth and aroma. Don't forget salt and pepper to enhance all the flavors. The broth brings moisture and richness. Balsamic vinegar adds a lovely acidity, balancing the dish. Finish with fresh spinach for color and nutrients. A sprinkle of parsley makes it pretty. Each ingredient plays a role in creating a delightful meal. So, gather them all and let’s get cooking! {{ingredient_image_1}} Start by seasoning the chicken breasts. Use salt, pepper, paprika, and thyme. Make sure to coat both sides well. Next, heat olive oil in a large skillet over medium-high heat. Once hot, add the chicken. Cook for about 6-7 minutes on each side. You want them golden brown and cooked through. When done, take the chicken out and set it aside. In the same skillet, add your chopped onion. Sauté the onion for about 3-4 minutes. Wait until it turns translucent. After that, add minced garlic and sliced mushrooms. Cook these for another 3-4 minutes. You want the mushrooms to brown nicely. This will add great flavor to your dish. Now, it’s time to add the orzo pasta. Stir it in and let it toast for about 1 minute. This gives the orzo a nice flavor. Next, pour in the chicken broth and balsamic vinegar. Bring this mixture to a gentle boil. Once boiling, reduce the heat to low, cover the skillet, and let it simmer. Cook for about 10-12 minutes. The orzo will absorb most of the liquid and become tender. While the orzo cooks, slice the cooked chicken into pieces. Once the orzo is ready, add the baby spinach. Stir until the spinach wilts. Then gently fold in the sliced chicken. Taste your dish and adjust the seasoning with extra salt and pepper. Serve hot and garnish with fresh parsley for a burst of color and flavor. To make Marsala chicken orzo, start with the right methods. Season your chicken well. Use salt, pepper, paprika, and thyme. This adds great flavor. Heat olive oil in a large skillet. Cook the chicken on medium-high heat. Aim for a golden brown crust. Remove the chicken before cooking the veggies. This keeps it juicy. For extra taste, consider adding more herbs. Fresh thyme works well. You can also use rosemary for a different twist. A splash of lemon juice brightens the dish. Try adding a pinch of red pepper flakes. This brings a nice kick to the orzo. Don't forget to taste and adjust the seasoning. One common mistake is overcooking the orzo. Keep an eye on it while it simmers. It should absorb most of the liquid but still be tender. Another mistake is not letting the chicken rest. Let it sit for a few minutes before slicing. This helps keep it moist. Lastly, don't skip the fresh parsley. It adds color and fresh flavor to the final dish. Pro Tips Perfectly Cooked Chicken: Ensure the chicken reaches an internal temperature of 165°F for safety and optimal juiciness. Toasting Orzo: Toasting the orzo for a minute adds a nutty flavor that enhances the overall dish. Fresh Spinach Addition: Add the baby spinach at the end to keep its vibrant color and nutrients intact. Herb Variations: Experiment with fresh herbs like basil or oregano for a different flavor profile. {{image_2}} You can switch orzo for other pasta types. Try small shapes like ditalini or acini di pepe. These will work well with the sauce and chicken. You can even use whole wheat pasta for a healthier choice. The cooking time may change, so check the package. To make this dish vegetarian, skip the chicken. Use extra mushrooms, zucchini, or bell peppers instead. Add more veggies for flavor and texture. You can also use vegetable broth to keep it rich. This way, you still enjoy a hearty meal without meat. If you want other protein options, consider shrimp or tofu. Shrimp cooks quickly and adds a nice touch. Just sauté it until pink. For tofu, use firm or extra-firm. Cube it and add it with the veggies. Both options will make your dish just as satisfying. You can store Marsala Chicken Orzo in the fridge. Place it in an airtight container. It stays fresh for up to three days. Make sure to let it cool before sealing. This keeps the flavors intact and prevents sogginess. If you want to freeze it, use a freezer-safe container. Marsala Chicken Orzo can last for up to three months in the freezer. Just remember to label the container with the date. This helps you keep track of how long it’s stored. To reheat, thaw it overnight in the fridge if frozen. You can use a microwave or a skillet. If using a microwave, heat it in 30-second bursts. Stir between each burst to heat evenly. If using a skillet, add a splash of broth to keep it moist. Heat over low until warm. Enjoy your meal again! You can pair Marsala Chicken Orzo with simple sides. A fresh green salad works well. You could also serve garlic bread for a hearty touch. Roasted vegetables add color and flavor. Try steamed broccoli or green beans for a healthy option. You can also enjoy it with a light white wine. To check if chicken is done, use a meat thermometer. The internal temperature should reach 165°F. You can also cut into the chicken to check. The meat should be white with no pink inside. Juices should run clear, not red or pink. If you see any pink, cook it longer. Yes, you can use pre-cooked chicken for Marsala Chicken Orzo. This saves time and makes cooking easier. Just add the chicken when you mix in the spinach. Ensure the chicken is warmed before serving. This will keep your dish tasty and satisfying. In this article, we explored the rich ingredients and steps to make Marsala Chicken Orzo. We covered how to prepare the chicken, cook vegetables, and combine flavors for a delicious meal. You learned tips to enhance taste and avoid common mistakes. I also shared variations and storage info to help you make this dish your own. With these insights, you can create a comforting meal any day. I hope you try this recipe and enjoy every bite!

Marsala Chicken Orzo Delightful and Hearty Meal

- 4 boneless, skinless chicken breasts - 1 cup buttermilk - 1 tablespoon garlic powder - 1 tablespoon onion powder - 1 teaspoon smoked paprika - 1 teaspoon salt - ½ teaspoon black pepper - 1 cup all-purpose flour - ½ cup panko breadcrumbs The main ingredients for this melt in your mouth chicken focus on chicken and a flavorful marinade. The chicken breasts provide the base. Buttermilk helps tenderize the meat. Garlic powder, onion powder, smoked paprika, salt, and black pepper add rich flavors. The flour and panko breadcrumbs create a crispy coating that gives the chicken its signature crunch. - 1 teaspoon dried thyme - ½ teaspoon cayenne pepper (optional for heat) Adding dried thyme enhances the dish with a lovely herbal note. If you like heat, cayenne pepper adds a nice kick. You can adjust these spices to suit your taste. - Fresh parsley, chopped for garnish - Lemon wedges Garnishing with fresh parsley adds a vibrant green touch. Lemon wedges give a fresh zing when squeezed over the chicken. This makes the dish not only tasty but also visually appealing. Serve it on a large platter for a beautiful presentation. {{ingredient_image_1}} To start, grab a large bowl. Add 1 cup of buttermilk, 1 tablespoon of garlic powder, 1 tablespoon of onion powder, 1 teaspoon of smoked paprika, 1 teaspoon of salt, and ½ teaspoon of black pepper. Mix these well. Next, add 4 boneless, skinless chicken breasts into the bowl. Make sure to coat each piece thoroughly. This helps the chicken absorb all those tasty flavors. Cover the bowl with plastic wrap and pop it in the fridge. For the best taste, let it marinate for at least 2 hours. If you have time, overnight is even better. Now, let’s make the crunchy coating. In a shallow dish, mix 1 cup of all-purpose flour, ½ cup of panko breadcrumbs, 1 teaspoon of dried thyme, and ½ teaspoon of cayenne pepper if you like some heat. Panko breadcrumbs are special. They create a light and crispy texture. This makes your chicken extra delicious. Before you bake, preheat your oven to 400°F (200°C). This step is key to getting that perfect golden color. While the oven heats, line a baking sheet with parchment paper. This makes cleanup easy later. Once the oven is ready, take the chicken out of the marinade. Shake off any excess buttermilk. Now, dredge each piece in the flour mixture. Make sure every part is covered, then shake off the extra coating. Place the coated chicken breasts on the baking sheet. Brush each piece with ¼ cup of melted unsalted butter. This adds flavor and helps with browning. Bake in the oven for 20 to 25 minutes. Check that the chicken is golden brown and cooked through. The internal temperature should reach 165°F (74°C). After baking, take the chicken out of the oven. Let it rest for about 5 minutes. This helps keep the chicken juicy. For a beautiful finish, garnish with freshly chopped parsley. This adds a pop of color and freshness to your dish. Enjoy your melt-in-your-mouth chicken! Marinating your chicken is key. I recommend at least 2 hours, but overnight is best. This lets all the flavors soak in. You can adjust spices to match your taste. If you love garlic, add more garlic powder! Want it spicy? Add extra cayenne. Always taste your marinade before adding the chicken. To avoid dry chicken, cook at 400°F (200°C). This helps keep it juicy inside. Use a meat thermometer to check for doneness. The chicken should reach 165°F (74°C). Letting the chicken rest for 5 minutes after baking helps keep moisture in. For a crispy coating, use panko breadcrumbs. They add crunch that regular breadcrumbs can’t match. When coating, shake off excess flour. This prevents clumping. Handle the chicken gently to keep that nice texture. When serving, make sure it looks appealing on the plate. Pro Tips Marination Time Matters: Allowing the chicken to marinate overnight not only enhances the flavor but also tenderizes the meat, making it even more succulent. Perfect Coating: For an extra crispy texture, make sure to shake off any excess flour before baking. This helps the coating adhere better and prevents sogginess. Check the Temperature: Use a meat thermometer to ensure the chicken reaches an internal temperature of 165°F (74°C). This guarantees it's fully cooked and safe to eat. Rest Before Serving: Let the chicken rest for at least 5 minutes after baking. This step allows the juices to redistribute, resulting in a juicier bite. {{image_2}} You can change the flavor of Melt In Your Mouth Chicken easily. Try different seasonings for new tastes. Here are a few ideas: - Italian Blend: Use dried oregano, basil, and parsley. - Cajun Spice: Add paprika, garlic powder, and thyme for a kick. - Herb Mix: Combine rosemary, dill, and sage for a fresh flavor. If you like heat, adjust the cayenne pepper. Start with a little, then add more if you want it spicy. Just remember, a little can go a long way! You can cook this chicken in different ways. If you have an air fryer, it works great. Here’s how to do it: 1. Preheat your air fryer to 375°F (190°C). 2. Coat the chicken as usual, then place it in the basket. 3. Cook for about 15-20 minutes, turning halfway through. Check the internal temperature; it should reach 165°F (74°C). Grilling is another fun option. Grilled chicken gets a smoky flavor. Just marinate as usual and grill on medium heat for 6-8 minutes per side. Flip only once for nice grill marks. Pair your chicken with tasty sides. Here are some ideas: - Garlic Mashed Potatoes: Creamy and rich, they match well with the chicken. - Fresh Garden Salad: A light salad adds crunch and freshness. - Steamed Vegetables: Broccoli or green beans work well for color and health. For sauces and dips, try these: - Honey Mustard: Sweet and tangy, it complements the chicken well. - Ranch Dressing: A classic dip that adds creaminess. - Spicy Aioli: Mix mayonnaise with garlic and hot sauce for a kick. These variations will make your meal special and satisfying! To keep your Melt In Your Mouth Chicken fresh, store leftovers properly. Place the chicken in an airtight container. This helps maintain its taste and moisture. You can refrigerate it for up to four days. If you want to enjoy it later, think about freezing instead. Freezing cooked chicken can be simple and effective. Wrap each piece tightly in plastic wrap. Then, place them in a freezer-safe bag. This helps prevent freezer burn and keeps the chicken tasty. You can freeze it for up to three months. When you're ready to eat, thaw the chicken in the fridge overnight. This method keeps it safe and helps retain its moisture. To reheat, place the chicken in an oven at 350°F (175°C) for about 15-20 minutes. This will warm it through without drying it out. Enjoy your delicious chicken again! Marinate the chicken for at least 2 hours. For the best taste, let it soak overnight. This gives the flavors time to soak into the meat. The buttermilk tenderizes the chicken, making it juicy and soft. Yes, you can use skin-on chicken. It can add extra flavor and crispiness. Just make sure to adjust cooking time. Skin-on pieces may take longer to cook through. Always check the internal temperature to ensure it reaches 165°F. You can serve this chicken with garlic mashed potatoes or a fresh garden salad. Roasted vegetables are also a great choice. For drinks, pair it with a light white wine or iced tea. Lemon wedges can brighten the meal. Your chicken may not be crispy due to a few reasons. Make sure to coat it well with the flour mixture. Also, check that your oven is hot enough. If the coating is too wet, it won't crisp up. Let the chicken rest before baking to remove excess moisture. You’ve learned to make Melt In Your Mouth Chicken, from marinating to cooking and serving. This recipe uses simple ingredients like chicken breasts, buttermilk, and spices to create flavor-packed meals. With tips for keeping chicken juicy and variations to try, you can customize your dish. Remember, resting after baking adds to the taste and texture. Enjoy impressing your friends and family with this delicious dish, ensuring every bite is satisfying and crispy. Happy cooking!

Melt In Your Mouth Chicken Delicious and Juicy Recipe

- 4 boneless, skinless chicken breasts - 1 cup cherry tomatoes, halved - 1 red onion, thinly sliced - 1 bell pepper (any color), sliced - 3 cloves garlic, minced For this dish, I use boneless, skinless chicken breasts. They cook quickly and stay juicy. Cherry tomatoes add sweetness, and bell peppers bring crunch. Red onion gives depth, and garlic adds a rich aroma. - 1/3 cup balsamic vinegar - 1/4 cup honey - 2 tablespoons olive oil - 1 teaspoon dried thyme - Salt and pepper to taste The marinade is key. I mix balsamic vinegar, honey, and olive oil. This blend creates a sweet and tangy taste. Dried thyme adds herbal notes, while salt and pepper enhance the flavors. - Fresh basil for presentation For a pop of color, I use fresh basil. It not only looks great but also adds a fresh taste. Just sprinkle it on top before serving. This simple step makes the dish feel gourmet. {{ingredient_image_1}} - Prepping the marinade: Start by mixing the balsamic vinegar, honey, olive oil, dried thyme, salt, and pepper in a large bowl. Use a whisk to blend it well. This mix creates a sweet and tangy flavor that will soak into the chicken. - Marinating the chicken: Add the chicken breasts to the marinade. Make sure each piece is well coated. Let them sit for about 15 minutes. This step allows the chicken to absorb all the delicious flavors. - Layering the vegetables in the skillet: Take a large oven-safe skillet and layer the sliced red onion, bell pepper, and halved cherry tomatoes evenly on the bottom. This creates a colorful base and adds flavor to the dish. - Baking the chicken and vegetables: Place the marinated chicken on top of the vegetables. Pour any leftover marinade over the chicken and veggies. Scatter the minced garlic on top for extra flavor. Bake in a preheated oven at 400°F (200°C) for 25 to 30 minutes. The chicken should reach an internal temperature of 165°F (75°C) when done. - Resting the dish: Once the chicken is cooked, take the skillet out of the oven. Let the dish rest for a few minutes. This helps the juices settle and keeps the chicken moist. - Garnishing before serving: Finally, add fresh basil on top. This not only adds flavor but also makes the dish look beautiful. Enjoy your One Pan Balsamic Chicken! To get the best flavor, soak the chicken for at least 15 minutes. This soak helps the chicken absorb the marinade. The mix has sweet honey and tangy balsamic vinegar. Finding the right balance makes each bite tasty. Adjust the honey if you want it sweeter. You can also add more vinegar for tang. Always check the chicken for doneness. It should reach an internal temperature of 165°F (75°C). Use a meat thermometer to be sure. After cooking, let the chicken rest for a few minutes. This resting time helps the juices stay inside. Your chicken will be moist and tender when served. Use a sturdy oven-safe skillet for this dish. Cast iron or stainless steel works great. They hold heat well and cook evenly. For easy cleanup, soak the skillet in warm, soapy water. Scrub gently to remove any stuck bits. This helps keep your cookware in good shape for next time. Pro Tips Marinate Longer: For even more flavor, marinate the chicken for at least 30 minutes or up to overnight in the refrigerator. Use Fresh Herbs: Fresh thyme or oregano can elevate the flavor profile. Consider adding fresh herbs just before serving for a burst of freshness. Veggie Variations: Feel free to add other vegetables like zucchini or asparagus for more color and nutrients. Check for Doneness: Always use a meat thermometer to ensure chicken is cooked through, reaching an internal temperature of 165°F (75°C). {{image_2}} You can change the vegetables in this dish. Try using zucchini, asparagus, or mushrooms. Each adds a new taste. You could also use fresh herbs like rosemary or parsley. If you want to swap the chicken, consider using turkey or pork. These meats work well with the balsamic flavors. To add some heat, include red pepper flakes or a pinch of cayenne. This kicks up the flavor! For brightness, squeeze in some lemon juice or add orange zest. These citrus notes make the dish pop. This chicken pairs well with grains. Serve it over rice, quinoa, or couscous. A fresh salad also complements the meal nicely. When plating, arrange the chicken on top of the veggies for a colorful look. Add a sprinkle of fresh basil for an extra touch. After cooking, let the dish cool. Place leftovers in an airtight container. This helps keep the chicken moist. You can store it in the fridge for up to three days. For best taste, eat it within two days. To freeze One Pan Balsamic Chicken, let it cool fully. Slice the chicken for easier thawing. Then, place it in a freezer-safe bag. Remove as much air as possible. You can freeze it for up to three months. To thaw, place it in the fridge overnight. Reheat in the oven or microwave until hot. This dish is great for meal prep. Make a big batch on Sunday. Divide it into portions and store them in the fridge. For quick meals, reheat in the microwave for about two minutes. You can also warm it up on the stove for better texture. Yes, you can use bone-in chicken for this dish. Bone-in chicken takes longer to cook. Adjust the baking time to 35-40 minutes. Always check the internal temperature. It should reach 165°F (75°C). Making a vegetarian version is easy. Substitute chicken with tofu or tempeh. You can also use chickpeas for extra protein. Marinate the tofu or tempeh like chicken. Bake until heated through, about 20-25 minutes. Balsamic chicken pairs well with many sides. Try serving it with rice or quinoa. A fresh salad adds crunch and color. Roasted veggies also complement the dish nicely. You can make garlic bread for a cozy touch. This blog post covers a flavorful dish: One Pan Balsamic Chicken. We explored its main ingredients like chicken, tomatoes, and peppers. The marinade adds a nice touch with balsamic vinegar and honey. You learned step-by-step how to prepare, cook, and serve this meal. Don't forget to try the tips for flavor and tenderness, and feel free to explore variations. Store leftovers properly for the best taste. Enjoy your cooking adventures, and let this dish bring joy to your table!

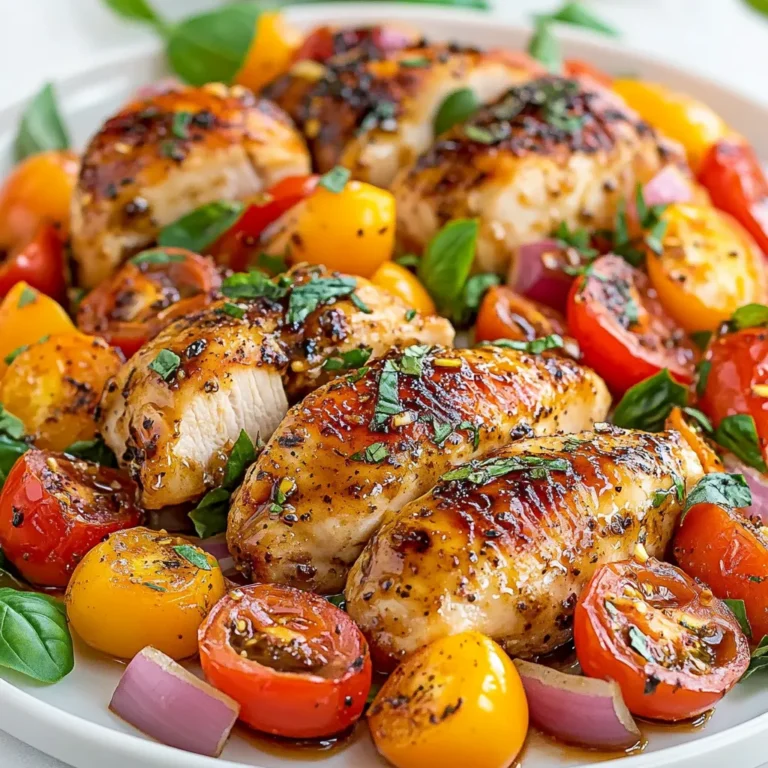
One Pan Balsamic Chicken Flavorful and Simple Dish

- 1 pound ground beef - ½ pound ground pork (omit if you prefer a beef-only version) - 1 small onion, finely chopped - 2 cloves garlic, minced Swedish meatballs need a good mix of meats. Ground beef gives flavor and texture. Adding ground pork makes them juicier. Onions and garlic add a nice depth to the taste. Make sure the onion is finely chopped so it blends well. Minced garlic brings a great aroma. - 1 cup beef broth - 1 tablespoon soy sauce - 1 tablespoon lingonberry jam (or other berry jam if unavailable) The creamy lingonberry sauce is key to this dish. Beef broth adds richness. Soy sauce gives it a savory kick. Lingonberry jam brings sweetness and a bit of tartness. If you cannot find lingonberry jam, any berry jam works well too. - ¾ cup breadcrumbs - 1 teaspoon ground allspice - 1 teaspoon ground nutmeg - Salt and pepper to taste - 1 tablespoon cornstarch mixed with 2 tablespoons cold water (slurry) Breadcrumbs help bind the meatballs together. Allspice and nutmeg add warmth and depth. Adjust salt and pepper to your liking. The cornstarch slurry thickens the sauce, giving it a creamy finish. This mix of ingredients creates a classic and comforting dish. {{ingredient_image_1}} 1. In a large bowl, combine the ground beef and ground pork. If you want a beef-only version, skip the pork. 2. Add the finely chopped onion and minced garlic to the meat. 3. Mix in the breadcrumbs, egg, milk, allspice, nutmeg, salt, and pepper. 4. Stir until just combined. Do not overmix, or your meatballs may be tough. 5. Use your hands to form small meatballs, about 1 inch in diameter. 6. Place the meatballs on a baking sheet while you form the rest. 1. In a large skillet, heat the olive oil over medium heat. 2. Once the oil is hot, add the meatballs in batches. 3. Brown them on all sides for about 5-7 minutes total. 4. After cooking, remove the meatballs from the skillet and set them aside. 1. In the same skillet, add the beef broth, soy sauce, and lingonberry jam. 2. Stir these ingredients well and bring the mix to a simmer. 3. Slowly whisk in the heavy cream and cook, stirring often for about 5 minutes, until the sauce thickens slightly. 4. Add the cornstarch slurry to the sauce. Cook for an additional minute until it becomes creamy and smooth. 5. Return the meatballs to the skillet, gently coating them in the sauce. 6. Allow the meatballs to simmer in the sauce for 2-3 minutes. This ensures they are heated through. Enjoy your Swedish meatballs with creamy sauce! To get the best meatballs, do not overmix the meat. Overmixing makes the meatballs tough. Mix just until combined. This keeps them soft and juicy. Aim for meatballs about 1 inch wide. This size cooks evenly and keeps them tender. Adjust the seasoning to your taste. Add more salt or spices if you like. Fresh herbs like parsley can brighten the dish. You can also garnish with lingonberry sauce on the side. This makes for a beautiful presentation. When frying, use medium heat for even browning. Don’t crowd the pan; cook in batches. This ensures every side gets a nice brown color. You can also use the oven. Bake at 400°F for about 20 minutes for a hands-free method. Both ways yield tasty meatballs! Pro Tips Use Fresh Ingredients: Always opt for fresh ground meats and herbs to enhance the flavor of your meatballs. Don’t Overmix: When combining the ingredients, mix just until combined to keep the meatballs tender and juicy. Adjust Spice Levels: Feel free to adjust the amount of allspice and nutmeg according to your taste preference for a personalized flavor. Perfect Sauce Consistency: If your sauce is too thick, add a splash of beef broth or water to reach your desired consistency. {{image_2}} You can try different berry jams if you can't find lingonberry. Raspberry or cranberry jam works well. Both add a nice sweet-tart flavor. You can also change the creaminess of your sauce. If you prefer a tangy taste, use sour cream instead of heavy cream. This switch will give your sauce a different texture and flavor. If you want a leaner option, ground turkey or chicken are great choices. They cook up well and still taste amazing. For plant-based diets, try using vegetarian or plant-based meatballs. Many brands now offer tasty options that mimic the texture and flavor of meat. Traditional sides for meatballs include creamy mashed potatoes or buttered egg noodles. These pair well with the sauce. You can also serve your meatballs with a side salad for a fresh touch. A simple green salad with vinaigrette will balance the richness of the meatballs. If you want something different, try roasted vegetables or coleslaw. Both add color and crunch to your meal! To keep your meatballs fresh, store them in the fridge. Place them in an airtight container. They can last for about three to four days this way. If you want to save them longer, freezing is a great option. To freeze meatballs, first let them cool completely. Then, place them in a single layer on a baking sheet. Once frozen, transfer them to a freezer bag. They can last up to three months in the freezer. When reheating meatballs, use the oven for the best results. Preheat your oven to 350°F (175°C). Place the meatballs on a baking sheet and cover with foil. Heat for about 20 minutes or until warm. You can also use the microwave for quick reheating. Place the meatballs on a plate and add a splash of broth or sauce to keep them moist. Heat in short intervals, checking often to avoid drying them out. Cooked meatballs can last in the fridge for about three to four days. If frozen, they can last up to three months. Always check for signs of spoilage before eating. Look for any off smells or changes in color. If the meatballs feel slimy or sticky, it's best to throw them away. Trust your senses to keep your meals safe. Swedish meatballs, called köttbullar, have a rich history. They trace back to the 18th century. King Charles XII brought the recipe from Turkey. The dish became popular in Sweden due to its savory taste. Today, it is a beloved meal served at home and in restaurants. Yes, you can make Swedish meatballs without pork. Simply use more ground beef. You can also try ground turkey or chicken. These options work well and keep the flavor nice. Just remember, the texture may change a bit. To make Swedish meatballs gluten-free, swap regular breadcrumbs for gluten-free ones. You can use crushed gluten-free crackers as a substitute. For the sauce, check that your soy sauce is gluten-free. This way, you still enjoy the same great taste. Swedish meatballs pair well with many sides. Creamy mashed potatoes are a classic choice. You can also serve them with lingonberry sauce for a sweet touch. Other options include egg noodles or rice. A green salad adds freshness too. Swedish meatballs combine rich flavors and textures. You learned about key ingredients, from meat to seasonings. I shared step-by-step instructions to create delicious meatballs and a creamy lingonberry sauce. Tips and variations help you customize your dish. Remember to store leftovers properly for the best taste later. Swedish meatballs are versatile, satisfying, and full of tradition. Enjoy cooking and sharing this classic dish with family and friends!

Swedish Meatballs Savory Recipe for Everyone

- Cajun Chicken Ingredients - 1 lb boneless, skinless chicken breast, cubed - 2 tablespoons Cajun seasoning - Tortellini Ingredients - 2 cups cheese tortellini - Seasoning and Garnishes - 1 medium onion, diced - 1 red bell pepper, diced - 3 cloves garlic, minced - 1 cup heavy cream - 1 cup diced tomatoes (canned or fresh) - 1 tablespoon olive oil - Salt and pepper to taste - Fresh parsley, chopped (for garnish) When I make Cajun chicken tortellini, I love using fresh ingredients. They bring out the best flavors. You need chicken, of course. I prefer boneless, skinless chicken breast cut into cubes. This way, they cook quickly and soak up all the spices. The Cajun seasoning is key to this dish. It adds a warm, spicy kick. You can buy it or make your own blend if you like. Next, I always use cheese tortellini. The cheese adds a nice creaminess to the dish. You can find it in the pasta aisle, and it cooks quickly. For the veggies, I add a medium onion and a red bell pepper. They add sweetness and color. Garlic is a must too. It gives a lovely aroma and flavor. The creamy sauce comes from heavy cream and diced tomatoes. You can use canned or fresh tomatoes. Both work great! Finally, I like to finish with fresh parsley. It adds a pop of color and freshness. Gather these ingredients, and you’ll be ready to create a delicious meal! {{ingredient_image_1}} First, boil a large pot of salted water. Once it boils, add the cheese tortellini. Cook it according to the package instructions. This usually takes about 3-5 minutes. When done, drain the tortellini and set it aside. Next, take the cubed chicken breast. Toss it with the Cajun seasoning. Make sure each piece is well coated. Heat olive oil in a large skillet over medium heat. Add the chicken and cook it until golden brown. This should take about 5-7 minutes. Once cooked, remove the chicken from the skillet and set it aside. In the same skillet, add diced onion and red bell pepper. Sauté these for about 3-4 minutes until they soften. Then, add the minced garlic and cook for 1 more minute until it smells great. Now, return the cooked chicken to the skillet. Add in the diced tomatoes and heavy cream. Stir everything together well. Let this mixture simmer for about 3-4 minutes. This helps all the flavors blend nicely. Finally, gently fold the cooked tortellini into the skillet. Make sure the tortellini is covered in the creamy sauce. Cook for another 2-3 minutes. Taste and adjust the seasoning with salt and pepper. Serve it hot, garnished with fresh chopped parsley. Enjoy your meal! To make great Cajun seasoning, start with two tablespoons. You can use store-bought seasoning or make your own. A mix of paprika, cayenne, garlic powder, onion powder, and thyme works well. Adjust the spice level by adding more or less cayenne. Taste the seasoning before adding it to the chicken. This step makes sure it meets your flavor needs. A creamy sauce makes this dish special. Use heavy cream for the best results. When you add the cream, lower the heat. Simmer gently for a few minutes. This helps blend the flavors without boiling away the cream. If you like it thicker, add a bit of cheese. Cream cheese or shredded cheese can work wonders, too. Timing is key for a perfect Cajun chicken tortellini. Cook the tortellini first, so it’s ready when you need it. After cooking the chicken, don’t let it sit too long. Add the veggies right away. Keep an eye on the sautéed veggies; they should be soft, not mushy. Finally, when you combine everything, stir gently. This way, the tortellini stays intact and soaks up the tasty sauce. Pro Tips Choose Fresh Ingredients: Using fresh, high-quality ingredients will enhance the flavor of your Cajun chicken tortellini. Opt for fresh vegetables and good-quality chicken for the best results. Adjust Spice Level: If you prefer a milder dish, reduce the amount of Cajun seasoning or substitute it with a milder blend. Taste as you go to achieve your desired heat level. Make it Creamy: For an extra creamy sauce, consider adding a bit more heavy cream or a splash of cream cheese. This will give the dish a richer texture. Garnish for Freshness: Don’t skip the fresh parsley! It not only adds a pop of color but also brightens the dish with its fresh flavor. {{image_2}} You can easily change the protein in Cajun chicken tortellini. Try shrimp for a seafood twist. Shrimp cooks fast, so add it after the veggies. You can also use sausage. Andouille sausage works well for that smoky flavor. Just slice it and sauté it with the onions and peppers. If you prefer turkey, use ground turkey for a leaner option. Each protein adds its own taste, making the dish new each time. If you want a vegetarian version, skip the chicken. Instead, add mushrooms and zucchini. They both soak up the Cajun spices well. Use the same cooking steps as you would for chicken. For protein, add chickpeas or lentils. They make the meal filling and healthy. Don't forget to keep the heavy cream for that rich taste. You can even swap it for a plant-based cream if you prefer. While the heavy cream sauce is rich and creamy, you can try other sauces. A tomato-based sauce gives a different flavor. Use the canned tomatoes but skip the cream. Add Italian herbs for fun. You can also use a pesto sauce for a fresh twist. Mix it in with the tortellini for a bright taste. Each sauce changes the meal, keeping it exciting and new. You can store leftover Cajun chicken tortellini in an airtight container. Let it cool first. Place it in the fridge for up to three days. Make sure to cover it well to keep it fresh. This keeps the creamy sauce from drying out. To reheat, place the tortellini in a skillet over medium heat. Add a splash of water or cream to help it stay moist. Stir it often until it heats through. You can also use the microwave. Heat it in short bursts, stirring in between. This prevents it from getting too hot in spots. If you want to freeze it, do so right after cooking. Let it cool completely, then portion it out. Use freezer-safe bags or containers. It can last up to three months in the freezer. When ready to eat, thaw it overnight in the fridge before reheating. This way, the flavors stay vibrant and delicious. You can use milk mixed with butter for a lighter option. Use 3/4 cup of milk and add 1/4 cup of melted butter. This mix gives a similar richness. For a dairy-free option, try coconut cream or cashew cream. Both add creaminess without dairy. Cajun seasoning brings some heat, but spice levels can vary. If you like it milder, use less seasoning. You can also add more cream to tone down the spice. Adjust it to match your taste by adding sweetness or acidity. Absolutely! Homemade tortellini adds a special touch. Just make sure it's cooked before adding it to the dish. Fresh tortellini cooks faster than store-bought, so keep an eye on it. Add it to the skillet gently for the best result. Cooking time for tortellini is usually about 3 to 5 minutes. Follow the package instructions for best results. If using fresh tortellini, check after 2 minutes. It should be soft but still firm to the bite. This blog post covered how to make a tasty Cajun chicken tortellini dish. We looked at the ingredients, step-by-step cooking, and tips to enhance flavor and texture. I shared variations for different diets and how to store leftovers. Cooking can be fun and creative. With the right choices, you can make this dish your own. Enjoy your cooking journey and the delicious meal that follows!

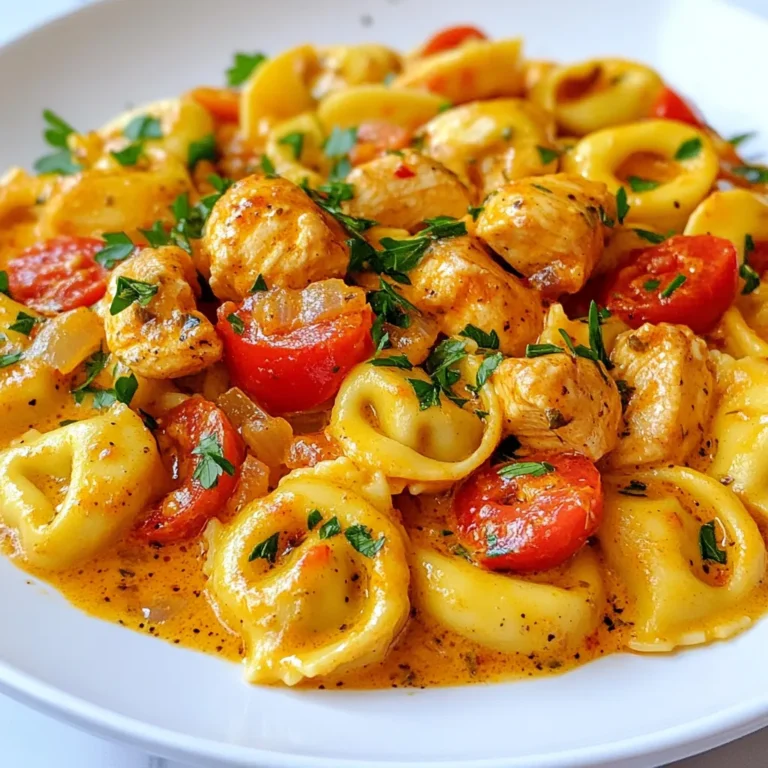
Cajun Chicken Tortellini Flavorful and Simple Meal

- 2 boneless, skinless chicken breasts - 2 tablespoons olive oil - 1 teaspoon garlic powder - 1 teaspoon Italian seasoning - Salt and pepper to taste - 1 cup cherry tomatoes, halved - 1 cup heavy cream - 1 cup chicken broth - 1 cup grated Parmesan cheese - 8 ounces fettuccine pasta - Fresh basil leaves for garnish - Red pepper flakes (optional for heat) Marry Me Chicken Pasta is a simple dish that packs big flavor. To make it, you need fresh and high-quality ingredients. Start with two boneless, skinless chicken breasts. They are easy to cook and absorb flavors well. Next, grab some olive oil. This oil helps brown the chicken and adds richness. Garlic powder and Italian seasoning bring depth to every bite. Don’t forget salt and pepper. They balance all the flavors in the dish. Cherry tomatoes add a burst of sweetness. Use one cup of these juicy gems, sliced in half. Heavy cream and chicken broth create a rich, creamy sauce. The heavy cream gives a smooth texture, while the broth adds savory notes. Grated Parmesan cheese is a must. It melts perfectly into the sauce, enhancing the flavor. Fettuccine pasta is the star of the show. It holds the sauce well, making every forkful delightful. To finish, add fresh basil leaves for a bright taste. If you like some heat, sprinkle in red pepper flakes. They add a nice kick without overpowering the dish. With these ingredients, you are ready to create a meal that is sure to impress. {{ingredient_image_1}} To cook the fettuccine pasta, fill a large pot with water. Add salt to the water. Bring the water to a boil over high heat. Once boiling, add the fettuccine. Cook the pasta according to the package instructions, usually about 8-10 minutes. Stir occasionally to prevent sticking. When the pasta is al dente, reserve ½ cup of the pasta water before draining. This water helps to thicken the sauce later. While the pasta cooks, take your chicken breasts. Pat them dry with a paper towel. This helps the seasoning stick better. Rub the chicken with garlic powder, Italian seasoning, salt, and pepper. Heat olive oil in a large skillet over medium-high heat. Add the seasoned chicken breasts to the skillet. Cook for 6-7 minutes on each side. The chicken should be golden brown and no longer pink inside. Remove the chicken and let it rest on a board. In the same skillet, add halved cherry tomatoes. Sauté them for 2-3 minutes until they soften. Next, pour in the heavy cream and chicken broth. Stir the mixture to combine. Bring it to a gentle simmer. After a few minutes, add grated Parmesan cheese. Mix until the cheese melts and the sauce thickens. If the sauce is too thick, use the reserved pasta water to reach your desired consistency. Once the chicken has rested, slice it into strips. Return the chicken to the skillet with the sauce. Add the drained fettuccine too. Toss everything together until the pasta is well coated. The creamy sauce should cover the pasta and chicken evenly. Serve your Marry Me Chicken Pasta hot. Garnish with fresh basil and a sprinkle of red pepper flakes if you like some heat. To cook tender chicken, aim for 6-7 minutes on each side over medium-high heat. Use a meat thermometer to check for an internal temperature of 165°F. This ensures it's safe to eat. To avoid overcooking, remove the chicken from the skillet as soon as it reaches this temperature. Let it rest for a few minutes before slicing. This keeps the juices inside, making the chicken juicy and tender. The sauce needs to be creamy and flavorful. If it’s too thick, add a little reserved pasta water to adjust the thickness. Start with a few tablespoons and mix well. To achieve the best flavor balance, use fresh cherry tomatoes. Their sweetness pairs well with the salt of the Parmesan. Taste the sauce before serving, adding salt or pepper as needed. Garnish your dish with fresh basil leaves. They add a bright touch. For extra heat, sprinkle red pepper flakes on top. Serve Marry Me Chicken Pasta with a simple side salad or garlic bread. These pairs add texture and flavor. For wine, a light Pinot Grigio complements the creaminess of the dish. Enjoy the food and the company! Pro Tips Perfectly Cooked Chicken: Use a meat thermometer to ensure the chicken reaches an internal temperature of 165°F for optimal juiciness. Enhance the Flavor: Marinate the chicken in olive oil, garlic, and Italian seasoning for at least 30 minutes before cooking to deepen the flavors. Thickening the Sauce: If your sauce is too thin, let it simmer longer to reduce and thicken, or add a little more Parmesan cheese. Garnishing Tips: Fresh basil adds a burst of flavor, but try adding lemon zest for a refreshing twist. {{image_2}} You can easily switch up the pasta you use in this dish. Fettuccine is great, but try penne or even spaghetti. Each type brings a unique twist to the final meal. For proteins, chicken is a classic choice, but shrimp works well too. Sauté it just like the chicken. Turkey is another option; it’s lean and tasty. Want to add more flavor? Toss in some veggies. Spinach adds color and nutrients. Bell peppers bring sweetness and crunch. Adjust the spice to match your taste. If you like it hot, sprinkle in red pepper flakes. You can also add garlic for extra depth. If you need gluten-free options, use gluten-free pasta. Many brands offer great alternatives that taste good. For dairy-free meals, swap heavy cream with coconut milk. Nutritional yeast can replace Parmesan cheese for a cheesy flavor without dairy. To store leftover Marry Me Chicken Pasta, place it in an airtight container. Make sure it cools down first. You can keep it in the fridge for up to three days. When reheating, use low heat in a skillet. This helps keep the pasta creamy. Add a splash of chicken broth to help revive the sauce. You can freeze Marry Me Chicken Pasta for longer storage. First, let it cool completely. Then, transfer it to a freezer-safe container. It will stay good for up to two months. When you are ready to eat, thaw it overnight in the fridge. Reheat on low heat, adding a bit of broth or cream for a smooth texture. Marry Me Chicken Pasta is a creamy, flavorful dish that combines chicken and pasta. It is said to be so good that it could make someone propose! The dish is believed to have started online and quickly gained fame. Many people love this dish for its rich taste and easy preparation. Yes, you can make Marry Me Chicken Pasta ahead of time. To do this, follow these simple meal prep tips: - Cook the chicken and pasta as directed. - Store them separately in airtight containers. - Refrigerate for up to three days. When you are ready to eat, just heat them up in a skillet. Add a splash of cream to keep the sauce creamy. If you love spice, here are some ways to heat up your dish: - Add red pepper flakes while cooking the sauce. - Include fresh chopped chili peppers in the skillet with the tomatoes. - Serve with hot sauce on the side for extra kick. This dish pairs well with many sides. Here are some great options: - Garlic bread for a crunchy texture. - A fresh green salad to balance the creaminess. - Steamed vegetables like broccoli or asparagus for added nutrition. This blog post covered all you need to make Marry Me Chicken Pasta. We explored the key ingredients, step-by-step cooking methods, and tips for perfect results. You learned how to store and reheat leftovers, along with fun variations to try. Cooking this meal can impress anyone and is really enjoyable! So gather your ingredients and get started. You’ll create a dish that tastes amazing and might even win hearts. Enjoy your cooking adventure!

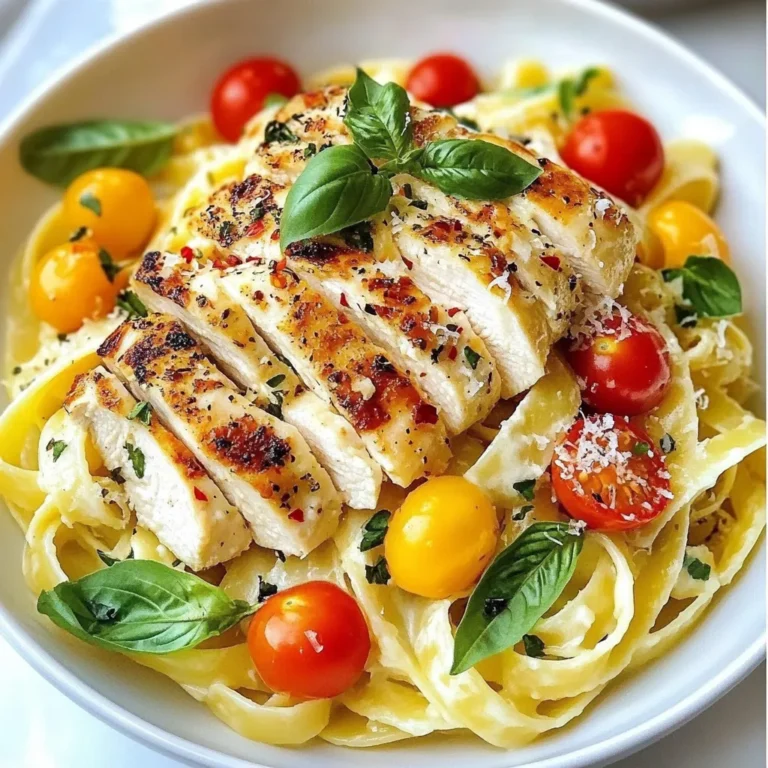
Marry Me Chicken Pasta Delicious One-Pan Recipe

To make One Pan Chicken and Rice Bake, you will need fresh and simple ingredients. Here’s what you will need: - 4 bone-in, skin-on chicken thighs - 1 cup basmati rice - 2 cups chicken broth - 1 medium onion, finely chopped - 3 cloves garlic, minced - 1 bell pepper, diced (any color) - 1 cup frozen peas - 1 teaspoon smoked paprika - 1/2 teaspoon cumin - 1/2 teaspoon turmeric - 1/4 teaspoon cayenne pepper (optional) - Salt and pepper to taste - 2 tablespoons olive oil - Fresh parsley for garnish Using these ingredients, you create a meal that is both hearty and flavorful. The chicken provides protein, while the rice and veggies add texture and nutrients. The spices bring warmth and depth to the dish. It's a simple way to enjoy a balanced meal in one pan. {{ingredient_image_1}} Start by seasoning the chicken thighs. Use salt, pepper, smoked paprika, cumin, turmeric, and cayenne. Rub these spices onto both sides. This adds flavor to the chicken. Next, heat olive oil in a large oven-safe skillet over medium heat. Once hot, add the chopped onion, minced garlic, and diced bell pepper. Sauté these for about 3-4 minutes. You want them soft and fragrant. Now, stir in the basmati rice. Make sure to coat it with the oil and vegetables. This step helps the rice absorb flavors. Pour in the chicken broth and add frozen peas. Mix everything well. Nestle the seasoned chicken thighs back into the skillet, placing them on top of the rice mixture. This ensures the chicken cooks evenly and flavors the rice. Preheat your oven to 375°F (190°C). This temperature cooks the chicken and rice perfectly. Cover the skillet with a lid or aluminum foil. Transfer it to the oven and bake for 30-35 minutes. This time allows the chicken to cook through and the rice to absorb the broth. Once done, remove the skillet from the oven. Let it rest, covered, for 5 minutes. This resting time helps the flavors settle. Garnish with fresh parsley before serving. Enjoy your meal! To get great chicken, start with a hot skillet. Heat 2 tablespoons of olive oil on medium heat. Add the chicken thighs skin-side down. Let them sear for 5-7 minutes. This makes the skin crispy and tasty. Flip them and sear the other side for 5 minutes. Remove them and set aside. This method locks in flavor and keeps the chicken juicy. For fluffy rice, use basmati rice. Stir it in with the sautéed veggies. Pour in 2 cups of chicken broth. Make sure the rice is fully covered. Nestle the chicken on top. Cover the skillet to trap steam. This helps the rice cook evenly. It will soak up all the broth and flavor. You can add more spices for extra flavor. Try a pinch of garlic powder or onion powder. You can also use Italian seasoning for a twist. A dash of lemon zest brightens the dish. Experiment to find what you like best. Fresh herbs make this dish pop. Try adding chopped parsley or cilantro. You can also use thyme or rosemary for a cozy feel. Add them right before serving for the best taste. Fresh herbs give a nice color and taste boost. Pro Tips Use Fresh Herbs: Fresh parsley adds a burst of flavor and freshness to the dish. Consider adding other herbs like thyme or rosemary for variation. Let it Rest: Allowing the dish to rest for 5 minutes after baking helps the flavors meld and makes serving easier. Customize the Veggies: Feel free to swap the bell pepper and peas for other vegetables you enjoy, such as carrots, zucchini, or spinach. Check for Doneness: Ensure the chicken reaches an internal temperature of 165°F (75°C) for safe consumption, and the rice should be tender and fluffy. {{image_2}} You can make this dish your own with simple swaps. - Chicken alternatives: If you don't have chicken thighs, try drumsticks or breast. They cook well too. For a vegetarian option, use firm tofu or tempeh. Just marinate them in the spices. - Rice options: While basmati rice is great, you can use jasmine rice or brown rice. Adjust the broth amount for brown rice since it needs more liquid. Spice up your dish with fun flavors. - Different spice blends: Try Italian herbs like oregano and basil for a different taste. Or, mix in curry powder for a warm flavor. You can also use taco seasoning for a fun twist. - Adding extra vegetables: Toss in veggies like carrots, zucchini, or spinach. They add color and nutrients. You can add them during the sauté step or mix them in with the rice. To store leftovers, let the dish cool to room temperature. Place it in an airtight container. I recommend using glass containers or BPA-free plastic ones. This keeps the food fresh longer. Make sure to store it in the fridge within two hours. Enjoy your meal for up to three days. The best way to reheat this dish is in the oven. Set your oven to 350°F (175°C). Cover the dish with foil to keep moisture in. Heat for about 20 minutes or until hot. You can also use a microwave for quick reheating. Heat on medium power for 3-5 minutes. Stir halfway to ensure even heating. Can I use boneless chicken? Yes, you can use boneless chicken thighs or breasts. They will cook faster than bone-in cuts. Adjust the cooking time to about 25-30 minutes. Check that the chicken reaches 165°F for safety. How to make this dish gluten-free? To make this dish gluten-free, use gluten-free chicken broth. Check the labels on your rice and spices to ensure they are gluten-free too. This way, everyone can enjoy this meal! Caloric breakdown This one pan chicken and rice bake serves about four people. Each serving has around 450 calories. This may vary based on specific brands and portions used. Macronutrient details - Protein: about 30 grams - Carbohydrates: around 50 grams - Fat: roughly 15 grams These values can help you plan your meals based on your dietary needs. Enjoy this tasty dish while keeping your nutrition in mind! This dish combines simple ingredients, like chicken and rice, with fresh veggies and spices. Each step guides you from preparation to cooking, ensuring a tasty result. Use my tips for perfect texture and added flavor. You can also tweak ingredients or storage methods based on your needs. Explore and enjoy making this meal your own, whether you're new to cooking or a seasoned chef. Embrace the joy of flavors and satisfaction of a home-cooked dish. Your kitchen adventures are just beginning!

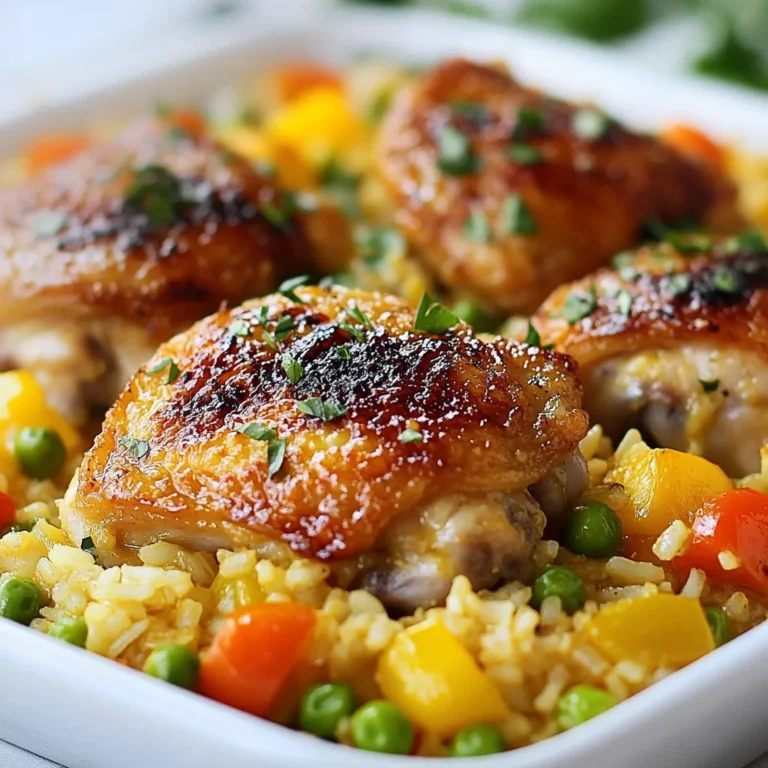
One Pan Chicken and Rice Bake Simple Family Meal

- 4 chicken breasts, boneless and skinless - 1 cup fresh cranberries - 1 large orange (zested and juiced) - 1/2 cup chicken broth The main ingredients create a balanced mix of flavors. Chicken breasts provide protein, while fresh cranberries add tartness. The orange gives a bright, citrusy zest. Chicken broth keeps the dish moist and rich. This combination shines in any meal. - 2 tablespoons honey - 1 teaspoon fresh thyme (or 1/2 teaspoon dried thyme) - 1 tablespoon olive oil - Salt and pepper to taste Honey brings sweetness to the dish. Fresh thyme adds an earthy note. Olive oil helps with cooking and adds flavor. Salt and pepper enhance all the ingredients. These additional ingredients make the dish come alive. - Fresh parsley, chopped Fresh parsley adds color and freshness. It brightens up the plate and adds a pop of flavor. This small touch makes your meal look beautiful and inviting. Garnishing elevates the whole dining experience. {{ingredient_image_1}} To make the sauce, start by boiling the cranberries and orange mixture. In a medium saucepan, combine 1 cup of fresh cranberries, the zest of 1 large orange, the juice of that orange, 1/2 cup of chicken broth, 2 tablespoons of honey, 1 teaspoon of fresh thyme, and a pinch of salt and pepper. Turn the heat to medium and bring the mixture to a gentle boil. Once it starts boiling, reduce the heat and let it simmer. Keep an eye on it for about 10 minutes. You want the cranberries to burst and the sauce to thicken slightly. This step is key to building flavor. While your sauce simmers, prepare the chicken. Take 4 boneless, skinless chicken breasts. Season both sides with salt and pepper. This adds depth to the flavor. Next, heat 1 tablespoon of olive oil in an oven-safe skillet over medium-high heat. Once the oil is hot, add the chicken. Sear each breast for about 3-4 minutes on each side. You want them golden brown. This step locks in moisture and adds a nice crust. Now, it’s time for the oven. Pour the cranberry-orange sauce over the seared chicken in the skillet. Make sure each piece is well-coated for maximum flavor. Transfer the skillet to your preheated oven at 375°F (190°C). Bake for 20-25 minutes. Check that the chicken reaches an internal temperature of 165°F (74°C). After baking, remove the skillet from the oven. Let the chicken rest for a few minutes before serving. This helps the juices redistribute. For the final touch, garnish with chopped fresh parsley. This adds color and freshness to your dish. Enjoy your Cranberry Orange Chicken Delight! To keep your chicken juicy, always sear it before baking. Searing locks in moisture and flavor. Use medium-high heat and a bit of olive oil. Cook each side for about 3-4 minutes until golden brown. If you want to try a different method, you can grill the chicken. Just marinate it in the cranberry-orange sauce for a few hours. Grilling adds a nice smoky flavor that pairs well with the sweet sauce. You can spice things up by adding a pinch of cinnamon or nutmeg. These spices blend well with the cranberries and orange. Fresh herbs, like rosemary or sage, can also add depth. Feel free to mix and match to find your favorite flavor. For pairing, serve this dish with rice or quinoa. Both grains soak up the sauce well. A simple green salad or steamed veggies also works nicely to balance the meal. Ideal side dishes include garlic mashed potatoes or roasted Brussels sprouts. Their flavors complement the sweet and tangy chicken. For presentation, slice the chicken and arrange it on a platter. Drizzle the sauce over the top and sprinkle fresh parsley for color. This makes for a beautiful and inviting meal. Pro Tips Use Fresh Ingredients: Fresh cranberries and a ripe orange will enhance the flavor of the dish significantly. Frozen cranberries can work in a pinch but won't have the same bright taste. Perfectly Sear the Chicken: Make sure the pan is hot enough before adding the chicken. This will create a beautiful golden crust and lock in moisture. Let it Rest: Allowing the chicken to rest after baking helps redistribute the juices, ensuring each bite is tender and juicy. Garnish for Presentation: Fresh parsley not only adds a pop of color but also a fresh flavor that complements the dish beautifully. {{image_2}} You can change the fruits in the sauce. Instead of cranberries, try using blueberries or cherries. They give a different taste but still pair well with chicken. If you want a sweeter sauce, consider using apples or pears. They add a nice fruity flavor too. For the chicken, you can use turkey breasts or even pork chops. These proteins work well with the sauce. Just adjust the cooking time as needed. To make this dish gluten-free, check your chicken broth. Some brands add gluten. Use a certified gluten-free broth instead. This small change keeps the dish safe for those with gluten issues. If you want a low-sugar option, skip the honey. You can also use a sugar substitute like stevia or monk fruit. These options help cut sugar but keep the meal tasty. Add global flavors to this recipe by mixing in spices. For a Mexican twist, add cumin and chili powder. This gives the dish a warm, spicy kick. If you want to go Asian, add soy sauce and ginger to the sauce. This change creates a unique flavor that blends sweet and savory. You can also top the chicken with sesame seeds for added crunch. To store leftovers, place them in an airtight container. This keeps the chicken fresh. You can store it in the fridge for up to three days. Make sure to let it cool before sealing. This helps prevent moisture buildup, which can make it soggy. For longer storage, you can freeze the chicken. Divide it into portions and place them in freezer bags. Squeeze out the air to prevent freezer burn. It can last in the freezer for up to three months. When you're ready to enjoy it, thaw it in the fridge overnight. This keeps the meat safe and tasty. For safe reheating, use the oven or microwave. If using an oven, set it to 350°F (175°C) and heat until warm. In the microwave, cover the dish to keep moisture in. This helps maintain flavor and texture. Avoid reheating more than once. This keeps the chicken juicy and delicious. Cranberry Orange Chicken Delight is a tasty dish that blends sweet and savory. The chicken has a nice, juicy flavor from the fresh cranberries and oranges. This dish is colorful and looks great on any plate. The sauce gives the chicken a lovely shine and a unique taste. You will enjoy the mix of tangy and sweet flavors, making it a big hit at dinner. Yes, you can make this recipe ahead of time. If you want to save time, cook the chicken and make the sauce earlier in the day. Store the sauce and chicken in separate airtight containers. Keep them in the fridge for up to three days. When you are ready to eat, reheat the chicken in the oven. Warm the sauce on the stove until it is hot. This method keeps the flavors fresh. You can check if the chicken is cooked by measuring its internal temperature. Use a meat thermometer to check the thickest part of the chicken. The safe temperature is 165°F (74°C). If you do not have a thermometer, cut into the chicken. The meat should be white, not pink. Juices should run clear. This way, you can be sure it is safe to eat. This recipe showcases how to make a flavorful cranberry orange chicken. You learned about the main and additional ingredients, along with step-by-step cooking instructions. We explored tips for enhancing flavor and serving suggestions. You can even try variations with different proteins or spices. Store your leftovers safely for tasty meals later. Cooking should be fun, so enjoy trying this dish. Trust me, you will love how delicious and easy it is!

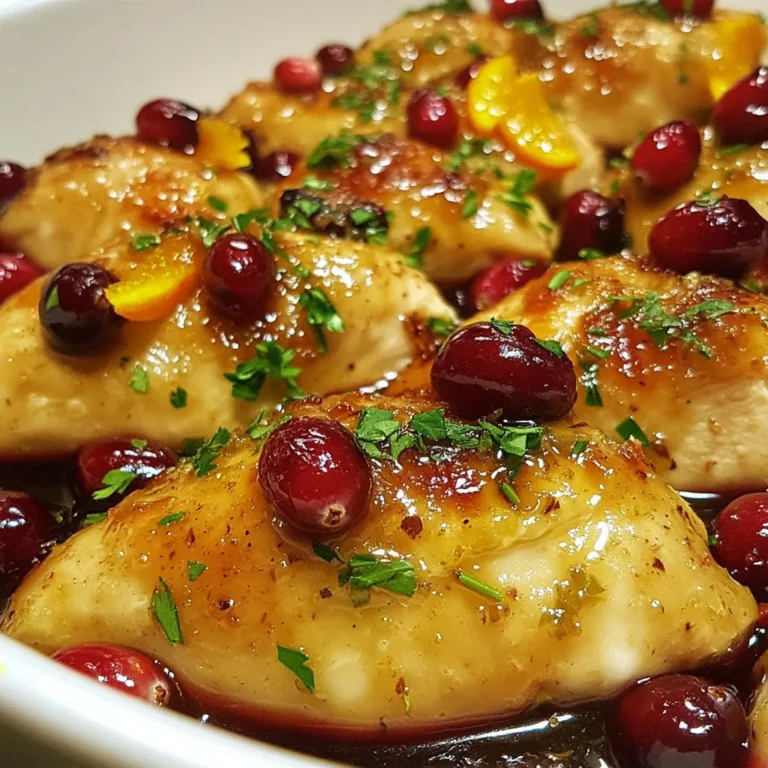
Cranberry Orange Chicken Delight Flavorful Meal Guide

- Fettuccine pasta: This is the base of your dish. It holds the sauce well. Use 8 oz for four servings. - Ground beef: You need 1 lb of ground beef for a rich flavor. It adds protein and heartiness. - Dairy products: Heavy cream, cheddar cheese, Parmesan cheese, and cream cheese create a creamy sauce. They blend together to make a luxurious texture. - Vegetables: Use a small onion, two cloves of garlic, cherry tomatoes, half a cucumber, and green onions. They add color and crunch. - Seasonings: Italian seasoning, salt, and pepper enhance the taste. They bring out the best in every ingredient. These ingredients come together to create a delightful and comforting meal. Each one plays a key role in making Loaded Cheeseburger Alfredo a hit at your table. {{ingredient_image_1}} To cook fettuccine al dente, fill a large pot with water. Add a good amount of salt to the water. Bring it to a rolling boil. Add the fettuccine and cook according to the package directions. This usually takes about 8-10 minutes. Taste a piece to ensure it is firm but tender. When done, drain the pasta but save a cup of the pasta water. This water will help adjust the sauce later if needed. Reserving pasta water is very important. It contains starch that helps the sauce stick to the pasta. This makes your dish creamier and more flavorful. To brown the ground beef, heat a large skillet over medium heat. Add one tablespoon of olive oil to the skillet. Once hot, add the ground beef. Use a spoon to break it apart. Cook until it’s browned, which takes about 5-7 minutes. Make sure to stir it often for even cooking. Next, add diced onion and minced garlic to the skillet. Sauté these with the beef for another 3-4 minutes. The onion should turn translucent. This step adds great flavor to your dish. Now, it’s time to make the Alfredo sauce. Lower the heat to low. Add one cup of heavy cream to the skillet. Next, add softened cream cheese, shredded cheddar, and grated Parmesan cheese. Stir until everything melts and combines into a smooth sauce. Adjust the seasoning to your taste. Add one teaspoon of Italian seasoning, salt, and pepper. If the sauce feels too thick, you can add a bit of the reserved pasta water. This step ensures you get the creamy texture you want. To make sure the sauce coats the pasta well, follow these steps: - Use enough pasta water. When you drain the fettuccine, save some water. This water helps thin the sauce and make it stick to the pasta. - Combine quickly. Add the cooked pasta to the sauce while it’s hot. This keeps the sauce creamy and helps it cling to every noodle. To achieve the best flavor balance, consider these tips: - Taste as you go. Always taste your sauce before serving. Adjust the salt and pepper to fit your taste. - Add fresh ingredients at the end. Mixing in the cherry tomatoes, cucumber, and green onions at the end adds a fresh crunch and bright flavor. To make your Loaded Cheeseburger Alfredo look and taste amazing, try these garnishes: - Extra cheese. Sprinkle some more shredded cheddar on top just before serving. - Fresh parsley. A sprinkle of fresh parsley adds color and freshness. For side dishes that pair well, I suggest: - Garlic bread. It’s perfect for soaking up any leftover sauce. - A simple salad. A light green salad with a tangy dressing balances the rich pasta. These tips will help you serve a dish that impresses both in taste and looks! Pro Tips Use Quality Ingredients: High-quality cheeses and fresh vegetables enhance the flavor of your Alfredo sauce, making it richer and more delicious. Don’t Overcook the Pasta: Cook the fettuccine until al dente for the best texture. It will continue to cook slightly when mixed with the hot sauce. Adjust the Sauce Consistency: If your Alfredo sauce is too thick, gradually add reserved pasta water until you achieve your desired creaminess. Garnish for Freshness: Fresh herbs like parsley not only add color but also provide a burst of flavor that complements the dish beautifully. {{image_2}} You can change the meat in Loaded Cheeseburger Alfredo. Ground turkey gives a lighter option. Chicken also works well. Just cook it until golden brown, like the beef. For plant-based eaters, try lentils or veggie crumbles. They add great flavor and texture. To bring more heat, add a pinch of cayenne pepper or red pepper flakes. If you like sauces, drizzle hot sauce on top before serving. You can also spice things up with smoked paprika. For veggies, consider adding bell peppers or spinach. They add color and nutrition. You could even toss in some mushrooms. They bring a nice umami taste. Don't be shy; mix and match flavors! To keep your Loaded Cheeseburger Alfredo fresh, store it in an airtight container. This helps prevent moisture loss and keeps flavors intact. Let the pasta cool down before sealing it up. I recommend eating leftovers within three days for the best taste. After that, it might lose its creamy texture. When reheating, avoid the microwave if you can. Instead, use a skillet on low heat. This warms the pasta evenly and helps keep it moist. Stir in a splash of heavy cream or milk to revive the sauce's creaminess. If the sauce thickens too much, add a bit of reserved pasta water. This will bring it back to life! You can use milk and butter. Mix ¾ cup of milk with ¼ cup of melted butter. This gives a rich taste. For a lighter version, try half-and-half or coconut milk. Both options keep the dish creamy but lower the fat. Yes, you can prepare this dish in advance. Cook the pasta and store it separately. Keep the meat sauce in the fridge for up to three days. When ready to eat, warm the sauce and mix with the pasta. This saves time on busy nights. Absolutely! Kids love cheesy pasta. To please picky eaters, cut veggies smaller or skip them. You can also add more cheese for extra flavor. This dish is fun and tasty, making it a family favorite. This blog post covered everything you need to make Loaded Cheeseburger Alfredo. You learned about the key ingredients, step-by-step cooking, and clever tips. I shared ways to customize this dish with alternative proteins and flavors. Plus, I provided storage info to save your leftovers. With all these insights, you can create a tasty meal that suits your taste. Enjoy cooking and impress your family with a dish they'll love!

Loaded Cheeseburger Alfredo Creamy Pasta Delight

PREV 1 … 53 54 55 … 86 NEXT
spicy fork kitchen

explore

DessertsDinnerAppetizersDrinks

Our Policies

  • Cookie Policy
  • Copyright Policy
  • Disclaimer
  • GDPR Policy
  • Terms Of Use
Back to Top
  • About
  • Contact Us
  • Privacy Policy
© 2026 spicy fork kitchen