FREE DINNER EBOOK! Get your copy!
  • Cookie Policy
  • GDPR Policy
  • Disclaimer
  • Terms Of Use
  • Visit my other site: Fun Cookie Recipes
spicy fork kitchen
  • Home
  • Dinner
  • Desserts
  • Drinks
  • Appetizers
  • Contact
  • About
  • Privacy Policy
  • Home
  • Dinner
  • Desserts
  • Drinks
  • Appetizers
  • Contact
  • About
  • Privacy Policy
  • Cookie Policy
  • GDPR Policy
  • Disclaimer
  • Terms Of Use
Visit my other site: Fun Cookie Recipes

HOME / CATEGORIES /

Latest

To make Baked Garlic Parmesan Wings, you need the following items: - 2 pounds chicken wings - 1/4 cup olive oil - 4 cloves garlic, minced - 1/2 cup grated Parmesan cheese - 1 teaspoon garlic powder - 1 teaspoon onion powder - 1 teaspoon Italian seasoning - Salt and pepper to taste - Fresh parsley, chopped (for garnish) These ingredients come together to create a tasty and crispy wing. Using high-quality ingredients makes a big difference. I recommend fresh garlic for the best flavor. Look for good Parmesan cheese; grated or shredded works well. A quality olive oil adds richness to the marinade. Choose chicken wings that are fresh or frozen without added hormones. This ensures each bite is packed with flavor. Feel free to get creative! You can add a pinch of cayenne pepper for heat. Try lemon zest for a fresh twist. A splash of hot sauce in the marinade gives a nice kick. You can also use fresh herbs like thyme or rosemary. These will enhance the taste and make your wings even more delicious. Start by preheating your oven to 400°F (200°C). This step helps cook the wings evenly. Line a baking sheet with parchment paper. This makes cleanup easy. In a large bowl, mix together 1/4 cup of olive oil, 4 minced garlic cloves, 1 teaspoon each of garlic powder, onion powder, and Italian seasoning. Add salt and pepper to taste. Stir until well combined. Now, add 2 pounds of chicken wings to the bowl. Make sure each wing is coated with the marinade. Let the wings marinate for at least 30 minutes. This gives them a nice flavor. After marinating, arrange the wings in a single layer on the prepared baking sheet. This helps them cook well. Bake the wings in the oven for 40 to 45 minutes. Remember to flip them halfway through. This ensures both sides become golden brown and crispy. When the wings are done baking, take them out of the oven. Immediately sprinkle 1/2 cup of grated Parmesan cheese over the hot wings. The heat will melt the cheese slightly, adding a rich flavor. For a nice touch, garnish the wings with chopped fresh parsley. This not only adds color but also enhances the taste. Serve these wings hot for the best experience! To get your wings extra crispy, use a few simple tricks. First, dry the wings well with paper towels. This step helps remove moisture. Less moisture means more crispiness! Next, use a baking rack if you have one. This lets air flow around the wings, making them crisp on all sides. Lastly, bake them at 400°F. This heat ensures they cook through while getting that golden brown finish. You can easily change the flavor of your garlic Parmesan wings! For a spicy kick, add some red pepper flakes or cayenne pepper to your marinade. Want a zesty twist? Mix in lemon zest or a splash of lemon juice. You can also try different cheeses. Instead of Parmesan, use Pecorino Romano for a sharper taste. Experiment with fresh herbs like thyme or rosemary for a fresh flavor boost! Avoid these mistakes for better wings! First, don’t skip marinating. Letting the wings sit in the marinade adds flavor. Next, don’t overcrowd the baking sheet. If wings are too close, they won’t crisp up. Make sure they have space to breathe. Also, flipping them halfway is key! This ensures even cooking and browning. Lastly, remember to sprinkle the cheese while the wings are hot. This helps the cheese melt and stick nicely! {{image_2}} You can change the flavor of your wings easily. Try using smoked paprika for a smoky taste. You may also add cayenne pepper for heat. If you love herbs, mix in fresh thyme or rosemary. Lemon zest gives a bright twist. You can even swap the garlic with ginger for a new kick. Baking is great, but other methods work too. For air frying, preheat your air fryer to 380°F (193°C). Cook the wings for 25-30 minutes, shaking the basket halfway. This gives a crispy finish with less oil. Grilling is another fun option. Preheat your grill to medium heat and cook the wings for 20-25 minutes, turning them often. You get a nice char and smoky flavor. Need gluten-free wings? Use gluten-free seasonings and check your olive oil. For a dairy-free option, skip the Parmesan. Instead, try nutritional yeast for a cheesy taste. If you want lower fat, use skinless wings. You can also use tofu or cauliflower for a plant-based version. These swaps keep the flavors tasty and fun. After enjoying your Baked Garlic Parmesan Wings, store any leftovers in an airtight container. This keeps them fresh and tasty. Let the wings cool to room temperature before sealing them. You can store them in the fridge for up to three days. Make sure to separate layers with parchment paper to avoid sticking. To enjoy your wings again, preheat your oven to 375°F (190°C). Place the wings on a baking sheet lined with parchment paper. Heat them for about 10-15 minutes. This method ensures they stay crispy. You can also use a microwave, but the skin may not be as crunchy. If you choose the microwave, heat them for 1-2 minutes. If you have more wings than you can eat, freezing is a great option. Place the wings in a freezer-safe bag or container. Remove as much air as possible to prevent freezer burn. They can last up to three months in the freezer. When ready to eat, thaw them overnight in the fridge before reheating. This way, you preserve the flavor and texture. Yes, you can use frozen wings. Just make sure to thaw them first. Thawing helps the wings cook evenly. This keeps them juicy and crispy. You can leave them in the fridge overnight. If you’re in a hurry, you can use cold water to thaw them. To add spice, use hot sauce in the marinade. A tablespoon or two works well. You can also add cayenne pepper for extra heat. Adjust the amount to suit your taste. For a smoky flavor, try smoked paprika. Mix it in with the other spices. These wings pair great with a few sides. Try celery sticks and carrot sticks for crunch. A side of ranch or blue cheese dressing works well, too. You can also serve them with a fresh salad. Consider some crispy potato wedges for a hearty meal. This guide covers everything you need for baked garlic Parmesan wings. We explored essential ingredients and quality tips. You learned the step-by-step process for perfect wings. We shared tips for crispiness and flavor tricks. Variations let you customize your wings for everyone. Finally, we discussed how to store and reheat leftovers. With this knowledge, you can create tasty wings with confidence. Enjoy your cooking and eat well!

Baked Garlic Parmesan Wings Crispy Flavorful Delight

To make Cheesy Broccoli Cheddar Rice Casserole, gather these simple ingredients: - 2 cups cooked white rice - 3 cups fresh broccoli florets (steamed until tender) - 1 cup sharp cheddar cheese, shredded - 1 cup mozzarella cheese, shredded - 1 can (10.5 oz) cream of mushroom soup - 1/2 cup whole milk - 1/2 teaspoon garlic powder - 1/2 teaspoon onion powder - Salt and pepper to taste - 1/4 cup breadcrumbs - 2 tablespoons olive oil - Optional: 1/4 teaspoon red pepper flakes for heat To make this casserole, you need a few key tools: - Large mixing bowl - 9x13 inch casserole dish - Small bowl for breadcrumbs - Cooking pot for steaming broccoli - Oven for baking You can add a few extra ingredients to enhance the taste: - 1/4 teaspoon red pepper flakes for a spicy kick - Fresh herbs like parsley or thyme for freshness - A squeeze of lemon juice for brightness This recipe is easy to follow and fun to make, so don’t forget to check the Full Recipe for more details! To start, gather your ingredients. You will need cooked white rice and fresh broccoli florets. I like to steam the broccoli until it is tender. It keeps the bright color and nice crunch. Shred your sharp cheddar and mozzarella cheese. This step makes mixing easier. Next, grab your cream of mushroom soup and whole milk. You will also need garlic powder, onion powder, salt, pepper, breadcrumbs, and olive oil. If you want a kick, add red pepper flakes. In a large mixing bowl, combine the cooked rice, steamed broccoli, cream of mushroom soup, whole milk, garlic powder, onion powder, and a pinch of salt and pepper. Mix everything well. I always stir in half of both cheeses at this point. This helps the flavors blend nicely. Once mixed, transfer the mixture to a greased 9x13 inch casserole dish. Spread it evenly across the bottom. In a small bowl, mix breadcrumbs with olive oil. If you like heat, add red pepper flakes. Sprinkle this mixture over the casserole for a crunchy top. Then add the remaining cheddar and mozzarella cheese on top. Bake in a preheated oven at 350°F (175°C) for 25-30 minutes. You want the cheese to be bubbly and the breadcrumbs golden. Once done, let it cool for a few minutes. For a nice touch, garnish with fresh parsley or extra cheese before serving. Enjoy your cheesy broccoli cheddar rice casserole! For the full recipe, check the previous section. When it comes to cheese, I love using sharp cheddar. It adds a bold flavor. Mozzarella is great for creaminess and stretch. You can also mix in pepper jack for a spicy kick. Avoid pre-shredded cheese, as it contains anti-caking agents. Freshly shredded cheese melts better, giving you that perfect gooey texture. To keep your casserole moist, use enough liquid. The cream of mushroom soup and whole milk work well together. Don’t skip the cheese, as it adds moisture too. If your mixture seems dry, add a bit more milk. Bake it covered for the first 15 minutes. This helps trap steam and keeps everything nice and juicy. Spices can really elevate your casserole. Garlic powder and onion powder are my go-to choices. They add depth without overwhelming the dish. If you like heat, try adding red pepper flakes. Start with a little, then taste and adjust. Always season with salt and pepper to bring out the flavors. Don’t be afraid to experiment! {{image_2}} If you want to keep this dish vegetarian, you are in luck! The base of this casserole is already meat-free. You can use a cream of celery soup or a homemade white sauce instead of cream of mushroom soup. This swap adds a nice twist to the flavor. You can also add more veggies. Try bell peppers, carrots, or even peas. They add color and nutrients. To make this casserole gluten-free, swap the cream of mushroom soup for a gluten-free version. Many brands offer this option in stores. You can also use gluten-free breadcrumbs on top. This keeps the crunch and flavor without the gluten. Always check your cheese labels too. Most cheeses are gluten-free, but it’s best to be sure. Want to make it a meal? You can add proteins like chicken or ham. For chicken, use cooked, shredded chicken. Add about two cups to your rice and broccoli mix. If you prefer ham, diced ham works great too. Use about one to two cups, depending on how meaty you want it. Both options make the casserole heartier and more filling. For a full recipe, check out the detailed steps above! Storing leftovers from your Cheesy Broccoli Cheddar Rice Casserole is simple. First, let the casserole cool down completely. Then, transfer it to an airtight container. You can keep it in the fridge for up to three days. Make sure to cover it well to avoid drying out. To reheat, you can use the oven or a microwave. If using the oven, preheat it to 350°F (175°C). Place the casserole in an oven-safe dish. Cover it with foil to keep moisture in. Heat for about 20 minutes, or until warm. If using a microwave, place a portion in a microwave-safe bowl. Heat for 1-2 minutes, checking often to ensure it heats evenly. If you want to save your casserole for later, freezing works great. First, let it cool completely. Then, cut it into portions for easy thawing. Wrap each portion in plastic wrap, then place them in a freezer bag. This way, it can last for up to two months. When ready to eat, thaw it in the fridge overnight before reheating. Enjoy your meal anytime! For the full recipe, check out the Cheesy Broccoli Delight Casserole. Yes, you can use frozen broccoli. Just make sure to thaw and drain it first. Frozen broccoli cooks faster, so watch it closely. It can work well in this cheesy broccoli cheddar rice casserole. Using frozen broccoli saves time and effort, making this dish even easier to prepare. If you want a substitute for cream of mushroom soup, try cream of chicken soup instead. You can also blend silken tofu with vegetable broth for a vegan option. Another choice is to make a homemade white sauce with milk, butter, and flour. Each option adds its own unique flavor while keeping your casserole creamy. To make this recipe ahead of time, prepare it up to the baking step. After mixing all the ingredients, cover the dish and store it in the fridge for up to 24 hours. When ready to bake, just remove it from the fridge and let it sit for 15 minutes at room temperature. Then, bake as directed. This way, you can enjoy a warm, cheesy broccoli cheddar rice casserole without the last-minute rush. This guide covered all you need for a great casserole. We discussed essential ingredients, helpful tips, and tasty variations. You can now prepare it with confidence. Always choose the best cheese and avoid a dry dish. Make it your own with fun flavors or proteins. Store leftovers properly to enjoy later. With these steps, you’ll create a delicious meal every time. Enjoy cooking and sharing your casserole creations!

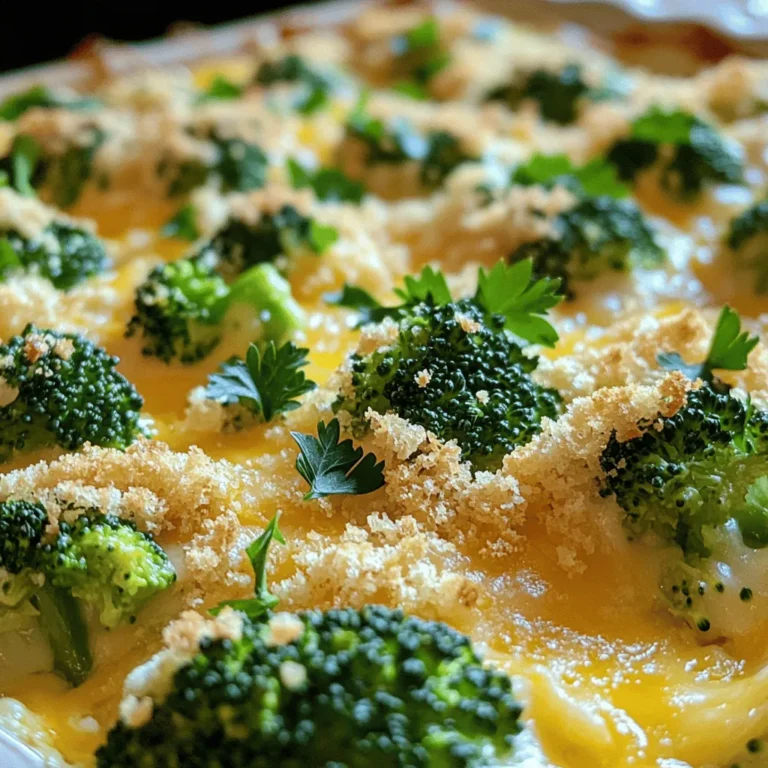
Cheesy Broccoli Cheddar Rice Casserole Delight

To make Spicy Korean Beef Bowls, you will need the following ingredients: - 1 lb (450g) ground beef - 2 cloves garlic, minced - 1 teaspoon ginger, grated - 3 tablespoons soy sauce - 2 tablespoons gochujang (Korean chili paste) - 1 tablespoon sesame oil - 1 tablespoon brown sugar - 1 cup broccoli florets - 1 carrot, julienned - 1 red bell pepper, sliced - 2 green onions, chopped - Cooked rice (white or brown, for serving) - Sesame seeds, for garnish - Optional: Kimchi, for serving These ingredients combine to create a dish that is spicy, savory, and full of flavor. The ground beef serves as a hearty base, while the gochujang adds heat and depth. Fresh veggies like broccoli, carrot, and bell pepper give color and crunch. You can adjust some ingredients based on your taste. For example, if you prefer less spice, use less gochujang. If you want more crunch, you can add more vegetables. These ingredients are easy to find in most grocery stores. You can also explore local markets for fresher options. Check out the Full Recipe for step-by-step instructions on how to put it all together. - Heat the sesame oil in a skillet. Start by pouring the sesame oil into a large skillet. Set the heat to medium-high. - Sauté garlic and ginger. Next, add the minced garlic and grated ginger. Cook them for about one minute. You want them to smell amazing. - Cook the ground beef. Increase the heat to high and add the ground beef. Cook it for about five to seven minutes. Break it up into smaller pieces as it cooks. - Mix soy sauce, gochujang, and brown sugar. In a small bowl, combine the soy sauce, gochujang, and brown sugar. Stir this well until the sugar dissolves. - Add to the cooked beef. Pour your sauce mixture over the cooked beef. Stir the beef until it is well coated. - Incorporate vegetables. Now, add the broccoli, carrots, and red bell pepper. Cook this for another three to four minutes. You want the veggies to be tender, but still crisp. - Spoon rice into bowls. Grab your cooked rice and spoon it into serving bowls. - Top with the beef and vegetable mixture. Now, add the spicy beef and veggie mix on top of the rice. - Garnish and add optional sides. Sprinkle sesame seeds over the bowl. If you like, add kimchi on the side for extra flavor. For the full recipe, check out [Full Recipe]. Enjoy your meal! To make your Spicy Korean Beef Bowls shine, start with high-quality gochujang. This Korean chili paste adds depth and heat. It has a unique flavor that makes the dish pop. Look for brands that use natural ingredients. A good gochujang will elevate your meal. Balancing spice levels is key. If you want a milder taste, use less gochujang. You can add more sugar to balance the heat. On the other hand, if you love spice, feel free to add more. Taste as you go and adjust to your liking. Browning ground beef well is essential. Use a large skillet and heat it over high heat. This helps achieve a nice brown color. Break the meat into smaller pieces while it cooks. This allows for even cooking and flavor absorption. For tender-crisp vegetables, don’t overcook them. Add broccoli, carrots, and bell peppers toward the end of cooking. Stir-fry them for just a few minutes. This keeps the veggies bright and crunchy, adding great texture. For a complete meal, pair your beef bowls with side dishes like kimchi or pickled vegetables. They add tangy flavors that complement the heat. You can also serve it with steamed edamame or a simple cucumber salad. Garnishes can enhance the dish too. Sprinkle sesame seeds on top for crunch. Chopped green onions add freshness. You can also drizzle extra sesame oil for a rich flavor. Feel free to get creative with your toppings! {{image_2}} You can easily swap out the proteins in this dish. Instead of ground beef, try ground chicken or turkey. For a meat-free option, use firm tofu. Just crumble it into the skillet for a great texture. Vegetable substitutions can also enhance this recipe. If you don't have broccoli, use snap peas or green beans. Instead of red bell pepper, try yellow or orange peppers. Feel free to mix in your favorite veggies for added color and nutrients. To make a milder version, reduce the gochujang. You can start with just one tablespoon and taste as you go. Adding a bit of brown sugar can help balance the heat too. If you want extra spice, add more gochujang or a sprinkle of red pepper flakes. A dash of hot sauce when serving can also kick things up a notch. Just remember, you can always add more heat, but it’s hard to take it away! You can serve this dish in fun ways. For a fresh twist, make lettuce wraps. Just spoon the spicy beef mixture into large lettuce leaves and roll them up. This adds crunch and is great for a low-carb option. Another idea is to turn it into noodle bowls. Use your favorite noodles, like rice noodles or soba. Simply lay the noodles in a bowl, top with the spicy beef and veggies, and enjoy. Each bite will be a delicious blend of flavors. For the full recipe, check the original ingredients and steps. To store leftover Spicy Korean Beef Bowls, let them cool first. Place the beef and veggies in an airtight container. Make sure to cover it tightly. In the fridge, these bowls last about 3 to 4 days. If you want to keep them fresh longer, consider freezing. You can freeze the cooked beef mixture. Just place it in a freezer-safe container or a zip-top bag. Remove as much air as you can. This helps prevent freezer burn. The beef will stay good for up to 3 months. When you're ready to eat, thaw it overnight in the fridge. Reheat it in a skillet or microwave until hot. Preparing ingredients in advance can save time. Chop the veggies and store them in separate containers. You can also mix the sauce and keep it in the fridge. When you want a quick meal, just cook the beef, add the prepped veggies, and mix in the sauce. This way, you can enjoy a tasty dish in no time. You can find the Full Recipe above to guide you. How long does it take to cook Spicy Korean Beef Bowls? It takes about 25 minutes to cook Spicy Korean Beef Bowls. The prep time is 10 minutes, and the cooking time is 15 minutes. This quick meal fits perfectly into busy weeknights. Can I make this recipe ahead of time? Yes, you can make this dish ahead of time. Cook the beef and veggies, then store them in the fridge. Reheat them when you're ready to eat. What can I substitute for gochujang? You can use sriracha or chili paste if you don't have gochujang. Both options provide heat but may lack the same depth of flavor. Is there a vegetarian alternative to this recipe? Absolutely! You can use plant-based ground meat or tofu instead of ground beef. The flavors will still shine through, giving you a tasty meal. Can I use a slow cooker for this recipe? Yes, a slow cooker works well for this dish. Just brown the beef first, then add all ingredients to the slow cooker. Cook on low for 4-6 hours. What’s the best way to cook ground beef? The best way to cook ground beef is to use high heat in a skillet. Break it apart with a spatula as it cooks. This makes it brown nicely and keeps it juicy. For the full recipe, check here. This blog post shared a simple recipe for Spicy Korean Beef Bowls. We covered ingredients, steps, and tips to make your dish shine. Remember to adjust spice levels for your taste. Don’t hesitate to swap ingredients for a fun twist. You can even meal prep for busy days! Enjoy making this easy recipe, knowing you can create a flavorful meal anytime. Dive into your kitchen and savor every bite you make!

Spicy Korean Beef Bowls Tasty and Easy Weeknight Meal

- 2 cans (16 oz each) refrigerated biscuit dough - 1 cup granulated sugar - 2 tablespoons ground cinnamon - 1 cup brown sugar, packed - 1/2 cup unsalted butter, melted - 2 apples, peeled, cored, and chopped - 1 cup caramel sauce - 1/2 cup chopped pecans (optional) - Granny Smith - Honeycrisp - Bundt cake pan - Mixing bowls - Whisk or fork For this recipe, I love using Granny Smith apples. They add a nice tartness. Honeycrisp apples are also a great choice. They are sweet and crisp, which balances well with the caramel. You need a bundt pan for the best shape. A mixing bowl helps you mix your sugars. Use a whisk or fork to combine the cinnamon and sugar well. All these ingredients come together to create that warm, gooey delight. You will love how simple it is to make this treat. For the full recipe, check the link for step-by-step details. - First, preheat your oven to 350°F (175°C). Grease a bundt pan with nonstick spray or butter. - Next, mix the granulated sugar and ground cinnamon in a small bowl. - Open both cans of biscuit dough and cut each biscuit into quarters. - Roll each quarter in the cinnamon-sugar mixture until fully coated. - Start by placing half of the biscuit quarters in the bottom of the bundt pan. - Add half of the chopped apples and half of the pecans if you choose to use them. - Drizzle half of the melted butter over this first layer. - Repeat this layering process. Add the remaining biscuit quarters, apples, and pecans. - Top with the rest of the melted butter. - Finally, drizzle the brown sugar evenly over the top. - Pour the caramel sauce over the entire mixture. - Bake for 35-40 minutes, or until the monkey bread turns golden brown and cooks through. - Once it’s done, let it cool in the pan for about 10 minutes. Then, invert the bread onto a serving plate. - Drizzle any remaining caramel sauce over the warm monkey bread before serving. Enjoy making this treat from the Full Recipe! To make great monkey bread, start with good biscuit dough. You want soft, fluffy dough for the best results. Avoid using old or frozen dough, as it does not cook well. When baking, fill the bundt pan to just below the rim. This keeps the dough from overflowing. If you overfill, the bread can spill over and make a mess in your oven. Drizzle the caramel sauce evenly over the layers of dough and apples. Start from the center and move outward. This ensures every piece gets some caramel. If you like a bit of crunch, add chopped pecans with the apples. They add a nice flavor and texture. Mixing them in gives a great balance to the sweetness. This monkey bread pairs well with vanilla ice cream or whipped cream. The warmth of the bread and cold ice cream is a treat. For drinks, serve it with hot apple cider or coffee. These drinks complement the sweet, warm flavors of the bread. Enjoy sharing this delicious dish with friends and family! {{image_2}} You can switch up the flavors in your monkey bread to keep things fun. One tasty option is chocolate chip caramel monkey bread. Just add a cup of chocolate chips between the layers. This twist gives a rich taste and a sweet surprise. You can also use other fruits like pears or peaches. Each fruit adds its unique flavor, making your dish fresh and exciting. If you want to make a healthier version, there are easy swaps. First, try using less sugar. You can reduce the granulated sugar by half without losing taste. Another option is to use whole grain biscuit dough. This change adds fiber and nutrients while keeping the tasty flavor intact. Seasonal ingredients can make your monkey bread special. For fall, try pumpkin spice monkey bread. Just add pumpkin puree and pumpkin pie spice to the mix. For summer, berry-infused versions are a great choice. Use fresh blueberries or strawberries for a bright, fruity twist. These seasonal variations keep your dessert exciting and delicious. For the full recipe of this delightful treat, refer to the Full Recipe section. To keep your caramel apple monkey bread fresh, choose an airtight container. This will help seal in moisture and flavor. If you plan to eat it soon, store it in the fridge. For longer storage, freezing is best. You can wrap it tightly in plastic wrap, then place it in a freezer bag. When you want to enjoy leftovers, the microwave is fast. Heat it for about 20-30 seconds. If you prefer a crispy texture, use the oven. Preheat the oven to 350°F (175°C) and warm it for about 10 minutes. This method keeps the outside crisp and the inside warm. In the fridge, your monkey bread stays fresh for about three days. Look for signs of spoilage. If you see mold or an off smell, it's best to toss it. If stored in the freezer, it can last up to three months. Just remember to check for quality before eating. Yes, you can use homemade biscuit dough. It will add a fresh taste. Just make sure the dough is soft and easy to work with. Follow the same steps for cutting and coating. The flavors will blend well with the caramel and apples. You can tell when it is done by checking the color. It should be golden brown on top. Insert a toothpick into the center. If it comes out clean, it is ready. The edges should also pull away from the pan slightly. If you don’t have a bundt pan, use a round cake pan. You can also try a regular loaf pan. Just adjust the baking time. The monkey bread might take longer to bake in a thicker pan. Yes, you can make it vegan. Use plant-based butter instead of regular butter. You can also use almond or oat milk for the caramel sauce. Look for vegan biscuit dough at the store, or make your own. Absolutely! You can double the recipe with ease. Just use two bundt pans or a larger pan. Keep an eye on the baking time. It may take a bit longer to cook through. - Check out the complete Caramel Apple Monkey Bread recipe [here](#). This blog post covered how to make delicious caramel apple monkey bread. We explored the ingredients needed, recommended apple types, and equipment. I shared step-by-step instructions and handy tips to achieve the best texture and flavor. Remember, you can easily adapt flavors or make healthier swaps. Don’t forget storage tips for leftovers, as well as answers to common questions. Dive into this fun recipe and enjoy each bite!

Caramel Apple Monkey Bread Sweet and Simple Delight

- 1 lb large shrimp, peeled and deveined - 8 oz fettuccine pasta - 3 cloves garlic, minced - 1 cup heavy cream - 1 tablespoon Cajun seasoning - 1/2 cup grated Parmesan cheese - Chopped green onions and parsley - 2 tablespoons olive oil - Salt and pepper to taste To create the best Cajun Shrimp Alfredo, focus on fresh, quality ingredients. The shrimp brings a sweet, briny flavor. I recommend large shrimp for a satisfying bite. Fettuccine pasta pairs well with the rich sauce and holds onto it nicely. Garlic adds depth to the dish. Minced garlic cooks quickly, so watch it closely. Heavy cream is essential for that luscious sauce. It gives the dish its creamy texture. Cajun seasoning adds a kick of flavor. You can find it at most grocery stores. If you like more heat, feel free to add extra. Parmesan cheese makes the sauce rich and cheesy. It melts beautifully into the cream, adding a savory note. For garnish, I love using green onions and parsley. They add color and freshness to the plate. Olive oil is important for sautéing the shrimp. It helps them cook evenly. Don’t forget salt and pepper to enhance all the flavors. You will find the complete recipe in the [Full Recipe] section. Enjoy cooking this delicious meal! - Bring salted water to a boil. - Cook fettuccine al dente and drain. Cooking pasta is the first step. Make sure to use enough salt in the water. This adds flavor to the pasta. I love fettuccine for its wide shape. It holds sauce well, giving every bite a creamy taste. After cooking, save a bit of pasta water. It helps later to adjust the sauce's thickness. - Toss shrimp with Cajun seasoning. - Sauté shrimp in olive oil until pink and opaque. Next, season your shrimp. Toss them in a bowl with Cajun seasoning. Make sure they are well coated. This spice gives a bold flavor that I find irresistible. Heat olive oil in a large skillet. Add the shrimp and sauté them for 2-3 minutes. They should turn pink and opaque. Remove them from the skillet and set aside. - Sauté garlic until fragrant. - Add heavy cream and simmer to thicken. - Stir in Parmesan cheese for creaminess. Now, let’s make the sauce. In the same skillet, add minced garlic. Sauté it for about 30 seconds until fragrant. This step fills the kitchen with a wonderful smell. Pour in the heavy cream and stir. Let it simmer for 2-3 minutes. This thickens the sauce nicely. Then, reduce the heat and mix in the grated Parmesan cheese. Stir until the cheese melts, making the sauce creamy. - Toss cooked shrimp and fettuccine with sauce. - Season and garnish before serving. Finally, combine everything. Add the cooked shrimp and fettuccine to the skillet. Toss them together with the sauce. If the sauce seems too thick, add some reserved pasta water. This step makes sure every piece of pasta is coated. Season with salt and pepper to taste. Garnish with chopped green onions and parsley before serving. This adds color and freshness, making your dish look beautiful. For the full recipe, check the earlier section. To make the best Cajun shrimp, avoid overcooking. Cook shrimp just until they turn pink and opaque. This keeps them tender and juicy. You can adjust the Cajun seasoning based on your taste. If you want it spicier, add more seasoning. If you prefer milder flavors, start with less. Use high-fat cream for the richest sauce. Heavy cream gives a thick and smooth texture. If the sauce is too thick, reserve pasta water. Add a little at a time until you reach your desired creaminess. This simple trick can change the whole dish! Serve your dish in a bright, colorful bowl. This makes the food pop and look inviting. Top with extra Parmesan cheese and fresh parsley. A sprinkle of green adds beauty and freshness. You can also place a few whole shrimp on top. This creates an elegant look for your meal. For the full recipe, check the link above! {{image_2}} Cajun Shrimp Alfredo is great on its own, but you can make it your own. Here are some fun ways to change it up. - Increase Cajun seasoning for more heat. This adds a strong flavor. - Add diced jalapeños for an extra kick. This brings in fresh spice and crunch. - Substitute shrimp with chicken or sausage. Both add nice flavors and textures. - Use tofu for a vegetarian option. It soaks up the sauce well and is filling. - Incorporate bell peppers or spinach. They add color and nutrients. - Serve with a side of garlic bread or salad. Both pair well with this creamy dish. Feel free to explore these options to make your meal unique! Check out the Full Recipe for more ideas. To keep your Cajun Shrimp Alfredo fresh, store it in an airtight container in the fridge. This method keeps the flavors intact. You can enjoy your leftovers for up to 3 days. Just remember, the sooner you eat, the better the taste! Reheating is simple. You can use a microwave or heat it in a skillet. If it seems dry, add a splash of cream or some pasta water. This trick helps bring back the creamy texture you love. If you want to save some for later, freeze it in portions. This dish can last for up to a month in the freezer. When you're ready to enjoy it again, thaw it overnight in the fridge. Then, reheat as usual. Your Cajun Shrimp Alfredo will taste almost as good as fresh! Cajun Shrimp Alfredo is a rich and creamy pasta dish. It combines fettuccine and shrimp with a spicy twist. The shrimp gets coated in Cajun seasoning, which adds warmth and depth. The sauce is made with heavy cream and Parmesan cheese, making it smooth and luscious. Each bite is a blend of heat and comfort, perfect for a cozy dinner. Yes, you can prepare Cajun Shrimp Alfredo ahead of time. Cook the pasta and shrimp separately, then store them. Keep the sauce in a different container. When you’re ready to eat, combine everything in a skillet. You can reheat it gently over low heat. Add a splash of cream or reserved pasta water to keep it creamy. Serve Cajun Shrimp Alfredo with a simple salad for freshness. A Caesar salad pairs well with the creamy pasta. Garlic bread is perfect for soaking up the sauce. For wine, a crisp Chardonnay complements the dish nicely. You can also try a light Pinot Grigio for a refreshing balance. Cajun Shrimp Alfredo combines tender shrimp, creamy sauce, and flavorful pasta. You learned the key ingredients, step-by-step cooking, and helpful tips. With simple adjustments, you can customize spice levels, swap proteins, or add vegetables. Store leftovers easily for tasty meals later. Enjoy sharing this dish with friends or family. Make it yours and savor the flavor!

Cajun Shrimp Alfredo Simple and Creamy Delight

- 1 cup green or brown lentils, rinsed - 3 large carrots, diced - 1 onion, diced - 3 cloves garlic, minced - 1 inch fresh ginger, grated - 4 cups vegetable broth - 2 tablespoons soy sauce (or tamari for gluten-free) The core of this soup lies in the lentils, carrots, onion, garlic, and ginger. Lentils bring protein and fiber. Carrots add sweetness and color. The onion, garlic, and ginger create a strong, aromatic base. You’ll also need vegetable broth for depth and soy sauce for umami. - 1 tablespoon sesame oil - 1 tablespoon chili paste (adjust to taste) - 1 teaspoon ground cumin - 1 tablespoon sesame seeds (toasting recommended) - Fresh cilantro, for garnish - Lime wedges, for serving To spice things up, sesame oil adds a rich, nutty flavor. Chili paste gives it heat. Ground cumin adds warmth. Toasted sesame seeds provide crunch. Fresh cilantro brightens up the soup, while lime wedges add a zesty finish. - Tamari instead of soy sauce for gluten-free - Add more veggies like spinach or bell peppers - Include other spices like turmeric or coriander You can easily adapt this recipe. Swap soy sauce for tamari to keep it gluten-free. Add spinach or bell peppers for extra nutrients. Spice it up with turmeric for an earthy taste or coriander for a hint of citrus. {{ingredient_image_1}} First, grab a large pot and heat one tablespoon of sesame oil over medium heat. Once the oil is warm, add one diced onion and three diced carrots. Sauté these for about five to seven minutes. You want the onion to turn translucent. This step builds a strong base for our soup. Next, add three minced garlic cloves and one inch of grated ginger. Cook for one more minute. This will make your kitchen smell amazing. Now it's time to bring in the lentils. Add one cup of rinsed green or brown lentils to the pot. Pour in four cups of vegetable broth and two tablespoons of soy sauce. For extra heat, add one tablespoon of chili paste. If you like, you can adjust this later. Finally, mix in one teaspoon of ground cumin. Stir everything well. Bring the mixture to a boil. Once boiling, lower the heat and let it simmer for 25 to 30 minutes. This allows the lentils to cook until tender, and the soup will thicken nicely. After simmering, taste your soup. Add salt and pepper as needed. If you want a creamier soup, use an immersion blender. Blend just a bit to keep some chunks for texture. Toast one tablespoon of sesame seeds in a dry skillet over medium heat. This takes about two to three minutes. Watch them closely, as they can burn easily. Serve your soup hot. Garnish it with toasted sesame seeds, fresh cilantro, and a lime wedge for a zesty finish. Enjoy your flavorful comfort dish! To get the spice just right, use chili paste. Start with one tablespoon. Taste the soup, then add more if you like it hotter. Remember, spice builds up, so add a little at a time. For the right soup thickness, watch your liquid. If it feels too thick, add more broth. If it’s too thin, let it simmer longer. Using an immersion blender can help create a creamy texture. Blend part of the soup, but leave some chunks for texture. You can boost the flavor with other spices. Try adding smoked paprika for a smoky taste. A pinch of cayenne can also add heat. Fresh herbs like basil or parsley can brighten the soup. Just toss them in before serving for a fresh flavor. Pair this soup with crusty bread for a hearty meal. A simple green salad on the side adds freshness. You can also serve it with rice for a filling option. Lime wedges make a great garnish too. Squeeze some lime juice over the soup right before eating for extra zing. Pro Tips Use Fresh Ingredients: Fresh carrots and ginger will elevate the flavor of your soup, providing a vibrant taste and aroma. Adjust the Heat: The chili paste can be adjusted to your spice preference. Start with less and add more as needed to suit your taste. Texture Variation: For a more textured soup, blend only half of the mixture. This adds creaminess while keeping some hearty chunks. Store Leftovers Properly: Store any leftover soup in an airtight container in the fridge for up to 3 days, or freeze for longer storage. {{image_2}} You can easily make this soup gluten-free. Use tamari instead of soy sauce. Tamari tastes similar but has no wheat. This swap keeps the flavor intact while accommodating gluten-free diets. Feel free to mix it up with different vegetables. Try adding spinach, kale, or bell peppers. You can also use other legumes, like chickpeas or black beans. These changes can add new textures and flavors to your soup. Spice lovers can turn up the heat. Add more chili paste or fresh chopped chili. If you prefer a milder soup, reduce the chili paste. You can also add herbs like cilantro or basil. These herbs can brighten the soup and give it a fresh taste. To keep your Spicy Sesame Carrot Lentil Soup fresh, follow these steps: - Cool the Soup: Let it cool down to room temperature. - Use Airtight Containers: Store the soup in clean, airtight containers to avoid spills. - Refrigerate: Place the containers in the fridge. This keeps the soup fresh for later. - Freezing Option: You can freeze the soup too! Use freezer-safe bags or containers. Just leave some space for expansion. When you want to enjoy your soup again, follow these tips: - Stovetop Method: Pour the soup into a saucepan over medium heat. Stir it often. Heat until it’s hot throughout. - Microwave Method: Use a microwave-safe bowl. Heat in short bursts, 1-2 minutes at a time. Stir in between to heat evenly. - Don’t Overheat: Avoid boiling. High heat can change the flavor and texture. When stored properly, your soup can last: - In the Fridge: About 3 to 5 days. - In the Freezer: Up to 3 months. Label your containers with the date. This helps you keep track of freshness. Enjoy your soup at its best! You can use several options instead of lentils. Chickpeas or black beans work well. Quinoa or barley can also add great texture. Each substitute will change the flavor slightly, but they will still create a tasty soup. If you choose grains, reduce the cooking time since they cook faster. Yes, you can make this soup ahead of time. It stores well in the fridge for up to three days. To meal prep, let the soup cool completely. Then, transfer it to an airtight container. You can also freeze the soup for up to three months. Just thaw it in the fridge before reheating. To make the soup spicier, add more chili paste. Start with a teaspoon more, then taste. You can also add red pepper flakes for extra heat. If you want a different flavor, try adding sliced jalapeños or fresh hot peppers. Just be careful not to overpower the other flavors in the soup. This blog post covers a delicious soup made with lentils, veggies, and tasty spices. You learned how to sauté, simmer, and enhance flavors while keeping dietary needs in mind. From storing leftovers to making swaps, the tips make sure your soup shines. Remember, you can adjust the spice and add herbs to create your perfect bowl. Experiment and enjoy your cooking journey!

Spicy Sesame Carrot Lentil Soup Flavorful Comfort Dish

- 1 cup unsalted butter - 1 ½ cups granulated sugar - 1 cup brown sugar - 4 large eggs - 1 teaspoon vanilla extract - 1 ½ cups all-purpose flour - 1 cup unsweetened cocoa powder - 1 teaspoon baking powder - ½ teaspoon salt - 1 cup mini marshmallows - 1 cup graham cracker crumbs - ½ cup semi-sweet chocolate chips - ½ cup milk chocolate bars Gather these ingredients before you start baking. The butter adds richness. Sugar gives sweetness, while brown sugar adds moisture. Eggs bind everything together. Vanilla adds a warm note. Flour and cocoa powder form the base. Baking powder helps the bars rise. Salt balances the sweetness. Mini marshmallows create that classic s'mores flavor. Graham cracker crumbs add crunch, and the chocolate chips bring extra sweetness. You can use different chocolates if you like. Dark chocolate or white chocolate can work too. The fun is in mixing flavors to suit your taste. Enjoy picking the best ingredients for your S’mores Brownie Bars! {{ingredient_image_1}} 1. Preheating the oven: Start by turning your oven to 350°F (175°C). This temperature helps the brownies bake evenly. 2. Lining the baking dish with parchment paper: Grab a 9x13-inch baking dish. Line the bottom and sides with parchment paper. Let the paper hang over the edges. This will make it easy to lift the brownies out later. 1. Combining wet ingredients: In a large bowl, mix melted butter, granulated sugar, and brown sugar. Whisk until everything is blended. 2. Incorporating dry ingredients: In another bowl, sift together the flour, cocoa powder, baking powder, and salt. Slowly add this mix to the wet ingredients. Stir gently until just combined. 3. Adding graham cracker crumbs and chocolate chips: Fold in graham cracker crumbs and chocolate chips. Make sure they are evenly spread through the batter. 1. Layering the brownie batter: Pour half of the brownie batter into your lined baking dish. Spread it out evenly using a spatula. 2. Adding marshmallows and chocolate: Sprinkle mini marshmallows and chopped milk chocolate bars over the first layer. Add half of the remaining graham cracker crumbs on top. 3. Topping with remaining brownie batter: Pour the rest of the brownie batter over the marshmallows and chocolate. Spread it out gently, covering everything. 1. Baking time and temperature: Place the dish in the oven. Bake for 25-30 minutes. 2. Testing for doneness: To check if they are done, insert a toothpick into the center. It should come out with moist crumbs. Remember, it might not be clean because of the gooey marshmallows. To make your S’mores Brownie Bars even more delicious, add extra marshmallows. You can layer them on top or mix them into the batter. This gives a gooey texture and sweet taste. Try different types of chocolate too. Use dark chocolate for a rich flavor or white chocolate for a sweet twist. Mixing these chocolates can create a fun flavor blend. Prevent overmixing your batter. Mix just until the dry ingredients blend in. Overmixing can make the brownies tough. Cool the brownies properly for the best texture. Let them sit in the pan for about 15 minutes. Then, transfer them to a wire rack. Cooling helps them set and makes cutting easier. Get creative with toppings! Try drizzling caramel sauce or chocolate syrup on top. You can also add crushed graham crackers for crunch. Pair these bars with ice cream. Vanilla or caramel ice cream works great. The cold ice cream balances the warm, gooey brownies perfectly. Pro Tips Use Room Temperature Eggs: Allow your eggs to come to room temperature before mixing. This helps create a smoother batter and improves the overall texture of the brownies. Don’t Overmix: When combining the dry and wet ingredients, mix until just combined. Overmixing can lead to dense brownies instead of the desired fudgy texture. Let Them Cool: Allow the brownies to cool completely in the pan before cutting. This helps them set up properly, making it easier to achieve clean cuts. Customize Toppings: Feel free to experiment with different toppings like peanut butter chips, butterscotch chips, or even a sprinkle of sea salt for added flavor. {{image_2}} You can make these S’mores Brownie Bars gluten-free. Use gluten-free flour instead of all-purpose flour. This swap keeps the bars tasty and chewy. Be sure to check your flour blend. Some blends work better than others for baking. If you want a vegan version, it’s easy! Replace the eggs with flaxseed meal. Mix one tablespoon of flaxseed meal with three tablespoons of water. Let it sit for a few minutes until it thickens. For dairy-free options, use coconut oil instead of butter. Choose dairy-free chocolate chips too. Want to add a twist? You can mix in nuts like walnuts or pecans. They add a nice crunch. You can also add different candies or even peanut butter chips. Try adding a pinch of cinnamon for a warm flavor. The options are endless! To keep your S’mores brownie bars fresh, store them in an airtight container. This helps lock in moisture. You can keep them at room temperature for up to three days. If you want them to last longer, refrigerate them for up to a week. For the best results, layer parchment paper between the bars. This prevents them from sticking together. A glass container works great as it keeps the bars soft while letting them breathe. If you want to save some for later, freezing is a great option. First, cut the bars into pieces. Wrap each piece in plastic wrap. Then, place the wrapped bars in a freezer-safe bag. Make sure to remove as much air as possible. This keeps them from getting freezer burn. You can freeze them for up to three months. When you want to enjoy them again, take the bars out and let them thaw in the fridge overnight. You can also let them sit at room temperature for a couple of hours. Either way, they will taste just as good! You can check if your S’mores Brownie Bars are done by using a toothpick. Insert it into the center of the bars. If it comes out with some moist crumbs, they are ready. The toothpick may not come out clean due to the gooey marshmallows. Keep an eye on the time as you bake them for 25-30 minutes. Yes, you can make S’mores Brownie Bars ahead of time. They taste great even after a day or two. Just let them cool completely, and store them in an airtight container. This way, they remain fresh and tasty. You can also freeze them for longer storage. Just remember to wrap them well. You can get creative with your toppings! Here are some fun ideas: - Whipped cream - Chocolate sauce - Caramel sauce - Extra mini marshmallows - Crushed graham crackers These will add flavor and make your bars look extra special. S’mores Brownie Bars do not need to be refrigerated if you eat them within a few days. Just keep them in a cool place. If you want to keep them longer, then refrigerate them. Just make sure to let them come back to room temperature before serving for the best taste. You now have a complete guide to making S’mores Brownie Bars. We covered the ingredients, step-by-step instructions, and tips to get the best flavor. You learned about variations and smart storage methods. S’mores Brownie Bars offer fun twists for everyone. They are easy to make and perfect for sharing. Enjoy the rich flavors, warm textures, and happy moments they bring. Get creative with toppings and customize them to your taste. These treats will surely be a hit at any gathering!

S’mores Brownie Bars Deliciously Indulgent Treat

- Lean White Chicken I use 2 cups of cooked shredded chicken. This is the star of the dish. You can use leftover chicken or rotisserie chicken for ease. - Low-Carb Tortilla Alternatives Instead of traditional tortillas, I slice 6 large zucchinis into thin strips. These zucchini strips serve as a healthy, low-carb substitute. - Flavor Enhancers I blend in 1 cup of softened cream cheese, 1/2 cup of Greek yogurt, and 1 can of green chilies. These add creaminess and a kick of flavor. I also sprinkle in garlic powder, cumin, and onion powder to elevate the taste. {{ingredient_image_1}} - Preheating the Oven First, set your oven to 350°F (175°C). This step is key for even cooking. - Mixing the Filling In a large bowl, combine the cooked shredded chicken, softened cream cheese, Greek yogurt, and drained green chilies. Add garlic powder, cumin, onion powder, salt, and pepper. Mix well until the filling is smooth and creamy. This blend packs a lot of flavor! - Creating Zucchini Strips Next, slice the zucchini lengthwise into thin strips. You want about 12 strips to wrap the filling. These will act as your low-carb tortillas. Make them as thin as you can for easy rolling. - Layering the Dish In a 9x13 inch baking dish, spread a thin layer of chicken broth. This helps prevent sticking. It also adds moisture to the enchiladas. - Rolling the Enchiladas Take a zucchini strip and place a generous tablespoon of the chicken mixture at one end. Roll it tightly and place it seam-side down in the dish. Repeat this until you use all the filling and zucchini strips. This process makes each bite delicious. - Baking Instructions Pour any leftover chicken broth over the rolled enchiladas. Sprinkle the remaining Monterey Jack cheese on top. Cover the dish with aluminum foil and bake for 20 minutes. After that, remove the foil and bake for another 10 minutes. You want the top to be golden and bubbling. When done, let it cool for a few minutes before serving. Garnish with fresh cilantro for a nice touch. - Suggested Spices and Herbs I love adding spices to my enchiladas. Try using smoked paprika for a warm touch. You can also add dried oregano for a hint of earthiness. Fresh cilantro makes a great garnish too. It adds color and flavor. Don't be shy with salt and pepper; they boost the taste nicely. - Tips for Creaminess To make your filling extra creamy, ensure your cream cheese is softened. This helps it blend well with the chicken and yogurt. If you want more richness, mix in some sour cream. It enhances the texture and flavor. - Baking Alternatives If you don’t want to bake, try cooking these on the stovetop. Use a large pan and cover it. Cook on low heat until the cheese melts. It’s a quick and easy way to enjoy them too. - Temperature and Timing Tips Always preheat your oven to 350°F (175°C). This helps your enchiladas cook evenly. Cover them with foil for the first 20 minutes. This keeps them moist. Then, uncover for the last 10 minutes to get that nice, golden top. Check them to make sure they don’t overcook. Pro Tips Use Fresh Zucchini: Opt for firm, fresh zucchini to ensure they hold their shape while baking and provide a nice texture for your "tortillas". Experiment with Cheese: Feel free to mix different types of cheese like Pepper Jack or Cheddar for a unique flavor profile. Make Ahead: Assemble the enchiladas ahead of time and refrigerate them for up to 24 hours before baking for a quick dinner solution. Garnish Generously: Add a sprinkle of fresh lime juice or diced avocado on top before serving to enhance the flavors and presentation. {{image_2}} Chicken Alternatives for Different Diets You can switch up the chicken in this dish. For a healthier twist, try turkey. It has less fat and still tastes great. If you want a plant-based option, use shredded jackfruit or tofu. Both are excellent at soaking up flavors. Cheese Choices This recipe uses Monterey Jack cheese, which melts nicely. You can use cheddar for a sharper taste. If you need a dairy-free option, try vegan cheese. Just make sure it melts well for the best texture. Making it Vegan To make these enchiladas vegan, swap chicken with chickpeas or lentils. Use a vegan cream cheese and yogurt. This keeps the creaminess and flavor intact. You can also add more veggies for a hearty filling. Gluten-Free Alternatives Zucchini works well for a low-carb tortilla. If you prefer another option, try using corn tortillas. They are naturally gluten-free. Just check the label to ensure no gluten sneaks in. To keep your low carb white chicken enchiladas fresh, follow these tips: - Refrigeration Guidelines: Store leftovers in an airtight container. They will last up to four days in the fridge. Always let the enchiladas cool down before sealing them. This keeps moisture from building up. - Freezing Instructions: If you want to save some for later, freeze them. Wrap each enchilada in plastic wrap. Then place them in a freezer-safe bag. They can last up to three months. To reheat, let them thaw in the fridge overnight. To enjoy your enchiladas again, reheat them carefully. Here are the best methods: - Oven Method: Preheat your oven to 350°F (175°C). Place the enchiladas in a baking dish. Cover them with foil to keep them from drying out. Heat for about 20 minutes or until warmed through. - Microwave Method: If you're in a hurry, use the microwave. Place a damp paper towel over the enchiladas. Heat them for one to two minutes, checking often. This keeps the texture soft. Using these storage and reheating tips helps you enjoy your low carb white chicken enchiladas even more! Can I use regular tortillas instead of zucchini? Yes, you can use regular tortillas if you prefer. However, that adds more carbs. Zucchini strips keep it low-carb and tasty. They also add great flavor and texture. How can I make the dish spicier? To spice things up, add jalapeños or diced hot peppers to the filling. You can also sprinkle cayenne pepper or chili powder into the mix. Another option is to serve with a spicy salsa or hot sauce. What can I serve as a side dish? For a great side, consider a simple salad or some avocado slices. You can also pair this dish with cauliflower rice for a low-carb option. Fresh veggies are a nice choice, too, adding crunch and color. This article walks you through making low-carb white chicken enchiladas. You learned about key ingredients, from lean chicken to low-carb tortillas. I shared step-by-step instructions, tips for flavor, and variations to suit different diets. Plus, proper storage and reheating methods were covered to keep meals fresh. Remember, feel free to adapt the recipe to your taste. Enjoy experimenting with flavors and making this dish your own!

Low Carb White Chicken Enchiladas Easy and Tasty Meal

- 2 cups fresh peaches or 2 cans of peaches in syrup - 1 cup granulated sugar - 1 tablespoon lemon juice - 1 teaspoon cinnamon - 1 box yellow cake mix - 1 cup unsalted butter, melted - ½ cup chopped pecans (optional) For a great Peach Cobbler Dump Cake, you need simple, fresh ingredients. You can use fresh peaches or canned peaches in syrup. Using fresh peaches gives a bright flavor. If you go the canned route, choose those in syrup for added sweetness. Granulated sugar sweetens the fruit. The lemon juice adds a nice tang. Cinnamon warms the dish and brings out the peach flavor. The yellow cake mix is the heart of this recipe. It creates a lovely crust on top. Melted butter makes everything rich and golden. If you like, add chopped pecans for a bit of crunch. - 9x13 inch baking dish - Mixing bowl - Measuring cups and spoons - Whisk or spoon for mixing You will need a few tools for this treat. A 9x13 inch baking dish is perfect for the cake. Grab a mixing bowl to combine your ingredients. Measuring cups and spoons help ensure you get the right amounts. A whisk or spoon will help mix everything well. With all these ingredients and tools ready, you can start creating your Peach Cobbler Dump Cake. For the full recipe, check the details above. Choosing the best peaches Look for ripe peaches. They should feel firm but slightly soft. Check for a sweet smell. The color should be vibrant and bright. Avoid peaches with bruises or dark spots. How to peel and slice peaches To peel, dip peaches in boiling water for 30 seconds. Then, place them in cold water. The skin should come off easily. Cut the peach in half, remove the pit, and slice into wedges. You can also use canned peaches, just drain them well. Combining peaches with sugar, lemon juice, and cinnamon In a large bowl, mix the sliced peaches with one cup of sugar. Add one tablespoon of lemon juice and one teaspoon of cinnamon. Stir until the peaches are well coated. Properly spreading cake mix and butter Pour the peach mixture into a 9x13 inch baking dish. Spread it evenly. Next, sprinkle the dry yellow cake mix on top. Don’t stir! Just spread it out. Finally, drizzle one cup of melted butter over the cake mix. This creates a tasty crust when baking. Oven preheating tips Preheat your oven to 350°F (175°C). This step is key for even baking. Make sure the oven reaches the right temperature before you bake. Checking for doneness Bake for 35-40 minutes. Look for a golden brown top and bubbling edges. To check, insert a toothpick in the center. If it comes out clean, it's done. Let it cool for a few minutes before serving. Enjoy with vanilla ice cream or whipped cream for a treat! For the complete recipe, check out the [Full Recipe]. One common mistake is over mixing the cake mix. This can make your dump cake dense instead of fluffy. Just spread the cake mix evenly without stirring it into the peach layer. Another mistake is skipping the pecans. Pecans add a nice crunch and flavor. If you like nuts, include them for added texture. To boost flavor, try adding a splash of vanilla extract. This simple addition makes a big difference. You can also add a pinch of nutmeg for warmth. Don't be afraid to experiment with spices like ginger or cardamom. Each spice brings its own unique taste to your cake. For the best serving experience, top your dump cake with vanilla ice cream. The cold ice cream contrasts nicely with the warm cake. You can also use whipped cream for a lighter touch. For a fun presentation, serve in individual bowls. Add a slice of fresh peach or a sprinkle of cinnamon on top. This makes your dish look even more inviting. For the full recipe, check out Peach Paradise Dump Cake! {{image_2}} You can switch up the fruit in this dump cake. Blueberries, cherries, or apples work great too. Each fruit adds a new taste and flair. You can mix different fruits for a fun twist. Picture peaches with tart cherries or juicy apples. The flavors blend well together and make each bite special. If you need gluten-free, pick a gluten-free cake mix. Many brands offer great choices. You can also use cornstarch or arrowroot to thicken the fruit. This helps keep the mix tasty and smooth. Just follow the same steps in the recipe, and you’ll have a delicious gluten-free dessert. To make this cake vegan, swap butter for coconut oil or vegan butter. Use coconut sugar or a sweetener like maple syrup in place of granulated sugar. For the cake mix, check that it’s dairy-free. You can still enjoy this dessert without animal products. Each change keeps the taste rich and sweet. For the full recipe, check out the [Full Recipe] section. To store leftovers, let your Peach Cobbler Dump Cake cool completely. Once cool, cover it tightly with plastic wrap or aluminum foil. You can also place it in an airtight container. Store it in the fridge for up to four days. This helps keep the cake moist and fresh. You can freeze the Peach Cobbler Dump Cake if you want to save it for later. Cut it into pieces and wrap each piece in plastic wrap. Then place the wrapped pieces in a freezer bag or container. Be sure to label it with the date. It can stay in the freezer for about three months. To reheat frozen pieces, remove them from the freezer. Let them thaw in the fridge overnight. Then, warm them in the oven at 350°F (175°C) for about 15-20 minutes. This helps bring back the cake's warm and delicious taste. For the best flavor and texture, enjoy your Peach Cobbler Dump Cake within four days if stored in the fridge. If frozen, it’s best to eat it within three months. After that, it may lose some taste and texture. Remember, proper storage keeps your dessert tasting great! Yes, you can prepare this cake ahead. Mix the peaches, sugar, lemon juice, and cinnamon. Place this mixture in the baking dish. You can cover it and store it in the fridge for up to a day. When you are ready, just sprinkle the cake mix and butter on top. Then bake as directed. This saves you time and keeps flavors fresh. This cake pairs well with vanilla ice cream or whipped cream. The cold creaminess balances the warm, sweet cake. You might also enjoy a drizzle of caramel sauce or a sprinkle of toasted pecans on top. These toppings add extra flavor and texture. Yes, frozen peaches work well in this recipe. Thaw them first and drain any excess liquid. This helps prevent the cake from becoming too soggy. If you use fresh peaches, make sure they are ripe and sweet for the best flavor. Absolutely! You can change the flavor by adding spices like nutmeg or ginger. You can also mix in different fruits like blueberries or raspberries. If you want a nutty flavor, try adding walnuts or almonds. Get creative and make it your own! To reheat leftovers, place a slice in the microwave for about 30 seconds. You can also warm it in the oven at 350°F (175°C) for 10-15 minutes. Cover it with foil to keep it moist. This helps maintain the cake’s texture and flavor. This blog post outlined how to create a delicious Peach Cobbler Dump Cake. We covered main ingredients, preparation tools, and step-by-step instructions. I shared tips for avoiding common mistakes and enhancing flavors. You learned about variations, storage info, and answered common FAQs. With this knowledge, you can now make your cake perfect. Enjoy the process and the tasty results!

Peach Cobbler Dump Cake Simple and Delicious Treat

To create the perfect gingerbread overnight oats, gather these key ingredients: - 1 cup rolled oats - 2 cups almond milk (or any milk of choice) - 1 tablespoon chia seeds - 1 teaspoon ground ginger - 1 teaspoon ground cinnamon - ¼ teaspoon ground nutmeg - 1 tablespoon molasses - 1 tablespoon maple syrup (adjust for sweetness) - ½ cup Greek yogurt (optional for creaminess) - ¼ cup chopped walnuts or pecans (for crunch) - Pinch of salt These ingredients work together to create a delicious, spiced flavor. The oats soak up the almond milk overnight, making them soft and creamy. Many people have different dietary needs. Here are some swaps you might consider: - Use coconut milk or soy milk instead of almond milk for a different flavor. - For a nut-free option, use oat milk or hemp milk. - Swap chia seeds with flax seeds if you prefer. - If you want to skip the Greek yogurt, try using coconut yogurt for a dairy-free option. - For a sugar substitute, consider using agave syrup instead of maple syrup. These options let everyone enjoy the oats while meeting their dietary needs. Toppings can take your gingerbread overnight oats to the next level. Here are some fun ideas: - Add a sprinkle of extra cinnamon or nutmeg for more spice. - Top with additional chopped walnuts or pecans for more crunch. - A dollop of whipped cream or yogurt makes it feel special. - Fresh fruit like bananas or berries can add sweetness and color. - Drizzle with extra maple syrup for a sweet touch. These toppings add flavor, texture, and a festive look to your oats. For the full recipe, check the main article! Start by gathering all your dry ingredients. You will need: - 1 cup rolled oats - 1 tablespoon chia seeds - 1 teaspoon ground ginger - 1 teaspoon ground cinnamon - ¼ teaspoon ground nutmeg - Pinch of salt In a large mixing bowl, add the rolled oats, chia seeds, ground ginger, ground cinnamon, ground nutmeg, and the pinch of salt. Mix them well using a whisk or a spoon. This step ensures that all the flavors blend together nicely. For the wet ingredients, you will need: - 2 cups almond milk (or any milk of choice) - 1 tablespoon molasses - 1 tablespoon maple syrup (adjust for sweetness) - ½ cup Greek yogurt (optional for creaminess) In a separate bowl, combine the almond milk, molasses, and maple syrup. Whisk them together until fully blended. If you want creamier oats, add the Greek yogurt now. Mix until smooth. Now, pour the wet mixture into the dry ingredients. Stir them together until everything is evenly combined. Gently fold in the chopped walnuts or pecans if you like some crunch. Once mixed, divide the mixture into individual jars or containers. Seal them with lids and place them in the refrigerator. Let them chill overnight or for at least 4-5 hours. This lets the oats absorb the liquid and soften. When morning arrives, stir the oats again. If you need a thinner consistency, add a splash of almond milk. Serve chilled, topped with nuts, a sprinkle of cinnamon, or a dollop of yogurt for extra flair. Enjoy! For the complete recipe, check the Full Recipe section. To make your oats creamy, use rolled oats. They soak up liquid better than instant oats. Adding Greek yogurt gives a rich texture. Mix it in well with the wet ingredients. If you want a lighter version, skip the yogurt. Instead, add more almond milk for creaminess. You can also try using coconut milk for a tropical twist. Taste is key when it comes to sweetness. Start with one tablespoon of maple syrup. If you like it sweeter, add more syrup. You can also switch molasses for honey or agave. For spices, use one teaspoon of ground ginger and cinnamon. Adjust these to fit your taste. A dash of nutmeg adds warmth but use it lightly. Gingerbread overnight oats are perfect for meal prep. Mix a batch in just ten minutes. Divide into jars and store in the fridge. They keep well for four to five days. On busy mornings, grab one jar and go! You can enjoy them cold or warm them up in the microwave. Add toppings like nuts or fresh fruit right before eating. For the complete recipe, refer to the Full Recipe section. {{image_2}} You can change the flavor of your gingerbread overnight oats easily. Try pumpkin spice for a warm twist. It adds nice notes of nutmeg and allspice. Or, mix in cocoa powder for a chocolate version. This gives a rich flavor and a fun look. You can even add vanilla extract for extra depth. These swaps keep your oats fun and fresh. If you need vegan options, swap the Greek yogurt for almond yogurt. Use maple syrup instead of molasses for sweetness. For gluten-free oats, make sure to choose certified gluten-free oats. These small changes let everyone enjoy this tasty dish without worry. You can still savor that gingerbread flavor while meeting your dietary needs. When serving gingerbread oats, add toppings for extra flavor and texture. Fresh fruit like sliced bananas or berries brightens the dish. Nuts like almonds or pecans give a nice crunch. You can also sprinkle on some pumpkin seeds for added nutrition. A drizzle of extra maple syrup or a dollop of yogurt can enhance the sweetness. These toppings make the oats even more delicious and fun to eat. To keep your gingerbread overnight oats fresh, use airtight containers. Glass jars work great. Make sure the lids seal tightly. This helps keep the oats moist and tasty. If you add toppings, store them separately. Gingerbread overnight oats can last up to five days in the fridge. After that, the oats may become too soggy. Always check for any signs of spoilage before eating. If it smells off or has a strange color, throw it away. You can freeze gingerbread overnight oats for up to three months. Just use a freezer-safe container. Leave some space at the top for expansion. When ready to eat, thaw in the fridge overnight. You can also warm them up in the microwave. They may need a splash of milk to regain creaminess after freezing. For the full recipe, check out the detailed instructions above. Yes, you can make Gingerbread Overnight Oats ahead of time. This recipe works best when you prepare it the night before. The oats soak up the flavors and become soft and creamy. You can make a batch for the week and store them in the fridge. Just divide them into jars or containers. This helps you grab breakfast easily. If you don’t have Greek yogurt, you can try several options. You can use regular yogurt for a similar taste. If you want a dairy-free option, go for coconut yogurt or almond yogurt. For a thicker texture, use silken tofu blended until smooth. This will add creaminess without the dairy. Each option will give a different flavor, so pick what you like! Making these oats vegan is easy. Simply skip the Greek yogurt or use a plant-based yogurt. Use almond milk or other dairy-free milk options. For sweetness, maple syrup is already vegan, so you are good with that. This way, you can enjoy a tasty and healthy breakfast that fits your diet. Check the Full Recipe for more details. In this blog post, we explored the world of Gingerbread Overnight Oats. We covered ingredients, step-by-step instructions, tips for creaminess, and fun variations. You learned how to store your oats properly for lasting flavor. Also, we answered common questions about meal prep and substitutions. These oats are a tasty and healthy choice. You can easily make them suit your needs. Enjoy your delicious creation and have fun experimenting with flavors!

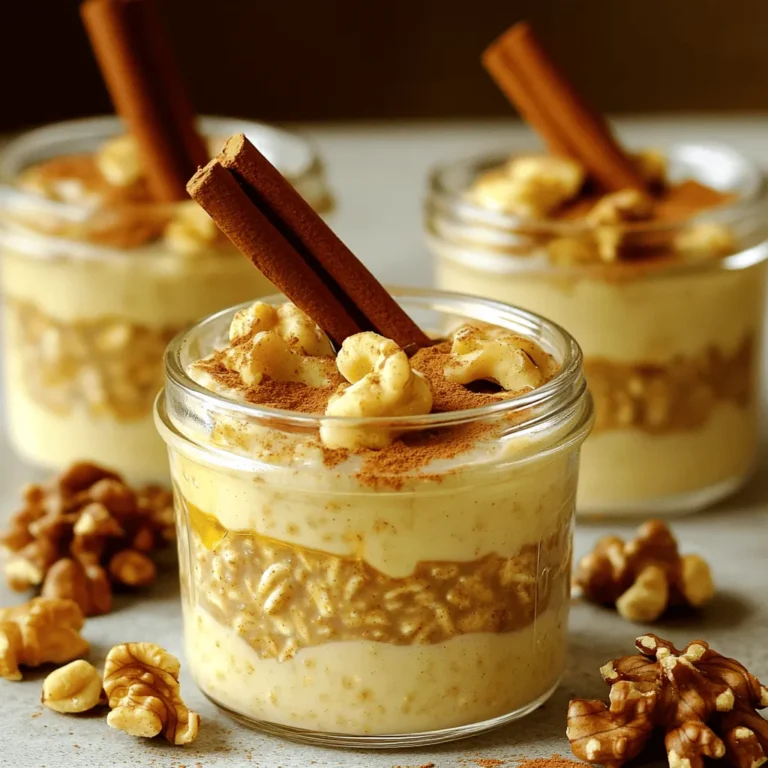
Gingerbread Overnight Oats Flavorful and Easy Recipe

PREV 1 … 51 52 53 … 86 NEXT
spicy fork kitchen

explore

DessertsDinnerAppetizersDrinks

Our Policies

  • Cookie Policy
  • Copyright Policy
  • Disclaimer
  • GDPR Policy
  • Terms Of Use
Back to Top
  • About
  • Contact Us
  • Privacy Policy
© 2026 spicy fork kitchen