FREE DINNER EBOOK! Get your copy!
  • Cookie Policy
  • GDPR Policy
  • Disclaimer
  • Terms Of Use
  • Visit my other site: Fun Cookie Recipes
spicy fork kitchen
  • Home
  • Dinner
  • Desserts
  • Drinks
  • Appetizers
  • Contact
  • About
  • Privacy Policy
  • Home
  • Dinner
  • Desserts
  • Drinks
  • Appetizers
  • Contact
  • About
  • Privacy Policy
  • Cookie Policy
  • GDPR Policy
  • Disclaimer
  • Terms Of Use
Visit my other site: Fun Cookie Recipes

HOME / CATEGORIES /

Latest

To make the best salted caramel pumpkin cookies, you need a few simple ingredients. Each one adds great flavor and texture. Here’s what you will need: - 1 cup pumpkin puree - 1/2 cup unsalted butter, softened - 1 cup brown sugar, packed - 1/2 cup granulated sugar - 1 large egg - 1 teaspoon vanilla extract - 2 1/2 cups all-purpose flour - 1 teaspoon baking soda - 1 teaspoon baking powder - 1 teaspoon ground cinnamon - 1/2 teaspoon ground ginger - 1/4 teaspoon ground nutmeg - 1/2 teaspoon salt - 1 cup salted caramel sauce (store-bought or homemade) - Sea salt flakes for topping Each ingredient plays a key role in creating a rich, warm flavor. The pumpkin puree brings moisture and a nice sweetness. The butter gives the cookies a tender crumb. Brown sugar adds depth, while granulated sugar helps them spread just right. Eggs act as a binder, and vanilla gives a warm aroma. The flour and leavening agents work together for a perfect rise. Spices like cinnamon, ginger, and nutmeg create that cozy fall vibe. Salt enhances all these flavors. Finally, the salted caramel sauce provides that dreamy finish, while sea salt flakes add a little crunch. Now you are ready to gather these ingredients and start baking. Enjoy the process and the delicious smells that will fill your kitchen! 1. Preheat the oven Set your oven to 350°F (175°C) and line a baking sheet with parchment paper. This step is key for even baking. 2. Creaming the butter and sugars In a large bowl, mix the softened butter with brown sugar and granulated sugar. Beat for 2-3 minutes until it becomes light and fluffy. This step adds air, which makes the cookies soft. 3. Mixing in wet ingredients Add the pumpkin puree, egg, and vanilla extract to the creamed mixture. Mix until everything is well combined. The pumpkin will give your cookies moisture and flavor. 4. Combining dry ingredients In another bowl, whisk together the flour, baking soda, baking powder, spices, and salt. This mix will help the cookies rise and adds warmth. 5. Folding in salted caramel sauce Gently fold the salted caramel sauce into the wet mixture. Make sure it is evenly mixed in. This is where the magic happens, adding a rich flavor to each bite. 6. Shaping and placing on baking sheet Use a cookie scoop or tablespoon to drop rounded balls of dough onto the prepared baking sheet, about 2 inches apart. Spacing is important for even baking. 7. Baking time and cooling process Bake the cookies for 10-12 minutes. The edges should be golden, while the centers may look a bit soft. Let them cool on the baking sheet for about 5 minutes before moving them to a wire rack. This helps them hold their shape while cooling. Enjoy the sweet and salty burst of flavor with each bite of these dreamy cookies! - Achieving the right texture: Start with softened butter. Cream it well with the sugars. This helps create a light, fluffy mix. Use the right amount of flour; too much makes cookies dry. The dough should be soft but not sticky. - Substituting ingredients: You can swap unsalted butter for coconut oil. If you prefer a lighter cookie, use half the brown sugar and add a bit more granulated sugar. For a richer flavor, mix in some chocolate chips or nuts. - Ensuring proper mixing techniques: Mix the wet ingredients well before adding dry ones. This helps blend flavors. When adding dry ingredients, stir gently. Overmixing can lead to tough cookies. You want to keep it light and airy. - Overmixing the dough: This can make your cookies tough. Mix just until you see no dry flour. It’s okay if the dough looks a bit lumpy. Remember, less is more. - Not measuring ingredients accurately: Use measuring cups and spoons for precision. Too much flour can dry out the cookies. Always level off dry ingredients. For liquids, use clear measuring cups to see the amount. Accurate measurements ensure delicious cookies every time. {{image_2}} You can make these cookies your own by adding nuts or chocolate chips. Nuts like pecans or walnuts add a nice crunch. Chocolate chips bring rich sweetness. Both options enhance the cookie's texture and flavor. You can also try different spices. For example, add cloves or allspice for extra warmth. You could even swap cinnamon for pumpkin pie spice. Each spice brings its own character to the cookies. If you're looking for gluten-free options, use almond flour or a gluten-free blend. These alternatives keep the cookies soft and delicious. Just make sure to check your baking powder, as some contain gluten. For vegan alternatives, replace the egg with a flaxseed meal mix. Use coconut oil instead of butter for a rich flavor. Also, make sure your caramel sauce is vegan. These swaps keep the cookies tasty and suitable for everyone. You can store your salted caramel pumpkin cookies at room temperature. Place them in an airtight container. This keeps them soft and fresh. If you want to keep them longer, you can refrigerate them. Just make sure to seal them well to prevent drying out. For even longer storage, consider freezing the cookies. Wrap them tightly in plastic wrap, then place them in a freezer bag. This helps lock in their flavor and texture. These cookies are best for about one week when stored at room temperature. In the fridge, they can last up to two weeks. If you freeze them, they can stay good for about three months. Just remember to let them thaw before enjoying. The flavors will still shine through, making them a perfect treat anytime! To make your cookies softer, use room-temperature butter. Cream it well with sugars. Add an extra egg yolk for moisture. Bake for a shorter time. Do not overbake! Check them at 10 minutes. They should look slightly underbaked. They'll firm up as they cool. Yes, you can use fresh pumpkin! Just cook and mash it first. Make sure it is smooth and not too watery. Drain extra liquid if needed. Canned pumpkin is often easier. It saves time and ensures proper texture. You can use regular caramel sauce if you want. Add a pinch of sea salt to mimic the flavor. For a healthier option, try maple syrup. It won't be as rich, but it adds sweetness. You can also make a quick homemade version with sugar and cream. This blog post covered how to make delicious pumpkin cookies. We talked about key ingredients like pumpkin puree and salted caramel. You learned step-by-step instructions for mixing and baking. I shared tips for perfecting texture and common mistakes to avoid. You also discovered cool flavor variations and storage tips. Remember, baking is all about having fun. Enjoy experimenting and make these cookies your own!

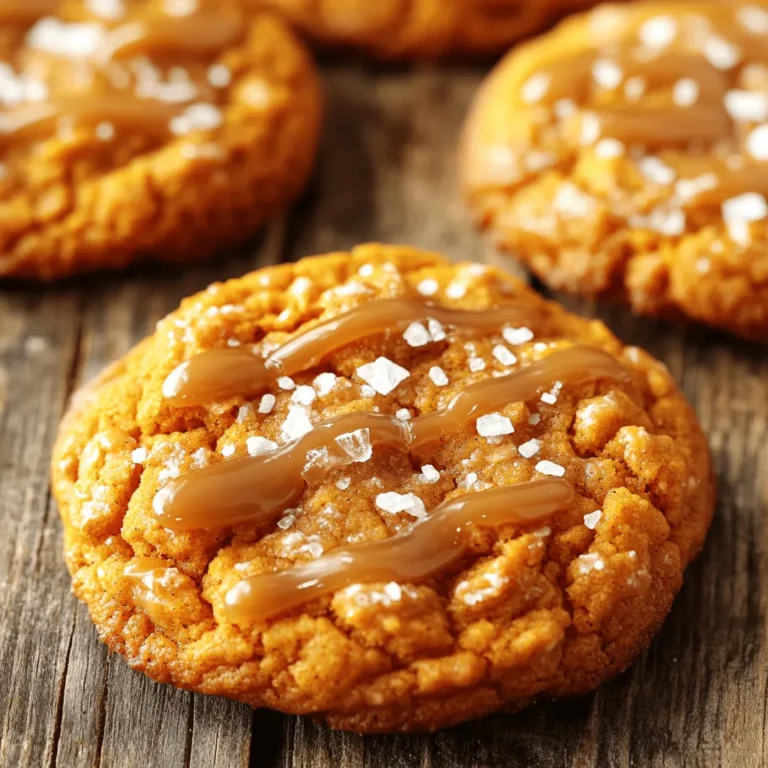
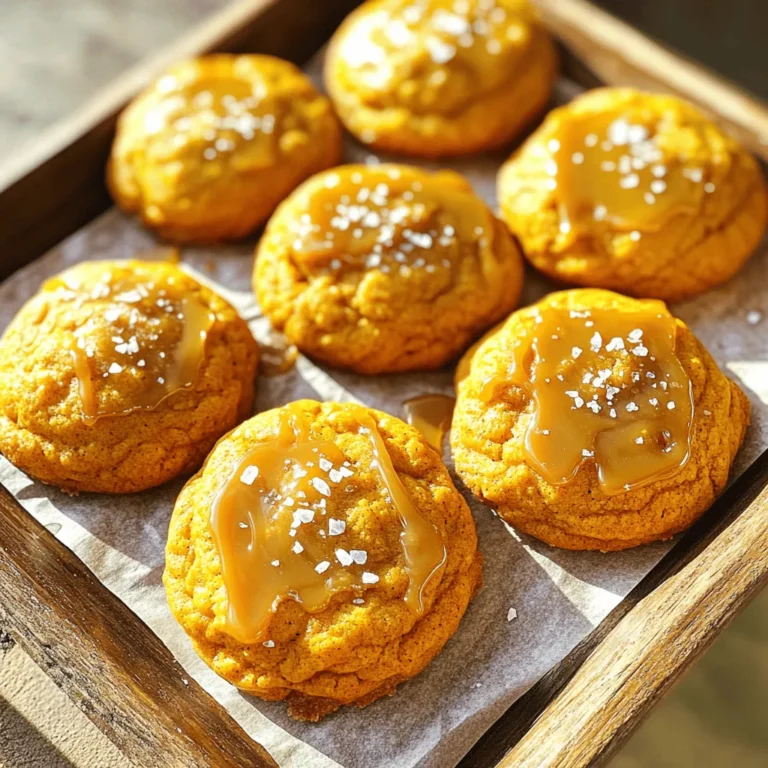
Salted Caramel Pumpkin Cookies Dreamy Fall Treat

- 2 pounds chicken wings - 4 tablespoons olive oil - 6 cloves garlic, minced - 1/2 cup grated Parmesan cheese The main ingredients are simple yet packed with flavor. Chicken wings are the star of the dish. They soak up all the seasonings well. Olive oil helps the wings crisp up nicely. Minced garlic adds a bold taste. Grated Parmesan cheese brings a rich, savory touch. - 1 teaspoon onion powder - 1 teaspoon smoked paprika - 1 teaspoon salt - 1/2 teaspoon black pepper Seasoning is key to great wings. Onion powder adds sweetness without being too strong. Smoked paprika gives a hint of smokiness. Salt enhances all the flavors, while black pepper adds a bit of heat. Each spice plays a role in creating the perfect bite. - 2 tablespoons fresh parsley, chopped (for garnish) - Hot sauce - Ranch dressing Garnishes make the dish pop. Fresh parsley adds color and freshness. Hot sauce gives a spicy kick for those who love heat. Ranch dressing offers a cool balance. These options let you customize your meal and make it more enjoyable. 1. Preheat your oven to 425°F (220°C). This step is key to crispy wings. 2. Line a large baking sheet with parchment paper for easy cleanup. 3. In a large bowl, add the chicken wings. 4. Pour in the olive oil, minced garlic, onion powder, smoked paprika, salt, and black pepper. 5. Toss the wings in the bowl until they are well coated with the mix. 1. Arrange the wings in a single layer on the prepared baking sheet. 2. Make sure they have space between them for even cooking. 3. Bake the wings in the preheated oven for 30 minutes. 4. After 30 minutes, take them out and flip each wing over. 5. Return the wings to the oven for another 15-20 minutes. 6. Look for a crispy and golden brown color. 1. Once baked, remove the wings from the oven. 2. Sprinkle the grated Parmesan cheese on top while they are hot. 3. The heat will melt the cheese slightly, adding great flavor. 4. Garnish with chopped fresh parsley for a pop of color. 5. Serve the wings hot with your choice of dipping sauces, like ranch or hot sauce. To get the best crispy wings, start with the right baking temperature. Preheat your oven to 425°F (220°C). This high heat helps the wings cook fast and turn golden. Next, avoid overcrowding your baking sheet. Lay the wings in a single layer. If they touch, they won’t crisp up well. Give them space to breathe! Marinating your wings can boost the taste. Try letting them sit with olive oil, garlic, and spices for an hour. This way, the flavors soak in deeply. You can also mix in extra spices. For a kick, add cayenne pepper or chili powder. If you love herbs, fresh thyme or rosemary works great too! When serving wings, think about what sides to pair with them. Crispy fries or a fresh salad complement the wings nicely. You can also serve some veggies like carrots and celery for crunch. And don’t forget the dipping sauces! Ranch, blue cheese, or hot sauce are perfect for dipping. They add flavor and fun to each bite! {{image_2}} You can change up the flavor of your wings easily. Adding different cheeses can create unique tastes. For a twist, try using feta or cheddar cheese. Each cheese brings its own flavor, which makes your wings more exciting. Incorporating herbs and spices can also enhance your wings. For a fresh taste, consider adding rosemary or thyme. You can also mix in a pinch of cayenne for some heat. This way, you can make the wings fit your mood or the season. If you want to try something different, use an air fryer. With an air fryer, you can make crispy wings without using much oil. Cook them at 400°F for about 25 minutes. Flip them halfway through for even cooking. Grilling is another fun option. To grill, preheat your grill to medium heat. Place the wings on the grill for about 15-20 minutes. Turn them often to get that nice char and smoky flavor. For those who need gluten-free options, this recipe is simple to adapt. Just ensure your spices and sauces are gluten-free. Most of the ingredients are naturally gluten-free. If you’re watching your salt intake, try low-sodium alternatives. Use less salt in the seasoning mix. You can also skip the Parmesan cheese or use a low-sodium cheese. This way, you keep the flavor without the extra salt. To store your leftover wings, place them in an airtight container. Make sure the wings are cool before sealing the container. This helps keep them fresh. You can store them in the fridge for up to three days. Reheat them in the oven for the best texture. This way, they stay crispy and tasty. If you want to keep the wings longer, freezing is a great option. First, let the wings cool completely. Then, spread them out on a baking sheet in a single layer. Freeze them for about two hours. Once frozen, transfer the wings to a freezer bag. Remove as much air as possible before sealing. For reheating, bake them from frozen at 400°F (200°C) for about 25-30 minutes. This will help regain their crispy texture. When stored properly, leftover wings last about three days in the fridge. In the freezer, they can last up to three months. Always check for signs of spoilage before eating. If the wings smell off or look unusual, it’s best to toss them. Enjoy your wings safe and delicious! To make your wings crispy, start with a high oven temperature. Preheat your oven to 425°F (220°C). Use a large baking sheet lined with parchment paper. Make sure to coat the wings well with olive oil and seasonings. This helps them crisp up nicely. Avoid overcrowding the baking sheet. Give each wing space to breathe. Bake for 30 minutes, flip them, then bake for another 15-20 minutes. This method ensures a golden, crispy texture. Yes, you can use frozen chicken wings. Just remember to thaw them first. It’s best to leave them in the fridge overnight. If you're short on time, you can run them under cold water. After thawing, follow the same steps in the recipe. The wings will still turn out tasty. To reheat leftover wings, use your oven for the best results. Preheat your oven to 350°F (175°C). Place the wings on a baking sheet. Heat them for about 10-15 minutes or until they are hot. If you want them crispy again, bake them a bit longer. You can also use an air fryer if you have one. It gives them a nice crunch. Absolutely! Baked Garlic Parmesan Wings are great for meal prep. You can make a large batch and store them in the fridge. Just place them in an airtight container. They last about 3-4 days. When you're ready to eat, reheat them as mentioned above. This way, you have a quick and tasty meal ready to go. For dipping sauces, ranch dressing is a classic choice. It pairs well with the garlic flavor. Blue cheese dressing is another popular option. If you like heat, try a spicy hot sauce. You can also mix honey with mustard for a sweet touch. Feel free to get creative and try your favorite sauces! Baked Garlic Parmesan Wings are easy and fun to make. We covered the key ingredients, preparation steps, and cooking tips. You learned how to achieve the perfect crispy texture and flavorful variations. Always store your leftovers properly to enjoy them later. Remember, the right dips elevate your wings. Whether you share them at a party or enjoy them alone, these wings will impress. Happy cooking!

Baked Garlic Parmesan Wings Crispy and Flavorful Treat

To make Moroccan Chicken Stew, gather these simple ingredients: - 4 boneless, skinless chicken thighs, cut into chunks - 2 tablespoons olive oil - 1 onion, diced - 3 garlic cloves, minced - 1 teaspoon ground cumin - 1 teaspoon ground coriander - 1 teaspoon ground cinnamon - 1/2 teaspoon turmeric - 1/4 teaspoon cayenne pepper (optional, for heat) - 1 can (14oz) diced tomatoes - 1 cup chicken broth - 1 cup chickpeas, drained and rinsed - 1 large carrot, sliced - 1 red bell pepper, diced - Salt and pepper to taste - Fresh cilantro, chopped (for garnish) - Lemon wedges (for serving) Herbs and spices are the heart of this stew. The cumin adds warmth. Coriander gives a hint of citrus. Cinnamon adds sweetness. Turmeric brings color and health benefits. Cayenne pepper is optional, but it adds a nice kick if you like heat. Fresh cilantro on top makes the dish bright and fresh. You can change the recipe based on what you have. If you want a veggie twist, add more carrots or bell peppers. You can also use chicken breast instead of thighs. If you like more spice, add more cayenne or some paprika. Each change can give the stew a new and exciting flavor. {{ingredient_image_1}} Start by gathering all your ingredients. You will need: - 4 boneless, skinless chicken thighs, cut into chunks - 2 tablespoons olive oil - 1 onion, diced - 3 garlic cloves, minced - 1 teaspoon ground cumin - 1 teaspoon ground coriander - 1 teaspoon ground cinnamon - 1/2 teaspoon turmeric - 1/4 teaspoon cayenne pepper (optional, for heat) - 1 can (14oz) diced tomatoes - 1 cup chicken broth - 1 cup chickpeas, drained and rinsed - 1 large carrot, sliced - 1 red bell pepper, diced - Salt and pepper to taste - Fresh cilantro, chopped (for garnish) - Lemon wedges (for serving) Make sure you chop the onion, carrot, and bell pepper. Mince the garlic too. This makes cooking easier. Heat the olive oil in a large pot over medium heat. Add the diced onion. Cook it for about five minutes. The onion should become soft. Next, stir in the minced garlic along with the spices: cumin, coriander, cinnamon, turmeric, and cayenne pepper. Cook this mix for one minute. It will smell amazing! Now, add the chicken chunks to the pot. Cook them for about five to seven minutes. You want them to brown on all sides. Pour in the diced tomatoes and chicken broth. Then, add the chickpeas, carrot, and bell pepper. Stir everything well. Bring the stew to a boil. Once it boils, lower the heat and cover the pot. Let it simmer for 30 to 35 minutes. Check that the chicken is fully cooked. After the stew is ready, season it with salt and pepper to taste. Serve the stew warm. Garnish it with fresh cilantro and lemon wedges on the side. Enjoy your meal! To boost the flavor of your Moroccan chicken stew, use fresh spices. Ground spices lose their punch over time. Toast them in the pot for a minute before adding the chicken. This step helps release their oils and enhances their taste. You can also add dried fruits like apricots or raisins for a sweet twist. They balance the spices nicely. For a thicker stew, let it simmer longer. If it gets too thick, add a splash of broth. Stir often to prevent sticking. If you prefer a lighter stew, add more broth from the start. You want the chicken to be tender and the veggies to stay vibrant. Serve your stew warm in bowls. Garnish with fresh cilantro and lemon wedges. The lemon adds a bright flavor that lifts the dish. Pair it with crusty bread or fluffy couscous. These sides help soak up the tasty sauce. Enjoy it with a side of yogurt for creaminess. Pro Tips Choose the Right Chicken: Opt for bone-in chicken thighs for more flavor and tenderness. They hold up well during cooking and absorb the spices beautifully. Spice It Up: Feel free to adjust the cayenne pepper according to your heat preference. Start with a little and add more if you like it spicier. Let It Simmer: Allow the stew to simmer longer for deeper flavors. The longer it cooks, the more the spices will meld together for a richer taste. Garnish for Freshness: Don't skip the fresh cilantro and lemon wedges. They add a bright, fresh flavor that complements the warm spices perfectly. {{image_2}} You can easily make Moroccan Chicken Stew vegetarian or vegan. Substitute chicken with hearty vegetables. Use eggplant, zucchini, or mushrooms for depth. You can also add tofu or tempeh for protein. Replace chicken broth with vegetable broth. This keeps the rich flavor and texture of the stew. Your dish stays hearty and satisfying. If you want to change the protein, consider using lamb or beef. Cut them into small pieces like chicken. You can also use fish, like cod or salmon, for a lighter option. Cook fish gently to avoid it breaking apart. Each protein brings a unique flavor to the stew. Spice up your stew with different global flavors. Add harissa for a North African kick. You can also try curry powder for a different taste. For a Mediterranean twist, mix in olives or capers. Go for fresh herbs like basil or parsley for freshness. Each variation keeps the essence of Moroccan stew while adding new layers of flavor. After cooking, let the stew cool down. Once cool, place it in an airtight container. Store it in the fridge for up to 3 days. The flavors will deepen as it sits. To freeze, use a freezer-safe container. Leave some space at the top for expansion. It can last up to 3 months in the freezer. When ready to eat, thaw it overnight in the fridge. Reheat the stew on the stove over medium heat. Stir it often to avoid sticking. You can add a splash of chicken broth to keep it moist. Heat until it’s warm all the way through. Enjoy it with fresh cilantro and lemon wedges for a bright touch! You can serve Moroccan Chicken Stew with several tasty sides. Here are my favorites: - Couscous: This fluffy grain soaks up the stew's flavors well. - Rice: A simple white or brown rice pairs nicely with the stew. - Flatbread: Soft pita or naan is great for scooping up the stew. - Salad: A fresh green salad with lemon dressing adds crunch. - Yogurt: A dollop of plain yogurt cools and balances the spices. These sides will enhance your meal and make it even better. Yes, you can use other meats in this stew. Here are some options: - Chicken breasts: They work well but may dry out. Cook them less time. - Lamb: Lamb adds rich flavor, but it needs more cooking time. - Beef: Use stew meat, but ensure it cooks until tender. - Turkey: Ground turkey or turkey thighs can be a lighter choice. Each meat will change the taste a bit, but they all fit well with the spices. Moroccan Chicken Stew lasts about 3 to 4 days in the fridge. Make sure to store it in an airtight container. Let the stew cool down before putting it in the fridge. When you want to eat it again, reheat it on the stove or in the microwave. If you want it to last longer, consider freezing it. This guide covered all you need for Moroccan Chicken Stew. We explored key ingredients, cooking steps, and helpful tips. You learned how to add your twist with variations and how to store leftovers safely. Use these insights to make your stew tasty and unique. Enjoy every bite and share it with loved ones. Happy cooking!

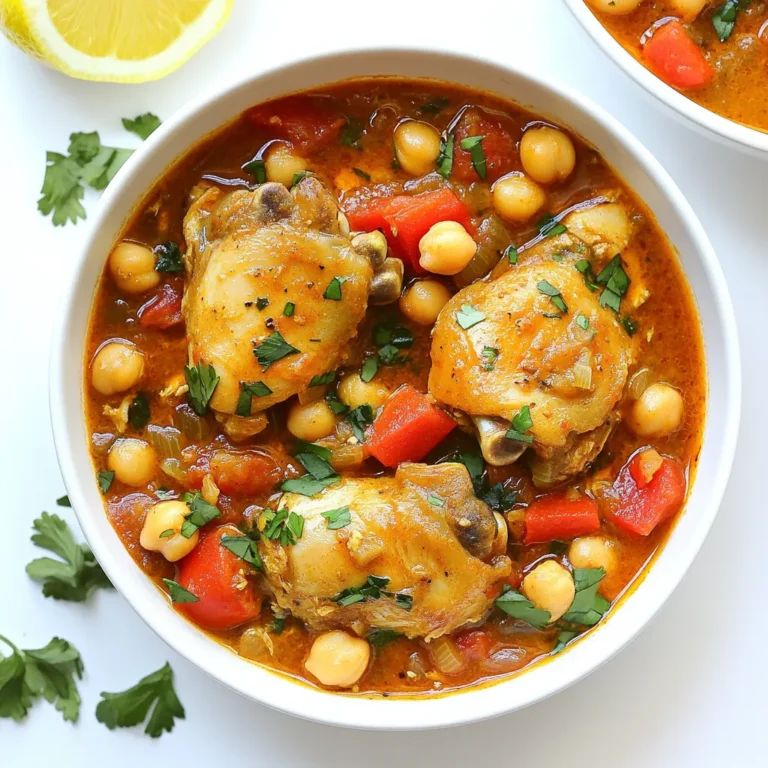
Moroccan Chicken Stew Savory and Simple Recipe

- 1 lb ground beef - 1 cup breadcrumbs - 1 small onion, finely chopped - 1 egg - 1 teaspoon garlic powder - 1 teaspoon Worcestershire sauce - Salt and pepper to taste The main ingredients for Amish Hamburger Steak Bake are simple yet hearty. Ground beef gives the dish its rich flavor. Breadcrumbs help bind the patties together as they cook. Chopped onion adds sweetness and depth. An egg acts as a binder, helping the meat hold its shape. Garlic powder adds a nice kick, while Worcestershire sauce brings complexity. Season with salt and pepper for the perfect taste. - 2 cups beef broth - 2 cups frozen mixed vegetables (carrots, peas, corn) - 1 can (10.5 oz) cream of mushroom soup - 1 tablespoon soy sauce - 1 cup shredded cheddar cheese - Fresh parsley for garnish The additional ingredients take this bake to the next level. Beef broth provides moisture and flavor. Frozen mixed vegetables add color and nutrition. Cream of mushroom soup creates a creamy sauce that holds everything together. Soy sauce enhances the umami taste. Shredded cheddar cheese on top melts beautifully, creating a delicious crust. Fresh parsley adds a pop of color and freshness when serving. {{ingredient_image_1}} First, preheat your oven to 375°F (190°C). This step warms the oven and gets it ready for baking. While the oven heats, grab a large mixing bowl. In this bowl, combine the following ingredients: - 1 lb ground beef - 1 cup breadcrumbs - 1 small onion, finely chopped - 1 egg - 1 teaspoon garlic powder - 1 teaspoon Worcestershire sauce - Salt and pepper to taste Mix these ingredients well. Use your hands or a spoon to blend them until they form a uniform mixture. Next, form the mixture into oval-shaped patties. Aim for about four patties total. Make them about an inch thick for even cooking. Set the patties aside. Now, heat a large skillet over medium heat. Add the patties to the skillet. Brown them for about 3-4 minutes on each side. They should have a nice color but don’t need to cook all the way through yet. For the sauce, mix together in a separate bowl: - 2 cups beef broth - 1 can (10.5 oz) cream of mushroom soup - 1 tablespoon soy sauce Stir this mixture until it is smooth. Now, take a large baking dish and place the browned hamburger patties in it. Pour the sauce mixture over the patties. Then, scatter 2 cups of frozen mixed vegetables on top. Cover the baking dish with aluminum foil. Place it in the oven and bake for 30 minutes. After 30 minutes, remove the foil. Sprinkle 1 cup of shredded cheddar cheese over the top. Return the dish to the oven and bake uncovered for an additional 10-15 minutes. Wait until the cheese is melted and bubbly. Once done, take it out of the oven. Let it cool for a few minutes before serving. Garnish with fresh parsley for a nice touch. To make great hamburger patties, mix the beef gently. If you mix too hard, the meat gets tough. Use your hands to combine the meat with breadcrumbs, onion, egg, and spices. Form the mixture into oval-shaped patties, about 1 inch thick. This thickness helps them cook evenly. When browning the patties, don’t cook them all the way through. Brown each side for about 3-4 minutes on medium heat. You want a nice crust but not fully cooked. This keeps them juicy later. Seasoning is key to great flavor. Start with salt and pepper, but don’t stop there. Taste the meat mixture before cooking. You can add more garlic powder or Worcestershire sauce for depth. For the broth and soup, choose a good beef broth. You can use homemade broth for richer taste. If you want a lighter flavor, chicken broth works too. The cream of mushroom soup adds creaminess and flavor. You can swap it with a different creamy soup if you like. Cheddar cheese is a must for this dish. It melts well and adds a nice sharpness. You can try other cheeses too, like mozzarella or pepper jack for a twist. Add the cheese at the right time. After baking for 30 minutes, take off the foil and sprinkle the cheese on top. Bake uncovered for another 10-15 minutes. This way, the cheese melts perfectly and gets bubbly. Pro Tips Keep It Juicy: To ensure your hamburger steaks remain moist, do not overcook them while browning. They will finish cooking in the oven. Customize Your Veggies: Feel free to swap the frozen mixed vegetables for your favorite fresh or frozen options, such as green beans or bell peppers, for a personal touch. Cheese Variations: Experiment with different types of cheese like mozzarella or pepper jack for a unique flavor twist. Make Ahead: This dish can be prepared a day in advance; simply assemble it, cover, and refrigerate until you're ready to bake. {{image_2}} You can switch up the meat in this recipe. Ground turkey or chicken works well. They keep the dish light and tasty. If you want a vegetarian option, try using black beans or lentils. You can also make it gluten-free. Use gluten-free breadcrumbs instead of regular ones. This small change keeps the dish safe for more diets. Want to boost the flavor? Add some spices like paprika or chili powder. These spices can bring warmth and depth. You might also want to add more veggies. Chopped bell peppers or mushrooms can mix nicely. They add more color and nutrition to your meal. To make a full meal, serve your dish with sides. Mashed potatoes or rice pair well with it. You could also add a fresh salad for crunch. For presentation, use a nice dish and garnish with parsley. This adds a lovely green touch and makes it look special. To store leftovers, cool the dish first. Place it in an airtight container. This helps keep the flavors fresh. You can store it in the fridge for up to three days. When you want to eat it, check for any signs of spoilage. To freeze this dish, let it cool completely. Then, place it in a freezer-safe container. You can also use freezer bags. Be sure to label it with the date. For the best quality, eat it within three months. When ready to eat, thaw it in the fridge overnight before reheating. To reheat, use the oven or microwave. If using the oven, preheat to 350°F (175°C) and bake for about 20 minutes. Cover it with foil to keep moisture in. For the microwave, heat in short bursts, stirring in between. This keeps the texture nice and moist. What is Amish Hamburger Steak Bake? Amish Hamburger Steak Bake is a cozy, one-dish meal. It features ground beef patties baked with a creamy sauce and mixed veggies. This dish is hearty and full of flavor. Can I make this dish ahead of time? Yes, you can make this dish ahead of time. Prepare the patties and layer them in the dish. Cover and store in the fridge. Bake it when you are ready to eat. How can I customize this recipe? You can customize this recipe easily. Add different vegetables or change the cheese type. You can also spice it up with herbs or sauces you enjoy. Can I use fresh vegetables instead of frozen? Yes, fresh vegetables work well in this dish. Just chop them into small pieces. Adjust the cooking time if needed, as fresh veggies may cook faster. Is it necessary to brown the patties? Browning the patties adds flavor. It creates a nice crust and seals in juices. However, you can skip this step if you're short on time. What can I use in place of cream of mushroom soup? You can use other cream soups, like chicken or celery. For a healthier choice, try a homemade cream sauce. Just mix cream with spices and a bit of broth. What sides go best with this dish? This dish pairs great with mashed potatoes or a fresh salad. You can also serve it with bread to soak up the sauce. Is this dish freezer-friendly? Yes, this dish freezes well. Just make sure it cools completely before freezing. Store it in an airtight container to keep it fresh. How should leftovers be reheated? Reheat leftovers in the oven for best results. Use a low temperature to warm it up evenly. You can also use the microwave but be careful not to overcook. You now know the key ingredients and steps to make Amish Hamburger Steak Bake. With tips on flavor, texture, and even variations, you can create a dish your family will love. Remember to store leftovers properly to keep them fresh. This recipe allows for easy changes, so feel free to get creative. Enjoy this hearty meal that is both tasty and satisfying. Cooking can be fun and rewarding, and this dish proves it!

Amish Hamburger Steak Bake Hearty Family Favorite

Here’s what you need for your Chocolate Covered Strawberry Brownies. Gather these items for a great treat: - 1 cup unsalted butter, melted - 2 cups granulated sugar - 1 cup brown sugar, packed - 4 large eggs - 2 teaspoons vanilla extract - 1 cup all-purpose flour - 1 cup unsweetened cocoa powder - 1 teaspoon baking powder - 1/2 teaspoon salt - 1 cup fresh strawberries, hulled and quartered - 1 cup semisweet chocolate chips - Additional strawberries for topping These ingredients blend together to create rich, fudgy brownies with bursts of fresh strawberry flavor. The mix of sugars adds sweetness, while the cocoa gives a deep chocolate taste. Fresh strawberries make each bite special. You will love the chocolate chips that melt into gooey pockets. Make sure you use fresh strawberries for the best flavor. They bring a nice contrast to the rich brownies. Grab these items, and let's make something amazing! - Preheat your oven to 350°F (175°C). - Grease a 9x13 inch baking pan or line it with parchment paper. - In a large bowl, combine melted butter, granulated sugar, and brown sugar until smooth. - Add the eggs, one at a time, and whisk well. Then add the vanilla extract. - Sift together the flour, cocoa powder, baking powder, and salt in another bowl. - Gradually mix the dry ingredients into the wet mixture until just combined. - Fold in the quartered strawberries and chocolate chips. Make sure they are evenly spread throughout the batter. - Pour the brownie batter into the prepared pan and spread it out evenly. - Bake in the preheated oven for 25-30 minutes. Check with a toothpick; it should come out with a few moist crumbs. - Once baked, let the brownies cool before decorating. - Melt more chocolate chips in a microwave-safe bowl. Do this in 30-second intervals, stirring until smooth. - Drizzle the melted chocolate over the cooled brownies. Top with whole strawberries for decoration. - Allow the chocolate to set before cutting the brownies into squares. To avoid overbaking brownies, watch the time closely. Set a timer for 25 minutes. Check with a toothpick. If it comes out with moist crumbs, your brownies are done. If it’s wet, bake a few more minutes. Perfecting the brownie texture is all about mixing. Don’t overmix the batter once you add the dry ingredients. This keeps the brownies soft and chewy. You want them to be a little fudgy, not cake-like. Drizzling chocolate on your brownies is easy. Melt some chocolate chips in the microwave. Use a spoon to drizzle it over the brownies. You can also use a piping bag for more control. For more strawberries, slice some fresh ones and place them on top. You can also chop them and mix them into the batter. They add a lovely flavor and color to your brownies. Pairing your brownies with ice cream makes a great dessert. Vanilla ice cream is a classic choice. The cold ice cream balances the warm brownies perfectly. You can also add whipped cream for a light touch. This adds a nice, airy feel and looks beautiful on the plate. Serve with a drizzle of chocolate for an extra treat. {{image_2}} You can add fun twists to your brownies. Try adding nuts like walnuts or pecans. The nuts give a nice crunch and pair well with chocolate and strawberries. If you want a more intense flavor, use dark chocolate instead of semisweet. Dark chocolate has a rich taste that complements the strawberries perfectly. Making gluten-free chocolate covered strawberry brownies is easy. Just swap the all-purpose flour for a gluten-free blend. Many blends work well and taste great! If you want a healthier option, try low-sugar alternatives. You can use sugar substitutes like stevia or monk fruit. These swaps let you enjoy brownies without the extra sugar. To keep your brownies fresh, use an airtight container. This helps seal in moisture. Place a piece of parchment paper between layers to avoid sticking. Chocolate covered strawberry brownies last about 3 to 5 days at room temperature. If you store them in the fridge, they can last up to a week. Just remember they may lose some of their softness in the fridge. Freezing brownies is easy and a smart way to save them. First, cut the brownies into squares. Wrap each square tightly in plastic wrap. Then, place the wrapped brownies in a freezer-safe bag. To defrost chocolate covered strawberry brownies, take them out of the freezer and leave them at room temperature. This usually takes about an hour. If you want them warm, pop them in the microwave for a few seconds. Enjoy the delicious taste! Can I use frozen strawberries instead of fresh? Yes, you can use frozen strawberries. Just thaw them first and drain any excess juice. Fresh strawberries give a better texture and taste, but frozen works in a pinch. What should I do if my brownies are too dry? If your brownies are dry, you can add a little melted butter or a splash of milk. This will help add moisture. Also, make sure not to overbake them next time. How do I know when my brownies are done? Check the center with a toothpick. If it comes out with a few moist crumbs, your brownies are done. Baking them too long will dry them out. Can I use a different type of chocolate for melting? Yes, you can use milk chocolate or dark chocolate. Each type will change the flavor, so pick what you prefer. Just melt it slowly to avoid burning. What to serve with chocolate covered strawberry brownies? These brownies pair well with vanilla ice cream or whipped cream. They also go great with fresh berries on the side. How to enhance the presentation for special occasions? Use a pretty platter to serve them. Drizzle extra melted chocolate over the top and add a sprinkle of powdered sugar. Place whole strawberries around for a pop of color. This blog post covered how to make delicious chocolate-covered strawberry brownies. We discussed each ingredient, from butter to strawberries, and provided clear instructions for mixing and baking. I shared tips for perfecting texture and fun decoration ideas, plus flavor variations and storage methods. Remember, you can adjust this recipe to suit your taste and dietary needs. Enjoy every bite of your brownies, and don’t forget to get creative with toppings! Happy baking!

Chocolate Covered Strawberry Brownies Deliciously Simple

To make blueberry lemon ricotta pancakes, you need the following: - 1 cup all-purpose flour - 1 tablespoon baking powder - 1/2 teaspoon salt - 2 tablespoons sugar - 1 cup ricotta cheese - 1 large egg - 1/2 cup milk - Zest of 1 lemon - 2 tablespoons fresh lemon juice - 1 cup fresh blueberries (plus extra for topping) - Butter or oil, for cooking To ensure your pancakes turn out great, measure your ingredients carefully. Use a dry measuring cup for flour and sugar. Fill the cup, then level it off with a knife. For liquids, like milk, use a liquid measuring cup. Pour until you reach the right line. Using fresh blueberries makes a big difference. They add sweetness and a burst of flavor. Opt for whole-milk ricotta for a creamy texture. Fresh lemon juice and zest brighten the taste. If you can, use organic lemons, as they often have more flavor. Enjoy your pancakes topped with extra berries and a drizzle of maple syrup! - Mix Dry Ingredients Start by taking a medium bowl. Add 1 cup of all-purpose flour, 1 tablespoon of baking powder, 1/2 teaspoon of salt, and 2 tablespoons of sugar. Whisk these together until they blend well. - Combine Wet Ingredients In a large bowl, mix 1 cup of ricotta cheese, 1 large egg, and 1/2 cup of milk. Add the zest of 1 lemon and 2 tablespoons of fresh lemon juice. Mix until it becomes smooth and creamy. - Incorporate Dry with Wet Mixture Gradually add the dry ingredients to the wet mixture. Stir gently until just combined. Don't worry if you see a few lumps; they help keep the pancakes fluffy. Fold in 1 cup of fresh blueberries, making sure they spread evenly in the batter. - Preheat Skillet Heat a non-stick skillet or griddle over medium heat. Lightly grease it with butter or oil. This helps the pancakes cook evenly and prevents sticking. - Cooking Process for Perfect Pancakes Pour about 1/4 cup of batter onto the skillet for each pancake. Cook until bubbles appear on the surface, which takes about 2-3 minutes. - How to Achieve Golden Brown Color Carefully flip each pancake and cook for another 2-3 minutes. Aim for a golden brown color. This shows they are fully cooked inside. Repeat with the rest of the batter, greasing the skillet as needed. To make your pancakes fluffy, use fresh baking powder. Old baking powder loses its power. Also, mix the wet and dry ingredients gently. Over-mixing leads to dense pancakes. It's fine if some lumps remain in the batter. Adding ricotta cheese gives a nice creaminess. Lastly, let the batter rest for a few minutes. This helps the pancakes rise better when cooked. A common mistake is using too much flour. Always measure flour correctly to avoid dense pancakes. Another mistake is cooking on too high heat. This can burn the outside while leaving the inside raw. Also, don’t skip the blueberries! They add flavor and moisture. Finally, resist the urge to flip too soon. Wait for bubbles to form on the surface. Serve the pancakes stacked high for a great look. Top them with fresh blueberries for color and taste. A dusting of powdered sugar adds sweetness. Drizzle warm maple syrup on top for extra flavor. You can also add whipped cream for a special touch. Remember, the more colorful the plate, the more inviting it looks! {{image_2}} You can switch up the fruit in these pancakes. Try raspberries for a tart kick. Strawberries add sweetness and color. You can even mix in bananas for a creamy texture. Each fruit brings its own flavor, making your pancakes unique. To make these pancakes gluten-free, use a gluten-free flour blend. Rice flour or almond flour works great too. For a dairy-free option, swap ricotta cheese with almond or soy yogurt. Use almond milk instead of regular milk. These swaps keep the flavor while meeting your needs. Serving these pancakes can be fun! Stack them high and top with fresh blueberries. A sprinkle of powdered sugar looks great too. Drizzle with maple syrup or honey for extra sweetness. You can add a dollop of whipped cream for a treat. Serve with a side of crispy bacon or fresh fruit for a full meal. After enjoying your pancakes, let them cool first. Place leftover pancakes in an airtight container. Keep them in the fridge. They stay fresh for up to three days. For best taste, eat them within this time. To reheat pancakes, use a microwave or skillet. For the microwave, place pancakes on a plate. Heat for about 20-30 seconds. Check if they are warm enough. If not, heat for a few more seconds. For the skillet, warm it over low heat. Add a little butter or oil. Heat each pancake for about 1-2 minutes on each side. This keeps them fluffy and tasty. To freeze pancakes, stack them with parchment paper in between. Place the stack in a freezer-safe bag or container. Remove excess air to prevent freezer burn. You can freeze pancakes for up to two months. When ready to eat, thaw them overnight in the fridge. Reheat them using microwave or skillet methods. Enjoy your pancakes as if they were fresh! To make these pancakes healthier, you can substitute some ingredients. Try whole wheat flour instead of all-purpose flour. You can also reduce the sugar by half. Use low-fat ricotta cheese for fewer calories. Adding a little ground flaxseed can boost fiber too. Yes, you can make the batter ahead of time. Mix it up and store it in the fridge for up to 24 hours. Just give it a gentle stir before cooking. This saves time for busy mornings. These pancakes taste great with many toppings. Serve them with fresh blueberries on top. A drizzle of maple syrup adds sweetness. You can also add whipped cream for a rich touch. A sprinkle of powdered sugar makes them look fancy. Yes, you can create a vegan version. Use a plant-based ricotta made from nuts or tofu. Replace the egg with a flax egg or applesauce. Almond milk or oat milk works well instead of dairy milk. You’ll know the pancakes are done when they turn golden brown. Look for bubbles forming on the surface before flipping. After flipping, cook until the other side is golden too. A toothpick inserted in the center should come out clean. For the full recipe, you can find it on many cooking websites or blogs. I also recommend checking out cooking videos for visual guidance. If you want more pancake ideas, explore recipes for different flavors, like banana or chocolate chip. You learned how to make delicious blueberry lemon ricotta pancakes. We covered ingredients, measurements, and tips for perfect cooking. Remember, a fluffy texture is key for great pancakes. Avoid common mistakes to make serving easy and fun. Try different fruit or substitutions to enjoy even more flavors. With proper storage, your leftovers can stay fresh for future meals. Keep experimenting and enjoy your pancake journey!

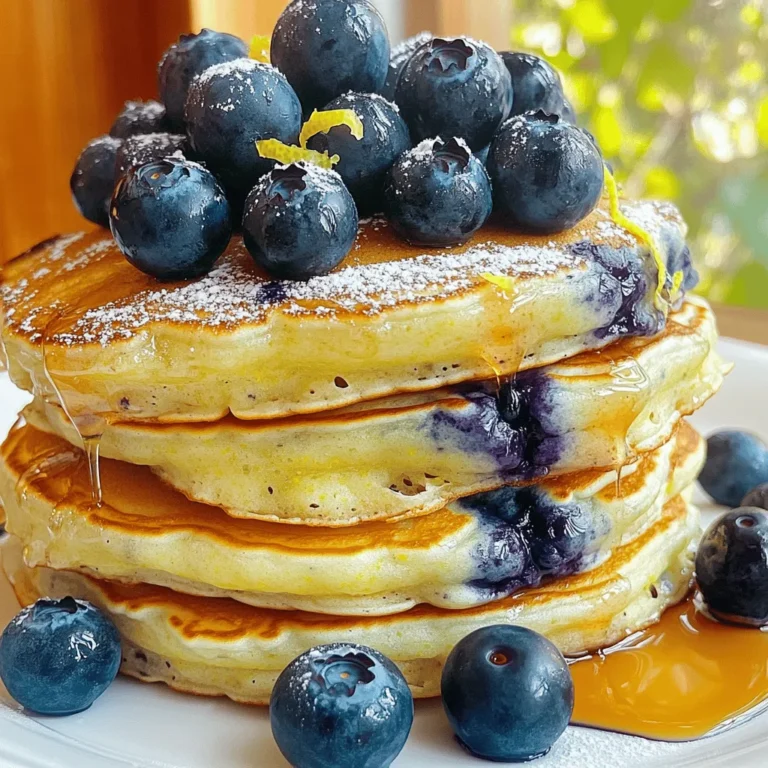
Blueberry Lemon Ricotta Pancakes Delightful Breakfast

- 8 oz elbow macaroni - 4 cups sharp cheddar cheese, shredded - 1 cup cream cheese, softened - 1 cup milk - 1 cup diced jalapeños (fresh or pickled) - 1/2 cup panko breadcrumbs - 1/2 cup crispy fried onions - 1/4 cup chopped green onions - Seasonings: garlic powder, onion powder, smoked paprika, salt, and pepper - 2 tablespoons butter To make a great Jalapeño Popper Mac and Cheese, you need good ingredients. The elbow macaroni forms the base of the dish. The sharp cheddar cheese gives it a rich flavor. Cream cheese adds creaminess. You can use fresh or pickled jalapeños for that spicy kick. Panko breadcrumbs and crispy fried onions create a crunchy topping. Green onions add a nice pop of color and flavor. Don't forget the seasonings! They bring everything together and enhance the taste. If you want to change things up, you have options. You can swap elbow macaroni for shells or cavatappi. For cheese, try gouda or pepper jack for different flavors. If fresh jalapeños are too spicy, use canned or pickled ones. They work well, too. Each serving has around 400 to 500 calories. It also has about 25 grams of fat and 20 grams of protein. This dish is rich and filling, making it perfect for comfort food lovers. Start by bringing a large pot of water to a boil. Add a generous amount of salt; this adds flavor to the pasta. Once the water is boiling, add the elbow macaroni. Cook it according to the package instructions until it's al dente. This means it should be firm but not hard. Drain the pasta and set it aside for later. In a medium saucepan, melt the butter over medium heat. Next, add the milk and cream cheese. Whisk them together until smooth. Gradually stir in the shredded cheddar cheese. Keep mixing until the cheese melts and the sauce gets creamy. This creates a rich base for your mac and cheese. In a large mixing bowl, combine the cooked macaroni and diced jalapeños. Pour the cheese sauce over the mixture. Mix well to coat every piece of pasta with the sauce. Then, transfer it to a greased 9x13 baking dish. Spread it out evenly. Preheat your oven to 350°F (175°C). Now, for the topping, mix panko breadcrumbs with crispy fried onions in a small bowl. Sprinkle this mixture on top of the mac and cheese. Bake for 20 to 25 minutes, until the top turns golden and crispy. To avoid clumping, melt your butter first. Next, add the milk and cream cheese slowly. Whisk constantly as you heat it. This method keeps your sauce smooth. When you add cheddar cheese, do it gradually. Stir until it melts completely. This ensures a creamy texture that coats every bite. You can adjust the spice by changing the jalapeño amount. If you like it hot, add more diced jalapeños. For a milder taste, use less. You can also try adding spices like cayenne pepper or chili powder for extra heat. This way, you make the dish just right for your taste. Garnish your dish with chopped green onions for color. You can also sprinkle extra panko breadcrumbs on top after baking for crunch. Serve with a fresh salad or garlic bread for a complete meal. These sides add balance to the rich mac and cheese. {{image_2}} You can easily add meat to your Jalapeño Popper Mac and Cheese for extra flavor. Bacon is a great choice. Its smokiness pairs well with the cheese and spice. Just cook the bacon until crispy, crumble it, and mix it in. You can also try sausage. Cook it, then slice it before adding it to the dish. If you want a seafood twist, shrimp or crab work well too. For shrimp, sauté it in garlic and butter. This adds a nice depth to the dish. For crab, use lump crab meat for a sweet finish. Both options will take your mac and cheese to the next level. You can enjoy a meat-free version of this dish. Swap the dairy for non-dairy options. Use plant-based cream cheese and almond milk. Nutritional yeast can add a cheesy flavor without the dairy. You can also add vegetables for extra nutrition. Spinach, bell peppers, or corn can add color and taste. Sauté them before mixing them in. This not only boosts flavor but also makes your dish healthier. Not all pasta shapes are created equal. Different shapes hold the sauce differently. Elbow macaroni is classic, but you can try cavatappi or shell pasta too. These shapes have grooves that catch more cheese sauce, making every bite delicious. However, thinner pasta may not hold the sauce as well. Spaghetti or angel hair can get lost in the cheese. So, stick to pasta shapes that can hold their own with creamy sauces for the best results. To store leftovers, let the mac and cheese cool down. Then, place it in an airtight container. This helps keep it fresh. You can store it in the fridge for up to three days. After that, the taste and texture may change. If you want to freeze it, portion it into smaller containers. Make sure to leave some space for expansion. You can freeze it for up to three months. When you're ready to eat, thaw it in the fridge overnight. To reheat, place it in the oven at 350°F (175°C) until warm. This keeps the texture nice and creamy. The best serving temperature is warm, around 160°F (70°C). After reheating, check the temperature with a food thermometer. If it's not warm enough, heat it a bit longer. To refresh the dish, add a splash of milk. This will help restore the creamy texture. Yes, you can make this dish in advance. Here’s how: - Cook the Pasta: Prepare the elbow macaroni and cheese sauce as directed. - Prepare for Baking: Mix everything in the baking dish, but don’t bake yet. - Cover and Chill: Wrap the dish tightly in plastic wrap and store it in the fridge. To reheat: - Oven Method: Preheat to 350°F (175°C). Unwrap and bake for about 30-35 minutes until hot. - Microwave Method: Cover loosely and heat in short bursts, stirring in between. Yes, this dish can be kid-friendly with a few tweaks. - Adjust the Spice: If your kids dislike heat, reduce the jalapeños. You can use less or even skip them. - Mild Cheese Option: Choose a mild cheddar cheese instead of sharp cheddar. Let your kids taste as you go. They might enjoy helping in the kitchen too! You can easily make this dish gluten-free. Here are some tips: - Pasta Options: Use gluten-free elbow macaroni. Many brands offer great taste and texture. - Flour Modifications: If you use any flour in the sauce, replace it with a gluten-free blend. Always double-check labels to ensure all ingredients are gluten-free. Enjoy the creamy comfort without worry! This blog post covered how to make Jalapeño Popper Mac and Cheese. We talked about the key ingredients, step-by-step cooking methods, and tips for success. Customizing spice levels and variations help make it fit your taste. Storing leftovers is easy, and reheating keeps the dish tasty. Overall, this recipe shines as comfort food. Enjoy your cooking journey!

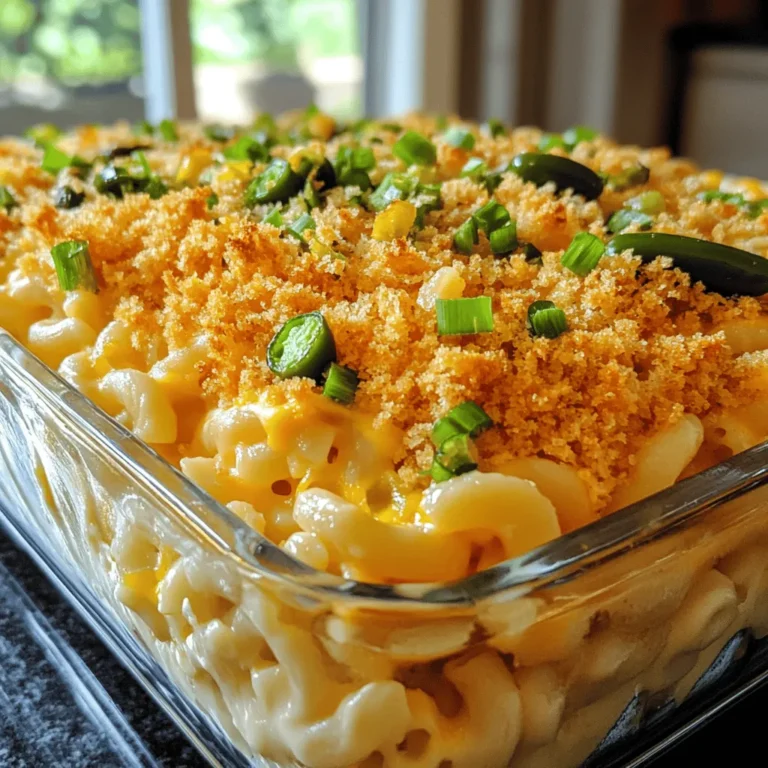
Jalapeño Popper Mac and Cheese Creamy Comfort Dish

To make teriyaki glazed meatloaf, you need some basic items. Here’s what to gather: - 1 lb ground beef (or a mix of beef and pork) - 1 cup breadcrumbs - 1/2 cup finely chopped onion - 1/4 cup grated carrot - 2 cloves garlic, minced - 1 large egg - 1/4 cup milk - 1/4 teaspoon black pepper - 1/4 teaspoon salt - 1/4 cup teriyaki sauce (plus extra for glazing) These ingredients form the heart of the dish. The ground meat gives it structure, while the breadcrumbs add softness. Onions and garlic bring flavor, and the egg helps bind it all together. You can customize your meatloaf with extra ingredients. Here are some suggestions: - Add 1 tablespoon of soy sauce for more umami. - Use ginger for a fresh kick. - Mix in chopped bell peppers for crunch. - Try herbs like cilantro for a twist. If you need to adjust for diet, use ground turkey or lentils instead of meat. This keeps the dish hearty and tasty. Garnishing can elevate your dish. Here are some ideas: - Sprinkle sesame seeds on top before serving. - Add sliced green onions for freshness. For side dishes, consider serving it with: - Steamed broccoli for color and health. - Rice or quinoa to soak up the teriyaki sauce. - A simple salad for a light touch. These choices make your meal more balanced and visually appealing. Enjoy the blend of flavors and textures! First, gather all your ingredients. You will need: - 1 lb ground beef (or a mix of beef and pork) - 1 cup breadcrumbs - 1/2 cup finely chopped onion - 1/4 cup grated carrot - 2 cloves garlic, minced - 1 large egg - 1/4 cup milk - 1/4 teaspoon black pepper - 1/4 teaspoon salt - 1/4 cup teriyaki sauce (plus extra for glazing) - 1 tablespoon sesame seeds (for garnish) - 2 green onions, sliced (for garnish) Start by preheating your oven to 350°F (175°C). In a large bowl, combine the ground beef, breadcrumbs, chopped onion, grated carrot, and minced garlic. Next, add the egg and milk. Mix it all well until combined. Now, season the mixture with salt, black pepper, and 1/4 cup of teriyaki sauce. Make sure everything is evenly mixed. It should feel moist but hold together well. Shape the mixture into a loaf and place it in a greased loaf pan or on a lined baking sheet. This helps in easy removal later. Bake the meatloaf in your preheated oven. Set the timer for 45 to 55 minutes. The meatloaf should cook until it reaches an internal temperature of 160°F (70°C). To check doneness, use a meat thermometer. Insert it into the center of the loaf. If it reads 160°F, your meatloaf is done. If not, give it more time in the oven. About 10 minutes before the meatloaf finishes baking, brush the top with extra teriyaki sauce. This adds a sweet and shiny glaze. While applying the glaze, focus on covering the top evenly. This helps the flavor spread throughout the meatloaf as it cooks. Once it’s done, let it rest for 10 minutes before slicing. This keeps the juices inside and makes for a tasty meal. To keep your meatloaf moist, milk and egg are key. Milk adds creaminess, while the egg binds the mixture. This combo helps prevent a dry loaf. When mixing, avoid overworking the meat. Gently combine the ingredients to keep the texture light. A well-mixed meatloaf keeps its shape and is easy to slice. The best internal temperature for meatloaf is 160°F (70°C). Use a meat thermometer to check. This step ensures it’s fully cooked but not dry. After baking, let the meatloaf rest for 10 minutes. This resting time allows juices to settle, making each slice juicy and flavorful. Try adding spices like garlic powder or onion powder for extra depth. Fresh herbs like parsley or cilantro can brighten the taste. You can also experiment with different marinades or sauces. Soy sauce or hoisin sauce can give a unique twist to the teriyaki flavor. These small changes can make your meatloaf even more delicious. {{image_2}} You can swap out ground beef for leaner meats. Ground turkey or chicken works great. They keep the dish light while still being tasty. If you want a vegetarian option, use lentils or mushrooms. Both add great texture and flavor. To change the flavor, try adding some heat. A dash of chili flakes gives a nice kick. You can also mix in other Asian flavors. Ginger, hoisin, or even sriracha can bring new life to this dish. Don't be afraid to get creative! If you want to try something new, use a slow cooker. It makes the meatloaf super moist and tender. Just adjust the cooking time to about six hours on low. For a smoky taste, grill or smoke the meatloaf. It adds a nice char and enhances the flavor. Just remember to monitor the temperature closely! To store leftover meatloaf, let it cool first. Wrap it well or place it in an airtight container. This keeps it fresh and tasty. You can use glass or plastic containers for storage. Make sure they seal tightly to avoid air getting in. For freezing, cut the meatloaf into slices. Wrap each slice in plastic wrap, then place them in a freezer bag. This helps keep them from freezer burn. To reheat, let the slices thaw in the fridge overnight. You can warm them in the oven at 350°F until hot. The microwave works too, but be careful not to overcook them. Teriyaki glazed meatloaf lasts about 3 to 4 days in the fridge. In the freezer, it can last up to 3 months. Check for signs of spoilage before eating. If it smells bad or has a strange color, it’s best to throw it away. Always be safe with leftovers! What if I don’t have teriyaki sauce? If you lack teriyaki sauce, you can mix soy sauce with honey or brown sugar. This mix gives a sweet and salty flavor similar to teriyaki. You can also add garlic and ginger for an extra kick. Can I make meatloaf in advance? Yes, you can prepare meatloaf ahead of time. Shape it and store it in the fridge for up to 24 hours before baking. This saves time on busy days. You can also freeze it for longer storage. What’s the best way to serve leftover meatloaf? To serve leftover meatloaf, slice it and reheat in the oven or microwave. Drizzle with more teriyaki sauce for added flavor. You can also make meatloaf sandwiches with your favorite bread. Why is my meatloaf falling apart? If your meatloaf falls apart, it may be due to too few binding agents. Ensure you use enough breadcrumbs and egg. Mixing the meatloaf well helps it hold together. How do I know when the meatloaf is done? To check if meatloaf is done, use a meat thermometer. It should reach an internal temperature of 160°F (70°C). The meatloaf should also be firm and no longer pink inside. Caloric content per serving Each serving of teriyaki glazed meatloaf has about 250-300 calories. This varies based on the meat used and any added ingredients. Health benefits of the ingredients used The meat provides protein for muscle health. Onions and carrots add vitamins and minerals. Teriyaki sauce gives a nice flavor while offering some antioxidants. Overall, this dish can be part of a balanced meal. In this post, we explored making teriyaki glazed meatloaf. We discussed key ingredients, cooking steps, and tips to keep it moist. Variations offered options for everyone, from meat lovers to those on special diets. Storing and reheating leftovers helps minimize waste. With the right techniques, you can enjoy this dish in many ways. Experiment with flavors and spices, and make it your own. Enjoy making a meal that pleases everyone at the table!

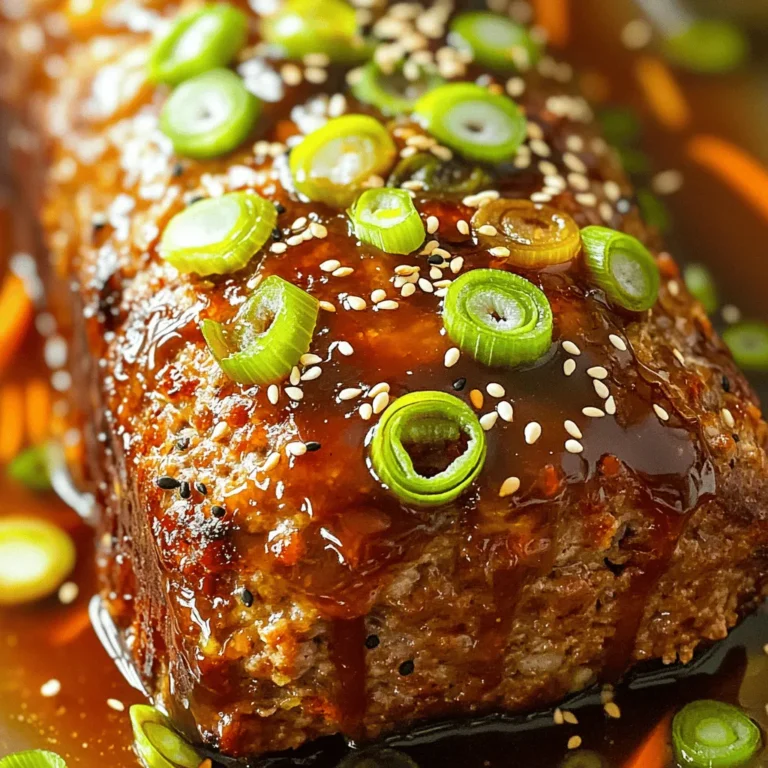
Teriyaki Glazed Meatloaf Simple and Flavorful Dish

To make this soup, you will need a few key ingredients. Here’s what to gather: - 4 large red bell peppers, roasted and peeled - 1 medium onion, chopped - 3 garlic cloves, minced - 2 cups vegetable broth - 1 cup coconut milk - 1 teaspoon smoked paprika - 1 tablespoon olive oil - Salt and pepper to taste - Fresh basil leaves for garnish These ingredients give the soup its rich flavor and creamy texture. The roasted peppers are the star. They bring sweetness and depth. The coconut milk adds creaminess without dairy. You can change things up based on what you have or like. Here are some ideas: - Use chicken broth instead of vegetable broth for a heartier taste. - Swap coconut milk with heavy cream for extra richness. - Add a pinch of cayenne for heat if you like spice. - Try fresh thyme or oregano for added herbal notes. These options let you play with flavors. Feel free to get creative based on your taste. This soup is not just tasty, but it can also be healthy. Here’s a quick look at the nutrition: - Calories: About 200 per serving - Protein: 3 grams - Fat: 14 grams (mostly from coconut milk) - Carbohydrates: 20 grams - Fiber: 3 grams This soup offers a good mix of nutrients. The bell peppers provide vitamin C, while coconut milk adds healthy fats. It’s comforting and nourishing, making it a great choice for any meal. First, I roast the red bell peppers. You start by preheating your oven to 450°F (230°C). Take the whole peppers and place them on a baking sheet. Roast them for about 25 to 30 minutes. Make sure to turn them occasionally. You want the skin to be charred and blistered. Once done, remove them from the oven and let them cool. After they cool, peel off the skin and remove the seeds. This step gives the soup a sweet and smoky flavor. Now, let’s make the base. In a large pot over medium heat, add 1 tablespoon of olive oil. Once hot, toss in the chopped onion. Sauté it for 5 to 7 minutes until it turns translucent. Next, add the minced garlic and 1 teaspoon of smoked paprika. Cook this mix for another 1 to 2 minutes. Stir it often to prevent burning. This step builds a strong flavor base for your soup. After the base is ready, it’s time to blend everything together. Add the roasted red peppers to the pot along with 2 cups of vegetable broth. Bring this mixture to a simmer and let it cook for about 10 minutes. This helps to blend all the flavors. Now, use an immersion blender to puree the soup until it’s smooth. If you don’t have one, you can use a regular blender in batches. Once blended, stir in 1 cup of coconut milk. Season with salt and pepper to taste. Heat the soup gently for a few more minutes. Your creamy roasted red pepper soup is now ready to serve! Roasting peppers can bring out their sweet flavor. Start by preheating your oven to 450°F (230°C). Place whole red bell peppers on a baking sheet. Roast them for 25-30 minutes. Turn them every 10 minutes, so they cook evenly. When the skin is charred and blistered, remove them from the oven. Let them cool before peeling off the skin and removing the seeds. This step ensures a smoky, rich taste in your soup. A smooth soup needs a good blending technique. You can use an immersion blender right in the pot. This method makes it easy and less messy. If you prefer a regular blender, work in batches. Fill the blender halfway to avoid spills. Blend until creamy and smooth. Adding coconut milk at this stage enhances the creaminess and adds a nice flavor. To make your soup even tastier, try adding a few extras. A pinch of cayenne can add heat. For a savory twist, mix in some fresh herbs like thyme or rosemary. You can also swap coconut milk for heavy cream for a richer taste. Always taste your soup before serving. Adjust salt and pepper as needed. This step allows you to control the final flavor. {{image_2}} You can easily add protein to your creamy roasted red pepper soup. Chicken works great here. Cook and shred some chicken breast before adding it to the soup. You can stir it in before serving. For a plant-based option, try tofu. Use firm tofu, press it to remove water, and cut it into cubes. Sauté the tofu until golden brown, and then mix it into the soup. Both options add flavor and heartiness. If you want a dairy-free soup, coconut milk is a fantastic choice. It gives a rich and creamy texture. If you need more thickness, try adding pureed white beans or cashews. Soak cashews in water, then blend them until smooth. This method adds creaminess without dairy. You can also use almond milk for a lighter soup. Each option keeps the flavors rich but free from dairy. To give your soup a kick, consider adding some heat. Red pepper flakes or diced jalapeños can spice things up. Add them while cooking the onions and garlic for the best flavor. For a smoky taste, you might want to add more smoked paprika. You could also toss in some chipotle peppers in adobo sauce for a deeper flavor. These variations will make the soup even more exciting and bold. You can keep leftover creamy roasted red pepper soup in the fridge. First, let it cool down to room temperature. Then, transfer it to an airtight container. It will stay fresh for about 3 to 4 days. Make sure to label the container with the date. This way, you can track how long it has been stored. If you want to save the soup for later, freezing is a great option. Pour the cooled soup into freezer-safe bags or containers. Leave some space at the top because soup expands when frozen. You can store it for up to 3 months. When you’re ready to eat it, just thaw it in the fridge overnight. To reheat the soup, pour it into a pot over low heat. Stir it often to help it warm evenly. If the soup looks too thick, add a splash of vegetable broth or coconut milk. This keeps the flavor rich and creamy. Avoid using the microwave as it may change the texture. Enjoy your comforting soup! Yes, you can make this soup ahead of time. The flavors get better as it sits. I often prepare it a day before serving. Store it in an airtight container in the fridge. When you're ready, just reheat it on the stove. This soup pairs well with many sides. I enjoy serving it with crusty bread or grilled cheese sandwiches. A fresh salad also works great to balance the flavors. You can even add a sprinkle of cheese or some croutons on top for extra texture. The soup lasts about 3 to 4 days in the fridge. Make sure to store it in a sealed container. If you want to keep it longer, consider freezing it. Just remember to leave some space in the container for expansion. In this blog post, we covered how to make creamy roasted red pepper soup. You learned about key ingredients and how to prepare roasted peppers. I shared step-by-step cooking instructions and helpful tips for the best flavor and texture. We also explored variations, storage tips, and answered common questions. This soup is easy to make and versatile. You can change it based on your taste. Whether you keep it simple or add your twist, enjoy this delicious dish!

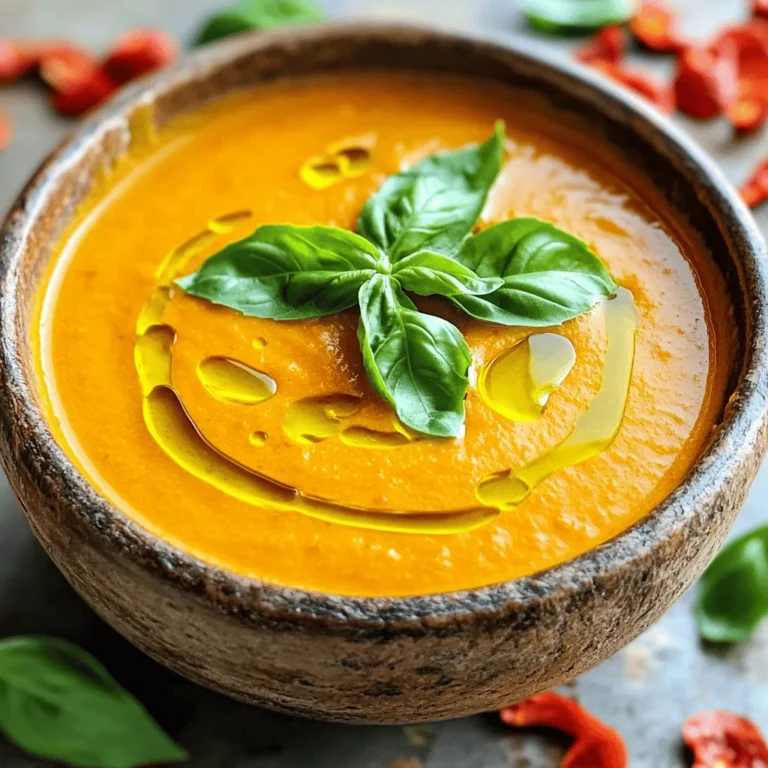
Creamy Roasted Red Pepper Soup Comforting and Simple

- 1 cup pumpkin puree - 1/2 cup unsalted butter, softened - 1 cup brown sugar, packed - 1/2 cup granulated sugar - 1 large egg - 1 teaspoon vanilla extract - 2 cups all-purpose flour - 1 teaspoon baking soda - 1/2 teaspoon baking powder - 1 teaspoon ground cinnamon - 1/2 teaspoon ground ginger - 1/4 teaspoon nutmeg - 1/4 teaspoon salt - 1 cup salted caramel sauce (store-bought or homemade) - Sea salt flakes for topping When selecting ingredients for salted caramel pumpkin cookies, quality matters. Choose a rich pumpkin puree for the best flavor. You can use fresh pumpkin, but canned puree saves time. Look for unsalted butter that is soft but not melted. This helps in mixing. Brown sugar adds moisture and flavor. Use packed brown sugar for the best results. For granulated sugar, pick a fine brand. The egg should be large and fresh. For spices, use fresh ground cinnamon, ginger, and nutmeg for more depth. If you have dietary restrictions, here are some swaps: - Use coconut oil instead of butter for a dairy-free option. - Substitute a flax egg for the large egg to make it vegan. - Swap all-purpose flour with a gluten-free blend. These choices keep your cookies delicious while meeting your needs! 1. Preheat Oven: Set your oven to 350°F (175°C). This step warms up the oven for even baking. Line a baking sheet with parchment paper. This helps the cookies not to stick. 2. Mix Wet Ingredients: In a large bowl, cream together the softened butter, brown sugar, and granulated sugar. Mix until smooth and fluffy. Add the pumpkin puree, egg, and vanilla extract. Stir until well combined. 3. Combine Dry Ingredients: In another bowl, whisk the flour, baking soda, baking powder, cinnamon, ginger, nutmeg, and salt. This helps evenly distribute the leavening agents and spices. 4. Combine Mixtures: Gradually add the dry mix to your wet mix. Stir gently until just combined. Avoid overmixing; this keeps your cookies soft. 5. Add Caramel: Gently fold in the salted caramel sauce. Save some for drizzling later. 6. Scoop Cookies: Use a cookie scoop or spoon to drop rounded tablespoons of dough onto the baking sheet. Leave space between each cookie. 7. Bake: Bake for 12-15 minutes. The edges should turn golden, and the centers should look set. 1. Cool Cookies: After baking, take the cookies out. Let them cool on the baking sheet for about 5 minutes. Then, transfer them to a wire rack to cool completely. 2. Drizzle Caramel: Once your cookies cool, drizzle the reserved salted caramel on top. To drizzle effectively, use a spoon or a squeeze bottle. Start from one side and move to the other in a zigzag pattern. 3. Perfect Drizzle Tips: For a great drizzle, make sure the caramel is warm. This makes it easier to pour. You can also sprinkle sea salt flakes lightly on top for extra flavor. To get soft and chewy cookies, follow these tips: - Use room temperature butter. It helps create a fluffy texture. - Do not overmix the dough. Mix until just combined for best results. - Bake cookies until edges are golden but centers look slightly soft. To ensure your oven bakes evenly: - Use an oven thermometer to check the temperature. - Rotate baking sheets halfway through cooking for even baking. If you want to save cookie dough for later: - Scoop dough into balls and freeze them on a tray. - Once frozen, place balls in a zip-top bag. - You can bake them straight from the freezer; just add a minute or two to the bake time. To add extra depth to your cookies, consider these spices: - A pinch of ground cloves can enhance the warm flavors. - Substitute some cinnamon with allspice for a twist. If you love chocolate, you can mix in: - 1 cup of chocolate chips for rich flavor. - Chopped nuts like pecans or walnuts for crunch. To customize the salted caramel sauce: - Try adding a bit of vanilla or bourbon for a richer taste. - Use a touch of sea salt in the sauce for an extra kick. {{image_2}} You can easily swap pumpkin for other ingredients. Try using applesauce for a fruity twist. For a spicier taste, gingerbread works well too. You can also use sweet potato puree for a different flavor profile. If you want gluten-free cookies, use a gluten-free flour blend. For vegan cookies, replace the egg with a flax egg and use vegan butter. These swaps keep your cookies tasty and friendly for all diets. Plate your cookies on a colorful platter for a fun touch. You can arrange them in a stack with a drizzle of caramel on top. This makes them look extra special for gatherings. For gifts, place cookies in a clear bag tied with a ribbon. This way, they look lovely and are easy to share. You can also use a decorative tin for a charming presentation. Pair your cookies with warm apple cider or a cup of coffee. The flavors mix well and make a perfect treat. Consider serving them with a scoop of vanilla ice cream for a delicious dessert. To keep your cookies fresh, store them in an airtight container. This keeps moisture in and prevents them from drying out. If you stack your cookies, place parchment paper between layers to avoid sticking. At room temperature, these cookies stay fresh for about five days. For longer storage, you can freeze them. Just wrap each cookie in plastic wrap and place them in a freezer bag. They will last up to three months in the freezer. When you want to enjoy them, simply remove the cookies and let them thaw at room temperature. If your cookies become stale, don’t worry! You can revive them easily. For a quick fix, use the microwave. Heat one cookie for about 10 seconds. Check if it's warm enough. If not, heat it for a few more seconds. This softens the cookie back to its chewy state. For a crispier texture, use the oven. Preheat it to 300°F (150°C) and place the cookies on a baking sheet. Warm them for about 5-7 minutes. This will bring back their fresh-baked taste. What is the best way to prevent cookies from spreading? To stop cookies from spreading, chill your dough for at least 30 minutes. This helps the fat firm up. Also, make sure your baking sheet is cool before adding the dough. Using parchment paper can help too. Can I use store-bought caramel sauce instead of homemade? Yes, you can use store-bought caramel sauce. Just make sure it is salted caramel for the best flavor. It saves time and still tastes great in the cookies. How do I know when the cookies are done baking? Cookies are done when the edges turn golden brown and the centers look set. They may seem soft, but they will firm up as they cool. Keep an eye on them during the last few minutes. What to do if cookies are too dry or crumbly? If your cookies are dry, try adding a bit more pumpkin puree or butter next time. This will add moisture and richness. Make sure not to overmix the dough, as this can also cause dryness. Adjusting sweetness levels in the cookie recipe If you want less sweetness, reduce the brown sugar or granulated sugar slightly. You can also use less caramel sauce. Taste the dough before baking to find the right balance for you. Tips for achieving the perfect texture in baked cookies To get soft and chewy cookies, do not overbake them. Take them out when they still seem a bit underbaked. Let them cool on the baking sheet for a few minutes before moving them to a wire rack. This helps keep them soft. This blog post covers everything you need to make amazing cookies. We discussed the right ingredients, cooking steps, and cooling tips to get the best flavor. I shared tricks for soft cookies and fun variations. You also learned how to store and heat cookies to keep them fresh. Remember, baking is about creativity and enjoying the process. Don’t be afraid to try new flavors and ideas. With these tips, your cookie-making skills will shine! Enjoy baking and sharing your delicious treats!

Salted Caramel Pumpkin Cookies Irresistible Fall Treat

PREV 1 … 50 51 52 … 86 NEXT
spicy fork kitchen

explore

DessertsDinnerAppetizersDrinks

Our Policies

  • Cookie Policy
  • Copyright Policy
  • Disclaimer
  • GDPR Policy
  • Terms Of Use
Back to Top
  • About
  • Contact Us
  • Privacy Policy
© 2026 spicy fork kitchen