FREE DINNER EBOOK! Get your copy!
  • Cookie Policy
  • GDPR Policy
  • Disclaimer
  • Terms Of Use
  • Visit my other site: Fun Cookie Recipes
spicy fork kitchen
  • Home
  • Dinner
  • Desserts
  • Drinks
  • Appetizers
  • Contact
  • About
  • Privacy Policy
  • Home
  • Dinner
  • Desserts
  • Drinks
  • Appetizers
  • Contact
  • About
  • Privacy Policy
  • Cookie Policy
  • GDPR Policy
  • Disclaimer
  • Terms Of Use
Visit my other site: Fun Cookie Recipes

HOME / CATEGORIES /

Latest

To make a delicious chocolate hazelnut babka, you will need: - 4 cups all-purpose flour - 1/4 cup granulated sugar - 1 packet (2¼ teaspoons) active dry yeast - 1/2 teaspoon salt - 1/2 cup whole milk, warmed - 1/2 cup unsalted butter, melted and cooled - 3 large eggs - 1 teaspoon vanilla extract - 1 cup hazelnuts, toasted and roughly chopped - 1 cup chocolate hazelnut spread (like Nutella) - 1/4 cup unsweetened cocoa powder - 1 egg (for egg wash) These ingredients come together to create a rich, flavorful dough. The flour gives structure, while the sugar adds sweetness. Yeast helps the dough rise, making it light and airy. The milk and butter add richness, and eggs give the babka a lovely color and texture. You can customize your babka with these optional ingredients: - Cinnamon for a warm spice flavor - Orange zest for a fresh twist - Almond extract for a nutty note - Dark chocolate chunks for extra richness Feel free to experiment! Each addition can make your babka unique. To create your chocolate hazelnut babka, gather the following tools: - Large mixing bowl - Whisk - Rolling pin - Baking pan (9x5 inch loaf pan) - Clean kitchen towel - Wire rack for cooling Having the right equipment makes your baking process smoother. It also helps you achieve the best results. {{ingredient_image_1}} To start, grab a large mixing bowl. Combine 4 cups of all-purpose flour, 1/4 cup of granulated sugar, 2¼ teaspoons of active dry yeast, and 1/2 teaspoon of salt. In another bowl, mix 1/2 cup of warmed whole milk, 1/2 cup of melted and cooled unsalted butter, 3 large eggs, and 1 teaspoon of vanilla extract. Stir these wet ingredients into the dry mix until a dough forms. Now, turn the dough onto a floured surface. Knead it for 8 to 10 minutes. You want it smooth and elastic. Next, shape the dough into a ball. Place it in a greased bowl, cover with a towel, and let it rise in a warm spot for 1 to 2 hours. It should double in size. While the dough rises, you can make the filling. In a bowl, mix 1 cup of chocolate hazelnut spread with 1/4 cup of unsweetened cocoa powder. Stir until it’s smooth. For a crunch, add half of the toasted hazelnuts now. Once your dough has risen, punch it down to release the air. Roll it out on a floured surface into a large rectangle. Aim for about 16 by 24 inches. Spread the chocolate hazelnut filling evenly across the dough. Then, sprinkle the remaining chopped hazelnuts on top. From one long side, carefully roll the dough into a log. Pinch the seam to seal it. Slice the log in half lengthwise, exposing the filling. Now, twist the two halves together. Coil the twisted dough into a loaf shape. Place it in a greased 9x5 inch loaf pan. Cover the pan with a towel and let the babka rise for another 30 to 45 minutes. Preheat your oven to 350°F (175°C) during the last 10 minutes of rising. Beat an egg and brush it over the top for a glossy finish. Bake for 30 to 35 minutes. Look for a deep golden color. If the top browns too fast, cover it with aluminum foil halfway through baking. Enjoy the warm aroma filling your kitchen! - Not Measuring Ingredients Correctly: Use a scale for accurate measurements. - Skipping the Dough Rise: This step adds lightness and fluffiness. - Overmixing the Dough: Mix until combined. Overmixing makes the dough tough. - Too Much Flour: Flour should be added gradually to avoid a dry dough. - Not Prepping the Pan: Grease your pan well to prevent sticking. - Kneading: Knead the dough for 8-10 minutes until it feels smooth. - Warm Environment: Let the dough rise in a warm spot. This helps it double in size. - Egg Wash: Brush the dough with an egg for a shiny, golden crust. - Baking Time: Bake until golden brown, but check often to avoid burning. - Fresh Hazelnuts: Toast hazelnuts for a richer flavor before adding them to the filling. - Quality Chocolate Spread: Use a high-quality chocolate hazelnut spread for the best taste. - Cocoa Powder: Choose unsweetened cocoa powder for a deep chocolate flavor. - Vanilla Extract: Always use pure vanilla for a more intense flavor. These tips can help you create a rich and delightful Chocolate Hazelnut Babka that impresses! Pro Tips Use Fresh Yeast: For the best rise and texture, ensure your yeast is fresh and active. You can test it by mixing it with warm water and sugar; it should foam within minutes. Room Temperature Ingredients: Let your eggs and butter come to room temperature before mixing. This helps create a smoother dough that rises better. Chill the Filling: For easier spreading, chill the chocolate hazelnut filling slightly before applying it to the dough. This prevents it from melting into the dough too quickly. Storage Tips: Keep any leftover babka in an airtight container at room temperature for up to 3 days. You can also freeze slices for later enjoyment! {{image_2}} You can change the filling in your babka to suit your taste. Try using almond paste instead of chocolate hazelnut spread. You can also mix in fruit jams like raspberry or cherry for a sweet twist. If you prefer something less sweet, consider a savory filling. A blend of cheese and herbs can give your babka a unique flavor. While hazelnuts are classic, you can experiment with different nuts. Walnuts and pecans bring their own rich taste. Almonds add a nice crunch and a different flavor profile. You can even use a mix of nuts for extra depth. Just make sure to toast them first. Toasting enhances their flavor and adds a lovely crunch. You can make this babka fit different diets. For gluten-free options, use a gluten-free flour blend. Look for one that works well for baking. If you want a vegan babka, replace the eggs with flax eggs or applesauce. Use plant-based milk and a vegan butter substitute. This way, everyone can enjoy the rich and irresistible delight of babka. To keep your chocolate hazelnut babka fresh, wrap it tightly in plastic wrap. This keeps moisture in and prevents it from drying out. Place the wrapped babka in an airtight container or a resealable bag. Store it at room temperature for up to three days. If you want it to last longer, consider refrigeration. When you want to enjoy leftover babka, preheat your oven to 350°F (175°C). Unwrap the babka and place it on a baking sheet. Heat it for about 10 to 15 minutes. This warming brings back the soft texture and melts the chocolate spread slightly. You can also use a microwave. Heat it for 15 to 20 seconds for a quick treat. If you want to freeze babka, first let it cool completely. Wrap it tightly in plastic wrap and then in aluminum foil. This double wrapping protects it from freezer burn. You can freeze babka for up to three months. To enjoy, thaw it overnight in the fridge and then reheat it as mentioned above. Babka has roots in Eastern European Jewish culture. It comes from the Polish word for "grandmother." People baked it to celebrate special occasions. The sweet bread often had chocolate or cinnamon fillings. Over time, bakers added new flavors. Chocolate hazelnut babka is a tasty twist on this classic. Yes, you can use milk alternatives. Almond milk, oat milk, or soy milk work well. Choose unsweetened versions to keep the flavor balanced. Just make sure to warm your milk alternative before adding it to the dough. It helps the yeast activate and rise. Check for a deep golden color on the top. You can also insert a toothpick into the center. If it comes out clean, your babka is ready. The texture should feel soft but not doughy. If the top browns too fast, cover it with foil halfway through baking. You can find chocolate hazelnut babka at bakeries or specialty stores. Many grocery stores also carry it now. If you want something homemade, try local artisan bakeries. Some online shops sell babka too, making it easy to enjoy this treat. This guide covered all you need for making Chocolate Hazelnut Babka. We explored the key ingredients and equipment you need. You learned the step-by-step process from dough to baking. I shared tips to avoid mistakes and improve texture. You can also explore tasty variations, storage tips, and common questions. Now, it's your turn to bake and enjoy this delicious treat!

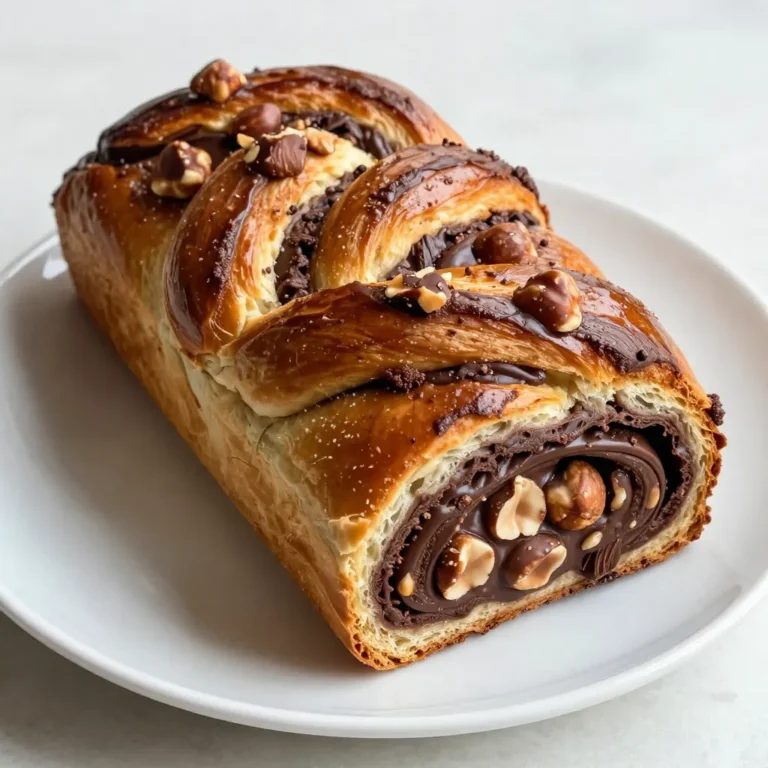
Chocolate Hazelnut Babka Rich and Irresistible Delight

To bake these delicious muffins, gather the following ingredients: - 1 cup all-purpose flour - 1/2 cup unsweetened cocoa powder - 1 teaspoon baking powder - 1/2 teaspoon baking soda - 1/4 teaspoon salt - 1/2 cup granulated sugar - 1/2 cup brown sugar, packed - 2 large eggs - 1/2 cup buttermilk (or substitute with milk + 1 teaspoon vinegar) - 1/3 cup vegetable oil - 1 teaspoon vanilla extract - 1 cup chocolate chips (mix of dark and milk chocolate) - 1/2 cup chopped walnuts or pecans (optional) If you need to switch some ingredients, here are a few easy swaps: - Buttermilk: You can use regular milk mixed with vinegar. This gives a similar tang. - Cocoa powder: Dark cocoa powder can replace regular cocoa for a richer taste. - Vegetable oil: You can use melted butter or coconut oil for a unique flavor. - Sweeteners: Use coconut sugar or honey if you prefer a healthier option. Feel free to get creative with your muffins! Here are some fun add-ins: - Nuts: Chopped walnuts or pecans add crunch. - Dried fruits: Raisins or dried cherries can give a sweet twist. - Spices: A pinch of cinnamon or nutmeg can enhance the flavor. - Extras: Add peanut butter chips or white chocolate for more variety. These ingredients and options help make your triple chocolate muffins a delightful treat! Enjoy experimenting with flavors! {{ingredient_image_1}} Start by preheating your oven to 350°F (175°C). Line a muffin tin with paper liners or spray it with non-stick spray. In a large bowl, whisk together 1 cup of all-purpose flour, 1/2 cup of cocoa powder, 1 teaspoon of baking powder, 1/2 teaspoon of baking soda, and 1/4 teaspoon of salt. This mix sets the base for your muffins. In another bowl, mix together 1/2 cup of granulated sugar, 1/2 cup of brown sugar, and 2 large eggs. Add 1/2 cup of buttermilk, 1/3 cup of vegetable oil, and 1 teaspoon of vanilla extract. Whisk until smooth. Slowly add the dry mix to the wet mix. Stir gently until just combined. A few lumps are fine. Next, fold in 1 cup of chocolate chips and 1/2 cup of chopped walnuts or pecans if you want a nutty crunch. Spoon the batter into the prepared muffin tin, filling each cup about 3/4 full. Baking is both art and science. Keep your oven steady at 350°F. Bake the muffins for 18-20 minutes. To check for doneness, insert a toothpick into the middle. If it comes out clean, your muffins are ready. Do not overmix the batter; this keeps your muffins light and fluffy. After baking, take the muffins out of the oven. Let them cool in the pan for about 5 minutes. Then, transfer them to a wire rack to cool completely. This step stops the muffins from getting soggy. For a lovely touch, serve them warm. Dust with powdered sugar or drizzle melted chocolate on top. Place them on a rustic wooden board to wow your guests! To make the best triple chocolate muffins, focus on your ingredients. Use fresh cocoa powder for a deep chocolate taste. Measure flour correctly by spooning it into the cup, then leveling it off. This helps avoid dense muffins. Mix wet and dry ingredients separately before combining them. This step keeps your muffins fluffy. When adding chocolate chips, use a mix of dark and milk chocolate for a rich flavor. One common mistake is overmixing the batter. This can lead to tough muffins. Mix just until the dry ingredients are combined. Another mistake is not checking your oven temperature. An oven thermometer can help you bake at the right heat. Lastly, don’t skip the cooling time. Muffins continue to cook slightly after you remove them from the oven. To boost the chocolate flavor, add a bit of espresso powder to the dry ingredients. It intensifies the chocolate taste without adding coffee flavor. You can also use chocolate chunks instead of chips for a gooey texture. For extra richness, consider folding in some cocoa nibs. These tips will take your muffins to the next level! Pro Tips Use Quality Chocolate: Opt for high-quality chocolate chips for the best flavor. The better the chocolate, the richer your muffins will be. Don't Overmix: When combining wet and dry ingredients, mix just until incorporated. Overmixing can lead to tough muffins. Check for Doneness: Use a toothpick to check if the muffins are baked through. If it comes out with a few moist crumbs, they’re perfect! Experiment with Add-ins: Feel free to mix in other add-ins like dried fruit or coconut for a unique twist on the classic chocolate muffin. {{image_2}} You can switch up the chocolate types in your muffins. Use milk chocolate for sweetness, dark chocolate for depth, or white chocolate for a creamy twist. You can also mix in flavored chocolate chips, like mint or orange, for fun surprises. If you want a crunch, add nuts like walnuts or pecans. They add texture and a nice flavor. If you need gluten-free muffins, swap the all-purpose flour for a gluten-free blend. Many blends work well and keep the muffins fluffy. For dairy-free options, use almond milk or coconut milk instead of buttermilk. You can also try dairy-free chocolate chips. Both options keep the taste rich and satisfying. Seasonal changes can inspire new flavors. In the fall, add warm spices like cinnamon or nutmeg. These spices give a cozy feel to the muffins. In summer, mix in fresh berries for a fruity burst. You can also top them with a sprinkle of sea salt for a flavor boost. Each season can bring a new twist to your triple chocolate muffins! To keep your triple chocolate muffins fresh, store them in an airtight container. This helps prevent them from drying out. You can leave them at room temperature for up to three days. If you want them to last longer, store them in the fridge. Just be sure to seal them well to maintain their moist texture. If you have extra muffins, freezing them is a great idea. First, let the muffins cool completely. Then, wrap each muffin tightly in plastic wrap. Place them in a freezer-safe bag or container. They can stay frozen for up to three months. When you crave a muffin, just take one out and let it thaw at room temperature. To enjoy your muffins warm, reheat them in the oven. Preheat the oven to 350°F (175°C). Place the muffins on a baking sheet and heat for about 5 to 10 minutes. You can also use a microwave. Heat for about 15 to 20 seconds. Just be careful not to overheat them, or they may become tough. Enjoy your warm, gooey chocolate treat! Triple chocolate muffins stand out with three types of chocolate. Regular chocolate muffins use only cocoa powder or one kind of chocolate. In triple chocolate muffins, you get rich cocoa powder, dark chocolate chips, and milk chocolate chips. This mix creates layers of flavor. You experience deep, smooth chocolate in every bite. The result is a more intense chocolate taste that delights your senses. Triple chocolate muffins can last up to four days at room temperature. Store them in an airtight container to keep them fresh. If you want them to last longer, you can freeze them. They freeze well for up to three months. Just make sure to wrap each muffin tightly in plastic wrap before placing them in a freezer bag. When you’re ready to eat, thaw them at room temperature or warm them in the microwave. Yes, you can make some easy swaps for a healthier muffin. Here are a few ideas: - Use whole wheat flour instead of all-purpose flour. - Replace granulated sugar with coconut sugar or a sugar substitute. - Swap buttermilk for unsweetened applesauce or Greek yogurt. - Choose dark chocolate chips with a higher cocoa content for more antioxidants. These changes can help you enjoy a tasty treat while cutting back on calories and sugar. In this post, I shared how to make delicious triple chocolate muffins. We covered essential ingredients, cooking techniques, and tips for bakers. Remember, you can tweak ingredients to suit your taste. Don’t forget the optional add-ins for extra flavor. Store your muffins properly for long-lasting goodness. Keep experimenting with variations to find your favorite twist. Enjoy baking these treats, and share them with those you love. Happy muffin-making!

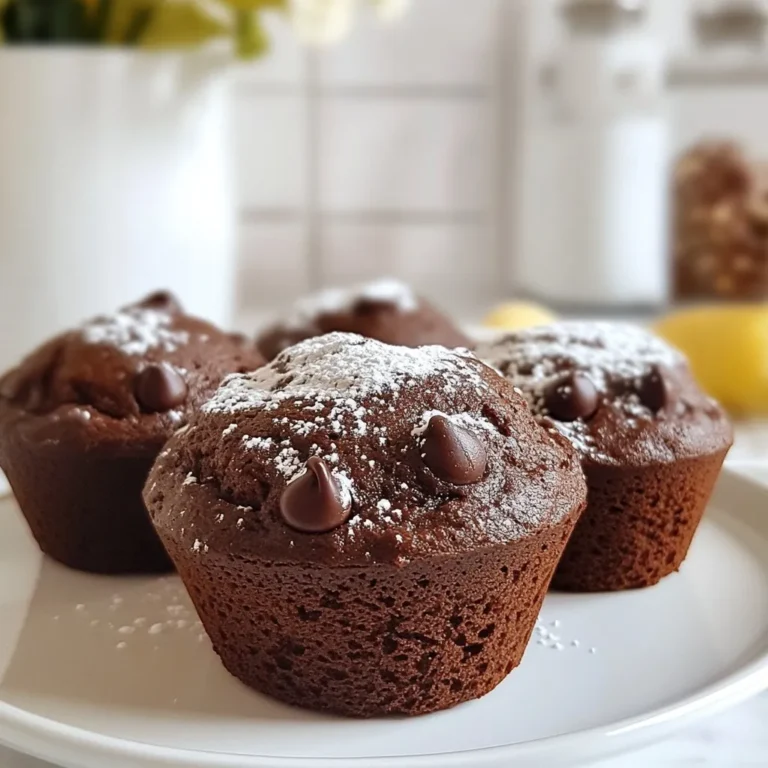
Triple Chocolate Muffins Delightfully Rich Treat

For these blondies, I use a few key ingredients that make them special: - 1 cup unsalted butter - 1 cup brown sugar, packed - 1/2 cup granulated sugar - 2 large eggs - 1 teaspoon vanilla extract The unsalted butter gives a rich flavor. I love using brown sugar for that deep sweetness. The eggs add moisture, and vanilla gives a nice aroma. Next, we have the dry ingredients. These give the blondies their structure: - 2 cups all-purpose flour - 1 teaspoon baking powder - 1/2 teaspoon baking soda - 1 teaspoon cream of tartar - 1/2 teaspoon salt - 1 teaspoon ground cinnamon All-purpose flour is a must for that chewy base. Baking powder and baking soda help with rise. Cream of tartar adds a slight tang, while the salt enhances all the flavors. Ground cinnamon adds warmth. To finish, I use a simple topping: - 1/4 cup granulated sugar for topping - 1 teaspoon ground cinnamon for topping This topping gives a sweet crunch and a lovely spice. Making these blondies is easy, and the ingredients are simple to find. {{ingredient_image_1}} - Preheat your oven to 350°F (175°C). - Grease a 9x13 inch baking dish and line it with parchment paper. Make sure some paper hangs over the edges for easy lifting later. - In a medium saucepan, melt 1 cup of unsalted butter over medium heat. Stir it often. - Cook until the butter turns a deep golden brown and smells nutty. This will take about 5-7 minutes. - Once browned, remove it from heat and let it cool slightly. - In a large bowl, combine the brown butter with 1 cup of packed brown sugar and 1/2 cup of granulated sugar. Whisk them together until smooth. - Add in 2 large eggs, one at a time, beating well after each. Then stir in 1 teaspoon of vanilla extract. - In a separate bowl, whisk together 2 cups of all-purpose flour, 1 teaspoon of baking powder, 1/2 teaspoon of baking soda, 1 teaspoon of cream of tartar, 1/2 teaspoon of salt, and 1 teaspoon of ground cinnamon. - Gradually mix the dry ingredients into the wet ingredients until just combined. Be careful not to overmix; this keeps the texture nice and chewy. - Spread the batter evenly in the prepared baking dish. Use a spatula to smooth the top. - In a small bowl, mix 1/4 cup of granulated sugar and 1 teaspoon of cinnamon. Sprinkle this mixture evenly over the batter. - Bake in the preheated oven for 20-25 minutes. Check for doneness by inserting a toothpick into the center. It should come out clean or with a few moist crumbs. - Once baked, allow the blondies to cool in the pan for about 10 minutes. - Lift them out using the parchment paper and transfer to a wire rack to cool completely. - When cool, cut into squares and serve. Enjoy these delightful treats with friends or family! To get the best texture in your blondies, do not overmix the batter. When you mix too much, the blondies can become tough. Just mix until the dry and wet ingredients are combined. Also, use fresh eggs. Older eggs can affect the rise and moisture of your blondies. Browning butter is key for flavor. Melt it in a medium saucepan over medium heat. Stir often until it turns a deep golden brown and smells nutty. Watch closely to avoid burning. If it burns, you'll need to start again. Serve these blondies warm for the best taste. A scoop of vanilla ice cream on top adds a delightful touch. Pair them with milk, coffee, or a sweet dessert wine for extra enjoyment. Pro Tips Brown Butter Perfection: Make sure to watch the butter closely while it browns to avoid burning. The nutty aroma and golden color are key to enhancing the flavor. Don’t Overmix: Mix the dry ingredients into the wet just until combined to maintain a tender texture. Overmixing can lead to dense blondies. Cooling Time Matters: Allow the blondies to cool in the pan for about 10 minutes before transferring to a wire rack. This helps set the edges and makes cutting easier. Storage Tips: Store any leftovers in an airtight container at room temperature for up to 3 days, or refrigerate for up to a week to keep them fresh. {{image_2}} You can make these blondies even better by adding chocolate chips. Choose your favorite type, like dark or milk chocolate. Just fold them in gently before baking. Another option is to mix in nuts. Pecans or walnuts add a nice crunch. Be sure to chop them into smaller pieces for even distribution. If you need a gluten-free option, swap the all-purpose flour for a gluten-free blend. Many brands work well in baking. Just check the package for the right amount to use. For a vegan version, replace the butter with a plant-based option. Use flax eggs instead of regular eggs. One tablespoon of ground flaxseed mixed with three tablespoons of water makes a great substitute. In the fall, try adding pumpkin spice to the batter. This adds a warm, cozy flavor that is perfect for autumn. Just mix in one teaspoon along with the dry ingredients. When summer arrives, you might want to use seasonal fruits. Chopped apples or berries can brighten up these blondies. They add flavor and moisture, making each bite delicious! To keep your Brown Butter Snickerdoodle Blondies fresh, store them in an airtight container. Place them at room temperature for up to three days. If you want to keep them longer, consider refrigeration. Just wrap them well in plastic wrap first. This helps maintain moisture. These blondies last about five days in the fridge. If you need to store them longer, freezing is a great option. They can stay in the freezer for up to three months. Make sure to wrap them tightly in plastic wrap and then place them in a freezer bag. To enjoy your blondies warm, heat them in the microwave for about 10-15 seconds. This brings back their soft, gooey texture. You can eat them cold, too, as they still taste great. Choose what you prefer! Blondies and brownies differ mainly in their ingredients and texture. Blondies use brown sugar, while brownies use cocoa. This gives blondies a lighter, caramel flavor. Brownies are denser and richer. Blondies also have a chewy texture, while brownies are often fudgy. Both are delicious, but they offer unique tastes. Yes, you can use alternative sugars. Coconut sugar works well in blondies. It adds a slight caramel flavor too. You can also try maple syrup or agave nectar. Just keep in mind that these may change the texture. Adjust your liquid ingredients if needed. Look for a few signs to tell if blondies are done. The edges should be golden brown, and the center should look set. Use a toothpick to test doneness. Insert it into the middle; it should come out clean or with a few moist crumbs. If it’s too wet, bake a few more minutes. You can replace butter with oil but expect changes. Butter gives blondies a rich flavor and texture. Oil makes them softer and less rich. Use an equal amount of oil, but consider the taste. It may not be as satisfying, but it can work in a pinch. To make blondies chewier, use more brown sugar. Brown sugar adds moisture and chewiness. Also, avoid overmixing the batter. This keeps the blondies tender. Chill the dough for a bit before baking to enhance the chewiness as well. Enjoy your chewy treats! These brown butter snickerdoodle blondies are a treat you can make easily. From selecting the right ingredients to following simple steps, this recipe is straightforward. You learned about adding flavors or making dietary adjustments. Remember to store your blondies properly for the best taste. Enjoy these sweet delights warm or cold! With this guide, you’ll impress everyone with your baking skills. Grab your ingredients and start baking today!

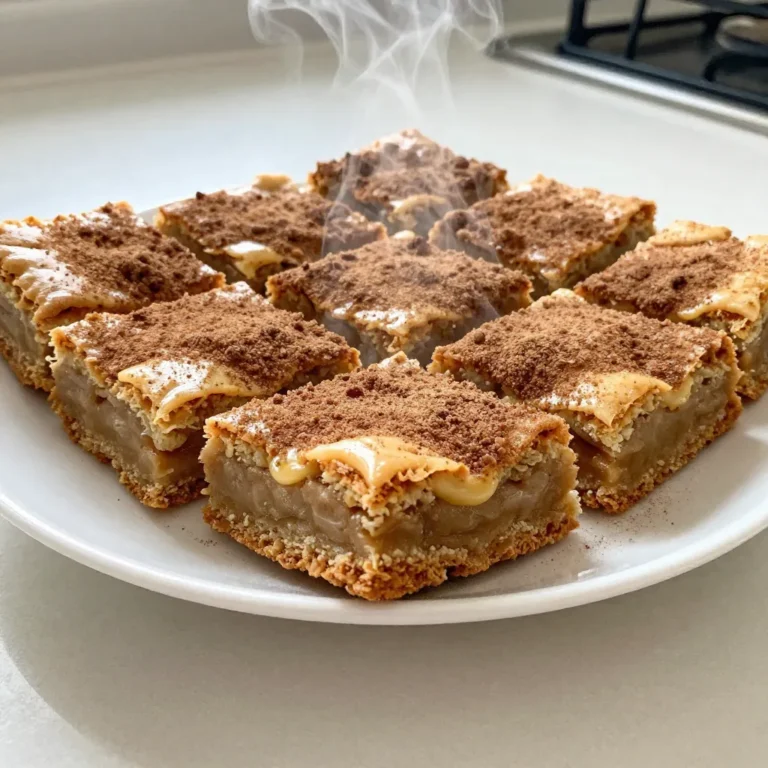
Brown Butter Snickerdoodle Blondies Delightful Treat

- 2 ¾ cups all-purpose flour - 1 teaspoon baking powder - ½ teaspoon baking soda - ½ teaspoon ground nutmeg - ½ teaspoon ground cinnamon - 1 cup unsalted butter, softened - 1 cup granulated sugar - 1 large egg - 1 teaspoon vanilla extract - ¾ cup eggnog - 1 cup powdered sugar (for icing) - Extra nutmeg and cinnamon for garnish When making eggnog sugar cookies, choose fresh ingredients for the best taste. Look for: - Butter: Use unsalted butter; it gives you control over the salt. - Eggnog: Pick a rich, creamy eggnog for a full flavor. Organic or homemade is often best. - Spices: Freshly ground nutmeg and cinnamon provide a stronger flavor. Check the expiration dates on your spices. You can make this recipe your own with simple swaps: - Flour: For a gluten-free option, try a 1:1 gluten-free flour blend. - Sugar: Coconut sugar or brown sugar can add a deeper flavor. - Egg: Use a flax egg (1 tablespoon flaxseed meal + 2.5 tablespoons water) for a vegan option. - Butter: For dairy-free, use a plant-based butter or coconut oil. These tips help you create cookies that fit your taste and dietary needs. Enjoy baking! {{ingredient_image_1}} Start by preheating your oven to 350°F (175°C). This makes sure your cookies bake evenly. Next, line your baking sheets with parchment paper. This helps the cookies not stick and makes cleanup easy. In a medium bowl, whisk together the flour, baking powder, baking soda, nutmeg, and cinnamon. Mixing these dry ingredients first helps to spread the flavors evenly. Set this bowl aside for later. In a large bowl, cream the softened butter and granulated sugar using an electric mixer. Mix until the mixture looks light and fluffy. This step is key for a soft texture in your cookies. Now, beat in the egg, vanilla extract, and eggnog into the butter and sugar. Mix well until everything is combined smoothly. Gradually add the dry mixture to this wet mixture. Mix just until combined. Be careful not to overmix; it can make your cookies tough. Use a cookie scoop or a tablespoon to drop the dough onto the prepared baking sheets. Leave about 2 inches between each cookie. This spacing allows them to spread while baking. Bake the cookies for 10-12 minutes, or until the edges turn golden. Once baked, let them cool on the sheet for 5 minutes, then transfer to a wire rack. In a small bowl, mix powdered sugar with a few tablespoons of eggnog. Stir until smooth. Adjust the icing consistency with more eggnog or powdered sugar as needed. Once your cookies are cool, drizzle the icing over them. Finish by sprinkling a pinch of nutmeg and cinnamon on top for extra flavor and a festive touch. To get soft and chewy cookies, you need to cream the butter and sugar well. Mix until it feels light and fluffy. This step adds air to the dough. When you mix in the eggnog, it helps keep cookies moist. Make sure not to overmix after adding the dry ingredients. A few lumps are okay. This keeps the cookies tender. One mistake is baking cookies too long. Keep an eye on them. They should be just golden at the edges. If you wait until they look brown, they may be dry. Another mistake is using cold butter. Always soften it first. Cold butter won’t mix well and leads to hard cookies. Lastly, don’t skip the eggnog. It adds flavor and moisture. When icing, start with cooled cookies. Warm cookies will melt your icing. Mix the powdered sugar with eggnog until smooth. Aim for a drizzle-able consistency. If it’s too thick, add more eggnog. If it’s too thin, add more powdered sugar. Drizzle the icing on top and sprinkle with extra nutmeg and cinnamon. This makes them look pretty and tasty. Pro Tips Chill the Dough: For thicker cookies, chill the dough for at least 30 minutes before baking. This helps the cookies hold their shape and enhances the flavors. Use Fresh Spices: Always opt for fresh ground nutmeg and cinnamon for the best flavor. Fresh spices can significantly elevate the taste of your cookies. Perfect Icing Consistency: When making the icing, start with less eggnog and gradually add more until you reach the desired consistency. It should be thick enough to hold its shape but still smooth for drizzling. Decorative Touch: Add a pinch of cinnamon and nutmeg on top of the icing for an eye-catching finish and additional flavor. This small step makes a big visual difference! {{image_2}} You can make eggnog sugar cookies even better. Try adding ginger for warmth. A half teaspoon works well. You can also add cloves or allspice for a cozy touch. If you want a twist, use orange zest. It gives a bright flavor that pairs nicely with the eggnog. Experiment with different spices to find your favorite mix. If you need a gluten-free option, swap all-purpose flour for gluten-free flour. Make sure it’s a blend meant for baking. This helps keep the texture light and fluffy. Use the same amount, 2 ¾ cups. The cookies will still taste great and fit your diet. Enjoy the holiday flavors without worrying! You can change up the icing for fun. Instead of eggnog icing, use cream cheese icing for a richer flavor. Mix 4 ounces of cream cheese with powdered sugar and a bit of milk. It gives a tangy twist. You can also top the cookies with crushed candy canes or chocolate chips. These add a fun crunch and make your cookies pop! To keep your eggnog sugar cookies fresh, store them in an airtight container. Line the container with parchment paper to avoid sticking. You can also add a slice of bread to keep them soft. This helps absorb moisture. When stored properly, these cookies last about one week at room temperature. If you keep them in the fridge, they can last up to two weeks. Just make sure they are well-sealed to prevent drying out. To freeze your eggnog sugar cookies, place them in a single layer on a baking sheet. Freeze until solid, then transfer them to a freezer-safe bag. They can last up to three months in the freezer. When you're ready to enjoy, thaw them at room temperature. Then, add icing before serving for a fresh taste. Yes, you can make these cookies ahead of time. Bake them and let them cool. Once cool, store them in an airtight container. They stay fresh for about a week. You can also freeze the cookies. Wrap them well, and they can last up to three months. When you want to eat them, just thaw and enjoy! I recommend using store-bought eggnog for ease. Choose a brand you like, as the flavor shines through. If you prefer homemade eggnog, that works too! Just ensure it is thick and creamy for the best results. The richness enhances the cookie's flavor. You can use margarine, but it may change the taste and texture. Butter adds richness and depth that margarine can't match. If you want a dairy-free option, look for a high-quality margarine. Just ensure it is softened for easy mixing. To make smaller cookies, use a smaller scoop or spoon. Adjust the baking time to 8-10 minutes. For larger cookies, use a bigger scoop and bake for 12-14 minutes. Keep an eye on them, so they don’t burn. Adjusting size alters the texture, but both will taste great! In this blog post, I covered the key ingredients for delicious eggnog sugar cookies and shared step-by-step instructions to make them. I provided tips for selecting quality ingredients and offered helpful substitutions. You also learned tricks for achieving the right cookie texture and ice them perfectly. Remember, you can customize your cookies or store them properly for later. Enjoy baking! These cookies will surely bring joy to your holiday season.

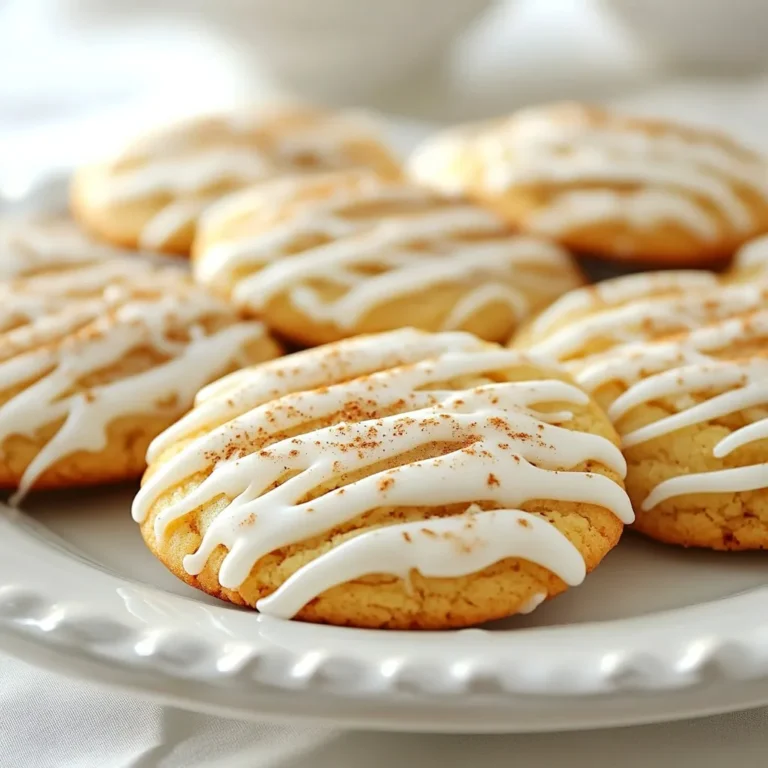
Eggnog Sugar Cookies Delicious Holiday Delight

For this recipe, you need 4 ears of fresh corn. Look for ears that feel heavy and have bright green husks. Fresh corn gives the best flavor and texture for grilling. The marinade brings this dish to life. Gather these ingredients: - 2 tablespoons olive oil - 1 teaspoon chili powder - 1 teaspoon smoked paprika - 1/2 teaspoon garlic powder - Zest of 1 lime - Juice of 2 limes - Salt and pepper to taste Mixing these items creates a tangy and spicy flavor that makes the corn special. The lime juice adds brightness, while the chili powder brings some heat. You can add fun touches to your corn ribs. Here are some great ideas: - Fresh cilantro, for garnish - Lime wedges, for serving These garnishes not only add color but also enhance the flavor. The lime wedges give each bite a fresh zing. {{ingredient_image_1}} First, you need to preheat your grill. Set it to medium-high heat. This step is key for even cooking. A hot grill helps create those lovely char marks. Next, grab your fresh corn. Stand each cob upright on a cutting board. Cut down the sides to make quarters. Aim for rib-like shapes. This is where the fun begins! Now it’s time for the marinade. In a large bowl, mix 2 tablespoons of olive oil. Add 1 teaspoon of chili powder and 1 teaspoon of smoked paprika. Then, toss in 1/2 teaspoon of garlic powder. For zesty flavor, add lime zest and juice from 2 limes. Finally, season with salt and pepper. Whisk everything until smooth. Add the corn ribs to the bowl. Toss them well to coat in the marinade. Let them sit for at least 15 minutes. This waiting time lets the flavors soak in. Place the corn ribs on the hot grill. Cook them for about 5 to 7 minutes on each side. Look for nice grill marks and tenderness. Keep an eye on them to avoid overcooking. Once grilled, take the corn ribs off the grill. Arrange them on a platter. Garnish with fresh cilantro for color. Serve with lime wedges on the side. This adds an extra zing! Enjoy your tasty summer treat! Pick fresh corn for the best taste. Look for ears with bright green husks. The kernels should be plump and shiny. If they feel dry or have dark spots, skip them. Sweet corn works well in this dish. To boost flavor, add more lime juice or zest. You can also mix in some honey for sweetness. If you like heat, try adding more chili powder or a splash of hot sauce. Let your taste guide you. Grill the corn ribs on medium-high heat. This gives them nice grill marks. Cook for 5-7 minutes per side. Watch closely to avoid burning. Turn them only once or twice for even cooking. When done, they should be tender but not mushy. Pro Tips Choosing the Right Corn: Opt for fresh, in-season corn for the best sweetness and flavor. Look for kernels that are plump and tightly packed. Marinate Longer for More Flavor: If time allows, marinating the corn ribs for 30 minutes or even an hour can enhance the flavor even more. Watch the Cooking Time: Keep an eye on the corn while grilling. Overcooking can lead to a mushy texture; you want them tender with a slight crunch. Experiment with Toppings: Feel free to add your favorite toppings, such as crumbled cheese or a drizzle of spicy mayo, for an extra flavor boost. {{image_2}} For a kick, add more heat. Mix in 1-2 teaspoons of cayenne pepper. You can also use jalapeños for fresh flavor. This spicy twist makes your taste buds dance. Adjust the lime juice to balance the heat. Serve with cooling sour cream for a great contrast. If you love cheese, this one's for you. After grilling, sprinkle fresh parmesan on top. Mix in herbs like basil or parsley with the cheese. This adds a rich, savory taste to the corn. The herbs give it a fresh aroma. You can even add lemon zest for a citrusy boost. For a unique flavor, try honey or maple syrup. Drizzle it on the corn before grilling. This adds a sweet layer that pairs well with the chili. You can also toss in some cinnamon for warmth. This twist makes the corn ribs a fun treat for all ages. After making Chili Lime Grilled Corn Ribs, let them cool to room temperature. Place the ribs in an airtight container. Store them in the fridge for up to three days. Be sure to keep the lime wedges and cilantro separate until ready to eat. This helps keep everything fresh. To reheat the corn ribs, use a grill or stovetop. Heat the grill to medium. Place the corn ribs on the grill for about 3-5 minutes. Turn them occasionally until warm. If using a stovetop, heat a skillet over medium heat. Add a small amount of oil and warm the corn ribs for about 4-5 minutes. Enjoy the zesty flavors again! You can freeze corn ribs, but they might lose some texture. To freeze, first cool them completely. Wrap each rib in plastic wrap or foil. Place the wrapped ribs in a freezer-safe bag. Corn ribs can last up to three months in the freezer. When you are ready to eat them, thaw in the fridge overnight before reheating. To cut corn into ribs, grab fresh corn. Stand the ear upright. Carefully slice down each side. Cut until you have long, rib-like pieces. Aim for four quarters per ear. This method keeps the corn juicy and tasty. Yes, you can prep the corn ribs ahead of time. Cut and marinate them a few hours before grilling. Store them in the fridge. This helps the flavors soak in well. Just remember to grill them fresh for the best taste. Chili lime grilled corn ribs pair well with many dishes. Try them with grilled meats like chicken or steak. They also go great with fresh salads or rice. For a light meal, serve with guacamole and chips. To make this recipe vegan, use a plant-based oil. Olive oil works well, but you can try others too. All the spices and lime juice are already vegan. This way, you can enjoy the same zesty flavor without any animal products. In this blog post, I covered how to make delicious corn ribs, starting from fresh corn to optional garnishes. You learned the best marinade ingredients, grilling tips, and how to enhance flavors. I also shared fun variations to try and important storage tips. Remember, grilling corn ribs can be easy and fun. You can serve them with almost anything you love. Try these ideas, and you'll impress your friends and family. Enjoy cooking these tasty treats!

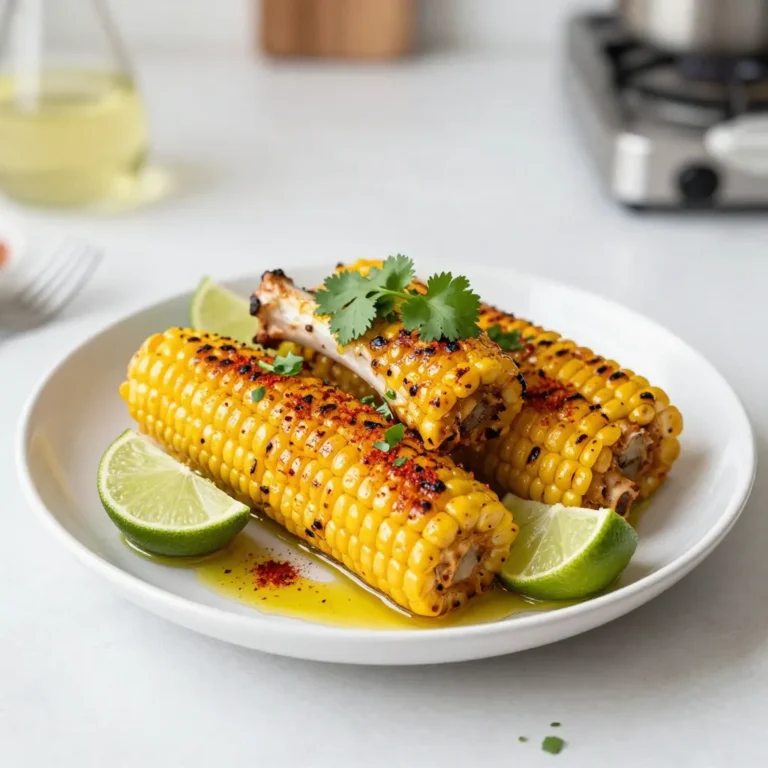
Chili Lime Grilled Corn Ribs Flavorful Summer Treat

To make Vegan Impossible Meatloaf, gather these key items: - 1 lb Impossible Burger (or any plant-based ground meat) - 1 cup cooked quinoa - 1/2 cup finely chopped onion - 1/2 cup finely chopped bell pepper (any color) - 2 cloves garlic, minced - 1/2 cup grated carrots - 1/4 cup ground flaxseed mixed with 1/4 cup water (flax egg) - 1/4 cup gluten-free breadcrumbs (or regular breadcrumbs) - 2 tablespoons soy sauce (or tamari for gluten-free) - 1 tablespoon maple syrup - 1 teaspoon dried thyme - 1 teaspoon smoked paprika - 1 teaspoon black pepper - Salt to taste These add flavors and textures: - 1/4 cup ketchup for glazing You can make some easy swaps if needed: - Use any plant-based ground meat for Impossible Burger. - If you don’t have quinoa, try using brown rice or bulgur. - For gluten-free, use gluten-free breadcrumbs and tamari. - Maple syrup can be replaced with agave if desired. - Swap flax egg with chia seeds mixed with water for a similar binding effect. Feel free to get creative with these ingredients. Each choice can change the taste or look of your meatloaf! {{ingredient_image_1}} First, preheat your oven to 350°F (175°C). This ensures your meatloaf bakes evenly. Next, line a loaf pan with parchment paper. This makes it easy to remove the meatloaf later. In a large mixing bowl, combine the following: - 1 lb Impossible Burger - 1 cup cooked quinoa - 1/2 cup finely chopped onion - 1/2 cup finely chopped bell pepper - 2 cloves garlic, minced - 1/2 cup grated carrots - 1/4 cup ground flaxseed mixed with 1/4 cup water - 1/4 cup gluten-free breadcrumbs - 2 tablespoons soy sauce - 1 tablespoon maple syrup - 1 teaspoon dried thyme - 1 teaspoon smoked paprika - 1 teaspoon black pepper - Salt to taste Mix all these ingredients well. You can use your hands to make sure everything blends nicely. This helps the flavors mix better. Once mixed, transfer the mixture into the loaf pan. Press it down firmly to shape it into a loaf. If you like, spread 1/4 cup of ketchup over the top for a tasty glaze. Now, place the loaf pan in your preheated oven. Bake for 45-50 minutes. You want the loaf to be firm and slightly browned on top. After baking, let it cool for 10 minutes. This helps it set and makes slicing easier. Enjoy your warm vegan meatloaf! To get the right texture, use a mix of ingredients. The Impossible Burger gives a nice base. Adding cooked quinoa adds a chewy bite. Grated carrots help with moisture. The flax egg binds it all together. You want it firm but not dry. Press the mixture firmly in the pan. This helps shape the loaf well. You can boost flavor in many ways. Adding soy sauce gives it a savory taste. Smoked paprika adds a nice depth. Don't skip the maple syrup for a touch of sweetness. Fresh herbs can also add a lot. Try adding chopped parsley or basil for freshness. If you like heat, add some red pepper flakes too. One common mistake is overmixing the ingredients. This can make the loaf dense. Mix just until well combined. Another mistake is not letting it cool before slicing. This helps the loaf hold its shape. Also, avoid skipping the glaze. Ketchup on top adds a nice finish and extra flavor. Pro Tips Flax Egg Tip: Make sure to let the flaxseed mixture sit for about 5 minutes to thicken before adding it to the other ingredients. This helps bind the meatloaf effectively. Texture Tip: For a meatier texture, consider adding finely chopped mushrooms or lentils to the mixture. They enhance the flavor and provide extra nutrition. Glazing Tip: If you enjoy a sweeter glaze, mix the ketchup with a little bit of brown sugar or balsamic vinegar for a unique flavor boost. Serving Tip: Allow the meatloaf to rest for at least 10 minutes after baking. This helps it firm up, making it easier to slice and serve. {{image_2}} You can easily make this vegan meatloaf gluten-free. Use gluten-free breadcrumbs instead of regular ones. Ensure your soy sauce is gluten-free by using tamari. Quinoa is naturally gluten-free, so it works well in this dish. You can change the flavor by adding spices or herbs. For a zestier taste, add a pinch of cayenne pepper or chili powder. If you prefer a sweeter flavor, try adding more maple syrup or even a splash of balsamic vinegar. Italian herbs like oregano and basil can give it an Italian twist. Feel free to sneak in more veggies or nuts. Chopped mushrooms or zucchini can add moisture and flavor. You can also add chopped walnuts or pecans for extra crunch and protein. Just be sure to chop them small so they mix well with the other ingredients. Store leftover Vegan Impossible Meatloaf in an airtight container. Keep it in the fridge for up to five days. Before storing, let it cool to room temperature. This helps preserve texture and flavor. You can freeze the meatloaf for later use. Wrap it tightly in plastic wrap and then in foil. Label it with the date. It will stay good in the freezer for up to three months. To thaw, place it in the fridge overnight before reheating. To reheat, slice the meatloaf into portions. Place it in a preheated oven at 350°F (175°C) for about 20 minutes. You can also use a microwave for quicker reheating. If you use a microwave, heat it in 30-second bursts until warm. Enjoy it warm for the best taste! Yes, you can skip quinoa. Use more breadcrumbs instead. This keeps the meatloaf firm. You could also add cooked lentils or rice. Both will work well in this dish. To add heat, mix in some chili powder. You can also use diced jalapeños for a fresh kick. A dash of hot sauce in the mix gives a nice boost. Adjust the heat to your taste. This meatloaf pairs great with mashed potatoes or a fresh salad. You can also serve it with steamed veggies for a balanced meal. A side of roasted sweet potatoes adds a lovely touch too. Enjoy your meal! In this guide, we explored the key ingredients for meatloaf, from main to optional. You learned step-by-step how to prepare and bake it to perfection. We shared tips for texture and flavor while highlighting variations for different diets. Proper storage and reheating can keep your meatloaf fresh, too. Remember, cooking is a fun way to experiment. Enjoy making each batch your own. Happy cooking!

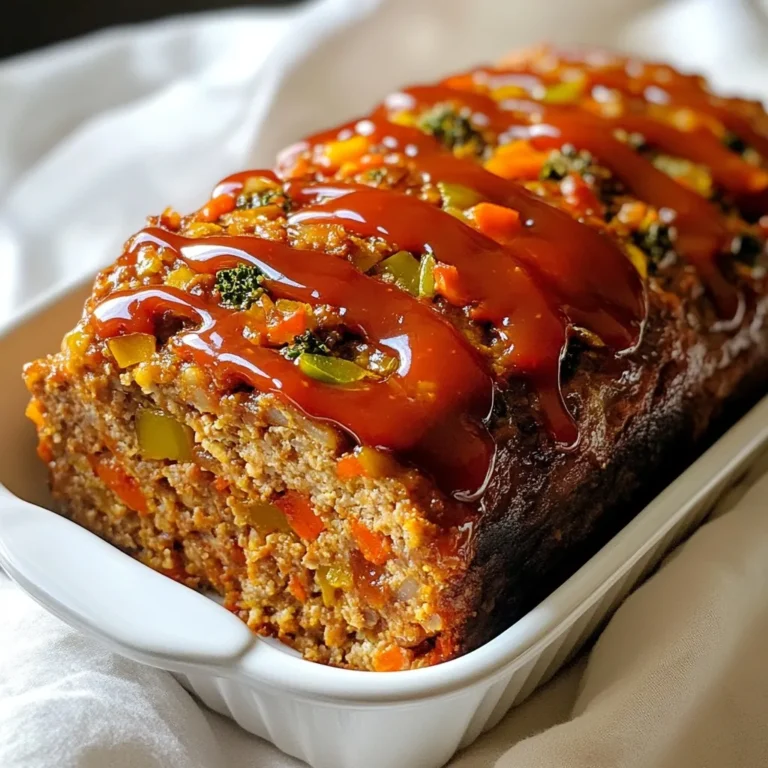
Vegan Impossible Meatloaf Flavorful and Easy Recipe

- 2 ½ cups all-purpose flour - 1 teaspoon baking powder - ½ teaspoon baking soda - ½ teaspoon salt - ¾ cup unsalted butter, softened - 1 cup granulated sugar - ½ cup brown sugar, packed - 2 large eggs - 2 teaspoons vanilla extract - ½ cup rainbow sprinkles (plus extra for topping) - 1 cup royal icing or cream cheese frosting (optional for topping) When choosing flour, use unbleached all-purpose flour. It gives the best texture. Make sure the butter is softened. This helps it mix well with the sugars. Use fresh eggs for the best flavor. For sprinkles, choose colorful ones to make your bars pop. If you want a sweeter treat, go for cream cheese frosting. You can swap all-purpose flour with a gluten-free blend if needed. Use coconut oil or margarine instead of butter for a dairy-free option. For a lower sugar version, try using a sugar substitute. You can also replace eggs with flax eggs for a vegan option. If you don’t have sprinkles, chopped nuts or dried fruit work well too. {{ingredient_image_1}} 1. Start by preheating your oven to 350°F (175°C). 2. Line a 9x13 inch baking pan with parchment paper. Leave some overhang for easy removal. 3. In a medium bowl, whisk together 2 ½ cups of all-purpose flour, 1 teaspoon of baking powder, ½ teaspoon of baking soda, and ½ teaspoon of salt. Set this mixture aside. 4. In a large bowl, beat ¾ cup of softened unsalted butter, 1 cup of granulated sugar, and ½ cup of packed brown sugar. Mix until light and fluffy, about 2-3 minutes. 5. Add 2 large eggs one at a time, mixing well after each addition. Then, add 2 teaspoons of vanilla extract. 6. Gradually add the dry mixture to the wet ingredients. Mix on low speed until just combined. 7. Gently fold in ½ cup of rainbow sprinkles. Ensure they are evenly distributed in the batter. 8. Pour the batter into your prepared baking pan. Spread it evenly using a spatula. 9. Bake for 20-25 minutes. The edges should be lightly golden. A toothpick inserted in the center should come out clean. 10. Let the cookie bars cool in the pan on a wire rack. Use the parchment paper overhang to lift them out easily. 11. Once completely cool, spread 1 cup of royal icing or cream cheese frosting on top if you like. 12. Add extra rainbow sprinkles on top for decoration. 13. Cut into squares or rectangles before serving. For soft, chewy bars, use room temperature butter. It helps the sugar mix well. Beat the butter and sugars until fluffy. This adds air and makes the bars light. Avoid mixing too long after adding flour. You want a soft dough, not a hard one. When folding in sprinkles, do it gently. This keeps the bars from becoming tough. If your bars are dry, you may have overbaked them. Check them at 20 minutes. If they are too crumbly, try adding a little milk next time. Too much flour can cause dryness too, so measure carefully. If they spread too much, your butter may have been too warm. Chill the dough for 30 minutes before baking if needed. These bars taste great on their own. For a fun twist, add frosting on top. Cream cheese frosting pairs well with the sweetness. You can cut them into small squares for parties. Serve with a scoop of ice cream for a yummy dessert. These bars are perfect for birthdays or any celebration. Pro Tips Use Room Temperature Ingredients: Ensuring your butter and eggs are at room temperature helps create a smooth batter and allows for better incorporation of air, resulting in fluffier cookie bars. Don’t Overmix the Batter: Once you add the dry ingredients to the wet, mix just until combined to avoid tough cookie bars. A few flour streaks are okay! Let Them Cool Completely: Allow the cookie bars to cool completely in the pan before frosting. This prevents the frosting from melting and ensures a beautiful finish. Customize Your Sprinkles: Feel free to use themed sprinkles for special occasions, like red and green for Christmas or pastel colors for Easter, to elevate your cookie bars! {{image_2}} You can change the flavor of your Funfetti sugar cookie bars easily. For a twist, try adding almond extract instead of vanilla. This gives your bars a nice nutty taste. You can also mix in different flavored extracts, like lemon or orange, to brighten up the flavor. Another fun idea is to use chocolate chips or peanut butter chips along with the sprinkles. This adds a great texture and taste. If you need to make your cookie bars gluten-free, swap out the all-purpose flour for a gluten-free blend. Make sure it works for baking to keep the texture right. For dairy-free options, use vegan butter instead of unsalted butter. You can also use flax eggs in place of regular eggs. Just mix one tablespoon of ground flaxseed with three tablespoons of water, let it sit for a few minutes, and use it like an egg. Toppings can make your cookie bars even more fun! If you love frosting, use royal icing or cream cheese frosting on top. You can mix in some extra sprinkles for color. Another idea is to drizzle melted chocolate over the bars. Dark, white, or milk chocolate all work well. For a fruity twist, try adding fresh berries on top. They add a nice tartness and look great too. To keep your Funfetti sugar cookie bars fresh, store them in an airtight container. This helps keep them soft and tasty. If you have frosting on top, wait until it's set before covering. You can also wrap the bars in plastic wrap for extra protection. Store them at room temperature for the best taste. You can freeze these cookie bars for later. First, let them cool completely. Then, cut them into squares. Wrap each square in plastic wrap, then place them in a freezer bag. You can freeze them for up to three months. When you want to eat them, just thaw them overnight in the fridge. When stored properly, these cookie bars last about one week at room temperature. If frozen, they keep well for about three months. Just remember, the sooner you eat them, the fresher they taste! Enjoy them as a fun treat any time. You can tell the bars are done when the edges turn a light golden color. A toothpick test works well too. Insert a toothpick into the center. If it comes out clean, they are ready. Bake them for 20-25 minutes for the best results. Keep an eye on them towards the end to avoid overbaking. Yes, you can use many types of sprinkles! Mix and match colors to fit any theme. Nonpareils, jimmies, or even chocolate sprinkles work well. Just ensure the sprinkles are safe for baking. Some sprinkles might bleed their color, so choose wisely for the best look. Royal icing is made with egg whites and sugar, giving it a hard finish. It dries well, making it great for decoration. Cream cheese frosting is rich and creamy, with a soft texture. It tastes sweet and tangy, making it perfect for spreading. Both add a delicious touch to your Funfetti Sugar Cookie Bars! We covered all the key steps to make delicious Funfetti Sugar Cookie Bars. You learned about ingredients, preparation, and baking process. The tips helped avoid common mistakes. You can also add your favorite flavors and toppings for a twist. Remember the best storage tips to keep them fresh. Enjoy sharing these tasty treats with friends. Now, it’s time to bake and have fun!

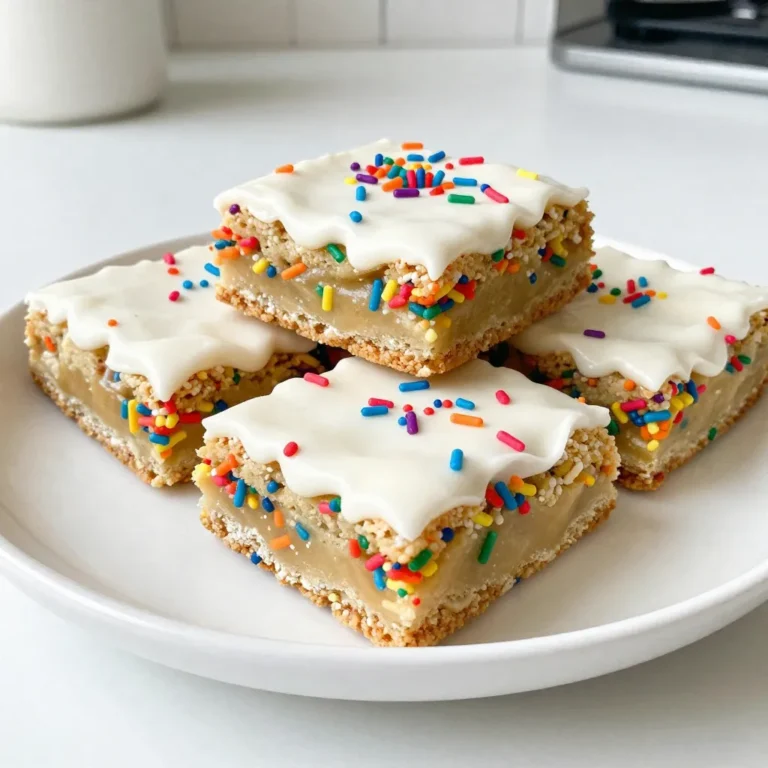
Funfetti Sugar Cookie Bars Irresistible Treat Recipe

To make a tasty Vegan Carrot Potato Soup, gather these simple ingredients: - 4 large carrots, peeled and chopped - 2 medium potatoes, peeled and diced - 1 onion, chopped - 2 cloves garlic, minced - 4 cups vegetable broth - 1 teaspoon ground cumin - 1 teaspoon ground coriander - 1 tablespoon olive oil - Salt and pepper to taste - Fresh parsley, chopped (for garnish) These ingredients create a rich and hearty soup. The carrots and potatoes provide sweetness and depth. The onion and garlic offer a nice base flavor. Cumin and coriander add warmth and spice. Using vegetable broth enhances the flavor without any animal products. Fresh parsley brightens the dish and adds a pop of color. Feel free to adjust the amounts based on your taste. You can add more garlic for a stronger flavor or use different herbs for variety. The key is to balance the flavors and make the soup your own. {{ingredient_image_1}} Sautéing the onion and garlic Start by heating the olive oil in a large pot over medium heat. Add the chopped onion and sauté it for about five minutes. You want the onion to turn soft and clear. Then, add the minced garlic and cook for another minute. This will make your kitchen smell amazing. Adding carrots and potatoes Next, toss in the chopped carrots and diced potatoes. Mix everything well. This step adds color and flavor to your soup. Toasting spices Now, sprinkle the ground cumin and ground coriander over the veggies. Stir for one to two minutes. Toasting the spices brings out their rich flavors, making your soup even tastier. Simmering the soup Pour in the vegetable broth, making sure all the veggies are covered. Bring the soup to a boil. Once it boils, reduce the heat and let it simmer. Cover the pot and cook for about 20 to 25 minutes. The vegetables should become tender during this time. Blending for smoothness After the veggies are soft, use an immersion blender to puree the soup until it is smooth. If you do not have one, carefully transfer the soup in batches to a regular blender. Blend until creamy and velvety. Adjusting seasoning Return the pureed soup to the pot. Taste it and add salt and pepper as needed. If it feels too thick, you can add more vegetable broth or water. Heat it through for another five minutes, stirring occasionally. Enjoy your delicious vegan carrot potato soup! To boost the taste of your vegan carrot potato soup, consider adding spices. Ground cumin and ground coriander bring warmth and depth. You can also try smoked paprika for a lovely smoky flavor. Fresh herbs like thyme or dill can add a fresh touch. For a kick, a pinch of red pepper flakes works well too. For garnishing, fresh parsley is a must. It adds a nice color and flavor. Another great option is a drizzle of olive oil on top. You can even sprinkle some roasted seeds for crunch. These simple touches make your soup more appealing and tasty. Using an immersion blender is my favorite for this soup. It allows you to blend right in the pot. This saves time and fewer dishes to clean. If you don’t have one, a regular blender works too. Just blend in small batches to avoid spills. For the perfect consistency, start with the right amount of broth. If the soup is too thick, add more broth or water. Blend until you reach a smooth texture. This soup should be creamy, not chunky. Adjust it to your liking for a great meal. Pro Tips Use Fresh Ingredients: The flavor of your soup will greatly improve with fresh, high-quality carrots and potatoes. Look for vibrant colors and firm textures. Adjust the Spice Level: Feel free to add more spices or a pinch of cayenne pepper if you prefer a spicier soup. This can add an extra dimension of flavor. Garnish Thoughtfully: Fresh herbs like parsley or cilantro not only enhance the flavor but also add a pop of color to your presentation. Consider adding a squeeze of lemon for brightness. Texture Preference: If you like your soup chunky, reserve some diced carrots and potatoes before blending. Add them back in after pureeing for added texture. {{image_2}} You can switch up the veggies in this soup. Sweet potatoes add a nice sweetness. Parsnips bring a unique flavor too. Both work well with the spices. If you have other veggies, like squash or turnips, feel free to try them. Changing the broth can also change the taste. Use mushroom broth for a deeper flavor. You can even use a homemade broth for a fresh touch. Just make sure it’s vegan-friendly. To make the soup creamier, try adding coconut cream or cashew cream. These dairy alternatives blend well and add richness. You can also use soy or almond milk for a lighter touch. Want some heat? Add chili powder or hot sauce to spice it up. Start with a small amount and adjust to your taste. This way, you control how spicy your soup becomes. To keep your vegan carrot potato soup fresh, store leftovers in an airtight container. Allow the soup to cool before sealing. Place the container in the fridge. It will stay good for about 4-5 days. When ready to eat, give it a good stir. You may need to add a splash of broth or water to thin it out. Freezing this soup is easy and great for meal prep. Pour the cooled soup into freezer-safe bags or containers. Leave some space at the top for expansion. It can last in the freezer for up to 3 months. When you want to enjoy it, thaw overnight in the fridge. Reheat on the stove over low heat, stirring often. If it's too thick, add a bit more vegetable broth or water to reach your desired consistency. Can I make this soup ahead of time? Yes, you can make this soup ahead of time. It tastes even better after a day. Just store it in the fridge. Reheat it on the stove before serving. How long does the soup last in the fridge? This soup lasts about five days in the fridge. Store it in an airtight container. Always check for signs of spoilage before eating. Is this soup gluten-free? Yes, this soup is gluten-free. The ingredients used, like vegetables and broth, do not contain gluten. It is safe for those with gluten intolerance. Can I use fresh herbs instead of dried? Absolutely! Fresh herbs can add a bright flavor. If using fresh parsley, add it at the end for the best taste. Use about three times more fresh herbs than dried. This blog post shared a simple soup recipe that is healthy and tasty. I covered the key ingredients, step-by-step instructions, and helpful tips. You can personalize it with your favorite veggies or spices. Storage details help keep your soup fresh and flavorful. This soup is a go-to meal that you can enjoy anytime. It's easy to make and packed with nutrients. I hope you feel inspired to try it, share it, and enjoy it with friends and family.

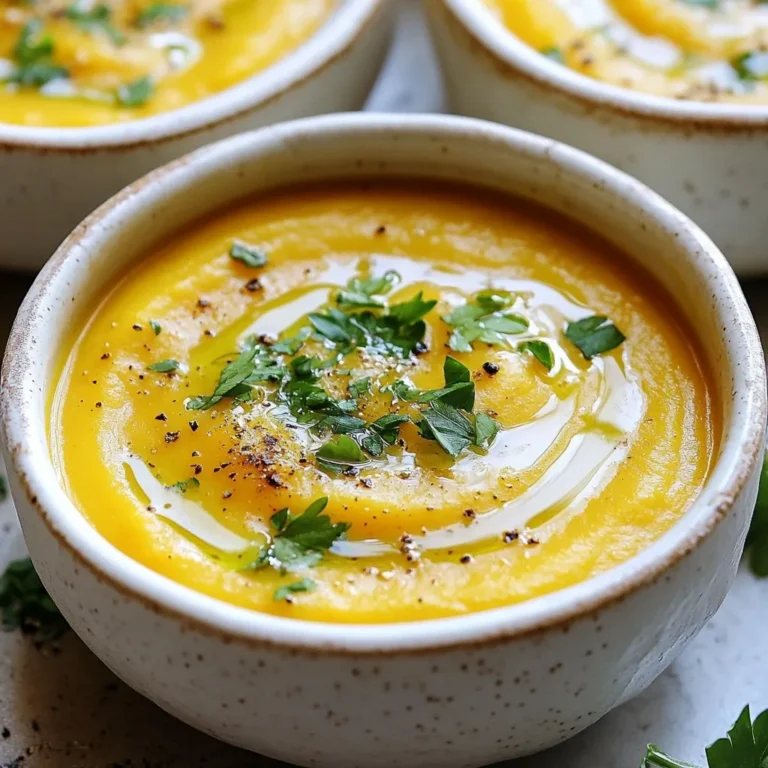
Vegan Carrot Potato Soup Flavorful and Nourishing Dish

The key to a great Orange Cinnamon Iced Tea lies in the ingredients. Here’s what you need: - 4 black tea bags - 4 cups boiling water - 1 orange, zested and juiced - 2 cinnamon sticks - 1/4 cup honey (or to taste) - 4 cups cold water - Ice cubes - Orange slices for garnish - Cinnamon sticks for garnish Each ingredient in this drink offers unique benefits: - Black tea: Rich in antioxidants. It can help boost heart health. - Orange: High in vitamin C. It supports the immune system and adds a fresh taste. - Cinnamon: Known for its anti-inflammatory properties. It can help stabilize blood sugar levels. - Honey: A natural sweetener. It has antibacterial properties and adds a lovely flavor. - Water: Essential for hydration. It helps you feel refreshed on hot days. You can adjust the recipe based on what you have: - Black tea: Use green tea or herbal tea for a different flavor. - Honey: Maple syrup or agave nectar works well if you prefer a vegan option. - Orange: Lemon or lime can add a tangy twist. - Cinnamon sticks: Ground cinnamon can be used, but add it slowly since it’s stronger. Feel free to mix and match based on your taste and what’s in your kitchen! {{ingredient_image_1}} Start by boiling 4 cups of water. Use a kettle for this. Once it boils, pour it into a heatproof pitcher. Add 4 black tea bags to the hot water. Let the tea steep for 5 to 7 minutes. The longer it steeps, the stronger it gets. After steeping, remove the tea bags. This step is key to avoid bitterness. Next, add the juice and zest of one orange. This gives the tea a fresh taste. Then, drop in 2 cinnamon sticks. These add warmth and spice. While the tea is still warm, stir in 1/4 cup of honey. Mix it well until the honey fully dissolves. Let the tea cool at room temperature. This step is important for the best flavor. Once cooled, stir in 4 cups of cold water. This will help chill the tea even more. Now, place the pitcher in the fridge. Let it chill for at least 2 hours. This allows the flavors to blend nicely. When you are ready to serve, fill tall glasses with ice cubes. Pour the chilled tea over the ice. For a finishing touch, add an orange slice and a cinnamon stick to each glass. This looks great and adds more flavor. To get the best taste, use fresh ingredients. Fresh oranges and good-quality tea bags matter. If you want less sweetness, start with less honey. You can always add more later. Adjust the orange juice to make it brighter. Don’t forget to taste as you go. This helps you find the perfect balance. When making Orange Cinnamon Iced Tea, avoid oversteeping the tea bags. This can make the tea bitter. Keep an eye on the steeping time, around 5-7 minutes, is best for flavor. Remember to remove the tea bags right after steeping. If you add honey to hot tea, it will dissolve well. If you wait too long, it may not mix in properly. Also, don’t skip the cooling step. Letting the tea cool before adding cold water helps the flavors blend better. Adjusting sweetness in your iced tea is easy. Start with 1/4 cup of honey and taste. If you like it sweeter, add more honey a bit at a time. You can also use other sweeteners like agave or maple syrup. Just remember, sweeteners can change the flavor a little. If you want a healthier option, try adding a splash of orange juice instead of more sugar. Fresh ingredients make a big difference in taste. For extra flavor, add fresh orange slices or mint leaves when serving. You can also try other spices like ginger or cardamom for a new twist. If you want a more intense flavor, let the tea sit in the fridge longer. The longer it sits, the more the flavors mix and develop. Enjoy experimenting to find your perfect mix! Pro Tips Choose Quality Tea: Using high-quality black tea bags will enhance the flavor of your iced tea significantly. Experiment with Sweetness: Adjust the amount of honey based on your taste preferences; you can also use agave or maple syrup as alternatives. Chill Time Matters: Allowing your tea to chill for at least 2 hours helps the flavors develop and results in a more refreshing drink. Garnish for Aesthetic: Add extra orange slices and cinnamon sticks not only for decoration but also to infuse more flavor as it sits. {{image_2}} You can add a twist to your Orange Cinnamon Iced Tea by using other citrus fruits. Try adding lemon, lime, or grapefruit. Each fruit brings a different zing. For lemon, use the juice and zest. Lime adds a fresh taste. Grapefruit gives a nice balance of sweet and tart. Experiment with these fruits to find your favorite blend. If you want to change the sweetness, you can swap honey for other options. Agave syrup is a great substitute. It dissolves well and has a mild taste. You can also use maple syrup for a rich flavor. Just remember to start with less and adjust to your taste. Each sweetener changes the drink's character, so have fun with it! For those who prefer herbal tea, you can easily make this drink. Use herbal tea bags instead of black tea. Look for flavors like chamomile or hibiscus. These add a lovely floral note. If you want decaf, check for decaffeinated black tea bags. This way, you can enjoy your drink any time without the caffeine buzz. To store leftover iced tea, pour it into a clean pitcher. Make sure the pitcher has a lid. This helps keep the tea fresh. Place the pitcher in the fridge. It stays good for about 3 to 5 days. If you want extra cold tea, add ice just before serving. Keep your iced tea covered. This prevents it from absorbing other smells in the fridge. Use a glass or plastic pitcher. Avoid metal containers, as they may change the taste. If you notice any strange smells or flavors, it's time to toss it. Always check for freshness before drinking. You can reuse the orange slices and cinnamon sticks! After you finish your tea, put them in water for a light flavor. This can be a fun way to make a quick drink. You can also use the spent tea bags for compost. They help nourish your plants. The best tea for iced tea is black tea. It has bold flavors that mix well with orange and cinnamon. You can also use green tea for a lighter taste. Each type of tea gives a unique flavor. I prefer black tea for this recipe. It makes the orange and cinnamon pop! Yes, you can make this iced tea without honey. If you want it sweet, try using sugar or agave. You can also skip sweeteners for a less sweet drink. The orange juice adds natural sweetness too. Adjust it to your taste to enjoy your drink. You can store Orange Cinnamon Iced Tea in the fridge for up to 5 days. Keep it in a sealed pitcher to stay fresh. If you see any changes in color or smell, it’s best to toss it out. Enjoy your tea while it’s fresh for the best flavor! I shared key ingredients and their benefits for making great iced tea. We discussed easy steps for brewing, cooling, and serving it. I also offered tips to avoid common mistakes and enhance flavors. You now know how to store leftovers and explore fun variations. Remember, experimenting can lead to your favorite drink. Enjoy your iced tea and share it with friends!

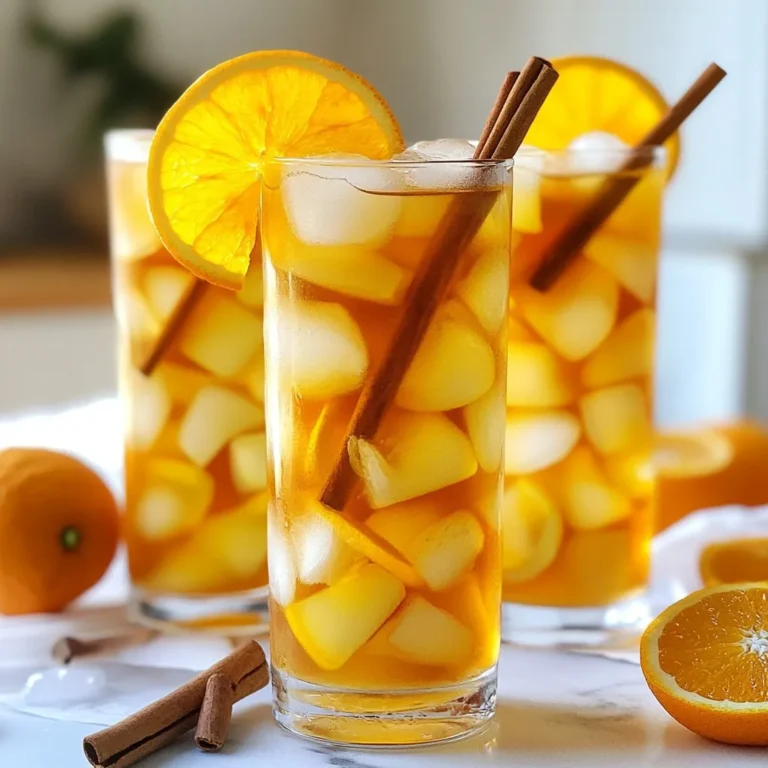
Orange Cinnamon Iced Tea Refreshing Summer Drink

To make Teriyaki Tofu Rice Bowls, gather these key items: - 1 block (14 oz) firm tofu, pressed and cubed - 1 cup jasmine rice - 2 cups vegetable broth (or water) - 1/4 cup soy sauce (low sodium) - 2 tablespoons maple syrup - 1 tablespoon rice vinegar - 1 tablespoon fresh ginger, grated - 2 cloves garlic, minced - 1 tablespoon cornstarch - 2 tablespoons sesame oil - 1 cup broccoli florets - 1 cup bell pepper, sliced (any color) - 1 carrot, julienned - 2 green onions, sliced (for garnish) - Sesame seeds (for garnish) These ingredients come together to create a tasty and nutritious meal. Each one plays a role in building flavor and texture. You will need some basic tools to make this dish: - A sharp knife - A cutting board - Mixing bowls - A saucepan for rice - A skillet for stir-frying - A whisk for mixing marinades - A spatula for stirring Having these tools makes cooking easier and helps ensure great results. To add extra flair to your rice bowls, consider these optional toppings: - Sliced avocado for creaminess - Fresh cilantro for a burst of flavor - Chopped peanuts for crunch - Red pepper flakes for heat These garnishes enhance the dish and let you customize your rice bowls to your taste. {{ingredient_image_1}} Start by pressing the tofu. You want to remove excess moisture. Place the block of tofu on a plate. Put a heavy object on top, like a skillet. Let it sit for at least 15 minutes. This step makes the tofu crispier. After pressing, cut the tofu into 1-inch cubes. In a bowl, mix soy sauce, maple syrup, rice vinegar, ginger, and garlic. Whisk these ingredients until they blend well. Add the cubed tofu to the bowl. Make sure all the pieces are covered. Let the tofu marinate for 15-20 minutes. This adds great flavor. Rinse the jasmine rice under cold water. Do this until the water runs clear. In a saucepan, combine the rice and vegetable broth or water. Bring it to a boil over high heat. Once boiling, reduce the heat to low. Cover and simmer for about 15 minutes. The rice is done when the liquid is absorbed. While the rice cooks, heat sesame oil in a skillet over medium heat. Add the broccoli florets, bell pepper slices, and julienned carrot. Stir-fry these veggies for 5-7 minutes. You want them tender yet crisp. This keeps the colors bright and flavors fresh. In a separate skillet, add the marinated tofu and its sauce. Cook over medium heat for 7-10 minutes. Stir occasionally until the tofu turns golden brown. In a small bowl, mix cornstarch with 2 tablespoons of water to create a slurry. Add this to the tofu mixture. Cook for another 2-3 minutes to thicken the sauce. Once the rice is cooked, fluff it with a fork. Divide the rice into serving bowls. Top each bowl with the stir-fried vegetables and glazed tofu. For the finishing touch, add sliced green onions and a sprinkle of sesame seeds. This adds crunch and flavor. Enjoy your delicious teriyaki tofu rice bowls! Tofu can be watery, which makes it hard to cook. Pressing it helps remove extra moisture. Here’s how to do it: - Wrap the tofu block in a clean kitchen towel. - Place it on a plate and add a heavy object on top. A cast-iron pan works well. - Let it sit for at least 15 minutes. If you have more time, let it press longer. - After pressing, cut the tofu into 1-inch cubes for a great texture and taste. To make the teriyaki sauce just right, play with the ingredients: - Start with low-sodium soy sauce to keep the dish healthy. - Add maple syrup for sweetness. Use more or less based on your taste. - Grated ginger adds freshness. If you like spice, add a bit more. - Rice vinegar gives a nice tang. Adjust the amount to fit your palate. - If you want a thicker sauce, mix cornstarch with water and add it to the pan. Leftovers are great for quick meals. Here’s how to store and reheat: - Let rice bowls cool down before storing them in airtight containers. - Keep the tofu and vegetables separate to maintain their texture. - Refrigerate for up to 3 days. For longer storage, freeze the tofu mixture. - To reheat, use a microwave or skillet. Add a splash of water to keep it moist. - Stir well to heat evenly. Enjoy your quick meal! Pro Tips Press the Tofu Well: Make sure to press the tofu for at least 15-20 minutes to remove as much moisture as possible. This ensures the tofu absorbs more flavor and becomes crispy when cooked. Customize Your Vegetables: Feel free to swap out the vegetables for your favorites or whatever is in season. Zucchini, snap peas, or mushrooms can make great additions! Adjust the Sweetness: If you prefer a sweeter teriyaki sauce, add an extra tablespoon of maple syrup. For a saltier flavor, a touch more soy sauce will do the trick. Garnish for Extra Flavor: Don't skip the green onions and sesame seeds! They add a wonderful crunch and enhance the overall flavor of your dish. {{image_2}} If you want to switch things up, try tempeh or seitan. Both have great texture. Tempeh adds nutty flavors, while seitan mimics meat. You could also use chickpeas for a protein-rich option. Just cook them as you would the tofu, marinating them in the same sauce. The beauty of these rice bowls lies in their flexibility. You can use any veggies you enjoy. Zucchini, snap peas, or mushrooms work well. Just cut them into bite-sized pieces. Cook them in the same way as the broccoli and bell peppers. This allows you to customize the bowl to your taste. While jasmine rice is delicious, you can try other grains, too. Quinoa or brown rice add more fiber. You can even use cauliflower rice for a low-carb option. Serve the tofu and veggies on top for a colorful, healthy meal. To store your Teriyaki Tofu Rice Bowls, let them cool first. Use airtight containers. Place rice, tofu, and veggies in separate sections. This keeps everything fresh. You can also mix them but note that the rice can get soggy. If you want to freeze your bowls, it’s best to freeze the tofu and rice separately. Store them in freezer-safe bags. Make sure to push out all the air. When you want to enjoy them, thaw in the fridge overnight. Reheat in the microwave or on the stove. Your Teriyaki Tofu Rice Bowls will last in the fridge for up to four days. After that, they may lose their flavor and texture. Always check for signs of spoilage before eating. If it smells off or looks strange, throw it away. Yes, you can make this dish gluten-free. Use tamari instead of soy sauce. Tamari is a great gluten-free alternative and works well in this recipe. Always check labels for hidden gluten in sauces and broths. You can try hoisin sauce for a sweet flavor. Alternatively, use a spicy chili sauce for heat. Both options can add a twist to your rice bowls. Adding protein is easy! You can mix in cooked chicken, shrimp, or even chickpeas. Just stir them in with the tofu or serve them on top. Yes, you can prep most of this dish ahead of time. Cook the rice and veggies, then store them separately. Reheat and add the tofu before serving for fresh warmth. Try serving these bowls with a simple cucumber salad. Edamame or steamed dumplings also make great sides. They add color and flavor to your meal. This blog post covered making Teriyaki Tofu Rice Bowls. I shared important ingredients, tools, and optional toppings. You learned step-by-step how to prepare, marinate, and cook tofu and vegetables. I also offered tips for better flavor and storage. You can customize this dish with different veggies or grains. It’s a fun and easy meal. Try these ideas to suit your taste, and enjoy your cooking!

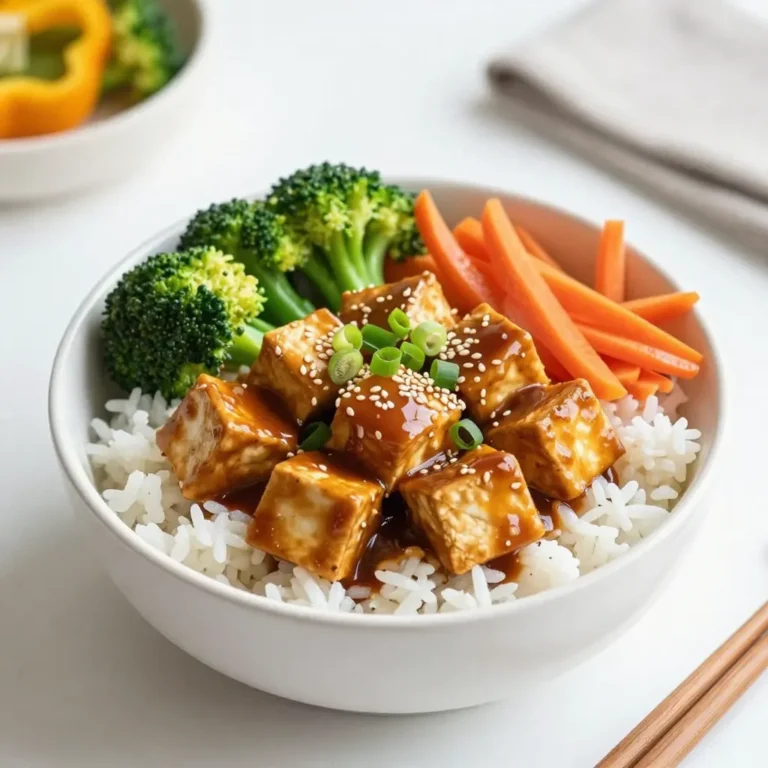
Teriyaki Tofu Rice Bowls Flavorful and Easy Recipe

PREV 1 … 4 5 6 … 86 NEXT
spicy fork kitchen

explore

DessertsDinnerAppetizersDrinks

Our Policies

  • Cookie Policy
  • Copyright Policy
  • Disclaimer
  • GDPR Policy
  • Terms Of Use
Back to Top
  • About
  • Contact Us
  • Privacy Policy
© 2025 spicy fork kitchen