FREE DINNER EBOOK! Get your copy!
  • Cookie Policy
  • GDPR Policy
  • Disclaimer
  • Terms Of Use
  • Visit my other site: Fun Cookie Recipes
spicy fork kitchen
  • Home
  • Dinner
  • Desserts
  • Drinks
  • Appetizers
  • Contact
  • About
  • Privacy Policy
  • Home
  • Dinner
  • Desserts
  • Drinks
  • Appetizers
  • Contact
  • About
  • Privacy Policy
  • Cookie Policy
  • GDPR Policy
  • Disclaimer
  • Terms Of Use
Visit my other site: Fun Cookie Recipes

HOME / CATEGORIES /

Latest

- 4 boneless, skinless chicken thighs - 1 cup broccoli florets - 1 cup bell peppers (red, yellow, and green), sliced - 1 cup snap peas - 1 medium carrot, thinly sliced The chicken thighs are juicy and flavorful. They cook well and stay tender. The assorted veggies add color and crunch. Broccoli, bell peppers, snap peas, and carrots make a great mix. You can also use other veggies if you prefer. Just remember to cut them to a similar size for even cooking. - 1/4 cup soy sauce (low sodium) - 1/4 cup honey - 2 tablespoons rice vinegar - 2 cloves garlic, minced - 1 tablespoon grated fresh ginger - 1 tablespoon cornstarch - 1 tablespoon sesame oil The teriyaki sauce is the star of this dish. It’s sweet and savory. Soy sauce gives it a rich flavor. Honey adds sweetness. Rice vinegar brings a nice tang. Garlic and ginger add warmth and depth. Cornstarch thickens the sauce and makes it cling to the food. Sesame oil gives a nutty finish that is delightful. - Sesame seeds - Chopped green onions Garnishes make the dish pop! Sesame seeds add a nice crunch. Chopped green onions give a fresh taste. These little touches enhance both flavor and look. They make your meal feel special and gourmet. {{ingredient_image_1}} First, preheat your oven to 425°F (220°C). This step ensures even cooking. Next, line a large baking sheet with parchment paper. This makes clean-up easy and keeps food from sticking. Now, let’s make the teriyaki sauce. In a mixing bowl, whisk together the following ingredients: - 1/4 cup soy sauce - 1/4 cup honey - 2 tablespoons rice vinegar - 2 cloves garlic, minced - 1 tablespoon grated fresh ginger - 1 tablespoon cornstarch - 1 tablespoon sesame oil Mix until smooth. This sauce will give your chicken and veggies a sweet and savory taste. Take your chicken thighs and place them on the prepared baking sheet. Pour half of the teriyaki sauce over the chicken. Make sure each piece is well coated. Next, it's time to add the veggies. Arrange the broccoli, bell peppers, snap peas, and carrot slices around the chicken. Drizzle the rest of the teriyaki sauce over the veggies. Toss the vegetables gently to coat them evenly with the sauce. This helps the flavors blend together. Bake your dish in the preheated oven for 25-30 minutes. Check that the chicken reaches an internal temperature of 165°F (75°C). The veggies should be tender-crisp. Once done, remove the baking sheet from the oven. Let it rest for a few minutes. This helps the juices settle. Serve your teriyaki chicken and vegetables hot. You can garnish them with sesame seeds and chopped green onions for a lovely touch. Enjoy your meal! To make a great teriyaki sauce, start with the right balance. You can adjust the sweetness by adding more honey or cutting back if it’s too sweet. If you want more saltiness, add extra soy sauce. For a thick sauce, mix cornstarch with a bit of water before adding it to the sauce. This will help it coat the chicken and veggies nicely. Choosing the right vegetables can change the dish. Broccoli, bell peppers, snap peas, and carrots work great. You can also try zucchini, asparagus, or even mushrooms for a different taste. If you want to switch things up, feel free to add or substitute your favorite veggies. Just remember to cut them into similar sizes for even cooking. For the best flavor, marinate the chicken thighs for at least 30 minutes. This lets the sauce soak in and makes the chicken juicy. If you prefer, you can grill or sauté the chicken instead of baking. Both methods add a nice char and flavor. Just be sure to cook it to the right temperature, which is 165°F (75°C). Pro Tips Marinate for More Flavor: If time allows, marinate the chicken in the teriyaki sauce for 30 minutes to an hour before baking. This enhances the flavor and tenderness of the chicken. Veggie Variations: Feel free to swap in your favorite vegetables like zucchini, asparagus, or mushrooms. Just keep in mind cooking times may vary. Use Fresh Ingredients: For the best flavor, use fresh garlic and ginger. They will make a noticeable difference in the taste of your teriyaki sauce. Check Chicken Temperature: Ensure the chicken is cooked to an internal temperature of 165°F (75°C) for safe consumption. Use a meat thermometer for accuracy. {{image_2}} You can make this dish healthier with some simple swaps. Here are a few ideas: - Use skinless chicken breasts instead of thighs for fewer calories. - Replace honey with a low-calorie sweetener. - For gluten-free options, use tamari instead of soy sauce. These changes keep the dish tasty while cutting down on calories and gluten. Want to spice things up? Here are ways to add extra flavor: - Add red pepper flakes for some heat. - Fresh herbs like cilantro or basil can brighten the dish. - Try teriyaki sauce variations, like adding pineapple juice for a sweet twist. Mixing and matching flavors makes your meal unique each time. Meal prepping makes cooking easy. Here’s how you can prepare this dish in advance: - Marinate the chicken and cut the veggies a day ahead. - Store everything in an airtight container in the fridge. Leftovers can also be a lifesaver: - Store them in the fridge for up to three days. - Reheat in the oven or microwave for a quick meal. These tips help you enjoy your Sheet Pan Teriyaki Chicken and Vegetables again! Store your sheet pan teriyaki chicken and vegetables in the fridge. It lasts for about 3 to 4 days. Use airtight containers to keep it fresh. Glass or plastic containers work well. Make sure to let the dish cool before sealing. You can freeze this dish. Freeze it after cooking. Place it in freezer-safe bags or containers. It stays good for about 3 months. When you're ready to eat, thaw it overnight in the fridge. Reheat it in the oven or microwave until hot. Get creative with your leftovers! Shred the chicken and mix it into a salad. Try it in a wrap with fresh veggies. Serve the veggies on rice or quinoa for a quick meal. Pair the dish with steamed rice, noodles, or a simple green salad for a tasty side. Yes, you can use chicken breasts. However, chicken thighs have more fat and flavor. They stay juicier during cooking. If you use breasts, reduce the baking time by about five minutes. Chicken breasts cook faster and can dry out. Aim for an internal temperature of 165°F (75°C) for both cuts. If you need a substitute, try tamari for a gluten-free option. Coconut aminos work well for a soy-free choice. For a sweeter flavor, use liquid aminos or even a mix of broth and a little vinegar. These options can fit various dietary needs. Always adjust the amounts to suit your taste. The best way to check is with a meat thermometer. Insert it into the thickest part of the chicken. It should read 165°F (75°C). If you don’t have a thermometer, check the juices. They should run clear, not pink. Also, the meat should no longer be shiny. This post covered tasty chicken thighs with a homemade teriyaki sauce and fresh veggies. You learned how to prepare, bake, and serve this dish, plus tips for adjusting flavors and storing leftovers. Remember, cooking is flexible, so feel free to try different veggies or sauces. Enjoy your new teriyaki skills and create delicious meals that fit your taste. Happy cooking!

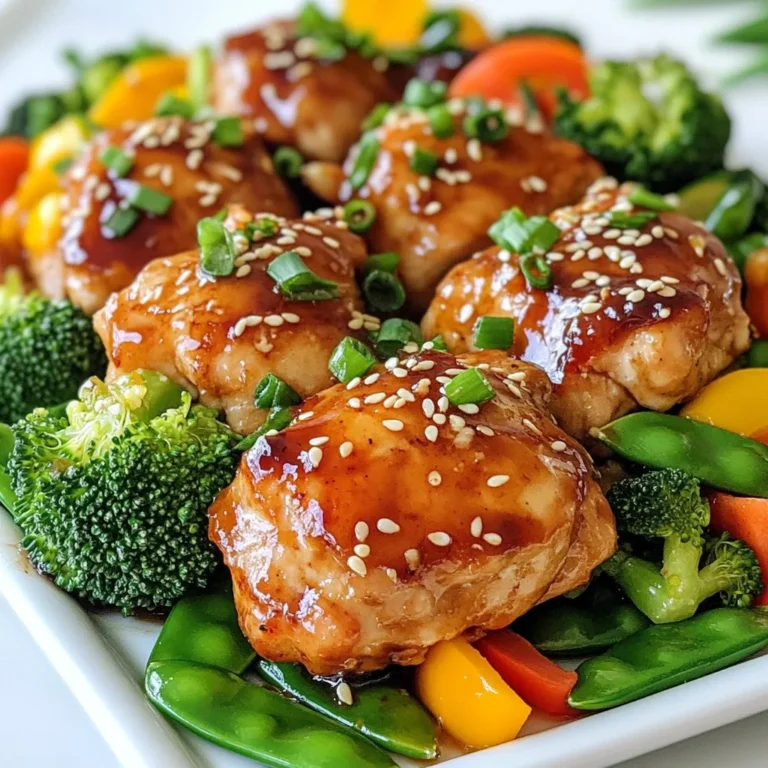
Sheet Pan Teriyaki Chicken and Vegetables Delight

To make the Copycat Buffalo Wild Wings Garlic Parmesan Sauce, gather these simple ingredients: - 1 cup unsalted butter - 1 cup grated Parmesan cheese - 5 cloves garlic, minced - 1 teaspoon garlic powder - 1 teaspoon onion powder - 1 teaspoon salt - 1 teaspoon black pepper - 1 teaspoon crushed red pepper flakes - 2 tablespoons fresh parsley, chopped These ingredients create a rich and creamy sauce. The unsalted butter is key for a smooth base, while the Parmesan adds a salty, cheesy flavor. Fresh garlic gives the sauce its signature taste. The spices, like black pepper and crushed red pepper flakes, bring warmth and depth. Finally, fresh parsley adds color and freshness to the dish. Make sure to use high-quality Parmesan for the best flavor. You can find it in blocks or pre-grated. Fresh garlic is a must for that strong aroma and taste. Adjust the crushed red pepper according to your spice preference. Gather all these ingredients to whip up this delightful sauce quickly! {{ingredient_image_1}} - Start with a medium saucepan. - Place it on low heat. - Add 1 cup of unsalted butter. - Wait for it to melt completely. - When the butter melts, add 5 cloves of minced garlic. - Sauté for 1-2 minutes. - Watch closely and avoid browning the garlic. - Stir in 1 cup of grated Parmesan cheese. - Add 1 teaspoon of garlic powder. - Next, include 1 teaspoon of onion powder. - Mix in 1 teaspoon of salt. - Add 1 teaspoon of black pepper. - Then, add 1 teaspoon of crushed red pepper flakes. - Keep stirring until the cheese melts. - Aim for a smooth sauce, about 3-4 minutes. - Remove the saucepan from heat. - Let the sauce cool slightly. - Drizzle over your favorite wings. - Garnish with 2 tablespoons of chopped fresh parsley before serving. - Enjoy this tasty sauce as a dip or drizzle! - Use fresh ingredients: Fresh garlic and parsley bring out big flavor. - Adjust spice level: Use more or less crushed red pepper to fit your taste. - Monitor heat carefully: Keep it low to avoid burning the garlic. - Stir consistently for smoothness: Stir while cooking to keep the sauce creamy. - Ideal garnishing ideas: Sprinkle chopped parsley on top for a nice look. - Pairings with wings: This sauce is great on all types of chicken wings. Pro Tips Use Fresh Garlic: For the best flavor, always use fresh garlic instead of pre-minced or jarred garlic. This will enhance the aroma and taste of your sauce. Adjust Spice Levels: Feel free to modify the amount of crushed red pepper flakes according to your heat preference. Start with less and add more if you enjoy a spicier sauce. Stir Constantly: When melting the cheese into the sauce, keep stirring to prevent it from clumping or sticking to the bottom of the pan, ensuring a smooth consistency. Storage Tips: Store any leftover sauce in an airtight container in the refrigerator for up to a week. Reheat gently on low heat before using. {{image_2}} To make a spicy garlic parmesan sauce, you can easily amp up the heat. - Add more crushed red pepper to your taste. - Incorporate a splash of your favorite hot sauce to enhance the flavor. These simple tweaks will give you a kick with every bite. You can bring fresh life to your sauce by adding herbs. - Mix in additional herbs like thyme, rosemary, or oregano for depth. - Experiment with seasonal ingredients such as fresh basil or dill. These herbs will add a new dimension and freshness to your sauce. If you need a dairy-free option, don't worry! You can still enjoy this sauce. - Substitute with vegan butter to keep it creamy. - Explore non-dairy cheese options like nutritional yeast or cashew cheese. This way, you keep the flavors while being mindful of dietary needs. To store leftover sauce, let it cool first. Then, place it in an airtight container. This keeps the sauce fresh and prevents odors. Use glass or plastic containers with tight lids for the best results. The sauce can stay in the fridge for up to a week. To warm the sauce safely, use a small saucepan. Heat on low and stir gently. This helps the sauce warm evenly without burning. If the sauce seems too thick, add a splash of warm water or broth. This maintains the smooth texture we love. Yes, you can freeze the sauce! Pour it into freezer-safe containers, leaving some space for expansion. It can last up to three months in the freezer. To defrost, move it to the fridge overnight. Reheat it slowly on low heat, stirring well for a creamy finish. To make this sauce spicy, you can add more crushed red pepper flakes. Start with one teaspoon and taste it. If you want more heat, add more. You can also stir in some hot sauce. Choose a sauce that you like. This will give a nice kick without changing the sauce too much. Yes, you can use other cheeses if you want. Grated Romano cheese is a great choice. It has a sharp flavor that works well. You could also try using a mix of cheeses. Just make sure they melt well. This will keep the sauce creamy and tasty. The sauce can last about one week in the fridge. Store it in an airtight container. This helps keep it fresh. Always check for any changes in smell or texture before using it. If it looks or smells off, it’s best to toss it out. You learned how to make a delightful Garlic Parmesan sauce. We covered the ingredients, step-by-step instructions, and do’s and don’ts for great flavor. Remember to use fresh ingredients and adjust the spice levels to your taste. You can even try variations like a spicy version or a dairy-free alternative. Proper storage and reheating will keep your sauce fresh and tasty. Enjoy your cooking, and let this sauce elevate your next meal!

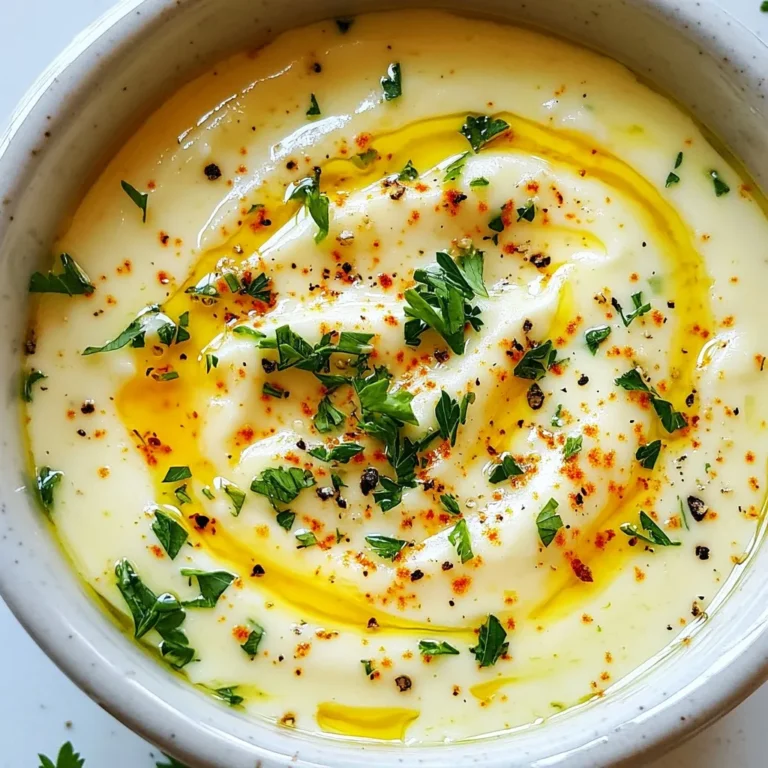
Copycat Buffalo Wild Wings Garlic Parmesan Sauce Recipe

To make a great One-Pot Beef Stroganoff, you need a few key ingredients. Each one plays a special role in making this dish tasty and hearty. - 1 lb (450g) beef sirloin, thinly sliced - 2 tablespoons olive oil - 1 medium onion, diced - 3 cloves garlic, minced - 8 oz (225g) mushrooms, sliced - 1 teaspoon dried thyme - 1 teaspoon paprika - Salt and pepper to taste - 4 cups beef broth - 2 cups wide egg noodles (or your preferred pasta) - 1 tablespoon Dijon mustard - 1 cup sour cream - Fresh parsley, chopped (for garnish) The beef sirloin gives your stroganoff a tender, beefy flavor. The olive oil helps brown the beef and adds richness. Onions and garlic bring a sweet and savory base. Mushrooms add a nice earthiness to the dish. You can choose dried thyme and paprika for a burst of flavor. Salt and pepper enhance all the tastes. The beef broth adds depth and moisture. Egg noodles soak up the broth and make the meal filling. Dijon mustard gives a tangy kick, while sour cream adds creaminess. Lastly, fresh parsley makes the dish look bright and fresh. This mix of ingredients creates a meal that is not only easy to make but also very satisfying. - Heat 2 tablespoons of olive oil in a large pot over medium-high heat. - Add 1 pound of thinly sliced beef sirloin. Cook for about 3-4 minutes until it is browned. - Once browned, remove the beef from the pot and set it aside. - In the same pot, add 1 medium diced onion. Cook for about 2-3 minutes until it softens. - Next, stir in 3 minced garlic cloves. Cook for another 30 seconds until fragrant. - Add 8 ounces of sliced mushrooms. Cook them for about 5 minutes until tender. - Stir in 1 teaspoon of dried thyme, 1 teaspoon of paprika, and salt and pepper to taste. Mix well. - Pour in 4 cups of beef broth and bring it to a boil. - Add 2 cups of wide egg noodles. Reduce heat to a simmer and cover. - Cook for 10-12 minutes, stirring occasionally until the noodles are done. - Once cooked, stir in 1 tablespoon of Dijon mustard and 1 cup of sour cream until combined. - Finally, return the cooked beef to the pot. Mix gently until warmed through. - Preventing overcooking beef: Cook the beef quickly. Brown it for 3-4 minutes. Remove it when it’s still pink inside. This keeps it tender and juicy. - Ensuring noodles cook properly: Keep an eye on the noodles while they simmer. Stir them often. This helps them cook evenly and not stick together. - Presentation ideas for a beautiful dish: Serve the stroganoff hot in a large bowl. Top it with fresh parsley for color. Add a sprinkle of black pepper for extra flair. - Accompaniments to serve with stroganoff: Pair it with a side salad or some crusty bread. This balances the meal and adds crunch. - Overcrowding the pot: Avoid adding too much beef or mushrooms at once. This can lower the pot’s heat and make your food steam instead of brown. - Skipping the seasoning adjustments: Always taste your dish before serving. Adjust the salt and pepper for the best flavor. This small step can make a big difference in taste. {{image_2}} You can swap the beef in this dish. Chicken works well and cooks fast. Use thin slices of chicken breast. Pork is another tasty choice. Thinly slice pork tenderloin for great flavor. If you want a meat-free option, use mushrooms. They add a nice, earthy taste. You can change up the flavors with herbs and spices. Try adding rosemary or oregano for a twist. A pinch of cayenne pepper can add some heat. For a creamy sauce, consider alternatives to sour cream. Greek yogurt or cashew cream works well too. Noodles can change the texture of your stroganoff. Use gluten-free pasta if needed. Whole grain noodles add fiber and a nutty flavor. Think about the shape of the pasta too. Wide egg noodles are great, but you can use fusilli or penne for a fun look. To keep your beef stroganoff fresh, use an airtight container. Glass or plastic containers work well. Store it in the fridge as soon as it cools down. This helps keep bacteria away. Your stroganoff will taste best if eaten within three days. When you reheat, use a pot on low heat. Stir gently to mix everything well. This helps all the flavors come back together. If you use a microwave, cover the dish to keep moisture. Avoid high heat to stop the sauce from separating. To freeze beef stroganoff, let it cool completely. Then, place it in a freezer-safe container. Leave some space at the top for expansion. It will last up to three months in the freezer. To thaw, put it in the fridge overnight. Reheat on low heat until hot. One-Pot Beef Stroganoff lasts about 3 to 4 days in the fridge. Store it in an airtight container. Make sure it cools down before sealing it. This helps keep it fresh and tasty. Yes, you can make this recipe in advance. Cook it fully, then let it cool. Store it in the fridge for up to 3 days. Reheat it on the stove or microwave when ready to eat. This saves time on busy days. Yes, you can make it gluten-free. Use gluten-free egg noodles instead of regular ones. Check that your beef broth is gluten-free as well. This way, everyone can enjoy this dish. You can serve it with a side salad or steamed veggies. Some like to pair it with crusty bread for dipping. Rice or mashed potatoes also work well. These sides balance the rich flavors of the stroganoff. Yes, you can substitute sour cream. Use plain Greek yogurt for a lighter option. You can also try cream cheese for a richer taste. Each choice brings a unique flavor to the dish. This blog post covered how to make a delicious One-Pot Beef Stroganoff. We explored the key ingredients, easy steps, and useful tips for a great meal. You learned how to prepare tender beef, cook aromatics, and combine everything with noodles and sauce. We also discussed variations and storage options to keep your dish fresh. Remember, with a few tweaks, you can make this dish your own. Enjoy cooking!

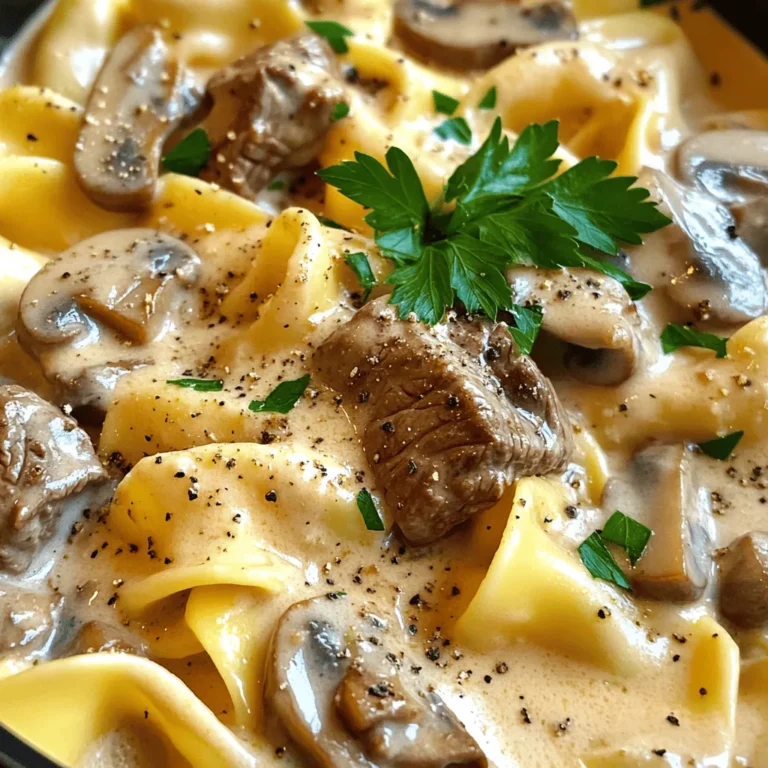
One-Pot Beef Stroganoff Tasty and Simple Meal

- 4 large russet potatoes - 1 pound ground beef or turkey - 1 packet taco seasoning - 1 cup shredded cheddar cheese - 1 cup canned black beans, rinsed and drained - 1 cup diced tomatoes - 1/2 cup sour cream - 1/4 cup sliced green onions - 1/2 cup sliced jalapeños (optional) - Olive oil - Salt and pepper to taste - Fresh cilantro for garnish For these Loaded Taco Potato Skins, you need a mix of hearty and fresh items. The russet potatoes form the base. They are starchy and hold up well to all the toppings. Ground beef or turkey gives a nice protein punch. Taco seasoning brings bold flavor, making the dish pop. Black beans add texture and fiber. Tomatoes bring freshness and a burst of color. Shredded cheddar cheese melts beautifully, adding creaminess. Sour cream adds a tangy finish, while green onions and jalapeños give crunch and heat. Don’t forget the olive oil! It not only helps the potatoes crisp up but also enhances the taste. You can adjust the salt and pepper as needed. Fresh cilantro makes everything look great and adds a bright flavor. Gather these ingredients, and you will be ready to make a delicious snack or meal. - Preheat the oven: Start by heating your oven to 400°F (200°C). This step is key for crispy skins. - Scrub and pierce the potatoes: Take your large russet potatoes and wash them well. Use a fork to poke several holes in each potato. This helps steam escape while they bake. - Brush with olive oil and sprinkle with salt: Coat the potatoes with olive oil. Sprinkle them lightly with salt. This adds flavor and helps the skins crisp up. - Brown the ground beef or turkey: In a skillet, cook the ground beef or turkey over medium heat. Stir until it turns brown. Drain any extra fat. - Add taco seasoning: Mix in the taco seasoning. Follow the package directions, usually adding water. Let it simmer for about five minutes to blend the flavors. - Scoop out the potato flesh: Once the potatoes cool, cut them in half lengthwise. Carefully scoop out some flesh, leaving a bit to support the skin. - Fill with taco meat and toppings: Brush the potato skins with olive oil and add salt and pepper. Fill each skin with the cooked taco meat. Add black beans, diced tomatoes, and shredded cheddar cheese. - Return to the oven: Place the filled skins back in the oven. Bake for another 5-7 minutes until the cheese melts and bubbles. Enjoy your tasty Loaded Taco Potato Skins! Each bite is a blend of flavors and textures that you won't forget. To make sure your potato skins are crispy, follow these steps: - Choose large russet potatoes. Their size and starch help create a great texture. - Scrub the potatoes well. This removes dirt and adds flavor. - Pierce them with a fork. It helps steam escape while baking. - Brush olive oil on the skins. This promotes crispiness. - Bake at a high heat of 400°F (200°C). This gives a nice crunch. - Bake them directly on the oven rack. It allows hot air to circulate. To prevent sogginess, avoid overcooking the potatoes. Once they are tender, take them out. Also, scoop out only a portion of the flesh. Leave a thin layer to support the skin. Loaded Taco Potato Skins pair well with many sides and sauces. You can serve them with: - Fresh guacamole for a creamy texture. - Salsa for a zesty kick. - A simple salad for a refreshing side. Ideal dipping sauces include: - Sour cream, which adds a cool element. - Spicy ranch dressing for more flavor. - Chipotle sauce for a smoky taste. Garnishing adds flair to your dish. Here are some ideas: - Fresh herbs like cilantro bring color and freshness. - Sliced jalapeños add heat and crunch. - Drizzle with hot sauce for a spicy touch. For personalized toppings, consider: - Chopped olives for a briny flavor. - Avocado slices for creaminess. - Additional cheese if you love dairy. {{image_2}} For a vegetarian twist, you can swap the ground beef or turkey for plant-based options. Try using black beans or lentils for protein. They add great flavor and texture. You can also use crushed tofu seasoned with taco spices. This will give you a hearty filling. Add more veggies to the mix! Consider using corn, bell peppers, or zucchini. These will bring extra color and nutrients. Diced avocado is also a great choice for creaminess. If you like heat, add more spice to your skins. Use hot sauce or spicy canned beans when you prepare the filling. This will kick up the flavor. You can also add fresh jalapeños or serrano peppers for a zesty punch. For a more intense heat, try adding chipotle peppers in adobo sauce. These smoky peppers will elevate your dish to a new level. Adjust the amount based on your heat preference. Cheese is key in loaded taco potato skins. While cheddar cheese is a classic choice, you can mix it up. Use monterey jack for a milder taste or pepper jack for extra spice. Combining different cheeses enhances flavor. Try a blend of mozzarella and gouda for a creamy, rich finish. Each cheese melts differently, creating a nice texture contrast. Don't be shy to experiment with your favorite cheese types! To keep your Loaded Taco Potato Skins fresh, follow these steps: - Allow the skins to cool to room temperature. - Place them in an airtight container. - Store them in the fridge. They will stay fresh for about 3 days. After that, they may lose their taste and texture. When reheating, I want you to keep that crispy texture. Here’s how: 1. Oven method: Preheat your oven to 350°F (175°C). Place the potato skins on a baking sheet. Bake for about 10-15 minutes. This keeps them crispy. 2. Microwave method: If you're in a hurry, use the microwave. Place the skins on a plate. Heat them for 30 seconds to 1 minute. They won’t be as crispy, but will still taste good. Choose the oven for the best results, but the microwave works too! You can prepare Loaded Taco Potato Skins in advance. First, bake the potatoes and let them cool. Scoop out the flesh, but leave some for support. Brush the skins with olive oil and season them. Store the skins in an airtight container in the fridge for up to 24 hours. When ready to serve, fill them with taco meat and toppings. Bake them until the cheese melts and enjoy! Yes, sweet potatoes work well too. They add a hint of sweetness. The texture is softer, which contrasts with the toppings. Sweet potatoes are also packed with vitamins A and C, making them a nutritious choice. If you want a twist on the flavor, try sweet potatoes! If you want alternatives to sour cream, consider Greek yogurt. It has a similar texture and taste. You can also use mashed avocado for a creamy and rich option. For dairy-free options, try cashew cream or coconut yogurt. Each substitute brings a unique flavor to your Loaded Taco Potato Skins! Loaded Taco Potato Skins are fun and tasty. This blog post covered ingredients, prep, cooking, and storage. You can make these skins with meat or choose vegetarian options. I shared tips for crispy textures, great garnishes, and fun variations. Whether you enjoy them as a snack or an appetizer, they are sure to please. Don't hesitate to experiment with toppings and flavors. Enjoy your cooking adventure!

Loaded Taco Potato Skins Flavorful Taco Treats

To make Strawberry Shortcake Cookies, gather these simple items: - 1 cup all-purpose flour - ½ cup almond flour - 1 tsp baking powder - ¼ tsp baking soda - ¼ tsp salt - ½ cup unsalted butter, softened - ⅓ cup granulated sugar - 1 large egg - 1 tsp vanilla extract - 1 cup fresh strawberries, diced - ¼ cup powdered sugar (for dusting) You can swap ingredients if needed. Here are some ideas: - Use coconut flour instead of almond flour for a nut-free option. - If you are out of unsalted butter, use salted butter and skip the added salt. - You can replace fresh strawberries with diced peaches or blueberries for a different flavor. Accurate measuring is key for great cookies. Here’s how to do it right: - Use a kitchen scale for precise measurements, especially for flour. - Spoon flour into the measuring cup and level it off with a knife. Avoid packing it down. - For sticky ingredients like butter, use a liquid measuring cup for easy pouring. {{ingredient_image_1}} Start by preheating your oven to 350°F (175°C). This step is key for even baking. Next, line a baking sheet with parchment paper. This helps the cookies not stick. In a medium bowl, mix the dry ingredients. Combine 1 cup of all-purpose flour, ½ cup of almond flour, 1 tsp of baking powder, ¼ tsp of baking soda, and ¼ tsp of salt. Whisk these together until well blended. This mix gives the cookies their structure. Now, grab a large mixing bowl. Add ½ cup of softened unsalted butter and ⅓ cup of granulated sugar. Use an electric mixer on medium speed. Beat them together for about 3-4 minutes. The mixture should look light and fluffy. This step adds air to the cookies. Next, beat in 1 large egg and 1 tsp of vanilla extract. Mix until fully combined. The egg binds everything together. The vanilla adds a nice flavor. Now it’s time to add the stars of the show: the strawberries. Take 1 cup of fresh strawberries, diced. Gently fold them into the dough with a spatula. Be careful not to crush the berries. You want those juicy bits in every bite. Use a tablespoon to scoop the dough onto the lined baking sheet. Space them about 2 inches apart. They will spread a bit. Bake in the preheated oven for 10-12 minutes. Look for lightly golden edges. Once baked, let the cookies cool on the sheet for 5 minutes. Transfer them to a wire rack to cool completely. Dust with ¼ cup of powdered sugar before serving. Enjoy your delicious strawberry shortcake cookies! To get the right texture, mix the butter and sugar well. Beat them until they look light and fluffy. This step adds air to the dough. Make sure not to overmix the batter after adding the flour. Fold gently to keep the cookies soft. The almond flour adds a nice bite, so use it as directed. One common mistake is overbaking. Keep an eye on the cookies as they bake. They should be light golden at the edges. Another mistake is crushing strawberries. Fold them in gently to keep their shape. Also, make sure your butter is softened, but not melted. This helps the cookies hold their form. You can boost the flavor in simple ways. Add a little lemon zest for a fresh twist. A pinch of cinnamon can also add warmth. For extra sweetness, mix in some chocolate chips. These small changes can make your cookies unique. Feel free to experiment with different flavors to find your favorite. Pro Tips Use Fresh Strawberries: The flavor and juiciness of fresh strawberries will elevate your cookies. Avoid using frozen strawberries, as they can make the dough too wet. Don’t Overmix: When combining the wet and dry ingredients, mix until just combined. Overmixing can lead to tough cookies. Chill the Dough: If you have time, chill the dough for about 30 minutes before baking. This helps the cookies maintain their shape and enhances the flavor. Experiment with Flours: Feel free to substitute almond flour with other nut flours or even coconut flour for a different flavor profile, but be sure to adjust the liquid accordingly. {{image_2}} To make these cookies gluten-free, swap the all-purpose flour with gluten-free flour. Choose a blend that works well in baking. Almond flour can stay the same. This keeps the cookies soft and tasty. Ensure all other ingredients are gluten-free too. Always check labels for hidden gluten. You can add more flavor to these cookies easily. Try mixing in lemon zest for a bright taste. It adds a fresh twist. You can also toss in chocolate chips for a sweet treat. They melt and create little pockets of goodness. Both options make the cookies even more delightful. When strawberries are not in season, try other fruits. Blueberries and raspberries work well in this recipe. They bring their own unique flavors. You can also use peaches or cherries for a summer vibe. Just remember to dice the fruit small. This way, every bite is packed with flavor. To keep your strawberry shortcake cookies fresh, store them in an airtight container. Make sure they cool completely before sealing. This helps prevent moisture buildup. You can keep them at room temperature for up to three days. For longer storage, consider freezing them. Freezing these cookies is simple. First, let them cool completely. Next, place them in a single layer on a baking sheet. Freeze for about two hours until firm. Then, transfer them to a freezer bag. Label the bag with the date. You can freeze them for up to three months. To enjoy your strawberry shortcake cookies again, preheat your oven to 350°F (175°C). Place the cookies on a baking sheet. Heat them for about 5-7 minutes. This will make them warm and soft again. Enjoy them fresh from the oven! You can use regular all-purpose flour if needed. This swap works well in most recipes. For a nut-free option, try using oat flour or sunflower seed flour. Each alternative may change the flavor and texture slightly, but they will still taste great. Yes, you can prepare the dough in advance. Just cover it and store it in the fridge for up to 24 hours. When you're ready to bake, scoop the dough onto the baking sheet and bake as directed. This saves time on busy days. Store leftover cookies in an airtight container at room temperature. They stay fresh for about 3-5 days. If you want to keep them longer, place them in the fridge for up to a week. Just make sure the container is sealed tightly. Yes, you can use frozen strawberries. Thaw and drain them first to avoid sogginess. Chop them into small pieces before adding to the dough. Frozen strawberries may change the cookie's texture slightly, but they still add great flavor. Look for lightly golden edges as a sign they are ready. The centers may look soft, but they will firm up as they cool. A toothpick inserted should come out clean or with a few moist crumbs. If you see wet batter, bake a few more minutes. Now you can bake delicious cookies using our guide. We covered key ingredients, step-by-step instructions, and tips for texture. Don’t forget the variations for gluten-free options and flavor boosts. Proper storage keeps your cookies fresh, too. Remember these methods to improve your baking skills. With practice, you’ll create tasty treats every time. Enjoy your baking journey and share your results! Happy baking!

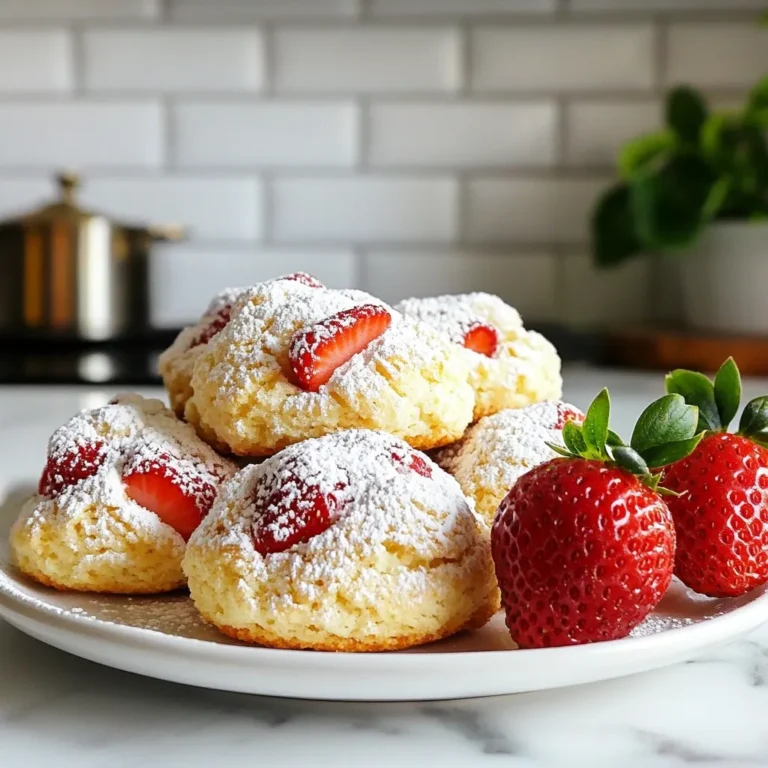
Strawberry Shortcake Cookies Simple and Delicious Treat

Cooking this creamy roasted red pepper pasta is simple and fun. Here’s what you need: - 2 large red bell peppers - 3 cloves garlic, peeled - 1 tablespoon olive oil - Salt and pepper to taste - 1 cup heavy cream - 1/2 cup grated Parmesan cheese - 1 teaspoon Italian seasoning - 300g pasta of your choice (such as penne or fettuccine) - Fresh basil leaves for garnish Each ingredient plays a key role. The red bell peppers add sweetness and a vibrant color. Garlic brings depth to the flavor. Olive oil helps with roasting and adds richness. Heavy cream creates that creamy texture we all love. Parmesan cheese adds a salty kick, and Italian seasoning ties all the flavors together. Choose pasta that you enjoy. Penne or fettuccine works well. When you add fresh basil, it brightens the dish and adds a lovely aroma. This simple list of ingredients makes a meal that’s not just tasty, but also beautiful on the plate. I promise, your family will love it! {{ingredient_image_1}} First, you need to preheat your oven to 400°F (200°C). While the oven heats, grab a baking sheet. Place two large red bell peppers and three peeled garlic cloves on it. Drizzle one tablespoon of olive oil over everything. Don't forget to sprinkle salt and pepper to taste. This step makes the peppers flavorful. Roast the peppers and garlic in the oven for about 25 to 30 minutes. Keep an eye out for signs of doneness. The peppers should feel soft and have a little char on their skin. Once they look good, take them out of the oven and let them cool for a few minutes. Now it’s time to make the sauce. Peel off the skin from the roasted peppers and remove the seeds. In a blender, add the roasted peppers, garlic, one cup of heavy cream, half a cup of grated Parmesan cheese, and one teaspoon of Italian seasoning. Blend everything until it’s smooth and creamy. Taste it and adjust the seasoning with salt and pepper if needed. Next, cook the pasta according to the package instructions. You want it to be al dente, which means it should still have a slight bite. Before draining the pasta, reserve one cup of the cooking water. This water is important for adjusting the sauce later. In a large mixing bowl, combine the cooked pasta and the creamy roasted red pepper sauce. Toss the pasta well to make sure every piece is coated. If the sauce seems too thick, add the reserved pasta water a little at a time. This will help you get the perfect sauce consistency. Enjoy your creamy roasted red pepper pasta! To boost the taste of your creamy roasted red pepper pasta, consider adding a pinch of red pepper flakes for heat. You can also mix in smoked paprika for a deeper flavor. If you want to switch up the cheese, try using goat cheese or feta. These will add a tangy twist and make your dish even better. For the best creaminess, blend your roasted peppers and garlic thoroughly. The smoother the sauce, the richer it feels in your mouth. If the sauce is too thick, slowly mix in some of the reserved pasta water. It helps to get the right consistency without losing flavor. Plating can make your dish stand out. Use a big spoon to create a swirl of pasta on the plate. Place the sauce on top, letting it drape down the sides. For garnish, sprinkle fresh basil leaves and extra grated Parmesan. This adds color and makes the dish look fancy and inviting. Pro Tips Roasting Perfection: Ensure the peppers are slightly charred for a deeper flavor. This enhances the sweetness and gives a smokier taste to your sauce. Creamy Consistency: When blending the sauce, add a little pasta water if it’s too thick. This helps achieve the perfect creamy texture without losing flavor. Cheese Variations: For a different taste, try substituting the Parmesan with Pecorino Romano or adding a bit of cream cheese for extra creaminess. Herb Freshness: Fresh basil is a great garnish, but you can also try adding a sprinkle of red pepper flakes for a hint of heat or using fresh parsley for a different flavor profile. {{image_2}} You can add protein to your creamy roasted red pepper pasta. Chicken, shrimp, or tofu work well. If you choose chicken, grill or sauté it until cooked through. For shrimp, cook them until they turn pink. If you want a plant-based option, tofu can be cubed and sautéed until golden. Adjust cooking time based on your protein choice. Chicken usually takes about 15 minutes, shrimp cooks in 5-7 minutes, and tofu takes about 10 minutes. Make sure to season your protein to keep it flavorful. Roasting veggies adds extra flavor to your dish. Try adding zucchini, spinach, or cherry tomatoes. Cut them into bite-sized pieces and roast them alongside the bell peppers. This makes your meal more colorful and nutritious. You can also stir in fresh greens like spinach or kale after mixing in the sauce. They’ll wilt nicely and add a fresh taste. If you need a gluten-free version, choose pasta made from rice, quinoa, or lentils. These options are widely available in stores. Brands like Banza or Tinkyada offer great choices that cook well. Make sure your cream and cheese are gluten-free too. This way, you can enjoy all the creamy goodness without any worries. To keep your creamy roasted red pepper pasta fresh, store it properly. Allow the pasta to cool down. Then, place it in an airtight container. You can refrigerate it for up to three days. If you want to keep it longer, freeze it. Use a freezer-safe container or bag. Press out as much air as you can before sealing. This helps prevent freezer burn. When reheating, you want to keep that creamy texture. You can use the stovetop or microwave. For the stovetop, heat in a pan over low heat. Stir often and add a splash of water or cream if needed. For the microwave, use a microwave-safe bowl. Heat in short bursts, about 30 seconds at a time. Stir in between until it’s hot. Aim for a temperature of 165°F (74°C) to be safe. Enjoy your delicious meal! Yes, you can use jarred roasted red peppers. They save time and are easy to find. However, they can be a bit softer than fresh peppers. This affects the sauce's texture slightly. Fresh roasted peppers offer a deeper, smokier flavor. If you want a richer taste, go for fresh. To make this dish vegan, swap heavy cream with coconut cream or cashew cream. You can use nutritional yeast instead of Parmesan cheese for a cheesy flavor. Also, ensure your pasta is egg-free. These simple swaps keep the dish creamy and flavorful. Penne and fettuccine work great with creamy red pepper sauce. Penne holds sauce well in its ridges. Fettuccine offers a smooth surface that complements the sauce. You can also try spaghetti or rotini if you prefer. Choose any pasta you love! Yes, there are ways to make this recipe lighter. Use half-and-half instead of heavy cream for fewer calories. You can also reduce the amount of cheese or use a lighter cheese option. Adding more vegetables like spinach or zucchini can increase fiber and decrease calories. You can create a delicious dish with roast red peppers and creamy sauce. We went over the key ingredients, steps, and tips to make it right. I hope you feel ready to try this recipe, whether you want to add protein or go vegan. Remember, cooking is fun! Experiment and enjoy your meal. Sharing your results with friends makes it even better. Enjoy your cooking journey!

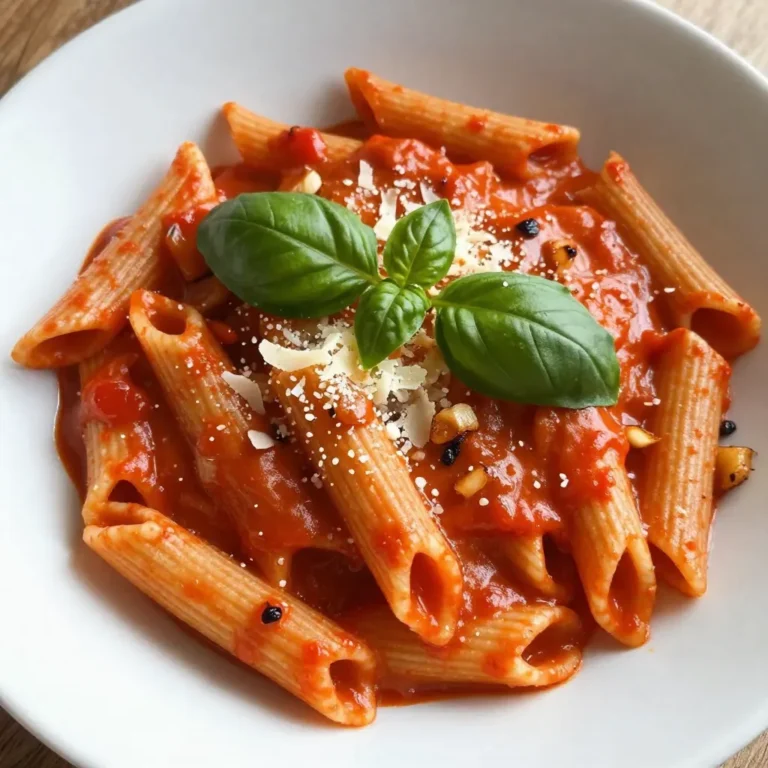
Creamy Roasted Red Pepper Pasta Flavorful Dinner Idea

To make sticky honey garlic chicken wings, you will need: - 2 lbs chicken wings, separated into drumettes and flats - 1/2 cup honey - 1/4 cup low sodium soy sauce - 4 cloves garlic, minced - 1 tablespoon grated fresh ginger - 1 tablespoon apple cider vinegar - 1 tablespoon sesame oil - 1 teaspoon red pepper flakes (optional) - Salt and pepper to taste - 1 tablespoon sesame seeds (for garnish) - 2 green onions, thinly sliced (for garnish) The key flavors in these wings come from the honey and soy sauce. Honey adds sweetness, while soy sauce brings a salty depth. Garlic and ginger give a warm, aromatic touch. Each ingredient plays a role in creating that sticky glaze we all love. To boost the flavor, consider adding these: - Fresh herbs like cilantro or parsley for a fresh taste. - A splash of lime juice can add brightness. - Use smoked paprika for a hint of smokiness. - Add more red pepper flakes for extra heat. These optional additions can help you create a dish that suits your taste perfectly! Start by rinsing the chicken wings under cold water. This step keeps the wings clean. Next, pat them dry with paper towels. Dry wings help achieve a crispy texture. After that, season them with salt and pepper. This simple step adds flavor right from the start. In a medium bowl, whisk together the following ingredients: - 1/2 cup honey - 1/4 cup low sodium soy sauce - 4 cloves garlic, minced - 1 tablespoon grated fresh ginger - 1 tablespoon apple cider vinegar - 1 tablespoon sesame oil - 1 teaspoon red pepper flakes (optional) Mix these well until they blend nicely. This sauce is sweet and savory, perfect for the wings. Place the chicken wings in a large resealable bag or bowl. Pour the marinade over the wings. Seal the bag or cover the bowl. Let them sit in the fridge for at least 2 hours, or overnight if you can. This wait allows the flavors to soak in. When you're ready to cook, preheat your oven to 425°F (220°C). Line a baking sheet with aluminum foil and set a wire rack on it. This way, the heat circulates around the wings, helping them cook evenly. Remove the wings from the marinade, shaking off the extra liquid. Arrange them in a single layer on the rack. Save the marinade for later use. Bake the wings for 25-30 minutes until they turn crispy and golden. Flip them halfway through for even cooking. While they bake, pour the reserved marinade into a small saucepan. Bring it to a boil, then lower the heat. Let it simmer for 5-10 minutes until it thickens a bit. Once baked, toss the wings in the thickened glaze. Serve them in a bowl and garnish with sesame seeds and sliced green onions. Enjoy your delicious sticky honey garlic chicken wings! To get that ideal sticky feel, focus on the glaze. When you simmer the reserved marinade, it thickens and coats the wings well. This makes them shiny and sticky. Don't rush this step. Let it simmer slowly to reach the right thickness. Toss the hot wings in the glaze right after baking. This adds a nice layer of flavor. You can cook these wings in many ways. Here are my favorites: - Oven: Preheat to 425°F (220°C). This method gives crispy wings. Use a wire rack on a baking sheet to let air flow around the wings. - Air Fryer: Cook at 375°F (190°C) for 25-30 minutes. This method makes them crispy without much oil. - Grill: Grill over medium heat. This adds a smoky flavor. Make sure to turn them often to avoid burning. Each method gives a delicious result, so pick what you prefer! To make these wings even better, try these tips: - Add Heat: Mix in more red pepper flakes or fresh chili for spice. - Citrus Zest: Add lemon or lime zest to the marinade for a fresh twist. - Herbs: Fresh herbs like cilantro or parsley can brighten the dish. - Toasted Sesame Oil: Use toasted sesame oil instead of regular for a deeper flavor. These simple changes can take your wings from great to amazing! {{image_2}} If you love heat, add red pepper flakes. Use one teaspoon for a mild kick. For extra spice, double the flakes. You can also blend in hot sauce for more flavor. Try Sriracha or your favorite hot sauce. This change turns your wings into a spicy treat. Baking wings gives a crispy texture without extra oil. Bake them at 425°F for best results. This method is simple and healthy. If you prefer frying, heat oil in a large pot. Fry the wings until golden brown. This option is tasty but less healthy. Both methods give great flavors. You can switch up the marinade for new flavors. Try using maple syrup instead of honey for a different sweetness. You can also add citrus juice like lime or orange for freshness. Want a smoky taste? Use smoked soy sauce or add some liquid smoke. These changes can make your wings unique. To keep your sticky honey garlic chicken wings fresh, follow these simple steps: - Let the wings cool down to room temperature. - Place them in an airtight container. - Add a layer of parchment paper between layers to avoid sticking. - Store in the fridge for up to three days. This method preserves their flavor and texture. When you're ready to enjoy leftover wings, reheating them right is key. Here’s how to do it: - Preheat your oven to 375°F (190°C). - Place the wings on a baking sheet lined with foil. - Bake for about 10-15 minutes until they are heated through. - For extra crispiness, broil them for an additional 2-3 minutes. This will help restore their delicious crunch. Freezing is a great way to save extra chicken wings. Here are some do's and don'ts: - Do freeze the wings right after cooking. - Do place them in a single layer on a baking sheet first, then transfer to a freezer-safe bag. - Don't store wings with the glaze on them. This can make them soggy when reheated. - Don't keep them in the freezer for more than three months for best quality. Following these tips will help you enjoy your wings later without losing their yummy taste! Yes, you can make these wings in an air fryer. Start by preheating the air fryer to 400°F (200°C). Prepare the wings as you normally would. After marinating, arrange the wings in a single layer in the air fryer basket. Cook for about 25 minutes, flipping halfway through. This method gives you crispy wings with less oil. Chicken wings pair well with many sides. Here are some tasty options: - Celery sticks - Carrot sticks - Ranch or blue cheese dressing - French fries - Potato wedges - Salad with a light vinaigrette - Garlic bread These sides add crunch and balance the meal. You can also serve them with cold drinks like soda or beer. You can store leftover wings in the fridge for up to four days. Place them in an airtight container to keep them fresh. If you want to keep them longer, freeze them. They can last up to three months in the freezer. Just make sure to reheat them properly to keep them crispy. You now have a clear guide to making sticky honey garlic chicken wings. We covered essential ingredients, step-by-step cooking methods, and tips for that perfect bite. Try different variations to keep meals exciting. Don’t forget the best practices for storage to enjoy leftovers. These simple steps and ideas will help you impress at your next gathering. Dive in, experiment, and enjoy the process of creating delicious wings!

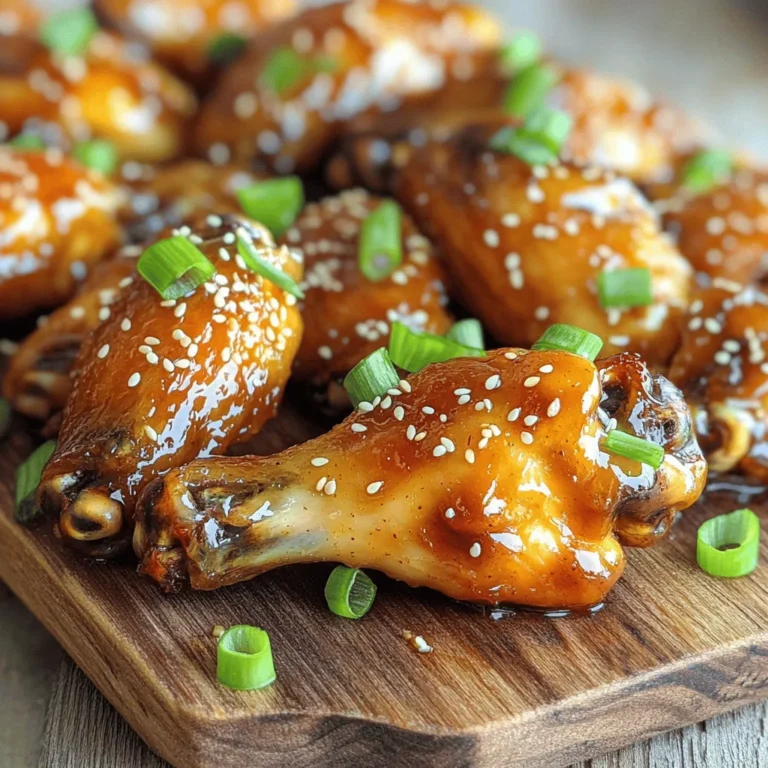
Sticky Honey Garlic Chicken Wings Flavorful Delight

- 4 large bell peppers (any color) - 2 cups fresh spinach, chopped - 1 cup feta cheese, crumbled - 1 cup cooked quinoa (or rice) - 1 small onion, finely chopped - 2 cloves garlic, minced - 1 teaspoon dried oregano - 1 teaspoon olive oil - Salt and pepper to taste - ½ cup marinara sauce (optional) - Fresh parsley, chopped (for garnish) When I make spinach feta stuffed peppers, I love to gather fresh ingredients. You can use any color bell peppers, like red, yellow, or green. They add a nice touch to the dish. The star of this recipe is the fresh spinach. I always chop it finely for even mixing. Feta cheese gives a nice salty flavor, which pairs well with the spinach. Cooked quinoa or rice works well as a base. Quinoa adds protein, making the dish more filling. You can add a small onion and minced garlic for extra flavor. Dried oregano adds an herbal touch that brightens the taste. I use a little olive oil to sauté the onion and garlic until soft. Salt and pepper bring all the flavors together. If you like, you can use marinara sauce for a tangy twist. Finally, fresh parsley makes a great garnish. It adds color and freshness to your plate. You can add other ingredients to make your stuffed peppers unique. Consider adding chopped tomatoes or olives for extra flavor. If you like a bit of heat, diced jalapeños can spice things up. If you're gluten-free, make sure to use rice instead of quinoa. You can also swap feta for a dairy-free cheese if needed. For a lower-carb option, try using cauliflower rice instead of quinoa or rice. 1. Preheat your oven to 375°F (190°C). This makes sure your peppers cook well. 2. Prepare the bell peppers. Cut off the tops and remove seeds and membranes. Set them aside. This step keeps the peppers firm and ready for stuffing. 3. Sauté onions and spinach. In a skillet, heat 1 teaspoon of olive oil over medium heat. Add 1 small finely chopped onion. Cook for 3-4 minutes until it looks clear. 4. Add 2 minced garlic cloves and 2 cups of chopped spinach to the skillet. Cook until the spinach wilts, about 2-3 minutes. This mix adds great flavor to your dish. 1. Combine ingredients in a bowl. In a large bowl, mix the sautéed onions and spinach with 1 cup of cooked quinoa, 1 cup of crumbled feta cheese, and 1 teaspoon of dried oregano. Season with salt and pepper. Make sure to blend well. 2. Pack the mixture into peppers. Stuff each bell pepper with the spinach and feta mixture. Press down gently to pack it in. This ensures every bite is full of flavor. 1. Baking instructions and time. If you like, spread ½ cup of marinara sauce at the bottom of a baking dish. Place the stuffed peppers upright. Drizzle more sauce on top if you want. Cover the dish with foil and bake for 25 minutes. 2. Tips for checking pepper tenderness. After 25 minutes, remove the foil. Bake for another 10 minutes. Check if the peppers are soft by poking them with a fork. If they are tender, they are ready to serve. - Suggested spices and herbs: You can boost the taste with more herbs. Try adding basil or thyme. A pinch of red pepper flakes adds heat. For a zing, use lemon zest. - Incorporating additional vegetables: Feel free to add chopped mushrooms, zucchini, or carrots. They add texture and nutrition. Just sauté them with the onions and garlic. Make sure to cook the quinoa or rice properly. This keeps the filling light and fluffy. When stuffing the peppers, pack the mixture gently. This helps them cook evenly. Covering with foil while baking keeps moisture in. Remove the foil later for a slightly crispy top. Serve the stuffed peppers on a colorful platter. A drizzle of marinara sauce adds a nice touch. Garnish with fresh parsley for a pop of color. Pair them with a simple side salad for a balanced meal. {{image_2}} You can easily make this dish vegetarian or vegan. For a vegetarian meal, simply keep the feta cheese. If you want it vegan, swap feta for tofu or a nut-based cheese. Both options keep the flavor rich and delicious. Adding more veggies like mushrooms or zucchini can boost nutrition too. Feel free to change the grain. Quinoa is great, but rice, barley, or farro work well too. Each grain brings a unique taste and texture. When it comes to cheese, try goat cheese or a dairy-free option. These choices add a twist to the classic flavor. Boost the Mediterranean vibe by adding olives or sun-dried tomatoes. These ingredients add saltiness and depth to the dish. You can also sprinkle fresh herbs like basil or mint on top. These additions can make your stuffed peppers even more vibrant and tasty. To store your leftover spinach feta stuffed peppers, let them cool first. Place them in an airtight container. You can keep them in the fridge for up to four days. If you want to enjoy them later, separate the filling from the peppers to keep them fresh longer. This helps prevent sogginess. When you're ready to eat your leftovers, preheat your oven to 350°F (175°C). Place the peppers in a baking dish. Cover with foil to keep them moist. Heat for about 15-20 minutes or until they are warm throughout. You can also use a microwave, but the oven keeps the peppers from getting too soft. You can freeze spinach feta stuffed peppers for up to three months. To freeze, wrap each pepper in plastic wrap and then place them in a freezer bag. When you want to eat them, thaw in the fridge overnight. Then, bake them at 350°F (175°C) until heated through. This keeps the flavors and textures nice. Yes, you can make spinach feta stuffed peppers ahead of time. Prepare the filling and stuff the peppers. Store them in the fridge for up to 24 hours. When you are ready to bake, just pop them in the oven. This saves time and makes a quick meal. Stuffed peppers pair well with many sides. Here are some great options: - A simple green salad with lemon vinaigrette. - Garlic bread for a crunchy bite. - Steamed vegetables like broccoli or green beans. - A side of quinoa or rice. These sides add color and nutrients to your meal. You can tell the peppers are done baking by their color and texture. They should be tender and slightly wrinkled. You can pierce them with a fork. If it goes in easily, they are ready. Bake them for 25 minutes covered, then 10 more minutes uncovered for the best results. This blog post covers how to make spinach feta stuffed peppers. We discussed the key ingredients, step-by-step instructions, and helpful tips. You can customize the recipe with different grains or vegetables as needed. For best results, store leftovers properly and reheat carefully. Enjoy creating this tasty dish. With the right steps, you'll impress everyone at your table. Happy cooking!

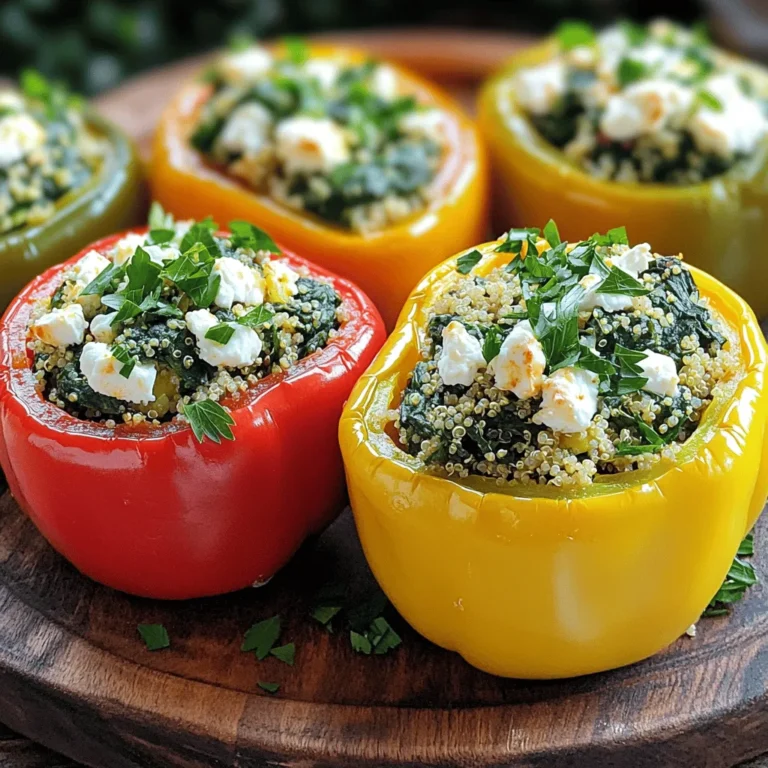
Spinach Feta Stuffed Peppers Healthy Flavorful Dish

- 4 tablespoons all-purpose flour - 4 tablespoons granulated sugar - 2 tablespoons unsweetened cocoa powder - 1/8 teaspoon baking powder - 1/8 teaspoon salt - 3 tablespoons milk - 2 tablespoons hazelnut spread (like Nutella) - 2 tablespoons vegetable oil - 1/4 teaspoon vanilla extract - 2 tablespoons chopped hazelnuts (optional, for garnish) Each ingredient plays a key role in your mug cake. The all-purpose flour gives the cake structure. Sugar adds sweetness and helps it brown. Cocoa powder gives that rich chocolate flavor. Baking powder helps the cake rise, while salt balances the flavors. Milk adds moisture, and hazelnut spread brings a creamy texture and nutty taste. Vegetable oil keeps the cake soft. Vanilla extract enhances the overall flavor. Chopped hazelnuts, if you choose to use them, provide a crunchy topping. If you want to adjust the recipe, keep these conversions in mind: - 1 tablespoon = 3 teaspoons - 1/4 cup = 4 tablespoons - 1 cup = 16 tablespoons Use these conversions to help scale the recipe up or down as needed. Remember, if you change the servings, you may also need to adjust cooking time. Making a chocolate hazelnut mug cake is simple. You need just a few minutes and one mug. Gather your ingredients and tools before you start. You’ll need a microwave-safe mug, a whisk, and a spoon. 1. Mix Dry Ingredients: In your mug, add 4 tablespoons of all-purpose flour, 4 tablespoons of granulated sugar, 2 tablespoons of cocoa powder, 1/8 teaspoon of baking powder, and 1/8 teaspoon of salt. Whisk them until they blend well. 2. Add Wet Ingredients: Now, pour in 3 tablespoons of milk, 2 tablespoons of hazelnut spread, 2 tablespoons of vegetable oil, and 1/4 teaspoon of vanilla extract. Mix everything until smooth. Make sure there are no lumps. 3. Optional Hazelnuts: If you like crunchy bits, fold in 2 tablespoons of chopped hazelnuts into the mixture. This step adds texture and flavor. 4. Microwave the Cake: Place your mug in the microwave. Cook on high for 1 minute. Keep an eye on it to prevent overflow. If it’s not fully set, microwave in 15-second bursts until done. 5. Cool and Serve: Once cooked, let your mug cake cool for about a minute. This helps avoid burns when you dig in. The total time to make this dessert is about 10 minutes. Prep takes 5 minutes. For the best results, watch your cake while it cooks. If you want more flavor, serve it warm with extra hazelnut spread and a sprinkle of chopped hazelnuts. A scoop of vanilla ice cream on the side makes it even better! Enjoy your perfect treat! To get the best texture, use fresh ingredients. Old baking powder can ruin your cake. Mix the dry ingredients well before adding wet ones. This helps avoid lumps. When you add the milk and hazelnut spread, stir gently. Don't overmix; a few lumps are fine. Microwave in short bursts to prevent overflow. One mistake is using the wrong mug size. Choose a large mug to give the cake room to rise. Another common error is not watching the time. Overcooking makes the cake dry. If your cake is too wet, it needs more time. Start with 1 minute, then check in 15-second increments. Serve your mug cake warm for the best taste. Top it with a scoop of vanilla ice cream for a creamy contrast. Drizzle more hazelnut spread on top for extra flavor. Add chopped hazelnuts for a nice crunch. You can also enjoy it with a cup of coffee or tea. {{image_2}} You can change the taste of your chocolate hazelnut mug cake easily. Try adding a pinch of cinnamon for warmth. A dash of espresso powder gives it a coffee kick. If you love orange, mix in some orange zest. You can even swap hazelnut spread for peanut butter for a nutty twist. Feeling adventurous? Add a few chocolate chips! Need to make this dessert fit your diet? You can use almond flour instead of all-purpose flour for a gluten-free option. For a lower sugar treat, try a sugar substitute like stevia. You can replace milk with almond or oat milk for a dairy-free version. If you want a vegan mug cake, use mashed banana instead of egg and skip the milk. You don’t have to limit yourself to a mug! You can use a small bowl or ramekin instead. Just make sure it’s microwave-safe. The cooking time might change a little, so keep an eye on it. If you have a mini oven, use that too! Just adjust the time based on your oven’s settings. Enjoy experimenting with these variations! After you enjoy your chocolate hazelnut mug cake, you might have some left. To store it, cover the mug with plastic wrap or place it in an airtight container. This keeps it fresh and moist. Store it in the fridge for up to two days. To reheat the mug cake, take it out of the fridge. If it is in a plastic container, transfer it back to a microwave-safe mug. Heat it in the microwave for about 10 to 15 seconds. Check it to see if it is warm. If not, heat it in 5-second bursts. You want it warm, not hot. You can freeze the mug cake if you want to save it for later. Let it cool completely first. Wrap it tightly in plastic wrap and then foil. This helps prevent freezer burn. Store it in the freezer for up to one month. When you want to eat it, thaw it in the fridge overnight. Reheat it in the microwave when you’re ready to enjoy! You can make a mug cake on the stove. Use a small pot with a lid. Fill the pot with a little water, then place a heat-safe mug inside. Make sure the water does not touch the batter. Cover the pot and heat it on low. Cook for about 10-15 minutes. Check the cake with a toothpick. If it comes out clean, it's done. This way, you still get a warm treat! Yes, you can! Try peanut butter, almond butter, or any chocolate spread. Each will bring a new taste to your mug cake. If you use a thicker spread, you may need to add a little extra milk. This keeps the cake moist and tasty. Feel free to experiment with your favorite flavors! Absolutely! Swap the all-purpose flour for a gluten-free blend. Many brands offer great options that work well in baking. Just check that the blend includes a binding agent, like xanthan gum. This helps your mug cake hold together. You can still enjoy the rich chocolate and hazelnut flavor without gluten. This post covered how to make a tasty mug cake. We explored the ingredients, cooking steps, and useful tips. You learned how to customize flavors and store leftovers. Remember to avoid common mistakes for the best results. Enjoy your mug cake fresh or later, warm and delicious. Try different spreads and baking tools for more fun. With these tricks, each mug cake can be a personal treat. Now, go ahead and bake!

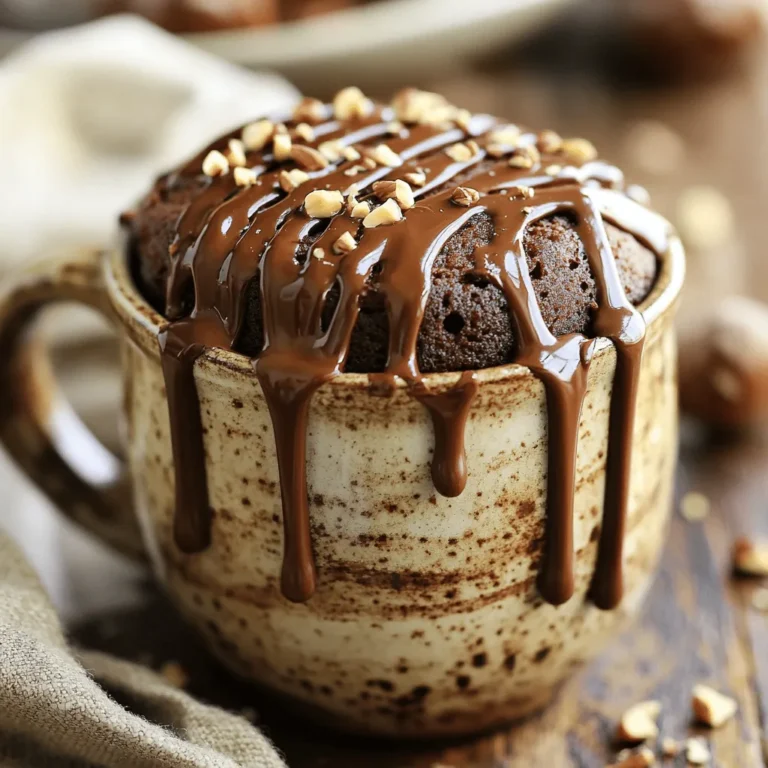
Chocolate Hazelnut Mug Cake Irresistible Dessert Treat

To make Garlic Parmesan Roasted Asparagus, gather these simple ingredients: - 1 lb fresh asparagus, trimmed - 4 cloves garlic, minced - 3 tablespoons olive oil - 1/2 cup grated Parmesan cheese - 1 teaspoon lemon zest - 1/2 teaspoon red pepper flakes (optional) - Salt and pepper to taste - Fresh parsley, chopped (for garnish) When choosing asparagus, look for bright green stalks. They should be firm and straight. The tips must be closed and compact. Avoid asparagus that looks wilted or has soft spots. Fresh asparagus has a sweet, earthy smell. If you can, buy it in season for the best flavor. If you need a substitute for Parmesan cheese, try Pecorino Romano. It has a salty kick. Grated nutritional yeast is a great vegan option. It adds a cheesy flavor without dairy. You can also use a blend of any hard cheese you have on hand. Just keep the cheese grated for the best melt! Start by rinsing the asparagus under cold water. This removes dirt and sand. Next, trim the tough ends. You can do this by bending the asparagus gently. It will snap where it becomes tender. You want to use the best parts for this dish. In a big bowl, add the trimmed asparagus. Then, add the minced garlic and olive oil. Toss it all together well. Make sure the asparagus gets coated evenly. Now, sprinkle the grated Parmesan cheese, lemon zest, red pepper flakes, salt, and pepper over the top. Toss again to mix everything nicely. Spread the asparagus mixture on a baking sheet. Use parchment paper to prevent sticking. Lay the asparagus in a single layer. This helps it cook evenly. Roast in your preheated oven for 15 to 20 minutes. Look for the asparagus to be tender and the cheese to turn golden brown. Remove it from the oven and let it cool for a couple of minutes. Finish by garnishing with fresh parsley. Enjoy your tasty side dish! To get great roasted asparagus, start with fresh spears. Look for bright green color and firm texture. Trim the ends to remove any woody parts. This helps the asparagus cook evenly. Toss the asparagus with garlic and olive oil well. This step ensures every piece gets flavor. Spread the spears in one layer on the baking sheet. This allows hot air to circulate and cook them evenly. Roast for 15-20 minutes until tender and slightly crispy. To boost the flavor, add lemon zest. It gives a bright and fresh taste. You can also sprinkle red pepper flakes for heat. This step adds a nice kick if you like spice. For a unique twist, try adding herbs like thyme or rosemary. Fresh herbs can change the dish's taste completely. You can even mix in some balsamic vinegar before roasting for a sweet touch. Keep an eye on the oven while the asparagus roasts. Every oven is a bit different. Check for tenderness around the 15-minute mark. If they start to brown too much, take them out. Remember, you want them tender but still bright green. If you roast them too long, they can become mushy. Let them cool for a few minutes before serving. This helps keep them crisp and flavorful. {{image_2}} You can customize your Garlic Parmesan Roasted Asparagus with herbs and spices. Try adding fresh thyme or rosemary for a fragrant twist. If you like heat, sprinkle in some cayenne pepper. For a fresh touch, mix in fresh dill or basil after roasting. These flavors blend well with the cheese and garlic. To make this dish vegetarian, you can use nutritional yeast instead of Parmesan cheese. It gives a cheesy flavor without dairy. If you want it vegan, swap the cheese and add a splash of balsamic vinegar for depth. You can also use a vegan Parmesan, found in many stores today. Mixing asparagus with other veggies adds color and taste. Bell peppers and cherry tomatoes roast nicely alongside asparagus. You can also add zucchini or carrots for more crunch. Just make sure to cut them to a similar size so they cook evenly. This mix of veggies makes your dish exciting and nutritious. To store your Garlic Parmesan Roasted Asparagus, let it cool first. Place it in an airtight container. You can keep it in the fridge for up to three days. Avoid stacking the asparagus too high. This way, it stays crispy. If you have leftover cheese, store it separately to prevent sogginess. When you're ready to enjoy the leftovers, preheat your oven to 350°F (175°C). Spread the asparagus on a baking sheet. Bake for about 10 minutes. This helps to bring back the crispiness. You can also microwave it for a quick heat. Just be careful not to overheat. That can make it mushy. Garlic Parmesan Roasted Asparagus lasts about three days in the fridge. If you want to save it longer, freeze it. Wrap it tightly in plastic wrap or foil. Label it with the date. It can last for up to three months in the freezer. When you're ready to eat it, thaw it overnight in the fridge. Then, reheat as described above. Yes, you can use frozen asparagus. Just remember to thaw it first. Frozen asparagus may not get as crispy as fresh. If you use frozen, roast it a bit longer. Aim for about 20-25 minutes. Asparagus is done when it is tender and slightly browned. You can test it by piercing a spear with a fork. If it goes in easily, it’s ready. The cheese should be golden, too. Garlic Parmesan Roasted Asparagus pairs well with many dishes. Try it with grilled chicken or fish. It also goes great with pasta. For a simple meal, add it to a salad. Enjoy it alongside rice or quinoa for a healthy side. In this post, we explored how to make garlic Parmesan roasted asparagus. We covered choosing fresh asparagus and alternatives for cheese. I shared easy prepping and roasting steps, along with tips for perfect results. You learned about flavor boosts and healthy swaps too. Keep these ideas in mind next time you cook. Enjoy the bright flavors and great texture of this dish. Add your twist or pair with your favorite meals for a tasty experience!

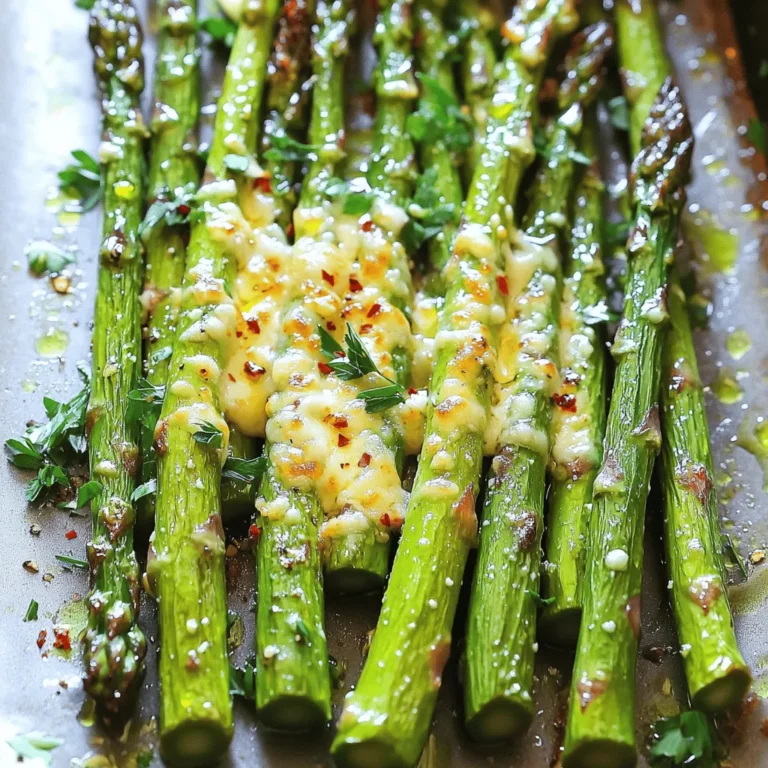
Garlic Parmesan Roasted Asparagus Savory Side Dish

PREV 1 … 47 48 49 … 86 NEXT
spicy fork kitchen

explore

DessertsDinnerAppetizersDrinks

Our Policies

  • Cookie Policy
  • Copyright Policy
  • Disclaimer
  • GDPR Policy
  • Terms Of Use
Back to Top
  • About
  • Contact Us
  • Privacy Policy
© 2026 spicy fork kitchen