FREE DINNER EBOOK! Get your copy!
  • Cookie Policy
  • GDPR Policy
  • Disclaimer
  • Terms Of Use
  • Visit my other site: Fun Cookie Recipes
spicy fork kitchen
  • Home
  • Dinner
  • Desserts
  • Drinks
  • Appetizers
  • Contact
  • About
  • Privacy Policy
  • Home
  • Dinner
  • Desserts
  • Drinks
  • Appetizers
  • Contact
  • About
  • Privacy Policy
  • Cookie Policy
  • GDPR Policy
  • Disclaimer
  • Terms Of Use
Visit my other site: Fun Cookie Recipes

HOME / CATEGORIES /

Latest

To make rainbow veggie spring rolls, you need fresh and colorful ingredients. Here’s what to gather: - 1 pack of rice paper wrappers - 1 cup red cabbage, thinly sliced - 1 cup carrots, julienned - 1 cup bell peppers (red, yellow, and green), thinly sliced - 1 cup cucumber, julienned - 1 avocado, sliced - 1 cup fresh mint leaves - 1 cup fresh cilantro leaves These ingredients create a vibrant mix. Each adds a unique crunch and taste. The rice paper wraps hold it all together nicely. For the dipping sauce, you’ll want a mix of sweet and savory. Here’s what you need: - 1/4 cup peanut butter - 2 tablespoons soy sauce (or tamari for gluten-free) - 2 tablespoons lime juice - 1 tablespoon honey or agave syrup - Water (to thin) This sauce pairs perfectly with the fresh rolls. It also adds a creamy element to each bite. You can make your dish even more appealing with some garnishes: - 1/4 cup sesame seeds Sprinkling sesame seeds on top gives the rolls a nice finish. It adds a bit of crunch and a touch of style. Enjoy creating this colorful dish! {{ingredient_image_1}} Start by washing all your veggies. Clean the red cabbage, carrots, bell peppers, cucumber, and avocado. Slice each vegetable into thin strips or julienne them. Use a sharp knife for clean cuts. Place each type in separate bowls. This keeps things neat and organized. You will enjoy the colors and textures of your fresh veggies. Get a large shallow dish or wide bowl. Fill it with warm water. Dip one rice paper wrapper into the water for about 10-15 seconds until it feels soft. Carefully take it out and lay it flat on a clean surface. Now, it’s time to fill the wrapper! On the lower third, layer a small handful of red cabbage. Next, add some carrot sticks, bell pepper strips, and cucumber. Place an avocado slice on top. Don't forget a few mint and cilantro leaves for flavor. To roll, fold the sides of the rice paper over the filling. Then, roll it tightly from the bottom up. Make sure it is snug but not too tight. Repeat this with your remaining wrappers and filling. Each roll should look colorful and inviting! For the perfect dipping sauce, take a small bowl. Whisk together peanut butter, soy sauce, lime juice, and honey. If it’s too thick, add a splash of water to thin it out. Mix until smooth. Taste it! Adjust flavors if needed. This sauce adds a creamy, zesty touch to your spring rolls. Now you are ready to enjoy your colorful and fresh rainbow veggie spring rolls! Rolling spring rolls takes a bit of practice but is easy once you know how. First, soak a rice paper wrapper in warm water for about 10-15 seconds. It should feel soft but still firm. Lay it flat on a clean surface. Place your filling on the bottom third of the wrapper. Use a mix of red cabbage, carrots, bell peppers, cucumber, avocado, mint, and cilantro. Now, fold the sides in first. Then, roll it tightly from the bottom up. Keep it snug but don’t squeeze too hard. This way, you avoid tearing the wrapper. If you find it hard to roll, try using less filling. If you have leftover spring rolls, store them properly to keep them fresh. Place them in an airtight container. You can separate layers with parchment paper. This prevents them from sticking together. Store them in the fridge for up to two days. If you want to keep them longer, freeze the rolls. Wrap them in plastic wrap and place them in a freezer bag. They can last for about a month in the freezer. When ready to eat, let them thaw overnight in the fridge. Many people make mistakes when making spring rolls. Here are a few to watch for: - Soaking the wrapper for too long can make it too soft. - Overfilling the spring rolls makes them hard to roll. - Forgetting to fold the sides in can lead to spills when rolling. - Not using fresh herbs makes the rolls less tasty. By avoiding these mistakes, your spring rolls will look great and taste even better! Pro Tips Choose Fresh Ingredients: Use the freshest vegetables possible for vibrant colors and maximum crunch in your spring rolls. Soak Rice Paper Quickly: Don't soak the rice paper wrappers for too long; 10-15 seconds is usually enough to soften them without tearing. Experiment with Fillings: Feel free to customize your spring rolls with other vegetables or proteins like shrimp, tofu, or even fruit for a sweet twist. Keep the Dipping Sauce Smooth: If your dipping sauce is too thick, add water gradually until you reach your desired consistency for easy dipping. {{image_2}} You can add protein to your spring rolls. Tofu is a great choice. Use firm tofu and slice it thin. Cook it in a pan until golden. Shrimp is another option. Boil or sauté shrimp until they turn pink. Add a few pieces to your rolls for extra flavor. Choose proteins based on your taste. While peanut sauce is tasty, there are many options. Try soy sauce mixed with rice vinegar. This gives a nice tang. Sweet chili sauce adds a kick and sweetness. For a creamy dip, use tahini mixed with lemon juice. You can even mix yogurt with herbs for a fresh taste. The sauce choice can change the whole dish. You can switch up the veggies based on the season. In spring, use asparagus or snap peas for crunch. Summer brings fresh tomatoes and zucchini. In fall, add roasted sweet potatoes or butternut squash. Winter calls for hearty greens like kale. Use what you have for a fresh twist. This makes each roll unique and fun! To keep your rainbow veggie spring rolls fresh, store them in an airtight container. Place a damp paper towel in the container. This towel keeps the rolls moist. Make sure the rolls do not touch each other to prevent sticking. Store them in the fridge for the best taste. They taste best within 1-2 days of making. You can freeze spring rolls, but they need care. First, wrap each roll in plastic wrap. This step keeps them from freezer burn. Next, place the wrapped rolls in a freezer-safe bag. They can last up to 2 months in the freezer. When you want to eat them, let them thaw in the fridge overnight. Then, enjoy them cold or warm them gently. Each ingredient has its own shelf life. Here’s a quick list: - Rice paper wrappers: Keep them in a cool, dry place. They last for a long time. - Fresh veggies: Use them within a week for the best crispness. - Avocado: Use it within a day or two after cutting. - Mint and cilantro: These herbs stay fresh for about a week in the fridge. Always check your ingredients before using them. Fresh items make the best spring rolls! Yes, you can make these spring rolls in advance. Just prepare them up to two days before serving. Store them in an airtight container. Place a damp paper towel between layers to keep them fresh. This way, you can enjoy these colorful treats anytime. If you can't find rice paper, try using lettuce leaves. Butter lettuce works well. You can also use thin tortillas. These options still let you enjoy the fresh veggies inside. Yes, Rainbow Veggie Spring Rolls can be gluten-free. Just use tamari instead of soy sauce in the dipping sauce. Check your rice paper wrappers to ensure they are gluten-free. This way, everyone can enjoy these tasty rolls. To add spice, mix some sriracha into the dipping sauce. You can also add sliced jalapeños inside the rolls. If you like heat, try adding a pinch of chili flakes. These options will make your spring rolls have a nice kick. Rainbow Veggie Spring Rolls are fresh, colorful, and fun to make. We discussed key ingredients, step-by-step instructions, and tips for rolling. I shared ways to personalize your rolls with proteins and sauces. Also, we covered storage methods for leftovers. In closing, making these spring rolls is easy and rewarding. They are a healthy snack or meal. Enjoy the process and get creative with your fillings. Happy rolling!

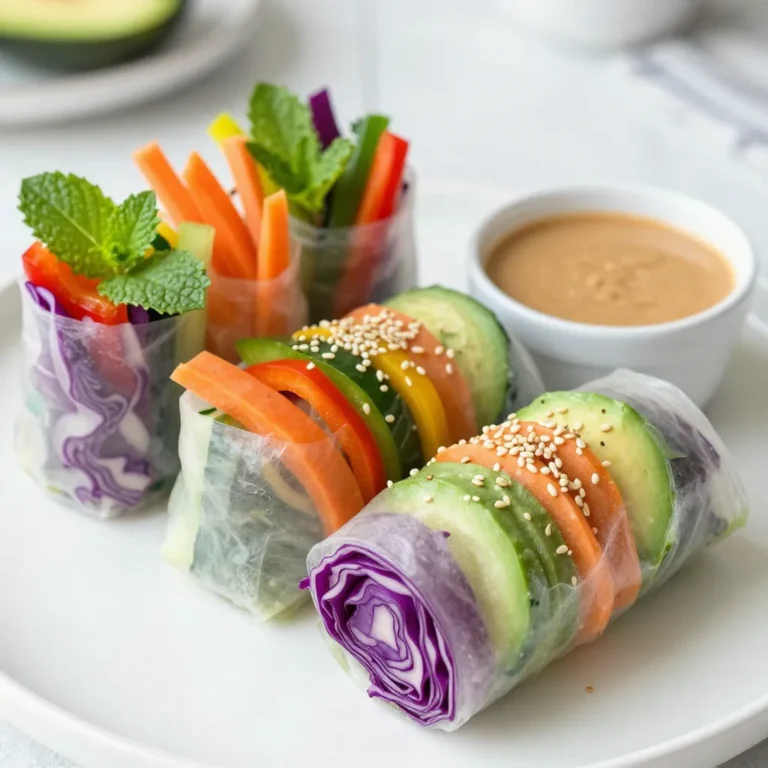
Rainbow Veggie Spring Rolls Colorful and Fresh Treat

- 6 bone-in, skin-on chicken thighs - 4 cloves garlic, minced - 2 tablespoons fresh rosemary, chopped - 2 tablespoons fresh thyme, chopped - 1 tablespoon olive oil - 1 teaspoon lemon zest - Salt and pepper to taste - 1 lemon, sliced into rounds - Fresh parsley for garnish Gathering the right ingredients is key to making garlic herb roasted chicken thighs. Start with six bone-in, skin-on chicken thighs. This cut has great flavor and stays juicy during cooking. You will also need four cloves of garlic, minced finely. Garlic adds a wonderful aroma and taste. Next, chop two tablespoons of fresh rosemary and two tablespoons of fresh thyme. These herbs bring a fresh, earthy flavor. You will also need one tablespoon of olive oil to help the herbs stick and add richness. Add one teaspoon of lemon zest to brighten the dish. Don't forget salt and pepper to taste. These basic seasonings enhance all the flavors. Finally, slice one lemon into rounds for roasting. This adds moisture and flavor during cooking. For garnish, use fresh parsley to add color and a fresh taste. With these ingredients on hand, you are ready to create a flavorful delight. {{ingredient_image_1}} - Preheat your oven to 425°F (220°C). - In a small bowl, mix minced garlic, chopped rosemary, chopped thyme, olive oil, lemon zest, salt, and pepper. This makes a tasty herb paste. - Dry the chicken thighs well with paper towels. This helps the skin get nice and crispy. - Rub the herb paste under and on top of each chicken thigh. Make sure each piece is well coated. - Place the chicken thighs skin-side up on a baking sheet. I like to use parchment paper for easy cleanup. - Add lemon slices around the chicken. This adds great flavor and moisture. - Roast for 35-40 minutes until the chicken is cooked through. Check that it reaches 165°F (75°C) inside. The skin should be golden brown and crispy. To get that perfect crispy skin, start by drying the chicken thighs. I use paper towels to pat them dry. This step is key. Any moisture will steam the skin instead of making it crisp. After drying, rub the herb paste under the skin and on top. Make sure to cover every inch. This adds flavor and helps the skin crisp up nicely. To make your chicken even more flavorful, try adding herbs like sage or oregano. Fresh basil also works well. You can even add a pinch of chili flakes for a little heat. Mix and match to find your favorite blend. This way, each bite bursts with taste. Broiling is a great trick to get extra crispy skin. Once your chicken is nearly done, switch to broil for the last 2-3 minutes. But watch it closely! The high heat can burn quickly. Keep the oven light on or peek through the window. This method gives you that golden brown finish that looks and tastes amazing. Pro Tips Dry the Chicken: Patting the chicken thighs dry before seasoning helps achieve a crispy skin during roasting. Herb Paste Distribution: Make sure to get the herb paste under the skin and on top for maximum flavor infusion. Monitor Temperature: Use a meat thermometer to check for doneness; chicken should reach an internal temperature of 165°F (75°C). Rest Before Serving: Let the chicken rest for a few minutes after roasting to allow the juices to redistribute for a juicier bite. {{image_2}} You can change the herbs in this recipe. Fresh sage or oregano work great. Sage adds a warm, earthy taste. Oregano gives a nice, slightly sweet flavor. Try mixing different herbs for a unique twist. You can even add a bit of basil for a fresh touch. Want some heat? Add chili flakes. Just a pinch can make a big difference! If you like tangy flavors, try adding mustard to the herb paste. It will give a nice kick to the chicken. You can also mix in some honey for a sweet contrast. You can grill the chicken thighs too! Grilling gives a nice smoky flavor. Just make sure to cook them until they reach 165°F (75°C). Roasting in the oven creates crispy skin and juicy meat. Both methods work well, so choose what you like best. To keep your garlic herb roasted chicken thighs fresh, store them in an airtight container. Make sure to let the chicken cool before sealing. Place it in the fridge within two hours of cooking. This helps keep the chicken juicy and safe to eat. It will last for about 3 to 4 days. If you want to enjoy your chicken later, freezing is a great option. To freeze your garlic herb chicken, wrap each thigh tightly in plastic wrap. Then, place the wrapped thighs in a freezer bag. Remove as much air as you can from the bag before sealing it. Label the bag with the date. Your chicken can stay frozen for up to 3 months. To reheat, thaw it in the fridge overnight before cooking. To reheat your chicken and keep it moist, use the oven. Preheat it to 350°F (175°C). Place the chicken in a baking dish, cover it with foil, and heat for 20-25 minutes. This method helps keep the skin crispy. You can also use an air fryer for 10-12 minutes at 375°F (190°C). This gives you a nice, crunchy skin while keeping the meat juicy. To check if chicken thighs are done, use a meat thermometer. The safe internal temperature is 165°F (75°C). Insert the thermometer into the thickest part of the meat. If it reads 165°F, your chicken is cooked. Another way to check is by looking at the juices. If they run clear, the chicken is likely done. Let the chicken rest for 5 minutes after cooking. This helps keep the juices inside. Yes, you can use boneless chicken thighs. They will cook faster than bone-in thighs. Reduce the cooking time to about 25-30 minutes at 425°F (220°C). Check the internal temperature to ensure it reaches 165°F (75°C). Boneless thighs may not get as crispy, so consider broiling for a few minutes to enhance the texture. Garlic herb roasted chicken thighs go well with many sides. Here are some great options: - Roasted vegetables, like carrots and broccoli - Creamy mashed potatoes - Fresh green salad - Garlic bread or crusty rolls - Quinoa or rice pilaf These sides complement the flavors of the chicken and create a balanced meal. This blog post showed you how to make delicious garlic herb roasted chicken thighs. We covered the key ingredients, step-by-step instructions, and helpful tips to ensure a perfect meal. Remember, drying the chicken helps it get that crispy skin. You can adjust flavors with different herbs or spices. Don't forget to store leftovers properly for later enjoyment. With these easy tips and tricks, you'll impress everyone at your table. Get cooking and savor every bite!

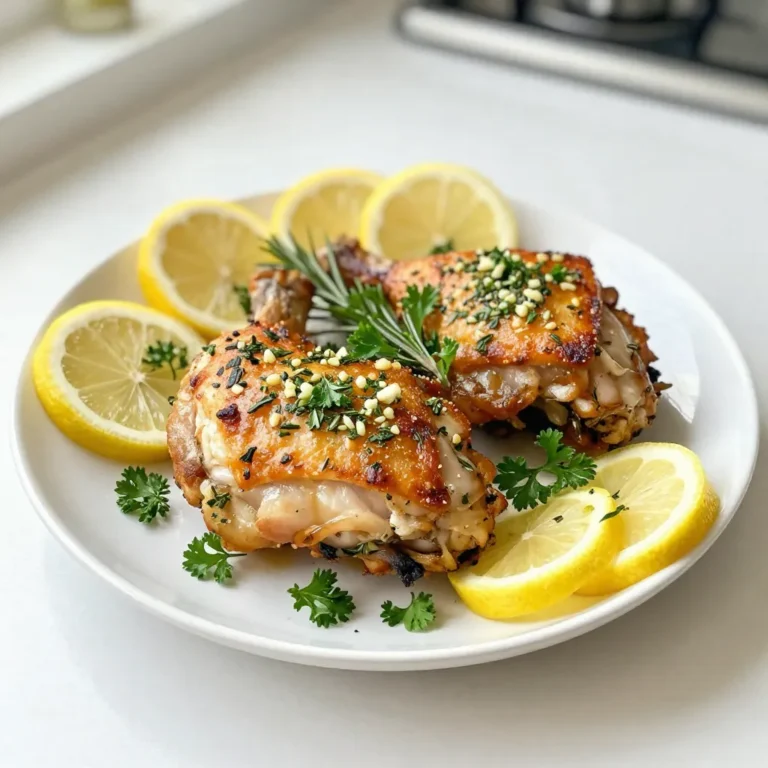
Garlic Herb Roasted Chicken Thighs Flavorful Delight

To make your burger bowls, gather these key items: - 1 pound ground beef or plant-based burger alternative - 1 teaspoon garlic powder - 1 teaspoon onion powder - 1 teaspoon smoked paprika - Salt and pepper to taste - 4 cups mixed greens (spinach, arugula, or romaine) - 1 cup cherry tomatoes, halved - 1 cucumber, diced - 1/2 red onion, thinly sliced - 1 avocado, sliced - 1/2 cup shredded cheddar cheese (or dairy-free cheese) - 1/4 cup pickles, sliced - 1/4 cup barbecue sauce or your favorite burger sauce These ingredients help build a flavorful and filling meal. The ground beef or plant-based option serves as the heart of the dish. The spices add depth, while the greens and veggies create a fresh base. Feel free to get creative with your toppings! Here are some ideas: - Sliced jalapeños for heat - Crispy bacon bits for crunch - Sour cream for creaminess - Ranch or garlic sauce for extra flavor These toppings allow you to customize your bowl. Each addition brings a unique taste and texture to your meal. If you prefer plant-based options, substitute the ground beef with a veggie burger or lentils. For cheese, use a dairy-free version made from nuts or soy. These swaps make the dish suitable for various diets. They still deliver on flavor and satisfaction. These ingredient choices ensure that anyone can enjoy a delicious burger bowl, regardless of dietary needs. {{ingredient_image_1}} To start, grab a large bowl. Add the ground beef or your plant-based option. Then, mix in the garlic powder, onion powder, smoked paprika, salt, and pepper. Use your hands to blend everything well. Make sure the seasonings coat the meat evenly. This step adds flavor to each bite. Now, form the mixture into patties. You can make about 4 to 6, depending on how big you want them. Next, get your skillet ready. Preheat it over medium-high heat. Once hot, place the patties in the skillet. Cook them for 4 to 5 minutes on each side. You want them browned and fully cooked through. To check if they are done, cut one open. It should not be pink inside. After cooking, take the patties out and let them rest for a minute. This helps keep them juicy. Then, chop the patties into bite-sized pieces. Now it’s time to build your burger bowls. Start with a base of mixed greens. You can use spinach, arugula, or romaine. Divide the greens into large bowls. Next, add the chopped burger patties on top of the greens. Now, layer on the cherry tomatoes, cucumber, red onion, and avocado slices. Don’t forget to sprinkle the shredded cheese and pickles over the top. Finally, drizzle your favorite barbecue sauce or burger sauce over everything. Serve your bowls right away. Let everyone mix their bowls to match their taste. Enjoy this fun and tasty meal! To cook beef or plant-based patties, start with quality meat or alternatives. Use a mix of garlic powder, onion powder, and smoked paprika for flavor. Form your patties evenly to ensure they cook well. Heat your skillet to medium-high before adding patties. Cook them for 4-5 minutes on each side. Look for a nice brown crust. For plant-based patties, follow the same cooking time, but check package instructions. Let the patties rest for a minute before chopping them into bite-sized pieces for your bowls. Fresh ingredients make your burger bowls shine. Use leafy greens like spinach or romaine for crunch. Choose ripe cherry tomatoes and firm cucumbers for flavor. Thinly slice red onions for a crisp bite. Avocados should be ripe but not too soft. Shredded cheese adds richness, so pick your favorite. When selecting pickles, look for ones with a nice crunch. Always wash your veggies before use to remove dirt and pesticides. Fresh ingredients make every bite taste better. When serving burger bowls to guests, let them customize their own. Set out toppings in small bowls so everyone can choose. Include options like extra cheese, more veggies, or different sauces. A drizzle of barbecue sauce or a special burger sauce enhances the flavor. Offer a side of baked sweet potato fries for a fun touch. Encourage guests to mix their bowls for a unique taste experience. This interactive style makes the meal more enjoyable and personal. Pro Tips Cooking Temperature: Ensure your skillet is adequately preheated to achieve a nice sear on the patties, enhancing flavor and texture. Resting Time: Let the cooked patties rest for a minute before chopping to retain juices, making them more flavorful and moist. Fresh Ingredients: Use fresh, ripe vegetables for the toppings to enhance the overall flavor and presentation of your burger bowls. Customizable Sauces: Experiment with different sauces or dressings to personalize each bowl, making it a fun and unique dining experience for everyone. {{image_2}} You can make a tasty burger bowl without meat. Use a plant-based burger instead. These options taste great and are filling. Try black bean patties or lentil burgers. They add protein and fiber. You can also use chickpea patties for a unique twist. Add the same spices for flavor. If you follow a keto diet, skip the grains and sugars. Use lettuce as a base instead of mixed greens. You can use more cheese and avocado. These add healthy fats. For protein, select ground beef or turkey. Avoid barbecue sauce or select a low-carb option. This keeps your bowl flavorful and on track. Your burger bowl can be as unique as you are! Add any spices you love. Consider chili powder for heat or cumin for warmth. You can also swap veggies based on your favorites. Try bell peppers, radishes, or even roasted zucchini. Each bite can taste different! Let your creativity shine when building your bowl. You can store leftover burger bowls in the fridge. Use an airtight container to keep them fresh. It’s best to eat them within three days. Make sure to keep the sauce separate. This helps the greens stay crisp. To reheat, you can use a microwave or a skillet. If using a microwave, place the bowl in for 1-2 minutes. Stir it halfway to heat evenly. If using a skillet, warm it over low heat for about 5 minutes. Add a splash of water if it feels dry. You can freeze burger patties for later use. Form the patties and place them on a baking sheet. Freeze them for about an hour until firm. Then, wrap each patty in plastic wrap and place them in a freezer bag. They can last up to three months. When ready to cook, thaw in the fridge overnight. A Burger Bowl is a fun and tasty meal. It combines burger ingredients in a bowl. Instead of a bun, you use greens. You can add your favorite toppings, like cheese and veggies. It’s a great way to enjoy burgers in a new style. Yes, you can use frozen beef or alternative patties. Just make sure to thaw them first. Cook them as you would fresh patties. This saves time and still gives you yummy flavors. Burger Bowls can be healthy. They use fresh veggies and lean meat. You can control the toppings and sauces. This helps you make a meal that fits your needs. Plus, they are low in carbs if you skip the bun. Many sauces go well with Burger Bowls. Barbecue sauce is a popular choice. You can also try ranch dressing, ketchup, or mustard. Each sauce adds its own flavor, making every bowl unique. Burger bowls are fun and easy meals you can customize. We discussed main ingredients and toppings, plus tasty alternatives. You learned how to cook patties and assemble bowls step-by-step. Tips helped enhance flavor and freshness, while variations and storage ideas made it practical. Ultimately, burger bowls are healthy and suitable for everyone. Enjoy making them at home, and always try new ideas to keep it exciting. Your cooking will impress family and friends!

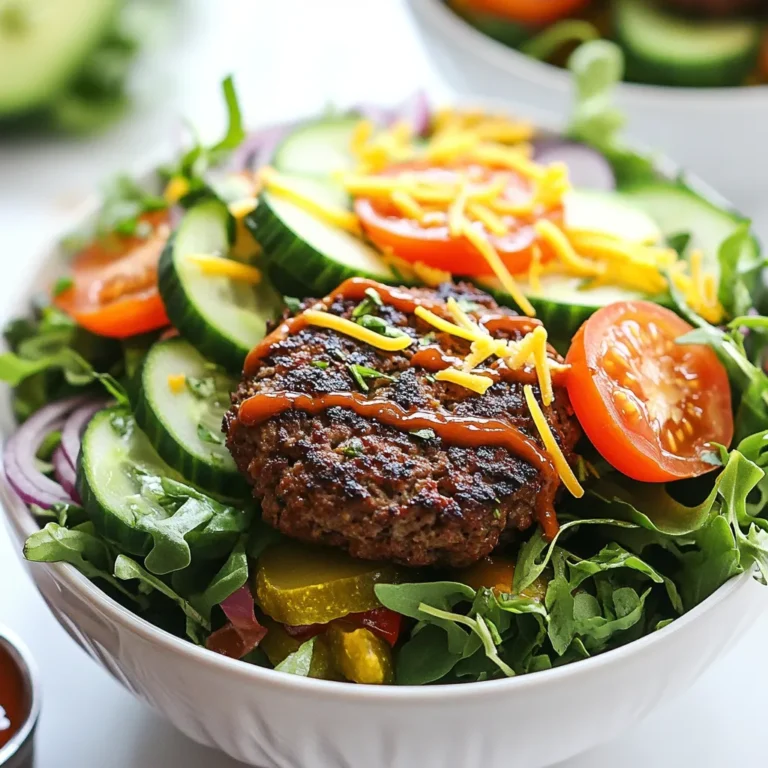
Burger Bowls Savory and Satisfying Meal Idea

- 1 can chickpeas, drained and rinsed - 1 can white beans, drained and rinsed - 1 medium onion, diced - 3 cloves garlic, minced - 2 carrots, diced - 2 celery stalks, diced - 4 cups vegetable broth - 1 teaspoon ground cumin - 1 teaspoon smoked paprika - 2 tablespoons olive oil - Salt and pepper to taste - Fresh parsley, chopped (for garnish) - Zest of 1 lemon I love using chickpeas and white beans in this soup. They are rich in protein and fiber. They also create a hearty base that fills you up. The diced onion, garlic, carrots, and celery add great flavor and texture. I always make sure to use fresh ingredients for the best taste. The spices are simple but effective. Ground cumin and smoked paprika bring warmth and depth. Olive oil helps to sauté the veggies and adds a smooth flavor. Don't forget the salt and pepper! They help to balance the dish nicely. - 1/2 teaspoon crushed red pepper flakes - Additional garnishes like lemon slices or more parsley If you like a bit of heat, add crushed red pepper flakes. They give the soup a nice kick. You can also play with garnishes for extra flavor. Lemon slices add brightness, and more parsley looks pretty on top. - Calories per serving: About 250 - Protein content: Approximately 12 grams - Dietary considerations: Vegan and gluten-free This soup is not only tasty but also healthy. Each serving has about 250 calories. The protein content is around 12 grams, making it a great option for a filling meal. Plus, it's vegan and gluten-free, so many people can enjoy it! {{ingredient_image_1}} - Prepping the vegetables Start by dicing one medium onion, two carrots, and two celery stalks. You want even pieces to cook well. Mince three cloves of garlic. This adds a nice flavor to the soup. - Draining and rinsing the beans Open one can of chickpeas and one can of white beans. Drain and rinse them under cold water. This removes extra salt and makes them healthier. - Sautéing the vegetables In a large pot, heat two tablespoons of olive oil over medium heat. Add the diced onion, carrots, and celery. Sauté for about 5-7 minutes until they soften. Stir in the minced garlic and cook for one more minute. This will fill your kitchen with a lovely aroma. - Toasting the spices Next, add one teaspoon of ground cumin and one teaspoon of smoked paprika. If you like a bit of heat, add ½ teaspoon of crushed red pepper flakes. Sauté for another 1-2 minutes. This step brings out the full flavor of the spices. - Simmering the soup Pour in four cups of vegetable broth and bring it to a boil. Once boiling, reduce the heat to low. Add the drained chickpeas and white beans. Let the soup simmer for 15-20 minutes. This helps all the flavors mix together. - How to use an immersion blender After simmering, take an immersion blender and blend part of the soup. This gives it a creamy texture. If you don’t have one, carefully transfer the soup in batches to a regular blender. Be careful with hot liquid! - Adjusting seasonings Stir in the zest of one lemon for a fresh taste. Then, season with salt and pepper to your liking. Taste as you go to find the right balance. - Serving suggestions Serve the soup hot. Garnish each bowl with chopped fresh parsley. This adds color and freshness. Consider pairing it with a slice of crusty bread for a full meal. To make this soup burst with flavor, use fresh herbs. Parsley adds a fresh touch. You can also try thyme or rosemary for a warm note. Spices are key. Ground cumin gives depth, while smoked paprika adds a little warmth. If you like heat, add crushed red pepper flakes. Taste as you go to perfect the seasoning. A great soup has the right creaminess. For this, blend part of the soup. An immersion blender works well. It keeps some beans whole for texture. If you don’t have one, pour it in a blender in batches. Just be careful with hot liquid! Blend until smooth but leave some chunks for interest. This soup pairs well with crusty bread. A slice of sourdough or whole grain is perfect for dipping. A fresh salad on the side brightens the meal. For garnishes, consider lemon zest for zing. A drizzle of olive oil adds richness. Fresh parsley not only looks nice but adds flavor too. Pro Tips Use Fresh Herbs: Fresh parsley adds a vibrant flavor and color to your soup. Consider adding other herbs like thyme or rosemary for a different twist. Adjust the Consistency: If you prefer a thicker soup, blend more of the mixture until you reach your desired creaminess. You can also add a splash of coconut milk for a richer flavor. Spice it Up: If you enjoy heat, increase the amount of crushed red pepper flakes or add a dash of hot sauce to give your soup an extra kick. Make it Ahead: This soup tastes even better the next day! Prepare it in advance and store it in the refrigerator for easy meals throughout the week. {{image_2}} You can switch up beans in this recipe. Try black beans or pinto beans for a twist. These beans bring different flavors and textures. Mixing them keeps the soup exciting. Adding greens is another fun swap. Spinach or kale can boost nutrition. Toss in a handful when the soup simmers. They will wilt down nicely, adding a fresh touch. Want some heat? Make a spicy version! Add crushed red pepper flakes for some kick. You can also use fresh jalapeños for a bolder flavor. Adjust the amount to fit your taste. For a Mediterranean twist, include some sun-dried tomatoes or olives. These ingredients bring rich, savory notes. A sprinkle of feta cheese on top can add creaminess. This soup is naturally vegan. It uses only plant-based ingredients, making it friendly for everyone. You can enjoy it guilt-free while savoring each bite. It is also gluten-free! All the ingredients are safe for those with gluten issues. You can enjoy this hearty soup without worry. Chickpea white bean soup lasts about 3 to 5 days in the fridge. To keep it fresh, store it in airtight containers. This helps to lock in flavors and prevent spoilage. Before placing it in the fridge, let the soup cool down. This step is important to avoid raising the temperature inside your fridge. To freeze the soup for later, allow it to cool completely. Then, pour the soup into freezer-safe bags or containers. Leave some space at the top to allow for expansion. Seal them tightly and label with the date. For thawing, place the soup in the fridge overnight. You can also use the microwave on a low setting if you need it quickly. For the best reheating methods, use the stove or microwave. If using the stove, heat it gently over low heat while stirring. If using the microwave, place the soup in a microwave-safe bowl. Cover it loosely to prevent splatter. Heat in short bursts, stirring in between. This keeps the flavor and texture intact, making each bowl as good as the first. Chickpea white bean soup is a hearty dish. It combines chickpeas and white beans for protein. The soup also has bright flavors from vegetables like onion, carrots, and celery. Spices like cumin and paprika add warmth. The result is a comforting, creamy soup that fills you up. To make this soup in a slow cooker, follow these steps: - Heat olive oil in a pan. - Sauté onion, carrots, and celery until soft. - Add garlic and spices; cook for one minute. - Transfer everything to the slow cooker. - Pour in the vegetable broth and add beans. - Cook on low for 6-8 hours or high for 3-4 hours. - Blend part of the soup for creaminess before serving. Yes, you can add meat for extra flavor. - Cook diced chicken or sausage in the pan before the vegetables. - Stir in cooked ground turkey or beef along with the beans. - Use shredded rotisserie chicken for a quick option. Adding meat gives a different texture and taste. This soup is packed with health benefits. - Chickpeas and white beans provide protein and fiber. - The vegetables add vitamins and minerals. - Spices like cumin can help digestion. - This soup is filling and satisfying, perfect for comfort. Eating it warms the body and soul, making it a perfect meal. This blog shared how to make a tasty Chickpea White Bean Soup. You learned about key ingredients like beans, vegetables, and spices. I gave clear steps for prepping, cooking, and serving the soup. You found tips to enhance flavor and texture. Plus, I suggested fun variations to fit your taste. In closing, this soup is healthy, easy to make, and packed with flavor. Enjoy experimenting and finding your own twist!

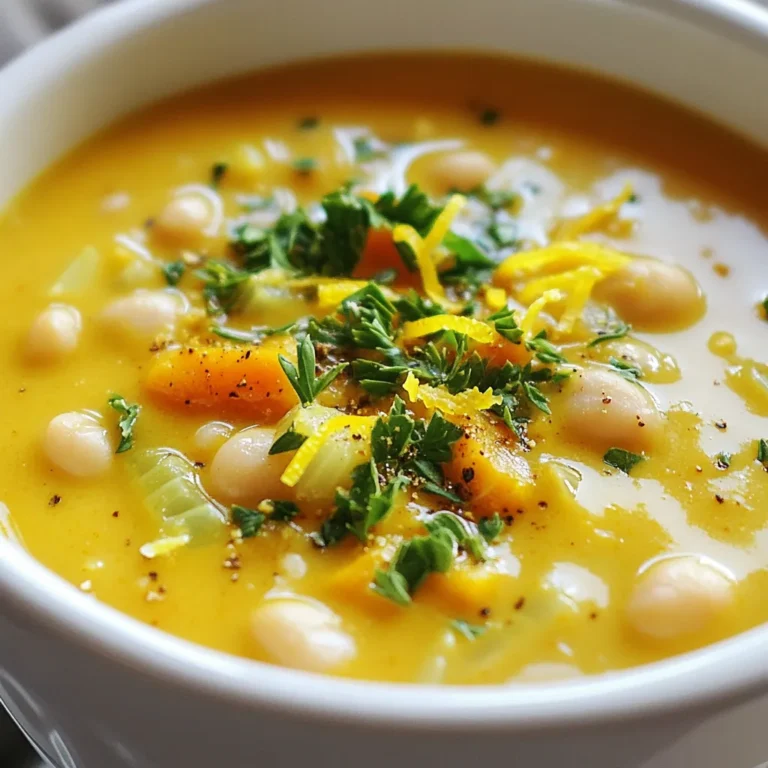
Chickpea White Bean Soup Nourishing and Simple Recipe

To make Sunrise Breakfast Enchiladas, gather these ingredients: - 6 large corn tortillas - 4 large eggs - 1/2 cup milk - 1 cup black beans, drained and rinsed - 1 cup diced bell peppers (red and yellow) - 1/2 cup diced onion - 1 cup shredded Monterey Jack cheese - 1/2 teaspoon cumin - 1/2 teaspoon chili powder - Salt and pepper to taste - 1 avocado, sliced - Fresh cilantro for garnish - Salsa for serving You will need a few key tools for this recipe: - A large skillet for cooking - A mixing bowl for the egg mixture - A baking dish to hold the enchiladas - Measuring cups and spoons for accuracy - A microwave for warming tortillas If you don't have certain ingredients, here are some easy swaps: - Use flour tortillas instead of corn if you prefer. - Swap black beans for pinto beans or kidney beans. - Use any cheese you like; cheddar works great too. - Instead of milk, try almond milk or oat milk. - Fresh herbs can replace cilantro for a different flavor. - Add spinach or zucchini for extra veggies. {{ingredient_image_1}} To make Sunrise Breakfast Enchiladas, gather your ingredients first. You need corn tortillas, eggs, milk, black beans, bell peppers, onion, and cheese. Don’t forget spices like cumin, chili powder, salt, and pepper. The prep takes about 15 minutes, and cooking will take around 30 minutes. Start by preheating your oven to 350°F (175°C). In a skillet, heat a splash of olive oil over medium heat. Add diced onion and bell peppers. Sauté these veggies for about 5 minutes. You want them soft and fragrant. Once they are ready, take them off the heat and set them aside. In a bowl, whisk together four large eggs and half a cup of milk. Add the sautéed veggies and one cup of black beans to this mix. Don't forget to sprinkle in half a teaspoon of cumin and chili powder, along with salt and pepper to taste. Mix it all well so the flavors blend nicely. Warm the corn tortillas in the microwave for about 20 seconds. This makes them easy to roll. Spoon a good amount of the egg and vegetable mix into the center of each tortilla. Top it with a sprinkle of shredded Monterey Jack cheese. Roll each tortilla tightly and place them seam-side down in a greased baking dish. Pour any leftover egg mixture over the rolled enchiladas. Then, sprinkle the remaining cheese on top. Cover the dish with foil and bake for 20 minutes. After that, take off the foil and bake for another 10 minutes. You want the cheese to be bubbly and golden. Once done, let them cool for a couple of minutes before serving. Enjoy with avocado slices, fresh cilantro, and salsa! To make Sunrise Breakfast Enchiladas shine, focus on your cooking method. Start by sautéing the onion and bell peppers in a bit of olive oil. This step builds sweet flavors. Remember, cook them until soft, about five minutes. Then, mix your eggs with spices. Whisk until well combined. This blend adds depth to the dish. Gently stir the egg mix and cooked veggies on low heat. You want them just set, not dry. This technique keeps the eggs tender. Keeping your enchiladas moist is key for a great breakfast. First, warm your corn tortillas for about 20 seconds in the microwave. This makes them soft and easy to roll. When you fill the tortillas, don’t overstuff them. A little filling goes a long way. After rolling, pour any leftover egg mixture on top. This moisture helps during baking. Also, cover the dish with foil for the first half of baking. This traps steam and keeps them fluffy. For a colorful plate, serve your enchiladas with fresh avocado slices and cilantro. The creaminess of the avocado balances the spice. Add a generous scoop of salsa on the side for a tasty kick. You can also serve these with a side of fresh fruit. A fruit salad adds a sweet touch. If you want a drink, serve with fresh orange juice. It pairs perfectly with the savory flavors of the enchiladas. Pro Tips Use Fresh Ingredients: Fresh vegetables and herbs can elevate the flavor of your enchiladas, making them taste vibrant and delicious. Customize Your Fillings: Feel free to add other ingredients like spinach, mushrooms, or different types of cheese to suit your taste preferences. Make Ahead: Prepare the enchiladas in advance and store them in the fridge. Just pop them in the oven when you're ready to eat! Perfect Tortilla Texture: Warming the tortillas before filling them makes them more pliable and reduces the risk of cracking during rolling. {{image_2}} You can easily make Sunrise Breakfast Enchiladas vegetarian. Just skip the eggs or add more veggies. Try using spinach, zucchini, or mushrooms. You can also add extra beans for protein. These changes keep the dish hearty and full of flavor. If you want more protein, add cooked chicken or turkey. Shredded meats work well. You can also try crumbled sausage or bacon. This will give your enchiladas a tasty twist. Just remember to adjust the spices to match the meat you choose. Do you love heat? Add diced jalapeños or hot sauce to the egg mix. You can also sprinkle crushed red pepper flakes on top. For a smoky taste, add some chipotle peppers. These additions will wake up your taste buds and make breakfast more exciting. To store your leftover Sunrise Breakfast Enchiladas, let them cool first. Place them in an airtight container. You can keep them in the fridge for up to four days. If you want them to last longer, freezing is a great option. When you're ready to enjoy the enchiladas again, preheat your oven to 350°F (175°C). Place the enchiladas in a baking dish. If they are cold, add a splash of water or salsa on top to keep them moist. Cover the dish with foil and bake for about 15-20 minutes. To freeze the enchiladas, wrap each one in foil or plastic wrap. Then place them in a freezer-safe bag. They can be frozen for up to three months. When you want to eat them, thaw overnight in the fridge. Then follow the reheating instructions above for best results. Sunrise Breakfast Enchiladas are a tasty morning dish. They combine corn tortillas with eggs, beans, and veggies. You fill each tortilla with a mix of sautéed onions, bell peppers, and black beans. Then, you roll them up with cheese and bake until golden. This dish is colorful and packed with flavor. Yes, you can make these enchiladas ahead of time. Prepare the filling and roll the enchiladas. Place them in a baking dish and cover tightly. Store them in the fridge for up to one day. When ready, just bake as instructed. This makes breakfast easy! Serve these enchiladas with fresh avocado slices and salsa. You can also add a side of fruit for a sweet touch. A dollop of sour cream adds creaminess. For a crunchy bite, consider tortilla chips. This adds fun and extra flavors to your meal. To spice up this recipe, add more chili powder. You can also use diced jalapeños in the filling. If you like heat, try adding hot sauce on top. Another option is to use pepper jack cheese instead of Monterey Jack. These changes will give you a flavorful kick! You learned how to make tasty sunrise breakfast enchiladas. We covered the needed ingredients, key tools, and swaps. I walked you through each cooking step. Tips helped you perfect your technique, keep enchiladas moist, and suggest sides. Remember, you can customize with proteins or spicy extras. Store leftovers properly to enjoy later. These simple methods make cooking fun and easy. You’ll impress friends and family with your skills and delicious meals. Dive into the kitchen and create your tasty masterpiece!

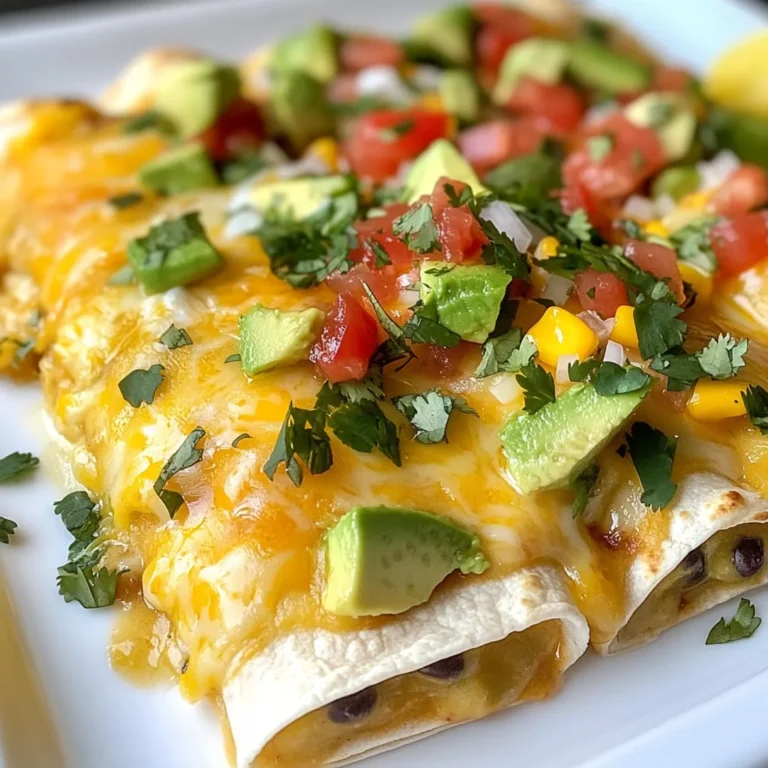
Sunrise Breakfast Enchiladas Flavorful Morning Meal

- 1 cup coconut milk (canned or carton) - 1/2 cup chia seeds - 2 tablespoons honey or maple syrup - 1 ripe mango, diced - 1/2 teaspoon vanilla extract - Pinch of salt - Toasted coconut flakes (for garnish) - Fresh mint leaves (for garnish) When creating mango coconut chia pudding, you need simple, fresh ingredients. Each one plays a key role. Coconut milk gives a creamy base. It adds a subtle sweetness and rich flavor. You can use canned or carton coconut milk. Both work well, but canned offers a thicker texture. Chia seeds are the heart of this pudding. They soak up liquid and expand, creating a lovely texture. They are full of fiber, protein, and healthy fats. Just half a cup is enough for four servings. Honey or maple syrup adds sweetness. You can adjust the amount to your taste. If you prefer a lighter touch, you can use just one tablespoon. A ripe mango brings freshness. Its bright color and juicy taste make the pudding pop. Dice it just before serving for the best flavor. Vanilla extract adds warmth. It enhances the overall taste without taking over. A pinch of salt balances the sweetness and richness. Toasted coconut flakes make a great garnish. They add crunch and a burst of flavor. Fresh mint leaves are a lovely touch. They give a refreshing finish. Coconut milk has healthy fats that support heart health. It also contains vitamins and minerals like magnesium and potassium. These help keep you energized. Chia seeds are tiny powerhouses. They are rich in omega-3 fatty acids, which are good for your brain. Plus, they have high fiber content. This helps with digestion and keeps you feeling full. Mango is not just tasty; it is also packed with vitamins. It has vitamin C, which boosts your immune system. Plus, it contains vitamin A, good for your skin and eyes. Enjoying mango in this pudding makes it a smart choice for your health. In a medium bowl, I start by whisking together one cup of coconut milk and two tablespoons of honey or maple syrup. This mix adds sweetness and creaminess. Next, I add half a teaspoon of vanilla extract and a pinch of salt. The salt enhances all the flavors. Now, I slowly sprinkle in half a cup of chia seeds while whisking continuously. This step is key! Whisking helps prevent the seeds from clumping together. Once they are fully mixed in, I let the mixture sit for about five minutes. After that, I whisk again to break up any clumps that may have formed. Keeping the mix smooth makes the final pudding texture perfect. I cover the bowl and place it in the refrigerator. I let it chill for at least four hours or overnight. This allows the chia seeds to absorb the liquid and thicken the pudding. When I am ready to serve, I stir the pudding again to ensure it is well-mixed. Then, I divide the chia pudding into serving bowls or jars. I top it with diced mango and garnish it with toasted coconut flakes and fresh mint leaves. This adds a lovely touch to the dish. To get the best texture, whisk the coconut milk well. Mix it with honey or maple syrup, vanilla, and salt. Whisk until smooth. When adding chia seeds, sprinkle them slowly. Keep whisking to avoid lumps. Let the mixture sit for about 5 minutes. This helps the seeds absorb liquid. Whisk again to break any clumps. For the best results, refrigerate the pudding for at least 4 hours. Overnight is even better. This allows the chia seeds to thicken and create a creamy texture. To sweeten your pudding, you can try different options. Honey and maple syrup are great, but consider agave syrup too. If you want a twist, add spices like cinnamon or nutmeg. These spices add warmth and depth to the flavor. For a tropical touch, mix in a dash of cardamom. Feel free to experiment with flavors to find your favorite. Presentation makes your dish more inviting. Layer the pudding in clear jars for a beautiful look. This way, you can see the layers of mango and chia. For a colorful touch, top with a slice of fresh mango. Garnish with toasted coconut flakes for crunch. Add fresh mint leaves for a pop of color and freshness. This not only looks great but also enhances the taste. {{image_2}} You can change the coconut milk for almond or cashew milk. Both add a nice twist. Almond milk gives a nutty taste, while cashew milk is creamy. These options are great for those who want dairy-free choices. They keep the pudding light and tasty. Seasonal fruits can brighten your pudding. Try adding berries like strawberries, blueberries, or raspberries. They add a sweet and tangy flavor. You can also mix fruits together. Mango and berries create a colorful, flavorful combo. Fresh fruit makes your dessert healthy and fun. If you want to make this recipe vegan, replace honey with agave syrup or maple syrup. Both options keep it sweet without any animal products. You can also skip the sweetener if you prefer a less sweet taste. Adjusting these ingredients helps meet various diets and keeps everyone happy. Mango coconut chia pudding keeps well in the fridge for about five days. Store it in a sealed container. Glass jars work great for this. They keep the pudding fresh and let you see the layers. Yes, you can freeze mango coconut chia pudding! It stays good in the freezer for up to three months. When you’re ready to eat it, move it to the fridge to defrost overnight. This keeps the taste and texture nice. Leftover coconut milk is perfect for smoothies or soups. You can also use it in baking to add creaminess. Leftover chia seeds can be added to oatmeal or yogurt. They boost your breakfast with extra fiber and protein. Can I make chia pudding in advance? Yes, you can make chia pudding ahead of time. It needs at least 4 hours to thicken. I often prepare it the night before. This way, it’s ready for breakfast or a snack. How can I adjust the sweetness of the pudding? You can change the sweetness by adding more or less honey or maple syrup. Taste as you mix. This lets you find the perfect flavor for your liking. Is chia pudding healthy for weight loss? Yes, chia pudding can aid weight loss. Chia seeds are high in fiber. They help you feel full longer. The healthy fats in coconut milk also support a balanced diet. What can I substitute for coconut milk? You can use almond milk or oat milk instead. These nut milks provide a light flavor. They keep the pudding creamy without coconut. Are there any nut-free options? Yes, if you need nut-free options, use rice milk or soy milk. Both work well in chia pudding. They keep the texture smooth and delicious. What dishes pair well with chia pudding? Chia pudding goes well with fresh fruit or granola. You can also serve it with yogurt for added creaminess. It makes a great breakfast or dessert. How to serve at a gathering or brunch? Serve chia pudding in clear cups or jars. This shows off the layers. Add fresh mango and toasted coconut on top for a colorful touch. It’s a visual delight that impresses guests. This blog shows how to make mango coconut chia pudding. We discussed the key ingredients, health benefits, and easy steps to whip it up. You learned tips for the best texture and flavor, along with storage advice. Whether you stick to the recipe or try variations, this pudding is a tasty, healthy choice. Enjoy making it your own and impressing others with your delicious creation!

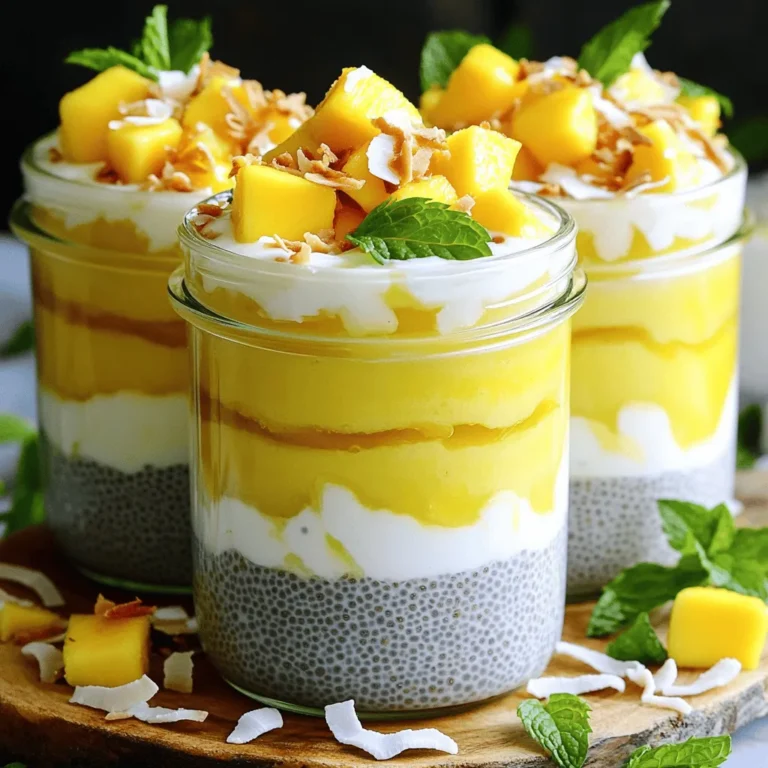
Mango Coconut Chia Pudding Delightful and Healthy Treat

- 4 pieces of flatbread - 1 cup fresh mozzarella cheese, sliced - 1 cup cherry tomatoes, halved - 1/2 cup fresh basil leaves, torn - 2 tablespoons olive oil - 1 teaspoon balsamic glaze (optional) - Salt and pepper to taste For this Margherita flatbread pizza, I love using fresh and simple ingredients. The flatbread serves as a perfect base. You can buy it at the store or make it at home if you have time. The fresh mozzarella melts beautifully. It adds creaminess to each bite. Cherry tomatoes bring sweetness and bright color. I prefer using small, ripe tomatoes for the best flavor. Fresh basil leaves are essential for that classic taste. I like to tear them by hand. This releases their oils and enhances the aroma. Olive oil adds richness and depth. A drizzle on top makes each slice even better. The balsamic glaze is optional but gives a nice sweet touch. Don't forget to season with salt and pepper. This will bring out all the flavors. - Preheat your oven to 400°F (200°C). - Arrange flatbreads on a baking sheet lined with parchment paper. Start by heating your oven. This step is key for a crispy crust. While it warms up, grab a baking sheet. Lay down some parchment paper. This helps with easy cleanup and prevents sticking. Place your flatbreads on the sheet, ready for tasty toppings. - Drizzle olive oil on flatbreads. - Place mozzarella, cherry tomatoes, and seasoning. Now it’s time to add flavor. Drizzle olive oil on the flatbreads. Spread it out so every bite gets that rich taste. Next, lay down slices of fresh mozzarella. Make sure to cover the flatbreads well. Then, scatter halved cherry tomatoes on top, cut side up. This way, they stay juicy as they bake. Finally, sprinkle salt and pepper to taste. - Bake until cheese is melted and edges are golden. - Add fresh basil and optional balsamic glaze. Place the baking sheet in the oven. Bake for about 10 to 12 minutes. Keep an eye on it. You want the cheese to melt and bubble. The edges should turn a nice golden brown. When it’s done, take it out and sprinkle torn basil leaves on top. This adds a fresh kick. If you like a little sweetness, drizzle with balsamic glaze. Now, slice your flatbread into wedges and serve hot. Enjoy your delicious creation! How to choose the best flatbread Choosing the right flatbread matters. Look for flatbread that is soft but sturdy. You want it to hold the toppings without getting soggy. Whole wheat or traditional varieties work well. If you make your own, roll it thin for a crisp crust. Tips for even cheese melting To get the best melt from mozzarella, slice it evenly. Thin slices help it melt faster and more evenly. Place them close together on the flatbread. This way, every bite has that gooey, delicious cheese. Avoid piling too much cheese, as it can weigh down the flatbread. Suggestions for additional toppings Want to spice it up? Add some sliced olives, pepperoni, or arugula. You can also try a sprinkle of red pepper flakes for heat. Fresh veggies like bell peppers or spinach add color and taste, too. Don't be afraid to mix and match flavors based on what you like. How to adjust seasoning according to taste Seasoning is key! Taste your flatbread before baking. Add salt and pepper as needed. You can also drizzle more olive oil for richness. If you love tang, add extra balsamic glaze after baking. Adjust the flavors until it feels just right for you. {{image_2}} You can switch up the cheese for different flavors. Try using provolone or goat cheese. These cheeses add a nice twist to your pizza. You can also mix in some sharp cheddar for a kick. Seasonal veggies can make your flatbread even better. In spring, add fresh asparagus or zucchini. During summer, use bell peppers or ripe eggplant. Fall brings butternut squash, which adds sweetness. In winter, roasted Brussels sprouts work well. Each season brings fresh tastes. If you need a gluten-free option, look for gluten-free flatbreads at the store. You can also make your own using almond flour or cauliflower. This way, everyone can enjoy pizza. For a vegan twist, swap the mozzarella with cashew cheese or a store-bought vegan cheese. You can also skip the cheese altogether and add more veggies. For the glaze, use a balsamic reduction made from vinegar and sugar. These swaps keep the pizza tasty and plant-based. To keep your Margherita flatbread pizza fresh, store it properly. First, let the pizza cool to room temperature. Then, place it in an airtight container. This helps keep the moisture in and prevents it from drying out. You can also wrap the flatbread in plastic wrap for extra protection. If you want to save it for later, freezing is a great option. Slice the pizza into wedges. Wrap each piece in plastic wrap, then place them in a freezer bag. This way, you can enjoy your pizza anytime. It stays tasty for up to three months in the freezer. Reheating your pizza is easy. The best way is to use an oven. Preheat it to 350°F (175°C). Place the flatbread on a baking sheet. Heat for about 10 minutes. This method keeps the crust crispy and the cheese melty. You can also use a skillet. Heat the skillet over medium heat. Add the pizza and cover it. Cook for about 5 minutes. This way, the bottom gets crispy, while the cheese warms up. Avoid the microwave if you want the best taste. It makes the crust soggy. What is the difference between flatbread and traditional pizza? Flatbread is thinner and crispier than traditional pizza. It has a simpler base. Traditional pizza uses yeast, which makes the dough rise. Flatbread often uses no yeast, giving it a denser texture. This means flatbread cooks faster. It also allows toppings to shine more brightly. Can I use pre-made sauces or canned tomatoes? Yes, you can use pre-made sauces or canned tomatoes. These options save time and still taste good. Just choose a sauce that you enjoy. You can also mix canned tomatoes with herbs for a quick sauce. This keeps flavors fresh and bright. How can I make this recipe spicier? To spice up your flatbread pizza, add red pepper flakes. You can also mix in sliced jalapeños or hot sauce. For a smoky kick, try adding some chipotle peppers. Adjust the amount based on your taste. This way, you get the heat you love. What can I substitute if I don't have fresh basil? If you don’t have fresh basil, use dried basil instead. You can also try other fresh herbs, like oregano or parsley. Each one gives a different flavor. Remember to use less dried herb, as it's stronger than fresh. This Margherita flatbread pizza is simple and fun to make. You learned about the ingredients, step-by-step instructions, and helpful tips. Variations allow you to customize flavors. Storage tips keep leftovers fresh. I showed you how to adapt the recipe for any diet. Try this recipe at home. You’ll enjoy its fresh taste and easy prep. Cooking should be fun, so get creative and share with friends!

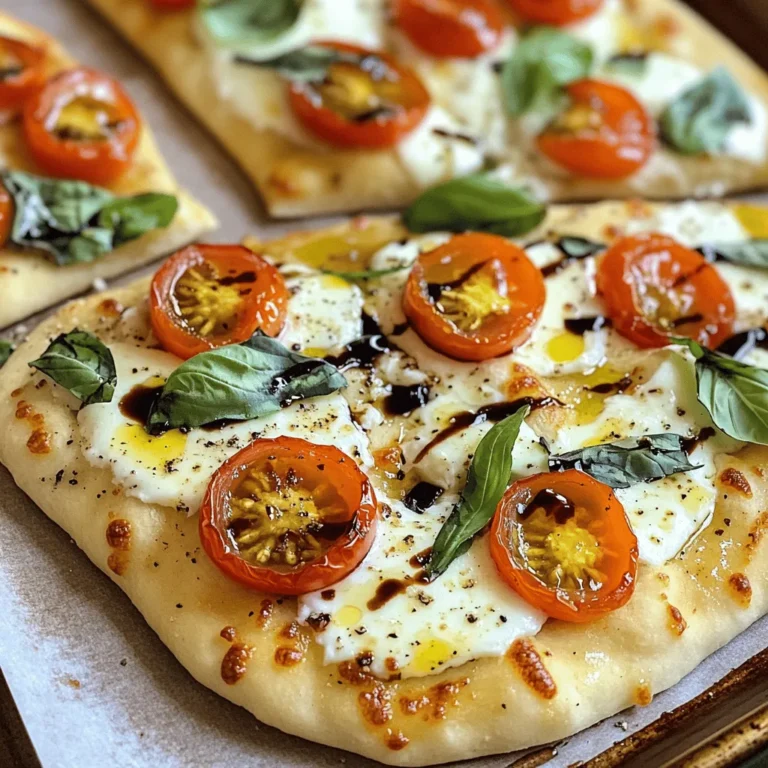
Margherita Flatbread Pizza Fresh and Flavorful Recipe

- 4 large russet potatoes - 2 cups broccoli florets, steamed - 1 cup sharp cheddar cheese, shredded - ½ cup cream cheese, softened - ½ cup Greek yogurt - 1 teaspoon garlic powder - Salt and pepper to taste - 2 tablespoons olive oil - Green onions, chopped (for garnish) The key to this dish is fresh, quality ingredients. Russet potatoes give a fluffy texture. Broccoli adds crunch and color. Sharp cheddar cheese brings a bold flavor. Cream cheese and Greek yogurt make the filling creamy. Garlic powder enhances the taste. Always use salt and pepper to match your flavor. You can also add more cheese for a richer bite. - Baking tray - Mixing bowl - Fork - Knife - Oven You need a few simple tools. A baking tray holds the potatoes while they bake. A mixing bowl helps combine the filling. A fork is crucial for piercing the potatoes. Use a knife to cut the potatoes later. Your oven needs to be hot to bake the potatoes and make them soft. - Preheat the oven to 400°F (200°C). - Wash and scrub the russet potatoes well. Pierce each potato with a fork many times. - Bake the potatoes directly on the oven rack for 45-60 minutes. They should feel tender when poked with a knife. - In a large bowl, combine the steamed broccoli, shredded cheddar, cream cheese, and Greek yogurt. - Add garlic powder, salt, and pepper to taste. Mix everything until it is well combined. - Once the potatoes cool, cut them in half lengthwise. Scoop out a bit of the inside, but leave some potato for support. - Fold the scooped potato flesh into the broccoli-cheddar mixture until everything is mixed well. - Generously stuff each potato skin with the filling. Make sure to mound it slightly at the top. - Drizzle the stuffed potatoes with olive oil. - Place them back on a baking tray and bake for 15-20 minutes. Look for a golden and bubbly top. - Choosing the right potatoes: Use large russet potatoes. They have a fluffy texture when baked. This texture holds the filling well and offers a hearty bite. Avoid waxy potatoes, as they do not bake as well. - Ensuring cheese melts perfectly: Shred your cheese instead of using blocks. Shredded cheese melts evenly and blends better with the filling. Mix in cream cheese and Greek yogurt for a creamy texture. This will help the cheese melt smoothly and evenly. - Presentation ideas: Serve your stuffed spuds on a rustic wooden board. This adds charm to your meal. Drizzle extra Greek yogurt on top for a creamy touch. A sprinkle of fresh herbs or more cheese adds color and flair. - Pairing with side dishes: These stuffed spuds pair well with a fresh salad or roasted veggies. A side of steamed green beans or a simple coleslaw adds crunch and freshness. This makes your meal balanced and colorful. - Overcooking the potatoes: Keep an eye on your baking time. Overcooked potatoes can become mushy. Test for doneness with a fork. It should pierce easily but not fall apart. - Skipping the seasoning: Don't forget to season your filling. Salt and pepper enhance the flavors. A little garlic powder adds depth. Make sure to taste your filling before stuffing the potatoes. Adjust the seasoning if needed. {{image_2}} You can switch up the filling for stuffed spuds. Try a spinach and feta version for a fresh twist. Simply replace the broccoli with two cups of fresh spinach. Add half a cup of crumbled feta cheese. This will give your dish a Mediterranean flair. You can also explore different cheese varieties. Gouda or mozzarella can add creaminess and flavor. Mix and match to find your favorite combination. If you need gluten-free options, use gluten-free potatoes. Most potatoes are naturally gluten-free. For a vegan version, replace cheese and yogurt with plant-based options. You can use cashew cheese or nutritional yeast for a cheesy flavor. Silken tofu can work well in place of cream cheese. These swaps make the dish suitable for more diets. Add spices to boost the flavor of your stuffed spuds. Paprika gives a mild kick, while cayenne adds heat. You can also try smoked paprika for a deeper taste. For fun toppings, consider crispy bacon bits or sour cream. Chopped herbs like parsley or dill can add freshness. Experiment with different toppings to find what you love! To store leftover stuffed spuds, let them cool first. Place them in an airtight container. You can keep them in the fridge for up to three days. For longer storage, freeze the stuffed potatoes. Wrap each spud in plastic wrap, then place them in a freezer bag. They can last up to three months in the freezer. To reheat your stuffed spuds, use the oven for the best results. Preheat the oven to 350°F (175°C). Place the potatoes on a baking tray and cover with foil. Heat for about 20-25 minutes or until warmed through. This keeps your potatoes from getting soggy. You can also microwave them, but they may lose some texture. If using the microwave, place a damp paper towel over them to help retain moisture. To make broccoli cheddar stuffed spuds, start by baking large russet potatoes. Preheat your oven to 400°F. Wash and pierce each potato with a fork. Bake them for 45-60 minutes until they are soft. While the potatoes bake, steam 2 cups of broccoli florets. In a bowl, mix the broccoli with 1 cup of shredded sharp cheddar, ½ cup of softened cream cheese, ½ cup of Greek yogurt, 1 teaspoon of garlic powder, salt, and pepper. Once the potatoes cool, cut them in half and scoop out some flesh. Mix this flesh into your broccoli filling. Stuff the potato skins with this mixture and drizzle olive oil on top. Bake again for 15-20 minutes until golden. Yes, you can prepare the filling ahead of time! Just mix the broccoli, cheeses, and spices in a bowl. Store it in the fridge for up to 24 hours before using. When you're ready to bake, stuff the filling into the baked potatoes. This makes meal prep easier and quick for busy nights. Stuffed potatoes pair well with many sides. Here are some ideas: - A simple green salad - Steamed vegetables like carrots or green beans - Garlic bread for extra carbs - A light soup such as tomato or vegetable The stuffed potatoes are done when the tops are golden and bubbly. You can check them by inserting a fork into the filling. If it goes in easily, they are ready to eat. The aroma of melted cheese will also be a good sign! Yes, feel free to get creative with cheese! You can use mozzarella for a milder flavor or pepper jack for some heat. Feta can add a nice tang, too. Just remember to adjust the amount based on how strong you want the flavor to be. You learned how to make delicious broccoli cheddar stuffed potatoes. We covered all the steps, from baking the potatoes to creating the creamy filling. I shared tips to avoid common mistakes and different variations to try. Remember, you can adapt this dish to suit your taste. Enjoy experimenting with new flavors! Keep it simple, and you’ll impress everyone at the table. Happy cooking!

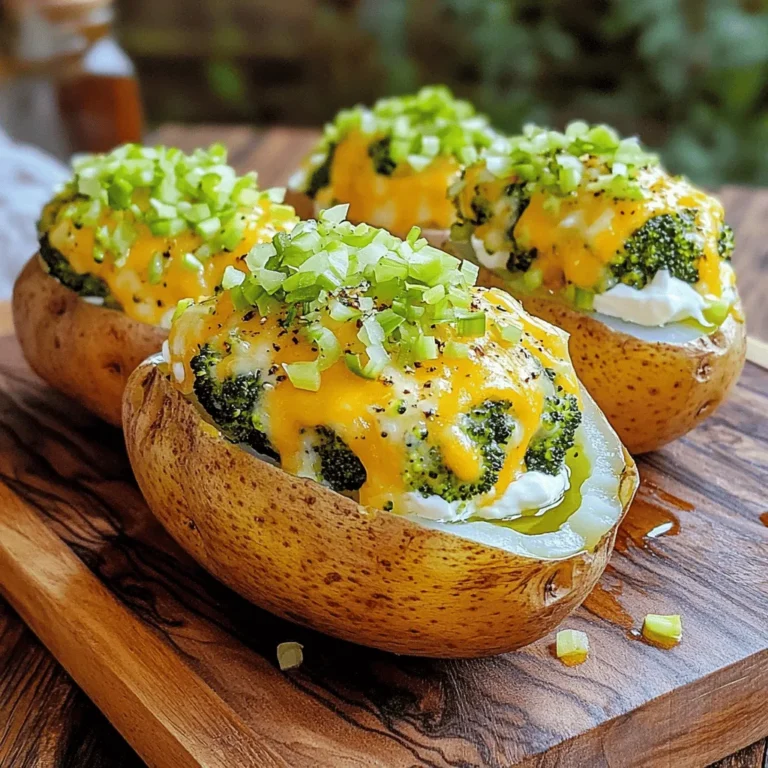
Broccoli Cheddar Stuffed Spuds Savory and Hearty Dish

- 1 pound ground beef or turkey - 1/2 cup breadcrumbs - 1/4 cup grated Parmesan cheese - 1/4 cup chopped fresh parsley - 1 large egg - 2 cloves garlic, minced - 1/2 teaspoon salt - 1/4 teaspoon black pepper - 1 cup honey - 1/2 cup soy sauce (low sodium preferred) - 1 tablespoon apple cider vinegar - 1 teaspoon ground ginger - 1 tablespoon cornstarch (optional for thickening) - 1 tablespoon water (if thickening) You need fresh ingredients for the best flavor. Ground beef or turkey works great for the meatballs. The breadcrumbs give them a nice texture, while the Parmesan cheese adds a rich taste. Don’t forget the parsley; it brightens the dish. For the pantry staples, minced garlic is key. It provides a strong flavor that pairs well with the honey. Salt and pepper will enhance the taste, so don’t skip them. Now, for the sauce, honey is the star. It brings sweetness and a sticky texture. Soy sauce adds saltiness, while apple cider vinegar gives a tangy kick. Ground ginger adds warmth and depth. If you want a thicker sauce, cornstarch and water can help achieve that. Gather all these items before you start. It makes the process smoother and more fun. Enjoy cooking these meatballs! - Combine all the main ingredients in a large bowl. - Use your hands or a spatula to mix until ingredients are thoroughly combined. - Shape the meat mixture into small meatballs, about 1 inch in diameter. - Place the formed meatballs on a baking sheet. - In a medium bowl, whisk together honey, soy sauce, apple cider vinegar, and ground ginger. - Transfer the meatballs to the slow cooker. Pour the honey garlic sauce over the meatballs. Make sure they are coated evenly. - Cover the slow cooker and set it on low for 5-6 hours or high for 2-3 hours. - If you want a thicker sauce, mix cornstarch with water to create a slurry. Stir it into the slow cooker in the last 30 minutes of cooking. - Use a mixture of ground beef and pork for added flavor. This combo makes the meatballs juicy. - Chill the meat mixture before shaping for better handling. Cold meat is easier to mold. - Adjust honey for sweetness as desired. You can use less if you like it less sweet. - Add red pepper flakes for heat. This gives the sauce a nice kick that most people enjoy. - Serve on a platter with toothpicks for gatherings. This makes it easy for guests to grab. - Pair with rice or pasta for a complete meal. Both options soak up the sauce well, enhancing the dish. {{image_2}} When choosing between ground beef and turkey for your meatballs, consider these points: - Flavor: Beef has a richer taste. It adds depth to the dish. Turkey is lighter and leaner. It can be a great option for those watching their fat intake. - Texture: Beef tends to be juicier, while turkey can be drier. Adding more breadcrumbs or moisture helps turkey stay tender. - Cooking Time: Both options cook similarly in the slow cooker. Ground turkey may need a bit less time if you form smaller meatballs. If you want a meatless version, try using lentils or chickpeas. Both options are great for texture and protein. - Lentils: Cooked lentils mash well and hold the shape. They blend great with spices and sauce. - Chickpeas: Use mashed chickpeas for a nutty flavor. They add a nice crunch when mixed with breadcrumbs. You can switch up the sauce for new flavors. Here are some tasty alternatives: - BBQ Sauce: For a smoky, sweet taste, use your favorite BBQ sauce. It pairs well with ground turkey. - Sweet and Sour Sauce: This sauce gives a tangy twist, perfect for a fun dish. Experimenting with these variations keeps the recipe fresh and exciting. Enjoy the creativity in your kitchen! To store cooked meatballs in the fridge, let them cool first. Place them in an airtight container. They will stay fresh for up to four days. When reheating, use the microwave or stovetop. Heat until warm, but do not overcook. This keeps them juicy and tender. For the best taste, freeze meatballs and sauce separately. Use freezer bags or containers. Make sure to remove excess air to prevent freezer burn. You can store them for about three months. When you want to eat them, thaw in the fridge overnight. Then, reheat them on the stove or in the microwave. To prep meatballs ahead of time, mix the ingredients in a large bowl. Shape them into balls and place them on a baking sheet. Freeze them for about an hour. Once firm, transfer them to a freezer bag. This way, you can pull out a few meatballs for busy nights. Cook them straight from frozen or thaw first for quicker cooking. Yes, you can prepare these meatballs in advance. Mix the meatball ingredients and shape them into balls. Place them on a baking sheet and cover. You can store them in the fridge for up to 24 hours. This way, you save time when you're ready to cook. You can also freeze them for longer storage. Just make sure to wrap them well. Thaw them in the fridge before cooking. Leftover meatballs can last up to four days in the fridge. Store them in an airtight container to keep them fresh. If you want to store them longer, freeze them. Frozen meatballs can stay good for about three months. Just remember to cool them down before you put them in the freezer. This helps prevent ice crystals from forming. Yes, you can cook these meatballs on the stovetop. Heat a large skillet over medium heat. Add a little oil to the pan. Brown the meatballs on all sides, about 5-7 minutes. Once browned, pour the honey garlic sauce over them. Cover and simmer on low for about 15-20 minutes. This method gives you a nice crust on the outside while keeping them juicy inside. This blog shared a simple way to make tasty honey garlic meatballs. You learned about the key ingredients needed, from ground beef or turkey to garlic and honey. The step-by-step instructions made cooking easy, even for beginners. I also shared tips to enhance your meatballs and sauce, plus storage advice for leftovers. Try these recipes for gatherings or meal prep. With just a few tweaks, you can customize them to fit your taste. Enjoy the process, and happy cooking!

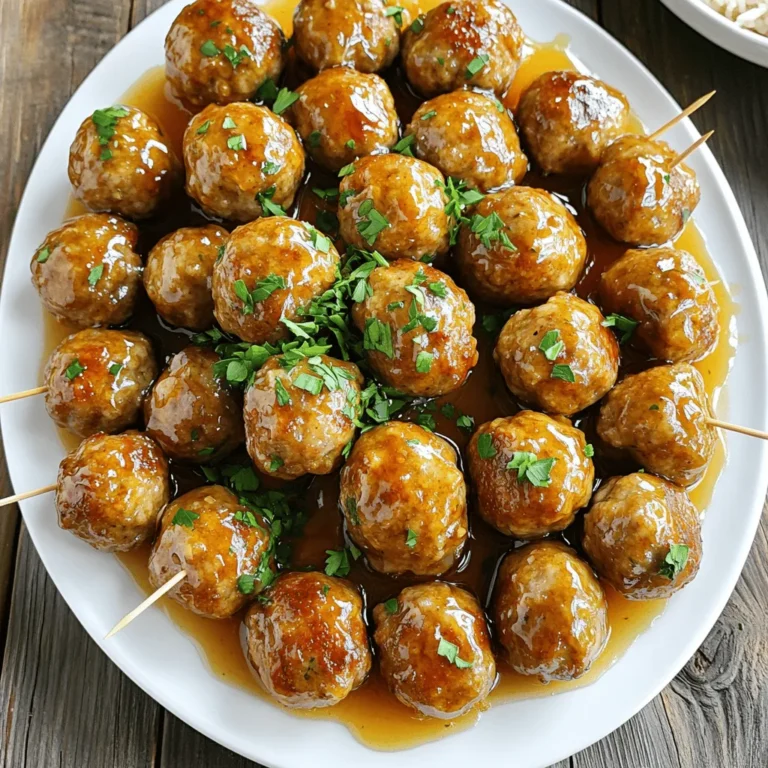
Slow Cooker Honey Garlic Meatballs Flavorful Recipe

For this tasty dish, you will need: - 1 lb ground turkey - 3 medium zucchinis, sliced - 1 cup cherry tomatoes, halved - 1 cup onion, diced - 2 cloves garlic, minced - 1 cup cooked quinoa - 1 cup shredded mozzarella cheese - 1/2 cup grated parmesan cheese - 2 tablespoons olive oil These ingredients work well together to create a flavorful and filling casserole. Want to switch things up? Here are some fun options: - Cooked spinach or kale for extra greens - Bell peppers for added crunch - Black beans for a protein boost - Different cheese like cheddar for a unique taste Adding these can make the dish your own and keep it exciting. Seasonings bring the casserole to life. You should use: - 1 teaspoon dried oregano - 1 teaspoon dried basil - Salt and pepper to taste These spices add warmth and depth. Feel free to adjust based on your taste. If you like a bit of heat, consider adding crushed red pepper flakes! {{ingredient_image_1}} First, gather all your ingredients. You will need ground turkey, zucchinis, cherry tomatoes, onion, garlic, quinoa, mozzarella cheese, parmesan cheese, olive oil, and seasonings. This will help you stay organized. Preheat your oven to 375°F (190°C). This ensures the casserole cooks evenly. In a large skillet, heat the olive oil over medium heat. Add the diced onion and minced garlic. Sauté until the onion turns soft and clear. This takes about 3 to 4 minutes. Next, add the ground turkey. Break it apart with a spoon. Cook it until it turns brown and is no longer pink. This should take about 5 to 7 minutes. Then, stir in the sliced zucchinis and cherry tomatoes. Add the dried oregano, dried basil, salt, and pepper. Cook for another 5 minutes until the zucchinis soften. In a large bowl, mix the cooked quinoa with the turkey and vegetable mix. Stir until everything blends well. Next, transfer the mixture into a greased 9x13 inch baking dish. Spread the mix evenly. Now, sprinkle mozzarella and parmesan cheese on top. Bake the casserole in the preheated oven for 25 to 30 minutes. You will know it’s done when the cheese is melted and bubbly. After baking, let it cool for a few minutes before serving. Enjoy! To cook ground turkey well, use medium heat in a skillet. Heat olive oil first. Add diced onion and minced garlic. Cook until the onion is clear. Then, add the ground turkey. Break it up with a spoon. Cook it until it turns brown. This takes about 5-7 minutes. Make sure there's no pink meat left. A good cooking tip is to stir often. This helps the turkey cook evenly and stay juicy. When choosing zucchini, look for firm, shiny skin. Avoid zucchinis with soft spots or wrinkles. The smaller ones taste better and have fewer seeds. Try to pick zucchinis that are about 6 to 7 inches long. If they are too big, they may be watery. A great tip is to check the color. Deep green zucchinis are usually fresher. Cheese can change the flavor of your casserole. Mozzarella gives a nice stretch and mild taste. You can mix in cheddar for a sharper flavor. If you like a kick, try pepper jack cheese. For a gourmet touch, add goat cheese or feta. Sprinkle herbs on top for extra flavor. You can even try mixing different cheeses. This makes your dish unique each time! Pro Tips Use Fresh Herbs: Fresh basil and oregano can elevate the flavors of your casserole. Add them just before serving for a burst of freshness. Make It Ahead: This casserole can be prepared a day in advance. Just assemble it and refrigerate, then bake it when you're ready to serve. Customize Your Veggies: Feel free to substitute or add any vegetables you have on hand, such as bell peppers or spinach, for extra nutrition and flavor. Check for Doneness: Ensure the turkey is cooked through and the zucchini is tender before removing it from the oven for the best texture. {{image_2}} To make a tasty vegetarian version, swap ground turkey for lentils or black beans. Both options add protein and fiber. For more flavor, use a mix of mushrooms and bell peppers. They bring a nice texture and taste. You can also add extra veggies like spinach or carrots. This keeps the dish colorful and healthy. If you're watching carbs, try cauliflower rice instead of quinoa. It works well and keeps the casserole light. Zucchini is already low in carbs, so use it freely. You can also skip the cheese or use a low-fat version. This keeps the flavors while helping you stick to your diet. For a kick, add red pepper flakes or diced jalapeños. This brings more heat to your casserole. If you prefer mild flavors, just stick to the herbs like oregano and basil. They give great taste without the spice. You can always serve hot sauce on the side for those who enjoy extra heat. To store leftover turkey zucchini casserole, place it in an airtight container. Make sure to let it cool completely before sealing. You can keep it in the fridge for up to three days. Always label the container with the date, so you know when to eat it. When you’re ready to enjoy the leftovers, preheat your oven to 350°F (175°C). Place the casserole in an oven-safe dish. Cover it with foil to keep it moist. Heat for about 20 minutes or until it is hot all the way through. You can also reheat individual portions in the microwave for about 2-3 minutes. If you want to freeze the casserole, do it before baking. Wrap the dish tightly with plastic wrap and then foil. This helps prevent freezer burn. You can freeze it for up to three months. To thaw, move it to the fridge overnight. Bake it at 375°F (190°C) for about 35-40 minutes after thawing. Check that the center is hot before serving. Yes, you can use other meats. Ground chicken, beef, or pork work well. Each will add a different flavor. If you choose beef, lean ground beef is best. For a lighter option, go with chicken. Just remember to adjust cooking times slightly, if needed. To make this casserole healthier, you can swap a few ingredients. Use lean turkey or chicken. You can reduce the cheese or use low-fat cheese. Adding more veggies is a great idea. Try bell peppers, spinach, or carrots. You can also use brown rice or cauliflower rice instead of quinoa. This casserole pairs well with many sides. A fresh salad adds crunch and color. Try a simple green salad with vinaigrette. Garlic bread or whole-grain rolls are tasty options too. For a light touch, serve it with steamed vegetables like broccoli or green beans. This blog post covered all you need for Turkey Zucchini Casserole. You learned about key ingredients, cooking steps, and tips for perfecting your dish. You also explored variations to suit your taste, from vegetarian to low-carb options. Proper storage and reheating tips ensure your leftovers stay fresh. Remember, cooking is all about finding what works best for you. Enjoy making this healthy casserole and share it with family and friends. Your kitchen creations can lead to great meals!

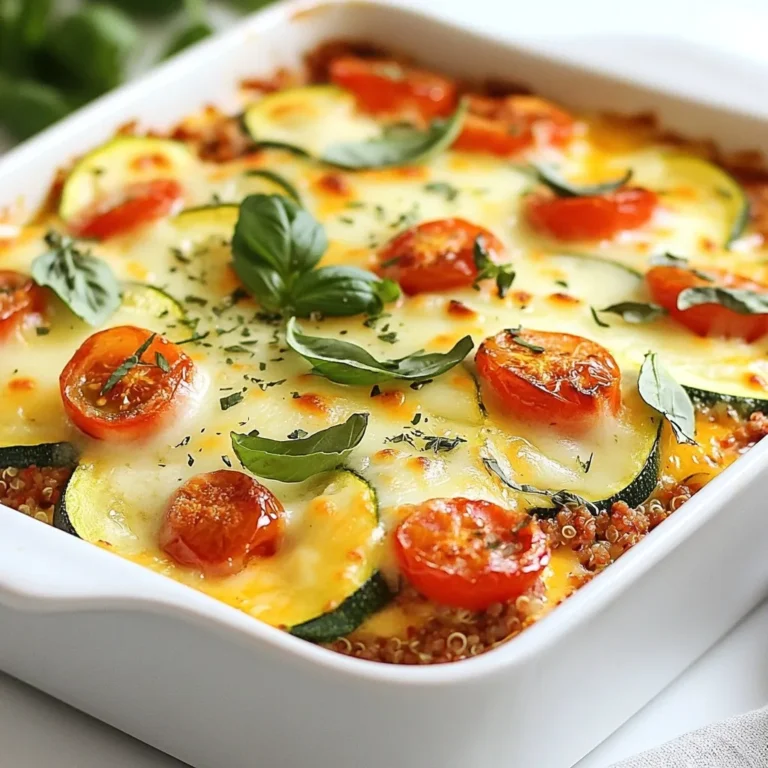
Turkey Zucchini Casserole Flavorful and Simple Dish

PREV 1 … 46 47 48 … 86 NEXT
spicy fork kitchen

explore

DessertsDinnerAppetizersDrinks

Our Policies

  • Cookie Policy
  • Copyright Policy
  • Disclaimer
  • GDPR Policy
  • Terms Of Use
Back to Top
  • About
  • Contact Us
  • Privacy Policy
© 2026 spicy fork kitchen