FREE DINNER EBOOK! Get your copy!
  • Cookie Policy
  • GDPR Policy
  • Disclaimer
  • Terms Of Use
  • Visit my other site: Fun Cookie Recipes
spicy fork kitchen
  • Home
  • Dinner
  • Desserts
  • Drinks
  • Appetizers
  • Contact
  • About
  • Privacy Policy
  • Home
  • Dinner
  • Desserts
  • Drinks
  • Appetizers
  • Contact
  • About
  • Privacy Policy
  • Cookie Policy
  • GDPR Policy
  • Disclaimer
  • Terms Of Use
Visit my other site: Fun Cookie Recipes

HOME / CATEGORIES /

Latest

When making Witches Brew Lemonade, you need some fun and simple ingredients. Here’s the detailed list: - Water (4 cups) - Fresh lemon juice (1 cup) - Granulated sugar (1 cup) - Activated charcoal powder (1/2 teaspoon) - Vanilla extract (1 teaspoon) - Green grape juice (1 cup) - Garnishing options: Fresh mint leaves, lemon slices, edible glitter, or purple sugar Each ingredient plays a key role. Water acts as the base, while fresh lemon juice adds a bright, tangy flavor. Granulated sugar sweetens the drink, balancing the tartness of the lemons. Activated charcoal powder gives the drink a spooky, dark color. It also adds a unique twist. Vanilla extract adds depth to the flavor. Green grape juice introduces a light sweetness and a nice green hue. For garnishing, fresh mint leaves and lemon slices make the drink look fresh. Edible glitter or purple sugar adds a magical touch, perfect for any Halloween or themed party. Gather these ingredients, and you’re ready to brew some fun! {{ingredient_image_1}} To make Witches Brew Lemonade, follow these simple steps. First, gather all your ingredients. You'll need water, fresh lemon juice, sugar, activated charcoal, grape juice, and vanilla extract. 1. Combine water and lemon juice: In a large pitcher, pour in 4 cups of water. Add 1 cup of fresh lemon juice. Squeeze about 4-5 lemons to get enough juice. Mix these two well. 2. Dissolve sugar thoroughly: Next, add 1 cup of granulated sugar to the pitcher. Stir it well until the sugar fully dissolves. This step is key for a sweet drink. 3. Incorporate activated charcoal: Now, sprinkle in 1/2 teaspoon of activated charcoal powder. Stir until it mixes evenly. This gives the drink a spooky, dark color. 4. Add green grape juice and vanilla extract: Pour in 1 cup of green grape juice. Then, add 1 teaspoon of vanilla extract. Stir gently to blend all the flavors together. 5. Adjust sweetness to taste: Take a quick taste of your mixture. If it needs more sweetness, add extra sugar. Stir again until fully dissolved. 6. Chill the mixture: Place the pitcher in the refrigerator. Let it chill for at least 1 hour. This helps the flavors meld together for a refreshing drink. 7. Serve with ice and garnish: When it's time to serve, fill cups with ice. Pour the lemonade over the ice. 8. Garnish: Top each glass with fresh mint leaves and a lemon slice. If you want a magical touch, sprinkle some edible glitter or purple sugar on top. Enjoy this spooky, refreshing drink at your next gathering! - Ensuring sugar dissolution: Always add your sugar to the water and lemon juice mix. Stir well until the sugar disappears. This step is key for a smooth drink. - Adjusting sweetness based on tartness of lemons: Lemons can vary in tartness. Taste your lemonade before serving. If it’s too tart, add a bit more sugar and stir until dissolved. - Chilling time recommendations: For the best flavor, chill the lemonade for at least one hour. This allows the flavors to blend well. Serve it cold for a refreshing treat. - Using unique glassware: Serve your Witches Brew Lemonade in fun glasses. Goblets or mason jars can add a spooky touch to your drink. - Creative garnishing options: Use fresh mint leaves and lemon slices to decorate each glass. For extra magic, sprinkle edible glitter or purple sugar on top. This makes your drink look as good as it tastes! Pro Tips Customize Sweetness: Feel free to adjust the amount of sugar based on your taste preference. Start with less and add more if needed. Chill for Best Flavor: Let the mixture chill in the refrigerator for at least an hour. This allows all the flavors to meld beautifully. Activated Charcoal Safety: Be mindful of the amount of activated charcoal you use, as it can interfere with certain medications. Consult with a healthcare provider if unsure. Garnishing Tips: Experiment with different garnishes like edible flowers or colorful straws to enhance the presentation and make it more festive! {{image_2}} You can make Witches Brew Lemonade even more fun with a few twists. Here are some ideas to try: - Different Fruit Juices: Swap in cranberry juice for a tart kick. Orange juice brings a sweet, bright note. You can mix them all for a fruit punch feel. - Alcoholic Version Ideas: For adults, add vodka or gin to make a spooky cocktail. Use 1-2 ounces per glass. This adds a nice twist for Halloween parties. - Alternative Garnishes: Instead of mint, try basil or rosemary for a fresh taste. Edible flowers like pansies add a pop of color and whimsy. They make your drink look magical. These variations help you customize your drink for any occasion. Experiment and find your perfect blend! To keep Witches Brew Lemonade fresh, store it in the fridge. Use a sealed container or pitcher. This method helps the flavors stay vibrant. It lasts for about three days. After that, it may lose its taste and charm. You can freeze Witches Brew Lemonade for a longer shelf life. Pour the lemonade into ice cube trays or freezer-safe bags. Leave some space in the bag for expansion. To defrost, place the cubes in a bowl at room temperature. For quick serving, blend the cubes for a slushy treat. Enjoy the spooky fun all year round! Yes, you can make Witches Brew Lemonade ahead of time. Mix all the ingredients and chill in the fridge. This drink tastes even better after sitting for an hour. The flavors blend nicely, giving it a more magical taste. Activated charcoal is safe in small amounts. It can help with detox and digestion. However, avoid it if you take certain medications, as it may interfere with their absorption. Always consult a doctor if unsure. If you don’t have green grape juice, try white grape juice or apple juice. Both options keep the flavor light and sweet. You can also mix in some lemon-lime soda for a fizzy twist. To reduce sweetness, cut back on the sugar. Start with half the sugar and taste. You can also use less grape juice. Adding more fresh lemon juice can balance the sweetness with some tartness. This blog post guides you through making a unique lemonade with activated charcoal. You learned about the ingredients and how to prepare this drink step by step. I shared tips for perfecting the recipe, plus fun variations to try. You can store leftovers easily and even freeze them. Remember, the best part of this lemonade is its refreshing twist. Enjoy experimenting with flavors and presentations. Your creativity will make every sip special!

Witches Brew Lemonade Refreshing and Spooky Drink

To make Baked Everything Bagel Crisps, you need a few simple ingredients. Here is what you'll need: - 4 large everything bagels - 1/4 cup olive oil - 1 teaspoon garlic powder - 1 teaspoon onion powder - 1/2 teaspoon smoked paprika - 1/2 teaspoon sea salt - 1 tablespoon sesame seeds (optional) - 1 tablespoon poppy seeds (optional) These ingredients come together to create a snack that is both crunchy and packed with flavor. The everything bagels bring that classic taste, while the spices add extra depth. Olive oil helps the crisps get nice and crispy, making them perfect for dipping or enjoying on their own. If you want extra texture, add the sesame seeds and poppy seeds. They give the crisps a delightful crunch. Gather these items before you start. Having everything ready makes cooking easier and more fun! - Preheat the oven to 350°F (175°C). - Line a baking sheet with parchment paper. This makes cleanup easy. To slice bagels into thin rounds, use a serrated knife. This type of knife cuts through the bagels without crushing them. Aim for slices about 1/4 inch thick. Thin slices help create that perfect crispy texture. In a mixing bowl, combine the olive oil with the spices. Use 1 teaspoon of garlic powder, 1 teaspoon of onion powder, and 1/2 teaspoon of smoked paprika. Add 1/2 teaspoon of sea salt. If you like, mix in 1 tablespoon each of sesame seeds and poppy seeds. This blend adds great flavor and crunch. Take each bagel slice and brush both sides with the seasoned oil mix. Make sure each slice gets a good coating. Next, arrange the slices on the baking sheet in a single layer. Avoid overlapping them to ensure even baking. Bake the bagel slices for about 15-20 minutes. Check for a golden brown color and crisp texture. Flip the slices halfway through the baking time. This helps them crisp up evenly. Once baked, remove the crisps from the oven. Let them cool completely on the baking sheet. Cooling is key because it helps them become even crunchier. Store the cooled bagel crisps in an airtight container at room temperature. They can last up to one week. To get that great crunch, slice your bagels thin. I recommend about 1/4 inch thick. This thickness helps them bake evenly and become crisp. Use a serrated knife for clean slices. A dull knife can squish the bagels, making them soggy instead of crispy. Oven accuracy is key. Preheat your oven to 350°F (175°C) before baking. An oven thermometer helps ensure the right temperature. If the oven is too hot, the crisps may burn. If it is too cool, they may not crisp up well. You can also add more spice for extra flavor. Try a pinch of cayenne for heat or some dried herbs like oregano or thyme. A sprinkle of cheese powder can make them cheesy and savory. These crisps pair well with many dips. Serve them with creamy hummus, tzatziki, or classic cream cheese. You can also enjoy them with guacamole or a spicy salsa. These dips add a tasty twist to your snack! {{image_2}} You can make baked everything bagel crisps using different bagel types. Try sesame bagels for a nutty twist. Onion bagels add great flavor too. Feel free to experiment! Each bagel brings a new taste to the crisps. The key is to slice them thinly, no matter which type you choose. This ensures they get that perfect crunch. If you want a vegan version, use plant-based oils. Coconut oil can be a great choice. It gives a nice flavor without any animal products. Adjust the seasoning to fit your taste. You can add more garlic powder or even a bit of nutritional yeast for a cheesy flavor. This way, your vegan friends can enjoy these tasty crisps too. For gluten-free bagel crisps, look for gluten-free bagels. Many stores offer good options now. Just follow the same steps in the recipe. You may need to bake them a bit longer to reach the right crispness. Watch them closely to avoid burning. Enjoy a gluten-free snack that everyone can love! To keep your baked everything bagel crisps fresh, always use airtight containers. This prevents air from getting in and helps maintain their crunch. Place a paper towel inside the container to absorb any moisture. Store your crisps at room temperature, away from direct sunlight. A cool, dry place works best. Baked everything bagel crisps can last up to one week when stored properly. Check for any signs of spoilage before eating. If they smell stale or feel soft, it’s best to discard them. Crisps should always be crisp and flavorful, so keep an eye out for any changes. Yes, you can prepare these bagel crisps ahead of time. They store well and taste great later. After baking, let them cool fully. Then, place them in an airtight container. Keep them at room temperature for up to a week. This way, you have a quick snack ready when you want it. Just remember, they will be crunchier when fresh. If you don't have olive oil, don’t worry. You can use other oils too. Canola oil, avocado oil, or melted coconut oil work well. Each oil brings a different taste, so choose what you like. Just make sure the oil has a high smoke point for baking. This helps achieve the best crunch and flavor. You can make bagel crisps without an oven by using an air fryer. Set your air fryer to 350°F (175°C). Slice the bagels as you would for baking. Brush them with the oil mixture. Place the slices in the air fryer basket in a single layer. Cook for about 8-10 minutes, flipping halfway. Keep an eye on them so they don’t burn. Enjoy your crispy snack! You now know how to make delicious bagel crisps at home. We covered the ingredients, steps, and tips for a perfect outcome. You learned how to choose flavors and make variations. Remember the storage tips to keep them fresh. Whether you serve them as snacks or with dips, these crisps will impress. Try these easy methods and enjoy your tasty creations! Embrace your kitchen skills and have fun with this recipe!

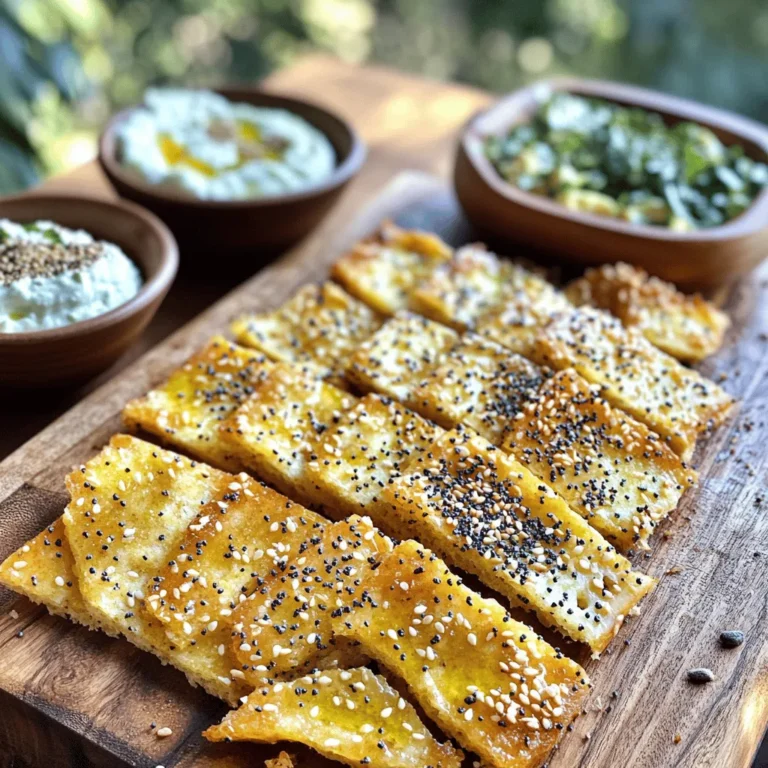
Baked Everything Bagel Crisps Crunchy and Flavorful Snack

- 1 cup coconut milk (full fat for creaminess) - 1 cup almond milk (or any plant-based milk) - 1/2 cup chia seeds - 2 tablespoons maple syrup (adjust to taste) - 1 ripe mango, peeled, pitted, and diced - 1 teaspoon vanilla extract - A pinch of salt - Toasted coconut flakes (for topping) - Fresh mint leaves (for garnish) For a creamier texture, always choose full-fat coconut milk. If you want a lighter option, you can use light coconut milk. You can replace almond milk with any plant-based milk, like oat or soy milk. For sweetness, maple syrup works well, but you can also use honey or agave. If you need a sugar-free option, try using a sugar substitute like stevia. These ingredients blend to make a tasty treat. The chia seeds soak up liquid and thicken the mix. The mango adds freshness and sweetness, while coconut milk gives a rich flavor. The vanilla extract enhances the taste, and salt balances the sweetness. Topping with toasted coconut and mint adds a lovely finish. Start by mixing the coconut milk and almond milk in a large bowl. Use a whisk to blend them well. Add the maple syrup, vanilla extract, and a pinch of salt. Whisking is key; it helps create a smooth texture. This base will be the flavor heart of your pudding. Next, it’s time to add the chia seeds. Pour them into the milk mixture slowly while stirring. This step is crucial to prevent clumping. If you add them too fast, they may clump together. Once added, let the mixture rest for at least four hours. You can even leave it overnight. This allows the seeds to soak up the liquid and thicken the pudding. When ready to serve, grab your favorite glasses or bowls. Start by layering the chia pudding at the bottom. Then, add a layer of diced mango on top. Repeat these layers as desired. For a stunning finish, top with toasted coconut flakes and fresh mint leaves. This not only adds flavor but also makes your dish look beautiful. Serve in clear glass jars to show off those lovely layers! You can change the sweetness of your pudding easily. Use agave for a light taste. Honey adds a rich flavor. Both work great! You can also play with spices. A pinch of cinnamon gives warmth. Nutmeg adds a nice kick. These small changes make each pudding unique. Using full-fat coconut milk is key. It makes your pudding creamy and rich. The thickness comes from the chia seeds. Chill the mixture for at least four hours. If you can, let it sit overnight. This gives the seeds time to swell and absorb the liquid. The result? A smooth and thick pudding. Presentation matters! Garnish your pudding with fresh mint leaves. They add a nice pop of color. Toasted coconut flakes give a crunchy texture. Serve in clear glass jars. This way, everyone can see the pretty layers. You can even use themed glassware for special events. It makes your dessert feel festive and fun! {{image_2}} You can switch up the fruit in your coconut mango chia pudding. Berries like strawberries or blueberries add a nice pop of color. Kiwi also brings a tangy flavor that pairs well. When mixing fruits, balance is key. Sweet fruits like mango can balance tart ones like raspberries. Experiment with what you like best! If you want to try different milk, oat milk or soy milk work great. Oat milk gives a creamy texture, while soy milk adds protein. Both options change the flavor a bit. Use sweetened or unsweetened versions based on your taste. This way, you can create a pudding that suits your palate perfectly. Making this pudding vegan is easy! Simply use maple syrup as your sweetener. For a sugar-free treat, consider using stevia or monk fruit. These options keep the sweetness without added sugar. You will still enjoy a rich taste while keeping it healthy and delicious! You can store coconut mango chia pudding in the fridge for up to five days. To keep it fresh, use a sealed container. This way, your pudding will stay creamy and delicious. If you notice any separation, just give it a stir before serving. Also, keep it away from strong-smelling foods to avoid any taste changes. Yes, you can freeze chia pudding! However, the texture may change a bit. To freeze, place it in an airtight container. When you're ready to eat it, let it thaw in the fridge overnight. For a quicker option, leave it at room temperature for a few hours. After thawing, stir it well to restore some of its creaminess. If you have extra mango or coconut, there are many fun ways to use them! You can make a smoothie with leftover mango. Just blend it with some ice and almond milk for a refreshing drink. For coconut, try adding it to oatmeal or yogurt. Toasted coconut flakes make a great topping for pancakes, too! These ideas help avoid waste and keep your meals exciting. Chia pudding lasts about 5 days in the fridge. Store it in an airtight container. Keep it covered to prevent it from absorbing other smells. If you see any signs of spoilage, like mold, throw it out. Yes, you can make chia pudding in advance. I often prepare it the night before. This gives the seeds time to absorb the liquid and thicken. It’s perfect for busy mornings or meal prep. Just remember to mix it well before serving. Chia pudding is very healthy. Chia seeds are packed with fiber, protein, and omega-3s. They help keep you full longer. Coconut milk adds healthy fats, which are good for your heart. Together, they make a nutritious treat that tastes great! This article explored making delicious chia pudding. We covered the key ingredients, step-by-step instructions, and useful tips. You learned how to customize flavors and achieve the best texture. Don’t forget about fun variations and effective storage methods. Chia pudding is simple and versatile. Whether for breakfast or dessert, it's a tasty, healthy choice. Experiment with different fruits and flavors to find your perfect mix. Enjoy your pudding making journey!

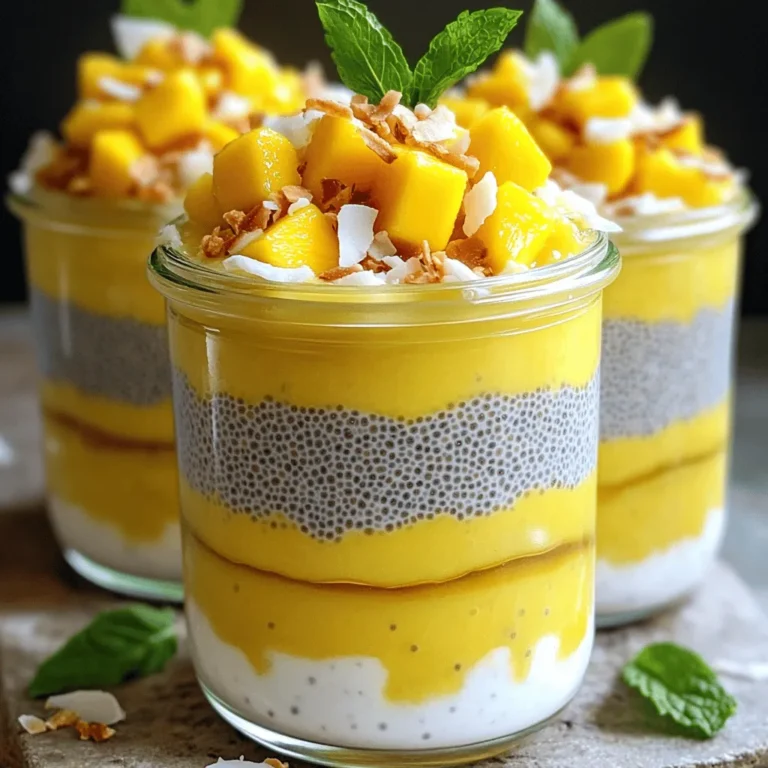
Coconut Mango Chia Pudding Fresh and Tasty Treat

- 8 oz rice noodles - 1 tablespoon sesame oil - 1 cup bell peppers (mixed colors), thinly sliced - 1 cup snap peas, trimmed - 1 carrot, julienned - 2 green onions, chopped - 2 tablespoons fresh ginger, grated - 3 tablespoons soy sauce (or tamari for gluten-free) - 1 tablespoon rice vinegar - 1 tablespoon honey or maple syrup - 1 tablespoon sesame seeds - Fresh cilantro, for garnish - Salt and pepper, to taste You can use any rice noodles. They are light and soak up flavor well. If you want a different texture, try whole wheat noodles. For the vegetables, feel free to mix and match. Broccoli, zucchini, or carrots work great. If you cannot find snap peas, snow peas will do fine. Instead of fresh ginger, ground ginger can be used. Use less, about half a teaspoon, since it is more potent. Tamari is a good choice for those who need gluten-free options. You can swap honey for maple syrup to keep it vegan. Use low-sodium soy sauce if you want less salt. This dish is packed with nutrients. Here’s a basic rundown: - Calories: About 350 per serving - Protein: 8 grams from the noodles and veggies - Carbohydrates: 55 grams, mainly from rice noodles - Fat: 10 grams from sesame oil and seeds - Fiber: 4 grams from veggies, a good source of digestion aid This bowl is healthy and full of flavor, making it a great meal choice! Start by boiling water in a large pot. Once it boils, add the rice noodles. Cook them based on the package instructions, which usually takes about 4-6 minutes. When they are done, drain the noodles and rinse them under cold water. This stops the cooking and keeps them from getting sticky. After rinsing, set the noodles aside. Next, heat the sesame oil in a large skillet over medium-high heat. Add the sliced bell peppers, snap peas, and julienned carrot to the skillet. Stir-fry these veggies for about 3-4 minutes. You want them to be tender but still crisp. This keeps the colors bright and the flavors fresh. In a small bowl, combine the grated ginger, soy sauce, rice vinegar, and honey or maple syrup. Whisk these ingredients together until they blend well. This sauce adds a sweet and spicy kick to your noodles. It brings all the flavors together beautifully. Now, it’s time to mix everything. Add the cooked rice noodles to the skillet with the sautéed vegetables. Pour the sauce over the noodles and veggies. Toss everything together for about 2 minutes. This heats it all up and coats the noodles evenly with the sauce. Remove the skillet from the heat. Stir in the chopped green onions and sesame seeds. Add salt and pepper to taste. For the final touch, serve the noodle bowl in bowls and top with fresh cilantro. This will give your dish a nice pop of color and flavor. Enjoy your meal! To cook rice noodles well, follow these steps: - Bring a large pot of water to a boil. - Add the rice noodles and cook as per the package. - After cooking, drain and rinse them under cold water. - This stops the cooking and helps keep them firm. - Do not overcook, or they may turn mushy. Sautéing vegetables adds great taste to your bowl. Here’s how: - Heat sesame oil in a large skillet over medium-high heat. - Add bell peppers, snap peas, and carrots at once. - Stir-fry for 3-4 minutes. - Aim for tender-crisp veggies. They should be bright and colorful. - Don't overcrowd the pan. This helps the veggies cook evenly. You can easily change the sauce flavor. Here are some tips: - If you like more heat, add chili flakes or sriracha. - Want it sweeter? Add more honey or maple syrup. - For a tangy kick, increase the rice vinegar. - Always taste the sauce as you mix. Adjust it until it’s perfect. Pair your noodle bowl with these ideas: - Serve with a side of fresh spring rolls. - Add a crisp salad with lime dressing. - Top with crushed peanuts for extra crunch. - Enjoy with a light tea or a fruity drink. - Garnish with lime wedges for a zesty finish. {{image_2}} You can make this dish vegetarian or vegan easily. Replace honey with maple syrup. Use soy sauce or tamari for a gluten-free option. For added flavor, add tofu. Firm tofu holds up well and absorbs the sauce nicely. Just sauté it with the veggies for a great texture. If you want more protein, consider chicken or shrimp. Cook them first until golden. Then add the veggies and sauce. For shrimp, cook until they turn pink. For chicken, ensure it’s fully cooked. This adds heartiness to your noodle bowl. Feel free to mix in other vegetables. Broccoli, bok choy, or mushrooms work well. Each veggie brings its own flavor. You can also try zucchini or baby corn. The more colors you add, the prettier and better it tastes! For a gluten-free dish, use rice noodles and tamari. Be sure to check the labels for gluten-free status. This way, you can enjoy the dish without worry. Always taste for flavor! Enjoy your meal without any gluten. You can store leftover Sesame Ginger Noodle Bowl in the fridge. Place the noodles and veggies in an airtight container. Make sure to cool them down first. This way, they stay fresh and tasty. Leftovers can last up to three days. I recommend using glass containers. They keep food fresh, and you can see what's inside. If you prefer plastic, use BPA-free options. Choose containers with tight-fitting lids to prevent spills. To reheat, place the noodles in a skillet. Add a splash of water or a bit of oil. Heat on medium until warm. You can also use a microwave. Heat in short bursts, stirring in between. This keeps the noodles from getting too dry. Enjoy your meal again with the same great taste! Yes, you can make this dish ahead of time. Cook the noodles and veggies, then store them separately. When you're ready to eat, just reheat everything and add the sauce. This way, the noodles stay fresh. If you need a substitute, try using whole wheat noodles, soba, or even zucchini noodles. Each option gives a unique taste and texture. Make sure to adjust the cooking time as needed. To add some heat, mix in red pepper flakes or sliced chili peppers. You can also use spicy sesame oil for a different kick. Start with a little and add more until it suits your taste. Yes, you can use vegetable oil or olive oil instead. However, sesame oil gives this dish its unique flavor. If you want to keep that essence, try to find toasted sesame oil. This dish blends influences from Asian cuisine, especially Chinese and Thai. Noodle bowls are popular for their tasty flavors and easy preparation. They highlight fresh veggies and delicious sauces, making them a favorite worldwide. In this blog post, we explored the key ingredients, step-by-step instructions, and helpful tips for making a delicious Sesame Ginger Noodle Bowl. We also discussed variations to meet different diets, storage options, and answered common questions. This dish is easy to customize and full of flavor. You can make it your own with different veggies and proteins. Enjoy experimenting with this tasty meal, and share your creations with friends and family. Happy cooking!

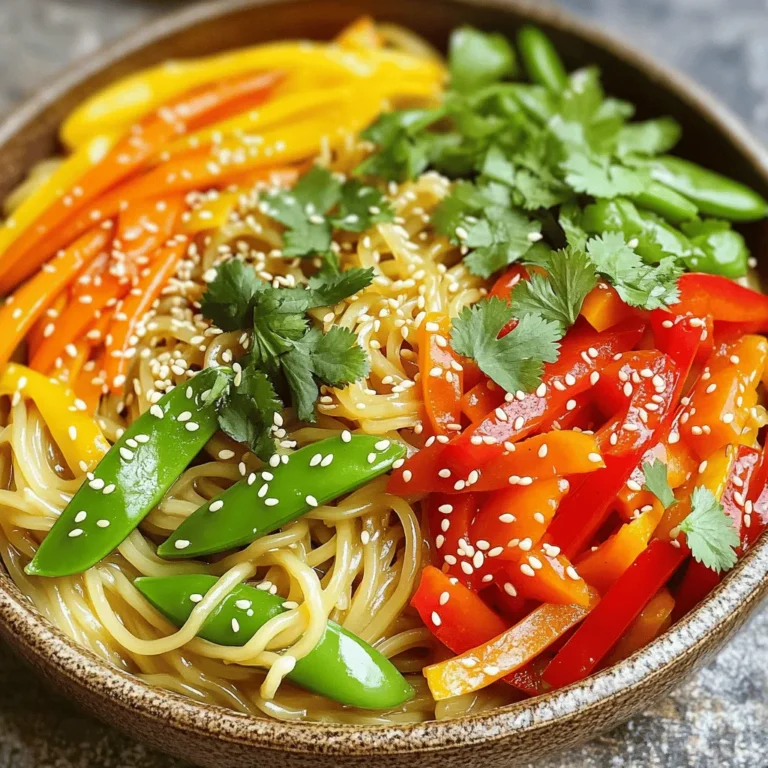
Savory Sesame Ginger Noodle Bowl Easy and Flavorful

- 1 loaf of challah bread - 2 cups fresh or frozen blueberries - 8 oz cream cheese - 4 large eggs - 2 cups milk - 1/2 cup granulated sugar - 1 teaspoon vanilla extract - 1 teaspoon ground cinnamon - 1/4 teaspoon salt - Zest of 1 lemon - 1/4 cup powdered sugar (for serving) - Maple syrup (for serving) To make Blueberry Cheesecake French Toast Casserole, you need simple, fresh ingredients. Start with a loaf of challah bread. This bread is soft and perfect for soaking up flavors. You can use fresh or frozen blueberries, which add a sweet and tart taste. Cream cheese gives the dish its cheesecake flavor and rich texture. You will also need eggs, which help bind everything together. For the liquid mixture, gather milk, granulated sugar, and vanilla extract. These ingredients add creaminess and sweetness. Ground cinnamon gives warmth and depth to the flavor. A touch of salt balances the sweetness, while lemon zest brightens the whole dish. Lastly, powdered sugar makes a lovely garnish, and maple syrup adds a delicious drizzle on top. With these ingredients, you create a delightful breakfast or brunch dish that everyone will love. - Preheat your oven to 350°F (175°C). This step is key for even baking. - Grease a 9x13-inch baking dish with butter or cooking spray. This helps to prevent sticking. - In a large bowl, beat 8 oz of softened cream cheese until it is smooth and creamy. - Add 4 large eggs one by one, mixing well after each addition. This makes the mixture fluffy. - Pour in 2 cups of milk, 1/2 cup of granulated sugar, 1 teaspoon of vanilla extract, 1 teaspoon of ground cinnamon, 1/4 teaspoon of salt, and zest of 1 lemon. Mix until everything is fully combined. - Place 1 loaf of challah bread, cut into 1-inch cubes, into the greased baking dish. - Gently fold in 2 cups of fresh blueberries. You can use frozen blueberries, but thaw them first. - Pour the cream cheese mixture evenly over the bread and blueberries. Make sure every piece is coated well. - Cover the dish tightly with foil. If you want, you can refrigerate it for at least 30 minutes or overnight. - If you chill it overnight, let the casserole sit at room temperature for 15 minutes before baking. - Bake the casserole covered with foil for 30 minutes. Then, remove the foil and bake for another 15 to 20 minutes. Look for a golden brown top and a set center. - Once done, take it out and let it cool slightly. You can dust it with powdered sugar before serving. Enjoy it warm! - Choosing the right bread: Use challah bread for the best texture. Its soft and fluffy nature absorbs the egg mixture well. If you cannot find challah, brioche is a good option too. - Ensuring even coating of blueberries: Gently fold the blueberries into the bread cubes. This helps spread the berries throughout the dish. Avoid smashing the blueberries to keep them whole and juicy. - Baking tips for a golden brown finish: Bake covered for the first half to keep it moist. Remove the foil for the last 15-20 minutes. This creates a nice golden crust on top. - Best garnishes for presentation: Dust with powdered sugar before serving. Add a few fresh blueberries on top for color. This makes the dish look inviting and fresh. - Pairing with syrup or fruits: Serve with warm maple syrup for sweetness. You can also add sliced bananas or strawberries for extra flavor and texture. - Overmixing the batter: Mix just until combined. Overmixing can make the casserole dense and tough. Aim for a smooth mixture without lumps. - Not allowing it to rest: Let the casserole sit before baking. This helps the bread soak up the mixture. You can refrigerate it overnight for a richer flavor. {{image_2}} You can get creative with the bread. Instead of challah, try brioche or sourdough. Each bread brings a unique taste. For fruits, mix it up with strawberries, raspberries, or peaches. Seasonal fruits add new flavors and colors to your casserole. Spices can boost flavor. A pinch of nutmeg or cardamom brings warmth and depth. You may also consider adding chocolate chips. The sweet chocolate pairs well with blueberries and cream cheese. If you need gluten-free options, use gluten-free bread. Many brands offer tasty choices. For dairy-free, swap cream cheese with a plant-based version and use almond or oat milk. These swaps keep the dish delicious while catering to dietary needs. To store your Blueberry Cheesecake French Toast Casserole, use an airtight container. Place it in the refrigerator for up to three days. If you want to keep it longer, you can freeze it. Wrap it tightly with plastic wrap, then foil. It will last up to three months in the freezer. When you reheat, the best method is the oven. Preheat it to 350°F (175°C). Place the casserole in a baking dish and cover it with foil. Heat for about 20 minutes. This keeps it moist. You can also microwave it on medium heat. Just cover it loosely and check every minute until warm. The casserole stays fresh in the fridge for three days. In the freezer, it can last for three months. For the best taste, eat it within one month of freezing. Always look for signs of spoilage, like off-smells or changes in color. Yes, you can make this casserole ahead of time. Prepare it the night before and place it in the fridge. This gives the bread time to soak up the mixture. Bake it in the morning for a fresh breakfast! If you don’t have challah bread, you can use other types. Brioche or French bread works well too. Just make sure it’s soft and slightly sweet. This will help keep the same delicious taste. Yes, you can use frozen blueberries. Just thaw them first and drain excess water. This ensures they won’t make your casserole soggy. Fresh blueberries are great, but frozen ones work just as well. To avoid sogginess, let the casserole rest after mixing. Also, don’t skip the refrigeration step. This helps the bread absorb the liquid without getting too mushy. Absolutely! You can mix in fruits like strawberries or raspberries. Just remember to keep the same amount so the liquid ratio stays right. This adds more flavor and variety to your dish. Bake the casserole for about 45-50 minutes. Cover it with foil for the first 30 minutes. Remove the foil to let it brown for the last 15-20 minutes. This casserole pairs well with maple syrup and a dusting of powdered sugar. You can also add whipped cream or fresh fruit on the side for extra flavor. Store leftovers in an airtight container in the fridge. They will stay fresh for up to three days. Reheat in the oven or microwave when you’re ready to enjoy again. You now have the tools to create a delicious blueberry challah casserole. We covered the key ingredients, step-by-step instructions, and helpful tips to make it perfect. Remember to choose the right bread and not to overmix the batter. You can also explore various ingredient swaps to keep it exciting. Store your leftovers properly to enjoy them later. With this recipe, breakfast or brunch can become a delightful and easy experience. Now, it's time to bake and enjoy!

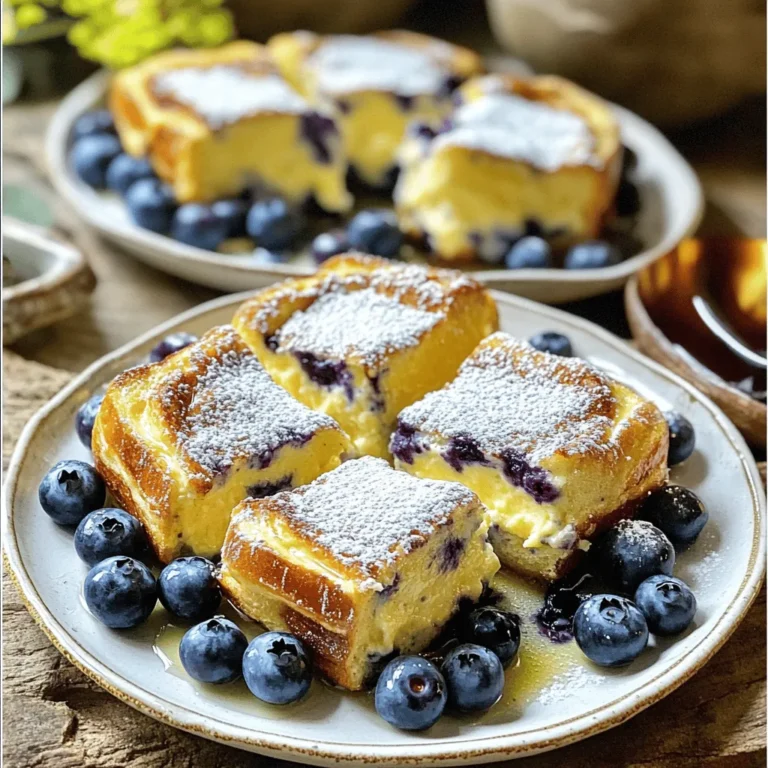
Blueberry Cheesecake French Toast Casserole Delight

- Brownie mix and additional ingredients - 1 box of brownie mix (plus ingredients required on the box: typically eggs, water, and oil) Brownie mix is the base of this treat. Follow the box directions for the best results. - Cream cheese and powdered sugar - 1 cup cream cheese, softened - ½ cup powdered sugar - 1 teaspoon vanilla extract Cream cheese adds a creamy texture. Powdered sugar sweetens the mix. The vanilla gives a warm flavor. - Dark chocolate and coconut oil - 8 oz dark chocolate, chopped (or chocolate chips) - 1 tablespoon coconut oil (or vegetable oil) Dark chocolate coats the truffles and adds rich taste. Coconut oil helps the chocolate melt smoothly. These ingredients create a tasty mix of flavors and textures. Each one plays a key role in making the Candy Cane Brownie Truffles special and festive. {{ingredient_image_1}} First, you need to bake the brownies. Preheat your oven as per the box instructions. Prepare a baking dish and pour in the brownie mix. Bake until done, then let them cool completely. This cooling step is key. It helps you crumble them easily later. Once cool, crumble the brownies. Break them into small pieces until they look like sand. This makes it easier to mix with the filling later on. Now, let’s make the filling. In a large bowl, add the crumbled brownies. Then, add the softened cream cheese. Make sure it is soft enough to mix in easily. Next, pour in the vanilla extract and powdered sugar. Now comes the fun part! Add in the ½ cup of crushed candy canes. Mix everything until it is well combined. You want it to hold together when you press it. This tells you it's ready for the next step. It's time to shape the truffles. Take small portions of the brownie mixture. Roll each into bite-sized balls, about 1 inch wide. Place them on a baking sheet lined with parchment paper. Refrigerate the truffles for about 30 minutes. This helps them firm up, making the next steps easier. While waiting, let’s melt the chocolate. In a microwave-safe bowl, add the chopped dark chocolate and coconut oil. Microwave in 30-second bursts. Stir in between until smooth. Now, dip each chilled truffle into the melted chocolate. Make sure each one gets covered completely. Let any extra chocolate drip off before placing them back on the parchment paper. This is where the magic happens! While the chocolate is still wet, sprinkle crushed candy canes on top. This gives your truffles that festive look. Let them sit at room temperature until the chocolate hardens. You can also pop them in the fridge for a faster set. Enjoy your creation! To get the best texture for your truffles, crumble the brownies into fine pieces. This helps them blend well with the cream cheese. The mixture should hold together when pressed. If it's too dry, add a bit more cream cheese. Add the crushed candy canes right into the mixture before rolling into balls. This ensures every bite has that minty crunch. When coating the truffles, sprinkle more candy canes on top while the chocolate is still wet. This creates a fun and festive look. One common mistake is overmixing the ingredients. Mix just until combined; otherwise, your truffles may become tough. Another mistake is not chilling the truffles enough before coating. Refrigerating them for at least 30 minutes helps the chocolate stick better. For mixing, use a large bowl and a sturdy mixer. A stand mixer works great but a hand mixer is fine too. When it comes to baking sheets, choose ones with a flat surface. Line them with parchment paper for easy cleanup. This prevents sticking and makes it easier to remove the truffles once coated. Pro Tips Use Quality Chocolate: For the best flavor, choose high-quality dark chocolate. It will enhance the overall taste of the truffles. Chill the Mixture: After mixing the brownie and cream cheese, chill the mixture for about 10 minutes before rolling into balls. This makes it easier to shape. Experiment with Flavors: Try adding a dash of peppermint extract for an extra minty kick, or substitute different flavored chocolates for unique variations. Storage Tips: Store truffles in an airtight container in the refrigerator for up to a week. They can also be frozen for longer storage. {{image_2}} You can switch up the flavor of your truffles easily. Instead of candy canes, try using crushed Oreos or pretzels. This adds a fun twist to the classic taste. You can also change the chocolate. Use milk chocolate or white chocolate for a sweeter flavor. Each option gives a unique taste and feel to your truffles. If you need gluten-free options, use a gluten-free brownie mix. This lets everyone enjoy these treats without worry. For vegan substitutions, swap cream cheese for a plant-based alternative. Use dairy-free chocolate to keep it vegan. These adjustments make the truffles more accessible to different diets. Pair your Candy Cane Brownie Truffles with festive drinks, like hot cocoa or peppermint tea. The rich chocolate blends well with these flavors. For a fun presentation, place truffles in cute holiday cups. You can also sprinkle extra crushed candy canes on a platter for a colorful look. These touches make serving more special and festive. To keep your Candy Cane Brownie Truffles fresh, use airtight containers. Glass or plastic containers work well. Layer the truffles with parchment paper to avoid sticking. Store them in the fridge for up to one week. This keeps them firm and tasty. You can freeze truffles for longer storage. Place them in a single layer on a baking sheet first. Freeze them for about two hours until solid. Then, transfer the truffles to a freezer-safe bag. They can last up to three months in the freezer. When you're ready to enjoy, move them to the fridge overnight. This helps them thaw slowly and stay fresh. These truffles make great gifts! Use clear cellophane bags for wrapping. Add festive ribbons to make them look special. You can also use small boxes with decorative paper. Custom labels add a nice touch. Write the name of the treat and the date made. This way, your friends will know what to expect! Yes, you can use homemade brownies instead of a boxed mix. Just make sure your brownies are moist and dense. Crumble them finely, just like you would with boxed brownies. This helps the filling mix well. Using homemade brownies can add a personal touch and unique flavor. These truffles can last about one week in the fridge. Store them in an airtight container to keep them fresh. If you leave them at room temperature, they may get soft. For longer storage, you can freeze them. They last about three months in the freezer. Absolutely! You can add different mix-ins to the truffles. Consider using nuts, dried fruit, or other candies. You can also switch the chocolate type. Try white chocolate or milk chocolate for a twist. Adding a splash of peppermint extract can enhance the candy cane flavor. The options are endless! You learned how to make delicious truffles using brownie mix and cream cheese. We covered each step, from baking to garnishing. With tips on avoiding common mistakes, your truffles will impress everyone. Remember to experiment with flavors and adjust for your dietary needs. Proper storage will keep them fresh longer. These truffles are not just treats; they make great gifts too. Enjoy making them for yourself or to share. Dive in and get creative with your truffle-making adventures!

Candy Cane Brownie Truffles Irresistible Treat Idea

To make spicy gochujang pasta, you will need the following ingredients: - 8 oz spaghetti or your preferred pasta - 2 tablespoons gochujang (Korean chili paste) - 1 tablespoon sesame oil - 1 tablespoon soy sauce - 1 tablespoon honey or maple syrup - 2 cups baby spinach - 1 red bell pepper, sliced into thin strips - 1 small zucchini, spiralized or sliced - 3 cloves garlic, minced - 1 tablespoon ginger, grated - 2 green onions, chopped (for garnish) - Sesame seeds (for garnish) You might not have every ingredient on hand. Here are some easy swaps: - Pasta: Use any pasta you like, such as fettuccine or penne. - Gochujang: If you can't find gochujang, you can mix chili powder with a bit of soy sauce. - Sesame Oil: Olive oil can replace sesame oil for a different flavor. - Honey: Maple syrup or agave syrup works well too. - Spinach: Kale or Swiss chard makes a great substitute. - Bell Pepper: Any color of bell pepper will work, or you can use carrots for crunch. Gochujang is more than just a tasty paste. It offers some health perks, too: - Rich in Antioxidants: Gochujang contains ingredients like chili peppers, which help fight free radicals. - Boosts Metabolism: The heat from chili peppers may help speed up your metabolism. - Low in Calories: Gochujang adds flavor without a lot of calories, making it great for weight control. - Vitamins and Minerals: This paste can provide vitamins A and C from its ingredients, which are good for your skin and immune health. Gochujang pasta is a simple dish packed with flavor and health benefits. You can easily customize it to fit your taste. Enjoy making this easy weeknight meal! {{ingredient_image_1}} First, fill a large pot with water. Add a generous pinch of salt. Bring it to a boil. Once boiling, add your spaghetti or preferred pasta. Cook it according to the package instructions until it is al dente. This usually takes about 8 to 10 minutes. After cooking, drain the pasta. Be sure to save about 1/2 cup of the pasta water. This will help later. In a medium bowl, combine the gochujang, sesame oil, soy sauce, and honey (or maple syrup). Use a whisk or spoon to mix them well. You want a smooth sauce that has a nice balance of heat and sweetness. Set this mixture aside for later. Take a large skillet and heat a drizzle of sesame oil over medium heat. Once hot, add the minced garlic and grated ginger. Sauté them for about 1 minute. You want to smell the aroma! Next, add the sliced red bell pepper and zucchini. Cook these together for about 3 to 4 minutes until they start to soften. Then, toss in the baby spinach. Cook it until it wilts down, which will only take a minute or two. Now it’s time to bring everything together. Add the drained pasta to your skillet with the sautéed vegetables. Pour the gochujang sauce over the pasta. Toss everything together well. If the pasta looks dry, gradually add some of the reserved pasta water. This will help create a nice, creamy texture. Taste your dish and adjust the seasoning if needed. You can add more gochujang for heat or honey for sweetness if you like. Once you’re happy with the flavor, divide the gochujang pasta into bowls. Garnish with chopped green onions and a sprinkle of sesame seeds for extra flair. Enjoy your flavorful and easy weeknight meal! To make the sauce shine, mix the gochujang, sesame oil, soy sauce, and honey well. Use a whisk for a smooth blend. If you want a richer taste, add more sesame oil. This will enhance the flavor and give it a nice sheen. The sauce should coat the pasta nicely, so feel free to adjust the amounts to your liking. Gochujang brings heat, but you control it. If you prefer a milder dish, start with less gochujang. You can always add more later. Taste the sauce before mixing it with pasta. If it's too spicy, mix in some honey or maple syrup to balance the heat. This adds sweetness without losing flavor. Cooking pasta correctly is key. Always use plenty of salted water to boil your pasta. This adds flavor and helps the pasta cook evenly. Cook it until it’s al dente, which means firm to the bite. Save some pasta water before draining. You may need it to adjust the sauce later, keeping everything creamy and tasty. Pro Tips Use Fresh Ingredients: Fresh vegetables and high-quality gochujang will enhance the overall flavor of your pasta dish. Adjust Spice Level: If you prefer a milder dish, start with less gochujang and gradually add more to suit your taste. Experiment with Proteins: Consider adding grilled chicken, shrimp, or tofu for additional protein and texture. Make it a Meal Prep: This pasta keeps well, so consider making a larger batch for easy lunches throughout the week. {{image_2}} You can easily add protein to your gochujang pasta. Chicken, shrimp, or tofu works great. For chicken, grill or sauté bite-sized pieces until cooked. For shrimp, cook until they turn pink. If you choose tofu, press it to remove water, then cube and sauté until golden. Add your protein right before combining with the pasta. This step enhances the dish and makes it more filling. To keep this dish vegetarian, skip the meat and add more veggies. Try mushrooms, carrots, or snap peas for extra flavor and crunch. If you want it vegan, use maple syrup instead of honey. You can also substitute soy sauce with tamari to keep it gluten-free. These changes make the dish tasty while fitting your diet. If you need gluten-free options, use rice noodles or gluten-free pasta. Both choices work well with the gochujang sauce. Just follow the cooking instructions on the package. You can still enjoy the spicy flavor of gochujang pasta without gluten. This flexibility makes it easy to adapt for everyone at your table. Store leftover gochujang pasta in an airtight container. Keep it in the fridge. It will stay fresh for up to three days. Make sure the pasta is cool before sealing. This helps prevent moisture buildup. To reheat, use the microwave or a skillet. If using the microwave, place the pasta in a bowl. Add a splash of water to keep it moist. Heat for about 1-2 minutes. Stir halfway through to heat evenly. If using a skillet, add a little sesame oil over medium heat. Stir until warmed through. You can freeze gochujang pasta for longer storage. Place it in a freezer-safe container. Make sure to leave some space for expansion. It can last up to three months in the freezer. When ready to eat, thaw it overnight in the fridge. Reheat as described above. Gochujang is a Korean chili paste. It has a thick texture and a sweet, spicy taste. This paste comes from fermented soybeans, red chili powder, and salt. It adds deep flavor and heat to dishes. Many love it for its unique blend of sweet, spicy, and umami. You can find gochujang in Asian markets or online. It works great in marinades, soups, and sauces. Yes, you can make this dish ahead of time. Cook the pasta and the sauce separately. Store each in the fridge for up to three days. When you are ready to eat, reheat the pasta and sauce. You may need to add a splash of water to keep it moist. Freshen it up with green onions and sesame seeds before serving. You can use gochujang in many dishes. It adds flavor to stir-fries, stews, and marinades. Try mixing it into salad dressings for a kick. You can also use it in tacos, burgers, or roasted vegetables. Be creative and add it to your favorite recipes for extra depth and heat! You’ve learned about the key ingredients and their benefits, especially gochujang. I shared steps to cook pasta, make sauce, and sauté vegetables. The tips help to perfect flavors and adjust spice levels. Adding protein or choosing vegan options makes this dish flexible. Plus, I covered storage and reheating for leftovers. Gochujang adds a tasty kick. You can enjoy this dish anytime, fresh or stored. Enjoy cooking!

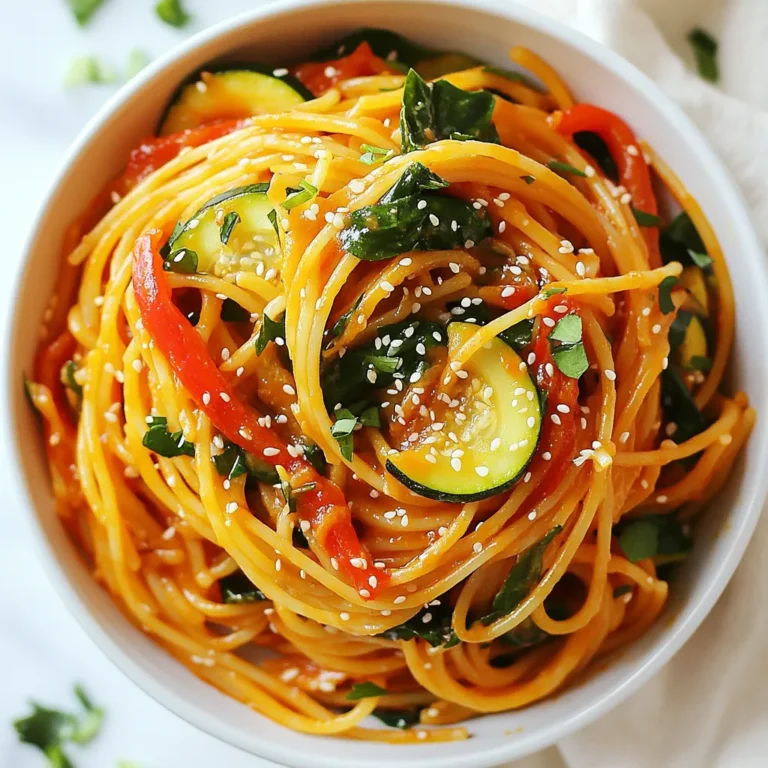
Gochujang Pasta Flavorful and Easy Weeknight Meal

- 1 can (15 oz) chickpeas, drained and rinsed - ½ cup fresh parsley, chopped - ½ cup fresh cilantro, chopped - 1 small onion, roughly chopped - 3 cloves garlic, minced - 1 teaspoon ground cumin - 1 teaspoon ground coriander - ½ teaspoon baking powder - 2 tablespoons flour (or chickpea flour for gluten-free) - 2 tablespoons olive oil - Salt and pepper to taste To make air fryer falafel, you need simple, fresh ingredients. The star ingredient is chickpeas. They provide protein and a hearty texture. Fresh herbs like parsley and cilantro add a bright flavor. Onion and garlic give depth and aroma. Cumin and coriander are key spices. They bring warmth to each bite. Baking powder helps the falafel puff up a bit, making them light. Flour acts as a binder, ensuring they hold their shape. Olive oil adds flavor and helps achieve a crispy outside. Before you start cooking, gather these ingredients. This will make your cooking process smooth. Each ingredient plays a role in creating delicious, crunchy falafel. When you use fresh and quality items, your falafel will taste even better. To start, grab your food processor. Add the drained chickpeas, parsley, cilantro, onion, and garlic. Then, sprinkle in the ground cumin and ground coriander. Don’t forget the baking powder, flour, salt, and pepper. Pulse this mixture until it is coarsely blended. You want it to be chunky, not a smooth paste. If needed, stop and scrape down the sides to mix it well. The right texture is key for great falafel. You want it to hold together but still have some bite. Next, transfer the falafel mixture to a bowl. Cover it with plastic wrap and place it in the fridge. Chill for about 30 minutes. This step is important. Refrigerating helps the flavors meld together. Plus, it makes the mixture easier to shape into balls or patties. Now, let’s get to air frying! First, preheat your air fryer to 375°F (190°C). While it heats, take the chilled mixture and form it into small balls. Golf ball size works well. Lightly brush or spray the air fryer basket with olive oil. This prevents sticking. Place the balls in a single layer, leaving space between each one. This helps them cook evenly. Air fry for 12 to 15 minutes. Flip them halfway through to ensure even crispiness. When they are golden brown, they are ready! Carefully remove them and repeat with any leftover mixture. Enjoy your crispy, flavorful falafel! How does olive oil impact crispiness? Olive oil adds flavor and helps the falafel brown. It creates a nice crust when air frying. Use about two tablespoons for best results. What are the best practices for air frying? Preheat your air fryer to 375°F (190°C). This step ensures even cooking. Place falafel in a single layer, leaving space between them. This allows hot air to flow around each piece. How can you add spices or herbs to taste? You can mix in extra herbs like mint or dill. A pinch of cayenne pepper adds heat. Feel free to experiment with your favorite flavors. What are some good dipping sauce suggestions? Tahini sauce pairs well with falafel. You can also try a yogurt dip or a spicy harissa sauce. These dips boost flavor and add variety. What happens if you overprocess the mixture? Overprocessing makes the falafel too mushy. Aim for a coarse blend, so they hold shape. Why is it important not to overcrowd the air fryer basket? If you overcrowd, the falafel won't cook evenly. This can lead to soggy spots. Air circulation is key for crispy results. {{image_2}} You can switch things up with different beans. Black beans work great in falafel. They add a nice flavor and earthiness. You can also use chickpea flour for a gluten-free option. It binds well and keeps the falafel crispy. Want some heat? Add jalapeños to the mix. They bring a nice kick to your falafel. You can also incorporate roasted veggies. Carrots or bell peppers add sweetness and depth. Just chop them small before mixing. For plating, arrange the falafel on a vibrant platter. Serve with tahini sauce or yogurt dip on the side. Garnish with more parsley or cilantro for color. Pair your falafel with a fresh salad. It balances the dish and adds crunch. Enjoy your meal with warm pita bread for a satisfying combo! Store any leftover falafel in an airtight container. This keeps them fresh and tasty. You can keep them in the fridge for up to three days. Make sure they cool down before sealing to avoid moisture build-up. To freeze falafel, place them in a single layer on a baking tray. Once frozen, transfer them to a freezer-safe bag. This method prevents them from sticking together. You can store them for up to three months. To reheat, bake them in the oven at 375°F (190°C) for about 15-20 minutes. This keeps them crispy. Look for signs that your falafel have spoiled. If they smell sour or look dry, it’s best to throw them away. To extend freshness, you can freeze them right after making. This way, you can enjoy them later without losing flavor. Cook falafel for 12 to 15 minutes at 375°F (190°C). Flip them halfway for even cooking. The exact time may change based on the size of your falafel. Larger balls may need more time, while smaller ones cook faster. Aim for a golden brown color for the best crunch. Yes, you can use dried chickpeas. First, soak them overnight in water. This softens them. After soaking, drain and rinse the chickpeas. Then, boil them for about 30 minutes until tender. Let them cool before using them in your falafel mix. This method gives you a fresh taste. Falafel tastes great with many sauces. I recommend tahini sauce, which is creamy and nutty. Yogurt dips are another good choice; they add a cool touch. Try mixing yogurt with garlic and lemon for flavor. Hummus also pairs well, adding more chickpea goodness. Crumbling falafel often happens due to too much moisture. Make sure to drain the chickpeas well. If your mix is too wet, add a bit more flour. Another reason may be overprocessing. Blend just until combined, not smooth. This keeps falafel together while cooking. Absolutely! You can prepare the falafel mix a day in advance. Just keep it in the fridge until you’re ready to cook. You can also shape the falafel and refrigerate them. This helps save time on busy days while keeping the flavors fresh. Reheat falafel in your air fryer for the best results. Set it to 350°F (175°C) and cook for about 5 minutes. This method keeps them crispy. You can also microwave them, but they might lose some crunch. For best texture, stick with the air fryer. Making air fryer falafel is simple and enjoyable. We covered the key ingredients, like chickpeas and herbs, and walked through the steps to blend, chill, and cook the mixture. You learned tips to get that perfect crispy texture and how to avoid common mistakes. Variations can spice things up, too, with alternative ingredients or tasty sauces. Store your leftovers properly to keep them fresh. Overall, air fryer falafel is a healthy, fun dish that fits many diets. Enjoy making it your own!

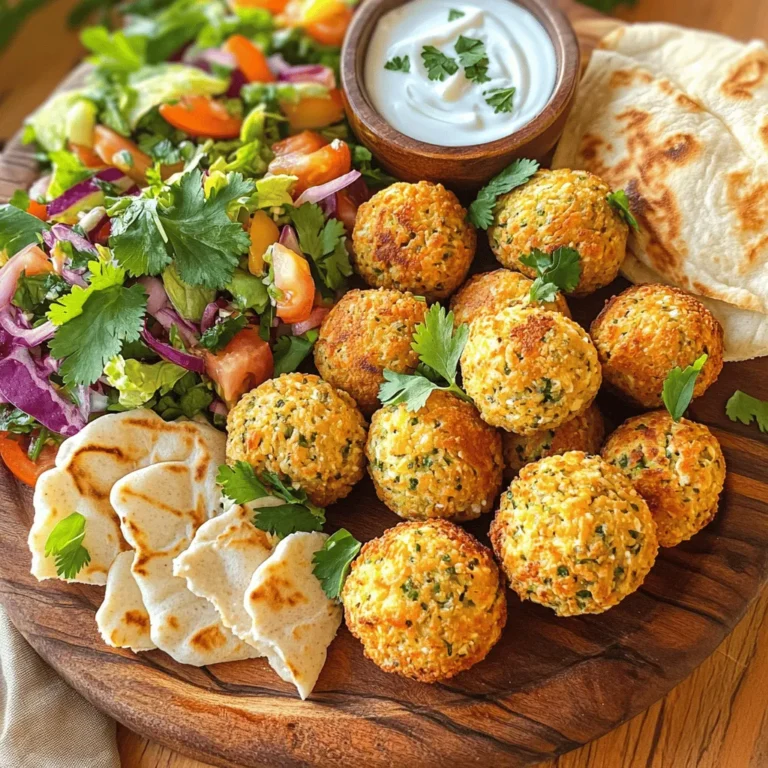
Air Fryer Falafel Crunchy and Flavorful Recipe

To make roasted red pepper hummus, you need a few key items. Here’s what you will need: - 1 can (15 oz) chickpeas, drained and rinsed - 1 red bell pepper, roasted (you can buy it or roast it at home) - 2 tablespoons tahini - 2 tablespoons olive oil - 2 tablespoons lemon juice - 1 garlic clove, minced - 1/2 teaspoon cumin - Salt and pepper, to taste - Water as needed for desired consistency - Fresh parsley, for garnish - Paprika, for garnish These ingredients blend to create a creamy and rich flavor. The roasted red pepper adds a sweet touch that makes this hummus special. You can change up your hummus by adding a few fun flavors. Here are some optional extras: - A pinch of chili powder for heat - A squeeze of lime juice for a tangy twist - A handful of spinach for extra greens - A dash of smoked paprika for a deeper flavor Feel free to mix and match these ingredients to suit your taste. The goal is to make it your own. Roasted red pepper hummus packs a nutritional punch. Here’s what you get in a serving: - High in protein from chickpeas - Healthy fats from olive oil and tahini - Vitamins from the red bell pepper and garlic - Fiber to keep you full This hummus is not just tasty; it is also good for you. Enjoy it as a dip, spread, or snack. To make the hummus, start with the red bell pepper. You can roast it at home or buy it roasted. If you choose to roast it, preheat your oven to 450°F (230°C). Cut the pepper in half and take out the seeds. Place it on a baking sheet with the skin facing up. Roast for 20-25 minutes until the skin is black and blistered. Once out of the oven, let it cool. After it cools, peel off the skin and set the pepper aside. This step gives your hummus a rich flavor. Now it’s time to blend! In a food processor, add the chickpeas, roasted red pepper, tahini, olive oil, lemon juice, minced garlic, and cumin. Blend everything until it’s smooth and creamy. If the hummus is too thick, add water one tablespoon at a time. Blend again until you reach a nice consistency. Don't forget to taste it! Add salt and pepper as needed for flavor. Once blended, transfer your hummus to a serving bowl. For a lovely finish, drizzle some olive oil on top. Sprinkle paprika and chopped parsley for color. This makes the dish look great! Serve the hummus with warm pita bread, fresh veggies, or crunchy crackers. You can even add a small bowl of olive oil with herbs on the side for a fun dip. Enjoy your hummus as a snack or a party treat! To get your hummus just right, texture matters a lot. Start with good chickpeas. Canned chickpeas work well, but dried chickpeas can be creamier. If using dried, soak them overnight and cook until soft. When you blend, add a bit of water slowly. This helps reach your perfect smoothness. If it’s too thick, keep adding a little water until it feels right. For a richer taste, use fresh garlic. Roasting the garlic gives a sweet flavor. You can also add more lemon juice for brightness. A pinch of smoked paprika adds depth too. Don’t forget to taste your hummus as you go! This way, you can adjust salt and pepper to your liking. If you want a kick, try adding a bit of cayenne pepper. Roasted red pepper hummus is great with many things. Serve it with warm pita bread for a classic combo. Fresh vegetable sticks like carrots and cucumbers make it crunchy and fresh. You can also add crackers for a fun snack. For a special touch, drizzle olive oil and sprinkle herbs on top. This adds color and extra flavor. Enjoy your hummus with friends or family for a tasty treat! {{image_2}} To make this hummus spicy, add a dash of cayenne pepper or crushed red pepper flakes. Start with a pinch and taste as you go. You can always add more heat. This adds a lovely kick to the creamy texture. It’s great for those who love bold flavors. For a fresh twist, mix in your favorite herbs. Basil, cilantro, or dill work well. Just chop them finely and add them to the food processor with the other ingredients. This gives the hummus a vibrant taste and a beautiful color. It’s perfect for a summer picnic or a gathering. This recipe is already vegan and gluten-free! You can enjoy it without worry. If you want to boost the nutrition, add some spinach or kale. Just blend those greens in with the chickpeas and peppers. This adds vitamins without changing the great flavor. You can store roasted red pepper hummus in an airtight container. Place it in the fridge right after making it. This keeps it fresh and tasty. Make sure to cover the top with a thin layer of olive oil. This helps prevent it from drying out. You can enjoy it for up to five days. Freezing hummus is easy and a great way to save some for later. Use a freezer-safe container. Leave some space at the top because hummus can expand. If you want, you can freeze it in smaller portions. This way, you can take out just what you need. Hummus can freeze well for up to three months. When you store hummus in the fridge, check for any changes. If it smells off or has strange colors, throw it away. To reheat frozen hummus, let it thaw in the fridge overnight. Then mix it well before serving. If it seems thick after thawing, add a little water and stir. It will be creamy and good to enjoy again! You can use sunflower seed butter or Greek yogurt. Peanut butter also works well. Each option adds a unique flavor. Choose what you like best. The taste may change, but it will still be good. Homemade hummus stays fresh for about 4 to 7 days. Make sure to store it in an airtight container. If you see any changes in color or smell, it’s best to toss it. Yes, you can use store-bought roasted red peppers. They save time and taste great. Just drain them before adding to the hummus. This choice makes prep quick and easy. You now know how to make tasty roasted red pepper hummus. We covered key ingredients, step-by-step instructions, and clever tips. You also learned about fun variations and how to store your hummus. In the end, this dish is easy and fun to make. It offers great flavor and nutrition. Enjoy your hummus as a snack or party dip!

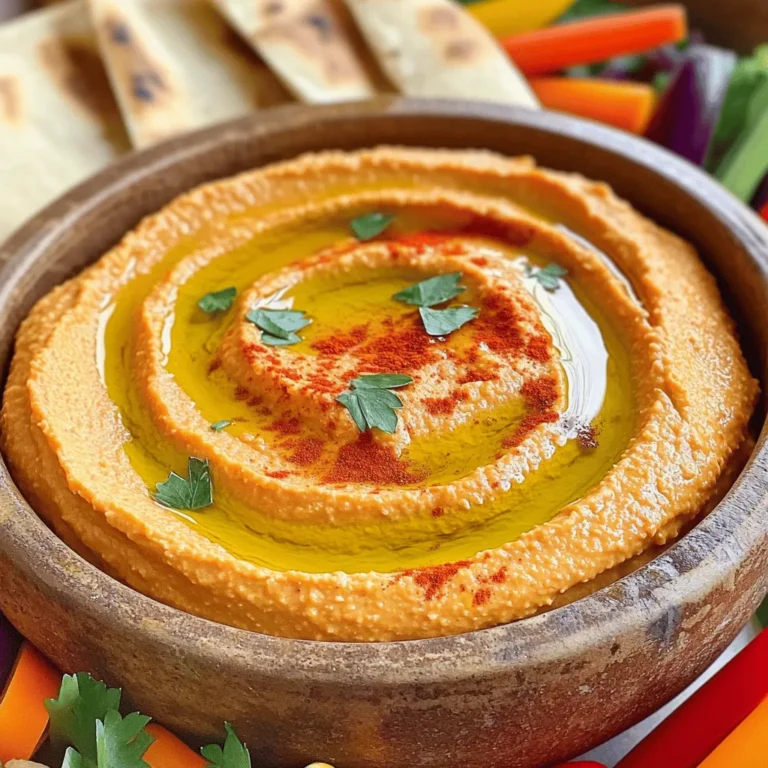
Roasted Red Pepper Hummus Rich and Creamy Delight

- 3 ripe bananas, mashed - 1/2 cup unsalted butter, melted - 1/2 cup brown sugar - 2 large eggs - 1 teaspoon vanilla extract - 1 1/2 cups all-purpose flour - 1 teaspoon baking soda - 1/2 teaspoon salt - 1 teaspoon ground cinnamon - 1/2 teaspoon ground cardamom - 1/4 teaspoon ground ginger - 1/4 teaspoon ground cloves - 1/2 cup chopped walnuts or pecans (optional) - 1/4 cup Greek yogurt or sour cream You need ripe bananas for the best flavor. They should be soft and sweet. Use unsalted butter to control the salt in your bread. Brown sugar adds a rich, caramel-like taste. Large eggs help bind the mixture together. Vanilla extract gives a warm, inviting aroma. All-purpose flour provides the structure. Baking soda helps the bread rise. Salt enhances all the flavors. Ground cinnamon, cardamom, ginger, and cloves add a cozy chai flavor. You can add chopped walnuts or pecans for crunch, but that’s optional. Greek yogurt or sour cream keeps the bread moist and tender. With these ingredients, you can create a delicious chai spiced banana bread that warms the soul. Make sure to gather everything before you start. This will help you create a smooth and easy baking experience. 1. Preheat your oven to 350°F (175°C). Grease a 9x5 inch loaf pan. This helps the bread come out easily. 2. In a large bowl, mix together 1/2 cup melted unsalted butter and 1/2 cup brown sugar. Stir until the mix is smooth. 3. Next, add 3 ripe bananas, 2 large eggs, and 1 teaspoon vanilla extract to the butter and sugar mix. Stir well until everything is combined. 4. In another bowl, sift together 1 1/2 cups all-purpose flour, 1 teaspoon baking soda, 1/2 teaspoon salt, 1 teaspoon ground cinnamon, 1/2 teaspoon ground cardamom, 1/4 teaspoon ground ginger, and 1/4 teaspoon ground cloves. Sifting helps to mix the dry ingredients well. 5. Gradually add the dry mix to the wet mixture. Stir gently until just combined. Be careful not to overmix; this keeps your bread soft. 6. Fold in 1/2 cup chopped walnuts or pecans and 1/4 cup Greek yogurt. The nuts add crunch, and yogurt keeps it moist. 7. Pour the batter into the prepared loaf pan. Smooth the top with a spatula. 8. Bake for 60-65 minutes. Check if it's done by inserting a toothpick into the center. It should come out clean. 9. Let the bread cool in the pan for 10 minutes. Then, transfer it to a wire rack to cool completely. 10. Slice and serve warm or let it cool and enjoy later. Using ripe bananas is key. They should be soft and brown. These bananas will give your bread a sweet flavor and moist texture. If the bananas are green, your bread may taste bland. Aim for three ripe bananas for best results. To avoid overmixing, mix just until you see no dry flour. Stir gently with a spatula. Overmixing makes the bread dense. Keep it light and fluffy to get a perfect loaf. You can add more spices for a deeper flavor. Try adding nutmeg or allspice. They pair well with chai spices. A dash of vanilla extract boosts the taste too. If you like nuts, add chopped walnuts or pecans. They add crunch and richness. You can also fold in chocolate chips for a sweet twist. If your banana bread is too dense, it may need more moisture. Add a bit more yogurt or sour cream. This helps keep it light. For dry banana bread, check your oven temperature. It might be too high. You can also add a little milk to the batter. If you want to adjust the sweetness, use less brown sugar. Taste the batter and see if it needs more sweetness. {{image_2}} To make gluten-free chai spiced banana bread, you can use a mix of gluten-free flours. Here are some good options: - Almond flour - Oat flour - Coconut flour When you switch to gluten-free flour, check the baking time. This bread may bake faster, so start checking for doneness at 50 minutes. Use a toothpick to test; if it comes out clean, it’s ready! For a vegan version, you can replace eggs and butter easily. Here’s how: - Use flax eggs: Mix 1 tablespoon of ground flaxseed with 2.5 tablespoons of water. Let it sit for 5 minutes. - Replace butter with coconut oil or a vegan butter spread. To add moisture without dairy, use applesauce or extra mashed bananas. They keep the bread soft and tasty! You can get creative with flavors in your chai spiced banana bread. Here are some fun ideas: - Add chocolate chips for a sweet twist. - Toss in dried fruits like raisins or cranberries for extra flavor. These additions can make the bread even more delicious and fun to eat! To keep your chai spiced banana bread fresh at room temperature, wrap it tightly in plastic wrap or foil. This prevents air from drying it out. Store it in a cool, dry place, like a pantry. If you want to slice it, use a bread knife to cut even pieces. This keeps the bread moist longer. For long-term storage, freezing is a great option. First, let the bread cool completely. Wrap it well in plastic wrap, then place it in a freezer-safe bag. Make sure to remove as much air as possible. To thaw, take it out and leave it at room temperature for a few hours. You can also reheat slices in the oven for a warm treat. Chai spiced banana bread lasts about 3 to 4 days at room temperature. If stored in the fridge, it can last up to a week. Look for signs of spoilage, like mold or an off smell. If the bread feels dry or crumbly, it may be past its prime. Always trust your senses to know if it’s still good to eat. To make banana bread from scratch, follow these simple steps: 1. Preheat your oven to 350°F (175°C) and grease a 9x5 inch loaf pan. 2. Mix melted butter and brown sugar in a large bowl until smooth. 3. Add ripe, mashed bananas, eggs, and vanilla extract to the butter-sugar mix. Stir well. 4. Sift together flour, baking soda, salt, and spices in another bowl. 5. Combine dry and wet ingredients gently. Do not overmix. 6. Fold in nuts and Greek yogurt for moisture, if desired. 7. Pour batter into the pan and bake for 60-65 minutes. 8. Cool before slicing and enjoy your delicious banana bread. Yes, you can use frozen bananas! Here’s how: - Thaw the bananas by leaving them in the fridge overnight or using the microwave. - Once thawed, mash them well before adding them to your mixture. - Bananas may be a bit watery, but they will add great flavor and moisture. Absolutely! You can reduce the sugar in several ways: - Cut the brown sugar in half for a less sweet bread. - Substitute some sugar with unsweetened applesauce for added moisture without too much sweetness. - You could also try using stevia or other sweeteners for a lower-calorie option. Chai spices offer many health benefits: - Cinnamon can help balance blood sugar levels. - Cardamom is known to aid digestion and has anti-inflammatory properties. - Ginger can help with nausea and may boost the immune system. - Cloves contain antioxidants and may help improve liver health. These spices not only enhance flavor but also add nutritional value to your banana bread! Making chai spiced banana bread is simple and fun. You learned how to combine ripe bananas and spices for great flavor. Remember to mix well but not overdo it. Try different variations like gluten-free or vegan options too. Store your bread correctly to enjoy it longer. With these tips, your banana bread will be a hit. Enjoy baking and sharing this delicious treat!

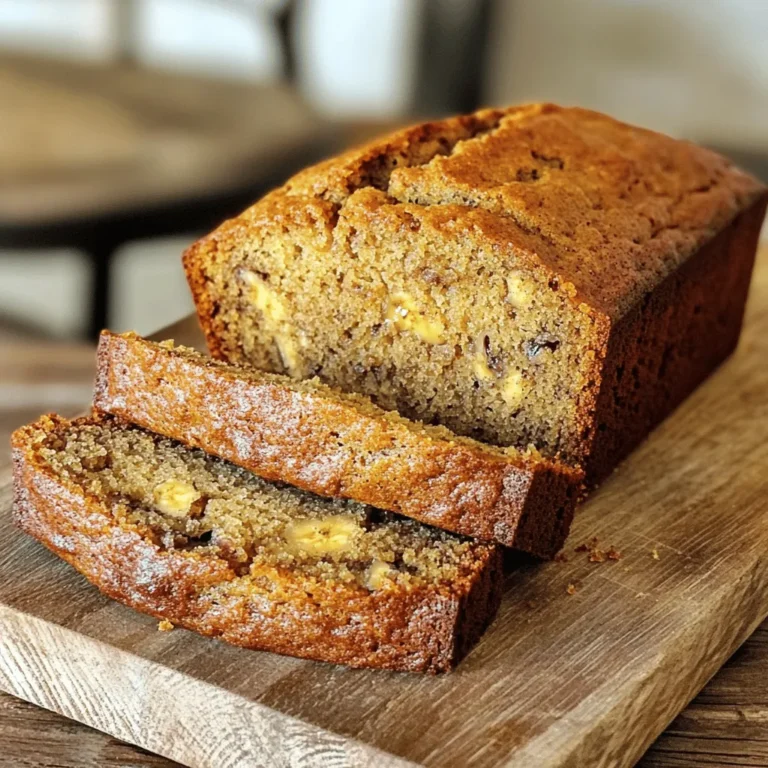
Chai Spiced Banana Bread Flavorful and Easy Recipe

PREV 1 … 44 45 46 … 86 NEXT
spicy fork kitchen

explore

DessertsDinnerAppetizersDrinks

Our Policies

  • Cookie Policy
  • Copyright Policy
  • Disclaimer
  • GDPR Policy
  • Terms Of Use
Back to Top
  • About
  • Contact Us
  • Privacy Policy
© 2026 spicy fork kitchen