FREE DINNER EBOOK! Get your copy!
  • Cookie Policy
  • GDPR Policy
  • Disclaimer
  • Terms Of Use
  • Visit my other site: Fun Cookie Recipes
spicy fork kitchen
  • Home
  • Dinner
  • Desserts
  • Drinks
  • Appetizers
  • Contact
  • About
  • Privacy Policy
  • Home
  • Dinner
  • Desserts
  • Drinks
  • Appetizers
  • Contact
  • About
  • Privacy Policy
  • Cookie Policy
  • GDPR Policy
  • Disclaimer
  • Terms Of Use
Visit my other site: Fun Cookie Recipes

HOME / CATEGORIES /

Latest

- Spaghetti squash - Olive oil - Garlic - Cashews - Vegetable broth - Nutritional yeast - Lemon juice - Salt and pepper - Fresh parsley - Cherry tomatoes To create a delicious Spaghetti Squash Alfredo, you need fresh ingredients that pack flavor. Start with a medium spaghetti squash. This veggie serves as a low-carb base, mimicking pasta. Olive oil adds richness, while minced garlic gives a warm, savory kick. Next, cashews bring creaminess to the Alfredo sauce. Soak them in water for at least three hours. This softens them, making them easier to blend. Vegetable broth adds depth, and nutritional yeast provides that cheesy flavor without dairy. A splash of lemon juice brightens the dish, and salt and pepper enhance all the flavors. Don’t forget the garnishes! Fresh parsley adds color and taste, while halved cherry tomatoes provide a sweet burst. Each ingredient plays a key role in making this dish both comforting and delightful. {{ingredient_image_1}} First, preheat your oven to 400°F (200°C). This temperature helps the squash cook evenly. Grab your medium spaghetti squash. Cut it in half lengthwise. Be careful! Scoop out the seeds with a spoon. Drizzle one tablespoon of olive oil on the cut sides. Sprinkle salt and pepper to taste. This adds great flavor. Place the squash cut-side down on a baking sheet lined with parchment paper. Roast the squash in the oven for about 40-50 minutes. Check for tenderness. You want to be able to shred the flesh easily with a fork. When it’s done, the skin will look lightly browned. Let it cool for a few minutes before handling. While the squash roasts, start on the Alfredo sauce. In a blender, combine one cup of soaked cashews, three cloves of minced garlic, one cup of vegetable broth, one-fourth cup of nutritional yeast, and one tablespoon of lemon juice. Blend everything on high until it’s smooth and creamy. If the sauce is too thick, add a bit more broth. Season with salt and pepper to taste. This sauce will bring a rich, creamy flavor to your dish. Once the squash has cooled, use a fork to shred the flesh into spaghetti-like strands. It’s fun to watch the transformation! In a large bowl, gently toss the strands with the Alfredo sauce. Mix until the squash is coated evenly. This is where the magic happens! Serve it right away for the best taste. Roasting spaghetti squash gives it a lovely texture. Here’s how to do it right: - Roasting Techniques: Cut the squash in half and scoop out the seeds. Drizzle olive oil on the cut sides. Season with salt and pepper. Place cut-side down on a baking sheet. Roast at 400°F for 40-50 minutes. The squash is done when the flesh is tender and shreds easily with a fork. - Alternative Cooking Methods: You can microwave the squash for a quick option. Cut it in half and place it in a microwave-safe dish. Add a little water and cover it. Cook on high for about 10-12 minutes. An Instant Pot is another great choice. Place the squash on a trivet with one cup of water. Cook on high pressure for 7-10 minutes. You can make your Alfredo sauce even better with these tips: - Ingredient Adjustments: Try adding herbs like basil or thyme for extra flavor. You can also swap out cashews for sunflowers seeds if you need a nut-free option. Add a pinch of nutmeg for warmth. - Suggestions for Additional Toppings: Fresh veggies like spinach or broccoli work well. You can also add grilled chicken or shrimp for protein. A sprinkle of red pepper flakes gives a nice kick. Presentation matters! Here are some ideas: - Plating Ideas: Use a large bowl for serving. Twirl the spaghetti squash strands with tongs for a fancy look. Add a sprinkle of fresh parsley and halved cherry tomatoes on top for color. - Pairing Recommendations: Serve with a light side salad or garlic bread. A crisp white wine like Pinot Grigio pairs well with this dish. Enjoy this meal with friends or family for a cozy night in. Pro Tips Choose the Right Squash: Select a spaghetti squash that feels heavy for its size and has a smooth, firm skin for the best texture and flavor. Soak Cashews: Soaking cashews for at least 3 hours helps to achieve a smoother, creamier Alfredo sauce. For a quick soak, you can use hot water for 30 minutes. Flavor Variations: Feel free to add herbs like thyme or basil to the Alfredo sauce for extra flavor. You can also incorporate sautéed mushrooms or spinach for added nutrition. Leftover Storage: Store any leftovers in an airtight container in the fridge for up to 3 days. Reheat gently on the stove, adding a splash of vegetable broth to loosen the sauce. {{image_2}} If you want a gluten-free meal, spaghetti squash is the perfect base. It makes a great substitute for regular pasta. You can also try zucchini noodles or rice noodles. Just remember to check the labels for gluten-free options. This dish is naturally gluten-free, making it easy for anyone to enjoy. For a vegan sauce, cashews work wonderfully. If you need a nut-free option, try blended silken tofu. This gives a nice creamy texture too. You can also add avocado for richness. It’s a great way to boost flavor while keeping it plant-based. To elevate the taste, add fresh herbs like basil or thyme. They bring a nice touch of freshness. You can also sprinkle in spices like paprika or black pepper for warmth. For a protein boost, toss in cooked chickpeas or sautéed mushrooms. These add nutrition and heartiness to your meal. To store your Spaghetti Squash Alfredo, let it cool first. Place it in an airtight container. Store it in the fridge for up to three days. This dish stays fresh and tasty when sealed well. If you notice any changes in color or smell, it’s best to throw it out. You can freeze both the spaghetti squash and the sauce. First, let them cool completely. Pack each in separate airtight containers. The squash can last up to three months in the freezer. The sauce also stays good for about three months. To thaw, move the containers to the fridge overnight. You can reheat the squash in the oven or microwave. For the sauce, warm it gently on the stove. Stir often to keep it smooth and creamy. To make spaghetti squash taste like pasta, focus on enhancing its flavor and texture. Here are some tips: - Roasting: Roasting brings out the natural sweetness. Cut the squash, drizzle with olive oil, and season with salt and pepper. Bake at 400°F until tender. - Sauce Pairing: Use a rich sauce like Alfredo. It coats the strands well and adds creaminess. - Seasoning: Add herbs and spices to elevate the taste. Garlic and nutritional yeast work wonders. - Toppings: Use fresh ingredients like cherry tomatoes or parsley. They add color and flavor. These methods create a delicious pasta-like experience with spaghetti squash. Yes, you can prepare Spaghetti Squash Alfredo ahead of time. Here are some tips for meal prep: - Squash Prep: Roast the spaghetti squash and shred it into strands. Store it in an airtight container in the fridge for up to four days. - Sauce Storage: Make the Alfredo sauce and keep it in a separate container. It will stay fresh for about five days in the fridge. - Reheating: When ready to serve, combine the squash and sauce in a pan. Heat gently until warmed through. This makes for a quick and easy meal on busy days. To complete your meal with Spaghetti Squash Alfredo, consider these side dishes: - Salad: A fresh green salad with a light vinaigrette balances the richness. - Garlic Bread: A slice of garlic bread adds a tasty crunch and pairs well with the sauce. - Roasted Vegetables: Roasted broccoli or asparagus offers great texture and flavor. - Protein: Grilled chicken or shrimp can boost the dish with additional protein. These options create a well-rounded meal that satisfies all appetites. This post covered how to make delicious Spaghetti Squash Alfredo. You learned about the key ingredients and cooking steps. I shared tips for perfect texture and flavor, plus variations to suit different diets. Spaghetti squash is a tasty, healthy choice that many can enjoy. Experiment with the sauce and toppings to find your favorite mix. Remember, cooking should be fun and delicious!

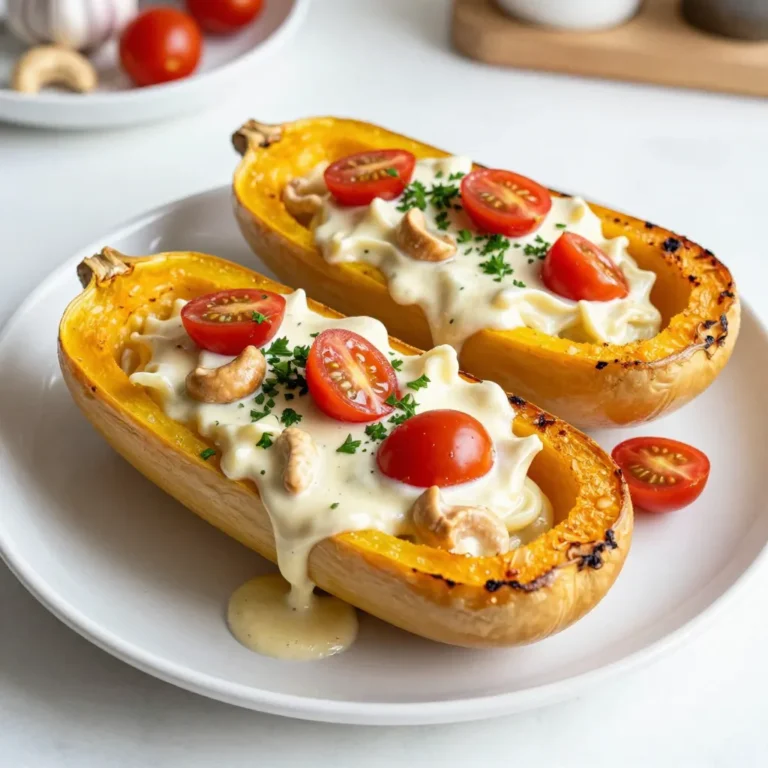
Spaghetti Squash Alfredo Creamy Comfort Dish

To make Lemon Chicken Orzo Soup, you need a few key ingredients. These form the base of the dish and create a warm, inviting flavor. Here’s what you will need: - 1 tablespoon olive oil - 1 medium onion, chopped - 2 cloves garlic, minced - 2 medium carrots, diced - 2 celery stalks, diced - 1 lemon, zested and juiced - 6 cups chicken broth - 1 cup uncooked orzo pasta - 2 cups cooked chicken, shredded - 2 cups fresh spinach, chopped - 1 teaspoon dried thyme - 1 teaspoon dried oregano - Salt and pepper to taste - Fresh parsley, chopped (for garnish) Each of these ingredients plays a role. The onion and garlic add depth to the soup. The lemon brings brightness, while the orzo gives it heartiness. You can add some optional ingredients for extra flavor. These are not necessary, but they can take your soup up a notch: - Fresh herbs like dill or basil - A pinch of red pepper flakes for heat - A splash of white wine for depth - Lemon slices for garnish These additions will give your soup a little twist. Feel free to mix and match based on your taste. This soup is not only tasty but also nutritious. Here’s a quick look at its nutritional benefits: - Calories: About 300 per serving - Protein: High in protein from chicken and orzo - Vitamins: Rich in vitamins A and C from carrots and spinach - Fiber: Offers dietary fiber from vegetables This soup serves well as a comforting meal, packed with nutrients to keep you feeling good. Enjoy a bowl and feel the warmth! {{ingredient_image_1}} Start by heating one tablespoon of olive oil in a large pot over medium heat. Add one medium onion, chopped, and sauté for about 3 to 4 minutes. You want the onion to be soft and see-through. Next, stir in two cloves of minced garlic. Cook it for one more minute until it smells nice. Then, add two diced carrots and two diced celery stalks. Sauté these veggies for about 5 minutes until they begin to soften. Now it's time to bring in the broth. Pour in six cups of chicken broth, and then add the zest from one lemon along with one teaspoon of dried thyme and one teaspoon of dried oregano. This will add great flavor. Bring the mixture to a gentle boil. Once it boils, toss in one cup of uncooked orzo pasta. Stir it well and cook for 8 to 10 minutes. Check the orzo to make sure it's tender. After that, lower the heat and mix in two cups of shredded chicken. You can use rotisserie chicken for ease. Finally, add two cups of chopped spinach and let it warm through for about 2 to 3 minutes. After the soup is warm, squeeze in the juice of that fresh lemon. Season with salt and pepper to your liking. Remove the pot from the heat and let it sit for a couple of minutes. When ready, serve the soup in bowls. For a nice touch, garnish with chopped parsley and add a slice of lemon on the side. Enjoy your comforting bowl of lemon chicken orzo soup! To cook orzo just right, follow these steps. Start by bringing a pot of salted water to a boil. Add the orzo and stir it gently. Cook for about 8-10 minutes until it's tender but still firm. Drain the orzo well and toss it with a bit of olive oil to prevent sticking. This simple trick keeps it from clumping. You can easily change the flavor of your soup. Try adding fresh herbs like dill or basil for a new taste. For extra crunch, toss in some diced bell peppers. If you want a creamy soup, stir in a splash of cream or milk before serving. Adding a pinch of red pepper flakes gives it a nice kick. To make this soup, you need a few key tools. A large pot helps you cook everything evenly. A good knife makes chopping easy and safe. Use a cutting board for a clean workspace. A wooden spoon works well for stirring without scratching your pot. Finally, a ladle is perfect for serving the soup. Pro Tips Use Fresh Ingredients: Fresh vegetables and herbs enhance the flavor of the soup, making it more vibrant and delicious. Adjust the Lemon Zest: For a more pronounced lemon flavor, feel free to add extra lemon zest, but do this gradually to avoid overpowering the dish. Cook Orzo Al Dente: To prevent the orzo from becoming mushy, cook it until just al dente, as it will continue to absorb liquid even after removing from heat. Make it a Meal: Add some crusty bread on the side or a simple salad for a complete meal that pairs perfectly with the soup. {{image_2}} You can change this soup by adding seasonal veggies. Think about using zucchini, green beans, or peas. Adding these gives more color and taste. You can toss them in with the carrots and celery. This way, they cook just right. You can also try leafy greens like kale or Swiss chard. They add nutrients and a lovely texture. If you need a gluten-free soup, swap the orzo for rice or quinoa. Both options cook well and soak up the flavor. You can use brown rice for a nutty taste. Just keep an eye on cooking times. For broth, check labels to find gluten-free options. This way, everyone can enjoy the soup. To make this soup vegetarian, skip the chicken and use veggie broth. You can add more beans or lentils for protein. Chickpeas work well and add a nice bite. For flavor, add smoked paprika or a dash of soy sauce. You can still use all the veggies and lemon for zest. This way, you keep the soup bright and tasty. To keep your Lemon Chicken Orzo Soup fresh, store it in an airtight container. Let the soup cool before sealing it. This helps prevent moisture buildup. Place it in the fridge if you plan to eat it in the next few days. It should stay good for about 3 to 4 days. Reheating soup is easy and quick. Pour the soup into a pot over medium heat. Stir it gently as it warms. You can also use the microwave. Place the soup in a microwave-safe bowl and cover it loosely. Heat it for 1 to 2 minutes, stirring halfway through. Check the temperature before serving. If you want to save some for later, freezing is a great option. Allow the soup to cool completely, then pour it into freezer-safe bags. Remove as much air as possible before sealing. This prevents freezer burn. Label the bags with the date. Your soup can last in the freezer for up to 3 months. When ready to eat, thaw it overnight in the fridge or use the microwave. Yes, you can use other pasta types. Small pasta shapes like ditalini or pastina work well. Just watch the cooking time, as it may differ from orzo. You want the pasta to be tender but not mushy. Checking the package instructions helps you get it right. Lemon Chicken Orzo Soup lasts about 3 to 4 days in the fridge. Make sure to store it in an airtight container. This keeps it fresh and tasty. When you’re ready to eat, just reheat it on the stove or in the microwave. If you don't have chicken broth, vegetable broth is a great choice. You can also use water with a bit of salt and herbs for flavor. This keeps your soup tasty and satisfying. If you want more zest, add a squeeze of lemon juice for a bright touch. Lemon Chicken Orzo Soup is simple and tasty. We covered key ingredients and steps to make it. I shared tips to cook orzo and how to add flavor. You can even make variations with seasonal veggies or try gluten-free options. Proper storage will keep leftovers fresh. Enjoy this soup anytime, and make it your own. You'll impress friends and family with your skills. Remember the tricks, and have fun creating!

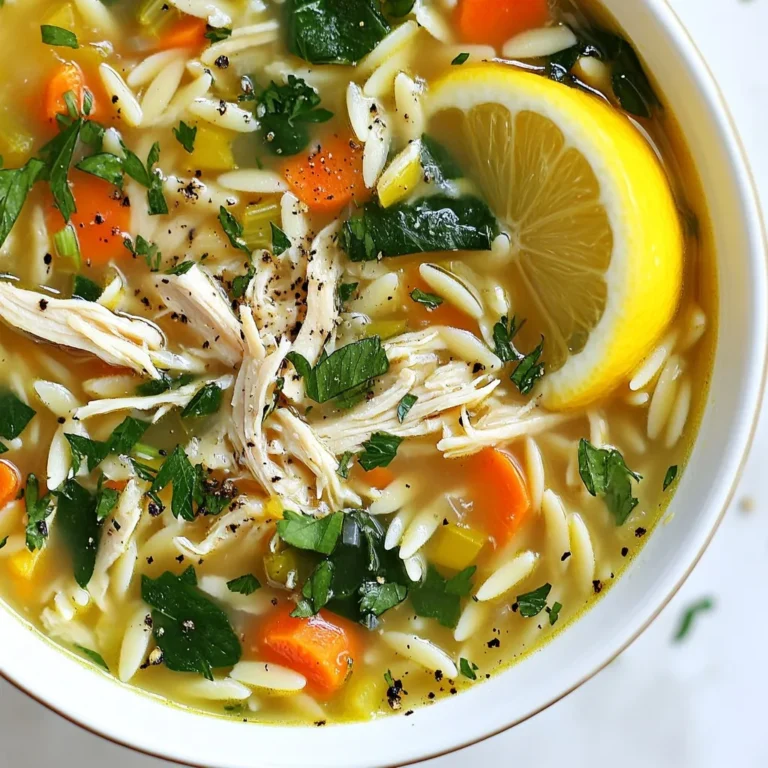
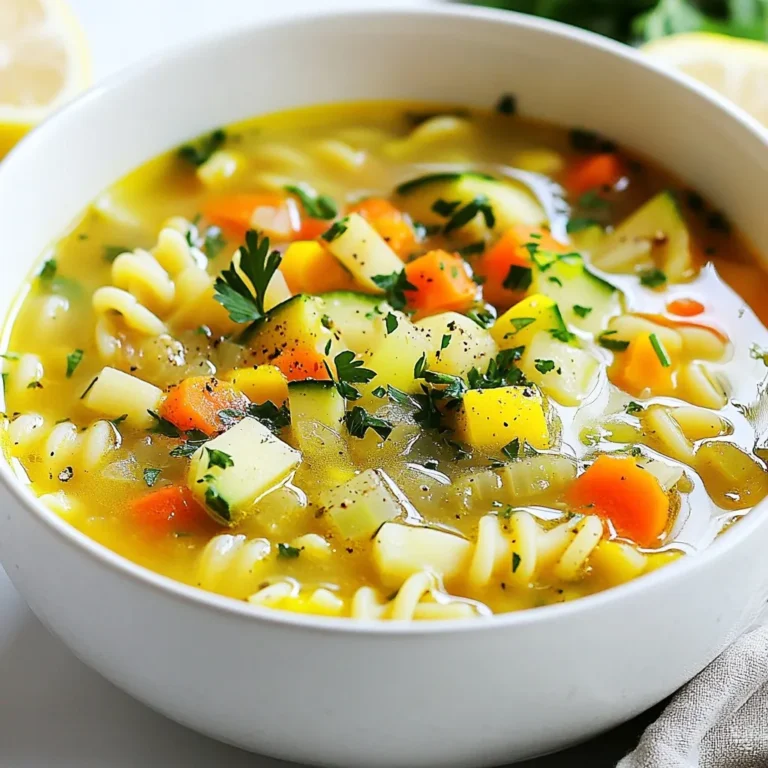
Lemon Chicken Orzo Soup Simple and Comforting Meal

- 1 cup whole wheat flour - 1 cup protein powder (unflavored or pizza flavor) - 1 teaspoon baking powder - ½ teaspoon garlic powder - ½ teaspoon onion powder - ½ teaspoon dried oregano - ¼ teaspoon salt - ½ cup Greek yogurt - ¼ cup water - 1 cup shredded mozzarella cheese - 1 cup sliced pepperoni - 2 tablespoons pizza sauce (for dipping) These Pepperoni Pizza Protein Rolls are not just tasty; they pack a punch. Each roll is rich in protein thanks to the protein powder and Greek yogurt. The whole wheat flour boosts fiber, making these rolls filling and satisfying. A single roll offers a good balance of carbs, protein, and fat. This makes them great for a snack or light meal. Choosing quality ingredients is key to great flavor. Here are some tips: - Whole Wheat Flour: Always choose whole wheat for more nutrients. It adds texture and flavor. - Protein Powder: Pick a powder you enjoy. Unflavored works well, but pizza flavor adds fun. - Cheese: Fresh mozzarella melts beautifully. Shredded cheese is easy and saves time. - Pepperoni: Look for high-quality pepperoni. It adds the best flavor. If you want less fat, turkey or veggie options are good too. - Greek Yogurt: Use plain Greek yogurt for creaminess without extra sugar. With these tips, you can make delicious rolls that everyone will enjoy! {{ingredient_image_1}} 1. First, preheat your oven to 375°F (190°C). This makes sure your rolls bake correctly. 2. Next, grab a mixing bowl. Combine the whole wheat flour, protein powder, baking powder, garlic powder, onion powder, oregano, and salt. Stir them well. 3. In another bowl, mix the Greek yogurt and water until it's smooth. This makes the dough soft. 4. Now, fold the yogurt mixture into the dry ingredients. Keep mixing until a dough forms. 5. On a lightly floured surface, knead the dough for about 2 minutes. You want it smooth and elastic. 6. Roll the dough out into a rectangle, about ¼ inch thick. This shape helps with filling. 7. Sprinkle half of the mozzarella cheese evenly over the dough. Then, add the sliced pepperoni on top. 8. Carefully roll the dough from one end to the other. Make a tight log to hold in all the flavors. 9. Slice the rolled dough into 1-inch thick pieces. Arrange these rolls on your prepared baking sheet. 10. Top each roll with the remaining mozzarella cheese. If you like, add a sprinkle of extra oregano for flavor. 11. Bake for 15-20 minutes. Look for a golden brown color and bubbly cheese. 12. Let the rolls cool for a couple of minutes before serving. This helps avoid burns. Serve these tasty rolls warm. Use pizza sauce on the side for dipping. They make a great snack or appetizer. You can also pair them with a fresh salad. Enjoy sharing these fun treats with friends and family! To get the best results, always preheat your oven first. This ensures even cooking. Use parchment paper on your baking sheet. It helps the rolls not stick and makes cleanup easy. Keep an eye on your rolls as they bake. Every oven is different, so check for a golden brown color. Start with the right mix of dry and wet ingredients. Combine whole wheat flour and protein powder well. This helps the dough rise and stay soft. When mixing, ensure there are no lumps. Knead the dough for about two minutes. This gives it a nice texture. Roll it out evenly for the best shape. Adding garlic and onion powder boosts the taste of your rolls. Dried oregano gives a nice pizza flavor. For extra kick, you can add crushed red pepper flakes. Don’t forget the mozzarella cheese! It melts beautifully and adds creaminess. You can also try different spices for a unique twist. Pro Tips Use Room Temperature Ingredients: Allow your Greek yogurt and water to come to room temperature for a smoother dough consistency. Experiment with Seasonings: Feel free to add your favorite spices or herbs to the dough for an extra flavor boost. Customize Fillings: Swap out pepperoni for other toppings like vegetables or different types of cheese for variety. Storage Tips: Store any leftovers in an airtight container in the fridge for up to 3 days, or freeze for longer storage. {{image_2}} You can easily make these rolls vegetarian. Swap the pepperoni for veggies. Try bell peppers, mushrooms, or spinach. You can also add olives for extra flavor. Use a mix of your favorite vegetables. This gives you a tasty and colorful snack. Get creative with your toppings! Add sliced jalapeños for heat. You can also sprinkle on some feta cheese for a tangy twist. Consider adding fresh basil or arugula after baking. These toppings give fresh flavor and a nice look. Not a fan of unflavored protein powder? Try pizza-flavored protein powder instead! This adds extra taste to your rolls. You can also use plant-based protein for a vegan option. Just make sure it mixes well with the dough. This way, you keep your rolls tasty and filling. To keep your Pepperoni Pizza Protein Rolls fresh, let them cool first. Place the rolls in an airtight container. You can also wrap them in plastic wrap. Store them in the fridge for up to three days. This keeps them tasty and safe to eat later. When you are ready to enjoy your rolls again, preheat your oven to 350°F (175°C). Place the rolls on a baking sheet. Heat them for about 10 minutes. This helps them regain their crisp texture. You can also use a microwave for quick reheating. Just heat them for about 30 seconds to 1 minute. To freeze your Pepperoni Pizza Protein Rolls, let them cool completely. Wrap each roll in plastic wrap, then place them in a freezer bag. You can freeze them for up to three months. When you're ready to eat, thaw them in the fridge overnight. Reheat them in the oven for the best taste. To make your rolls healthier, swap white flour for whole wheat flour. Whole wheat adds fiber. You can also cut back on cheese and use less pepperoni. Try adding more veggies like spinach or bell peppers. This boosts nutrients without losing taste. Lastly, use low-fat Greek yogurt for fewer calories. Yes, you can! Feel free to use cheddar, provolone, or even a dairy-free option. Each cheese offers a unique flavor. Just make sure it melts well, so it blends into the rolls nicely. Absolutely! These rolls store well in the fridge. Just cool them completely before packing. Store them in an airtight container for up to four days. They also freeze well for longer storage. Reheat them in the oven for the best texture. I recommend pizza sauce as a classic choice. You can also try ranch or garlic sauce for something different. Marinara or even pesto can add great flavor. Choose what you love the most! Try adding crushed red pepper flakes for heat. You can also mix in herbs like basil or thyme. A dash of smoked paprika adds a nice twist, too. Experiment with your favorite spices to find your perfect blend! In this blog, we explored key ingredients for making delicious protein rolls. We discussed how to choose the best items and their nutritional info. You learned step-by-step how to prepare and bake these rolls. I shared tips for perfecting your dough and enhancing flavor. Lastly, we talked about variations and storage. With these insights, you can create tasty, healthy rolls at home. Enjoy your baking journey!

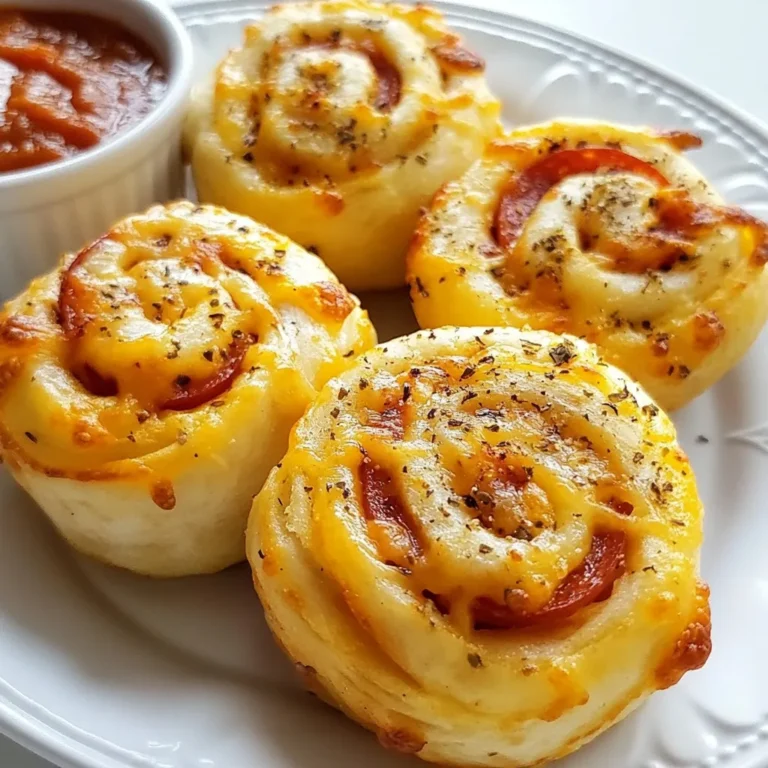
Pepperoni Pizza Protein Rolls Tasty and Filling Snack

Here are the ingredients you need to make crispy coconut chicken strips. Each item adds its own flavor and texture. - 1 pound chicken breasts, cut into strips - 1 cup shredded coconut - 1 cup panko breadcrumbs - 1/2 cup all-purpose flour - 2 large eggs - Seasonings: garlic powder, onion powder, paprika, salt, pepper - Oil for frying Each ingredient plays a key role. The chicken gives you protein. Coconut adds a sweet crunch. Panko breadcrumbs create that perfect crispy bite. Flour helps the coating stick. Eggs bind everything together. The seasonings bring extra flavor to the dish. Lastly, the oil is what makes it all crispy and golden. You can use coconut oil or vegetable oil depending on your taste. {{ingredient_image_1}} To start, prepare your dredging station. In one shallow bowl, add 1/2 cup of all-purpose flour. Season it with salt, pepper, 1 teaspoon of garlic powder, and 1 teaspoon of onion powder. Next, take a second bowl and whisk 2 large eggs until they are smooth. In a third bowl, mix 1 cup of shredded coconut with 1 cup of panko breadcrumbs. This setup makes coating easier and keeps your hands clean. Now, take each chicken strip, about 1 pound cut into strips, and dip it in the seasoned flour. Make sure to shake off any excess flour. Next, coat the chicken strip in the beaten eggs, ensuring it is fully covered. Finally, roll the chicken in the coconut-panko mixture. Press lightly to make sure it sticks well. Repeat this for all the chicken strips. Heat enough oil in a large skillet over medium heat. You want about 1/4 inch of oil in the pan. To check if the oil is hot, drop a small piece of the coconut mixture into it. If it sizzles, you’re ready. Carefully add a few chicken strips to the skillet, but don’t overcrowd it. Fry each strip for about 3 to 4 minutes on each side. They should turn golden brown and be fully cooked. Once done, remove the chicken strips and place them on a paper towel-lined plate to drain any excess oil. Enjoy them warm! To make your chicken strips super crispy, use panko breadcrumbs. Panko is lighter and crunchier than regular breadcrumbs. It gives your chicken a great texture. Next, oil temperature is key. Heat your oil to medium heat before frying. If the oil is too cold, the chicken will soak up oil. If it's too hot, it will burn. A good test is to drop a small coconut piece in. If it sizzles, you're ready! Want more taste? You can add spices. Try cayenne for heat or curry powder for warmth. You can also mix in some dried herbs like thyme or basil. For marinades, use a mix of lime juice, garlic, and soy sauce. Marinate your chicken strips for 30 minutes. This adds flavor inside and out. Serve your crispy chicken with tasty dips. Sweet chili sauce pairs well, adding a nice kick. A yogurt dip with herbs brings a cool contrast. For sides, think fresh salads or rice. A mango salad adds a fruity touch. This makes your meal bright and colorful. Pro Tips Choose the Right Coconut: For a sweeter flavor, opt for sweetened shredded coconut. If you prefer a more natural taste, unsweetened coconut works beautifully as well. Maintain Oil Temperature: Be sure to keep your oil at the right temperature. If it's too cool, the chicken will absorb more oil and become greasy; if too hot, the coating may burn before the chicken cooks through. Press the Coating: When rolling the chicken strips in the coconut-panko mixture, press down firmly to help the coating adhere better and create a thicker, crunchier crust. Experiment with Dips: While sweet chili sauce is a classic pairing, don't hesitate to try other dips like a spicy mango salsa or a zesty cilantro lime yogurt for a unique twist. {{image_2}} To bake the chicken strips, preheat your oven to 400°F (200°C). Arrange the coated strips on a baking sheet lined with parchment paper. Bake for 15-20 minutes, flipping halfway through. This method gives you a lighter dish. It also cuts down on oil. Make sure the chicken reaches an internal temperature of 165°F (74°C). For a gluten-free option, replace all-purpose flour with almond flour or coconut flour. Use gluten-free panko breadcrumbs instead of regular ones. This keeps the crunch while avoiding gluten. Just check the labels to ensure they are certified gluten-free. With these swaps, your chicken strips still stay crispy and tasty. You can add a tropical twist by mixing in spices like curry powder or ginger. These spices bring unique flavors that pop. If you want heat, sprinkle some chili flakes into the coconut-panko mixture. This gives your chicken a spicy kick. Experiment with different spices to find your favorite blend! To store leftovers, place the chicken strips in an airtight container. Let them cool before sealing. They will stay fresh for up to three days in the fridge. When it's time to reheat, use a skillet over medium heat. This helps keep the strips crispy. You can also use an oven. Set it to 350°F and warm the strips for about 10 minutes. If you want to freeze the chicken strips, let them cool completely first. Arrange them in a single layer on a baking sheet. Freeze for about an hour, then transfer them to a freezer bag. This keeps them from sticking together. They can last up to three months in the freezer. When you're ready to eat, thaw them in the fridge overnight. Cook them in a skillet until they're hot throughout. Crispy coconut chicken strips can be stored in the fridge for up to three days. In the freezer, they can last for three months. Always check for any off smells or changes in texture before eating. Proper storage helps maintain their great taste and texture. Yes, you can prepare the chicken strips ahead of time. Bread them and place them on a baking sheet. Cover the sheet with plastic wrap and refrigerate. You can fry them later when you are ready to eat. This method keeps them fresh and tasty. You can use either sweetened or unsweetened coconut. Sweetened coconut adds a hint of sweetness. Unsweetened coconut gives a more natural coconut flavor. Choose based on your taste preference. The chicken is fully cooked when it reaches an internal temperature of 165°F. Use a meat thermometer to check. The chicken will also be golden brown on the outside and no longer pink inside. Yes, chicken thighs work great too! They stay juicy and tender. Just cut them into strips like the breasts. Adjust the cooking time if needed, as thighs may take a bit longer. Coconut oil or vegetable oil are both great choices. Coconut oil adds a nice flavor. Vegetable oil is neutral and works well too. Make sure the oil is hot enough before frying for the best crispiness. This blog post shared a tasty way to make Crispy Coconut Chicken Strips. You learned the right ingredients, from chicken to seasonings. I outlined step-by-step instructions for coating and cooking, plus tips for maximum crispiness. Variations show how to bake or adapt recipes for gluten-free needs. In the end, you can customize this dish to fit your tastes. Enjoy experimenting with flavors and serve it up with your favorite dips!

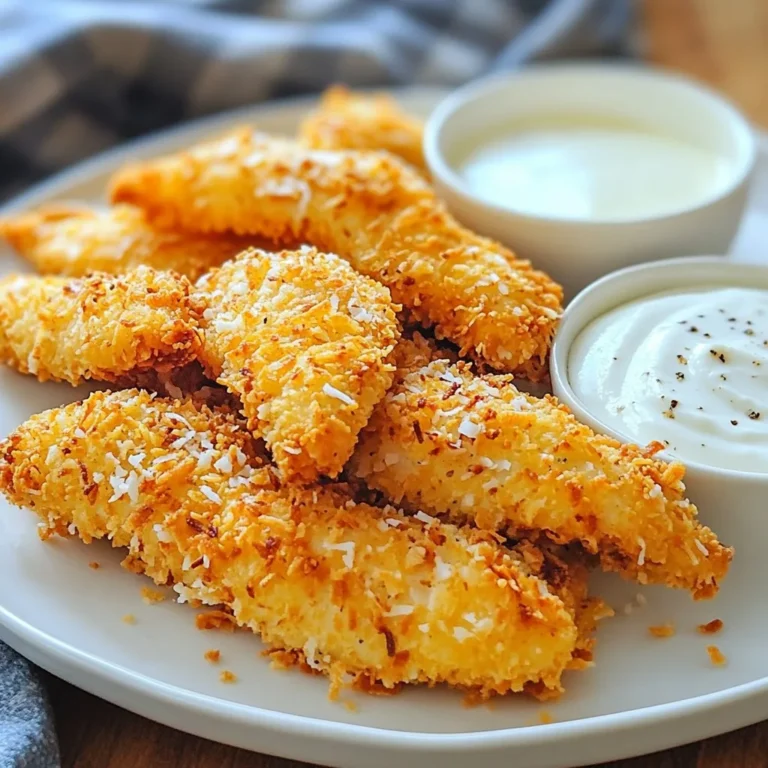
Crispy Coconut Chicken Strips Flavorful and Easy Dish

- 1 lb fresh salmon fillet, skin removed and cut into bite-sized cubes - 1/4 cup honey - 3 tablespoons soy sauce (low sodium) - 2 cloves garlic, minced - 1 tablespoon fresh ginger, grated - 1 tablespoon olive oil - 1 teaspoon sesame oil - 1 tablespoon sesame seeds - 2 green onions, chopped - Salt and pepper to taste Gather these ingredients to make your honey garlic salmon bites. Fresh salmon is key. It should be firm and bright. Honey adds sweetness and depth. Low-sodium soy sauce gives a rich umami flavor. Garlic and ginger bring warmth and zest. Olive oil helps the marinade stick and adds a nice mouthfeel. For garnish, sesame seeds and green onions add crunch and color. Salt and pepper enhance all the flavors. These simple ingredients come together to create a dish that is both savory and sweet. Trust me; they will impress your family and friends! {{ingredient_image_1}} To start, gather your ingredients. In a medium bowl, mix together the honey, soy sauce, minced garlic, grated ginger, olive oil, and sesame oil. Whisk it all until it blends well. This mix is your marinade. It gives the salmon its sweet and savory flavor. Next, take your fresh salmon fillet. Cut it into bite-sized cubes. Place these cubes in the bowl with the marinade. Gently toss them to coat every piece evenly. Cover the bowl and put it in the fridge. Let it marinate for 15 to 30 minutes. This step is key. It helps the salmon absorb the flavors. Now, it's time to bake. Preheat your oven to 400°F (200°C). While it heats up, line a baking sheet with parchment paper. This keeps the salmon from sticking. Once the oven is ready, take the salmon out of the fridge. Spread the marinated salmon bites on the baking sheet in a single layer. Pour any leftover marinade over the top. This adds extra flavor while baking. Bake the salmon for 12 to 15 minutes. Keep an eye on it. You want the pieces to be cooked through and slightly caramelized. For even cooking, turn them halfway through. When the salmon bites are done, take them out of the oven. Let them cool for a few minutes. This helps with handling. Now, it’s time for garnish. Sprinkle sesame seeds and chopped green onions over the salmon. This adds a nice crunch and brightness. You can serve these bites warm or let them cool to room temperature. They make a great appetizer or a main dish. Enjoy your sweet and savory honey garlic salmon bites! To make your marinade just right, you can adjust the sweetness and saltiness. If you like it sweeter, add more honey. For a saltier taste, increase the soy sauce. I suggest letting the salmon marinate for a longer time. This helps the flavors soak in better. Aim for at least 30 minutes if you can. The longer, the tastier! You can choose between baking and pan-searing. Baking is simpler and gives even cooking. Preheat your oven to 400°F (200°C) for the best results. If you want a crispier bite, try pan-searing. It cooks the salmon quickly and adds a nice crust. Broiling is another great option. It caramelizes the honey and gives a rich flavor. Just keep an eye on it to avoid burning. Pair these salmon bites with tasty sides. Rice, quinoa, or steamed veggies work well. For a fresh twist, serve with a salad. When it comes to presentation, use a nice platter. Arrange the bites neatly and sprinkle with sesame seeds and green onions on top. This adds color and makes it look fancy! Pro Tips Marinate for Maximum Flavor: Allowing the salmon to marinate for at least 30 minutes enhances the flavor and tenderness of the fish. Even Cooking: Make sure to cut the salmon into uniform pieces to ensure they cook evenly and avoid overcooking some pieces. Check for Doneness: Salmon is perfectly cooked when it flakes easily with a fork and has an internal temperature of 145°F (63°C). Garnish for Presentation: Adding sesame seeds and green onions not only enhances the visual appeal but also adds an extra crunch and flavor to the dish. {{image_2}} You can change the flavor of honey garlic salmon bites easily. Adding spices makes it fun. Consider adding red pepper flakes for heat. Fresh herbs like cilantro or basil can brighten the dish. You might also use alternative sweeteners. Maple syrup or agave can replace honey. Each option gives a new twist to the flavor! If you need gluten-free options, use tamari instead of soy sauce. This keeps the dish tasty without gluten. For low-carb variations, reduce the honey. You can also serve the salmon on a bed of veggies instead of rice. This keeps it light and healthy while still being filling. You don’t have to stick with salmon! Other fish like tilapia or cod work well too. They absorb flavors nicely and cook quickly. If you want a different protein, chicken or tofu can be great substitutes. Marinate them just like the salmon for a delicious meal. Each protein brings its own unique taste to your dish. To keep your honey garlic salmon bites fresh, store them in the fridge. Use an airtight container. They will last for up to three days. For longer storage, you can freeze them. Place the salmon bites in a freezer-safe bag. Make sure to remove as much air as possible. They can stay good for up to three months in the freezer. When you’re ready to eat, reheating is key. The best way is to use the oven. Preheat it to 350°F (175°C). Place the salmon bites on a baking sheet. Cover them with foil to keep them moist. Heat for about 10 minutes. Check to see if they are warm throughout. You can also use a microwave. Heat in short bursts of 30 seconds. This keeps the texture soft and tasty. You can prepare these salmon bites in advance. Marinate the salmon the night before. This lets the flavors blend well. For quick meals, try adding leftovers to salads or rice bowls. They also taste great in a sandwich. Just chop them up and mix with some greens. This way, you create a tasty meal in no time! Yes, you can use frozen salmon. First, thaw it safely. Place the salmon in the fridge overnight. If you need it faster, use the cold water method. Just seal the fish in a bag and soak it in cold water for about an hour. Make sure the water stays cold. Once thawed, pat the salmon dry. This helps the marinade stick better. I recommend marinating the salmon for 15 to 30 minutes. This time allows the flavors to soak in well. If you use a longer time, the salmon can become too salty. Always check the taste after the recommended time. You want a good balance of sweet and savory. Many sides complement honey garlic salmon bites. Here are some tasty options: - Steamed rice: White or brown rice works great. - Quinoa: This adds a nutty flavor and is healthy. - Roasted vegetables: Choose your favorites like broccoli or carrots. - Green salad: A fresh salad with a light dressing brightens the meal. - Cucumber salad: This adds a nice crunch and coolness. These sides make your meal even more delicious and satisfying. This blog post covered everything you need to make tasty honey garlic salmon bites. We discussed the main ingredients, flavor boosters, and how to cook the salmon perfectly. I shared tips and tricks to enhance your dish and even offered suggestions for variations. Remember, you can easily store and reheat leftovers, too. With these easy steps and ideas, you can enjoy delicious meals any time. Embrace your cooking skills and try it out!

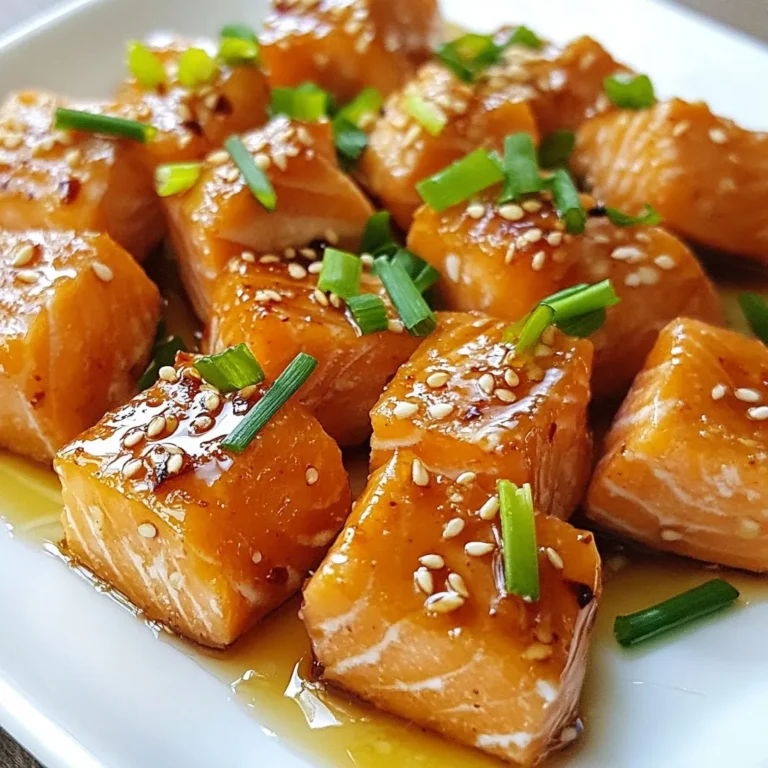
Honey Garlic Salmon Bites Savory and Simple Recipe

- 1 cup unsalted butter (2 sticks) - 2 cups granulated sugar - 4 large eggs - 1 teaspoon vanilla extract - 1 cup all-purpose flour - 1 cup unsweetened cocoa powder - 1 teaspoon baking powder - ½ teaspoon salt - 1 cup crushed pretzels - 1 cup chocolate chips - 1 cup caramel sauce (store-bought or homemade) - Flaky sea salt for topping For the best flavor, I recommend using Ghirardelli chocolate chips. They melt well and taste great. For caramel sauce, Duncan Hines offers a smooth, rich option if you prefer store-bought. If you want to make homemade caramel, use granulated sugar and heavy cream for that perfect chewy texture. You can add chopped nuts for extra crunch. Walnuts or pecans work well here. If you love chocolate, try mixing in some white chocolate chips or dark chocolate chunks. Another fun twist is to sprinkle some crushed pretzels on top before baking for added crunch! {{ingredient_image_1}} First, preheat your oven to 350°F (175°C). Grease a 9x13 inch baking pan. You can also line the pan with parchment paper for easy removal later. This step helps the brownies bake evenly and prevents sticking. Next, melt 1 cup of unsalted butter in a medium saucepan over low heat. Once melted, let it cool slightly. In a large bowl, mix the melted butter with 2 cups of granulated sugar. Whisk well until combined. Now, add 4 large eggs one at a time. Then, stir in 1 teaspoon of vanilla extract. Mix until smooth. In a separate bowl, sift together 1 cup of all-purpose flour, 1 cup of unsweetened cocoa powder, 1 teaspoon of baking powder, and ½ teaspoon of salt. Gradually add the dry ingredients to the wet mixture. Stir just until combined. Be careful not to overmix. Finally, gently fold in 1 cup of crushed pretzels and 1 cup of chocolate chips. Pour the brownie batter into your prepared pan. Spread it evenly. Bake in the preheated oven for about 25-30 minutes. To check if they are done, insert a toothpick in the center. It should come out with a few moist crumbs. Once baked, remove the brownies from the oven. Immediately drizzle 1 cup of caramel sauce over the top. You can use store-bought or homemade caramel. Sprinkle flaky sea salt over the caramel while it’s warm. This helps the salt stick. Let the brownies cool in the pan for at least 1 hour before cutting them into squares. Enjoy these delicious treats! To make the best brownies, follow these tips: - Melt the butter slowly: This keeps your brownies soft and rich. - Do not overmix: Stir until just combined for a fudgy texture. - Choose good chocolate chips: High-quality chocolate enhances the flavor. - Use a toothpick: Check for moist crumbs, not wet batter, for perfect doneness. - Let them cool: Cooling helps set the brownies and makes cutting easier. Avoid these common pitfalls in your brownie journey: - Not measuring ingredients: Accurate measurements ensure the right texture. - Skipping the salt: A pinch of salt balances the sweetness perfectly. - Using cold eggs: Bring eggs to room temperature for better mixing. - Opening the oven door too soon: This can cause brownies to sink. - Not letting them cool: Cutting too soon leads to messy squares. Here are some fun ways to serve your brownies: - Drizzle extra caramel sauce: This adds a rich touch to each bite. - Top with whipped cream: It creates a delightful contrast in texture. - Serve with ice cream: A scoop of vanilla pairs perfectly. - Garnish with whole pretzels: This makes for a fun and tasty decoration. - Make brownie sundaes: Layer brownies, ice cream, and toppings for a treat. Pro Tips Use Room Temperature Ingredients: Allow your eggs and butter to come to room temperature before mixing. This helps create a smoother and more uniform batter. Don’t Overmix the Batter: Mix until just combined to ensure your brownies remain fudgy and tender rather than cakey. Customize Your Toppings: Feel free to add nuts, chocolate chunks, or even a swirl of peanut butter for a unique flavor twist. Let Them Cool Completely: Allowing the brownies to cool in the pan for at least an hour helps them set properly and makes cutting easier. {{image_2}} You can make these brownies even better with nuts. Chopped walnuts or pecans add a nice crunch. Just fold in about one cup of your chosen nuts with the pretzels and chocolate chips. You can also add other fun mix-ins. Try white chocolate chips or toffee bits for a different flavor. Want to make these brownies gluten-free? Swap the all-purpose flour for a gluten-free blend. Many brands work well, so pick one you like. Ensure the chocolate chips and pretzels are also gluten-free. This way, everyone can enjoy these sweet treats. To turn these brownies vegan, you can make a few easy swaps. Use plant-based butter instead of regular butter. Replace the eggs with flax eggs or applesauce. For flax eggs, mix one tablespoon of ground flaxseed with three tablespoons of water. Let it sit for a few minutes until it thickens. Use dairy-free chocolate chips and caramel sauce to keep it all vegan. Enjoy these delicious brownies guilt-free! To keep your salted caramel pretzel brownies fresh, store them properly. I recommend placing them in an airtight container. This helps prevent them from drying out. You can stack the brownies, but separate layers with parchment paper. Keep the container in a cool, dry place. They last about 3 to 4 days on the counter. If you want them to last longer, refrigeration works too. Just remember, cold brownies can be more firm. Freezing brownies is easy and a great way to save some for later. First, let the brownies cool completely. Cut them into squares. Wrap each square tightly in plastic wrap. Then, place the wrapped brownies in a freezer bag. Be sure to remove excess air from the bag. You can freeze them for up to 3 months. When you're ready to enjoy them, just thaw the brownies in the fridge overnight. To reheat brownies, start by taking them out of the fridge or freezer. If frozen, let them thaw first. You can warm them in the microwave for 10 to 15 seconds. This makes them soft and gooey again. If you prefer an oven, preheat it to 350°F. Place the brownies on a baking sheet and cover them with foil. Heat them for about 5 to 10 minutes. This method keeps them moist and tasty. Yes, you can use milk chocolate or dark chocolate. Each type gives a unique taste. Milk chocolate adds sweetness, while dark chocolate brings rich flavor. You can also mix different types for a fun twist. Just remember, the chocolate chips should still melt well in the brownies. To make homemade caramel, you'll need sugar, butter, and cream. Start by heating sugar in a pot over medium heat. Stir until it melts and turns golden. Then, add butter and mix until smooth. Slowly pour in cream and stir until combined. Let it cool before drizzling on your brownies. This sauce will add a nice touch to your dessert. Use a sharp knife to cut brownies. Make sure it's clean for neat edges. For even squares, score the brownies first before cutting all the way through. You can also dip the knife in hot water, then wipe it dry before cutting. This method helps you get clean cuts. Enjoy those perfect brownie squares! We covered the key ingredients and steps to make tasty brownies. You learned about brands to trust and how to mix and bake them just right. We explored tips to avoid common mistakes and shared creative ways to serve them. Plus, we looked at fun variations and storage tips. Now you can enjoy delicious brownies anytime. Happy baking!

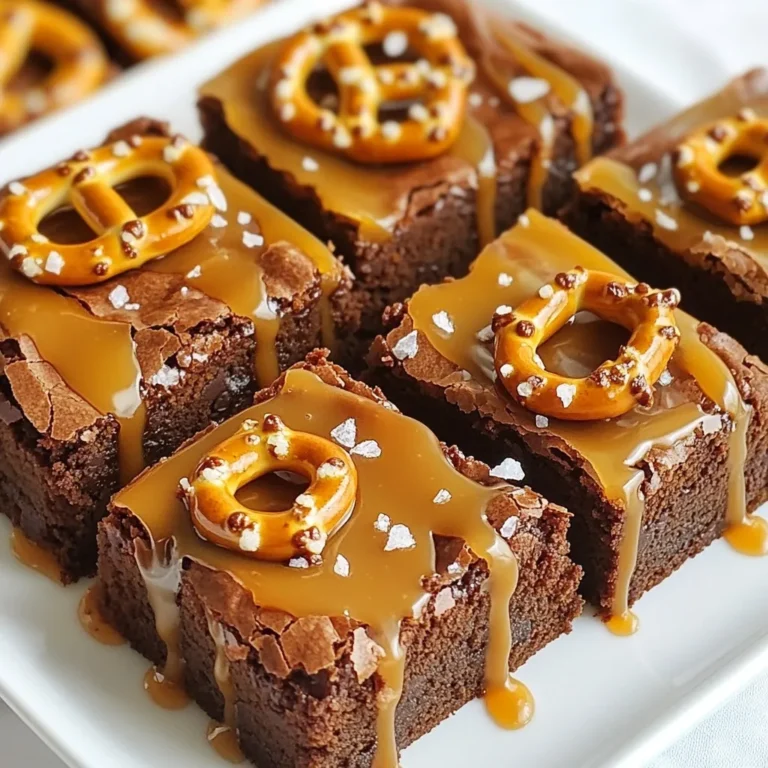
Salted Caramel Pretzel Brownies Irresistible Sweet Treat

- 1 tablespoon olive oil Olive oil adds healthy fats. It also enhances the flavor of the soup. - 1 medium onion, diced Onion gives a sweet and savory base. It adds depth and aroma to the dish. - 2 cloves garlic, minced Garlic brings a strong flavor and health benefits. It helps boost the immune system. - 2 medium carrots, diced Carrots add sweetness and color. They are rich in vitamins and good for eyesight. - 2 celery stalks, diced Celery adds crunch and a fresh taste. It is low in calories and good for digestion. - 1 medium zucchini, diced Zucchini provides moisture and a mild flavor. It's low in calories and adds nutrients. - 1 cup whole grain pasta (such as farro or whole wheat) Whole grain pasta offers fiber and protein. It makes the soup filling and nourishing. - 6 cups vegetable broth Broth is the heart of the soup. It infuses flavor and keeps it healthy. - 1 can (14 oz) diced tomatoes, undrained Diced tomatoes add acidity and sweetness. They are rich in vitamins and antioxidants. - 1 cup kale, chopped Kale is a superfood packed with nutrients. It adds color and boosts health benefits. - 1 teaspoon dried oregano Oregano gives a warm, earthy flavor. It also has anti-inflammatory properties. - 1 teaspoon dried basil Basil adds a sweet, aromatic touch. It's known for its antioxidant benefits. - Salt and pepper to taste These seasonings enhance all flavors in the soup. Adjust to your preference. - Fresh parsley, chopped for garnish Parsley adds a fresh finish. It also brings vitamins and a pop of color. - A squeeze of fresh lemon juice Lemon juice brightens the soup. It adds a zesty flavor and boosts vitamin C. Feel free to add proteins like chicken or beans. You can also use other veggies like spinach or bell peppers for variety. This soup is not just tasty; it’s healthy too! The vegetables provide vitamins and minerals. Whole grain pasta adds fiber to aid digestion. Olive oil and garlic support heart health. Enjoy this soup for comfort and wellness! {{ingredient_image_1}} 1. Start by heating 1 tablespoon of olive oil in a large pot over medium heat. 2. Dice 1 medium onion and add it to the pot. Sauté it for about 3-4 minutes until it turns translucent. 3. Next, mince 2 cloves of garlic and stir them in. Cook for 1 more minute. This will make your kitchen smell amazing! 4. Now, dice 2 medium carrots and 2 celery stalks. Add them to the pot and cook for about 5 minutes, stirring occasionally. 5. Dice 1 medium zucchini and mix it in. Let it cook for another 3 minutes. 6. Pour in 6 cups of vegetable broth and add a can of 14 oz diced tomatoes. Bring this mixture to a gentle boil. 7. Add 1 cup of whole grain pasta, 1 teaspoon of dried oregano, and 1 teaspoon of dried basil. Season with salt and pepper to taste. 8. Reduce the heat and let it simmer for about 10-12 minutes. This lets the pasta cook al dente. 9. Finally, stir in 1 cup of chopped kale. Let it cook for another 2 minutes until it’s tender. 10. Before you serve, squeeze fresh lemon juice for a bright flavor. 11. Ladle the hot soup into bowls and top with chopped fresh parsley. Tips for sautéing: - Always heat the oil before adding veggies. This helps unlock their flavors. - Stir often to avoid burning and to mix the flavors well. Ingredient order matters: - Start with onions and garlic for a strong base flavor. - Add harder veggies first, then softer ones like zucchini and kale. This ensures everything cooks evenly. You can cook Italian Penicillin Soup in a slow cooker or an Instant Pot for ease: - Slow Cooker: Sauté the vegetables in a pan first. Then, add everything to the slow cooker and cook on low for 6-8 hours. This deepens flavors. - Instant Pot: Use the sauté function for the veggies. Then, add the rest and set for 5 minutes. Quick and flavorful! Alternative cooking methods can also change the taste: - Roasting the veggies before adding them can bring out their natural sweetness. - Using homemade broth instead of store-bought gives a richer flavor. Italian Penicillin Soup pairs well with crusty bread or cheesy toast. You can also add toppings for extra flair: - A sprinkle of grated Parmesan cheese adds a nice touch. - Fresh herbs like basil or thyme can enhance the soup’s flavor. For garnishes, consider: - Chopped fresh parsley for a pop of color. - A drizzle of olive oil for richness. These simple steps and tips will make your Italian Penicillin Soup a dish to remember! When making Italian Penicillin Soup, avoid burning your veggies. Start with medium heat when you sauté. Stir often and watch them closely. If they brown too much, they lose flavor. Season your soup as you cook. This builds layers of flavor. Add salt and pepper at different stages. It helps each bite taste great. To enhance broth flavor, use high-quality vegetable broth. A homemade broth is even better. Simmer it with herbs and spices for extra depth. Fresh herbs make a big difference. Add parsley, basil, or thyme. They brighten the soup and add freshness. A squeeze of lemon juice right before serving also gives a nice pop. If you have leftover soup, get creative! You can use it as a sauce for pasta. It also works well as a base for a grain bowl. Store your soup in an airtight container. It lasts in the fridge for up to three days. To reheat, use low heat on the stove. Stir often to keep it from sticking. Enjoy your comforting bowl of goodness! Pro Tips Fresh Ingredients: Using fresh vegetables will enhance the flavor and nutritional value of your soup. Cook Pasta Separately: For a heartier soup, consider cooking the pasta separately and adding it to each bowl before serving to prevent it from becoming mushy. Herb Variations: Feel free to experiment with different herbs like thyme or rosemary for a unique flavor profile. Storage Tips: This soup can be stored in the refrigerator for up to 3 days; however, add fresh pasta when reheating to maintain texture. {{image_2}} You can change up the veggies in Italian Penicillin Soup. If you don’t have zucchini, try using bell peppers, green beans, or spinach. Each option adds a unique taste and texture. If you want a different pasta, use gluten-free options like brown rice pasta or quinoa pasta. These swaps keep the soup tasty and friendly for everyone. To make this soup vegan, skip the chicken broth and use vegetable broth. This keeps the soup light while still full of flavor. For a vegetarian option, use vegetable broth and add tofu for protein. If you need low-sodium soup, look for low-sodium broth. You can also cut back on salt while cooking. This way, you can enjoy the soup without worrying about sodium intake. To kick up the flavor, consider adding spices like red pepper flakes or smoked paprika. These spices add warmth and depth to the soup. You can also mix in protein. Shredded chicken or white beans work great. Both options make the soup heartier and more filling. This flexibility allows you to create a dish that suits your taste and needs. Store Italian Penicillin Soup in airtight containers. Let the soup cool first. Place it in the fridge if you plan to eat it within three days. If you want to keep it longer, freeze it. Use freezer-safe bags or containers to prevent freezer burn. When freezing, leave some space for expansion. In the fridge, the soup lasts about three days. In the freezer, it can last up to three months. Look for signs of spoilage like off smells or mold. If the soup has a strange color or texture, it's best to toss it. To reheat, use a pot on the stove for the best flavor. Heat on medium-low until warm. Stir often to avoid hot spots. You can also use a microwave. In this case, heat in short bursts, stirring in between. This helps keep the texture just right. Avoid overcooking, as it can make the pasta mushy. Italian Penicillin Soup is a comforting dish that warms the soul. It blends fresh veggies, whole grain pasta, and herbs. This soup has roots in Italian kitchens, often made when someone is sick. Families believe it can help heal. It's not just food; it's love in a bowl. Yes, you can make this soup ahead of time. It tastes even better the next day. Just let it cool, then store it in the fridge. You can keep it for up to three days. To reheat, warm it slowly on the stove. Add a splash of broth if it thickens. You can serve Italian Penicillin Soup with a few tasty sides. Here are some ideas: - Crusty bread or garlic bread for dipping - A fresh green salad with a light vinaigrette - Grated parmesan cheese on top of the soup - A side of roasted vegetables for extra flavor Yes, this soup is healthy! It packs a lot of nutrients. Here’s a quick look at its benefits: - Vegetables: Carrots, celery, and kale provide vitamins and minerals. - Whole grain pasta: Offers fiber for good digestion. - Olive oil: Contains healthy fats that are good for the heart. - Tomatoes: Packed with antioxidants, which can help fight disease. Many people call it "Italian penicillin" because they feel better after eating it. This soup is not only tasty but also a great choice for a healthy meal. This article gives you everything you need to make Italian Penicillin Soup. You now know the ingredients, cooking steps, and ways to customize the recipe. You learned tips to enhance flavor and avoid common mistakes. Remember, you can swap ingredients to meet your needs, like going vegan or gluten-free. Store any leftovers properly and enjoy them later. With this guide, you can create a warm and tasty dish that benefits your health. Dive in and make your version of this comforting classic!

Italian Penicillin Soup Comforting and Healthy Delight

You need 2 cups of fresh cranberries. Look for ones that are bright and firm. Avoid any that are soft or mushy. Fresh cranberries give the best flavor and color to your sauce. For sweetness, use 1 cup of orange juice. Freshly squeezed juice adds the best taste. You also need 1/2 cup of maple syrup. You can adjust this amount based on how sweet you want the sauce. Add 1/4 cup of diced pears for a fruity twist. A dash of spice makes it special. Use 1/4 teaspoon of ground cinnamon and 1/4 teaspoon of ginger powder. These spices boost the flavor beautifully. Also, include 1/2 teaspoon of vanilla extract for warmth. If you like, fold in 1/4 cup of chopped walnuts. This gives a nice crunch. Don’t forget a pinch of salt. It helps balance the sweetness. {{ingredient_image_1}} First, grab your fresh cranberries. You need 2 cups for this recipe. Rinse them under cold water. Make sure to drain them well. This step helps remove any dirt. Clean berries make a better sauce. Look for any soft or bad ones and discard them. Next, take a medium saucepan. Add the rinsed cranberries, 1 cup of orange juice, and 1/2 cup of maple syrup. Stir gently to mix everything. Heat this over medium heat. Bring it to a simmer. You will see the cranberries start to pop. This usually takes about 5 minutes. Keep an eye on them! After the cranberries burst, it’s time for more flavor. Add in 1/4 cup of diced pears, 1/4 teaspoon of ground cinnamon, and 1/4 teaspoon of ginger powder. Then pour in 1/2 teaspoon of vanilla extract and a pinch of salt. Stir the mixture well. Let it cook for another 3 minutes. This helps all the tastes blend nicely. If you like, fold in 1/4 cup of chopped walnuts for some crunch. Once done, remove from heat and let cool. The sauce will thicken as it cools. To make this recipe your own, you can adjust the cooking time. If you want a chunkier sauce, cook it for less time. Simmer for about 5 minutes. If you prefer a smoother sauce, let it cook for longer. Aim for 8-10 minutes. Keep an eye on the cranberries. You want them to burst, but not turn to mush. Adding more flavors can make your sauce special. Try using fresh herbs like thyme or rosemary for a unique twist. You can also mix in spices like nutmeg or allspice. For extra sweetness, add more maple syrup or honey. If you like tartness, a little lemon juice can brighten the dish. Don’t forget to taste as you go! To serve your cranberry sauce, use a lovely glass bowl. This makes the bright red color pop. For a nice touch, garnish with whole cranberries and a sprig of mint. You can also sprinkle some chopped walnuts on top for crunch. This makes it look fancy and inviting for guests! Pro Tips Freshness Matters: Always choose firm, bright cranberries for the best flavor and texture. Sweetness Control: Adjust the maple syrup according to your taste preference; you can start with less and add more as needed. Flavor Enhancer: Consider adding a splash of brandy or orange liqueur for an extra depth of flavor. Storage Tips: This sauce keeps well in the refrigerator for up to a week, making it a great make-ahead option. {{image_2}} You can change the sweetener in this recipe. If you want a different taste, try honey or agave syrup. Both work well to sweeten the sauce. You can also use brown sugar for a richer flavor. Just remember to adjust the amount based on your taste. Start with less if you are not sure. Adding fruit can give your cranberry sauce an extra burst of flavor. Diced apples or orange zest can make it fresh and bright. You can even mix in some dried fruits like raisins or apricots. They add sweetness and texture. Feel free to experiment with your favorite fruits. Each option gives you a unique twist! If you need a nut-free sauce, leave out the walnuts. The sauce will still be tasty and have a great texture. You can add seeds like pumpkin or sunflower for crunch instead. They are safe for those with nut allergies and add a nice bite. Enjoy the sauce without worries while keeping it delicious! To keep your cranberry sauce fresh, store it in an airtight container. Make sure to let it cool to room temperature before sealing it. Place it in the fridge for up to one week. This way, it stays safe and tasty. You can freeze cranberry sauce for longer storage. Use a freezer-safe container or a zip-top bag. Leave some space at the top of the container or bag, as the sauce expands when frozen. It will last up to three months in the freezer. When you want to use it, simply thaw it in the fridge overnight. Cranberry sauce has a good shelf life. If stored properly, it can stay fresh in the fridge for about one week. In the freezer, it can last for up to three months. Always check for any signs of spoilage before serving. If it looks or smells off, it’s best to toss it. Yes, you can make cranberry sauce ahead of time. It tastes even better after resting. Make it a day or two in advance. Store it in the fridge in an airtight container. This way, the flavors blend well together. Just remember to give it a stir before serving. To adjust the sweetness, simply add more or less maple syrup. Start with half a cup, then taste it. If it needs more sweetness, add a tablespoon at a time. You can also use honey or agave if you prefer. Balance is key to a great flavor. Cranberry sauce pairs well with many dishes. It goes great with turkey and chicken. Try it on sandwiches or with cheese. It also adds a nice touch to roasted veggies. Use it as a topping for desserts like cheesecake or ice cream. The bright flavor makes any dish pop! You learned how to make cranberry sauce with fresh ingredients. We covered essential steps, from rinsing cranberries to adding special flavors. I shared helpful tips on cooking times and ways to enhance the taste. You can also explore variations, storage tips, and answers to common questions. Enjoy experimenting with your unique cranberry sauce. You’ll impress friends and family with your skills.

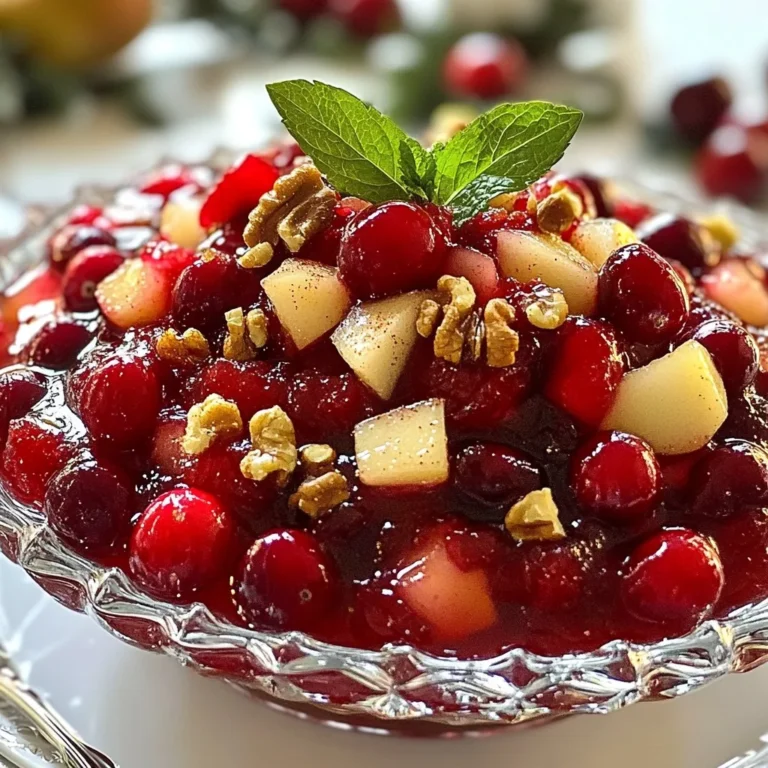
Fresh 15-Minute Cranberry Sauce Quick and Easy Recipe

- 8 oz elbow macaroni - 1 lb lean sliced beef - 1 cup diced bell peppers - 1 cup diced onions - 2 cloves garlic, minced - 2 tablespoons olive oil - 2 cups shredded provolone cheese - 1 cup shredded cheddar cheese - 2 cups chicken or beef broth - 1 cup milk - 1/4 cup all-purpose flour - 1 teaspoon salt - 1/2 teaspoon black pepper - Optional: chopped fresh parsley for garnish To make Protein Philly Cheesesteak Mac and Cheese, you need a solid list of ingredients. Each one plays a key role in building flavor and texture. First, the elbow macaroni forms the base of this dish. It soaks up the cheesy sauce and holds all the goodness. The lean sliced beef adds protein and heartiness. You can use sirloin for the best taste. Next, we have the bell peppers and onions. They bring a sweet crunch that balances the richness. Garlic boosts the flavor further. The olive oil helps sauté these veggies and adds a nice sheen. For the cheesy goodness, provolone and cheddar bring a creamy, melty texture. The broth and milk create a smooth cheese sauce. Flour helps to thicken this mix, so it clings well to the macaroni. Finally, salt and black pepper season the dish. You can add parsley as a fresh garnish for color and taste. Gather all these ingredients, and you'll be ready to whip up this delightful meal! {{ingredient_image_1}} Start by boiling a large pot of water. Add salt to the water to help flavor the pasta. Once the water boils, add 8 oz of elbow macaroni. Cook it according to the package instructions until it's al dente. Drain the pasta and set it aside. In a large skillet, heat 2 tablespoons of olive oil over medium-high heat. When the oil is hot, add 1 lb of lean sliced beef, like sirloin. Cook the beef for about 5-7 minutes. It should be browned all over. Remove the beef from the skillet and set it aside for later. In the same skillet, add 1 cup of diced onions and 1 cup of diced bell peppers. Sauté them for about 3-4 minutes. You want them to soften a little. Then, add 2 cloves of minced garlic and cook for another minute. Now, lower the heat to medium. Sprinkle 1/4 cup of all-purpose flour over the veggies. Stir everything together and cook for about 1 minute. Gradually whisk in 2 cups of chicken or beef broth and 1 cup of milk. Cook this mixture until it thickens, which should take about 3-5 minutes. Finally, season it with 1 teaspoon of salt and 1/2 teaspoon of black pepper. Take the skillet off the heat. Stir in 2 cups of shredded provolone cheese and 1 cup of shredded cheddar cheese. Mix until the cheese melts and is fully combined. Add the cooked macaroni and the reserved beef into the cheese sauce. Stir everything until it's well mixed. If you like a baked version, preheat your oven to 350°F (175°C). Transfer the mac and cheese mixture to a baking dish. If you want, add more cheese on top. Bake it for 15-20 minutes until it is bubbly and golden on top. Spoon the creamy mac and cheese onto plates. You can garnish it with chopped fresh parsley for a touch of color and flavor. This dish is perfect for a cozy night in or a gathering with friends! For this dish, I like using lean sliced beef, such as sirloin. Sirloin offers great flavor and stays tender. You can also try flank steak for a different taste. Avoid fatty cuts, as they may make the dish greasy. When you choose high-quality beef, it makes your mac and cheese even better. Seasoning is key to a delicious meal. I recommend using salt and black pepper as basics. You can also add garlic powder or onion powder for extra flavor. A dash of smoked paprika gives a nice touch. Fresh herbs, like parsley, brighten up the dish. Experiment with flavors to find what you love. If you want a dairy-free option, use plant-based milk like almond or oat milk. For the cheese, look for dairy-free shreds made from nuts or soy. Just make sure they melt well. This keeps the creamy texture, so everyone can enjoy it. Taste your sauce as you mix in the alternatives. Clumping can ruin a good cheese sauce. To avoid this, make sure your heat is low when adding cheese. Stir it in slowly and keep mixing until it melts. Using shredded cheese instead of blocks helps too. If your sauce clumps, whisk in a bit more milk to smooth it out. Pro Tips Use High-Quality Cheese: For the best flavor and creaminess, opt for high-quality cheeses like aged provolone and sharp cheddar. Cook Pasta Perfectly: Make sure to cook the macaroni al dente, as it will continue to cook when mixed with the hot cheese sauce. Customize Your Vegetables: Feel free to add other vegetables like mushrooms or spinach for extra flavor and nutrition. Make It Spicy: For a kick, add some diced jalapeños or a dash of hot sauce to the cheese sauce. {{image_2}} You can switch up the protein in this dish. Try chicken, turkey, or even tofu. Each option brings a unique flavor. If you want a lighter taste, chicken works great. For a heartier bite, go with beef or turkey. Tofu is perfect for a plant-based twist. Cheese is key to a creamy mac and cheese. You can use monterey jack or gouda instead of provolone and cheddar. Monterey jack melts nicely, giving a smooth texture. Gouda offers a rich, smoky flavor that enhances the dish. Want a vegetarian version? Skip the beef and add sautéed mushrooms. Mushrooms give a meaty feel and deep flavor. You can also add more veggies like zucchini or spinach. This way, you keep it hearty and healthy without meat. If you love heat, make it spicy! Add jalapeños or hot sauce to the mix. Fresh jalapeños give a crisp bite, while hot sauce adds a nice kick. Adjust the heat to your taste. Start small and add more as needed. Your taste buds will thank you for the extra flavor! To keep your Protein Philly Cheesesteak Mac and Cheese fresh, store it in an airtight container. It stays good for up to three days in the fridge. Make sure to let it cool before sealing it. This helps prevent moisture build-up. You can freeze the mac and cheese for later use. Place it in a freezer-safe container. It can last for about two months in the freezer. To avoid freezer burn, wrap the container tightly with plastic wrap. Remember to label it with the date. When you are ready to eat, thaw the dish in the fridge overnight if frozen. For reheating, you have a few options. You can use the oven, microwave, or stovetop. - Oven: Preheat to 350°F (175°C). Bake covered for about 20 minutes. - Microwave: Place in a microwave-safe dish. Heat in 1-minute intervals, stirring in between. - Stovetop: Add a splash of milk while heating in a pan. Stir until warmed through. These tips will help you enjoy your Protein Philly Cheesesteak Mac and Cheese at its best! Yes, you can make this dish ahead of time. Cook the pasta and beef, then mix. Store it in the fridge for up to two days. When ready, heat it on the stove or bake it in the oven. To lower calories, use leaner beef like ground turkey. Replace some cheese with a lower-fat option. You can also use whole grain pasta for more fiber and fewer carbs. This dish pairs well with a fresh salad. Try a simple green salad with a light vinaigrette. You can also serve garlic bread or steamed vegetables for more color and nutrients. Absolutely! You can swap elbow macaroni for penne or shells. Just make sure to adjust the cooking time if needed. All shapes will hold the cheese sauce well. Yes, it’s perfect for meal prep. Store it in individual containers. You can easily grab a portion for lunch or dinner. It reheats well in the microwave or oven. This recipe offers a tasty blend of classic flavors. You learned about the right ingredients and the simple steps to make it. I shared tips to enhance taste and ways to customize the dish. Remember, you can swap ingredients or adjust spices to fit your style. With storage tips, enjoy then share this meal for days to come. Embrace the fun of cooking and savor every bite.

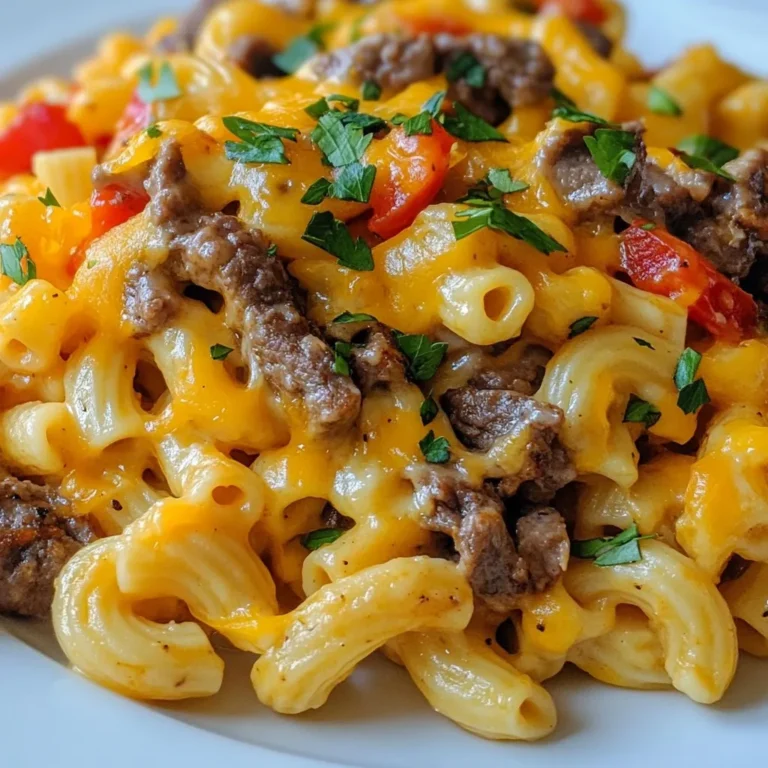
Protein Philly Cheesesteak Mac and Cheese Delight

- 500g boneless chicken thighs, sliced - 1 medium onion, sliced - 1 red bell pepper, sliced - 1 green bell pepper, sliced - 3 cloves garlic, minced - 1-inch piece ginger, grated - 2 tablespoons gochujang (Korean chili paste) - 1 tablespoon soy sauce - 1 tablespoon honey - 1 teaspoon sugar - 2 tablespoons vegetable oil - 1 tablespoon sesame oil - Salt and pepper to taste - 2 green onions, chopped (for garnish) - Toasted sesame seeds (for garnish) I love using fresh ingredients. They bring life to the dish. Start with 500 grams of boneless chicken thighs. Slicing the chicken helps it cook evenly. Next, grab a medium onion and two bell peppers, one red and one green. These veggies add color and crunch. For the marinade, you’ll need gochujang, soy sauce, honey, and sugar. Gochujang gives heat and depth. Soy sauce adds saltiness. Honey and sugar balance the flavors, making it sweet yet spicy. Don't forget the aromatics! Use three cloves of minced garlic and one inch of grated ginger. They add a punch of flavor. Finally, for the garnish, chop two green onions and have some toasted sesame seeds ready. These add a nice finish and a bit of crunch. With these ingredients, you're ready to create a flavor-packed delight! {{ingredient_image_1}} To start, grab a bowl. Add the sliced chicken thighs. Mix in 2 tablespoons of gochujang, 1 tablespoon of soy sauce, 1 tablespoon of honey, and 1 teaspoon of sugar. Stir everything well. This mix gives the chicken bold flavors. Let the chicken marinate for at least 30 minutes. This step is key for flavor. Next, take a large skillet or wok. Pour in 2 tablespoons of vegetable oil and 1 tablespoon of sesame oil. Heat the oils over medium-high heat. Once hot, add the marinated chicken. Spread it out in a single layer. Cook for about 5-7 minutes. Stir occasionally until the chicken is cooked through and starts to brown. The smell will be amazing! Now it's time for the veggies. Add 1 sliced onion and the sliced red and green bell peppers to the skillet. Stir-fry them for about 3-4 minutes. You want them tender but still crisp. Next, mix in 3 minced garlic cloves and a 1-inch piece of grated ginger. Cook for another minute. This will add a lovely aroma and more flavor to your dish. To make the best Korean spicy chicken stir-fry, high heat is key. It helps to sear the chicken and lock in flavors. Use a large skillet or wok to allow enough space for cooking. When the oil is hot, add the chicken in a single layer. This will give you that nice golden brown color and crispy texture. Adjusting the amount of gochujang is also important. If you like it spicy, add more! If you prefer milder heat, start with less. You can always taste and tweak it later. This way, you can create a dish that matches your spice level. Pair your stir-fry with rice or noodles. Steamed white rice works well and so do stir-fried noodles. Both options soak up the sauce nicely. For garnishing, consider using chopped green onions and toasted sesame seeds. These add color and crunch. Want to get creative? Try topping with crushed peanuts or cashews for extra texture. This makes your dish not only tasty but also visually appealing. Pro Tips Marinate Longer for Depth: Allow the chicken to marinate for at least 1-2 hours or even overnight for a more intense flavor. Adjusting Spice Level: If you prefer less heat, reduce the amount of gochujang or add a bit of honey to balance the spice. Vegetable Variations: Feel free to use other vegetables like broccoli, carrots, or snap peas for added color and nutrition. Serve with Rice: This stir-fry pairs beautifully with steamed rice or noodles to soak up the delicious sauce. {{image_2}} You can change the vegetables in this dish. Broccoli, snap peas, or carrots work well. These veggies add flavor and color. They also boost nutrition. Try to use fresh, crisp vegetables for the best taste. Just chop them into bite-sized pieces. Toss them in with the chicken for a tasty stir-fry. If you want to switch proteins, you have choices. Beef, tofu, or shrimp can replace chicken. Beef gives a rich taste. Use thin slices for quick cooking. Tofu is great for a plant-based option. It soaks up flavors well. Shrimp cooks fast and adds a nice touch. Just adjust the cooking time based on what you choose. For a gluten-free version, swap soy sauce for tamari. Tamari has a similar taste but is gluten-free. This change keeps the meal safe for those with gluten allergies. Make sure to check labels on any sauces to avoid gluten. Enjoy your dish worry-free! To keep your Korean spicy chicken stir-fry fresh, follow these tips: - Refrigerate Quickly: Store leftovers in the fridge within two hours of cooking. This helps prevent bacteria growth. - Use Airtight Containers: Place the stir-fry in glass or plastic containers with tight lids. This keeps the dish fresh and stops it from absorbing other smells. - Label and Date: Write the date on the container. This way, you know how long it has been stored. Enjoy your leftovers within three days for the best taste. When reheating, aim to keep the chicken moist. Here are the best methods: - Stovetop Method: Heat a pan over medium heat. Add a splash of water or broth to keep it juicy. Stir the chicken gently until it's warmed through. - Microwave Method: Place the stir-fry in a microwave-safe bowl. Cover it with a damp paper towel. Heat in short bursts, stirring in between. This helps keep the moisture. - Avoid Overcooking: Reheat until just warmed. Overheating can dry out the chicken. Enjoy your meal again without losing flavor! The spice level of Korean Spicy Chicken Stir-Fry mainly comes from gochujang, a Korean chili paste. Gochujang has a rich, deep heat that varies by brand. For many, it adds a nice kick without being overwhelming. If you love spicy food, you might want to add more gochujang. If you prefer milder flavors, use less. You can always adjust it later to suit your taste. Yes, you can make this dish in advance! Meal prepping is a great idea. Marinate the chicken and store it in the fridge overnight. This lets the flavors sink in more. You can cook the stir-fry just before serving. If you want to store leftovers, keep them in an airtight container in the fridge. They stay fresh for about 3 days. Just reheat and enjoy! Korean Spicy Chicken Stir-Fry goes well with many side dishes. Here are some tasty options: - Steamed rice: It balances the spicy chicken perfectly. - Salad: A crisp salad adds freshness and crunch. - Kimchi: This fermented side adds tangy flavor. - Noodles: Stir-fried noodles make a hearty meal. Feel free to mix and match these sides for a complete meal! This Korean Spicy Chicken Stir-Fry uses simple ingredients for rich flavors. It starts with a tasty marinade of gochujang and soy sauce. Cooking the chicken at high heat keeps it juicy, while fresh veggies add color and crunch. You can switch up the veggies or protein to suit your taste. Don't forget to store leftovers correctly to enjoy later. With easy tips, you can master this dish and impress anyone at your table. Try it out, and let the flavors shine!

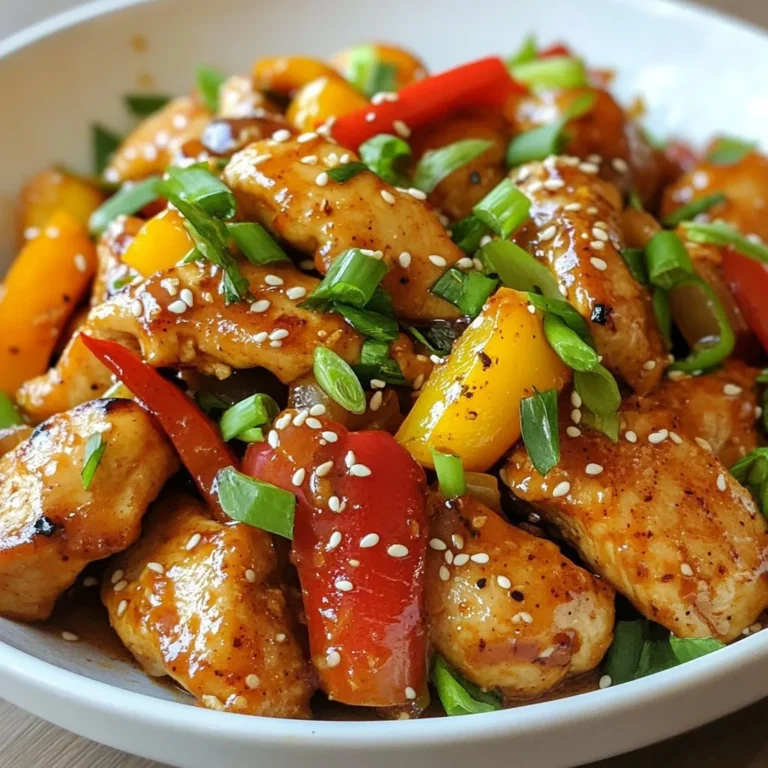
Korean Spicy Chicken Stir-Fry Flavor-Packed Delight

PREV 1 … 3 4 5 … 86 NEXT
spicy fork kitchen

explore

DessertsDinnerAppetizersDrinks

Our Policies

  • Cookie Policy
  • Copyright Policy
  • Disclaimer
  • GDPR Policy
  • Terms Of Use
Back to Top
  • About
  • Contact Us
  • Privacy Policy
© 2025 spicy fork kitchen