FREE DINNER EBOOK! Get your copy!
  • Cookie Policy
  • GDPR Policy
  • Disclaimer
  • Terms Of Use
  • Visit my other site: Fun Cookie Recipes
spicy fork kitchen
  • Home
  • Dinner
  • Desserts
  • Drinks
  • Appetizers
  • Contact
  • About
  • Privacy Policy
  • Home
  • Dinner
  • Desserts
  • Drinks
  • Appetizers
  • Contact
  • About
  • Privacy Policy
  • Cookie Policy
  • GDPR Policy
  • Disclaimer
  • Terms Of Use
Visit my other site: Fun Cookie Recipes

HOME / CATEGORIES /

Latest

To make sweet chili garlic shrimp tacos, you need some key items. Here’s what to gather: - 1 pound large shrimp, peeled and deveined - 2 tablespoons sweet chili sauce - 2 cloves garlic, minced - 1 tablespoon olive oil - 1 teaspoon lime juice - Salt and pepper to taste - 4 small corn tortillas - 1 cup shredded red cabbage - 1/2 avocado, sliced - Fresh cilantro for garnish - Lime wedges for serving These ingredients give the tacos a sweet and savory taste. The shrimp adds a nice texture. The sweet chili sauce and garlic create a flavorful marinade that makes the shrimp shine. You can also add extra toppings to make your tacos even better. Here are some ideas: - Diced tomatoes - Sliced jalapeños - Sour cream or Greek yogurt - Crumbled queso fresco - Radish slices These toppings can give your tacos a fun twist. Each adds its own flavor and crunch, so mix and match as you like! To prepare these tasty tacos, you need a few simple tools: - Mixing bowl for marinating shrimp - Large skillet for cooking shrimp - Tongs to flip the shrimp - Spatula for serving - Small plates for assembling tacos Having these tools ready helps speed up your cooking time. You can easily make these tacos in just 15 minutes! First, get a bowl. Add 1 pound of shrimp, 2 tablespoons of sweet chili sauce, and 2 cloves of minced garlic. Drizzle in 1 tablespoon of olive oil and 1 teaspoon of lime juice. Now, sprinkle salt and pepper to taste. Toss everything well to coat the shrimp. Let them sit for about 5 minutes. This step really helps the flavors mix. Next, heat a large skillet over medium-high heat. When it is hot, add the marinated shrimp in a single layer. Cook for 2-3 minutes on one side. You will see them start to turn pink. Now, flip each shrimp and cook for another 2 minutes. They should turn fully cooked and opaque. Once done, take them off the heat. Now, it’s time for the tortillas. Grab 4 small corn tortillas. Warm them in a dry skillet for a few seconds on each side. You want them just pliable. This makes them easier to fold later. Now, let’s build your tacos! Start by placing a handful of shredded red cabbage in each tortilla. Then, add 3-4 shrimp on top. Slice half an avocado and place some slices in each taco. Finally, sprinkle fresh cilantro over everything. Serve your tacos right away with lime wedges on the side. This adds a zesty kick! You can make these tacos unique. Start by changing the sauce. Try using sriracha for heat or a mango salsa for sweetness. You can also mix in some diced jalapeños for a spicy kick. Want more crunch? Add sliced radishes or cucumber. If you love cheese, sprinkle some queso fresco on top. Your taco, your rules! To cook shrimp well, focus on timing. Heat your skillet until it's hot. This helps the shrimp sear nicely. Don’t overcrowd the pan; cook in batches if needed. This keeps the shrimp juicy and tender. Watch closely; shrimp cooks fast. When they are pink and opaque, they are done. This usually takes 4 to 5 minutes. Make your tacos look great to impress your guests. Use a bright platter to serve them. Arrange lime wedges around the tacos for color. You can drizzle some extra sweet chili sauce on top for flair. Finally, add a sprinkle of fresh cilantro for a pop of green. These small touches make a big difference! {{image_2}} You can switch shrimp for other proteins. Chicken, fish, or tofu work well. For chicken, use bite-sized pieces and marinate the same way. For fish, try a white fish like tilapia or cod. Tofu can be cubed and pressed to remove extra water. Each protein absorbs the sweet chili sauce nicely. Feel free to mix up the sauce. Try using sriracha for heat or teriyaki for sweetness. A yogurt sauce adds creaminess and balances the spice. For a zesty twist, blend lime juice and mayonnaise. Each option gives a unique taste while keeping the tacos fun and fresh. If you can't find corn tortillas, you have options. Flour tortillas are a great substitute. Lettuce wraps make a low-carb choice. You can also use cabbage leaves for a crunchy bite. Each option offers a different texture and flavor to your tacos. To store leftover shrimp tacos, first, separate the shrimp from the tortillas. Place the shrimp in a container with a tight lid. Use parchment paper between layers to keep them fresh. Store the tortillas in a different container. Make sure to seal them well to avoid drying out. Keep everything in the fridge for up to two days. This way, your shrimp will stay tasty. To reheat shrimp, use a skillet on medium heat. Add a little olive oil to the pan. Place the shrimp in the skillet for 2-3 minutes. Stir gently until they are warm. For tortillas, warm them in the skillet for a few seconds on each side. This helps them stay soft and flexible. Avoid using the microwave, as it can make them tough. You can freeze the shrimp before cooking. Just place them in a freezer bag. Remove as much air as you can, then seal it. They will stay good for up to three months. You can also freeze the sweet chili sauce in ice cube trays. Once frozen, transfer the cubes to a bag. This way, you can easily use them later. However, tortillas do not freeze well. They can become dry and brittle. Yes, you can use frozen shrimp. Just make sure to thaw them first. Place the frozen shrimp in the fridge overnight or run them under cold water. This helps keep the shrimp tender and juicy. Many toppings can enhance your shrimp tacos. Here are some ideas: - Chopped tomatoes - Sliced jalapeños - Crumbled feta cheese - Sour cream or Greek yogurt - Fresh radishes Feel free to mix and match your favorites for extra flavor and crunch. To spice things up, try these tips: - Add sliced jalapeños directly to the tacos. - Mix in some hot sauce with the shrimp marinade. - Use a spicy chili sauce instead of sweet chili sauce. Adjust the heat level to fit your taste! This blog offers a simple guide to making sweet chili garlic shrimp tacos. You learned about key ingredients, tools, and step-by-step cooking instructions. We explored tasty toppings and ways to customize your dish. I shared tips for cooking shrimp just right and serving it nicely. Plus, I talked about storage and answered your common questions. Now go ahead and create your own delicious tacos. Enjoy experimenting with flavors and toppings!

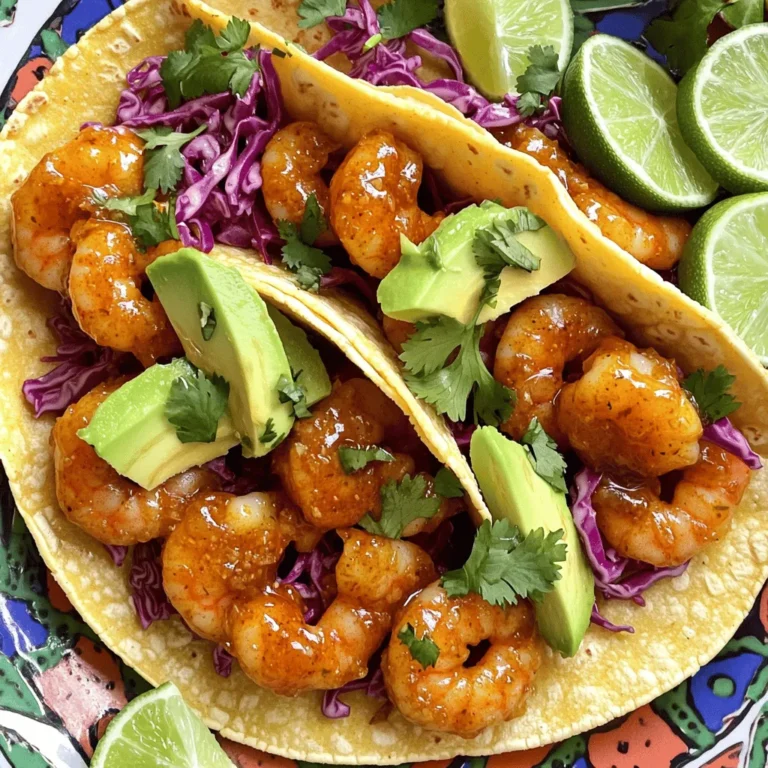
Savory Sweet Chili Garlic Shrimp Tacos 15 Minutes

- 1 and 1/2 cups all-purpose flour - 1/2 cup unsweetened cocoa powder - 1 teaspoon baking powder - 1/2 teaspoon baking soda - 1/4 teaspoon salt - 1/2 cup unsalted butter, softened - 1 cup granulated sugar - 1 large egg - 2 teaspoons vanilla extract - 1 tablespoon red food coloring - 1/2 cup powdered sugar (for dusting) When it comes to making red velvet crinkle cookies, quality ingredients matter. Each one plays a role in the cookie's taste and texture. For example, unsweetened cocoa powder gives the cookies a rich flavor, while the red food coloring creates that iconic look. You might want to make some changes based on your needs. Here are some options: - Vegan alternatives: Use a plant-based butter and a flax egg instead of the large egg. Mix 1 tablespoon of ground flaxseed with 2.5 tablespoons of water. Let it sit until it thickens. - Gluten-free options: Replace all-purpose flour with a gluten-free flour blend. Make sure it has xantham gum for the right texture. - Flavor variations: Add chocolate chips or nuts for a fun twist! These additions can enhance the cookie flavor and add crunch. These swaps can help you enjoy this treat, no matter your dietary needs! {{ingredient_image_1}} To begin, preheat your oven to 350°F (175°C). Line a baking sheet with parchment paper. This step makes for easy cleanup and helps prevent sticking. Next, grab a bowl and whisk together the dry ingredients. You will need 1 and 1/2 cups of all-purpose flour, 1/2 cup of unsweetened cocoa powder, 1 teaspoon of baking powder, 1/2 teaspoon of baking soda, and 1/4 teaspoon of salt. Mix these well so they blend evenly. Set this bowl aside for later. Now it's time to make the dough. In a large mixing bowl, use an electric mixer to cream 1/2 cup of softened unsalted butter and 1 cup of granulated sugar together. Beat them on medium speed for about 3-4 minutes. The mixture should look light and fluffy. After that, add in 1 large egg, 2 teaspoons of vanilla extract, and 1 tablespoon of red food coloring. Mix until everything is well combined. Next, slowly add the dry ingredients from the first step to the wet mixture. Mix just until the dough comes together. Be careful not to overmix, as this can change the texture of your cookies. Chilling the dough is important for perfect cookies. Place the dough in the refrigerator for about 30 minutes. This helps it firm up, making it easier to handle. Once chilled, take the dough out and roll it into 1-inch balls. After rolling, coat each ball thoroughly in powdered sugar. This will give your cookies that classic crinkle look when baked. Place the dough balls on the lined baking sheet, leaving about 2 inches between each. Now, it’s baking time! Place the baking sheet in your preheated oven. Bake the cookies for 10-12 minutes. You want the edges to be set, but the centers should still be slightly soft. To check for doneness, gently press the center of a cookie. If it springs back, they are ready. Allow the cookies to cool on the baking sheet for about 5 minutes before moving them to a wire rack. This helps them set and makes them easier to handle. Enjoy the delightful aroma as they cool! To get those lovely crinkles, follow a few key steps. First, you need to chill the dough. This cools the fat and helps the cookies hold their shape. After chilling, roll the dough balls in powdered sugar. This sugar creates the crinkle effect as the cookies bake. The sugar melts and cracks, making the cookies look stunning. Avoid overmixing the dough. When you mix too much, the cookies can turn out tough. Mix just until the ingredients blend. Also, don’t skip the chilling step. If the dough is warm, the cookies spread too much while baking. Red velvet crinkle cookies look great on a pretty platter. Dust them with extra powdered sugar for a nice touch. Serve these cookies with milk, coffee, or tea. The flavors pair well and make for a delightful snack. Pro Tips Chill the Dough: Chilling the dough for about 30 minutes not only makes it easier to handle but also helps the cookies maintain their shape while baking. Use Quality Food Coloring: For the best vibrant color, opt for gel food coloring instead of liquid. It provides a richer hue without adding extra moisture. Don’t Overbake: Remove the cookies from the oven when the edges are set, and the centers are slightly soft. They will continue to firm up as they cool. Presentation is Key: Dust the cooled cookies with powdered sugar just before serving for an elegant finish that enhances their visual appeal. {{image_2}} To make your red velvet crinkle cookies vegan, you can use simple egg replacements. A popular choice is to use flaxseed meal. Mix one tablespoon of flaxseed with three tablespoons of water. Let it sit for five minutes until it thickens. This mix works well to bind your dough. For dairy-free alternatives, replace the butter with coconut oil or a vegan butter spread. Both options work great for keeping your cookies soft. You can also use almond milk or soy milk in place of any dairy ingredients. If you need a gluten-free version, consider using almond flour or a blend of gluten-free flour. These options give a nice texture. Another good choice is a gluten-free all-purpose flour mix, which usually includes xanthan gum. This helps your cookies hold together better. When you switch to gluten-free flour, you might need to adjust the baking time. Keep an eye on the cookies as they bake. They may need a minute or two less or more, depending on the flour you choose. To boost the flavor, you can add spices or extra extracts. A pinch of cinnamon or nutmeg adds warmth. You can also add a teaspoon of peppermint extract for a fresh twist. Experimenting with flavors keeps baking fun and exciting. Some people love classic red velvet flavors, while others enjoy modern twists. You can mix in chocolate chips for added richness or sprinkle in crushed nuts for crunch. Each variation brings its own special touch to the cookies. To keep your red velvet crinkle cookies fresh, use airtight containers. Place parchment paper between layers to avoid sticking. Zip-top bags also work well. Press out excess air before sealing. Store cookies at room temperature for best taste. You can freeze both cookie dough and baked cookies. For dough, scoop portions onto a baking sheet. Freeze until firm, then transfer to zip-top bags. For baked cookies, let them cool completely before freezing. To thaw, place cookies in the fridge overnight. For dough, bake straight from the freezer but add a couple of extra minutes to the bake time. These cookies stay fresh for about a week at room temperature. Store them in a cool, dry place. If they develop a hard or stale texture, it's time to toss them. Signs of spoilage include an off smell or mold. To make cookies soft and chewy, you need to focus on a few key factors. Here are my top tips: - Use butter: Softened unsalted butter adds moisture and flavor. - Don’t overmix: Mix until the dough comes together. Overmixing can lead to tough cookies. - Chill the dough: Chilling for about 30 minutes helps control spread and keeps them soft. - Bake just right: Remove cookies when the edges are set but the centers are still soft. They continue to cook as they cool. These steps help prevent dryness and keep your red velvet crinkle cookies delightfully soft. Yes, you can make these cookies ahead of time. Here are a few recommendations: - Chill the dough: Shape the dough into balls, coat them in powdered sugar, and chill. This makes it easy to bake fresh cookies later. - Baking: You can freeze the rolled dough balls. Just thaw them for a few minutes before baking. - Baked cookies: Store baked cookies in an airtight container at room temperature for up to a week. These tips let you enjoy fresh cookies on your schedule! Red velvet desserts have a rich history. They first appeared in the early 20th century. The cake became famous for its striking red color and subtle cocoa flavor. The term "velvet" refers to the cake's texture, which is soft and smooth. During the 1920s, red velvet cake gained popularity due to its unique taste and appearance. Many people associate red velvet desserts with special occasions, especially around holidays. Today, red velvet flavors show up in many treats, like cookies, cupcakes, and brownies. Its vibrant color and rich flavor make it a favorite for dessert lovers everywhere. In this post, we explored how to make delicious red velvet crinkle cookies. We covered ingredients, substitutions, and step-by-step instructions. I shared tips to achieve the perfect texture and common mistakes to avoid. Red velvet crinkle cookies are a great treat for any occasion. With easy variations and storage tips, you can enjoy these cookies fresh or save them for later. Get creative with flavors and impress your friends!

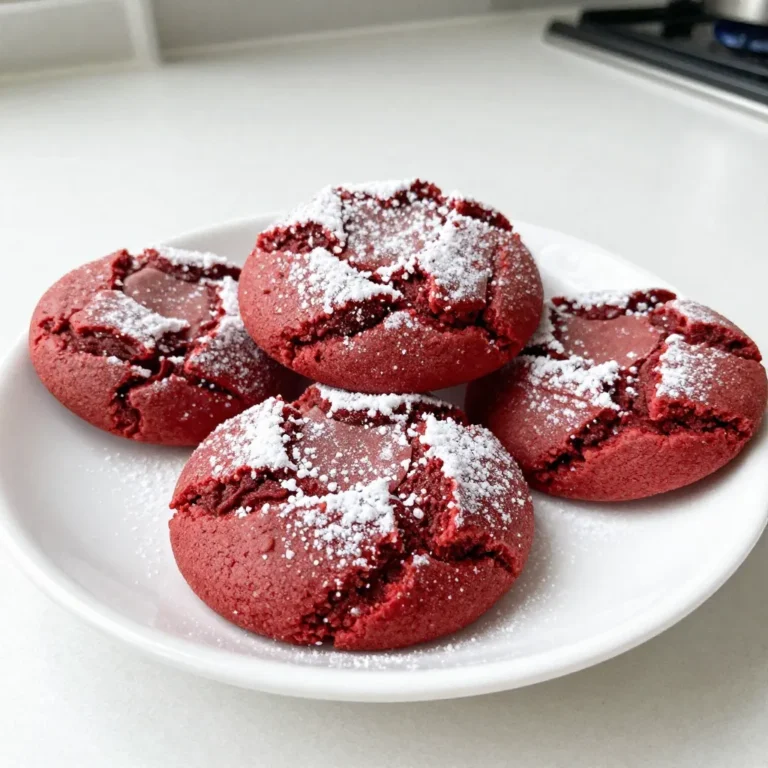
Red Velvet Crinkle Cookies Delightfully Soft Treat

- 1 lb chicken breast, diced - 1 tablespoon olive oil - 1 medium onion, chopped - 3 cloves garlic, minced - 1 cup cherry tomatoes, halved - 1 cup bell peppers, diced (red or yellow) - 1 teaspoon dried oregano - 1 teaspoon dried basil - 1/2 teaspoon paprika - 1 cup orzo pasta - 4 cups chicken broth - 1 cup fresh spinach, roughly chopped - 1/2 cup feta cheese, crumbled - Salt and pepper to taste - Fresh parsley, for garnish You can swap chicken breast for turkey or firm tofu. Both work great. For the orzo, try quinoa or rice for a gluten-free option. If you don’t have fresh spinach, use kale or Swiss chard. You can change cherry tomatoes to diced canned tomatoes for a different taste. If feta cheese is not available, goat cheese or ricotta makes a nice choice. Each serving of this dish is packed with nutrients. The chicken offers protein, while orzo adds carbohydrates. The veggies bring fiber and vitamins. Feta cheese gives healthy fats and adds flavor. This meal is well-balanced and fills you up without weighing you down. It is great for a family dinner or meal prep. {{ingredient_image_1}} 1. Heat one tablespoon of olive oil in a large pot over medium heat. 2. Add one pound of diced chicken breast and season with salt and pepper. Cook for 5-7 minutes until the chicken turns golden brown. 3. Next, add one chopped onion and three minced garlic cloves. Sauté these for 2-3 minutes until the onion becomes clear. 4. Stir in one cup of halved cherry tomatoes, one cup of diced bell peppers, one teaspoon of dried oregano, one teaspoon of dried basil, and half a teaspoon of paprika. Cook for another 3-4 minutes until the vegetables soften. 5. Now, add one cup of orzo pasta and four cups of chicken broth to the pot. Bring this to a boil. Then lower the heat and cover the pot. Let it simmer for 10-12 minutes until the orzo is tender and the liquid is mostly gone. 6. Finally, add one cup of roughly chopped fresh spinach and half a cup of crumbled feta cheese. Mix until the spinach wilts. Taste and add more salt or pepper if needed. - Chicken Browning: Make sure the chicken is in a single layer. This helps it brown better. - Onion and Garlic: Stir often to prevent burning. You want them soft, not brown. - Adding Vegetables: Add them in stages. This keeps their colors bright and flavors fresh. - Simmering Orzo: Keep the pot covered for better heat control. This helps the orzo cook evenly. - Final Mixing: Gently fold in the spinach and feta. This keeps the cheese fluffy and the spinach intact. Cooking times are key for perfect results. If you rush, the chicken can be undercooked and unsafe. The orzo needs time to absorb flavors. Simmering lets all the tastes blend together. If you overcook the orzo, it becomes mushy. Pay attention to the times. They help you create a tasty dish every time. To boost flavors in your One-Pot Mediterranean Chicken Orzo, start with fresh herbs. Fresh basil and parsley add bright notes. You can also use lemon juice for a zesty kick. Add a splash of balsamic vinegar for depth. This dish loves a good balance of salt, so taste as you go. Using high-quality olive oil makes a difference. It adds richness that enhances every bite. You can also mix in olives or capers for a briny touch. If you want a spicy kick, consider adding red pepper flakes. One common mistake is overcooking the chicken. This can make it dry and tough. Cook it just until golden brown. Another mistake is adding too much broth at once. You want the orzo to soak it up, not swim in it. Keep an eye on the cooking time for the orzo. If overcooked, it turns mushy. Not seasoning at each step can lead to blandness. Make sure to season the chicken, vegetables, and broth. Also, don’t skip the resting time after cooking. It helps flavors meld together. For serving, use shallow bowls to show off the colors. Garnish with fresh parsley and extra feta cheese. A side of crusty bread pairs well for dipping. You can also serve it with a light salad for a fresh crunch. If you want to elevate it further, drizzle a little extra virgin olive oil on top. This adds a nice finish and enhances flavors. Enjoy your dish warm for the best taste experience. Pro Tips Choose Fresh Ingredients: Using fresh vegetables and herbs will enhance the flavors of your dish significantly, making it more vibrant and delicious. Monitor Orzo Cooking Time: Orzo can become mushy if overcooked. Keep an eye on it and taste-test a minute or two before the recommended cooking time. Customize with Vegetables: Feel free to add other vegetables like zucchini or olives for added flavor and nutrition. Just adjust the cooking time accordingly. Serve Immediately: This dish is best enjoyed fresh. If you let it sit too long, the orzo may absorb too much liquid and lose its creamy texture. {{image_2}} To make a vegetarian version, swap chicken for chickpeas. Use one can of drained and rinsed chickpeas. This change keeps the dish hearty and protein-rich. You can also add more veggies like zucchini or eggplant for extra flavor and texture. Consider adding shrimp or cooked sausage for a protein boost. Just add them in the last few minutes of cooking. For more vegetables, try adding broccoli, kale, or carrots. These options enhance nutrition and color. If you want a different taste, try adding lemon zest and juice. This will give the dish a fresh, bright flavor. You can also use fresh herbs like thyme or cilantro. Just toss them in at the end for the best flavor. To store your One-Pot Mediterranean Chicken Orzo, let it cool first. Once it's cool, place it in an airtight container. This helps keep it fresh and tasty. You can store it in the fridge for up to three days. Make sure to label your container with the date. This way, you know when to eat it. When you're ready to enjoy your leftovers, reheat gently. You can use a microwave or a stovetop. If using a microwave, place the orzo in a bowl. Add a splash of chicken broth or water to keep it moist. Heat in short bursts, stirring often. If using the stovetop, place it in a pan over low heat. Stir frequently until warmed through. This keeps your dish from drying out. You can also freeze your One-Pot Mediterranean Chicken Orzo. To do this, let it cool completely. Then, transfer it to a freezer-safe container. It can last up to three months in the freezer. When you're ready to eat it, thaw it in the fridge overnight. Reheat using the methods above. This makes for a quick meal later on! Yes, you can use other pasta types. You might try small shells, penne, or even gluten-free pasta. Just check the cooking time. Some pasta takes longer, and some cooks faster. Adjust the broth and time as needed. For best results, use a shape that holds sauce well. If you want to swap out chicken, try chickpeas or tofu. Both options add protein and work well with the flavors. You can also use shrimp or cooked sausage for a different taste. Just add them in the same way as the chicken, adjusting cook times as needed. To make this dish gluten-free, use gluten-free orzo or another gluten-free pasta shape. You can find these at most grocery stores. Make sure to check the labels for any hidden gluten. The rest of the ingredients are already gluten-free, so you are good to go! This blog post covered the key parts of making a one-pot Mediterranean orzo dish. We discussed the ingredients, step-by-step instructions, and useful tips. You learned how to enhance flavors and avoid common mistakes. I also shared ways to adjust the recipe for different diets and how to store leftovers. Cooking can be easy and fun. With the right knowledge, you can make a delicious meal with confidence. Enjoy experimenting and sharing this dish with others!

One-Pot Mediterranean Chicken Orzo Flavor Boost

- 4 chicken thighs, skinless and boneless - 1 can (400ml) coconut milk - 1 onion, sliced - 3 cloves garlic, minced - 1 tablespoon ginger, grated - 2 tablespoons red curry paste - 1 tablespoon fish sauce (or soy sauce for a vegetarian option) - 2 tablespoons lime juice - 1 tablespoon sugar - Fresh cilantro - Cooked jasmine rice In this dish, chicken thighs form the heart of the meal. They cook tender and juicy in rich coconut milk. Coconut milk adds a creamy, sweet taste that pairs well with spices. Aromatics like onion, garlic, and ginger bring depth to the flavor. They create a warm and inviting smell that fills your kitchen. The red curry paste adds a kick of flavor. It’s a mix of spices that makes the dish exciting. Fish sauce or soy sauce boosts umami, making every bite delicious. Lime juice adds brightness and freshness. The sugar balances all the flavors, creating a perfect harmony. To finish, fresh cilantro adds color and a fresh taste. Serving it over jasmine rice soaks up the sauce well. This dish is comforting, flavorful, and sure to please anyone at your table. Enjoy each bite of this savory comfort dish! {{ingredient_image_1}} - Slicing onions and bell pepper: Start by slicing one onion into thin strips. Then, slice one bell pepper into bite-sized pieces. This adds color and flavor to your dish. - Mince garlic and grate ginger: Take three cloves of garlic and mince them finely. Grate one tablespoon of fresh ginger. These aromatics will give your dish a wonderful depth of flavor. - Sautéing aromatics: In a large pot or Dutch oven, heat a drizzle of oil over medium heat. Add the sliced onion and sauté for about three to four minutes. Cook until the onion is soft and translucent. Next, add the minced garlic and grated ginger. Stir for one to two minutes, letting their fragrant aroma fill the air. - Searing chicken thighs: Now it’s time to add four skinless, boneless chicken thighs to the pot. Sear the chicken for about four to five minutes on each side. You want them lightly browned. This step locks in the flavors, making your chicken juicy and delicious. - Combining all ingredients: Pour in one can of coconut milk and one cup of chicken broth. Stir in two tablespoons of red curry paste, one tablespoon of fish sauce, one tablespoon of lime juice, and one tablespoon of sugar. Mix everything well. This blend creates a rich and creamy sauce. - Braising and adding bell pepper: Bring your pot to a gentle simmer. Cover it and reduce the heat to low. Let the chicken braise for about thirty minutes. This allows all the flavors to meld beautifully. In the last ten minutes, add the sliced bell pepper. Stir it in gently. - Adjusting seasoning before serving: Taste your dish and adjust the seasoning with salt and pepper as needed. This final touch ensures your coconut milk braised chicken is just perfect. Serve it over a bed of jasmine rice, and enjoy a comforting meal! - Best practices for sautéing aromatics: Start with a hot pot. Add oil and let it heat up. Sauté the onions for 3-4 minutes until they turn clear. Then, mix in garlic and ginger for 1-2 minutes. This brings out their great flavors. - Tips for perfectly seared chicken: Make sure the chicken is dry. This helps it sear well. Place it in a hot pot and don’t move it for 4-5 minutes. This creates a nice brown crust. Flip it only once to keep it juicy. - Adding other spices or herbs: You can change the flavor easily. Try adding fresh basil or cilantro. A pinch of turmeric or cumin can add depth too. Experiment with flavors that you love. - Adjusting heat level with curry paste: Red curry paste is bold. If you want it milder, use less paste. For more heat, add a touch of chili powder. Taste as you go to find your perfect heat level. - Serving suggestions for aesthetic appeal: Serve the chicken over fluffy jasmine rice. This adds a nice base. Drizzle the creamy sauce over the top for a lovely look. A sprinkle of bell pepper adds color. - Incorporating garnishes effectively: Fresh cilantro adds a pop of green. Chop it finely and sprinkle it on right before serving. You can also add lime wedges. They give a fresh finish and look great on the plate. Pro Tips Marinate for More Flavor: For an extra depth of flavor, marinate the chicken in the coconut milk and spices for at least 30 minutes before cooking. Adjust Spice Levels: If you prefer a milder dish, reduce the amount of red curry paste or add a spoonful of sugar to balance the heat. Use Fresh Herbs: Adding fresh herbs like basil or mint as a garnish can elevate the dish and add a refreshing touch. Leftover Potential: This dish tastes even better the next day! Store leftovers in the fridge and enjoy as a quick meal or with noodles. {{image_2}} You can switch chicken for other proteins. Tofu works great if you want a vegetarian dish. It soaks up flavors well. For meat lovers, try beef or shrimp. Both bring a new taste to the dish. Remember to adjust cooking times based on the protein you choose. Changing the curry type can alter the taste. Green curry adds a fresh kick. Yellow curry gives a milder, sweeter flavor. You can also toss in veggies like carrots or snap peas. This adds color and crunch to your meal. Each change keeps the dish exciting and tasty. You can enjoy coconut milk braised chicken in many ways. For a soup-like dish, add more broth. This makes it perfect for sipping. You can also serve it over jasmine rice or try noodles. Each option offers a new way to enjoy this comforting dish. You can store coconut milk braised chicken in the fridge for up to three days. Make sure to place it in an airtight container. For reheating, simply warm it on the stove over low heat. Stir often to ensure even heating. You can also use a microwave; cover it loosely to avoid splatters. For freezing, let the dish cool completely before transferring it to a freezer-safe container. Label it with the date. It can last for about three months in the freezer. To thaw, move it to the fridge overnight. Reheat it gently on the stove or in the microwave until hot. Meal prepping with coconut milk braised chicken is simple. You can cook a batch over the weekend and divide it into portions. Use small containers for easy weekday meals. Pair each portion with jasmine rice. This way, you have a delicious meal ready to go! Yes, you can use bone-in chicken. Bone-in chicken adds more flavor. Just make sure to adjust cooking time. Bone-in pieces may need extra time to cook through. Use a meat thermometer to check if the chicken reaches 165°F. Serve this dish with jasmine rice. The rice soaks up the tasty sauce. You can also add steamed vegetables or a fresh salad. These sides balance the richness of the chicken. Enjoying this with warm naan is also a great choice! This dish has a mild spice level. Red curry paste gives it some heat. If you prefer less spice, use less curry paste. You can also add more coconut milk to cool it down. It’s all about your taste! If your sauce is thin, there are easy fixes. You can simmer it longer to reduce it. This will help it thicken naturally. Another option is to mix a little cornstarch with water. Add this mixture to the sauce and stir well. Let it cook until thickened. This blog post covered how to make coconut milk braised chicken with simple ingredients and steps. We explored key components like chicken thighs, coconut milk, and various flavorings. You learned best practices for cooking and tips for great presentation. We also discussed variations, storage tips, and answered common questions. Coconut milk braised chicken is a flexible dish. It adapts to your taste and ingredients. Try it with your favorite spices or proteins. Happy cooking!

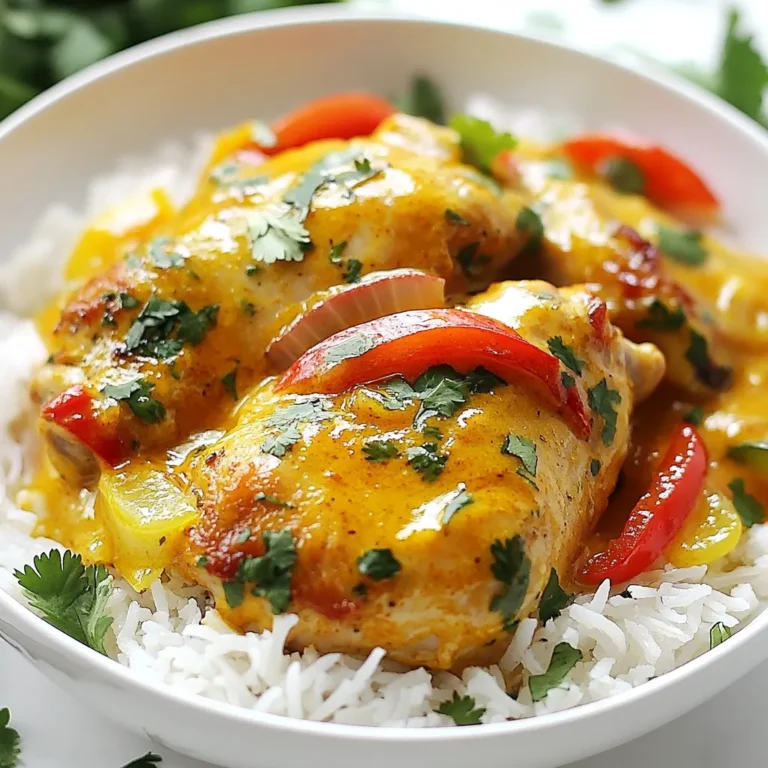
Coconut Milk Braised Chicken Savory Comfort Dish

To make Crispy Cajun Sweet Potato Wedges, you will need the following items: - 2 medium sweet potatoes, peeled and cut into wedges - 3 tablespoons olive oil - 1 teaspoon smoked paprika - 1 teaspoon garlic powder - 1 teaspoon onion powder - 1 teaspoon dried oregano - 1 teaspoon cayenne pepper (adjust to taste) - 1 teaspoon salt - ½ teaspoon black pepper - Fresh parsley, chopped (for garnish) You can adjust the spice level based on your taste. If you love heat, add more cayenne pepper. For a milder flavor, reduce the cayenne to half. You can also swap in chili powder for a different kick. Feel free to mix in other herbs, like thyme or rosemary, for a unique twist. No olive oil? Use any cooking oil you have on hand, like canola or avocado oil. If you can't find smoked paprika, regular paprika works too, but it won’t have that smoky flavor. You can replace garlic powder with fresh minced garlic. Just be sure to use less, as fresh garlic is stronger. Start by peeling your sweet potatoes. Cut them into wedges. Aim for uniform sizes. This helps them cook evenly. Next, preheat your oven to 425°F (220°C). While the oven heats, grab a large mixing bowl. Add the olive oil and all the spices: smoked paprika, garlic powder, onion powder, dried oregano, cayenne pepper, salt, and black pepper. Mix these until they blend well together. Add the sweet potato wedges to the bowl. Toss them gently to coat every wedge with the spice mix. Now, take a baking sheet and line it with parchment paper. Arrange the wedges on the sheet in a single layer. Make sure they don’t touch. This space helps them crisp up. Bake for 25 to 30 minutes. Halfway through, flip the wedges carefully to ensure even cooking. Look for a golden brown color when they are done. To get those perfect crispy edges, keep a few things in mind. First, cut your wedges to a similar size. This ensures they cook at the same rate. Use enough olive oil to coat the wedges lightly. Too much oil can make them soggy. Also, avoid overcrowding the baking sheet. It’s better to use two sheets if needed. Lastly, let the sweet potato wedges rest for a couple of minutes after baking. This allows the steam to escape, making them even crispier. Flipping your sweet potato wedges is key to even cooking. Use a spatula to lift them gently. Start at one end and slide the spatula under a wedge. Flip it over quickly. Try to keep the wedges intact during this process. If they stick, wait a moment before trying again. This helps prevent breakage. Make sure to flip all the wedges, so they brown nicely on both sides. Enjoy the aroma as they cook! To get your sweet potato wedges nice and crispy, follow these tips: - Cut wedges evenly. Aim for uniform shapes. This helps them cook evenly. - Soak in water. Soak your wedges in cold water for about 30 minutes. This removes some starch and can help them crisp up better. - Pat dry. After soaking, dry the wedges with a clean towel. This removes excess moisture. - Use a hot oven. Make sure your oven is at 425°F (220°C) before baking. A hot oven helps achieve that perfect crunch. - Don’t crowd the pan. Spread the wedges out in a single layer. Room for air to flow will lead to crispiness. Choosing sweet potatoes is key for great wedges. Here’s how: - Look for firmness. Pick sweet potatoes that feel heavy and firm. Avoid any with soft spots or wrinkles. - Choose medium-sized ones. Medium sweet potatoes are easier to cut into wedges. They cook evenly too. - Check the skin color. A smooth, orange skin is usually a good sign. This indicates freshness and flavor. - Organic is better. If you can, choose organic sweet potatoes. They often taste sweeter and are free from harmful chemicals. These crispy wedges are super versatile. Here are some ideas for serving: - Dipping sauces. Pair them with dips like ranch, garlic aioli, or spicy ketchup. - Topping ideas. Add toppings like crumbled feta, fresh herbs, or a drizzle of balsamic glaze. - As a side dish. Serve them alongside grilled chicken, fish, or veggie burgers for a complete meal. - Flavor boost. Sprinkle some lime juice or hot sauce on top for a zing. - Salad topping. Toss crispy wedges on your salads for added crunch and flavor. {{image_2}} To kick up the heat, add more cayenne pepper. You can also mix in red pepper flakes. Try adding hot sauce to the oil blend for extra spice. Just remember, start slow. You can always add more. Taste the spice level as you go. This way, you can find the perfect heat that suits your taste. For a fresh twist, add herbs to your spice mix. You can use fresh rosemary or thyme. Just chop them finely and mix them in. This adds a lovely aroma and flavor. You can also sprinkle some dried herbs like basil or dill. These herbs balance the sweetness of the potatoes. Mix sweet and savory for a unique taste. Add a drizzle of honey or maple syrup before baking. This will give your wedges a sweet glaze. You can also sprinkle some cinnamon for warmth. Pairing sweet potatoes with savory spices creates a delightful contrast. This makes every bite a new experience. Try different combinations to find your favorite mix. To keep your crispy Cajun sweet potato wedges fresh, let them cool. Place them in an airtight container. You can store them in the fridge for up to three days. If you want them to stay crispy, try to keep them in a single layer. When you are ready to eat the leftovers, the oven is your best friend. Preheat your oven to 400°F (200°C). Spread the wedges on a baking sheet and heat for about 10-15 minutes. This helps restore their crispy texture. You can also use a skillet. Heat a little oil in the skillet and add the wedges. Cook for a few minutes, flipping often, until they are warmed through and crispy. If you want to save some wedges for later, freezing is easy. First, let them cool completely. Then, spread them out on a baking sheet and freeze until solid. After that, transfer them to a freezer bag. They can last up to three months in the freezer. When you’re ready to enjoy them, bake from frozen. Just add a few extra minutes to the cooking time. To make sweet potato wedges crispy, start with the right amount of oil. Use enough olive oil to coat the wedges but not too much. Toss the wedges well in the oil and spices. Spread them out on a baking sheet in a single layer. This helps hot air circulate around them. Bake them at a high temperature of 425°F (220°C) for 25-30 minutes. Flip them halfway through for even cooking. Yes, you can use other potatoes. Russet or Yukon Gold potatoes work well. These types have a high starch content, making them crispier. However, sweet potatoes add a nice sweetness and flavor. Adjust the cooking time if you choose different potatoes. You want them golden and crispy, just like the sweet potato wedges. The best way to cut sweet potatoes is to first peel them. Then, slice each potato lengthwise into thick planks. After that, cut the planks into wedges. Aim for wedges that are about 1 inch thick. This size ensures they cook evenly and get crispy. Yes, you can make these wedges in an air fryer. Preheat the air fryer to 400°F (200°C). Toss the wedges with oil and spices as you would for the oven. Place them in a single layer in the air fryer basket. Cook for about 15-20 minutes, shaking the basket halfway through. This gives you that crispy texture with less oil. Crispy sweet potato wedges taste best when eaten fresh. However, you can store leftovers in an airtight container for up to 3 days. To keep them crispy, avoid stacking them. Reheat in the oven or air fryer for the best results. This way, they regain their crunch before serving. Crispy Cajun sweet potato wedges are a tasty treat. We covered the key ingredients and fun variations. I shared step-by-step instructions for perfect preparation and baking tips for crispiness. You learned best practices and how to store leftovers for later. These wedges are simple, delicious, and great for sharing. Try different spices or herbs. Enjoy making this recipe your own!

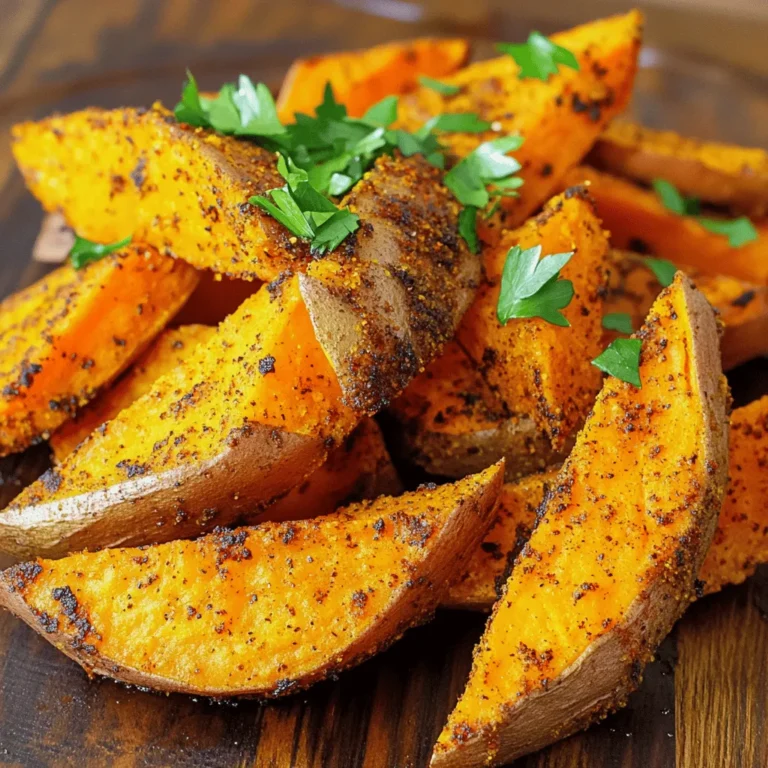
Crispy Cajun Sweet Potato Wedges Flavorful Snack Recipe

- 1 ripe banana - 2 tablespoons natural peanut butter - 1 scoop chocolate protein powder (plant-based or whey) - 1 cup unsweetened almond milk (or milk of choice) - 1 tablespoon cocoa powder - 1 tablespoon honey or maple syrup (optional for sweetness) - A pinch of salt - Ice cubes (optional, for a thicker smoothie) - Ripe Banana: Bananas add natural sweetness and fiber. They help with digestion and energy. - Natural Peanut Butter: This gives healthy fats and protein. It supports muscle growth and keeps you full. - Chocolate Protein Powder: A great source of protein, it aids in muscle repair and growth. Choose plant-based or whey based on your needs. - Unsweetened Almond Milk: It is low in calories and dairy-free. It offers a creamy texture without added sugars. - Cocoa Powder: Rich in antioxidants, cocoa adds a deep chocolate flavor and can boost your mood. - Honey or Maple Syrup: These are natural sweeteners. They can enhance taste without refined sugar. - Pinch of Salt: A little salt helps balance sweetness and enhances flavor. - Ice Cubes: Adding ice makes your smoothie thicker and extra refreshing. - For peanut butter, I recommend brands like Justin's or Smucker's. They offer pure, natural options. - For protein powder, try Orgain or Optimum Nutrition. Both have great flavors and quality. - Almond milk options include Califia Farms or Silk. They are tasty and creamy. - For cocoa powder, I like Ghirardelli or Hershey's. They provide rich flavor and quality. - Honey can be sourced from local beekeepers or brands like Manuka Doctor. - Maple syrup choices include Grade A or B from brands like Maple Grove Farms. To start, gather your ingredients. You will need: - 1 ripe banana - 2 tablespoons natural peanut butter - 1 scoop chocolate protein powder - 1 cup unsweetened almond milk - 1 tablespoon cocoa powder - 1 tablespoon honey or maple syrup (optional) - A pinch of salt - Ice cubes (optional) Add the banana, peanut butter, protein powder, almond milk, cocoa powder, and salt into your blender. If you want more sweetness, add honey or maple syrup. Blend on high speed for about 30 seconds. Check the texture; it should be smooth and creamy. If you want it thicker, toss in some ice cubes and blend again until you reach your desired thickness. Getting the right texture is key. For a thicker smoothie, use frozen banana slices instead of fresh ones. You can also add more ice cubes for a colder drink. If it seems too thick, pour in a little more almond milk. Blend it again until it is just right. You want a creamy, drinkable smoothie. Pour your smoothie into a tall glass or bowl. Top it off with a sprinkle of cocoa powder or a drizzle of peanut butter for extra flair. You can also add some sliced bananas or chopped nuts on top. Enjoy this smoothie right away for the best flavor. You can even serve it as a fun breakfast or a post-workout treat. You can make this smoothie your own. Try adding spinach for extra greens. You can also use flavored protein powder for a fun twist. Want some crunch? Add chopped nuts or granola on top. You can switch out the banana for avocado. This will give a creamy texture without the banana flavor. If you're vegan, swap honey for maple syrup. You can use a plant-based protein powder too. For nut allergies, try sunflower seed butter instead of peanut butter. You can also use oat milk or coconut milk instead of almond milk. You can prep this smoothie ahead. Just blend all your ingredients and store in the fridge for one day. If you want to keep it longer, freeze it in a jar. When you’re ready, blend it again after thawing. This makes a quick breakfast or snack! {{image_2}} To make a vegan version, swap the protein powder for a plant-based option. Use almond milk as your base. This keeps it creamy and rich. You can also skip the honey and use maple syrup for sweetness. This way, you keep it 100% vegan while still enjoying those yummy flavors. If you don’t have chocolate protein powder, try vanilla or unflavored. You can also use pea protein or hemp protein. These options still give you a protein boost. Just remember, the flavor might change a bit. Adjust the cocoa powder to keep it tasty. Get creative with flavors! Add a tablespoon of chia seeds for a nutty twist. You could also mix in a spoonful of almond butter for extra richness. Want a fruity kick? Toss in some berries! They add color and a fresh taste. You can even try a dash of cinnamon for warmth. There are so many ways to make this smoothie your own! If you have leftover smoothie, pour it into an airtight container. Store it in the fridge. It tastes best within one day. Before drinking, give it a good shake. This helps mix the ingredients again. You can freeze the smoothie too! Pour it into ice cube trays or freezer bags. This makes it easy to grab a portion later. When you want to drink it, let it thaw in the fridge. You can also blend it again for a fresh taste. Most ingredients last a while. Here’s a quick look: - Ripe bananas: 2-3 days on the counter or 6 months in the freezer. - Natural peanut butter: 3-6 months in the pantry, up to a year in the fridge. - Chocolate protein powder: 1-2 years if stored in a cool, dry place. - Almond milk: Unopened, it lasts 7-10 days after the sell-by date; opened, use within 7 days. - Cocoa powder: 2-3 years in a cool, dry spot. - Honey or maple syrup: Indefinite shelf life if stored properly. - Salt: Indefinite shelf life. - Ice cubes: Use within 3-6 months for best quality. Knowing how to store your smoothie and its ingredients helps keep everything fresh. Enjoy every sip! Yes, this smoothie can be a meal replacement. It contains protein, healthy fats, and carbs. The banana provides energy, while peanut butter offers good fats. Adding protein powder boosts the protein content, making it more filling. Absolutely! You can skip the protein powder. The smoothie will still taste great. Just add extra peanut butter or yogurt for protein. You might want to add more banana for texture. To reduce sweetness, skip the honey or maple syrup. You can also use less ripe bananas, as they are sweeter. Adjust the amount of almond milk, too, for a less sweet taste. Peanut butter is rich in protein and healthy fats. It helps keep you full and supports muscle growth. It also has vitamins like E and B. Plus, it contains minerals like magnesium and potassium. Yes, you can use other nut butters! Almond, cashew, or sunflower seed butter work well. Each nut butter has its own flavor and nutrients. Just remember that the taste of the smoothie will change slightly. This blog post covered the best ingredients for your smoothie and their health perks. You learned step-by-step instructions to mix your drink perfectly. The tips showed how to personalize your smoothie to fit your needs. Variations included vegan options and fun flavor combos. Finally, we discussed how to store leftovers and answered common questions. Make smoothies that are tasty and good for you. Enjoy the journey of blending!

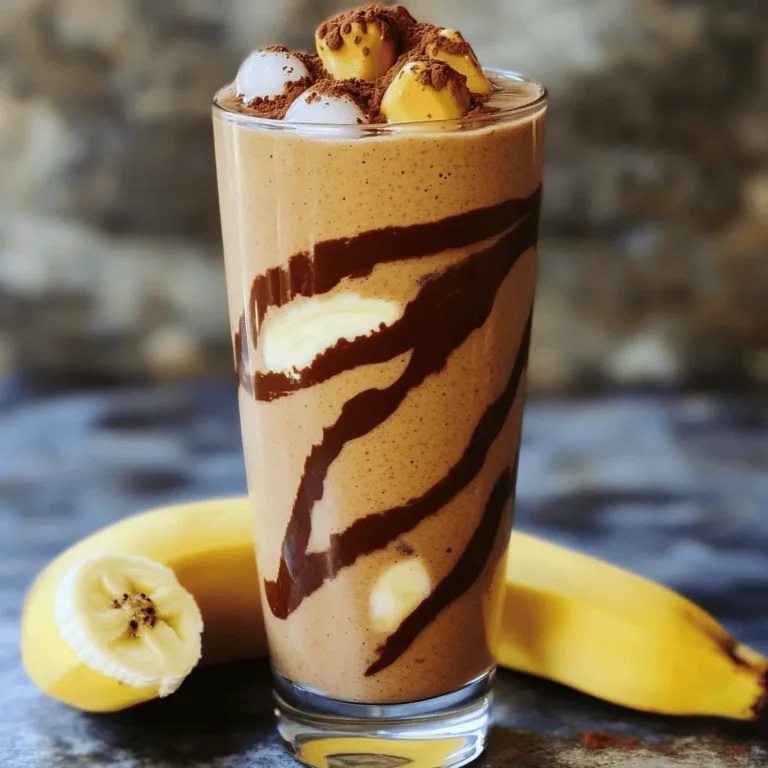
High-Protein Peanut Butter Cup Smoothie Delight

For this creamy mushroom and spinach orzo, gather these simple ingredients: - 1 cup orzo pasta - 2 tablespoons olive oil - 1 small onion, finely chopped - 2 cloves garlic, minced - 8 ounces mushrooms, sliced (cremini or button) - 4 cups fresh spinach, roughly chopped - 1 cup vegetable broth - 1 cup heavy cream (or coconut cream for dairy-free) - 1/2 teaspoon dried thyme - Salt and pepper to taste - 1/2 cup grated Parmesan cheese (optional) - Fresh parsley, chopped, for garnish Feel free to add your favorite flavors. Here are some optional ideas: - Cherry tomatoes for a pop of color - Peas for sweetness and texture - Crushed red pepper for a hint of heat - Lemon zest for brightness If you have dietary needs, here are some easy swaps: - Use gluten-free orzo for a gluten-free dish. - Swap heavy cream with coconut cream for dairy-free. - Use nutritional yeast instead of Parmesan for a vegan option. These options let you enjoy this dish while meeting your dietary needs. 1. Cook the Orzo: Start by boiling water in a medium pot. Add salt to the water. Once it boils, add 1 cup of orzo pasta. Cook it according to the package instructions, usually about 8-10 minutes. When done, drain it and set it aside. 2. Sauté Vegetables: In a large skillet, heat 2 tablespoons of olive oil over medium heat. Add 1 small finely chopped onion. Sauté it for about 2-3 minutes, until it becomes translucent. 3. Add Garlic and Mushrooms: Next, stir in 2 cloves of minced garlic and 8 ounces of sliced mushrooms. Sauté these for another 5-7 minutes. The mushrooms should become tender and release some moisture. 4. Incorporate Spinach: Add 4 cups of roughly chopped fresh spinach to the skillet. Mix it in, and cook until it wilts, which takes about 2-3 minutes. 5. Make it Creamy: Pour in 1 cup of vegetable broth and bring it to a simmer. Then, stir in 1 cup of heavy cream and 1/2 teaspoon of dried thyme. Allow the mixture to bubble gently for about 2 minutes. 6. Combine Everything: Add the drained orzo to the skillet. Stir well to combine all the ingredients. Season it with salt and pepper to taste. If you’d like, mix in 1/2 cup of grated Parmesan cheese until it melts and makes the dish creamy. 7. Serve: Divide the orzo into serving bowls. Garnish with chopped fresh parsley for a nice pop of color. - Start boiling the water for the orzo first. This saves time. - Chop the onion and garlic while the water boils. - Sauté the vegetables while the orzo cooks to use time wisely. - Prepare the ingredients you will add next while waiting for the mushrooms to cook. - When the orzo is done, it will be al dente, firm yet tender. - The onion should turn clear and soft when sautéed. - Mushrooms will look browned and release moisture when cooked right. - Spinach will shrink and turn a deep green when it wilts. - The cream mixture should bubble gently but not boil hard, indicating it's ready for orzo. To make your orzo creamy, use heavy cream or coconut cream. This adds richness. Stir in the cream slowly to blend well. Let the mixture simmer gently to thicken. - Use fresh mushrooms for great flavor. - Cook until they release moisture for best taste. - Add thyme to enhance the earthiness. One mistake is overcooking the orzo. It should be al dente. Drain it right away to stop cooking. Another mistake is adding the cream too early. Wait until the vegetables soften first. - Don’t skip seasoning! Salt and pepper boost flavor. - Avoid using dry spinach. Fresh spinach wilts nicely and adds color. Serve creamy mushroom and spinach orzo in warm bowls. Top with fresh parsley for a pop of color. This dish pairs well with grilled chicken or shrimp for protein. - Try a side salad with light dressing to balance the meal. - A crusty bread works great for dipping. Enjoy this dish with good company! {{image_2}} You can add many veggies to this dish. Think about using bell peppers, zucchini, or peas. Just chop them up and toss them in with the mushrooms. Each veggie brings its own taste and color, making your orzo even more fun. Want to make this dish heartier? Try adding protein. Cooked chicken or shrimp works well. For a plant-based option, try tofu or chickpeas. Cube the tofu and sauté it with the onions. This gives you a filling meal that everyone will enjoy. Make your orzo pop with flavor! Add fresh herbs like basil or dill. A splash of lemon juice can brighten the dish. You can also sprinkle in spices like paprika or red pepper flakes. Each of these can change the dish's profile, making it your own special creation. To store leftovers, let the orzo cool down first. Place it in an airtight container. Keep it in the fridge. It will last for about 3 to 4 days. Make sure to label the container with the date. This way, you know when to enjoy it again. You can freeze this dish for longer storage. Use a freezer-safe container. Make sure to leave some space at the top. The orzo may expand as it freezes. It can last for up to 2 months. When you are ready to eat, just thaw it in the fridge overnight. When reheating, add a splash of broth or cream. This helps keep the orzo creamy. You can use the stovetop or microwave. If using the stovetop, heat it on low. Stir often to avoid sticking. If using a microwave, cover it with a lid. Heat in short bursts, stirring in between. Enjoy your creamy mushroom and spinach orzo warm and delicious! Yes, you can make creamy mushroom and spinach orzo gluten-free. Use gluten-free orzo made from rice or corn. These options cook similarly to regular orzo. Just check the package for cooking times. This swap keeps your dish tasty and safe for those who need to avoid gluten. To boost flavor, use fresh ingredients. The mushrooms and spinach add depth. Sauté them well to bring out their natural taste. Adding garlic, thyme, and a splash of vegetable broth enhances the flavor too. Don't forget to season with salt and pepper. Mixing in Parmesan cheese adds a nice touch of richness. Creamy mushroom and spinach orzo pairs well with several side dishes. A simple green salad with a light vinaigrette works great. Roasted vegetables add color and nutrition. You can also serve crusty bread to soak up the creamy sauce. For protein, grilled chicken or shrimp complements the dish nicely. In this guide, we covered the key ingredients for creamy orzo, including options for customization. I shared step-by-step cooking instructions with time management tips to help you stay on track. I also highlighted common mistakes and serving ideas to elevate your dish. Lastly, we discussed storage methods to keep leftovers fresh. Experiment with flavors and ingredients, and enjoy making this meal your own! With practice, you’ll create a delicious creamy orzo every time.

Creamy Mushroom and Spinach Orzo Delightful Dish

- 2 cups all-purpose flour - 1/2 cup brown sugar, packed - 2 teaspoons baking powder - 1/2 teaspoon baking soda - 1/2 teaspoon salt - 1/2 cup unsalted butter, cold and cubed - 1/2 cup chopped pecans, toasted - 3/4 cup heavy cream - 1/4 cup maple syrup - 1 teaspoon vanilla extract - Additional cream for brushing - Maple syrup and chopped pecans for topping Each ingredient plays a key role in making your scones rich and tasty. All-purpose flour gives the scones structure. Brown sugar adds sweetness and a hint of caramel. Baking powder and baking soda help the scones rise. Salt balances the flavors. Use cold, cubed unsalted butter for a flaky texture. Chopped pecans provide crunch and flavor. Heavy cream enriches the dough, while maple syrup adds a delightful sweetness. Vanilla extract enhances the overall taste. Lastly, you’ll need extra cream for brushing the tops before baking. This gives them a nice golden color. Maple syrup and pecans on top serve as a perfect finish. Gather these ingredients, and you’ll be ready to make bakery-style scones that impress! 1. Preheating the oven: Start by preheating your oven to 400°F (200°C). This ensures your scones bake evenly and rise nicely. 2. Preparing the baking sheet: Line a baking sheet with parchment paper. This helps prevent sticking and makes cleanup easier. 1. Mixing dry and wet ingredients: In a large bowl, whisk together 2 cups of all-purpose flour, 1/2 cup of packed brown sugar, 2 teaspoons of baking powder, 1/2 teaspoon of baking soda, and 1/2 teaspoon of salt. Make sure everything is well combined. 2. Proper incorporation techniques: Now, add 1/2 cup of cold, cubed unsalted butter. Use a pastry cutter or your fingers to mix it in until it looks like coarse crumbs. Then, gently fold in 1/2 cup of toasted, chopped pecans. 3. In a separate bowl, whisk together 3/4 cup of heavy cream, 1/4 cup of maple syrup, and 1 teaspoon of vanilla extract. Pour this wet mixture into the dry mix and combine until just moistened. You want to see a few flour streaks; do not over-mix. 1. Forming the scone dough: Turn the dough out onto a lightly floured surface. Pat it into a circle about 1 inch thick. Cut the dough into 8 wedges and place them on the baking sheet. 2. Baking duration and temperature: Brush the tops with a bit of heavy cream for a nice golden color. Bake for 18-20 minutes, or until they turn lightly golden brown and are cooked through. - Use cold butter. Cold butter makes scones flaky. It creates air pockets while baking. - Do not over-mix the dough. Mix until just combined. A few flour streaks are fine. Over-mixing makes scones tough. - Toast your pecans before adding them. Toasting brings out their rich flavor. Just a few minutes in the oven will do. - Choose quality maple syrup. Real maple syrup adds depth. It gives your scones that sweet, warm flavor. - Use a pastry cutter for mixing butter. It breaks butter into small pieces easily. Your hands may warm the butter too much. - Use parchment paper on your baking sheet. It prevents sticking and makes cleanup easy. A good non-stick sheet also works well. {{image_2}} You can change up these scones in fun ways. If you want to add a seasonal twist, try mixing in spices. For fall, a pinch of cinnamon or nutmeg gives warmth. In spring, consider adding lemon zest for a fresh taste. You can also swap out the pecans for other nuts. Walnuts or almonds can bring new flavors. Just remember to toast them for the best taste. If you need gluten-free scones, use gluten-free flour. Many brands work well without changing the texture much. For a dairy-free version, use coconut cream instead of heavy cream. You can also find plant-based butter as a good alternative. These scones are perfect with coffee or tea. They pair well with a warm drink on a chilly day. For toppings, try a dollop of clotted cream or a spread of fruit preserves. You can also drizzle more maple syrup on top for extra sweetness. Chopped nuts sprinkled on the scones add a nice crunch, making each bite special. To keep your scones fresh, store them in airtight containers. This prevents air and moisture from ruining their texture. If you plan to eat them within a few days, just keep them on the counter. If you want to save them for longer, consider freezing. Wrap each scone tightly in plastic wrap, then place them in a freezer bag. This method keeps them safe from freezer burn. At room temperature, these scones will last about three days. If you refrigerate them, they may stay fresh for up to a week. However, always check for signs of spoilage. If you notice any mold or an off smell, it's best to toss them out. To reheat your scones, use an oven set to 350°F (175°C). Place the scones on a baking sheet and cover them with foil. Heat for about 10 minutes, and they'll be warm and soft. If you want to microwave them, do so for about 15-20 seconds. Be careful not to dry them out. Adding a little butter or cream before reheating can help keep them moist. You can use milk or half-and-half. These options will make your scones lighter. If you prefer non-dairy, try almond milk or coconut cream. Both add a nice flavor. Remember, these substitutes may change the texture slightly. Yes, you can make the dough ahead. Wrap it tightly in plastic wrap. Store it in the fridge for up to 24 hours. When you're ready, just cut and bake it. It saves time and still tastes great! Look for a light golden color on top. You should also feel a firm texture. If you tap the bottom, it should sound hollow. This means they are baked through. Enjoy the smell as they cool! This blog post covered all the steps to make tasty scones from scratch. We explored the key ingredients, mixing and baking methods, and helpful tips for perfect results. You can also customize your scones with various flavors or dietary needs. Store them properly to keep them fresh longer. Remember, baking scones is simple and fun! With practice, you can create delicious treats that everyone will enjoy. Happy baking, and enjoy your scones!

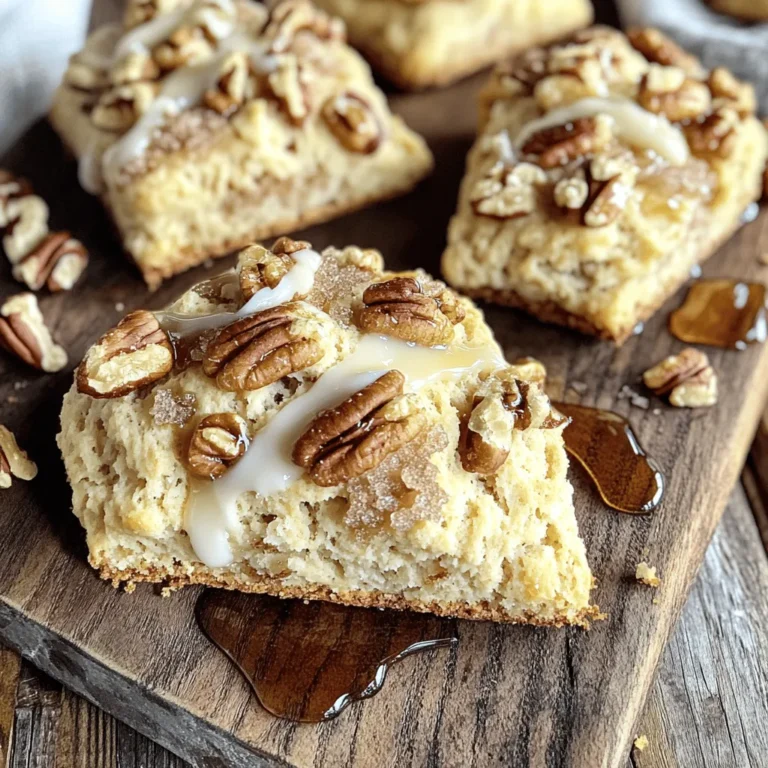
Bakery-Style Brown Sugar Maple Pecan Scones Recipe

For the Pumpkin Spice Energy Balls, you will need: - 1 cup rolled oats - 1/2 cup almond butter - 1/2 cup canned pumpkin puree - 1/4 cup honey or maple syrup - 1 teaspoon pumpkin pie spice - 1/2 teaspoon vanilla extract - 1/4 cup ground flaxseed - 1/4 cup mini chocolate chips (optional) - Pinch of salt These ingredients blend to create a tasty and nutritious snack. The oats give a hearty base. The almond butter adds creaminess and healthy fats. Pumpkin puree brings moisture and flavor. Honey or maple syrup sweetens the mix. The pumpkin pie spice adds a warm, cozy taste. Flaxseed boosts fiber and nutrition. The chocolate chips, if you use them, add a sweet treat. If you need substitutes, here are some options: - Rolled oats: You can use quick oats or ground oats for a finer texture. - Almond butter: Peanut butter or sunflower seed butter work well too. - Canned pumpkin puree: You can use fresh pumpkin puree if you prefer. - Honey or maple syrup: Agave syrup or brown rice syrup can be good sweeteners. - Flaxseed: Chia seeds can replace flaxseed for a similar texture. These swaps can help you make this recipe fit your taste or what you have on hand. Each energy ball is packed with nutrition. Here’s a quick look at what you get per ball: - Calories: About 100 - Protein: 3 grams - Fat: 4 grams - Carbohydrates: 14 grams - Fiber: 2 grams - Sugar: 3 grams These energy balls are not just tasty; they also offer a good balance of nutrients. They provide energy, healthy fats, and fiber, making them a great snack for any time of the day. Making pumpkin spice energy balls is easy and fun. You need some basic tools. Grab a large mixing bowl and a smaller one. You will also want a spatula and your hands for mixing. This whole process takes about 45 minutes, but the prep time is just 15 minutes. You will create 12 to 15 tasty balls. First, gather your dry ingredients. In your large mixing bowl, add: - 1 cup rolled oats - 1/4 cup ground flaxseed - 1 teaspoon pumpkin pie spice - Pinch of salt Stir these together well. This step helps blend the flavors. You want the spices to spread evenly. It makes the energy balls taste great. Now, it's time for the wet ingredients. In your smaller bowl, mix together: - 1/2 cup almond butter - 1/2 cup canned pumpkin puree - 1/4 cup honey or maple syrup - 1/2 teaspoon vanilla extract Stir until it's all smooth. Then, pour this mixture into your dry ingredients. Use your spatula or hands to combine everything. Mix until you can't see any dry bits. If you want, fold in 1/4 cup of mini chocolate chips for a sweet twist. Once mixed, take small portions of the mixture. Roll them into balls about 1 inch wide. Place them on a plate or baking sheet lined with parchment paper. Repeat this until you have used all the mixture. Finally, refrigerate the energy balls for at least 30 minutes. This helps them firm up and makes them easier to eat. Enjoy your tasty and nutritious snack! You can easily change the flavor of these energy balls. Try different spices, like cinnamon or nutmeg. You can also swap the pumpkin puree for applesauce. It gives a nice twist! If you love nuts, add chopped walnuts or pecans. For a sweeter taste, mix in more chocolate chips or dried fruits. Each option makes your snack unique. Getting the right texture is key. If the mixture is too dry, add a splash of almond milk. If it’s too wet, mix in more oats or flaxseed. Use your hands to roll the balls. This ensures they hold together well. If you find them crumbly, let them chill longer in the fridge. They will firm up nicely! To save time, prep your ingredients ahead of time. Measure out oats and flaxseed a day before. You can also mix the wet ingredients in a blender for a quick job. When forming the balls, use a cookie scoop. This keeps them all the same size and helps you work faster. Make a big batch and store extras for later! {{image_2}} You can make your Pumpkin Spice Energy Balls even better with some healthy add-ins. Try adding: - Chia seeds for extra fiber and omega-3s. - Dried fruit like cranberries or raisins for sweetness. - Nuts like walnuts or pecans for healthy fats. - Protein powder for a protein boost. These add-ins not only change the flavor but also add nutrition. Look at what you have at home. You can mix and match to find your favorite combo. Want to switch up the taste? You can play with flavors. Here are some ideas: - Chocolate: Add cocoa powder or swap chocolate chips for dark chocolate. - Coconut: Mix in shredded coconut for a tropical twist. - Nutty: Use different nut butters, like peanut or cashew, for a new taste. - Spiced: Add a pinch of cinnamon or nutmeg for a warm kick. These options keep your energy balls fun and fresh. Experiment to find what you love best! Energy balls work great as snacks or treats. Here are some ways to enjoy them: - On-the-go: Pack a few in your bag for a quick snack. - Post-workout: They make a perfect recovery bite after exercise. - Lunchbox treat: Kids will love finding these in their lunch. - Party snack: Arrange them on a tray for your next gathering. These ideas help you enjoy your energy balls anytime. They are tasty, healthy, and easy to eat! Store your Pumpkin Spice Energy Balls in the fridge. They will stay fresh for up to one week. Keep them in a sealed container or a zip-top bag. This helps keep them moist and tasty. When you want a quick snack, just grab one from the fridge! For longer storage, freezing is a great option. Place the energy balls in a single layer on a baking sheet. Freeze them for about an hour. Once they are firm, transfer them to a freezer-safe bag. Make sure to label the bag with the date. They will stay good for up to three months in the freezer. When you want one, just take it out and let it thaw. Use airtight containers for storing your energy balls. Glass jars or plastic containers work well. If you have a lot, stack them in layers with parchment paper between. This prevents them from sticking together. Choose containers that fit your fridge or freezer space. This way, your Pumpkin Spice Energy Balls stay fresh and ready to enjoy! Pumpkin Spice Energy Balls last about one week in the fridge. If you store them in an airtight container, they stay fresh longer. You can also freeze them for three months. Just thaw them in the fridge overnight before eating. Yes, you can use other nut butters. Peanut butter works well and adds a nice flavor. Cashew butter or sunflower seed butter are great options too. Just keep in mind that this may change the taste a bit. Absolutely! These energy balls are a fun snack for kids. They are healthy and packed with nutrients. The sweetness from honey or maple syrup makes them tasty. Plus, you can involve your kids in making them! This blog post covered how to make tasty Pumpkin Spice Energy Balls. We looked at key ingredients and tasty substitutes, plus their nutrition facts. You learned step-by-step how to mix and form the balls. We shared tips for adding flavors and perfecting texture. You can also explore fun variations and storage tips. Simple, fun, and healthy snacks like these can fit into any diet. Give them a try today!

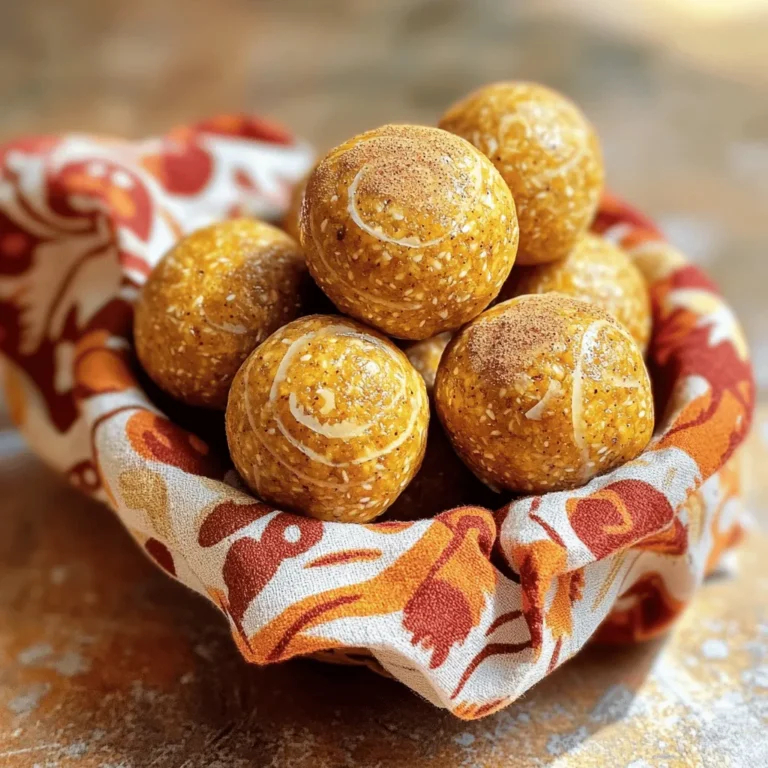
Pumpkin Spice Energy Balls Tasty and Nutritious Snack

To make Creamy Sun-Dried Tomato Tortellini Soup, you need a few key ingredients. Each one plays a big role in building flavor. Here’s what you need: - 1 tablespoon olive oil - 1 medium onion, diced - 3 cloves garlic, minced - 1 can (14.5 oz) diced tomatoes, undrained - 1 cup sun-dried tomatoes, packed in oil, chopped - 4 cups vegetable broth - 1 teaspoon dried basil - 1 teaspoon dried oregano - 1 cup heavy cream - 9 ounces cheese tortellini (fresh or frozen) - 1 cup spinach, roughly chopped - Salt and pepper to taste - Grated Parmesan cheese for serving - Fresh basil leaves for garnish Using fresh ingredients gives the soup a bright taste. Olive oil adds richness, while onions and garlic bring a sweet, savory base. The diced tomatoes and sun-dried tomatoes add depth and a hint of sweetness. Vegetable broth makes it hearty, and herbs like basil and oregano provide a warm aroma. Heavy cream creates a silky texture, while tortellini makes it filling. Spinach adds color and nutrients. Don't forget salt and pepper to enhance the flavors. Top it off with Parmesan and fresh basil for a tasty finish! 1. Heating the olive oil Start by pouring one tablespoon of olive oil into a large pot. Heat it over medium heat. 2. Sautéing onion and garlic Next, add one medium diced onion. Cook it for about five minutes until it turns soft and clear. Then, stir in three minced garlic cloves. Cook for one more minute until you smell that great garlic aroma. 3. Adding tomatoes and broth Now, open a can of diced tomatoes, keeping the juice. Add that along with one cup of chopped sun-dried tomatoes. Pour in four cups of vegetable broth. Sprinkle in one teaspoon each of dried basil and oregano. Mix it all well and bring it to a simmer. 4. Allowing flavors to meld Once it simmers, lower the heat. Let it cook for about ten minutes. This helps all the flavors mix together nicely. 5. Incorporating heavy cream After that, stir in one cup of heavy cream. Raise the heat slightly to bring the soup back to a gentle simmer. 6. Cooking tortellini Add nine ounces of cheese tortellini. Cook according to the package. If it’s fresh, it takes about three to five minutes. For frozen, it’s about five to seven minutes. 7. Final seasoning and adding spinach Just before serving, add one cup of roughly chopped spinach. Stir it in until it wilts. Taste the soup and add salt and pepper as you like. 8. Serving suggestions Serve the soup hot. Top each bowl with grated Parmesan cheese and fresh basil leaves. Enjoy the warm, comforting flavors! - Fresh vs frozen tortellini I love using fresh tortellini. It cooks quickly and adds great flavor. Frozen tortellini works too. Just give it a few extra minutes to cook. - Adjusting seasoning Taste as you go! Add salt and pepper slowly. This helps you find the right balance. Remember, sun-dried tomatoes can be salty, so season carefully. - Balancing creaminess For a lighter soup, try using less heavy cream. You can also add more vegetable broth. This keeps the soup rich but not too thick. - Enhancing flavor with herbs Fresh herbs make a big difference. If you can, use fresh basil instead of dried. You can also add a pinch of thyme or parsley for extra taste. {{image_2}} You can change this creamy sun-dried tomato tortellini soup in fun ways. Let’s explore some tasty options! - Adding protein: You can make this soup heartier by adding cooked chicken, shrimp, or sausage. Just cook your choice of protein in the pot before adding the onion. This will boost flavor and give you more filling bites. - Vegetarian options: If you want a vegetarian soup, skip the meat. You can add more veggies like carrots or bell peppers. These will add color and crunch. - Using different vegetables: Feel free to mix in other vegetables. You can use zucchini, kale, or mushrooms. Each adds its own taste and texture to the soup. Just make sure to cook them until tender. - Gluten-free alternatives for tortellini: If you need a gluten-free option, look for gluten-free tortellini. Many brands offer great taste and texture. You can also use rice or quinoa instead. These options keep the soup delicious while meeting your dietary needs. These simple variations let you customize the soup to fit your cravings and diet. Enjoy making it your own! Refrigeration guidelines Store your creamy sun-dried tomato tortellini soup in an airtight container. It will stay fresh in the fridge for about 3 to 4 days. Make sure to let it cool down before sealing it. Freezing instructions You can freeze this soup for later use. Pour it into freezer-safe containers, leaving some space at the top. This soup can last up to 3 months in the freezer. Thaw it overnight in the fridge before reheating. Reheating methods Reheat the soup on the stove over medium heat, stirring often. You can also use a microwave. Heat it in intervals of 1 minute, stirring each time, until hot. If it's too thick, add a splash of broth or water. Shelf life The shelf life of the soup is about 3 to 4 days in the fridge and up to 3 months in the freezer. Always check for signs of spoilage before eating, like off smells or changes in texture. Enjoy your soup hassle-free! Yes, you can make this soup ahead of time. It tastes great after flavors blend. Just store it in the fridge. Reheat when you're ready to eat. You can use half-and-half or coconut cream as a substitute. Both options will give a creamy texture. If you want a lighter version, try using milk. Just know that it may not be as rich. Absolutely! This soup is great for meal prep. You can portion it out in containers. It stays good in the fridge for about three days. To add spice, you can mix in red pepper flakes. Start with a small amount and taste. You can also use hot sauce or diced jalapeños for a kick. This blog post covered a tasty tortellini soup recipe. You learned the key ingredients and simple steps to make it. We shared tips to enhance flavor and storage advice for leftovers. Tortellini soup is versatile and easy to customize. Feel free to add proteins or veggies based on your preference. I hope you feel ready to try this recipe at home. Enjoy your cooking!

Creamy Sun-Dried Tomato Tortellini Soup Delight

PREV 1 … 37 38 39 … 86 NEXT
spicy fork kitchen

explore

DessertsDinnerAppetizersDrinks

Our Policies

  • Cookie Policy
  • Copyright Policy
  • Disclaimer
  • GDPR Policy
  • Terms Of Use
Back to Top
  • About
  • Contact Us
  • Privacy Policy
© 2026 spicy fork kitchen