FREE DINNER EBOOK! Get your copy!
  • Cookie Policy
  • GDPR Policy
  • Disclaimer
  • Terms Of Use
  • Visit my other site: Fun Cookie Recipes
spicy fork kitchen
  • Home
  • Dinner
  • Desserts
  • Drinks
  • Appetizers
  • Contact
  • About
  • Privacy Policy
  • Home
  • Dinner
  • Desserts
  • Drinks
  • Appetizers
  • Contact
  • About
  • Privacy Policy
  • Cookie Policy
  • GDPR Policy
  • Disclaimer
  • Terms Of Use
Visit my other site: Fun Cookie Recipes

HOME / CATEGORIES /

Latest

To make Cozy Harvest Veggie Lentil Soup, gather these simple ingredients: - 1 cup dried green or brown lentils, rinsed - 2 tablespoons olive oil - 1 medium onion, diced - 2 cloves garlic, minced - 3 medium carrots, diced - 2 celery stalks, diced - 1 medium potato, cubed - 1 zucchini, diced - 1 cup butternut squash, peeled and cubed - 1 can (14 oz) diced tomatoes - 4 cups vegetable broth - 2 cups kale or spinach, chopped - 1 teaspoon dried thyme - 1 teaspoon dried oregano - Salt and pepper to taste - Fresh parsley, chopped (for garnish) You can swap ingredients based on what you have. Try these options: - Use red lentils for a quicker cook time. - Replace olive oil with coconut oil for a slightly sweet taste. - Substitute sweet potato for regular potato for a sweeter flavor. - Try other greens like Swiss chard or arugula. - Use fresh herbs instead of dried for a more vibrant taste. Fresh veggies make your soup taste better. Here’s what to look for: - Choose firm carrots, not soft ones. - Look for bright green kale or spinach, no wilting. - Select potatoes with smooth skins, avoiding any sprouts. - Pick zucchini that feels heavy for its size and has shiny skin. - For butternut squash, pick ones that feel heavy and have dull skin. With these tips, you can create a hearty and healthy soup that warms you up. Enjoy each spoonful of this cozy delight! Start by gathering all your ingredients. You will need: - 1 cup dried green or brown lentils, rinsed - 2 tablespoons olive oil - 1 medium onion, diced - 2 cloves garlic, minced - 3 medium carrots, diced - 2 celery stalks, diced - 1 medium potato, cubed - 1 zucchini, diced - 1 cup butternut squash, peeled and cubed - 1 can (14 oz) diced tomatoes - 4 cups vegetable broth - 2 cups kale or spinach, chopped - 1 teaspoon dried thyme - 1 teaspoon dried oregano - Salt and pepper to taste - Fresh parsley, chopped (for garnish) Dice the onion and mince the garlic. Chop the carrots, celery, potato, zucchini, and butternut squash. Rinse the lentils under cool water. In a large pot, heat the olive oil over medium heat. Add the diced onion. Sauté it for about 3-5 minutes. Wait until it turns translucent. Next, add the minced garlic. Cook for an extra minute until it smells great. Now, add the carrots, celery, potato, zucchini, and butternut squash to the pot. Sauté these for 5-7 minutes until they start to soften. Stir in the rinsed lentils and diced tomatoes, juice included. Pour in the vegetable broth, then add thyme and oregano. Bring this mixture to a boil. Lower the heat and let it simmer without a lid for about 25-30 minutes. Check for tenderness in the lentils and veggies. Stir occasionally to keep it from sticking. After that, add the chopped kale or spinach. Cook for another 5 minutes until the greens wilt. Finally, season with salt and pepper to your liking. If it's too thick, add more broth. To make your soup even better, use fresh, high-quality veggies. This can really enhance the flavor. You can also try adding a splash of lemon juice for brightness. If you want a richer taste, sauté the veggies a bit longer. For a heartier meal, serve the soup with crusty bread. This makes a great pairing. Lastly, don’t forget to garnish with fresh parsley before serving. It adds color and fresh flavor! Store your leftover soup in airtight containers. Let it cool before sealing. It keeps well in the fridge for up to five days. If you want to save it longer, freeze it. Use freezer-safe bags or containers. Remember to leave some space for expansion. Label the bags with the date. This way, you know when to use it. Add extra flavor with herbs and spices. Fresh herbs like basil or cilantro work great. You can also use a splash of lemon juice for brightness. For some heat, try adding red pepper flakes. A dash of soy sauce adds umami. These small tweaks can turn a good soup into a great one. You can make this soup a day ahead. This allows flavors to blend better. Just follow the recipe and cool it down. Then store it in the fridge. When you’re ready to eat, reheat it on the stove. Add a bit more broth if it is too thick. This soup tastes even better the next day! {{image_2}} This soup is already vegan and gluten-free. You use lentils, vegetables, and broth. These ingredients fit a plant-based diet. If you want more flavor, try adding some herbs. Fresh herbs like basil or cilantro can brighten the taste. Feel free to swap out veggies based on what you have. Cauliflower, sweet potatoes, or bell peppers work well. Just keep the cooking time in mind. Some veggies cook faster than others. For example, bell peppers soften quickly, while root veggies take longer. You can boost the protein in this soup easily. Chickpeas, quinoa, or tofu are great choices. If you use chickpeas or tofu, add them during the last 10 minutes of cooking. Quinoa can be added earlier, about halfway through. This way, it cooks well without becoming mushy. You can freeze Cozy Harvest Veggie Lentil Soup for up to three months. This soup is perfect for meal prep. To freeze, let it cool completely. Then, pour it into an airtight container or freezer bag. Make sure to leave some space at the top, as the soup expands when frozen. Label the bag with the date so you know when to use it. To reheat frozen soup, move it to the fridge the night before. This helps it thaw slowly. Once thawed, pour the soup into a pot or a microwave-safe bowl. Heat it on low to medium heat on the stove, stirring often. If you're using the microwave, heat it in short bursts, stirring in between. Add a splash of broth or water if it seems too thick. The soup lasts about five days in the fridge. Store it in an airtight container to keep it fresh. If you notice any off smells or colors, it's best to toss it. Always trust your senses when it comes to food safety. Yes, you can use canned lentils. They cut down cooking time. Rinse the canned lentils before adding them to the soup. Use about 1.5 cups of canned lentils. Add them in the last 10 minutes of cooking. This keeps them firm but soft. To thicken the soup, blend a portion of it. Use an immersion blender for ease. Blend until smooth, then stir back into the pot. You can also add more lentils or a small potato. Cooking for longer makes the soup thicker, too. The soup lasts about 4 to 5 days in the fridge. Store it in an airtight container. Let it cool before sealing. If you want to keep it longer, freeze it. This soup is great for meal prep! You’ve learned about key ingredients and tips for making a great soup. We discussed how to choose fresh vegetables and alternative options. You now have steps for preparation and cooking, plus ways to store leftovers. We also explored variations, including vegan choices and protein additions. Remember, making soup can be easy and fun. Use these tips to create your perfect bowl. Enjoy the warmth and comfort that a good soup brings!

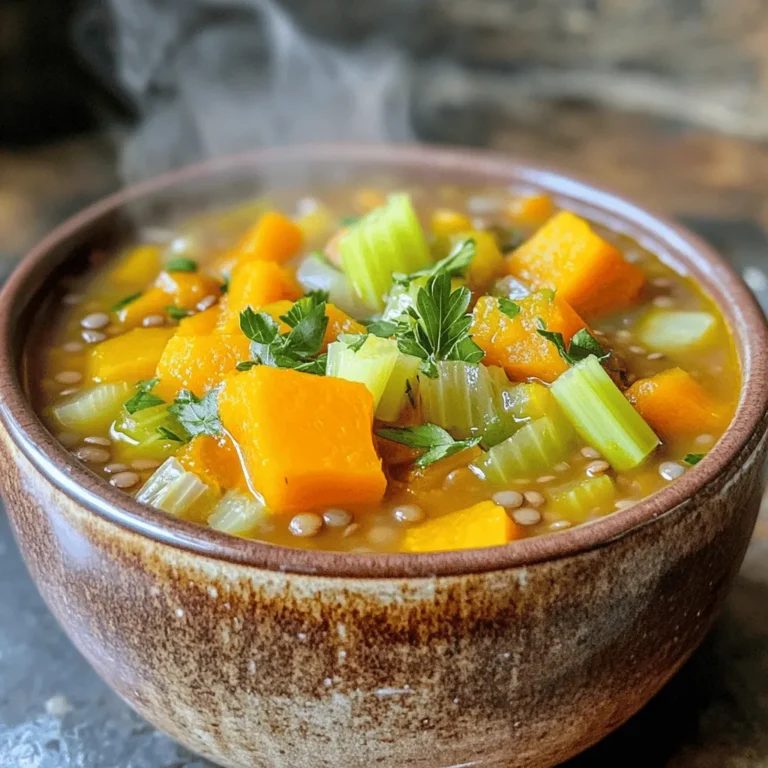
Cozy Harvest Veggie Lentil Soup Comforting Delight

- 1 cup unsalted butter, melted - 2 cups granulated sugar - 4 large eggs - 1 teaspoon vanilla extract - 1 cup all-purpose flour - 1 cup cocoa powder - 1/2 teaspoon baking powder - 1/4 teaspoon salt - 1 cup chocolate chips - 1 cup pecans, roughly chopped - 1 cup caramel sauce (store-bought or homemade) The ingredients for caramel turtle brownies create a rich and tasty treat. Each item plays a key role in making these brownies special. The melted butter gives a moist base, while sugar adds sweetness. Eggs help bind everything together. The vanilla extract brings a warm flavor that blends perfectly with chocolate and caramel. - Alternatives for unsalted butter: You can use coconut oil or margarine if you're looking for dairy-free options. - Options for gluten-free flour: Look for a gluten-free all-purpose flour that includes xanthan gum. This helps the brownies hold together well. - Vegan-friendly ingredient swaps: Replace eggs with flaxseed meal mixed with water. Use a plant-based butter and dairy-free chocolate chips. With these substitutions, you can enjoy brownies without missing out on flavor or texture. These options make the recipe flexible for different diets. Start by preheating your oven to 350°F (175°C). This step warms your oven for even baking. You can use a 9x13 inch baking pan. Greasing the pan helps the brownies release easily. However, using parchment paper makes it even simpler to lift them out later. In a large bowl, whisk together the melted butter and granulated sugar. This step helps blend the ingredients smoothly. Next, add four large eggs, one at a time. Mix well after each egg, then stir in the vanilla extract. In another bowl, sift together the flour, cocoa powder, baking powder, and salt. Gradually add this dry mix to the wet ingredients. Be careful not to overmix; this keeps your brownies soft and chewy. Finally, fold in chocolate chips and chopped pecans. Now it's time to pour the brownie batter! Pour half of it into your prepared pan and spread it evenly. Drizzle half of the caramel sauce over this layer. To create a marbled effect, gently swirl the caramel into the batter using a knife. Next, pour the remaining batter over the caramel layer. Smooth the top, then drizzle more caramel and swirl it again for that eye-catching look. Bake the brownies in your preheated oven for 25-30 minutes. Check for doneness by inserting a toothpick in the center. It should come out with a few moist crumbs. Once done, take them out and let the brownies cool completely in the pan. This cooling time helps them set and makes cutting easier. Enjoy your delicious caramel turtle brownies! To get the best brownies, focus on texture. You want them soft and chewy. Use good quality chocolate chips for rich flavor. Melted butter makes the brownies moist and adds a great taste. For gooey centers, underbake slightly. Remove the pan when a toothpick shows moist crumbs. This helps keep the center fudgy. Let the brownies cool in the pan for a few minutes. Then, move them to a wire rack to cool completely. Garnish your brownies for an extra treat. Drizzle more caramel sauce on top. Sprinkle extra chopped pecans for crunch. These small touches make a big difference. Serve your brownies warm with ice cream or whipped cream. The cold cream pairs well with the warm, gooey texture. It’s a match made in dessert heaven! One common mistake is overmixing the batter. This can make brownies tough, not soft. Mix just until the dry ingredients are combined. Another mistake is not letting the brownies cool properly. Cutting them too soon makes a mess. Cool them in the pan first, then on a rack. Enjoy your delicious, neat brownies! {{image_2}} You can add fun flavors to your brownies. Try mixing in espresso for a coffee kick. Coffee and chocolate go well together. A little espresso gives a rich taste. You can also change the nuts in your brownies. Pecans are classic, but walnuts or almonds work too. Each nut adds its own flavor and crunch. Mixing different nuts can make the brownies even more exciting. The type of chocolate you use can change the flavor. Dark chocolate chips give a rich taste. They add depth to your brownies. On the other hand, milk chocolate chips make them sweeter. You might also want to use white chocolate. It adds a creamy flavor that pairs well with caramel. Try mixing different types of chocolate to find your favorite blend. You can make brownies for any season or holiday. For Halloween, add pumpkin spice to the batter. It gives a warm, cozy flavor. At Christmas, try adding peppermint extract for a festive touch. For birthdays, you can mix in colorful sprinkles. They make your brownies fun and festive. Experiment with flavors that fit special occasions. Your caramel turtle brownies can be a year-round treat! To keep your caramel turtle brownies fresh, start by letting them cool completely. Place them in an airtight container. This helps maintain their soft texture. You can also layer them with parchment paper to prevent sticking. If you have a large batch, cut them into squares first. This way, you can grab one easily when cravings hit. Freezing brownies is simple and great for later enjoyment. Wrap each brownie tightly in plastic wrap. Then, place them in a freezer-safe bag or container. This protects them from freezer burn. To thaw, take them out and leave them at room temperature for about an hour. If you want to heat them, pop them in the microwave for 10-15 seconds. Enjoy them warm! Brownies can last up to four days at room temperature. Store them in a cool, dry place. If they last longer, consider refrigeration. Signs of spoilage include a dry texture or off smell. If you see mold, throw them away immediately. Always trust your senses when it comes to food safety. Yes, you can make caramel turtle brownies ahead of time. This will save you stress on busy days. Here are some tips: - Make the brownies: Bake them and let them cool completely. - Store properly: Wrap them tightly in plastic wrap or place them in an airtight container. - Chill or freeze: You can refrigerate for up to a week or freeze for longer. - Reheat: If frozen, thaw in the fridge overnight before serving. Making homemade caramel sauce is easy! Here’s a simple recipe for you: - Ingredients: - 1 cup granulated sugar - 6 tablespoons unsalted butter, cut into pieces - 1/2 cup heavy cream - 1 teaspoon vanilla extract - Directions: 1. In a saucepan, heat sugar over medium heat. 2. Stir constantly until it melts and turns amber. 3. Add butter and stir until melted. 4. Slowly add heavy cream while stirring. 5. Remove from heat and add vanilla extract. Yes, you can make this recipe nut-free! Here are some suggestions: - Omit the pecans: Just leave them out for a nut-free brownie. - Substitute with seeds: Use sunflower seeds or pumpkin seeds for crunch. - Chocolate chips: Ensure they are nut-free, as some brands may contain traces. Caramel turtle brownies are delicious on their own, but pair them with extras for a treat: - Ice cream: Vanilla or caramel ice cream works great. - Whipped cream: A dollop adds a light touch. - Fresh fruit: Serve with berries for a fresh contrast. - Coffee or milk: These drinks balance the sweetness well. You now know how to make delicious caramel turtle brownies. We covered the key ingredients, like butter and chocolate, along with useful substitutions. I shared steps on prepping, mixing, and baking. You learned tips for perfect texture and common mistakes to avoid. Don't forget the variations to keep things exciting! Whether serving with ice cream or storing leftovers, you have all the tools. Dive into brownie-making and enjoy your tasty treats!

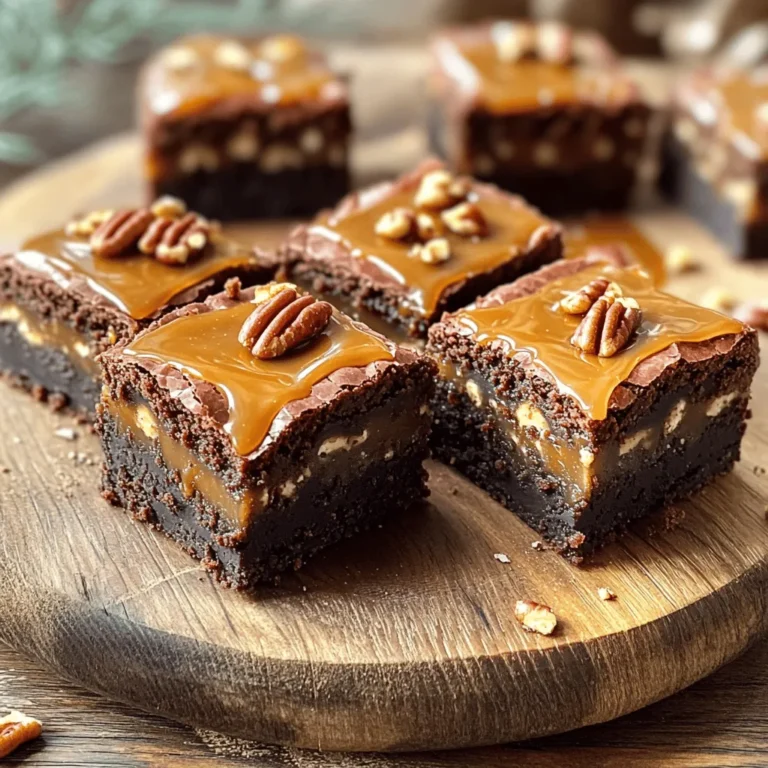
Caramel Turtle Brownies Irresistible Decadent Delight

- 2 cups all-purpose flour - 1 cup apple cider - 1 cup granulated sugar - 1/2 cup brown sugar, packed - 1/2 cup unsalted butter, melted - 2 large eggs - 1 teaspoon vanilla extract - 1 teaspoon baking powder - 1/2 teaspoon baking soda - 1/2 teaspoon ground cinnamon - 1/4 teaspoon ground nutmeg - 1/2 teaspoon salt - 1 cup diced apples (peeled and cored) - 1/2 cup walnuts or pecans, chopped (optional) - 1 tablespoon sugar combined with 1 teaspoon ground cinnamon (for topping) Gathering these ingredients is the first step. Each one plays a key role in making these muffins rich and tasty. The apple cider gives a sweet, tart flavor. The diced apples add texture and more apple taste. Using both granulated and brown sugars helps create a moist muffin with a nice crust. The spices, such as cinnamon and nutmeg, bring warmth and a hint of fall. You can choose to add nuts for crunch. I love walnuts or pecans for that extra bite. Make sure to have everything ready before you start. This way, you will mix the batter smoothly without stress. Having fun with this recipe is easy when you have all your ingredients lined up and ready to go! 1. Preheating the oven and preparing the muffin tin Start by preheating your oven to 350°F (175°C). This ensures your muffins bake evenly. Line a muffin tin with paper liners or lightly grease the cups. This step helps with easy removal after baking. 2. Mixing dry ingredients and wet ingredients separately In a large mixing bowl, add 2 cups of all-purpose flour, 1 teaspoon of baking powder, 1/2 teaspoon of baking soda, 1/2 teaspoon of ground cinnamon, 1/4 teaspoon of ground nutmeg, and 1/2 teaspoon of salt. Stir well to combine. In a separate bowl, whisk together 1 cup of granulated sugar, 1/2 cup of brown sugar, 1/2 cup of melted unsalted butter, 2 large eggs, 1 teaspoon of vanilla extract, and 1 cup of apple cider. Mix until smooth. 1. Folding the wet ingredients into dry ingredients Pour the wet mixture into the dry ingredients. Use a spatula to gently fold them together. Do this until just combined. Be careful not to overmix; this keeps the muffins light and fluffy. 2. Incorporating diced apples and nuts Next, fold in 1 cup of diced apples. If you like, add 1/2 cup of chopped walnuts or pecans at this stage. This adds crunch and flavor, making the muffins even more delicious. 1. Filling muffin cups and adding topping Divide the batter evenly among the muffin cups. Fill each cup about 2/3 full to allow room for rising. In a small bowl, mix 1 tablespoon of sugar with 1 teaspoon of ground cinnamon for the topping. Sprinkle this mix generously over the batter in each cup. 2. Baking time and checking for doneness Place the muffin tin in the preheated oven. Bake for about 18-22 minutes. To check if they are done, insert a toothpick into the center of a muffin. If it comes out clean, your muffins are ready. After baking, let them cool in the pan for 5 minutes. Then transfer them to a wire rack to cool completely. To get the best texture for your muffins, avoid overmixing. Overmixing can make muffins dense and tough. Mix just until you see no dry flour. It’s okay if there are some lumps. Using room temperature ingredients is key. Cold butter or eggs can lead to uneven mixing. Take your eggs and butter out well before you start baking. This simple step will help create a light and fluffy muffin. You can add spices or extracts for extra flavor. A pinch of ginger or a drop of almond extract can make these muffins shine. Don't hesitate to experiment! Using fresh fruits instead of dried can make a big difference. Fresh apples bring moisture and a juicy bite. If you use dried fruits, consider soaking them in warm water first. This keeps them from being too chewy. For serving, try warm muffins with honey or butter on top. The warmth melts the butter, making each bite even better. It adds a lovely touch of sweetness. Garnishing with a sprinkle of cinnamon makes your muffins look great. It adds a warm color and a hint of spice. Just a light dusting on top can make all the difference in how they look on the table. {{image_2}} You can switch up the flavor of your muffins easily. Instead of apples, try using pears or cranberries. Both fruits add a unique twist and a burst of freshness. You can also choose different nuts. Walnuts and pecans are great, but feel free to skip nuts if you prefer. This keeps the muffins light and fluffy. For those who need a gluten-free option, you can use a gluten-free flour blend. Look for blends that include rice flour or almond flour. Just remember to adjust the baking ratios. You might need extra liquid or eggs to keep the muffins moist. Always check the package for specific instructions. If you want a vegan version, I suggest using flax eggs instead of real eggs. To make a flax egg, mix one tablespoon of ground flaxseed with three tablespoons of water. Let it sit for a few minutes. For butter, use coconut oil or a vegan butter substitute. For milk, almond or oat milk works well. These swaps keep the taste rich and delicious without animal products. To keep your muffins fresh, store them at room temperature. Place them in an airtight container. You can also use a large zip-top bag. This keeps them soft for about three days. Avoid leaving them out too long, as they can dry out. If you want to store muffins longer, refrigeration works well. Wrap each muffin in plastic wrap. Then place them in a sealed container. This helps maintain moisture. Muffins last up to a week in the fridge. For long-term storage, freezing is best. Let the muffins cool completely. Wrap each muffin tightly in plastic wrap. Then, place them in a freezer-safe bag. Be sure to squeeze out as much air as possible. Muffins can last up to three months in the freezer. When you're ready to enjoy your muffins, reheating is key. For room temperature muffins, pop them in the microwave for about 10-15 seconds. This warms them without drying them out. If your muffins are cold from the fridge, try the oven. Preheat it to 350°F (175°C). Place the muffins on a baking sheet for about 5-10 minutes. This method keeps them nice and fluffy. For frozen muffins, remove them from the freezer. Let them thaw in the fridge overnight or at room temperature for a few hours. Then, reheat as mentioned above. This way, you get that bakery-fresh taste every time! Yes, you can use store-bought apple cider. It saves time and is easy to find. However, fresh apple cider offers a brighter taste. Fresh cider often has more complex flavors. This can enhance the muffins' overall taste. If you choose store-bought, pick a quality brand for best results. Absolutely! You can prepare the batter ahead of time. Store it in the fridge for up to 24 hours. When ready, just scoop and bake. You can also bake the muffins in advance. Let them cool, then store in an airtight container. They will stay fresh for about three days. If you need them longer, freeze them. Just make sure to wrap them well. To ensure even baking, you should calibrate your oven. An oven thermometer can help you check the temperature. Also, place your muffin tin in the center of the oven. This allows air to flow evenly around it. Rotate the tin halfway through baking for even cooking. This small step can make a big difference in muffin texture. This article covered the key ingredients and steps to make delicious muffins. You learned to mix dry and wet ingredients separately and achieve the perfect texture. We also explored variations like gluten-free and vegan options. Remember to store your muffins right for freshness and reheat them well. With these tips in mind, you can enjoy or share these muffins anytime. Happy baking!

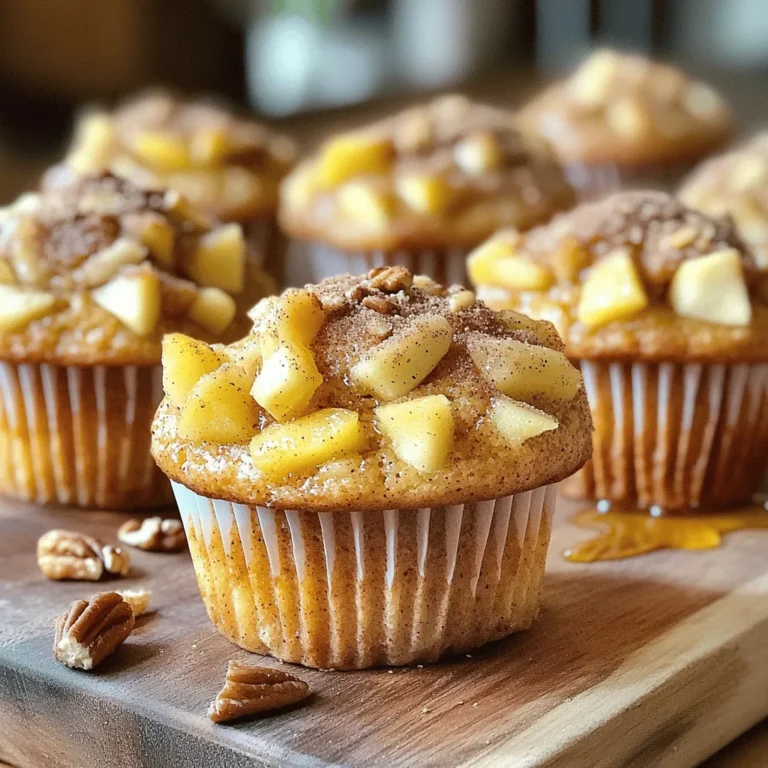
Bakery-Style Apple Cider Muffins Easy and Delicious Treat

First, you need to preheat your oven to 400°F (200°C). This step is crucial to ensure even cooking. While the oven heats, grab a large mixing bowl. You will mix all your ingredients in this bowl. Now, let's mix the creamy filling. Add 1 cup of chopped spinach, 1 cup of chopped artichoke hearts, and 1 cup of softened cream cheese to the bowl. Then, add 1 cup of shredded mozzarella cheese and 1/2 cup of grated Parmesan cheese. Next, include 1/4 cup of sour cream, 1 tablespoon of garlic powder, 1 teaspoon of onion powder, and 1/2 teaspoon of black pepper. Stir everything together until it’s smooth and creamy. You want every bite to be full of flavor. Next, we will prepare the puff pastry. Lightly flour your surface and roll out the pastry until it is flat. Then, cut it into 3-inch squares. These squares will hold your filling. Time to add the filling to the pastry squares. Place about 1 tablespoon of the spinach and artichoke mixture in the center of each square. Now, fold the corners of the pastry over the filling. Pinch the edges together to create a pocket. Make sure each pocket is sealed tightly to keep the filling inside. For a golden finish, apply an egg wash. In a small bowl, whisk one egg. Brush this egg over the tops of each pastry. This will give a nice color when baked. Arrange your filled pastry bites on a baking sheet lined with parchment paper. Bake them for about 15 to 20 minutes. Look for a golden brown color and flaky texture. After baking, let them cool for a few minutes before serving. Enjoy your Cheesy Spinach Artichoke Dip Bites! Ensuring a golden finish To get a nice golden color, use an egg wash. Mix one egg with a splash of water. Brush this mix over the tops of each pastry before baking. This will give them a shiny, appealing look. Avoiding soggy bottoms To prevent soggy bottoms, bake on a lined sheet. Use parchment paper to keep them from sticking. Also, make sure your filling is not too wet. Drain artichokes well and avoid adding too much sour cream. Pairings for appetizers These bites pair well with a variety of dips. Consider serving them with marinara or a simple garlic aioli. They also taste great with a fresh salad on the side. Serving temperature recommendations Serve these bites warm for the best flavor. Let them cool for a few minutes after baking. This helps the filling set and makes them easier to eat. Overfilling the pastries Be careful not to overfill the pastry squares. A tablespoon of filling per square is enough. If you add too much, they may burst while baking. Improper sealing techniques Make sure to pinch the edges well to seal them. If they are not sealed, the filling may leak out during baking. This can lead to a messy outcome and less tasty bites. Pro Tips Use Fresh Ingredients: Fresh spinach and artichokes will enhance the flavor of your dip bites significantly. If possible, opt for fresh over canned for a brighter taste. Don’t Overfill: Be careful not to overfill the pastry squares. A tablespoon of filling is perfect to ensure the bites seal properly and bake evenly. Egg Wash Technique: For a beautiful golden-brown finish, be sure to whisk the egg wash well and apply it evenly across the pastry tops. Serve Warm: These dip bites are best enjoyed warm. If making ahead, reheat briefly in the oven before serving to restore their flaky texture. {{image_2}} You can switch up the cheeses to change the flavor. Use sharp cheddar or creamy goat cheese. Each cheese brings its own taste. You can also mix cheeses for a unique bite. Adding vegetables boosts nutrition and flavor. Try bell peppers, mushrooms, or sun-dried tomatoes. Each adds a different twist. You can even add spices. Cajun seasoning or red pepper flakes give a nice kick. For gluten-free options, use gluten-free puff pastry. Many brands offer this, and it bakes well. It keeps the texture light and flaky. If you want vegan alternatives, swap cream cheese with a vegan version. Use cashew cheese or tofu instead. Greek yogurt can replace sour cream. For cheese, try nutritional yeast for a cheesy flavor. These options keep the dish tasty and friendly for all diets. You can store Cheesy Spinach Artichoke Dip Bites in the fridge. Place them in an airtight container. They will stay fresh for about 3 days. Make sure they cool down before you seal them up. You can also freeze these bites for longer storage. To freeze, wrap each bite in plastic wrap. Then, place them in a freezer bag. They will last for about 2 months in the freezer. Reheating these bites is easy. The best way is to use an oven. Preheat your oven to 350°F (175°C). Place the bites on a baking sheet. Heat them for about 10-15 minutes or until warm. This method keeps the pastry crispy. You can also use a microwave, but it may make them soft. If you use the microwave, heat in short bursts. Enjoy them warm for the best taste! You can store these bites in the fridge for up to three days. To keep them fresh, place them in an airtight container. If you want to keep them longer, freezing is a good option. Yes, you can prepare the filling a day in advance. Just store it in the fridge. You can also assemble the bites ahead of time and keep them in the fridge. Bake them when you're ready to serve. These bites pair well with a variety of dips. You can serve them with marinara, ranch, or a tangy yogurt dip. They also go great with a fresh salad or veggie platter. Yes, you can bake them straight from the freezer. Just add a few extra minutes to the baking time. This way, you can enjoy them warm and crispy anytime! In this article, we covered how to make Cheesy Spinach Artichoke Dip Bites. We reviewed the ingredients, which include spinach, artichokes, and various cheeses. I provided step-by-step instructions, tips for cooking, and suggestions for serving. We also explored variations, storage methods, and answered common questions. These bites are easy to make and perfect for sharing. Enjoy making them for your next event!

Cheesy Spinach Artichoke Dip Bites Simple Treat

- 1 cup canned pumpkin puree - 1/2 cup granulated sugar - 1/2 cup brown sugar, packed - 1/2 cup vegetable oil - 2 large eggs - 1 teaspoon vanilla extract - 1 1/2 cups all-purpose flour - 1 teaspoon baking powder - 1 teaspoon baking soda - 1 teaspoon ground cinnamon - 1/2 teaspoon ground nutmeg - 1/2 teaspoon salt - 1 cup semi-sweet chocolate chips For this recipe, I use standard measuring cups and spoons. Here are my measurements: - Pumpkin puree: Use canned for ease. It gives great moisture. - Sugars: I mix granulated and brown sugar for a nice balance of sweetness. - Vegetable oil: It keeps the bars moist and soft. - Eggs: They help bind all the ingredients together. - Flour: All-purpose flour works best for texture. - Baking powder and baking soda: These help the bars rise. - Spices: Cinnamon and nutmeg add that warm, cozy flavor. - Salt: Just a pinch brings out all the flavors. - Chocolate chips: Semi-sweet pairs perfectly with pumpkin. You can swap ingredients to fit your taste or needs: - Pumpkin puree: You can use homemade pumpkin puree if you prefer. - Sugars: Try coconut sugar for a lower glycemic option. - Oil: Applesauce can replace oil for a lighter version. - Eggs: Use flax eggs if you want a vegan option. - Flour: Almond flour can be used for a gluten-free version. - Chocolate chips: Dark chocolate or white chocolate chips work too! - Spices: Experiment with ginger or allspice for a different kick. First, turn your oven to 350°F (175°C). This heat helps cook the bars just right. Next, take a 9x13-inch baking pan. You can grease it lightly or use parchment paper. This makes it easy to lift the bars out later. In a large mixing bowl, add 1 cup of canned pumpkin puree. Then, add 1/2 cup of granulated sugar and 1/2 cup of packed brown sugar. Pour in 1/2 cup of vegetable oil. Crack in 2 large eggs and add 1 teaspoon of vanilla extract. Mix everything well until it is smooth and creamy. This mixture gives the bars their moist texture. In another bowl, whisk together 1 1/2 cups of all-purpose flour. Add 1 teaspoon of baking powder, 1 teaspoon of baking soda, 1 teaspoon of ground cinnamon, 1/2 teaspoon of ground nutmeg, and 1/2 teaspoon of salt. Make sure everything is well blended. This step is key for the right rise and flavor. Now, slowly add the dry mix to the wet ingredients. Stir gently until just combined. Be careful not to overmix. Overmixing can make the bars tough. After that, fold in 1 cup of semi-sweet chocolate chips. If you want, save a few chips to sprinkle on top. Pour the batter into your prepared pan. Spread it evenly with a spatula. If you saved some chocolate chips, sprinkle them on top now. Bake the bars in the oven for 25-30 minutes. Check them with a toothpick; it should come out clean. Once baked, take them out and let them cool in the pan for about 10 minutes. Then, move them to a wire rack to cool completely. After cooling, cut the bars into squares and enjoy! To get the best texture, use canned pumpkin puree. It makes the bars moist. Measure your flour correctly. Too much flour will make them dry. Be gentle when mixing the batter. Overmixing can lead to tough bars. Bake them until a toothpick comes out clean. This keeps them soft and chewy. Let the bars cool completely before storing. If they are warm, they can get soggy. Use an airtight container to keep them fresh. You can also wrap them in plastic wrap for extra protection. Store them in the fridge for up to five days. They can even last longer in the freezer. Just make sure to label them! You can boost the flavor with spices. Add more cinnamon or nutmeg for warmth. A pinch of cloves can add depth. If you like it spicy, try adding some ginger. These spices work well with the pumpkin. They make every bite more exciting. Experiment with your favorite spices to find your perfect mix! {{image_2}} You can switch up the chocolate in your bars. Instead of semi-sweet chocolate chips, try dark chocolate. Dark chocolate adds a rich flavor that pairs well with pumpkin. You can also use milk chocolate for a sweeter treat. White chocolate chips create a fun contrast. Mix and match to find your favorite! Nuts and dried fruits can add extra crunch and flavor. Walnuts or pecans work well here. They add a nice texture to your bars. Dried cranberries or raisins can add sweetness. Just fold them into the batter before baking. Be creative and use what you enjoy! If you want to cut down on sugar, use alternative sweeteners. Maple syrup or honey makes a great substitute. Use about 3/4 cup if you switch to liquid sweeteners. You can also try coconut sugar for a lower glycemic option. Adjust the amount based on your taste. To keep your pumpkin chocolate chip bars fresh, store them in an airtight container. Place a piece of parchment paper between layers if you stack them. This method helps prevent sticking. You can also wrap the bars tightly in plastic wrap. Keep them at room temperature for a few days. If you want to extend their life, refrigerate them. They stay moist and tasty in the fridge. Freezing your pumpkin chocolate chip bars is easy. First, let the bars cool completely. Then, cut them into squares. Wrap each square in plastic wrap. Place the wrapped bars in a freezer-safe bag or container. Be sure to remove as much air as possible to avoid freezer burn. They can last for up to three months in the freezer. When you're ready to enjoy them, thaw them at room temperature. When stored at room temperature, these bars last about 3 to 4 days. If you keep them in the fridge, they can last up to a week. The flavor and texture remain great during this time. If you freeze them, as mentioned, they can last for three months. Always check for any signs of spoilage before eating. Enjoy your tasty treats! Yes, you can. Use a gluten-free flour blend instead of all-purpose flour. Many blends work well in this recipe. Just make sure the blend contains xanthan gum for better structure. You can use flaxseed meal or applesauce. For one egg, mix 1 tablespoon of flaxseed meal with 2.5 tablespoons of water. Let it sit for five minutes. You can also use 1/4 cup of unsweetened applesauce. Check with a toothpick. Insert it in the center of the bars. If it comes out clean or with a few crumbs, they are done. You want to avoid a wet toothpick, which means they need more time. Yes, you can! Cook and puree fresh pumpkin until smooth. This can add a fresh taste. Just make sure to measure the same amount as canned pumpkin. They can be! Pumpkin adds fiber and vitamins. Using less sugar can also make them healthier. Plus, the chocolate chips add flavor without too many extra calories. We covered all the key steps to make pumpkin chocolate chip bars. We discussed the ingredients, measurements, and substitutions to help you customize your recipe. You learned how to prep your oven and mix the batter for great results. Plus, tips for perfect texture and storing leftovers were shared. Remember, you can also try fun variations or alternative ingredients to suit your taste. Enjoy baking and feel free to share your creations!

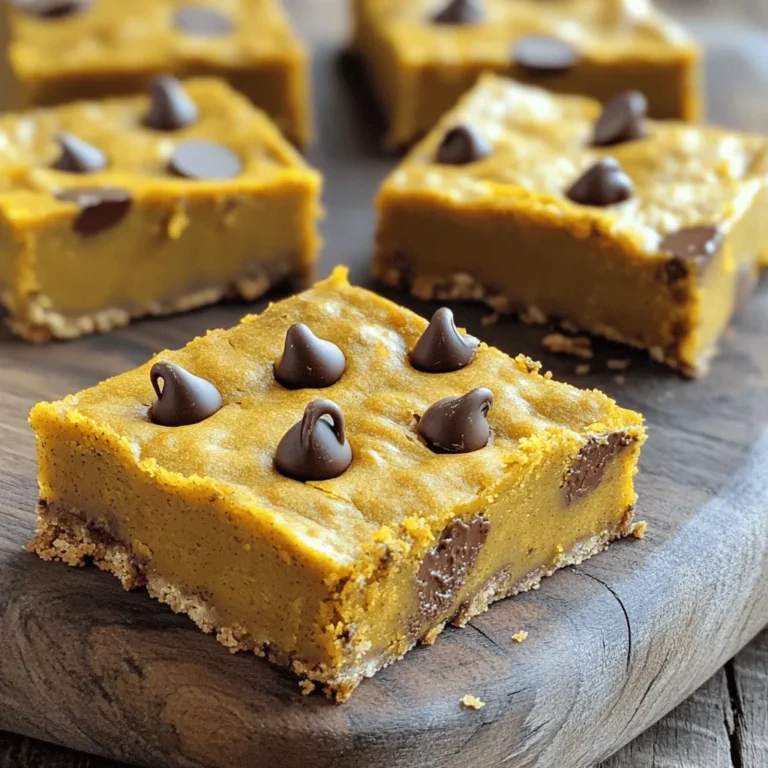
Pumpkin Chocolate Chip Bars Tasty and Easy Recipe

- 1 lb boneless, skinless chicken breast, cut into bite-sized pieces - 1/2 cup all-purpose flour - 1 teaspoon garlic powder - 1/2 teaspoon salt - 1/2 teaspoon black pepper - 1/4 teaspoon cayenne pepper (optional, for heat) - 1 large egg, beaten - 1 cup panko breadcrumbs - 1/4 cup sweet chili sauce - 2 tablespoons fresh garlic, minced - 1 tablespoon soy sauce - 1 tablespoon olive oil - Sesame seeds and chopped green onions for garnish For a perfect batch, I use: - Chicken: 1 lb gives you great bites. - Flour: 1/2 cup coats the chicken well. - Egg: 1 large egg binds the coating. - Panko: 1 cup creates the crispy crunch. - Sweet chili sauce: 1/4 cup adds that sweet flavor. - Garlic: 2 tablespoons provides a strong taste. - Soy sauce: 1 tablespoon adds depth. - Optional Cayenne: 1/4 teaspoon if you like heat. If you want more flavor, try adding herbs or spices. Use your favorite hot sauce to adjust heat, or try different sauces for variety. Preheat your oven to 400°F (200°C). This step is key for even cooking. Lining the baking sheet with parchment paper makes cleanup easy. It also helps the chicken bites crisp up without sticking. In a mixing bowl, combine the flour, garlic powder, salt, black pepper, and cayenne pepper. Stir until well mixed. This blend gives the chicken great flavor. Coat each chicken piece in the flour mix, shaking off any extra. Next, dip it in the beaten egg. Finally, roll it in panko breadcrumbs for a crunchy crust. Make sure each piece is fully covered. Place the coated chicken on the lined baking sheet. Drizzle a bit of olive oil over the chicken bites. This helps them get golden brown. Bake for 20-25 minutes, flipping halfway through for even cooking. While the chicken bakes, heat a saucepan on medium. Mix the sweet chili sauce, minced garlic, and soy sauce. Cook for 3-4 minutes, stirring often. The sauce should smell amazing and warm. Once the chicken is baked, remove it from the oven. Toss the hot chicken bites in the sweet chili garlic sauce until they are nicely coated. Transfer the sauced chicken bites to a serving platter. For a lovely finish, sprinkle sesame seeds and chopped green onions on top. This adds color and flavor! Panko breadcrumbs are key for a crunchy bite. They create a light and airy crust, unlike regular breadcrumbs. When you coat the chicken, make sure every side is covered. This ensures a nice crispness as they bake. For even baking, space the chicken bites well on the tray. This allows hot air to flow around them. If you crowd them, they may steam instead of crisp up. Flipping halfway through also helps each side get golden brown. To boost the taste, consider adding extra spices. A pinch of smoked paprika can add a nice depth. You can also sprinkle some onion powder for flavor. These additions keep things exciting. Marinating the chicken before cooking can deepen the flavors. Try soaking it in a mix of soy sauce and garlic for an hour. This gives a tasty boost that makes each bite special. Pair these bites with a sweet chili dip or a creamy ranch dressing. The contrast of flavors makes each bite more enjoyable. You can also serve them with fresh veggies like carrots or celery for a crunchy side. These chicken bites are great for parties or game days. They are fun finger foods that everyone loves. You can also serve them as a main dish with rice or a salad for a complete meal. {{image_2}} For those who need gluten-free options, you can swap out the all-purpose flour with a gluten-free blend. Look for blends made from rice flour, potato starch, or almond flour. This keeps the bites crispy and tasty without the gluten. If you're looking for a vegan option, use chickpeas or tofu instead of chicken. You can marinate the tofu in soy sauce and garlic for more flavor. Use a plant-based egg substitute to help the coating stick. You can adjust the spice level by using different peppers. If you want more heat, try adding diced jalapeños or serrano peppers to the sauce. For a milder flavor, skip the cayenne pepper in the coating. You can also switch up the sauce. Try adding sriracha for a spicy kick or hoisin sauce for a sweeter taste. Mix and match until you find your perfect blend! You can serve these bites on skewers for a fun twist. Just thread the chicken pieces onto wooden or metal skewers before baking. This makes them easy to grab and eat. For a nice plated presentation, place the bites on a large dish and drizzle extra sauce on top. Add some fresh herbs or edible flowers for color. It makes a great centerpiece for any gathering! After cooking, let your Sweet Chili Garlic Chicken Bites cool. Place leftovers in an airtight container. This helps keep them fresh. Store them in the fridge for up to three days. If you want the best taste, eat them within two days. To reheat, use an oven or air fryer for crunch. A microwave works too, but it may make them soggy. To avoid that, cover them with a damp paper towel. This keeps moisture in while heating. You can freeze these bites for later enjoyment. Allow them to cool completely first. Then, place them in a single layer on a baking sheet. Freeze for about two hours. Once they are firm, transfer them to a freezer bag. Make sure to remove as much air as possible. For reheating, use the oven for best results. Preheat it to 400°F (200°C) and bake for about 15 minutes. If they are still frozen, add five more minutes. This keeps them crispy and tasty. You can pair these bites with many tasty sides. Here are some ideas: - Steamed Rice: White or brown rice works well. - Veggies: Try a fresh cucumber salad or roasted broccoli. - Dipping Sauces: Serve with extra sweet chili sauce or soy sauce. - Noodles: Sesame noodles make a great, light side. These sides add color and flavor to your meal. Yes, you can prepare these bites in advance. Here’s how: - Prep Chicken: You can coat the chicken and store it in the fridge for up to 24 hours. - Make Sauce: Prepare the sweet chili garlic sauce ahead. Store it in the fridge for a few days. - Cooking: When ready, bake the chicken bites straight from the fridge. Adjust the baking time if needed. This makes meal prep easy and quick. Absolutely! If you want more heat, try these tips: - Cayenne Pepper: Add more cayenne to the flour mix. - Chili Flakes: Sprinkle red chili flakes on top before serving. - Hot Sauce: Mix hot sauce into the sweet chili sauce for extra kick. These changes will fire up your chicken bites! This blog post covered how to make Sweet Chili Garlic Chicken Bites. We looked at the key ingredients, including chicken breast, coating, and sauce. I shared step-by-step instructions from preparation to serving. Remember to use panko breadcrumbs for a crisp finish, and you can adjust flavor with spices. In the end, these bites offer great taste and flexibility. Enjoy experimenting with different flavors and serving styles. Trust me, they will impress anyone at your table.

Sweet Chili Garlic Chicken Bites Flavorful Snack Idea

When making the Apple Cider Donut Bundt Cake, you’ll need a few key ingredients. Here’s the list: - 2 cups apple cider - 1 cup granulated sugar - 1 cup brown sugar, packed - 3 large eggs - 1 cup unsweetened applesauce - ½ cup vegetable oil - 2 teaspoons vanilla extract - 3 cups all-purpose flour - 1 teaspoon baking powder - 1 teaspoon baking soda - 1 teaspoon ground cinnamon - ½ teaspoon ground nutmeg - ½ teaspoon salt - ½ cup granulated sugar (for coating) - 2 teaspoons ground cinnamon (for coating) These ingredients work together to create a moist and fluffy cake. The apple cider adds a rich flavor, while the sugars give it sweetness and structure. Applesauce keeps the cake moist without adding extra fat. Using fresh apple cider is best. It gives the cake a nice apple taste. If you don’t have apple cider, you can use store-bought cider too. Just check the label for added sugars. Make sure to measure your ingredients accurately. This will help your cake rise well and taste just right. A kitchen scale can help if you have one. Now that you have the ingredients ready, you can move on to mixing and baking your cake. Happy baking! 1. Preheat your oven to 350°F (175°C). This helps your cake rise well. 2. Grease and flour a 10-cup Bundt pan. This stops the cake from sticking. 3. Pour the apple cider into a medium saucepan. Heat it over medium heat. 4. Bring the cider to a boil. Once it boils, lower the heat. 5. Let it simmer until it reduces to about 1 cup. This takes about 15-20 minutes. 6. After reducing, let the cider cool a bit. 1. In a large bowl, mix the granulated sugar, brown sugar, and eggs. 2. Beat this mixture until it is smooth and creamy. 3. Now, add the applesauce, vegetable oil, vanilla extract, and reduced cider. 4. Mix well until all the wet ingredients blend together. 1. In another bowl, whisk together the flour, baking powder, baking soda, ground cinnamon, ground nutmeg, and salt. 2. Gradually add this dry mix to the wet ingredients. 3. Stir until just combined. Do not overmix, or your cake may turn dense. 4. Pour the batter into the prepared Bundt pan evenly. 5. Bake the cake for 50-60 minutes. A toothpick should come out clean when it’s done. 1. Once baked, let the cake cool in the pan for about 15 minutes. 2. Carefully invert it onto a wire rack to cool completely. 3. While the cake cools, mix ½ cup granulated sugar and 2 teaspoons ground cinnamon in a small bowl. 4. Brush the cooled cake lightly with melted butter. 5. Then, coat the cake with the cinnamon-sugar mixture for a sweet finish. To make a moist Apple Cider Donut Bundt Cake, start with the right measurements. Use a kitchen scale for accuracy if you can. Too much flour can dry out your cake. Mix your wet and dry ingredients carefully. Overmixing can make the cake tough. Stop mixing as soon as you see no dry flour. This helps keep your cake fluffy and light. Make sure your oven is at the right temperature. An oven thermometer can help you check this. If it's too hot, your cake will bake too fast. If it's too cool, it may not rise well. Using the right Bundt pan is key. A 10-cup pan works best for this recipe. Greasing and flouring the pan prevents sticking. This step is crucial for easy removal. When serving, let the cake cool completely. This will keep it from breaking. Brush the top with melted butter and coat it in cinnamon-sugar for a beautiful finish. Pair your cake with a warm drink like apple cider or coffee. These flavors go great together and enhance the cake's taste. You can also serve it with vanilla ice cream for a fun twist. {{image_2}} You can make this cake even better with a glaze. A simple glaze uses just powdered sugar and apple cider. Mix one cup of powdered sugar with two tablespoons of apple cider. Stir until smooth. Pour this over the cooled cake for a sweet finish. You can also add flavors to the glaze. Try maple syrup or vanilla extract for a twist. These flavors pair well with the spices in the cake. For a fun touch, add a pinch of nutmeg to the glaze. If you want a gluten-free cake, use a gluten-free flour blend. This keeps the cake light and fluffy. Make sure the blend has xanthan gum for texture. For a dairy-free version, swap out the vegetable oil for coconut oil. Use almond milk in place of any dairy. Applesauce adds moisture and flavor, so keep that in the recipe. Fall brings a chance to add spices. You can mix in ginger or cloves for a warm taste. These spices enhance the autumn vibe. You can also include fruits in your cake. Add chopped pears or cranberries for a fresh twist. These fruits mix nicely with the apple cider flavor. Each bite will be a surprise! To keep your Apple Cider Donut Bundt Cake fresh, store it properly. You can keep it at room temperature for a few days. Use a cake dome or wrap it in plastic wrap. This method keeps it moist. If you live in a hot or humid area, use the fridge. Just remember, it may dry out faster. Want to save some cake for later? Freezing is a great option! First, let the cake cool completely. Wrap it tightly in plastic wrap, then place it in a freezer bag. This helps keep it fresh. To thaw, take it out of the freezer and leave it in the fridge overnight. This method keeps the cake soft. Enjoy your cake later without losing its fluffy texture! Yes, you can use store-bought apple cider. It saves time and is easy to find. However, fresh apple cider gives a richer flavor. Fresh cider has more depth and a natural sweetness. Store-bought might be a bit thinner in taste. If you want the best flavor, go for fresh cider when you can. To make the cake less sweet, you can adjust the sugar levels. Try using less granulated sugar or brown sugar. Reducing the sugar by ¼ cup can help. You can also use unsweetened applesauce for moisture and taste. It will still keep the cake soft and yummy without all the sweetness. If you want to replace applesauce, there are good options. You can use mashed bananas or plain yogurt. Both add moisture and taste. Another option is pureed pumpkin, which works well too. Each choice brings its own flavor, so pick what you like best. To check if the cake is done, use a toothpick. Insert it in the center of the cake. If it comes out clean, the cake is ready. If it has batter on it, bake a bit longer. Usually, the cake takes about 50-60 minutes. Keep an eye on it as it bakes for perfect results. This blog post covered how to make a delicious apple cider Bundt cake. We started with a list of simple ingredients and followed clear steps. You learned tips to bake a moist cake and coat it perfectly. I also shared variations for extra fun and storage tips. Enjoying this cake with loved ones can make special moments even better. Happy baking!

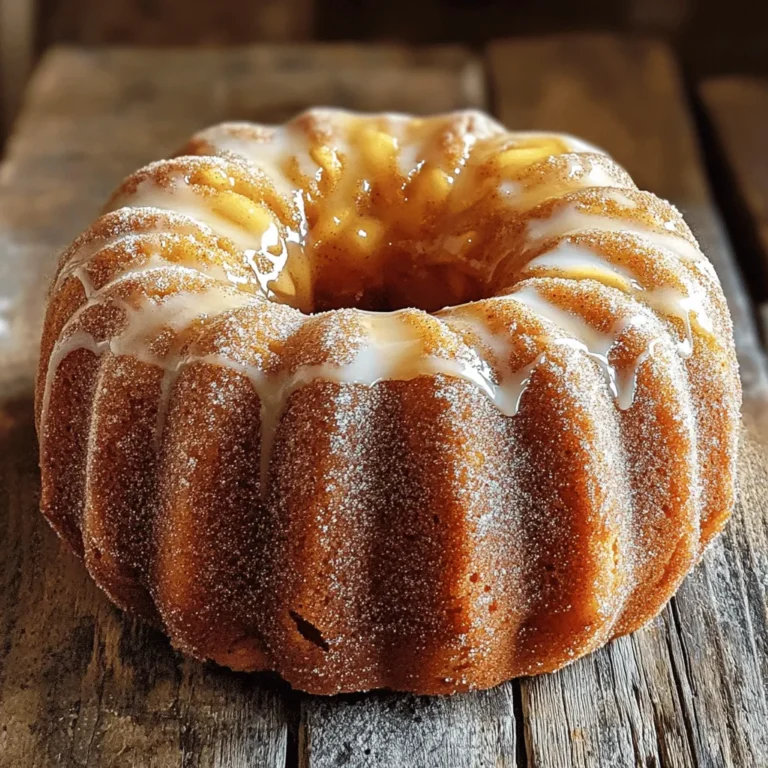
Apple Cider Donut Bundt Cake Simple and Fluffy Recipe

To create these tasty treats, gather the following ingredients: - 1 cup graham cracker crumbs - 4 tablespoons unsalted butter, melted - 1 cup canned pumpkin puree - 1 cup cream cheese, softened - 1/2 cup granulated sugar - 1/4 cup brown sugar - 2 teaspoons vanilla extract - 1 teaspoon pumpkin pie spice - 2 large eggs - 1 cup mini marshmallows - 1/2 cup chocolate chips - Whipped cream for topping - Chocolate syrup for drizzling These ingredients blend together to create a creamy, pumpkin-flavored cheesecake. The graham cracker crumbs act as a crunchy base. The pumpkin puree brings a rich flavor, while the cream cheese gives a smooth texture. You can customize your S'mores Pumpkin Cheesecake Cups. Here are some ideas: - Add crushed graham crackers on top for extra crunch. - Use caramel sauce instead of chocolate syrup for a different taste. - Swap mini marshmallows for larger ones or add peanut butter cups for fun. These variations let you make the dessert your own. Experiment with toppings to find your favorite mix. When selecting ingredients, freshness matters. Here are some tips: - Look for canned pumpkin with no added sugars or spices. - Choose cream cheese that is smooth and free from lumps. - Check the expiration dates on all products before buying. Fresh ingredients enhance flavor and texture. Always choose the best to make your S'mores Pumpkin Cheesecake Cups shine. First, set your oven to 325°F (163°C). Grab a muffin tin and line it with cupcake liners. In a medium bowl, mix the graham cracker crumbs with melted butter. Make sure it’s well combined. Spoon about 2 tablespoons of this mix into each muffin cup. Press down firmly. This forms a nice, sturdy crust for your cheesecake cups. Next, take a large mixing bowl. Beat the softened cream cheese with a hand mixer until it’s smooth. Add in the pumpkin puree, granulated sugar, brown sugar, vanilla extract, pumpkin pie spice, and eggs. Mix everything together until fully combined. Scrape the sides of the bowl as needed. The mixture should be creamy and smooth. Now, pour the pumpkin cheesecake mixture over the crusts in the muffin tin. Fill each cup about three-quarters full. Place the muffin tin in the oven and bake for about 25 to 30 minutes. The filling should set and have a slight jiggle in the center. After baking, sprinkle mini marshmallows on top. Return the tin to the oven for an extra 2 to 3 minutes. The marshmallows should turn golden and gooey. Once they’re done baking, take the cheesecake cups out of the oven. Let them cool at room temperature first. Then, place them in the fridge for at least 2 hours. This helps them set properly. When ready to serve, add a dollop of whipped cream on top. Drizzle with chocolate syrup and sprinkle more graham cracker crumbs for that extra touch. Enjoy your delicious treat! To get that perfect creamy texture in your cheesecake cups, mix the cream cheese first. Ensure it is soft before you add anything else. This makes mixing easier and smoother. After adding the pumpkin puree and sugars, mix well until there are no lumps. Don't overbeat the eggs; just mix until they blend in. This helps keep a nice texture without air bubbles. To get those beautiful golden marshmallows, watch them closely while they bake. After the cheesecake cups are done, sprinkle mini marshmallows on top. Then, return them to the oven for just 2-3 minutes. The goal is to melt them slightly and get that nice golden color. If they brown too fast, you can turn off the oven and let the residual heat finish the job. Cracks can be a real bummer, but there are ways to avoid them. First, make sure your ingredients are at room temperature. Cold ingredients can lead to uneven cooking. Bake at a low temperature, like 325°F, for even cooking. Once done, let them cool slowly in the oven with the door slightly open. This helps prevent sudden temperature changes, which cause cracks. {{image_2}} You can add chocolate chips for a fun twist. Just mix 1/2 cup of chocolate chips into the pumpkin cheesecake filling. This change gives your dessert extra sweetness and richness. The melted chocolate adds a nice texture too. You can also sprinkle some chocolate chips on top before baking for a more decadent treat. If you want to try a different shape, make mini s'mores cheesecake bars. Use a baking dish instead of muffin cups. Press the graham cracker mixture into the bottom and pour the filling on top. Bake it as you would the cups. Once cooled, cut into squares and top with mini marshmallows and chocolate syrup. These bars are perfect for sharing at parties. You can make these cups gluten-free by using gluten-free graham crackers. For a vegan option, swap the cream cheese for a vegan cream cheese alternative. Use flax eggs instead of regular eggs. Mix 1 tablespoon of ground flaxseed with 2.5 tablespoons of water for each egg. This change keeps the texture creamy while making it plant-based. Always check labels to ensure all ingredients fit your dietary needs. To keep your S'mores Pumpkin Cheesecake Cups fresh, store them in a sealed container. I recommend using an airtight container. This helps keep the flavors strong and the texture smooth. Place a layer of parchment paper between layers if stacking them. This will prevent sticking. When stored properly, these cheesecake cups last about 5 days in the fridge. Just make sure to keep them covered. If you notice any changes in color or smell, it’s best to toss them out. You want to enjoy them at their best! You can freeze the cheesecake cups for up to 3 months. First, make sure they are fully cool. Wrap each cup tightly in plastic wrap. Then, place them in a freezer-safe bag or container. When ready to eat, pull them out and let them thaw in the fridge. Avoid refreezing once they have thawed. Enjoy your tasty treats later! Yes, you can make these cups ahead. Prepare them up to 2 days in advance. Once baked, cool them, then chill in the fridge. This lets the flavors blend nicely. Just add toppings before serving to keep them fresh. To adjust sweetness, change the sugar amounts. You can add less granulated sugar. If you want more sweetness, add a bit more brown sugar. Taste the mixture before baking to find the right balance for you. If you don’t have mini marshmallows, use whipped cream. You can also try marshmallow fluff for a smooth texture. Another tasty option is small pieces of chocolate or even toasted coconut for a unique twist. In this post, we covered how to make S'mores Pumpkin Cheesecake Cups. We detailed essential ingredients, offered baking tips, and shared fun variations. You learned how to select fresh ingredients and get that perfect texture. Remember, small tweaks can change your dessert game. Whether you try the gluten-free option or the mini bars, have fun creating. With proper storage, you can enjoy these treats for days. Embrace your creativity and make this dessert your own!

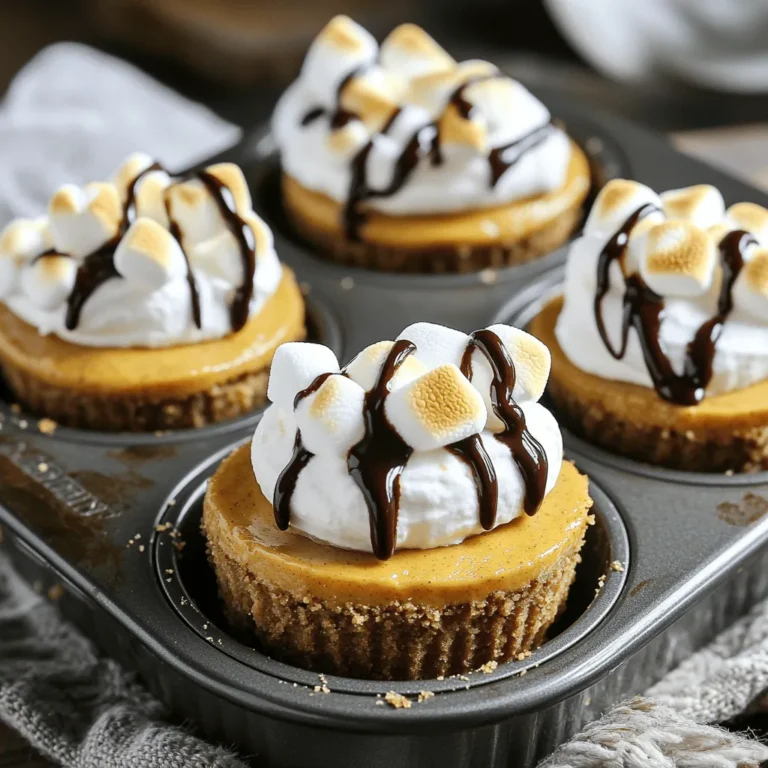
S’mores Pumpkin Cheesecake Cups Irresistible Dessert

- 4 salmon fillets (about 6 oz each) - 1 cup heavy cream - 1 cup grated Parmesan cheese - 4 cloves garlic, minced - 1 teaspoon Italian seasoning - Juice of 1/2 lemon - Fresh parsley, chopped - 1 cup baby spinach To make creamy garlic parmesan salmon, you need key ingredients first. Salmon fillets are your main star. They should be fresh for the best taste. Heavy cream gives the sauce its rich and creamy texture. Parmesan cheese adds a savory punch that makes this dish shine. Next, you will need seasonings. Garlic brings a robust flavor. Use fresh, minced garlic for the best results. Italian seasoning adds warmth and depth. Don't forget the lemon juice; it will brighten the dish and balance the creaminess. For optional garnishes, fresh parsley adds color and freshness. Baby spinach is a great way to add greens. It wilts nicely in the sauce and makes the dish look appealing. Gather these ingredients, and you’re ready to cook a meal that’s both tasty and impressive. First, season the salmon fillets. Sprinkle salt and black pepper on both sides. This adds flavor. Next, choose a large skillet. A heavy skillet works best. It heats evenly and keeps the salmon from sticking. Now, heat olive oil in the skillet over medium-high heat. When the oil is hot, place the salmon fillets skin-side down. Cook for about 4 to 5 minutes. You want the skin crispy. After that, carefully flip the fillets. Cook for another 3 to 4 minutes until they are done. The fish should flake easily with a fork. Remove the salmon from the skillet and set it aside. In the same skillet, add minced garlic. Sauté the garlic for about 1 minute. You want it to smell great, not burn. Then, pour in the heavy cream. Stir it all together and bring to a simmer. Add the grated Parmesan cheese next. Stir constantly until the cheese melts. The sauce should be smooth and creamy. Now, add the baby spinach to the sauce. Cook for 2 to 3 minutes until it wilts. Then, squeeze in the juice from half a lemon. This adds a nice zing. Finally, return the salmon to the skillet. Spoon some creamy sauce over the top. Let it simmer for another minute to heat through. - Check internal temperature: Cook the salmon until it reaches 145°F. Use a meat thermometer for accuracy. This ensures it's safe and delicious. - Tips for crispy skin: Start with a hot skillet. Dry the skin well before cooking. This helps it get that perfect golden crisp. - Adding more cheese: For a richer flavor, add extra Parmesan cheese. This makes the sauce even creamier. - Modifying cream thickness: If you like a thicker sauce, simmer it longer. This reduces the cream and intensifies the flavor. - Pairing sides like salad or garlic bread: A fresh salad or warm garlic bread pairs well. They balance the rich flavors of the salmon. - Plating for visual appeal: When serving, spoon the creamy sauce over the salmon. Add a sprinkle of parsley for color. This makes the dish look as good as it tastes! {{image_2}} - Alternative fish options: You can swap salmon for trout or tilapia. These fish cook well and have a mild taste, making them great for this dish. Choose fillets about the same size for even cooking. - Dairy-free variations: If you want a dairy-free option, use coconut milk or almond milk. Both give a creamy texture. For cheese, try a plant-based parmesan. This keeps the dish rich without dairy. - Adding herbs like dill or basil: Fresh herbs can brighten the dish. Dill pairs well with fish, adding a fresh, light flavor. Basil brings a sweet note. You can mix them in the sauce or sprinkle on top before serving. - Introducing other vegetables: You can add vegetables for more color and nutrition. Cherry tomatoes, bell peppers, or asparagus work great. Just toss them into the skillet with the spinach, letting everything cook together. - Oven-baked version: To bake, season the salmon and place it in a baking dish. Cover with the creamy sauce and bake at 375°F for about 15-20 minutes. This method keeps the salmon moist and lets the flavors blend nicely. - Grill preparation: For a smoky flavor, grill the salmon. Season and grill each side for about 4-5 minutes. After grilling, you can add the creamy sauce in a separate pan. This method gives a nice char and keeps the salmon juicy. To keep your creamy garlic parmesan salmon fresh, store leftovers in the fridge. Place the salmon in an airtight container. This helps prevent it from drying out. Make sure to store it within two hours of cooking. Leftovers stay good for up to three days. Choose glass or plastic containers with tight lids. They help keep the salmon moist. Avoid using metal containers, as they can affect the taste. If you have a lot, divide the salmon into smaller portions. This makes it easier to reheat later. When you want to enjoy your salmon again, reheat it gently. The best methods are using the stove or microwave. If using the stovetop, place the salmon in a pan over low heat. Add a splash of cream to keep the sauce creamy. Heat until warm, about 5-7 minutes. To keep the sauce from getting too thick, stir in a little extra cream or broth. This helps maintain the smooth texture. If microwaving, use a microwave-safe plate. Cover it with a damp paper towel. Heat for 1-2 minutes, checking often. Yes, you can freeze creamy salmon! However, the texture may change a bit after thawing. For best results, freeze the salmon without the sauce. Wrap each fillet in plastic wrap, then place in a freezer bag. Label the bags with the date. Use within three months for the best taste. To thaw, place the salmon in the fridge overnight. Avoid thawing in the microwave. It can cook the salmon unevenly. Once thawed, you can warm it up following the reheating instructions above. Creamy garlic parmesan salmon lasts about 3 to 4 days in the fridge. Store it in an airtight container to keep it fresh. Look for signs of spoilage like an off smell or slimy texture. If you notice either, it's best to toss it out. Keeping your dish properly stored helps it stay tasty for longer. Yes, you can make parts of this recipe ahead of time. You can prepare the salmon fillets and sauce in advance. Store them separately in the fridge. When you're ready to eat, reheat the salmon in a skillet over low heat. Warm the sauce gently to keep it creamy. This way, you save time and still enjoy a delicious meal. If you need a substitute for heavy cream, try using half-and-half or coconut milk. Both will change the flavor slightly but still work well. If you use half-and-half, the sauce may be less thick. When substituting, adjust the amount of cheese to keep it rich and creamy. This way, you can still enjoy a delightful dish! You learned how to prepare creamy garlic Parmesan salmon with easy steps. We covered key ingredients, cooking methods, and helpful tips for the perfect dish. You can make variations or substitute ingredients to fit your taste. Proper storage extends the life of your meal and maintains its flavor. Whether you enjoy it fresh or reheated, this recipe is sure to impress. Dive into this dish and enjoy a delightful, creamy salmon experience!

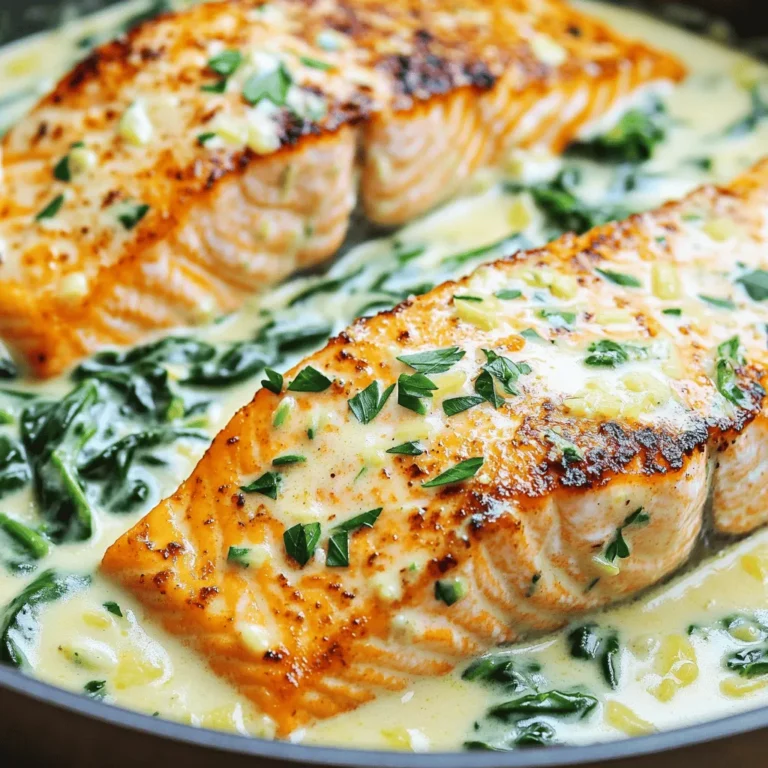
Creamy Garlic Parmesan Salmon Skillet Simple Recipe

- 1 cup unsalted butter - 1 1/2 cups brown sugar, packed - 2 large eggs - 1 teaspoon vanilla extract - 2 cups all-purpose flour - 1/2 teaspoon baking powder - 1/4 teaspoon salt - 1 cup pecans, roughly chopped - 1/2 cup corn syrup - 1/2 cup granulated sugar You might want a vegan option. Use coconut oil instead of butter. Replace eggs with flaxseed meal mixed with water. For gluten-free blondies, try almond flour or a store-bought gluten-free blend. These will work well. If you need a nut-free version, skip the pecans. Use chocolate chips or dried fruit for extra flavor. 1. Preheat oven and prepare baking dish: Start by preheating your oven to 350°F (175°C). Grease a 9x13-inch baking dish with butter or cooking spray. This step makes it easy to remove your blondies later. 2. Brown the butter to perfection: In a medium saucepan, melt 1 cup of unsalted butter over medium heat. Keep stirring until it turns golden brown and smells nutty. This process takes about 5-7 minutes. Remove it from heat and let it cool a bit. 3. Combining butter and sugar: In a large mixing bowl, pour the browned butter and add 1 1/2 cups of packed brown sugar. Whisk them together until smooth. This mixture will give the blondies a rich, sweet flavor. 4. Adding eggs and vanilla: Next, add 2 large eggs, one at a time. Make sure to whisk well after each egg. Then stir in 1 teaspoon of vanilla extract. This adds warmth and depth to the flavor. 5. Preparing the pecan blondie batter: In another bowl, combine 2 cups of all-purpose flour, 1/2 teaspoon of baking powder, and 1/4 teaspoon of salt. Gradually mix this dry mixture into the butter-sugar mix. Stir until just combined, being careful not to overmix. 6. Swirling in corn syrup mixture: Fold in 1 cup of roughly chopped pecans. Pour the batter into your prepared baking dish and spread it evenly. In a small bowl, mix 1/2 cup of corn syrup with 1/2 cup of granulated sugar. Drizzle this mixture on top of the blondie batter. 7. Baking time and signs of doneness: Use a knife to swirl the corn syrup mixture into the blondie batter for a marbled look. Bake in the oven for 25-30 minutes. You’ll know they’re ready when the edges are golden brown and a toothpick comes out with a few moist crumbs. Let them cool for about 10 minutes before transferring to a wire rack. Enjoy this delightful treat! To make sure your blondies are just right, focus on their texture. Aim for a soft, fudgy center. They should not be too wet or dry. Mix just until the flour disappears. Overmixing can lead to tough blondies, so be gentle. Browning butter adds a rich flavor. To do this well, heat it slowly. Stir often to prevent burning. Look for a golden color and a nutty smell. It usually takes about 5 to 7 minutes. If you see dark bits, you may have burned it. Serve your blondies warm with a scoop of vanilla ice cream. The cold ice cream melts into the warm blondies. For a fun twist, drizzle more corn syrup on top. This adds a sweet touch. To make them look fancy, dust with powdered sugar. Use a fine sieve for even coverage. This simple step will impress your guests. Store your blondies in an airtight container. This keeps them fresh for up to a week. If they become a bit dry, place a slice of bread in the container. The bread will help keep them moist. When reheating, use the microwave. Heat for just a few seconds to warm them up. Avoid heating too long, or they will become tough. Enjoy your blondies warm, just like fresh out of the oven! {{image_2}} You can switch up the flavors in these blondies to suit your taste. - Chocolate chip variation: Add 1 cup of chocolate chips to the batter. The blend of chocolate and pecans is rich and amazing. - Adding spices for warmth: Stir in 1 teaspoon of cinnamon or nutmeg. These spices give the blondies a cozy, warm flavor. You can also adapt the blondies for different diets. - Sugar-free or low-sugar alternatives: Use a sugar substitute, like erythritol or monk fruit, in place of brown sugar. This keeps the sweetness while reducing calories. - Options for nut-free blondies: Simply leave out the pecans. You can replace them with seeds like pumpkin or sunflower for a nice crunch. Feel free to change the recipe with the seasons. - Fall-inspired blondies with pumpkin: Add 1 cup of pumpkin puree for a fall twist. This change makes the blondies moist and delicious. - Summer versions with seasonal fruit: Toss in 1 cup of fresh berries or chopped peaches. This adds a burst of flavor and freshness to each bite. How do I know when the blondies are done? You can tell the blondies are done by looking for golden edges. A toothpick inserted in the center should come out with a few moist crumbs. This means they are perfectly baked and ready to enjoy. Can I use different nuts in this recipe? Yes, you can use different nuts! Almonds, walnuts, or hazelnuts work well. Feel free to mix your favorite nuts for a unique taste. How to scale the recipe for more or fewer servings? To scale the recipe, you can easily double or halve the ingredients. For 24 blondies, double everything. For 6 blondies, halve the amounts. Just keep the baking time similar, but check for doneness. Substituting cornstarch for flour – is it possible? I do not recommend using cornstarch instead of flour. Cornstarch does not provide the same structure. Stick to all-purpose flour for the best results. How long do blondies last? If stored in an airtight container, blondies last for about 4-5 days. Keep them in a cool place to maintain their freshness. Can I freeze these blondies for later use? Yes, you can freeze blondies! Wrap them tightly in plastic wrap and place them in a freezer bag. They will stay fresh for up to 2 months. Just thaw them overnight in the fridge before enjoying. Each serving of my Brown Butter Pecan Pie Blondies has about 340 calories. Here’s how those calories break down: - Carbohydrates: 50 grams - Fats: 15 grams - Proteins: 4 grams These blondies are rich and satisfying. They pack a sweet punch with a nutty flavor. You can make these blondies lighter. Here are a few ideas: - Reduce sugar: Use less brown sugar or corn syrup. - Try natural sweeteners: Consider using honey or maple syrup. - Whole grains: Swap all-purpose flour for whole wheat flour for extra fiber. These tweaks help cut calories while keeping the yummy taste. To enjoy these blondies without guilt, follow these tips: - Serving size: Cut them into 12 equal squares. - Mindful eating: Savor each bite and enjoy the flavor. - Pair with fruit: Serve a small piece with fresh fruit for balance. These simple steps help you enjoy the treat while keeping portions in check. This blog post shared a simple and tasty blondie recipe. We covered the key ingredients, substitutions, and step-by-step instructions. Tips and tricks helped ensure your blondies turn out great every time. We also explored variations to suit your taste and dietary needs. Enjoy baking these delicious treats. They can be shared and customized for any occasion. With the right care, your blondies will be a hit at home or on special days. Happy baking!

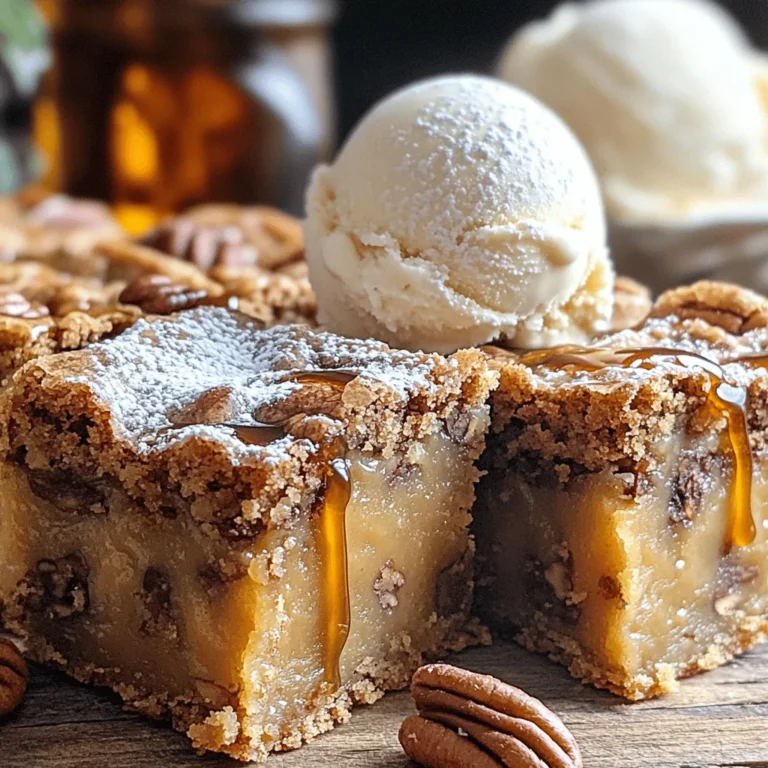
Brown Butter Pecan Pie Blondies Delightful Treat

PREV 1 … 35 36 37 … 86 NEXT
spicy fork kitchen

explore

DessertsDinnerAppetizersDrinks

Our Policies

  • Cookie Policy
  • Copyright Policy
  • Disclaimer
  • GDPR Policy
  • Terms Of Use
Back to Top
  • About
  • Contact Us
  • Privacy Policy
© 2026 spicy fork kitchen