FREE DINNER EBOOK! Get your copy!
  • Cookie Policy
  • GDPR Policy
  • Disclaimer
  • Terms Of Use
  • Visit my other site: Fun Cookie Recipes
spicy fork kitchen
  • Home
  • Dinner
  • Desserts
  • Drinks
  • Appetizers
  • Contact
  • About
  • Privacy Policy
  • Home
  • Dinner
  • Desserts
  • Drinks
  • Appetizers
  • Contact
  • About
  • Privacy Policy
  • Cookie Policy
  • GDPR Policy
  • Disclaimer
  • Terms Of Use
Visit my other site: Fun Cookie Recipes

HOME / CATEGORIES /

Latest

- 1 ½ cups graham cracker crumbs - ½ cup unsalted butter, melted - 2 tablespoons granulated sugar - 2 (8 oz) packages cream cheese, softened - 1 cup granulated sugar - 1 teaspoon vanilla extract - 2 large eggs - 2 cups apples, peeled and diced (such as Granny Smith or Honeycrisp) - 1 teaspoon cinnamon - ½ teaspoon nutmeg - 1 cup caramel sauce (store-bought or homemade) - ¼ cup chopped pecans (optional) To make caramel apple cheesecake bars, you need some tasty ingredients. First, graham cracker crumbs create a sturdy base. You mix these crumbs with melted butter and sugar. This forms a sweet crust that holds everything together. Next, cream cheese gives the bars a rich and smooth filling. Make sure the cream cheese is soft. This helps blend it well with sugar and eggs. The eggs keep the filling light and fluffy. Now, the stars of our bars are the apples. Granny Smith or Honeycrisp apples are best. They add a nice crunch and tartness. You can peel and dice them for easy mixing. Spices like cinnamon and nutmeg add warmth and flavor. They make the bars feel like fall. Finally, you can drizzle caramel sauce on top for that sweet finish. If you like, add chopped pecans for a crunchy bite. Gather these ingredients, and you are ready to start making your delicious dessert! 1. Preheat your oven to 350°F (175°C). Line a 9x13 inch baking pan with parchment paper. Leave some paper hanging over the edges for easy removal. 2. In a bowl, mix 1 ½ cups of graham cracker crumbs, ½ cup melted unsalted butter, and 2 tablespoons of sugar. Stir until it looks like wet sand. 3. Press the mixture evenly into the bottom of the pan to form the crust. Bake for 10 minutes, then let it cool slightly. 1. In a large bowl, beat 2 packages of softened cream cheese with an electric mixer until smooth. 2. Add 1 cup of granulated sugar and 1 teaspoon of vanilla extract. Mix well until combined. 3. Add 2 large eggs, one at a time. Mix on low speed until just combined. Don't overmix; this helps keep it creamy. 4. Gently fold in 2 cups of peeled and diced apples, 1 teaspoon of cinnamon, and ½ teaspoon of nutmeg. Make sure they are evenly spread throughout. 1. Pour the apple cheesecake filling over the baked crust. Spread it evenly with a spatula. 2. Drizzle 1 cup of caramel sauce over the top. Use a knife or toothpick to swirl it through the filling. 3. If you like, sprinkle ¼ cup of chopped pecans on top for added crunch. 1. Bake in the preheated oven for 35-40 minutes. The center should be set, and the edges will turn a light golden color. 2. After baking, let the cheesecake bars cool to room temperature. Then, refrigerate for at least 3 hours to set completely. 3. Once set, lift the bars from the pan using the parchment overhang. Slice them into squares and enjoy! To get the best texture for your cheesecake bars, avoid overmixing the filling. When you beat the cream cheese and sugar, mix just until smooth. Then, add the eggs one at a time. Keep the mixer on low. This helps keep the filling creamy and fluffy. When it’s time to cut your bars, use a sharp knife. Dip it in warm water for clean cuts. Wipe the knife after each slice. This way, you get neat squares that look great on a plate. For a twist on flavor, try substituting the apples. Fuji or Gala apples work well too. You can also add cranberries or raisins for a sweet touch. This gives your bars a fun mix of tastes. Consider adding toppings for extra flair. You can sprinkle chopped pecans on top. Or, drizzle more caramel sauce for a richer flavor. A pinch of sea salt can also elevate the taste. Experiment with what you like. This makes your dessert even more special! {{image_2}} You can switch up the apples in this recipe for fun. Try using Fuji or Gala apples for a sweeter taste. You could even add cranberries or raisins for a tart twist. This adds great flavor and texture to your bars. If you need a gluten-free option, use gluten-free graham cracker crumbs for the crust. You can also make these bars vegan. Replace cream cheese with a plant-based cream cheese. For eggs, use flaxseed meal mixed with water as a binder. These swaps keep the bars tasty and suitable for everyone. These cheesecake bars shine when paired with ice cream or whipped cream. A scoop of vanilla or a dollop of whipped cream brings out the flavors. For gatherings, serve the bars on a nice platter. Drizzle extra caramel sauce on top and sprinkle with cinnamon. Add a few apple slices for a beautiful finish. To keep your caramel apple cheesecake bars fresh, store them in an airtight container. Place a layer of parchment paper between the bars and the lid. This prevents sticking. Always refrigerate them if you plan to eat them within a few days. If you want to save some for later, you can freeze the bars. First, let them cool completely. Cut them into squares and wrap each piece tightly in plastic wrap. Then, place the wrapped bars in a freezer bag. Make sure to remove as much air as possible before sealing the bag. These bars will last about 5 days in the fridge. Look for any signs of spoilage, like a sour smell or discoloration. If you see these signs, it’s best to toss them. If frozen, they can last up to 3 months. When you’re ready to eat, just thaw them in the fridge overnight. Enjoy your tasty treat! Yes, you can use store-bought caramel sauce. It saves time and tastes great. If you want a fun twist, try making homemade caramel sauce. It’s simple and adds a personal touch. Just cook sugar, butter, and cream until smooth. Yes, you can make these bars ahead of time. Prepare them a day before your event. Just bake, cool, and refrigerate them. This way, they set well and flavors blend nicely. It also makes serving easy when you have guests. To get clean cuts, use a sharp knife. Dip the knife in hot water before cutting. Wipe it dry between slices. This helps keep the edges smooth. Another tip is to chill the bars before slicing. Cold bars cut much neater. If you have leftovers, store them in an airtight container. Keep them in the fridge for up to five days. You can also freeze them for later. Just wrap them tightly in plastic wrap and foil. Thaw in the fridge before serving again. This article covered how to make delicious caramel apple cheesecake bars from scratch. We discussed the key ingredients, like graham crackers and cream cheese, and provided step-by-step instructions for preparation and baking. I shared tips for perfecting texture, flavor enhancements, and storage ideas so you can enjoy these treats longer. Experiment with different fruits or dietary options to make them your own. With this guide, you can create a delightful dessert that's sure to impress! Enjoy your baking adventure!

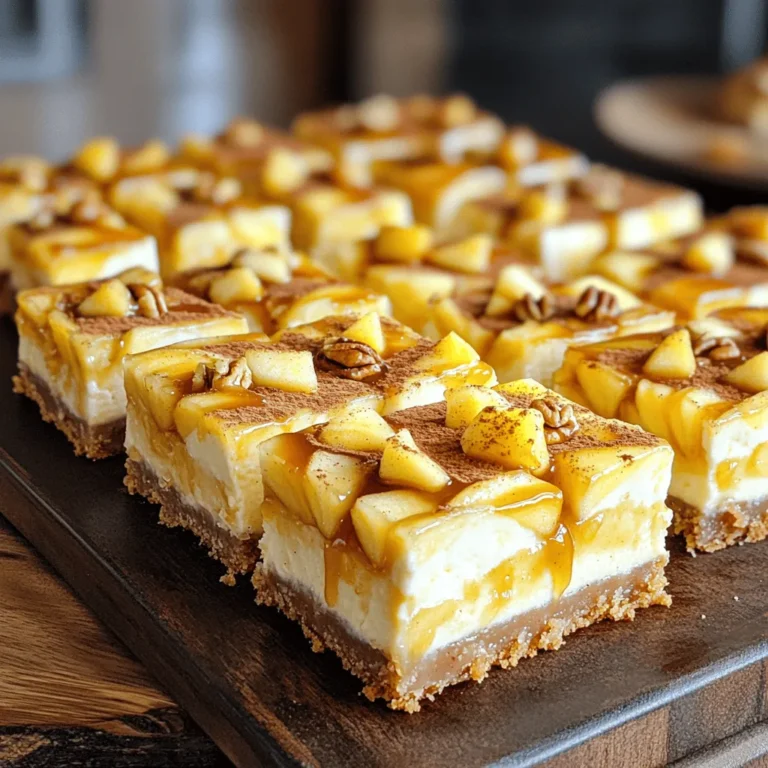
Caramel Apple Cheesecake Bars Tasty Fall Dessert

For this roasted fall veggie medley, you need a colorful mix of vegetables. Here’s what to gather: - 2 cups butternut squash, peeled and cubed - 2 cups Brussels sprouts, halved - 1 cup carrots, sliced - 1 red onion, cut into wedges - 1 cup beets, peeled and cubed These veggies give great flavor and texture. Each one adds its special touch to the dish. To make the medley pop with flavor, you will also need: - 4 cloves garlic, minced - 3 tablespoons olive oil - 1 tablespoon fresh rosemary, chopped - 1 teaspoon smoked paprika - Salt and pepper to taste - ¼ cup feta cheese, crumbled (optional) - 2 tablespoons balsamic glaze (optional for drizzling) These seasonings will elevate your dish. The feta cheese and balsamic glaze are great for a finishing touch. To make this recipe, you will need a few key items: - A large mixing bowl - A large baking sheet - Parchment paper - A sharp knife for chopping - A cutting board Having the right tools makes cooking easier. With this equipment, you’ll create a tasty, beautiful dish. First, you need to preheat your oven. Set it to 425°F (220°C). This high heat will help caramelize the veggies. Next, grab a large bowl. Add the following vegetables: - 2 cups butternut squash, peeled and cubed - 2 cups Brussels sprouts, halved - 1 cup carrots, sliced - 1 red onion, cut into wedges - 1 cup beets, peeled and cubed Drizzle 3 tablespoons of olive oil over the veggies. Then, add 4 cloves of minced garlic, 1 tablespoon of chopped rosemary, 1 teaspoon of smoked paprika, and salt and pepper to taste. Toss everything well. You want each piece to be coated in oil and seasoning. Now, line a large baking sheet with parchment paper. Spread the veggie mixture on the sheet in a single layer. Make sure to leave some space between them. This helps them roast evenly. Place the sheet pan in the preheated oven. Roast the veggies for about 25-30 minutes. Stir them halfway through for even cooking. They should be tender and slightly caramelized when done. Once they’re ready, you can sprinkle some crumbled feta cheese on top, if you like. A drizzle of balsamic glaze adds extra flavor too! Enjoy your roasted fall veggie medley warm. When picking veggies, look for bright colors and firm textures. Choose butternut squash that feels heavy for its size. The skin should be smooth and free of blemishes. For Brussels sprouts, select ones that are tight and green. They should feel firm in your hand. Carrots should be crisp and straight, not limp. Beets need to be firm and smooth, with no soft spots. Red onions should be dry and shiny, with no signs of sprouting. Fresh garlic will be plump and not sprouted. Picking the right veggies will make your dish taste amazing! To get veggies roasted evenly, cut them into similar sizes. Aim for about one-inch pieces. This helps them cook at the same rate. Spread them out on the sheet pan without crowding. If they are too close, they will steam instead of roast. Stir the veggies halfway through cooking. This will help them brown nicely on all sides. Use parchment paper for easy cleanup and to help them roast better. This roasted fall veggie medley is super versatile! You can serve it as a side dish with any main course. It also tastes great over a bed of greens. Add it to grain bowls for a healthy meal. Top with crumbled feta cheese for a salty kick. Drizzle some balsamic glaze for extra sweetness. You can even mix the leftovers into soups or pasta. Enjoy this dish in many ways! {{image_2}} You can change up the veggies based on what’s fresh. Instead of butternut squash, use sweet potatoes. They add a nice sweetness that pairs well with the other flavors. For Brussels sprouts, try green beans or cauliflower. These swaps keep the dish vibrant and fun. Remember to keep the same amount of veggies for best results. You can play with the seasonings to match your taste. Instead of smoked paprika, use cumin for a warm flavor. If you like spice, add a pinch of cayenne pepper. You can also mix in Italian herbs like oregano and thyme for a new twist. Experiment with seasonings to find what makes you happy. Want to boost flavor? Add nuts or seeds for crunch. Walnuts or pumpkin seeds work well here. You can also toss in some dried cranberries or raisins for a hint of sweetness. If you enjoy cheese, try goat cheese or Parmesan instead of feta. These options add layers of flavor to your veggie medley. To store your roasted fall veggie medley, let it cool first. Use an airtight container. Place the veggies inside and seal it tight. They will stay fresh for up to four days in the fridge. If you want to keep them longer, consider freezing. When you’re ready to eat those tasty veggies again, take them out of the fridge. You can reheat them in the oven or microwave. For the oven, set it to 350°F (175°C). Spread the veggies on a baking sheet. Heat for about 10-15 minutes, until warm. In the microwave, place them in a safe bowl. Heat for 1-2 minutes, stirring halfway through. If you want to freeze the roasted veggies, place them in a freezer-safe bag. Squeeze out as much air as you can before sealing. They can stay in the freezer for up to three months. When you’re ready to eat, thaw them in the fridge overnight before reheating. This helps keep their flavor and texture. Yes, you can use frozen vegetables. They save time and are easy to find. When using frozen veggies, your cooking time may change. Check the package for specific instructions. Frozen vegetables might not roast as well as fresh ones. They can become soft instead of crispy. If you want crispy veggies, I recommend using fresh ones. If you want a feta cheese substitute, try goat cheese or ricotta. Both options add creaminess. You can also use nutritional yeast for a dairy-free option. It gives a cheesy flavor without the cheese. For a nutty twist, try toasted pine nuts or sunflower seeds. Each choice adds a unique taste to your roasted veggie medley. To tell if the vegetables are done, look for some browning. Tenderness is also a good sign. You can poke them with a fork. If they go through easily, they are ready. Roasting takes about 25-30 minutes at 425°F. Stir halfway through to ensure even cooking. Enjoy the sweet and savory aroma that fills your kitchen! In this blog post, I shared how to make a tasty roasted fall veggie medley. We covered the best vegetables, seasoning ideas, and equipment to use. I provided easy step-by-step instructions for roasting, plus tips for choosing fresh veggies and ensuring even cooking. You can even try different seasonal swaps and flavor add-ins. Remember, proper storage and reheating will keep leftovers delicious. Enjoy experimenting with this simple dish! Your kitchen will smell amazing, and your taste buds will thank you.

Roasted Fall Veggie Medley Sheet Pan Delicious Dish

To make this tasty cinnamon swirl pumpkin bread, gather these key ingredients: - 1 cup pumpkin puree - 1/2 cup vegetable oil - 1 cup granulated sugar - 1/2 cup brown sugar, packed - 3 large eggs - 1 teaspoon vanilla extract - 2 cups all-purpose flour - 1 teaspoon baking soda - 1/2 teaspoon baking powder - 1 teaspoon ground cinnamon - 1/2 teaspoon ground nutmeg - 1/4 teaspoon ground ginger - 1/2 teaspoon salt - 1/4 cup granulated sugar (for swirl) - 2 teaspoons cinnamon (for swirl) In this recipe, we divide the ingredients into two groups: dry and wet. The wet ingredients include pumpkin puree, oil, sugars, eggs, and vanilla extract. These add moisture and flavor. The dry ingredients consist of flour, baking soda, baking powder, spices, and salt. They create structure and help the bread rise. This balance is key to a perfect loaf. You can swap some ingredients if needed. For pumpkin puree, try sweet potato puree for a twist. Use melted coconut oil instead of vegetable oil for a different taste. If you want less sugar, reduce the amounts of granulated and brown sugar. You could also try honey or maple syrup. For the flour, a gluten-free blend works well if you need a gluten-free option. Just ensure you use a blend meant for baking. First, set the mood by preheating your oven to 350°F (175°C). This is important for even baking. Next, grease a 9x5 inch loaf pan. Use butter or oil to keep the bread from sticking. You can also line the pan with parchment paper for easy removal. In a large bowl, mix the wet ingredients. Combine 1 cup of pumpkin puree, 1/2 cup of vegetable oil, and both sugars: 1 cup of granulated sugar and 1/2 cup of packed brown sugar. Add 3 large eggs and 1 teaspoon of vanilla extract. Whisk until it looks smooth and well combined. In another bowl, sift together the dry ingredients. You will need 2 cups of all-purpose flour, 1 teaspoon of baking soda, 1/2 teaspoon of baking powder, and spices: 1 teaspoon of ground cinnamon, 1/2 teaspoon of ground nutmeg, 1/4 teaspoon of ground ginger, and 1/2 teaspoon of salt. This helps mix and aerate the flour. Now, let’s make the cinnamon swirl. In a small bowl, mix 1/4 cup of granulated sugar with 2 teaspoons of cinnamon. This will create a sweet and spicy layer in your bread. Pour half of the pumpkin batter into the pan. Evenly sprinkle half of the cinnamon mix over it. Then, pour the rest of the batter into the pan, topping it with the remaining cinnamon mix. Use a knife to swirl it gently through the batter. Bake in the oven for 55–65 minutes. Check with a toothpick; it should come out clean when the bread is ready. After baking, let the bread cool in the pan for about 10 minutes. Then, transfer it to a wire rack to cool completely. Once cooled, slice the bread and serve it on a wooden board. Add a small bowl of butter or cream cheese on the side. A sprinkle of cinnamon on top of each slice adds a nice touch. Enjoy your treat! To bake the best cinnamon swirl pumpkin bread, avoid common mistakes. First, measure your ingredients carefully. Use the right cups for dry and wet items. Second, do not overmix your batter. Stir it gently just until combined. Overmixing can make the bread tough. Lastly, always check your oven temperature with a thermometer. Ovens can be off by a few degrees, affecting your bake. For a moist texture, use fresh pumpkin puree. Canned pumpkin works too, but check for pure pumpkin, not pie filling. Adding a mix of sugars helps create a nice balance of sweetness. Brown sugar gives depth, while granulated sugar adds lightness. Also, feel free to adjust spices to your taste. More cinnamon or a pinch of cloves can enhance the flavor profile. Having the right tools makes a big difference in baking. Use a sturdy mixing bowl and a good whisk for blending wet ingredients. A sifter helps combine dry ingredients well. Make sure your loaf pan is greased well to avoid sticking. Lastly, have a toothpick handy to check if the bread is done. It should come out clean when inserted into the center of your loaf. {{image_2}} You can add nuts or chocolate chips for extra flavor. Chopped walnuts or pecans work well. They add a nice crunch to the soft bread. If you prefer a sweeter touch, try semi-sweet chocolate chips. Mix in about 1 cup of either option when combining your wet and dry ingredients. This change makes the bread even more delightful. Feel free to switch up the spices. You can use allspice or cardamom for a different taste. A touch of clove can add warmth, too. If you want a citrus kick, try adding orange zest. Use about one tablespoon of zest for a bright flavor. These options keep your cinnamon swirl pumpkin bread exciting. To make this bread gluten-free, swap regular flour for a gluten-free blend. Look for a blend that works in baking. For a vegan version, you can replace eggs with flax eggs. Mix one tablespoon of ground flaxseed with three tablespoons of water for each egg. This allows everyone to enjoy this tasty treat. To keep your cinnamon swirl pumpkin bread fresh, wrap it tightly in plastic wrap. This helps to lock in moisture. You can also store it in an airtight container. Place it at room temperature for short-term storage. Avoid putting it in the fridge, as this can dry it out. If you want to save some for later, freezing is a great option. First, let the bread cool completely. Then, wrap it tightly in plastic wrap and then in aluminum foil. This double wrap prevents freezer burn. You can freeze it for up to three months. When you are ready to enjoy it, just thaw it in the fridge overnight. Cinnamon swirl pumpkin bread stays fresh for about three days at room temperature. If you follow the storage tips, it can last longer. In the fridge, it may last a week, but the texture may change. For the best taste, enjoy it fresh within a few days. Yes, you can make this bread in advance. It tastes great even after a day or two. Just store it in an airtight container. Keep it in a cool place to keep it fresh longer. You can also freeze it for up to three months. Just let it cool before wrapping it tightly. Cinnamon swirl pumpkin bread pairs well with many things. You can serve it with: - Soft butter - Cream cheese - A sprinkle of cinnamon sugar - Warm maple syrup These add flavor and make each slice more special. To check if the bread is done, insert a toothpick into the center. If it comes out clean, the bread is ready. You can also gently press the top. If it springs back, it’s done. Baking time is usually between 55 to 65 minutes. Yes, you can use fresh pumpkin. Just cook it until soft, then mash it well. Make sure to remove any extra water. This helps keep your bread from getting too wet. Using fresh pumpkin gives the bread a nice, fresh flavor. To slice the bread, wait until it cools. This helps keep the slices neat. Use a sharp bread knife for clean cuts. If you want perfect slices, chill the bread in the fridge for a bit. This makes it easier to slice without crumbling. You learned about the key ingredients and methods for making Cinnamon Swirl Pumpkin Bread. I shared how to mix wet and dry elements perfectly. You now know helpful tips to improve your baking. I also covered tasty variations and proper storage methods. Baking can be a fun, rewarding activity. With these insights, you can make delicious bread that everyone will love. Enjoy the process and share your results with friends and family!

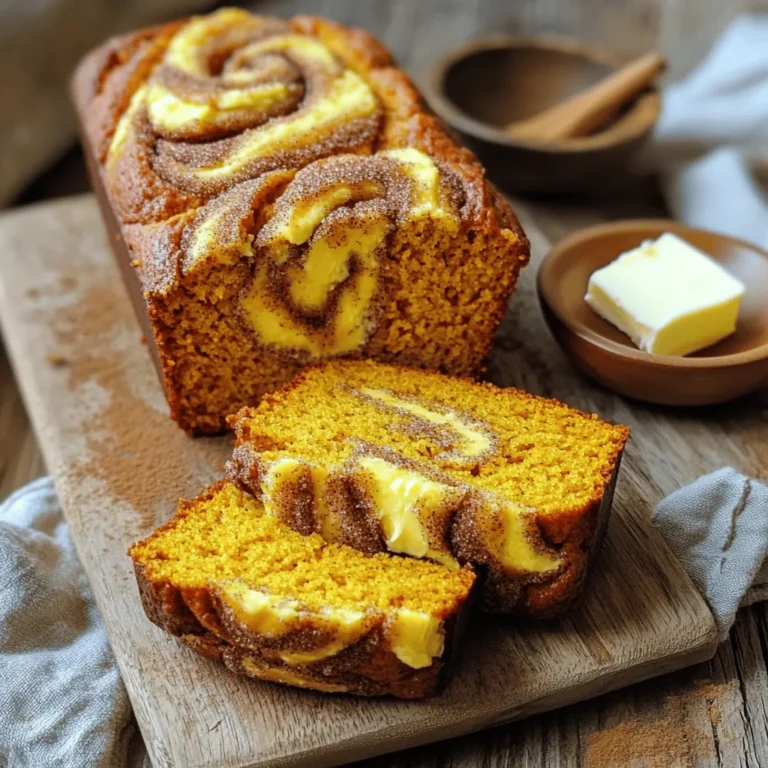
Cinnamon Swirl Pumpkin Bread Delightful Fall Treat

- 1 lb shrimp, peeled and deveined - 4 tablespoons unsalted butter - 4 cloves garlic, minced - 1 teaspoon smoked paprika - 1 teaspoon chili powder - 1 lime, juiced - Salt and pepper to taste - 8 small corn tortillas - 1 cup shredded cabbage - 1 avocado, sliced - Fresh cilantro, for garnish - Sliced radishes, for garnish When you shop for shrimp, look for fresh, bright colors. The shells should be clean and shiny. Choose shrimp with a mild ocean smell. If you can, buy shrimp that are wild-caught for better taste. For spices, fresh is best. Check the expiration dates on your paprika and chili powder. You want vibrant colors and strong aromas. For produce, select firm, ripe avocados and crisp cabbage. Fresh herbs like cilantro should be bright green and fragrant. If you want to switch proteins, use chicken or firm tofu. Both work well in tacos. For dairy-free options, try vegan butter or olive oil. Both will give you good flavor without dairy. Remember to keep the spices and fresh toppings for that tasty kick! Start by heating a large skillet over medium heat. This temperature works well for melting the butter. Add four tablespoons of unsalted butter to the skillet. Let it melt completely without burning. Once melted, add four minced garlic cloves. Sauté the garlic for about one minute. You want the garlic to smell amazing, not brown. The key here is to watch the heat closely and stir often. This ensures the garlic becomes fragrant but does not scorch. Now it’s time for the shrimp. Add one pound of peeled and deveined shrimp to the skillet. Cook the shrimp for about two to three minutes on each side. You know they are done when they turn pink and opaque. This means they are cooked through but still juicy. Don’t walk away during this step! Keep an eye on them. Overcooked shrimp can become tough and rubbery. Once cooked, squeeze in the juice of one lime and toss the shrimp to coat in the sauce. To warm the corn tortillas, you can use a separate skillet or the microwave. If using the skillet, heat it on medium and warm each tortilla for about 30 seconds per side. If using the microwave, wrap them in a damp paper towel and heat for about 20 seconds. This will make them soft and pliable. Now, it's time to build your tacos! On each tortilla, place a portion of the garlic butter shrimp. Top with a handful of shredded cabbage and a few slices of avocado. Garnish with fresh cilantro for that bright flavor. For an extra crunch, add sliced radishes on top. Serve the tacos on a colorful platter with lime wedges. Guests can squeeze lime over their tacos for added zest. This presentation makes the dish inviting and fun! To make your tacos even better, try adding spices and herbs. Here are some favorites: - Cumin: This spice adds a warm, earthy taste. - Oregano: A hint of this herb brings freshness. - Red pepper flakes: Use these for a spicy kick. - Fresh lime zest: This adds brightness and depth. Mix these into your shrimp while cooking for more flavor. You can also add fresh herbs like parsley or dill as a final touch. Cooking shrimp can be tricky. Overcooking makes them tough. Here’s how to avoid common mistakes: - Use medium heat: This helps shrimp cook evenly. - Watch the color: Shrimp turn pink when cooked. They should also be opaque. - Timing: Cook shrimp for 2-3 minutes per side. They cook fast! If you see them curling tightly, they may be overdone. Remove them from heat as soon as they are done. How you serve your tacos matters! Here are fun ways to present them: - Colorful platter: Use a bright dish to make your tacos pop. - Lime wedges: Serve these on the side for a zesty drizzle. - Extra toppings: Set out hot sauce, sour cream, or extra herbs. This lets guests customize their meal. For a final touch, sprinkle sliced radishes on top. They add crunch and color! {{image_2}} You can make your garlic butter shrimp tacos even more exciting with unique toppings. Consider adding: - Pico de gallo: This fresh salsa adds a zesty kick. - Mango salsa: Sweet and spicy, it balances the shrimp's flavor. - Pickled onions: They give a tangy crunch that brightens each bite. - Crumbled feta or cotija cheese: A creamy touch that enhances the taste. - Hot sauce: For those who love a spicy kick. Mix and match these toppings to create your own flavor profile. Get creative and enjoy the process! The tortillas you choose can change the whole taco experience. You have options: - Corn tortillas: These are traditional. They have a nice texture and flavor. - Flour tortillas: Softer and more flexible, they are great for holding fillings. - Lettuce wraps: A low-carb option, they add a fresh crunch. Experiment with these choices to find your favorite. Adjusting the spice level can make your tacos just right for you. Here are some tips: - Mild: Skip the chili powder for a gentle flavor. - Medium: Stick to the recipe, using both spices. - Spicy: Add extra chili powder or a pinch of cayenne pepper. You can also use spicy salsa or fresh jalapeños for added heat. Tailor the tacos to match your taste! To keep your garlic butter shrimp tacos fresh, store any leftovers in the fridge. Place the shrimp in an airtight container. Make sure to cool them down first. You can store the shrimp for up to three days. If you want to keep them longer, freeze them. Use a freezer-safe bag. Remove as much air as you can before sealing. Frozen shrimp can last for up to three months. When you’re ready to enjoy the leftovers, reheat them gently. Use a skillet over low heat for the best results. Add a small pat of butter to keep things moist. Stir often to prevent sticking. You can also microwave the shrimp, but check every 30 seconds. This way, you will avoid overcooking and losing flavor. The ingredients have different shelf lives. Cooked shrimp should be eaten within three days when stored in the fridge. Fresh shrimp should be cooked or frozen within one day of purchase. Corn tortillas can last for two weeks in the pantry. Remember to check the expiration dates on your spices. They are best when fresh but can last for months if stored properly. Yes, you can prepare garlic butter shrimp tacos ahead of time. However, I recommend cooking the shrimp just before serving for the best taste. You can prep ingredients like the garlic, spices, and toppings a day early. Store them in separate containers in the fridge. When you’re ready to eat, just cook the shrimp, warm the tortillas, and assemble the tacos. This way, everything stays fresh and delicious. Many sides go well with garlic butter shrimp tacos. Here are a few suggestions: - Mexican street corn: This dish adds a sweet and creamy flavor. - Black beans: They provide a nice protein boost. - Chips and salsa: A crunchy and zesty addition. - Guacamole: The creaminess complements the shrimp nicely. These sides enhance the meal and create a fun dining experience. Storing your leftovers correctly is key to keeping them tasty. For garlic butter shrimp tacos, follow these tips: - Shrimp: Place any leftover shrimp in an airtight container. They will last in the fridge for up to two days. - Tortillas: Store tortillas in a separate bag or container to keep them from getting soggy. - Toppings: Keep toppings like cabbage, avocado, and cilantro in their own containers to maintain freshness. When you’re ready to enjoy leftovers, just reheat the shrimp gently. This keeps the flavors intact and the texture just right. You’ve learned about making delicious garlic butter shrimp tacos. We covered key ingredients, like fresh shrimp and spices. I shared tips on selecting quality produce and even suggested substitutes. You now know how to cook shrimp perfectly and assemble your tacos. Remember to get creative with your toppings and spice levels. Proper storage can help you enjoy leftovers at their best. Enjoy experimenting with this tasty dish in your kitchen! Happy cooking!

Garlic Butter Shrimp Tacos Fresh and Flavorful Feast

- 2 pounds baby potatoes - 1/2 cup sour cream - 1/4 cup cream cheese, softened - 1 cup shredded sharp cheddar cheese - 1/2 cup cooked bacon bits (or chopped green onions for a vegetarian option) - 1/4 cup green onions, sliced - 1 teaspoon garlic powder - 1 teaspoon onion powder - Salt and pepper to taste - Olive oil for drizzling I love using baby potatoes for this dish. They cook fast and have a nice creamy texture. You’ll want to start with two pounds. They shine in this recipe. The sour cream and cream cheese give that rich, creamy feel. Mix in half a cup of sour cream and a quarter cup of softened cream cheese. Sharp cheddar cheese adds great flavor. You’ll use a full cup, divided. For protein, add bacon bits. If you want a veggie option, use green onions instead. Spices bring out the best in the potatoes. Use a teaspoon each of garlic powder and onion powder. Salt and pepper are key, too. Use them to taste. And don’t forget the olive oil for that crispy finish! Gather these ingredients, and you’re set for a delicious meal. Each one adds flavor and comfort to the dish. {{ingredient_image_1}} To begin, place 2 pounds of baby potatoes in a large pot. Cover them with water and add a pinch of salt. Bring the water to a boil. Cook the potatoes for about 15 to 20 minutes. You want them fork-tender, which means they should break apart easily when poked with a fork. After boiling, drain the potatoes and let them cool for a few minutes. Be careful when handling hot potatoes to avoid burns. Once the potatoes cool enough to touch, lay them on a parchment-lined baking sheet. Use a potato masher or the bottom of a glass to smash each potato down to about 1/2 inch thick. This helps them cook evenly. Next, drizzle olive oil over the smashed potatoes. Sprinkle with salt and pepper to taste. These simple steps enhance the flavor of your dish. Now, let’s prepare the cheesy topping. In a mixing bowl, combine 1/2 cup sour cream, 1/4 cup softened cream cheese, 1 teaspoon garlic powder, and 1 teaspoon onion powder. Mix until creamy and smooth. Spoon this cheese mixture generously over each smashed potato. For extra flavor, scatter 1/2 cup cooked bacon bits or chopped green onions on top. Finally, sprinkle 1 cup shredded sharp cheddar cheese over everything. Bake the potatoes in a preheated oven at 425°F (220°C) for 15 to 20 minutes. Look for melted, bubbly cheese and crispy edges. Enjoy! To get crispy edges on your loaded smashed potatoes, start with boiling them just right. Aim for fork-tender, about 15-20 minutes. After smashing, drizzle olive oil generously over each potato. This helps them crisp up nicely in the oven. For a gooey cheese topping, mix half of your cheddar into the cheese blend before baking. This gives a rich base. Then, sprinkle the remaining cheese on top just before baking. This creates a delicious, gooey layer that pulls apart beautifully. You need a few key tools to smash and bake your potatoes. A good potato masher or the bottom of a glass works great for smashing. For baking, use a sturdy baking sheet lined with parchment paper. The parchment keeps the potatoes from sticking and helps with easy cleanup. One common mistake is overcooking the potatoes. If they’re too soft, they won’t hold their shape when you smash them. Watch the clock and test with a fork. Another mistake is mishandling the toppings. If you put too much cheese on too soon, it can burn. Layer it wisely for the best results. For dietary needs, bacon can be swapped with chopped green onions. This keeps the flavor and adds a fresh twist. If you need dairy-free options, use vegan cheese and plant-based sour cream for the same creamy texture. Pro Tips Choose the Right Potatoes: Baby potatoes are ideal for smashing as they have a creamy texture and hold their shape well during cooking. Don't Overcook: Keep an eye on the boiling time; overcooked potatoes can become mushy and difficult to smash. Customize Your Toppings: Feel free to add your favorite toppings like jalapeños, olives, or different types of cheese for a unique twist. Serve Immediately: These potatoes are best enjoyed fresh out of the oven when the cheese is gooey and the edges are crispy. {{image_2}} You can easily make loaded smashed potatoes vegetarian or vegan. For a vegetarian twist, swap bacon bits for chopped green onions. This adds a fresh taste and crunch. If you want a vegan option, replace the sour cream and cream cheese with dairy-free alternatives. Look for plant-based sour cream and cream cheese. Many brands offer great flavors that work well in this dish. Let your creativity shine with toppings and spices! Try adding crispy fried onions or jalapeños for a kick. You can also mix in spices like smoked paprika or cumin for a unique flavor. When it comes to cheese, experiment with different types. Gouda or pepper jack can add new taste dimensions to your loaded smashed potatoes. Feel free to mix and match your favorite toppings! You don't have to stick to just one cooking method. For a quicker option, use an air fryer. Cook at 400°F for about 12-15 minutes for crispy edges. If you have an Instant Pot, you can boil the potatoes first, then smash and bake. Want a smoky flavor? Grill the smashed potatoes on medium heat. They will get a delicious, charred taste. Each method offers a new way to enjoy this comfort food! To keep your loaded smashed potatoes fresh, store them in an airtight container. Allow them to cool before sealing. Place the container in the fridge. They can last for about three to four days. If you notice any off smells or discoloration, it’s best to toss them out. To reheat leftover potatoes, the oven is your best friend. Preheat it to 350°F (175°C). Place the potatoes on a baking sheet. Cover them with foil to keep them moist. Bake for about 15-20 minutes or until heated through. You can also use the microwave for quick reheating. Just cover them with a damp paper towel and heat for 1-2 minutes. This helps keep the texture nice. Freezing loaded smashed potatoes is a great way to save them. First, let them cool completely. Then, arrange them on a baking sheet in a single layer. Freeze them for about 1-2 hours. Once frozen, transfer them to a freezer bag or container. They can last up to three months. To thaw, move them to the fridge overnight. Reheat them in the oven for the best results. For loaded smashed potatoes, I recommend using baby potatoes. They are small, tender, and have a creamy texture. You can also use Yukon Gold potatoes. Their buttery flavor adds a nice touch to the dish. Avoid starchy potatoes like Russets, as they may become too mushy when smashed. Yes, you can prep loaded smashed potatoes ahead of time! Boil and smash the potatoes. Then, store them in the fridge without toppings. When you're ready to eat, add the toppings and bake them. This tip saves time and makes meal prep easy. You’ll know the potatoes are done when they are fork-tender. This means you can easily pierce them with a fork. Usually, boiling for 15-20 minutes works well. Keep an eye on them to avoid overcooking. You want them soft but not falling apart. If you want a different flavor, use Greek yogurt instead of sour cream. It has a similar creaminess and tang. For a dairy-free option, try using cashew cream. Both options give you a tasty twist while keeping the dish rich and creamy. Loaded smashed potatoes are easy and fun to make. We covered the main ingredients, how to prepare them, and tips for baking. You can change up flavors with different toppings or diets. Remember to avoid common mistakes like overcooking and to store leftovers properly. Enjoy your tasty creations and share them with friends. Cooking can be a fun experience, so be creative and explore!

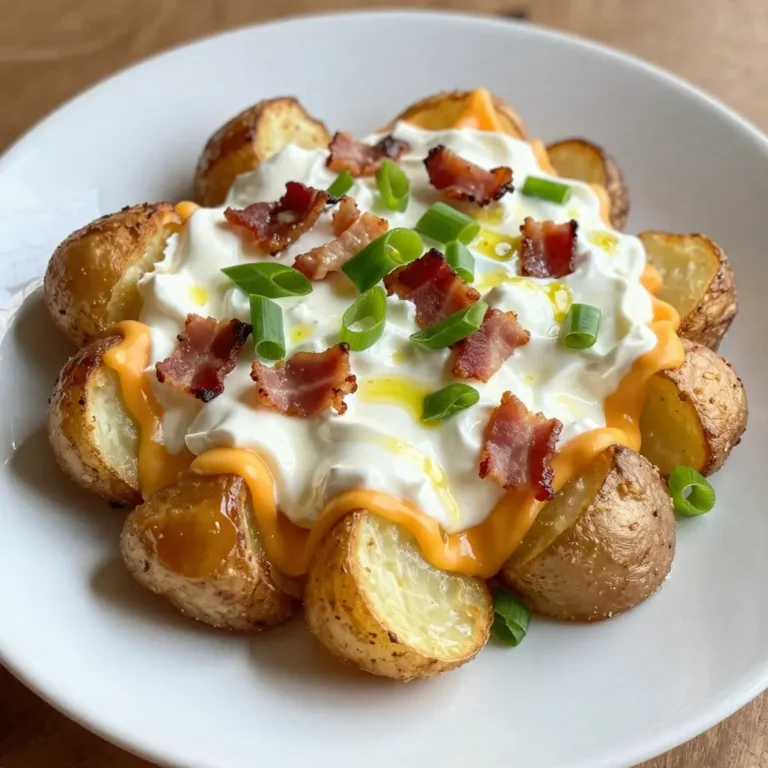
Loaded Smashed Potatoes Irresistible Comfort Food Dish

To make this creamy dish, gather these ingredients: - 8 oz. pasta (such as fettuccine or penne) - 1 cup pumpkin puree (canned or homemade) - 1 cup heavy cream - 1 cup grated Parmesan cheese - 2 tablespoons unsalted butter - 2 cloves garlic, minced - 1 teaspoon dried sage - 1/2 teaspoon nutmeg - Salt and pepper to taste - Fresh parsley, chopped (for garnish) I like to use fettuccine or penne for this recipe. Fettuccine holds the sauce well, while penne has great bite. Other types like rigatoni or linguine work too. Choose what you enjoy most. - Pasta: Look for dried pasta made from durum wheat. This type cooks well and gives a nice texture. - Pumpkin Puree: Canned puree is easy and consistent. If you make your own, use fresh, ripe pumpkins for the best flavor. - Heavy Cream: Choose heavy cream with no additives. This ensures a rich, creamy sauce. - Parmesan Cheese: Freshly grated cheese gives the best taste. Pre-grated cheese can have anti-caking agents that affect flavor. - Spices: Use fresh spices when possible. They add more flavor than older, stale ones. - Butter: Unsalted butter lets you control the salt in your dish. With these ingredients, you’ll create a delightful Pumpkin Alfredo Pasta Skillet that’s sure to impress! To start, grab a large skillet and melt the butter over medium heat. When the butter is melted, add the minced garlic. Sauté the garlic for about 1-2 minutes. You want it fragrant but not browned. Next, stir in the pumpkin puree. Mix it well with the garlic and butter. Cook this mixture for another 2-3 minutes. This step heats the pumpkin through and blends the flavors. Now, it's time to add the heavy cream. Pour it in gradually, stirring constantly. You want to bring this mixture to a gentle simmer. Then, add the grated Parmesan cheese, dried sage, nutmeg, salt, and pepper. Stir until the cheese melts and the sauce becomes creamy. This sauce will be rich and flavorful. While the sauce simmers, cook the pasta. Choose fettuccine or penne, as they work best. Follow the package instructions for cooking time. Aim for al dente, which means it should be firm but cooked through. Once cooked, drain the pasta but save about 1/2 cup of the pasta water. This water helps adjust the sauce later. Now, it's time to bring everything together. Add the cooked pasta to the skillet with your pumpkin Alfredo sauce. Toss the pasta gently to coat it in the sauce. If the sauce seems too thick, add a bit of the reserved pasta water. This will help to reach the perfect consistency. Taste the dish and adjust the seasoning if needed. Remove the skillet from the heat. Serve the pasta right away, garnished with freshly chopped parsley. This adds a nice touch of color and freshness to your meal. Enjoy the creamy, savory flavors of pumpkin Alfredo pasta! For a creamy texture in your pumpkin Alfredo, stir well as you cook. Start with melted butter and sauté minced garlic until fragrant. Then, slowly add heavy cream while mixing. This step helps blend the flavors. When you add Parmesan cheese, do it gradually. This way, it melts smoothly. If the sauce is too thick, use the reserved pasta water. Add it little by little to reach your perfect consistency. To boost the flavor of your Pumpkin Alfredo, use fresh herbs when possible. Dried sage gives a nice earthy taste, but fresh sage can add brightness. Nutmeg adds warmth, so don’t skip it! You can also try adding a squeeze of lemon juice for a zesty kick. If you like a bit of heat, sprinkle in some red pepper flakes. Each of these can lift the dish from good to great. Serving this dish well makes it more enjoyable. Use a large serving bowl or individual plates. Garnish with chopped fresh parsley for a pop of color. You can also add extra Parmesan cheese on top. For a bit of crunch, consider serving with toasted garlic bread on the side. This adds texture and complements the creamy pasta. Enjoy your meal while it's warm for the best taste! {{image_2}} You can boost the meal by adding protein. Chicken works great. Cook it in the skillet before you add the sauce. Use diced chicken breast for quick cooking. Shrimp is another tasty choice. Sauté it until pink and tender. If you prefer a plant-based option, try tofu. Cube it and sauté until crispy. Each protein adds flavor and makes the dish more filling. Seasonal veggies can make this dish more colorful and healthy. Try adding spinach for a pop of green. It wilts nicely in the sauce. You can also use roasted butternut squash for extra sweetness. Carrots add crunch and color. Just slice them thin and sauté along with the garlic. These veggies not only enhance taste but also boost nutrients. To make this dish vegan, swap out the dairy ingredients. Use coconut cream instead of heavy cream. It gives a rich texture with a hint of sweetness. Nutritional yeast can replace Parmesan cheese. It adds a cheesy flavor without dairy. Use vegan butter for cooking. This way, you keep all the creaminess and taste while sticking to a vegan diet. After enjoying your Pumpkin Alfredo Pasta Skillet, let any leftovers cool. Place the pasta in an airtight container. This keeps the dish fresh and tasty. Store it in the fridge for up to three days. If you notice any excess sauce, keep it separate to prevent sogginess. Want to save some for later? You can freeze the leftovers. First, let the pasta cool completely. Then, place it in a freezer-safe container or bag. Remove as much air as possible to avoid freezer burn. It will stay good for up to three months. When you’re ready to eat, thaw it overnight in the fridge. To reheat, you can use the microwave or the stove. If using the stove, add a splash of water or broth to the skillet. Heat it on low, stirring gently until warm. This helps keep the sauce creamy. If using the microwave, heat in short intervals. Stir between each interval to ensure even heating. Enjoy your flavorful pasta just like fresh! Yes, you can use fresh pumpkin. Start by roasting or boiling the pumpkin. Then, mash it until smooth. This method gives a fresher taste. Just make sure to drain any extra water. Fresh pumpkin may change the texture a bit. You can use milk mixed with cornstarch. This mix adds creaminess without the fat. Coconut milk or cashew cream also works well. These options keep the dish rich and tasty. Adjust the amount based on your desired thickness. The dish lasts about three to four days in the fridge. Store it in an airtight container to keep it fresh. Reheat it on low heat to avoid burning. Add a splash of water if it seems thick. Yes, you can prepare the sauce ahead of time. Store it in the fridge for up to two days. Cook the pasta fresh when ready to serve. This keeps the pasta from getting mushy. Mix it all together just before eating for the best taste. In this post, we covered how to make a tasty Pumpkin Alfredo Pasta Skillet. We talked about choosing the right ingredients and the best pasta types. I shared step-by-step instructions for making the sauce and cooking the pasta. You learned tips for perfect texture and flavor. There are fun variations to try and smart ways to store leftovers. Now you can impress friends and family with this dish. Enjoy creating your version of Pumpkin Alfredo Pasta!

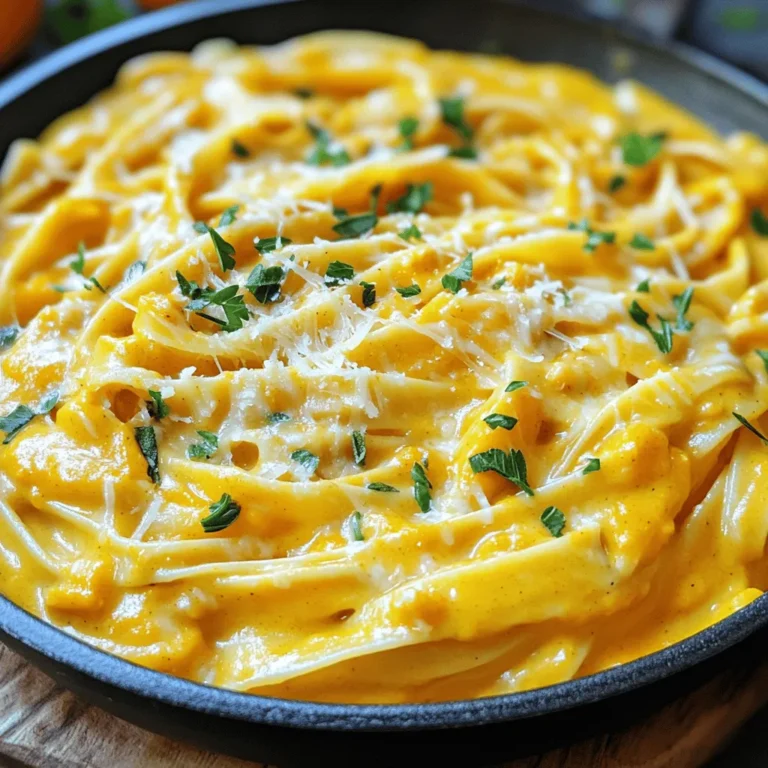
Savory Pumpkin Alfredo Pasta Skillet You’ll Love

- 1 cup fresh or frozen strawberries - 1 scoop vanilla protein powder - 1/2 cup low-fat cream cheese, softened - 1/2 cup Greek yogurt - 1/2 cup milk (dairy or non-dairy) - 1 tablespoon honey or maple syrup (optional) - 1/2 teaspoon vanilla extract - 1/2 teaspoon graham cracker crumbs (for garnish) - Ice cubes (optional) To make this smoothie, you need fresh or frozen strawberries. They give the drink a bright flavor. Next, grab some vanilla protein powder. This adds protein and keeps you full. Low-fat cream cheese creates a rich and creamy texture. Greek yogurt adds protein and tanginess. Milk of your choice makes it easy to blend. You can choose dairy or non-dairy options. If you like it sweeter, add honey or maple syrup. A little vanilla extract boosts the flavor. Finally, graham cracker crumbs make a fun topping. They remind you of cheesecake crust. If you want your smoothie colder and thicker, add some ice cubes. This mix of ingredients makes a tasty and healthy drink. - Combine ingredients in a blender. Start by adding 1 cup of strawberries, 1 scoop of vanilla protein powder, 1/2 cup of softened low-fat cream cheese, 1/2 cup of Greek yogurt, and 1/2 cup of milk to your blender. If you want it sweeter, add 1 tablespoon of honey or maple syrup and 1/2 teaspoon of vanilla extract. - Blend until smooth and creamy. Blend on high speed. Make sure everything mixes well. If the smoothie is too thick, you can add a bit more milk. For a thicker texture, toss in some ice cubes and blend again. - Adjust sweetness as needed. After blending, taste your smoothie. If you want it sweeter, add more honey or syrup and blend again. This step ensures it’s perfect for your taste. - Pour into a glass. Once your smoothie is smooth, carefully pour it into a tall glass. - Garnish with graham cracker crumbs. Sprinkle about 1/2 teaspoon of graham cracker crumbs on top for that cheesecake touch. It adds a nice crunch and flavor. - Serve and enjoy. Grab a straw or a spoon, and enjoy your strawberry cheesecake protein smoothie right away. It’s fresh and delicious! - Choosing ripe strawberries Use ripe strawberries for the best taste. They should be bright red and firm. Check for freshness by smelling them. A sweet scent means they are ready. - Tips for achieving the perfect consistency For a creamy smoothie, blend your ingredients well. Start with the softer items like cream cheese and yogurt. Add the strawberries next. If it’s too thick, pour in more milk. If it’s too thin, blend in some ice. - Recommendations for protein powder types Vanilla protein powder works well in this smoothie. It adds flavor without overpowering the strawberries. You can choose plant-based or whey protein, based on your needs. Each brings a nice boost of protein. - Adjusting thickness with ice Want a thicker smoothie? Just toss in some ice cubes. Blend again until smooth. This gives your drink a frosty texture, perfect for warm days. {{image_2}} You can easily change this smoothie to fit your needs. If you want a dairy-free option, try using vegan cream cheese or coconut yogurt. Almond or oat milk works great too. You can also swap strawberries for other fruits. Blueberries or bananas add their unique twist. If you want to change the sweetness, consider using stevia or agave syrup. These options keep the flavor rich without adding extra sugar. Want to get creative? You can add chocolate or cocoa powder for a richer taste. A tablespoon of cocoa gives it a fun twist. You can also add spices like cinnamon or nutmeg. Just a pinch can enhance the flavor and make it feel special. These small changes can make your smoothie exciting every time you make it. To keep your strawberry cheesecake protein smoothie fresh, follow these tips: - Refrigeration: If you have leftovers, store the smoothie in an airtight container. It stays fresh for up to 24 hours. Shake or stir it well before drinking to mix any separated layers. - Freezing: You can freeze the smoothie too. Pour it into ice cube trays or freezer-safe bags. It stays good for up to three months. To enjoy, let it thaw overnight in the fridge. Blend it again for a smooth texture. - Best Practices: Always consume the smoothie cold. If you need to, you can reblend it with a few ice cubes for extra chill. This smoothie is best enjoyed fresh but has a short shelf life: - In the Fridge: It remains fresh for about 24 hours. After that, it may lose flavor and texture. - Signs of Spoilage: Watch for changes in color or smell. If it smells sour or looks off, it's best to toss it. Enjoy every sip while it’s fresh! The protein content varies based on the protein powder used. A scoop typically has 20-25 grams of protein. With Greek yogurt and cream cheese, the total protein can reach 30 grams. This makes it a great choice for muscle repair and growth. Yes, you can make it vegan! Use a plant-based protein powder, almond cream cheese, and coconut yogurt. Replace dairy milk with almond or oat milk. This keeps the taste while making it vegan-friendly. To thicken your smoothie, add ice cubes. You can also use frozen strawberries instead of fresh ones. For more creaminess, add an extra scoop of Greek yogurt or cream cheese. Blend until smooth for the best texture. Yes, this smoothie is great for meal prep! You can blend it ahead of time and store it in the fridge for up to 24 hours. Just give it a good shake before drinking. For longer storage, freeze it in individual portions. Absolutely! Feel free to experiment with chocolate or strawberry protein powder. Each flavor will add a unique twist to your smoothie. Just remember to adjust the sweetness to match your taste. This smoothie is packed with nutrients. Strawberries are high in vitamins and antioxidants. Greek yogurt adds protein and probiotics for gut health. Cream cheese offers calcium. Honey gives natural sweetness and energy. Overall, it's a tasty way to boost your health! This blog post covered how to make a delicious protein smoothie with simple steps. We discussed tasty ingredients like fresh strawberries and creamy yogurt. You learned how to blend this mix until it’s smooth and how to add your favorite flavors or swaps. In summary, making this smoothie is easy and fun. Enjoy the process and experiment with your ingredients. A healthy smoothie can boost your day and support your goals. Grab your blender and get blending!

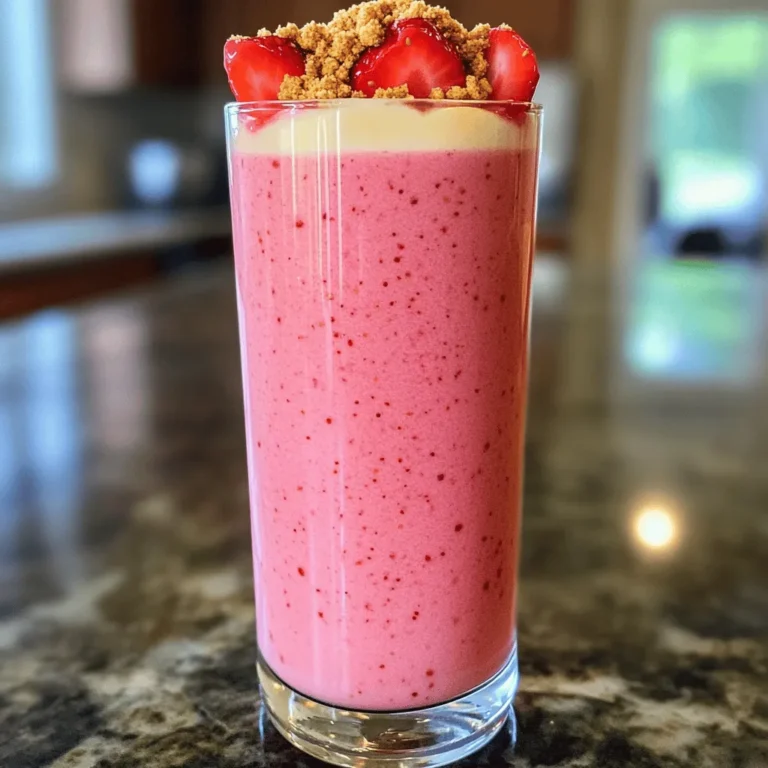
Strawberry Cheesecake Protein Smoothie Quick and Easy

- 1.5 pounds baby potatoes, halved - ¼ cup olive oil - 4 cloves garlic, minced I love using baby potatoes in this recipe. They are small and tender, making them perfect for roasting. When you cut them in half, the inside gets nice and fluffy. The skin gets crispy, which adds great texture. Olive oil helps the potatoes roast well. It gives them a lovely flavor and helps the garlic stick. Minced garlic brings a strong taste. It really makes these potatoes pop. - ½ cup grated Parmesan cheese - 1 teaspoon dried oregano - 1 teaspoon paprika Parmesan cheese is a star here. It melts slightly and creates a savory crust on the potatoes. Dried oregano adds a hint of earthiness. It pairs well with the garlic and cheese. Paprika gives a warm color and a slight kick. Together, these seasonings make the dish burst with flavor. - Fresh parsley, chopped - Salt and pepper Adding fresh parsley at the end brightens the dish. It adds a pop of color and a fresh taste. Salt and pepper are key seasonings. They enhance all the flavors in the dish. You can adjust them to your liking. This way, you make the potatoes just right for your taste buds. First, preheat your oven to 425°F (220°C). This step helps the potatoes cook evenly and get crispy. While the oven heats, line a large baking sheet with parchment paper. This keeps the potatoes from sticking and makes cleanup easy. In a large mixing bowl, add the halved baby potatoes. Pour in the olive oil and sprinkle the minced garlic, grated Parmesan cheese, dried oregano, paprika, salt, and pepper over the top. Now, toss the potatoes with the mixture. Make sure every piece is coated well. This ensures that the flavors stick to the potatoes as they bake. Spread the coated potatoes in a single layer on the lined baking sheet. This step is key for getting that crispy texture. Bake them in the preheated oven for 25-30 minutes. Flip the potatoes halfway through baking. This helps them brown evenly. Once they are golden brown and crispy, take them out of the oven. Let them cool for a couple of minutes. To finish, garnish with freshly chopped parsley before serving. This adds a pop of color and fresh taste. Enjoy your tasty sheet pan garlic Parmesan potatoes! To get that crispy finish, space your potatoes well on the baking sheet. If they touch, they will steam instead of crisp. Spread them out in one layer. This allows hot air to circulate and brown them evenly. Flipping the potatoes halfway through baking is key. This step helps both sides brown nicely. Use a spatula to turn them over gently. This way, you will get that golden crunch all over. If you need an alternative for olive oil, consider using avocado oil. It has a similar taste and can handle high heat. You can also try melted butter for a richer flavor. When it comes to herbs and spices, feel free to mix it up. Use fresh herbs like rosemary or thyme for a fragrant twist. You can also add a pinch of cayenne pepper for some heat. Pair your crispy potatoes with tasty dips. Sour cream or a spicy aioli works great. You can also try a tangy yogurt sauce for a fresh taste. For presentation, serve the potatoes in a rustic bowl. Sprinkle extra Parmesan and parsley on top for a pop of color. This makes the dish look inviting and delicious. {{image_2}} You can spice up your potatoes with a spicy garlic Parmesan version. Just add red pepper flakes to your mix. This gives a great kick without losing the garlic flavor. Another option is the herbed Mediterranean style. Use fresh herbs like thyme, rosemary, or basil. This change brings a bright taste to your dish. Mix these herbs with the garlic and Parmesan for a fresh twist. You can add other vegetables to your sheet pan. Carrots, bell peppers, or broccoli work great. Just chop them into similar sizes to the potatoes. This helps them cook evenly. Timing is key when adding different veggies. Root vegetables, like carrots, need more time. Add them to the pan at the same time as the potatoes. Leafy greens, like spinach, cook fast. Add them in the last 5-10 minutes of baking. For a gluten-free option, check your Parmesan cheese. Some brands may contain gluten. Most fresh cheeses are safe, but always read the label. If you're vegan, substitute the Parmesan with nutritional yeast. This gives a cheesy flavor without dairy. You can also use vegan butter instead of olive oil for a richer taste. To store your leftover garlic Parmesan potatoes, place them in an airtight container. Allow them to cool first. Once cool, seal the container tight. This helps keep them fresh. You can store them in the fridge for up to four days. If you want to freeze them, use freezer-safe bags. Remove as much air as possible before sealing. Label the bags with the date. Frozen potatoes can last up to three months. Remember to thaw them in the fridge before reheating. For the best reheating, use an oven. Preheat it to 375°F (190°C). Spread the potatoes on a baking sheet. Heat for about 10-15 minutes. This keeps them crispy and warm. You can also use an air fryer. It gives a nice crunch. Set the air fryer to 350°F (175°C) and heat for 5-7 minutes. To keep them crispy, do not cover them while reheating. Covering traps steam and makes them soggy. In the fridge, your garlic Parmesan potatoes last about four days. After that, they may not taste good. Look for signs of spoilage. If they smell bad, have a slimy texture, or change color, toss them away. Always trust your senses to keep food safe. To get crispy potatoes, follow these tips. First, cut each potato in half. This helps them cook faster. Use baby potatoes for the best texture. Next, make sure to coat them well in olive oil. The oil helps crisp up the skin. Spread the potatoes in a single layer on your baking sheet. If they are too close, they will steam, not crisp. Flip the potatoes halfway through baking. This ensures they cook evenly. Bake them at 425°F for 25-30 minutes. Look for a golden brown color. Lastly, let them cool for a few minutes before serving. This helps them firm up a bit more. Yes, you can use other potato types! If you want a different flavor, try Yukon Gold or red potatoes. They are creamy and delicious. You can also use fingerling potatoes for a fun shape. Just make sure to cut them into similar sizes. This helps them cook evenly. If you choose larger potatoes, cut them into smaller pieces. This way, they will cook just as fast. These potatoes go well with many dishes! Serve them alongside grilled chicken or steak. They also pair nicely with fish. A fresh salad adds a nice crunch to your meal. For a vegetarian option, try them with roasted veggies. You can also serve them with a dipping sauce, like ranch or aioli. This adds a fun twist! Enjoy your meal with friends and family for a great time. This article outlined how to make delicious sheet pan garlic Parmesan potatoes. We covered the main ingredients, step-by-step instructions, tips for crispiness, and variations. Remember, spacing your potatoes and flipping them helps them get crispy. Feel free to experiment with flavors or veggies. Store leftovers properly for later enjoyment. Cooking can be fun and rewarding, leading to tasty meals. Now, it’s time to try this recipe and enjoy your cooking!

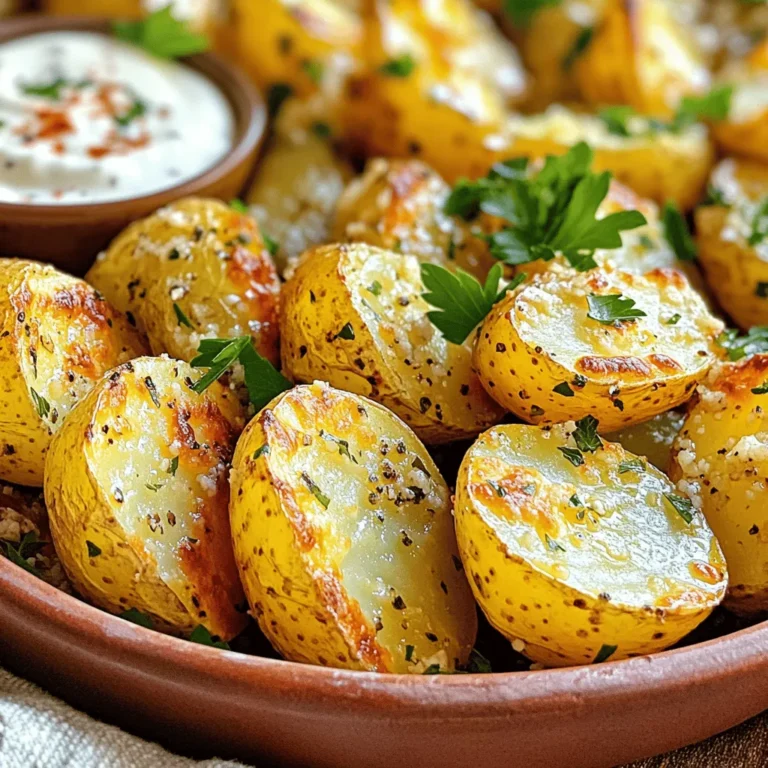
Sheet Pan Garlic Parmesan Potatoes Tasty and Simple

- 1 lb boneless chicken breasts - 1 cup buttermilk - 1 cup all-purpose flour - 1 teaspoon garlic powder - 1 teaspoon onion powder - 1 teaspoon paprika - 1 teaspoon cayenne pepper (adjust for spice preference) - 1/2 teaspoon salt - 1/2 teaspoon black pepper - 1/2 cup buffalo sauce - 2 tablespoons melted butter The core of this recipe is the chicken. I love using boneless chicken breasts. They cook quickly and are easy to handle. Cut them into bite-sized pieces. This makes them perfect for dipping. Next is the buttermilk. It keeps the chicken moist. The buttermilk also helps the flavors stick. Marinate the chicken in it for at least 30 minutes. This step is key for great taste. For the coating, we use all-purpose flour. Mixing it with spices adds depth. I use garlic powder, onion powder, paprika, cayenne pepper, salt, and black pepper. You can adjust the cayenne for your spice level. Finally, we have the sauce. Buffalo sauce adds that classic kick. Mixing it with melted butter balances the heat. This combo makes the chicken bites truly special. Make sure you have all these ingredients ready. They create the perfect flavor and texture for your Air Fryer Buffalo Chicken Bites. First, take the chicken pieces and place them in a bowl. Pour in the buttermilk. Make sure all pieces are coated. This step is key. Let the chicken marinate for at least 30 minutes. This time helps the meat become tender and soak up flavor. Get another bowl for the coating. Combine the flour, garlic powder, onion powder, paprika, cayenne pepper, salt, and black pepper. Stir this mixture well. This blend adds a great taste to the chicken bites. Now, it’s time to cook! Preheat your air fryer to 400°F (200°C) for about 5 minutes. While it heats, remove the chicken from the buttermilk. Let any extra buttermilk drip off. Dredge each piece in the flour mixture. Make sure every piece is well-coated. Place the coated chicken bites in the air fryer basket. Lay them in a single layer. Avoid overlapping to get even crispiness. You might need to cook in batches. Lightly spray the chicken with cooking spray. This helps make them extra crispy. Cook the chicken bites for 10-12 minutes. Flip them halfway through so they cook evenly. They should turn golden brown and be cooked through. While they cook, mix the buffalo sauce and melted butter in a bowl. Once the chicken bites are ready, transfer them to the bowl with the sauce. Toss gently to coat every piece. Then, return the coated bites to the air fryer for 2-3 more minutes. This final step helps set the sauce and adds a nice finish. To get the best crunch from your chicken, I recommend using cooking spray. It helps create a crispy texture that is hard to resist. Spray the chicken lightly before cooking. This little step makes a big difference in the final outcome. Marinating the chicken in buttermilk is key for flavor and tenderness. I suggest marinating for at least 30 minutes. This allows the chicken to soak up the buttermilk and spices. If you have more time, letting it sit for a few hours enhances the flavor even more. When cooking in the air fryer, avoid overcrowding the basket. Place the chicken bites in a single layer. This ensures even cooking and crispiness. If you have a lot of chicken, cook it in batches. It might take longer, but the results will be worth it. {{image_2}} You can make these buffalo chicken bites even spicier. Just add more cayenne pepper. Start with an extra half teaspoon. Taste the mixture before cooking. Adjust it according to your heat level. This gives you control over your spice. You can also try other hot sauces for a twist. If you want a healthier option, use whole wheat flour. It adds fiber and nutrients. You can also try almond flour or oat flour. These flours change the taste but still work well. They keep the bites light and crispy. Feel free to get creative with flavors. You can mix in different spices like cumin or smoked paprika. Try adding garlic or onion powder for extra zest. You can also use barbecue sauce instead of buffalo sauce. Each option brings a different taste to your bites. Enjoy experimenting with your favorites! After making Air Fryer Buffalo Chicken Bites, you may have some leftovers. To store them correctly, place the bites in an airtight container. You can keep them in the fridge for up to three days. If you want them to last longer, freeze them. Use a freezer-safe bag or container and remove as much air as possible. They can stay fresh for up to three months in the freezer. When you are ready to enjoy your leftover buffalo chicken bites, reheating them can be tricky. To keep them crispy, use the air fryer again. Preheat the air fryer to 350°F (175°C). Place the bites in the basket and heat for about 5-7 minutes. This method will help restore their crunch. If you prefer the oven, place them on a baking sheet and heat at the same temperature. The shelf life of your buffalo chicken bites depends on how you store them. In the fridge, they are safe to eat for three days. If frozen, they remain safe for three months. Always check for any off smells or changes in texture before eating. If you notice anything unusual, it’s best to throw them away. Yes, you can use frozen chicken for this recipe. However, it is best to thaw it first. Thaw your chicken in the fridge overnight or use the microwave. This helps the chicken cook evenly and absorb the buttermilk better. If you don’t thaw, the chicken may cook unevenly and stay tough. To make these buffalo chicken bites less spicy, reduce the cayenne pepper. You can start with just a pinch. Another option is to mix in more buttermilk to the buffalo sauce. This will cool down the heat. You can also serve with a creamy dip like ranch or blue cheese to balance the spice. Buffalo chicken bites taste great with several dipping sauces. Here are some tasty options: - Ranch dressing - Blue cheese dressing - Honey mustard - BBQ sauce - Garlic aioli These sauces add flavors that complement the spicy and tangy buffalo sauce. You now have a clear guide to make delicious buffalo chicken bites. We covered all the key ingredients, from chicken to sauces, and I shared step-by-step cooking instructions. Remember to marinate well and season to taste for the best results. Don't forget to explore variations for unique flavors, and follow my tips for crispy texture. With these insights, you can enjoy tasty, homemade buffalo chicken bites anytime. Happy cooking!

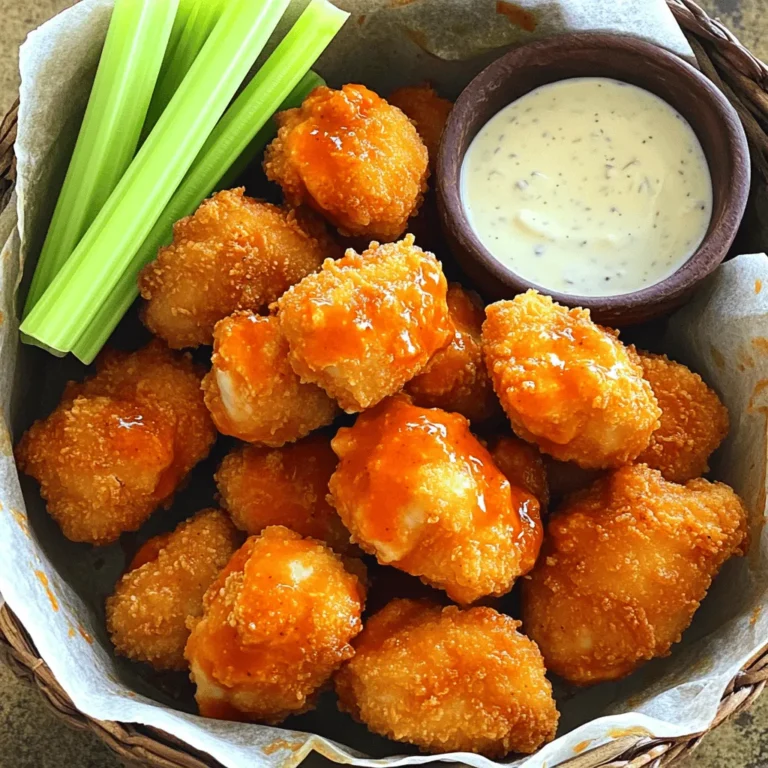
Air Fryer Buffalo Chicken Bites Crispy and Flavorful

To make the best double chocolate zucchini bread, you need these key ingredients: - 1 medium zucchini, grated (about 1 cup) - 1 cup all-purpose flour - 1/2 cup unsweetened cocoa powder - 1/2 teaspoon baking powder - 1/2 teaspoon baking soda - 1/4 teaspoon salt - 1/2 cup granulated sugar - 1/2 cup packed brown sugar - 1/3 cup vegetable oil (or melted coconut oil) - 2 large eggs - 1 teaspoon vanilla extract - 1/2 cup semi-sweet chocolate chips - 1/4 cup chopped walnuts or pecans (optional) These ingredients work together to create a moist and rich bread. The zucchini adds moisture without a strong flavor. The cocoa powder and chocolate chips give the bread its deep chocolate taste. You can easily swap some ingredients for others based on your needs: - Oil Options: Instead of vegetable oil, you can use melted coconut oil. It adds a nice flavor. - Sugar Types: If you want less refined sugar, use coconut sugar instead of granulated sugar. - Flour Alternatives: For a gluten-free option, use almond flour or a gluten-free blend. These substitutions help you tailor the recipe to your diet or what you have at home. You can make this bread even more special by adding extras: - Nuts: Chopped walnuts or pecans add a nice crunch. - Chocolate Types: Use dark chocolate chips or white chocolate chips for a twist. - Spices: A pinch of cinnamon or nutmeg can enhance the flavor profile. Feel free to experiment with these add-ins. They allow you to create a version of the bread that fits your taste. 1. Start by preheating your oven to 350°F (175°C). This ensures even baking. 2. Grab a 9x5-inch loaf pan. Grease it or line it with parchment paper. This helps the bread release easily. 3. In a medium bowl, whisk together: - 1 cup all-purpose flour - 1/2 cup unsweetened cocoa powder - 1/2 teaspoon baking powder - 1/2 teaspoon baking soda - 1/4 teaspoon salt Set this aside. 4. In a large bowl, mix: - 1/2 cup granulated sugar - 1/2 cup packed brown sugar - 1/3 cup vegetable oil (or melted coconut oil) Stir it until smooth. 5. Beat in: - 2 large eggs (one at a time) - 1 teaspoon vanilla extract Mix until everything is well combined. 6. Add in 1 cup of grated zucchini. Stir to distribute it evenly in the mix. 7. Gradually add the dry mix to the wet mix. Stir just until combined. Overmixing can make it tough. 8. Fold in: - 1/2 cup semi-sweet chocolate chips - 1/4 cup chopped walnuts or pecans (if using) Ensure they are evenly spread throughout the batter. 9. Pour the batter into your prepared loaf pan. Smooth the top with a spatula. - Bake in the preheated oven for 50-60 minutes. - Check doneness by inserting a toothpick into the center. It should come out clean or with a few moist crumbs. - If the top browns too quickly, cover it with foil halfway through baking. 1. Let the bread cool in the pan for 10-15 minutes. This makes it easier to remove. 2. Transfer it to a wire rack to cool completely. 3. For serving, slice the bread and place it on a wooden board. 4. Dust it with powdered sugar or drizzle with chocolate ganache for a special touch. 5. Enjoy it warm with a pat of butter or plain! To make sure your zucchini bread stays moist, use fresh zucchini. Grate it just before adding it to the batter. Squeeze out excess water, but keep some for moisture. This helps the bread stay soft and tender. Avoid overmixing the batter. Mix until just combined to keep it light. One common mistake is using too much flour. Always measure flour correctly by spooning it into the cup, then leveling it off. Another mistake is not checking for doneness. Use a toothpick to test if it comes out clean or with a few crumbs. If it’s wet, bake it longer. When grating zucchini, use a box grater or food processor for quick work. Make sure to remove any tough skin if needed. Measure the grated zucchini by packing it lightly into a cup. This ensures you have the right amount for your bread. {{image_2}} To make this bread gluten-free, swap the all-purpose flour with a gluten-free blend. Look for a blend that has xanthan gum. This will help mimic the texture of regular flour. You can also try using almond flour for a nutty taste. Just adjust the amount to one cup to keep it balanced. To make this recipe vegan, replace the eggs with flax eggs. Mix one tablespoon of flaxseed meal with three tablespoons of water. Let it sit for five minutes until it thickens. For the oil, use melted coconut oil or applesauce for a lighter option. This keeps the bread moist while keeping it plant-based. Add spices for extra flavor. A teaspoon of cinnamon or nutmeg works wonders. You can also try adding a splash of almond or orange extract for a unique twist. For a richer taste, mix in dark chocolate chips or even white chocolate. These small changes can make your zucchini bread even more delightful. To keep your double chocolate zucchini bread fresh, wrap it tightly in plastic wrap. This method seals in moisture. You can also place it in an airtight container. Store it at room temperature for up to three days. If you prefer, you can refrigerate it. Just make sure it is well-wrapped to avoid drying out. Freezing is a great option for long-term storage. First, let the bread cool completely. Then, wrap it in plastic wrap and aluminum foil. This protects it from freezer burn. You can freeze it for up to three months. When you're ready to enjoy it, thaw it in the fridge overnight or at room temperature for a few hours. At room temperature, your bread should stay fresh for about three days. In the fridge, it can last up to a week. If you freeze it, you can enjoy it for three months. Always check for any signs of spoilage before eating. This way, you ensure you get the best taste and quality. Yes, you can use frozen zucchini! Just thaw it first. Make sure to drain excess water. This helps keep your bread from being too wet. Frozen zucchini works well and saves time. You can use applesauce or mashed bananas as an egg substitute. Use 1/4 cup of either for each egg. This will keep the bread moist and tasty. You can also try flaxseed meal mixed with water. Use 1 tablespoon of flaxseed meal and 3 tablespoons of water for one egg. To check if the bread is done, insert a toothpick into the center. If it comes out clean or with a few moist crumbs, the bread is ready. If it has wet batter on it, bake a little longer. Absolutely! You can make mini loaves. Just divide the batter among mini loaf pans. Bake them for about 25-30 minutes. Keep an eye on them, as baking time varies. Enjoy your little treats! You learned how to make delicious double chocolate zucchini bread. We covered key ingredients, substitutes, and helpful tips. Remember to avoid common mistakes, like over-grating zucchini. Explore gluten-free and vegan options for more variety. Don't forget proper storage for that fresh taste. Enjoy baking and sharing this tasty treat with others! You can feel proud of your baking skills and share the joy of this unique recipe.

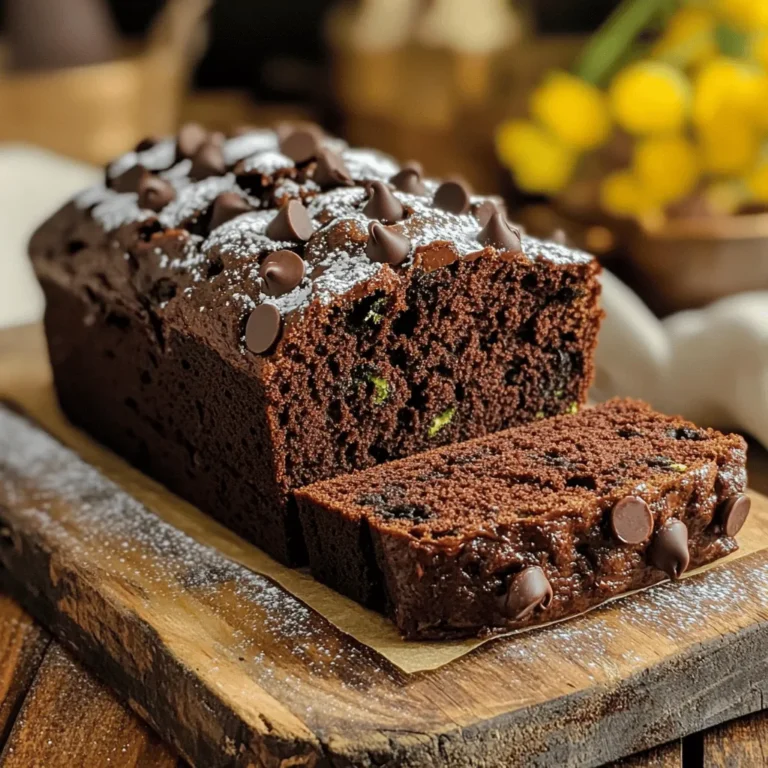
Double Chocolate Zucchini Bread Bakery Delight

PREV 1 … 32 33 34 … 86 NEXT
spicy fork kitchen

explore

DessertsDinnerAppetizersDrinks

Our Policies

  • Cookie Policy
  • Copyright Policy
  • Disclaimer
  • GDPR Policy
  • Terms Of Use
Back to Top
  • About
  • Contact Us
  • Privacy Policy
© 2026 spicy fork kitchen