FREE DINNER EBOOK! Get your copy!
  • Cookie Policy
  • GDPR Policy
  • Disclaimer
  • Terms Of Use
  • Visit my other site: Fun Cookie Recipes
spicy fork kitchen
  • Home
  • Dinner
  • Desserts
  • Drinks
  • Appetizers
  • Contact
  • About
  • Privacy Policy
  • Home
  • Dinner
  • Desserts
  • Drinks
  • Appetizers
  • Contact
  • About
  • Privacy Policy
  • Cookie Policy
  • GDPR Policy
  • Disclaimer
  • Terms Of Use
Visit my other site: Fun Cookie Recipes

HOME / CATEGORIES /

Latest

To create tasty chicken gyro bowls, you will need these main ingredients: - 1 lb boneless, skinless chicken thighs - 2 tablespoons olive oil - 2 cloves garlic, minced - 2 teaspoons dried oregano - 1 teaspoon smoked paprika - Salt and pepper to taste - 1 cup cooked quinoa - 1 cup cherry tomatoes, halved - 1 cucumber, diced - 1 red onion, thinly sliced - 1 cup mixed lettuce leaves - 1/2 cup Kalamata olives, pitted These ingredients combine to make a delicious, filling meal. The chicken thighs are juicy and flavorful, while the fresh veggies add color and crunch. The tzatziki sauce adds a cool touch to your gyro bowls. Here’s what you need: - 1 cup plain Greek yogurt - 1/2 cucumber, grated and excess water squeezed out - 2 cloves garlic, minced - 1 tablespoon lemon juice - Salt and pepper to taste - 1 tablespoon fresh dill, chopped This sauce is creamy and refreshing. It pairs well with the warm chicken and cool veggies. To prepare these chicken gyro bowls, gather these essential kitchen tools: - Mixing bowls - Grill pan or outdoor grill - Knife and cutting board - Grater for the cucumber - Measuring cups and spoons Having the right tools makes cooking easier and more enjoyable. You can create these bowls quickly and efficiently! To start, make the chicken marinade. In a bowl, mix together: - 2 tablespoons olive oil - 2 cloves garlic, minced - 2 teaspoons dried oregano - 1 teaspoon smoked paprika - Salt and pepper to taste Add 1 pound of boneless, skinless chicken thighs to the bowl. Make sure each piece is coated well. Cover the bowl and let it sit in the fridge for at least 30 minutes. If you have time, marinating for 2 hours gives even better flavor. Next, you’ll cook the chicken. Preheat your grill pan or outdoor grill to medium-high heat. Once hot, place the marinated chicken thighs on the grill. Cook for about 6-7 minutes on each side. You know it’s ready when the juices run clear. After cooking, let the chicken rest for a few minutes. This helps keep it juicy. Then, slice it into strips. Now, let's make the tzatziki sauce. In a mixing bowl, combine: - 1 cup plain Greek yogurt - 1/2 cucumber, grated and excess water squeezed out - 2 cloves garlic, minced - 1 tablespoon lemon juice - Salt and pepper to taste - 1 tablespoon fresh dill, chopped Stir everything together until smooth. Taste it and adjust the seasoning if needed. Refrigerate the sauce until you’re ready to assemble the bowls. It’s time to put everything together. Start by layering cooked quinoa at the bottom of each bowl. Next, add a handful of mixed lettuce leaves. Top this with sliced grilled chicken, halved cherry tomatoes, diced cucumber, thinly sliced red onion, and Kalamata olives. For the final touch, spoon a generous amount of tzatziki sauce over each bowl. Drizzle a little olive oil on top and, if you want, sprinkle some extra dill for garnish. Serve the bowls on rustic wooden boards or colorful plates. Adding lemon wedges can brighten up the look. Enjoy your meal! To boost the flavor of your chicken, marinate it well. Use a mix of olive oil, minced garlic, oregano, smoked paprika, salt, and pepper. Coat the chicken thighs fully. For best results, marinate for at least 30 minutes. If you have more time, let it sit for up to 2 hours. This step makes the chicken tender and flavorful. Cooking the chicken right is key. Preheat your grill pan or outdoor grill on medium-high heat. Grill the marinated chicken thighs for 6 to 7 minutes on each side. Check that the juices run clear when done. Let the chicken rest for a few minutes before slicing. This keeps it juicy and tasty. Making tzatziki is easy! Combine Greek yogurt, grated cucumber, minced garlic, lemon juice, salt, pepper, and chopped dill. Mix until smooth. If it’s too thick, add a bit of water or more lemon juice. Taste and tweak the seasoning as you like. Refrigerate it until you need it. A good tzatziki should be creamy and fresh. {{image_2}} If you want a vegetarian twist, swap the chicken for roasted chickpeas or grilled veggies. This keeps the flavor lively and adds a nice crunch. Try using bell peppers, zucchini, and eggplant for a colorful mix. You can also add some feta cheese for a salty kick. This option still pairs well with tzatziki and will keep your meal fresh and tasty. While quinoa is a great base, feel free to switch it up. Brown rice or bulgur wheat both offer a hearty texture. If you want something lighter, try cauliflower rice. It's low in carbs and still gives a satisfying bite. Each of these options absorbs the tzatziki well, enhancing the overall taste of your bowl. Chicken is delicious, but many other proteins work well too. Try grilled shrimp for a seafood twist. You could also use lamb, which adds a rich flavor. For a plant-based choice, tempeh or tofu marinated in the same spices makes a great alternative. Each protein brings its own unique taste, making your gyro bowl fun and different every time. To keep your Chicken Gyro Bowls fresh, store them in airtight containers. Place layers of chicken, quinoa, and veggies in the container. Keep the tzatziki sauce separate to prevent sogginess. You can store the chicken and veggies together, but make sure to cover them well. This helps to keep all flavors intact. When you are ready to enjoy your leftovers, reheat the chicken and quinoa in the oven or microwave. If using a microwave, heat in short bursts. Stir in between to ensure even heating. Avoid reheating the tzatziki sauce. Instead, serve it cold on top after warming the bowl. This keeps the sauce fresh and flavorful. Leftover Chicken Gyro Bowls can last up to three days in the fridge. After this time, the chicken may dry out or lose taste. For longer storage, consider freezing the chicken and quinoa. They can last for up to three months in the freezer. Just remember to label your containers with the date! Gyro bowls come from Greece. They take the flavors of traditional gyros and put them in a bowl. Gyros are made with spiced meat, usually lamb or chicken, cooked on a vertical rotisserie. People serve it with fresh veggies and sauce. The bowl version is easier to eat and fun to customize. Yes, you can use store-bought tzatziki if you're short on time. Many brands offer tasty options. However, making it at home is simple and fresh. You can adjust the taste to your liking. Homemade tzatziki uses Greek yogurt, cucumbers, garlic, and dill. This gives it a bright and creamy flavor. To make these chicken gyro bowls gluten-free, focus on the base. Use quinoa, which is naturally gluten-free. Check that your tzatziki sauce ingredients are also gluten-free. Most of the ingredients, like chicken, vegetables, and olives, are safe. Always read labels, especially for pre-made items. Yes, you can prepare parts of this dish in advance. Marinate the chicken the night before. Cook the quinoa and chop the veggies ahead of time. You can also make the tzatziki a day in advance. Just store everything in the fridge. This way, you save time when it’s meal time. You learned how to make tasty chicken gyro bowls, from marinating to serving. Use fresh ingredients and follow the steps for the best flavor. Try different proteins or vegetarian options to mix things up. Store leftovers well to enjoy another day. Enjoy cooking and share your gyro bowls with friends and family!

Chicken Gyro Bowls with Tzatziki Flavor Boost

- 3 cups cooked chicken (rotisserie option) - 8 oz cream cheese, softened - 1 cup sour cream - 1 can (10.5 oz) cream of chicken soup - 1 cup shredded cheddar cheese - 1 cup frozen peas and carrots (thawed) For this casserole, using rotisserie chicken makes it easy. You can shred it and save time. The cream cheese and sour cream create a rich, smooth base. They blend with the cream of chicken soup for a creamy texture. The shredded cheddar cheese adds a nice flavor and melts beautifully. The peas and carrots give the dish color and nutrients. - 1 teaspoon garlic powder - 1 teaspoon onion powder - 1 teaspoon dried parsley - Salt and pepper to taste The garlic and onion powders pack in flavor without being too strong. Dried parsley adds a fresh touch. Salt and pepper balance everything out. You can adjust these spices to fit your taste. - 2 cups crushed buttery crackers (like Ritz) - 4 tablespoons melted butter The crushed buttery crackers create a delightful crunch. Mixing them with melted butter helps them brown nicely. This topping makes the casserole feel special and adds a fun texture. Together, these ingredients create a warm, comforting dish. You can prepare this meal for family gatherings or cozy nights at home. It's a dish that brings everyone to the table with smiles. {{ingredient_image_1}} - Preheat your oven to 350°F (175°C). - Grease a 9x13 inch casserole dish. - In a large bowl, mix the softened cream cheese, sour cream, and cream of chicken soup. - Stir until the mixture is smooth and creamy. - Fold in the shredded chicken and thawed peas and carrots. - Add garlic powder, onion powder, dried parsley, salt, and pepper. - Mix until all the ingredients are well combined. - Transfer the chicken mixture into the greased casserole dish. Spread it evenly. - In another bowl, mix the crushed buttery crackers with melted butter. - Sprinkle the cracker mixture over the chicken layer. - Top it with shredded cheddar cheese, ensuring it covers the whole dish. - Bake for 30-35 minutes until bubbly and golden. - Let it cool for a few minutes before serving. - Use rotisserie chicken for ease. It saves time and adds great flavor. - Ensure cream cheese is fully softened. This helps create a smooth, creamy mix. - Garnish with fresh parsley. It makes the dish look nice and adds flavor. - Pair with a green salad or warm bread. These sides balance the meal well. - Avoid overmixing the chicken mixture. This keeps the chicken tender and moist. - Don't skip the resting time after baking. Letting it rest improves the texture and taste. Pro Tips Use Rotisserie Chicken: For added convenience and flavor, rotisserie chicken is a fantastic option that saves time on cooking and shredding. Cheese Variations: Feel free to experiment with different types of cheese, such as Monterey Jack or pepper jack, for a unique twist on the classic flavor. Add Extra Veggies: Incorporate additional vegetables like bell peppers or broccoli for an extra nutritional boost and crunchy texture. Make Ahead: This casserole can be prepared ahead of time and stored in the fridge. Just bake it when you’re ready to serve for a quick meal. {{image_2}} You can change up the cheese in your Million Dollar Chicken Casserole. Try Monterey Jack or even cream cheese. Both options melt well and add great flavor. For veggies, swap peas and carrots for broccoli or mixed frozen veggies. Each choice gives the dish a new twist. If you need a gluten-free option, use gluten-free crackers. They work just as well and keep the crunch. For a lighter version, swap the sour cream with Greek yogurt. This change cuts calories and adds protein without losing creaminess. Want to make this dish even more fun? Layer it with pasta for a hearty casserole. You can also serve it in individual ramekins. This makes serving easy and adds a nice touch for guests. Store leftover Million Dollar Chicken Casserole in the fridge. Use a tight lid or wrap it well. This keeps the casserole fresh. It can last about three to four days. Choose glass or plastic containers for easy storage. Make sure they are airtight to avoid drying out. You can freeze the casserole for later use. First, let it cool completely. Then, wrap it tightly with plastic wrap. You can also use aluminum foil for extra protection. For best results, eat it within three months. To reheat, thaw it in the fridge overnight before cooking. To heat up your casserole, you can use an oven or microwave. The oven gives the best texture. Preheat it to 350°F (175°C). Bake for 20-25 minutes until hot. For the microwave, use a microwave-safe dish. Heat for 3-5 minutes, stirring halfway through. Cover it with a damp paper towel to keep it moist. The Million Dollar Chicken Casserole stays fresh for about 3 to 4 days in the fridge. Make sure to store it in an airtight container. This helps keep out moisture and air. If you cover it well, it will stay tasty longer. Remember to check for any signs of spoilage before serving. Yes, you can prepare this casserole ahead of time. To do this, mix all the ingredients and place them in the casserole dish. Cover it tightly and store it in the fridge. You can bake it the next day. This makes dinner easy after a busy day. Just remember to add a few extra minutes to the baking time if it’s cold from the fridge. This dish pairs well with various sides. Here are some great options: - A fresh green salad adds crunch and color. - Garlic bread complements the creamy flavors. - Steamed veggies like broccoli or green beans add nutrition. - For drinks, a light lemonade or iced tea works nicely. These sides make the meal complete and satisfying. Enjoy your delicious casserole! This blog post detailed how to make a delicious Million Dollar Chicken Casserole. We covered the key ingredients like chicken, cream cheese, and cheddar, and shared step-by-step instructions. I also offered expert tips, serving ideas, and ways to store your leftovers. In conclusion, this dish is not only easy to prepare but also versatile. You can customize it to fit your taste. Enjoy making and sharing this tasty casserole with family and friends!

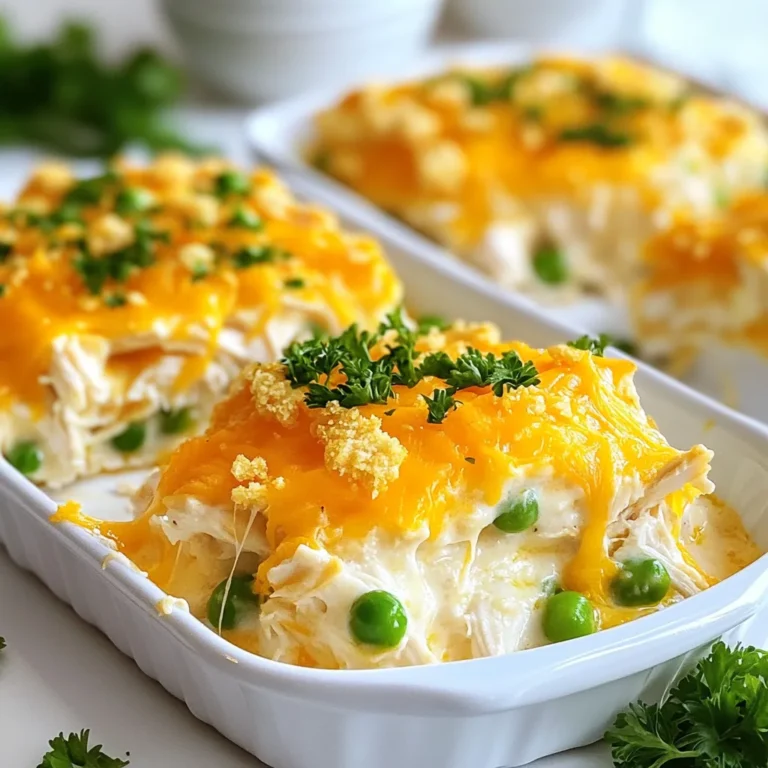
Million Dollar Chicken Casserole Easy Family Meal

- 1 ½ cups all-purpose flour - 1 teaspoon baking powder - ½ teaspoon baking soda - ½ teaspoon salt - 1 teaspoon ground cinnamon - ½ cup granulated sugar - ½ cup brown sugar, packed - ½ cup unsalted butter, softened - 2 large eggs - 1 teaspoon vanilla extract - 1 cup unsweetened applesauce - 1 medium apple, peeled and diced (preferably Granny Smith) - ½ cup all-purpose flour - ⅓ cup brown sugar, packed - 2 teaspoons ground cinnamon - ¼ cup unsalted butter, melted - ½ cup rolled oats The ingredients for apple cinnamon streusel muffins are simple yet vital for a tasty treat. You start with dry ingredients. They form the base of your muffins. The flour, baking powder, and baking soda create the right rise. Salt enhances the flavors, while cinnamon adds warmth. Next, you gather the wet ingredients. The sugars sweeten the muffins and help them brown. Softened butter adds richness. Eggs bind the mix together. Vanilla gives a lovely aroma. Applesauce brings moisture and adds apple flavor. The diced apple gives bites of juicy goodness. Lastly, the streusel topping is a must. It adds a crunchy, sweet layer on top. The oats give it a hearty texture. The ground cinnamon in the topping ties all the flavors together. When baked, this topping becomes a golden crown on your muffins. Each ingredient plays a role in making these muffins delightful. Enjoy the process of mixing and baking, and soon you will have a batch of warm, fragrant muffins to share. - Preheat the oven to 350°F (175°C). - Line muffin tin with paper liners or grease lightly. - In a bowl, whisk together 1 ½ cups of flour, baking powder, baking soda, salt, and 1 teaspoon of cinnamon. Set it aside. - In a large bowl, beat together ½ cup of softened butter, ½ cup of granulated sugar, and ½ cup of brown sugar until creamy. - Add 2 eggs, 1 teaspoon of vanilla extract, and 1 cup of applesauce. Mix until smooth. - Gradually mix the dry ingredients into the wet mixture. Stir gently until just combined. - Fold in 1 medium apple, peeled and diced, until evenly spread in the batter. - For the streusel topping, mix ½ cup flour, ⅓ cup brown sugar, 2 teaspoons of cinnamon, ¼ cup melted butter, and ½ cup rolled oats in a small bowl until crumbly. - Divide the muffin batter evenly into the muffin cups, filling each about 2/3 full. - Generously sprinkle the streusel topping over each muffin. - Bake for 18-20 minutes. Check with a toothpick; it should come out clean. - Avoid overmixing the batter. This keeps the muffins light and fluffy. - Use room temperature ingredients. This helps them blend better and rise nicely. - Check doneness with a toothpick. Insert it into the center; it should come out clean. - Serve warm or at room temperature. Warm muffins taste best and bring out flavors. - Dust with powdered sugar. This adds a nice touch and makes them look pretty. - Pair with apple slices for garnish. Fresh apple slices complement the muffins perfectly. - Store muffins in an airtight container. This keeps them fresh for several days. - Reheat muffins in the microwave for a few seconds. This helps restore their soft texture. {{image_2}} For the best muffins, I suggest using Granny Smith apples. They add a nice tartness that balances the sweetness. You can also try Honeycrisp or Fuji apples for a sweeter taste. If you want to mix it up, seasonal fruits like pears or berries work well too. If you need gluten-free muffins, use almond or coconut flour instead of all-purpose flour. These flours give a nice texture. For a vegan option, replace butter with coconut oil and use flax eggs instead of chicken eggs. Just mix one tablespoon of flaxseed meal with three tablespoons of water for each egg. Want to add a twist? Toss in walnuts or pecans for crunch. You could also add chocolate chips for a sweet touch. For extra warmth, sprinkle in some nutmeg or ginger. These spices bring a cozy flavor that pairs well with apples. Enjoy trying these fun changes! To keep your apple cinnamon streusel muffins fresh, store them in the fridge. They will last about five days. Make sure to place them in an airtight container. This keeps them moist and prevents them from drying out. You can also wrap them in plastic wrap before putting them in the container. This extra layer helps seal in flavor. You can freeze these muffins for longer storage. First, let them cool completely. Then, wrap each muffin tightly in plastic wrap. Place them in a freezer-safe bag or container. This method keeps their taste and texture intact. To thaw, just remove a muffin and let it sit at room temperature for about 30 minutes. You can also microwave it for a few seconds for a warm treat. Homemade muffins usually have a good shelf life. They generally last about one week at room temperature. However, the fridge or freezer extends their life. Signs your muffins have spoiled include a dry texture or an off smell. If you see mold, throw them away immediately. Enjoy your muffins while they are fresh for the best taste! Yes, you can use whole wheat flour. Whole wheat flour adds fiber and nutrients. It gives your muffins a nutty taste. The muffins may be denser but still tasty. You may need to add a bit more liquid. To make them healthier, reduce the sugar. You can cut the granulated sugar by half. Use unsweetened applesauce for added moisture. You can also replace some butter with Greek yogurt. This change lowers fat and adds protein. You can use several substitutes for eggs. Applesauce works well; use ¼ cup for each egg. Flaxseed meal mixed with water is another option. Mix 1 tablespoon of flaxseed with 2.5 tablespoons of water. Let it sit for a few minutes to thicken. Yes, you can make mini muffins! Fill each mini cup about halfway. Bake for 10 to 12 minutes. Check for doneness with a toothpick. Watch them closely, as they bake faster than regular muffins. To enhance cinnamon flavor, add a pinch of nutmeg. You can also increase the amount of ground cinnamon slightly. Consider using cinnamon extract for a stronger taste. Mixing cinnamon into the apples adds extra flavor as well. This blog shared a simple recipe for apple muffins with a crunchy streusel topping. You learned about the essential dry and wet ingredients needed and the step-by-step process to bake them. I also provided tips for perfect muffins and a few variations to explore. Remember, these muffins are great warm or stored for later. Have fun baking and enjoy every bite!

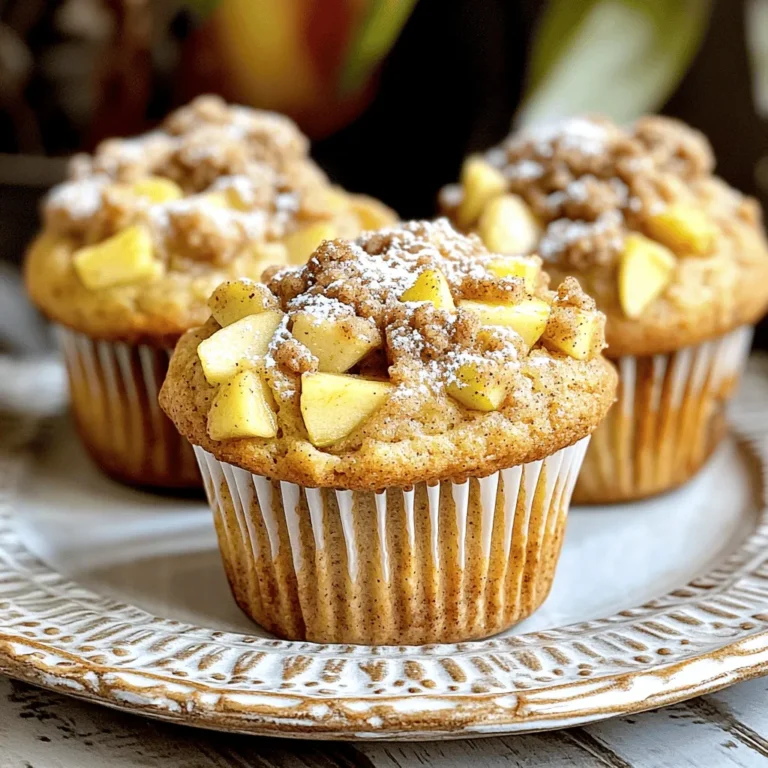
Apple Cinnamon Streusel Muffins Scrumptious Bake

To make a Protein Mocha Oatmeal Latte Bowl, you need: - 1 cup rolled oats - 2 cups unsweetened almond milk (or any milk of choice) - 1 tablespoon cocoa powder - 2 tablespoons protein powder (vanilla or chocolate) - 1 tablespoon maple syrup (or honey) - 1 teaspoon instant coffee or espresso powder - 1/2 teaspoon vanilla extract - Pinch of salt These ingredients blend to create a creamy and rich breakfast. The rolled oats provide fiber and energy. The almond milk keeps it dairy-free and light. Cocoa powder adds a chocolaty flavor, while protein powder boosts your morning. Sweeteners like maple syrup or honey give it just the right touch of sweetness. Instant coffee gives this bowl a mocha flavor. You can also add some fun toppings: - Sliced bananas - Chocolate shavings - Chopped nuts - Almond butter These toppings add texture and flavor to your oatmeal bowl. Bananas bring creaminess and natural sweetness. Chocolate shavings add a little indulgence. Chopped nuts give a nice crunch, and almond butter adds richness. Mix and match these toppings to make your bowl perfect! - In a medium saucepan, combine: - 1 cup rolled oats - 2 cups unsweetened almond milk - 1 tablespoon cocoa powder - 2 tablespoons protein powder - 1 tablespoon maple syrup - 1 teaspoon instant coffee - 1/2 teaspoon vanilla extract - A pinch of salt Mix these ingredients well. Stir until they blend smoothly. This mix will create the base of your bowl. - Bring the mixture to a gentle boil over medium heat. Watch closely as it heats up. Stir often to prevent sticking. Boiling allows the oats to absorb flavors. - Once the mixture boils, reduce the heat to low. Let it simmer quietly. This step cooks the oats without burning them. - Stir the oatmeal to reach your desired thickness. This usually takes about 5-7 minutes. If it looks too thick, add a splash of milk. - After cooking, remove the saucepan from heat. Pour the oatmeal into large bowls or individual servings. - Top your oatmeal with fun extras for added flavor: - Sliced bananas - A sprinkle of chocolate shavings - Chopped nuts - A drizzle of almond butter These toppings make your Protein Mocha Oatmeal Latte Bowl special. Enjoy your warm bowl, packed with energy! To make creamy oatmeal, start with rolled oats. These oats cook well and give a great texture. Use almond milk for a smooth base. If you want it creamier, add more almond milk or any milk you like. Adjust the thickness by adding more liquid as needed. If you prefer thicker oatmeal, reduce the liquid a bit. You can take your flavor up a notch. Try adding a pinch of cinnamon or nutmeg for warmth. Extracts, like almond or hazelnut, can add depth too. For sweetness, you can use maple syrup or honey. Taste as you go and find what works best for you. Want to save some time? Prepare overnight oats. Just mix your ingredients in a jar and leave it in the fridge. In the morning, you’ll have an easy breakfast. Meal prepping is also a smart move. Cook a big batch of oatmeal on Sunday. Then, store it in the fridge for the week. Just reheat when you're ready to eat. {{image_2}} You can change the taste of your Protein Mocha Oatmeal Latte Bowl easily. Try different protein flavors. Vanilla or chocolate protein powder adds fun. You can also use flavored almond milk. Almond milk with vanilla adds sweetness. Chocolate almond milk gives a richer taste. If you want alternatives for oats, try quinoa flakes or chia seeds. Both options cook fast. For a dairy-free or nut-free choice, use coconut milk instead of almond milk. Rice milk is another good option. These swaps keep your bowl tasty and healthy. You can make your bowl shine with seasonal toppings. In fall, add apples and cinnamon. They bring warmth and comfort. In summer, try fresh berries like strawberries and blueberries. They add a juicy pop to your meal. Toppings make your bowl exciting and fresh! To keep your Protein Mocha Oatmeal Latte Bowl fresh, store any leftovers in an airtight container. Place the container in the fridge. This will keep your oatmeal good for up to three days. If you want to keep it longer, consider freezing it. Transfer the cooled oatmeal to freezer-safe bags. Make sure to squeeze out as much air as you can before sealing. This helps prevent freezer burn. You can freeze the oatmeal for up to three months. When it's time to enjoy your oatmeal again, you have two options: the microwave or the stovetop. - Microwave Method: Pour the oatmeal into a microwave-safe bowl. Add a splash of almond milk to help it heat evenly. Microwave on high for about one minute. Stir and heat for an additional 30 seconds if needed. - Stovetop Method: Place the oatmeal in a saucepan over low heat. Add a splash of milk to keep it creamy. Stir while it heats for about 5 minutes or until it’s warm throughout. Both methods work well, but the stovetop gives a creamier texture. Choose what fits your time and mood best! Yes, you can! Feel free to use any milk you like. Here are some options: - Dairy milk - Soy milk - Oat milk These choices work well in this Protein Mocha Oatmeal Latte Bowl. Each type brings its own flavor and texture. If you want creamy oatmeal, dairy or oat milk is great. For a nut-free option, soy milk is perfect too. Making this recipe vegan is easy. You just need to swap a few ingredients. - Use a plant-based protein powder. Look for one made from pea or rice. - For sweeteners, choose maple syrup or agave nectar instead of honey. These changes will keep the dish tasty and plant-based. You won’t miss the dairy or animal products at all! Yes, you can prepare this dish in advance. It works well as overnight oats. Just follow these steps: 1. Combine all ingredients in a bowl. 2. Cover and place in the fridge overnight. In the morning, your oats will be ready to eat. You can warm them up if you like. Add your favorite toppings before serving. This method saves time and gives you a quick breakfast option! This blog post covered how to make delicious oatmeal with rolled oats, almond milk, and cocoa powder. We explored cooking tips to achieve the perfect texture and flavor. You can personalize your oatmeal with tasty toppings and make it ahead for busy days. You also learned to store leftovers nicely. Try these tips and enjoy healthy oatmeal any time. With a few simple changes, you can create a tasty meal that suits you!

Protein Mocha Oatmeal Latte Bowl Energizing Breakfast

- 6 ripe tomatoes, chopped - 1 cup fresh basil leaves, torn - 1 large onion, diced - 4 cloves garlic, minced - 1 can (14 oz) of crushed tomatoes - 1 cup vegetable broth - 1 teaspoon dried oregano - 1 teaspoon sugar - ¼ cup heavy cream (optional for creaminess) - Salt and pepper to taste - 2 tablespoons olive oil Gathering fresh ingredients is key for the best taste. The ripe tomatoes bring sweetness. Fresh basil adds a bright flavor. Diced onion and minced garlic give depth. These ingredients form the base of your soup. Next, we add canned and dry ingredients. Crushed tomatoes enhance the tomato flavor. Vegetable broth adds richness and warmth. Dried oregano gives a hint of earthiness. Sugar balances the acidity of tomatoes. You can also add optional ingredients for creaminess. Heavy cream makes the soup rich and smooth. Salt and pepper elevate all the flavors. Olive oil adds a touch of luxury. Drizzling it on top before cooking enhances the dish. With these ingredients, you create a comforting meal. Each component works together to deliver a delicious taste. Start by chopping your fresh tomatoes. You will need six ripe tomatoes for the best flavor. Dice one large onion and set it aside. Next, mince four cloves of garlic. This adds a nice kick to your soup. Finally, tear one cup of fresh basil leaves. Fresh basil brightens the dish and adds depth. In your slow cooker, layer the chopped fresh tomatoes and the can of crushed tomatoes. Then, add the diced onion and minced garlic. Pour in one cup of vegetable broth for a rich base. Next, sprinkle in a teaspoon of dried oregano and one teaspoon of sugar. The sugar balances the acidity of the tomatoes. Don’t forget to season with salt and pepper to taste. Drizzle two tablespoons of olive oil on top to enhance the flavor. Cover your slow cooker and set it to low for 6-8 hours or high for 3-4 hours. The goal is to make the tomatoes and onions soft. Once the cooking time is up, use an immersion blender to blend the soup until smooth. If you like a chunkier texture, blend only half the soup. If you want a creamier soup, stir in ¼ cup of heavy cream and warm it for another 10 minutes. Adjust the seasoning if needed and serve hot. Enjoy your delicious slow cooker tomato basil soup! To make your soup burst with flavor, I suggest adding fresh herbs. Basil is key, but you might also try adding a bit of thyme or rosemary. A pinch of red pepper flakes can bring a nice kick. When it comes to blending, you have choices. If you use an immersion blender, the soup will be smooth. If you want it chunky, blend only half. This gives you a mix of textures. Presentation matters! Serve your soup in bowls with a drizzle of olive oil on top. You can also sprinkle fresh basil for a pop of color. Pair it with crusty bread or a fresh salad. This makes your meal feel special and complete. If you want a creamier soup, stir in heavy cream at the end. This adds richness and depth. For a vegan twist, use coconut milk or a nut-based cream instead. Both options keep it tasty without dairy. Feel free to adjust to your taste! {{image_2}} You can make your soup heartier by adding proteins. - Incorporating beans or lentils: Black beans or lentils add great texture and protein. Just rinse and drain them before adding. They cook well in the slow cooker and soak up the soup's flavor. - Adding cooked chicken or turkey: Shredded chicken or turkey boosts the soup's richness. Stir it in during the last hour of cooking for a warm meal. You can change the soup's taste with a few simple tweaks. - Spicy variations with red pepper flakes: If you love heat, add red pepper flakes. Start with a pinch and taste as you go. This adds a kick without overpowering the dish. - Italian-inspired twists with additional herbs: Mix in oregano, thyme, or rosemary for an Italian flair. Fresh or dried herbs work well. Just remember, fresh herbs are often stronger, so use less. Using seasonal ingredients can enhance your soup. - Using seasonal vegetables during summer: In summer, add zucchini or bell peppers. Their fresh taste brightens the soup and celebrates summer’s bounty. - Incorporating winter veggies for a heartier soup: In winter, try carrots or sweet potatoes. They add warmth and a bit of sweetness, making the soup feel cozy and filling. To keep your delicious soup fresh, store it in airtight containers. This helps prevent spoilage and keeps flavors intact. You can refrigerate the soup for about 3 to 5 days. Just make sure it cools down to room temperature before sealing it up tight. If you want to save some for later, freezing is a great option. Let the soup cool fully before you freeze it. Use freezer-safe containers or bags to avoid freezer burn. When you’re ready to enjoy it again, thaw it in the fridge overnight. For a quick reheat, warm it on the stove or in the microwave. Just stir well to get an even heat. Don’t let any of that tasty soup go to waste! You can use leftovers in many ways. Try turning it into a rich pasta sauce by adding cooked pasta and some cheese. It also makes a great base for casseroles. Just mix it with cooked grains or proteins and bake until bubbly. This way, you create new meals without much extra work. The soup lasts about 4 to 5 days in the fridge. Make sure to store it in an airtight container. This keeps it fresh and safe to eat. Always check for any off smells or changes in texture before enjoying your soup again. Yes, you can make this soup vegan! To do this, simply omit the heavy cream. You can use coconut milk or almond milk for creaminess instead. These options add a nice flavor without dairy. Always check your vegetable broth to ensure it's vegan, too. Absolutely! You can use canned tomatoes. Just replace the 6 fresh tomatoes with an additional can of crushed tomatoes. This is a great shortcut and works well. The flavor will still be rich and tasty. Canned tomatoes also save time and add convenience to your cooking. This blog post shows you how to make a tasty Slow Cooker Tomato Basil Soup. We discussed fresh ingredients, canned options, and seasonings. I shared steps to prepare and cook your soup. You also learned tips to enhance flavor and ways to customize it. With easy ways to store and repurpose leftovers, you can enjoy this soup for days. Try out different proteins and flavors to match your taste. Cooking can be fun and creative, so get inspired and make this soup!

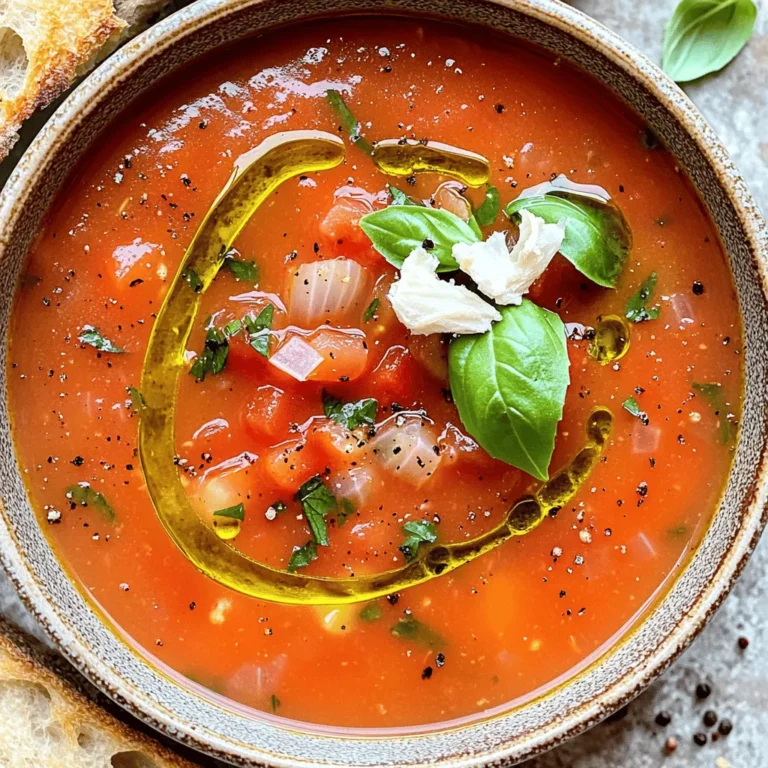
Slow Cooker Tomato Basil Soup Easy and Delicious Meal

- 1.5 lbs boneless, skinless chicken thighs or breasts, cut into bite-sized pieces - 2 cups snap peas, trimmed - 1 red bell pepper, sliced - 1 cup carrots, thinly sliced - 1/4 cup teriyaki sauce (store-bought or homemade) - 2 tablespoons soy sauce (low sodium) - 1 tablespoon sesame oil - 1 tablespoon fresh ginger, minced - 2 cloves garlic, minced - 1 tablespoon honey (or maple syrup for a vegan option) - 2 teaspoons cornstarch mixed with 2 tablespoons water (optional, for thickening) - Sesame seeds, for garnish - Chopped green onions, for garnish Gather these ingredients before you start cooking. The chicken is the star of the dish. I like to use thighs for juiciness. Snap peas add crispness and color. The red bell pepper and carrots bring sweetness and crunch. The marinade gives all the flavors a boost. You can use store-bought teriyaki sauce or make your own. If you want a thicker sauce, the cornstarch is a great trick. It helps make the sauce cling to the chicken and veggies. Garnishing with sesame seeds and green onions makes the dish look beautiful. Enjoy these tips as you prep for a delicious meal! To start, gather your ingredients and get ready to mix. In a large bowl, combine: - 1/4 cup teriyaki sauce - 2 tablespoons soy sauce - 1 tablespoon sesame oil - 1 tablespoon fresh ginger, minced - 2 cloves garlic, minced - 1 tablespoon honey Stir these together until they blend well. This mixture gives the chicken a sweet and savory flavor. Next, add the chicken pieces. Toss them in the marinade until they are fully coated. If you have extra time, let them marinate for about 15 minutes. This step enhances the flavor but is optional if you’re in a hurry. Now, preheat your oven to 425°F (220°C). Line a large baking sheet with parchment paper. Spread the marinated chicken evenly on the sheet. Bake the chicken for 10 minutes. This initial cooking allows it to start cooking through. While the chicken bakes, prepare your vegetables. In a separate bowl, mix: - 2 cups snap peas, trimmed - 1 red bell pepper, sliced - 1 cup carrots, thinly sliced Add a splash of soy sauce and a drizzle of sesame oil to the veggies. Toss them to coat. After the chicken has baked for 10 minutes, take it out of the oven. Gently stir in the mixed vegetables, spreading them around the chicken. Return the baking sheet to the oven and bake for an additional 12-15 minutes. The chicken should be fully cooked and the vegetables tender-crisp. If you want a thicker sauce, mix 2 teaspoons cornstarch with 2 tablespoons water. Add this mixture to your baking sheet. Stir everything together, then bake for another 2-3 minutes. This will thicken the sauce nicely. When done, remove the baking sheet from the oven. Let it sit for a few minutes before serving. For a beautiful presentation, serve the chicken and vegetables on a large platter. Drizzle any remaining sauce over the top. Finish with sesame seeds and chopped green onions for extra flavor and color. Marinating adds depth to your dish. I recommend marinating the chicken for at least 15 minutes. If you're short on time, even a quick 5-minute soak helps. Use a bowl that fits your chicken nicely for easy mixing. Coat each piece well. This ensures every bite is packed with flavor. For roasting, snap peas, red bell peppers, and carrots work best. They keep their crunch while soaking up flavors. To achieve a tender-crisp texture, toss the veggies in a splash of soy sauce and sesame oil. Spread them evenly on the pan and check them often. You want them vibrant and slightly firm. You can make your own teriyaki sauce at home with simple ingredients. Mix together 1/4 cup soy sauce, 1 tablespoon honey, and 1 teaspoon cornstarch. This gives you a tasty sauce without additives. If you prefer vegan options, swap honey for maple syrup. You can even use low-sodium soy sauce for a lighter flavor. {{image_2}} You can switch up the protein in this dish. Tofu is a great choice for a vegetarian option. It soaks up the teriyaki sauce well. Just press it before cooking to remove extra moisture. If you want to use shrimp, choose large, peeled shrimp. They cook quickly and add a nice flavor. Beef is another option. Use thinly sliced flank steak for a tender bite. You can change the veggies based on the season. Try asparagus in spring or zucchini in summer. Broccoli also works great here. It adds a nice crunch and color. If you want even more crunch, add water chestnuts or bell peppers. They bring a fresh taste and a nice bite to the meal. If you like heat, add chili paste or flakes to the sauce. Just a little can give the dish a nice kick. Start small and adjust to your taste. For those who love spice, consider adding sliced jalapeños. They add a great flavor and heat. You can also serve the dish with sriracha on the side for extra spice. After making your teriyaki chicken, let it cool down a bit. Store it in an airtight container. This helps keep it fresh. It can last in the fridge for about 3 to 4 days. If you want to enjoy it later, keep it sealed well to avoid drying out. If you have leftovers, freezing is a great option. Use freezer-safe bags or containers. Squeeze out air to prevent freezer burn. Your teriyaki chicken will stay good for up to 3 months. When you’re ready to eat, thaw it in the fridge overnight. Reheat it gently in the oven or microwave for best results. For meal prep, store the chicken and veggies separately. This keeps each component fresh and tasty. You can quickly assemble your meal when you’re ready to eat. Just combine the chicken and veggies and heat them up. This method saves time and adds variety to your meals throughout the week. Yes, you can use chicken breasts. They are leaner than thighs. This change affects the texture and flavor. Thighs are juicier and more flavorful. Breasts can dry out if overcooked. Adjust the cooking time if using breasts. They may need less time in the oven. Start with 8 to 10 minutes, then check for doneness. You can serve rice with the chicken. White or brown rice works great. Quinoa is also a nice option. For a low-carb choice, try cauliflower rice. Add a side salad for freshness. A simple cucumber salad pairs well too. These sides make it a complete meal. You get protein, veggies, and grains all in one! To make this dish gluten-free, use gluten-free soy sauce. Look for brands like Tamari or Coconut Aminos. Check labels to ensure they are gluten-free. You can also use coconut sugar instead of honey. Most other ingredients are naturally gluten-free. This way, everyone can enjoy the meal without worry. This blog post walked you through making a tasty sheet pan teriyaki chicken meal. We covered the main and optional ingredients, provided step-by-step instructions, and shared helpful tips and variations. You learned how to marinate, bake, and customize your dish. Remember, proper storage ensures your leftovers stay fresh. Feel free to explore different proteins and veggies to suit your taste. Cooking should be fun and versatile, so enjoy experimenting with this dish!

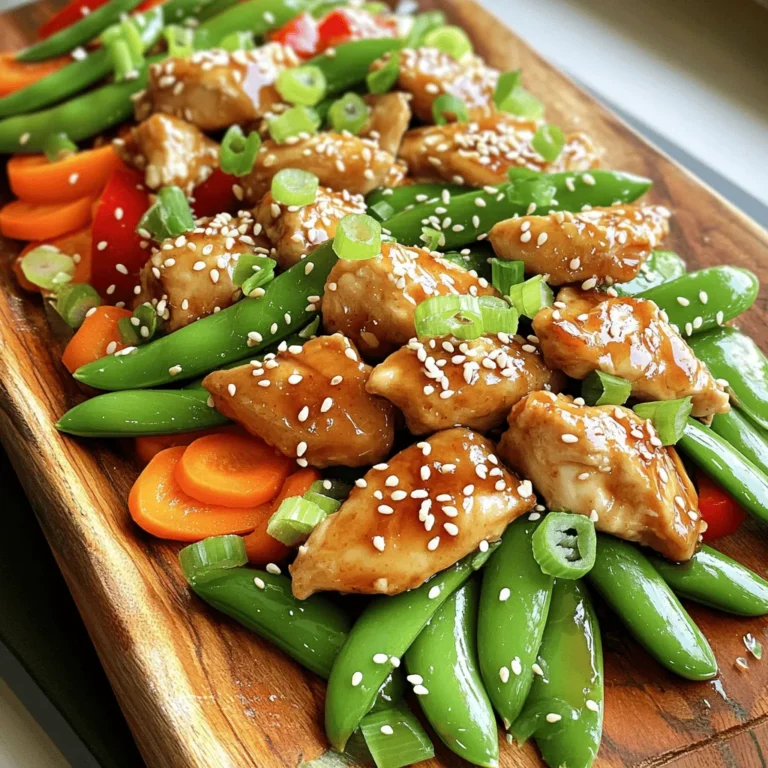
Sheet Pan Teriyaki Chicken & Snap Peas Delight

- 4 medium russet potatoes - 3 tablespoons olive oil - 2 teaspoons Cajun seasoning - 1 teaspoon garlic powder - 1 teaspoon onion powder - ½ teaspoon paprika - ½ teaspoon freshly ground black pepper - Salt to taste - Fresh parsley, chopped (for garnish) I love using russet potatoes for their fluffy texture. They cook up crispy and tender. Olive oil adds flavor and helps the spices stick. Cajun seasoning gives these wedges a bold, spicy kick. Garlic and onion powder enhance the taste without overpowering. Paprika adds a lovely color and mild sweetness. Freshly ground black pepper brings a warm heat. Remember to adjust salt to your taste for the perfect balance. Always choose firm potatoes. Look for ones without blemishes or soft spots. Fresh herbs like parsley add a nice touch. Feel free to wash the potatoes just before you cut them. This keeps them clean and fresh. Store your spices in a cool, dry place to keep them potent. Fresh ingredients make a big difference in flavor, so choose wisely! First, you need to wash the potatoes. Use cold water to remove dirt and grit. Once clean, pat them dry with a kitchen towel. Dry potatoes crisp better in the air fryer. Next, slice each potato into wedges. Aim for about eight wedges per potato. This gives you nice, thick pieces that hold flavor well. In a large mixing bowl, combine the olive oil and spices. Add 2 teaspoons of Cajun seasoning, 1 teaspoon of garlic powder, 1 teaspoon of onion powder, and ½ teaspoon of paprika. Include ½ teaspoon of black pepper and a pinch of salt. Mix well until all the spices blend together. This seasoning mix gives the wedges a bold, tasty kick. Preheat your air fryer to 400°F (200°C) for about 5 minutes. This step helps the wedges cook evenly. Place the seasoned potato wedges in the air fryer basket. Make sure they lay in a single layer. If needed, cook them in batches for best results. Cook for 15 to 18 minutes, shaking the basket halfway through. This keeps them crispy and golden. When they are done, remove the wedges and let them cool for a minute. Finally, garnish with fresh chopped parsley before serving. Enjoy! To get that perfect crunch, focus on a few key steps. First, cut the potatoes evenly. Aim for about eight wedges per potato. This helps them cook evenly. Next, dry the potato wedges well. Moisture can make them soggy. Toss them in olive oil and seasoning to create a nice coating. This layer helps them crisp up in the air fryer. Set your air fryer to 400°F (200°C). This high heat helps achieve that crispy finish. Cook the wedges for 15 to 18 minutes. Halfway through, shake the basket. This ensures even cooking. Each air fryer is a bit different. Check the wedges a few minutes early. You want golden brown and crispy, not burnt. Avoid overcrowding the air fryer basket. If you add too many wedges, they won’t crisp up. Cook in batches if needed. Another mistake is not shaking the basket. This can lead to uneven cooking. Lastly, don’t skip the drying step. Wet potatoes will not turn out crispy. Follow these tips for the best result. Enjoy your delicious, crispy Cajun potato wedges! {{image_2}} To make your wedges even spicier, add more Cajun seasoning. You can also mix in cayenne pepper. Start with 1/4 teaspoon and adjust to your taste. This gives your wedges a fiery kick. Pair them with a cooling dip like ranch or yogurt. You'll enjoy the contrast of flavors. For a cheesy twist, sprinkle shredded cheese on the wedges. Add cheese halfway through cooking. Cheddar, pepper jack, or mozzarella work well. The cheese melts and becomes gooey. This variation is perfect for cheese lovers. Serve them with salsa or guacamole for extra flavor. Try adding fresh herbs for a unique taste. Chopped rosemary or thyme brings great flavor. Mix the herbs into the seasoning blend. You can also use dried herbs if fresh ones are not available. These herbs add a lovely aroma. They make your wedges more fragrant and flavorful. After enjoying your Cajun potato wedges, cool them completely. Place the wedges in an airtight container. They will stay fresh in the fridge for up to three days. Always label your container with the date. This way, you remember when you stored them. To bring back the crispiness, reheat the wedges in the air fryer. Set the air fryer to 375°F (190°C). Heat them for about 5-7 minutes. This method helps restore their crunch. You can also use the oven if you prefer. Bake them at 400°F (200°C) for about 10 minutes. If you want to freeze your wedges, first let them cool completely. Spread them out on a baking sheet in a single layer. Freeze for an hour until they are solid. Then, transfer them to a freezer bag. They can last up to three months in the freezer. When you're ready to eat, you can cook them straight from frozen. Just add a few extra minutes to the cooking time in the air fryer. Yes, you can use sweet potatoes! They add a nice sweetness. Just slice them like regular potatoes. Follow the same steps in the recipe. Cooking times may vary slightly. Sweet potatoes might need a few extra minutes. These wedges taste great with many dips! Here are some ideas: - Ranch dressing - Ketchup - Spicy mayo - Garlic aioli - Honey mustard Mix and match to find your favorite. Each sauce brings out the flavors in the wedges. You can bake these wedges in the oven. Follow these steps: 1. Preheat your oven to 425°F (220°C). 2. Spread the seasoned potato wedges on a baking sheet. 3. Bake for 25-30 minutes, flipping halfway. Watch for a golden brown color and crispiness. Enjoy the same great taste! You learned about the key ingredients for tasty potato wedges and their uses. I shared easy steps for preparing, mixing, and cooking in an air fryer. Tips helped you achieve a crispy texture and avoid common mistakes. I also covered fun variations to try and how to store leftovers properly. Overall, these wedges are simple, fun, and delicious. Enjoy making them your own!

Air Fryer Cajun Potato Wedges Crispy and Flavorful

- 1 cup graham cracker crumbs - 2 tablespoons sugar - 4 tablespoons unsalted butter, melted - 8 oz cream cheese, softened - 1 cup powdered sugar - 1 teaspoon vanilla extract - 1 cup heavy whipping cream - 1 cup fresh strawberries, diced - Extra strawberries for garnish When I create no-bake strawberry cheesecake cups, I start with simple yet tasty ingredients. The base is a crunchy crust made from graham cracker crumbs. You need one cup of crumbs, plus two tablespoons of sugar and four tablespoons of melted unsalted butter. This mix gives structure and sweetness. Next, for the filling, I use eight ounces of softened cream cheese. This creamy base is key to a rich texture. I blend it with one cup of powdered sugar and one teaspoon of vanilla extract. This adds sweetness and flavor. To make the cheesecake light and airy, I whip one cup of heavy cream until it forms stiff peaks. This step is crucial for a fluffy texture. I then gently fold the whipped cream into the cream cheese mix. Finally, I stir in one cup of diced fresh strawberries for a burst of fruitiness. For a finishing touch, I always keep extra strawberries on hand. These serve as a beautiful garnish. Each ingredient plays a role in making these cups a delightful treat. The mix of flavors and textures keeps everyone coming back for more! To make the crust, first grab a medium bowl. Combine 1 cup of graham cracker crumbs and 2 tablespoons of sugar. Mix them well. Then, add 4 tablespoons of melted unsalted butter. Stir until all the crumbs are coated evenly. This will create a tasty base for your cheesecake cups. Next, take a large mixing bowl. Beat 8 ounces of softened cream cheese until it becomes smooth. Slowly mix in 1 cup of powdered sugar and 1 teaspoon of vanilla extract. Keep mixing until everything blends well and is creamy. In another bowl, whip 1 cup of heavy whipping cream until stiff peaks form. Gently fold this whipped cream into the cream cheese mixture. This step adds lightness to your filling. Finally, stir in 1 cup of diced fresh strawberries. Make sure they spread evenly throughout. Now, it’s time to layer your cups. Divide the crust mixture evenly among serving cups. Use about 1-2 tablespoons of the crust per cup. Press it down to form a solid base. Next, spoon the cheesecake filling over the crust in each cup. Smooth the tops with a spatula for a nice finish. Finally, refrigerate the cups for at least 2 hours. This helps them set properly. Before serving, add extra strawberries on top for a lovely garnish. - Use clear cups to show off layers. - Serve on a pretty tray for a nice touch. - Add a mint leaf on top for color. - Drizzle some strawberry sauce around the plate. - Use a piping bag for neat layers. - Try adding lemon zest for a fresh taste. - Use almond or coconut extract for a twist. - Whip the cream until stiff peaks form. - Fold the whipped cream gently to keep air in. - Make sure the cream cheese is very soft. - Always soften the cream cheese before mixing. - If it's too cold, it won't blend well. - Don’t overmix the whipped cream; it can turn into butter. - Avoid leaving the cups out too long before serving. - Make sure to refrigerate for at least 2 hours to set properly. {{image_2}} You can switch things up with different flavors. Try making chocolate strawberry cheesecake cups. Just add melted chocolate to the cream cheese mix. The rich taste will wow your guests. Another option is mixed berry cheesecake cups. Use a mix of strawberries, blueberries, and raspberries. This makes a colorful and tasty treat. The mix of flavors brings a fresh twist to the classic recipe. If you need gluten-free options, look for gluten-free graham crackers. They work just as well in the crust. You can enjoy the same great taste without the gluten. For a vegan version, use non-dairy cream cheese. There are many brands that taste great and work perfectly in the recipe. This way, everyone can enjoy these delicious cups. Using seasonal fruits can elevate your cheesecake cups. In summer, fresh raspberries or blueberries are perfect. They add a bright flavor and color to the dessert. During fall, consider adding pumpkin spice for a festive touch. This keeps the dessert fun and fresh all year round. To keep your no-bake strawberry cheesecake cups fresh, store them in the fridge. Place them in an airtight container or cover them with plastic wrap. This helps prevent drying out. These cheesecake cups stay fresh for up to three days. After that, the texture changes, and they may not taste as good. You can freeze these cheesecake cups, but I recommend freezing them unassembled. This keeps the crust crunchy and the filling smooth. To freeze, place the crust in cups and cover them well. Leave the filling out until you are ready to serve. When thawing, move the cups to the fridge overnight. This helps them come back to their creamy state. Before serving, add the filling and garnish with fresh strawberries. This way, you maintain the best flavor and texture. These cheesecake cups need to set for at least 2 hours in the fridge. This time allows the filling to firm up. If you can, let them chill longer for better flavor and texture. Yes, you can make these cups a day ahead. Just store them in the fridge until you're ready to serve. Keep them covered to prevent them from absorbing any other food smells. If you need a dairy-free option, you can use coconut cream. This thick and creamy alternative works well. You can also use a whipped topping made from soy or almond milk. Just ensure it’s unsweetened for best results. This blog post shared how to make no-bake cheesecake cups. You learned about simple ingredients, detailed steps, and helpful tips. We discussed variations to suit your taste and ideas for storage. No-bake cheesecake cups are easy and fun to make. Remember, using fresh fruits can really boost flavor. Keep these tips in mind, and you will impress everyone. Enjoy making your delicious cheesecake cups!

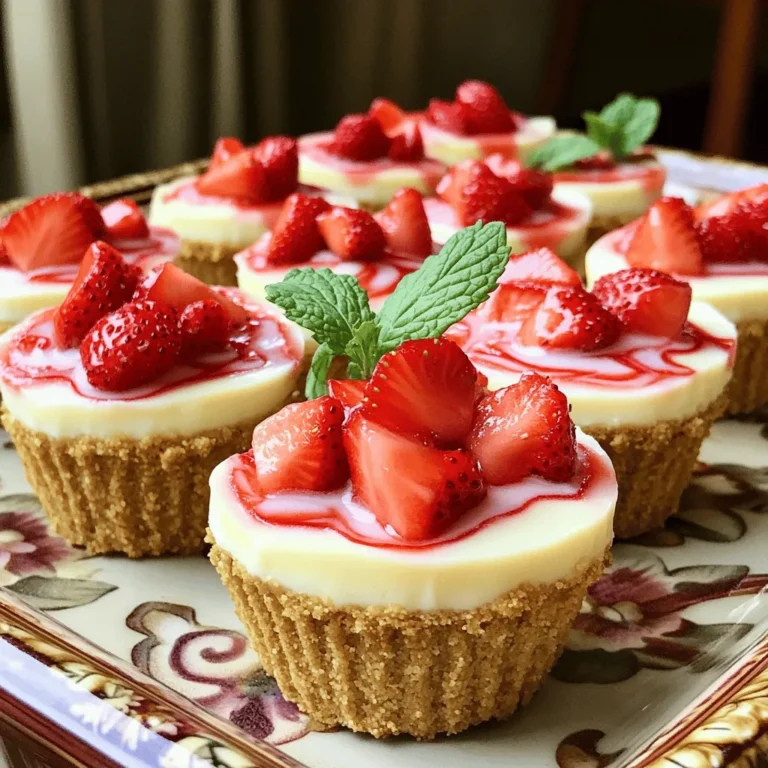
No Bake Strawberry Cheesecake Cups Simple Delight

To make delicious blueberry streusel muffins, you will need the following ingredients: - 1 ½ cups all-purpose flour - ¾ cup granulated sugar - 2 teaspoons baking powder - ½ teaspoon baking soda - ½ teaspoon salt - 1 large egg - ½ cup milk - ⅓ cup vegetable oil - 1 teaspoon vanilla extract - 1 ½ cups fresh blueberries - For the Streusel Topping: - ½ cup all-purpose flour - ⅓ cup brown sugar, packed - ¼ cup rolled oats - ½ teaspoon ground cinnamon - ¼ cup cold butter, cubed These simple ingredients create a tasty muffin that bursts with fresh blueberry flavor. The streusel on top adds crunch and sweetness. Using fresh ingredients makes a big difference in taste. You will love how easy it is to find everything you need. First, set your oven to 375°F (190°C). This step is key for even baking. While the oven heats, line a 12-cup muffin tin with paper liners or grease it. This helps muffins come out easily. In a big bowl, mix 1 ½ cups flour, ¾ cup sugar, 2 teaspoons baking powder, ½ teaspoon baking soda, and ½ teaspoon salt. Whisk these together until they are well combined. This mix forms the base of your muffins. In another bowl, take 1 large egg, ½ cup milk, ⅓ cup vegetable oil, and 1 teaspoon vanilla extract. Whisk these until smooth. This mix adds moisture and flavor to your muffins. Now, pour the wet mix into the dry mix. Gently fold them together until they just combine. It’s okay if the batter is a bit lumpy. Overmixing can lead to tough muffins, which we want to avoid. Take 1 ½ cups of fresh blueberries and fold them into the batter. Be careful not to smash the berries. They add bursts of flavor and color to each muffin. In a medium bowl, mix ½ cup flour, ⅓ cup brown sugar, ¼ cup rolled oats, and ½ teaspoon ground cinnamon. Add ¼ cup cold butter, cut into cubes. Use a fork or your fingers to blend until it looks like coarse crumbs. This topping gives a sweet crunch. Distribute the batter evenly into the muffin cups. Fill each cup about ½ to ⅔ full. Top each muffin with the streusel mixture, making sure to cover them well. This ensures each muffin has a lovely topping. Place the muffin tin in your preheated oven. Bake for 18-20 minutes. The tops should be golden brown. To check for doneness, insert a toothpick into the center. If it comes out clean, they are ready. After baking, let the muffins cool in the tin for 5 minutes. Then, transfer them to a wire rack to cool completely. This prevents sogginess and keeps them fluffy. Enjoy your delicious blueberry streusel muffins! To make the best blueberry muffins, follow a few key steps. First, use fresh blueberries. They add great flavor and moisture. If you use frozen blueberries, do not thaw them. They can make your batter watery. Next, mix the wet and dry ingredients gently. You want the batter to be slightly lumpy. This helps keep the muffins light and fluffy. Lastly, do not overbake. Check them at 18 minutes. A toothpick should come out clean but moist. You can swap ingredients if needed. For flour, use whole wheat flour for a healthier option. If you need a dairy-free version, try almond milk or oat milk instead of regular milk. You can also use coconut oil in place of vegetable oil. For the streusel, brown sugar can be replaced with coconut sugar. This gives a different flavor but still tastes great. Many of these swaps can make your muffins unique and fun. Storing your muffins correctly keeps them fresh. After they cool, place them in an airtight container. They stay fresh for up to three days at room temperature. If you want them to last longer, freeze them. Wrap each muffin in plastic wrap and place them in a freezer bag. They will keep well for up to three months. When you want one, just let it thaw at room temperature or warm it up in the oven for a few minutes. {{image_2}} You can switch up the fruit in these muffins. If you love raspberries, use them instead of blueberries. They add a tart flavor. Chopped strawberries also work well. They bring sweetness and color. For a tropical twist, try diced pineapple. Just make sure to adjust the sugar if needed. Want a gluten-free version? It's easy! Replace all-purpose flour with gluten-free flour. Use a mix that has xanthan gum. This helps the muffins rise and hold together. You can also try almond flour or coconut flour. These options give a different taste and texture. Just remember, mix in the same way as the original recipe. To make these muffins vegan, swap the egg for a flax egg. Mix one tablespoon of ground flaxseed with three tablespoons of water. Let it sit until thick. Also, use plant-based milk like almond or oat milk. Replace the butter in the streusel with coconut oil. These changes keep the muffins moist and tasty. Enjoy a delicious treat that fits your diet! To keep your blueberry streusel muffins fresh, store them in an airtight container. Place parchment paper between layers to prevent sticking. Store at room temperature for up to three days. If you want to keep them longer, consider refrigerating them. However, this can make the muffins dry. Yes, you can freeze blueberry muffins! Wait for them to cool completely. Wrap each muffin in plastic wrap, then place them in a freezer bag. They will last up to three months in the freezer. When you want one, just take it out and let it thaw. To reheat muffins, preheat your oven to 350°F (175°C). Place the muffins on a baking sheet. Heat them for about 10 minutes. If you want a quicker method, use the microwave. Heat each muffin for 15 to 20 seconds. Enjoy them warm for the best taste! Blueberry muffins can last about 2 to 3 days at room temperature. Store them in an airtight container to keep them fresh. If you want them to last longer, you can refrigerate them for about a week. Yes, you can use frozen blueberries in your muffins. They work well and keep the muffins moist. Just fold them in gently, and do not thaw them first. This helps prevent the batter from turning blue. Muffins can become dense if you overmix the batter. Mixing too much adds too much air and gluten. Measuring flour incorrectly can also lead to a dense texture. For light muffins, fold gently until just combined. Streusel has a crumbly texture and often includes oats. It usually has a lighter topping because of the butter and flour mix. A crumble is thicker and denser, often baked with fruit mixed in. Muffins are done when they are golden brown on top. Insert a toothpick in the center; it should come out clean. If there are wet batter bits, give them a few more minutes. This blog post covered all you need to make perfect blueberry muffins. We explored ingredients, step-by-step instructions, and handy tips. You learned how to create variations, store muffins, and answered common questions. Now, enjoy your delicious muffins. Baking is fun and can be easy. Try different fruits or share with friends. Happy baking!

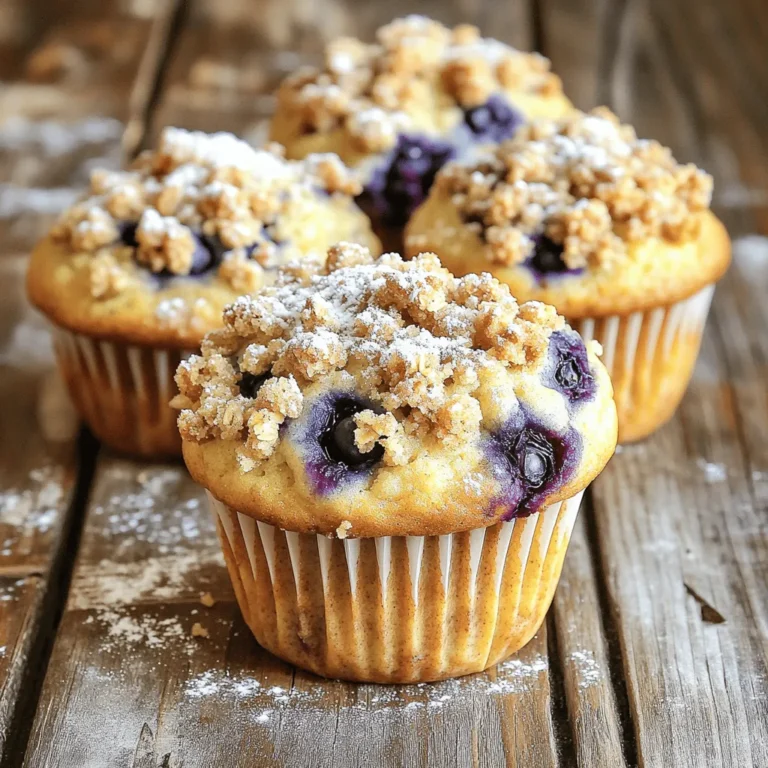
Blueberry Streusel Muffins Delightfully Easy Recipe

- 1.5 lbs boneless, skinless chicken thighs, cut into bite-sized pieces - 1 cup bell peppers, chopped (mix of red, green, and yellow) - 1 cup onion, diced - 1 cup pineapple chunks (fresh or canned, drained) The main ingredients create a hearty base for your sweet and sour chicken. I love using chicken thighs because they are juicy and tender. The colors from the bell peppers and pineapple add a bright touch. You can use fresh or canned pineapple, based on what you have on hand. - 1/2 cup brown sugar - 1/2 cup rice vinegar - 1/4 cup soy sauce (low sodium) - 1 tablespoon ketchup - 2 cloves garlic, minced - 1 tablespoon fresh ginger, minced - 2 teaspoons cornstarch mixed with 2 tablespoons water (for thickening) - Salt and pepper to taste The sauce is key to this dish. Brown sugar gives it sweetness, while rice vinegar adds tang. Low-sodium soy sauce keeps the flavor strong without too much salt. Garlic and ginger bring warmth and depth. Cornstarch helps thicken it up for a nice finish. - Fresh herbs - Cooked rice for serving Garnishes make your dish pop. Fresh herbs like cilantro or green onions add color and freshness. Serving the chicken over cooked rice helps soak up all the tasty sauce. It turns your meal into a complete feast. In your slow cooker, combine the chicken and vegetables. Start with 1.5 lbs of boneless, skinless chicken thighs. Cut them into bite-sized pieces. Add 1 cup of chopped bell peppers, and 1 cup of diced onion. Toss in 1 cup of pineapple chunks too. This mix creates a colorful base. In a large bowl, whisk together your sauce ingredients. Use 1/2 cup of brown sugar, 1/2 cup of rice vinegar, and 1/4 cup of low-sodium soy sauce. Add 1 tablespoon of ketchup, 2 cloves of minced garlic, and 1 tablespoon of minced ginger. Mix until smooth. This sauce gives the dish its sweet and tangy flavor. You can cook your dish on low or high settings. If you choose low, it will take 5-6 hours. Cooking on high only takes 3-4 hours. Either way, the chicken will become tender and juicy. About 30 minutes before serving, stir in a mixture of 2 teaspoons of cornstarch and 2 tablespoons of water. This thickens the sauce nicely. Serve your sweet and sour chicken over cooked rice. This adds a nice texture and balances the flavors. For a fresh touch, consider garnishing with herbs like cilantro or green onions. These will enhance your dish's look and taste. Enjoy your meal! Using chicken thighs makes this dish juicy and tender. Thighs have more fat than breasts, which keeps them moist while cooking. They add great flavor to the sweet and sour sauce. If you prefer, you can use chicken breasts. Just remember, breasts may dry out if overcooked. To make this meal more filling, serve it with rice. White rice or brown rice works well. You can also add a side of steamed broccoli or snap peas. These greens balance the sweet sauce and add nice color to your plate. Another option is a simple cucumber salad for a fresh crunch. You can easily change the sweetness or tartness of your dish. If you want it sweeter, add more brown sugar. For more acidity, increase the rice vinegar. If you like some heat, try adding crushed red pepper flakes or a dash of hot sauce. Experiment to find your perfect balance! {{image_2}} You can make a great vegetarian version of sweet and sour chicken. Simply replace the chicken with tofu or your favorite vegetables. Tofu absorbs flavors well, so it's a fantastic choice. Use firm tofu for the best texture. Chop it into bite-sized pieces like the chicken. You can also add veggies like broccoli, carrots, or snap peas for extra color and crunch. If you want to change the sweetness, try different sweeteners. Honey or maple syrup can work well. You may find honey gives a nice floral note. Maple syrup adds a rich, earthy taste. Adjust the amount to your liking. Start with half the amount of brown sugar and add more as needed. Taste as you go to find the right balance. For a fun twist, add tropical fruits like mango or kiwi. These fruits bring a fresh, bright flavor. Dice them and add them in the last 30 minutes of cooking. You can also mix in coconut for an extra tropical vibe. This will make your meal not only tasty but also colorful and fun to eat. To store leftovers properly, let the sweet and sour chicken cool down. Put it in an airtight container. You can keep it in the fridge for up to four days. Label the container with the date for easy tracking. This way, you can enjoy your meal again without worry. For freezing, use freezer-safe bags or containers. Make sure to remove as much air as possible. This helps prevent freezer burn. Sweet and sour chicken can last in the freezer for up to three months. When ready to eat, let it thaw overnight in the fridge for the best results. To reheat the chicken, you can use the microwave or stovetop. If using the microwave, place it in a bowl and cover it. Heat in short bursts, stirring in between. This keeps it moist. If you use the stovetop, add a splash of water or broth to a pan. Heat on medium until warm. This keeps the texture nice and fresh. Yes, you can use frozen chicken in this dish. Just remember that it will take longer to cook. If you start with frozen chicken, cook it on high for about 4 to 5 hours. Make sure the chicken reaches a safe temperature of 165°F. This method keeps the chicken juicy and tender. To add some heat, try these ideas: - Add red pepper flakes to the sauce. - Use a spicy soy sauce or sriracha instead of regular soy sauce. - Toss in some chopped jalapeños or chili peppers with the veggies. Adjust the spice level to fit your taste. You can always add more, but it’s hard to take it away! If you don’t have rice vinegar, you can use apple cider vinegar or white wine vinegar. These options give a similar tangy flavor. Just keep in mind that the taste may shift slightly. Start with the same amount and adjust if needed. This sweet and sour chicken will last about 3 to 4 days in the fridge. Make sure to store it in an airtight container. If you want it to last longer, consider freezing it for up to 3 months. Just remember to thaw it in the fridge before reheating. This article explored all the key steps to make delicious sweet and sour chicken. We covered the main ingredients, sauce prep, cooking methods, and serving ideas. I shared tips on choosing chicken, adjusting flavors, and making it a complete meal. You also learned storage tips and variations, like a vegetarian option. In short, this dish is fun, tasty, and easy to customize. Enjoy your cooking adventure and make it your own!

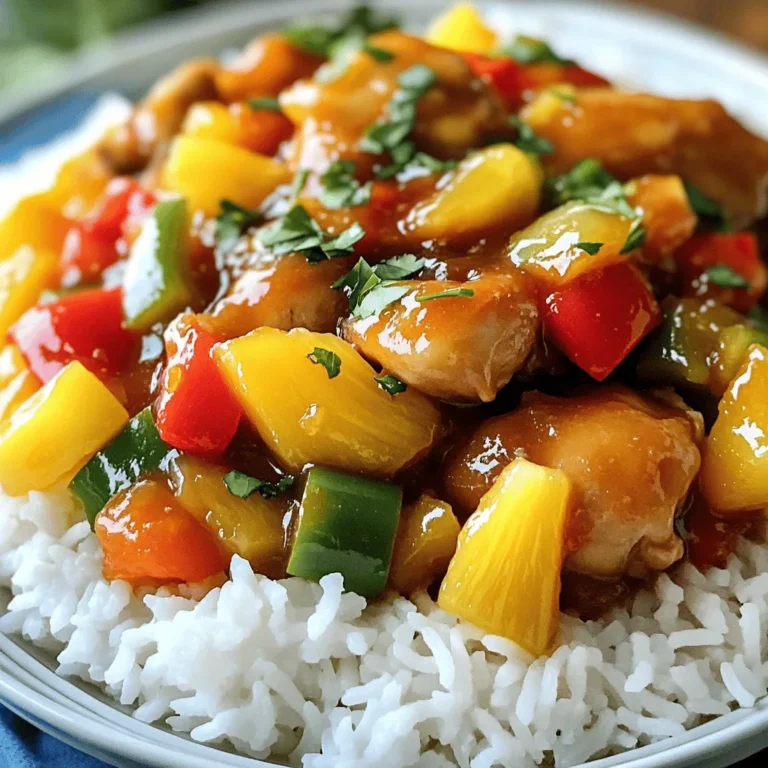
Slow Cooker Sweet & Sour Chicken Delightful Meal

PREV 1 … 30 31 32 … 86 NEXT
spicy fork kitchen

explore

DessertsDinnerAppetizersDrinks

Our Policies

  • Cookie Policy
  • Copyright Policy
  • Disclaimer
  • GDPR Policy
  • Terms Of Use
Back to Top
  • About
  • Contact Us
  • Privacy Policy
© 2026 spicy fork kitchen