FREE DINNER EBOOK! Get your copy!
  • Cookie Policy
  • GDPR Policy
  • Disclaimer
  • Terms Of Use
  • Visit my other site: Fun Cookie Recipes
spicy fork kitchen
  • Home
  • Dinner
  • Desserts
  • Drinks
  • Appetizers
  • Contact
  • About
  • Privacy Policy
  • Home
  • Dinner
  • Desserts
  • Drinks
  • Appetizers
  • Contact
  • About
  • Privacy Policy
  • Cookie Policy
  • GDPR Policy
  • Disclaimer
  • Terms Of Use
Visit my other site: Fun Cookie Recipes

HOME / CATEGORIES /

Latest

To make these delicious bars, you need a few key ingredients: - 1 cup graham cracker crumbs - 1/4 cup unsalted butter, melted - 2 tablespoons brown sugar - 2 cups cream cheese, softened - 1 cup pumpkin puree - 1/2 cup powdered sugar - 1 teaspoon vanilla extract - 1 teaspoon pumpkin pie spice - 1/2 cup heavy whipping cream - 1/2 cup caramel sauce, plus extra for topping - A pinch of sea salt Each ingredient plays an important role. The graham cracker crumbs form a sweet crust. The cream cheese and pumpkin give the filling a rich and creamy texture. The caramel sauce adds a sweet touch on top. If you need to make changes, here are some easy swaps: - Use crushed digestive biscuits instead of graham crackers for a different crust flavor. - Replace the unsalted butter with coconut oil for a dairy-free option. - Try Greek yogurt instead of cream cheese for a lighter filling. - Maple syrup can replace powdered sugar if you want natural sweetness. - You can use almond milk or oat cream instead of heavy cream for a dairy-free version. These substitutions can help you customize the recipe to your taste. To ensure the best taste, use fresh and high-quality ingredients: - Choose real pumpkin puree, not pumpkin pie filling. It should be pure and smooth. - Look for full-fat cream cheese. This gives a creamy and rich filling. - Use fresh spices. They add a stronger flavor to your bars. - Opt for high-quality caramel sauce. A good sauce enhances the overall taste. Quality ingredients make a big difference here. They help create a treat that everyone will enjoy. To start, gather your ingredients for the crust. You need: - 1 cup graham cracker crumbs - 1/4 cup unsalted butter, melted - 2 tablespoons brown sugar In a bowl, mix the graham cracker crumbs, melted butter, and brown sugar. Stir until it looks like wet sand. This mixture forms a tasty base for your cheesecake. Next, press it firmly into a greased 9x9-inch baking dish. Make sure to spread it evenly. Once done, place the dish in the refrigerator. Let it chill while you make the filling. Now it’s time for the filling. You will need: - 2 cups cream cheese, softened - 1 cup pumpkin puree - 1/2 cup powdered sugar - 1 teaspoon vanilla extract - 1 teaspoon pumpkin pie spice - 1/2 cup heavy whipping cream - 1/2 cup caramel sauce, plus extra for topping - A pinch of sea salt In a large bowl, beat the softened cream cheese until it’s smooth. This step ensures a creamy texture. Then, add the pumpkin puree, powdered sugar, vanilla extract, and pumpkin pie spice. Mix until everything is well combined. In another bowl, whip the heavy cream until stiff peaks form. This makes the filling light and fluffy. Gently fold the whipped cream into the pumpkin mixture. Be careful not to deflate it. Pour the pumpkin cheesecake filling over the chilled crust. Spread it evenly to the edges. Now, for a fun touch, drizzle caramel sauce on top in a swirling pattern. Use a knife to create swirls or marbling. This adds both flavor and a beautiful look. Sprinkle a pinch of sea salt on top for contrast. Cover the dish with plastic wrap and place it in the refrigerator. Chill for at least 4 hours, or until it sets nicely. Once set, cut the bars into squares. Drizzle more caramel sauce over each piece before serving. Enjoy your delicious, no-bake treat! To get the best texture for your cheesecake bars, focus on the cream cheese. Make sure it is soft. This helps it blend smoothly. Beat it well before adding other ingredients. When mixing in the pumpkin puree, ensure there are no lumps. Whipping the heavy cream is key. Beat it until stiff peaks form, then fold it gently into the pumpkin mixture. This step adds air, making the bars light and fluffy. You want them creamy but not too dense. One common mistake is not chilling the bars long enough. You must refrigerate them for at least four hours. If you cut them too soon, they will fall apart. Another mistake is skipping the sea salt. A pinch of salt brings out the flavors. Without it, the bars may taste flat. Lastly, avoid over-mixing your filling after adding the whipped cream. This can deflate the mixture and change the texture. To add more flavor, try using fresh spices. Instead of just pumpkin pie spice, add a bit of cinnamon or nutmeg. This can give the bars a warm, cozy taste. You can also mix in chopped nuts or chocolate chips for a fun twist. Drizzling extra caramel on top adds sweetness and richness. If you want a more decadent flavor, consider using cream cheese with a hint of vanilla. This small change can elevate the whole dessert. {{image_2}} You can play with flavors in your cheesecake bars. Think about chocolate, berry, or mint. For a chocolate version, mix in cocoa powder with the cream cheese. For berry flavors, swirl in pureed raspberries or strawberries. You can also try adding a hint of coffee for a mocha twist. Each flavor adds a fun spin to your bars. Want to make your bars a bit healthier? Try using Greek yogurt instead of cream cheese. It adds protein and keeps the texture creamy. You can swap out the brown sugar for honey or maple syrup. This change lowers refined sugar while adding unique flavors. For a gluten-free option, use almond flour instead of graham cracker crumbs. These swaps keep your dessert tasty and lighter. You can change the bars for each season. In fall, add apple pie spice for an autumn vibe. For winter, mix in peppermint extract for a festive flavor. In spring, try adding lemon zest for a fresh taste. Each season offers new ideas to keep your dessert exciting. Don't forget to top with seasonal fruits for a colorful touch! Storing your no bake caramel pumpkin cheesecake bars is easy. Keep them in the fridge. Use an airtight container to keep them fresh. You can also cover the dish tightly with plastic wrap. Make sure the bars are fully chilled before storing. This helps maintain their creamy texture. You can freeze these cheesecake bars for later. First, cut them into squares. Wrap each square in plastic wrap. Then, place them in a freezer-safe bag. Press out as much air as you can. They will stay fresh for up to three months. When you're ready to eat them, thaw them in the fridge overnight. These cheesecake bars taste best within a week. They will stay good for up to five days in the fridge. After that, the texture may change. If you freeze them, they remain good for three months. Always check for any signs of spoilage before serving. Enjoy your tasty treat! Yes, you can use homemade caramel sauce. Making it at home can add a personal touch. Just ensure it’s thick enough to drizzle. Homemade sauce often tastes fresher and richer. You can adjust the sweetness to your liking too. If you don’t have heavy cream, try using whipped coconut cream. It gives a similar texture and taste. You can also use half-and-half or evaporated milk. These options may change the taste slightly, but the bars will still be delicious. Chill the bars for at least four hours. This helps them set properly. If you have time, chilling them overnight is even better. The flavors meld together as they chill, making each bite even more delightful. You learned how to make no-bake caramel pumpkin cheesecake bars with easy steps. I shared tips on choosing the best ingredients, along with fun variations. Storing and freezing information helps keep your dessert fresh. Remember to avoid common mistakes for perfect results. These bars are not just tasty; they are fun to make for any occasion. Enjoy experimenting with flavors and enjoy your sweet treat!

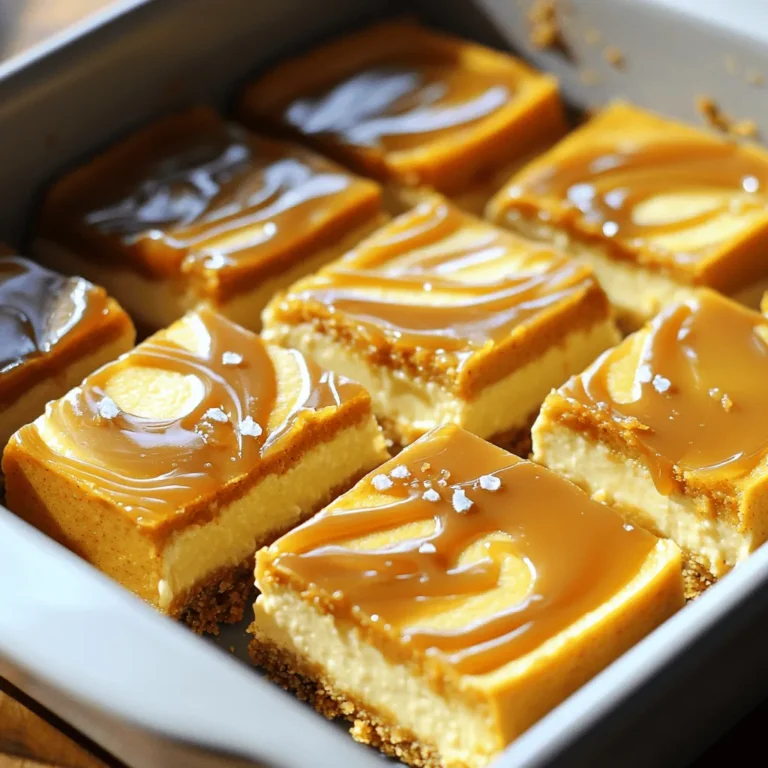
No Bake Caramel Pumpkin Cheesecake Bars Delightful Treat

To make your Pumpkin Chocolate Chip Energy Balls, gather these items: - 1 cup rolled oats - 1/2 cup pumpkin puree - 1/4 cup almond butter (or peanut butter) - 1/4 cup honey or maple syrup - 1 teaspoon pumpkin pie spice - 1/2 teaspoon vanilla extract - 1/4 teaspoon salt - 1/2 cup dark chocolate chips - 1/4 cup chopped nuts (optional: walnuts or pecans) These energy balls are not just tasty; they pack a nutritious punch. Each ball has a good balance of carbs, protein, and healthy fats. They offer fiber from oats and pumpkin, plus healthy fats from nut butter. The dark chocolate adds a touch of sweetness and antioxidants. If you need to swap ingredients, there are many options. Use peanut butter if you don't have almond butter. You can also try agave syrup instead of honey. For a nut-free option, replace the nut butter with sun butter. If you want a twist, add dried fruit or seeds for extra flavor and texture. To start, gather all your ingredients. You will need: - 1 cup rolled oats - 1/2 cup pumpkin puree - 1/4 cup almond butter (or peanut butter) - 1/4 cup honey or maple syrup - 1 teaspoon pumpkin pie spice - 1/2 teaspoon vanilla extract - 1/4 teaspoon salt - 1/2 cup dark chocolate chips - 1/4 cup chopped nuts (optional: walnuts or pecans) In a large mixing bowl, add the rolled oats, pumpkin puree, almond butter, and honey. This mix is the base of your energy balls. Make sure to measure carefully for the best taste. Next, add the pumpkin pie spice, vanilla extract, and salt to the bowl. Use a spoon or spatula to mix well. You want everything to blend evenly. Once mixed, gently fold in the dark chocolate chips and any nuts you choose. This adds fun texture and flavor. Now, it’s time to chill the mixture. Place the bowl in the fridge for about 30 minutes. Chilling helps the mix firm up, making it easier to roll into balls. After the mixture has chilled, take it out of the fridge. Use your hands to roll the mix into small balls, about 1 inch in size. This process can be messy, but it’s fun! Once you've rolled all the balls, place them on a baking sheet lined with parchment paper. For a fun twist, roll the balls in extra oats or coconut if you like. Finally, store your energy balls in an airtight container in the fridge. They will stay fresh for up to a week. If you want to keep them longer, you can freeze them. Just pull them out whenever you want a tasty snack! To make sure your energy balls hold together well, use the right ratio of wet to dry. The pumpkin puree and nut butter add moisture. The oats act as a binder. If your mix feels too dry, add a bit more pumpkin or nut butter. You want a sticky texture that rolls easily. If it’s too wet, add more oats. Aim for a balance that lets you shape them without mess. You can boost the taste by adding spices. Try cinnamon or nutmeg for extra warmth. For a crunchier bite, add chopped nuts like walnuts or pecans. They give a nice contrast to the soft pumpkin. You can also roll the balls in oats or coconut for texture. This adds a fun look and a bit more flavor. Don’t forget to use quality dark chocolate chips; they make a big difference! Store your energy balls in an airtight container. Keep them in the fridge for up to a week. If you want to save some for later, freeze them. They freeze well and can last for months. Just pull them out and let them thaw before enjoying. This way, you always have a tasty snack ready. {{image_2}} You can swap almond butter for any nut butter you like. Peanut butter adds a rich taste. Cashew butter is creamy and sweet. Sunflower seed butter works well for nut-free options. Each nut butter will change the flavor a bit. Choose your favorite, and make it your own! Feel free to play with add-ins! You can add dried fruits, like cranberries or raisins. Chopped nuts, like walnuts or pecans, add crunch and nutrition. You might also try seeds like chia or flax for extra fiber. The options are endless, so get creative! Change up the spices to find new flavors. Cinnamon or nutmeg can add warmth. A dash of ginger gives a spicy kick. You can also try different extracts. Almond extract adds a sweet note, while coconut extract gives a tropical feel. Adjust the spices to match your taste! To keep your Pumpkin Chocolate Chip Energy Balls fresh, use an airtight container. Store them in the fridge. This helps maintain their taste and texture. Avoid leaving them out at room temperature. They can dry out or get too soft if not stored properly. Freezing your energy balls is easy. Place them in a single layer on a baking sheet. After they freeze for a few hours, transfer them to a freezer-safe bag or container. Make sure to label the bag with the date. Frozen energy balls last for up to three months. When you want to eat them, let them thaw in the fridge overnight. In the refrigerator, these energy balls can stay fresh for about a week. If you freeze them, they can last for three months. Always check for any off smells or changes in texture before eating. Keeping them stored right ensures you enjoy a tasty snack every time. Yes, you can use maple syrup instead of honey. Maple syrup gives a nice flavor. You can also try agave nectar. Each sweetener may change the taste a little. Experiment to find which you like best. These energy balls last about one week in the fridge. Store them in an airtight container. You can also freeze them for longer storage. If frozen, they can last for up to three months. Yes, you can use gluten-free oats. If you want to avoid oats, try almond flour or coconut flour. These options will change the texture a bit. Adjust the liquid in the recipe if needed. This blog post covered the key steps and tips to make energy balls. We discussed ingredients, preparation, and storage. You learned how to enhance flavor and texture. Remember, you can change nut butters and add different mix-ins for variety. These energy balls are easy to make. They provide energy and taste great. With the right storage, they stay fresh longer. Enjoy trying new flavors and creating your own perfect snack!

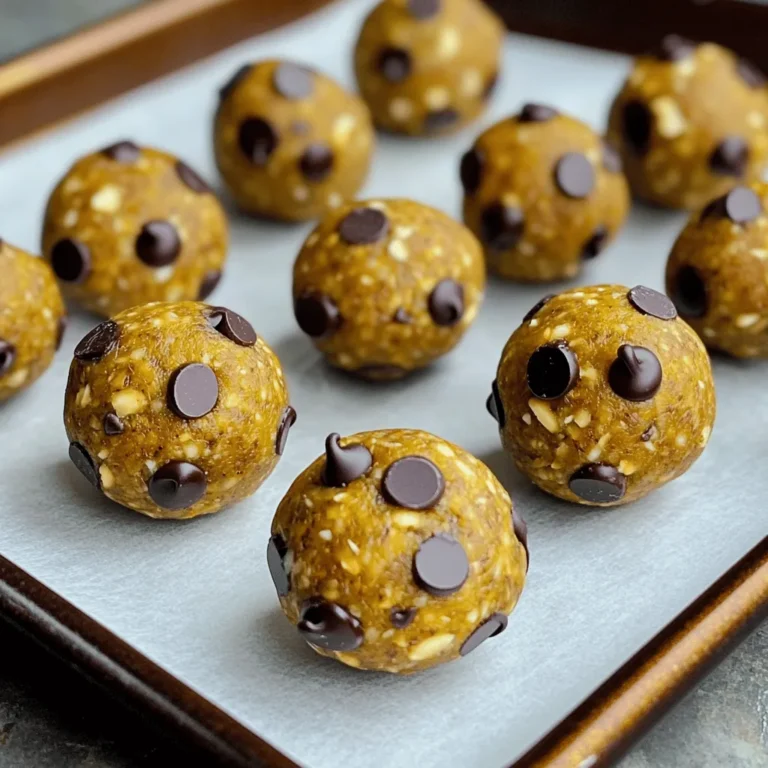
Pumpkin Chocolate Chip Energy Balls Delicious Snack

- 1 lb Brussels sprouts, halved - 3 tablespoons honey - 3 cloves garlic, minced - 2 tablespoons olive oil - 1 tablespoon soy sauce (or tamari) - Salt and pepper to taste - 1 teaspoon red pepper flakes (optional for heat) - Sesame seeds - Chopped green onions Brussels sprouts are the star of this dish. I love using fresh ones. They give a great crunch and flavor. Honey adds a sweet touch. It balances the garlic's strong taste. Garlic is a must here, minced finely for the best flavor. For the additional ingredients, I choose olive oil for its richness. Soy sauce or tamari adds umami. Salt and pepper are essential for seasoning. If you like heat, red pepper flakes work well. They add a nice kick. You can also garnish your dish. Sesame seeds give a nice crunch. Chopped green onions add freshness. They make the dish look bright and inviting. Enjoy these flavors in every bite! First, trim the ends off the Brussels sprouts. You want to remove any brown spots. Next, cut the sprouts in half. This helps them cook evenly and get crispy. Rinse the halved sprouts under cold water. After that, pat them dry with a clean towel. Drying is key to getting that perfect crunch later. In a large bowl, mix together three tablespoons of honey and three minced garlic cloves. Add two tablespoons of olive oil and one tablespoon of soy sauce. This sauce gives the sprouts a sweet and savory flavor. To spice it up, add salt, pepper, and a teaspoon of red pepper flakes if you like heat. Whisk everything together until it’s well combined. Now, it’s time to preheat your air fryer. Set it to 375°F (190°C) and let it heat for about five minutes. Once it’s preheated, take the honey garlic sauce and add the Brussels sprouts. Toss them in the sauce until they are well coated. Place the sprouts in the air fryer basket in a single layer. You might need to do this in batches. Cook the Brussels sprouts for 15 to 18 minutes. Make sure to shake the basket halfway through. This helps the sprouts cook evenly and become crispy on all sides. After they turn golden brown, remove them from the air fryer. Place them on a serving platter and enjoy your delicious dish! To get that crispy texture, always cook Brussels sprouts in a single layer. This step lets hot air flow around each sprout. If you pile them up, they will steam instead of crisp. To avoid sogginess, pat the sprouts dry after rinsing. Moisture can make them soft, so a dry sprout is key. You can adjust the sweetness and heat in this recipe. If you like it sweeter, add more honey. For extra heat, increase the red pepper flakes. Try different sauces too! A splash of balsamic vinegar can add a nice tang. You can even swap the soy sauce for teriyaki for a different kick. Set your air fryer to 375°F (190°C) for best results. This temperature helps get that golden color while cooking evenly. Keep your air fryer clean for better air flow. Regularly check the basket and heating element. A clean air fryer cooks better and lasts longer. {{image_2}} You can switch honey for maple syrup. Maple adds a nice sweetness. It gives a different flavor that some people love. Adding nuts or dried fruit can change the dish. Try almonds, walnuts, or cranberries. These add crunch and sweetness, making every bite fun. Want some heat? Add more red pepper flakes. You can make these Brussels sprouts spicy. Just be careful not to add too much at once. Balsamic vinegar gives a nice tang. It can balance the sweetness of the honey. Just mix a tablespoon into the sauce for a bright twist. These Brussels sprouts go well with many proteins. Chicken, pork, or tofu all pair nicely. The flavors blend well and make a tasty meal. You can also add these sprouts to salads or grain bowls. They make a great topping with their crunch and flavor. Try mixing them with quinoa or brown rice for a complete dish. After you enjoy your Air Fryer Honey Garlic Brussels Sprouts, store any leftovers in an airtight container. This keeps them fresh and tasty. You can place them in the fridge for up to four days. If you want to keep them longer, freezing is a good option. To reheat your Brussels sprouts, the air fryer works best. Set it to 350°F (175°C) for about 5 to 7 minutes. This method helps keep them crispy. Shaking the basket halfway through reheating ensures even warmth and crunch. Yes, you can freeze honey garlic Brussels sprouts! To freeze, let them cool completely. Then, spread them in a single layer on a baking sheet to freeze. Once frozen, transfer them to a freezer-safe bag or container. They last up to three months. When you're ready to eat, reheat directly from the freezer in the air fryer for best results. Yes, you can use frozen Brussels sprouts. However, the texture will change. Frozen sprouts often become softer and less crispy. If you choose frozen, cook them for a bit longer. Aim for 20-25 minutes in the air fryer. Check them halfway through and toss. This helps them cook evenly. Yes, this recipe can be gluten-free. Simply swap soy sauce for tamari. Tamari is a gluten-free soy sauce. Always check labels for hidden gluten. This makes sure your meal is safe and delicious for gluten-sensitive folks. To make these Brussels sprouts vegan, replace honey with maple syrup. This keeps the sweet flavor. Also, ensure your soy sauce is vegan. Most are, but some brands add animal products. With these swaps, you can enjoy a tasty vegan dish. This blog post covered how to make delicious honey garlic Brussels sprouts. We looked at the main ingredients, step-by-step instructions, and tips to improve texture and flavor. I also shared storage info and answers to common questions. You can enjoy Brussels sprouts in many ways, making them fun and easy. With this recipe, you can impress anyone with your cooking. So, gather your ingredients and get started! Your taste buds will thank you.

Air Fryer Honey Garlic Brussels Sprouts Savory Delight

- 2 cups all-purpose flour - 1/4 cup granulated sugar - 1/2 teaspoon salt - 2 teaspoons baking powder - 1/2 teaspoon baking soda - 1/2 teaspoon ground cinnamon - 1/2 cup unsalted butter, softened - 1/2 cup apple cider - 1/2 teaspoon vanilla extract - 1/2 cup brown sugar, packed - 1 tablespoon ground cinnamon (for filling) - 1/4 cup chopped apples (peeled and diced) - 1/2 cup powdered sugar (for icing) - 1-2 tablespoons milk (for icing) Gathering the right ingredients is key. Start with all-purpose flour. It gives the rolls their nice structure. Granulated sugar adds sweetness. Salt enhances flavor. Baking powder and baking soda help the rolls rise. Ground cinnamon brings warmth and spice. You will need unsalted butter. Softened butter blends well for a rich taste. Apple cider is a star here. It adds moisture and a hint of apple flavor. Vanilla extract rounds out the taste. For the filling, brown sugar adds depth. The tablespoon of cinnamon gives a warm kick. Chopped apples add a fresh crunch. To top it all off, icing makes it special. Powdered sugar blended with milk creates a sweet drizzle. Adjust the milk for your preferred thickness. This mix of flavors makes these cinnamon rolls gooey and irresistible. You will love how they come together! - Whisking Dry Ingredients Start with a large bowl. Add 2 cups of all-purpose flour, 1/4 cup of granulated sugar, 1/2 teaspoon of salt, 2 teaspoons of baking powder, 1/2 teaspoon of baking soda, and 1/2 teaspoon of ground cinnamon. Whisk it well until everything blends together. - Mixing Wet Ingredients In another bowl, cream 1/2 cup of softened unsalted butter. Add 1/2 cup of apple cider and 1/2 teaspoon of vanilla extract. Mix until it looks smooth and creamy. - Combining Mixtures Gradually add the wet mixture to the dry ingredients. Stir until a dough forms. It should feel slightly sticky. Turn the dough onto a floured surface and knead gently for 1-2 minutes until smooth. - Rolling Out the Dough Roll the dough into a rectangle about 1/4 inch thick. Make sure it is even all around. - Adding the Filling Spread 1/2 cup of packed brown sugar evenly over the dough. Then, sprinkle 1 tablespoon of ground cinnamon on top. Finally, evenly distribute 1/4 cup of chopped apples over the mixture. - Rolling and Slicing Start from one long side and carefully roll the dough into a log shape. Cut the log into 1-inch thick slices. - Arranging for Baking Place the slices in a greased baking dish. Make sure to leave some space between each roll to allow for rising. - Baking Time and Temperature Preheat your oven to 375°F (190°C). Bake the cinnamon rolls for 20-25 minutes. They should be golden brown and cooked through. - Making the Icing While the rolls bake, whisk together 1/2 cup of powdered sugar and 1-2 tablespoons of milk in a small bowl. Mix until smooth and dripable. You can adjust the milk to get your desired consistency. - Glazing the Rolls Once the rolls are done baking, let them cool for about 5 minutes. Drizzle the icing over the top while they are still warm. This helps the icing melt into the rolls, making them even tastier! Recommended Flour and Cinnamon I like to use all-purpose flour for these rolls. It gives the best texture. For cinnamon, choose a high-quality ground cinnamon. It can make a big difference. Try fresh cinnamon for a stronger flavor. How to Avoid a Sticky Dough If your dough feels too sticky, don't worry. Dust your work surface with extra flour. Knead the dough gently, but don’t overdo it. A light touch keeps the rolls soft and fluffy. Presentation Tips Serve the cinnamon rolls on a rustic wooden platter. This adds a homey feel. Garnish with a sprig of fresh cinnamon and thin apple slices. It looks great and tastes even better. Pairing with Beverages These rolls pair well with warm apple cider or coffee. The flavors blend nicely, making your breakfast or brunch even more special. Alternative Sweeteners You can swap granulated sugar for maple syrup or honey. Just remember that liquid sweeteners may need adjustments in the wet ingredients. Vegan Options for the Icing For a vegan icing, mix powdered sugar with almond milk. This keeps it creamy and delicious without dairy. You can also use coconut milk for added flavor. {{image_2}} You can make these rolls even better with a few simple changes. Try adding nuts or raisins. They add crunch and sweetness. Chopped walnuts or pecans work well. Consider spices too. You can mix in nutmeg or allspice for extra warmth. A pinch of ginger also brings a nice bite. Feel free to experiment! Want a twist? Try a cream cheese filling. Mix softened cream cheese with a bit of sugar and vanilla. Spread it on the dough before the cinnamon and sugar. Caramelized apples are another great filling. Cook peeled and diced apples with butter and brown sugar until soft. Spread this mix in place of the usual filling. It will add a lovely, sweet touch. Seasonal flavors can inspire your rolls. For fall, add pumpkin spice. Just mix some pumpkin puree into your dough for a pumpkin spice cinnamon roll. During the holidays, add festive ingredients. Think of crushed peppermint candies or dried cranberries. You can even use eggnog in place of milk in the icing for a holiday treat! Room Temperature Storage You can keep leftover apple cider cinnamon rolls at room temperature. Place them in an airtight container. They will stay fresh for about 2 days. Refrigerating for Freshness If you want them to last longer, refrigerate them. Wrap each roll in plastic wrap. Store in a container. They will stay good for up to a week in the fridge. Proper Freezing Techniques To freeze the rolls, let them cool completely first. Then, wrap each roll tightly in plastic wrap. Place them in a freezer-safe bag. They can last for up to 3 months in the freezer. Reheating After Freezing When you are ready to eat them, remove the rolls from the freezer. Let them thaw in the fridge overnight. Then, reheat them in the oven at 350°F (175°C) for about 10-15 minutes. This will help them taste fresh again. Best Practices for Consumption The best way to enjoy these rolls is fresh. If stored properly, they can last a few days. For the best taste, eat them within the first 2 days. Always check for any signs of spoilage before eating. Can I use whole wheat flour instead of all-purpose flour? Yes, you can use whole wheat flour. It will give the rolls a nutty flavor. Just use the same amount as all-purpose flour. The rolls might be denser, but still yummy! How do I know when the cinnamon rolls are fully baked? Look for a golden brown color on top. The rolls should feel firm to the touch. You can also insert a toothpick in the center. If it comes out clean, they are ready! Can I make the dough ahead of time? Yes! You can make the dough and chill it in the fridge. Just wrap it well. The dough will stay fresh for about 24 hours. Let it come to room temp before rolling it out. What is the best way to reheat leftover cinnamon rolls? For the best taste, use the oven. Preheat it to 350°F (175°C). Place the rolls on a baking sheet. Heat for about 10 minutes. You can also use the microwave for 15-20 seconds if you’re in a rush. How can I make these cinnamon rolls more fluffy? To make fluffier rolls, add an extra teaspoon of baking powder. Make sure your butter is softened but not melted. Also, don’t over-knead the dough. This keeps it light and airy! In this blog post, I shared all you need for delicious apple cider cinnamon rolls. We covered the ingredients, step-by-step instructions, tips, variations, storage info, and FAQs. These rolls are easy to make and perfect for any occasion. Try adding nuts or alternative fillings for fun twists. With proper storage, you can enjoy them fresh later. Baking is all about sharing joy and flavor. Get started, and enjoy your homemade treats!

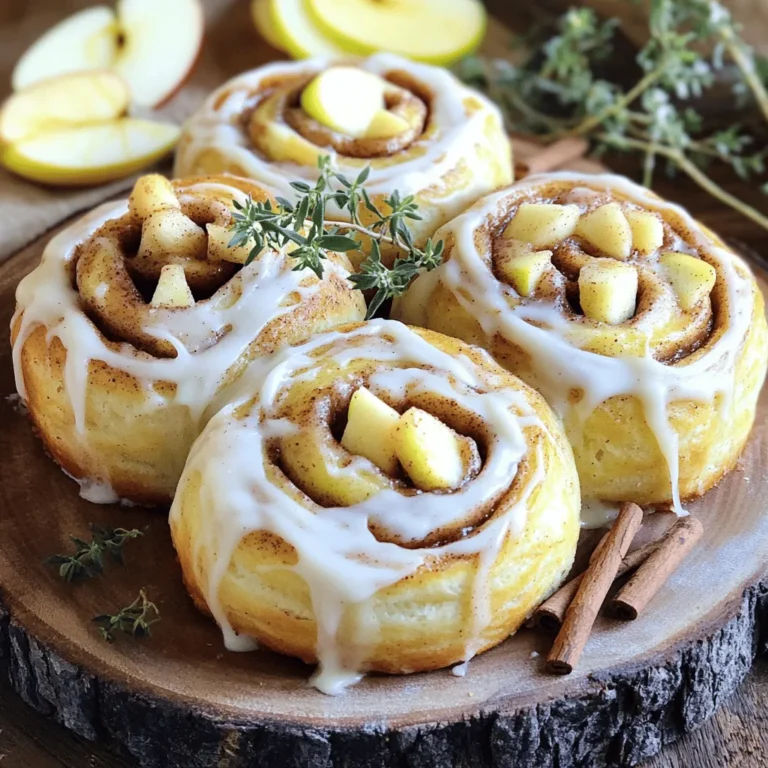
Apple Cider Cinnamon Rolls Gooey and Irresistible Treat

To make this soup, gather these key items: - 1 cup wild rice, rinsed - 2 tablespoons olive oil - 1 medium onion, diced - 3 cloves garlic, minced - 8 ounces cremini mushrooms, sliced - 2 carrots, diced - 2 celery stalks, diced - 6 cups vegetable broth - 1 teaspoon dried thyme - 1 teaspoon dried rosemary - Salt and pepper to taste - 1 cup coconut milk or heavy cream - Fresh parsley, chopped (for garnish) These ingredients bring rich flavors and textures to your soup. The wild rice lends a nutty taste, while the mushrooms add umami. The broth ties everything together, making each spoonful comforting. You may want to add a few items to boost flavor: - 1 bay leaf - 1 teaspoon lemon juice - 1/2 teaspoon smoked paprika - Fresh herbs like dill or basil These optional ingredients can add depth to your soup. A bay leaf infuses a subtle aroma. Lemon juice brightens the flavors, and smoked paprika gives a warm touch. Using fresh ingredients makes a big difference. Here are some tips: - Choose firm mushrooms without blemishes. - Use organic vegetables when possible for better taste. - Rinse wild rice well to remove any grit. Freshness matters in soup. It enhances flavor and makes each bowl a delight. Always check your ingredients before cooking. If they look fresh, your soup will taste amazing! Start by heating 2 tablespoons of olive oil in a skillet over medium heat. Once hot, add 1 medium diced onion and 3 cloves of minced garlic. Stir them together. Cook until the onion turns soft and clear, about 4 to 5 minutes. This step builds a strong flavor base for your soup. After sautéing, add 8 ounces of sliced cremini mushrooms to the skillet. Cook them for 5 minutes until they soften. Then, transfer this mixture to your slow cooker. Next, add 1 cup of rinsed wild rice, 2 diced carrots, and 2 diced celery stalks. Pour in 6 cups of vegetable broth. Season with 1 teaspoon of dried thyme and 1 teaspoon of dried rosemary. Don’t forget to add salt and pepper to taste. Stir everything well to mix all the ingredients. Now, cover the slow cooker and choose your cooking time. If you set it to low, let it cook for 6 to 8 hours. If you prefer the high setting, it will only need 3 to 4 hours. The rice should be tender when it’s done. After cooking, add 1 cup of coconut milk or heavy cream. This makes the soup creamy and rich. Adjust the seasoning if needed before serving. To make your soup super creamy, use coconut milk or heavy cream. I like coconut milk for its rich flavor. Stir it in after cooking, and it will blend smoothly. If you want more creaminess, blend a cup of the soup. Then, mix it back into the pot. This makes the texture rich and velvety. Seasonings can really boost your soup's taste. I recommend adding a bay leaf while it cooks. It adds a lovely depth of flavor. You can also stir in some nutritional yeast for a cheesy taste. Adjust salt and pepper at the end. Taste as you go for just the right balance. Storing leftovers is easy. Put the soup in an airtight container in the fridge. It lasts about 3 to 4 days. When you reheat, add a splash of water or broth. This keeps the texture nice. If you freeze it, use it within three months. Thaw it overnight in the fridge before reheating. {{image_2}} To make a vegan version, skip the heavy cream. Use coconut milk for creaminess. This swap keeps the soup rich and smooth. You can also add more veggies. Try spinach or kale for extra nutrients. These greens cook down well and add color. For a hearty soup, add proteins like chickpeas or beans. You can stir in cooked lentils too. These ingredients boost the protein and make the soup filling. If you want meat, shredded chicken works great. Add it at the end, just to heat through. If you like spice, add red pepper flakes. Start with a pinch and taste as you go. You can also add chopped jalapeños for a fresh kick. For a smoky flavor, try smoked paprika. This adds depth and warmth to the soup. To keep your soup fresh, let it cool first. Pour it into an airtight container. Seal it tightly and store it in the fridge. It will last for about 3 to 4 days. Label the container with the date. This way, you know when to eat it. If you want to save some for later, freezing is a great option. Use freezer-safe containers or bags for easy storage. Make sure to leave some space at the top. Soup expands when it freezes. Your soup will stay good for up to 3 months in the freezer. When you're ready to eat, just thaw it in the fridge overnight. When reheating, you have options. You can use the stove or the microwave. If using a stove, pour the soup into a pot. Heat it over medium heat, stirring often. For the microwave, place the soup in a microwave-safe bowl. Heat it in short intervals, stirring in between. This keeps the soup from getting too hot in one spot. Ensure it’s heated through before serving. Enjoy your warm, comforting bowl of soup! Yes, you can use regular rice, but it will change the texture. Wild rice has a nutty flavor and chewy texture. Regular rice cooks faster, so adjust the cooking time to avoid mushiness. Use a 1:2 ratio of rice to broth when using regular rice. You can use heavy cream or almond milk as a substitute. Heavy cream adds richness, while almond milk keeps it lighter. If you want a dairy-free option, use oat milk or soy milk. Adjust the quantity based on your taste preference. The soup lasts for about 3-4 days in the fridge. Make sure to store it in an airtight container. Before serving, check for any off smells or changes in texture. Reheat it on the stove or in the microwave until hot. Yes, you can make this soup on the stove. Just sauté the onions and garlic in a pot. Then, add the mushrooms, rice, and broth. Simmer for about 30-40 minutes until the rice is tender. Stir in the coconut milk at the end. This article covered how to make a tasty Mushroom Wild Rice Soup. We explored key ingredients, cooking steps, and tips for the best flavor. I shared ways to enhance the soup’s texture and flavor, plus variations to fit your needs. Remember, storing leftovers properly keeps your soup fresh for later. Enjoy your cooking journey. With these tips, you can create a delicious meal your family will love. Dive in and get started. This soup is sure to impress!

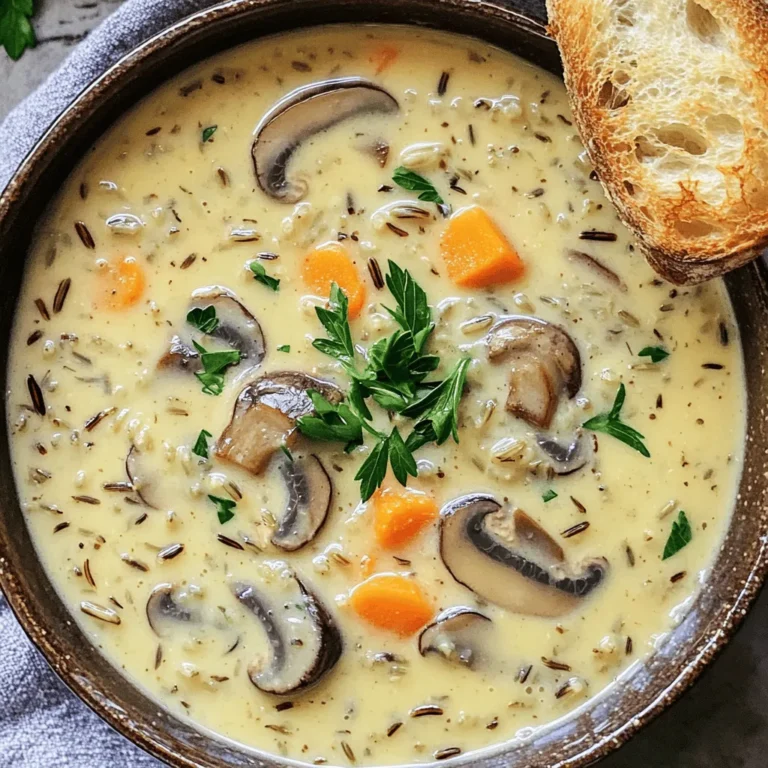
Savory Slow Cooker Mushroom Wild Rice Soup Recipe

- 1 zucchini, diced - 1 red bell pepper, chopped - 1 yellow bell pepper, chopped - 1 small red onion, sliced - 1 cup corn kernels (fresh or frozen) - 1 can black beans, drained and rinsed To make these tacos, you need fresh veggies. The zucchini adds a nice crunch. Red and yellow bell peppers bring sweetness and color. The red onion adds a bit of sharpness. Corn kernels give a sweet pop. Black beans add protein and creaminess. These veggies work together to create a tasty filling. - 2 tablespoons olive oil - 2 teaspoons chipotle powder - 1 teaspoon cumin - 1 teaspoon garlic powder - Salt and pepper to taste The right seasonings make a big difference. Olive oil helps the veggies roast nicely. Chipotle powder brings a smoky heat. Cumin gives a warm, earthy flavor. Garlic powder adds depth. Salt and pepper bring out all the flavors. These seasonings make the tacos really shine. - Corn tortillas (8-10) - Fresh cilantro, chopped (for garnish) - Lime wedges (for serving) Corn tortillas are a must for taco night. They hold the filling perfectly. Fresh cilantro adds a burst of freshness. Lime wedges give a zesty kick when squeezed over the tacos. These simple additions elevate the whole meal. Enjoying these tacos is all about the balance of flavors and textures. First, preheat your oven to 400°F (200°C). This step gets the oven hot and ready for roasting. Next, in a large bowl, combine the diced zucchini, chopped red and yellow bell peppers, sliced red onion, corn, and black beans. Mix them well to get an even blend of colors and textures. Now, drizzle 2 tablespoons of olive oil over the vegetables. This oil helps with roasting and adds flavor. Sprinkle in 2 teaspoons of chipotle powder, 1 teaspoon of cumin, and 1 teaspoon of garlic powder. Don't forget to add salt and pepper to taste. Stir everything until the vegetables are thoroughly coated with the spices. Next, spread the vegetable mixture evenly on a large baking sheet lined with parchment paper. This helps keep the veggies from sticking. Roast them in the oven for about 20-25 minutes. Stir the veggies halfway through to ensure they cook evenly. Look for them to be tender and slightly charred. While the veggies roast, warm your corn tortillas on a skillet over medium heat. This makes them soft and easy to fold. Once the veggies are done, let them cool slightly. To assemble the tacos, place a generous amount of roasted veggies onto each tortilla. Finally, garnish with fresh chopped cilantro and serve with lime wedges. Enjoy the burst of flavors in every bite! Use fresh, seasonal veggies for best taste. Zucchini, bell peppers, and onions work well. You can also try squash or carrots. If you can't find an ingredient, use what you have. For example, swap red bell pepper with green bell pepper or even sweet potatoes. Set your oven to 400°F (200°C). This temperature helps veggies roast well. Stir the veggies halfway through cooking. This ensures they cook evenly and get that nice, charred flavor we love. Store leftover tacos in an airtight container. They stay fresh for about three days in the fridge. To reheat, use a skillet over medium heat. This keeps the tortillas soft and tasty. You can also microwave them, but they may get a bit soggy. Enjoy them again for a quick meal! {{image_2}} You can enjoy these tacos even more by adding proteins. Tofu is a great choice. It soaks up flavors well. Just cube it and mix it with the veggies. Tempeh is another option. It has a nutty taste and adds texture. Cook it until golden and mix it in. Both options make the tacos heartier. Want more heat? You can try different spices. Chili powder adds warmth without being too hot. Cayenne pepper gives a fiery kick. If you love citrus, add lime zest to the mix. It brightens the flavor and makes each bite pop. Adjust the spice level to fit your taste. If you want to make these tacos vegan, you can easily do it. Most of the ingredients are already plant-based. Just skip any cheese or dairy. Instead, use avocado slices for creaminess. You can also make a cashew cream for a rich touch. This way, you create a delicious, plant-based taco. To store your sheet pan chipotle veggie tacos, use airtight containers. Glass or plastic containers work best to keep the flavors fresh. Place any leftovers in the fridge within two hours of cooking. These tacos last about 3 to 4 days in the fridge. Always check for any signs of spoilage before eating. If you want to save your tacos for later, freezing is a great option. First, let the roasted veggies cool down. Then, place them in a freezer-safe bag or container. Remove as much air as possible to prevent freezer burn. The tacos can stay good for about 2 to 3 months in the freezer. When you’re ready to eat, thaw the veggies overnight in the fridge. For reheating, you can use the microwave or heat them in a skillet over medium heat until warm. Enjoy them with fresh tortillas for the best taste! Yes, you can prepare these tacos in advance. You can roast the veggies and store them in a container. Just keep the roasted mix in the fridge for up to three days. When you're ready to eat, warm the veggies in a skillet. Heat your tortillas too. This saves time and keeps your meal fresh. If you need an alternative, try flour tortillas or whole wheat tortillas. You can also use lettuce wraps for a low-carb option. These choices still taste great with the veggie mix. Just make sure they are soft and pliable before filling them. Yes, this recipe can be gluten-free. Corn tortillas are naturally gluten-free. If you choose flour tortillas, check for gluten-free labels. For added safety, you can also use rice paper wraps. Enjoy these tacos without worry if you follow these tips! This blog post showed you how to make tasty veggie tacos. We started with fresh vegetables like zucchini and bell peppers, then seasoned them for flavor. Roasting the veggies gave them a nice taste that works well in warm corn tortillas. You learned tips for choosing ingredients and how to store leftovers. With these simple steps, you can enjoy healthy tacos anytime. I hope you feel inspired to try this fun recipe!

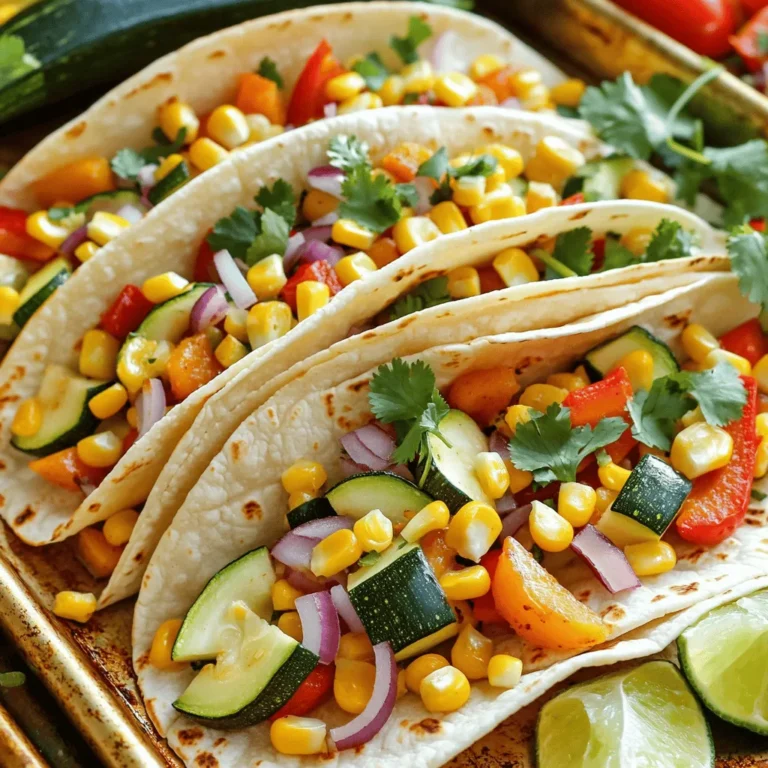
Sheet Pan Chipotle Veggie Tacos Flavorful Delight

- 8 oz wide rice noodles - 1 lb flank steak, thinly sliced against the grain - 1 bell pepper (red or green), sliced - 1 cup broccoli florets Mongolian beef noodles use wide rice noodles. These noodles soak up flavors well. Flank steak adds a rich taste. Slice it thinly for quick cooking. Fresh vegetables like bell peppers and broccoli add color and crunch. - 2 tablespoons soy sauce - 1/4 cup hoisin sauce - 1 tablespoon chili paste (adjust for spice preference) Soy sauce gives the dish a savory kick. Hoisin sauce adds sweetness and depth. Chili paste brings heat. You can adjust the chili based on your spice level. - 3 green onions, chopped - Sesame seeds, for garnish Green onions add a fresh taste. They also give a pop of color. Sesame seeds add a nice crunch. They make the dish look appealing. These ingredients come together to create a tasty meal. Each one plays a key role in flavor and texture. Enjoy your cooking adventure! To start, you need to marinate the flank steak. This step adds flavor and helps tenderize the meat. In a small bowl, mix 2 tablespoons of soy sauce with 1 tablespoon of cornstarch. Toss the thinly sliced flank steak in this mix until it is well coated. Let it sit for about 15 minutes. This simple process makes a big difference in taste. Next, you will cook the rice noodles. Boil water in a pot, then add 8 ounces of wide rice noodles. Follow the package instructions, usually boiling for about 5-7 minutes. You want them soft but not mushy. Once cooked, drain them and set aside. They will soak up the sauce later. Now, it's time to stir-fry the veggies. Heat 2 tablespoons of vegetable oil in a large skillet or wok over medium-high heat. When the oil is hot, add the marinated beef in a single layer. Sauté for 2-3 minutes until the beef is browned. Set the beef aside. In the same skillet, add 1 sliced bell pepper and 1 cup of broccoli florets. Stir-fry for 3-4 minutes until they are just tender. Next, add 3 minced garlic cloves and 1-inch grated ginger. Stir quickly for about 30 seconds until you can smell the aroma. This mix of flavors will make your dish pop. To bring it all together, return the cooked beef to the skillet. Now, add 1/4 cup of hoisin sauce and 1 tablespoon of chili paste. Mix well to combine everything. Finally, add the cooked noodles and toss gently. Make sure the noodles are coated in the sauce and heated through. Remove the skillet from heat and stir in 3 chopped green onions. Garnish with sesame seeds before serving. This dish is ready to enjoy! To make your flank steak shine, marination is key. Use soy sauce and cornstarch. The soy adds flavor, while cornstarch makes the meat tender. Coat the beef well and let it sit for 15 minutes. This time allows the flavors to seep in. When cooking, heat your skillet until it’s hot. This helps the beef brown nicely. Cook it in one layer for best results. Cooking rice noodles can be tricky. Follow the package instructions closely. Usually, they need about 5 to 7 minutes in boiling water. Check them often to avoid overcooking. You want them tender, but not mushy! Once cooked, drain them well. This keeps them from sticking together later. Chili paste adds heat to the dish. Start with one tablespoon, then taste it. If you want more spice, add a bit more. Remember, you can always add heat, but it’s hard to take it away. Adjusting the chili paste helps you find your perfect balance. Enjoy the flavors as they blend in your Mongolian beef noodles! {{image_2}} You can change the protein in Mongolian Beef Noodles for a new taste. Chicken works well. Use thin slices of chicken breast instead of flank steak. Tofu is a great choice for a vegetarian option. Firm tofu soaks up flavors well. For seafood lovers, try shrimp. Cook the shrimp until pink and tender, then mix it in. Adding more veggies can boost flavor and nutrition. Carrots add crunch and sweetness. Snow peas give a fresh taste. Mushrooms bring umami, while bok choy adds a nice green touch. You can also toss in spinach for extra color and health benefits. Feel free to mix and match your favorites! If you need gluten-free noodles, there are easy swaps. Rice noodles are already gluten-free, making them a perfect choice. You can also try zucchini noodles for a low-carb option. Simply spiralize zucchini and cook it lightly. These alternatives keep the dish tasty while meeting dietary needs. To keep your Mongolian Beef Noodles fresh, store leftovers in an airtight container. Let the dish cool to room temperature before sealing it. This helps prevent moisture build-up. You can keep them in the fridge for up to three days. If you want to store them longer, consider freezing. Just make sure to use a freezer-safe container. Reheating your Mongolian Beef Noodles is easy. The best method is to use a skillet. Heat a small amount of oil over medium heat. Add the noodles and stir frequently until they are hot. You can also use a microwave if you are short on time. Place the noodles in a microwave-safe bowl and cover it. Heat for one to two minutes, stirring halfway through. This ensures even heating. Preparing Mongolian Beef Noodles ahead of time can save you time later. You can marinate the flank steak the night before. Store it in the fridge to soak in the flavors. You can also chop the vegetables in advance. Store them in airtight bags or containers. Cook the noodles when you are ready to eat. This keeps everything fresh and tasty. You can enjoy many tasty sides with Mongolian beef noodles. Here are a few ideas: - Steamed dumplings: They add great flavor and texture. - Egg rolls: Crispy and delicious, they're perfect for dipping. - Sesame cucumber salad: A refreshing choice that balances the rich noodles. - Fried rice: A classic that pairs well with the beef. Mongolian beef noodles can be spicy, but it depends on how much chili paste you use. If you want less heat, use less chili paste. You can also add it slowly and taste as you go. For those who love spice, add more chili paste for a kick. Adjust it to fit your taste! Yes, you can use different noodles. Here are some choices: - Udon noodles: They are thick and chewy, adding a nice bite. - Soba noodles: These are made from buckwheat and have a unique taste. - Egg noodles: They are soft and soak up sauce well. Feel free to experiment with what you have at home! Mongolian beef noodles offer a rich blend of flavors and textures. You now know the key ingredients, from wide rice noodles to flank steak. The step-by-step guide ensures you cook each element perfectly. Don't forget the tips to enhance your dish, like marinating well and adjusting spice levels. Feel free to explore variations and alternatives for protein and vegetables. Proper storage and reheating can keep your meal fresh. Enjoy creating this dish that’s sure to impress. Cooking can be simple and fun with the right approach. Dive in and savor every bite!

Mongolian Beef Noodles Flavorful and Quick Recipe

- 1 ½ cups all-purpose flour - 2 tablespoons sugar - 2 teaspoons baking powder - ½ teaspoon baking soda - ½ teaspoon salt - 1 teaspoon ground cinnamon - 1 cup buttermilk (or milk) - 1 large egg - 2 tablespoons melted butter - 1 teaspoon vanilla extract - 1 cup peeled and diced apples (Granny Smith or Honeycrisp work well) - ½ cup brown sugar - 2 tablespoons ground cinnamon (for filling) - 1 cup cream cheese frosting (store-bought or homemade) These ingredients come together to create a warm, sweet breakfast. The dry ingredients form a fluffy base, while the wet ingredients bring moisture and flavor. The apples add a nice crunch, and the cinnamon filling gives that classic roll taste. Lastly, the cream cheese frosting makes it feel special. Mix them well, and you'll have a delightful treat that is sure to impress. Start by making the pancake batter. In a large bowl, mix together the dry ingredients. You need: - 1 ½ cups all-purpose flour - 2 tablespoons sugar - 2 teaspoons baking powder - ½ teaspoon baking soda - ½ teaspoon salt - 1 teaspoon ground cinnamon Whisk these dry items well to blend. In another bowl, combine the wet ingredients. You will need: - 1 cup buttermilk (or regular milk) - 1 large egg - 2 tablespoons melted butter - 1 teaspoon vanilla extract Whisk these together until smooth. Now, pour the wet mix into the dry mix. Stir gently until just combined; it’s okay if some lumps remain. Finally, fold in 1 cup of peeled and diced apples. Use Granny Smith or Honeycrisp for the best flavor. Next, prepare the cinnamon filling. In a small bowl, mix: - ½ cup brown sugar - 2 tablespoons ground cinnamon Combine these two until they are well mixed. This will give your pancakes that delicious cinnamon roll taste. Now it’s time to cook! Preheat your skillet or griddle over medium heat. Once hot, pour ¼ cup of pancake batter onto it. Before the pancake bubbles, sprinkle about a tablespoon of the cinnamon filling on top. When bubbles form and the edges look set, flip the pancake. Cook for another 1-2 minutes until golden brown. Remove it from the skillet and keep it warm. Repeat this with the remaining batter and filling, stacking the pancakes on a plate. Once all the pancakes are cooked, stack them high on a plate. Drizzle 1 cup of cream cheese frosting over the top right before serving. You can also add extra apple slices and a sprinkle of cinnamon for a lovely finish. To get fluffy pancakes, avoid over-mixing the batter. When mixing, stop as soon as you combine the wet and dry ingredients. A few lumps are fine. Over-mixing makes pancakes tough, not soft. The ideal cooking temperature is medium heat. If it’s too hot, pancakes burn. If too low, they cook unevenly. A non-stick skillet works best. You can test the heat by adding a drop of water. If it sizzles, it’s ready. Get creative with your garnishes! Try adding sliced apples, chopped nuts, or a sprinkle of cinnamon on top. You can also drizzle maple syrup or honey for added sweetness. For side dishes, crispy bacon or fresh fruit complements the pancakes well. You can also serve them with yogurt for a creamy texture. For cream cheese frosting, you need: - 8 oz cream cheese, softened - 4 cups powdered sugar - 1 teaspoon vanilla extract - 2-4 tablespoons milk (for consistency) To get the right consistency, mix the cream cheese and sugar well. Add milk slowly until you reach your desired thickness. Taste and adjust the sweetness if needed. This frosting adds a rich, creamy touch to the pancakes. {{image_2}} You can switch up the fruit in these pancakes. Try diced pears, bananas, or berries. Each fruit adds a new taste. For seasonal fun, use pumpkin in the fall or fresh strawberries in spring. This keeps your breakfast exciting and fresh. If you need gluten-free pancakes, use gluten-free flour. It works well in this recipe. For a vegan option, swap the egg with a flax egg. Mix one tablespoon of ground flaxseed with three tablespoons of water. Let it sit for a few minutes. You can also use almond milk instead of buttermilk. For frosting, try a vegan cream cheese or make a simple glaze with powdered sugar and plant milk. Want more texture? Add chopped nuts like walnuts or pecans. They give a nice crunch. You can also mix in chocolate chips for a sweet twist. If you love spices, try adding nutmeg or cardamom along with the cinnamon. These small changes can create a whole new flavor experience. To keep your leftover pancakes fresh, stack them with parchment paper between each one. Place the stack in an airtight container. You can store them in the fridge for up to three days. If you want to save them longer, freeze them for up to two months. Just make sure they are completely cool before freezing. When it’s time to eat your pancakes again, you have two good options. The microwave is quick and easy. Place a pancake on a microwave-safe plate and cover it with a damp paper towel. Heat for about 20-30 seconds. The stovetop gives you a nice warm texture. Heat a skillet over medium-low heat. Place the pancake in the skillet and heat for about a minute on each side. This method helps bring back the fluffy texture. If you have leftover cream cheese frosting, store it in an airtight container in the fridge. It will stay fresh for up to one week. You can also freeze the frosting for up to three months. Just let it thaw in the fridge before using it again. If it’s too thick after thawing, mix in a little milk to get the right consistency. Yes, you can prepare these pancakes in advance. Here are some tips: - Batter Storage: Store the batter in the fridge for up to 24 hours. Mix again before cooking. - Cooked Pancakes: Make pancakes and let them cool. Then, place them in an airtight container. They last for about three days in the fridge. - Freezing: For longer storage, freeze pancakes in a single layer. Once frozen, stack them with parchment paper between each pancake. They can last for up to two months. I recommend using Granny Smith or Honeycrisp apples. Here’s why: - Granny Smith: They are tart and crisp. This balances the sweet filling well. - Honeycrisp: They are sweet and juicy, adding a nice flavor and texture. Yes, you can use regular milk! However, here are some great substitutes: - Milk with Vinegar: Add 1 tablespoon of vinegar to one cup of milk. Let it sit for 5 minutes to sour. - Yogurt or Sour Cream: Mix equal parts with water to make a buttermilk substitute. This adds creaminess to your pancakes. To make fluffy pancakes, follow these key factors: - Don’t Overmix: Mix the batter gently. Lumps are okay; they help keep the pancakes light. - Rest the Batter: Let the batter sit for about 5-10 minutes. This helps it thicken and improves texture. - Right Temperature: Cook on medium heat. Too hot can burn the outside while the inside stays raw. You now have everything to make delicious apple cinnamon pancakes. We covered ingredients from dry to wet, filling, and frosting. I shared step-by-step instructions for mixing, cooking, and stacking. With tips to perfect texture and creative serving ideas, you can impress anyone. Consider variations for dietary needs and exciting flavors. Don't forget about storage to keep them fresh. Enjoy your pancake journey!

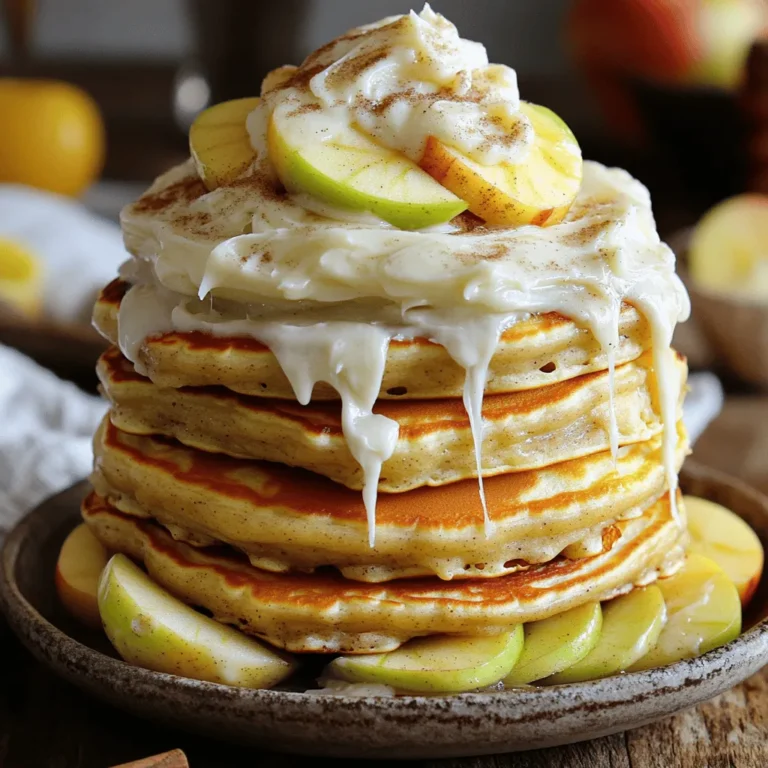
Apple Cinnamon Roll Pancakes Delightful Breakfast Treat

For a cozy pumpkin spice latte, you need these main ingredients: - 4 cups brewed coffee - 1 cup milk (dairy or non-dairy) - 1 cup pumpkin puree - 1/4 cup brown sugar (adjust to taste) - 1 teaspoon vanilla extract - 1 teaspoon pumpkin spice mix (cinnamon, nutmeg, ginger, and cloves) These simple items blend to create a rich and warm drink. The brewed coffee adds a strong base. Pumpkin puree gives it that fall flavor. Brown sugar sweetens everything up. Vanilla extract adds a lovely touch, while the spice mix brings warmth and comfort. You can make your latte your own with a few optional ingredients: - Whipped cream for topping - Ground cinnamon for garnish Adding whipped cream makes it feel special. A sprinkle of ground cinnamon on top adds extra flair and flavor. Feel free to experiment with flavored syrups or extra spices! The type of milk you choose can change your drink's taste and texture. Here are some great options: - Whole milk for a creamy latte - Almond milk for a nutty flavor - Oat milk for a smooth, sweet touch - Coconut milk for a tropical twist Each option brings its own flavor. Choose what you love best to make your drink perfect for you. To start, gather your ingredients. You need: - 4 cups brewed coffee - 1 cup milk (dairy or non-dairy) - 1 cup pumpkin puree - 1/4 cup brown sugar (adjust to taste) - 1 teaspoon vanilla extract - 1 teaspoon pumpkin spice mix (cinnamon, nutmeg, ginger, and cloves) - Whipped cream for topping - Ground cinnamon for garnish In your slow cooker, pour in the brewed coffee. Next, add the pumpkin puree. It gives a creamy texture and rich flavor. Then, sprinkle in the brown sugar and vanilla extract. This adds sweetness and warmth. Finally, toss in the pumpkin spice mix. Stir the mixture well to blend everything together. Now, it’s time to cook. Add the milk to the slow cooker. Mix it again to combine all the ingredients. Cover the slow cooker and set it to low heat. Let it cook for 2 to 3 hours. This slow cooking helps the flavors meld perfectly. You will notice a warm, inviting aroma filling your kitchen. After the cooking time, give your latte a good stir. This helps blend any ingredients that may have settled. Now, you’re ready to serve! Pour the latte into mugs. Top it with whipped cream for a delightful finish. Finally, sprinkle some ground cinnamon on top. This adds an extra touch of spice. Enjoy your cozy pumpkin spice latte! To adjust the sweetness in your pumpkin spice latte, start with less sugar. Use 1/4 cup of brown sugar, then taste the mix. If you want it sweeter, add more sugar. You can also try maple syrup as a natural sweetener. It adds a nice flavor twist. Remember, you can always add more, but you can't take it out! To boost the pumpkin flavor, use quality pumpkin puree. A good brand makes a big difference. You can also add a pinch of salt. Salt brings out the sweet and spicy notes. If you want, add a little extra pumpkin spice mix. Mix in more cinnamon, nutmeg, or ginger to find your perfect blend. Always taste as you go! For the best slow cooker results, keep the lid on. This helps the flavors meld. Cook on low heat for 2-3 hours for the best taste. Stir the mixture halfway through to combine. If you notice any lumps, a quick whisk will help. When serving, let it cool a bit. This latte is best hot but not scalding. Enjoy the warmth! {{image_2}} You can switch the milk to fit your taste. Use almond, oat, or soy milk. Each adds a unique flavor. Almond milk makes it nutty, while oat milk offers creaminess. Coconut milk adds a tropical twist, too. Choose what you like best! To make this drink vegan, use non-dairy milk and skip the whipped cream. You can whip coconut cream for a tasty topping. Use maple syrup instead of brown sugar for a nice sweetness. This keeps all the delicious flavors intact. Want to change things up? Try adding a dash of cocoa powder for chocolate flavor. A splash of peppermint extract makes a festive twist. You can also mix in caramel syrup for extra sweetness. These add-ins make your latte even more fun! After you enjoy your pumpkin spice latte, you might have some left. To store it safely, let the latte cool to room temperature. Then, pour it into an airtight container. Make sure to seal it well. Store it in the fridge for up to three days. If you want to keep it longer, consider freezing. When you are ready to enjoy your leftovers, reheating is easy. Pour the cold latte into a pot. Heat it over medium heat, stirring often. This helps it warm evenly. You can also use a microwave. Just pour it into a microwave-safe cup. Heat in short bursts of 30 seconds. Stir in between until it’s hot. Freezing your latte is a great way to save it. Pour the cooled latte into ice cube trays. This lets you make small portions. Once frozen, transfer the cubes to a freezer bag. This way, you can use them later. When you want a latte, blend a few cubes with milk. This gives you a quick and tasty drink. Yes, you can use fresh pumpkin. Start by cooking and pureeing the pumpkin. Roast it until soft, then blend it until smooth. This gives a fresh taste. However, pumpkin puree saves time. It is already cooked and ready to use. To boost the flavor, increase the brewed coffee amount. You can use dark roast coffee for a richer taste. Another option is to add an extra shot of espresso. This gives a nice kick. Just remember, taste as you go to find your perfect strength. If you don't have a slow cooker, you can use a saucepan. Combine your ingredients in the pan and heat on low. Stir often to avoid burning. You can also use a large pot or a Dutch oven. Just keep an eye on it while it cooks. We covered how to make a Pumpkin Spice Latte at home. You learned about key ingredients, preparation steps, and tasty variations. I shared tips to enhance flavor and customize your drink. Remember, enjoy making this drink your own. You can switch milk types or add flavors. Storing and reheating are easy, too. With this guide, you can create a perfect latte that fits your taste. Happy brewing!

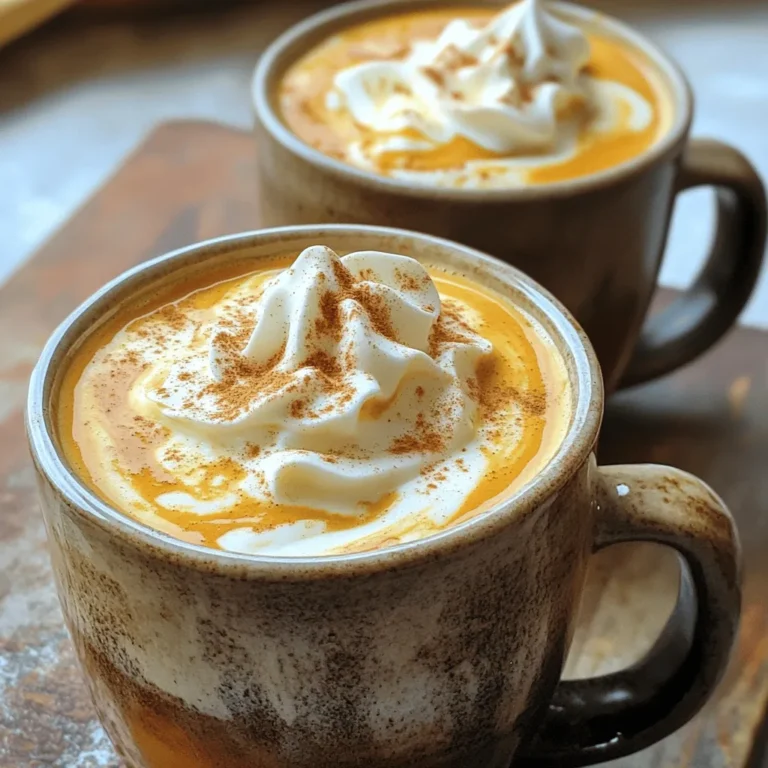
Slow Cooker Pumpkin Spice Latte Cozy Fall Drink

- 1 lb baby carrots, peeled - 3 tablespoons honey - 2 tablespoons soy sauce (low sodium) - 2 cloves garlic, minced - 1 tablespoon olive oil - 1/2 teaspoon black pepper - 1/4 teaspoon salt - Fresh parsley, chopped (for garnish) To make Air Fryer Honey Garlic Carrots, you need fresh, simple ingredients. Start with baby carrots. Their small size helps them cook evenly. Peel them first for a cleaner look and taste. Next, you need honey. It brings sweetness and helps the carrots caramelize. Use low sodium soy sauce to add depth without too much salt. Minced garlic adds a punch of flavor. Olive oil helps the carrots brown and adds richness. Black pepper gives a hint of spice, while salt enhances all the flavors. Finally, fresh parsley adds a bright touch when you serve the dish. Gather these ingredients, and you’re ready to create a tasty side dish that everyone will love! - Combine honey, soy sauce, minced garlic, olive oil, black pepper, and salt. - Stir well to create a uniform mixture. This mixture will coat the carrots and add a sweet and savory flavor. - Toss the baby carrots in the marinade. Make sure they are well coated. - Let them sit for at least 15 minutes. This time allows the carrots to soak up the flavors and become delicious. - Preheat your air fryer to 370°F (188°C) for 5 minutes. This step helps the carrots cook evenly. - Place the marinated carrots in the air fryer basket. Arrange them in a single layer for the best results. - Cook for 12-15 minutes, shaking the basket halfway through. This helps them caramelize well. The carrots should be tender and slightly crispy on the outside. - Use fresh, baby carrots for best results. - Consider using whole carrots cut into sticks for a different look. Choosing the right carrots makes a big difference. Fresh baby carrots are sweet and tender. They cook well in the air fryer. If you want a rustic feel, cut whole carrots into sticks. This gives you thicker pieces that can hold more flavor. - Arrange carrots in a single layer in the air fryer. - Shake the basket for consistent caramelization. To get the best taste, arrange your carrots in a single layer. This helps them cook evenly. If they overlap, some may cook faster than others. Shaking the basket halfway through cooking helps too. It allows all sides to caramelize nicely, giving you that delicious crispiness. - Modify honey or soy sauce to suit your taste. - Add more garlic for a stronger flavor. You can make this dish your own by adjusting the sweetness. If you like it sweeter, add more honey. If you want it saltier, add more soy sauce. I often add an extra clove of garlic for a bolder taste. This gives the dish a lovely punch that matches the sweet honey. Feel free to taste and tweak as you go! {{image_2}} You can easily change the flavor of your honey garlic carrots. Try adding ginger for a warm, spicy kick. Red pepper flakes bring heat and a fun twist. For a fresh taste, use herbs like thyme or rosemary. These spices make your dish unique and even more tasty. Carrots are great, but don’t stop there! You can switch to parsnips for a sweeter bite. Sweet potatoes also work well and add a rich flavor. Experimenting with different veggies keeps meals exciting and colorful. If you want a different sweetener, try maple syrup. It adds a lovely depth of flavor. Agave syrup is another option and is milder. These alternatives make it easy to adjust the taste to your liking. To keep your honey garlic carrots fresh, store them in an airtight container in the refrigerator. This helps lock in flavor and moisture. They are best enjoyed within 3-4 days. After that, they may lose their taste and texture. When you want to enjoy your leftovers, you have a couple of great options. You can use the microwave or the air fryer for the best texture. If you choose to microwave, add a splash of water. This step helps retain moisture, making your carrots tasty and juicy again. You can use frozen carrots, but the texture will change. They may become softer and mushy. Frozen carrots also take longer to cook. If you use them, extend the cooking time by a few minutes. Check them often to avoid overcooking. Fresh carrots give the best crunch and flavor. The carrots are done when they are tender but still firm. They should have a slight crisp on the outside. You can test by piercing them with a fork. If it goes in easily but still offers some resistance, they are perfect. Look for a nice caramel color as well. These carrots pair well with many dishes. Grilled chicken or steak make great choices. You can also serve them with rice or quinoa for a hearty meal. A fresh salad adds a nice crunch and balances the sweet flavor. Enjoy them with whatever you love! In this blog post, I shared a simple, tasty recipe for honey garlic carrots. We covered the ingredients and step-by-step instructions for preparing, marinating, and air frying the carrots. I also offered tips for choosing the right carrots and adjusting flavors. Remember, you can customize this dish by adding spices or trying different veggies. Storing leftovers is easy, and reheating keeps them delicious. Enjoy making this recipe and discovering new flavors each time!

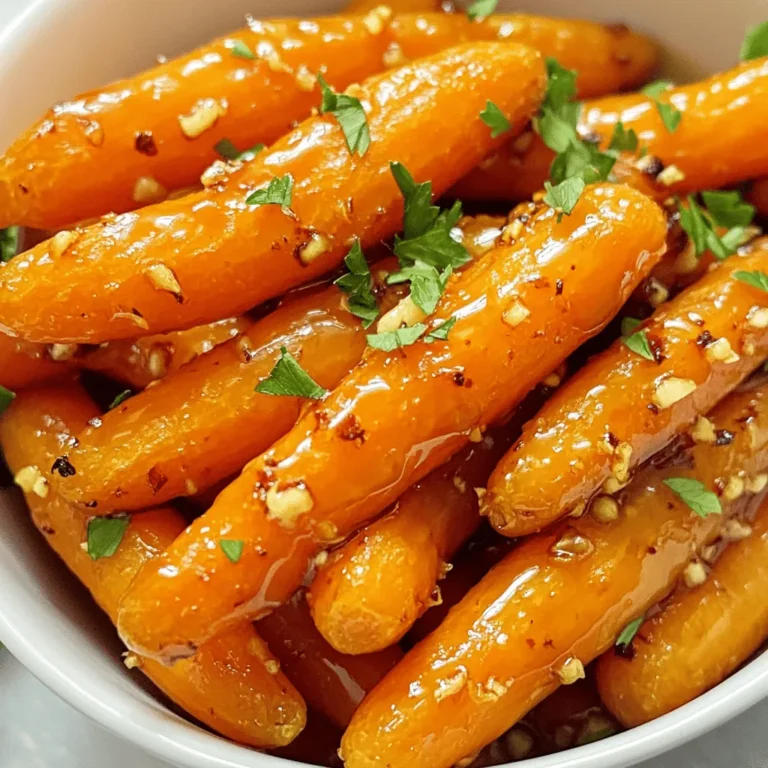
Air Fryer Honey Garlic Carrots Flavorful and Easy Dish

PREV 1 … 29 30 31 … 86 NEXT
spicy fork kitchen

explore

DessertsDinnerAppetizersDrinks

Our Policies

  • Cookie Policy
  • Copyright Policy
  • Disclaimer
  • GDPR Policy
  • Terms Of Use
Back to Top
  • About
  • Contact Us
  • Privacy Policy
© 2026 spicy fork kitchen