FREE DINNER EBOOK! Get your copy!
  • Cookie Policy
  • GDPR Policy
  • Disclaimer
  • Terms Of Use
  • Visit my other site: Fun Cookie Recipes
spicy fork kitchen
  • Home
  • Dinner
  • Desserts
  • Drinks
  • Appetizers
  • Contact
  • About
  • Privacy Policy
  • Home
  • Dinner
  • Desserts
  • Drinks
  • Appetizers
  • Contact
  • About
  • Privacy Policy
  • Cookie Policy
  • GDPR Policy
  • Disclaimer
  • Terms Of Use
Visit my other site: Fun Cookie Recipes

HOME / CATEGORIES /

Latest

To make caramel apple cheesecake bites, gather these items: - 1 cup graham cracker crumbs - 1/4 cup granulated sugar - 1/2 cup unsalted butter, melted - 8 oz cream cheese, softened - 1/2 cup powdered sugar - 1 teaspoon vanilla extract - 1 small apple, peeled, cored, and finely diced - 1/2 teaspoon cinnamon - 1/4 cup caramel sauce (plus extra for drizzling) - Pinch of salt You can swap some ingredients if needed: - Use gingersnap crumbs instead of graham cracker crumbs for a spicier flavor. - Coconut oil can replace unsalted butter for a dairy-free option. - For a lighter cream cheese, try Neufchâtel cheese. - You can use brown sugar instead of granulated sugar for a deeper taste. For the best results, measure carefully: - Use a dry measuring cup for the graham cracker crumbs and sugar. - Pack the crumbs lightly but firmly to avoid air pockets. - Use a liquid measuring cup for melted butter. - When measuring powdered sugar, spoon it into the cup and level it off with a knife for accuracy. Start by gathering your ingredients for the crust. You need graham cracker crumbs, granulated sugar, and melted butter. Mix these in a medium bowl. Combine until the crumbs look like wet sand. This part is key because it holds everything together. Now, take mini muffin tins. Press about a tablespoon of this mixture into each cup. Use the back of a spoon to pack it down firmly. Make sure it is even and solid. This will form a nice base for your dessert. Next, you will create the cheesecake filling. Take softened cream cheese and put it in a bowl. Beat it until smooth and creamy. It should be free of lumps. Gradually add powdered sugar, vanilla extract, and a pinch of salt. Mix until everything is well combined. Now, chop your small apple into tiny pieces. Sprinkle in the cinnamon, then fold the apple and cinnamon into the cream cheese mixture. Make sure the apple is spread out evenly. This step adds flavor and texture to your bites. Now, it's time to assemble your cheesecake bites. Spoon the cheesecake mixture into the muffin tins over the crusts. Fill each cup to the top. This ensures each bite has a good amount of creaminess. After filling, place the muffin tin in the fridge. Let the bites chill for at least two hours. This helps them set and become firm. Once they are chilled, remove them carefully from the muffin tin. Drizzle caramel sauce on top of each bite for extra sweetness. You can also add thin apple slices for a nice touch. Enjoy your delicious caramel apple cheesecake bites! When making caramel apple cheesecake bites, avoid overmixing the filling. Overmixing can make the cheesecake too fluffy. Be gentle when folding in the diced apples. If you chop them too large, they won’t blend well. Also, don’t skip chilling time. If you remove them too soon, they may fall apart. For a smooth filling, make sure your cream cheese is very soft. It should be at room temperature. This helps it mix well with the sugar and other ingredients. A pinch of salt enhances the flavors and balances the sweetness. The right amount of caramel sauce adds a creamy richness without making it too runny. Serve these bites chilled for the best taste. Drizzle extra caramel sauce on top for a sweet finish. Add thin apple slices around the bites for a pretty presentation. Sprinkle a little cinnamon on top for a warm touch. This adds color and a lovely aroma, making them even more inviting. {{image_2}} You can make your caramel apple cheesecake bites even better. Add spices like nutmeg or ginger for warmth. These spices blend well with the apple and caramel. You can also try different extracts. Almond or maple extract gives a unique touch. Just one teaspoon will change the flavor. Experiment and find your favorite mix. Want a lighter treat? Use sugar substitutes like stevia or erythritol. These sweeteners make the bites lower in calories. You can also swap the cream cheese for Greek yogurt. This change adds protein and cuts fat. Look for low-fat or fat-free options for the crust too. Use whole wheat crumbs instead of regular graham crackers. These swaps keep the taste while being healthier. Change up the fruit for seasonal fun. In fall, use pears or cranberries instead of apples. These fruits offer a new taste and texture. In summer, fresh berries like blueberries or strawberries work great. They add a burst of color too. Each season brings unique flavors, so have fun trying different fruits. The options are endless! To keep your caramel apple cheesecake bites fresh, store them in an airtight container. Place parchment paper between layers if you stack them. This prevents sticking and keeps them neat. Keep the container in the fridge. These bites taste best when chilled. You can freeze these bites if you want to store them longer. First, let them cool completely. Then, place them on a baking sheet. Freeze for about an hour until firm. After that, transfer them to a freezer-safe container or bag. Make sure to label it with the date. In the fridge, these cheesecake bites last up to five days. If frozen, they can last for about three months. Just remember to thaw them in the fridge before serving. Enjoy the sweetness of caramel and apple whenever you want! Yes, you can make caramel apple cheesecake bites ahead of time. They taste better after chilling. Just prepare them and store them in the fridge. They can sit there for up to three days. This makes them perfect for parties or family gatherings. You can even freeze them if you want to save them longer. Just remember to thaw them in the fridge before serving. Serving these bites is simple. Place them on a nice platter for a pretty display. You can drizzle extra caramel sauce on top for added sweetness. Garnish with thin apple slices and a sprinkle of cinnamon. This adds a lovely touch and makes them look fancy. They are perfect for dessert tables or as a fun snack. Yes, you can make these cheesecake bites gluten-free. Use gluten-free graham crackers for the crust. Most brands offer tasty options that work well. You can also find gluten-free caramel sauce. Just check the label to be sure. This way, everyone can enjoy these delicious treats! You learned about cheesecake bites—how to make them, and tips to enhance your recipe. Remember to choose the right ingredients, measure them carefully, and avoid common mistakes for the best results. Experiment with flavors and healthier options to make this dessert your own. With proper storage, you can enjoy these bites longer. Making them ahead of time can save you stress. Now, you have the tools to create delicious cheesecake bites! Enjoy every bite and impress your friends and family.

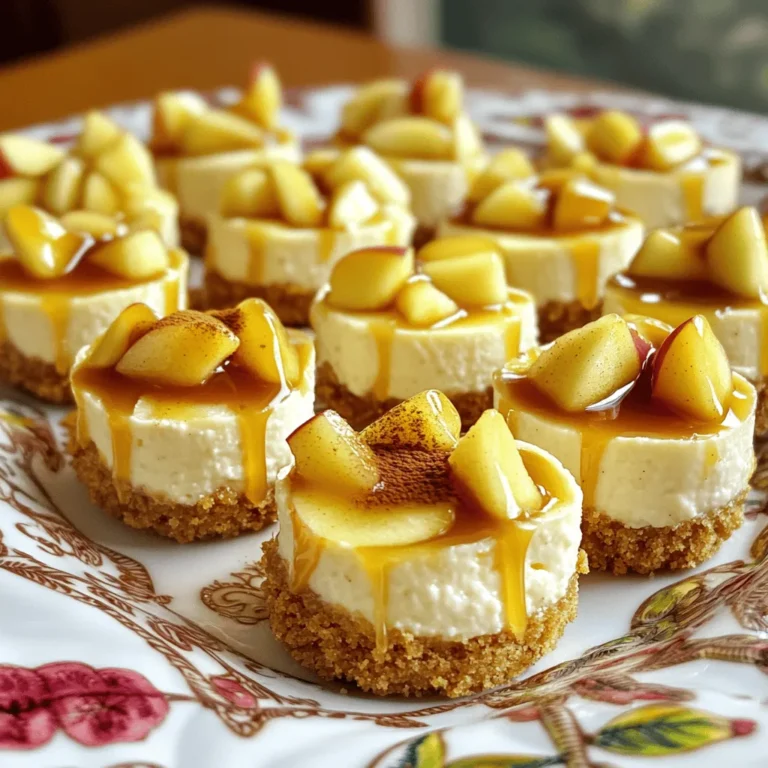
Caramel Apple Cheesecake Bites Irresistible Dessert Treat

For these tasty meatballs, you need: - 1 pound ground beef (or ground chicken) - 1/2 cup breadcrumbs - 1/4 cup grated Parmesan cheese - 1/4 cup finely chopped green onions - 1/4 cup chopped fresh cilantro - 1 large egg - 2 cloves garlic, minced - 1 teaspoon salt - 1/2 teaspoon black pepper - 1 cup sweet chili sauce - 1 tablespoon soy sauce (low-sodium preferred) - 1 tablespoon rice vinegar - 1/2 teaspoon red pepper flakes (adjust to taste) These ingredients blend to create meatballs full of flavor. The ground beef gives a rich taste, while the breadcrumbs help hold the meatballs together. Parmesan cheese adds a nice cheesy touch, and the green onions and cilantro bring freshness. You can mix things up with these optional ingredients: - Chopped bell peppers for crunch - A dash of sesame oil for a nutty flavor - Different herbs like parsley or basil These add-ins allow you to customize the meatballs to your liking. They make the dish your own and can surprise your family with new tastes. If you need to make changes for dietary needs, here are some options: - Use ground turkey or plant-based meat for a lighter choice. - Swap breadcrumbs with gluten-free options to make it gluten-free. - For a vegetarian version, use lentils or chickpeas instead of meat. These substitutions ensure everyone can enjoy the meal. You can cater to different diets while keeping the flavors intact. To start, gather your ingredients. You will need: - 1 pound ground beef (or ground chicken) - 1/2 cup breadcrumbs - 1/4 cup grated Parmesan cheese - 1/4 cup finely chopped green onions - 1/4 cup chopped fresh cilantro - 1 large egg - 2 cloves garlic, minced - 1 teaspoon salt - 1/2 teaspoon black pepper In a large bowl, combine the ground meat, breadcrumbs, Parmesan, green onions, cilantro, egg, garlic, salt, and pepper. Mix until just combined. Be careful not to overmix. This keeps the meatballs tender. Now, it's time to shape the mixture. Use your hands to roll the meat into 1-inch balls. Place each meatball on a baking sheet lined with parchment paper. This makes it easier to move them later. Next, prepare the sauce. In a separate bowl, whisk together: - 1 cup sweet chili sauce - 1 tablespoon soy sauce (low-sodium) - 1 tablespoon rice vinegar - 1/2 teaspoon red pepper flakes (adjust to taste) Once mixed, place the meatballs in the slow cooker in a single layer. Pour the sweet chili sauce mixture over the meatballs. Make sure to coat each one evenly. Cover the slow cooker and cook on low for 4-5 hours or on high for 2-3 hours. The meatballs should be cooked through and tender. After cooking, gently stir to coat the meatballs in the sauce before serving. Enjoy your savory meal! To make perfect meatballs, start with fresh ingredients. Use ground beef or ground chicken for a lighter bite. Mix the meat with breadcrumbs, Parmesan, green onions, cilantro, egg, garlic, salt, and pepper. Be careful not to overmix; this keeps them tender. Shape the mixture into 1-inch balls. This size cooks evenly and stays juicy. Want more heat? Add red pepper flakes to your meatball mix. Start with 1/2 teaspoon, then taste. You can always add more but not take it out. For less spice, skip the flakes or use sweet chili sauce only. If you like it mild, serve with a side of rice to balance the heat. You can boost flavor by adding different herbs. Try fresh basil or parsley for a twist. Adding a splash of Worcestershire sauce in the meat mix adds depth. For a tangy touch, mix in some lime juice. Experimenting with these extras can create a new favorite in your home. {{image_2}} You can use various meats for your sweet chili meatballs. Ground beef gives a rich flavor. Ground chicken is leaner and lighter. Ground turkey offers a nice balance. Each type brings its taste and texture. Just remember to adjust cooking time if using a different meat. For example, turkey may cook a bit faster. If you want a meatless option, try plant-based proteins. You can use lentils, beans, or chickpeas. These ingredients work well with the sweet chili sauce. They add a hearty feel without meat. Just mash them a bit and mix with your other ingredients. You can also find store-bought meat substitutes for an easy swap. You might want to kick up the flavor of your meatballs. Add more red pepper flakes for heat. You can mix in some smoked paprika for a smoky twist. Adding pineapple juice can enhance the sweetness. If you love garlic, try adding more minced garlic for a bold taste. Experimenting with these flavors makes your dish unique. After your meal, let the meatballs cool to room temperature. Then, place them in an airtight container. This keeps them fresh longer. Store the container in the fridge. They will stay good for about three to four days. If you want to keep them longer, freezing is a great option. To freeze meatballs, first, let them cool completely. Then, arrange them in a single layer on a baking sheet. Freeze them for about one hour. This helps them keep their shape. After they freeze, move the meatballs to a freezer-safe bag. Label the bag with the date. They can last for up to three months in the freezer. When you’re ready to enjoy your meatballs again, reheating is easy. For the best results, use the slow cooker. Place the meatballs in the cooker with some extra sauce. Heat them on low for about one hour. You can also use the microwave. Just place them in a microwave-safe dish, cover, and heat for 1-2 minutes. Check if they are heated through before serving. Yes, you can bake these meatballs. Preheat your oven to 400°F. Place the meatballs on a lined baking sheet. Bake for about 20-25 minutes until they are brown and cooked through. This method gives a nice crust. Sweet chili meatballs taste great with many sides. You can serve them with steamed rice or noodles. Fresh veggies, like broccoli or snap peas, also pair well. If you want something light, a salad is a good choice too. These meatballs can last up to four days in the fridge. Store them in an airtight container. Make sure they cool down before you store them. This keeps them fresh and tasty for your next meal. Absolutely! Homemade sweet chili sauce works well for this recipe. Just make sure it has a good balance of sweet and spicy. This way, you can make it just the way you like. Yes, there are a few mistakes to watch out for. First, do not overmix the meatball mixture. This can make them tough. Second, make sure the meatballs are all the same size. This helps them cook evenly. Finally, don't skip the sauce coating step; it adds flavor. You’ve learned how to make tasty sweet chili meatballs, from ingredients to cooking steps. You can also try variations like different meats or meatless options. Remember to store your leftovers well for future meals. With these tips, you can make perfect meatballs every time. Enjoy the process and share your tasty results!

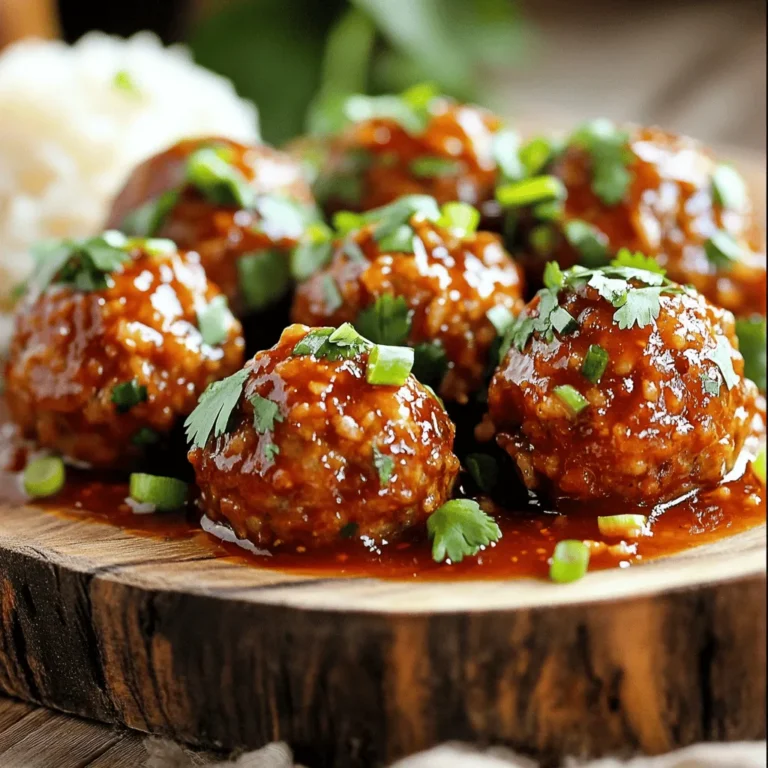
Slow Cooker Sweet Chili Meatballs Savory Family Meal

- Medium head of cauliflower - Optional garnishes: Fresh parsley, chopped green onions - 1 cup all-purpose flour (or gluten-free option) - 1 teaspoon garlic powder - 1 teaspoon onion powder - 1 teaspoon smoked paprika - ½ teaspoon salt - ½ teaspoon black pepper - 1 cup water - 1 cup BBQ sauce (your choice) - Cooking spray or olive oil for misting The fresh produce is key to this dish. Cauliflower provides a great base. You can use fresh parsley and green onions for a bright touch when serving. Next, dry ingredients add flavor and texture. All-purpose flour helps create a crispy coating. You can switch to gluten-free flour if needed. Garlic powder and onion powder bring a savory kick. Smoked paprika adds depth. Salt and black pepper round out the taste. For wet ingredients, water forms the batter. Choose your favorite BBQ sauce for the finishing touch. A light mist of cooking spray or olive oil helps crisp the wings in the air fryer. These ingredients create a fun and tasty dish that everyone will enjoy! 1. Preheat your air fryer to 400°F (200°C) for about 5 minutes. This step is key for a crisp finish. 2. Make the batter. In a mixing bowl, whisk together: - 1 cup all-purpose flour (or gluten-free flour) - 1 teaspoon garlic powder - 1 teaspoon onion powder - 1 teaspoon smoked paprika - ½ teaspoon salt - ½ teaspoon black pepper Gradually add 1 cup of water. Stir until you have a smooth batter. It should be thick but pourable. 3. Coat the cauliflower florets. Dip each piece into the batter. Make sure they are well-coated. Allow any extra batter to drip off. Place them in the air fryer basket in one layer. 4. Place the coated florets in the air fryer. If your air fryer is small, cook in batches. 5. Mist for crispiness. Lightly spray the florets with cooking spray. This step helps them become golden. 6. Set cooking time. Cook the cauliflower wings for 12-15 minutes. Shake the basket halfway through. This ensures even cooking for all pieces. 7. Warm the BBQ sauce while the wings cook. Use a small saucepan over low heat. This makes the sauce easy to coat. 8. Toss the wings in the sauce. Once they are crispy, take them out and place them in a bowl. Pour the warm BBQ sauce over them. Toss until each wing is well-coated. 9. Return to the air fryer. Put the sauced wings back in the air fryer. Cook for an additional 3 minutes. This helps the sauce set on the wings. 10. Cool slightly before serving. Let the wings rest for a minute. They are now ready to enjoy! To get that perfect crunch, coating is key. Make sure to coat each cauliflower piece well. The batter should be thick enough to stick but not too thick. After coating, mist the florets with cooking spray. This helps them crisp up nicely in the air fryer. Cooking in batches also matters. If you fill the basket too much, the wings will steam instead of fry. Frying in small batches helps each piece cook evenly. This way, you get that golden, crispy finish you want. When serving, presentation makes a big difference. Arrange the BBQ cauliflower wings on a platter. You can line the platter with fresh parsley for color. This adds a nice touch to your dish. Don’t forget the dips! A small bowl of extra BBQ sauce is perfect for dipping. You can also pair these wings with fresh veggies or a crunchy salad. One big mistake is overcrowding the air fryer. If the basket is too full, the air won’t circulate well. This leads to soggy wings instead of crispy ones. Another mistake is not shaking the basket during cooking. Shaking the basket halfway through helps all sides cook evenly. This simple step can make a huge difference in texture. {{image_2}} You can switch up the BBQ sauce for different flavors. Homemade sauce gives you control over taste. You can adjust sweetness or spice to your liking. Store-bought options are quick and easy. Look for brands with natural ingredients for a healthier choice. Want a spicy kick? Add hot sauce to your BBQ mix. For sweetness, try honey or maple syrup. You can even mix in spices like cayenne or chipotle for depth. Cauliflower wings are popular, but you can try cauliflower leaves too. They provide a different texture and taste. Simply coat and air fry them the same way. Other veggies work well too! Try broccoli, zucchini, or bell peppers. Just cut them into bite-sized pieces. They will crisp up nicely in the air fryer. If you need gluten-free options, swap all-purpose flour for almond or coconut flour. These options work well for the batter. Just keep an eye on the texture. For vegan modifications, use a plant-based BBQ sauce. You can also replace the flour with chickpea flour for added protein. These changes make the dish friendly for all diets. To store leftover cauliflower wings, let them cool first. Place them in an airtight container. Keep them in the fridge for up to three days. When you're ready to eat, you want to reheat them for the best taste. To maintain crispiness, preheat your air fryer to 350°F (175°C). Place the wings in the basket in a single layer. Heat them for about 5-7 minutes. This will make them crispy again. You can also use a regular oven at 375°F (190°C). If you want to freeze prepared wings, first let them cool completely. Then, place them on a baking sheet in a single layer. Freeze them for about one hour. Once frozen, transfer the wings to a freezer bag or container. To thaw and reheat, take them out of the freezer and place them in the fridge overnight. When ready, preheat your air fryer to 350°F (175°C). Cook them for about 7-10 minutes until they are hot and crispy again. Enjoy your delicious wings! You should air fry cauliflower wings for 12-15 minutes. Shake the basket halfway through. This helps them cook evenly and get crispy. Yes, you can use frozen cauliflower. Just thaw it first and pat it dry. This helps the batter stick better. To reheat, place the wings back in the air fryer. Heat them at 350°F for about 5-7 minutes. This keeps them crispy and tasty. To spice them up, add cayenne pepper to the batter. You can also use a spicy BBQ sauce for extra heat. Set your air fryer to 400°F (200°C) for the best results. This temperature helps achieve a nice crisp on the outside while cooking them through. You now have a complete guide to making crispy cauliflower wings in an air fryer. We discussed the key ingredients, preparation steps, and helpful tips for perfect results. Remember to cook in batches for the best texture. Feel free to experiment with sauces and veggies. This recipe is easy to adapt for your tastes and diet. Enjoy your flavorful and healthy snack!

Air Fryer BBQ Cauliflower Wings Flavorful Dish

For our Pumpkin Pecan Coffee Cake, we need a blend of dry ingredients. This helps the cake rise and gives it flavor. Here is what you need: - 1 cup all-purpose flour - 1 cup whole wheat flour - 1 teaspoon baking powder - 1 teaspoon baking soda - 1/2 teaspoon salt - 1 teaspoon ground cinnamon - 1/2 teaspoon ground nutmeg - 1/4 teaspoon ground ginger These spices bring warmth and a cozy autumn feel to the cake. The flours give it a nice texture. Now, let’s look at the wet ingredients. These help bind the cake and add moisture. You’ll need: - 1 cup canned pumpkin puree - 1 cup brown sugar - 1/2 cup granulated sugar - 1/2 cup vegetable oil - 3 large eggs - 1 teaspoon vanilla extract The pumpkin puree is the star of the show! It adds rich flavor and moistness. The sugars help sweeten the cake and create a lovely crust. Finally, we have some extra ingredients for crunch and flavor. Here’s what you’ll use: - 1/2 cup chopped pecans - 1/2 cup walnuts (optional) - 1/4 cup powdered sugar (for dusting) The pecans give a nice crunch, while walnuts add more texture if you choose to include them. The powdered sugar is perfect for a sweet finish on top. Start by gathering all your ingredients. You need: - 1 cup all-purpose flour - 1 cup whole wheat flour - 1 teaspoon baking powder - 1 teaspoon baking soda - 1/2 teaspoon salt - 1 teaspoon ground cinnamon - 1/2 teaspoon ground nutmeg - 1/4 teaspoon ground ginger - 1 cup canned pumpkin puree - 1 cup brown sugar - 1/2 cup granulated sugar - 1/2 cup vegetable oil - 3 large eggs - 1 teaspoon vanilla extract - 1/2 cup chopped pecans - 1/2 cup walnuts (optional) - 1/4 cup powdered sugar (for dusting) Preheat your oven to 350°F (175°C). Grease and flour a 9x13 inch baking pan. You can also use parchment paper for easy cleanup. In a medium bowl, whisk together the dry ingredients. Mix the all-purpose flour, whole wheat flour, baking powder, baking soda, salt, cinnamon, nutmeg, and ginger. Make sure they are well combined. In a large bowl, combine the pumpkin puree, brown sugar, and granulated sugar. Beat everything until smooth. Then, add the vegetable oil and mix until it blends well. Now, add the eggs one at a time, mixing after each addition. Stir in the vanilla extract. Then, gradually add the dry mixture. Stir gently until just combined. A few lumps are okay; do not overmix. Finally, fold in the chopped pecans and walnuts if you choose to add them. Pour the batter into the prepared baking pan. Spread it evenly across the pan. Bake in your preheated oven for 30-35 minutes. Check for doneness by inserting a toothpick in the center. It should come out clean. Once baked, let the cake cool in the pan for about 10 minutes. Then, transfer it to a wire rack to cool completely. When cool, dust the top with powdered sugar before slicing. Enjoy every slice! To get the best texture in your Pumpkin Pecan Coffee Cake, use room-temperature eggs. They mix better and help the cake rise. Make sure you don’t overmix the batter. A few lumps are okay. This keeps the cake light and fluffy. Also, folding in the nuts gently adds a nice crunch without breaking them apart. This cake shines when served warm. I love serving it with a dusting of powdered sugar on top. You can cut it into squares for easy serving. For a cozy treat, try adding a scoop of vanilla ice cream on the side. It creates a nice mix of warm and cold. Pair your coffee cake with a hot cup of coffee or tea. The flavors blend perfectly. A spiced chai tea enhances the warm spices in the cake. You could also serve it with a dollop of whipped cream for added creaminess. For a fun twist, try topping it with caramel sauce. {{image_2}} You can switch up the flours in this recipe for fun. Instead of all-purpose flour, try almond flour or oat flour. These flours add unique flavors and textures. You might also use a gluten-free blend if you want to avoid gluten. Adjust the liquid in the recipe as needed, since different flours absorb moisture differently. Feel free to get creative with this cake! You can add chopped apples or pears for a fresh twist. Dried cranberries or raisins also make a great addition. Spices like cardamom or allspice can bring warmth to the flavor. Just remember to keep the total amount of add-ins in check so the cake stays moist. Want to make this cake a bit lighter? You can replace some oil with unsweetened applesauce. This swap keeps the cake moist while cutting calories. Use less sugar by adding a splash of maple syrup or honey. You can also reduce the amount of brown sugar without losing flavor. Enjoy these options while still savoring every bite! To keep your Pumpkin Pecan Coffee Cake fresh, store it in an airtight container. This helps keep the moisture in and prevents it from drying out. I recommend placing a piece of parchment paper between the cake and the lid. This way, it stays soft and tasty. You can store it at room temperature for up to three days. If you want it to last longer, the fridge is a good option. It can stay fresh in the fridge for about a week. Just remember to let it come to room temperature before serving again. If you want to save some for later, freezing is a great choice! First, cool the cake completely. Next, wrap it tightly in plastic wrap. Then, place it in a freezer-safe bag or container. This helps avoid freezer burn. The cake can freeze well for up to three months. When you want to enjoy it again, just take it out and let it thaw in the fridge overnight. To warm up your cake, preheat your oven to 350°F (175°C). Place the slices on a baking sheet. Cover the cake with foil to prevent it from drying out. Heat for about 10-15 minutes. You can also use the microwave. Heat a slice for about 20-30 seconds. Check it often to avoid overheating. Enjoy your warm, delicious cake with a cup of coffee! Yes, you can use fresh pumpkin. Just make sure to cook it first. Peel the pumpkin, chop it, and steam or bake until soft. Then, mash it until smooth. This will give your coffee cake a fresh taste. Fresh pumpkin also adds moisture, which is great for texture. You can replace eggs with applesauce. Use 1/4 cup of unsweetened applesauce for each egg. This will keep your cake moist and add some natural sweetness. You can also use mashed banana or even yogurt. Both work well and keep the flavor balanced. To make this cake gluten-free, swap the all-purpose flour with a gluten-free flour blend. Make sure to check that the blend has xanthan gum. This will help give your cake the right texture. You might also want to adjust the baking powder to ensure it rises well. We covered key ingredients for your cake, from dry to wet and extra elements. I shared clear steps for prepping, mixing, and baking. You learned tips for perfecting texture and serving ideas. We explored fun variations, including alternative flours and healthy swaps. I also provided storage best practices and answered common questions. With these insights, you can make a delicious cake tailored to your taste. Enjoy baking!

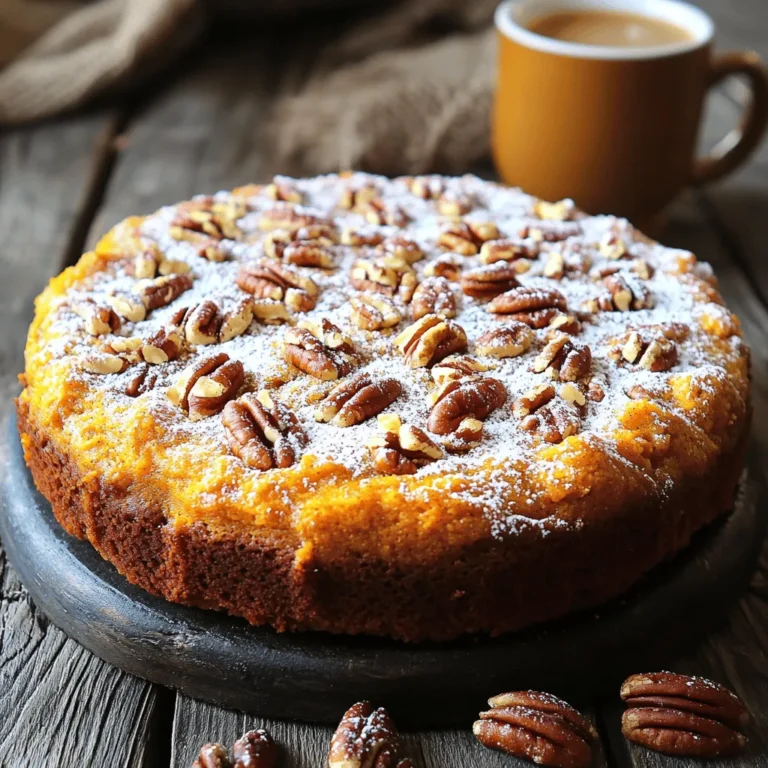
Pumpkin Pecan Coffee Cake Delightful Autumn Treat

- 12 oz fettuccine pasta - 1 lb large shrimp, peeled and deveined - 2 tablespoons Cajun seasoning The main ingredients make this dish a standout. Fettuccine pasta provides a perfect base. Large shrimp add a juicy protein. Cajun seasoning brings a bold kick to the meal. - 1 cup heavy cream - 1/2 cup grated Parmesan cheese - 1/4 cup cream cheese, softened Creamy textures come from dairy. Heavy cream creates a rich sauce. Parmesan cheese adds a sharp flavor. Cream cheese smooths everything out. These dairy ingredients make the dish luxurious. - 2 tablespoons olive oil - 3 cloves garlic, minced - Salt and pepper to taste - Fresh parsley, chopped (for garnish) Olive oil helps to sauté the shrimp. Garlic gives a savory note to the dish. You’ll need salt and pepper to enhance flavors. Fresh parsley brightens the plate and adds color. Each of these ingredients plays a key role in flavor. Start by boiling a large pot of water. Make sure to add a good amount of salt. This helps the pasta taste better. Once the water is boiling, add the fettuccine. Cook it according to the package directions until it is al dente. This usually takes about 8 to 10 minutes. When done, drain the pasta and save a cup of the pasta water for later. Next, take your shrimp and place them in a bowl. Sprinkle Cajun seasoning over the shrimp. Toss them well until they are fully coated. Now, heat olive oil in a large skillet over medium heat. Once hot, add the seasoned shrimp. Cook them for 2 to 3 minutes on each side. They should turn pink and be cooked through. Remove the shrimp from the skillet and set them aside. In the same skillet, lower the heat. Add the minced garlic and sauté for about 30 seconds. You want the garlic to smell nice but not burn. Now, pour in the heavy cream, stirring as you go. Next, add the Parmesan cheese and cream cheese. Keep stirring until the cheeses melt and the sauce becomes smooth. If the sauce is too thick, add some reserved pasta water bit by bit until you get your desired thickness. Return the cooked shrimp to the skillet. Gently toss them in the creamy sauce, ensuring they get well coated. Then, add the drained fettuccine to the skillet. Mix everything together. Taste it and adjust the seasoning with salt and pepper as needed. To get a creamy sauce, use heavy cream and cheese. Heat the cream on low. Stir it gently to avoid burning. I like to add the cheese slowly. This helps it melt better. If the sauce is too thick, you can add some reserved pasta water. This water has starch that helps the sauce stick. Timing is key when cooking shrimp. Cook them for just 2 to 3 minutes on each side. They turn pink when done. If you cook them too long, they can get rubbery. Use medium heat to keep them tender. Always check for a nice golden color. Pair your creamy Cajun shrimp Alfredo with a fresh side salad. Garlic bread also works well. For wine lovers, a light white wine is perfect. To make it pretty, add fresh parsley on top. Fresh herbs not only look good but also add flavor. You can even sprinkle some extra Parmesan for a tasty touch. {{image_2}} You can swap shrimp for chicken or scallops. If you choose chicken, cut it into bite-sized pieces. Season the chicken with Cajun spice just like you do with shrimp. Cook the chicken until it’s no longer pink. Scallops are a great choice too. Sear them for about 2-3 minutes on each side. Both options work well in this creamy sauce. Want a meatless dish? Use veggies instead of shrimp. Bell peppers, zucchini, and mushrooms add great flavor. Sauté the veggies in the skillet before adding the garlic. Cook them until they are tender. Toss the veggies into the creamy sauce. This keeps the dish rich and tasty while being plant-based. Adjust the spice to fit your taste. If you like it mild, use less Cajun seasoning. Start with one tablespoon and add more if needed. For extra heat, consider adding cayenne pepper or hot sauce. This way, you can control the flavor and heat level. Enjoy the dish just how you like it! To keep your Creamy Cajun Shrimp Alfredo fresh, store it in the fridge. Use an airtight container for best results. It stays good for up to three days. Before storing, let it cool down. This helps prevent sogginess. Always label your container with the date. When you want to enjoy leftovers, reheat them gently. The best method is on the stove. Add a splash of milk or cream to help restore creaminess. Heat over low heat and stir often. This keeps the dish from getting dry. You can also use a microwave. Heat it in short bursts, stirring in between. If you want to freeze your dish, use a freezer-safe container. Divide it into portions for easy meals later. Creamy Cajun Shrimp Alfredo can be frozen for up to two months. To thaw, place it in the fridge overnight before reheating. Avoid freezing with fresh parsley on top; add that just before serving. Cajun seasoning is a mix of spices. It usually has paprika, cayenne pepper, garlic powder, onion powder, and black pepper. Some blends may also include oregano and thyme. This spice mix brings a warm, bold flavor to dishes. It adds a kick that makes meals exciting. You can adjust the mix based on your taste. Yes, you can! To increase heat, add more Cajun seasoning. You can also include crushed red pepper flakes or diced jalapeños. Start with small amounts, then taste as you go. This way, you can control the heat level. If you want a milder dish, reduce the seasoning. To make this dish gluten-free, choose gluten-free pasta. Many brands offer rice, quinoa, or chickpea options. These pastas work well in this recipe. Just follow the cooking instructions on the package. Ensure all other ingredients are gluten-free, like the Cajun seasoning and cream. Serve Creamy Cajun Shrimp Alfredo in a large bowl. This makes it easy for everyone to share. Garnish with fresh parsley for a pop of color. You can also add extra Parmesan cheese on top. Serve with a side salad or garlic bread for a complete meal. Creamy Cajun Shrimp Alfredo is a delicious dish packed with flavor and comfort. We covered the key ingredients, from fettuccine to shrimp, and the creamy dairy components. I shared steps to cook the pasta, prepare the shrimp, and create that perfect sauce. You also learned tips for making the dish even better and ways to store leftovers. In the end, this recipe offers tasty options for everyone. Whether you enjoy the classic way or want a twist, you can make it your own. Enjoy cooking and sharing this dish!

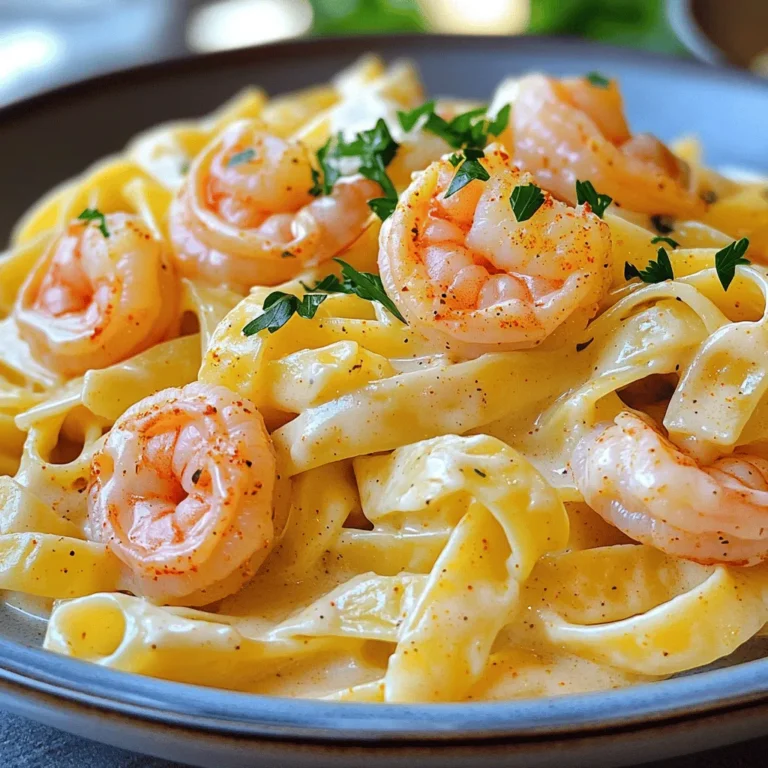
Creamy Cajun Shrimp Alfredo Simple and Flavorful Dish

- 4 boneless, skinless chicken breasts - 1 lb Brussels sprouts, halved - 1 cup cherry tomatoes, halved - 1/4 cup balsamic vinegar - 2 tablespoons olive oil - 2 tablespoons honey - 1 teaspoon garlic powder - 1 teaspoon onion powder - Salt and pepper to taste - Fresh basil, for garnish The main ingredients for the Balsamic Chicken & Brussels Sheet Pan make it simple and tasty. First, you need the chicken. It gives the dish its protein. The Brussels sprouts add crunch and nutrition. Cherry tomatoes offer a sweet burst of flavor. For the glaze, balsamic vinegar is key. It brings that tangy taste we love. Olive oil helps the glaze stick. Honey adds sweetness to balance the vinegar. This mix makes your chicken juicy and the veggies vibrant. To spice things up, garlic and onion powders are must-haves. They give depth to the flavor. Season with salt and pepper to taste. Finally, don’t forget fresh basil! It adds a lovely aroma and color. With these ingredients, you are set for a delicious, easy meal. Each bite bursts with flavor! - Preheat your oven to 400°F (200°C). - In a bowl, whisk together the balsamic vinegar, olive oil, honey, garlic powder, onion powder, salt, and pepper. This creates a tasty glaze. - Place the chicken breasts on a large sheet pan, leaving space between them. - Drizzle half of the balsamic glaze over the chicken. Make sure each piece is coated well. - In another bowl, toss the halved Brussels sprouts and cherry tomatoes with the other half of the glaze. - Arrange the veggies around the chicken on the pan. - Roast the pan in the preheated oven for 25-30 minutes. - Check the chicken’s internal temperature. It should reach 165°F. - After cooking, let the dish rest for 5 minutes. This helps the juices settle. - Garnish with fresh basil before serving. This adds a nice touch and flavor. To make a great balsamic glaze, balance is key. Start with equal parts balsamic vinegar and olive oil. The oil adds richness. For flavor, honey brings sweetness, while garlic and onion powder add depth. If you want a sweeter glaze, add more honey. For tanginess, increase the balsamic vinegar. Taste as you mix. Adjust the flavors until they suit your taste buds. Roasting chicken well keeps it juicy. First, use a high oven temperature, like 400°F (200°C). This helps brown the chicken. Make sure to space the chicken on the sheet pan. This allows heat to circulate and cook evenly. Brussels sprouts need proper care too. To make them crispy, cut them in half and toss them in the glaze. Spread them out on the pan. Avoid crowding, as it leads to steaming instead of roasting. Pair this dish with simple sides. A fresh salad or some crusty bread works well. You can also serve it with rice or quinoa for a heartier meal. If you have leftovers, get creative! Shred the chicken and toss it in a salad or sandwich. Mix the Brussels sprouts and tomatoes into a stir-fry or omelet. The options are endless! {{image_2}} You can change up the veggies in this dish. Use seasonal veggies like carrots or zucchini. These add a sweet crunch. Roasting cauliflower also works well. It brings a nice texture and flavor. Mixing different veggies keeps the dish fresh and fun. If you want to switch up the protein, turkey is a great choice. It cooks well and absorbs the glaze nicely. You can also try a plant-based protein. Adjust cooking times for these options. Turkey may take a bit longer, while plant-based proteins often cook faster. Boost the flavor by adding fresh herbs. Rosemary and thyme bring a lovely aroma. You can also try different vinegars. Apple cider vinegar or red wine vinegar can add a unique twist. Experiment with these choices to find your favorite flavor combo. To keep your Balsamic Chicken and Brussels sprouts fresh, store leftovers in an airtight container. Make sure to let the dish cool down first. Place it in the fridge within two hours of cooking. This dish will last about three to four days in the fridge. To reheat your leftovers, use the oven for the best results. Preheat the oven to 350°F (175°C). Place the chicken and veggies on a baking sheet. Cover them with foil to keep moisture in. Heat for about 15-20 minutes, or until warmed through. If you prefer a microwave, use it on medium power for a few minutes. To avoid dry chicken, add a splash of water before heating. If you want to freeze leftovers, follow these steps. First, let the dish cool completely. Then, place it in a freezer-safe container. Make sure to leave some space for expansion. Seal it tightly and mark the date. Balsamic Chicken will stay fresh for up to three months in the freezer. To thaw, move the container to the fridge overnight. For a quick option, use the microwave on defrost mode. After thawing, reheat using the oven or microwave methods noted above. This way, you keep that juicy flavor and texture! The best temperature to cook chicken is 400°F (200°C). At this heat, the chicken cooks evenly and stays juicy. Always check the internal temperature. It should reach 165°F (75°C) for safety. This ensures it is fully cooked and safe to eat. To make this dish gluten-free, use gluten-free balsamic vinegar. Always check labels on all ingredients to ensure they are gluten-free. Avoid products that may have gluten added. Fresh fruits and veggies, like the cherry tomatoes and Brussels sprouts, are safe. Yes, you can prepare this dish in advance. Marinate the chicken in the balsamic glaze a few hours ahead. Store the chicken and veggies in the fridge in an airtight container. When ready, just roast them in the oven. This saves time and helps flavors develop. This dish combines juicy chicken, flavorful Brussels sprouts, and sweet cherry tomatoes. You learned how to prepare a tasty balsamic glaze and roast everything to perfection. Remember, you can adjust flavors and use different vegetables or proteins. Storing leftovers is simple, and reheating keeps your meal delicious. Enjoy this easy recipe and make it your own with variations. You now have the tools to impress anyone at your table!

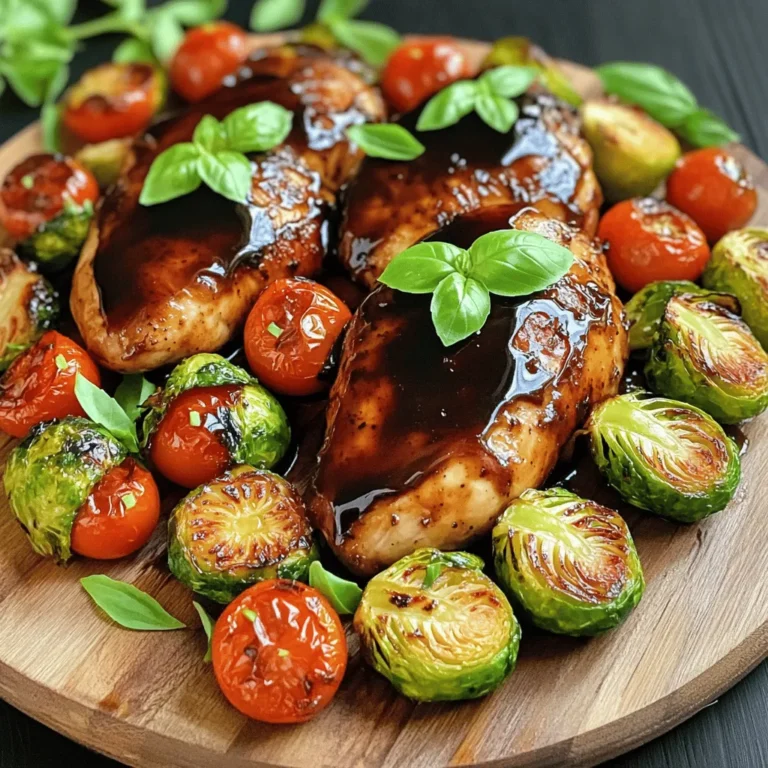
Balsamic Chicken & Brussels Sheet Pan Flavor Boost

- 4 boneless, skinless chicken breasts - 2 tablespoons olive oil - 2 teaspoons chili powder - 1 teaspoon cumin - 1 teaspoon garlic powder - 1 teaspoon onion powder - 1 teaspoon smoked paprika - Salt and pepper, to taste - 1 red bell pepper, sliced - 1 yellow bell pepper, sliced - 1 green bell pepper, sliced - 1 large red onion, sliced - Fresh lime wedges, for serving - Fresh cilantro, for garnish The chicken is the star here. I prefer boneless, skinless breasts for quick cooking. They soak up the marinade well, making every bite tasty. The colorful bell peppers and onion add crunch and sweetness. Together, they balance the spices beautifully. - 2 tablespoons = 30 milliliters - 1 teaspoon = 5 milliliters - 425°F = 220°C If you don’t have chili powder, you can use paprika. For cumin, try coriander. These swaps keep the flavor strong. - Choose firm, bright bell peppers. They should feel heavy for their size. - Look for onions with smooth skin and no soft spots. - Store spices in a cool, dark place. This keeps them fresh longer. {{ingredient_image_1}} First, preheat your oven to 425°F (220°C). This step ensures even cooking. While your oven warms up, grab a large baking sheet and line it with parchment paper. This makes cleaning easier later. Next, you’ll want to make the marinade. In a small bowl, mix together: - 2 tablespoons olive oil - 2 teaspoons chili powder - 1 teaspoon cumin - 1 teaspoon garlic powder - 1 teaspoon onion powder - 1 teaspoon smoked paprika - Salt and pepper, to taste Stir these ingredients well. Now, take your chicken breasts and place them in a large mixing bowl. Pour the marinade over the chicken, making sure each piece is well coated. Now it’s time to assemble everything on the baking sheet. Place the marinated chicken breasts in the center of the sheet pan. Next, scatter the sliced bell peppers and red onion around the chicken. This allows the flavors to mix as they bake. If you have leftover marinade, drizzle it over the vegetables for extra taste. Put the sheet pan in the preheated oven. Bake for 25-30 minutes. You want the chicken to reach an internal temperature of 165°F (75°C). Check the chicken with a meat thermometer. When it’s done, the vegetables should be tender too. Finally, remove the pan from the oven and let it rest for 5 minutes before slicing the chicken. To enhance the flavors of your fajita chicken, use a good marinade. The mix of spices is key. I like to use chili powder, cumin, garlic powder, onion powder, and smoked paprika. This blend adds depth. You should marinate the chicken for at least 30 minutes. If you have more time, let it sit for up to two hours. This way, the chicken absorbs all those tasty flavors. To avoid dry chicken, do not overcook it. Always check the internal temperature. Chicken should reach 165°F (75°C). This ensures it stays juicy and tender. Keep an eye on your veggies, too. You want them to have a nice crunch. Bake them until they soften but still hold their shape. This adds a great texture. For sides, consider serving rice or warm tortillas. They pair well with the chicken and veggies. Black beans or corn salad also make great additions. For garnishing, add fresh lime wedges and chopped cilantro. This adds color and a burst of flavor. You can also serve with avocado slices for a creamy touch. Pro Tips Marinate Longer: For even more flavor, marinate the chicken for at least 30 minutes, or up to overnight in the refrigerator. Customize Your Veggies: Feel free to add other vegetables like zucchini or mushrooms for added texture and flavor. Check for Doneness: Always use a meat thermometer to ensure the chicken reaches the safe internal temperature of 165°F (75°C). Serve with Toppings: Enhance your fajitas with toppings like avocado, sour cream, or cheese for a delicious finish. {{image_2}} You can spice up your sheet pan fajita chicken in fun ways. If you like heat, add more chili powder or sliced jalapeños. For a milder twist, try using sweet paprika instead of smoked paprika. You can also mix in some lime zest for a fresh kick. If you enjoy herbs, consider adding fresh cilantro or oregano to the marinade. These options let you customize the dish to your taste. If you need gluten-free options, this recipe is perfect as-is. All ingredients are naturally gluten-free. For those on a low-carb diet, skip the bell peppers and serve the chicken in lettuce wraps instead. You can also pair it with cauliflower rice for a tasty, low-carb alternative. These modifications help you enjoy the dish while sticking to your dietary needs. You have choices in how to serve your fajita chicken. You can keep it classic with warm tortillas for fajitas. Simply slice the chicken and fill the tortillas with veggies, chicken, and your favorite toppings. If you prefer bowls, layer rice or quinoa, topped with chicken and veggies. For a fun twist, roll up the chicken and veggies in a tortilla for a wrap. This adds a new texture and makes it easy to eat. To keep your fajita chicken fresh, store leftovers in the fridge. Use an airtight container. This helps keep moisture in and smells out. Place the chicken and veggies together for easy access. Your leftovers will stay good for three to four days. When you want to enjoy leftovers, the best way to reheat is in the oven. Preheat to 350°F (175°C). Place the chicken and veggies on a baking sheet. Heat for about 10-15 minutes. This keeps them warm and helps avoid sogginess. You can also use the microwave, but be careful. Heat in short bursts to prevent the chicken from drying out. If you have extra fajita chicken, freezing it is a great option. First, let it cool completely. Then, wrap it tightly in plastic wrap. Place it in a freezer bag. Remove as much air as you can. This will keep it fresh for up to three months. When you’re ready to eat, thaw in the fridge overnight or use the microwave. Enjoy your easy meal anytime! Bake the fajita chicken for 25-30 minutes. Set your oven to 425°F (220°C). The chicken should cook until it reaches 165°F (75°C). This way, you ensure it is safe and juicy. Yes, you can use other proteins. Beef strips work well for a heartier meal. Shrimp is also a tasty option. For a plant-based choice, try marinated tofu or tempeh. Adjust cooking times to fit the protein you choose. Many sides complement fajita chicken. Consider serving it with: - Warm tortillas - Cilantro lime rice - Refried beans - Corn salad - Guacamole These sides add color and flavor to your meal. Check the chicken’s internal temperature. It should reach 165°F (75°C). Use a meat thermometer for accuracy. When the chicken is done, it will be firm and no longer pink inside. This guide covered the key points for making perfect sheet pan fajita chicken. You learned about essential ingredients, measurement conversions, and freshness tips. I shared step-by-step baking instructions and helpful cooking tips to enhance your meal. Experimenting with flavor variations, dietary changes, and serving styles makes this dish versatile. Store and reheat leftovers effectively for future meals. Follow this advice, and you’ll enjoy delicious fajitas every time. Happy cooking!

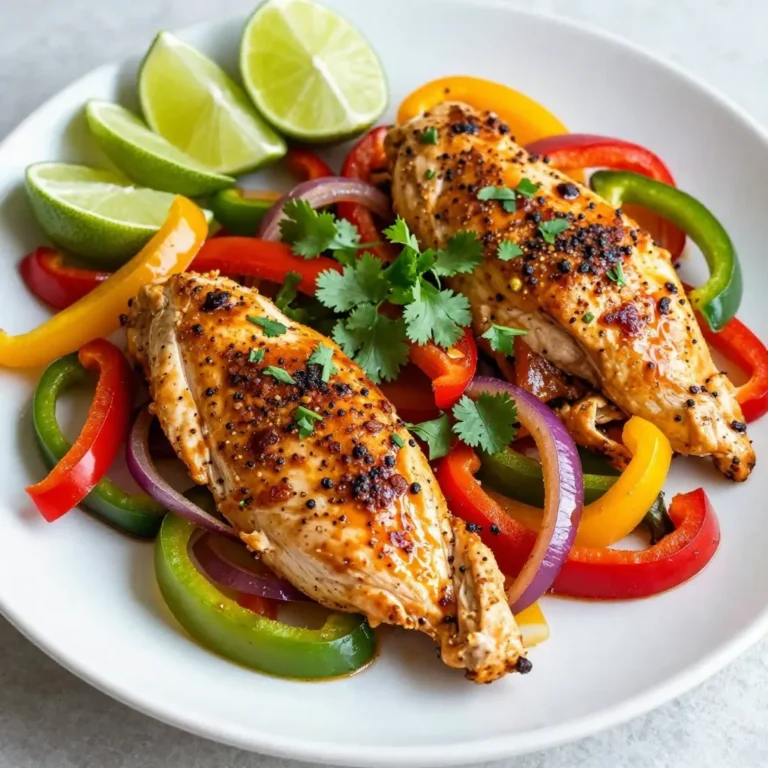
Sheet Pan Fajita Chicken Quick and Flavorful Dinner

- 1 lb Brussels sprouts, trimmed and halved - 3 tablespoons olive oil - 2 tablespoons honey - 2 tablespoons Dijon mustard - 1 tablespoon apple cider vinegar To make honey mustard Brussels sprouts shine, you need fresh Brussels sprouts. Look for bright green ones without any brown spots. The olive oil adds a nice richness. Honey gives sweetness, while Dijon brings a tangy punch. Apple cider vinegar balances the flavors. - 1/4 cup pecans, roughly chopped - 1/4 cup grated Parmesan cheese You can add pecans for a crunchy texture. They toast nicely in the oven. Parmesan cheese can enhance the savory notes. It melts beautifully over the sprouts, adding a creamy touch. Both are optional but worth considering. - Salt and pepper to taste Don't forget salt and pepper! These simple seasonings can elevate the dish. They help bring out all the flavors of the Brussels sprouts and the honey mustard mix. Adjust to your taste for the best results. 1. Preheat your oven to 400°F (200°C). This helps the Brussels sprouts cook evenly. 2. In a large bowl, combine the halved Brussels sprouts with olive oil, honey, Dijon mustard, and apple cider vinegar. Toss well. Make sure each sprout gets coated in the mix. 3. Season with salt and pepper. Adjust the seasoning to fit your taste. 1. Spread the Brussels sprouts out in a single layer on a baking sheet. This helps them roast well. 2. Roast in the oven for 20-25 minutes. Flip them halfway through. This ensures all sides get golden brown and tender. 1. In the last 5 minutes of roasting, sprinkle the chopped pecans over the Brussels sprouts. This adds a nice crunch. 2. If you like, sprinkle grated Parmesan cheese on top. Let it melt slightly before serving. This gives a tasty finish. How to trim and halve Brussels sprouts Start by rinsing your Brussels sprouts under cold water. This removes dirt. Next, cut off the tough stem ends. Then, simply slice each sprout in half. This helps them cook evenly. You can also remove any yellow leaves. Getting the right roast For the best texture, spread the halved sprouts on a baking sheet. Make sure they are in a single layer. This allows them to roast well. Roast at 400°F for 20-25 minutes. Flip them halfway through. They should turn golden brown and become tender. Variations to honey and mustard ratios You can adjust the honey and mustard to match your taste. Want it sweeter? Add more honey. Prefer a tangy kick? Increase the mustard. Just remember to keep the total amount the same. Additional seasonings to try Add garlic powder or onion powder for more depth. A pinch of smoked paprika can add a nice twist. You could also try crushed red pepper flakes for heat. Experiment with these options to make your dish truly unique. Pairing with main dishes These honey mustard Brussels sprouts go well with many main dishes. Serve them with roasted chicken or grilled salmon. They also pair nicely with steak. The sweet and tangy flavors enhance the meal. Best ways to serve honey mustard Brussels sprouts Serve them warm for the best taste. You can place them on a platter or in a bowl. If you added Parmesan, let it melt slightly before serving. Garnish with extra pecans for added crunch. Enjoy your meal! {{image_2}} You can easily adapt this recipe to fit different diets. If you want a vegan option, replace honey with maple syrup or agave nectar. Both give a sweet touch without animal products. For cheese lovers, skip the Parmesan or use a plant-based cheese. If you need gluten-free options, this recipe is naturally gluten-free. Just make sure the Dijon mustard you choose is gluten-free. Always check the labels to be safe. Let’s get creative! You can add fruits like apples or cranberries. These fruits bring a sweet and tart flavor that pairs well with Brussels sprouts. Simply chop them up and toss them in with the sprouts before roasting. Want to spice things up? Add chili flakes for a kick. Just a pinch can elevate the taste and make your dish exciting. Adjust the amount based on your heat preference. You don’t have to roast Brussels sprouts every time. Air frying is a great alternative. It cooks them quickly and makes them crispy. Set your air fryer to 375°F and cook for about 15-20 minutes, shaking halfway. Sautéing is another quick method. Heat olive oil in a pan, add halved Brussels sprouts, and cook for about 10-12 minutes. Stir them often for even cooking. This method gives a nice golden color and keeps the sprouts tender. To keep your honey mustard Brussels sprouts fresh, use an airtight container. Glass or BPA-free plastic containers work best. Store them in the fridge for up to three days. Make sure they cool down before sealing. This will help prevent moisture build-up. For reheating, the oven is your best choice. Preheat it to 350°F (175°C). Spread the sprouts on a baking sheet. Heat for about 10-15 minutes. This method helps keep them crispy. Avoid microwaving them, as this can make them soggy. Yes, you can freeze Brussels sprouts! First, blanch them in boiling water for three minutes. Then, cool them in ice water. Drain well and pack them tightly in freezer bags. Remove as much air as possible. To thaw, place them in the fridge overnight before cooking. This keeps their flavor and texture intact. How long to roast Brussels sprouts at 400°F? You should roast Brussels sprouts for 20-25 minutes at 400°F. They will get golden brown and tender. Remember to flip them halfway for even cooking. Can I make this recipe ahead of time? Yes, you can prep the Brussels sprouts in advance. Toss them with the honey mustard mix and store in the fridge. Roast them right before serving for the best taste. What are the health benefits of Brussels sprouts? Brussels sprouts are full of vitamins. They have vitamin C, vitamin K, and fiber. Eating them can help with digestion and support your immune system. They also have antioxidants, which are good for your health. Caloric content of honey mustard Brussels sprouts This recipe has about 150-200 calories per serving. It’s a healthy side dish that adds flavor without too many calories. The pecans and cheese can add a bit more, but they also add good fats. What can I use instead of Dijon mustard? If you don’t have Dijon mustard, you can use yellow mustard. It will change the flavor a bit but still taste good. You can also try whole grain mustard for a different texture. Can I replace honey with maple syrup? Yes, you can swap honey for maple syrup. It will give the dish a sweet flavor but with a different taste. Both options work well in this recipe and taste great! This blog post covered how to make delicious honey mustard Brussels sprouts. We explored the main ingredients, preparation, roasting steps, and seasoning. I also shared tips for perfecting your sprouts, plus variations and storage advice. Brussels sprouts are versatile and can fit many diets. You can enjoy them warm or cold, with many options to suit your taste. Now, it’s your turn to try this simple and tasty dish!

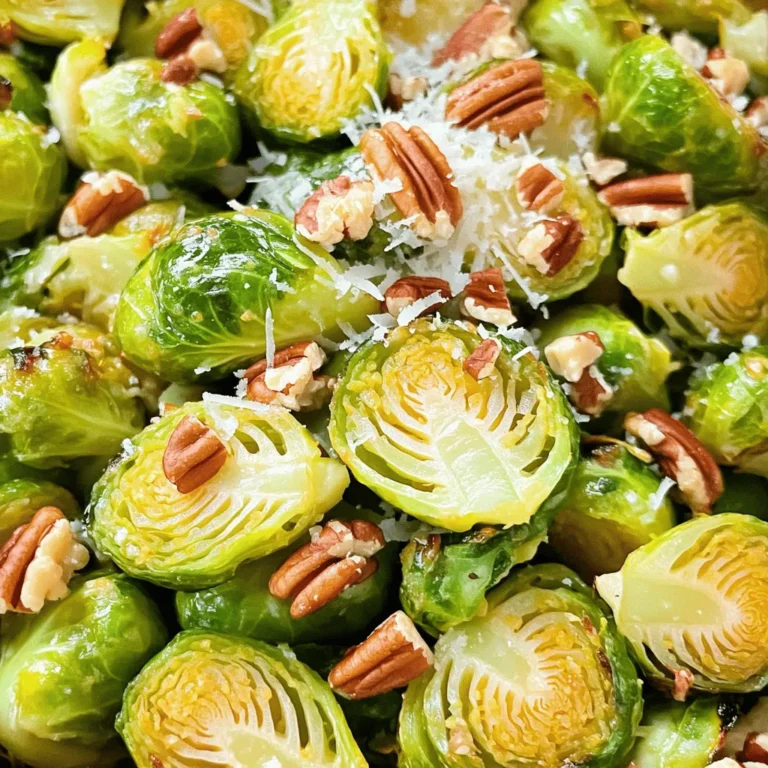
Honey Mustard Brussels Sprouts Simple Flavor Boost

To make these tasty knots, you need a few key items: - 1 loaf of pizza dough (store-bought or homemade) - 1/4 cup unsalted butter, melted - 4 cloves garlic, minced - 1/4 cup grated Parmesan cheese - 2 tablespoons fresh parsley, chopped - 2 tablespoons fresh basil, chopped - 1 teaspoon dried oregano - 1/2 teaspoon salt - 1/4 teaspoon black pepper These ingredients work together to create a rich flavor. The pizza dough gives the knots their shape. The garlic adds a strong taste, while the butter keeps them soft. While the essential ingredients shine, you can add more for fun. Consider these options: - Crushed red pepper flakes for heat - A sprinkle of Italian seasoning for extra depth - Fresh thyme or rosemary for a unique twist These ingredients can elevate your knots. They allow you to tailor the flavor to your liking. Quality matters when cooking. Here are some tips to choose the best items: - Look for fresh herbs. They should be bright and fragrant. - Choose good olive oil for the butter mix. It adds a nice taste. - Use freshly grated Parmesan. It melts better and tastes richer than the pre-grated kind. Investing in quality ingredients makes a big difference. Your knots will taste more vibrant and fresh. To start, gather all your ingredients. You need pizza dough, garlic, butter, herbs, and cheese. Preheat your oven to 375°F (190°C). Line a baking sheet with parchment paper. This will keep the knots from sticking. Next, roll out your pizza dough on a floured surface. Make it about half an inch thick. Cut the dough into strips that are one inch wide and five inches long. This makes the perfect size for knots. Now, take each strip and tie it into a knot. Tuck the ends underneath the knot. Place each knot on the prepared baking sheet. In a small bowl, mix melted butter, minced garlic, Parmesan cheese, parsley, basil, oregano, salt, and pepper. Stir well until combined. Brush this garlic herb mixture over each knot. Make sure to coat them well, but save some of the mixture for later. Bake the knots for 15 to 20 minutes. They should turn golden brown and smell amazing. Once baked, take them out and brush the remaining garlic herb mixture on top. Serve your garlic knots warm. They are great on their own or with marinara sauce for dipping. Enjoy every bite of these flavorful treats! To get soft and chewy garlic knots, start with good dough. Use pizza dough, either store-bought or homemade. Roll the dough out to about half an inch thick. This thickness gives you the right balance of chewiness and fluffiness. When you cut the dough into strips, try for even sizes. This helps them bake evenly. After tying the knots, let them rest for a few minutes before baking. This step allows the gluten to relax and makes for an even better texture. To boost flavor, use fresh herbs. I love adding parsley and basil to the garlic butter mix. Fresh herbs give a bright taste. You can also try adding red pepper flakes for a bit of heat. A sprinkle of garlic powder can enhance the garlic flavor too. If you want, mix in some grated cheese like mozzarella for a cheesy twist. Don’t forget to brush the knots with the garlic herb butter again after baking. This adds extra flavor and keeps them moist. One common mistake is overbaking the knots. Keep an eye on them as they bake. They should be golden brown, not dark brown. Another mistake is not using enough butter. A generous brush of garlic herb butter makes all the difference. Make sure to coat every knot well. Lastly, avoid skipping the resting time after tying the knots. This step is key for achieving the best texture. With these tips, you’ll be on your way to making perfect Parmesan Herb Garlic Knots! {{image_2}} You can change the flavor of your knots by using different herbs. Instead of parsley and basil, try rosemary, thyme, or dill. Each herb adds its own unique taste. Fresh herbs give a brighter flavor, while dried herbs are handy when fresh ones are not available. Mix and match your favorites to find what you love! If you want to switch up the cheese, use mozzarella or feta. Mozzarella gives a stretchy, gooey texture. Feta adds a tangy note. You can also add some crushed red pepper for heat. For a rich twist, try adding cream cheese inside the knots. It melts and creates a creamy surprise! While marinara sauce is tasty, you can try other dips too. Garlic knots pair well with ranch dressing or a creamy garlic dip. You can also serve them with pesto for a fresh twist. If you like spice, a spicy aioli can add kick. These knots are great for parties, game day, or just a cozy night in! To keep your garlic knots fresh, store them in an airtight container. Let them cool first. Place a paper towel in the container. This helps absorb excess moisture. You can keep them at room temperature for up to two days. For longer storage, move them to the fridge. They can last up to a week when refrigerated. To reheat garlic knots, use an oven for the best results. Preheat your oven to 350°F (175°C). Place the knots on a baking sheet. Heat for about 10 minutes, or until warm. You can also use a microwave. Just heat on low for about 30 seconds. But, this method may make them softer. Freezing is a great way to enjoy garlic knots later. First, wrap each knot in plastic wrap. Then, place them in a freezer bag. Make sure to remove as much air as possible. You can freeze them for up to three months. When ready to eat, thaw in the fridge overnight. Reheat them in the oven for the best taste. Parmesan Herb Garlic Knots taste best when fresh. If you store them right, they can last for 2 to 3 days. Keep them in an airtight container at room temperature. This will keep them soft and tasty. If they feel hard, you can warm them in the oven for a few minutes. This will bring back some softness. Yes, you can use homemade pizza dough for these knots! In fact, making your own dough can add a special touch. Just make sure to follow the same steps for rolling and cutting. Homemade dough gives you control over the flavor and texture. It can be a fun way to personalize your knots. Garlic knots go great with many dishes! You can serve them with marinara sauce for dipping. This adds a nice, tangy flavor. They also pair well with salads or soups. If you want a heartier meal, serve them alongside pasta dishes. The knots soak up all the delicious sauce, making every bite better! You now have all you need to make tasty Parmesan herb garlic knots. We covered essential and optional ingredients. You learned the baking steps and tips for perfect texture. Remember the variations to keep things fun. You also know how to store leftovers well. Enjoy these knots with friends or family. You will impress everyone with your skills. Keep practicing, and they will become a favorite dish in no time.

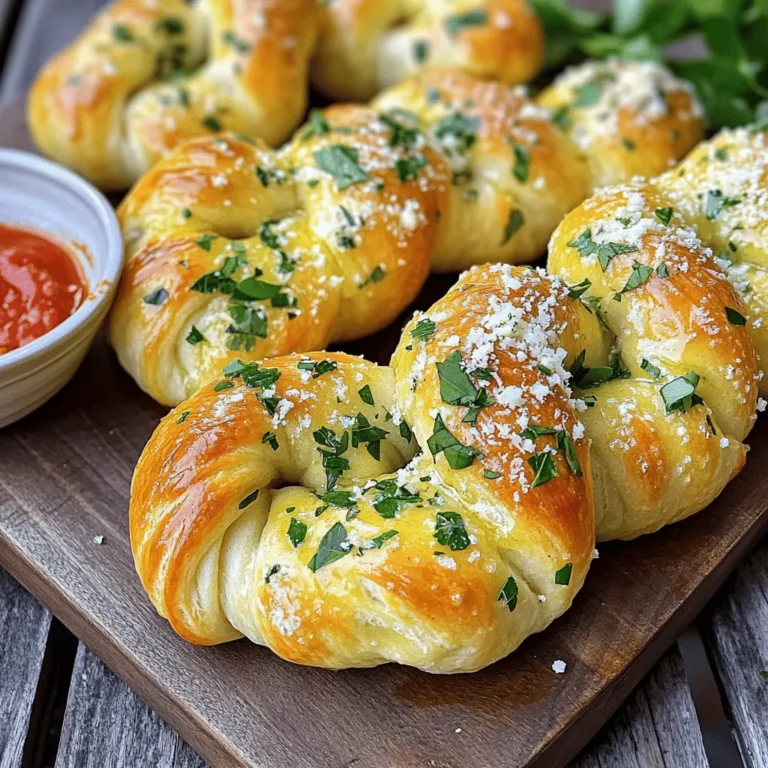
Parmesan Herb Garlic Knots Flavorful and Easy Recipe

- 1 ½ cups graham cracker crumbs - ½ cup unsalted butter, melted - 1 cup white chocolate chips - 16 oz cream cheese, softened - 1 cup granulated sugar - 3 large eggs - 2 tablespoons matcha powder - 1 teaspoon vanilla extract - Pinch of salt - Whipped cream and matcha powder for serving (optional) When measuring graham cracker crumbs, pack them lightly into the cup. This helps avoid a dry crust. For the butter, melt it until fully liquid but not boiling. Cream cheese should be at room temperature for easier mixing. Beat it well with sugar until smooth to avoid lumps. You can use cookie crumbs instead of graham crackers for a different flavor. For a dairy-free option, use vegan cream cheese and plant-based butter. Instead of white chocolate, try using dark chocolate for a richer taste. You can also swap matcha powder with cocoa powder for a chocolate version. To start, preheat your oven to 325°F (160°C). Grab an 8x8-inch baking pan and line it with parchment paper. Let the paper hang over the edges. This makes it easy to lift out the cheesecake later. In a bowl, mix 1 ½ cups of graham cracker crumbs with ½ cup of melted unsalted butter. Stir until it looks like wet sand. Press this mix firmly into the bottom of your pan. This will be your crust. Bake it for 10 minutes, then take it out and let it cool. Now for the fun part! In a microwave-safe bowl, melt 1 cup of white chocolate chips. Do this in 30-second bursts, stirring in between. Be patient; let it cool slightly after melting. In a large bowl, beat 16 oz of softened cream cheese with 1 cup of granulated sugar. Mix until it's creamy and smooth. Add in 3 large eggs, one at a time. Mix well after each one. Next, add the melted white chocolate, 2 tablespoons of matcha powder, 1 teaspoon of vanilla extract, and a pinch of salt. Stir until everything is well combined and smooth. Now, pour this cheesecake batter over your cooled crust. Spread it evenly. Bake for about 30-35 minutes. The edges should be set, but the center can still jiggle a bit. When the baking time is up, turn off the oven. Open the oven door a crack and let the cheesecake cool inside for 1 hour. This helps prevent cracks. After an hour, take it out and let it cool completely at room temperature. Then, cover it and put it in the fridge for at least 4 hours. For the best flavor and texture, let it chill overnight. Once set, use the parchment paper to lift the cheesecake from the pan. Cut it into squares and enjoy! To get the best texture in your Matcha White Chocolate Cheesecake Squares, start with softened cream cheese. This helps blend smoothly with sugar. Beat the mixture well to add air, which gives it a light texture. When you add eggs, mix in one at a time. This step keeps the mixture smooth and creamy. Don't overmix after adding matcha and white chocolate. One big mistake is not cooling the crust enough. If it's warm, it can make the cheesecake too soft. Another error is overbaking. You want the edges set but the center should jiggle. This jiggle means it's creamy and not dry. Lastly, avoid skipping the cooling step in the oven. It helps prevent cracks on the surface. To melt white chocolate smoothly, use a microwave-safe bowl. Heat it in 30-second bursts, stirring in between. This method keeps the chocolate from burning. If it seems too thick, add a tiny bit of vegetable oil. This extra fat helps it smooth out. Once melted, let it cool slightly before mixing into the cheesecake batter. {{image_2}} You can change the taste of these squares easily. For a richer flavor, use dark chocolate instead of white chocolate. Simply melt dark chocolate in the same way as white chocolate. The dark chocolate gives a nice contrast to the matcha. You can also add a hint of mint or orange zest for a fresh twist. Just mix in a teaspoon of either flavor when you combine the other ingredients. If you need a gluten-free option, swap graham cracker crumbs for gluten-free crumbs. You can find these in stores or make your own from gluten-free cookies. For a dairy-free version, use vegan cream cheese and dairy-free chocolate. This way, you can enjoy the cheesecake squares without dairy. Just ensure all your ingredients are labeled gluten-free and dairy-free. These cheesecake squares are perfect for any event. For a casual gathering, serve them at room temperature. You can add a dollop of whipped cream on top for fun. For a more formal occasion, chill the squares first. Present them on a nice platter, dusted with matcha powder. You can even add fresh berries on the side for color. These small touches make the dessert feel special. To store your Matcha White Chocolate Cheesecake Squares, place them in an airtight container. This keeps them fresh. If you plan to eat them within three days, they can stay in the fridge. If you want them to last longer, consider freezing. You can freeze these cheesecake squares for up to three months. First, wrap each square in plastic wrap. Then, place them in a freezer-safe bag or container. Make sure to label the bag with the date. This way, you’ll know when to use them. To enjoy your frozen cheesecake squares, transfer them to the fridge. Let them thaw for several hours or overnight. If you want to warm them slightly, use the microwave. Heat each square for about 10-15 seconds. This brings back their creamy texture without melting them too much. Enjoy your dessert as fresh as the day you made it! Yes, you can use different types of matcha powder. Look for culinary grade matcha for baking. It has a strong flavor and is more affordable. Ceremonial grade matcha is great for drinking but may be too costly for baking. These cheesecake squares last about 5 days in the fridge. Keep them in an airtight container. If you want to enjoy them longer, you can freeze them. They stay good for about 2 months in the freezer. Yes, you can make this recipe ahead of time. I often prepare it a day before serving. This allows the flavors to meld nicely. Just be sure to refrigerate it for at least 4 hours or overnight. You can serve these squares with a dollop of whipped cream. A light dusting of matcha powder adds a nice touch. Fresh berries also pair well, adding a fruity contrast. Enjoying them with a cup of green tea enhances the matcha flavor too. We covered the key ingredients and how to prepare them for your cheesecake. You learned step-by-step instructions and valuable tips for the best texture. Variations allow you to customize flavors and adapt the recipe to dietary needs. Lastly, we discussed storage methods to keep your cheesecake fresh. Remember, with practice, you can create the perfect treat for any occasion. Enjoy experimenting and sharing your delicious results!

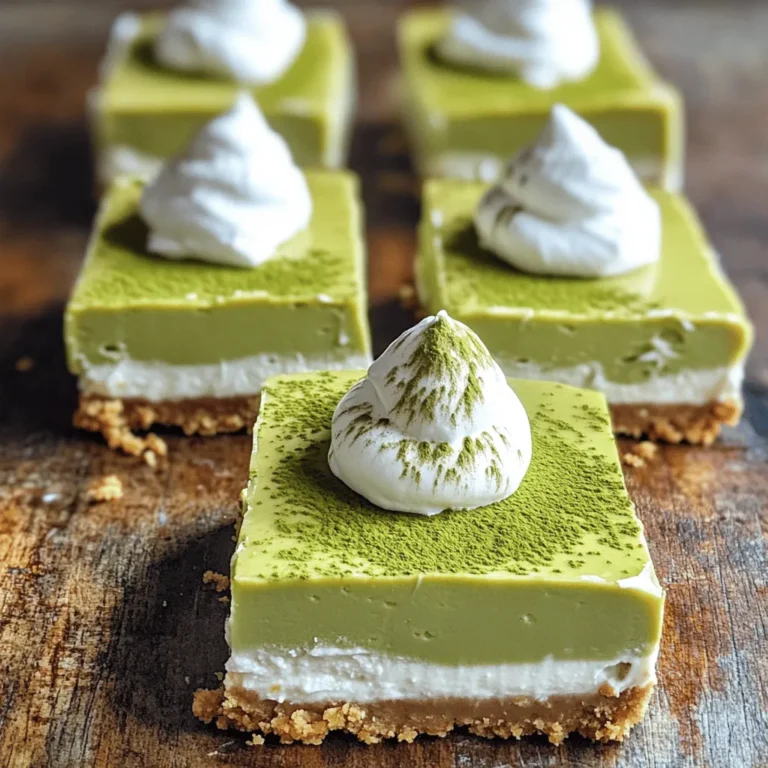
Matcha White Chocolate Cheesecake Squares Delightfully Easy

PREV 1 … 26 27 28 … 86 NEXT
spicy fork kitchen

explore

DessertsDinnerAppetizersDrinks

Our Policies

  • Cookie Policy
  • Copyright Policy
  • Disclaimer
  • GDPR Policy
  • Terms Of Use
Back to Top
  • About
  • Contact Us
  • Privacy Policy
© 2026 spicy fork kitchen