FREE DINNER EBOOK! Get your copy!
  • Cookie Policy
  • GDPR Policy
  • Disclaimer
  • Terms Of Use
  • Visit my other site: Fun Cookie Recipes
spicy fork kitchen
  • Home
  • Dinner
  • Desserts
  • Drinks
  • Appetizers
  • Contact
  • About
  • Privacy Policy
  • Home
  • Dinner
  • Desserts
  • Drinks
  • Appetizers
  • Contact
  • About
  • Privacy Policy
  • Cookie Policy
  • GDPR Policy
  • Disclaimer
  • Terms Of Use
Visit my other site: Fun Cookie Recipes

HOME / CATEGORIES /

Latest

To make a Crispy Sesame Tofu Stir Fry, you need the following key ingredients: - Firm Tofu: 1 block, pressed and cubed - Sesame Oil: 3 tablespoons - Vegetables: - 1 red bell pepper, sliced - 1 cup snap peas, trimmed - Seasonings: - 2 tablespoons soy sauce (or tamari for gluten-free) - 1 tablespoon maple syrup - 2 cloves garlic, minced - 1 teaspoon fresh ginger, grated - 1 tablespoon sesame seeds - 3 green onions, chopped - Additional: - 2 tablespoons cornstarch - Salt and pepper to taste Each ingredient plays a role in making this dish special. Firm tofu gives you the right texture. Sesame oil adds a rich flavor. The veggies bring color and crunch. Soy sauce and maple syrup balance salty and sweet flavors. Garlic and ginger add warmth and depth. Finally, sesame seeds and green onions give a nice finish. Gather these ingredients to get started. You’ll love how quickly you can whip this up! Pressing and Cubing the Tofu First, take your block of firm tofu. Press it to squeeze out extra moisture. You can use a clean kitchen towel or a tofu press for this. Once pressed, cut the tofu into 1-inch cubes. This size helps it cook evenly. Coating with Cornstarch Next, place the cubed tofu in a bowl. Sprinkle 2 tablespoons of cornstarch over it. Toss gently until all sides are coated. This will give your tofu that crispy texture. Heating the Pan Heat 2 tablespoons of sesame oil in a non-stick pan or wok. Set the heat to medium-high. Wait until the oil shimmers in the pan. This means it’s ready for cooking. Achieving Perfect Crispiness Add the coated tofu cubes to the hot pan. Cook them for about 5-7 minutes. Turn them often to ensure they brown evenly. You want them golden and crispy on all sides. This step makes the tofu delicious and crunchy. Cooking the Bell Pepper and Snap Peas Once the tofu is crispy, remove it from the pan. Set it aside on a plate. In the same pan, add the sliced red bell pepper and snap peas. Stir-fry these for about 2-3 minutes. They should be tender but still bright in color. Adding Aromatics: Garlic and Ginger Now, add the minced garlic and grated ginger to the pan. Stir-fry for 1 minute. This will fill the kitchen with a lovely aroma. The garlic and ginger add great flavor to your dish. Adding Sauce and Tofu Return the crispy tofu to the pan. Pour in 2 tablespoons of soy sauce and 1 tablespoon of maple syrup. Toss everything gently to coat the tofu and veggies evenly. Final Cooking Steps Cook for another 1-2 minutes. This allows the flavors to blend together. Finally, sprinkle sesame seeds and chopped green onions over the stir-fry. Mix gently to combine everything. Season with salt and pepper to taste. Your dish is now ready to serve! Pressing your tofu is key. This step removes moisture. Moist tofu won't crisp up. Use a tofu press or wrap it in a clean towel. Place a heavy object on top for 15-30 minutes. For coating, cornstarch works great. But you can try other methods too. Some use a mix of flour and spices. Others prefer breadcrumbs for a crunchier bite. Experiment to find your favorite. Want more flavor? Try adding sauces or spices. A splash of sriracha gives heat. You can also use chili paste for a spicy kick. For marinades, mix soy sauce with ginger and garlic. Let the tofu soak for 30 minutes. This adds depth to the dish. You can also use teriyaki sauce or even peanut sauce for a twist. Serving matters! Place the stir-fry in a deep bowl. It looks great and keeps everything warm. Garnish with extra sesame seeds and green onions. This adds color and texture. Pair your stir-fry with steamed rice or noodles. They soak up the tasty sauce. You could also add a side salad for freshness. {{image_2}} You can swap tofu for tempeh or seitan. Tempeh has a nutty taste and firm texture. It also adds extra protein. Seitan is chewy and mimics meat well. Both options make your stir fry hearty and satisfying. You can change the veggies in this dish. Try carrots, broccoli, or bell peppers. They all add crunch and color. You can also use mushrooms for a savory twist. Use seasonal vegetables for fresh flavors. In spring, use asparagus or snap peas. In summer, zucchini or bell peppers shine. In fall, add squash or Brussels sprouts. Winter brings kale or carrots to your plate. Make this dish gluten-free by using tamari instead of soy sauce. This simple swap keeps the flavor intact. You can add more veggies or tofu without changing the recipe. Try adding nuts for crunch or more garlic for flavor. These additions keep your dish vegan and delicious. To keep your crispy sesame tofu stir fry fresh, you need the right storage. Here are some best practices for refrigerating stir fry: - Cool Before Storing: Let the stir fry cool down to room temp. This avoids steam and sogginess. - Use Airtight Containers: Choose containers that seal tightly. This keeps out air and moisture. - Separate Tofu and Veggies: If possible, store tofu and vegetables in separate containers. This helps keep textures intact. When it's time to enjoy your leftovers, reheating correctly is key. Here are methods for reheating tofu stir fry: - Stovetop Method: Heat a non-stick pan over medium heat. Add a splash of water or oil to prevent sticking. Stir gently for 5 minutes. - Microwave Method: Place in a microwave-safe bowl. Cover with a damp paper towel. Heat in short bursts, stirring in between, until warm. To avoid soggy tofu, here are tips: - Don’t Overheat: Heating too long can make tofu rubbery. Just warm it until hot. - Use High Heat on Stovetop: This helps keep tofu crispy. If it starts to get soggy, increase the heat slightly. Following these steps will keep your crispy sesame tofu stir fry tasty for the next meal! Yes, you can use frozen tofu. Freezing changes the texture of the tofu. It becomes spongy and absorbs flavors better. This makes it great for stir-frying. Just remember to thaw it first, press it, and cube it. You may need to adjust cooking time for frozen tofu. If you don't have sesame oil, use other oils. Good alternatives include canola oil or peanut oil. Both have a high smoke point and good flavor. For a nutty taste, try toasted sesame oil. It adds great depth to your stir-fry. To add heat, use red pepper flakes or sriracha sauce. Mix these into the soy sauce for extra spice. You can also add sliced jalapeños or chili paste. Adjust the amount based on your heat level preference. Yes, you can prep this dish in advance. Cook the tofu and vegetables separately. Store them in airtight containers in the fridge. When you are ready to eat, just reheat and combine. This makes it a perfect option for quick meals. This blog post covered how to make a delicious tofu stir-fry. We explored the key ingredients, like firm tofu and colorful veggies. I shared easy steps for cooking and tips for making it crispy. You can even swap ingredients or adapt it for your diet. Remember to store leftovers properly and reheat them just right. This dish is versatile and tasty, perfect for any meal. Try it out and enjoy!

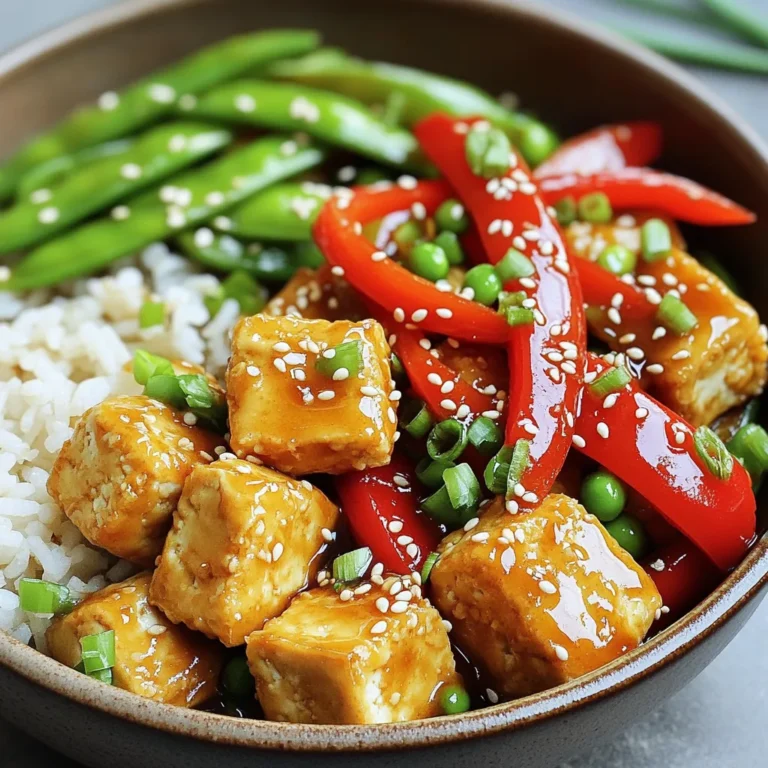
Crispy Sesame Tofu Stir Fry in 15 Minutes Delight

- 1 can of refrigerated cinnamon roll dough - 1 cup apple butter - 1 teaspoon ground cinnamon - 1/4 teaspoon nutmeg - 1/2 cup brown sugar, packed - 1/4 cup chopped pecans (optional) - 1/4 cup raisins (optional) The main ingredients for this recipe are simple and easy to find. You start with a can of refrigerated cinnamon roll dough. This makes the process quick and fun. Next, you need apple butter. This is the star of the dish. It adds a rich, sweet flavor. You also need ground cinnamon and nutmeg. These spices bring warmth and depth to your rolls. Brown sugar adds a sweet and sticky touch. If you like, you can also add chopped pecans and raisins. These optional ingredients give extra texture and flavor. - Powdered sugar for drizzling - Additional apple butter For the finishing touch, you can drizzle powdered sugar over the top. This adds a sweet, beautiful look. You can also serve extra apple butter on the side. It’s perfect for those who want more flavor. 1. Preheat your oven to 350°F (175°C). Grease a bundt pan or round baking dish. 2. In a small bowl, mix together: - 1/2 cup brown sugar, packed - 1 teaspoon ground cinnamon - 1/4 teaspoon nutmeg Keep this mix handy for later. 3. Open your can of refrigerated cinnamon roll dough. 4. Separate and cut each roll into quarters. 5. Take each quarter and dip it in: - 2 tablespoons melted butter 6. Roll the dough piece in the cinnamon-sugar mix you made earlier. 7. Layer the coated pieces in the prepared pan. 8. Spread dollops of 1 cup apple butter and optional ingredients like: - 1/4 cup chopped pecans - 1/4 cup raisins between the layers. 9. Keep layering until all dough pieces are used. Make sure to mix in the apple butter evenly. 10. Bake in your preheated oven for about 25-30 minutes. 11. Look for a golden brown color to know it is done. 12. To check doneness, insert a toothpick in the center. It should come out clean. 13. Once done, let the pull-apart cool slightly before inverting it onto a serving platter. 14. Drizzle with powdered sugar for a sweet finish. To make your Apple Butter Cinnamon Roll Pull-Apart shine, evenly spread the apple butter. This way, every bite is full of flavor. Take care to layer the dough and apple butter well. You can add dollops between each layer. This ensures that the apple butter reaches every piece. To avoid overbaking, keep an eye on the time. Start checking at 25 minutes. The rolls should be golden brown and firm. If they darken too much, cover with foil. This will help the rolls bake through without burning. The best way to serve this pull-apart is warm. Place it on a nice plate and let guests pull pieces apart. It’s fun and interactive! You can add extra apple butter on the side for those who want more. A scoop of vanilla ice cream also pairs nicely. The cold ice cream with warm rolls is a treat! Store any leftovers in an air-tight container. This keeps them fresh for up to three days. If you want to keep them longer, freeze the rolls. Wrap them tightly in plastic wrap before placing them in a freezer bag. To reheat, use the oven for the best texture. Preheat it to 350°F (175°C). Place the rolls on a baking sheet and cover with foil. Heat for about 10-15 minutes. This will make them warm and soft again, just like fresh! {{image_2}} You can change the taste of this pull-apart easily. Try using different fruit spreads instead of apple butter. Peach or berry spreads can bring a fresh twist. Each fruit adds its own flavor and charm. You can also mix in nuts or spices for more fun. Consider adding walnuts, almonds, or even a pinch of ginger. Each nut or spice will give your dish a unique edge. If you need gluten-free options, look for gluten-free cinnamon roll dough. Many brands offer this choice now. It lets everyone enjoy the treat. You can also make this recipe vegan. Use plant-based butter and find a dairy-free cinnamon roll dough. These changes keep the joy but fit different diets. Everyone can savor the deliciousness! Store your Apple Butter Cinnamon Roll Pull-Apart in an air-tight container. This keeps it fresh longer. If you leave it at room temperature, eat it within two days. For a longer shelf life, place it in the fridge. It stays good there for about a week. Make sure the container is sealed to avoid drying out. To freeze your pull-apart, first let it cool completely. Wrap it tightly in plastic wrap. Then, place it in a freezer-safe bag. This helps keep the flavor and texture. You can freeze it for up to three months. When you're ready to enjoy it, take it out and thaw it in the fridge overnight. Reheat it in the oven at 350°F (175°C) for about 10-15 minutes. Enjoy warm and delicious! Yes, you can use homemade apple butter. Homemade apple butter often tastes fresher and more flavorful. You can adjust the spices to your liking. Store-bought apple butter may have added sugars and preservatives. Homemade is a great choice if you want to control the ingredients. The rich taste of homemade will elevate your pull-apart. You can tell the pull-apart is done when it turns golden brown. It should look puffed and firm. A toothpick inserted into the center should come out clean. If it has dough sticking to it, it needs more time. Keep an eye on it while it bakes. Every oven is a bit different. Yes, you can make this recipe ahead of time. You can prepare it the night before. Just layer the dough and apple butter, then cover it tightly. In the morning, let it sit at room temperature for 30 minutes. Then, bake as directed. You can also store leftovers in an airtight container. They will stay fresh for a few days. You learned how to create a delicious Apple Butter Cinnamon Roll Pull-Apart. This recipe uses simple ingredients and easy steps. With the right tips, your dish will turn out perfect. You can customize it with fruits, nuts, or special diets. Store your leftovers well to keep them fresh. I hope you enjoy making and sharing this treat. It’s a sweet way to brighten your day!

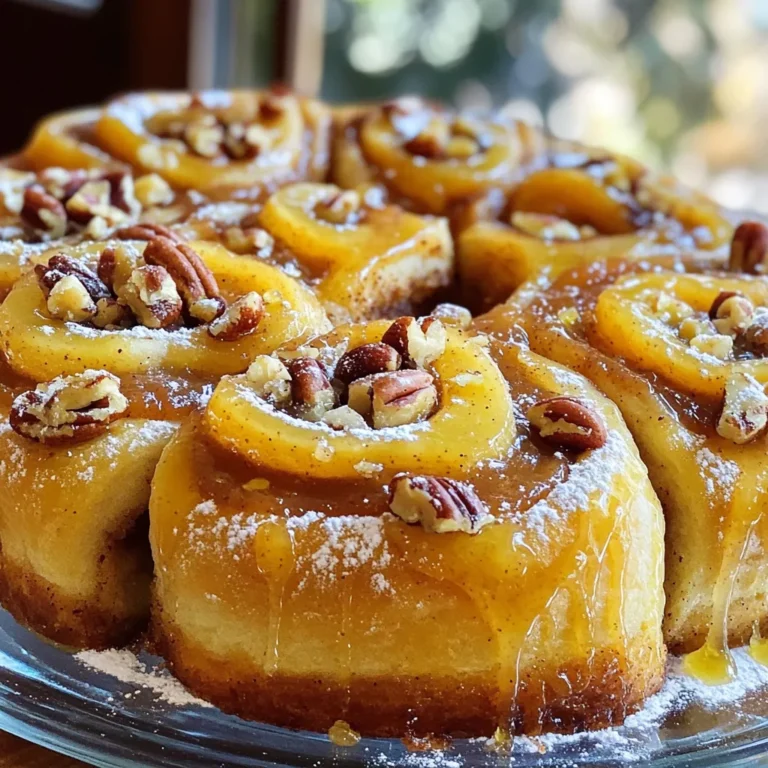
Apple Butter Cinnamon Roll Pull-Apart Delight Recipe

For the best French onion soup with cheesy bread, gather these key ingredients: - 4 large onions, thinly sliced - 2 tablespoons unsalted butter - 1 tablespoon olive oil - 1 teaspoon salt - 1 teaspoon sugar - 6 cups beef broth (or vegetable broth for a vegetarian option) - 2 teaspoons fresh thyme leaves (or 1 teaspoon dried thyme) - 1 bay leaf - 1/4 teaspoon black pepper - 1 baguette, sliced into 1-inch pieces - 2 cups shredded Gruyère cheese (or a mix of Gruyère and mozzarella for extra melting) - Fresh parsley, chopped (for garnish) These ingredients work together to create a warm and rich flavor. If you need to make swaps, consider these options: - Use sweet onions like Vidalia for a milder taste. - Substitute butter with olive oil for a dairy-free version. - Swap Gruyère for Swiss cheese if that’s what you have. - For a vegan option, use vegetable broth and non-dairy cheese. These alternatives can still keep your soup delicious. When buying ingredients, look for: - Fresh onions that feel firm and have no soft spots. - High-quality broth; homemade is best but store-bought works too. - Fresh thyme should be bright green and fragrant. - Choose a crusty baguette that is fresh for the best cheesy bread. Quality ingredients will elevate your French onion soup. First, slice the four large onions thinly. This step makes sure they cook evenly. In your slow cooker, add the sliced onions along with two tablespoons of unsalted butter and one tablespoon of olive oil. Sprinkle in one teaspoon of salt and one teaspoon of sugar. Stir this mix well to coat the onions. Cover the slow cooker and set it to low for 8-10 hours or high for 4-5 hours. The goal is to get the onions deeply caramelized. This adds a sweet flavor to your soup. Once the onions are caramelized, it's time to add flavor. Remove the lid from your slow cooker. Pour in six cups of beef broth or vegetable broth for a vegetarian option. Add two teaspoons of fresh thyme leaves, or one teaspoon if you're using dried thyme. Toss in one bay leaf and a quarter teaspoon of black pepper. Stir the mixture well to combine all the flavors. Cover the slow cooker again and cook on low for another 30 minutes. This allows the spices to blend into the broth. While the soup is cooking, let's get the cheesy bread ready. Preheat your oven to 400°F (200°C). Take a baguette and slice it into one-inch pieces. Arrange the slices on a baking sheet. Sprinkle half of the two cups of shredded Gruyère cheese over the bread. Bake the bread for about 8-10 minutes. Keep an eye on it until the cheese is bubbly and golden. When the soup is ready, ladle it into bowls. Top each bowl with a cheesy bread slice and sprinkle the rest of the cheese on top. For a final touch, return the bowls to the oven for another 5 minutes. This melts the cheese beautifully. Garnish with fresh parsley before serving. To get sweet, rich onions, start on low heat. This slow cooking helps them caramelize well. You should stir them every 30 minutes. This will help them cook evenly and brown nicely. The key is patience. It may take up to ten hours in the slow cooker. If you see them getting dark too fast, lower the heat. Choose cheese that melts well, like Gruyère or mozzarella. When topping your soup, use a thick layer for a gooey finish. Bake the cheesy bread until it's bubbly and golden. This adds a lovely crunch to your dish. After ladling the soup, add cheese on top and return it to the oven. This gives you a melty layer that pulls apart perfectly. Taste the soup before serving. You can add more salt or pepper if you want. Fresh thyme gives a lovely herbal note. If you prefer a little heat, try adding red pepper flakes. You can also switch up the broth. For a lighter taste, use vegetable broth. Adjusting these flavors can make the soup feel more personal and special. {{image_2}} You can enjoy French onion soup without meat. Just swap beef broth for vegetable broth. This keeps all the flavor while making it vegetarian. Use the same onions, butter, and spices. You will still get that rich, warm taste everyone loves. If you want a bit more depth, add a splash of soy sauce or miso paste. These options bring umami to your soup. Cheese makes this dish special. Gruyère is the classic choice, but you can mix it up! Try mozzarella for extra stretchiness. Or use sharp cheddar for a bold flavor. Blend cheeses for a unique taste. Just remember to use cheeses that melt well. This will give you that gooey cheese layer on top of your soup. Want to make your soup more filling? Add proteins like chicken, beef, or even lentils. Shredded rotisserie chicken works great. It adds protein without much effort. For a vegetarian option, use canned beans or lentils. They boost the soup's heartiness while keeping it healthy. Just add proteins alongside the broth and let them cook together. This way, you create a more satisfying meal. After you enjoy your French onion soup, store any leftovers in an airtight container. Let the soup cool to room temperature first. Then, place the container in the fridge. It will last for about 3 to 4 days. For the cheesy bread, wrap it in foil or plastic wrap. This keeps it fresh and tasty. To reheat the soup, pour it into a pot. Heat it on the stove over medium heat. Stir it often until it is hot. You can also use the microwave. Place the soup in a microwave-safe bowl. Heat it in short bursts, stirring in between. For the cheesy bread, pop it in the oven at 350°F (175°C) for about 10 minutes. This will make it crispy again. If you want to freeze the soup, use freezer-safe containers. Leave some space at the top for expansion. The soup can last for up to 3 months in the freezer. Thaw it overnight in the fridge before reheating. Cheese bread does not freeze as well. If you must freeze it, wrap it tightly. Just know it may not be as crispy when thawed. Yes, you can make French onion soup in advance. The flavors only get better when it sits. Cook the soup, let it cool, and store it in the fridge. You can keep it for up to three days. When you are ready to eat, just reheat it on the stove. Add the cheesy bread right before serving for that warm, gooey topping. To get the best flavor, focus on caramelizing the onions well. Cook them slowly, and let them turn a deep, rich brown. This step is key. Add fresh thyme and a bay leaf to enhance the taste. Use quality beef broth for a robust flavor. If you want a vegetarian option, vegetable broth works great too. Remember, good ingredients lead to great flavor! French onion soup is filling, but you can serve a few light sides. A simple green salad with a light vinaigrette works well. You can also add some roasted vegetables for extra color and taste. Try a crusty baguette on the side to dip in the soup. These sides will balance the rich, cheesy soup and make your meal complete! This blog post shared key points for making French onion soup. You learned about choosing fresh ingredients, step-by-step cooking, and tips for flavor. Remember, good onions make a big difference. Experiment with cheeses and proteins to fit your taste. Storing and reheating leftovers correctly keeps the soup tasty. I hope these tips help you create a delicious dish every time. Enjoy your cooking journey!

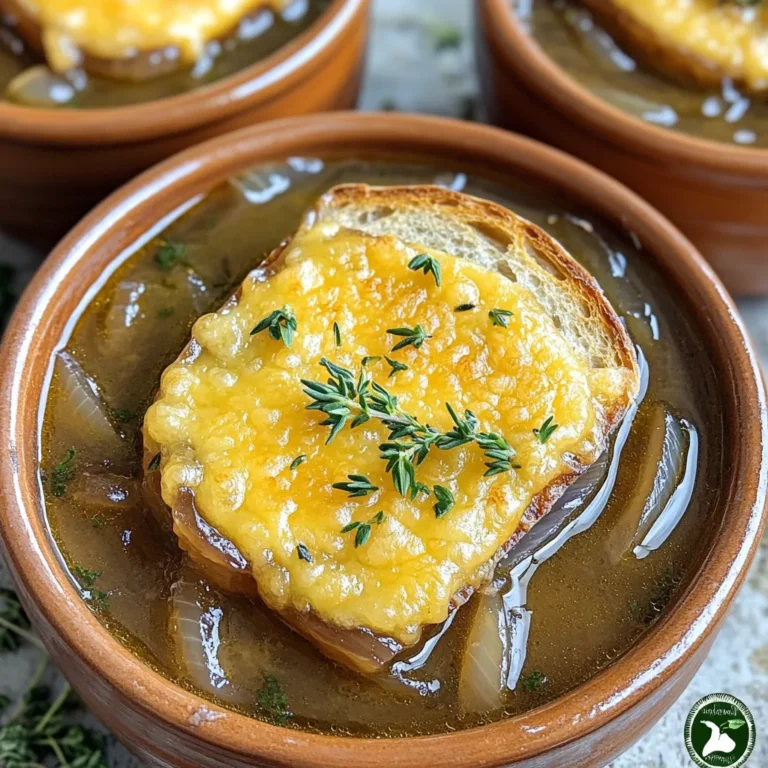
French Onion Soup with Cheesy Bread Comfort Dish

To make this tasty mug cake, you need the following main ingredients: - 4 tablespoons almond flour - 2 tablespoons unsweetened cocoa powder - 1 tablespoon protein powder (chocolate or vanilla) - 2 tablespoons natural peanut butter - 2 tablespoons maple syrup (or honey) - 1/4 teaspoon baking powder - 4 tablespoons almond milk (or any milk of choice) - A pinch of salt These ingredients work together to give you a rich and moist cake. Almond flour adds a nutty flavor and keeps the cake gluten-free. Cocoa powder gives you that deep chocolate taste. When choosing protein powder, you have a few options. You can use chocolate or vanilla protein powder. Chocolate powder will enhance the chocolate flavor. Vanilla powder will give a nice balance to the cake. I recommend looking for powders that do not contain added sugars. This keeps the cake healthier and still delicious. To make your mug cake even better, try adding these tasty extras: - 1 tablespoon dark chocolate chips - A few crushed nuts like walnuts or pecans - A dash of cinnamon for warmth These add-ins add texture and depth to your mug cake. Dark chocolate chips melt into the cake, making each bite delightful. Nuts add a nice crunch and healthy fats. A sprinkle of cinnamon can elevate the flavor in a fun way. Feel free to mix and match your favorites! Start by taking a microwave-safe mug. Add these dry ingredients: - 4 tablespoons almond flour - 2 tablespoons unsweetened cocoa powder - 1 tablespoon protein powder (chocolate or vanilla) - 1/4 teaspoon baking powder - A pinch of salt Mix well with a spoon. This ensures the dry ingredients blend nicely. You want a uniform mix before adding anything wet. Now, it’s time for the wet ingredients. Add: - 2 tablespoons natural peanut butter - 2 tablespoons maple syrup (or honey) Stir until the mix looks crumbly. Then, slowly pour in: - 4 tablespoons almond milk (or any milk of choice) Keep stirring until you have a smooth batter. If you love chocolate, fold in: - 1 tablespoon dark chocolate chips (optional) This step adds extra sweetness and texture. Place your mug in the microwave. Cook it on high for 40 to 60 seconds. Watch it closely to avoid overflow. The cake should rise and be set in the middle but still moist. Let it cool for one minute. Now, enjoy your delicious chocolate peanut butter mug cake straight from the mug! To get a soft and fluffy mug cake, measure your ingredients carefully. Use a scale if you have one. The almond flour and cocoa powder should be leveled off. Don't skip the baking powder; it helps the cake rise. Stir the dry mix well before adding wet ingredients. When you combine the wet ingredients, make sure to mix until smooth. This creates the best texture. One common mistake is overcooking the mug cake. Microwave strength varies, so check it at 40 seconds. If it looks slightly wet in the middle, it’s done. Another mistake is not mixing enough. Mixing well prevents lumps. Also, avoid using too much peanut butter, which can make the cake dense. Stick to the 2 tablespoons for the best result. You can bake this mug cake in the oven if you want. Preheat your oven to 350°F (175°C). Pour the batter into an oven-safe dish. Bake for about 15-20 minutes. Watch it closely to prevent burning. The microwave is faster, but the oven gives a different texture. Both ways taste great, so choose what works best for you! {{image_2}} You can make a vegan version of this mug cake easily. Here’s how: - Switch almond milk for any plant-based milk. - Replace natural peanut butter with a nut or seed butter of your choice. - Use maple syrup or agave nectar instead of honey. - Pick a vegan protein powder for that extra boost. These swaps keep the taste rich while making it plant-based. Get creative with flavors! Here are some fun ideas: - Mocha: Add a teaspoon of instant coffee to the dry mix. This gives a nice coffee kick. - Banana: Mash half a ripe banana and mix it into the batter. This adds natural sweetness and moisture. - Chocolate Chip: Use more dark chocolate chips if you want it extra chocolatey. Feel free to mix and match these flavors for a tasty twist! If you need a gluten-free option, the almond flour works great! Here are some tips: - Ensure your protein powder is gluten-free. - You can also swap almond flour for coconut flour. Just use less, about 2 tablespoons. Coconut flour absorbs more liquid. These changes ensure everyone can enjoy this treat without gluten worries. If you have any leftover mug cake, let it cool first. Then, cover the mug with plastic wrap or transfer the cake to an airtight container. This keeps it fresh and stops it from drying out. You can store it in the fridge for up to two days. When you're ready to eat the leftover cake, you can reheat it in the microwave. Place the mug in the microwave for about 20 to 30 seconds. Check it every few seconds to avoid overheating. If the cake feels dry, add a splash of almond milk. This keeps it moist and tasty. The ingredients in this mug cake have different shelf lives. Almond flour can last about six months if stored in a cool, dark place. Cocoa powder stays fresh for up to two years. Protein powder can last about a year, but check the label for specifics. Natural peanut butter lasts several months after opening if stored in the fridge. Maple syrup can last indefinitely if kept sealed and stored in a cool place. Yes, you can use other flours! Almond flour works great, but you can try oat flour or coconut flour. Each flour gives a different taste and texture. If you use coconut flour, remember it absorbs more liquid. So, you may need to add more milk to keep it moist. To boost the chocolate flavor, add more cocoa powder. One extra tablespoon can make a big difference. You can also add dark chocolate chips, which melt and create a rich taste. For even more fun, try a swirl of chocolate spread on top before microwaving. Yes, you can skip the protein powder. Just add a bit more almond flour to keep the texture right. You may want to reduce the liquid slightly, too. Your mug cake will still be tasty, just with less protein. This mug cake has about 350 calories. This count includes the almond flour, peanut butter, and maple syrup. If you add chocolate chips, it will go up a bit. You can check each ingredient to get a more accurate number based on what you use. This blog post covered how to make a chocolate peanut butter mug cake. I shared essential ingredients and tips to create a tasty, healthy treat. With the right protein powder and add-ins, you can boost flavor and nutrition. I also explained how to prepare, cook, and store your mug cake. Remember to avoid common mistakes for the best texture. Whether you want vegan options or unique flavors, this recipe adapts well. Enjoy your delicious creation and feel good about what you eat!

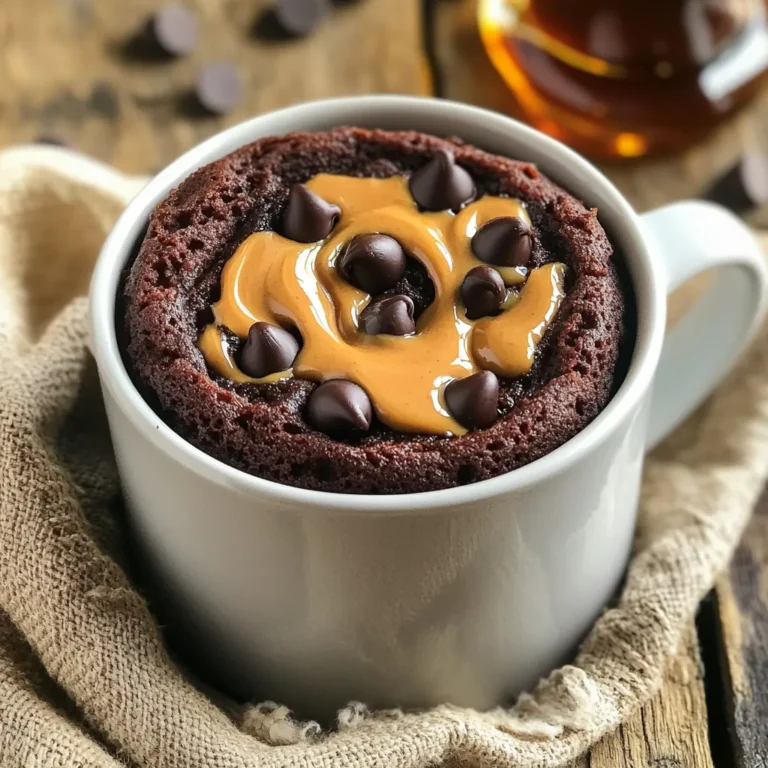
Chocolate Peanut Butter Mug Cake Protein Delight

- 4 chicken thighs, bone-in and skin-on - 4 medium potatoes, cut into wedges - 1 lemon, juiced and zested - 3 tablespoons olive oil - 3 cloves garlic, minced - 1 cup cherry tomatoes, halved - ¼ cup Kalamata olives, pitted and halved The main ingredients make this dish special. Chicken thighs bring rich flavor and keep moist. Potatoes add heartiness and soak up the tasty juices. Lemon gives a bright touch that wakes up the dish. Garlic adds depth and warmth, making every bite better. - 1 teaspoon dried oregano - 1 teaspoon dried thyme - 1 teaspoon smoked paprika - 1 teaspoon salt - ½ teaspoon black pepper The seasoning components are key to the dish’s flavor. Oregano and thyme give a classic Greek taste. Smoked paprika adds a hint of smokiness that makes it unique. Salt and pepper balance the flavors, making everything pop. - Fresh parsley, chopped Garnishes can elevate your meal. Fresh parsley adds a burst of color and freshness. You can sprinkle it on just before serving for a pretty finish. It makes your dish look as good as it tastes! First, gather your ingredients. You need chicken thighs, lemon, garlic, and herbs. In a large bowl, mix lemon juice, lemon zest, olive oil, minced garlic, oregano, thyme, smoked paprika, salt, and pepper. This mix becomes your marinade. Add the chicken thighs to the bowl and coat them well. For best flavor, let them marinate for 20 minutes. If you're in a rush, you can cook right away. Next, wash the potatoes. Cut them into wedges. Place the wedges on a large sheet pan. Drizzle olive oil over the potatoes. Then, add salt and pepper. Toss them until they are covered in the oil and seasoning. This helps them roast nicely and adds flavor. Now, it’s time to put it all together. Nestle the marinated chicken thighs among the potato wedges on the sheet pan. Scatter cherry tomatoes and Kalamata olives around the chicken and potatoes. This adds color and flavor, making the dish more appealing. Set your oven to 400°F (200°C). Place the sheet pan in the oven and roast for 35-40 minutes. The chicken should reach an internal temperature of 165°F (75°C). The potatoes will turn golden and tender. Once done, take it out and let it rest for 5 minutes. Before serving, sprinkle fresh parsley on top for a touch of color. Marinating chicken thighs adds great taste. The marinade mixes lemon juice, zest, olive oil, garlic, and spices. I recommend letting the chicken sit in the marinade for at least 20 minutes. This extra time helps the flavors soak in. You can keep it in the fridge if you want to marinate it longer. If time is short, even a quick dip works well. The key is to ensure each piece gets a good coating. This makes your chicken juicy and full of flavor. For great roasted potatoes, cut them into even wedges. This helps them cook at the same rate. Toss the wedges with olive oil, salt, and pepper before roasting. This step ensures they get a nice, golden color. I like to spread them out on the sheet pan. Crowding them can make them steam instead of roast. Keep an eye on them while they cook. You want them soft inside and crisp outside. Chicken thighs need to reach an internal temperature of 165°F (75°C). This ensures they are safe to eat. Use a meat thermometer to check. Insert it into the thickest part of the thigh, away from the bone. When the chicken is done, it will be juicy with a nice golden skin. Letting the chicken rest for 5 minutes after cooking is important. This helps keep the juices inside. Your meal will taste even better! {{image_2}} You can easily swap chicken thighs for chicken breasts. Chicken breasts cook faster. They might dry out, so watch the time closely. For a plant-based option, try tofu. Use firm tofu and press it to remove extra water. Marinate it just like the chicken. This change keeps the dish tasty and fun. Feel free to add more veggies to your sheet pan. Bell peppers bring color and sweetness. Zucchini and carrots also work well. Cut them into similar sizes as the potatoes. This way, everything cooks evenly. You can mix and match based on what you enjoy or have on hand. Herbs and spices can change the flavor a lot. If you like heat, add red pepper flakes. Fresh herbs like dill or mint can make it bright. Try using cumin for a warm twist. The key is to find what you love. Experimenting makes cooking exciting and personal. To keep your Greek Chicken & Potato Sheet Pan fresh, place leftovers in an airtight container. Make sure to cool the dish to room temperature first. Store it in the fridge for up to three days. If you want to keep it longer, freezing is a great option. When you're ready to enjoy leftovers, preheat your oven to 350°F (175°C). Place the chicken and potatoes on a baking sheet. Cover them with foil to prevent drying out. Heat for about 20 minutes or until warmed through. You can also use a microwave for quick reheating. Just make sure to heat in short bursts to avoid overcooking. To freeze, pack the cooled dish in a freezer-safe container. You can also separate the chicken and potatoes into smaller portions. Label with the date and freeze for up to three months. To reheat, simply thaw in the fridge overnight before following the reheating instructions. This way, you will always have a tasty meal ready to go! Yes, you can prepare this dish ahead of time. Marinate the chicken and cut the potatoes. Keep them in the fridge for up to 24 hours before cooking. This helps the chicken soak in the flavors. When you're ready, just lay everything on the sheet pan and roast it. This dish is great on its own, but side dishes can enhance your meal. Here are some ideas: - Greek salad with cucumbers and feta - Tzatziki sauce for dipping - Roasted vegetables like zucchini or bell peppers - Pita bread to soak up the juices To serve more people, simply double the recipe. Use a larger sheet pan or cook in batches. Make sure to keep the same cooking time. Check the chicken's temperature to ensure it reaches 165°F (75°C). If you don’t like Kalamata olives, try these options: - Green olives for a milder taste - Black olives for a different flavor - Capers for a briny kick - Leave them out if you prefer no olives at all This blog post covered how to make Greek Chicken and Potato Sheet Pan meals. You learned about the ingredients, step-by-step instructions, and helpful tips. We also explored variations and storage options. With this guide, you can create a tasty dinner that fits your needs. Experiment with different flavors and enjoy each bite! Cooking is fun, so let's make this meal and share it with family or friends. Happy cooking!

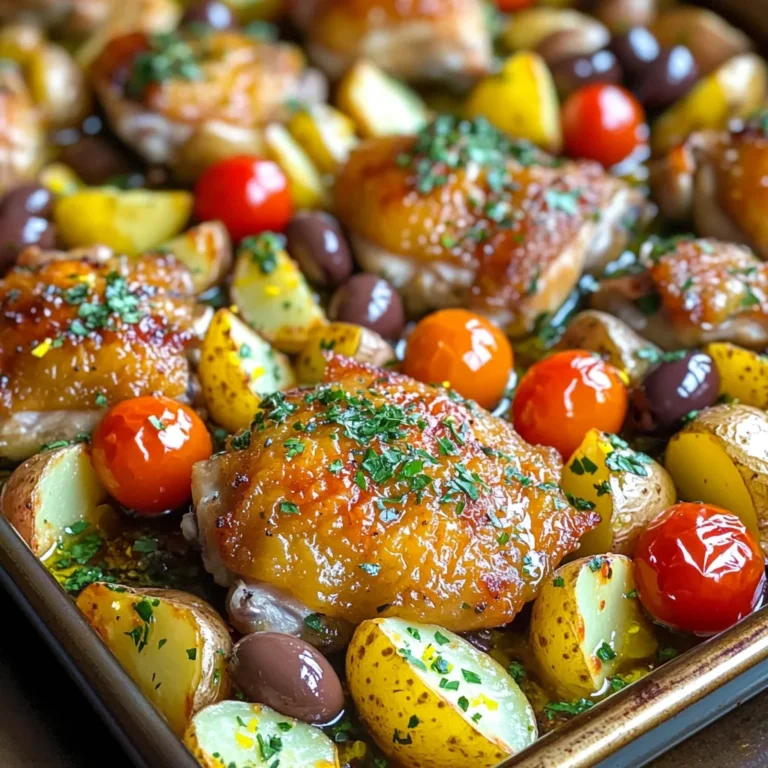
Greek Chicken & Potato Sheet Pan Simple Dinner Delight

- 1 cup unsalted butter, melted - 1 1/2 cups brown sugar, packed - 1/2 cup granulated sugar - 2 large eggs - 1 cup pumpkin puree - 2 teaspoons vanilla extract - 2 cups all-purpose flour - 2 teaspoons baking powder - 1 tablespoon pumpkin pie spice - 1/2 teaspoon salt - 1/2 cup white chocolate chips (optional) To create these delicious blondies, you need a few key items. First, unsalted butter gives a rich taste. You will mix brown sugar and granulated sugar for sweetness. Eggs and pumpkin puree add moisture and flavor. Vanilla extract rounds out the taste. Next, you will need all-purpose flour, baking powder, and pumpkin pie spice. These create a light and fluffy base. Salt helps enhance the flavors. If you like, you can add white chocolate chips for a sweet twist. - 1/4 cup granulated sugar (for topping) - 1 teaspoon cinnamon (for topping) For the topping, you need granulated sugar and cinnamon. This mixture will add a sweet and spicy layer to your blondies. It gives a nice crunch on top when baked. Gather these ingredients, and you are ready to bake! Each part plays a role in making these Pumpkin Spice Snickerdoodle Blondies a treat you will love. Preheat your oven to 350°F (175°C). This helps the blondies bake evenly. Grease a 9x13 inch baking pan. Then, line it with parchment paper. Leave some paper hanging over the edges. This makes it easy to lift the blondies out later. In a large bowl, mix 1 cup of melted butter, 1 ½ cups of brown sugar, and ½ cup of granulated sugar. Whisk this until it is creamy. Then, add 2 large eggs, one at a time. Mix well after each egg. Next, stir in 1 cup of pumpkin puree and 2 teaspoons of vanilla extract. Make sure everything is well combined. In another bowl, combine 2 cups of all-purpose flour, 2 teaspoons of baking powder, 1 tablespoon of pumpkin pie spice, and ½ teaspoon of salt. Whisk this mixture to break up any clumps. Gradually add the dry mixture to the wet mixture. Mix until just combined. Be careful not to overmix. If you want, fold in ½ cup of white chocolate chips for extra sweetness. Spread the batter evenly in your prepared baking pan. In a small bowl, mix ¼ cup of granulated sugar with 1 teaspoon of cinnamon. Sprinkle this mixture over the batter. Bake the blondies for 25 to 30 minutes. A toothpick should come out clean, with only a few moist crumbs. Let the blondies cool in the pan for about 15 minutes. Use the parchment paper to lift them out. Set them on a wire rack to cool completely. Once cool, cut the blondies into squares. Enjoy your tasty treat! To make your pumpkin spice snickerdoodle blondies moist and full of flavor, follow these tips: - Use fresh pumpkin puree for the best taste. Canned pumpkin works, but fresh is better. - Melt your butter, then let it cool slightly before mixing. This helps keep your blondies soft. - Do not overmix your batter. Mix until just combined to keep them fluffy. - Use brown sugar for a richer flavor. It adds depth and moisture compared to white sugar. How you serve your blondies can make them even more tempting. Here are some fun ideas: - Cut the blondies into squares and place them on a rustic wooden board. - Drizzle caramel sauce on top for a sweet touch. It pairs perfectly with pumpkin spice. - Use a festive platter to match the autumn vibe. Add some fall leaves or small pumpkins for decor. Sometimes, blondies can turn out differently than expected. If yours are too dry or overcooked, try these steps: - If they are dry, check your oven temperature. An oven that is too hot can bake them too fast. - To fix overcooked blondies, serve them warm with a scoop of ice cream. The creaminess helps balance the dryness. - For next time, use a toothpick to check doneness. Remove them when there are moist crumbs, not clean. {{image_2}} You can change the pumpkin puree for applesauce or mashed bananas. These swaps give a different taste. For spices, try cinnamon or nutmeg instead of pumpkin pie spice. Each swap alters the flavor in a fun way. White chocolate chips add sweetness, but you can use dark chocolate or nuts. Pecans or walnuts work well for crunch. Dried cranberries or raisins add chewy bites. Experiment with what you love for a unique twist. To make these blondies gluten-free, swap all-purpose flour for almond or coconut flour. For a vegan version, use flax eggs instead of real eggs. Combine one tablespoon of ground flaxseed with three tablespoons of water. Let it sit for five minutes to thicken. Replace butter with coconut oil or vegan butter. These changes keep the blondies tasty and friendly for everyone. To keep your pumpkin spice snickerdoodle blondies fresh, follow these steps: - Cool completely: Let them cool on a wire rack. This prevents moisture from making them soggy. - Use an airtight container: Place the blondies in an airtight container. This helps keep them soft and chewy. - Layer with parchment paper: If stacking, use parchment paper between layers. This avoids sticking. If you want to save some for later, here’s how to freeze your blondies: 1. Cut into squares: Wait until they are completely cool, then cut them. 2. Wrap well: Wrap each square in plastic wrap tightly. This helps prevent freezer burn. 3. Place in a freezer bag: Put the wrapped blondies in a freezer-safe bag. Remove as much air as possible. 4. Label and date: Write the date on the bag. This helps you track how long they’ve been frozen. 5. Thaw properly: When ready to eat, take them out and let them thaw in the fridge overnight. Your blondies will last for a while! Here’s how long you can keep them: - Room temperature: They stay fresh for about 3 to 5 days. - Refrigerator: If stored in the fridge, they last about a week. Enjoy your blondies while they are soft and tasty! Yes, you can use homemade pumpkin puree. Just make sure it is smooth and not too watery. Homemade puree can taste fresher than canned, which adds a nice touch to your blondies. To make it, roast a pumpkin, scoop out the flesh, and blend until smooth. This gives you a rich flavor. If you want a change, you can use dark chocolate chips or butterscotch chips. Nuts, like walnuts or pecans, can also add a nice crunch. For a fruity twist, try dried cranberries or cherries. Each option brings unique flavors to your blondies. To check if your blondies are done, insert a toothpick in the center. If it comes out clean or with a few moist crumbs, they are ready. The edges should be slightly golden, and the center should feel set but still soft. Overbaking can lead to dry blondies. Yes, you can make these blondies a day or two before your event. Just store them in an airtight container to keep them fresh. For best taste, let them cool completely before cutting. This allows the flavors to meld beautifully. You’ve learned all about making delicious Pumpkin Spice Snickerdoodle Blondies. We covered the best ingredients and step-by-step instructions for baking your treats. Plus, we shared tips on presenting and storing them. Remember, you can also customize the flavors or make them fit different diets. With these ideas, your blondies can be a hit! Enjoy baking and sharing these delights with friends and family. Happy baking!

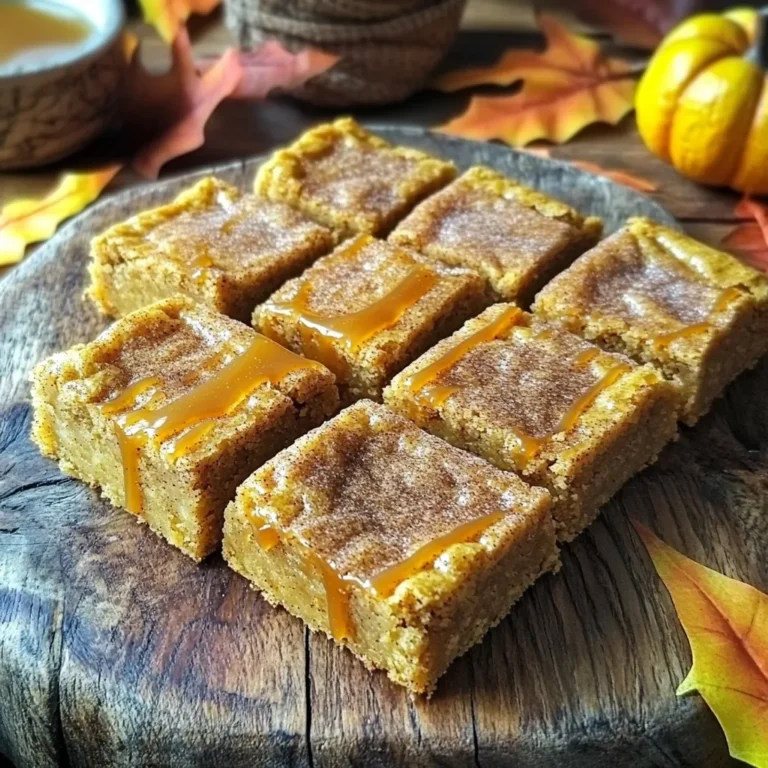
Pumpkin Spice Snickerdoodle Blondies Irresistible Treat

To make a hearty Slow Cooker Beef and Barley Soup, gather these simple ingredients: - 1 pound beef stew meat - 1 cup pearl barley - 4 cups beef broth - 2 cups water - 1 medium onion - 2 cloves garlic - 3 carrots - 2 stalks celery - 1 teaspoon dried thyme - 1 teaspoon dried oregano - 2 bay leaves - Salt and pepper - 1 tablespoon olive oil - 2 tablespoons fresh parsley (for garnish) These ingredients are easy to find in any grocery store. The beef stew meat gives the soup its rich flavor. Pearl barley adds a nice texture. The broth and water help create a warm, comforting base. Fresh parsley brightens the dish and adds color. Make sure your vegetables are fresh. Chopped carrots and celery add sweetness and crunch. The onion and garlic bring depth to the taste. Dried thyme and oregano give this soup its lovely aroma. Salt and pepper will enhance all the flavors. This list makes a soup that serves six. Each ingredient plays a role in making it both tasty and comforting. You can feel good knowing you are using wholesome ingredients to create a nourishing meal. First, heat 1 tablespoon of olive oil in a skillet over medium-high heat. When the oil gets hot, add 1 pound of beef stew meat cut into 1-inch cubes. Cook the beef for about 5 to 7 minutes. You want it browned on all sides. This step adds flavor. Once browned, transfer the beef into your slow cooker. In the same skillet, add 1 medium diced onion, 2 minced cloves of garlic, 3 chopped carrots, and 2 chopped stalks of celery. Cook these for about 3 to 4 minutes. Stir until the veggies start to soften. This makes them sweet and tasty. After that, add the sautéed veggies to the slow cooker. Now it’s time to bring everything together. Add 1 cup of rinsed pearl barley, 4 cups of beef broth, and 2 cups of water to the slow cooker. Next, sprinkle in 1 teaspoon of dried thyme, 1 teaspoon of dried oregano, and 2 bay leaves. Don’t forget to add salt and pepper to taste. Stir everything well to combine. Cover the slow cooker. Set it to low heat for 8 hours or high heat for 4 hours. The beef should be tender, and the barley should be cooked through. If using low heat, it’s great to prepare in the morning. You can come home to a warm dinner. Once the cooking time is done, carefully remove the bay leaves. Taste the soup and adjust the seasoning if needed. You can add more salt or pepper based on your liking. This final taste test makes sure the soup is just right. To make your soup shine, use the right seasonings. I recommend adding dried thyme, oregano, and a pinch of salt and pepper. These ingredients boost the beef's rich taste. Fresh parsley as a garnish adds a nice pop of color and flavor. Browning the beef is key. It creates a nice crust that adds depth. Heat olive oil in a skillet. Sear the beef cubes until they are brown on all sides. This step takes about 5 to 7 minutes. Transfer the meat to your slow cooker after browning. You can adjust the liquid in your soup based on your taste. If you like a thicker soup, use less water. For a brothier soup, add a bit more. Just remember to keep an eye on the barley. If you cook it too long, it can become mushy. Aim for a perfect texture by checking it towards the end of cooking. Serve your beef and barley soup hot. It pairs well with crusty bread or a fresh salad. For a fun twist, try adding a dollop of sour cream or a sprinkle of cheese on top. This adds richness and makes the dish feel special. You can also serve it in a bread bowl for a unique touch. {{image_2}} You can make this soup even better by adding more veggies. In the fall, try adding sweet potatoes or parsnips. In the spring, peas or asparagus work great. You can also toss in some spinach or kale for a green boost. Just chop them small so they cook well. Add them to the slow cooker with the other veggies. Want to change the meat? You can use chicken or turkey instead of beef. Just cut them into one-inch pieces and follow the same steps. For a meat-free version, try using lentils or chickpeas. They add protein and flavor. Use vegetable broth with them for a great taste. You can change the soup's flavor by adding spices. Try cumin for a warm taste or chili powder for some heat. You can also add a splash of soy sauce or Worcestershire sauce for extra zest. Experiment with different herbs like rosemary or basil to find your favorite mix. To store your leftover beef and barley soup, let it cool first. Place it in an airtight container. This helps keep it fresh. In the fridge, the soup lasts about three to four days. If you want it to last longer, consider freezing it. For freezing, use freezer-safe containers. Pour the cooled soup into the containers, leaving some space at the top. This space allows for expansion. The soup can freeze well for up to three months. When you’re ready to eat, move it to the fridge overnight to thaw. To reheat, pour the soup into a pot over low to medium heat. Stir often to avoid sticking. You can also use the microwave. Heat it in short bursts, stirring in between. Make sure it’s piping hot before serving. This ensures all flavors stay vibrant. Avoid reheating more than once to prevent spoilage. You can easily make this soup vegetarian. Use vegetable broth instead of beef broth. For the meat, replace it with hearty veggies like mushrooms or lentils. They add great texture and flavor. You can also use tofu for protein. This way, you keep the warmth and depth of the original dish while making it plant-based. Yes, you can use quick-cooking barley. However, you need to adjust the cooking time. Quick-cooking barley usually takes about 10 to 15 minutes to cook. Add it in the last 30 minutes of cooking to prevent it from becoming mushy. This keeps the soup tasty and the barley just right. Beef and barley soup is full of nutrients. Beef provides protein, iron, and zinc. Barley is high in fiber, which aids digestion. Carrots and celery add vitamins A and C. This soup is warm and filling. It nourishes your body and keeps you satisfied. Yes, you can cook this soup on the stovetop. Start by browning the beef in a pot. Then, add the sautéed vegetables, broth, and barley. Let it simmer for about 1.5 to 2 hours. Check the beef and barley for tenderness. This method is faster and still gives great flavor. Pair this soup with crusty bread or a fresh salad. A slice of sourdough complements the soup's rich taste. You can also serve it with crackers for added crunch. Try a light green salad for freshness. These sides enhance the meal and make it even more enjoyable. This blog post shared how to make tasty Slow Cooker Beef and Barley Soup. You learned about the key ingredients, step-by-step instructions, and helpful tips. The blog also covered variations to suit your taste and how to store leftovers for later. Remember, you can adjust flavors and ingredients to your liking. Enjoy cooking this warm and hearty soup that brings comfort to any meal. Happy cooking!

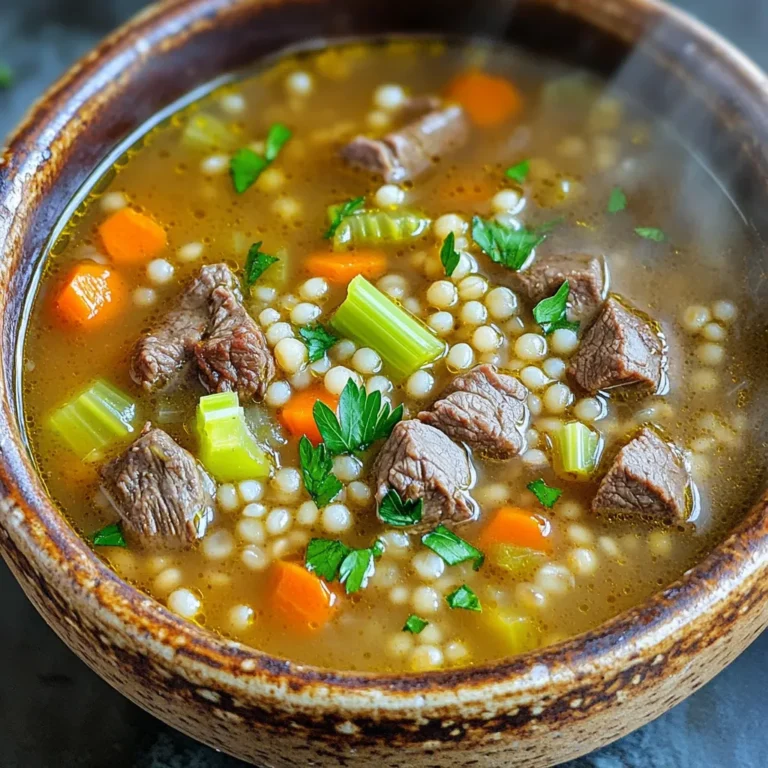
Slow Cooker Beef and Barley Soup Hearty Comfort Dish

- 2 lbs chicken wings - 1/4 cup honey - 2 tablespoons soy sauce - 3 cloves garlic, minced - 1 tablespoon sriracha - 1 teaspoon smoked paprika - 1 teaspoon black pepper - 1/2 teaspoon salt - 1 tablespoon cornstarch - Fresh cilantro, chopped - Sesame seeds The main ingredients for Air Fryer Spicy Honey Garlic Wings set the stage for big flavor. You need two pounds of chicken wings. They are the star of the dish. A quarter cup of honey adds a sweet touch. Two tablespoons of soy sauce give a savory kick. The flavor components enhance the taste. Minced garlic brings depth. Use three cloves for a bold bite. Sriracha adds heat. One tablespoon is perfect, but adjust for your spice level. Smoked paprika gives a nice, smoky flavor with just one teaspoon. Now let’s talk seasoning and coating. Black pepper brings warmth. Just a teaspoon does the trick. Salt is key, so use half a teaspoon. The cornstarch is important too. One tablespoon helps make the wings crispy. Lastly, for garnishes, you’ll want fresh cilantro and sesame seeds. Chopped cilantro adds brightness. Sesame seeds bring a nice crunch and look great on the plate. These ingredients blend perfectly to create a savory delight. To start, grab a large mixing bowl. Add the following ingredients: - 1/4 cup honey - 2 tablespoons soy sauce - 3 cloves garlic, minced - 1 tablespoon sriracha - 1 teaspoon smoked paprika - 1 teaspoon black pepper - 1/2 teaspoon salt Stir these well until they blend nicely. This mix will bring sweet and spicy flavors to your wings. Now, take your chicken wings and add them to the bowl. Toss the wings well to coat them in the marinade. Let them sit for at least 30 minutes, or up to 2 hours in the fridge. The longer they sit, the more flavor they soak up. Preheat your air fryer to 400°F (200°C) for about 5 minutes. After marinating, pull the wings from the bowl. Let any extra marinade drip off. Next, sprinkle 1 tablespoon of cornstarch over the wings. Toss them again to coat. This step helps the wings get nice and crispy. Arrange the wings in a single layer in the air fryer basket. Cook them for 25 to 30 minutes. Flip the wings halfway through cooking. Check for a golden brown color to know they are done. While your wings cook, grab the leftover marinade. Pour it into a small pot and simmer it for about 10 minutes. This will thicken the sauce. Once the wings are done, you can toss them in the thickened sauce for even more flavor. Enjoy every bite! To get crispy wings, cornstarch plays a key role. It helps absorb moisture. This makes the wings crunchy when cooked. After marinating, sprinkle cornstarch on the wings. Toss them to coat. Aim for a cooking temperature of 400°F (200°C). Cook the wings for 25-30 minutes. Flip them halfway for even crispiness. Marinating wings longer makes a big difference. It allows the flavors to soak in. You can marinate for 30 minutes or up to 2 hours. Adjust the spice level based on your taste. If you love heat, add more sriracha. For less spice, use less sriracha. Pair spicy wings with great sides. Some best options are celery sticks, carrot sticks, or a fresh salad. These sides cool down the heat of the wings. For dipping sauces, ranch or blue cheese work well. They balance the spice and add creaminess. Enjoy your wings with friends for a fun meal! {{image_2}} You can easily change the taste of your wings. For an Asian twist, add sesame oil and fresh ginger. This brings in a rich flavor that pairs well with honey. If you like heat, boost the sriracha or sprinkle chili flakes. The extra kick will make your wings even more exciting. Love wings but need a change? Try drumsticks instead of wings. They cook well and have great flavor. For a vegetarian option, use cauliflower florets. They soak up the sauce and taste amazing. Want a different sweetness? Use maple syrup or agave instead of honey. Each choice adds a unique twist. Want to switch it up? You can bake these wings in the oven. Preheat to 400°F (200°C) and cook for about 40 minutes. Flip them halfway for even cooking. If you prefer grilling, season your wings and cook over medium heat. This adds a smoky flavor and is perfect for summer cookouts. To keep your wings fresh, refrigerate them right after serving. Place them in an airtight container to lock in flavor. Be sure to cool them to room temperature first. This helps prevent sogginess and keeps them tasty. Store the wings for up to three days in the fridge. To reheat your wings, you can use either a microwave or air fryer. I recommend the air fryer for best results. The air fryer keeps the skin crispy. Heat them at 350°F (175°C) for about 5 to 7 minutes. If using a microwave, place wings on a plate and cover them with a damp paper towel. Microwave for one minute at a time until heated through. You can freeze wings if you have leftovers. To freeze, place them in a freezer-safe bag. Remove as much air as possible before sealing. They can last up to three months in the freezer. When ready to eat, thaw them in the fridge overnight. Reheat in the air fryer for best texture. Yes, you can use frozen wings. Here’s how to cook them: - No need to thaw: Place the frozen wings straight into the air fryer. - Increase cooking time: Cook for 35 to 40 minutes at 400°F (200°C). - Check doneness: Ensure the wings reach an internal temperature of 165°F (74°C). Cooking from frozen saves time and still gives you tasty wings! If you want to tone down the heat, try these tips: - Reduce sriracha: Use only 1 teaspoon or skip it entirely. - Add sweetness: Increase honey for a sweeter balance. - Include butter: Melt some butter and mix it in to soften the spice. These changes help you enjoy the flavor without too much heat! Here are some great side dishes and drinks to pair: - Celery and carrot sticks: Crunchy veggies cool the heat. - Blue cheese or ranch dip: Creamy dips complement the spice. - French fries or onion rings: Classic sides that everyone loves. - Cold beer or lemonade: Refreshing drinks balance the flavors. These pairings enhance your meal and keep everyone happy! You can create delicious spicy honey garlic wings using simple ingredients. Start by marinating wings in a mix of honey, soy sauce, and spices. Cook them until crispy and serve with fresh garnishes. Experiment with variations to suit your taste, like adding ginger for an Asian flair. Remember, proper storage and reheating ensure leftovers remain tasty. Now, you have the tools for making wings that impress at any gathering. Enjoy your cooking journey!

Air Fryer Spicy Honey Garlic Wings Savory Delight

To make savory herb and cheddar biscuits, gather these ingredients: - 2 cups all-purpose flour - 1 tablespoon baking powder - 1 teaspoon salt - ½ teaspoon black pepper - 1 teaspoon dried thyme - 1 teaspoon dried rosemary - ½ cup unsalted butter, cold and cubed - 1 cup sharp cheddar cheese, grated - ¾ cup buttermilk (or milk with 1 tablespoon lemon juice added) If you don't have some ingredients, don't worry. Here are some swaps: - All-purpose flour: Use whole wheat flour for a nuttier flavor. - Baking powder: You can make a mix of baking soda and cream of tartar. - Unsalted butter: Coconut oil or margarine work well too. - Sharp cheddar cheese: Try mozzarella or pepper jack for a different taste. - Buttermilk: Mix regular milk with vinegar or lemon juice as a substitute. Choosing the best ingredients makes a big difference. Here are some tips: - Flour: Look for unbleached all-purpose flour for better flavor. - Cheese: Freshly grated cheese melts better than pre-shredded. - Butter: Cold butter creates flaky layers in your biscuits. - Herbs: Use dried herbs that smell strong; this means they’re fresh. - Buttermilk: Check the expiration date for the best taste. These tips will help you pick quality ingredients that elevate your biscuits! 1. Preheat your oven to 425°F (220°C). Line a baking sheet with parchment paper. 2. In a large bowl, mix 2 cups of flour, 1 tablespoon of baking powder, 1 teaspoon of salt, ½ teaspoon of black pepper, 1 teaspoon of dried thyme, and 1 teaspoon of dried rosemary. Whisk until blended well. 3. Cut ½ cup of cold, cubed unsalted butter into the flour mix. Use a pastry cutter or your fingers. Mix until it looks like coarse crumbs. 4. Add 1 cup of grated sharp cheddar cheese to the bowl. Stir it in until evenly mixed. 5. Pour in ¾ cup of buttermilk. Gently stir until just combined. The dough should feel soft and slightly sticky. 6. Turn the dough onto a floured surface. Gently fold it over two or three times. Pat it down into a 1-inch thick rectangle. 7. Use a biscuit cutter to cut out shapes. Place them on the baking sheet, leaving about 1 inch between each biscuit. 8. Bake for 12-15 minutes. Watch for a golden brown top. Insert a toothpick; it should come out clean. 9. Once baked, remove the biscuits from the oven. Let them cool for a few minutes before serving. 10. Serve warm. Brush the tops with melted butter. Add a sprinkle of fresh herbs for a lovely touch. Enjoy them with your favorite soup or on their own! To make the best biscuits, you need the right mix. Start with cold butter. This helps keep the biscuits flaky. Use a pastry cutter or your fingers to mix the butter with the dry mix. Stop when you see coarse crumbs. Overmixing makes them dense. When you add the buttermilk, stir just until it comes together. The dough should feel soft and slightly sticky. Folding the dough a few times adds layers without being tough. Herbs give biscuits a great taste. Try using fresh thyme or rosemary if you have them. Fresh herbs add a nice pop. You can also mix in garlic powder for a savory touch. If you want more cheese flavor, use extra sharp cheddar. For a spicy kick, add chopped jalapeños. These simple changes can make your biscuits stand out. One mistake is using warm butter. Always keep it cold for the best texture. Avoid overworking the dough; it leads to hard biscuits. Another mistake is not measuring ingredients correctly. Use a kitchen scale for accuracy. Lastly, don't skip preheating the oven. A hot oven helps your biscuits rise and become golden. Follow these tips to ensure your savory herb and cheddar biscuits are a hit! {{image_2}} You can change the herbs to fit your taste. Try using fresh herbs like basil or parsley instead of dried thyme and rosemary. Fresh herbs give a bright flavor. You can also add spices like garlic powder or onion powder for more depth. A pinch of cayenne can add a nice kick! While sharp cheddar is great, you can explore other cheeses. Gruyère brings a nutty flavor, while feta adds tang. For a creamier texture, use mozzarella. Feel free to mix different cheeses for a unique taste. Each cheese will change the biscuits, making them special every time. Get creative with add-ins! Chopped jalapeños can give your biscuits heat. You can also mix in roasted garlic for a rich flavor. Sun-dried tomatoes add a pop of sweetness. Try adding cooked bacon bits for a savory twist. Each option adds a new layer of flavor, making each batch unique. To keep your savory herb and cheddar biscuits fresh, store them in an airtight container. Place a paper towel in the container to absorb moisture. This helps prevent sogginess. Store the biscuits at room temperature for up to three days. If you want to keep them longer, follow the freezing steps below. You can freeze these biscuits to enjoy later. First, let the biscuits cool completely. Then, wrap each biscuit tightly in plastic wrap. Place the wrapped biscuits in a freezer-safe bag or container. They can last for up to three months in the freezer. When you want to eat them, simply thaw overnight in the fridge. Reheat in the oven at 350°F (175°C) for about 10 minutes. This gives them a warm, fresh taste. These biscuits taste best when fresh. Keep them in an airtight container for the best flavor. If stored properly, they can last up to three days at room temperature. For longer freshness, freezing is the best option. Always check for any signs of spoilage before enjoying. If they smell off or feel hard, it's best to toss them. Enjoy your biscuits while they are still soft and flavorful! You can easily make these biscuits gluten-free. Use a gluten-free flour blend in place of all-purpose flour. Look for a blend that includes xanthan gum. This will help give your biscuits the right texture. Just follow the same steps as the original recipe. The flavors from the herbs and cheese will still shine through. Yes, you can use regular milk instead of buttermilk. If you don’t have buttermilk, add one tablespoon of lemon juice to three-quarters cup of milk. Let it sit for five minutes. This will create a similar tangy flavor. Your biscuits will still taste great and be fluffy. To reheat leftover biscuits, preheat your oven to 350°F (175°C). Place the biscuits on a baking sheet. Cover them with foil to keep them from drying out. Heat for about 10-15 minutes until warm. You can also use a microwave for quick reheating. Just heat for 15-20 seconds, but the oven gives a better texture. Enjoy your warm biscuits! This blog post covered key ingredients, step-by-step baking, and helpful tips. You learned how to choose quality ingredients and make tasty substitutions. Following the instructions ensures perfect texture and flavor. We explored fun variations, storage tips, and answered common questions. Use this guide to create the best biscuits you can. Remember, practice makes perfect, so don’t be afraid to try new things! Your next batch could be your best yet. Enjoy baking and share your results!

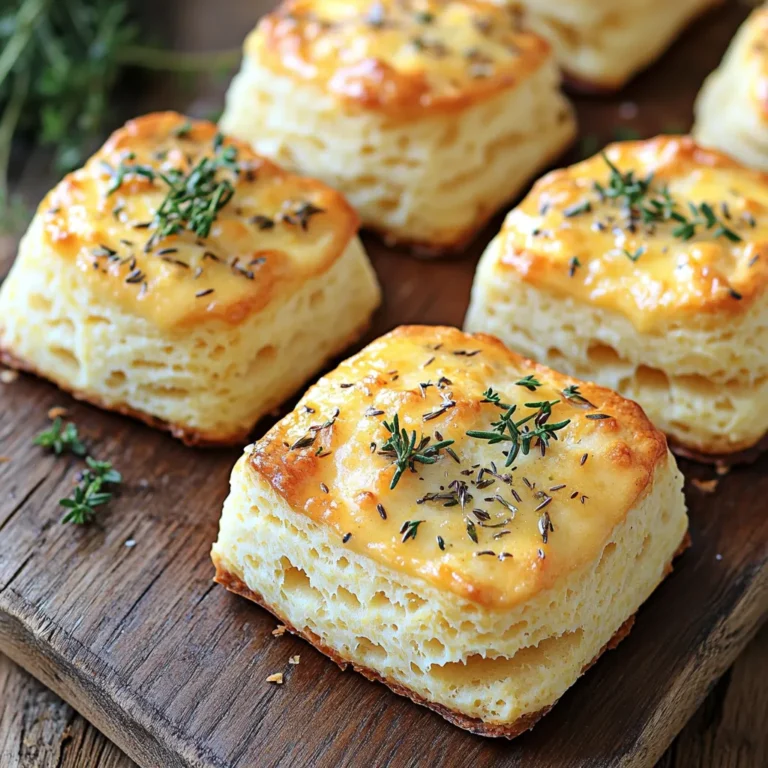
Savory Herb and Cheddar Biscuits Flavorful Delight

To make these delightful no-bake pumpkin pie truffles, you need just a few simple ingredients. Here’s what you will need: - 1 cup pumpkin puree - 1 cup cream cheese, softened - 2 cups crushed graham crackers - 1/2 cup powdered sugar - 1 teaspoon pumpkin pie spice - 1/2 teaspoon vanilla extract - 1 cup white chocolate chips, melted - 1/4 cup chopped pecans (optional for topping) Each ingredient plays a key role in creating the rich flavor and creamy texture of the truffles. The pumpkin puree gives a warm, earthy taste. Cream cheese adds creaminess and balance. Crushed graham crackers provide that classic pie crust crunch. Powdered sugar sweetens the mix perfectly. Pumpkin pie spice brings in cozy fall vibes, while vanilla extract rounds out the flavors. Melted white chocolate coats the truffles, making each bite feel like a treat. The chopped pecans on top add a nice crunch and extra flavor, but they are optional. You can adjust the ingredients based on your taste or dietary needs, making this recipe flexible. Enjoy gathering these items before you start creating your truffles! First, grab a mixing bowl. Add 1 cup of pumpkin puree and 1 cup of softened cream cheese. Next, sprinkle in 1/2 cup of powdered sugar and 1 teaspoon of pumpkin pie spice. Don't forget to add 1/2 teaspoon of vanilla extract. Use a hand mixer or spatula to blend everything together. Mix until you have a smooth and creamy texture. Now, it's time to add some crunch. Slowly mix in 2 cups of crushed graham crackers. Stir until the mixture becomes thick and moldable. Cover the bowl with plastic wrap and chill it in the fridge for about 30 minutes. This makes the mixture easier to handle. After chilling, use a small cookie scoop or your hands to form small balls, about 1 inch in diameter. Place each ball on a parchment-lined baking sheet. Once done, freeze them for another 20 minutes. While your truffles chill, melt 1 cup of white chocolate chips. Use a microwave-safe bowl. Heat the chocolate in 30-second bursts, stirring in between. Keep going until it's smooth and melted. Dip each chilled truffle into the melted chocolate using a fork. Let the excess chocolate drip off before placing it back on the parchment paper. If you like, sprinkle chopped pecans on top of each truffle before the chocolate hardens. Finally, let the chocolate set completely at room temperature or in the fridge. To make great truffles, start with the right mix. The ideal mix should be thick and moldable. If it feels too wet, add more crushed graham crackers. If it is too dry, you can blend in a little cream cheese. Chill the mixture for thirty minutes. This step helps the truffles hold their shape better. When handling the mixture, use a small cookie scoop. This tool helps you form even balls. If you prefer, use your hands, but keep them damp. This keeps the mix from sticking. After forming the balls, chill them again. This second chill makes dipping easier. To melt white chocolate safely, you have two options: microwave or stovetop. For the microwave, use a microwave-safe bowl. Heat the chocolate in thirty-second bursts. Stir between each round to prevent burning. For the stovetop, use a double boiler. Place water in a pot and set it on low heat. Put the chocolate in a bowl on top. Stir as it melts to avoid clumps. Whichever method you choose, watch closely. Burnt chocolate is hard to fix. With these tips, your no-bake pumpkin pie truffles will be a delight! {{image_2}} You can make these truffles even more fun with different flavors. Adding spices like cinnamon or nutmeg gives a warm touch. If you love mint, try peppermint extract for a fresh twist. Want to mix in chocolate? Add cocoa powder or mini chocolate chips for a richer taste. Each option brings its own special flair. The coating can change how your truffles taste and look. Instead of white chocolate, use dark chocolate or milk chocolate for a different sweetness. If you want a crunch, roll the truffles in shredded coconut or crushed nuts. These choices add texture and flavor. Experiment to find your favorite coating! To keep your no-bake pumpkin pie truffles fresh, place them in an airtight container. Store them in the fridge for up to one week. Make sure they are fully set before you store them. This keeps the chocolate coating firm. If you want to save them longer, freeze the truffles. Place them in a single layer on a baking sheet until frozen solid. Once frozen, transfer them to a freezer-safe bag or container. They can last up to three months in the freezer. Just remember to let them thaw in the fridge before serving. These truffles pair well with coffee or tea. The warm flavors of fall make this a perfect match. Serve them with a steaming cup to enjoy a cozy treat. These truffles shine at holiday gatherings. Their cute size makes them easy to share. Arrange them on a festive platter for a delightful display. Guests will love their rich flavor and creamy texture. Yes, you can make these truffles ahead of time. I often prepare them a day or two before a party. Just store them in the fridge in an airtight container. This helps them stay fresh and tasty. No-bake pumpkin pie truffles can last about one week in the fridge. If you freeze them, they can last for up to three months. Just make sure to store them in a sealed container to prevent freezer burn. You can use Greek yogurt or mascarpone as a cream cheese substitute. These options give a similar creaminess to the truffles. You might want to adjust the sugar to keep the flavor balanced. These no-bake pumpkin pie truffles are simple and fun to make. You mix pumpkin puree, cream cheese, and spices, then roll them into delicious truffles. You can coat them in melted white chocolate for a great finish. Try adding different flavors or toppings to make them unique. Remember, store them well for the best taste. Enjoy these treats at your next gathering or as a special snack. These truffles will be a hit, so have fun making them and sharing with friends!

No-Bake Pumpkin Pie Truffles Delightful Fall Treat

PREV 1 … 21 22 23 … 86 NEXT
spicy fork kitchen

explore

DessertsDinnerAppetizersDrinks

Our Policies

  • Cookie Policy
  • Copyright Policy
  • Disclaimer
  • GDPR Policy
  • Terms Of Use
Back to Top
  • About
  • Contact Us
  • Privacy Policy
© 2026 spicy fork kitchen