FREE DINNER EBOOK! Get your copy!
  • Cookie Policy
  • GDPR Policy
  • Disclaimer
  • Terms Of Use
  • Visit my other site: Fun Cookie Recipes
spicy fork kitchen
  • Home
  • Dinner
  • Desserts
  • Drinks
  • Appetizers
  • Contact
  • About
  • Privacy Policy
  • Home
  • Dinner
  • Desserts
  • Drinks
  • Appetizers
  • Contact
  • About
  • Privacy Policy
  • Cookie Policy
  • GDPR Policy
  • Disclaimer
  • Terms Of Use
Visit my other site: Fun Cookie Recipes

HOME / CATEGORIES /

Latest

- 2 cups cooked shredded chicken - 1 bell pepper (red or green), sliced - 1 onion, sliced - 1 cup corn (fresh or frozen) - 1 can (15 oz) black beans, rinsed and drained - 1 cup salsa (mild or spicy based on preference) - 2 cups shredded cheese (cheddar or Mexican blend) - 1 teaspoon cumin - 1 teaspoon chili powder - Salt and pepper to taste - 8 small flour tortillas, cut into strips - Fresh cilantro for garnish (optional) Gathering the right ingredients is key to a great fajita chicken casserole. Start with your cooked shredded chicken. This gives you a tasty base. Then, grab a bell pepper and an onion. Slice these up, as they add color and crunch. Next, you need some corn. You can use fresh or frozen; both work well. Don't forget the black beans. They add protein and fiber to your meal. Salsa is a must for flavor. You can choose mild or spicy, based on your taste. For that cheesy goodness, prepare two cups of shredded cheese. Cheddar or a Mexican blend works best. Then, grab some cumin and chili powder for the spice. Salt and pepper are also important to season the dish just right. Finally, you will need small flour tortillas. Cut them into strips for a nice texture in the casserole. Fresh cilantro can be used for garnish, adding a fresh touch to your dish. Each ingredient plays a part in making this casserole a flavorful dinner delight. {{ingredient_image_1}} - Preheat the oven to 375°F (190°C). This step is key for even cooking. - Sauté sliced bell pepper and onion with a splash of olive oil. Cook them until soft, about 5-7 minutes. - Season with cumin, chili powder, salt, and pepper. This adds great flavor. - In a large bowl, combine shredded chicken, sautéed vegetables, corn, black beans, and salsa. - Mix thoroughly until everything is well combined. This creates a tasty filling. - In a greased 9x13 inch baking dish, layer half of the tortilla strips across the bottom. - Pour half of the chicken mixture over the tortillas. - Sprinkle with 1 cup of shredded cheese. - Repeat this layering with the remaining tortilla strips, chicken mixture, and cheese on top. - Cover the dish with aluminum foil and bake for 20 minutes. - Remove the foil and bake for another 10-15 minutes. You want the cheese to be bubbly and golden. - Remove from the oven and let it cool slightly. - If desired, garnish with fresh cilantro before serving. This adds a nice touch. To achieve a cheesy, golden-brown topping, bake the casserole uncovered for the last 10-15 minutes. This helps the cheese bubble and brown nicely. For preventing soggy tortillas, layer them with care. Place half the tortilla strips at the bottom and then add the filling. This keeps them crispier. To enhance the flavor, consider adding more spices like paprika or garlic powder. You can also mix in diced jalapeños for heat. When it comes to salsa, homemade is often fresher and tastier. However, store-bought can save time. Choose a brand that you enjoy. For efficient chopping, use a sharp knife and a cutting board. Cut the bell pepper and onion in thin strips. This makes cooking faster. You can save time by using pre-cooked or rotisserie chicken. Just shred it and add it to the mix. It cuts your prep time in half! Pro Tips Use Leftover Chicken: This recipe is perfect for using up leftover rotisserie chicken, saving you time and adding extra flavor. Customize Your Spices: Adjust the cumin and chili powder to your taste; add cayenne for extra heat or smoked paprika for a smoky flavor. Cheese Choices: Experiment with different cheeses like pepper jack for a spicy kick or Monterey Jack for a milder flavor. Add More Veggies: Feel free to include additional vegetables such as zucchini or mushrooms for added nutrition and texture. {{image_2}} To make the casserole gluten-free, use corn tortillas instead of flour ones. You can also find gluten-free salsa. This change keeps all the great flavors. For vegetarian or vegan options, swap chicken for plant-based proteins like tofu or chickpeas. Replace cheese with a dairy-free option. These swaps still make a tasty dish. You can change the vegetables too. Try zucchini, mushrooms, or spinach for a new taste. Black beans are a great choice, but pinto or kidney beans work well too. You can switch the cheese too! Use pepper jack for a spicy kick or a smoked cheese for a richer flavor. Pair this casserole with rice or a fresh salad for a balanced meal. You can also serve it with tortilla chips for extra crunch. For garnishing, add fresh cilantro or sliced avocado to brighten up the dish. A dollop of sour cream or a sprinkle of lime juice adds a nice touch. To keep your Fajita Chicken Casserole fresh, store it in the fridge. Use an airtight container. This helps prevent moisture loss and keeps flavors intact. Your casserole stays good for about 3 to 4 days in the fridge. You can freeze the casserole before or after baking. If you freeze it raw, wrap it well in foil. This keeps it from getting freezer burnt. If it’s baked, let it cool first. Then, wrap it tightly. To thaw, place it in the fridge overnight. For a quick method, use the microwave on low. For the best texture, reheat in the oven. Preheat it to 350°F (175°C). Cover the casserole with foil to keep it moist. Bake for about 20 minutes or until warm. You can also use a microwave. It’s faster but may make it soggy. If you use a microwave, heat it in short bursts. This way, it warms evenly. Yes, you can use raw chicken. Start by sautéing it in the skillet first. Cook it fully until it is no longer pink. Then, mix it with the other ingredients. This makes sure the chicken is safe to eat. You can swap tortillas for rice or quinoa. Try using crushed corn chips for a crunchy base. You can also use zucchini slices for a low-carb option. Each choice gives a new twist to the dish. To add heat, try using spicy salsa. You can also add diced jalapeños to the mix. For an extra kick, sprinkle in some cayenne pepper or hot sauce. Adjust the heat to fit your taste. Yes, you can prep this dish ahead. Mix the filling and layer it in the dish. Cover and store it in the fridge overnight. When ready, just bake it. This saves time on busy nights. This chicken casserole combines simple ingredients for a hearty meal. You start with chicken, veggies, and seasonings, then layer in tortillas and cheese. Keep the texture perfect by avoiding soggy tortillas and adjusting spices. You can adapt it for any dietary needs and store leftovers easily. In the end, this dish is flexible and tasty. Enjoy exploring your own variations. Happy cooking!

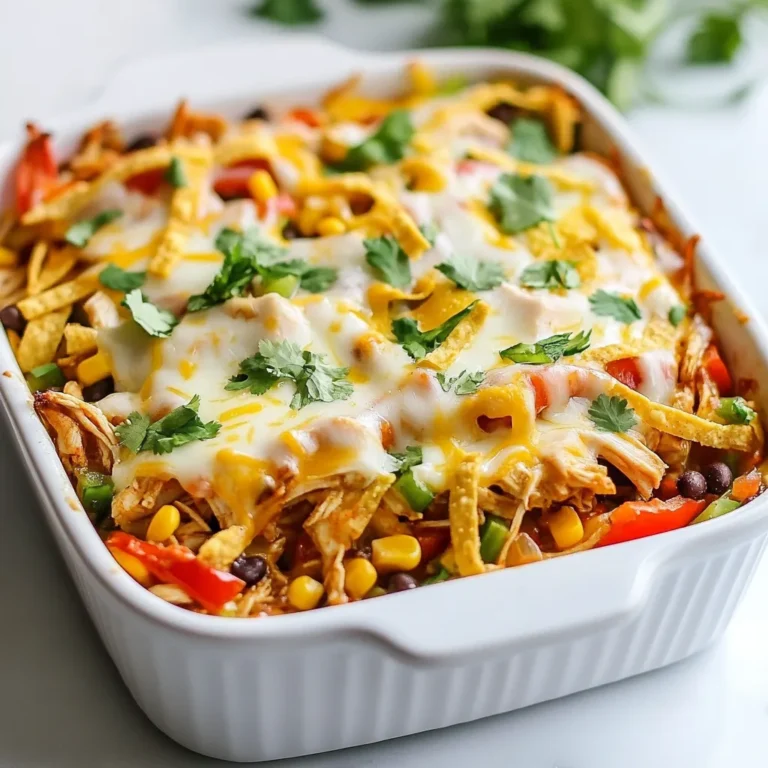
Fajita Chicken Casserole Flavorful Dinner Delight

- 1 cup fresh pineapple chunks - 1 ripe banana Fresh pineapple gives your smoothie a bright taste. It adds sweetness and a tropical vibe. The banana makes it creamy and smooth. Both fruits blend well together. - 1 cup coconut milk (or any non-dairy milk) - ½ cup Greek yogurt (or dairy-free yogurt) Coconut milk adds a rich, smooth flavor. It pairs perfectly with the fruits. Greek yogurt adds protein and creaminess. You can switch to dairy-free yogurt for a vegan option. - 2 tablespoons shredded coconut (unsweetened) - 1 tablespoon honey or maple syrup (optional) - Ice cubes (about 1 cup, adjust for desired thickness) Shredded coconut gives a nice texture and flavor. Honey or maple syrup can sweeten your smoothie if you like it sweeter. Ice cubes chill the drink and make it refreshing. Adjust the amount for your preferred thickness. {{ingredient_image_1}} - First, wash the fresh pineapple and banana. - Cut the pineapple into chunks. - Slice the banana into smaller pieces. - In your blender, combine the pineapple chunks, banana slices, and coconut milk. - Next, add the Greek yogurt for creaminess. - If you want a sweeter taste, add honey or maple syrup now. - Toss in the shredded coconut and ice cubes. - Blend everything on high until smooth. - If your smoothie is too thick, add a bit more coconut milk. - Taste your smoothie and adjust sweetness if needed. To get the right texture, use coconut milk. If you want it thicker, add less. For a chill factor, frozen fruits work great. They keep your smoothie cold without watering it down. You can freeze fresh pineapple or bananas ahead of time. This way, you always have them ready for your smoothie. Serving your smoothie in chilled glasses makes it look fancy. You can use mason jars too! Sprinkle extra shredded coconut on top for a nice touch. Garnishing with a slice of pineapple adds color and fun. You can even add a tiny umbrella for a tropical vibe. This makes your drink feel like a vacation in a glass. If you have dairy allergies, try dairy-free yogurt. Almond or soy yogurt works really well. For sweeteners, honey is great, but maple syrup is a good choice too. If you're avoiding sugar, try using agave syrup or stevia. These options make sure everyone can enjoy this smoothie! Pro Tips Use Frozen Pineapple: For a thicker and colder smoothie, consider using frozen pineapple chunks instead of fresh ones. Experiment with Flavors: Add a handful of spinach or kale for extra nutrients without altering the tropical flavor. Adjust Sweetness: Taste your smoothie before serving and adjust the sweetness to your preference, especially if using fresh, less ripe fruits. Chill Your Ingredients: For the best refreshing experience, chill your coconut milk and yogurt in advance. {{image_2}} You can easily change the flavors of your smoothie. Adding mango gives a sweet twist. Berries, like strawberries or blueberries, add color and taste. You can also blend in tropical greens, like spinach or kale. This adds nutrition without changing the flavor much. These greens make your smoothie even healthier while keeping it delicious. The liquid you choose makes a big difference. Almond milk or oat milk can replace coconut milk for a different taste. If you want extra hydration, use coconut water. This keeps the tropical vibe while adding a refreshing kick. Each liquid gives a unique texture and flavor. Want to make your smoothie more filling? Add protein powder. This gives you a protein boost without changing the taste. You can also use nut butter, like almond or peanut butter. This adds richness and makes the smoothie creamier. Both options are great for a tasty and healthy drink. To store leftover smoothie, pour it into a clean jar. Seal it tightly. Place it in the fridge. It stays fresh for about 24 hours. Shake or stir it before drinking. If it separates, that's normal. You can freeze the smoothie for later use. Pour it into ice cube trays or freezer bags. This way, you can enjoy it later. To thaw, place it in the fridge overnight. For quicker results, sit it in a bowl of cold water. Blend it again if needed for a smooth texture. If you have overriped bananas, use them in smoothies. They add natural sweetness and creaminess. Peel and slice them before adding to your blender. You can freeze them too. This way, you always have ripe bananas ready for your next smoothie. Yes, you can make this smoothie ahead of time. To prep, blend all the ingredients. Pour the smoothie into a jar. Seal it tight and store it in the fridge. It stays fresh for up to 24 hours. When ready to drink, give it a good shake. If it’s too thick, add a splash of coconut milk. Absolutely! To make this smoothie vegan, swap Greek yogurt for dairy-free yogurt. Use maple syrup instead of honey for sweetness. Coconut milk is already dairy-free. This way, you enjoy all the creamy goodness without any animal products. To thicken your smoothie, add more banana or some frozen pineapple. You can also use less coconut milk. Adding a bit of Greek yogurt will help as well. Just blend until smooth. If it’s too thick, you can always add a little more coconut milk to adjust. To wrap up, making a delicious smoothie is simple and fun. Use fresh pineapple, ripe bananas, coconut milk, and Greek yogurt for creaminess. Blend well, add sweeteners, and finish with shredded coconut and ice. Remember, you can switch fruits, try different liquids, and add proteins for more flavor and nutrition. Store any leftovers in the fridge or freeze for a treat later. Enjoy your smoothies, and don't hesitate to experiment with variations!

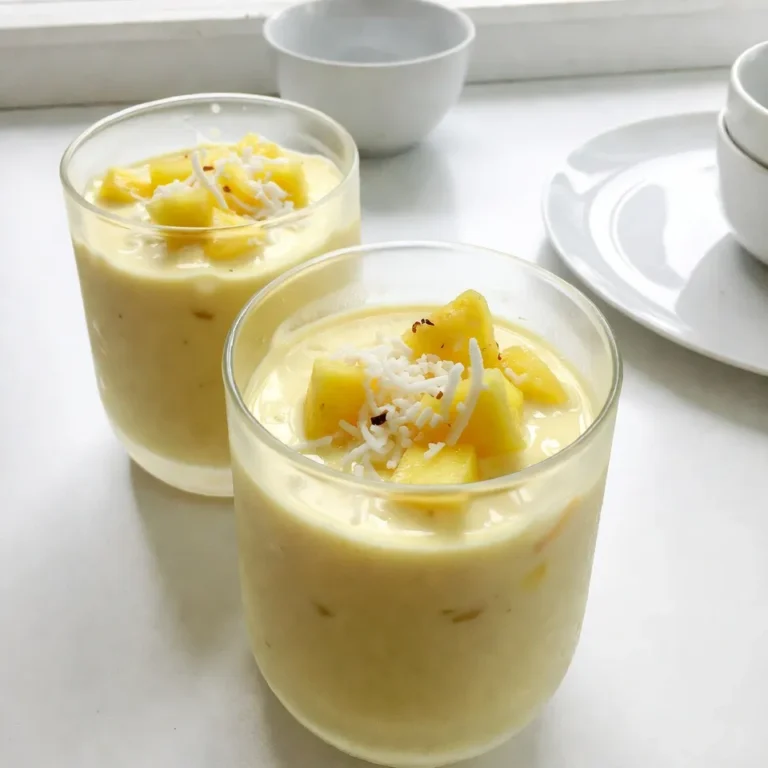
Tropical Pineapple Coconut Smoothie Refreshing Delight

For Maple Pecan Overnight Oats, you will need: - 1 cup rolled oats - 2 cups almond milk (or any milk of your choice) - 2 tablespoons maple syrup - 1/2 teaspoon vanilla extract - 1/4 teaspoon cinnamon - 1/4 teaspoon salt - 1/2 cup pecans, roughly chopped - Fresh fruits for topping (e.g., banana or berries) - Additional maple syrup for drizzling (optional) You can easily swap some ingredients to fit your taste or needs. If you don’t have almond milk, use oat milk, cow’s milk, or soy milk. For a dairy-free option, stick to plant-based milks. If you want a sugar-free version, try using a sugar substitute, like stevia or monk fruit sweetener. If pecans are not your favorite, walnuts or almonds work well too. You can even add seeds like chia or flax for extra nutrients. This recipe serves two and provides a balanced start to your day. Each serving has about: - Calories: 350 - Protein: 8 grams - Carbohydrates: 50 grams - Fiber: 8 grams - Sugars: 10 grams - Fat: 15 grams These oats are a great source of energy. They keep you full and provide healthy fats from the pecans. You also get fiber from the oats and fruits, which helps with digestion. Enjoying these oats supports a healthy morning routine. {{ingredient_image_1}} To make Maple Pecan Overnight Oats, you need just ten minutes. This recipe serves two. Gather all your ingredients first. You will need rolled oats, almond milk, maple syrup, vanilla extract, cinnamon, salt, and pecans. You can add fresh fruits for topping later. 1. Grab a mixing bowl. Add 1 cup of rolled oats. 2. Pour in 2 cups of almond milk. 3. Add 2 tablespoons of maple syrup. 4. Include 1/2 teaspoon of vanilla extract. 5. Sprinkle in 1/4 teaspoon of cinnamon and 1/4 teaspoon of salt. 6. Stir these ingredients well until they blend nicely. 7. Now, fold in 1/2 cup of roughly chopped pecans. 8. Transfer the mixture to jars or containers with lids. 9. Seal the jars and put them in the fridge overnight. In the morning, take out the jars. Give the oats a good stir before serving. If you want a creamier texture, add a splash of milk. Top your oats with fresh fruits like bananas or berries. A drizzle of maple syrup adds a nice touch. Enjoy your healthy breakfast! To get the best taste, use good quality maple syrup. It adds a rich sweetness. Fresh pecans also make a big difference. Toasting the pecans can enhance their flavor. Just toast them for a few minutes in a pan. This step brings out their natural oils. A pinch more cinnamon can also boost the taste. Feel free to adjust the amount to your liking. One common mistake is not letting the oats soak long enough. They need time to soften. Aim for at least 4-6 hours in the fridge. Another mistake is using too much liquid. Start with the given amount and adjust as needed. If your oats are too runny, they won’t be creamy. Lastly, avoid skipping fresh fruit on top. It adds flavor and nutrients. You can add seeds for a nutrition boost. Chia seeds or flaxseeds work well. They add fiber and omega-3s. You can also mix in some yogurt for creaminess. Greek yogurt adds protein, making your oats more filling. For extra sweetness, consider adding sliced bananas or berries. They not only taste great but also add vitamins. Pro Tips Choose Your Milk Wisely: Using almond milk gives a nutty flavor, but feel free to experiment with oat, soy, or coconut milk for different tastes and textures. Customize Your Sweetness: Adjust the amount of maple syrup according to your preference; you can also substitute it with honey or agave syrup for a different sweetness profile. Incorporate More Fiber: Add chia seeds or flaxseeds to boost the fiber content and add extra nutrition to your overnight oats. Make It Ahead: Prepare several jars at once and store them in the fridge for a quick grab-and-go breakfast throughout the week! {{image_2}} You can switch the pecans for other nuts. Almonds give a nice crunch. Walnuts add a bit of bitterness. Cashews offer a creamy texture. Choose what you like best! Mixing nuts can also add fun flavors. If you want a dairy-free version, use almond milk, coconut milk, or oat milk. Each option has its own taste. Almond milk is light, while coconut milk is rich. Oat milk gives a smooth, creamy feel. You can even try soy milk for extra protein. Want to spice up your oats? Add a scoop of nut butter for creaminess. Chia seeds boost fiber and omega-3s. Try adding a pinch of nutmeg or a swirl of cocoa powder for a twist. Fresh fruits like bananas or berries make great toppings. They add color and sweetness. You can also drizzle more maple syrup for extra sweetness! To keep your Maple Pecan Overnight Oats fresh, use airtight containers. Jars with lids work great. Fill the jars with the oats mixture and seal them tight. This step prevents air from getting in, which keeps the oats fresh. Always store them in the fridge. When stored properly, your overnight oats last about 3 to 5 days in the fridge. They may become thicker over time as the oats soak up the liquid. If they look too dry, add a splash of milk before eating. Always check for any off smells or changes in texture. You can enjoy your oats cold or warm them up. To reheat, transfer the oats into a microwave-safe bowl. Heat in short bursts of 30 seconds, stirring in between. This keeps the oats from getting too hot. If they seem thick, add a little milk to loosen them up before serving. Yes, you can make Maple Pecan Overnight Oats in advance. You can prepare them the night before or even up to three days ahead. Just mix all the ingredients and store them in jars. This makes busy mornings easier and lets you grab a healthy meal on the go. If you want to skip pecans, you can use other nuts. Walnuts, almonds, or hazelnuts work well. You can also add sunflower seeds or pumpkin seeds for crunch. This way, you can still enjoy great taste and texture in your oats. Yes, overnight oats are healthy. They contain fiber from oats, which helps digestion. Almond milk adds calcium, and maple syrup gives natural sweetness. Pecans provide healthy fats and protein. This meal is balanced and keeps you full for longer. You can keep overnight oats in the fridge for up to five days. Make sure to store them in a sealed container. If you notice any change in smell or color, it's best to discard them. Enjoy your oats fresh for the best taste! In this post, we explored the key ingredients for Maple Pecan Overnight Oats, their substitutes, and nutrition facts. I shared step-by-step mixing instructions and tips for storing and serving. I also highlighted common mistakes and how to boost flavor. You can get creative with different nut options or dairy-free alternatives. Remember, proper storage will keep your oats fresh. Now, you have all the tools to make delicious overnight oats that fit your taste and health needs. Enjoy your nutritious breakfast!

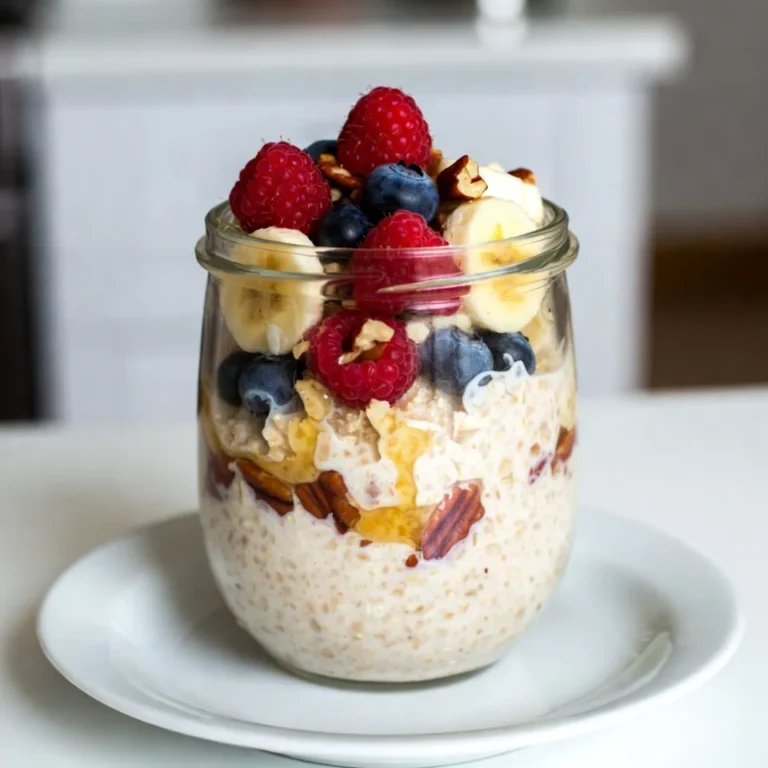
Maple Pecan Overnight Oats Simple and Healthy Recipe

For the chicken tenders, you’ll need: - 1 pound chicken tenders - 1 cup panko bread crumbs - 1/2 cup all-purpose flour - 2 large eggs These ingredients build the base of your dish. Chicken tenders are juicy and cook fast. Panko makes them crispy. All-purpose flour helps the breading stick, while eggs bind it all together. For the honey mustard sauce, gather: - 1/4 cup Dijon mustard - 1/4 cup honey - 1 tablespoon apple cider vinegar - Salt to taste This sauce adds a sweet and tangy kick. Dijon mustard gives it a nice bite. Honey balances this with sweetness. Apple cider vinegar adds depth. It’s simple yet flavorful. You will also need: - 1 teaspoon garlic powder - 1 teaspoon paprika - 1 teaspoon onion powder - Salt and pepper to taste - Olive oil spray These seasonings enhance the chicken’s flavor. Garlic powder adds warmth. Paprika gives a subtle smokiness. Onion powder rounds out the taste. Salt and pepper are must-haves for seasoning. Olive oil spray helps the tenders crisp up nicely in the air fryer. Start by patting the chicken tenders dry using paper towels. This helps the seasonings stick. Next, season both sides with salt, pepper, garlic powder, paprika, and onion powder. Make sure the seasoning is even. This adds great flavor to the chicken. Now, it’s time to set up your breading station. Use three bowls: - First bowl: Add 1/2 cup of all-purpose flour. - Second bowl: Whisk 2 large eggs until they are lightly beaten. - Third bowl: Place 1 cup of panko bread crumbs. This setup makes it easy to coat the chicken tenders. You will dip each piece in the flour, then the eggs, and finally the panko crumbs. Preheat your air fryer to 400°F (200°C) for about 5 minutes. While it heats, bread the chicken tenders. Dip each tender in flour, shaking off extra flour. Next, dip it into the eggs, letting the excess drip off. Finally, coat it with panko bread crumbs, pressing lightly to make them stick. Once the air fryer is hot, arrange the chicken tenders in a single layer in the basket. Spray them lightly with olive oil spray. Cook the chicken for about 10-12 minutes. Flip them halfway through. The tenders should turn golden brown and reach an internal temperature of 165°F. This means they are safe to eat and perfectly cooked. To get crispy chicken tenders, follow these steps. First, dry the chicken well with paper towels. This helps the breading stick better. Season both sides with salt, pepper, garlic powder, paprika, and onion powder. Use panko bread crumbs for a crunchier texture. When air frying, preheat the fryer to 400°F (200°C). This ensures the chicken cooks evenly and crisps up nicely. Lightly spray the breaded tenders with olive oil. This adds flavor and helps them brown. Avoid these common mistakes for the best results. Don't skip drying the chicken. Wet chicken makes the breading soggy. Be careful with the breading process. Make sure each tender is well-coated. If you overcrowd the air fryer basket, the tenders will not cook evenly. Always arrange them in a single layer. Lastly, don’t forget to flip the tenders halfway through cooking. This helps both sides get nice and crispy. Cooking times can vary based on the air fryer model. Generally, cook chicken tenders for 10-12 minutes. Always check that they reach an internal temperature of 165°F (74°C) for safe eating. If your tenders are thicker, add an extra minute or two. If they are smaller, check them a minute early. Adjusting cooking times will help you avoid overcooking or undercooking. {{image_2}} You can change the flavor of your chicken tenders easily. Try using a mix of Italian herbs. Combine dried oregano, basil, and thyme for a fresh taste. You can also use a taco seasoning blend for a zesty twist. Just sprinkle it on before breading the chicken. Chicken tenders are great, but you can use other proteins too. For a leaner option, use turkey tenders. They cook similarly and taste amazing. If you prefer seafood, try shrimp. Just adjust the cooking time since shrimp cooks faster than chicken. Do you like a kick in your sauce? Add a teaspoon of hot sauce to the honey mustard mix. This adds heat and depth to your dip. You can also mix in a pinch of cayenne pepper for more spice. Just be careful; a little goes a long way! First, let your chicken tenders cool down completely. This step helps keep them crispy. Once they cool, place them in an airtight container. You can keep them in the fridge for up to three days. If you want to keep them longer, freezing is a great option. To reheat chicken tenders, use the air fryer. Preheat it to 375°F (190°C). Place the tenders in the basket in a single layer. Heat them for about 5-7 minutes. This method keeps them crispy. You can also use an oven at 375°F. Just make sure to check them often. To freeze chicken tenders, let them cool first. After they cool, wrap each tender in plastic wrap. Then, place them in a freezer bag. Remove as much air as you can. Store them in the freezer for up to three months. When ready to eat, thaw them in the fridge before reheating. You cook chicken tenders in an air fryer for 10 to 12 minutes. Preheat your air fryer to 400°F (200°C) first. Place the tenders in a single layer. Flip them halfway through cooking. This helps them cook evenly and get crispy. Always check that the internal temperature reaches 165°F for safety. Yes, you can use frozen chicken tenders. Just add a few extra minutes to the cooking time. Start with 12 to 15 minutes at 400°F (200°C). Keep an eye on them to ensure they cook through. Make sure to flip them halfway for an even crisp. Chicken tenders pair well with a variety of dipping sauces. Honey mustard is a classic choice. Barbecue sauce, ranch dressing, and buffalo sauce also work great. You can even mix hot sauce with ranch for a spicy kick. Choose your favorite to enhance your meal! You learned how to make tasty chicken tenders from scratch. We covered the key ingredients, step-by-step instructions, and useful tips for crispiness. Plus, we discussed variations to keep things fun. Storing your tenders right helps them stay fresh and tasty. Remember, cooking is all about trying new things and enjoying the process. Don’t hesitate to adjust recipes to fit your taste. The joy of cooking lies in making tasty food you love!

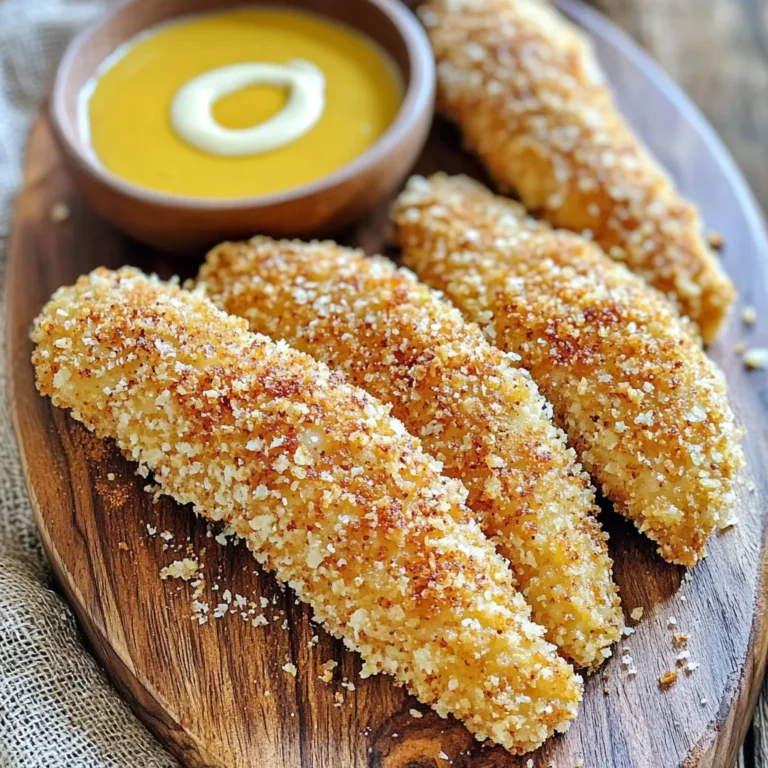
Air Fryer Chicken Tenders with Honey Mustard Fresh Recipe

- 1 cup unsalted butter, softened - 3/4 cup granulated sugar - 1/4 cup brown sugar, packed - 1 teaspoon vanilla extract - 2 1/4 cups all-purpose flour - 1 teaspoon baking powder - 1/4 teaspoon salt - 1 cup finely chopped apples (like Granny Smith) - 1 teaspoon ground cinnamon - 1/2 cup caramel sauce (store-bought or homemade) - A sprinkle of sea salt for garnish These ingredients bring together the sweet and tart flavors of fall. The apples add moisture and flavor. The caramel sauce gives a rich, gooey center. - Chopped nuts (like walnuts or pecans) - Additional spices (like nutmeg or allspice) - A dash of lemon juice for extra zing These optional items can add a fun twist to your cookies. Nuts add crunch, while spices enhance warmth and depth. - Use coconut oil instead of butter for a dairy-free option. - Substitute gluten-free flour for all-purpose flour. - Maple syrup can replace granulated sugar for a healthier choice. These swaps make the cookies suitable for many diets. With these options, everyone can enjoy these tasty treats. Start by gathering all your ingredients. You will need butter, sugars, flour, apples, and spices. Preheat your oven to 350°F (175°C). This step ensures even baking. Line a baking sheet with parchment paper to prevent sticking. Next, cream the softened butter with granulated and brown sugars. This makes the mix light and fluffy. Then, stir in the vanilla extract for added flavor. In another bowl, whisk together the flour, baking powder, and salt. Add this mix to the butter blend slowly. It should come together nicely. Now, fold in the finely chopped apples and ground cinnamon. This will give the cookies a lovely apple taste. Once your dough is ready, scoop about 1 tablespoon of it. Roll this into a ball. Place the balls on the prepared baking sheet, leaving space between them. Use your thumb or the back of a teaspoon to make an indentation in each cookie. This is where the caramel will go. Fill each thumbprint with caramel sauce. Be generous, as this adds richness. Bake the cookies in your preheated oven for 12-15 minutes. Watch for lightly golden edges. After baking, let the cookies cool on the sheet for 5 minutes. This helps them firm up a bit. Then, transfer them to a wire rack to cool completely. Once cooled, sprinkle a tiny pinch of sea salt on the caramel. This enhances the flavor and adds a nice touch. For a lovely presentation, serve the cookies on a decorative platter. Drizzle extra caramel around them and dust with powdered sugar. Enjoy your delicious Caramel Apple Thumbprint Cookies! To make soft and chewy cookies, use room-temperature butter. This helps the dough mix well. Cream the butter and sugars until fluffy. This adds air and lightness. Don't overmix the dough after adding flour. Stop when it just comes together. The dough should be soft but not sticky. When baking, check for golden edges. This means they are done but still soft inside. One mistake is using cold butter. It won't cream well with the sugars. Avoid pressing too hard when making the thumbprint. You want a nice dip, not a hole. Don’t skip the sea salt garnish. It enhances the sweet caramel flavor. Lastly, keep an eye on baking time. Every oven is different; baking too long can dry them out. Let the cookies cool completely before storing. Place them in an airtight container. They can stay fresh for about a week at room temperature. If you want them to last longer, freeze them. Use a freezer bag or container. Just remember to thaw them at room temperature when ready to eat. Enjoy the taste of fall anytime! {{image_2}} You can change the flavor of your cookies easily. Add nuts like walnuts or pecans for a crunchy twist. Chopped nuts mix well with apples and caramel. You could also add spices, like nutmeg or ginger, for a warm taste. A dash of allspice brings a new layer of flavor too. Try different combinations to find your favorite! While caramel is great, you can try other fillings. Apple butter adds a smooth and sweet taste. A mix of cream cheese and maple syrup adds a rich twist. If you love chocolate, a dollop of chocolate ganache gives a fun surprise. Experiment with fresh fruit jams for a fruity kick. You can make your cookies bigger or smaller. For mini cookies, use a teaspoon of dough for each one. This makes bite-sized treats perfect for sharing. For larger cookies, use two tablespoons of dough. Just remember, baking time may change. Keep an eye on them to avoid burning! Enjoy your caramel apple thumbprint cookies with a warm beverage. Hot cider or spiced tea pairs well. Coffee also complements the sweet flavors nicely. You can even serve them with vanilla ice cream. The creaminess balances the cookies' sweetness. For a fun twist, try them with a scoop of caramel ice cream. This adds an extra layer of flavor. When hosting, serve these cookies on a beautiful platter. You can drizzle extra caramel sauce around them for flair. A light dusting of powdered sugar adds an elegant touch. You might also use colorful autumn leaves as decoration. This creates a cozy, seasonal vibe. If it's a festive occasion, consider adding small, decorative pumpkins on the table. They enhance the autumn theme and make your display pop. These cookies shine in the fall but are great year-round. For autumn, serve with cinnamon-spiced drinks. In winter, pair them with hot cocoa. For spring, try them with fresh fruit. Summer is perfect for a picnic with lemonade. No matter the season, these cookies fit right in, bringing joy to any gathering. Yes, you can use different apples. Granny Smith apples add a nice tartness. Honeycrisp apples bring sweetness and crunch. Both work well in these cookies. Try mixing them for more flavor. The key is using apples that hold their shape when baked. These cookies stay fresh for about a week. Store them in an airtight container. If you want them to last longer, keep them in the fridge. They can also be frozen for up to three months. Just thaw them in the fridge before enjoying. Yes, you can freeze the cookie dough. After forming the dough balls, place them on a baking sheet. Freeze them for about an hour. Then, transfer them to a freezer bag. When you’re ready to bake, just add a few extra minutes to the baking time. This blog post walked you through making delicious caramel apple thumbprint cookies. We covered the key ingredients, step-by-step instructions, tips for perfect texture, variations for fun twists, and serving ideas. Remember, don’t be afraid to mix flavors or adjust sizes to fit your taste. Storing leftovers properly helps keep them fresh. Enjoy your baking journey and share these treats with friends and family. Each bite brings joy, making your efforts worthwhile!

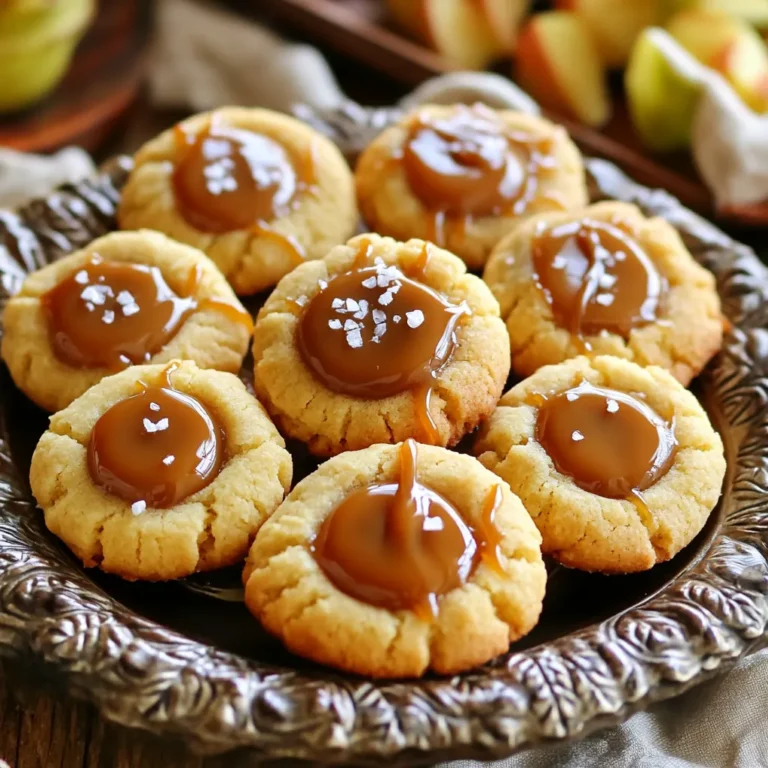
Caramel Apple Thumbprint Cookies Delightful Treats

- 1 cup cottage cheese (low-fat or full-fat) - 2 tablespoons cocoa powder (unsweetened) - 3 tablespoons honey or maple syrup (or to taste) - 1 teaspoon vanilla extract - 1/2 cup milk (dairy or non-dairy) - A pinch of salt - Dark chocolate shavings or chips (for topping) - Optional: Fresh berries (for garnish) I use cottage cheese as the base for this pudding. It adds creaminess and protein. The cocoa powder brings a rich chocolate flavor without added sugar. Honey or maple syrup acts as a natural sweetener. You can adjust it based on your taste. Vanilla extract enhances the overall flavor, making it feel gourmet. Milk helps blend everything smoothly. You can choose dairy or non-dairy milk as per your needs. A pinch of salt balances the sweetness and deepens the chocolate taste. Lastly, dark chocolate shavings or chips add a fun crunch on top! Cottage cheese is a powerhouse of protein. Just one cup packs around 25 grams of protein. This can help you feel full and satisfied. It also contains calcium, which is good for bones. Other nutrients include B vitamins and phosphorus. These all support your overall health. Plus, using low-fat cottage cheese can cut down on calories while keeping the flavor. If you want a healthy dessert, this pudding fits the bill! To start, gather all your ingredients. You will need: - 1 cup cottage cheese (low-fat or full-fat) - 2 tablespoons cocoa powder (unsweetened) - 3 tablespoons honey or maple syrup (or to taste) - 1 teaspoon vanilla extract - 1/2 cup milk (dairy or non-dairy) - A pinch of salt - Dark chocolate shavings or chips (for topping) - Optional: Fresh berries (for garnish) First, place the cottage cheese, cocoa powder, honey, vanilla extract, milk, and a pinch of salt in a blender. This is where the magic begins! Blend on high until smooth and creamy. You want a rich texture that feels like a treat. To get that perfect, creamy texture, scrape down the sides of the blender. Sometimes, bits can stick and not blend well. If your pudding seems too thick, add a little more milk. Blend again until it’s just how you like it. Taste the pudding and see if it needs more sweetness. Add honey or maple syrup until it’s just right for you. Remember, everyone's tastes are different! Once blended, pour the pudding into bowls or cups. Cover them with plastic wrap or lids. This keeps it fresh and helps it thicken. Refrigerate for at least 30 minutes. Before serving, add dark chocolate shavings or chips on top. This adds a nice touch. If you want, you can also add fresh berries for color and flavor. Enjoy your creamy cottage cheese chocolate pudding! You can swap honey or maple syrup with other sweeteners. Stevia or agave syrup works well too. Adjust the amount to suit your taste. Natural sweeteners keep the pudding healthy. Try using dates blended into the mix for a unique twist. For a smooth pudding, blend well. If the mix is thick, add more milk. Aim for a creamy texture that’s easy to scoop. Refrigerate it for at least 30 minutes to thicken. This helps the flavors meld together nicely. Use clear bowls or glasses for a nice look. Layer the pudding with dark chocolate shavings. Add fresh berries on top for a pop of color. It makes your dessert not just tasty but pretty too. A touch of mint can add freshness and style. {{image_2}} You can customize your Cottage Cheese Chocolate Pudding to suit your taste. Here are some fun ideas: - Peanut Butter: Add 2 tablespoons for a nutty twist. - Mint Extract: A drop can give a refreshing flavor. - Espresso Powder: Mix in 1 teaspoon for a coffee kick. - Cinnamon: Sprinkle in a dash for warmth. These add-ins make each bite unique and exciting. You can use various milks to change the texture and flavor. Here are some options: - Almond Milk: Use for a nutty and lighter taste. - Coconut Milk: This makes the pudding creamy and tropical. - Soy Milk: A great choice for a protein boost. - Oat Milk: Offers a smooth texture and mild flavor. Each milk gives a different profile to your dessert. Toppings can elevate your pudding even more. Consider these options: - Chopped Nuts: Almonds or walnuts add crunch and healthy fats. - Chia Seeds: Sprinkle a few for fiber and omega-3s. - Greek Yogurt: A dollop adds creaminess and protein. - Sliced Bananas: They add natural sweetness and texture. These toppings not only look great but also add extra nutrition. Storing leftover pudding properly keeps it fresh. First, make sure it cools to room temp. Then, transfer it to an airtight container. You can use plastic wrap, but a lid works best. Keep it in the fridge to maintain its creamy texture. Avoid leaving it at room temperature for too long, as that can spoil it. Cottage cheese chocolate pudding lasts about 3 to 5 days in the fridge. Always check for any off smells or changes in texture. If you see any signs of spoilage, it's best to throw it away. This pudding is quick to whip up, so making a fresh batch is easy if needed. If you want to save it for later, freezing is a great option. Use a freezer-safe container to store the pudding. Leave some space at the top, as it may expand when frozen. It can last for about a month in the freezer. To enjoy, thaw it in the fridge overnight. Stir well before serving to regain its smooth texture. Yes, you can use flavored cottage cheese. Flavors like vanilla or strawberry can add a fun twist. Just remember, it may change the taste. I suggest using plain cottage cheese for the best chocolate flavor. To make this pudding dairy-free, switch the milk. Use almond, soy, or coconut milk instead. You can also find dairy-free cottage cheese options. This way, you keep it creamy without dairy. Yes, you can boost the protein. Add a scoop of protein powder to the blend. Greek yogurt is another option. Both will make the pudding even richer in protein. This pudding pairs well with fresh berries. Strawberries, raspberries, or blueberries add great flavor. You can also add nuts for crunch. Try serving it with a dollop of whipped cream for extra delight. This blog post covered how to make a tasty cottage cheese chocolate pudding. We discussed ingredient choices and their health benefits, plus how to prepare and blend for the best texture. You learned tips for sweeteners and presentation, as well as flavor variations. Lastly, we went over storage tips and answered common questions. Cottage cheese chocolate pudding is easy and healthy. Enjoy making it your own!

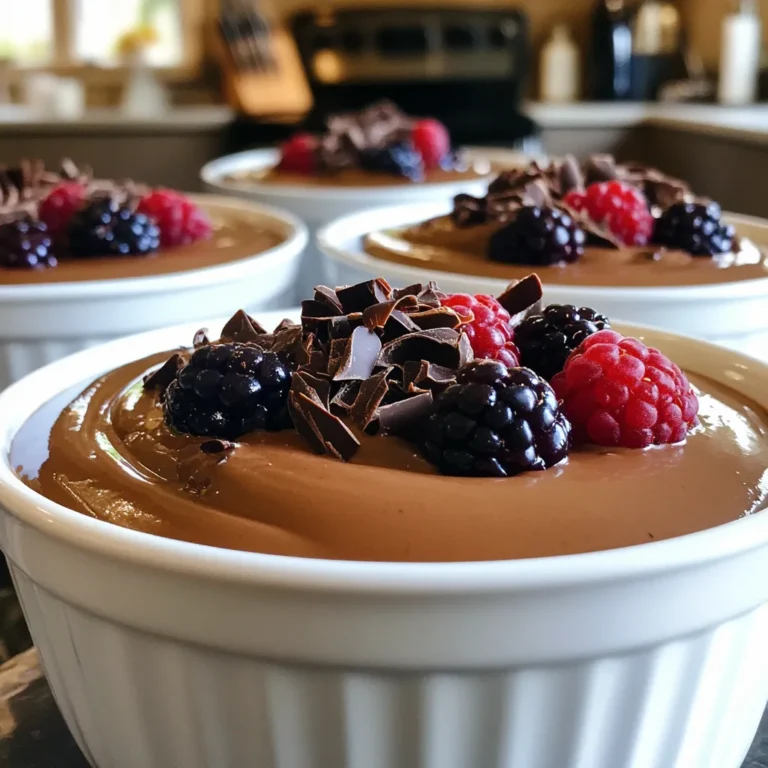
Cottage Cheese Chocolate Pudding High Protein Delight

To make this delightful pumpkin cream cheese pound cake, gather these items: - 1 ½ cups all-purpose flour - 1 teaspoon baking powder - ½ teaspoon baking soda - ½ teaspoon salt - 1 teaspoon ground cinnamon - ½ teaspoon ground nutmeg - ¼ teaspoon ground ginger - ½ cup unsalted butter, softened - 1 cup granulated sugar - ½ cup brown sugar, packed - 3 large eggs - 1 cup pumpkin puree (canned or fresh) - 1 teaspoon vanilla extract - 8 oz cream cheese, softened - ¼ cup powdered sugar - Optional: Chopped walnuts for garnish If you need to swap ingredients, here are some ideas: - Replace all-purpose flour with a gluten-free blend for a gluten-free option. - Use coconut sugar instead of granulated sugar for a lower glycemic index. - You can replace cream cheese with Greek yogurt for a lighter option. - If you don’t have pumpkin puree, mashed bananas work in a pinch. To make your cake extra special, consider these toppings: - Dust the top with powdered sugar for a sweet touch. - Add chopped walnuts for a nice crunch. - Serve with whipped cream or vanilla ice cream for added creaminess. - Drizzle caramel sauce over slices for a decadent finish. Start by gathering all your ingredients. Measure out: - 1 ½ cups all-purpose flour - 1 teaspoon baking powder - ½ teaspoon baking soda - ½ teaspoon salt - 1 teaspoon ground cinnamon - ½ teaspoon ground nutmeg - ¼ teaspoon ground ginger - ½ cup unsalted butter, softened - 1 cup granulated sugar - ½ cup brown sugar, packed - 3 large eggs - 1 cup pumpkin puree - 1 teaspoon vanilla extract - 8 oz cream cheese, softened - ¼ cup powdered sugar - Optional: Chopped walnuts for garnish Preheat your oven to 350°F (175°C). Grease and flour a 9x5 inch loaf pan to keep the cake from sticking. In a large bowl, mix the softened butter with granulated sugar and brown sugar. Use an electric mixer on medium speed. Cream these together until the mix turns light and fluffy. This should take about 3-5 minutes. Next, add the eggs one at a time. Mix well after adding each egg. Then, add the pumpkin puree and vanilla extract. Keep mixing until everything is well combined. In a medium bowl, whisk together the flour, baking powder, baking soda, salt, cinnamon, nutmeg, and ginger. This mixture adds flavor and helps the cake rise. Gradually add this dry mix to the wet ingredients. Mix just until combined. Be careful not to overmix. This keeps the cake light. Pour half of the pumpkin batter into your prepared loaf pan. Then, in a small bowl, mix the softened cream cheese with powdered sugar until smooth. Dollop the cream cheese mixture over the pumpkin batter. Top with the remaining pumpkin batter. Use a knife to gently swirl the cream cheese into the batter. This creates a lovely marbled effect. Bake the cake in the preheated oven for 60-70 minutes. Check for doneness with a toothpick. It should come out clean when the cake is ready. To get the best swirl, don’t overmix the cream cheese. Keep it thick. Use a gentle hand when swirling. You want to see both the pumpkin and cream cheese in each slice. This makes the cake look beautiful and appetizing. Enjoy your baking! Mistakes can happen, but avoiding them makes baking more fun. Here are some tips: - Overmixing the batter can make the cake tough. Mix just until combined. - Not measuring ingredients correctly can change the texture. Use dry and liquid measuring cups. - Skipping the cream cheese swirl can lessen the taste. It adds a nice flavor and looks great too. A moist cake is a happy cake. Here’s how to keep it moist: - Use room temperature ingredients. Cold butter or eggs can make the batter lumpy. - Add pumpkin puree for moisture. It gives the cake a rich flavor and soft texture. - Don’t overbake. Check the cake at 60 minutes. If a toothpick comes out clean, it’s done. Good tools make baking easier. Here’s what I recommend: - Stand mixer or hand mixer for mixing batter. It saves time and effort. - 9x5 inch loaf pan for the perfect shape. Make sure to grease it well. - Parchment paper can help with easy removal. Line the bottom of your pan for best results. - Cooling rack to cool the cake. It helps prevent soggy bottoms. With these tips and tricks, you will bake a delicious Pumpkin Cream Cheese Pound Cake that everyone loves! {{image_2}} You can add more spice to your pumpkin cream cheese pound cake. Cloves and allspice give a warm flavor. To try this, add 1/4 teaspoon of ground cloves and 1/4 teaspoon of allspice to your dry ingredients. These spices mix well with cinnamon and nutmeg. You will create a more aromatic and flavorful cake. Want a gluten-free option? You can replace all-purpose flour with a gluten-free blend. Use 1 ½ cups of your favorite gluten-free flour mix. Make sure it has xanthan gum for better texture. This version still tastes great and keeps the same moistness. Mini versions are fun and cute! To make mini pound cakes, use a mini loaf pan. Divide the batter evenly among the mini pans. Bake for about 25-30 minutes, or until a toothpick comes out clean. These mini treats are perfect for sharing or gifting. Plus, they look lovely on a fall dessert table! To keep your pumpkin cream cheese pound cake fresh, wrap it well. Use plastic wrap or foil to cover it tightly. This keeps moisture in and prevents drying. You can also store it in an airtight container. Place it in a cool, dry spot or your fridge. If you keep it in the fridge, enjoy it within a week. Freezing is a great way to save this cake for later. Let it cool completely first. Wrap slices or the whole cake in plastic wrap. Then, place it in a freezer bag. Remove as much air as possible before sealing. This will help keep it fresh. You can freeze it for up to three months. When you are ready to eat it, thaw it in the fridge overnight. The pumpkin cream cheese pound cake has a good shelf life. If stored properly, it lasts about a week in the fridge. In the freezer, it can last up to three months. Always check for signs of spoilage, like mold or an off smell. If it looks or smells bad, it’s best to toss it. Yes, you can use fresh pumpkin. Just cook and puree it first. Fresh pumpkin gives a lovely flavor. It may also add a bit more moisture. Make sure to drain any excess water before mixing. Check the cake with a toothpick. Insert it into the center. If it comes out clean, the cake is done. The top should be golden brown. You can also gently press the top; it should bounce back. Serve slices on a nice plate. Dust with powdered sugar on top. Add chopped walnuts for crunch. A scoop of vanilla ice cream goes well too. You can even pair it with whipped cream for extra flavor. Yes, you can make this cake ahead of time. It keeps well in the fridge for up to a week. Just wrap it tightly to keep it fresh. You can also freeze it for longer storage. Just thaw it before serving. This blog post covered every key step for making a delicious pumpkin cream cheese pound cake. You learned about ingredient options, steps for mixing and baking, and tips for success. Remember, avoid common mistakes to keep your cake moist. Also, don’t forget to explore tasty variations and proper storage tips. Baking is fun, and with these ideas, you can make a fantastic cake. Dive into this recipe, and enjoy your baking adventure!

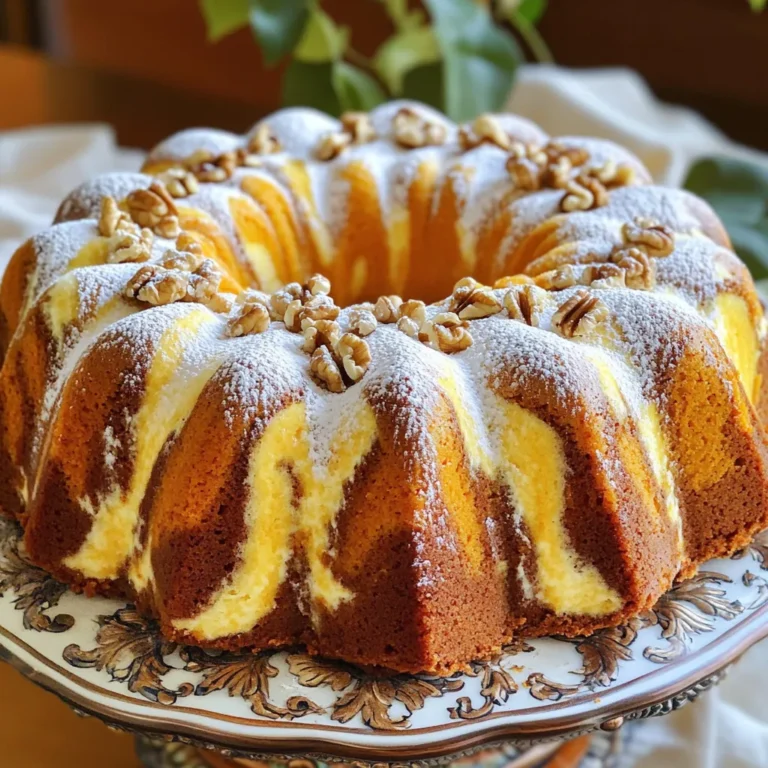
Pumpkin Cream Cheese Pound Cake Delightful Dessert Recipe

To make your apple blondies, gather these key ingredients: - 1 cup unsalted butter, melted - 1 cup brown sugar, packed - 2 large eggs - 2 teaspoons vanilla extract - 2 cups all-purpose flour - 1 teaspoon baking powder - 1/2 teaspoon baking soda - 1/2 teaspoon salt - 1 teaspoon ground cinnamon - 1 1/2 cups peeled and diced apples (about 2 medium apples) - 1/2 cup chopped walnuts (optional) These ingredients create a soft and sweet base, filled with juicy apple pieces. For the finishing touch, you will need these items for the cinnamon glaze: - 1 cup powdered sugar - 2 tablespoons milk - 1 teaspoon ground cinnamon Mix these together for a creamy and sweet glaze that adds flavor and beauty. You can add a twist to your blondies with these optional ingredients: - 1/2 cup raisins or dried cranberries - 1 teaspoon nutmeg for extra spice Feel free to get creative! These additions can enhance the texture and taste. First, set your oven to 350°F (175°C). Grease a 9x13 inch baking pan or line it with parchment paper. This makes it easy to remove the blondies later. In a large bowl, mix 1 cup of melted butter with 1 cup of packed brown sugar. Whisk them together until smooth. Next, add 2 large eggs one by one. Stir in 2 teaspoons of vanilla extract until the mixture looks fluffy. In another bowl, whisk together 2 cups of all-purpose flour, 1 teaspoon of baking powder, 1/2 teaspoon of baking soda, 1/2 teaspoon of salt, and 1 teaspoon of ground cinnamon. Gradually add this dry mix to the wet mixture. Stir gently until just combined. Be careful not to overmix! Now fold in 1 1/2 cups of peeled and diced apples, which is about 2 medium apples. If you like, add 1/2 cup of chopped walnuts for some crunch. Pour the batter into your prepared baking pan. Use a spatula to spread it evenly. Bake them for 25 to 30 minutes. To check if they are done, insert a toothpick in the center. If it comes out clean, they are ready! Once they’re done, take them out of the oven and let them cool in the pan for about 10 minutes. After that, move them to a wire rack to cool completely. While the blondies cool, prepare the cinnamon glaze. In a small bowl, mix 1 cup of powdered sugar with 2 tablespoons of milk and 1 teaspoon of ground cinnamon. Whisk until it’s smooth and pourable. Once the blondies are cool, drizzle the glaze over them. Let the glaze set a little before you cut them into squares. Enjoy this sweet treat! To keep your blondies fresh, store them in an airtight container. Place a piece of parchment paper between layers to prevent sticking. You can keep them at room temperature for up to three days. For longer storage, refrigerate them for about a week. You can also freeze blondies for up to three months. Make sure to wrap them tightly in plastic wrap and then place them in a freezer bag. For the best blondies, follow these baking tips: - Use room temperature ingredients: This helps the mixture blend smoothly. - Don’t overmix: Stir just until combined to keep them soft and chewy. - Check for doneness: Insert a toothpick in the center. It should come out clean or with a few moist crumbs. - Cool before cutting: Let them cool in the pan for at least 10 minutes. This helps them set properly. Avoid these common mistakes for great blondies: - Using cold butter: This can lead to a dense texture. - Skipping the salt: Salt enhances the flavors, so don’t leave it out. - Overbaking: Keep an eye on your blondies. They can dry out quickly if baked too long. - Not measuring ingredients correctly: Use a kitchen scale or proper measuring cups for accuracy. {{image_2}} You can make Apple Blondies healthier with easy swaps. Instead of unsalted butter, try using coconut oil. It adds a nice flavor and keeps the blondies moist. You can replace brown sugar with maple syrup or honey. Just use a little less because these sweeteners are sweeter. For the eggs, flax eggs work well. Mix one tablespoon of flaxseed meal with two and a half tablespoons of water. Let it sit for five minutes until it thickens. Want to change the flavor based on the season? In fall, add pumpkin spice to the batter. This adds warmth and a cozy taste. For winter, try adding a bit of nutmeg or ginger for a spicy kick. In spring, mix in fresh berries for a bright twist. You can also substitute apples with pears or peaches in summer. Each fruit brings a unique flavor that can change your blondies. If you need gluten-free blondies, swap all-purpose flour with gluten-free flour blends. Make sure the blend contains xanthan gum for better texture. You can also use almond flour, which gives a nutty taste. Just remember, almond flour may need a bit more liquid. Lastly, always check your baking powder and other ingredients to ensure they are gluten-free. Enjoy delicious blondies that fit your needs! To keep your apple blondies fresh, store them in an airtight container. This helps prevent drying out. If you stack them, place parchment paper between layers. This way, they won’t stick together. Keep the container in a cool, dry area. Avoid sunlight or heat, as they can spoil faster. Apple blondies stay fresh for about a week in the fridge. Make sure they are in a tight container. If you notice any change in smell or texture, it’s best to toss them. You can enjoy them cold or warm them slightly in the microwave for a cozy treat. Freezing apple blondies is easy. Here’s how: 1. Cool Completely: Let the blondies cool down completely before freezing. This prevents ice crystals. 2. Slice: Cut them into squares for easy serving later. 3. Wrap: Wrap each piece tightly in plastic wrap. 4. Bag: Place the wrapped blondies in a freezer-safe bag. 5. Label: Don’t forget to label the bag with the date. 6. Freeze: Store them in the freezer for up to three months. When you’re ready to enjoy, thaw them in the fridge overnight. You can also warm them in the oven for a few minutes to revive their delicious taste. Enjoy your treats anytime! Yes, you can use other fruits! Pears or peaches work well. You can also try berries for a twist. Just make sure to chop the fruit into small pieces. This keeps the texture nice in the blondies. Remember, the fruit you choose should be sweet and ripe for the best flavor. To check if the blondies are done, insert a toothpick in the center. If it comes out clean or with a few crumbs, they are ready. If the toothpick has wet batter, they need more time. Keep an eye on them after 25 minutes. They can bake for up to 30 minutes. If you don’t like walnuts, you have options. You can use pecans or almonds instead. If you want a nut-free version, try using chocolate chips or dried fruits. Both will add great flavor and sweetness. Just make sure to keep the same amount as the walnuts. You now have all the tools to make delicious apple blondies. We covered the key ingredients, steps for perfect baking, and some smart tips. You can even try different flavors or healthy swaps to make it your own. Remember to store your blondies right, so they stay fresh. If you're unsure about any aspect, check the FAQs to get the answers you need. Enjoy baking and experimenting with your new recipes!

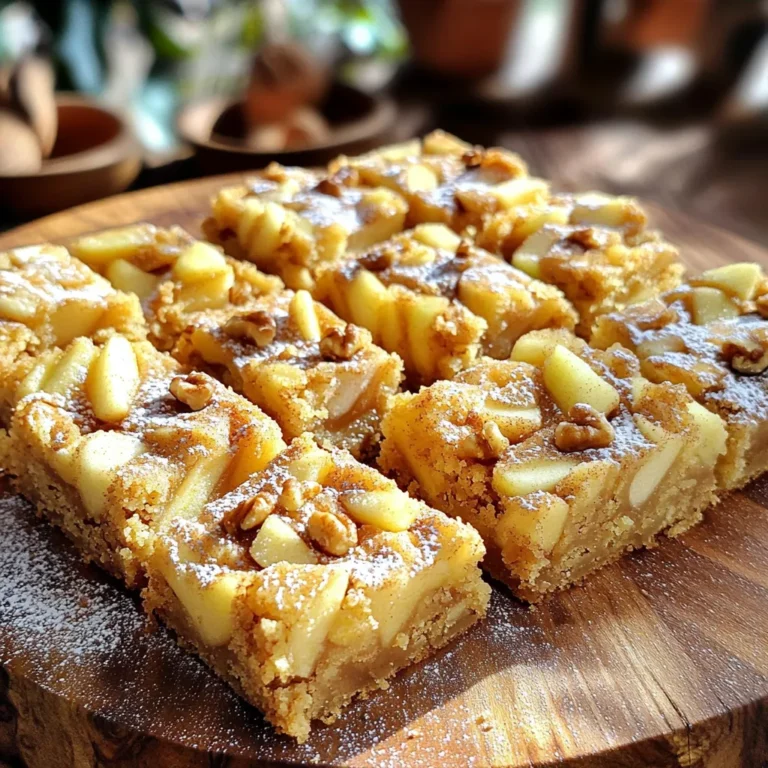
Apple Blondies with Cinnamon Glaze Easy Dessert Treat

To make creamy pesto tortellini soup, gather these ingredients: - 1 tablespoon olive oil - 1 small onion, diced - 3 cloves garlic, minced - 4 cups vegetable broth - 2 cups heavy cream - 1 cup basil pesto (store-bought or homemade) - 2 cups cheese tortellini (fresh or frozen) - 1 cup cherry tomatoes, halved - 1 cup baby spinach - Salt and pepper to taste - Fresh basil leaves for garnishing - Grated Parmesan cheese for topping You can swap ingredients to suit your taste. Use chicken broth instead of vegetable broth for more flavor. If you want a lighter soup, replace heavy cream with half-and-half or coconut milk. You can also use any type of pesto, like sun-dried tomato or arugula pesto. If you prefer gluten-free options, choose gluten-free tortellini. Garnishing makes the soup look and taste better. Fresh basil leaves add a nice touch. Grated Parmesan cheese gives it a salty flavor. You can also add a drizzle of olive oil for extra richness. To spice it up, try red pepper flakes. - Start by gathering all your ingredients. - Dice one small onion. - Mince three cloves of garlic. - Halve one cup of cherry tomatoes. - Measure out the cheese tortellini, spinach, and pesto. 1. Heat one tablespoon of olive oil in a large pot over medium heat. 2. Add the diced onion and cook for about five minutes. You want it translucent. 3. Add the minced garlic and cook for one more minute. The aroma will fill your kitchen. 4. Pour in four cups of vegetable broth. Bring it to a simmer. 5. Stir in two cups of heavy cream and one cup of basil pesto. Mix well. 6. Add the cheese tortellini and simmer. This takes about five to seven minutes. They float when they are done. 7. Gently stir in the halved cherry tomatoes and one cup of baby spinach. Cook for two to three minutes. You want the spinach to wilt. 8. Season with salt and pepper to taste. - The tortellini should float to the top of the soup. - Spinach wilts and changes color to a bright green. - The soup should be creamy and warm throughout. - Look for the tomatoes to soften but not fall apart. To boost the taste of your creamy pesto tortellini soup, use fresh ingredients. Fresh garlic gives a strong kick. You can also try adding a squeeze of lemon juice. This adds brightness and balances the creaminess. If you love spice, add red pepper flakes while cooking. Fresh herbs like parsley or thyme can also enhance the dish. One common mistake is cooking the tortellini for too long. Overcooking makes them mushy. Make sure to check them when they float. Another mistake is not seasoning enough. Taste the soup before serving and adjust salt and pepper. Avoid adding the spinach too early; it should wilt just before serving. For this recipe, you need a large pot to cook everything. A wooden spoon is great for mixing. A sharp knife helps you chop the onion and garlic. A cutting board keeps your area tidy. Lastly, having measuring cups ensures you get the right amounts of broth and cream. {{image_2}} You can add protein to make this soup heartier. Cooked chicken or shrimp works well. Just toss it in during the last few minutes of cooking. If you prefer meat, try diced sausage or bacon. They add a nice flavor. For a simple option, use canned beans like chickpeas or white beans. They are tasty and filling. To make this soup vegan or dairy-free, swap the heavy cream for coconut milk. It gives a creamy feel without dairy. Use vegetable broth to keep it plant-based. Choose vegan tortellini, which you can find in stores. Make sure the pesto is dairy-free too. You can blend basil, nuts, nutritional yeast, and olive oil for a great vegan pesto. Feel free to customize ingredients based on your taste. You can add different veggies like zucchini or bell peppers. Just chop them small and toss them in with the onions. If you like heat, add red pepper flakes or a splash of hot sauce. For a fresh twist, squeeze some lemon juice right before serving. This adds a bright flavor that lifts the soup. After enjoying the creamy pesto tortellini soup, let it cool. Then, transfer it to an airtight container. Store it in the fridge for up to three days. Make sure the container is sealed well to keep the soup fresh. When you’re ready to enjoy it again, just take it out and check for any signs of spoilage. To freeze this soup, let it cool completely first. Pour the soup into freezer-safe containers or bags. Leave some space at the top of the container, as the soup will expand when frozen. You can freeze it for up to three months. When you want to eat it, just take it out and thaw it in the fridge overnight. Reheating creamy pesto tortellini soup is easy. You can use the stove or the microwave. If using the stove, pour the soup into a pot and heat it on low, stirring often. For the microwave, place the soup in a microwave-safe bowl. Heat it for 1-2 minutes, stirring halfway through. Always check that it is hot all the way through before serving. Yes, you can use frozen tortellini in this recipe. Just add it straight to the pot during cooking. Frozen tortellini cooks quickly, usually within 5 to 7 minutes. Check the package for exact times. They will float when done, just like fresh ones. To lighten up this soup, swap heavy cream for half-and-half or use a plant-based milk. You can also cut back on oil or use less pesto. Adding more veggies like zucchini or bell peppers can boost nutrition without adding heaviness. This soup pairs well with crusty bread or a fresh salad. A simple green salad with lemon dressing is a great choice. You might also enjoy it with garlic bread for extra flavor. For a fun twist, try adding a side of roasted vegetables. This article covered all you need to know for making creamy pesto tortellini soup. We discussed the key ingredients, substitutions, and garnishes that can make your dish shine. I shared step-by-step instructions along with tips to avoid common mistakes. We also explored variations and how to store leftovers properly. Remember, your choices can transform this soup into a personal favorite. Get creative with flavors and enjoy every bowl you serve!

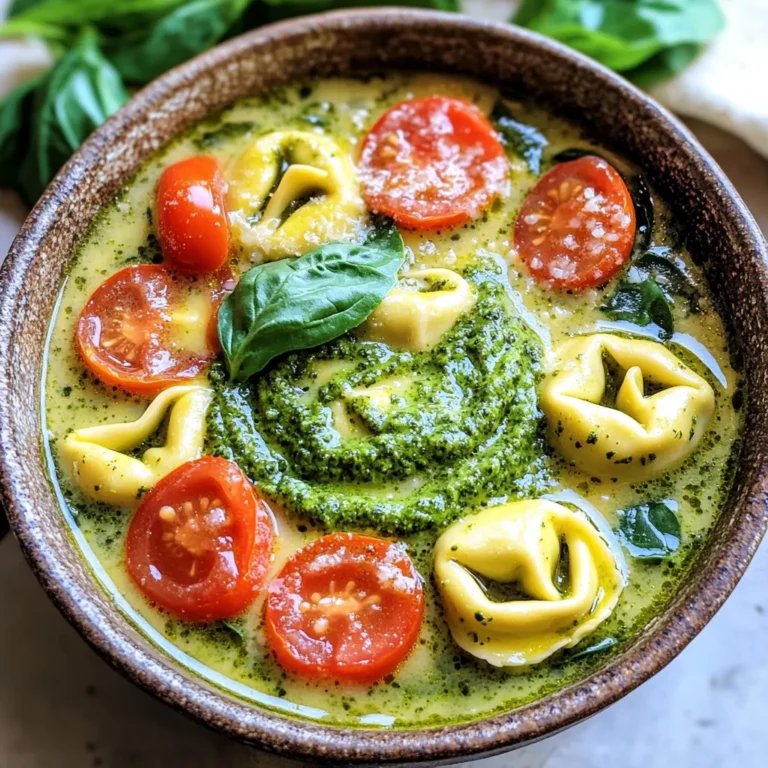
Creamy Pesto Tortellini Soup One Pot Delightful Dish

To make these tasty cheesecake bars, you need: - 1 cup graham cracker crumbs - 1/4 cup unsalted butter, melted - 2 tablespoons brown sugar - 1 (16 oz) cream cheese, softened - 1 cup granulated sugar - 3 large eggs - 1 teaspoon vanilla extract - 1 cup sour cream - 1 cup pecans, chopped - 1/2 cup caramel sauce (store-bought or homemade) - Pinch of salt These ingredients blend to create a creamy and sweet dessert. The graham cracker crumbs form a crunchy crust, while the cream cheese provides a rich and smooth filling. The pecans add a nice crunch, and the caramel gives a sweet finish. If you need substitutions, here are a few ideas: - Use almond flour instead of graham cracker crumbs for a gluten-free crust. - Swap cream cheese with mascarpone for a lighter texture. - Substitute Greek yogurt for sour cream to add protein. - Use maple syrup in place of caramel sauce for a different flavor. These swaps keep the spirit of the recipe while catering to different tastes or dietary needs. For this recipe, you will need: - 9x9 inch baking pan - Parchment paper - Medium mixing bowl - Large mixing bowl - Electric mixer - Spatula - Knife or skewer for swirling Having the right tools makes the process easier and helps you achieve great results. Make sure to line your pan with parchment; it helps in removing the bars easily after baking. Start by preheating your oven to 325°F (160°C). Grab a 9x9 inch baking pan and line it with parchment paper. Leave some overhang to help you lift the bars later. In a medium bowl, mix together 1 cup of graham cracker crumbs, 1/4 cup of melted unsalted butter, 2 tablespoons of brown sugar, and a pinch of salt. Stir until it looks like wet sand. Press this mixture firmly into the bottom of your prepared pan. This will be the base of your bars. Bake the crust for 10 minutes. Take it out and let it cool slightly. In a large mixing bowl, beat 1 (16 oz) package of softened cream cheese using an electric mixer. Mix until it’s smooth and creamy. Gradually add 1 cup of granulated sugar. Keep mixing until it’s all combined. Then, add in 3 large eggs one at a time. Make sure to mix well after each egg. Next, stir in 1 teaspoon of vanilla extract and 1 cup of sour cream. Mix until the filling is totally smooth. Now, gently fold in 1 cup of chopped pecans. This adds a nice crunch. Pour the cheesecake filling over the cooled crust. Spread it evenly with a spatula. Drizzle 1/2 cup of caramel sauce over the top. Use a knife or skewer to swirl the caramel into the filling. This creates a lovely marbled effect. Bake the cheesecake bars for 30-35 minutes. The center should be set but still slightly jiggly. After baking, take them out and let them cool at room temperature. Then, refrigerate for at least 4 hours or overnight. This helps them set properly. Once chilled, you can cut them into squares. To get a smooth and creamy cheesecake, it’s key to use soft cream cheese. Start by letting it sit at room temperature for about 30 minutes. This step helps it mix evenly. When you mix, use a hand mixer on low speed. Be gentle to avoid too much air. Air can make your cheesecake puff up and crack. Once your cheesecake bars cool, store them in the fridge. Use an airtight container to keep them fresh. They can last up to 5 days in the fridge. If you want to keep them longer, freeze them. Wrap each bar in plastic wrap, then place them in a freezer bag. They can last up to 3 months in the freezer. Just remember to thaw them in the fridge before serving. Serving these bars is fun! Chill them well before cutting. You can drizzle extra caramel sauce on top for a beautiful look. For a crunchy touch, sprinkle some chopped pecans over each bar. This adds flavor and makes them look fancy. Enjoy them with coffee or tea for a delightful treat! {{image_2}} You can change the flavor of your caramel pecan cheesecake bars easily. For a chocolate twist, add 1/2 cup of cocoa powder to the filling. This gives a rich, chocolatey taste. If you want pumpkin flavors, mix in 1 cup of pure pumpkin puree and a teaspoon of pumpkin spice. Both options give you a fun twist on this classic dessert. Want to make these bars gluten-free? Swap out the graham cracker crumbs. Use gluten-free graham crackers or almond flour instead. Mix the almond flour with a bit of melted butter and brown sugar. This keeps the crust delicious and safe for those with gluten sensitivities. You can also make no-bake caramel pecan cheesecake bars. Instead of baking the crust, chill it in the fridge for 30 minutes. For the filling, mix softened cream cheese, sugar, and vanilla. Fold in the pecans and caramel. Pour this mixture into your chilled crust and let it set in the fridge for at least four hours. This version is creamy and easy! To keep your Caramel Pecan Cheesecake Bars fresh, store them in the fridge. Place the bars in an airtight container. You can also cover them tightly with plastic wrap. This will help prevent them from drying out. They stay good for up to five days in the fridge. Want to save some for later? You can freeze these cheesecake bars! First, let them cool completely. Then, cut the bars into squares and wrap each piece in plastic wrap. After that, place the wrapped bars in a freezer-safe bag or container. They can last for up to three months in the freezer. When you're ready to enjoy your frozen bars, take them out of the freezer. Remove the plastic wrap but keep them in the container. Let them thaw in the fridge overnight. This helps maintain their texture. If you're in a hurry, you can leave them at room temperature for about an hour. Just don’t rush the thawing process to keep them creamy and delicious! Yes, you can make these bars ahead of time. They actually taste better after chilling. I suggest making them the day before you plan to serve. Let them cool, then refrigerate for at least four hours. This helps the flavors blend well. Just remember to cover them tightly to keep them fresh. If you need a substitute for cream cheese, try using mascarpone cheese. It has a smooth texture and creamy taste. You can also use ricotta cheese, but it may make the bars a bit grainy. Another option is to blend silken tofu until smooth for a dairy-free version. Each option will change the flavor a bit, so choose what fits your need. You will know the bars are done when the edges are set and the center is slightly jiggly. The jiggly part will firm up as it cools. If the bars puff up a lot, they might be overbaked. Look for a light golden color on top. This means they are ready to come out of the oven. You can now make delicious Caramel Pecan Cheesecake Bars with ease. We covered key ingredients, step-by-step instructions, and helpful tips. Variations let you customize flavors to fit your taste. Proper storage advice ensures your treats stay fresh and tasty. With these simple steps, you'll impress everyone with your baking. Enjoy being creative in the kitchen and try out different recipes. Happy baking!

Caramel Pecan Cheesecake Bars Indulgent Dessert Recipe

PREV 1 … 20 21 22 … 86 NEXT
spicy fork kitchen

explore

DessertsDinnerAppetizersDrinks

Our Policies

  • Cookie Policy
  • Copyright Policy
  • Disclaimer
  • GDPR Policy
  • Terms Of Use
Back to Top
  • About
  • Contact Us
  • Privacy Policy
© 2026 spicy fork kitchen