FREE DINNER EBOOK! Get your copy!
  • Cookie Policy
  • GDPR Policy
  • Disclaimer
  • Terms Of Use
  • Visit my other site: Fun Cookie Recipes
spicy fork kitchen
  • Home
  • Dinner
  • Desserts
  • Drinks
  • Appetizers
  • Contact
  • About
  • Privacy Policy
  • Home
  • Dinner
  • Desserts
  • Drinks
  • Appetizers
  • Contact
  • About
  • Privacy Policy
  • Cookie Policy
  • GDPR Policy
  • Disclaimer
  • Terms Of Use
Visit my other site: Fun Cookie Recipes

HOME / CATEGORIES /

Latest

- 2 large sweet potatoes, peeled and cubed - 1 tablespoon olive oil - 1 teaspoon garlic powder - 1 teaspoon onion powder - 1/2 teaspoon smoked paprika - Salt and pepper to taste - 1/2 cup breadcrumbs (panko recommended) - 1 tablespoon corn starch - 1/2 cup mayonnaise - 1-2 chipotle peppers in adobo sauce, minced - 1 teaspoon lime juice - 1 clove garlic, minced - Salt to taste - Air fryer - Medium-sized pot - Mixing bowl - Potato masher - Measuring spoons and cups To make these sweet potato tots, you need two main sets of ingredients. First, for the sweet potato tots, you will use two large sweet potatoes. Peel and cube them to start. You will also need olive oil, garlic powder, onion powder, smoked paprika, and some salt and pepper for taste. Panko breadcrumbs and corn starch help with texture and binding. Next, for the chipotle aioli, gather mayonnaise, chipotle peppers in adobo sauce, lime juice, minced garlic, and a bit of salt. The chipotle peppers add a nice kick, while the lime juice brightens the flavor. These ingredients come together to create a creamy, tasty dip for your tots. Do not forget the kitchen tools! You will need an air fryer to get that crispiness. A medium pot helps cook the sweet potatoes. A mixing bowl and potato masher are essential for making the mixture smooth. Measuring spoons and cups ensure you get the right amounts of each ingredient. With these ingredients and tools ready, you are set to make a delightful dish! - Boil sweet potato cubes until tender. - Drain and cool slightly. Start by filling a medium pot with water. Add salt, then bring it to a boil. Place the sweet potato cubes into the boiling water. Cook them for about 10-12 minutes. You want them soft enough to mash easily. Once tender, drain the sweet potatoes. Let them sit for a bit to cool down. - Mash the sweet potatoes until smooth. - Incorporate olive oil and spices. - Add breadcrumbs and corn starch. In a large mixing bowl, take the cooled sweet potatoes. Use a potato masher to mash them until they are smooth. Next, pour in the olive oil. Add garlic powder, onion powder, smoked paprika, salt, and pepper. Mix all the ingredients well. Now, stir in the breadcrumbs and corn starch. This will help your tots get that nice, crispy texture. - Preheat air fryer to 400°F (200°C). - Shape the mixture into tots. - Cook in batches until crispy. Set your air fryer to preheat at 400°F (200°C). While it heats, take your sweet potato mixture. Shape it into small tots, about the size of a golf ball. Make sure they are compact so they hold together while cooking. Place the tots in the air fryer basket in a single layer. Cook them in batches if needed. Air fry for 12-15 minutes. Flip them halfway through for even browning. They should turn a lovely golden brown and be crispy all around. To make sure your sweet potato tots are crispy, use panko breadcrumbs. They give a nice crunch that regular breadcrumbs can't match. Another key tip is to avoid overcrowding the air fryer basket. This allows hot air to circulate around each tot, helping them to crisp up evenly. If you stack them, they may become soggy. Want to make your chipotle aioli hotter? You can adjust the number of chipotle peppers you use. Start with one pepper if you prefer mild heat. You can always add more later if you want it spicier. To brighten the flavor, add more lime juice. This gives a tangy taste that balances well with the sweetness of the sweet potatoes. For a smooth aioli, blend the ingredients well. Combine mayonnaise, minced chipotle peppers, lime juice, and garlic. Mix until everything is fully combined and smooth. For the best taste, let the aioli chill in the fridge for a while. This resting time allows flavors to meld together, creating a more delicious dip. {{image_2}} You can change the flavor of your sweet potato tots. Use regular potatoes for a new taste. This swap gives a classic twist. You can also add herbs for a fresh touch. Try cilantro or parsley for added brightness. These herbs make the dish pop with color and flavor. Want to spice up your chipotle aioli? Add honey for a sweet kick. This mix balances heat and sweetness perfectly. You can also try different mustards to change the taste. Each type of mustard gives a unique flavor. Experiment with Dijon or whole grain for fun variations. Pair your sweet potato tots with various dipping sauces. Think ranch, ketchup, or barbecue for fun options. Each sauce brings its own flair. You can also serve the tots with a fresh salad. A crisp salad adds crunch and a healthy touch to your meal. Store your sweet potato tots in an airtight container. They stay fresh in the fridge for about three days. After that, they may lose flavor and texture. For the best results, reheat the tots in your air fryer. This keeps them crispy. If you're in a hurry, you can microwave them. Just keep in mind, they may not be as crunchy. You can freeze uncooked sweet potato tots for later. Just shape them and lay them on a tray, then freeze until firm. Once frozen, transfer them to a freezer-safe bag. You can also freeze cooked tots. Just store them in freezer-safe bags. They’ll be good for about three months. You cook sweet potato tots in an air fryer for 12-15 minutes. Start by preheating your air fryer to 400°F (200°C). Place the tots in a single layer and flip them halfway. This helps them get crispy and golden. Yes, you can make sweet potato tots ahead of time. You can prepare the mixture and shape the tots. Then, store them in the fridge for a few hours. If you want to store them longer, freeze them. Just cook them from frozen when you're ready to eat. You can use Greek yogurt as a great substitute for mayonnaise. It adds creaminess and a bit of tang. You can also try avocado or sour cream for a different flavor. These options keep the aioli rich and tasty. To make sweet potato tots gluten-free, simply use gluten-free breadcrumbs. Panko breadcrumbs are a great choice for added crunch. Always check the label to ensure they are gluten-free. This way, everyone can enjoy these tasty tots. In this post, I covered the key ingredients and steps needed to make sweet potato tots and chipotle aioli. I shared tips for achieving crispy tots and ideas for flavor variations. Remember, customizing your tots can make them even more fun to eat. Use these recipes and tips to create a tasty snack or side. Enjoy the cooking process and taste the results!

Air Fryer Sweet Potato Tots with Chipotle Aioli Delight

To make these delicious pumpkin snickerdoodle bars, you will need: - 1 cup pumpkin puree - 1 cup granulated sugar - 1/2 cup brown sugar, packed - 1/2 cup unsalted butter, softened - 2 large eggs - 2 teaspoons vanilla extract - 2 cups all-purpose flour - 1 teaspoon baking powder - 1/2 teaspoon baking soda - 2 teaspoons cinnamon - 1/2 teaspoon nutmeg - 1/2 teaspoon salt For the cinnamon sugar topping: - 2 tablespoons granulated sugar - 1 teaspoon cinnamon You can add some personal touches to your bars. Here are a few ideas: - Chopped nuts like pecans or walnuts for crunch - Chocolate chips for sweetness and richness - Raisins or dried cranberries for a chewy texture - A dash of ginger for extra spice Each ingredient plays a key role in making these bars great. - Pumpkin puree adds moisture and flavor. It gives the bars a lovely fall taste. - Granulated and brown sugar provide sweetness. Brown sugar adds chewiness and depth. - Butter makes the texture soft and rich. It helps the bars stay moist. - Eggs bind the ingredients and help them rise. They create a lovely texture. - Vanilla extract gives a warm, sweet flavor that complements the pumpkin. - All-purpose flour forms the structure. It helps the bars hold their shape. - Baking powder and baking soda help the bars rise. They make them light and fluffy. - Cinnamon and nutmeg add warmth and spice, enhancing the pumpkin flavor. - Salt balances the sweetness, making all flavors pop. With these ingredients, your pumpkin snickerdoodle bars will be soft, tasty, and perfect for sharing! Start by preheating your oven to 350°F (175°C). This heat is perfect for baking. While it warms, grab a 9x13-inch baking pan. You can grease it with butter or line it with parchment paper. Lining it helps the bars come out easily. In a large mixing bowl, add 1/2 cup of softened butter. Then, pour in 1 cup of granulated sugar and 1/2 cup of brown sugar. Mix these together until the mixture is light and fluffy. This step is key for a soft texture. Next, add in 1 cup of pumpkin puree, 2 large eggs, and 2 teaspoons of vanilla extract. Beat everything until it is fully combined and smooth. In another bowl, whisk together 2 cups of all-purpose flour, 1 teaspoon of baking powder, 1/2 teaspoon of baking soda, 2 teaspoons of cinnamon, 1/2 teaspoon of nutmeg, and 1/2 teaspoon of salt. Gradually add this dry mix to the wet mixture. Stir gently until just combined. Be careful not to overmix, as this can make the bars tough. Pour the batter into your prepared pan, smoothing it out evenly. In a small bowl, mix 2 tablespoons of granulated sugar with 1 teaspoon of cinnamon for the topping. Sprinkle this mixture over the top of the batter. Now, bake your bars for 25-30 minutes. Check them with a toothpick; it should come out clean. Once baked, let the bars cool in the pan for 10-15 minutes. Then, transfer them to a wire rack to cool completely. Finally, cut into squares and enjoy! To get those soft, chewy bars, follow these steps closely. First, measure your flour correctly. Too much flour makes the bars dry. Use a spoon to scoop flour into your measuring cup, then level it off. Next, don’t overmix your batter. Mix just until combined to keep the texture light. Also, be sure to use room-temperature butter and eggs. This helps create a creamy mixture that holds air well. Watch out for these common pitfalls. First, don’t skip the cinnamon sugar topping. It adds flavor and makes the bars look great. Second, avoid opening the oven door too early. This can cause your bars to sink. Lastly, check the bars with a toothpick at the 25-minute mark. It's better to underbake slightly than to overbake. Serving these bars warm makes them extra tasty. I suggest adding a sprinkle of cinnamon sugar on top for flair. A dollop of whipped cream or a scoop of vanilla ice cream pairs perfectly. You can also cut them into fun shapes if you're serving guests. For a festive touch, add some fall-themed decorations on the plate. {{image_2}} You can change the taste of these bars by adding different spices. Try some ginger or allspice for a new twist. You can also swap the pumpkin puree for applesauce. This change gives a fruity flavor while keeping the bars moist and soft. Another option is to add chocolate chips or butterscotch chips. They add sweetness and richness to each bite. If you want a gluten-free version, use a gluten-free flour blend. Just make sure it has xanthan gum to help bind the bars. For a vegan option, replace the eggs with flaxseed meal. Mix one tablespoon of flaxseed with three tablespoons of water. Let it sit until it thickens. Use coconut oil instead of butter for a rich flavor that also keeps the bars moist. You can switch things up with seasonal ingredients. In the fall, add chopped pecans or walnuts for extra crunch. In winter, try dried cranberries or raisins for a chewy texture. For a summer treat, you can mix in fresh berries instead of pumpkin. Each season brings new flavors, so feel free to experiment! To keep your pumpkin snickerdoodle bars fresh, store them in an airtight container. Use parchment paper between layers to prevent sticking. You can keep them at room temperature for up to three days. If you want them to last longer, place them in the fridge. They can stay good for about a week when refrigerated. For long-term storage, freeze your bars. Wrap each piece tightly in plastic wrap. Then, place them in a freezer-safe bag or container. Make sure to label them with the date. They can last up to three months in the freezer. When you’re ready to enjoy them, simply thaw them in the fridge overnight. To enjoy your pumpkin snickerdoodle bars later, you can reheat them. Preheat your oven to 350°F (175°C). Place the bars on a baking sheet and warm them for about 10 minutes. You can also use the microwave. Heat them for about 15-20 seconds. Enjoy them warm, and consider adding a sprinkle of cinnamon sugar or a scoop of ice cream on top. To cut pumpkin snickerdoodle bars, wait until they cool. I recommend using a sharp knife. First, grease the knife with a bit of oil. This helps the knife glide smoothly. Cut the bars into squares or rectangles. A ruler can help you make even cuts. For best results, wipe the knife after each cut. This keeps the edges clean and neat. To make these bars more cake-like, add an extra egg. You can also reduce the flour by half a cup. Another trick is to beat the eggs longer. This adds air to the batter, making it fluffier. You can also bake for a few more minutes. Keep an eye on them to avoid overbaking. A toothpick test will help you know when they’re done. Yes, you can use fresh pumpkin instead of canned puree. Start by roasting the pumpkin. Cut it in half, remove the seeds, and bake it until soft. Blend the flesh until smooth. Use this fresh puree in your recipe. It may have a different flavor, but it will still be tasty. Adjust the spices to enhance the flavor if needed. You’ve learned about the key ingredients for delicious pumpkin snickerdoodle bars. We covered mixing methods and baking tips for great texture. Remember to avoid common mistakes for the best results. Explore fun variations and dietary options to cater to all tastes. Finally, make the most of your leftovers with smart storage techniques. Enjoy your baking adventure, and don’t hesitate to experiment with flavors and tweaks. Happy baking, and may your treats be a hit!

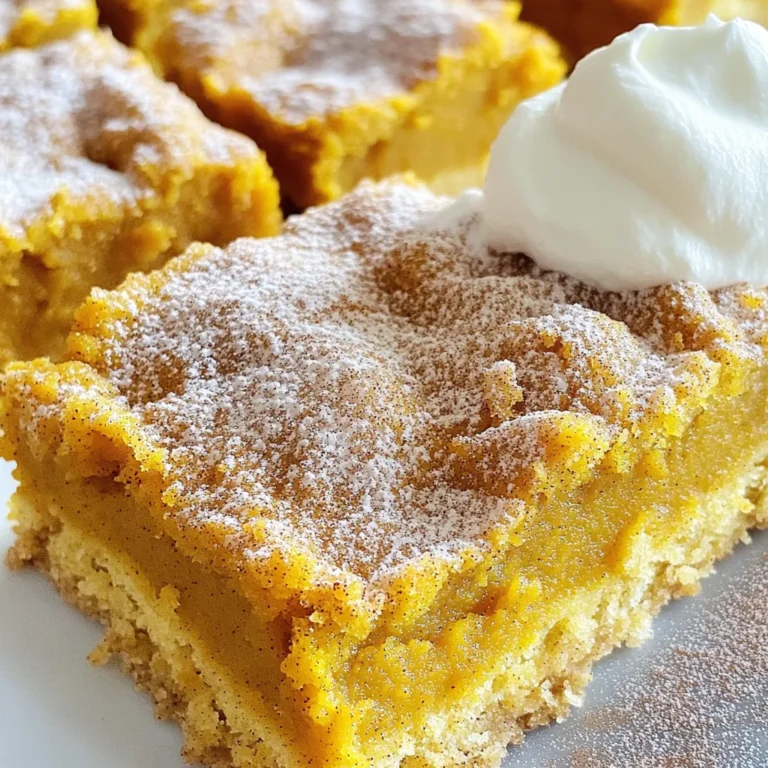
Pumpkin Snickerdoodle Bars Delightfully Soft Treat

- 3 medium-sized apples - 1 cup caramel sauce - 1 teaspoon cinnamon - 1 tablespoon lemon juice - 1 cup heavy cream - 1/4 cup powdered sugar - 1 teaspoon vanilla extract - 1 cup vanilla sponge cake - 1/2 cup chopped walnuts or pecans (optional) - Whipped cream for topping To make the Caramel Apple Trifle Cups, you need a few simple ingredients. Start with three medium apples. I prefer sweet apples like Honeycrisp or Fuji. They add a nice flavor. You will also need one cup of caramel sauce. This is the star of the show. For a touch of spice, grab a teaspoon of cinnamon. Next, keep the apples fresh with a tablespoon of lemon juice. This adds zing and helps prevent browning. You’ll also need one cup of heavy cream for a fluffy layer. To sweeten the cream, use a quarter cup of powdered sugar. Add a teaspoon of vanilla extract for extra flavor. Don’t forget the base! Use one cup of vanilla sponge cake. You can buy it or make it from scratch. If you like a crunch, add half a cup of chopped walnuts or pecans. Finally, you will want whipped cream for topping. This makes each cup look lovely and inviting. Gather these ingredients, and you are ready to create a wonderful dessert! First, take your three medium-sized apples. Peel and dice them into small pieces. In a mixing bowl, combine the diced apples with one tablespoon of lemon juice, one teaspoon of cinnamon, and one cup of caramel sauce. Toss the apples well so they are coated completely. This step is key! Let the apples sit for a bit. This helps the flavors blend and taste even better. Next, grab a large mixing bowl. Pour in one cup of heavy cream. Use an electric mixer to beat the cream on medium speed. Keep mixing until it starts to thicken. Add in one-fourth cup of powdered sugar and one teaspoon of vanilla extract. Continue to beat until you see soft peaks. This gives your cream a light texture that pairs perfectly with the apples. Now, it’s time to layer everything! Use clear cups or small jars for a beautiful presentation. Start with a layer of cubed vanilla sponge cake. Next, add a layer of your caramel-coated apples on top. Then, spoon a layer of whipped cream over the apples. Repeat these layers until the cups are full. Finish with one last layer of whipped cream on top. This creates a tall, pretty trifle that looks as good as it tastes! For a great trifle, layers are key. Start with a layer of sponge cake. Make sure each layer is even. This helps with the look and taste. I love using clear cups. They show off the pretty layers. You can see the apples and cream, which makes it special. Drizzling caramel can be fun! To get a nice drizzle, warm the caramel sauce. This makes it easier to pour. Use a spoon to drizzle from the edge to the center. Be careful not to add too much. Too much caramel can make a pool at the bottom. A light touch keeps it neat and tasty. You can add more flavor to your trifle! A pinch of nutmeg works well with cinnamon. You can also mix in some chopped pears with the apples. This adds a new twist. Try adding a splash of orange juice for a fresh taste. Mix and match to find your favorite. {{image_2}} You can swap apples for pears or berries. Pears add a sweet touch. Berries bring a tart flavor. Mix and match these fruits for unique tastes. Each fruit gives a new spin to your trifle. Try using seasonal fruits for fresh flavors. If you need gluten-free options, use gluten-free sponge cake. This keeps the treat safe for those with gluten issues. For vegan choices, you can replace heavy cream with coconut cream. Use vegan caramel sauce for a plant-based twist. These swaps keep the fun without losing flavor. For larger gatherings, serve in a big bowl instead of cups. This allows guests to scoop their own servings. You can layer the trifle in a clear glass bowl. It looks stunning and is easy to share. On special occasions, add a sprig of mint on top for a fresh look. To keep your caramel apple trifle cups fresh, store them in the fridge. Use airtight containers to keep moisture out. If you can, store the whipped cream separately. This helps maintain the cream's fluffy texture. When you assemble the trifle cups, make sure to layer them neatly. Avoid pressing down on the layers. This way, the layers stay intact and look beautiful when served. These trifle cups are best eaten within three days. After that, the apples might get soggy. Watch for any signs of spoilage. If you see any brown spots on the apples or if the cream smells sour, it’s time to throw them out. Always trust your senses when it comes to food safety. Enjoy your trifle cups while they are fresh for the best taste! You can prepare parts of this dessert ahead of time. Start by mixing the apples with lemon juice, cinnamon, and caramel sauce. Store this mixture in the fridge for up to a day. Whip the cream and store it separately. You can also cube the sponge cake ahead. Assemble the trifles just before serving. This keeps everything fresh and tasty. Yes, you can use store-bought items to save time. Look for pre-diced apples in the produce section. You can also buy caramel sauce ready to use. For the sponge cake, many bakeries sell delicious options. This makes it easy to create a tasty dessert without much effort. If you want a lighter option, use half-and-half or whole milk. You can also try coconut cream for a dairy-free choice. Just keep in mind that the texture may change. The dessert might not be as rich, but it will still taste great. This blog post covers how to make a delicious caramel apple trifle. You learned the ingredients, step-by-step instructions, and helpful tips to perfect your layers. We also explored tasty variations and proper storage. Remember, you can customize flavors and make this dessert your own. Enjoy creating this treat for gatherings or just a sweet night at home. Taste, look, and feel your best while you serve these trifles!

Caramel Apple Trifle Cups Delightful and Easy Treat

- 1 pound dried red beans, rinsed and soaked overnight - 1 large onion, diced - 1 green bell pepper, diced - 2 celery stalks, diced - 4 cloves garlic, minced - 1 tablespoon Cajun seasoning - 1 teaspoon dried thyme - 1 teaspoon smoked paprika The main ingredients in this dish are simple yet full of flavor. Dried red beans are the star here. Soaking them overnight helps make them tender. The fresh vegetables—onion, bell pepper, celery, and garlic—add great taste and texture. Cajun seasoning gives this dish its signature kick, while thyme and smoked paprika add depth. - 6 cups vegetable broth - 1 teaspoon salt and pepper to taste - 2 bay leaves - 1 jalapeño, diced (optional for extra heat) For the liquid components, vegetable broth is key. It adds richness to the dish. The bay leaves infuse flavor as the beans cook. If you like heat, add jalapeño. It gives a nice spicy touch. Season with salt and pepper to suit your taste. - 2 cups long-grain white rice - Fresh parsley, chopped (for garnish) - Lime wedges (for garnish) - Hot sauce (for those who like spice) The serving components are just as important. Long-grain white rice serves as a base for the beans. Garnishing with freshly chopped parsley adds color and freshness. A slice of lime brings brightness, while hot sauce is perfect for those who crave more heat. This dish is not just a meal; it's a flavorful experience. - Soaking the beans: Start by rinsing 1 pound of dried red beans. Place them in a bowl. Cover with water and let them soak overnight. This softens the beans and helps them cook evenly. - Chopping vegetables: While the beans soak, dice 1 large onion, 1 green bell pepper, and 2 celery stalks. Also, mince 4 cloves of garlic. These fresh veggies add great flavor. - Combining ingredients in the slow cooker: In a large slow cooker, add the soaked beans, diced onion, bell pepper, celery, and minced garlic. Then, mix in 1 tablespoon of Cajun seasoning, 1 teaspoon dried thyme, and 1 teaspoon smoked paprika. For some heat, add 1 diced jalapeño if you like. Pour in 6 cups of vegetable broth and toss in 2 bay leaves. Stir everything well. - Cooking on low vs high settings: Cover the slow cooker. Set it to low heat for 6-8 hours or high heat for 4-5 hours. The beans should be tender and creamy when done. - Adjusting consistency of beans: Once the beans are cooked, take out the bay leaves. If you want a thicker mix, mash some beans with a fork or the back of a spoon. This step will give your dish a nice texture. - Cooking rice: In a separate pot, cook 2 cups of long-grain white rice according to package instructions. This rice will serve as a base for your flavorful beans. To get the right bean consistency, soak your dried red beans overnight. This softens them and helps them cook evenly. When you cook, check the beans after the time is up. They should be tender and creamy. If they are not, let them cook a bit longer. For slow cooking, always cover the pot. This keeps the heat in and ensures even cooking. Stir occasionally if you can. This helps mix flavors well. Also, taste for salt and spice as it cooks. Adjust as needed for a perfect dish. For a great presentation, serve the dish in deep bowls. Finish with a sprinkle of freshly chopped parsley. Add a slice of lime on the side for color and flavor. For those who like it spicy, a dash of hot sauce is a must! Pair your Cajun red beans and rice with cornbread or a fresh salad. These sides balance the rich flavors and add freshness. Enjoy your meal with family or friends! {{image_2}} You can make Cajun red beans and rice even better by adding protein. - Including sausage or chicken: A great option is smoked sausage. Slice it and add it to the slow cooker. You can also use chicken thighs or breasts for a hearty bite. Just chop them up and mix them in. The meat will soak up all the spicy flavors. - Vegetarian alternatives: If you want a veggie dish, try adding mushrooms or tempeh. They both add texture and flavor. You can also use lentils as a protein source. Just remember to adjust the cooking time. Spice is a big part of Cajun food. You can control it easily. - Modifying Cajun seasoning: If you like it hot, add more Cajun seasoning. A little goes a long way, so start with a bit extra. If you want less heat, cut back on it. You can also skip the jalapeño. - Suggestions for milder or spicier variations: For a milder dish, try using a mix of Cajun and Italian seasoning. For more heat, add crushed red pepper flakes or a dash of hot sauce. Just taste as you go. If you don’t have a slow cooker, there are other ways to make this dish. - Instant Pot method: You can make this in an Instant Pot. Just add all the ingredients and cook on high pressure for about 35 minutes. Let the pressure release naturally for best results. - Stovetop version: For a stovetop dish, cook the beans in a large pot. Add enough broth to cover them. Let them simmer for about 1.5 to 2 hours, stirring often. Add the rice during the last 20 minutes of cooking. To store your Cajun red beans and rice, let them cool first. Place the leftovers in an airtight container. This keeps the flavors fresh. Store them in the fridge for up to four days. If you want them to last longer, freezing is best. For freezing, use a freezer-safe container. You can also use heavy-duty freezer bags. Make sure to remove as much air as possible. This helps prevent freezer burn. Your Cajun red beans and rice can last for about three months in the freezer. When you are ready to eat, thaw them in the fridge overnight. Reheat in a pot over low heat. Stir often to ensure even warming. You can also use the microwave. Just heat in short bursts, stirring in between. Enjoy your flavorful dish again! To make this dish vegan, swap out any meat-based products. Use vegetable broth instead of chicken broth. You can also add some tofu or tempeh for protein. These options keep the dish hearty and filling. Use plant-based Cajun sausage for a spicy twist. This way, you keep all the great flavors while making it vegan. Yes, you can use canned beans. Make sure to rinse them well to remove extra sodium. If using canned beans, reduce cooking time. You only need to cook them for about 1 to 2 hours on low heat. This change ensures they remain tender and do not fall apart. Adjust the liquid as needed, since canned beans already contain moisture. Cajun red beans and rice pair well with a few sides. You can serve them with cornbread, which adds a nice sweetness. A fresh green salad makes a great contrast. Consider adding some pickled vegetables for tanginess. Slices of lime also enhance the dish, adding a burst of freshness. Feel free to get creative with your sides! This blog post covered how to make Slow Cooker Cajun Red Beans & Rice. We explored the main ingredients, cooking methods, and tips for better taste and presentation. You learned about storing leftovers and variations to fit your taste. Making this dish is easy and offers many options. Enjoy experimenting with ingredients and sharing it with others. Cajun red beans and rice will surely delight your family and friends. Dive in and enjoy the flavors you create!

Slow Cooker Cajun Red Beans & Rice Flavorful Dish

For this treat, you need 2 cups of fresh strawberries. Make sure they are ripe and sweet. Slice them up after hulling. The sweetness of the strawberries adds a fruity burst to each bite. Adding 1 tablespoon of sugar helps bring out their natural juices. Let them sit for about 15 minutes to create a syrupy goodness. You will need several dairy items for a creamy texture. Start with 1 cup of heavy whipping cream. This will whip up light and fluffy. Add 3 tablespoons of powdered sugar and 1 teaspoon of vanilla extract to the cream. This mix adds sweetness and flavor. You also need 1 package (8 oz) of softened cream cheese. This gives our trifles a rich and smooth base. Finally, use 1 cup of prepared sweet vanilla pudding to keep it sweet and creamy. For structure, use 12-15 shortcake biscuits or ladyfingers. Both options work well in this recipe. They soak up the strawberry juices while holding their form. This creates a delicious, layered texture in each bite. You might also want fresh mint leaves for garnish. They add a nice touch of color and freshness to the top. Start by hulling and slicing 2 cups of fresh strawberries. Place them in a medium bowl. Sprinkle 1 tablespoon of sugar over the strawberries. This sugar will help draw out their juices. Let the berries sit for about 15 minutes. You’ll notice they become syrupy. This syrup adds sweetness and flavor to the trifles. In a mixing bowl, pour in 1 cup of heavy whipping cream. Use an electric mixer on medium speed. Whip until soft peaks form. Next, add 3 tablespoons of powdered sugar and 1 teaspoon of vanilla extract. Continue whipping until stiff peaks form. In another bowl, mix 1 package of softened cream cheese and 1 cup of prepared sweet vanilla pudding. Blend until smooth. Gently fold in half of the whipped cream. Be careful not to deflate it. Set aside the rest of the whipped cream for later. Now it’s time to assemble the trifles! Grab a trifle dish or individual cups. Start with a layer of shortcake biscuits or ladyfingers at the bottom. Then, add a layer of the cream cheese mixture. Next, spoon in a layer of the sweetened strawberries. Repeat these layers until you reach the top of the dish. Finish with a layer of whipped cream. Chill the trifles in the refrigerator for at least 1 hour. This helps the flavors meld together nicely. Before serving, add sliced strawberries and fresh mint leaves on top for a pop of color. To get the best whipped cream, use cold tools. Start with a chilled bowl and beaters. Whip the heavy cream on medium speed. Stop when soft peaks form, then add powdered sugar and vanilla. Continue mixing until you reach stiff peaks. This cream will hold its shape nicely in your trifles. You can change the layers to fit your taste. Try swapping strawberries for other fruits like blueberries or peaches. For a twist, mix in some lemon zest or almond extract into the cream. You can also use chocolate pudding instead of vanilla for a richer flavor. The options are endless, so feel free to be creative! For a beautiful presentation, use clear cups or trifle dishes. Layer your ingredients in a way that shows off the colors. Start with the biscuits, then the cream, and top with strawberries. Finish with a generous dollop of whipped cream. Add fresh mint leaves for a pop of color. This makes your trifles look as good as they taste. {{image_2}} You can switch out strawberries for other fruits. Try blueberries, raspberries, or peaches. Each fruit brings its own flavor and texture. For a tropical twist, use mango or pineapple. Mix and match fruits for fun flavors. You can layer different fruits for a colorful look. You can make this dessert gluten-free with simple swaps. Choose gluten-free ladyfingers or shortcake biscuits. Many stores sell these options now. Use certified gluten-free ingredients for the cream mixture too. Your guests will love it, and they won’t even know it’s gluten-free! Add flavor with extracts for a unique touch. Almond extract adds a nutty twist. You can also add lemon or coconut extract for a fresh taste. Just a drop or two can change the whole dish. Experiment with different flavors to find your favorite! Chilling your no bake strawberry shortcake trifles is key to their taste. After you assemble the trifles, cover them with plastic wrap. This keeps them fresh. Place them in the fridge for at least one hour. If you have time, chill them overnight. This extra time helps the flavors blend. Cold trifles taste best and feel refreshing. If you have leftover trifles, store them in the fridge. Use a container with a tight lid. This keeps the air out and maintains the taste. Enjoy leftovers within two days for the best flavor. Check the strawberries for freshness before eating. If they look mushy, it’s time to toss them. No bake strawberry shortcake trifles are best cold. Do not heat them. If the whipped cream deflates, you can refresh it. Just whip some heavy cream with a bit of sugar. Add this fresh cream on top before serving. This makes your trifles look nice and taste great again. Yes, you can make these trifles ahead of time. I often prepare them a day before. This gives the flavors time to blend. Just be sure to cover them well. The chilling helps keep everything fresh. If you need a substitute, try mascarpone or Greek yogurt. Both options work well and taste great. You can also use a dairy-free cream cheese if you prefer. This way, you can still enjoy the creamy texture. These trifles stay fresh for about three days in the fridge. Make sure to store them in a sealed container. After three days, the biscuits may get soggy. Enjoy them while they are still light and fluffy! You learned how to make delicious No Bake Strawberry Shortcake Trifles. We covered fresh strawberries, creamy ingredients, and tasty biscuits to build layers. I shared tips for perfect whipped cream and fun ways to customize your dessert. Remember to follow storage tips for the best taste later. Enjoy making this easy treat for yourself and friends. It’s sure to impress everyone!

No Bake Strawberry Shortcake Trifles Delightful Treat

- 2 cups cooked jasmine rice (preferably day-old) - 1 lb shrimp, peeled and deveined - 3 tablespoons honey - 4 tablespoons soy sauce (low sodium) - 3 cloves garlic, minced - 1 tablespoon fresh ginger, grated - 1 cup mixed vegetables (peas, carrots, corn) - 2 green onions, sliced - 2 eggs, beaten - 2 tablespoons sesame oil - Salt and pepper to taste - Lemon wedges for garnish - If you want a change, you can use scallops or chicken instead of shrimp. - For a gluten-free option, use coconut aminos in place of soy sauce. - If you prefer, you can swap in broccoli or bell peppers for mixed veggies. 1. In a small bowl, whisk together the honey and soy sauce. This mix gives your dish a sweet and savory flavor. Set this bowl aside for later. 2. Next, you need to prepare the shrimp. Peel off the shell and devein the shrimp. This means you remove the dark line on the back. Clean shrimp help your dish taste better. 1. Heat 1 tablespoon of sesame oil in a large skillet or wok over medium-high heat. 2. Add the minced garlic and grated ginger. Sauté them for about 30 seconds. You want to smell the sweet aroma. 3. Toss in the shrimp. Cook until they turn pink and opaque, about 2-3 minutes. This shows they are done. 4. Pour the honey-soy mixture over the shrimp. Stir to coat them well. Allow it to bubble for one minute. Then, transfer the shrimp to a plate and set aside. 5. In the same skillet, add the remaining sesame oil. Add the mixed vegetables now. Stir-fry for about 2 minutes until they heat through. 6. Push the veggies to the side of the skillet. Pour in the beaten eggs. Scramble until fully cooked, mixing it well with the veggies. 7. Add the cooked rice to the skillet. Break up any clumps. Stir everything together and cook for about 3-4 minutes. 8. Return the shrimp to the skillet with any remaining sauce. Mix well and season with salt and pepper to taste. 9. Remove from heat and stir in sliced green onions. - For a nice presentation, serve the fried rice in a bowl or on a plate. - Garnish with lemon wedges for a fresh touch. This adds flavor and makes your dish look great. How to choose fresh shrimp When selecting shrimp, look for those that are firm and shiny. Fresh shrimp should have a clean, ocean smell. Avoid any that smell sour or have a slimy texture. Size matters too! Large shrimp are often best for this dish. Importance of day-old rice Using day-old rice makes a big difference. Freshly cooked rice is moist and sticky, which can lead to clumping in your fried rice. Day-old rice dries out a bit, making it easier to fry. It gives a nice texture and helps absorb flavors. Adjusting flavors with soy sauce and honey You can change the taste by adding more soy sauce or honey. If you like it sweeter, add extra honey. For a saltier flavor, increase the soy sauce. Just be careful! Too much can overpower the dish. Quick cooking methods for time efficiency To save time, prep all your ingredients before cooking. Chop the garlic, ginger, and veggies. This way, you can cook quickly without stopping. Stir-frying is fast, so have everything ready to go! Reducing calories and sodium To cut calories, use less oil and soy sauce. You can also use a sugar substitute for the honey. Low-sodium soy sauce is a great choice for reducing salt. This keeps the dish tasty but lighter. Adding more vegetables You can boost nutrition by adding more veggies. Consider adding bell peppers, broccoli, or spinach. This not only makes the dish colorful but also increases fiber and vitamins. Plus, it tastes great! {{image_2}} You can switch up the protein in this dish. If you want to try other seafood, consider using scallops or crab. Both add a unique taste and texture. If you prefer meat, chicken works well. You can cook it just like the shrimp. For a plant-based option, use tofu. Tofu absorbs flavors well and adds a great bite. Want some heat? Add fresh chili or chili flakes for spice. This will give your dish a nice kick. You can also play with herbs. Fresh basil or cilantro can add a bright flavor. Experimenting with flavors keeps the dish exciting and fresh. Think about how you want to serve it. This dish works great as a main meal. Pair it with a side salad or a hot soup. If you want a smaller portion, serve it as a side dish. It complements many meals well. Adjusting how you serve it can change your dining experience. To store your honey garlic shrimp fried rice, place it in an airtight container. This keeps it fresh and prevents odors from mixing. It can stay in the fridge for up to three days. Make sure it cools down before you put it away. This helps avoid condensation, which can make it soggy. You can reheat your fried rice in two main ways: the microwave or stovetop. For the microwave, place it in a bowl and cover it with a damp paper towel. Heat it in short bursts, stirring in between until warm. This helps keep the rice moist. If you prefer stovetop reheating, add a splash of water or broth in a pan. Heat it over medium heat while stirring. This method helps preserve the flavors and texture better than the microwave. Yes, you can freeze honey garlic shrimp fried rice. It freezes well and makes for a quick meal later. Just make sure it is in a freezer-safe container or bag. To thaw, move it to the fridge overnight. You can reheat it straight from the freezer, but it may take longer. Just remember to add a bit of water to keep it from drying out. Enjoy your tasty dish even after a few weeks! Jasmine rice is the best choice for fried rice. It has a nice, fluffy texture. This rice stays separate and does not clump. The subtle fragrance enhances the dish. Day-old jasmine rice works best. It dries out a bit, making it easier to stir-fry. Freshly cooked rice can become mushy. Always try to use jasmine rice for great results. Yes, you can make this dish ahead of time. Meal prep makes busy days easier. Cooked fried rice stores well in the fridge. Keep it in an airtight container. It stays fresh for about 3 to 4 days. When ready to eat, just reheat it. You can use the microwave or stovetop. Add a splash of water while reheating to keep it moist. You can easily adjust this recipe for dietary needs. For a vegan version, skip the shrimp and eggs. Use tofu or tempeh instead. For gluten-free options, choose gluten-free soy sauce. This keeps the flavor without the gluten. Feel free to swap out vegetables based on your taste. You can make this dish work for everyone! This blog post showed how to make Honey Garlic Shrimp Fried Rice with simple steps. You learned what ingredients to use, along with helpful tips to make it better. We explored ways to switch ingredients for personal taste and dietary needs. Cooking can be fun and tasty! Use these ideas to prepare your dish. Enjoy every bite, and remember, practice makes perfect!

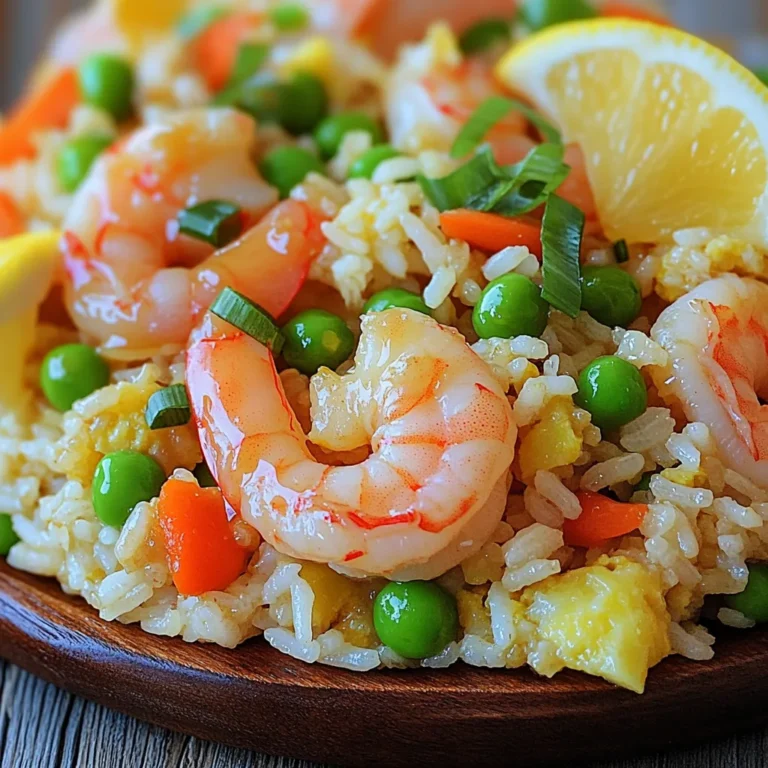
Honey Garlic Shrimp Fried Rice Tasty Dinner Recipe

- 4 cups all-purpose flour - 1/4 cup granulated sugar - 2 1/4 teaspoons active dry yeast (1 packet) - 1/2 teaspoon salt - 1 teaspoon ground cinnamon - 1 cup milk, warmed - 1/4 cup unsalted butter, melted - 2 large eggs - 1 cup pecans, roughly chopped - 1/2 cup pure maple syrup - 1/4 cup brown sugar - 1/4 cup unsalted butter, softened - Pinch of salt To make Maple Pecan Sticky Buns, you need the right ingredients. Each one plays a key role in taste and texture. First, the flour is the base. It gives the dough structure. I use all-purpose flour for the best results. Next, sugar adds sweetness. Granulated sugar helps the dough rise. It also brings a nice flavor. Yeast is vital. It makes the dough airy and light. I use active dry yeast, which is easy to find. Salt and cinnamon add flavor. Salt balances sweetness. Cinnamon gives warmth and depth. Warmed milk helps activate the yeast. It also makes the dough soft. Butter is key for richness. I use both melted and softened butter. They add flavor and moisture. Eggs help bind the dough. They also make it rich and fluffy. Pecans add a nice crunch. I chop them roughly to keep some texture. Maple syrup brings a unique sweetness. It makes the sticky topping rich and flavorful. Brown sugar adds depth. It enhances the caramel-like flavor of the syrup. Finally, a pinch of salt rounds it all out. Gather these ingredients to create the perfect Maple Pecan Sticky Buns. Happy baking! To start, I combine the dry ingredients in a large bowl. I mix 2 cups of flour, sugar, yeast, salt, and cinnamon. This helps the flavor blend well. In another bowl, I whisk the wet ingredients. I use warmed milk, melted butter, and eggs. Slowly, I add this mix to the dry ingredients. I stir until it comes together. Then, I add the rest of the flour, half a cup at a time. I knead the dough on a floured surface for about 5-7 minutes. The dough should feel smooth and elastic. Next, I place the kneaded dough in a greased bowl. I cover it with a damp cloth. I let it rise in a warm spot for about 1 hour. This helps the dough double in size. After it rises, I punch it down to release the air. In a small saucepan, I combine maple syrup, brown sugar, softened butter, and a pinch of salt. I heat this over medium heat. I stir until it becomes smooth and bubbly. Once ready, I pour the sticky mix into a 9x13 inch baking dish. I spread it evenly and sprinkle the chopped pecans on top. After the dough has risen, I roll it out on a floured surface. I aim for a large rectangle, about 16x12 inches. Then, I spread softened butter over the dough. Next, I sprinkle a mix of cinnamon and sugar on top. I roll the dough tightly from the long edge, making a log. I cut the log into 12 equal pieces. I place each piece in the baking dish on top of the pecan and syrup mix, with the spiral side up. For the final proof, I cover the dish with a cloth. I let the buns rise for another 30 minutes. During this time, I preheat the oven to 350°F (175°C). Finally, I bake the buns for 25-30 minutes. They should turn golden brown. After baking, I let them sit for 5 minutes. Then, I invert the dish onto a serving platter. To make great sticky buns, start with the dough. You want a soft and smooth texture. Use the right amount of flour to get this. If it feels sticky, add a little more flour. Knead the dough for 5-7 minutes on a floured surface. This helps develop gluten and gives it strength. Flavor is key in sticky buns. You can add spices like nutmeg or ginger for a twist. Try mixing in some chocolate chips or dried fruit. For extra crunch, use different nuts like walnuts or almonds. Flavored syrups can also add depth. Maple is classic, but try caramel or hazelnut for fun. When serving your sticky buns, presentation is important. Serve them warm on a nice platter. Drizzle extra maple syrup on top for a sweet touch. Add chopped nuts for a crunch and color. Pair with coffee or tea to balance the sweetness. Enjoy every bite! {{image_2}} You can make these sticky buns without nuts. Use alternative toppings for crunch. Try sunflower seeds or pumpkin seeds for a great texture. You can also add extra cinnamon or brown sugar to the topping for flavor. Just make sure you adjust the recipe to keep it tasty without the pecans. To make vegan sticky buns, swap dairy and eggs. Use almond milk or oat milk instead of regular milk. Replace eggs with a mix of flaxseed and water. For butter, try coconut oil or vegan butter. Keep an eye on the cooking time, as vegan dough may bake faster. Check for a golden brown color to ensure they are done. You can change the taste by adding chocolate or fruit. Chopped chocolate or cocoa powder gives a sweet twist. For fruit, add berries or apples for a fresh flavor. You can also explore different syrups. Swap maple syrup for honey or agave syrup for a new taste. Each option brings its unique twist to your sticky buns. To store your leftover maple pecan sticky buns, let them cool first. Place them in an airtight container. This keeps them fresh and moist. You can also wrap them tightly in plastic wrap. Both methods work well for short-term storage. For long-term storage, freezing is the best option. Wrap each bun in plastic wrap. Then, place them in a freezer-safe bag or container. Remove as much air as possible. This helps prevent freezer burn. To reheat, simply thaw them overnight in the fridge. Then, warm them in the oven at 350°F for about 10 minutes. This restores their soft texture. In an airtight container at room temperature, the sticky buns last about 2-3 days. If stored in the fridge, they can last up to a week. When frozen, they can stay good for 2-3 months. Always check for signs of spoilage before eating. Enjoy your sweet treats! Yes, you can prepare these buns in advance. Make the dough and let it rise. After the first rise, shape the buns and place them in the baking dish. Cover and store in the fridge overnight. In the morning, let them rise for 30 minutes before baking. This method saves time and keeps them fresh. If your dough is too sticky, add more flour gradually. Sprinkle a little flour on your work surface and on the dough. Knead it in gently until the dough feels soft and manageable. Avoid adding too much flour at once, as it can dry out the dough. You can use honey or agave syrup as a substitute for maple syrup. Both options will add sweetness and stickiness. However, the flavor will differ slightly. You may want to adjust the amount based on your taste preference. Yes, but the buns may be denser. If you want to use whole wheat flour, mix it with all-purpose flour for a lighter texture. Try a 50/50 blend to start. This way, you still get the nutty flavor of whole wheat without losing the fluffiness. The buns are done when they turn golden brown on top. You can also check by inserting a toothpick in the center. If it comes out clean or with just a few crumbs, the buns are ready. Keep an eye on them as they bake to avoid overcooking. Absolutely! If you want to skip the nuts, try using shredded coconut or chocolate chips. You can also add dried fruit like raisins or cranberries. Just make sure to adjust the sweetness if needed to keep the balance of flavors. You’ve learned how to make delicious sticky buns from scratch. We covered all the ingredients, tools, and steps needed. I also shared tips, variations, and storage info to help you succeed. These buns are great for breakfast or dessert. Try out different flavors and storage methods. Enjoy making these sticky buns for family and friends. Your baking skills will impress everyone!

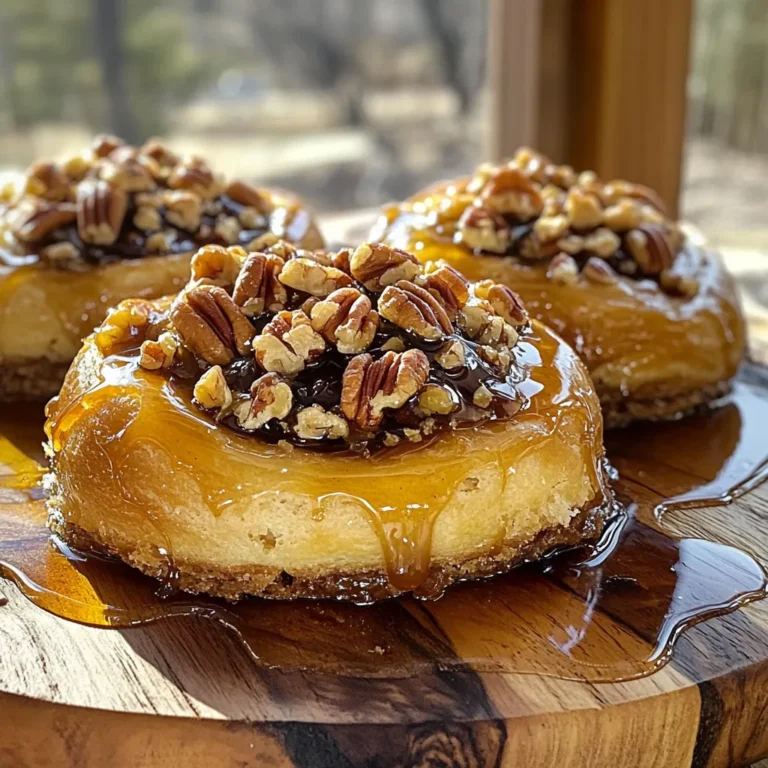
Maple Pecan Sticky Buns Irresistible Breakfast Treat

- 2 tablespoons olive oil - 1 medium onion, chopped - 3 garlic cloves, minced - 2 cans (14 oz each) diced tomatoes, undrained - 4 cups vegetable broth - 1 teaspoon dried basil - 1 teaspoon dried oregano - ½ teaspoon red pepper flakes (adjust to taste) - Salt and pepper to taste - 1 cup heavy cream (or coconut cream for dairy-free) - 2 cups fresh spinach, chopped - ½ cup grated Parmesan cheese (optional) - Fresh basil leaves for garnish When I prepare One Pot Tuscan Tomato Soup, I focus on fresh and simple ingredients. First, the olive oil is the base of flavor. It adds richness to the soup. I usually heat it in a large pot over medium heat. Next, I chop one medium onion. It brings sweetness and depth to the dish. I add the onion and let it cook until it turns soft and translucent. Then, I add minced garlic. It gives a lovely aroma and boosts flavor. For the heart of the soup, I use two cans of diced tomatoes. The juice from the tomatoes adds a nice tang. I don’t drain them; the liquid is vital for the soup's base. I mix in four cups of vegetable broth. This makes the soup hearty and filling. I also love using dried herbs. A teaspoon of dried basil and oregano adds warmth and earthiness. I sprinkle in red pepper flakes for a hint of heat. You can adjust this to your taste. To make the soup creamy, I add one cup of heavy cream. If you prefer dairy-free, coconut cream works great too. Fresh spinach is a must! I chop two cups and stir it in at the end. It adds color and nutrients. Finally, I often use grated Parmesan cheese. It gives a nice salty touch. I save some for garnish along with fresh basil leaves. This adds a fresh and vibrant flavor to the finished soup. 1. Sautéing the Onion and Garlic Start by heating the olive oil in a large pot over medium heat. Add the chopped onion. Cook it for about five minutes. This will make the onion soft and sweet. Next, toss in the minced garlic. Sauté for one to two minutes. You want it fragrant but not burnt. 2. Combining Fresh and Canned Ingredients Now, add two cans of diced tomatoes, including their juices. Pour in four cups of vegetable broth next. Add a teaspoon of dried basil and oregano. Toss in half a teaspoon of red pepper flakes, plus salt and pepper to taste. Stir everything well. Bring this mixture to a gentle simmer. 3. Simmering to Blend Flavors Let the soup simmer for 15 to 20 minutes. This process allows all the flavors to blend nicely. The tomatoes will break down a bit, creating a rich base. You can stir occasionally to keep it even. 4. Adding Cream and Fresh Spinach After the soup has simmered, stir in one cup of heavy cream. If you prefer, you can use coconut cream for a dairy-free option. Then, add two cups of fresh, chopped spinach. Cook for another five minutes. This will wilt the spinach and make it bright green. 5. Final Touches with Cheese and Seasoning If you want, mix in half a cup of grated Parmesan cheese. This adds a nice creaminess and depth. Taste the soup and adjust the seasoning if needed. Serve the soup hot. Garnish with fresh basil leaves on top. If you like cheese, add more Parmesan as a final touch. Enjoy your One Pot Tuscan Tomato Soup with crusty bread or a grilled cheese sandwich for a delightful meal! - Adjusting Spice Levels You can change the heat by adding or reducing red pepper flakes. Start with less if you prefer milder soup. Taste as you go. This way, you get the spice just right for you. - Improving Flavor with Fresh Herbs Fresh herbs add a bright taste. Try adding fresh basil or parsley at the end of cooking. You can also sprinkle them on top as garnish for color and flavor. - Cream Alternatives for Dietary Needs If you want a dairy-free option, use coconut cream. It gives a nice richness. Also, almond milk can work if you want a lighter soup. - Ideal Pairings for One Pot Tuscan Tomato Soup This soup goes great with crusty bread or a grilled cheese sandwich. You can even serve it with a side salad for a fuller meal. - Presentation Ideas for Visual Appeal Serve your soup in shallow bowls. Drizzle a bit of olive oil on top for extra taste. Add a sprinkle of Parmesan and fresh basil leaves as a final touch. This makes the dish look as good as it tastes! {{image_2}} One pot Tuscan tomato soup is very flexible. You can change it to fit your taste. Here are a few fun ways to make this soup your own. - Adding Protein Options: Chicken or Beans You can add cooked chicken or beans for extra protein. Shredded rotisserie chicken works well. If you prefer beans, try white beans or chickpeas. They add texture and make the soup heartier. - Vegetarian and Vegan Adjustments To make it vegetarian, skip the chicken and use vegetable broth. For a vegan soup, swap heavy cream with coconut cream or cashew cream. This keeps the soup rich and creamy without dairy. - Incorporating Seasonal Ingredients Use seasonal veggies for added flavor. Fresh zucchini, bell peppers, or carrots can brighten the soup. Just chop them small and add them with the onions. This keeps things fresh and exciting every time you make it. Feel free to experiment! This soup is a canvas, and you are the artist. - Refrigeration Tips: Once your soup cools, pour it into a clean, airtight container. This keeps it fresh for up to five days. Make sure to label the container with the date so you know when it was made. - Freezing for Long-term Storage: To freeze, use freezer-safe bags or containers. Leave some space for the soup to expand. It lasts well for about three months. When ready to eat, thaw it overnight in the fridge. - Best Methods to Retain Flavor and Texture: The microwave is quick but may lose some texture. Heat on medium power in short bursts. Stir often. For the stovetop, pour the soup into a pot. Heat on low to medium heat, stirring until warm. This helps keep the flavors bright and the cream smooth. Can I make this soup gluten-free? Yes, you can make this soup gluten-free. Just ensure your vegetable broth is gluten-free. Most brands offer gluten-free options. How can I store leftovers optimally? Store leftovers in an airtight container. Keep it in the fridge for up to three days. For longer storage, freeze the soup in portions. What are the best herbs to use in this recipe? Dried basil and oregano work great. You can also add thyme or parsley for more flavor. Fresh herbs can add a vibrant touch, too. Can I use fresh tomatoes instead of canned? Yes, you can use fresh tomatoes. You will need about 2 pounds, diced. Cook them down for about 30 minutes before adding broth. How do I make the soup spicier? To add spice, increase the red pepper flakes. You can also add a dash of hot sauce or sliced jalapeños for more heat. Adjust to your taste! This blog post covers the key ingredients, steps, and tips for making One Pot Tuscan Tomato Soup. You learned about essential ingredients like fresh veggies, canned tomatoes, and herbs. The step-by-step guide helps you prepare a creamy, delicious soup. I shared tips for flavor and serving suggestions. Lastly, we looked at variations to suit different diets and how to store and reheat your soup. Enjoy making this tasty dish that warms the soul, and get creative with your own twists!

One Pot Tuscan Tomato Soup Flavorful and Easy Recipe

To make a Mocha Banana Smoothie, you need fresh ingredients. Each one adds flavor and nutrition. Here’s what you’ll need: - 2 ripe bananas, frozen - 1 cup brewed coffee, cooled - 1 cup milk (dairy or non-dairy, like almond or oat) - 2 tablespoons cocoa powder - 1 tablespoon honey or maple syrup (adjust for sweetness) - 1 teaspoon vanilla extract - A pinch of cinnamon - Ice cubes (optional, for a thicker consistency) Using ripe bananas is key. They make the smoothie sweet and creamy. You can freeze them for a chill factor. The brewed coffee gives that rich mocha taste. Choose any milk you like. Dairy or non-dairy works great. Cocoa powder adds the chocolate flavor we love. Sweeteners like honey or maple syrup help balance the taste. You can add vanilla extract for a warm note. A pinch of cinnamon gives a nice twist. If you like a thicker smoothie, add ice cubes. - Step 1: Add ingredients to the blender. Start by placing 2 frozen ripe bananas in the blender. Next, pour in 1 cup of cooled brewed coffee. Add 1 cup of your choice of milk. This can be dairy or a non-dairy option like almond milk or oat milk. - Step 2: Blend until smooth. Cover the blender and blend on high speed. Mix until everything is creamy and smooth. This step ensures all the ingredients combine well. - Step 3: Adjust sweetness and blend again. Take a moment to taste your smoothie. If it needs more sweetness, add 1 tablespoon of honey or maple syrup. Blend again to mix in the extra sweetness evenly. - Step 4: Pour and serve immediately. Once your smoothie is perfectly blended, pour it into glasses. You can garnish with a sprinkle of cocoa powder or a slice of banana on the rim. Enjoy your drink right away for the best taste and texture! - Use non-dairy milk options like almond or oat milk. This adds flavor and cuts calories. - Reduce added sugars by using less honey or maple syrup. You can even skip sweeteners. - Add protein boosts, like Greek yogurt or a scoop of protein powder. This helps you feel full longer. - Experiment with spices. A pinch of nutmeg or cardamom can add a twist. - Choose the right coffee. Use strong coffee for a bolder taste, or try cold brew for smoothness. - Decide between thicker or thinner smoothies. Add ice for a thicker texture or use more milk for a thinner drink. - Use proper blending techniques. Blend on high until smooth, stopping to scrape down the sides if needed. This ensures a creamy finish. {{image_2}} You can change the taste of your mocha banana smoothie easily. Adding nut butter gives it a rich flavor. Peanut butter works well, while almond butter adds a nice twist. You can also try adding greens like spinach. This makes your drink healthier without changing the taste too much. Just a handful will do. If you want to switch up the sweetener, you have choices. Instead of honey or maple syrup, try date syrup. It’s sweet and has a unique flavor. Agave syrup is another good option. It’s lighter and blends well in your smoothie. Adjust the amount based on your taste. For a dairy-free version, pick the right milk. Almond milk and oat milk are great choices. They add a creamy texture and keep it light. If you want to make it vegan, simply skip the honey. Use maple syrup or agave instead. This way, you can enjoy a tasty treat that fits your diet. After making your mocha banana smoothie, you may have some left. You can store it in a tight container. I recommend using glass jars or BPA-free plastic containers. These keep the smoothie fresh and tasty. You should drink the smoothie within 1 to 2 days. If you wait too long, it may change flavor and texture. So, enjoy it soon! You can also freeze your smoothie for later use. This works well if you want a quick drink. To freeze, pour the smoothie into ice cube trays or freezer-safe bags. Make sure to leave some space for expansion. When you're ready to drink, thaw it in the fridge overnight. You can also blend it with a bit of milk for a smoother texture. This way, you get to enjoy the mocha banana flavor anytime! You can use avocados, applesauce, or silken tofu. Each option brings a different taste and texture. Avocados make your smoothie creamy. Applesauce adds sweetness and moisture. Silken tofu gives a smooth texture and boosts protein. Bananas add natural sweetness and creaminess. If you substitute them, adjust other ingredients. You might need more sweetener or a thicker base. Using hot coffee can change your smoothie. It may make the texture too thin and warm. If you prefer a colder drink, cooled coffee works best. It blends well with frozen bananas and ice. If you don't have cooled coffee, brew it in advance and chill it. You can also use instant coffee mixed with cold water. This method saves time and still tastes great. To create a more filling smoothie, add protein sources like Greek yogurt or protein powder. Both options will keep you full longer. Greek yogurt adds creaminess and protein. You can also mix in fiber-rich ingredients. Chia seeds, oats, or flaxseeds are excellent choices. They add bulk and help with digestion. Plus, they blend well into the drink. This blog post covered how to make a delicious mocha banana smoothie. We talked about ingredients like ripe bananas and brewed coffee. I provided step-by-step instructions for quick blending and serving. You learned tips for making it healthier and enhancing flavors. We explored variations and how to store leftovers properly. In closing, this smoothie is easy to customize and enjoyable for everyone. Try new ingredients and flavors to make it your own.

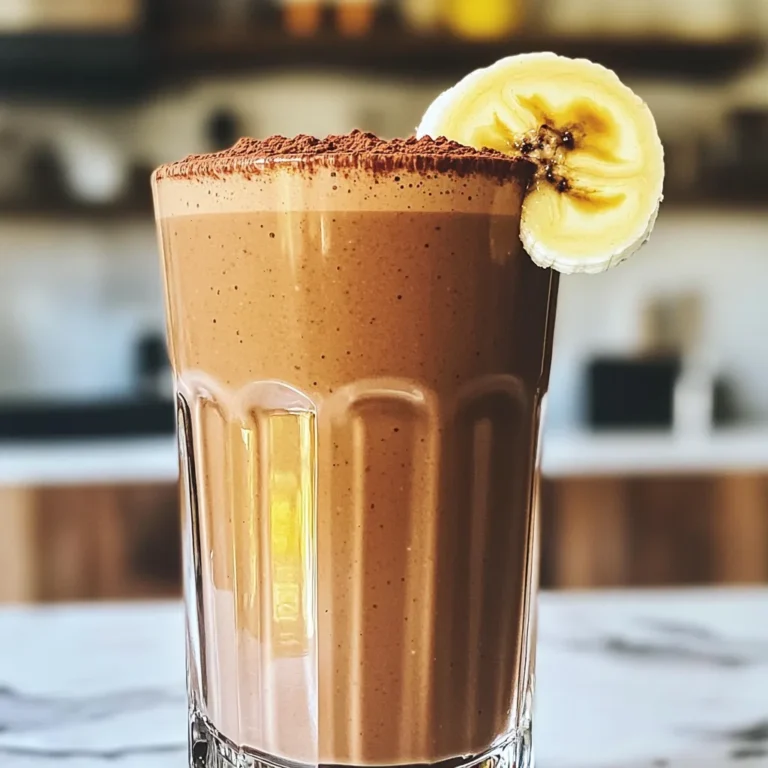
Mocha Banana Smoothie Easy and Delicious Recipe

- 4 boneless, skinless chicken breasts - 1 packet ranch seasoning mix - 1 can (10.5 oz) cream of chicken soup - 1 cup chicken broth - 1 cup heavy cream - 8 oz pasta (penne or rotini) - 1 cup frozen peas - 1 cup shredded cheddar cheese These main ingredients make this dish creamy and rich. The chicken breasts serve as the base of the meal. The ranch seasoning brings in a bold flavor. Cream of chicken soup adds smoothness, while chicken broth keeps everything moist. Heavy cream gives it that luscious texture. Choose penne or rotini for the pasta to hold the sauce well. Frozen peas add color and a sweet touch. Finally, shredded cheddar cheese melts to create a gooey finish. - Salt and pepper - Fresh parsley, chopped (for garnish) Don't forget salt and pepper! They enhance all the flavors. Fresh parsley adds a pop of color and freshness. It looks nice on top and brightens the dish. To start, layer the chicken breasts in the bottom of your slow cooker. Make sure they fit snugly. This helps them cook evenly. Next, mix the sauce ingredients. In a bowl, combine the ranch seasoning mix, cream of chicken soup, chicken broth, and heavy cream. Stir until smooth. Pour this creamy mixture over the chicken. Ensure it covers all the meat well. Now, it’s time to set the cooker. If you have all day, choose low for 6-7 hours. If you’re short on time, high for 3-4 hours works too. Once the chicken is tender, check it with a fork. It should shred easily. When the cooking time is almost done, prepare the pasta. Cook it according to the package until it’s al dente. Drain the pasta and set it aside. When the chicken is ready, shred it in the slow cooker using two forks. This step makes the chicken mix well with the sauce. Now, stir in the cooked pasta and frozen peas. They add color and nutrition. Finally, add the shredded cheddar cheese. Mix everything together until well combined. Let it sit for 10 minutes. This allows the cheese to melt. Season with salt and pepper to taste for extra flavor. - For the best texture, use fresh chicken breasts. They stay tender and juicy. - Add pasta about 30 minutes before serving. This keeps the pasta from getting mushy. - Stir gently when mixing in the pasta and peas. You want everything to blend well. - Try adding garlic powder for a tasty kick. A pinch of red pepper flakes adds heat. - Serve with a fresh salad or garlic bread. These sides complement the creamy dish nicely. - A sprinkle of lemon juice brightens the flavors. It adds a nice zing to each bite. {{image_2}} You can change up the protein in this dish easily. Try using turkey or tofu instead of chicken. Both options work well and keep the dish tasty. Just remember to adjust the cooking time. For pasta, feel free to switch from penne or rotini to your favorite shape. Bowties or shells can add fun to your meal. Want a kick? Add some heat with a spicy ranch variation. Mix in a few dashes of hot sauce or red pepper flakes to the sauce. This will give it a nice zing. If you love garlic, try a creamy garlic addition. Simply stir in minced garlic or garlic powder to the sauce mix. This will add depth and richness to your creamy ranch chicken pasta. To store leftovers, let the dish cool first. Place the creamy ranch chicken pasta in an airtight container. This keeps it fresh. Store it in the fridge for up to four days. When you're ready to eat, just heat it up. You can use the microwave or the stove. Stir it well to mix the flavors again. If you want to save some for later, freezing is a great option. Divide the pasta into portions. Use freezer-safe bags or containers. Make sure to remove as much air as possible. Label each bag with the date. You can freeze the pasta for up to three months. To reheat, defrost it overnight in the fridge. Then warm it on the stove or in the microwave. Add a splash of chicken broth to keep it creamy. Enjoy your delicious meal even later! Can I use frozen chicken breasts? Yes, you can use frozen chicken breasts. Just make sure to cook them longer. Add about an hour to the cooking time. This helps ensure they cook fully and stay tender. How to adjust the recipe for a larger group? To serve more people, simply double the ingredients. Use 8 chicken breasts, double the sauce, and increase the pasta. Ensure your slow cooker can handle the extra volume. Is there a vegetarian version of this recipe? Yes, you can make a vegetarian version. Substitute the chicken with mushrooms or tofu. Use vegetable broth and a plant-based cream to keep it creamy. What if my pasta is overcooked? If your pasta becomes overcooked, it may turn mushy. Next time, cook it for less time. Aim for al dente, or cook it separately and add it at the end. This keeps it firm. How can I prevent the dish from being too salty? To avoid a salty dish, limit the ranch seasoning. Taste as you cook to adjust flavor. You can always add more, but you can't take it out. Use low-sodium broth for a healthier option. This recipe combines simple ingredients like chicken, ranch, and cheese for a hearty meal. You learned how to layer, cook, and add pasta and peas for a tasty dish. Remember, you can swap proteins or tweak flavors to match your taste. Store any leftovers in the fridge or freezer for later. With these tips and steps, your cooking can be easy and fun. Enjoy your delicious creation and keep experimenting!

Slow Cooker Creamy Ranch Chicken Pasta Delight

PREV 1 … 18 19 20 … 86 NEXT
spicy fork kitchen

explore

DessertsDinnerAppetizersDrinks

Our Policies

  • Cookie Policy
  • Copyright Policy
  • Disclaimer
  • GDPR Policy
  • Terms Of Use
Back to Top
  • About
  • Contact Us
  • Privacy Policy
© 2026 spicy fork kitchen