FREE DINNER EBOOK! Get your copy!
  • Cookie Policy
  • GDPR Policy
  • Disclaimer
  • Terms Of Use
  • Visit my other site: Fun Cookie Recipes
spicy fork kitchen
  • Home
  • Dinner
  • Desserts
  • Drinks
  • Appetizers
  • Contact
  • About
  • Privacy Policy
  • Home
  • Dinner
  • Desserts
  • Drinks
  • Appetizers
  • Contact
  • About
  • Privacy Policy
  • Cookie Policy
  • GDPR Policy
  • Disclaimer
  • Terms Of Use
Visit my other site: Fun Cookie Recipes

HOME / CATEGORIES /

Latest

To make Minute Sesame Garlic Noodles, you need: - 8 oz spaghetti or rice noodles - 3 tablespoons sesame oil - 4 cloves garlic, minced - 2 tablespoons soy sauce - 1 tablespoon honey or maple syrup - 1 tablespoon rice vinegar - 1 tablespoon toasted sesame seeds - 2 green onions, finely chopped - 1 small carrot, julienned (for garnish) - Fresh cilantro leaves for garnish (optional) - Red pepper flakes (optional, for heat) If you don't have some of these items, here are some easy swaps: - Use whole wheat noodles instead of spaghetti or rice noodles. - Swap sesame oil for olive oil if needed. - Replace honey with agave syrup or brown sugar. - Use apple cider vinegar instead of rice vinegar. - Green onions can be replaced with chives or shallots. To ensure your dish tastes great, focus on ingredient quality: - Choose fresh garlic for the best flavor. - Use high-quality soy sauce for a deeper taste. - Look for vibrant green onions. They add color and crunch. - For the best sesame seeds, toast them lightly for more flavor. - Fresh herbs like cilantro brighten the dish. Use them if you can. First, grab a large pot. Fill it with water and add a pinch of salt. Bring the water to a boil. Add 8 ounces of spaghetti or rice noodles. Cook them for about 4 to 6 minutes or until they feel firm yet soft, called al dente. Once done, drain the noodles and set them aside. Now, let’s make the sauce. In a small bowl, combine 3 tablespoons of sesame oil, 4 minced garlic cloves, 2 tablespoons of soy sauce, 1 tablespoon of honey or maple syrup, and 1 tablespoon of rice vinegar. Whisk these ingredients together until they blend well. The sauce should smell amazing and look smooth. In a large mixing bowl, toss the drained noodles with the sauce. Make sure every noodle gets coated. Next, sprinkle 1 tablespoon of toasted sesame seeds and 2 finely chopped green onions over the noodles. If you like some heat, add red pepper flakes to taste. Gently toss everything again to mix. Finally, serve the noodles in bowls. Top them with julienned carrots and fresh cilantro for a colorful touch. Enjoy your delicious meal! To make the best sauce, use fresh garlic. Fresh garlic gives a strong taste. Mince the garlic finely for even flavor. Combine sesame oil, soy sauce, honey, and rice vinegar in a bowl. Whisk until smooth. This mix should taste sweet and salty. If you want, add a bit more honey for sweetness. Adjust the soy sauce for saltiness. This sauce is key for great noodles. For perfect noodles, boil salted water first. Add the spaghetti or rice noodles. Cook until al dente, usually 4 to 6 minutes. Stir the noodles gently to prevent sticking. Drain them well, but don’t rinse. Rinsing washes away the starch that helps the sauce stick. Keep the noodles warm until you mix them with the sauce. To add more flavor, think about toppings. Toasted sesame seeds give a nutty taste. Chopped green onions add freshness. If you like heat, sprinkle red pepper flakes on top. You can also add julienned carrots for crunch. Fresh cilantro can brighten the dish. These extras make the meal more colorful and tasty. {{image_2}} You can make your Minute Sesame Garlic Noodles even better by adding veggies. Some great choices are: - Bell peppers: Slice them thin for a sweet crunch. - Broccoli: Steam small florets to add texture. - Snap peas: Toss them in for a fresh, crisp taste. - Spinach: Stir in fresh leaves for extra color and nutrients. Feel free to mix and match any of these vegetables. They all pair well with the noodles and sauce. Adding protein makes this meal even more filling. Here are some tasty ideas: - Chicken: Grilled or shredded chicken gives a savory flavor. - Tofu: Use firm tofu for a plant-based option; pan-fry until golden. - Shrimp: Quick-cook shrimp for a nice seafood twist. - Eggs: Scramble a couple of eggs and mix them in for added richness. These proteins can boost the meal's health and taste. If you need a gluten-free option, simply swap out the noodles. Here are some great choices: - Rice noodles: They work perfectly as a substitute in this recipe. - Zucchini noodles: Spiralized zucchini adds a fresh twist and keeps it light. - Quinoa: This grain is gluten-free and offers a nutty flavor. With these options, anyone can enjoy this dish, no matter their dietary needs. Store your leftover Minute Sesame Garlic Noodles in an airtight container. This keeps them fresh and tasty. You can keep them in the fridge for up to three days. Make sure they are cooled down before you store them to avoid moisture buildup. If you need to stack them, place parchment paper between layers to prevent sticking. To reheat the noodles, you can use a microwave or a stove. For the microwave, place the noodles in a bowl. Add a splash of water to keep them moist. Heat for about 1-2 minutes, stirring halfway. If you prefer the stove, put the noodles in a pan over low heat. Add a little sesame oil to help them heat evenly. Stir until they are warmed throughout. If you want to save the noodles for longer, freezing is an option. First, let the noodles cool completely. Then, place them in a freezer-safe bag. Remove as much air as you can before sealing. They can stay in the freezer for about one month. When you are ready to eat them, thaw the noodles in the fridge overnight before reheating. Minute Sesame Garlic Noodles can last for about 3 to 5 days in the fridge. Store them in an airtight container to keep them fresh. Make sure they cool down before sealing the container. If you see any signs of spoilage, throw them away to stay safe. Yes, you can use different noodles! Rice noodles work well if you want a gluten-free option. You can also try whole wheat or egg noodles for different textures. Just make sure to adjust the cooking time based on the type of noodle you choose. To make the dish spicier, add red pepper flakes to the noodles. Start with a pinch and adjust to your taste. You can also include sliced fresh chili peppers or a dash of hot sauce. These options will give your noodles a nice kick! In this post, we covered everything you need for perfect Minute Sesame Garlic Noodles. We discussed key ingredients, tasty variations, and practical cooking tips. Remember, fresh ingredients make a big difference. You can always mix in veggies and proteins for more flavor and nutrition. Proper storage keeps leftovers tasty, and don’t forget to experiment with heat levels. Enjoy cooking and sharing this dish! Your kitchen will fill with amazing smells, and your meal will impress everyone.

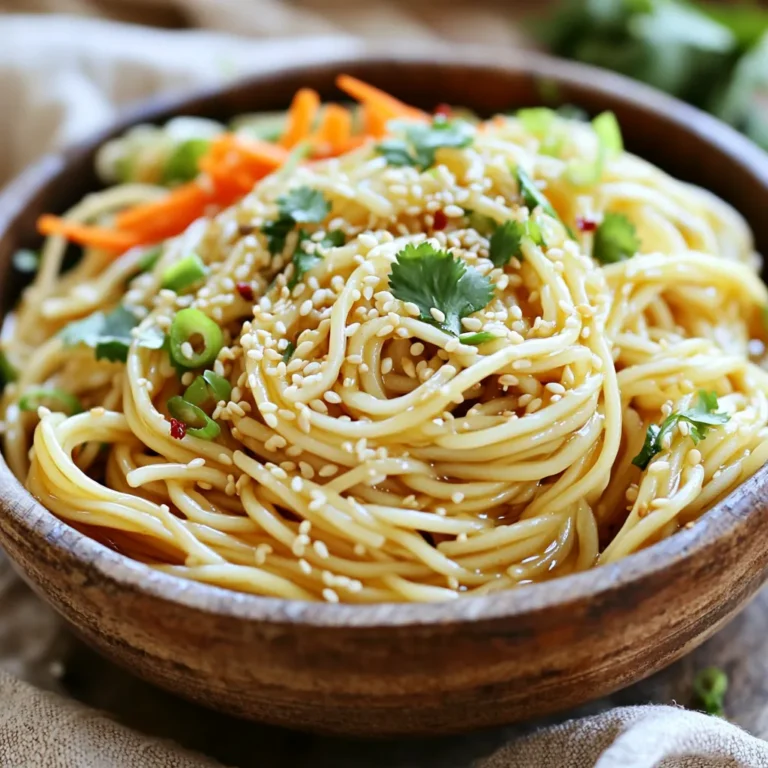
Minute Sesame Garlic Noodles Simple and Tasty Recipe

- 1 ½ cups all-purpose flour - 1 teaspoon baking soda - ½ teaspoon baking powder - ½ teaspoon salt - 1 teaspoon cinnamon - ½ teaspoon nutmeg - ½ teaspoon ginger For the dry ingredients, we start with all-purpose flour. This flour gives the bread its structure. Next, we add baking soda and baking powder for rise. Salt helps balance the flavors. We also mix in spices like cinnamon, nutmeg, and ginger for warmth and taste. These spices bring that cozy fall flavor to the bread. - 1 cup pumpkin puree - 1 cup granulated sugar - ½ cup brown sugar - 3 large eggs - ½ cup vegetable oil - 1 teaspoon vanilla extract Now, let’s move to the wet ingredients. Pumpkin puree is the star here, giving moisture and flavor. We mix in both granulated and brown sugar for sweetness. Eggs bind everything together and add richness. Vegetable oil keeps the bread moist and tender. A splash of vanilla extract adds a nice touch of sweetness. - 4 ounces cream cheese, softened - ¼ cup powdered sugar - 1 teaspoon lemon juice For the cream cheese filling, we start with softened cream cheese. This makes it easy to mix. We add powdered sugar for sweetness and a little lemon juice for brightness. This filling adds a creamy, tangy layer that pairs perfectly with the pumpkin batter. First, preheat your oven to 350°F (175°C). This temperature helps the bread bake evenly. Next, grease a 9x5 inch loaf pan with cooking spray or butter. You can also line it with parchment paper for easy removal. This step prevents the bread from sticking and makes serving a breeze. In a medium bowl, whisk together the dry ingredients. Use 1 ½ cups of all-purpose flour, 1 teaspoon of baking soda, ½ teaspoon of baking powder, ½ teaspoon of salt, and spices: 1 teaspoon of cinnamon, ½ teaspoon of nutmeg, and ½ teaspoon of ginger. Mixing these ingredients well adds flavor and helps the bread rise. In a large bowl, combine the wet ingredients. You will need 1 cup of pumpkin puree, 1 cup of granulated sugar, ½ cup of brown sugar, 3 large eggs, ½ cup of vegetable oil, and 1 teaspoon of vanilla extract. Mix this until it is smooth and creamy. This blend brings moisture and richness to your bread. Gradually add the dry mixture to the wet mixture. Stir gently until just combined. It’s okay if some lumps remain; overmixing can make the bread tough. Now, prepare the cream cheese filling. In a small bowl, beat together 4 ounces of softened cream cheese, ¼ cup of powdered sugar, and 1 teaspoon of lemon juice. This filling adds a delightful tang and creaminess to the bread. To layer in the loaf pan, pour half of the pumpkin batter into the greased pan. Spoon dollops of the cream cheese mixture over the batter. Then, pour the remaining pumpkin batter on top. Use a knife to gently swirl the two mixtures together. This creates a beautiful marble effect. Bake the bread in your preheated oven for 55 to 65 minutes. To check for doneness, insert a toothpick into the center. If it comes out clean, the bread is ready. Once baked, remove it from the oven. Allow the bread to cool in the pan for about 10 minutes. Then, transfer the loaf to a wire rack to cool completely. This step is key to keeping the bread moist and fluffy. Not overmixing is key. When you combine the wet and dry ingredients, stop once they blend. Some lumps are okay and help keep the bread light and fluffy. Bake at 350°F (175°C) for 55-65 minutes. Check with a toothpick in the center. It should come out clean. For a lovely presentation, slice the bread and place it on a rustic wooden board. Sprinkle cinnamon over the top for a warm touch. A dollop of whipped cream on the side makes it even better. It adds a delightful creaminess to each bite. You can add nuts or chocolate chips for more texture. Walnuts or pecans work great. If you want to spice things up, try adding more cinnamon or a pinch of cloves. Each little tweak can change the flavor and make it your own! {{image_2}} To make this bread gluten-free, you can swap the all-purpose flour. Use almond flour or a gluten-free blend. Both choices work well. Almond flour gives a nutty taste. The gluten-free blend often mimics regular flour. Adjust the amount based on the type you choose. Almond flour may need more moisture, so watch the texture. If you want a dairy-free version, choose a vegan cream cheese. Many brands offer great taste and texture. Look for one that is smooth and creamy. This swap keeps the bread rich and delicious. You will not miss the dairy at all. For a healthier twist, try using honey or maple syrup instead of granulated sugar. These natural sweeteners add unique flavors. Honey gives a floral note, while maple syrup brings a warm, earthy taste. Remember to adjust the liquid in your recipe. Use less oil if you add liquid sweeteners. This change makes your bread tasty and a bit healthier. To keep your Pumpkin Cream Cheese Bread fresh, follow these tips: - Room Temperature Storage: Wrap the cooled bread in plastic wrap or foil. Store it in a cool, dry place. It lasts about 3 to 4 days this way. - Refrigeration Guidelines: If you want to keep it longer, place the wrapped bread in the fridge. This option extends its life to about a week. Just remember, cold storage can change the texture slightly. Freezing this bread is easy and keeps it tasty: - How to Freeze: First, let the bread cool completely. Wrap it tightly in plastic wrap, then in foil. This helps prevent freezer burn. Place it in a freezer bag or container for extra protection. - Thawing the Bread: When you’re ready to eat, take the bread out and let it thaw at room temperature. This may take a few hours. If you're in a hurry, you can use the microwave on low for a quick thaw. - Storage Duration Recommendations: Your frozen Pumpkin Cream Cheese Bread will stay good for about 3 months. After that, the taste may change. Enjoy it fresh for the best flavor! You can tell when the Pumpkin Cream Cheese Bread is done with the toothpick test. Insert a toothpick into the center of the bread. If it comes out clean, your bread is ready. If it has wet batter on it, bake for a few more minutes. This simple test helps ensure your bread is moist but not undercooked. Yes, you can make this bread ahead of time. Bake the bread and let it cool completely. Wrap it tightly in plastic wrap or foil. This will keep it fresh for up to three days at room temperature. You can also store it in the fridge for about a week. Just make sure to let it come to room temperature before serving. If you don't have pumpkin puree, you can use butternut squash or sweet potato puree. Both options will give a similar taste and texture. Just make sure to mash them well before adding them to the batter. This way, you still get that lovely fall flavor in your bread. The shelf life of Pumpkin Cream Cheese Bread depends on storage. At room temperature, it lasts about three days. If you keep it in the fridge, it can last up to a week. For longer storage, you can freeze it. Wrapped well, it can stay fresh for up to three months. Just thaw it in the fridge when you’re ready to enjoy it! This post covered how to make Pumpkin Cream Cheese Bread. You learned about the dry and wet ingredients, including spices and sugars. I shared step-by-step instructions, helpful baking tips, and storage advice. I also suggested fun variations and serving ideas to boost flavor. Enjoy baking this bread or customizing it to your taste. It’s a tasty treat for any occasion! Take your skills to the next level and impress your friends and family.

Pumpkin Cream Cheese Bread Irresistible Fall Treat

- 1 lb turkey tenderloin - 1/4 cup honey - 1/4 cup Dijon mustard - 2 tablespoons olive oil - 1 tablespoon apple cider vinegar - 1 teaspoon garlic powder - 1 teaspoon onion powder - Salt and black pepper, to taste - 1 cup baby carrots - 1 cup Brussels sprouts, halved - Fresh parsley, for garnish For this dish, we need fresh and simple ingredients. The turkey tenderloin is the star. It's lean, tender, and full of flavor. The marinade blends sweet and tangy. Honey and Dijon mustard create a lovely balance that complements the turkey. The olive oil adds richness, while the apple cider vinegar gives a nice zing. Garlic and onion powders bring depth to the taste. Don't forget salt and pepper to make everything pop! For sides, I choose baby carrots and Brussels sprouts. They roast well and add color to the plate. The fresh parsley is not just for looks; it adds freshness. Each ingredient plays a role in making this meal tasty and fun. You can mix and match sides to fit your taste. Enjoy the process of gathering these items! - Preheat the oven to 400°F (200°C). - Line a baking sheet with parchment paper. - In a bowl, mix together: - 1/4 cup honey - 1/4 cup Dijon mustard - 2 tablespoons olive oil - 1 tablespoon apple cider vinegar - 1 teaspoon garlic powder - 1 teaspoon onion powder - Salt and pepper to taste. - Whisk until everything is well blended. - Place the turkey tenderloin on the baking sheet. - Pour half of the honey mustard glaze over the turkey. - Make sure to coat it evenly. - In a bowl, add 1 cup baby carrots and 1 cup halved Brussels sprouts. - Drizzle with olive oil, salt, and pepper, then toss well. - Arrange the veggies around the turkey on the baking sheet. - Drizzle the rest of the honey mustard glaze over the vegetables. - Roast in the oven for 25-30 minutes. - Use a meat thermometer to check for an internal temperature of 165°F (74°C). - When done, let the turkey rest for about 5 minutes before slicing. - Try using different seasonings like smoked paprika or cumin. - Fresh herbs like thyme or rosemary add great taste. You can mix and match flavors to find what you love. For example, adding a pinch of cayenne pepper gives heat. If you want a sweeter touch, a bit of brown sugar works well too. The key is to taste as you go. - Let the turkey rest for five minutes after cooking. - Cook the turkey to an internal temperature of 165°F (74°C). Resting is vital because it allows juices to settle. If you skip this step, the turkey can dry out. Use a meat thermometer to check the temperature. It ensures you cook the turkey just right. - Garnish with fresh parsley for color and flavor. - Serve with sides like mashed potatoes or green salad. A nice garnish makes your dish pop. Place parsley on top right before serving. For sides, consider roasted potatoes or steamed broccoli. They balance the meal well and add nutrition. {{image_2}} You can swap turkey tenderloin for chicken or pork. Both options taste great with honey mustard. If you use chicken, choose chicken breasts or thighs. For pork, pork tenderloin works well. Adjust cooking times based on the meat you choose. Chicken usually cooks faster, needing about 20-25 minutes. Pork may take 30-35 minutes. Always check the internal temperature. Chicken should reach 165°F (74°C), while pork is best at 145°F (63°C). Feel free to mix in other vegetables. Broccoli, sweet potatoes, or zucchini make excellent choices. Just cut them to similar sizes for even cooking. Seasonal vegetables are also a fun option. In summer, add bell peppers or cherry tomatoes. In winter, consider root veggies like parsnips or turnips. Each change brings a new taste and color to the dish. You can easily change the marinade for a twist. Try using whole grain mustard for a robust taste. Honey can be swapped for maple syrup or agave for a different sweetness. Want some heat? Add red pepper flakes or cayenne pepper. These spices can make the dish more exciting. You can also add herbs like thyme or rosemary for extra flavor. This keeps the recipe fresh and fun each time you cook it. To keep your turkey tenderloin fresh, store it in the fridge. Place it in an airtight container. Make sure to cover it well. This keeps moisture in and prevents drying. The turkey can last up to three days in the fridge. For cooked vegetables, use a separate container. Store them alongside the turkey or in their own. They stay fresh for about three days as well. Avoid stacking them too high. This helps them stay crisp and not become mushy. When reheating turkey, use the oven or microwave. The oven keeps it juicy. Preheat it to 325°F (160°C). Place the turkey in a dish and cover it with foil. Heat until it reaches 165°F (74°C). This ensures safety and flavor. If using a microwave, slice the turkey first. Place it on a plate and cover with a damp paper towel. Heat in short bursts of 30 seconds. Check often to keep it moist. You can freeze cooked turkey and vegetables for later. First, let them cool completely. Then, place the turkey in a freezer bag. Remove as much air as possible. This helps prevent freezer burn. For vegetables, use a freezer-safe container. They should not be stored for more than three months. Label everything with the date. This way, you know when to use them for the best taste. To keep turkey moist, marinate it. Use a mix of honey, Dijon mustard, olive oil, and apple cider vinegar. Let it soak for at least 30 minutes. This adds flavor and moisture. Cook at 400°F (200°C) until it reaches 165°F (74°C). Rest the turkey for 5 minutes after cooking. This helps the juices settle back in. Cook turkey tenderloin for 25 to 30 minutes at 400°F (200°C). Use a meat thermometer to check the internal temperature. It should reach 165°F (74°C). Cooking time may vary slightly based on the size of the tenderloin. Always ensure it is fully cooked for safety. Yes, you can prepare this dish ahead of time. Marinate the turkey and chop the vegetables a day before. Store them in the fridge until you are ready to cook. This saves time and allows flavors to blend. Just remember to let them sit at room temperature for about 15 minutes before cooking. Pair this turkey with sides like mashed potatoes or rice. Roasted vegetables, like green beans or asparagus, add color and health. A fresh salad can also lighten the meal. For a sweet touch, serve with a fruit salad. These sides complement the honey mustard flavor nicely. This blog post covered all you need for a delicious honey mustard turkey tenderloin. We explored necessary ingredients, step-by-step cooking instructions, and helpful tips. I shared variations for proteins and vegetables to keep your meals fun and exciting. Remember to store leftovers properly and follow reheating tips for the best meal experience. With these insights, your cooking will be both tasty and easy. Enjoy creating meals that impress!

Sheet-Pan Honey Mustard Turkey Tenderloin Delight

Cauliflower and Flour Requirements - 1 large head of cauliflower, cut into bite-sized florets - 1/2 cup all-purpose flour (or gluten-free flour) Cauliflower is the star of this dish. Choose a large head for more florets. Cutting them into bite-sized pieces ensures they cook evenly. The flour helps create a crispy batter. You can use gluten-free flour if you prefer. Seasoning Overview - 1/2 teaspoon garlic powder - 1/2 teaspoon onion powder - 1/4 teaspoon smoked paprika - 1/2 teaspoon salt - 1/2 teaspoon black pepper - 1/2 cup water The seasonings add depth to the flavor. Garlic powder and onion powder give that savory touch. Smoked paprika adds a nice, mild smokiness. Salt and black pepper enhance the overall taste. The water helps mix the dry ingredients into a smooth batter. Garnishing Elements - 1/2 cup teriyaki sauce (store-bought or homemade) - 2 tablespoons sesame seeds (for garnish) - 2 green onions, sliced (for garnish) Teriyaki sauce adds that sweet and savory shine. You can use store-bought for ease or make your own for a personal touch. Sesame seeds and green onions make the dish look pretty and add texture. Cutting and Washing Techniques Start by washing your cauliflower head under cold water. This step is key to removing dirt. Then, place it on a cutting board. Cut off the leaves and stem. Slice the cauliflower into bite-sized florets. Make sure they are all about the same size. This helps them cook evenly. Importance of Floret Size Floret size matters! Smaller pieces cook faster and become crispier. If the pieces are too big, they may not cook through. Aim for florets that are around 1 to 2 inches. This size gives a nice bite and holds the batter well. Mixing Techniques for Ideal Consistency In a large mixing bowl, add your flour, garlic powder, onion powder, smoked paprika, salt, and black pepper. Mix these dry ingredients well with a whisk. Then, slowly add water. Keep whisking until you form a smooth batter. It should be thick enough to coat the florets without dripping too much. Tips for Whisking Effectively Use a whisk or a fork to mix. Whisk in a circular motion to combine. If the batter feels too thick, add a little more water. If it’s too thin, sprinkle in more flour. The right consistency is key for a good coating. Preheating the Air Fryer Before you cook, preheat your air fryer to 375°F (190°C). Preheating helps to create a crispy texture. This step makes a big difference in the final result. Ideal Cooking Time and Temperature Place the battered florets in the air fryer. Cook them for about 12 to 15 minutes. Shake the basket halfway through cooking. This ensures that all sides get crispy and golden brown. Keep an eye on them to avoid burning. Tips for Achieving Crispiness For extra crispiness, avoid overcrowding the basket. Cook in batches if needed. A single layer allows hot air to circulate. This is what gives your cauliflower wings that perfect crunch. How to Avoid Sogginess To keep your cauliflower wings crispy, make sure to coat them well with batter. As you dip each floret, let excess batter drip off. This helps prevent a soggy texture. If you find them too wet, you can sprinkle a little extra flour before air frying. Best Practices for Air Fryer Usage Preheat your air fryer to 375°F (190°C) before adding the wings. This step helps them cook evenly. Arrange the florets in a single layer in the basket. Avoid overcrowding, as this can lead to steaming instead of frying. Shake the basket halfway through to ensure even crispiness. Recommended Seasonings to Add While garlic and onion powder work well, feel free to experiment! Adding a pinch of cayenne can give your wings a kick. Try a splash of soy sauce in the batter for extra depth. Pairing Suggestions These teriyaki cauliflower wings pair perfectly with rice or a fresh salad. If you want to elevate your meal, serve them alongside some steamed broccoli or snap peas for added crunch and nutrition. Presentation Ideas For a beautiful presentation, place the wings on a large platter. Drizzle some teriyaki sauce on top and sprinkle with sesame seeds and sliced green onions. This adds color and makes the dish look gourmet. Dip Recommendations To complement the wings, serve with a side of creamy ranch or spicy sriracha mayo. These dips add a nice contrast to the sweet teriyaki flavor. You can also try a zesty lime or lemon dipping sauce for a refreshing twist. {{image_2}} Spicy Teriyaki Option If you like heat, add sriracha or chili paste to your teriyaki sauce. Start with one tablespoon. Taste the sauce and adjust for more spice if needed. This kick adds a delicious twist to your cauliflower wings. Alternative Sauces and Marinades You can swap teriyaki for other sauces. Try barbecue sauce for a smoky taste. Buffalo sauce gives a tangy flavor. For a sweet touch, use honey mustard. Each option brings a unique flair to the dish. Baking Instructions To bake, preheat your oven to 425°F (220°C). Place the coated cauliflower on a baking sheet lined with parchment paper. Bake for 20-25 minutes, flipping halfway. This method gives crispy wings without the air fryer. Pan-Frying Alternatives For pan-frying, add oil to a skillet over medium heat. Fry the coated florets for about 4-5 minutes on each side until golden brown. This method creates a crunchy texture, but watch closely to prevent burning. Gluten-Free Modifications Use gluten-free flour instead of all-purpose flour. This swap keeps the dish gluten-free. Make sure your teriyaki sauce is also gluten-free. Check the label for safe ingredients. Vegan Considerations This recipe is already vegan-friendly. Just ensure your teriyaki sauce contains no animal products. For a fun twist, serve with a vegan ranch dip on the side. It pairs nicely with the wings! - Refrigeration Guidelines: Store your leftover teriyaki cauliflower wings in an airtight container. Keep them in the fridge for up to four days. This helps maintain their flavor and texture. - Freezing Instructions: If you want to save them longer, freeze the wings. Place them in a freezer-safe bag or container. They can last up to three months. Just make sure to label the bag with the date before freezing. - Best Ways to Reheat in an Air Fryer: The air fryer is the best tool for reheating. Preheat it to 375°F (190°C). Place the wings in a single layer. Heat them for about 5-7 minutes, shaking the basket halfway through. This keeps them crispy. - Alternative Reheating Options: If you don’t have an air fryer, use an oven. Preheat the oven to 350°F (175°C). Place the wings on a baking sheet and cover them with foil. Heat for about 10-15 minutes, or until warm. - How Long They Last in the Fridge: These wings can last in the fridge for about four days. After that, they may start losing taste and texture. - Signs of Spoilage: Check for signs before eating leftovers. If you see mold or a bad smell, it’s best to throw them away. Always trust your senses! Yes, you can use frozen cauliflower for this recipe. Just make sure to thaw it first. After thawing, pat the cauliflower dry with a paper towel. This helps remove excess moisture. If you skip drying, the batter might not stick well. Also, reduce the cooking time slightly. Start with 10 minutes and check for crispiness. Absolutely! You can make a simple teriyaki sauce at home. Here’s an easy recipe: - Ingredients: - 1/2 cup soy sauce - 1/4 cup honey or brown sugar - 2 tablespoons rice vinegar - 1 teaspoon garlic, minced - 1 teaspoon ginger, grated - 1 tablespoon cornstarch mixed with 1 tablespoon water - Instructions: 1. Combine soy sauce, honey, vinegar, garlic, and ginger in a pot. 2. Heat over medium heat until it simmers. 3. Stir in the cornstarch mixture to thicken. 4. Cook for another minute, then remove from heat. This sauce adds a fresh taste to your cauliflower wings! To spice up your teriyaki cauliflower wings, try these tips: - Add red pepper flakes to the batter for heat. - Mix sriracha into the teriyaki sauce for a kick. - Top the wings with sliced jalapeños for fresh heat. These options will give your dish extra flavor without overpowering it! This article detailed how to make a tasty cauliflower dish from start to finish. We explored essential ingredients, step-by-step cooking methods, and helpful tips to perfect texture and flavor. You also learned about variations for dietary needs and storage options. Now, you can easily prepare a delicious cauliflower meal that suits your taste. Enjoy experimenting with ingredients and techniques. With practice, you'll impress everyone with your growing cooking skills. Get started today and savor the results!

Air Fryer Teriyaki Cauliflower Wings Easy and Tasty Dish

- 1 cup raw almonds - 1 cup dark chocolate chips (dairy-free options) - 1 tablespoon coconut oil - 1/2 cup unsweetened shredded coconut - 1/4 teaspoon sea salt - 1 teaspoon vanilla extract - Optional topping: sprinkle of sea salt To make these no-bake chocolate almond clusters, start with your ingredients. First, gather 1 cup of raw almonds. These nuts give a nice crunch and flavor. Next, you need 1 cup of dark chocolate chips. If you prefer, you can use dairy-free chocolate chips. Then, grab 1 tablespoon of coconut oil. This oil helps the chocolate melt smoothly and adds a subtle flavor. You will also need 1/2 cup of unsweetened shredded coconut. This adds extra texture and a hint of sweetness. Don’t forget 1/4 teaspoon of sea salt for balance. It enhances the chocolate flavor. Lastly, 1 teaspoon of vanilla extract brings warmth to your clusters. If you want, add a sprinkle of sea salt on top for a tasty finish. These ingredients are simple, yet they come together to make a delightful treat. You can find them at most stores. I love how easy it is to whip up these treats with just a few items. Start by toasting the almonds. Use a dry skillet on medium heat. Stir often for about 5-7 minutes. Watch closely until they turn golden and smell great. Once done, take them off the heat and let them cool. This step adds crunch and flavor. Next, grab a microwave-safe bowl. Combine your dark chocolate chips and coconut oil. Heat this in the microwave. Do it in 30-second intervals. Stir in between each interval. Stop when the chocolate is smooth and melted. Be careful not to overheat it. Now, it's time to add flavor. Stir in the vanilla extract and sea salt into the melted chocolate. Mix well until everything blends together. Next, fold in the toasted almonds and shredded coconut. Ensure every almond is covered in chocolate goodness. Prepare your baking sheet by lining it with parchment paper. Use a spoon to scoop small amounts of the mixture. Place these clusters on the sheet, leaving space between them. If you want, add a sprinkle of sea salt on top for extra flavor. Finally, put the baking sheet in the fridge. Let the clusters chill for about 30 minutes. This allows them to harden. Once firm, they’re ready to enjoy! To get the best chocolate coating, start with high-quality dark chocolate chips. Use coconut oil to help the chocolate melt smoothly. Heat the chocolate in small bursts, stirring often. This method keeps it from burning. Look for a shiny, liquid texture. Once melted, mix in a pinch of sea salt for a richer taste. You can add a few extras to amp up the flavor. Try adding dried fruits like cranberries or apricots. They give a nice sweetness. You might also add a sprinkle of cinnamon or nutmeg to the chocolate mix. If you love crunch, consider adding chopped pretzels or another nut. These small tweaks can take your clusters to the next level. One common mistake is overheating the chocolate. Always heat in short bursts and stir often. Another issue is not cooling the almonds enough before mixing. Hot almonds can melt the chocolate. Lastly, don’t skip the refrigeration step. It helps the clusters set properly. Following these tips will help you make perfect clusters every time. {{image_2}} You can add dried fruits or nuts to your clusters. Dried cherries or cranberries give a sweet bite. Walnuts or pecans can add crunch. Just chop them up and mix them in with the almonds. This makes your treats more fun and tasty. You can also try using different types of chocolate. Milk chocolate adds sweetness, while dark chocolate brings a rich flavor. Experiment with what you like best! You can easily make these clusters vegan or gluten-free. To make them vegan, just use dairy-free dark chocolate chips. They work just as well and taste great. For a gluten-free treat, check that the chocolate and other ingredients are certified gluten-free. This way, everyone can enjoy your yummy clusters, no matter their diet! These no-bake treats are perfect for many occasions. Serve them at birthday parties, holiday gatherings, or movie nights. They pair well with coffee or tea, making them great for afternoon snacks. You can also package them in cute boxes as gifts. This adds a personal touch and makes your friends smile! To keep your no-bake chocolate almond clusters fresh, store them in an airtight container. This helps to keep moisture out and maintain their crispness. Place a piece of parchment paper between layers if you stack them. This will prevent sticking and keep them looking nice. These tasty treats last up to a week in the refrigerator. After that, they may lose their crunch and flavor. Make sure to check for any signs of spoilage before enjoying them. If they seem dry or off, it’s best to toss them out. You can freeze your clusters if you want to save some for later. First, let them cool completely. Then, place them in a single layer on a baking sheet. Freeze them until solid, which takes about an hour. After that, transfer them to an airtight bag or container. When you want to eat them, thaw in the fridge for a few hours. Enjoy them cold or at room temperature! Yes, you can use other nuts. Some great options include walnuts, pecans, or cashews. Each nut adds its own flavor. For example, walnuts give a rich taste. Pecans add a sweet crunch. Cashews bring creaminess to the mix. Feel free to experiment to find your favorite nut combo! I recommend using dark chocolate chips for a rich flavor. You can also use milk chocolate if you like it sweeter. For a dairy-free option, try vegan chocolate chips. Each type of chocolate will change the taste slightly. Choose what you love most! To keep the chocolate smooth, use low heat. Melt it slowly in short bursts. Stir it well between heats. Adding coconut oil helps too. It keeps the chocolate creamy. If you see any lumps, take it off the heat right away. Stir until smooth. Absolutely! You can make them a few days in advance. Store them in an airtight container in the fridge. They will stay fresh for about a week. Just take them out when you're ready to enjoy. No need to worry about them going bad! This blog post guides you through making delicious chocolate almond clusters. You learned about the simple ingredients and easy steps needed for this treat. I shared tips to perfect your textures and avoid common mistakes. You can also try fun variations to suit your taste. Remember, store your clusters well for the best taste later. Enjoy making these tasty snacks for any occasion. They’re sure to please everyone!

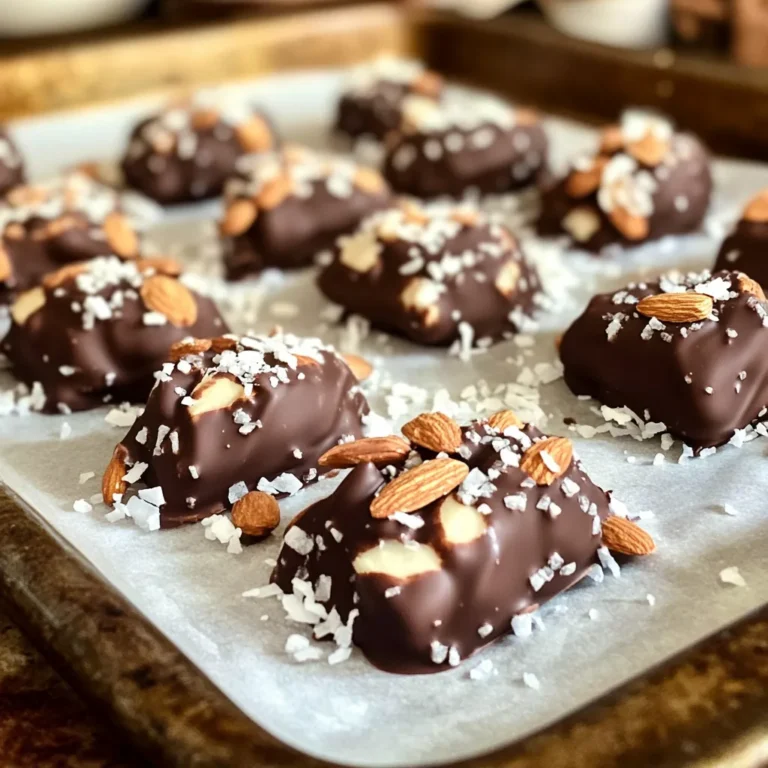
No-Bake Chocolate Almond Clusters Simple and Sweet Treat

For the base of these donuts, you will need: - 1 cup all-purpose flour - 1/2 cup granulated sugar - 1 teaspoon baking powder - 1/2 teaspoon baking soda - 1/2 teaspoon salt - 1 teaspoon ground cinnamon - 1/4 teaspoon nutmeg These dry ingredients form the heart of our recipe. The flour gives structure. Sugar adds sweetness, while baking powder and baking soda help the donuts rise. Cinnamon and nutmeg bring warmth and flavor. Now, let’s move to the wet ingredients. You'll need: - 1/2 cup unsweetened applesauce - 1/4 cup milk - 1 large egg - 2 tablespoons melted butter - 1 teaspoon vanilla extract The applesauce helps keep the donuts moist. Milk adds richness. The egg binds everything together. Butter gives a nice flavor, and vanilla brings a sweet aroma. For a fun touch, consider these toppings: - Cinnamon sugar (1/4 cup granulated sugar + 1 tablespoon cinnamon) Dusting the warm donuts with cinnamon sugar adds a lovely finish. You get a sweet crunch that pairs well with the soft donut. Enjoy experimenting with toppings like powdered sugar or a simple icing, too! First, turn your oven to 350°F (175°C). This is the perfect heat for baking. While the oven warms, take your donut pan and spray it with non-stick spray. This keeps your donuts from sticking later. Make sure to cover all the cavities well. In a large bowl, gather the dry ingredients. Add 1 cup of all-purpose flour, 1/2 cup granulated sugar, 1 teaspoon baking powder, and 1/2 teaspoon baking soda. Then, add 1/2 teaspoon salt, 1 teaspoon ground cinnamon, and 1/4 teaspoon nutmeg. Whisk all these together. Mixing well helps the flavors spread evenly. In a separate bowl, mix your wet ingredients. Combine 1/2 cup unsweetened applesauce, 1/4 cup milk, 1 large egg, 2 tablespoons melted butter, and 1 teaspoon vanilla extract. Stir until smooth. Now, pour this mixture into the dry ingredients. Gently fold them together. It’s okay if there are a few lumps; don’t overmix. Next, take the diced apple pieces and fold them into the batter gently. Now, use a spoon to fill each cavity in the donut pan. Fill them about 2/3 full. This allows room for the donuts to rise without spilling over. Place the filled donut pan into the heated oven. Bake for 12 to 15 minutes. To check if they are done, insert a toothpick into the center of a donut. If it comes out clean, they are ready! After baking, let the donuts cool in the pan for about 5 minutes. Then, transfer them to a wire rack to cool completely. If you want a sweet touch, toss the warm donuts in cinnamon sugar. This adds extra flavor and makes them look great! Overmixing can make your donuts tough. Mix the batter until just combined. You want some lumps. This keeps the donuts soft and fluffy. Remember, gentle is key! Make sure to fold the wet and dry ingredients carefully. For these donuts, I recommend using Granny Smith apples. They’re tart and hold their shape well. Other good choices are Honeycrisp or Fuji apples. Avoid soft apples like Red Delicious, as they can turn mushy. The right apple adds great flavor and texture to your donuts. To bake evenly, make sure your oven is preheated. An oven thermometer can help check the temperature. Fill each donut cavity about 2/3 full for best results. Also, rotate the pan halfway through baking. This helps all the donuts cook evenly and makes them rise beautifully. {{image_2}} To make gluten-free baked donuts, swap all-purpose flour for a gluten-free blend. Look for a brand that includes xanthan gum for the best texture. The rest of the recipe stays the same. You still get that warm, cozy flavor from the apples and spices. For a vegan version, replace the egg with a flax egg. To make a flax egg, mix 1 tablespoon of ground flaxseed with 2.5 tablespoons of water. Let it sit for a few minutes until it thickens. Use almond or oat milk instead of regular milk. For the butter, you can use coconut oil or vegan butter. This keeps your donuts soft and tasty. Want to mix it up? Add some fun flavors! You can toss in 1/2 cup of chopped nuts like walnuts or pecans for crunch. If you love chocolate, add 1/2 cup of mini chocolate chips. They melt into gooey bites of goodness. You can even mix in dried cranberries or raisins for a fruity twist. The options are endless! To keep your apple cinnamon baked donuts fresh, place them in an airtight container. This helps them stay soft and prevent drying out. You can store them at room temperature for up to three days. If you want them to last longer, consider refrigerating them. Just be sure to let them cool completely before storing. You can freeze these donuts for up to three months. To freeze, place the cooled donuts in a single layer on a baking sheet. Once frozen solid, transfer them to a freezer bag or container. This prevents them from sticking together. When you’re ready to enjoy them, simply thaw them in the fridge overnight. For the best taste, reheat your donuts in the oven. Preheat your oven to 350°F (175°C). Place the donuts on a baking sheet and heat for about 5-7 minutes. This will make them warm and soft again. If you prefer, you can also use a microwave. Heat each donut for about 10-15 seconds. Enjoy them warm for the best flavor! Yes, you can use whole wheat flour. It will give your donuts a nutty flavor. Keep in mind they may be denser than with all-purpose flour. Baked donuts stay fresh for about 2-3 days at room temperature. Store them in an airtight container. You can also refrigerate them for up to a week. You can use unsweetened applesauce as an egg substitute. Use 1/4 cup for each egg. This will keep the donuts moist and delicious. Yes, you can make them ahead of time. Bake the donuts and store them in an airtight container. Enjoy them within 2-3 days for the best taste. Serve these donuts warm with coffee or tea. You can also dust them with powdered sugar or drizzle with icing. They make a great treat for brunch or dessert. You learned how to make tasty baked donuts with the right steps and tips. We covered the key ingredients, both dry and wet, and discussed optional toppings to customize your treats. I provided clear instructions from prepping the oven to finishing touches. You also discovered ways to adapt the recipe for gluten-free or vegan diets. Now, you can bake donuts that everyone will enjoy. Enjoy the fun of sharing your tasty creations with friends and family!

Apple Cinnamon Baked Donuts Easy and Delicious Recipe

To make a rich and tasty creamy tomato tortellini soup, gather these key ingredients: - 2 tablespoons olive oil - 1 medium onion, diced - 3 cloves garlic, minced - 1 can (28 oz) crushed tomatoes - 4 cups vegetable broth - 1 teaspoon dried basil - 1 teaspoon dried oregano - Salt and pepper to taste - 1 cup heavy cream (or coconut cream for a dairy-free option) - 2 cups cheese tortellini (fresh or frozen) - 2 cups fresh spinach, roughly chopped - Grated parmesan cheese for serving (optional) - Fresh basil leaves for garnish These ingredients create a warm, creamy base. The crushed tomatoes give a rich flavor. The tortellini adds a nice bite, and the spinach brings freshness. You can add some optional ingredients to boost the taste of your soup: - Red pepper flakes for heat - A splash of balsamic vinegar for tang - Fresh herbs like thyme or parsley for brightness - Additional veggies like carrots or bell peppers for texture These add-ins can give your soup a personal touch. Use them based on what you like. If you have dietary needs, here are some easy swaps: - Use vegetable broth for a vegan option. - Swap heavy cream with coconut cream for a dairy-free choice. - Choose gluten-free tortellini for a gluten-free meal. These substitutions keep the soup delicious while meeting different diets. You can enjoy this creamy soup no matter your preferences! To start, grab a large pot. Pour in 2 tablespoons of olive oil. Heat the oil over medium heat. Once hot, add 1 medium onion, diced. Sauté the onion for about 4 to 5 minutes. You want it to be translucent. Now, stir in 3 cloves of minced garlic. Cook this for 1 to 2 minutes until it smells great. Next, pour in 1 can of crushed tomatoes. Then, add 4 cups of vegetable broth. Toss in 1 teaspoon of dried basil and 1 teaspoon of dried oregano. Season with salt and pepper to taste. Mix well. Bring the soup to a gentle boil. Once boiling, lower the heat and let it simmer for 10 minutes. This helps the flavors come together. After that, stir in 1 cup of heavy cream. If you want a dairy-free version, use coconut cream instead. Add 2 cups of cheese tortellini to the pot. If you have fresh tortellini, it will cook in 3 to 5 minutes. Frozen tortellini takes about 5 to 7 minutes. Once the tortellini is cooked, fold in 2 cups of roughly chopped fresh spinach. Let it wilt for 1 to 2 minutes. Finally, remove the pot from the heat and taste your soup. Adjust with more salt and pepper if needed. Using a large pot helps the soup cook evenly. It allows for good heat distribution. When you sauté the onion, make sure not to rush it. This step builds a rich flavor base. Stirring in the garlic at the right time keeps it from burning. You want that nice, fragrant smell to fill your kitchen. When adding cream, take your time. Stir it in gently. This keeps the soup smooth and creamy. If you’re using frozen tortellini, check the package for cooking times. Overcooking can make it mushy. Using fresh spinach adds color and nutrients. The cook time for tortellini depends on whether it's fresh or frozen. Fresh tortellini cooks faster, usually in about 3 to 5 minutes. Frozen tortellini needs a bit longer, around 5 to 7 minutes. Always check the package for specific times. This helps ensure your tortellini stays firm and tasty. If unsure, taste a piece to see if it's done. Adjusting the cooking time keeps your soup perfect. To get that rich, creamy texture in your soup, use heavy cream or coconut cream. Add the cream after the soup simmers. Stir it in slowly to mix well. If you want a lighter option, use half-and-half. For a silky finish, blend the soup before adding the cream. This gives a smooth feel and looks great! To boost flavor, try using fresh herbs. Adding fresh basil or parsley just before serving brings brightness. You can also add a pinch of red pepper flakes for heat. For more depth, a dash of balsamic vinegar works wonders. Don't forget to season well with salt and pepper. Taste as you go to find the perfect balance. One common mistake is cooking the tortellini too long. Follow package instructions closely to avoid mushiness. Another mistake is not letting the soup simmer long enough. This step helps flavors blend well. Lastly, don't skip the seasoning. A little salt and pepper can turn a good soup into a great one! {{image_2}} To make this soup dairy-free, swap the heavy cream for coconut cream. This gives a rich texture. You can also use almond milk or oat milk. Both options work well. They keep the soup creamy without the dairy. You can boost this soup by adding proteins. Chicken or sausage are great choices. Cook them in the pot before adding the onion. For a vegetarian option, try chickpeas or lentils. They add fiber and protein without meat. Adding seasonal vegetables can enhance your soup. In spring, use fresh peas or asparagus. In summer, try zucchini or corn. Fall brings squash and kale, while winter is perfect for root veggies like carrots and potatoes. Each adds flavor and texture, making the soup even better. To store leftover soup, let it cool first. Then, pour it into an airtight container. Seal the container tightly and place it in the fridge. The soup stays fresh for about three days. You can also label the container with the date. This helps you keep track of how long it has been stored. When it's time to enjoy your soup again, pour it into a pot. Heat it on low to medium heat. Stir often to prevent sticking. If the soup is too thick, add a splash of water or broth. Bring it to a gentle boil and enjoy! You can also use the microwave. Place the soup in a bowl and cover it. Heat in short bursts, stirring in between, until hot. You can freeze this soup for later. Use freezer-safe containers or bags. Leave some space at the top for expansion. The soup can last for up to three months in the freezer. When ready to eat, thaw it overnight in the fridge. Reheat it on the stove or microwave as mentioned earlier. Enjoy your delicious soup anytime you want! Yes, you can make this soup ahead of time. It tastes great after sitting for a while. Just cook the soup, let it cool, and store it in the fridge. When you are ready to eat, reheat it on the stove. If you use fresh tortellini, cook it right before serving. This keeps it tender and fresh. If you don’t have tortellini, you can use other pasta. Small shapes like shells or ditalini work well. You can also use rice for a different texture. Just make sure to adjust the cooking time based on what you choose. To thicken your soup, you have a few options. You can add more heavy cream or use a cornstarch slurry. To make a slurry, mix one tablespoon of cornstarch with two tablespoons of water. Stir it into the soup and cook until it thickens. Another option is to blend a portion of the soup until smooth, then return it to the pot. This blog post showed you how to make creamy tomato tortellini soup. You learned key ingredients, cooking steps, and useful tips. Explore tasty variations for special diets and how to store your soup well. Always adjust cook time based on your tortellini type. Don’t worry; you can make this soup ahead and even substitute ingredients. Cooking should be fun and easy. Follow these steps to enjoy a warm bowl of soup anytime!

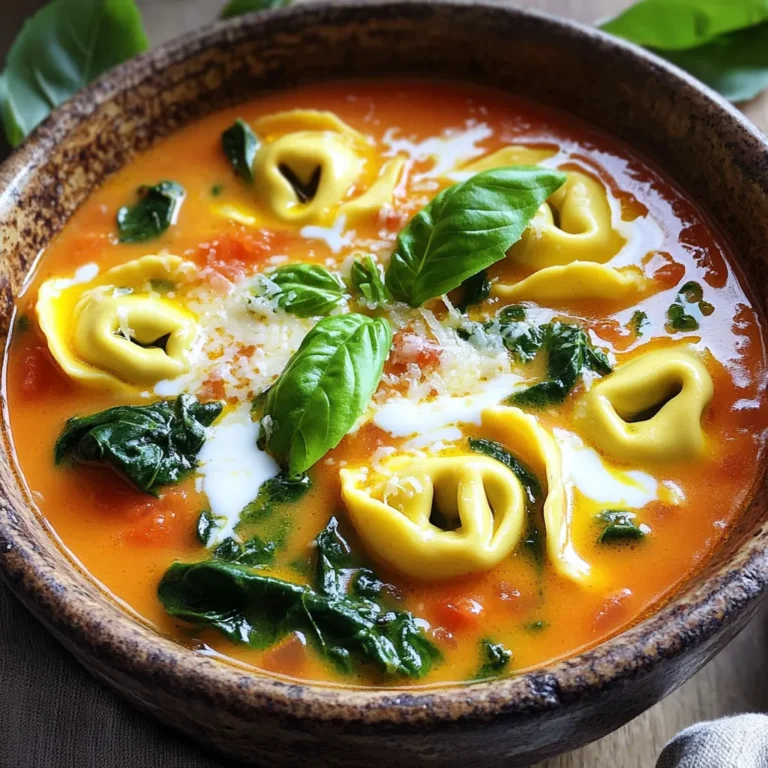
Creamy Tomato Tortellini Soup Simple and Satisfying

- 4 cups fresh broccoli florets - 1 medium onion, chopped - 2 cloves garlic, minced Fresh ingredients are key to making this soup delicious. Start with vibrant broccoli florets. They add color and nutrition. Chopped onion brings sweetness and depth. Minced garlic adds a nice touch of flavor. When you combine these, you create a great base for the soup. - 3 cups vegetable broth - 1 teaspoon dried thyme - 1 teaspoon paprika - Salt and pepper to taste Next, you need a rich broth. Vegetable broth works well to keep it light. Add dried thyme for an earthy note. Paprika brings a warm, smoky flavor. Don’t forget the salt and pepper. They help enhance the taste of the soup. - 2 cups shredded sharp cheddar cheese - 1 cup heavy cream (or a dairy-free alternative) - Fresh parsley for garnish (optional) The creamy part makes this soup special. Shredded sharp cheddar cheese melts well and adds richness. Heavy cream makes it extra creamy. If you prefer, you can use a dairy-free option. Fresh parsley can add a pop of color on top. It’s a nice touch when serving. First, chop your vegetables. Use a sharp knife to cut 4 cups of fresh broccoli florets. Next, chop 1 medium onion and mince 2 cloves of garlic. Peel and dice 1 medium potato, and shred 1 cup of carrots. This mix gives your soup great flavor and texture. Now, measure out your broth and seasonings. You’ll need 3 cups of vegetable broth. For the seasonings, gather 1 teaspoon of dried thyme, 1 teaspoon of paprika, and some salt and pepper. These add warmth and depth to your soup. Combine all the ingredients in your slow cooker. Start with the broccoli, onion, garlic, potato, carrots, and broth. Sprinkle in the thyme, paprika, salt, and pepper. Stir well to mix everything together. Now, set the cooking time and temperature. For a nice, slow cook, cover your slow cooker and set it on low for 6 to 8 hours. If you’re short on time, set it to high for 3 to 4 hours. The goal is to make the veggies tender and flavorful. Once your soup is cooked, puree it to your desired consistency. I recommend using an immersion blender for this. It’s easy and keeps your pot clean. You can leave some chunks for texture if you like that in your soup. Now, stir in 2 cups of shredded sharp cheddar cheese and 1 cup of heavy cream. This will make your soup super creamy and rich. Let it heat for another 15 to 30 minutes on low. Taste it, and adjust the seasonings if needed. Serve hot, and feel free to garnish with fresh parsley if you want a pop of color! To get the best texture in your broccoli cheddar soup, use an immersion blender. This tool lets you blend the soup right in the slow cooker. It makes it easy to control how smooth or chunky you want the soup. You can blend it until creamy or leave some chunks for added texture. This way, you enjoy bites of tender broccoli with every spoonful. Adjusting seasonings can make your soup shine. After blending, taste the soup and add more salt or pepper if needed. You can also add other herbs or spices to fit your taste. Try fresh thyme or a bit of nutmeg for something special. These small changes can elevate the flavor and make it truly yours. This soup pairs well with crusty bread or a light salad. The bread soaks up the creamy soup, making each bite delicious. Serve the soup hot for the best experience. I recommend heating it to at least 165°F (74°C) to ensure it's safe and tasty. Garnish with fresh parsley for a pop of color and a hint of freshness. {{image_2}} You can make this soup dairy-free easily. For cheddar cheese, use a dairy-free cheese. Look for brands that melt well. Nutritional yeast is a great choice too. It adds a cheesy flavor without dairy. For heavy cream, coconut milk works well. Almond milk or cashew cream are also good options. These alternatives keep the soup creamy and rich. Want to add more to your soup? You can include protein sources like cooked chicken or beans. Shredded rotisserie chicken adds flavor and heartiness. White beans or chickpeas can boost the protein too. You can also add vegetables like spinach or cauliflower. Just chop them small so they cook well. This makes the soup even more filling and tasty. If you like heat, try adding jalapeños or red pepper flakes. Slice fresh jalapeños and stir them in before cooking. For a more intense flavor, sprinkle red pepper flakes on top before serving. You can also use pepper jack cheese instead of cheddar. It will give your soup a nice kick. This spicy twist makes your broccoli cheddar soup stand out! To keep your soup fresh, store leftovers in the fridge. Use an airtight container. The soup will stay good for up to five days. If you want to save it longer, freeze the soup. Pour it into freezer-safe bags or containers. Leave some space at the top, as the soup will expand when frozen. When you're ready to enjoy your soup again, reheat it gently. The best way is on the stove over low heat. Stir it often to keep it from sticking. If the soup is too thick, add a splash of vegetable broth or water. This helps regain the creamy texture. In the fridge, your soup lasts about five days. Look for signs of spoilage like off smells or changes in color. If you see any mold, throw it away. Always trust your senses when it comes to food safety. Yes, you can use frozen broccoli. Frozen broccoli is handy and saves time. However, it may change the soup's texture. Fresh broccoli stays crispier, while frozen may turn softer. The flavor may be slightly less bright, but the soup will still taste good. To make this soup gluten-free, check your broth. Use a certified gluten-free vegetable broth. You can also thicken the soup with cornstarch or arrowroot. Just mix equal parts with cold water before adding it to the soup. This soup pairs well with crusty bread or a fresh salad. Try serving it with grilled cheese sandwiches for a cozy meal. You can also add a side of roasted veggies for more flavor and nutrition. This blog post covers all you need for a tasty Slow Cooker Broccoli Cheddar Soup. We discussed fresh ingredients like broccoli and garlic, along with seasonings to enhance flavor. You learned how to prepare and cook the soup step-by-step, and I shared tips for perfect texture and flavor adjustments. In conclusion, enjoy this cozy dish by trying different variations and using leftovers wisely. You can make it your own with simple changes. A warm bowl of soup is always welcome!

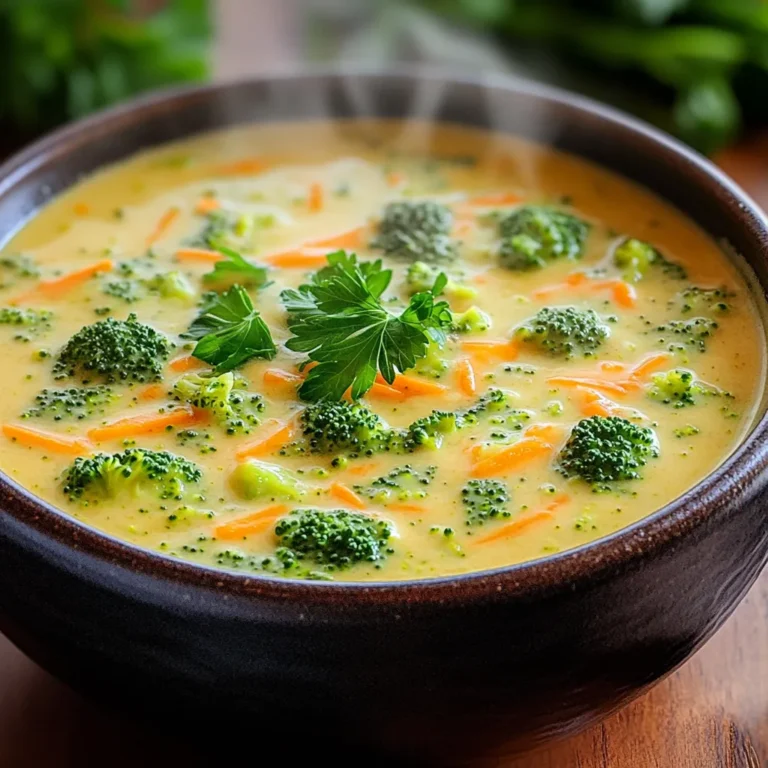
Savory Slow Cooker Broccoli Cheddar Soup Recipe

- 4 salmon fillets (about 6 oz each) - 1/4 cup honey - 3 tablespoons soy sauce (preferably low sodium) - 4 cloves garlic, minced - 1 tablespoon fresh ginger, grated - 1 tablespoon olive oil - 1 teaspoon sesame oil - 1/2 teaspoon black pepper - 2 cups green beans, trimmed - 1 red bell pepper, sliced - 1 cup cherry tomatoes, halved - Sesame seeds, for garnish - Fresh cilantro, for garnish When using salmon, choose fillets that are bright and moist. Fresh salmon gives the best flavor. Honey adds sweetness and helps create a nice glaze. Soy sauce adds a savory note. I like using low-sodium soy sauce to control the salt. Garlic and ginger add depth. Use fresh garlic and ginger for the best taste. Olive oil and sesame oil add richness and enhance the dish. If you have an allergy to soy, try using coconut aminos instead. This gives a similar flavor without the soy. For a different sweetener, maple syrup works well in place of honey. You can swap any vegetables based on what you have. Zucchini or broccoli can replace green beans or bell peppers. Always adjust cooking times for different veggies to make sure they cook well. Start by preheating your oven to 400°F (200°C). This temperature helps the salmon cook evenly. While the oven heats, grab a large baking sheet. Line it with parchment paper for easy cleanup later. This step saves time and effort when you finish cooking. In a small bowl, mix the marinade. Add 1/4 cup honey, 3 tablespoons soy sauce, and 4 minced garlic cloves. Next, include 1 tablespoon of grated ginger, 1 tablespoon of olive oil, 1 teaspoon of sesame oil, and 1/2 teaspoon of black pepper. Whisk everything together until you see a smooth blend. This marinade gives the salmon a sweet and savory flavor. Now it’s time to marinate the salmon. Place 4 salmon fillets on one side of the baking sheet. Brush half of your marinade over the salmon. Make sure each fillet gets a nice coat. On the other side, add 2 cups of green beans, 1 sliced red bell pepper, and 1 cup of halved cherry tomatoes. Drizzle the rest of the marinade over the veggies. Toss them gently to coat every piece. This adds flavor to your side dish. Slide the baking sheet into your preheated oven. Bake for about 15 to 20 minutes. The salmon is done when it flakes easily with a fork. The vegetables should be tender but still crisp. Keep an eye on them so they do not overcook. This timing helps you serve a fresh and tasty meal. To cook salmon just right, choose fresh fillets. Look for firm, bright flesh. The salmon should not smell fishy. When marinating, let it sit for at least 15 minutes. This helps the flavors soak in deep. Bake the salmon at 400°F (200°C). It cooks evenly at this heat. Check for doneness at 15 minutes. The salmon should flake easily with a fork. If it looks opaque, it's ready to eat. Roasting vegetables makes them tasty and sweet. Cut them into even pieces. This helps them cook at the same time. For this recipe, green beans, red bell pepper, and cherry tomatoes work well. Toss them in the marinade before baking. Spread them out on the pan. This gives them space to roast and not steam. Check for doneness after 15 minutes. They should be tender but still crisp. Serving is key to enjoying your meal. Use a large platter to show off the dish. Place the salmon in the center and surround it with the colorful veggies. Sprinkle sesame seeds and fresh cilantro on top. This adds a nice crunch and fresh taste. Serve with rice or a side salad for a complete meal. Enjoy your beautiful, tasty dish with family or friends! {{image_2}} You can switch up the veggies for this dish. Try using broccoli, asparagus, or zucchini. Each adds a unique flavor and texture. Carrots also work well. Just cut them into thin sticks to ensure they cook evenly. Feel free to mix and match your favorites. This makes the dish fun and colorful! If you want to change the sweetener, there are great options. Maple syrup gives a nice flavor. Brown sugar adds a deep sweetness. You can also use agave nectar for a lighter touch. Each one will change the taste a bit but still keep it yummy. To make the dish even better, add spices or herbs. A pinch of red pepper flakes gives a nice kick. Fresh herbs like parsley or basil can add freshness. You can even try dill for a unique twist. Experimenting with flavors makes the meal fun and keeps your taste buds happy! To store leftover honey garlic salmon, let it cool first. Place the salmon and veggies in an airtight container. Keep it in the fridge for up to three days. Make sure to separate the salmon from the veggies if you want to keep them fresh longer. When you are ready to enjoy your leftovers, preheat your oven to 350°F (175°C). Place the salmon and veggies on a baking sheet. Cover with foil to keep moisture in. Heat for about 10-15 minutes until warmed through. You can also use a microwave. Heat in 30-second bursts until warm, but be careful not to overcook it. If you want to freeze honey garlic salmon, wrap each fillet tightly in plastic wrap. Place them in a freezer-safe bag or container. This keeps out air and prevents freezer burn. You can freeze the salmon for up to two months. For best results, thaw it in the fridge overnight before reheating. You can pair this dish with rice or quinoa. Both options soak up the sauce well. A fresh salad also works great. I love a simple green salad or a crunchy slaw. You can add some crusty bread too for a nice touch. Yes, you can use frozen salmon fillets. Just make sure to thaw them first. It is best to put them in the fridge overnight. If you are in a hurry, you can use cold water to thaw. This method takes about 30 minutes. Cooking salmon in the oven takes about 15 to 20 minutes. The key is to check if it flakes easily with a fork. If it does, it is done. You want to avoid overcooking, as this can dry it out. Yes, honey garlic salmon is quite healthy. Salmon is rich in omega-3 fatty acids. These are good for your heart and brain. The veggies add fiber and vitamins. Just keep an eye on the honey for sugar content. You can prepare the marinade in advance. Just store it in the fridge for a day. You can also marinate the salmon ahead of time. Just make sure to cook it fresh for the best flavor. This post covered everything you need for a great sheet pan honey garlic salmon meal. We explored the ingredients, how to prepare and cook them, and ways to make this dish your own. I shared storage tips and answered common questions to help you succeed. Remember, cooking should be fun! Experiment with flavors and enjoy the process. You’ll impress your friends and family and create a meal they will love. Happy cooking!

Sheet Pan Honey Garlic Salmon Tasty Dinner Delight

To craft a warm, cozy Cinnamon Maple Latte, you need a few key items. Gather these main ingredients: - 1 cup strong brewed coffee or espresso - 1 cup milk (dairy or non-dairy) - 2 tablespoons pure maple syrup - 1 teaspoon ground cinnamon - 1/4 teaspoon vanilla extract These ingredients blend to create a rich flavor. The coffee gives you a nice kick, while the maple syrup adds sweetness. The cinnamon brings warmth and spice, making each sip delightful. You can take your latte to the next level with some fun garnishes. Here are some ideas: - Whipped cream (adds creaminess) - A sprinkle of cinnamon (for extra spice) - A cinnamon stick (as a stirrer and garnish) These garnishes not only look good, but they also add more flavor. Whipped cream makes it indulgent, while the cinnamon stick enhances the aroma. If you want to change things up, try different milk options. Here are some tasty alternatives: - Almond milk (light and nutty) - Oat milk (creamy and sweet) - Soy milk (rich and smooth) Each type of milk adds its own unique taste. Almond milk gives a nutty note, while oat milk makes it extra creamy. Choose what you like best! Start by brewing one cup of strong coffee or espresso. You can use a drip coffee maker or an espresso machine. Make sure it’s bold and rich, as this will balance the sweet and creamy flavors. Once brewed, set it aside. In a small saucepan, add one cup of milk. You can use dairy milk or a non-dairy option like almond or oat milk. Next, stir in two tablespoons of pure maple syrup, one teaspoon of ground cinnamon, and a quarter teaspoon of vanilla extract. Heat this mixture over medium heat. Whisk it often to keep it from burning. Heat until it’s hot and frothy, which should take about five minutes. If you want extra foam, use a milk frother or a blender. In a large mug, pour in your brewed coffee or espresso. Slowly pour the hot milk mixture over the coffee. If you want to save some foam for later, hold it back with a spoon. Once you combine the milk and coffee, give it a gentle stir. If you like, top it with whipped cream and sprinkle some cinnamon on top. You can also add a cinnamon stick for a nice touch. Creating froth can be easy without fancy tools. You can use a whisk or a jar. If using a jar, fill it halfway with milk. Close the lid tightly and shake it up quickly. This method works well and adds air to the milk. After shaking, microwave the jar for about 30 seconds. This will heat the milk and stabilize the foam. You can whisk the milk in a saucepan, too. Just make sure to keep stirring to avoid burning. Sweetness is key in a Cinnamon Maple Latte. Start with two tablespoons of maple syrup, then taste it. If you want more sweetness, add a little more syrup. You can also mix in a pinch of vanilla or nutmeg to boost flavor. Keep in mind that maple syrup has a unique taste, so adjust it to your liking. Some may prefer less sweetness, and that’s okay! You can always add more later. Presentation matters when making a latte. Pour the milk slowly to create layers. This makes the drink look appealing. You can top the latte with whipped cream for a rich touch. Sprinkling cinnamon on top adds color and flavor. A cinnamon stick can serve as a stirrer and looks nice in the mug. Using a clear glass mug helps show off the beautiful layers of your drink. {{image_2}} To make an iced version, start by brewing your coffee. Let it cool down. Fill a glass with ice. Pour cold coffee over the ice. Next, mix cold milk with maple syrup, cinnamon, and vanilla. Stir well. Pour the milk mixture over the coffee. Add whipped cream if you like. Sprinkle some cinnamon on top for fun. Enjoy this cool treat on a hot day! If you want lower sugar, try other sweeteners. You can use honey or agave syrup. They work well with the flavors. For a sugar-free option, consider stevia or monk fruit. Just add to taste, adjusting to your sweetness level. Each sweetener gives a unique twist to your latte. Want to spice things up? Add a pinch of nutmeg for warmth. It pairs nicely with cinnamon. You can also stir in cocoa powder for a chocolatey treat. This adds richness to the drink. For a fun twist, try a splash of peppermint extract. It gives a fresh burst of flavor. Use these extras to create your perfect cinnamon maple latte! To store leftover latte ingredients, keep them separate. Place brewed coffee or espresso in a sealed container in the fridge. Use it within three days for the best flavor. Store the milk mixture in another container. It can last up to two days. If you mixed in maple syrup, try to use it quickly. Maple syrup can change flavor over time. When reheating coffee or milk mixtures, do it slowly. Use a saucepan on low heat for best results. Stir often to avoid burning. If you choose to use a microwave, heat in short bursts. Stop and stir every 30 seconds. This method helps keep the latte creamy and smooth. Store pure maple syrup in a cool, dark place. If opened, keep it in the fridge. It can last for up to a year when stored this way. Always check for mold or off smells before use. If you find mold, boil the syrup to remove it. Just remember, maple syrup is best enjoyed fresh! The flavor profile of a Cinnamon Maple Latte is warm and sweet. The rich coffee blends well with the creamy milk. Pure maple syrup adds a smooth sweetness. Ground cinnamon gives it a cozy spice. When you sip this drink, you taste comfort. The vanilla extract rounds it out, adding depth. Overall, it feels like a hug in a mug. Yes, you can use instant coffee for this recipe. Instant coffee makes it quick and easy. Just mix the instant coffee with hot water. Use the same amount as brewed coffee. The flavor may not be as strong, but it still works. If you want a richer taste, brew strong coffee instead. You can find a Cinnamon Maple Latte in many cafes. Look for coffee shops that focus on seasonal flavors. Some chains may also offer it during fall. If they have a specialty drink menu, check there. If you don’t see it, ask the barista. They might make it for you if they have the ingredients. In this post, we explored how to make a delicious Cinnamon Maple Latte. We covered key ingredients, step-by-step brewing methods, and tips for the best taste. You can enhance your latte with fun variations and learn how to store leftovers properly. Remember, making a great latte at home is simple and rewarding. Enjoy experimenting with flavors that make it your own. Your perfect cup is just a brew away!

Cinnamon Maple Latte Flavorful Delight to Enjoy

PREV 1 … 17 18 19 … 86 NEXT
spicy fork kitchen

explore

DessertsDinnerAppetizersDrinks

Our Policies

  • Cookie Policy
  • Copyright Policy
  • Disclaimer
  • GDPR Policy
  • Terms Of Use
Back to Top
  • About
  • Contact Us
  • Privacy Policy
© 2026 spicy fork kitchen