FREE DINNER EBOOK! Get your copy!
  • Cookie Policy
  • GDPR Policy
  • Disclaimer
  • Terms Of Use
  • Visit my other site: Fun Cookie Recipes
spicy fork kitchen
  • Home
  • Dinner
  • Desserts
  • Drinks
  • Appetizers
  • Contact
  • About
  • Privacy Policy
  • Home
  • Dinner
  • Desserts
  • Drinks
  • Appetizers
  • Contact
  • About
  • Privacy Policy
  • Cookie Policy
  • GDPR Policy
  • Disclaimer
  • Terms Of Use
Visit my other site: Fun Cookie Recipes

HOME / CATEGORIES /

Latest

- 8 oz cream cheese, softened - 1/2 cup powdered sugar - 1/4 cup brown sugar - 1 tsp vanilla extract - 1 cup whipped cream (store-bought or homemade) - 1 large apple (Granny Smith or Honeycrisp), chopped - 1/2 cup caramel sauce (store-bought or homemade) - 1/4 cup chopped pecans (optional) To create the best Caramel Apple Cheesecake Dip, gathering the ingredients is key. Start with 8 ounces of softened cream cheese. This helps to mix easily and gives the dip a smooth texture. Next, you'll need 1/2 cup of powdered sugar and 1/4 cup of brown sugar. These sugars add sweetness and a lovely caramel flavor. You can adjust these amounts if you want a sweeter dip. A teaspoon of vanilla extract adds warmth and depth to the taste. Don’t skip this ingredient, as it brightens the flavors. Whipped cream is important, too. Use 1 cup of either store-bought or homemade whipped cream. This makes the dip light and fluffy. For the apple, choose one large Granny Smith or Honeycrisp. Chop it into bite-sized pieces for easy dipping. The tartness of Granny Smith pairs well with the dip’s sweetness. You'll also need 1/2 cup of caramel sauce. You can use store-bought sauce or make your own if you feel adventurous. Lastly, for those who enjoy crunch, add 1/4 cup of chopped pecans. They are optional but add a nice texture. Gathering these ingredients will set you up for a fun and tasty experience! - Step 1: Beat cream cheese until smooth. Start with 8 ounces of softened cream cheese. Use an electric mixer. Mix until it is creamy and there are no lumps. - Step 2: Incorporate powdered and brown sugar. Gradually add 1/2 cup of powdered sugar and 1/4 cup of brown sugar. Mix well after each addition. This helps blend all the flavors. - Step 3: Add vanilla extract and mix. Next, stir in 1 teaspoon of vanilla extract. This adds a warm, sweet flavor to your dip. - Step 4: Fold in whipped cream carefully. Take 1 cup of whipped cream and gently fold it into the mixture. Be careful not to deflate the whipped cream. You want a light, airy dip. - Step 5: Transfer to serving bowl. Scoop the mixture into a serving bowl. Smooth the top with a spatula for a nice look. - Step 6: Drizzle with caramel sauce. Drizzle 1/2 cup of caramel sauce over the top. Watch it cascade down the sides. This adds a sweet touch and makes it look fancy. - Step 7: Add chopped pecans. If you like, sprinkle 1/4 cup of chopped pecans on top. This gives a nice crunch and extra flavor. - Step 8: Serve with chopped apple pieces. Cut up a large apple, like Granny Smith or Honeycrisp, into bite-sized pieces. Use these for dipping. Enjoy your creamy and delightful treat! - Use room temperature cream cheese for easier mixing: Cold cream cheese can make blending hard. Let it sit out for about 30 minutes. This makes it creamy and smooth. - Gently fold whipped cream to retain fluffiness: When adding whipped cream, use a spatula to fold it in. This keeps the dip light and airy. If you mix too hard, it will lose its fluffiness. - Customize sweetness with more or less caramel sauce: You can adjust the sweetness by adding more or less caramel. Start with a small amount and taste it. This way, you can get the right balance for your dip. These simple tips will help you create a dip that is not only creamy but also full of flavor. Enjoy making your caramel apple cheesecake dip! {{image_2}} You can change this dip to suit your taste. Here are some ideas: - Try different apples like Fuji or Gala. Each type gives a new flavor. Fuji apples are sweet and crisp. Gala apples are juicy and fragrant. Mixing apples can make your dip more fun. - Substitute the caramel sauce with chocolate sauce. This twist makes it rich and sweet. Chocolate adds a new layer of flavor. It pairs well with the cream cheese and whipped cream. - Add spices like cinnamon or nutmeg for extra flavor. A sprinkle of cinnamon adds warmth. Nutmeg gives a nice touch of spice. These spices can make your dip taste even better. Feel free to explore these options and make the dip your own! To keep your caramel apple cheesecake dip fresh, refrigerate it right away. Place the dip in an airtight container or cover it tightly with plastic wrap. This helps prevent it from drying out or absorbing other smells from the fridge. The dip will stay good for about three days when stored properly. To keep the presentation fresh, avoid adding the apples until right before serving. Apples can brown when cut, which may affect the look of your dip. Just slice the apples and arrange them around the dip when you are ready to serve. For reusing the dip, simply scoop out what you need with a clean spoon. This keeps the remaining dip safe to eat. If you notice the dip has thickened after a day, you can stir in a small amount of whipped cream to bring back its creamy texture. Enjoy your delicious dip without worry! Yes, you can prepare this dip a day in advance. Just mix the ingredients and store it in the fridge. Cover it tightly with plastic wrap to keep it fresh. This makes it easy to serve when you need it. Just remember to add the caramel sauce and nuts on top right before serving. This dip pairs well with many items. Serve it with: - Chopped apple pieces - Graham crackers - Pretzel sticks - Vanilla wafers - Pecan halves Each option adds a fun crunch and flavor. You can also add a bowl of extra caramel sauce for dipping. The dip will last about 3 days in the fridge. Make sure to store it in a sealed container. If you see any changes in color or smell, it's best to toss it. Always check before enjoying leftovers. This blog post covered a tasty caramel apple cheesecake dip recipe. We went over the simple ingredients and easy steps that anyone can follow. I shared tips to perfect your dip and fun variations to try. Remember, you can store leftovers properly to enjoy them later. Enjoy making this treat for your family or friends! With these easy steps, you’ll impress everyone with your skills. Happy dipping!

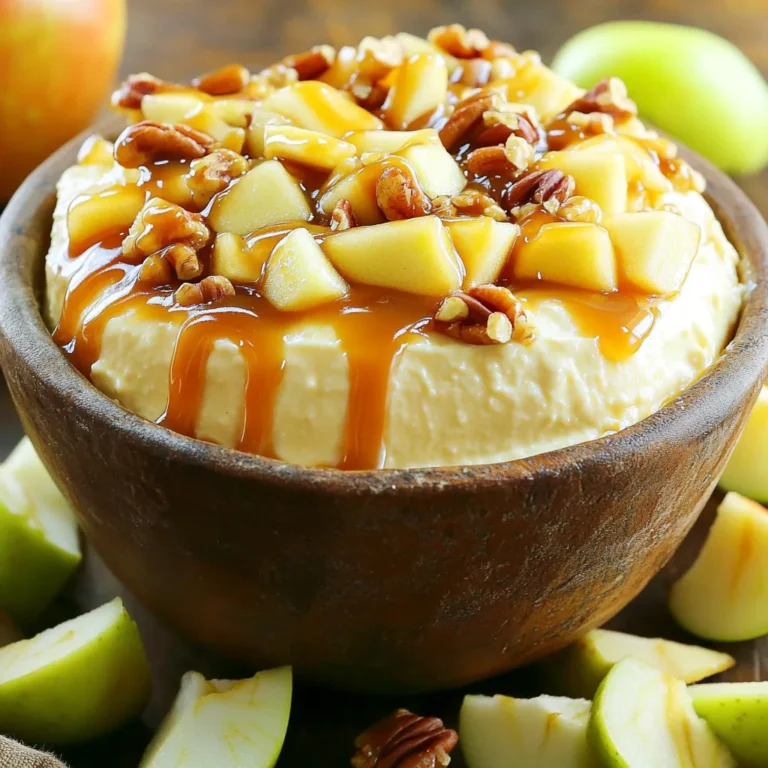
Caramel Apple Cheesecake Dip Creamy and Delightful Treat

- Greek Yogurt - Dark Chocolate Chips - Sweeteners: Honey or Maple Syrup - Flavorings: Vanilla Extract & Salt - Optional Toppings: Whipped Cream, Shaved Chocolate, Fresh Berries To make Greek Yogurt Chocolate Mousse, you need simple, high-quality ingredients. First, grab one cup of plain, unsweetened Greek yogurt. This yogurt gives the mousse its creamy base. Next, you’ll need one cup of dark chocolate chips. You can also use chopped chocolate if you prefer. The dark chocolate adds a rich flavor that pairs well with the yogurt. For sweetness, choose either two tablespoons of honey or maple syrup. Both add a nice touch of natural sweetness. Then, add one teaspoon of vanilla extract. This ingredient enhances the taste, making it even more delicious. A pinch of salt is also key. It balances the flavors and makes the chocolate pop. Finally, think about optional toppings. You can use whipped cream, shaved chocolate, or fresh berries. These add a fun finish and extra flavor. With these ingredients, you're set to create a rich and creamy dessert that everyone will love. To melt chocolate safely, use a microwave-safe bowl. Add dark chocolate chips to the bowl. Microwave the chocolate in 30-second bursts. Stir the chocolate after each interval. This helps it melt evenly. Once smooth, let it cool for a few minutes. Cooling is key, as hot chocolate can change the yogurt's texture. In a clean bowl, add Greek yogurt. Mix in honey or maple syrup, vanilla extract, and a pinch of salt. Whisk the ingredients until they are smooth. This creates a creamy base for the mousse. It’s important to mix well to avoid lumps. The yogurt should feel rich and thick. Once the chocolate is cool but still melted, it's time to combine. Gradually add the chocolate to the yogurt mixture. Use a spatula to fold gently. This keeps the mousse light and airy. Whip the mixture for about a minute with a whisk or electric mixer. Avoid overmixing, as that can make it dense. Chilling is vital for a good mousse. Spoon the mixture into cups or bowls. Cover each with plastic wrap. Refrigerate for at least one hour. This helps the mousse set properly. When ready to serve, remove from the fridge. Add your favorite toppings like whipped cream, shaved chocolate, or fresh berries for a lovely touch. To get the right texture for your mousse, avoid overmixing. When you fold the chocolate into the yogurt, do it gently. This keeps some air in the mousse. Air makes it light and fluffy. To incorporate air, whisk the yogurt mixture lightly. If you use an electric mixer, set it to low speed. Mix just until combined to keep it airy. You can easily adjust the sweetness of your mousse. If you like it sweeter, add more honey or maple syrup. Start with one tablespoon more and taste it. You may also try different sweeteners. Agave syrup or stevia can work well. Just remember, each sweetener has a different taste. This might change the flavor of your mousse, so experiment! Serving your mousse can be fun and creative. You can use small cups or fancy glasses. This makes it look special. For toppings, consider adding whipped cream, shaved chocolate, or fresh berries. These add color and texture. You can also layer the mousse with fruits for a beautiful look. {{image_2}} You can make this mousse dairy-free by using coconut yogurt. Coconut yogurt has a creamy texture and a slight coconut flavor. Just swap the Greek yogurt for an equal amount of coconut yogurt. This change keeps the mousse rich and tasty. You can also use dairy-free chocolate chips for the chocolate. Look for brands that are vegan-friendly. You can add spices or extracts to change the flavor. A pinch of cinnamon or a dash of espresso powder can enhance the chocolate taste. Adding a splash of almond or orange extract gives a nice twist. You can also mix in fruit purees or zests. A tablespoon of raspberry puree or orange zest adds fresh flavors. This mousse pairs well with many dishes. Try serving it with fresh fruit or a light biscuit. A cup of coffee or herbal tea complements the dessert nicely. If you want a richer experience, pair it with a scoop of vanilla ice cream. Each option adds a new layer to your dessert experience. You can store Greek Yogurt Chocolate Mousse in the fridge for up to three days. This mousse stays fresh and tasty. Use airtight containers to keep it safe. Glass jars or plastic containers work well. Make sure the lid fits snugly. Yes, you can freeze Greek Yogurt Chocolate Mousse! It holds up well in the freezer. Just place it in a freezer-safe container. Leave some space at the top, as it may expand. To serve after freezing, thaw it in the fridge overnight. This keeps it creamy and smooth. Stir it gently before serving for the best texture. Yes, you can use non-fat Greek yogurt. However, it may change the taste and texture. Non-fat yogurt can make the mousse less creamy. It may also taste a bit more tangy. If you want a rich mousse, I recommend using full-fat yogurt. To make this mousse vegan, swap out the ingredients. Use dairy-free yogurt made from coconut or almonds. Instead of dark chocolate chips, pick a vegan chocolate. For the sweetener, use maple syrup or agave nectar. This way, you can enjoy a creamy, plant-based treat. Serve this mousse in small cups for fun. You can layer it with some berries for color. Whipped coconut cream is a great topping too. For gatherings, place toppings on the side. This way, guests can pick their favorites. This article covered how to make creamy Greek yogurt chocolate mousse using simple ingredients. You learned how to melt chocolate, mix the yogurt base, and combine everything for a light, fluffy texture. I shared tips for adjusting sweetness, achieving the perfect consistency, and even serving suggestions. With variations for dairy-free options and creative presentations, making this dessert is easy. Enjoy making this tasty treat, and feel free to customize it to your taste!

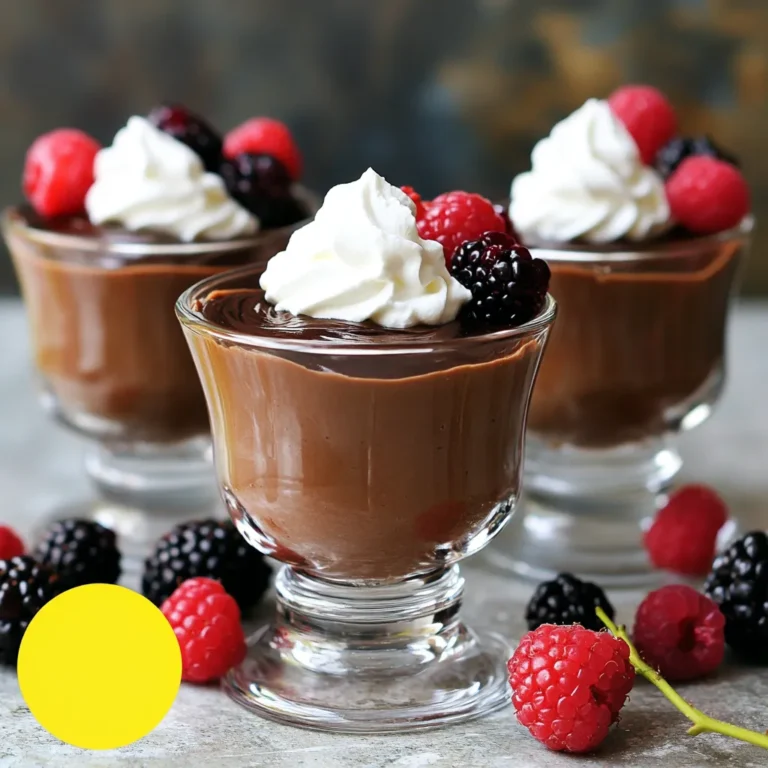
Greek Yogurt Chocolate Mousse Rich and Creamy Delight

- 8 oz (225g) egg noodles - 1 lb (450g) beef sirloin, thinly sliced - 2 tablespoons soy sauce - 1 tablespoon oyster sauce - 2 tablespoons cornstarch - 2 tablespoons vegetable oil - 1 cup bell peppers, thinly sliced (red and yellow for color) - 1 cup bok choy, chopped - 1 cup carrots, julienned - 3 green onions, sliced - 2 cloves garlic, minced - 1 teaspoon ginger, minced - Salt and pepper to taste When making Beef Chow Mein, you need fresh and quality ingredients. The egg noodles provide a nice base. The beef sirloin adds a rich flavor. Soy sauce and oyster sauce bring umami. Cornstarch helps make the beef tender and gives a nice gloss. Using bell peppers, bok choy, and carrots adds color and crunch. Garlic and ginger give a warm, fragrant touch. You can customize your Beef Chow Mein. Try adding snow peas for extra crunch. Mushrooms can add an earthy flavor. If you love spice, add some chili paste or fresh chilis. You might swap beef for chicken or tofu for a different taste. This dish is well-balanced. Each serving has protein from the beef and carbs from the noodles. The vegetables add vitamins and minerals. Here’s a quick look at the nutrition: - Calories: About 400 per serving - Protein: 30g - Carbs: 45g - Fat: 15g - Fiber: 4g These numbers can vary based on your choices. If you skip the beef, you lower the calories and fat. Enjoying this meal can also help meet your daily veggie needs! First, cook the egg noodles. Follow the package instructions for best results. Once they are cooked, drain them. Set the noodles aside in a bowl. This keeps them ready for later. Next, we marinate the beef. Take a bowl and add the thinly sliced beef. Pour in the soy sauce and oyster sauce. Sprinkle the cornstarch over the beef. Mix everything well. Make sure each piece of beef is coated. Let it sit for about 15 minutes. This adds flavor and tenderizes the meat. Now, it's time to cook. - Combining Everything Heat 1 tablespoon of vegetable oil in a large skillet or wok. Make sure the heat is high. Add the marinated beef in a single layer. Sear the beef for 2-3 minutes. It should turn brown. Remove the beef and set it aside. In the same skillet, add another tablespoon of oil. - Final Seasoning Add minced garlic and ginger to the hot oil. Stir quickly to wake up the flavors. Then, add bell peppers, bok choy, and carrots. Cook these veggies for 3-4 minutes. They should be tender but still crisp. Now, return the beef and noodles to the skillet. Toss everything together gently. Make sure the noodles mix well with the beef and veggies. Season with salt, pepper, and more soy sauce if you like. Cook for another 2 minutes to heat through. Finally, add sliced green onions. Give it a quick toss and remove from heat. This process gives you a tasty Beef Chow Mein full of flavor! To get the best flavor in your Beef Chow Mein, use fresh ingredients. Fresh veggies add crunch and color. Marinate the beef well with soy sauce and oyster sauce. This helps the beef soak up all the savory goodness. Cook the beef quickly over high heat. This gives it a nice sear and keeps it tender. Don't overcook the vegetables; they should stay bright and crisp. Toss everything together gently to keep the noodles intact. Many cooks over-marinate the beef. Fifteen minutes is enough. If you leave it too long, the meat can become tough. Another common mistake is overcrowding the pan. Cook in batches if needed. This helps the beef sear well instead of steaming. Also, be careful with salt. Soy sauce adds saltiness, so taste as you go. Lastly, avoid soggy noodles. Drain and rinse them before adding to the stir-fry. You can swap beef for chicken or shrimp. These proteins work well and cook fast. If you want a veggie option, use tofu or tempeh. For the veggies, feel free to mix and match. Snow peas, broccoli, or mushrooms can be great additions. If you can't find bok choy, use spinach or napa cabbage. For a gluten-free version, use tamari instead of soy sauce. Get creative and use what you have! {{image_2}} You can make a tasty vegetarian version of chow mein. Use tofu, tempeh, or seitan instead of beef. These options soak up flavors well. For a vegan dish, skip oyster sauce. Use more soy sauce or a vegan stir-fry sauce. This way, you still get great taste without meat. If you want to change up the protein, consider chicken, shrimp, or pork. Thinly slice chicken breast or pork tenderloin. Cook them like the beef. For shrimp, add them last. They cook fast and stay tender. Each protein gives a unique flavor to your chow mein. Feel free to mix and match vegetables based on what you like. Try broccoli, snap peas, or zucchini. Mushrooms add a hearty touch, while bean sprouts give crunch. Use what’s in season for the freshest taste. This makes your dish colorful and full of nutrients. To store your Beef Chow Mein, wait for it to cool. Place it in an airtight container. This keeps it fresh for up to three days. Make sure to refrigerate it right away. If you leave it out, it can spoil quickly. When you want to reheat your Beef Chow Mein, use a skillet. Heat it on medium. Add a splash of water or soy sauce to keep it moist. Stir it often to heat evenly. You can also use a microwave. Place it in a microwave-safe bowl and cover it. Heat for about 1-2 minutes, stirring halfway through. You can freeze Beef Chow Mein too. First, let it cool completely. Then, put it in a freezer-safe container. Make sure to leave some space for it to expand. It can last for up to three months in the freezer. When you're ready to eat, defrost it in the fridge overnight. Reheat it as described above. Beef Chow Mein is a popular Chinese dish. It features stir-fried egg noodles with beef and vegetables. The beef is marinated for flavor. The dish often includes bell peppers, bok choy, and carrots. All these elements blend together for a tasty meal. You can serve it hot, garnished with green onions. Making Beef Chow Mein takes about 30 minutes total. You need 15 minutes to prep the ingredients. Cooking takes another 15 minutes. This quick cook time makes it great for busy nights. Plus, you’ll enjoy a fresh, hot meal in no time. Yes, you can make Beef Chow Mein in advance. Prepare it and store it in the fridge for up to three days. When reheating, add a splash of water to keep it moist. Just heat it in a skillet until hot. It’s a great way to save time on a busy day. Beef Chow Mein is a tasty dish full of flavor. We covered the main and optional ingredients, along with key cooking steps. I shared tips to get the best taste and avoid common mistakes. You learned about variations to fit your diet, plus how to store leftovers properly. In closing, Beef Chow Mein is easy to make and customize. Enjoy your cooking and share your delicious results!

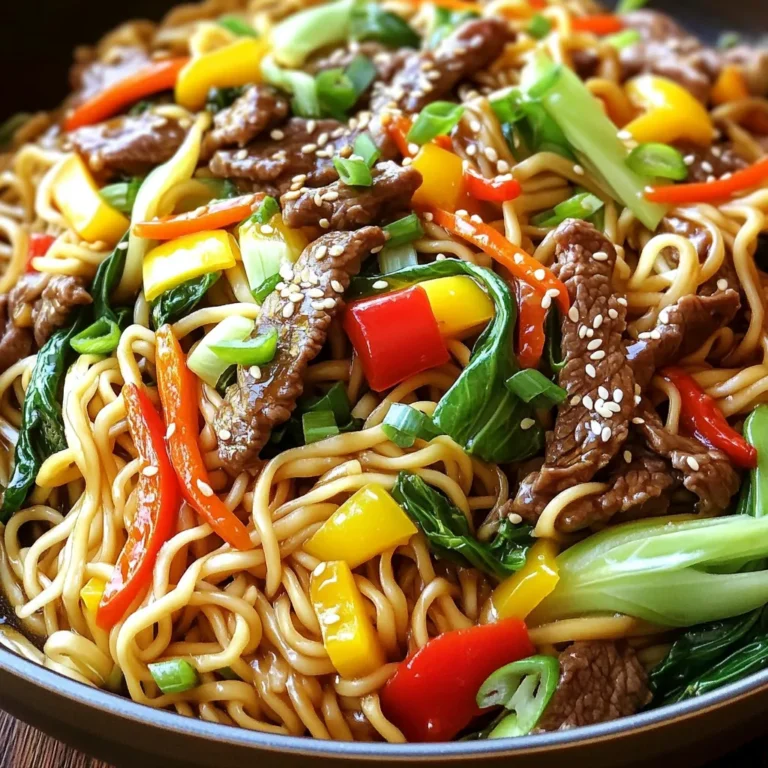
Beef Chow Mein Easy and Flavorful Stir-Fry Recipe

- 8 fresh jalapeños - 1 cup cream cheese - 1/2 cup shredded cheddar cheese - 1/4 cup grated parmesan cheese - 1/2 teaspoon garlic powder - 1/2 teaspoon onion powder - 1/4 teaspoon smoked paprika - Salt and pepper to taste - 1/2 cup breadcrumbs - Cooking spray To make these air fryer jalapeño popper bites, you need fresh ingredients. Start with 8 fresh jalapeños. These will give your dish the right heat and flavor. Use 1 cup of cream cheese. This makes the filling creamy and rich. Add 1/2 cup of shredded cheddar cheese for a sharp taste. A touch of 1/4 cup grated parmesan cheese adds depth to the flavor. Next, you will need spices and seasoning. Use 1/2 teaspoon of garlic powder. This gives the poppers a nice kick. Add 1/2 teaspoon onion powder for sweetness. A 1/4 teaspoon of smoked paprika adds a smoky flavor. Don’t forget salt and pepper to taste. These seasonings bring everything together. For the topping, use 1/2 cup of breadcrumbs. Panko works best for a crunchy texture. Lastly, grab some cooking spray. This helps the poppers crisp up in the air fryer. - First, take 8 fresh jalapeños. Halve them and remove the seeds. This step lowers the heat. - Next, soften 1 cup of cream cheese. Let it sit out for about 30 minutes. This makes mixing easy. - In a bowl, combine the softened cream cheese, 1/2 cup of shredded cheddar cheese, and 1/4 cup of grated parmesan cheese. - Add 1/2 teaspoon of garlic powder, 1/2 teaspoon of onion powder, 1/4 teaspoon of smoked paprika, and some salt and pepper. Mix until smooth. - Take each jalapeño half and fill it with the cheese mixture. Pack it in well for the best flavor. - Sprinkle 1/2 cup of breadcrumbs on top. Lightly press them in so they stick. - Spray the filled jalapeños with cooking spray. This helps them get crispy. - Place them in your air fryer basket in a single layer. Avoid crowding the basket. - Air fry at 375°F for 10-12 minutes. Watch for golden brown breadcrumbs. - Carefully take them out and let them cool for a minute. Enjoy your tasty bites! To ensure even cooking in your air fryer, always preheat it. Preheating helps to get the right crispness. Place your jalapeño popper bites in a single layer. Do not overcrowd the basket, as this can lead to uneven cooking. Depending on your air fryer, cook them for 10-12 minutes. If your air fryer runs hot, check them a bit earlier. You can add extra flavor to the filling with spices. Try adding a pinch of cayenne for heat or some cumin for earthiness. For cheese, mix in some pepper jack for a spicy kick or mozzarella for a milder taste. These simple swaps can change the whole flavor profile. To make sure the filling is creamy, use softened cream cheese. It blends well with the other cheeses. If you want a smooth texture, mix it well until there are no lumps. To avoid soggy breadcrumbs, use panko instead of regular breadcrumbs. Lightly spray the tops with cooking spray to help them crisp up in the air fryer. {{image_2}} You can easily change the base of this recipe. For a lighter option, use low-fat cream cheese. This swap still gives you a creamy texture but cuts some calories. If you want to add some crunch, consider adding bacon bits or crumbled sausage to the filling. You can even mix in some extra jalapeño for more heat! If you need a gluten-free option, swap regular breadcrumbs for gluten-free ones. This small change keeps the crunch without the gluten. For a vegan version, use a plant-based cream cheese and skip the cheese altogether. You can also add nutritional yeast for a cheesy flavor. Garnish your jalapeño popper bites with chopped cilantro or green onions for a fresh look. You can also serve them on a colorful platter to catch the eye. For parties, place a small bowl of ranch or sriracha sauce next to the bites for dipping. This adds flavor and fun for your guests. To keep your popper bites fresh, store them in the fridge. Place them in an airtight container. This helps prevent them from drying out. You can also wrap them in plastic wrap before putting them in a container. They will stay good for up to three days. You can easily reheat your popper bites in the air fryer. Set the air fryer to 350°F (175°C). Heat them for about 5 minutes. This keeps them crispy. You can also use the oven. Preheat it to 350°F (175°C) and bake for 10-12 minutes. Check for warmth and crispiness before serving. You can freeze jalapeño popper bites before or after cooking. If freezing before cooking, make sure to place them on a baking sheet first. Freeze them for about an hour until firm. Then, transfer them to a freezer bag. They can last up to three months. If you freeze them after cooking, let them cool first. Follow the same process of using a freezer bag. To thaw, place them in the fridge overnight. For a quick option, you can reheat them from frozen. Just add a few extra minutes to your reheating time. Air fryer jalapeño popper bites last about 3-5 days in the fridge. Store them in an airtight container. They taste best when fresh, but leftovers can still be yummy. Yes, you can make these poppers ahead. Prepare and fill them, then store in the fridge. Cook them just before serving for the best taste and texture. I love serving these bites with ranch or sriracha sauce. They also pair well with guacamole or a creamy blue cheese dip. Choose your favorite for a fun twist! Using frozen jalapeños is possible, but fresh ones taste better. If you use frozen, thaw and drain them well to avoid soggy poppers. I recommend an air fryer with adjustable temperature settings. Brands like Philips or Ninja offer great options. Choose one that fits your kitchen space and cooking needs! You can create delicious air fryer jalapeño popper bites with fresh ingredients and spices. Start by prepping the jalapeños and making the creamy filling. Next, fill the peppers, add toppings, and air fry them for a tasty snack. Remember to play with different flavors and storage methods to make these bites your own. With a few tips, you can ensure they stay crispy and enjoyable. Enjoy sharing them at your next gathering or as a tasty treat at home!

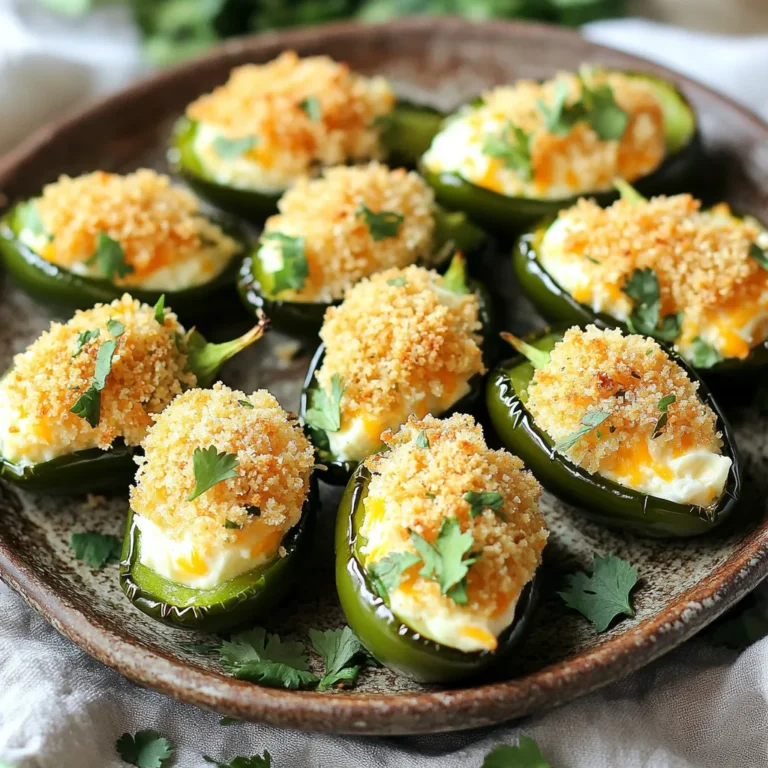
Air Fryer Jalapeño Popper Bites Tasty and Easy Snack

- 1 cup cream cheese, softened - 1/4 cup granulated sugar - 1 teaspoon vanilla extract - 1 cup whipped cream - 1 box of mini graham cracker crusts (about 6-8) - 6-8 strawberries with their green tops - Red frosting - A pinch of powdered sugar To create these Santa hat cheesecake bites, start with the cream cheese. It gives a rich, creamy base. The sugar adds sweetness, while the vanilla extract brings warmth. The whipped cream makes the filling light and fluffy. Mini graham cracker crusts hold the cheesecake and add crunch. Fresh strawberries act as the Santa hats, giving a festive look. Finally, the red frosting and powdered sugar add the perfect finishing touches. - Mixing bowl - Electric mixer or whisk - Spoon or spatula - Chilling tray or plate - Refrigerator You will need a mixing bowl for blending all the ingredients. An electric mixer or a good whisk helps you beat the cream cheese smoothly. A spoon or spatula works well for folding in the whipped cream. You will also want a tray or a plate to chill your cheesecake bites in the fridge. This step is key for the flavors to blend. - Fresh mint leaves - Edible gold stars For extra flair, consider adding fresh mint leaves to your platter. They add a pop of color and freshness. Edible gold stars can make your treats look even more festive. These garnishes elevate the presentation and make the bites even more fun. {{ingredient_image_1}} To start, grab a mixing bowl. You’ll need cream cheese, granulated sugar, and vanilla extract. Beat these together until the mix is smooth and creamy. This step is crucial for the perfect texture. Next, gently fold in the whipped cream. This makes your cheesecake light and airy. Be careful not to deflate the whipped cream. You want it fluffy! Now, take your mini graham cracker crusts. Carefully spoon the cheesecake filling into each crust. Fill them almost to the top, leaving a little space. This makes for a nice presentation. Next, wash your strawberries and pat them dry. If they have tall tops, trim them so they fit well. Place one strawberry on each cheesecake bite, pointed side up. This creates the look of a Santa hat. Now it’s time for decoration! Use red frosting to pipe a small circle of 'fur' at the base of each strawberry. This adds a fun touch. Then, dust a pinch of powdered sugar on top of the strawberries. It looks like fresh snow! Finally, chill the cheesecake bites in the fridge for at least 30 minutes. This helps the flavors meld and the cheesecake to set. Enjoy this festive treat! To get a smooth cheesecake texture, start with softened cream cheese. It mixes better and blends easily with sugar and vanilla. Beat the cream cheese until creamy, then gently fold in whipped cream. This keeps the mixture light and fluffy. If you overmix, the cheesecake can become dense. Chill the bites properly to let them set and firm up. A few common mistakes can ruin your cheesecake bites. First, do not skip softening the cream cheese. Cold cream cheese clumps and does not mix well. Second, avoid overfilling the mini graham cracker crusts. Leave a little space at the top for the strawberries. Lastly, check the strawberries for size. If they are too tall, trim the tops to fit properly. Decorating your Santa Hat Cheesecake Bites makes them pop! Use red frosting to pipe a circle around each strawberry base. It looks like Santa's hat. For added flair, dust powdered sugar for a snowy effect. You can also arrange the bites on a festive platter with mint leaves or edible gold stars. This adds color and makes them look even more special. Pro Tips Use Room Temperature Ingredients: Make sure your cream cheese is softened to room temperature for a smoother mixture and easier blending. Choose Fresh Strawberries: Opt for firm, ripe strawberries with green tops to enhance the festive look of your cheesecake bites. Pipe Frosting Neatly: For a clean and decorative finish, use a piping bag with a small round tip to create the 'fur' around the strawberries. Chill Before Serving: Allow the cheesecake bites to chill for at least 30 minutes to set the filling and enhance the flavors before serving. {{image_2}} You can change the flavor of the cheesecake filling easily. Try adding a splash of lemon juice for a zesty twist. You can also mix in melted chocolate for a rich taste. If you love fruit, add pureed berries for a fruity flavor. Each variation gives a new take on the classic cheesecake bite. For a twist on the Santa hat, try using raspberries instead of strawberries. They will still look great and taste fantastic. You can also use mini marshmallows at the base of the strawberry for a fluffy touch. If you want a more colorful look, use colored frosting to decorate the hats. The options are endless! These cheesecake bites are fun for many events. For a holiday party, serve them on a festive tray with twinkling lights. If you have a children’s party, add sprinkles on top for extra fun. You can also make mini versions for a cute dessert at a wedding. Adjust the presentation to fit any occasion you have in mind! You can store leftover Santa Hat Cheesecake Bites in the fridge. Place them in an airtight container. This keeps them fresh and tasty for up to three days. Be sure to keep them chilled to maintain their creamy texture. If you see any strawberries start to wilt, it’s best to eat those first. Freezing these treats is simple. First, place the cheesecake bites on a baking sheet. Make sure they do not touch each other. Freeze them for about an hour. Once frozen, transfer them to a freezer-safe bag. They can stay in the freezer for up to a month. When you want to eat them, thaw them in the fridge overnight. When serving cheesecake bites after storage, let them sit at room temperature for about 10 minutes. This enhances their flavor and texture. If you froze them, be sure to thaw them completely. Garnish with a fresh dusting of powdered sugar for that festive touch before serving. Enjoy your delightful bites! Yes, you can make Santa Hat Cheesecake Bites in advance. Prepare them a day ahead and chill in the fridge. The flavors blend well overnight. Just add the red frosting and powdered sugar just before serving to keep them fresh and pretty. If you need a substitute for strawberries, try using raspberries. They are bright and tasty. You can also use cherries or mini marshmallows. Just ensure the toppings look like Santa hats. This way, you keep the fun and festive look. Yes, there are several dietary substitutions you can use. For a dairy-free option, swap cream cheese with a dairy-free alternative. Use coconut cream instead of whipped cream for a lighter taste. You can also use honey or maple syrup in place of granulated sugar. Check your crust for gluten-free options if needed. Santa Hat Cheesecake Bites are fun and easy to make. We covered the main ingredients, essential tools, and tasty garnishes. You now know how to prepare, assemble, and chill these festive treats. My tips will help you avoid mistakes and achieve the best texture. Remember, you can explore flavor variations and creative toppings. Store leftovers wisely or freeze them for later. You can even prepare them in advance. Enjoy making these bites at your next celebration!

Santa Hat Cheesecake Bites Festive and Fun Treats

To make graveyard dirt cake cups, gather these key ingredients: - 1 package (15.25 oz) chocolate cake mix - 1 package (3.9 oz) instant chocolate pudding mix - 3 cups milk - 1 cup whipped topping - 1 package (8 oz) cream cheese, softened - 1 cup powdered sugar - 1 package (14 oz) Oreo cookies, crushed - Edible gummy worms You can make your cups look extra spooky with these fun extras: - Mini tombstone candies - Dark chocolate pieces (for gravestones) When choosing ingredients, look for these tips: - Select a well-known brand for cake mix and pudding to ensure taste. - Buy fresh cream cheese for the best texture. - Choose high-quality, dark chocolate for a rich flavor. - Find fresh gummy worms for a fun look. Check for vibrant colors and soft texture. By focusing on quality, you enhance the overall taste of your graveyard dirt cake cups. Enjoy the process and have fun creating this creepy treat! {{ingredient_image_1}} To start, preheat your oven as the cake mix package says. Grab a 9x13-inch pan and prepare it with cooking spray. Then, mix the chocolate cake batter according to the box. Pour the batter into the pan and bake it until a toothpick comes out clean. This usually takes about 30 minutes. Once baked, let the cake cool completely in the pan. In a large bowl, whisk together the instant chocolate pudding mix and 3 cups of milk. Keep whisking until the mix is smooth. Let it sit for about 5 minutes. It will thicken up nicely during this time. Next, crumble the cooled cake into small pieces. In a big bowl, mix half of the crumbled cake with the pudding until combined. Now it’s time to layer! Grab clear plastic cups or small jars. Start with a layer of the cake and pudding mix at the bottom. Then, add a layer of the cream cheese mixture. Keep repeating these layers until the cups are full. Make sure to finish with the pudding mix on top. Finally, sprinkle crushed Oreo cookies on the last layer to make it look like dirt. Insert gummy worms into the top and use mini tombstone candies for decoration. For the best taste, chill the cups in the fridge for at least 2 hours before serving. Enjoy your spooky treat! Start with a clear cup. It shows off the layers. Use a spoon to scoop out the cake and pudding. This keeps the layers neat and pretty. Alternate layers for the best visual impact. Use about two tablespoons of each layer. The more layers, the better it looks! Crush the Oreo cookies finely. This gives a realistic dirt effect. Use a rolling pin or a food processor. Sprinkle the crushed cookies thickly on top. Add a few gummy worms peeking out. This adds fun and makes it look spooky! You can prepare these cups a day early. Just store them in the fridge. This allows the flavors to meld well. Keep the worms and decorations off until serving. This keeps everything fresh and fun. If you make them early, they will still taste great! Pro Tips Use Room Temperature Ingredients: For a smoother cream cheese mixture, make sure your cream cheese is at room temperature before mixing. Customize Your Layers: Feel free to add more layers or different flavors, such as vanilla pudding, to create a unique taste experience. Chill for Best Flavor: Letting the dessert cups chill for at least 2 hours enhances the flavors and allows the layers to set properly. Creative Toppings: Get creative with your decorations! Use different types of candy or edible glitter to make your graveyard dirt cake cups even spookier. {{image_2}} To make Graveyard Dirt Cake Cups gluten-free, switch the cake mix. Look for a gluten-free chocolate cake mix at your store. Make sure to read the label to confirm it is safe. You can also use gluten-free Oreo cookies for the "dirt" layer. This way, everyone can enjoy this spooky treat. You can change the flavor of the pudding. Try vanilla pudding for a different taste. Butterscotch pudding adds a sweet twist too. You can combine chocolate and vanilla for a layered effect. This gives your cups a fun look and more flavor. Get creative with decorations for your dirt cake cups. Instead of gummy worms, use candy eyeballs for a creepier look. You can also add edible flowers for a colorful touch. Use chocolate sprinkles to mimic dirt or crushed nuts for a crunchy layer. Let your imagination run wild! To keep your Graveyard Dirt Cake Cups fresh, store them in the fridge. Use an airtight container to prevent them from drying out. You can keep them for up to three days. If you plan to serve them later, wait to add the gummy worms and tombstone decorations. This keeps everything looking fresh and spooky. When you refrigerate your dessert cups, place them on a flat surface. This way, the layers stay neat. Avoid stacking the cups to prevent squishing. If you notice any condensation, wipe it off gently. This keeps the "dirt" looking nice and dry. You can freeze Dirt Cake Cups for longer storage. Just make sure to use freezer-safe containers. Wrap each cup tightly in plastic wrap before placing it in the freezer. They can last up to two months. When ready to enjoy, thaw them in the fridge overnight. Add your decorations after they thaw to keep them looking great! Yes, you can use other cake flavors. Vanilla, red velvet, or even lemon work well. Each flavor adds its own twist to the dessert. Just remember that the pudding flavor should match the cake. This way, all layers taste great together. To make it more fun for kids, skip the gummy worms if you want. Instead, add colorful sprinkles or candy eyes. Use cute cookie shapes for decoration. You can also let kids help layer the cups. This makes it a fun activity for everyone! Use a sturdy tray or a large box. Keep the cups upright to avoid spills. If you have a cooler, that works great too. Just make sure to chill them well before moving. This keeps them fresh and tasty for your guests. This blog post covered everything you need for making dirt cake cups. We explored the best ingredients and tips for sourcing them. You learned step-by-step instructions, plus tips and tricks for perfect layers. Variations like gluten-free options and storage tips help you adapt your dessert. When you try this recipe, have fun with flavors and decorations. You'll impress everyone with your tasty treats. Enjoy the process and share your cake cups with friends and family!

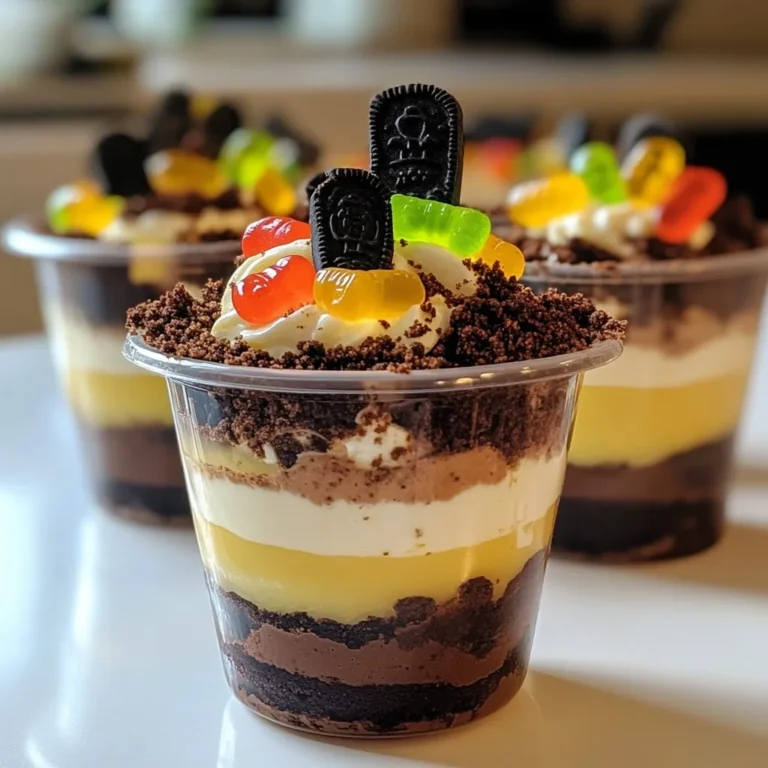
Graveyard Dirt Cake Cups Fun and Creepy Treats

- 2 boneless, skinless chicken breasts, sliced - 2 tablespoons Cajun seasoning - 3 tablespoons olive oil The main ingredients are key to the flavor of this dish. I use boneless, skinless chicken breasts for tender meat. Cajun seasoning adds a spicy kick that wakes up your taste buds. I choose olive oil for cooking because it has a nice flavor and is healthy. - 1 cup heavy cream - 1 cup chicken broth - 1 cup grated Parmesan cheese Dairy adds creaminess and richness. Heavy cream makes the sauce smooth and thick. Chicken broth gives the dish depth and flavor. I top it off with Parmesan cheese for a salty, savory finish. - 1 bell pepper (red or yellow), sliced - 3 cloves garlic, minced I love adding bell pepper for a crunchy texture and sweetness. Garlic brings a strong, aromatic flavor to the dish. Together, they balance the spicy Cajun seasoning. {{ingredient_image_1}} Start with a large pot. Fill it with salted water and bring it to a boil. Once boiling, add 8 ounces of fettuccine or linguine. Cook the pasta for about 8-10 minutes until it is al dente. It should still have a slight bite. After cooking, drain the pasta and set it aside. Take 2 boneless, skinless chicken breasts and slice them thin. In a mixing bowl, toss the chicken with 2 tablespoons of Cajun seasoning. Make sure each piece is coated well. Next, heat 3 tablespoons of olive oil in a skillet over medium-high heat. Add the seasoned chicken to the skillet. Cook for about 5-7 minutes until the chicken turns golden brown and is fully cooked. Once done, remove the chicken from the skillet and set it aside. In the same skillet, add the remaining tablespoon of olive oil. Then, add 3 cloves of minced garlic and 1 sliced bell pepper. Sauté for about 3-4 minutes until the veggies soften. Pour in 1 cup of chicken broth and bring it to a simmer. Lower the heat and add 1 cup of heavy cream. Stir well and let it cook for 2-3 minutes until the sauce thickens slightly. Add the cooked pasta and the sautéed chicken back into the skillet. Toss everything together so the pasta gets coated in the creamy Cajun sauce. Stir in 1 cup of grated Parmesan cheese. Taste and add salt and pepper as needed. To get the best taste, adjust the Cajun seasoning. Start with two tablespoons, then taste. If you want more heat, add a pinch more. Use salt and pepper to balance the flavors. A little salt can make the dish pop. If your sauce is too thick, add a splash of chicken broth. Stir well to combine. For a thicker sauce, let it simmer longer. You want it creamy but not too heavy. This dish pairs well with garlic bread or a fresh salad. The crunch of a salad complements the creamy pasta. For a nice touch, garnish with fresh parsley. It adds color and freshness to your plate. Pro Tips Use Fresh Ingredients: Fresh garlic and bell peppers will enhance the flavor of your dish, making it more aromatic and vibrant. Adjust the Spice Level: Feel free to modify the amount of Cajun seasoning based on your heat preference. Start with less and add more if desired. Let it Rest: Allowing the dish to sit for a minute after cooking helps the sauce thicken, creating a creamier texture. Garnish for Presentation: Adding fresh parsley not only adds color but also a fresh flavor that complements the richness of the sauce. {{image_2}} You can switch out chicken for shrimp. Shrimp cooks fast and adds a nice taste. Just sauté it like you do with chicken. For a plant-based option, use tofu. Press and cube the tofu, then season it with Cajun spice. Cook it until golden. Both options keep the dish tasty and fun. Try different types of pasta for this dish. Gluten-free pasta works well if you need it. Options like rice noodles or chickpea pasta can be great too. You can also experiment with shapes. Fettuccine and linguine are classic, but penne or rotini can add a fun twist. If you want a low-carb version, use zucchini noodles. They soak up the flavor and taste great. For a dairy-free option, swap heavy cream for coconut milk. It will give a different vibe but still keep it creamy. You can also use nutritional yeast instead of cheese for a cheesy flavor without dairy. After you enjoy your creamy Cajun chicken pasta, store any leftovers in an airtight container. This helps keep the flavors fresh. Make sure to let the pasta cool before sealing it up. Leftovers can last for about 3 to 4 days in the fridge. If you notice any change in smell or texture, it’s best to toss it. If you want to save it for later, freezing is a great option. Portion the pasta into freezer-safe containers. Leave some space at the top, as it may expand when frozen. You can freeze it for up to 2 months. To reheat, let it thaw in the fridge overnight. Then, warm it in a skillet over low heat. Stir in a splash of chicken broth or cream to keep it creamy. Enjoy your meal again! Fettuccine or linguine works best for Cajun chicken pasta. These shapes hold the sauce well. You can also try penne or rotini for a fun twist. Just ensure the pasta is cooked al dente for the best texture. Yes, you can prepare the chicken and sauce ahead of time. Cook the pasta fresh when you're ready to eat. This keeps the noodles from getting soggy. Store the cooked chicken and sauce in the fridge for up to three days. To add more heat, use extra Cajun seasoning. You can also add chopped jalapeños or red pepper flakes. If you like a smoky flavor, consider adding a dash of smoked paprika. Taste as you go to find your perfect spice level. Absolutely! Pre-cooked chicken can save you time. Just warm it up in the skillet before adding it to the sauce. This way, you still get great flavor without the extra cooking time. Yes, this recipe is great for meal prep. It stores well in the fridge. Just divide it into portions for easy lunches or dinners. Reheat in the microwave or on the stove, adding a splash of broth if needed. This blog post detailed how to create a delicious Cajun chicken pasta. We explored the main ingredients, from chicken to Cajun seasoning and olive oil. I shared step-by-step instructions for cooking pasta and making the creamy sauce. We also covered helpful tips, variations, and storage info to keep your dish fresh. In closing, this recipe is flexible and tasty. Enjoy your cooking and get creative as you try different flavors!

Creamy Cajun Chicken Pasta Flavorful Dinner Delight

- 1 can (15 oz) chickpeas, drained and rinsed - 1/4 cup buffalo sauce (adjust for spice preference) - 1 tablespoon olive oil - 1 teaspoon garlic powder - 1 teaspoon onion powder - Salt and pepper to taste - 1 avocado, sliced - 1 cup romaine lettuce, shredded - 1/2 cup cherry tomatoes, halved - 4 whole wheat tortillas or wraps - 1/4 cup vegan ranch dressing (optional) The main ingredients in these wraps provide a great mix of flavors. Chickpeas are the star, offering protein and fiber. Buffalo sauce gives a spicy kick that makes this dish special. Olive oil adds healthy fat, while garlic and onion powder bring rich taste. Fresh veggies like avocado and tomatoes add crunch and freshness. Vegan ranch dressing is a fun add-on. It cools the heat from the buffalo sauce. You can also toss in extra veggies or herbs. Consider cucumbers, bell peppers, or cilantro for more flavor. These options help you customize your wrap. These wraps are not just tasty; they are also healthy. Chickpeas provide protein and fiber. Avocado adds healthy fats and vitamins. Romaine lettuce gives you crunch and nutrients. Each wrap is filling and balanced. They make a great meal or snack. You can feel good about eating these wraps! {{ingredient_image_1}} Start with one can of chickpeas. Drain and rinse them well. In a medium bowl, use a fork or potato masher to mash the chickpeas. Leave some whole for texture. This gives the wraps a nice bite. Next, add 1/4 cup of buffalo sauce to the mashed chickpeas. You can adjust this based on how spicy you like it. Mix in 1 tablespoon of olive oil, 1 teaspoon of garlic powder, and 1 teaspoon of onion powder. Add salt and pepper to taste. Stir until everything is well combined. Make sure to taste it; adjust the sauce if you want more heat. Heat a skillet over medium heat. Take one tortilla and place it in the skillet. Warm it for about 30 seconds on each side. You want it soft and easy to fold. Repeat with the other tortillas. Now, lay a warm tortilla flat on a clean surface. Scoop a spoonful of the chickpea mixture into the center. Top it with sliced avocado, shredded romaine lettuce, and halved cherry tomatoes. For wrapping, fold in the sides of the tortilla first. Then, roll it up tightly from the bottom. This keeps all the tasty filling inside. Repeat the process for the remaining tortillas. Enjoy your delicious Vegan Buffalo Chickpea Wraps! To get the best flavor from chickpeas, start with canned ones. Rinse them well to remove any canning liquid. This helps reduce sodium and improves the taste. If you prefer dried chickpeas, soak them overnight. Cook them in boiling water until soft. This ensures they have the right texture for your wraps. I like to mash them slightly, leaving some whole for crunch. The spice in the buffalo sauce can vary. If you want it milder, use less sauce. You can also mix in some garlic powder or onion powder to balance the heat. Taste the mixture before you assemble your wraps. This way, you can make the flavors just right for you. Feel free to add more sauce if you enjoy the heat! Cut each wrap in half diagonally. This makes them easier to eat and look great on a platter. Arrange them nicely, and add cherry tomatoes for color. A drizzle of buffalo sauce on top adds flair. You can also serve with a side of vegan ranch dressing for dipping. This makes your wraps pop and impresses your guests! Pro Tips Adjust the Spice Level: Feel free to modify the amount of buffalo sauce based on your heat preference. Start with a smaller amount and gradually add more for extra kick. Texture Matters: For a more varied texture, consider adding some diced celery or chopped green onions to the chickpea mixture. Wrap It Right: Ensure you wrap tightly so that the filling doesn’t spill out while you’re enjoying your delicious creation. Make Ahead: You can prepare the chickpea mixture ahead of time and store it in the fridge. Just assemble the wraps when you’re ready to serve! {{image_2}} You can easily make this recipe gluten-free. Use gluten-free tortillas instead of whole wheat. Many stores sell tasty options made from rice or corn. Just check the label to be sure they fit your needs. This way, everyone can enjoy the wraps without worry. If you want more protein, try using lentils or quinoa. Both add great texture and flavor. You can also use chickpea salad or even tofu. Just make sure to spice them up like the chickpeas. This keeps the wraps exciting and tasty. Add more flavor with toppings. Try sliced cucumbers for crunch. Pickled red onions can add a tangy bite. For a spicy kick, toss in jalapeños or hot sauce. Lastly, fresh herbs like cilantro can brighten the wrap. Feel free to mix and match to find your favorite combo! To store your leftover wraps, place them in an airtight container. Keep them in the fridge for up to three days. If you want them to stay fresh, wrap each one in plastic wrap before placing them in the container. This helps keep them moist and tasty. You can freeze these wraps for later enjoyment. First, wrap each one tightly in plastic wrap. Then, place them in a freezer-safe bag or container. They can last in the freezer for up to three months. When you crave them, just thaw them in the fridge overnight. When you’re ready to eat, take the wraps out of the fridge or freezer. If they are frozen, let them thaw first. To reheat, you can use a skillet over medium heat. Warm each wrap for about two to three minutes on each side. This will make them soft again and bring out the flavors. You can also use a microwave. Heat for about 30 seconds, but check to avoid making them too soggy. Yes, you can make these wraps in advance. Prepare the chickpea mixture and store it in the fridge. You can keep it for up to three days. When ready to eat, warm the tortillas and assemble the wraps. This method saves time and keeps your meal fresh. You can use several alternatives for buffalo sauce. Try hot sauce mixed with vegan butter for a similar flavor. You can also use a mix of barbecue sauce and hot sauce for a sweet and spicy twist. Adjust the amounts to fit your taste. Absolutely! These wraps are kid-friendly because they are tasty and fun to eat. You can adjust the spice level by using less buffalo sauce. Plus, kids can help assemble their wraps, making it a fun cooking activity. Each Vegan Buffalo Chickpea Wrap has about 300 calories. This number can change based on the toppings and sauces you add. If you use less sauce or add more veggies, the calorie count can vary. Always check your specific ingredients for accuracy. You learned how to make tasty Vegan Buffalo Chickpea Wraps. We covered key ingredients, how to prepare them, and tips for the best flavor. Remember, you can change ingredients to suit your taste or dietary needs. These wraps store well and can even be frozen for later. Try different spices and add-ons to make them unique! Enjoy these wraps as a healthy meal or snack. Now, get cooking and share your creations with friends!

Vegan Buffalo Chickpea Wraps Flavorful and Nutritious

To make Caramel Apple Popcorn Crunch, you will need: - 8 cups popped popcorn (about 1/2 cup kernels) - 1 cup granulated sugar - 1/4 cup unsalted butter - 1/4 cup light corn syrup - 1 teaspoon vanilla extract - 1/2 teaspoon baking soda - 1 medium apple, diced (preferably Granny Smith) - 1/2 cup chopped pecans or walnuts (optional) - 1/2 teaspoon cinnamon - Pinch of salt These ingredients blend to create a sweet and crunchy treat. The apples add a nice freshness, while the nuts give a great crunch. If you don't have some ingredients, I have options for you: - Granulated sugar: Use brown sugar for a richer flavor. - Unsalted butter: You can replace it with coconut oil for a dairy-free option. - Light corn syrup: Maple syrup works well if you're looking for a natural sweetener. - Pecans or walnuts: Almonds or sunflower seeds can be great substitutes. These swaps can change the flavor but still keep the treat tasty. You will need some basic equipment: - Large saucepan: For making the caramel. - Baking sheet: To spread the popcorn mixture. - Parchment paper: To prevent sticking on the baking sheet. - Large bowl: To mix everything together. - Wooden spoon or spatula: For stirring the caramel and mixing. With these tools, you will create a delightful snack that everyone will love. Start by gathering all your ingredients. You will need: - 8 cups popped popcorn (about 1/2 cup kernels) - 1 cup granulated sugar - 1/4 cup unsalted butter - 1/4 cup light corn syrup - 1 teaspoon vanilla extract - 1/2 teaspoon baking soda - 1 medium apple, diced (preferably Granny Smith) - 1/2 cup chopped pecans or walnuts (optional) - 1/2 teaspoon cinnamon - Pinch of salt Make sure to pop the popcorn first. It helps to have it ready in a large bowl. Dice the apple into small pieces. If you use nuts, chop them too. This prep makes mixing easier later. In a large saucepan, combine sugar, butter, corn syrup, and a pinch of salt. Place the pan over medium heat. Stir the mixture until it starts to boil. Once it boils, stop stirring. Let it cook for 4 to 5 minutes. Look for a light golden brown color. When you get this color, remove the pan from the heat. Quickly stir in the vanilla extract and baking soda. Be careful! The mixture will bubble up. In a large bowl, combine the popped popcorn, diced apples, and nuts if you are using them. Sprinkle in the cinnamon. Pour the caramel mixture over the popcorn. Toss everything together quickly. You want to coat all the popcorn evenly. Spread the popcorn mixture onto a baking sheet lined with parchment paper. Make sure it is in an even layer. Bake in your preheated oven at 250°F (120°C) for one hour. Stir every 15 minutes. This helps it get crunchy all over. After an hour, take it out of the oven. Let it cool on the baking sheet. The caramel will harden as it cools. Once cooled, break it apart. You can serve it right away, or store it in an airtight container for up to a week. Enjoy your tasty treat! To make smooth caramel, use a heavy saucepan. This helps heat the sugar evenly. Always stir the mixture until it boils. Once it boils, stop stirring. Cook until it turns light golden brown for the best taste. Remember to work quickly when adding vanilla and baking soda. The bubbling can be intense, so be careful! Keep your Caramel Apple Popcorn Crunch in an airtight container. This keeps it fresh and crunchy. Store it at room temperature, away from heat. It lasts up to a week, but it’s so tasty, it might not last that long! Serve this treat in fun bowls for a snack time delight. You can also package it in bags for gifts. Try pairing it with apple cider for a cozy touch. For a party, set out some popcorn alongside other snacks. This will make your table colorful and inviting! {{image_2}} You can switch up the nuts in your Caramel Apple Popcorn Crunch. Try almonds, cashews, or pistachios. Each nut adds a unique flavor and crunch. Seeds like pumpkin or sunflower seeds also work well. This makes your snack even more fun and tasty! If you love chocolate, drizzle some melted chocolate over the cooled popcorn. Milk, dark, or white chocolate all taste great. You could also mix in caramel bits or toffee for added sweetness. For a fun twist, sprinkle some sea salt on top. Sweet and salty flavors blend perfectly! To make this treat gluten-free, ensure your popcorn is certified gluten-free. For a vegan version, replace butter with coconut oil or vegan butter. Use maple syrup instead of corn syrup. These changes still give you great taste while fitting different dietary needs. Enjoy your snack without worry! To keep your Caramel Apple Popcorn Crunch fresh, store it in an airtight container. This helps keep moisture out and maintains its crunch. You can use a glass jar or a plastic bin with a tight lid. Avoid leaving it in a warm spot, as heat can make it sticky. When stored properly, this treat can last up to a week. I recommend enjoying it fresh, but it stays tasty for this time. If you notice it going soft, it’s best to eat it sooner. Watch for a few signs to know if your snack is no longer good. First, check for any odd smells or a change in color. If the popcorn feels sticky or chewy instead of crunchy, toss it out. Always trust your senses; if it seems off, it’s best to not eat it. Yes, you can use microwave popcorn. Just make sure to choose plain, unsalted popcorn. This keeps the flavor balanced. If you use flavored popcorn, it may change the taste of your snack. You can replace corn syrup with honey or maple syrup. Both will work well and add a nice flavor. Just use the same amount as the corn syrup in the recipe. This change will make the caramel slightly different but still tasty. You can find pre-made Caramel Apple Popcorn Crunch at many grocery stores. Look in the snack aisle or near the popcorn. Online stores also sell it, making it easy to order. Popular brands often carry this fun snack, so check their websites too. This blog post covered key ingredients, step-by-step instructions, and helpful tips. You learned how to make Caramel Apple Popcorn Crunch, including substitutions and equipment you'll need. I shared variations for your tastes and best practices for storage. With these tools, you can create your popcorn treat with ease. Remember, you can always customize the recipe for fun and flavor. Enjoy your tasty creation!

Caramel Apple Popcorn Crunch Irresistible Snack Treat

- 1 medium butternut squash, peeled and diced - 1 cup Arborio rice - 4 cups vegetable broth - 1 medium onion, finely chopped - 3 cloves garlic, minced - 1 cup mushrooms, sliced - 1/2 cup grated Parmesan cheese or nutritional yeast - 1 teaspoon dried thyme - 1 teaspoon salt - 1/2 teaspoon black pepper - 2 tablespoons olive oil When making Slow Cooker Butternut Squash Risotto, you start with a medium butternut squash. Its sweet flavor and creamy texture make it perfect for this dish. Dice the squash into small pieces so it cooks evenly. Arborio rice is the star here. It gives that creamy texture that you want in risotto. You’ll also need vegetable broth to cook the rice and squash together. Onion and garlic add great flavor. I prefer finely chopped onion and minced garlic for smooth bites. If you want to add a bit more taste, sliced mushrooms work well. They are optional but can make the dish even richer. For seasoning, dried thyme brings a lovely herbal note. Salt and black pepper enhance the flavors without overpowering them. Olive oil adds a nice depth and helps everything blend together. This combination of ingredients creates a warm and comforting meal. It’s simple yet satisfying. I love how easy it is to prepare, especially in a slow cooker. 1. Prepare the butternut squash: Start by peeling and dicing the medium butternut squash into small cubes. This makes it cook evenly and blend well with the rice. Make sure to remove all the seeds. 2. Chop the onion and mince the garlic: Next, take the medium onion and chop it finely. This adds a great base flavor. Then, take three cloves of garlic and mince them. Fresh garlic gives a nice aroma. 1. Combine ingredients in the slow cooker: In your slow cooker, add the diced butternut squash, Arborio rice, chopped onion, minced garlic, and sliced mushrooms if you choose to use them. 2. Set cooking time and temperature: Pour in the four cups of vegetable broth. Add one teaspoon of dried thyme, one teaspoon of salt, and half a teaspoon of black pepper. Stir everything well. Drizzle two tablespoons of olive oil on top, cover the slow cooker, and set it to cook. You can choose low for 4-5 hours or high for 2-3 hours. The squash should be tender and the rice creamy when done. 1. Stir in cheese or nutritional yeast: When cooking is complete, stir in half a cup of grated Parmesan cheese. If you prefer vegan, use nutritional yeast instead. This adds a rich flavor and creaminess. 2. Adjust seasoning and let sit: Taste the risotto and adjust the seasoning if needed. Let it sit for about five minutes. This helps to thicken the dish. To make your risotto creamy, use Arborio rice. This rice has starch that thickens the dish. Stir the risotto well as it cooks. This helps release more starch, enhancing the creaminess. Cooking time can change based on your slow cooker. If you use high heat, it takes about 2-3 hours. On low heat, it will take 4-5 hours. The key is to check the squash and rice. They should be tender when done. For a great presentation, use shallow bowls. This gives the risotto space to shine. Top with extra Parmesan cheese or nutritional yeast for flavor. A sprinkle of fresh parsley adds color and freshness. Garnishing options include a drizzle of olive oil or a few toasted nuts. These add extra flavor and a nice crunch. You can also serve with a side salad for a complete meal. Cleaning your slow cooker is easy. Let it cool down first. Then wash the pot with warm soapy water. Use a soft sponge to avoid scratches. Never submerge the base in water. For longevity, avoid using metal utensils inside the pot. This can scratch the surface. Always check the cord for damage before use. Proper care helps your slow cooker last longer. {{image_2}} You can make this risotto vegan by using nutritional yeast instead of cheese. Nutritional yeast adds a cheesy flavor without any dairy. It’s a great way to keep the dish creamy and rich. For added nutrition, you can mix in more veggies. Think spinach, kale, or even roasted red peppers. These will not only boost the flavor but also add vibrant colors to your plate. Herbs and spices can transform your risotto. Try adding fresh basil or rosemary for a fragrant twist. A pinch of red pepper flakes can also bring some heat if you like spice. You might want to add proteins too. Cooked chicken or Italian sausage can make this dish more filling. Just stir them in during the last few minutes of cooking for a hearty meal. You can choose how creamy you want your risotto. For a creamier dish, stir it well after cooking. This helps break down the rice and squash together. If you prefer a chunkier risotto, simply leave some pieces of squash intact. This gives you a nice contrast in texture. Different rice types can change the dish as well. While Arborio rice is the traditional choice, you can try Carnaroli or even short-grain brown rice for a unique twist. Each type will give you a different taste and feel. To store your leftover risotto, use airtight containers. This helps keep the flavors fresh. You should let the risotto cool down before sealing it. In the fridge, butternut squash risotto lasts for about 3 to 5 days. Make sure to check for any off smells or changes in texture before eating. You can freeze risotto for longer storage. To do this, place the cooled risotto in freezer-safe bags or containers. Squeeze out excess air to prevent freezer burn. Risotto can stay fresh in the freezer for about 2 to 3 months. When you’re ready to eat, thaw it in the fridge overnight. Reheat in a pot on low heat, adding a splash of broth to restore creaminess. Making risotto in advance is a great time-saver. You can prepare it on a Sunday for easy meals during the week. Portion the risotto into single servings for quick lunches or dinners. This way, you can enjoy a creamy bowl of butternut squash risotto whenever you like. Can I use different types of squash? Yes, you can use other squashes. Acorn or pumpkin work well. Each type adds its own flavor. Butternut squash gives a sweet taste, which many love. What is the best rice for risotto? I recommend Arborio rice. It has a high starch content. This makes the risotto creamy and rich. Other options include Carnaroli or Vialone Nano, but Arborio is the most common. Can I use frozen butternut squash? You can use frozen butternut squash. Just add it to the slow cooker without thawing. It will cook down nicely. This saves prep time and keeps it simple. How to know when risotto is done cooking? Check the texture of the rice. It should be creamy and tender. If you bite it, it should have a slight chew. If needed, cook it a bit longer. Is this dish gluten-free? Yes, this risotto is gluten-free. Use Arborio rice and vegetable broth. Always check labels for hidden gluten in broth. Can I make it nut-free? Absolutely! This dish is nut-free by default. Just avoid adding nuts if you want to serve it with toppings. Use cheese or herbs instead for flavor. This blog post covered all you need to make a tasty risotto. You learned about key ingredients, how to prepare, and the cooking steps involved. I shared tips to perfect your dish and various ways to spice it up. You also found out how to store and reheat your risotto. Remember, risotto is fun and easy to make. Try different ingredients to make it your own. Enjoy creating this warm and comforting meal!

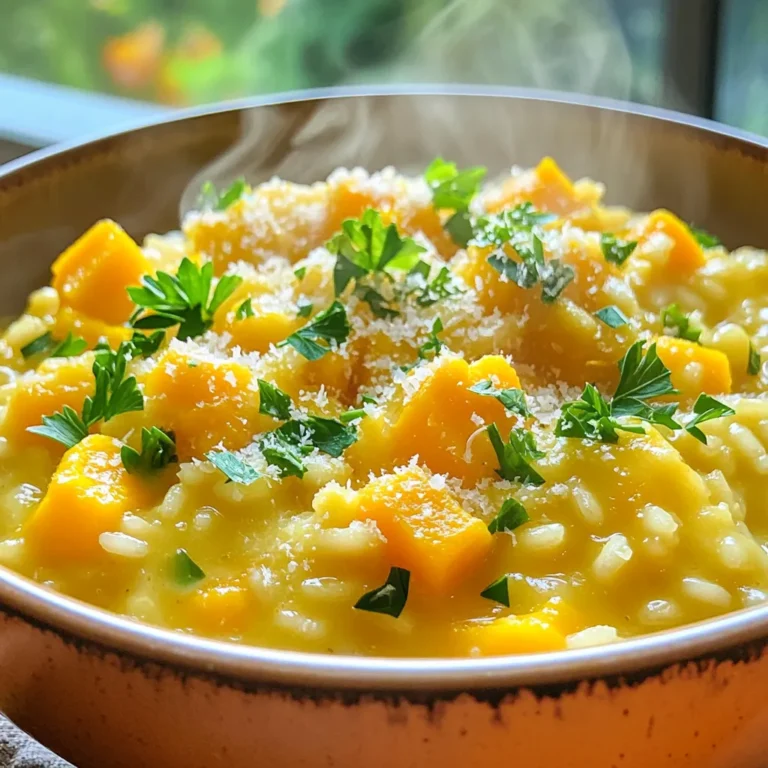
Slow Cooker Butternut Squash Risotto Creamy Delight

PREV 1 … 16 17 18 … 86 NEXT
spicy fork kitchen

explore

DessertsDinnerAppetizersDrinks

Our Policies

  • Cookie Policy
  • Copyright Policy
  • Disclaimer
  • GDPR Policy
  • Terms Of Use
Back to Top
  • About
  • Contact Us
  • Privacy Policy
© 2026 spicy fork kitchen