FREE DINNER EBOOK! Get your copy!
  • Cookie Policy
  • GDPR Policy
  • Disclaimer
  • Terms Of Use
  • Visit my other site: Fun Cookie Recipes
spicy fork kitchen
  • Home
  • Dinner
  • Desserts
  • Drinks
  • Appetizers
  • Contact
  • About
  • Privacy Policy
  • Home
  • Dinner
  • Desserts
  • Drinks
  • Appetizers
  • Contact
  • About
  • Privacy Policy
  • Cookie Policy
  • GDPR Policy
  • Disclaimer
  • Terms Of Use
Visit my other site: Fun Cookie Recipes

HOME / CATEGORIES /

Latest

- 2 cups cooked jasmine rice - 1 cup cooked chicken breast, diced - 1 cup mixed vegetables (carrots, peas, bell peppers) - 2 tablespoons sesame oil - 2 tablespoons soy sauce (low sodium) - 1 tablespoon oyster sauce (optional) - 2 eggs, beaten - 3 green onions, sliced - 1 tablespoon sesame seeds - Salt and pepper to taste To make Sesame Chicken Fried Rice, you need these simple ingredients. I recommend using day-old rice. It helps keep the dish from being too sticky. Freshly cooked rice can be too moist. You can use any diced chicken you like. If you have leftovers, that works great too. Mixed vegetables make it colorful and tasty. I use carrots, peas, and bell peppers for a nice mix. Sesame oil is key in this dish. It gives a rich, nutty flavor. Low-sodium soy sauce keeps it flavorful without being too salty. Adding oyster sauce is optional but gives a nice depth. Don't forget the eggs! They add protein and creaminess. Green onions and sesame seeds make great toppings. They add freshness and crunch. Make sure to have salt and pepper ready for seasoning. This blend of ingredients creates a quick and yummy meal. First, heat 1 tablespoon of sesame oil in a large skillet over medium-high heat. Add the diced chicken and stir-fry for about 2-3 minutes. You want the chicken heated through but not dry. It should stay juicy. Remove the chicken from the pan and set it aside. Next, add another tablespoon of sesame oil to the same skillet. Toss in the mixed vegetables, like carrots, peas, and bell peppers. Stir-fry them for about 3-4 minutes. Your goal is to achieve a tender texture without losing their crunch. Push the veggies to one side of the skillet. Pour the beaten eggs into the other side. Scramble the eggs until fully cooked. Then, add the cooked jasmine rice. Break up any clumps as you mix. Pour in the soy sauce and oyster sauce, if you’re using it. Stir everything together. Now, return the cooked chicken to the skillet. Toss in the sliced green onions and sesame seeds. Season with salt and pepper to taste. Stir-fry for another 2-3 minutes until everything is well mixed and hot. Serve your Sesame Chicken Fried Rice hot, garnished with extra sesame seeds and green onions if you like. Using day-old jasmine rice makes a big difference. The rice dries out slightly, which helps it fry better. Fresh rice can be too sticky. If you need fresh rice, cook it first, then spread it out on a tray. Let it cool for about 30 minutes. This step helps to dry it out before frying. To boost flavor, try adding garlic or ginger. A splash of rice vinegar can add brightness. You can also play with sauces. Swap soy sauce for tamari for a gluten-free option. For a spicy touch, add sriracha or chili flakes. Customize your fried rice to fit your taste! Serve your Sesame Chicken Fried Rice in a large bowl for a family-style meal. This dish looks great topped with sliced green onions and toasted sesame seeds. You can add a wedge of lime on the side for a fresh kick. For a pop of color, consider adding peas or red bell peppers as garnishes. {{image_2}} To make this dish vegetarian, skip the chicken. Use these tips: - Tofu: Dice firm tofu into cubes. - Tempeh: Crumble tempeh as a tasty option. - Mushrooms: Add sliced mushrooms for texture. You can swap chicken for other proteins. Here are a few ideas: - Shrimp: Cook for 2-3 minutes until pink. - Beef: Use thin strips and stir-fry for 3-4 minutes. - Tofu: If using tofu, ensure it’s well-pressed and diced. Adjust cooking times based on your choice of protein. Always ensure they are cooked through. Feel free to change the mixed vegetables. Here are some great choices: - Broccoli: Adds crunch and color. - Zucchini: Sliced zucchini cooks quickly. - Snow peas: Offer a sweet snap. Using seasonal vegetables can enhance your fried rice's flavor and nutrition. Always choose your favorites! To keep your sesame chicken fried rice fresh, store it in an airtight container. Let it cool down to room temperature first. This prevents moisture buildup. Place it in the fridge if you plan to eat it in a few days. For longer storage, freeze the fried rice. Use a freezer-safe container or bag. Make sure to squeeze out as much air as possible to prevent freezer burn. The best way to reheat fried rice is in a skillet. Heat it on medium-low. Add a splash of water or sesame oil. This helps keep the rice moist. Stir it often to heat evenly. You can also use a microwave. Place the rice in a bowl and cover it. Heat in 30-second intervals, stirring in between. This keeps the texture nice. If you want extra flavor, add a bit of soy sauce while reheating. Yes, you can use other types of rice. Brown rice works well but has a nuttier taste. Long-grain rice can also work, but the texture may differ. Jasmine rice offers a lovely floral aroma that enhances this dish. If you choose a different rice, adjust the cooking time as needed. Sesame Chicken Fried Rice can be made gluten-free. Use gluten-free soy sauce instead of regular soy sauce. Check oyster sauce for gluten-free labels, as some brands add wheat. This change keeps the dish flavorful without gluten. Always read labels carefully to ensure safety for gluten-free diets. You can store leftovers for up to four days in the refrigerator. Place the rice in an airtight container to keep it fresh. Make sure it cools down before sealing. If you want to keep it longer, consider freezing it. Frozen rice can last for about three months. This blog post covered how to make Sesame Chicken Fried Rice. You learned about the key ingredients, cooking steps, and helpful tips. I shared ideas for flavor tweaks, variations, and storage methods. You now have the tools to create a tasty meal tailored to your taste. Remember, cooking is fun, so feel free to experiment. Enjoy your cooking!

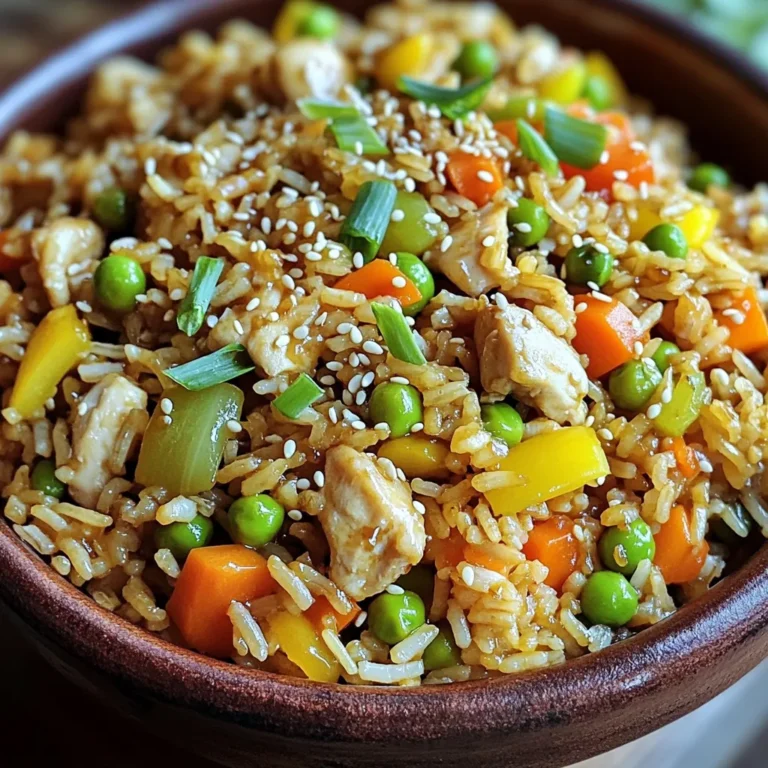
Savory Sesame Chicken Fried Rice Quick and Easy Meal

When making One-Pan Creamy Lemon Herb Salmon, using fresh and quality ingredients is key. Here’s what you need: - 4 salmon fillets (6 oz each) - 2 tablespoons olive oil - 1 teaspoon garlic powder - Salt and pepper to taste - 1 cup heavy cream - Zest of 1 lemon - Juice of 1 lemon - 1 teaspoon dried dill - 1 teaspoon dried parsley - 1 tablespoon capers (rinsed) - Fresh herbs for garnish (parsley or dill) Each ingredient plays a key role in the dish. The salmon gives a rich flavor and healthy fats. Olive oil helps in cooking and adds a light taste. Garlic powder enhances the overall taste without overpowering it. Salt and pepper balance the flavors. Heavy cream adds that creamy texture we love, while lemon zest and juice bring brightness. Dried dill and parsley add freshness and depth. Lastly, capers give a nice briny touch that elevates the dish. Feel free to experiment with fresh herbs for garnish. They will add color and flavor. This dish is straightforward but full of taste. Enjoy the process of gathering these ingredients, as they will create a delightful meal! Preheat your oven to 400°F (200°C). This temperature helps cook the salmon evenly. Preheating is key. It ensures your dish cooks right and flavors blend well. In a large oven-safe skillet, heat 2 tablespoons of olive oil over medium-high heat. Pat the salmon fillets dry. Season them with garlic powder, salt, and pepper on both sides. The oil should be hot before you add the salmon. Place the fillets in the skillet, skin-side down. Sear for 3-4 minutes until the skin turns crispy. Flip the fillets carefully and cook for 2-3 more minutes. Then, remove the salmon and set it aside on a plate. Reduce the heat to medium in the same skillet. Add 1 cup of heavy cream, lemon zest, lemon juice, dried dill, dried parsley, and 1 tablespoon of rinsed capers. Stir these ingredients together. Bring the sauce to a gentle simmer for about 3-5 minutes. This helps the sauce thicken slightly and enhances the flavors. Now, return the salmon fillets to the skillet. Nestle them in the creamy sauce and spoon some sauce over the top. Transfer the skillet to your preheated oven. Bake for 10-12 minutes until the salmon flakes easily with a fork. This step cooks the salmon through while keeping it moist. Once done, remove it from the oven and let it sit for a couple of minutes to cool slightly. When choosing salmon, look for bright, moist fillets. Fresh salmon should have a clean scent, like the sea. Avoid any fish with a strong, fishy smell. The skin should be shiny, and the flesh should bounce back when pressed. For sustainable options, look for salmon labeled as wild-caught or certified by the Marine Stewardship Council. This ensures that your choice supports healthy fish populations and ecosystems. Using an oven-safe skillet is key. This allows you to sear the salmon and bake it all in one pan. A good skillet retains heat well, giving you a nice sear on the fish. If you don’t have an oven-safe skillet, you can use a regular skillet and transfer the salmon to a baking dish after searing. This way, you get the same great flavor and texture. For the best presentation, serve the salmon right from the skillet. It looks rustic and inviting. Garnish with fresh herbs like parsley or dill for a pop of color. Pair this dish with sides like steamed vegetables or fluffy rice. These sides complement the creamy sauce and provide a balanced meal. You could also serve a light salad for freshness. {{image_2}} You can make this dish fit your needs. Here are some easy swaps: - Dairy-free options: Use coconut cream or almond milk instead of heavy cream. This keeps the sauce creamy while making it dairy-free. - Fresh herb variations: If you have fresh herbs on hand, use them instead of dried ones. Fresh dill or parsley will add a vibrant taste. Want to change the taste? Here are some fun ideas: - Adding heat with spices: Sprinkle in some red pepper flakes or cayenne pepper. This will give your salmon a nice kick. - Alternative citrus fruits: If you want a twist, try lime or orange juice. These fruits will brighten up the dish in a different way. You can cook this salmon in various ways. Here are two options: - Grilling vs. baking: Grilling adds a smoky flavor. Cook the salmon on a hot grill for about 6-8 minutes per side. - Skillet-only methods: For a quick meal, cook the salmon entirely in a skillet. Just skip the oven step and cook it longer on the stove until fully cooked. These variations let you enjoy the dish in different styles. Feel free to mix and match! To keep your One-Pan Creamy Lemon Herb Salmon fresh, follow these tips: - Let the salmon cool to room temperature. - Place the salmon in an airtight container. - Add the creamy sauce on top for moisture. - Store in the fridge for up to three days. - Avoid storing in metal containers as they can react with the lemon. - Use glass or plastic containers for best results. To reheat salmon without losing its great taste, try these steps: - Preheat your oven to 350°F (175°C). - Place the salmon in an oven-safe dish. - Cover it with aluminum foil to keep moisture in. - Heat for about 10-15 minutes, or until warm. - Check on it often to avoid overcooking. - If using a microwave, heat in short bursts of 30 seconds. - Add a splash of water if it seems dry. These methods will help keep your salmon tender and juicy. The cooking time depends on the thickness of the salmon fillet. For a 6 oz fillet, bake at 400°F for 10 to 12 minutes. If your fillet is thicker, increase the time by a couple of minutes. Always check for doneness by seeing if it flakes easily with a fork. Yes, you can use frozen salmon. Thaw it overnight in the fridge or under cold water for quicker results. Make sure to pat it dry before cooking. This helps get that nice crispy skin when searing it. If you want a lighter option, try using half-and-half or whole milk mixed with a bit of flour. For a dairy-free choice, coconut cream works well. It adds a nice creaminess and a hint of sweetness. You can also use nut-based creams for different flavors. This blog post covered everything you need to know about baking delicious salmon. We reviewed key ingredients, such as fresh salmon and heavy cream, and shared simple steps to get crispy skin and a creamy sauce. I also provided tips on selecting quality salmon and creative variations. Finally, we discussed storage and reheating to keep leftovers tasty. Remember, cooking can be fun! Enjoy experimenting with flavors and techniques as you create your tasty salmon dish.

One-Pan Creamy Lemon Herb Salmon Flavorful Delight

To make Minute Sweet Chili Garlic Noodles, you need these key items: - 200g rice noodles - 2 tablespoons sweet chili sauce - 2 cloves garlic, minced - 1 tablespoon soy sauce - 1 tablespoon sesame oil - 1 small carrot, julienned - 1 bell pepper, thinly sliced - 1 green onion, chopped These ingredients create a great blend of flavors. The rice noodles are the base, while the sweet chili sauce adds a nice kick. Garlic gives the dish depth. The veggies, like carrot and bell pepper, add crunch and color. Garnishes can enhance your dish. I suggest: - Sesame seeds for a nutty flavor - Fresh cilantro for brightness These not only look nice but also add extra taste. You can sprinkle them right before serving to keep them fresh. Want to spice things up? You can add: - A splash of lime juice for tanginess - Red pepper flakes for heat These options let you customize the dish to suit your taste. Experimenting with flavors can make your meal even more enjoyable. First, you need to cook the rice noodles. Boil water in a pot. Once it bubbles, add 200 grams of rice noodles. Cook them for about 3 to 4 minutes. You want them soft but not mushy. When they are done, drain them in a colander. Set them aside while you prepare the rest of the dish. Now, grab a large skillet or wok. Heat one tablespoon of sesame oil over medium heat. Add two cloves of minced garlic. Sauté the garlic for about 30 seconds until it smells great. Be careful not to burn it! Next, add one small carrot, julienned, and one bell pepper, thinly sliced. Stir-fry these for 2 to 3 minutes. You want them soft yet still crunchy. Now it’s time to bring everything together. Lower the heat a bit. Add the cooked rice noodles to the skillet with your sautéed veggies. Pour in two tablespoons of sweet chili sauce and one tablespoon of soy sauce. Stir everything gently to coat the noodles. Let it warm for about 2 to 3 minutes. Finally, sprinkle chopped green onions on top and give it one last toss. Serve the noodles in bowls. You can add sesame seeds and fresh cilantro for a nice touch! To cook rice noodles, follow the package directions. Usually, they take 3-4 minutes. Boil water in a pot and add the noodles. Stir them gently to prevent sticking. Once they soften, drain them well. Rinse with cold water to stop the cooking. This keeps them from getting mushy. Always remember to set them aside till you need them. For crunchy vegetables, heat your skillet before adding them. Use medium heat for the best results. Add garlic first and sauté for 30 seconds. Then, toss in the carrot and bell pepper. Stir-fry them for 2-3 minutes. Look for bright colors and a slight crunch. Don't overcook; you want them vibrant and fresh. You can easily change this recipe. If you want more spice, add chili flakes or sriracha. For a richer flavor, try adding peanut butter to the sauce. You can also mix in different veggies like broccoli or snap peas. For protein, add shrimp, chicken, or tofu. This dish is flexible, so make it your own! {{image_2}} You can easily add protein to make your noodles heartier. Chicken, shrimp, or tofu work great. Cook your protein before the garlic and veggies. This way, it absorbs all the flavors. For chicken, cut it into small pieces. Cook until golden and firm. For shrimp, just sauté until pink. If you use tofu, press it first to remove extra water. Cube it, then fry until crispy. This adds a tasty texture to your dish. If you want a vegetarian or vegan dish, skip the meat. Use tofu or tempeh instead. Both offer great texture and protein. You can also add chickpeas for a different twist. They will blend well with the sweet sauce. For extra greens, toss in some spinach or broccoli. Both cook quickly and add color. You can still enjoy all the flavors without meat. Sweet chili sauce is a star, but you can mix it up! Try adding hoisin sauce for a richer taste. A splash of lime juice can brighten the flavors. If you want heat, a dash of sriracha works well. For a nutty flavor, add a spoonful of peanut sauce. Experiment with different sauces to find your favorite. Each change makes the dish unique and fun! To store leftover Sweet Chili Garlic Noodles, let them cool first. Place them in an airtight container. Make sure you seal it tightly. Keep the container in the fridge. These noodles can last up to three days. If you want to keep them longer, consider freezing them. When ready to eat, take your noodles out of the fridge. You can reheat them in a pan. Add a splash of water or extra sauce for moisture. Heat over medium-low heat, stirring gently. This keeps your noodles from getting dry. If you prefer, you can also microwave them. Use a microwave-safe dish and cover it with a lid. Heat in short bursts, stirring in between. Freezing is a great option for meal prep. First, let the noodles cool completely. Then, divide them into portions. Place each portion in a freezer-safe bag or container. Squeeze out as much air as possible. Label the bags with the date. You can freeze them for up to a month. When you are ready to eat, thaw them in the fridge overnight. Reheat as described above for the best taste. Yes, you can use other types of noodles. Rice noodles work great, but you can try egg noodles or even spaghetti. Each type will change the texture and taste a bit. Just be sure to cook them according to their package instructions. This keeps your meal quick and tasty. To make it spicier, add chili flakes or sriracha. You can mix these into the sweet chili sauce. Another option is to add fresh sliced chili peppers while cooking. This will give your noodles a nice kick. Adjust the amount based on your heat preference. You can use hoisin sauce if you need a substitute. It has a different flavor but still works well. Mixing equal parts of honey and hot sauce can also give you a similar taste. Just remember to adjust the amount to match your desired sweetness and heat. Sweet chili garlic noodles are fun and tasty to make. We covered key ingredients, cooking steps, and helpful tips. You learned how to add your favorite protein and adjust flavors. With these insights, you can create your own noodle dish each time. Don’t forget to store leftovers properly for later. I hope this guide helps you whip up a satisfying meal that you can enjoy again and again. Dive into cooking and make it your own!

Minute Sweet Chili Garlic Noodles Quick Dinner Recipe

To make your Chocolate Espresso Loaf, gather these ingredients: - 1 ½ cups all-purpose flour - 1 cup granulated sugar - ½ cup unsweetened cocoa powder - 1 teaspoon baking powder - ½ teaspoon baking soda - ¼ teaspoon salt - 2 large eggs - ½ cup vegetable oil - 1 cup brewed espresso, cooled - 1 teaspoon vanilla extract - ½ cup semi-sweet chocolate chips - ¼ cup chopped walnuts (optional) You can make some changes if needed. If you run out of all-purpose flour, whole wheat flour works well. For sugar, you can use brown sugar for a deeper flavor. If you want less caffeine, try decaf espresso. For eggs, use flaxseed meal mixed with water for a vegan option. You can also substitute vegetable oil with melted coconut oil for a unique twist. Using high-quality ingredients makes a big difference in taste. Choose unbleached flour for a richer texture. Look for premium cocoa powder; it gives a bold chocolate flavor. Your espresso should be freshly brewed for the best aroma. Select chocolate chips with a high cocoa content for a deeper taste. Always use fresh eggs for the best rise and moisture in your loaf. Start by preheating your oven to 350°F (175°C). Grab a 9x5 inch loaf pan and grease it well to prevent sticking. In a large bowl, mix together the dry ingredients: 1 ½ cups flour, 1 cup sugar, ½ cup cocoa powder, 1 teaspoon baking powder, ½ teaspoon baking soda, and ¼ teaspoon salt. Whisk them until they blend nicely. In a separate bowl, beat 2 large eggs. Then, add ½ cup vegetable oil, 1 cup cooled espresso, and 1 teaspoon vanilla extract. Stir this mixture until it is smooth. Next, pour the wet mix into the dry mix. Gently fold them together until just combined. It’s key to avoid overmixing at this stage. After that, fold in ½ cup semi-sweet chocolate chips and, if you like, ¼ cup chopped walnuts. This will add a nice crunch and depth to your loaf. When pouring the batter into the loaf pan, use a spatula to smooth the top. This helps it bake evenly. Bake in your preheated oven for about 55 to 60 minutes. Each oven is a bit different, so keep an eye on your loaf. If you notice it browning too fast, you can cover it loosely with foil. To check if your loaf is done, insert a toothpick into the center. If it comes out clean or with a few crumbs, it's ready. If you see wet batter, give it a few more minutes. Once baked, take it out and let it cool in the pan for 10 minutes. This helps it firm up. After that, move it to a wire rack to cool completely. Enjoy the rich aroma while it cools! To make your Chocolate Espresso Loaf even better, you can add a few things. Try using dark chocolate chips instead of semi-sweet ones for a richer taste. You can also sprinkle some sea salt on top before baking. This adds a nice flavor contrast. If you love nuts, add more walnuts or try pecans. They give a nice crunch. One big mistake is overmixing the batter. This can make your loaf tough. Mix just until combined. Another mistake is not measuring ingredients correctly. Use a kitchen scale for accuracy. Also, make sure your espresso is cooled before adding it. Hot espresso can cook the eggs. Lastly, don't skip greasing the pan. This helps the loaf come out clean. To keep your loaf moist, use oil instead of butter. Oil keeps the loaf soft for longer. Make sure not to bake it too long. Check doneness with a toothpick. It should come out clean but not dry. Adding yogurt or sour cream can also help. Mix a little into your batter for extra moisture. {{image_2}} You can add nuts to your loaf for extra crunch. I suggest using walnuts. They add a nice flavor that pairs well with chocolate and espresso. Simply fold in ¼ cup of chopped walnuts when you mix in the chocolate chips. If you want a different nut, try pecans or hazelnuts. They will also taste great in the loaf. To change the flavor of your loaf, you can add spices or extracts. A pinch of cinnamon gives warmth and depth. For a twist, try adding a teaspoon of almond extract instead of vanilla. You can also use orange zest for a fresh, fruity note. These additions will make your loaf unique and exciting. You can make this loaf gluten-free by using a gluten-free flour blend. Make sure it includes xanthan gum to help with texture. For a vegan option, replace the eggs with flax eggs. Mix one tablespoon of ground flaxseed with three tablespoons of water. Let it sit for five minutes to thicken. Use this in place of each egg in the recipe. These swaps keep the loaf delicious and suitable for different diets. To keep your Chocolate Espresso Loaf fresh, wrap it tightly in plastic wrap. You can also use aluminum foil. Store it at room temperature for up to three days. For longer storage, place it in the fridge. Just make sure to wrap it well to avoid drying out. Freezing is a great option for long-term storage. First, let the loaf cool completely. Then, slice it into pieces. Wrap each slice in plastic wrap, then place them in a freezer bag. This way, you can enjoy a slice whenever you want! The loaf can last in the freezer for up to three months. Reheating is simple and quick. If you want a warm slice, take it out of the fridge. Place it in the microwave for about 10 to 15 seconds. For frozen slices, thaw them in the fridge overnight. Then, reheat in the microwave or toast them in a toaster oven. This brings back the fresh-baked taste! Yes, you can use instant coffee instead of brewed espresso. Just mix 1 tablespoon of instant coffee with 1 cup of hot water. Stir until the coffee dissolves. This will give your loaf a nice coffee flavor. However, brewed espresso has a richer taste. If you want a deeper flavor, stick with the espresso. To check if your loaf is fully baked, insert a toothpick into the center. If it comes out clean, the loaf is ready. If it has wet batter on it, bake for a few more minutes. Also, the loaf should spring back when gently pressed. A golden-brown top is another good sign. Chocolate Espresso Loaf is great for many occasions. Serve it at a brunch with friends. It makes a lovely dessert for a dinner party. You can also enjoy it with coffee in the afternoon. Birthdays or holidays are perfect times too. This loaf is a crowd-pleaser for any celebration. You learned how to make a delicious Chocolate Espresso Loaf. We covered the key ingredients, step-by-step instructions, and tips for success. Remember, use quality ingredients and avoid common mistakes for the best results. Variations allow you to create new flavors or cater to dietary needs. Store leftovers properly to enjoy later. This loaf suits many occasions, making it a versatile treat. Enjoy baking and share your tasty results!

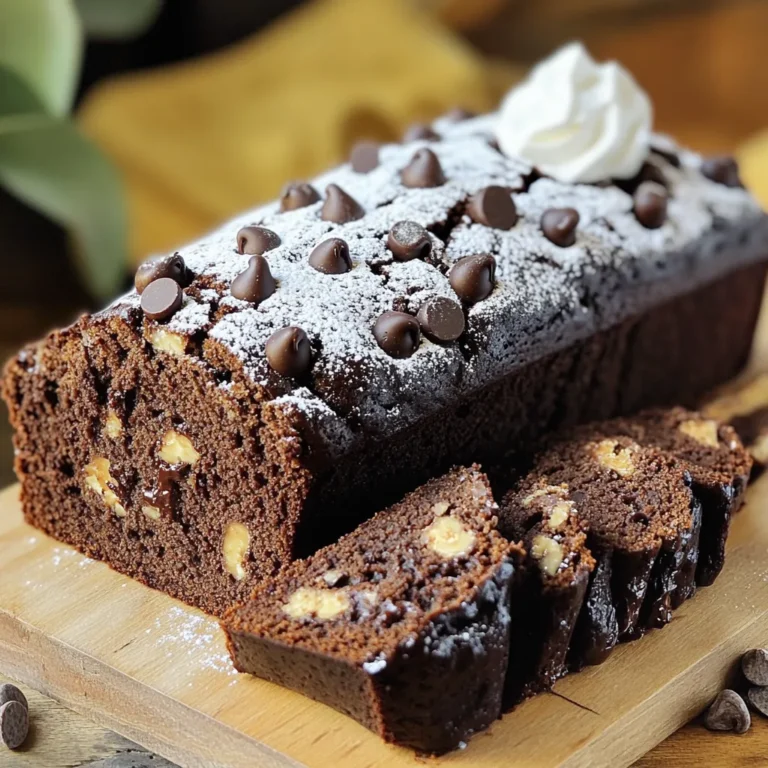
Chocolate Espresso Loaf Flavorful and Simple Recipe

- 1 lb gnocchi - 1 cup cherry tomatoes, halved - 1 red bell pepper, sliced - 1 zucchini, sliced - 1 cup broccoli florets - 1/4 cup pesto (homemade or store-bought) - 2 tablespoons olive oil - Salt and pepper to taste - Grated Parmesan cheese (optional, for serving) - Fresh basil leaves, for garnish For this dish, you need gnocchi as the star. You can use store-bought or make it from scratch. The choice is yours! Next, grab some colorful veggies. Cherry tomatoes bring sweetness, while red bell pepper adds crunch. Zucchini offers a mild taste, and broccoli gives a nice bite. Don’t forget the pesto! This sauce is key for flavor. Use homemade if you have time, or store-bought for ease. Add olive oil to help the veggies roast well. Season with salt and pepper to bring out the best taste. If you like cheese, have some grated Parmesan on hand for serving. Fresh basil leaves will brighten your dish right before you serve. - Homemade vs. Store-bought pesto - Parmesan cheese - Fresh basil leaves You can make your own pesto with fresh herbs, nuts, and oil. It tastes great but takes more time. Store-bought pesto is quick and easy. Both options will work well in this recipe. Parmesan cheese adds richness. If you love cheese, sprinkle some on top before serving. Fresh basil leaves can be used as a garnish. They add a pop of green and fresh flavor. - Preheat your oven to 425°F (220°C). This step helps cook everything evenly. - Prepare the vegetables by washing and slicing them. Cut cherry tomatoes in half, slice the red bell pepper and zucchini, and separate the broccoli into florets. - Boil a pot of salted water. Once boiling, add the gnocchi. Cook for about 2-3 minutes. They are ready when they float to the top. - Drain the gnocchi in a colander. In a bowl, toss the gnocchi with pesto until every piece is coated. This adds flavor to the dish. - Take the roasted vegetables from the oven. Add the pesto-coated gnocchi on top of them. - Gently toss everything together. Spread it evenly across the sheet pan. This helps all the flavors mix well. - Return the sheet pan to the oven. Bake for 10-12 more minutes. This step gives everything a nice, golden finish. - Remove the pan from the oven. If you like, sprinkle grated Parmesan cheese and fresh basil leaves on top for extra flavor. To get the best from your sheet pan meal, timing and temperature are key. Preheat your oven to 425°F (220°C). This high heat helps the veggies turn tender and slightly crispy. - Roast cherry tomatoes, red bell pepper, zucchini, and broccoli for about 15 minutes first. This gives them a head start. - After 15 minutes, add the gnocchi to the pan for an extra 10-12 minutes. Choosing the right vegetables makes a big difference. You want ones that roast well, like: - Cherry tomatoes - Red bell pepper - Zucchini - Broccoli These veggies add color and flavor. You can also try carrots or asparagus for a different taste. You can play with pesto flavors to boost your dish. You might add nuts like walnuts or pine nuts for extra crunch. - Try mixing in spinach or arugula for a fresh twist. - Add a squeeze of lemon juice for brightness. If you want cheese besides Parmesan, consider these options: - Feta for a tangy kick - Goat cheese for creaminess - Nutritional yeast for a vegan choice Each adds its own special touch. This dish pairs great with salads or other sides. A simple mixed green salad adds freshness and crunch. You can also serve it with garlic bread for a comforting meal. Perfect occasions for this dish include: - Weeknight dinners when time is tight - Casual gatherings with friends - Meal prep for easy lunches Enjoy your deliciously easy dinner! {{image_2}} You can switch up the veggies in this dish. Try using carrots for a sweet crunch. Asparagus adds a nice touch and cooks well. For a heartier option, consider using Brussels sprouts or sweet potatoes. Don’t forget seasonal veggies too! In summer, zucchini shines, while in fall, butternut squash makes it special. The key is to pick what you love and what’s fresh. If you need gluten-free gnocchi, look for brands made with rice or corn flour. You can even make your own using potatoes and gluten-free flour. For a vegan twist, use a plant-based pesto. Many brands offer great vegan options. You can also make your own by blending basil, nuts, and olive oil without cheese. Want to spice things up? Add red pepper flakes for heat. You can also mix in some smoked paprika for a warm flavor. To boost the herb taste, try adding fresh herbs like thyme or rosemary. These little changes can make your meal exciting and new every time you cook it. To store leftover sheet pan pesto gnocchi and veggies, let them cool first. Place them in an airtight container. Make sure to seal it well. Store it in the fridge for up to three days. This keeps the taste fresh. You can eat it cold or warm it up later. When reheating, avoid the microwave if you can. It can make the gnocchi mushy. Instead, use the oven. Preheat it to 350°F (175°C). Spread the leftovers on a baking sheet. Heat for about 10-15 minutes. Check that everything is warm and the edges are crispy again. If you want to freeze this dish, start by letting it cool completely. Use a freezer-safe container or bag to prevent freezer burn. It can last up to three months in the freezer. When you’re ready to eat, thaw it overnight in the fridge. After thawing, reheat in the oven for best results. This keeps the taste and texture just right. Yes, you can prepare some ingredients in advance. Chop the veggies and store them in the fridge. You can also cook the gnocchi a few hours earlier. Just keep them separate from the veggies. Mix everything right before you bake it. This saves time when you’re ready to eat. Look for gnocchi that floats to the top of the pot. This usually takes 2-3 minutes of boiling. You can also taste one. It should feel soft and slightly chewy. If it’s too hard, give it a bit more time in the water. This dish pairs well with many sides. A simple green salad adds freshness. Garlic bread is a great choice for some crunch. You could also serve it with a light white wine. This makes a lovely meal for any night of the week. This recipe for Sheet Pan Pesto Gnocchi brings together fresh veggies, gnocchi, and pesto in one dish. You learned about essential ingredients and how to prepare them. I shared useful tips to roast perfectly every time. You can customize the recipe with different flavors and vegetables. Enjoy this dish at any meal or gathering. It’s easy to make, versatile, and delicious. With proper storage, leftovers remain tasty too. Now, get cooking, and enjoy every bite!

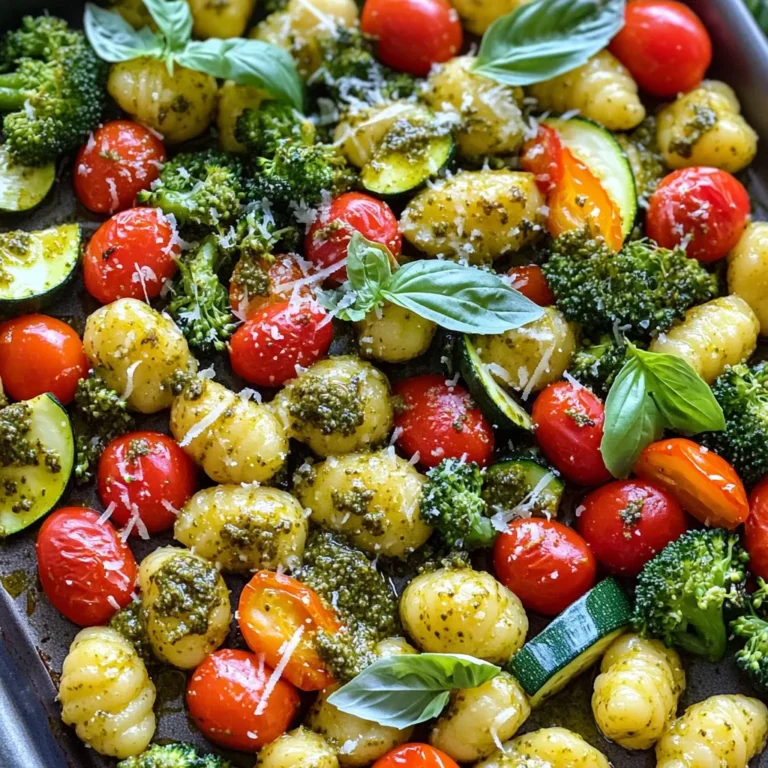
Sheet Pan Pesto Gnocchi Veggies Easy Dinner Idea

- 1 lb boneless, skinless chicken thighs, diced - 1/4 cup teriyaki sauce (store-bought or homemade) - 1 tablespoon sesame oil For my teriyaki chicken lettuce wraps, I always choose chicken thighs. They stay juicy and tender. I love using teriyaki sauce because it adds a sweet and savory taste. You can buy it or make your own. Sesame oil gives a rich, nutty flavor that makes this dish pop. - 1 tablespoon fresh ginger, grated - 2 cloves garlic, minced - 1 red bell pepper, finely diced - 1 cup shredded carrots - 1/4 cup water chestnuts, chopped - 2 green onions, thinly sliced Fresh ginger and garlic bring a bright kick. They add warmth and depth to the dish. I use red bell pepper for its sweetness and color. Shredded carrots not only add crunch but also a hint of sweetness. Water chestnuts provide a nice bite. Green onions give a fresh finish and a pop of color. - 1 head of butter lettuce, leaves separated - Optional sesame seeds for garnish Butter lettuce is my go-to choice for wraps. Its soft leaves hold the filling well. You can sprinkle sesame seeds on top for extra crunch and flavor. This simple addition makes the wraps even more enjoyable. First, heat sesame oil in a skillet over medium heat. This oil adds a nice nutty flavor. Next, add diced chicken thighs to the skillet. Cook them for about 6-8 minutes. You want them to be browned and cooked through. Browning the chicken gives it a great taste and texture. When they are golden, you know you did it right! Now it’s time to bring in some bold flavors. Stir in grated ginger and minced garlic. Cook these for just 1-2 minutes. You will love the smell! Then, pour teriyaki sauce over the chicken. Stir until everything is coated evenly. Add diced red bell pepper, shredded carrots, and chopped water chestnuts. Cook this mix for another 3-5 minutes. You want the veggies to soften but still be crisp. Once everything is cooked, remove the skillet from heat. Fold in the sliced green onions for a fresh crunch. To serve, take a lettuce leaf and spoon 2-3 tablespoons of the chicken mix into the center. Wrap it up like a burrito. Optional: sprinkle sesame seeds on top for extra crunch and flavor. Enjoy your tasty meal! To get the best flavor, pick a teriyaki sauce that you love. Look for a sauce with a balance of sweet and salty. If you have time, try making your own sauce. Use soy sauce, sugar, and mirin for a simple version. For cooking chicken, use boneless, skinless thighs. They stay juicy and tender. Cut the chicken into small pieces for even cooking. Sauté them in sesame oil until they brown. This takes about 6-8 minutes. Add grated ginger and minced garlic for extra flavor. Cook them for 1-2 minutes until you smell their aroma. To save time, prep your chicken and veggies ahead. Dice your chicken and chop your veggies the night before. Store them in the fridge. This way, you can cook quickly the next day. You can also use store-bought teriyaki sauce. This cuts down on prep time. If you're short on time, buy pre-diced chicken and mixed veggies. This makes the process fast and easy. To make this dish healthier, look for low-sodium teriyaki sauce. This option cuts down on salt but keeps the taste. You can also swap out the chicken for turkey or tofu. Both options work well and add different flavors. If you need to avoid certain foods, make substitutions. Use lettuce or cabbage for wraps. You can also add more veggies like zucchini or mushrooms. These changes keep the dish tasty and fit your needs. {{image_2}} You can switch up the protein in your teriyaki chicken lettuce wraps. Turkey works well. It has a similar texture and is leaner. Tofu is a great option too. It soaks up flavors nicely. For a vegetarian meal, use tempeh or seitan. They both give a hearty feel without meat. Don’t be afraid to mix in different vegetables! You can add mushrooms, snap peas, or zucchini. Each veggie brings its own taste. You can also use seasonal veggies. In summer, try adding fresh corn. In fall, consider using butternut squash. These changes keep the dish exciting. Want to spice things up? Add some chili paste for a kick. You can also try a Thai twist with peanut sauce. This adds a nutty flavor that pairs well. If you want something different, swap out teriyaki sauce. Use hoisin or sweet chili sauce instead. These options bring new tastes to your wraps. To store your teriyaki chicken lettuce wraps in the fridge, first, let them cool down. Place the chicken mixture in an airtight container. Keep the lettuce leaves separate to stay crisp. You can store them together if you plan to eat them soon. They will stay fresh for about 3 to 4 days. For longer storage, consider freezing the chicken mixture. Use a freezer-safe bag or container. Remove as much air as possible to avoid freezer burn. This way, you can keep it for up to 3 months. To reheat your chicken mixture, use a skillet over medium heat. This method helps keep the chicken juicy and avoids sogginess. Stir it gently until heated through. For the lettuce leaves, do not reheat them. Instead, use fresh leaves for wrapping. This keeps the wraps crunchy and enjoyable. Leftovers can last in the fridge for about 3 to 4 days. If you freeze them, they will stay good for about 3 months. Signs of spoilage include a bad smell or a change in color. If you see any mold, throw it away. Always trust your senses; if it doesn’t look or smell right, don’t eat it. Yes, you can! Making teriyaki sauce at home is simple and fun. Here’s a quick recipe: - 1/4 cup soy sauce - 1 tablespoon rice vinegar - 2 tablespoons honey or brown sugar - 1 teaspoon sesame oil - 1 teaspoon cornstarch mixed with 1 tablespoon water (for thickening) Mix the soy sauce, rice vinegar, honey, and sesame oil in a small pot. Heat it until it simmers. Then, add the cornstarch mix to thicken. Stir until smooth. If you want a change from lettuce wraps, try these options: - Collard greens - Cabbage leaves - Rice paper wraps You can also serve the chicken mixture in bowls with rice or quinoa. This way, you still enjoy the flavors without the wraps. To make this recipe gluten-free, swap out the soy sauce. Use tamari, which is a gluten-free soy sauce. - Check brands like San-J or Kikkoman's gluten-free line. - Make sure your teriyaki sauce is also gluten-free. Enjoy your tasty teriyaki chicken without worry! In this post, we explored how to make teriyaki chicken lettuce wraps. We covered key ingredients like chicken thighs and fresh veggies. I shared cooking tips for perfect flavor and texture. You now have ideas for quick meals and tasty variations. These wraps are easy to make and fun to customize. Remember, you can use leftovers creatively, too. Enjoy making this dish your own, and keep experimenting with flavors. Simple meals like these can really impress!

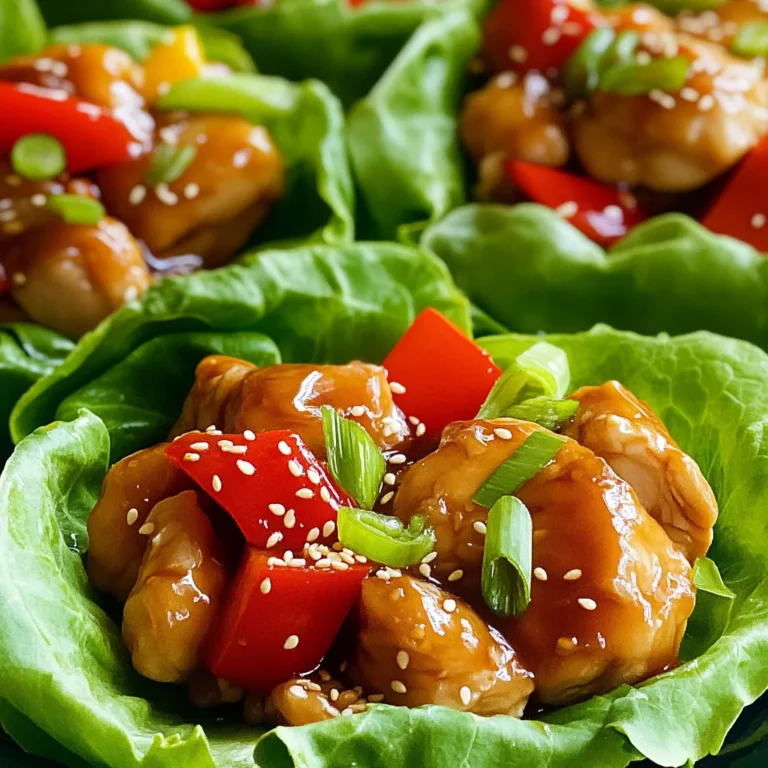
Teriyaki Chicken Lettuce Wraps Flavorful and Easy Meal

To make Keto Chocolate Chip Cookie Dough Bites, you need simple and healthy ingredients. Here is the list: - 1 cup almond flour - 1/4 cup coconut flour - 1/2 cup sugar-free chocolate chips - 1/4 cup erythritol sweetener - 1/4 cup unsalted butter, softened - 1 teaspoon vanilla extract - 1/4 teaspoon salt - 2 tablespoons almond milk Using almond flour and coconut flour keeps these bites low in carbs. I choose sugar-free chocolate chips to satisfy my sweet tooth while staying keto-friendly. Erythritol is my go-to sweetener because it has no calories and does not raise blood sugar. Softened butter adds richness and flavor, while vanilla extract brings warmth to the mix. A pinch of salt balances the sweetness. Almond milk is a great low-carb milk that helps achieve the right dough texture. You can use another low-carb milk if you prefer. Each ingredient plays a key role in making these bites delicious and satisfying. 1. Combine dry ingredients: Start by mixing the almond flour, coconut flour, and salt in a bowl. Stir well until everything is evenly mixed. 2. Cream butter and sweetener: In another bowl, take the softened butter and erythritol. Use an electric mixer or spatula to blend them until they look light and fluffy. 3. Mix wet ingredients into the butter mixture: Add the vanilla extract and almond milk to the butter mix. Stir it all together until there are no lumps and it's smooth. 1. Gradually add dry mixture to wet ingredients: Slowly add the dry mix to the creamed butter. Stir gently until it forms a dough. If the dough feels too dry, add a little more almond milk. 2. Adjust consistency with almond milk if needed: Keep an eye on the dough. You want it to hold together well but not be sticky. Adjust with almond milk until you reach the right texture. 1. Fold in chocolate chips: Take the sugar-free chocolate chips and mix them into the dough. Make sure they are evenly spread throughout. 2. Form bite-sized balls and freeze: Use your hands to shape the dough into small balls, about 1 inch wide. Place them on a baking sheet lined with parchment paper. Once you shape all the bites, put them in the freezer for about 30 minutes. This helps them firm up and makes them easy to eat later. - Achieving the right dough consistency Mix the almond flour and coconut flour well. The dough should feel soft but not sticky. If it’s too dry, add a little more almond milk. A little at a time goes a long way. - Substitutions for sweeteners Erythritol works great, but you can use monk fruit or stevia. Each sweetener has a unique taste. Adjust the amount based on your preference. - How to properly store the bites Keep your cookie dough bites in an airtight container. They last up to a week in the fridge. For longer storage, freeze them for future cravings. - Serving suggestions Serve the bites in a small bowl. Add a sprinkle of extra chocolate chips on top. You can also offer them on a platter with fresh berries for a pop of color. - Decorative ideas for presentation Place the bites in decorative liners. Use fun colors or patterns to brighten your table. A sprinkle of sea salt can also add a nice touch. {{image_2}} You can easily change the flavor of your Keto Chocolate Chip Cookie Dough Bites. One tasty idea is to make a peanut butter chocolate chip version. Just add 1/4 cup of natural peanut butter into the butter mixture. This will give your bites a rich, nutty flavor that pairs perfectly with chocolate. Another fun option is to add nuts or seeds. Chopped walnuts or pecans can add crunch and healthy fats. You might also try chia seeds or sunflower seeds for extra nutrition. Mix in about 1/4 cup of your choice for a unique twist. If you want a vegan-friendly version, swap the butter for coconut oil. Use a plant-based sweetener like monk fruit for a sweet taste. Replace almond milk with any nut-free milk, like oat milk, to keep it vegan. For those needing nut-free options, replace almond flour with sunflower seed flour. You can also use coconut flour, but adjust the amount to avoid dryness. This makes the bites safe and tasty for everyone. To keep your Keto chocolate chip cookie dough bites fresh, I recommend storing them properly. For short-term storage, place the bites in an airtight container in the refrigerator. They will stay fresh for up to a week. Make sure the container is sealed well to prevent any moisture from getting in. If you want to save them for later, you can freeze the bites. Freeze them on a baking sheet first until firm, then transfer them to a freezer-safe bag. This way, they won’t stick together. They can last in the freezer for up to three months. Just remember to label your bag with the date for easy tracking. When stored correctly, these treats can last for about a week in the fridge. If you freeze them, check for freshness when you take them out. The bites should still have a good texture and smell. To spot spoilage, look for changes in color or any off smells. If they feel dry or crumbly, it’s best to discard them. Enjoy your bites fresh for the best taste! Can I use another type of flour? Yes, you can use other low-carb flours. Coconut flour is a good choice. Just note that coconut flour absorbs more liquid. You may need to adjust the almond milk if you do this. Are these bites keto-friendly? Absolutely! These bites use almond flour and erythritol, which are great for keto diets. They keep your carb count low while satisfying your sweet cravings. How long will they last in the fridge? These cookie dough bites will stay fresh in the fridge for about a week. Make sure to store them in an airtight container to keep them tasty. What kitchen tools do I need? You will need a mixing bowl, an electric mixer or spatula, and a baking sheet. A set of measuring cups will also help you get the amounts right. How to know when the dough is ready? The dough should feel soft but not sticky. It needs to hold together when you form it into balls. If it crumbles, add a bit more almond milk to help it bind. This blog post covered everything you need to make tasty chocolate chip bites. We discussed the right ingredients, along with tips for prep and storage. Remember, adjusting sweetness and trying new flavors can make these bites even better. Keep the ideas shared here in mind, and enjoy making these treats. They are simple, fun, and great for sharing. Now, get in the kitchen and start creating your own delicious versions!

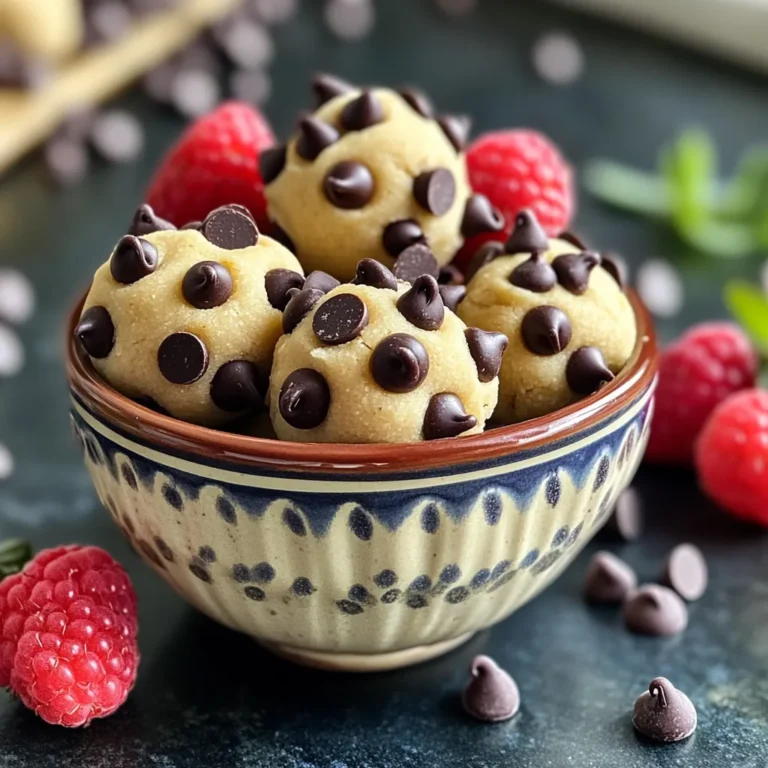
Keto Chocolate Chip Cookie Dough Bites Irresistible Treat

- 4 cups ripe tomatoes, chopped (or two 14.5 oz cans of diced tomatoes) - 1 medium yellow onion, chopped - 4 cloves garlic, minced - 1 cup coconut milk (canned) - 2 cups vegetable broth - 1 tablespoon olive oil - 1 teaspoon dried oregano - Salt and pepper to taste When you gather the main ingredients, you set the stage for a rich soup. Fresh tomatoes bring bright flavor and color. If you use canned tomatoes, they still work well. The yellow onion and garlic add depth to the dish. Coconut milk gives a creamy texture and a hint of sweetness. Vegetable broth adds more flavor without any meat. Olive oil helps sauté the onions, making them soft. Dried oregano enhances the taste, adding an herbal note. You’ll want to have salt and pepper ready to fine-tune the flavors. - 1 teaspoon sugar (optional, to balance acidity) - 1 cup fresh basil leaves, roughly chopped - 1 tablespoon lemon juice - Croutons, for garnish Adding a bit of sugar can balance the soup's acidity from the tomatoes. Fresh basil leaves bring a vibrant, herbal taste. Lemon juice adds brightness and a bit of zing. For a crunchy texture, croutons work wonders as a garnish. They add a fun twist to each spoonful. You can mix and match these optional ingredients based on your taste. Each choice can turn a simple bowl of soup into something special. First, heat 1 tablespoon of olive oil in a large pot over medium heat. When the oil gets warm, add 1 medium yellow onion, chopped. Sauté the onion for about 5-7 minutes. You want it to be soft and a bit see-through. This makes the base tasty. Next, stir in 4 cloves of minced garlic and 1 teaspoon of dried oregano. Cook this for 1-2 minutes. You should smell the garlic, but be careful not to burn it. This mix adds great flavor to your soup. Now, it’s time to add the main ingredients. Pour in 4 cups of chopped ripe tomatoes or two 14.5 oz cans of diced tomatoes. Then, add 2 cups of vegetable broth. Mix everything well and bring the soup to a simmer. Let it cook for about 15-20 minutes. This time helps all the flavors blend together nicely. Once the tomatoes are soft, take the pot off the heat. Use an immersion blender to blend the soup until it’s smooth. If you don't have one, carefully transfer the soup in batches to a traditional blender. Just remember, hot liquids can splash! After blending, return the soup to low heat. Stir in 1 cup of canned coconut milk, and add 1 teaspoon of sugar if you want to balance the acidity. Season with salt and pepper to your liking. Warm the soup for about 5 minutes. Just before serving, mix in 1 cup of roughly chopped fresh basil and 1 tablespoon of lemon juice. This adds a fresh taste. Taste the soup again and adjust the seasoning if needed. Serve hot in bowls, and top with croutons for a nice crunch. To make your soup creamy, an immersion blender works best. It blends the soup right in the pot. This keeps the heat in, making it easy and safe. If you don't have one, a traditional blender works too. Just be careful when blending hot liquids. To adjust the thickness, add more vegetable broth or coconut milk. If your soup is too thick, pour in a little broth. For a richer taste, stir in more coconut milk. This gives you control over the texture you want. Seasoning is key to a great soup. Start with salt and pepper to taste. Add the right amount to bring out the flavors. A hint of sugar can balance the acidity of the tomatoes. Consider adding fresh herbs like thyme or parsley for more depth. These herbs can brighten the dish. You can also add a splash of balsamic vinegar for a unique twist. This adds a touch of sweetness and tang. {{image_2}} You can switch up the milk for a different flavor. Here are some options: - Almond milk adds a nutty taste. - Soy milk gives a creamy texture. - Oat milk is a great choice for richness. You can also decide between fresh or canned tomatoes. Fresh tomatoes give a bright flavor. Choose ripe ones for the best taste. Canned tomatoes are quick and easy. They work well if you’re short on time. You can pack in some protein or fiber for a hearty meal. Here are a few ideas: - Beans like cannellini or black beans add protein and texture. - Lentils can also boost protein and fiber content. Adding vegetables makes the soup even better. Try these options: - Spinach wilts down nicely and adds nutrients. - Carrots add a touch of sweetness. These variations can make the soup fit your taste and needs. Feel free to mix and match! To store leftover soup, let it cool first. Pour the soup into a container with a lid. Use glass or BPA-free plastic containers for best results. Make sure to leave some space at the top to allow for expansion. Seal the container tightly. You can keep the soup in the fridge for up to four days. If you want to freeze the soup, use freezer-safe containers or bags. Make sure to leave some space for the soup to expand as it freezes. It will last for about three months in the freezer. When you're ready to eat it, take the soup out and thaw it in the fridge overnight. To reheat, pour the soup into a pot and heat it on medium. Stir often and heat until it’s hot. You can also use a microwave. Just heat it in short bursts, stirring in between. Enjoy your soup warm! Can I make this soup ahead of time? Yes, you can make this soup ahead of time. In fact, it tastes even better after a day in the fridge. Just let it cool down and store it in an airtight container. When you are ready to eat, heat it up on the stove. Stir well to mix everything again. Is this soup gluten-free? Yes, this soup is gluten-free. All the ingredients, like tomatoes, coconut milk, and vegetable broth, do not contain gluten. Just make sure to check the labels on your broth and any other packaged items. How many calories are in a serving? A serving of this soup has about 180 calories. This can vary based on your portion size and any extras you add, like croutons. It's a filling dish without being too heavy. What are the health benefits of tomatoes and basil? Tomatoes are rich in vitamins and antioxidants. They help with heart health and skin health. Basil adds flavor and packs anti-inflammatory properties. Together, they create a tasty dish that is good for you! This blog post covered all you need to know about vegan creamy tomato basil soup. You learned about main and optional ingredients, step-by-step instructions, tips for texture and flavor, variations, and how to store it. Remember, adjusting ingredients makes your soup unique. With this guide, you can enjoy a delicious, plant-based dish any day. Enjoy your cooking adventure and the tasty rewards that follow!

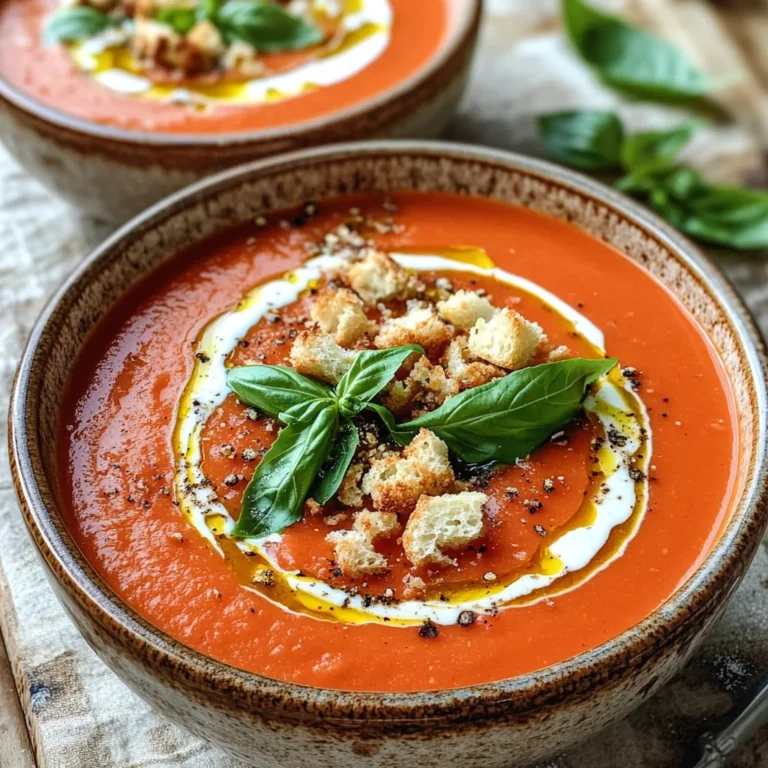
Vegan Creamy Tomato Basil Soup Simple and Tasty Dish

- 4 boneless, skinless chicken breasts - 4 oz cream cheese, softened - 1 cup shredded cheddar cheese - 1/2 cup diced fresh jalapeños (seeds removed for less heat) - 1/4 cup green onions, finely chopped - 1 cup breadcrumbs (panko for extra crunch) - 1 teaspoon garlic powder - 1 teaspoon onion powder - 1 teaspoon smoked paprika - Salt and pepper to taste - 2 tablespoons olive oil When it comes to these ingredients, precise measurements matter. Use 4 oz of cream cheese. This gives the filling a nice, creamy texture. For cheese lovers, 1 cup of cheddar cheese boosts flavor. If you want heat, add 1/2 cup of jalapeños. Don’t forget 1/4 cup of green onions for a fresh touch. Use 1 cup of breadcrumbs for crunch. The spices should be 1 teaspoon each of garlic powder, onion powder, and smoked paprika. Lastly, season with salt and pepper to your taste, and use 2 tablespoons of olive oil for cooking. You can swap some ingredients for different flavors. If you need a dairy-free option, use vegan cream cheese. For a cheese change, try pepper jack instead of cheddar for more spice. If jalapeños are too hot, you can use bell peppers. You can also use regular breadcrumbs if panko is not available. Lastly, if you want a lighter dish, skinless chicken thighs work well too. 1. Preheat your oven to 375°F (190°C). This helps cook the chicken evenly. 2. In a bowl, mix the cream cheese, cheddar cheese, diced jalapeños, and green onions. Stir well. This filling adds creaminess and spice. 3. Take each chicken breast and carefully slice it horizontally. Do not cut all the way through. This makes a pocket for the filling. 4. Season the chicken with salt, pepper, garlic powder, onion powder, and smoked paprika. This adds great flavor. 5. Spoon the jalapeño filling into each chicken breast. Fold the chicken over to keep the filling inside. 6. Pour breadcrumbs into a shallow dish. This will give the chicken a nice crunch. 7. Lightly coat each stuffed chicken breast with olive oil. Then press each side into the breadcrumbs. Make sure they are well-coated. 8. Place the stuffed chicken in a greased baking dish. Add a drizzle of olive oil on top for extra crispiness. 9. Bake the chicken for 25-30 minutes. Use a meat thermometer to check that the internal temperature reaches 165°F (74°C). 10. For an extra crispy top, broil the chicken for the last 2-3 minutes. Watch closely to avoid burning. Follow these steps, and you’ll create a delicious meal that everyone will love! To get the right texture, start by butterflying the chicken breasts. This means cutting them open without slicing all the way through. It makes a pocket for the filling. Season both sides well with salt, pepper, garlic powder, onion powder, and smoked paprika. This adds flavor all through the chicken. Bake at 375°F (190°C) until the chicken reaches 165°F (74°C). This ensures it cooks evenly. When stuffing, use a generous amount of the jalapeño popper filling. Press it gently into the center of each butterflied chicken breast. Once filled, fold the chicken over and seal the edges. This keeps the stuffing inside while cooking. For added flavor, you can drizzle a bit of olive oil over the chicken before baking. To get a nice crunch on your stuffed chicken, use panko breadcrumbs. They are lighter and crispier than regular breadcrumbs. Coat the chicken with olive oil before pressing it into the breadcrumbs. This helps them stick better. For an extra crunch, broil the chicken for the last 2-3 minutes of cooking. This gives a beautiful golden-brown finish. {{image_2}} You can make this dish even better by trying new cheeses. Cream cheese gives a rich base. If you want a sharper taste, use pepper jack cheese. It adds a nice kick. You can also mix in mozzarella for a gooey texture. Just keep the ratios similar to the recipe to maintain balance. To change the heat, you can adjust the jalapeños. If you like it mild, remove all seeds. For more heat, leave some seeds in. You can also add hot sauce to the cheese mix. If you want a smoky flavor, consider adding chipotle powder. Feel free to get creative with the stuffing. You can use cooked bacon bits for a savory twist. Another option is to add spinach for a fresh taste. If you want a different flavor, try sun-dried tomatoes. These swaps can give a whole new vibe to your chicken. To keep your Jalapeño Popper Stuffed Chicken fresh, let it cool down first. Place the chicken in an airtight container. This will help keep it moist and tasty. Store it in the fridge for up to 3 days. If you want to save it longer, consider freezing it. When you’re ready to enjoy leftovers, preheat your oven to 350°F (175°C). Place the chicken in an oven-safe dish. Cover it with foil to prevent drying out. Heat for about 20 minutes or until warm. You can also use a microwave. Just heat it in short bursts to keep it juicy. If you want to freeze the stuffed chicken, wrap each piece tightly in plastic wrap. Then, place them in a freezer-safe bag. They can last up to 3 months in the freezer. When ready to cook, thaw the chicken overnight in the fridge. This keeps it safe and helps maintain flavor. After thawing, follow the reheating instructions above for best results. Yes, you can make Jalapeño Popper Stuffed Chicken ahead of time. Prepare the chicken and stuff it with the creamy filling. After that, wrap it well and store it in the fridge. It will stay fresh for up to 24 hours. When ready to cook, take it out and bake as directed. This saves time on busy nights and keeps the flavors locked in. I love serving Jalapeño Popper Stuffed Chicken with a fresh salad. Crisp greens, tomatoes, and a light vinaigrette work well. You can also pair it with rice or mashed potatoes for something hearty. Try adding creamy ranch or blue cheese dressing for dipping. This adds a cool contrast to the spicy chicken. Absolutely! You can use turkey or pork for this recipe. Just ensure the meat is cooked to the right temperature. Turkey breasts work well, as they have a similar texture to chicken. Pork chops can be used too; just slice them open like the chicken. Both options will still give you that delicious, cheesy filling. In this post, we covered how to make tasty Jalapeño Popper Stuffed Chicken. We looked at key ingredients, exact measurements, and great substitutions. The step-by-step instructions help you prepare, cook, and bake it perfectly. Tips shared guide you in achieving the right texture and crunch. Variations let you choose different cheeses or spice levels. Lastly, we discussed how to store leftovers and reheat them. Now, you can confidently create this dish with ease and enjoy it anytime!

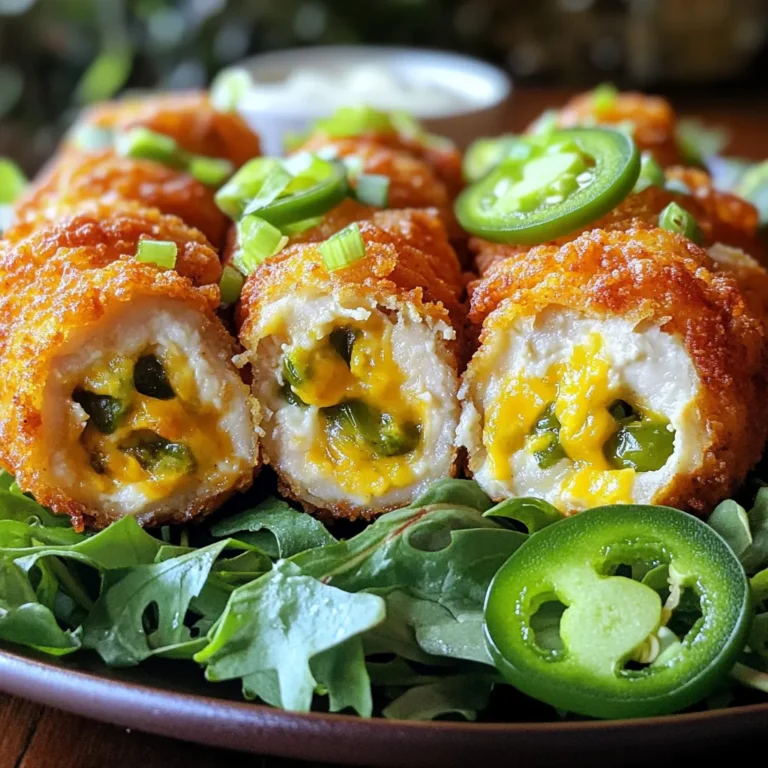
Jalapeño Popper Stuffed Chicken Savory and Easy Meal

To make this Strawberry Cheesecake Smoothie Bowl, you need these fresh ingredients: - 1 cup fresh strawberries, hulled and sliced - 1 banana, frozen - 1/2 cup Greek yogurt - 1/2 cup milk (almond or dairy) - 1 tablespoon cream cheese - 1 tablespoon honey or maple syrup - 1/2 teaspoon vanilla extract These ingredients create a sweet and creamy base. The strawberries add a bright flavor. The banana gives it a smooth texture, while the Greek yogurt and cream cheese add richness. You can customize your smoothie bowl with these optional ingredients: - Granola, for topping - Sliced strawberries and mint leaves, for garnish Granola adds a nice crunch. You can also add nuts or seeds for more texture. Fresh mint leaves not only look great but also add a refreshing taste. This smoothie bowl is a treat that packs great nutrients. Here’s a quick look at what you get per serving: - Calories: about 300 - Protein: around 10 grams - Carbohydrates: about 50 grams - Fiber: around 4 grams - Sugars: about 20 grams This bowl is a fun way to enjoy fruit and dairy. It's perfect for breakfast or a snack. Enjoy it fresh for the best taste and nutrition. To make the base, gather all your ingredients. You need fresh strawberries, a frozen banana, Greek yogurt, and milk. Also, grab cream cheese, honey or maple syrup, and vanilla extract. First, hull and slice the strawberries. This helps them blend better. Then, put all these ingredients into your blender. Blend them on high until smooth. If the mix gets stuck, stop and scrape the sides. This helps everything mix well. When it’s creamy, pour it into a bowl. For the best results, use a high-speed blender. It breaks down the fruits and mixes them well. Make sure your banana is frozen. This adds a nice chill to your smoothie bowl. If you want it sweeter, add a bit more honey or syrup. Don't rush the blending. A smooth texture makes it enjoyable. Remember to pause to check the consistency. It should be thick like ice cream, not runny. Garnishing makes your smoothie bowl look pretty. Use a spoon to create a swirl on top. This adds a fun look. Next, sprinkle granola on one side. It adds a nice crunch. For decoration, slice more strawberries and place them on top. Add fresh mint leaves for a pop of green. This makes your bowl look fresh and inviting. Serve it right away for the best taste! Enjoy your Strawberry Cheesecake Smoothie Bowl! To get a great texture in your smoothie bowl, focus on your ingredients. Use a frozen banana for creaminess. It helps thicken the mix without ice. Aim for a thick, yet smooth blend. Blend until there are no lumps. You can stop and scrape the sides to help. The goal is to have a creamy base that holds toppings well. Not all blenders work the same for smoothie bowls. A high-speed blender is best. It can easily blend frozen fruits and yogurt. Brands like Vitamix and Ninja are great choices. If you have a regular blender, add a little extra liquid. It helps the mix blend smoothly. Just remember, the right blender makes a big difference. Fresh ingredients make your smoothie bowl taste amazing. Store strawberries in the fridge but not washed. Washing them adds moisture, making them spoil fast. Keep bananas on the counter, away from sunlight. For yogurt, check the expiration date. Use it within a week of opening. If you buy in bulk, freeze what you won’t use soon. This way, you always have tasty fruit ready for your next bowl. {{image_2}} You can mix and match fruits for your smoothie bowl. Try blueberries, raspberries, or peaches! Each fruit adds a unique flavor. For a tropical twist, add pineapple or mango. They give a fresh taste that pairs well with strawberries. You can even use frozen fruits for a thicker texture. If you want a dairy-free option, swap Greek yogurt and milk with almond or coconut yogurt. Use nut milk like almond, cashew, or oat. These changes keep the smoothness without dairy. You can still enjoy a creamy texture while making it suitable for lactose-free diets. Boost your smoothie bowl's nutrition with simple add-ins. Consider adding spinach or kale for extra greens. Chia seeds or flaxseeds add fiber and omega-3s. Nut butters like almond or peanut can add protein. You can also sprinkle protein powder for an energy boost. These options make your bowl both tasty and healthy! If you have leftovers, store them in an airtight container. This will keep your smoothie bowl fresh. You can keep it in the fridge for up to one day. If you leave it longer, the texture may change. I recommend eating it right away for the best taste. You can freeze your smoothie bowl if you have extra. Pour it into a freezer-safe container. Make sure to leave a little space at the top, as it will expand. When you want to eat it, let it thaw in the fridge overnight. This keeps the flavor nice. To stop your smoothie from turning brown, use fresh ingredients. Lemon juice can help too. Just a little splash can keep the color bright. Store it in a cool place and cover it well to avoid air exposure. This will help keep your smoothie bowl looking and tasting fresh. Yes, you can make this smoothie bowl in advance. I suggest you blend the ingredients and store them in an airtight container. Keep it in the fridge for up to 24 hours. When you are ready to eat, stir it well. You may need to add a bit of milk to get the right texture again. However, I recommend you add the toppings just before serving. This keeps them fresh and crunchy. If you need a substitute for Greek yogurt, try using regular yogurt. It will give you a similar creaminess. You can also use cottage cheese for a protein boost. If you want a dairy-free option, use coconut yogurt or almond yogurt. These will keep the smoothie bowl rich and creamy while keeping it dairy-free. To make a vegan version, swap the Greek yogurt for coconut yogurt. Use almond milk instead of regular milk. Replace honey with maple syrup to keep it plant-based. Lastly, skip the cream cheese or choose a vegan cream cheese. This way, you’ll still enjoy the berry flavor and creamy texture. In this blog post, I covered how to make a delicious smoothie bowl. We started with the fresh and optional ingredients you can choose. Then, I shared easy steps to prepare and blend your bowl. I provided tips for the perfect mix and storage for leftovers. Lastly, I explained how to customize your bowl with variations and answered common questions. Smoothie bowls are simple and tasty. Enjoy making yours to fit your needs!

Strawberry Cheesecake Smoothie Bowl Delightfully Fresh

PREV 1 … 14 15 16 … 86 NEXT
spicy fork kitchen

explore

DessertsDinnerAppetizersDrinks

Our Policies

  • Cookie Policy
  • Copyright Policy
  • Disclaimer
  • GDPR Policy
  • Terms Of Use
Back to Top
  • About
  • Contact Us
  • Privacy Policy
© 2026 spicy fork kitchen