FREE DINNER EBOOK! Get your copy!
  • Cookie Policy
  • GDPR Policy
  • Disclaimer
  • Terms Of Use
  • Visit my other site: Fun Cookie Recipes
spicy fork kitchen
  • Home
  • Dinner
  • Desserts
  • Drinks
  • Appetizers
  • Contact
  • About
  • Privacy Policy
  • Home
  • Dinner
  • Desserts
  • Drinks
  • Appetizers
  • Contact
  • About
  • Privacy Policy
  • Cookie Policy
  • GDPR Policy
  • Disclaimer
  • Terms Of Use
Visit my other site: Fun Cookie Recipes

HOME / CATEGORIES /

Latest

Here are the main ingredients you need: - 2 cups old-fashioned rolled oats - 1 cup pumpkin seeds - 1 cup chopped pecans - 1/2 cup shredded coconut (unsweetened) - 1/2 cup almond butter - 1/3 cup maple syrup - 1/2 cup pumpkin puree - 1 tablespoon pumpkin pie spice - 1 teaspoon vanilla extract - A pinch of salt These ingredients come together to create a tasty and crunchy snack. The oats form the base, while pumpkin seeds and pecans add texture and flavor. Unsweetened coconut brings a bit of sweetness without too much sugar. Using whole ingredients makes your granola healthy and satisfying. Old-fashioned oats provide fiber, which is good for digestion. Pumpkin seeds are high in protein and healthy fats. Pecans bring vitamins and minerals. Almond butter adds creaminess and a nutty taste. Maple syrup offers natural sweetness without refined sugar. Pumpkin puree gives moisture and a rich flavor. Each ingredient has a purpose and adds to the overall goodness. If you have dietary needs, you can swap some ingredients. Here are a few ideas: - Nut-Free: Use sunbutter or soy nut butter instead of almond butter. - Vegan: Make sure your maple syrup is vegan, and use a plant-based butter. - Gluten-Free: Choose gluten-free oats to keep this snack safe for those with gluten intolerance. These swaps let you enjoy the recipe while meeting your needs. There’s always a way to make it work for you! Making no-bake pumpkin spice granola clusters is easy and fun. You start with the dry ingredients and then mix in the wet ones. The process takes about 10 minutes of prep time. After that, you let the mixture chill to set. This recipe yields around 12 servings. Begin by gathering a large mixing bowl. Add 2 cups of old-fashioned rolled oats, 1 cup of pumpkin seeds, 1 cup of chopped pecans, and 1/2 cup of shredded coconut. Sprinkle in a pinch of salt. Use a wooden spoon to stir everything together. Make sure each ingredient gets evenly mixed. This helps with flavor and texture in every bite. Next, grab a separate bowl for the wet ingredients. Pour in 1/2 cup of almond butter. Add 1/3 cup of maple syrup and 1/2 cup of pumpkin puree. Then, mix in 1 tablespoon of pumpkin pie spice and 1 teaspoon of vanilla extract. Whisk these ingredients until the mixture is smooth. This blend adds sweetness and spice to the clusters. Now, take the wet mixture and pour it over the dry ingredients. Stir gently until everything is coated well. After that, line a baking dish with parchment paper. Press the mixture firmly into the dish. Aim for a thickness of about 1 inch. This step ensures the clusters hold together well. Place the dish in the fridge for at least 2 hours. This chilling time helps the mixture set properly. Once it’s firm, take the dish out of the fridge. Lift the mixture out using the parchment paper. Cut it into squares or clusters with a sharp knife. Store the granola clusters in an airtight container. They can stay at room temperature or in the fridge for longer freshness. To get those perfect clusters, start with fresh ingredients. Old oats can lead to dry granola. When mixing, press the mixture down firmly into the pan. This helps the clusters stick together. If they feel loose, add a bit more almond butter or maple syrup. Allow them to chill in the fridge for at least two hours. This cooling time helps them set. I promise it makes a big difference! You can easily switch up the flavors in these granola clusters. Try adding chocolate chips for a sweet touch. Dried fruits like cranberries or raisins work well too. If you want a nut-free option, use sunflower seeds instead of nuts. You can also swap almond butter for peanut butter if you prefer. Experiment with spices like cinnamon or nutmeg for a unique twist. Accurate measurements matter for the best results. Use a kitchen scale if you have one. It ensures you get just the right amount of each ingredient. For dry ingredients, use the spoon and level method. Spoon the ingredient into your measuring cup, then level it off with a knife. This keeps your measurements precise. When measuring sticky ingredients like almond butter, spray your measuring cup with oil first. This helps the nut butter slide out easily. {{image_2}} You can easily add chocolate chips to this recipe. Just mix in a cup of dark or semi-sweet chocolate chips with the dry ingredients. This makes a sweet twist that kids love. The chocolate pairs well with the pumpkin spice flavor. It adds a rich and creamy texture to each bite. For a nut-free option, replace the chopped pecans with sunflower seeds or extra pumpkin seeds. This keeps the crunch while making it safe for those with nut allergies. You can also use sunflower seed butter instead of almond butter. This swap keeps the clusters delicious and safe for everyone. You can switch up the flavors based on the season. For a maple twist, use maple syrup as your sweetener and add a teaspoon of maple extract. If you want an apple flavor, mix in dried apple pieces with the dry ingredients. You can also add a teaspoon of cinnamon for extra warmth. These variations let you enjoy different tastes all year round. To keep your no-bake pumpkin spice granola clusters fresh, store them in an airtight container. You can choose to keep them at room temperature or in the fridge. If you store them at room temperature, place them in a cool, dry area. If you want them to last longer, the fridge is a great option. No-bake granola clusters can last up to one week when stored properly. If you keep them in the fridge, they may stay fresh for up to two weeks. Make sure to check for any signs of spoilage, such as off smells or changes in texture. You can freeze granola clusters for up to three months. To freeze, wrap them tightly in plastic wrap or place them in a freezer-safe bag. To thaw, simply take them out and let them sit at room temperature for about 30 minutes. Enjoy your tasty treat without losing its flavor or texture! Yes, you can use other nut butters. Some great options include peanut butter or cashew butter. Each nut butter gives a unique taste. Choose the one you love most. Just make sure it is creamy for the best mix. These clusters can last up to one week. Store them in an airtight container. You can keep them at room temperature. For longer freshness, place them in the fridge. This helps keep them crunchy and tasty. Absolutely! This recipe is already easy to make vegan. Just use maple syrup and almond butter as is. These ingredients are plant-based. You can swap honey for more maple syrup, too. You can enjoy these clusters in many ways. Try them with yogurt for breakfast. They also make great snacks on their own. Add them to smoothies for extra crunch. You can even sprinkle them on ice cream for a tasty treat. In this post, we explored how to make no-bake pumpkin spice granola clusters. We discussed the key ingredients, their benefits, and tasty substitutions. You learned the step-by-step process, helpful tips for perfect clusters, and wonderful variations. Storing your granola properly is also key. These clusters are fun and easy to personalize. Enjoy experimenting with flavors and sharing your tasty results!

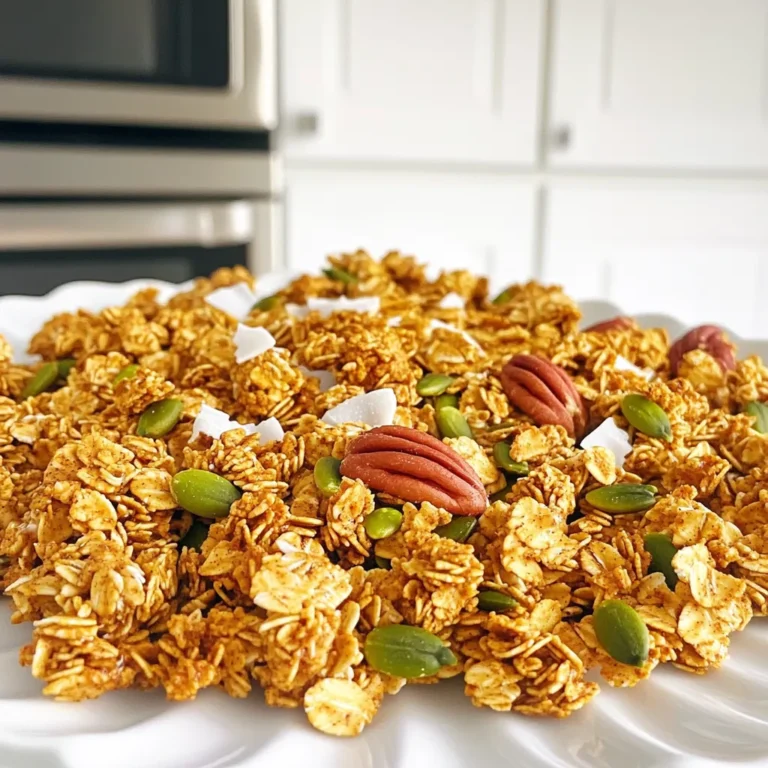
No-Bake Pumpkin Spice Granola Clusters Delight

- 1 pound large shrimp, peeled and deveined - 3 tablespoons olive oil - 4 cloves garlic, minced - 1 teaspoon red chili flakes - 1 tablespoon fresh ginger, minced - 1 red bell pepper, sliced - 1 cup snap peas, trimmed - 3 green onions, chopped - 2 tablespoons low-sodium soy sauce - 1 tablespoon sesame oil - Salt and pepper to taste - Fresh cilantro for garnish (optional) Gathering the right ingredients is key for this dish. You need large shrimp, garlic, and chili flakes for heat. Ginger adds a warm flavor, while red bell pepper and snap peas bring crunch. Green onions add fresh taste, and soy sauce and sesame oil give depth. Don't forget salt, pepper, and cilantro if you like. These ingredients work together to create a quick, zesty meal that bursts with flavor. Start by tossing the shrimp in a bowl. Add half of the minced garlic, red chili flakes, ginger, and a pinch of salt and pepper. Mix well to coat the shrimp evenly. Let it sit for about 10 minutes. This step helps the shrimp absorb all the flavors. Heat 3 tablespoons of olive oil in a large skillet over medium-high heat. Once the oil shimmers, add the remaining minced garlic. Sauté it for about 30 seconds. Be careful not to let it burn, as burnt garlic can taste bitter. Next, add the marinated shrimp to the skillet in a single layer. Cook for about 2 minutes on one side until they turn pink and slightly charred. Then flip the shrimp and cook for 1 more minute. Remove the shrimp from the skillet and set them aside. In the same skillet, add the sliced red bell pepper and snap peas. Stir-fry them for about 3-4 minutes. You want them to be tender but still crisp. Now it's time to bring everything together. Return the cooked shrimp to the skillet. Pour in 2 tablespoons of low-sodium soy sauce and drizzle with 1 tablespoon of sesame oil. Toss everything well to coat the shrimp and veggies. Heat through for about 1-2 minutes. Finally, stir in the chopped green onions. Taste and adjust the seasoning with more salt, pepper, or chili flakes if needed. Serve the stir fry hot, garnished with fresh cilantro if you like. Enjoy your quick and zesty meal! To get the best shrimp, avoid overcooking. When shrimp cook too long, they turn rubbery. Cook them just until they are pink. This usually takes about three minutes. To check for doneness, look for a C-shape. If they curl into a tight "C," they are done. If they form an "O," they are overcooked. You can change the spice level to fit your taste. If you want it milder, use less chili flakes. For more heat, add more chili flakes or a splash of hot sauce. Fresh herbs can add a nice touch. Try using basil or parsley for a fresh flavor. Cilantro also pairs well with shrimp. Add it right before serving for the best taste. Prep your ingredients in advance. Chop the veggies and mince the garlic before you start cooking. This way, you will save time when you are ready to stir-fry. Use a large skillet or wok to cook everything in one pan. This keeps it quick and makes cleanup easy. If you have a rice cooker, use it to cook rice while you stir-fry. This gives you a complete meal in no time. {{image_2}} You can easily switch proteins in this dish. Try using chicken, tofu, or beef. Each will bring its own flavor. For chicken, cut it into small pieces and cook until golden. Tofu works well, too. Just press it to remove excess moisture. Beef adds a hearty touch. Use thin strips for quick cooking. Each option will keep the dish quick and tasty. Feel free to mix in other vegetables. Carrots, broccoli, or bell peppers work great. You can also use zucchini or mushrooms for a different taste. Just make sure to cut them small. This helps them cook evenly. You can even add baby corn or bok choy for a crunchy bite. The more colors you add, the prettier your dish will look! Want to change the flavor? Swap out the soy sauce for teriyaki or oyster sauce. If you like it spicy, add sriracha or chili paste. For a sweeter taste, try hoisin sauce. Each sauce will create a unique dish. Don’t be afraid to experiment with flavors. Mixing and matching sauces is a fun way to make this recipe your own! Store your leftover stir fry in a tight container. Glass or BPA-free plastic containers work best. Make sure to cool the dish to room temperature before sealing. This helps to keep your shrimp tender and tasty. To reheat, use a skillet over low heat. This method warms the shrimp gently, keeping them from getting tough. You can add a splash of water or soy sauce to help steam the shrimp and keep them moist. Stir often until heated through. If you want to save some stir fry for later, freezing works well. Place the cooled stir fry in a freezer-safe bag. Remove as much air as possible before sealing. Label the bag with the date. This meal can last up to three months in the freezer. To enjoy, thaw overnight in the fridge and reheat as mentioned above. This dish comes together fast. It takes about 10 minutes to prep and 10 minutes to cook. In just 20 minutes, you have a tasty meal ready. Yes, you can use frozen shrimp. Just thaw them first. Place the shrimp in cold water for about 10-15 minutes. Once thawed, follow the recipe as usual. You can serve this stir fry with rice or noodles. A simple salad also pairs well. Try serving it with steamed broccoli or a fresh vegetable medley. The spice level can be adjusted. Start with 1 teaspoon of chili flakes for mild heat. If you want more spice, add more after cooking. Taste as you go to find your perfect balance. This blog post covered a quick and tasty Minute Chili Garlic Shrimp Stir Fry. We explored the key ingredients, like shrimp, garlic, and fresh veggies. I shared step-by-step instructions to make cooking easy. Plus, you learned tips for perfect shrimp, flavor adjustments, and time-saving tricks. Try different proteins and veggies for variety. Remember to store leftovers properly. Enjoy this dish for a quick meal that packs flavor! You can make it your own with simple changes.

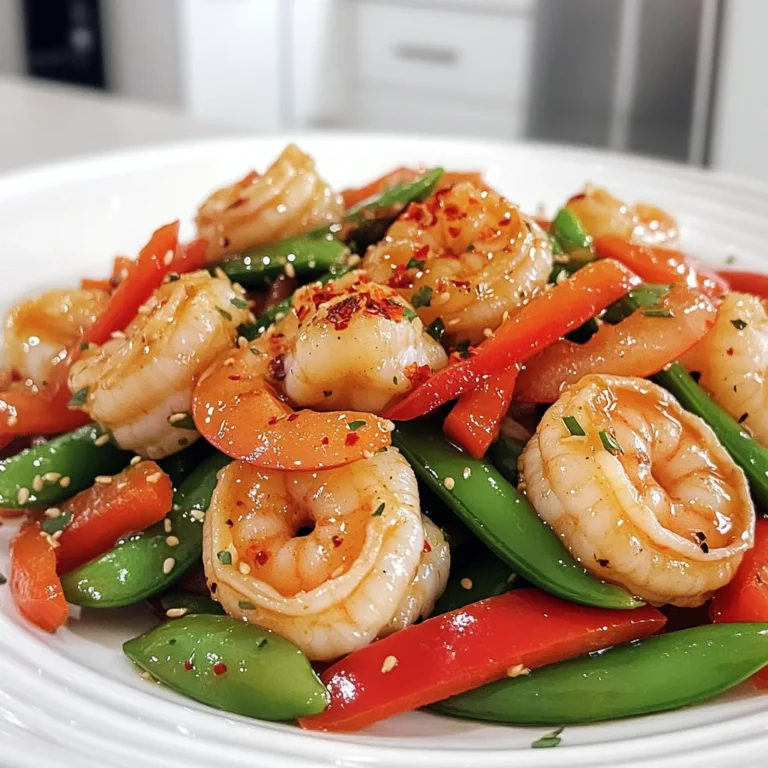
Minute Chili Garlic Shrimp Stir Fry Quick and Zesty Meal

- Butternut squash - Olive oil - Ground cinnamon - Goat cheese - French baguette - Honey - Fresh thyme leaves - Balsamic glaze - Baking sheets - Mixing bowls - Knife and cutting board The main ingredients in this recipe create a perfect balance of flavors. Butternut squash brings a natural sweetness, while goat cheese adds creaminess. Olive oil helps with roasting and brings richness. Ground cinnamon adds warmth to the dish. You can enhance the flavor with optional ingredients. Honey adds a touch of sweetness and pairs well with goat cheese. Fresh thyme leaves give a fresh herb taste. Balsamic glaze adds a tangy finish. To prepare, gather essential tools. Use baking sheets for roasting and toasting. Mixing bowls help combine ingredients. A knife and cutting board make prep easy. With these ingredients and tools, you are set to create a delightful dish. Prepping butternut squash Start by peeling the butternut squash. Use a sharp knife to remove the skin. Cut the squash in half and scoop out the seeds. Dice the squash into small, even cubes. This helps them cook evenly. Slicing the baguette Take your French baguette and slice it into 1/2-inch thick pieces. A serrated knife works best for this. Aim for uniform slices to ensure even toasting. Tossing and seasoning the squash In a large bowl, toss the diced squash with olive oil, salt, pepper, and ground cinnamon. Make sure each piece is well coated. This adds great flavor and helps with caramelization. Roasting tips Spread the seasoned squash on a baking sheet in a single layer. Roast it in a preheated oven at 425°F (220°C) for 25-30 minutes. Stir halfway through to ensure even cooking. Look for a tender texture and a golden color when done. Preparing the baguette for toasting Arrange the baguette slices on a separate baking sheet. Brush each slice lightly with olive oil. This step adds flavor and helps achieve that nice crispness. Timing for perfect crispness Toast the baguette slices in the oven for about 5-7 minutes. Keep a close eye on them to avoid burning. You want them golden brown and crispy, not dark. Combining goat cheese with honey and thyme In a mixing bowl, combine the softened goat cheese, honey, and fresh thyme leaves. Mix until smooth and creamy. This mixture adds a rich, sweet flavor that contrasts nicely with the squash. Steps to layer the goat cheese and squash Once the squash has cooled slightly, it's time to assemble. Spread a generous layer of the goat cheese mixture on each toasted baguette slice. Top each slice with a spoonful of the roasted butternut squash. Finish by drizzling a small amount of balsamic glaze over the top. Garnish with extra thyme leaves for a fresh touch. Enjoy your savory butternut squash goat cheese crostini! To get the best flavor from butternut squash, roasting is key. Here’s how to achieve that deep, sweet caramelization: - Cut the squash evenly: Aim for 1-inch cubes. This helps them cook evenly. - Spread them out: Place the squash in a single layer on the baking sheet. This allows for proper air flow and even cooking. - Watch for color: Look for a golden-brown hue. This means they are well caramelized. - Check for softness: The squash should be tender when pierced with a fork. Choosing the right goat cheese can elevate your crostini: - Select fresh, creamy goat cheese: Look for a soft texture that spreads easily. It adds a nice contrast to the roasted squash. - Quickly soften goat cheese: If your cheese is cold, place it in a microwave for 10-15 seconds. This makes it easy to mix. Pair your crostini with other flavors to enhance the dish: - Perfect pairings: Serve with a light salad or a glass of white wine. The freshness complements the crostini. - Presentation ideas: Arrange crostini on a wooden board. Drizzle balsamic glaze over the top and sprinkle extra thyme for a beautiful look. {{image_2}} To make your crostini shine, try adding spices or herbs to the squash. A pinch of nutmeg or a dash of paprika can add warmth. Fresh herbs like rosemary or sage also bring bright notes. You can also swap out goat cheese for feta or cream cheese. Each cheese adds a different taste, so experiment to find your favorite. If you want a vegetarian or vegan option, use plant-based cheese instead of goat cheese. There are many great vegan cheeses available. Use maple syrup instead of honey to keep it vegan. For those who need gluten-free options, choose gluten-free baguettes or crisp rice cakes. These alternatives keep the dish tasty for everyone. You can change the toppings based on the season. In fall, try adding roasted apples or pears for sweetness. In spring, fresh asparagus or radishes can add a crunchy texture. Summer brings ripe tomatoes and basil, which can elevate your crostini. Feel free to get creative with seasonal veggies to make this dish your own. After you enjoy your savory butternut squash goat cheese crostini, store any leftovers in an airtight container. Place parchment paper between layers to keep them from sticking. This helps maintain their crunch. Store the container in the fridge for up to three days for the best flavor. To reheat crostini, preheat your oven to 350°F (175°C). Place the crostini on a baking sheet and warm them for about 5-10 minutes. This method keeps them crispy. Avoid microwaving, as it can make them soggy. If you notice any moisture, place a paper towel under the crostini while reheating. You can freeze the components! Freeze the roasted butternut squash in a single layer on a baking sheet. After they are frozen, transfer them to a freezer bag. For best results, use them within three months. To defrost, place the squash in the fridge overnight. When ready to eat, reheat using the oven method above. You can tell the butternut squash is done when it is soft and golden. Look for a slight caramelization on the edges. It should be tender enough to pierce with a fork easily. Stir the squash halfway through roasting to ensure even cooking. Yes, you can prep some parts ahead. Roast the butternut squash and store it in the fridge. You can also mix the goat cheese with honey and thyme ahead of time. Just assemble the crostini right before serving for the best taste. While a French baguette is classic, you can use other breads too. Ciabatta or sourdough work well. You could also try whole-grain bread for added flavor. Just slice the bread thin for that perfect crisp. Add toppings like shredded chicken or roasted chickpeas for protein. You can also serve the crostini with a salad on the side. Another option is to layer on more cheese or nuts for extra crunch. Yes, you can use raw squash as a topping. Shred or slice it thinly for a fresh crunch. You could also try other toppings like roasted peppers or olives for a tasty twist. This recipe blog post covers all you need for making butternut squash crostini. We discussed key ingredients like butternut squash, olive oil, and goat cheese. You learned easy preparation and roasting steps to achieve perfect flavors. In the end, explore variations and storage tips to enhance your dish. With this knowledge, you can impress friends at any gathering. Enjoy creating and sharing this tasty treat!

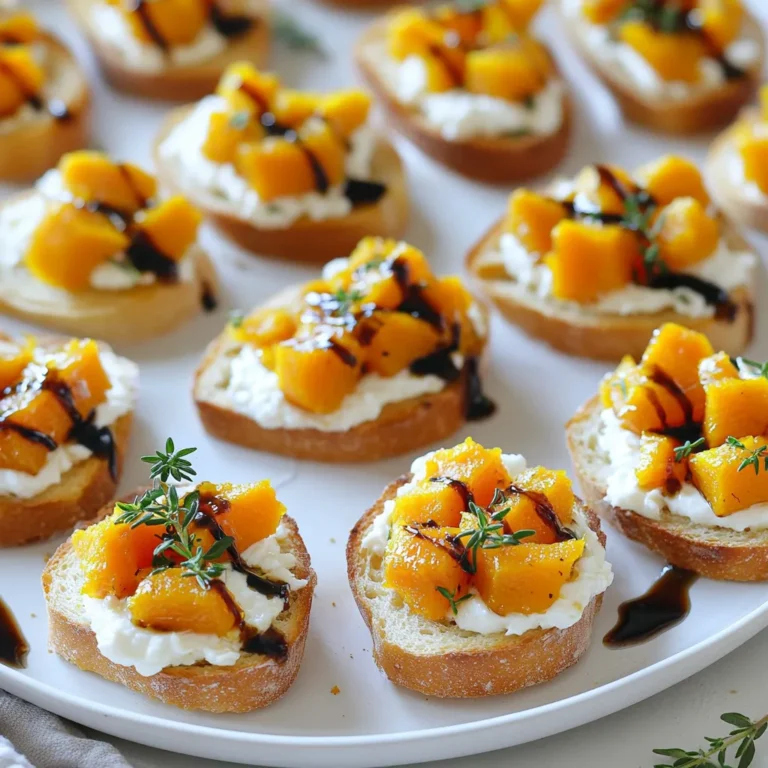
Savory Butternut Squash Goat Cheese Crostini Delight

To make this cozy soup, gather these simple ingredients: - 1 pound boneless, skinless chicken thighs - 4 cups chicken broth - 1 cup carrots, diced - 1 cup celery, diced - 1 medium onion, chopped - 3 cloves garlic, minced - 1 teaspoon dried thyme - 1 teaspoon dried oregano - 1/2 teaspoon black pepper - 1 cup heavy cream - 1 package (16 ounces) gnocchi - 2 cups fresh spinach, roughly chopped - Salt to taste - Fresh parsley, chopped (for garnish) Each ingredient plays a role in making this soup tasty. The chicken thighs add rich flavor and stay moist during cooking. The chicken broth forms the soup's base, bringing depth to every bite. Carrots and celery give sweetness and crunch, while onion and garlic add warmth. Dried thyme and oregano bring herb notes that elevate the dish. Black pepper adds a gentle kick. Heavy cream makes the soup creamy, and spinach adds freshness. Finally, parsley adds a pop of color and flavor when served. You can easily adjust this recipe based on what you have. If you prefer chicken breast, that works too. Use vegetable broth for a lighter soup. Swap out carrots for bell peppers or peas. You can use shallots instead of onion for a milder taste. If you want fewer calories, try using half-and-half instead of heavy cream. For a dairy-free option, coconut milk is a great choice. Gnocchi can be replaced with small pasta shapes if needed. Start by gathering all your ingredients. You will need: - 1 pound boneless, skinless chicken thighs - 4 cups chicken broth - 1 cup carrots, diced - 1 cup celery, diced - 1 medium onion, chopped - 3 cloves garlic, minced - 1 teaspoon dried thyme - 1 teaspoon dried oregano - 1/2 teaspoon black pepper - Salt to taste In your slow cooker, combine the chicken thighs, chicken broth, diced carrots, diced celery, chopped onion, minced garlic, thyme, oregano, and black pepper. This mix gives your soup a great base. Make sure everything is well mixed. Cover the slow cooker and set it to low for 6-7 hours or high for 3-4 hours. The chicken should be fully cooked and tender when done. Cooking on low lets the flavors blend nicely. You can check the chicken with a fork to see if it shreds easily. Once your chicken is tender, take it out of the slow cooker. Place it on a cutting board. Use two forks to shred the chicken into small pieces. Return the shredded chicken to the slow cooker. Now, it’s time to make it creamy! Stir in 1 cup of heavy cream and the gnocchi. Cover the slow cooker and cook on low for another 30 minutes. This step cooks the gnocchi and makes the soup rich. Just before serving, add 2 cups of chopped spinach. Stir until the spinach wilts. Season with salt to taste. Now, your soup is ready to enjoy! To get the best texture for gnocchi in your soup, follow a few easy steps. First, add the gnocchi to the soup only during the last 30 minutes of cooking. This keeps them soft but not mushy. If you cook them too long, they may break apart. If you want a slightly firmer bite, consider cooking them separately and adding them just before serving. This gives you more control over their texture. Using the right herbs and spices can make your soup shine. I love adding dried thyme and oregano, as they pair well with chicken. You can also try fresh herbs for a stronger flavor. Fresh parsley works great as a finishing touch. If you enjoy a kick, consider adding a pinch of red pepper flakes. This adds warmth without overpowering the dish. For the best results with your slow cooker, always check the seal before cooking. A tight seal keeps moisture in and helps flavors meld. Avoid lifting the lid while it cooks; this releases heat and alters cooking time. If you need to check, do it quickly. Lastly, feel free to adjust the cooking time. If your chicken is small, it may cook faster. Always ensure it reaches a safe internal temperature of 165°F. {{image_2}} If you need to change the recipe for health reasons, you have options. For a lighter soup, use low-fat milk instead of heavy cream. You can also swap out chicken broth for vegetable broth to make it vegetarian. If you're dairy-free, try coconut milk. It adds a nice creaminess too. For gluten-free gnocchi, look for options made from rice or potato flour. While chicken thighs are great, other proteins work well too. You can use chicken breasts if you prefer leaner meat. If you want something different, turkey is a nice choice. For a vegetarian twist, add lentils or chickpeas. Both add protein and texture without meat. You can also use diced sausage for added flavor. Want to mix up the flavor? Add a splash of lemon juice for brightness. You could toss in some red pepper flakes for heat. Fresh herbs like basil or dill can change the taste too. If you enjoy a smoky flavor, try adding smoked paprika. For a richer taste, throw in a tablespoon of soy sauce or Worcestershire sauce. Each of these changes can make your soup feel new and exciting! To keep your soup fresh, let it cool first. Once cool, pour it into an airtight container. Make sure to leave space at the top for expansion. Store it in the fridge for up to three days. If you want to keep it longer, consider freezing. When you're ready to enjoy your soup again, pour it into a pot. Heat it on low to medium heat, stirring often. This helps the soup warm evenly. You can also use the microwave. Just heat in short bursts and stir in between. If you freeze the soup, it can last up to three months. Use freezer-safe containers for best results. When ready to eat, thaw it overnight in the fridge. Then, reheat it as mentioned above. Just know that the gnocchi may be softer after freezing. This soup keeps well for 3 to 4 days in the fridge. Make sure you store it in an airtight container. The flavors get even better after a day. If you want to enjoy it later, you can freeze it too. Just remember to let it cool before freezing. Yes, you can use frozen gnocchi! Just add them to the slow cooker with the cream. They will cook perfectly in the soup. You don’t need to thaw them first. This saves you some time and makes meal prep easier. The soup is not gluten-free with regular gnocchi. Most gnocchi contains wheat flour. If you need a gluten-free option, look for gluten-free gnocchi made from potatoes or rice flour. Always check the package to be sure. Yes, you can make this soup on the stovetop. Start by cooking the chicken and veggies in a pot. Then, add the broth and herbs. Simmer until the chicken is cooked. Shred the chicken and follow the steps to add the cream and gnocchi. It will take about 30 to 40 minutes total on the stovetop. In this blog post, we explored the key ingredients for a tasty slow cooker creamy chicken gnocchi soup. We discussed how to prepare, cook, and shred ingredients to create the perfect texture. I shared useful tips to enhance flavors and suggested variations for different diets. Storing and reheating leftovers was also covered. This soup is simple to make and can fit your needs. Enjoy creating your own delicious version and share it with others!

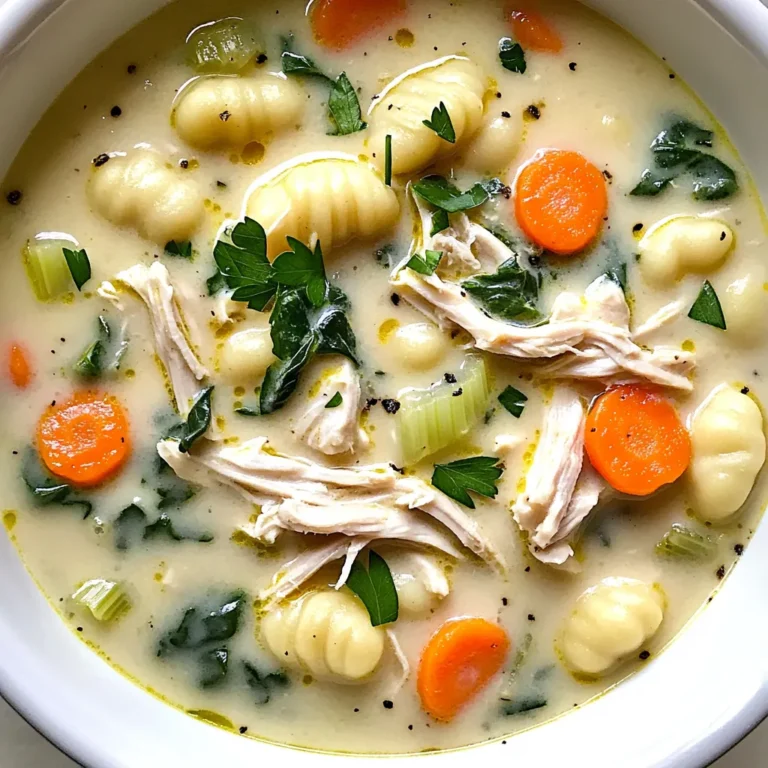
Savory Slow Cooker Creamy Chicken Gnocchi Soup Recipe

To make Pumpkin Cream Cheese Truffles, you need a few simple ingredients. Each one adds a special touch. Here’s what you need: - 1 cup canned pumpkin puree - 8 oz cream cheese, softened - 1 cup powdered sugar - 1 teaspoon vanilla extract - 1 teaspoon pumpkin pie spice - 1 ½ cups white chocolate chips, melted - Crushed graham cracker crumbs (for coating) - A pinch of salt Canned pumpkin puree is the star of this recipe. It gives the truffles a rich pumpkin flavor. Using canned pumpkin saves time, and it’s already cooked. Look for 100% pumpkin puree, not pumpkin pie filling. Softened cream cheese adds a creamy texture. It balances the sweetness of the sugar. Make sure it’s at room temperature for easy mixing. Powdered sugar sweetens the truffles. It also helps create a smooth mixture. It dissolves easily, so use it instead of granulated sugar. Vanilla extract adds warmth and depth to the flavor. A teaspoon is all you need. Always choose pure vanilla for the best taste. Pumpkin pie spice brings fall flavors to the truffles. It usually includes cinnamon, nutmeg, and ginger. Just one teaspoon is enough to make a big difference. Melted white chocolate chips coat these truffles. They add sweetness and a lovely finish. You can melt them in the microwave easily. These crumbs give the truffles a nice crunch. They mimic a pie crust, adding texture. Use store-bought or crush your own graham crackers. A pinch of salt enhances all the flavors. It balances the sweetness and makes each bite better. Don’t skip this step! With these ingredients, you’re ready to create a delicious treat that everyone will love. To start, grab a mixing bowl and combine these ingredients: - 1 cup canned pumpkin puree - 8 oz cream cheese, softened - 1 cup powdered sugar - 1 teaspoon vanilla extract - 1 teaspoon pumpkin pie spice - A pinch of salt Mix everything well. You want a smooth and creamy texture. This is the base for our truffles. After mixing, cover the bowl with plastic wrap. Place it in the fridge for about 1 hour. This step is key. Chilling firms up the mixture, making it easier to shape later. Once the mixture is firm, take a small cookie scoop or your hands. Form bite-sized balls, about 1 inch wide. Place each ball on a parchment-lined baking sheet. While the truffles chill, melt 1 ½ cups of white chocolate chips. Use a microwave-safe bowl. Heat in 30-second bursts, stirring in between. Stop when the chocolate is fully smooth. Now, take the chilled truffles from the fridge. Dip each one into the melted white chocolate. Use a fork to let excess chocolate drip off. Immediately roll the chocolate-coated truffles in crushed graham cracker crumbs. This gives them a nice texture and looks like pie crust. Place the truffles back on the parchment-lined sheet. Let them set for 15-20 minutes at room temperature or chill them in the fridge for faster results. Enjoy your tasty treats! To get a smooth mixture, start with softened cream cheese. Cold cream cheese will not mix well. Use a hand mixer or a whisk for the best results. Mix until the pumpkin puree and cream cheese blend together. This step is key to a creamy texture. Make sure no lumps remain. Lumps can ruin the truffle experience. Chilling the mixture is very important. It helps the truffles hold their shape. After mixing, cover the bowl and refrigerate for at least one hour. This step makes the mixture firm enough to scoop. If you skip this, the truffles may fall apart. A second chill after forming the truffles helps them set up nicely. When dipping truffles in chocolate, make sure the chocolate is smooth. Melt the white chocolate in short bursts to avoid burning. Stir between each interval for an even melt. Dip each truffle with a fork and let excess chocolate drip off. This creates a nice, even coat. If the chocolate hardens too quickly, reheat it gently. Feel free to get creative with coatings! While crushed graham crackers are traditional, you can try nuts or sprinkles. Chopped pecans or almonds add a nice crunch. For a fun twist, use colored sprinkles for special occasions. Experiment with flavors to find your favorite coating. Each choice can change the truffle's look and taste. {{image_2}} You can switch white chocolate for dark chocolate. Dark chocolate adds a rich taste. It also pairs well with pumpkin flavors. Melt dark chocolate just like you do with white. Dip each truffle in dark chocolate for a bold twist. Get creative with flavors! Try adding a touch of maple syrup for sweetness. You can also mix in crushed nuts for crunch. If you like spice, add more pumpkin pie spice or cinnamon. Each change gives your truffles a new flavor. You can make these truffles vegan too! Use coconut cream instead of cream cheese. For sweetening, use powdered coconut sugar. Melt dairy-free chocolate chips instead of regular chocolate. These changes keep the taste great while being dairy-free. To keep your Pumpkin Cream Cheese Truffles fresh, store them in an airtight container. Use parchment paper between layers to avoid sticking. Place the container in the fridge. This helps maintain the creamy texture and prevents drying out. When stored properly, these truffles last about one week in the fridge. I recommend enjoying them within this time for the best taste. If you notice any change in smell or texture, it’s best to toss them. You can freeze Pumpkin Cream Cheese Truffles for up to three months. First, freeze them on a baking sheet until solid. Then, transfer them to an airtight container or freezer bag. Label the bag with the date. Thaw in the fridge overnight before serving. Yes, you can use fresh pumpkin! First, cook the pumpkin until soft. Then, scoop out the flesh and blend it until smooth. Make sure it’s thick and not watery. This will give you a fresher taste in your truffles. You can try Greek yogurt for a tangy twist. Another option is mascarpone cheese. Both will change the flavor slightly, but they work well in the recipe. Just ensure they are creamy to keep the truffle texture. You can prepare the truffles a day or two in advance. Just follow the steps and store them in the fridge. They will stay fresh and tasty. This makes them perfect for parties or gatherings. Yes, they are gluten-free. The main ingredients don’t contain gluten. Just make sure to choose gluten-free graham cracker crumbs for coating. This way, everyone can enjoy them! These truffles pair well with coffee or tea. You can also serve them with a scoop of vanilla ice cream. If you want, add a sprinkle of extra pumpkin pie spice on top for a fun touch! You learned how to make tasty pumpkin cream cheese truffles. We covered the key ingredients, like canned pumpkin and white chocolate chips. You also got step-by-step instructions to create these delights. I shared tips for smooth mixtures and great coatings, plus tasty variations to try. Remember, proper storage keeps them fresh longer. Enjoy these simple treats any time. They’re fun, easy, and packed with pumpkin flavor. Happy creating!

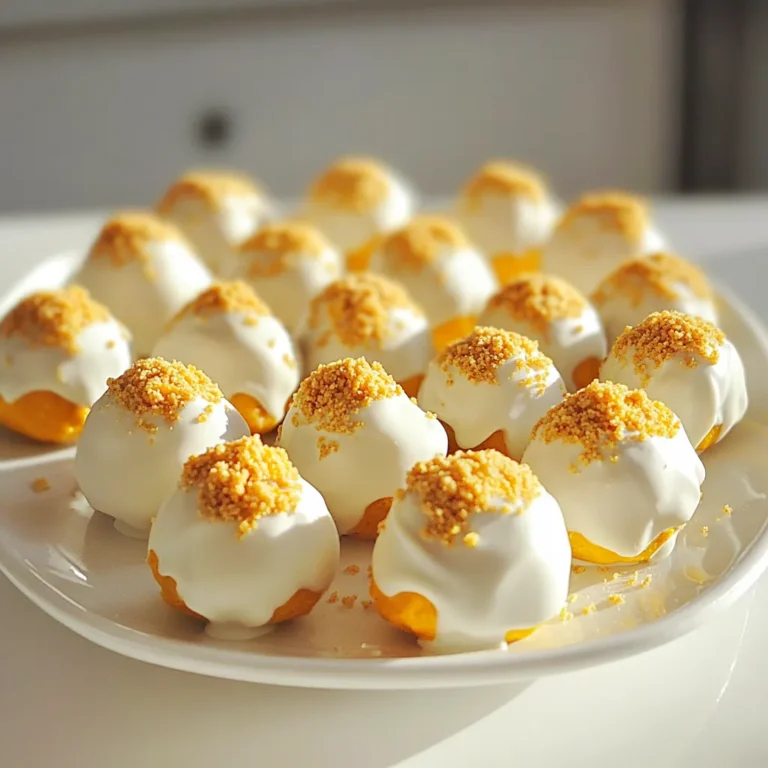
Pumpkin Cream Cheese Truffles Simple and Tasty Treat

To make a delightful pumpkin roll with caramel drizzle, you need a few key ingredients. Here’s the list: - 3/4 cup all-purpose flour - 1/2 teaspoon baking powder - 1/2 teaspoon baking soda - 1 teaspoon ground cinnamon - 1/2 teaspoon ground ginger - 1/4 teaspoon ground nutmeg - 1/4 teaspoon salt - 3 large eggs - 1 cup granulated sugar - 2/3 cup canned pumpkin puree - 1 teaspoon vanilla extract - 1 cup cream cheese, softened - 1 cup powdered sugar - 1 teaspoon lemon juice - 1/2 cup caramel sauce (store-bought or homemade) - Chopped pecans or walnuts (optional, for garnish) Each ingredient plays a special role. The flour gives the roll its structure. Baking powder and soda help it rise. The spices add warmth and flavor. Eggs and sugar create a fluffy texture. Pumpkin puree makes it moist and gives it that lovely orange hue. The cream cheese filling adds richness. The caramel drizzle is the sweet final touch. You can use chopped nuts for a nice crunch. This list covers everything you need to create this tasty treat! 1. Preheat your oven to 350°F (175°C). 2. Line a 15x10-inch jelly roll pan with parchment paper. Leave some overhang for easy removal. Lightly grease the paper. 3. In a medium bowl, whisk together the flour, baking powder, baking soda, cinnamon, ginger, nutmeg, and salt. Set this aside. 4. In a large mixing bowl, beat the eggs and sugar together. Whip until thick and pale, which takes about 2-3 minutes. 1. Stir in the pumpkin puree and vanilla extract with the egg mixture. Mix until well combined. 2. Gradually fold the flour mixture into the wet ingredients. Be careful not to overmix. 3. Pour the batter into the prepared jelly roll pan. Spread it evenly across the pan. 4. Bake for about 13-15 minutes. Check with a toothpick. It should come out clean. 5. Once baked, immediately turn the cake onto a clean kitchen towel. Dust the towel with powdered sugar. 6. Carefully peel off the parchment paper. Start at one short side and roll the cake with the towel. Let it cool completely while rolled. 1. While the cake cools, prepare the filling. Mix the cream cheese, powdered sugar, and lemon juice until smooth. 2. After the cake has cooled, unroll it carefully. Spread the cream cheese mixture evenly over the cake. 3. Roll the cake back up, this time without the towel. Place it seam-side down on a serving platter. 4. Drizzle caramel sauce generously over the top. You can sprinkle chopped nuts on top if you like. 5. Slice into pieces and serve. Enjoy your lovely pumpkin roll! To make a great pumpkin roll, cooling is key. After baking, turn the cake onto a towel sprinkled with powdered sugar. This helps prevent sticking. Roll it up with the towel inside to cool. This keeps it moist and flexible. When rolling, be gentle. Start at one short end and roll carefully. If it cracks, don't worry! You can cover it with the filling later. If you have dietary needs, substitute ingredients. Use gluten-free flour for a safe option. You can also swap eggs with flaxseed or applesauce to make it vegan. For the cream cheese filling, make sure your cream cheese is soft. This helps it mix well. Beat it until smooth to avoid lumps. Want to enhance the flavor? Add a touch of vanilla or cinnamon to the filling. These flavors pair well with pumpkin. A hint of nutmeg also works great. For a stunning presentation, place the pumpkin roll on a nice platter. Drizzle caramel sauce over the top. Sprinkle with chopped pecans or walnuts for crunch. Pair this treat with warm drinks like chai or coffee. The spices in the roll go well with these flavors. A scoop of vanilla ice cream on the side is also a nice addition. {{image_2}} For those with dietary needs, I have some great options. - Gluten-free options: You can swap all-purpose flour for gluten-free flour. Make sure it has a good binding agent, like xanthan gum, to keep your roll intact. - Vegan adaptations: Replace eggs with flaxseed meal. Mix one tablespoon of flaxseed meal with three tablespoons of water. Let it sit for a few minutes to thicken. Use a dairy-free cream cheese for the filling. Want to switch things up? Here are some fun ideas. - Adding chocolate or spices: You can fold in chocolate chips to the batter for a sweet surprise. For extra spice, add a pinch of ground cloves or allspice. - Incorporating different nuts: Try adding chopped pecans, walnuts, or even hazelnuts to the filling. They add a nice crunch and flavor. Make your pumpkin roll fit the season! - Holiday-themed variations: For Christmas, add peppermint extract to the cream cheese filling. For Thanksgiving, sprinkle some nutmeg on top for a festive touch. - Garnishes according to the season: In fall, use candied pecans as a topping. In spring, top with fresh berries for a bright look. To keep your pumpkin roll fresh, first, let it cool completely. Wrap it tightly in plastic wrap. Then, place it in an airtight container. This keeps it moist and tasty. You can store leftovers in the fridge for up to a week. For longer storage, freeze the roll. Just slice it first for easy serving later. When stored well, your pumpkin roll lasts about 5 to 7 days in the fridge. If you freeze it, aim to eat it within three months for the best taste. Look for signs of spoilage, like a sour smell or mold. If you see any, it's best to toss it. To reheat your pumpkin roll, slice it into pieces. Place them on a microwave-safe plate. Heat for about 10 to 15 seconds. This warms it without drying it out. You can also warm it in a toaster oven. Set it to low heat for a few minutes, checking often. Enjoy that soft texture and rich flavor! To make your pumpkin roll easier to roll, use a kitchen towel. Dust it with powdered sugar. When the cake comes out of the oven, flip it onto the towel. This will help prevent sticking. Start rolling from one end while the cake is warm. This keeps its shape better. Yes, you can make the filling ahead of time. Mix the cream cheese, powdered sugar, and lemon juice. Store it in an airtight container in the fridge. This way, you save time later. Just let it sit at room temperature for a bit before spreading. You know the pumpkin roll is done when a toothpick comes out clean from the center. Bake it for about 13-15 minutes. If the edges pull away from the pan slightly, that’s a good sign too. Keep an eye on it to avoid overbaking. If you need a substitute for cream cheese, try mascarpone or Greek yogurt. Both provide a creamy texture. You can also use a dairy-free cream cheese if you want a vegan option. Just adjust the sugar to taste for your filling. Yes, you can freeze the pumpkin roll. Wrap it tightly in plastic wrap and then in foil. This helps prevent freezer burn. It can stay good for about three months. Thaw it in the fridge before serving for the best texture. In this post, I shared how to make a delicious pumpkin roll. You learned about key ingredients, step-by-step instructions, and tips for success. I also covered tasty variations and storage practices to keep your treat fresh. Remember, practice makes perfect when rolling the cake. Have fun while experimenting with flavors and presentations. Enjoy your homemade pumpkin roll, and share it with friends for a delightful treat!

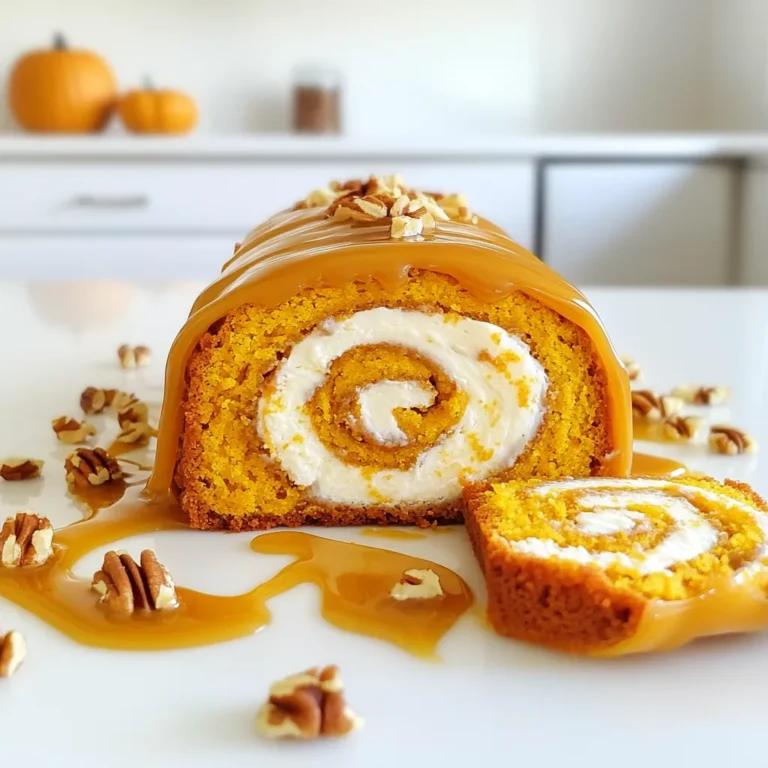
Pumpkin Roll with Caramel Drizzle Delightful Treat

To make these Chocolate Peanut Butter Oat Bars, gather the following ingredients: - 2 cups rolled oats - 1 cup creamy peanut butter - 1/2 cup honey or maple syrup - 1/2 cup unsweetened cocoa powder - 1/2 cup dark chocolate chips - 1/2 cup chopped nuts (like almonds or walnuts) - 1/4 teaspoon sea salt - 1 teaspoon vanilla extract Each ingredient plays a key role in the recipe. Rolled oats give the bars their chewy texture. Creamy peanut butter adds richness and flavor. Honey or maple syrup sweetens the mix and keeps it moist. Unsweetened cocoa powder adds a chocolatey taste without extra sugar. Dark chocolate chips provide little bursts of sweetness. Chopped nuts add crunch and healthy fats. Sea salt enhances all the flavors, and vanilla extract gives a warm note. This recipe is great because it is simple and quick. You can easily find these ingredients in your local store. Using quality ingredients makes a big difference in taste. Enjoy the process of gathering and preparing these items. Each step brings you closer to a delicious treat you can share or enjoy alone! First, grab a large mixing bowl. Add 2 cups of rolled oats. Next, include 1/2 cup of unsweetened cocoa powder. Then, toss in 1/2 cup of chopped nuts. These add crunch and flavor. Mix everything well until combined. Now, take a small saucepan. On low heat, warm 1 cup of creamy peanut butter and 1/2 cup of honey or maple syrup. Stir gently for about 3 to 5 minutes. Make sure it turns smooth and creamy. Remove the pan from heat. Stir in 1 teaspoon of vanilla extract and 1/4 teaspoon of sea salt. Mix well. Pour the warm peanut butter mixture into your bowl of dry ingredients. Mix until the oats and nuts are completely coated. Then, add 1/2 cup of dark chocolate chips. Stir until the chocolate chips are evenly spread throughout. Line an 8x8 inch baking dish with parchment paper. Leave some paper hanging over the sides. This helps you lift the bars out later. Transfer your mixture into this dish. Press it down firmly to create an even surface. Place the dish in the refrigerator for 1 to 2 hours. This helps the bars set firmly. Once chilled, lift the bars out using the parchment paper. Cut them into squares or rectangles. Enjoy your tasty treat! To get the best texture for these bars, use rolled oats. They hold together well and give a nice chew. When mixing the dry ingredients, ensure even distribution. This helps every bite taste great. Press the mixture firmly into the dish. This step creates a solid bar. If they feel too crumbly later, you may not have pressed hard enough. I recommend creamy peanut butter for this recipe. It blends well with other ingredients. Natural peanut butter works too, but it may change the texture. Look for brands without added sugar or oils. This choice keeps the bars healthy and tasty. If you like crunch, try chunky peanut butter instead. It adds a fun texture! Cleaning up after cooking can be a hassle. To make it easier, use parchment paper in your dish. This helps you lift the bars out easily. After mixing, use a rubber spatula to scrape down the bowl. This way, you get every bit of goodness. For sticky bowls, soak them in warm water first. This loosens the residue and makes washing simpler. {{image_2}} You can easily make these bars without nuts. Just skip the chopped nuts. Use the same amount of oats. The bars will still taste great! You can add sunflower seeds or pumpkin seeds for crunch. These seeds give a nice texture without adding nuts. To make vegan-friendly bars, use maple syrup instead of honey. This swap keeps everything plant-based. Make sure your dark chocolate chips are dairy-free. These small changes keep the flavor rich and satisfying without animal products. Get creative with add-ins! You can mix in dried fruits, like raisins or cranberries. They add sweetness and chewiness to the bars. Try using coconut flakes for a tropical twist. You can also switch the cocoa powder for carob powder for a different taste. These fun additions make each bite unique! To keep your chocolate peanut butter oat bars fresh, store them in an airtight container. Place the bars in the refrigerator. This keeps them cool and helps maintain their texture. Make sure they are not exposed to air, as this can dry them out. These bars are best enjoyed fresh but can last up to one week in the fridge. After that, they might lose some of their taste and texture. Always check for any signs of spoilage before eating. Look for changes in color or smell. If you want to store them for longer, freezing is a great option. Wrap each bar in plastic wrap or foil. Then, place them in a freezer-safe bag or container. They can last up to three months in the freezer. When you're ready to eat them, thaw the bars in the fridge overnight. This keeps them tasty and ready to enjoy! Yes, you can make simple swaps. For the oats, use quick oats for a softer texture. If you prefer a different nut butter, almond or cashew butter works well. Maple syrup is a great option if you want a vegan sweetener. You can also replace honey with agave syrup. Just remember, swapping ingredients may change the taste or texture. To boost the chocolate flavor, add more cocoa powder. Try increasing it to 3/4 cup. You can also add more dark chocolate chips. If you love chocolate, consider drizzling melted chocolate on top before chilling. This makes them look fancy and taste even better. If your bars crumble, they might need more moisture. You can add a bit more peanut butter or honey. Mixing in a tablespoon of water can help too. Ensure you press the mixture firmly into the pan. This helps it hold together better when set. You will know the bars are set when they feel firm to the touch. Chill them in the fridge for at least 1-2 hours. If you press down lightly and they spring back, they are ready. After chilling, cut and enjoy! If they are too soft, let them chill longer before cutting. This blog post showed you how to make tasty no-bake bars. We covered the key ingredients, like oats and peanut butter, and shared step-by-step instructions. I also gave tips for texture and easy cleanup. You could even tweak the recipe with variations, like nut-free or vegan options. Remember to store your bars properly for the best shelf life. Try different flavors to keep things fun. Enjoy your delicious treats!

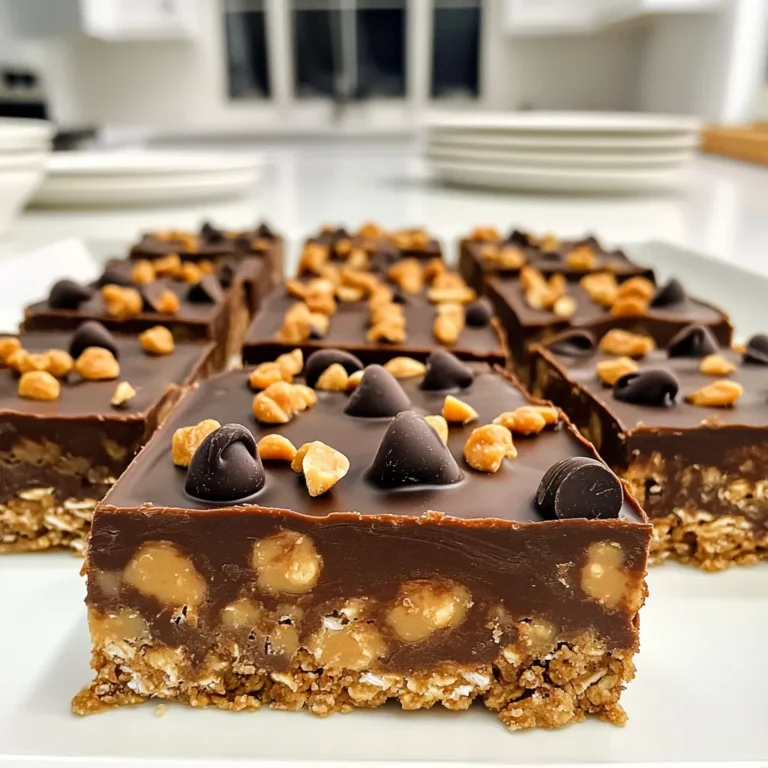
Chocolate Peanut Butter Oat Bars No Bake Delight

To make the best cranberry orange loaf, gather these key ingredients: - 2 cups all-purpose flour - 1 teaspoon baking powder - 1/2 teaspoon baking soda - 1/4 teaspoon salt - 1/2 cup unsalted butter, softened - 1 cup granulated sugar - 2 large eggs - Zest of 1 large orange - 1/2 cup fresh orange juice - 1 cup fresh or frozen cranberries, chopped - 1/2 teaspoon vanilla extract These ingredients work together to create a soft and moist loaf. The flour gives structure, while the butter adds richness. Eggs help bind everything, making it fluffy. Orange zest and juice provide bright flavor, and cranberries add a lovely tartness. You can take your loaf to the next level with these optional ingredients: - 1/4 cup slivered almonds - Powdered sugar for dusting Adding slivered almonds gives a nice crunch and nutty flavor. Dusting with powdered sugar at the end makes the loaf look fancy and inviting. These options can make your loaf unique and personal to your taste. First, gather all your ingredients. You will need: - 2 cups all-purpose flour - 1 teaspoon baking powder - 1/2 teaspoon baking soda - 1/4 teaspoon salt - 1/2 cup unsalted butter, softened - 1 cup granulated sugar - 2 large eggs - Zest of 1 large orange - 1/2 cup fresh orange juice - 1 cup fresh or frozen cranberries, chopped - 1/2 teaspoon vanilla extract - 1/4 cup slivered almonds (optional) - Powdered sugar for dusting (optional) Next, preheat your oven to 350°F (175°C). Grease and flour a 9x5 inch loaf pan. This step helps prevent sticking. In a medium bowl, whisk together the flour, baking powder, baking soda, and salt. This mix adds lift to your loaf. Set this bowl aside. In a large mixing bowl, cream the softened butter and sugar until light and fluffy. This should take about 3-4 minutes. It’s key for a tender loaf. Then, add the eggs one at a time, mixing well after each addition. Mix in the orange zest and vanilla extract. These ingredients add bright flavors. Gradually add the dry mixture to the wet mixture. Alternate with the orange juice, starting and ending with the flour mix. Be careful not to overmix. Now, gently fold in the chopped cranberries and slivered almonds, if you choose to use them. This adds texture and taste. Pour the batter into your prepared loaf pan. Smooth the top with a spatula. Bake in the preheated oven for 55-65 minutes. A toothpick inserted in the center should come out clean when it's ready. Once it’s done, let it cool in the pan for 10 minutes. Then, transfer the loaf to a wire rack to cool completely. If you want to add a touch of elegance, dust with powdered sugar once cooled. Enjoy the lovely aroma filling your kitchen! To get a soft and moist loaf, cream the butter and sugar well. This step adds air, making your loaf light. Mix the dry and wet ingredients gently. Overmixing can lead to a dense texture. Use fresh cranberries for the best taste. If you use frozen ones, don’t defrost them first. This keeps the loaf moist. Add more zest for a brighter orange flavor. You can also mix in some chopped nuts. Walnuts work great if you want a crunch. A pinch of cinnamon or nutmeg adds warmth. For a twist, try adding a splash of almond extract. This enhances the flavor without overpowering it. Always preheat your oven. This ensures even baking. Use a toothpick to check for doneness. Insert it in the center; it should come out clean. If the top browns too fast, cover it with foil. Let the loaf cool in the pan for 10 minutes before moving it. This helps keep its shape. {{image_2}} You can switch up the ingredients for more fun. Try whole wheat flour instead of all-purpose flour. This change adds a nutty taste and more fiber. For the sweetener, use honey or maple syrup. These options give a different flavor and sweetness. If you don’t have fresh cranberries, use dried ones. Just chop them to the size of fresh cranberries. You can also replace slivered almonds with walnuts or pecans for a crunch. Seasonal ingredients can make this loaf shine. In winter, add some chopped apples or pears for a cozy feel. In spring, mix in some fresh strawberries for a fruity twist. During summer, use blueberries or raspberries for a vibrant color and taste. In fall, add pumpkin puree and spices like cinnamon and nutmeg. This gives the loaf a warm and festive flavor. To make this loaf even more special, try unique flavors. Add a splash of almond extract for a sweet, nutty note. You can mix in some chocolate chips for a sweet surprise. Fresh herbs like rosemary or thyme can bring a nice savory touch. For a tangy kick, add a bit of lemon zest along with the orange. These flavors can change your cranberry orange loaf into something new and exciting! To keep your cranberry orange loaf fresh, wrap it tightly in plastic wrap. This helps keep moisture in. You can also place it in an airtight container. Store it at room temperature for up to three days. If you want it to last longer, consider freezing it. Freezing is an easy way to save your loaf. First, let the loaf cool completely. Then, wrap it in plastic wrap. For extra protection, add a layer of aluminum foil over the plastic. You can freeze the loaf for up to three months. When you're ready to eat it, just thaw it overnight in the fridge. The shelf life of your cranberry orange loaf is about three days at room temperature. If you store it in the fridge, it can last up to a week. The best practice is to keep it in an airtight container to avoid drying out. If you notice any mold or off smells, it’s best to discard it. Always check for freshness before enjoying your delicious loaf! Yes, you can use frozen cranberries in this recipe. Just chop them while they are still frozen. This keeps them from getting mushy. When mixing, they may add a little more moisture. This will not ruin your loaf. Just be aware it may take a bit longer to bake. Yes, you can substitute butter with oil. Use a light oil like canola or vegetable oil. One-half cup of butter equals about one-third cup of oil. The loaf may be slightly denser but still tasty. The flavor will change a bit, but it will still be great. To check if the loaf is done, use a toothpick. Insert it in the center of the loaf. If it comes out clean, your loaf is ready. If it has wet batter, bake it a little longer. Usually, it takes about 55 to 65 minutes. Keep an eye on it as it gets close to that time. You learned about making a delicious cranberry orange loaf. We covered essential and optional ingredients. I shared steps for prepping, mixing, and baking with clear tips for texture and flavor. You can explore fun variations and learn how to store your loaf. Remember, using frozen cranberries works fine, and oil can replace butter too. Following these guidelines will help you bake a tasty treat every time. Enjoy your baking journey!

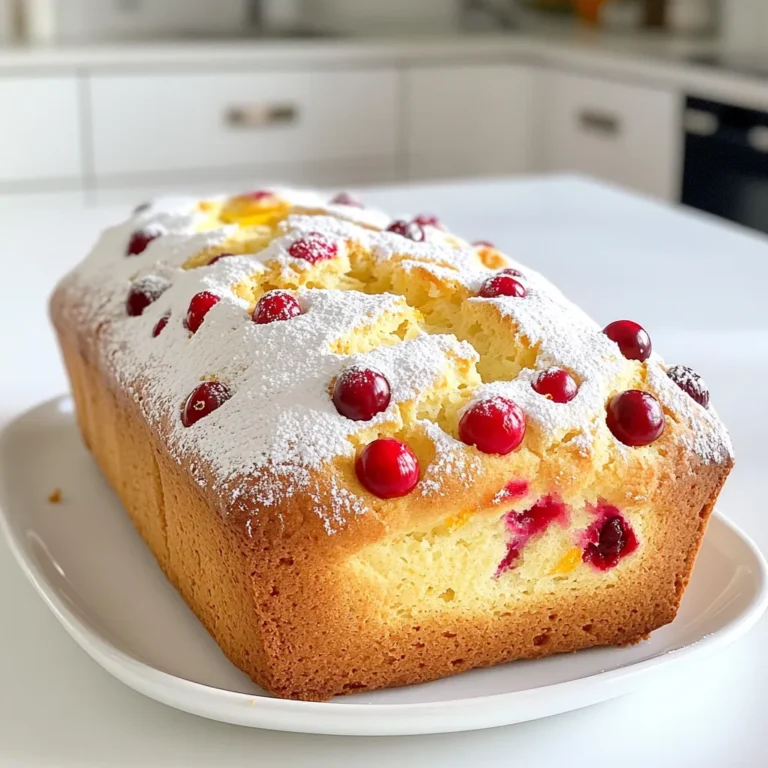
Cranberry Orange Loaf Bakery Style Delight Recipe

For this creamy delight, you will need: - 1 pound Italian sausage (mild or spicy) - 1 small onion, finely chopped - 2 cloves garlic, minced - 4 cups chicken broth - 1 can (14.5 oz) diced tomatoes, undrained - 1 teaspoon dried Italian herbs (oregano, basil, thyme) - 1 cup heavy cream - 8 oz fresh or frozen cheese tortellini - 3 cups fresh spinach - Salt and pepper to taste - Grated Parmesan cheese for garnish - Fresh parsley, chopped (for garnish) These ingredients come together to create a rich and hearty soup. The Italian sausage brings great flavor. The tortellini adds a fun texture. Spinach adds a nice color and nutrients. When serving, consider these garnishes to elevate your dish: - Grated Parmesan cheese - Fresh parsley, chopped Adding these toppings can enhance the look and taste. They make the soup feel more special. You can easily adapt this recipe to fit your needs: - To make it gluten-free, use gluten-free tortellini. - For a dairy-free option, swap heavy cream with coconut milk or a nut-based cream. These changes help everyone enjoy this soup. You can still keep the rich flavor while meeting dietary needs. First, grab a large pot or Dutch oven. Heat it over medium heat. Add one pound of Italian sausage. Use a spatula to break the sausage into small pieces as it cooks. Brown the sausage for about five to seven minutes. If there is too much fat, drain the excess. This step builds a great flavor base. Next, toss in one small chopped onion and two minced garlic cloves. Sauté them for three to four minutes. You want the onion to become soft and clear. Then, pour in four cups of chicken broth. Add a can of diced tomatoes, including their juices. Sprinkle in one teaspoon of dried Italian herbs, like oregano, basil, and thyme. Stir everything well and bring it to a gentle boil. Once boiling, add eight ounces of tortellini. Turn the heat down to a simmer. Cook the tortellini for three to five minutes, or according to the package instructions. When the tortellini are tender, stir in one cup of heavy cream. Add three cups of fresh spinach next. Let everything simmer for two to three more minutes, until the spinach wilts and the soup becomes creamy. - Stirring in Spinach Make sure the spinach is mixed well so it wilts evenly. This step adds great color and nutrients to your soup. Taste it and add salt and pepper to your liking. Don’t forget to garnish your soup with grated Parmesan cheese and fresh parsley before serving. Enjoy your creamy sausage tortellini soup! For smooth texture, cook the tortellini just right. Follow the package time closely. Overcooked tortellini becomes mushy. Keep the heat low when adding cream. This helps maintain a creamy base without curdling. Add fresh herbs like parsley right before serving. They give a bright taste. A dash of red pepper flakes can add a nice kick. Squeeze fresh lemon juice for a tangy twist. This brightens up the rich flavors. Avoid using too much broth. It can dilute the flavor. Don’t skip the onion and garlic; they build the soup’s base. Be careful with salt. Taste as you go to prevent over-seasoning. {{image_2}} You can swap the Italian sausage for other meats. Ground turkey or chicken works well. For a richer taste, try using smoked sausage or chorizo. Each option brings its unique flavor to the soup. Choose mild or spicy, depending on how much heat you want. If you want a meat-free version, skip the sausage. Replace it with mushrooms or lentils. Both add great texture and flavor. Use vegetable broth instead of chicken broth. Also, add more veggies like zucchini or carrots for extra nutrients. To really amp up the taste, add spices and herbs. A pinch of red pepper flakes gives a nice kick. Fresh basil or thyme can brighten the dish. A splash of lemon juice at the end adds freshness. Don't forget about garlic! Adding more minced garlic can enhance the overall flavor. To keep your creamy sausage tortellini soup fresh, first let it cool. Use an airtight container to store the soup. This way, it will stay tasty for up to three days in the fridge. Always label your container with the date. This helps you know how long it has been stored. If you want to save some soup for later, freezing is a great option. Use freezer-safe containers or bags. Make sure to leave some space in the container for expansion. The soup will stay good for up to three months in the freezer. When you’re ready to enjoy it, thaw it in the fridge overnight. To reheat, pour the soup into a pot over medium heat. Stir often to prevent sticking. If the soup is too thick, add a splash of chicken broth or water. Heat until it’s hot all the way through. You can also use the microwave, but stir it halfway to warm evenly. Enjoy your soup just like the first time! Yes, you can use frozen tortellini in this recipe. It cooks well in the soup. Just add it to the pot when you would normally add fresh tortellini. Frozen tortellini usually takes a bit longer to cook, about 5-7 minutes. Check the package for exact times. This makes the recipe easy to prepare, even on busy days. If you want a lighter option, you can use half-and-half or whole milk. For a dairy-free choice, try coconut milk or cashew cream. Each option will change the taste a bit. Experiment to find what you like best. Just remember, these substitutes may make the soup less creamy. This soup can last 3 to 4 days in the fridge. Be sure to store it in an airtight container. When you are ready to eat it again, reheat it on the stove or in the microwave. If it thickens too much, add a splash of broth or water to bring it back to life. Enjoy your creamy sausage tortellini soup! This blog post covered how to make creamy sausage tortellini soup. We looked at key ingredients, substitutions, and garnishes. You learned step-by-step cooking techniques, plus tips for great texture and flavor. I also shared fun variations and storage advice to keep your soup fresh. Cooking should be fun and easy. Enjoy experimenting with different ingredients to make this dish your own. Happy cooking!

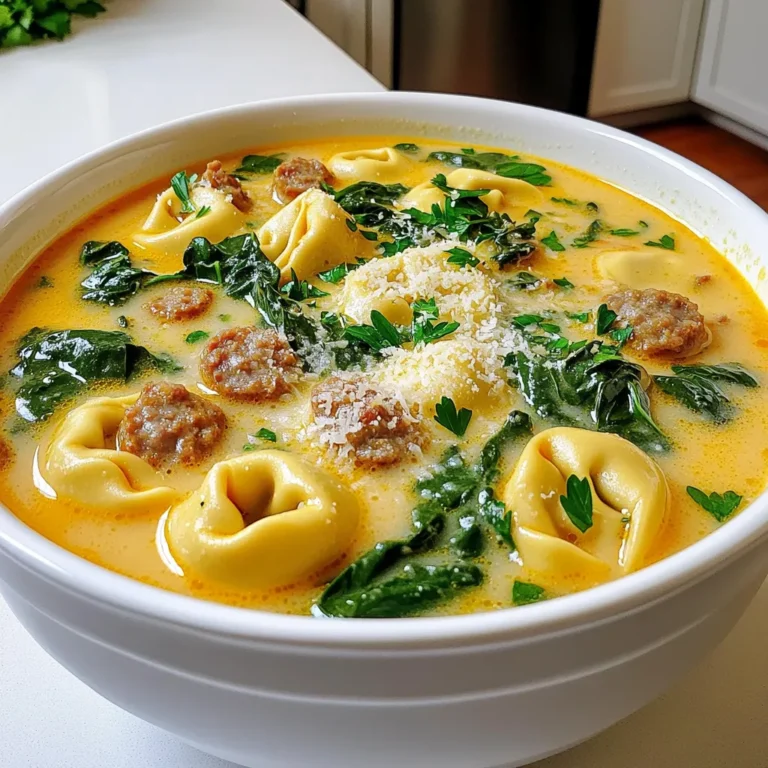
Creamy Sausage Tortellini Soup One Pot Delight

- 6 large jalapeños, halved and seeded - 1 cup cream cheese, softened - 1 cup shredded cheddar cheese - 1/2 cup panko breadcrumbs - 1/4 teaspoon garlic powder - 1/4 teaspoon onion powder - 1/4 teaspoon smoked paprika - Salt and pepper to taste - Olive oil spray - Cooking tools required: mixing bowl, spoon, air fryer, and a baking tray For these tasty Jalapeño Popper Bites, I love using fresh jalapeños. They bring a great kick! You will need large ones so they can hold the cheesy filling. The cream cheese and cheddar mix gives a rich flavor. This combo melts beautifully, making each bite heavenly. Panko breadcrumbs are key for that crispy texture. They coat the tops and get nice and crunchy in the air fryer. The seasoning adds depth to the filling. A bit of garlic powder, onion powder, and smoked paprika makes each bite pop with flavor. Don't forget the olive oil spray! It helps the panko turn golden brown. You’ll want these bites to look as good as they taste. Gather your tools, and let’s get cooking! To start, take your six jalapeños. Cut each one in half lengthwise. Use a small spoon to scoop out the seeds and membranes. This step helps reduce the heat so you can enjoy the flavors better. After you prepare the jalapeños, preheat your air fryer to 375°F (190°C). This temperature is perfect for making them crispy. In a mixing bowl, add one cup of softened cream cheese. Then, add one cup of shredded cheddar cheese. Mix them together until smooth. Next, add 1/4 teaspoon of garlic powder, 1/4 teaspoon of onion powder, and 1/4 teaspoon of smoked paprika. Don't forget to season with salt and pepper to taste. Stir well to combine all the flavors. Spoon the creamy cheese mixture into each jalapeño half. Fill them generously for a tasty bite. Now, take 1/2 cup of panko breadcrumbs and place them in another bowl. Lightly spray the tops of the stuffed jalapeños with olive oil. Then, dip the tops into the panko breadcrumbs for a crunchy coat. Place the stuffed jalapeños in a single layer in the air fryer basket. Air fry them for about 10 to 12 minutes. You want the jalapeños to be tender and the tops to turn golden brown and crispy. Once done, carefully remove them from the air fryer. Let them cool for a few minutes before you enjoy these tasty bites. To get that perfect crunch, timing is key. Air fry your jalapeño poppers for 10 to 12 minutes. Keep an eye on them. You want the tops golden brown and crispy, not burnt. Preheating your air fryer to 375°F (190°C) helps cook them evenly. This step makes sure they start off hot, which is vital for crispness. Want to kick up the spice? Try adding more garlic powder or smoked paprika. You can also mix in some cayenne for heat. For fresh flavor, toss in chopped cilantro or chives into your cheese mix. Fresh herbs can brighten the taste of your poppers. For a great presentation, arrange your jalapeño popper bites on a colorful platter. Sprinkle some chopped green onions or cilantro on top. Serve with dips like ranch dressing or a creamy chipotle sauce. These dips add a nice contrast to the cheesy poppers. {{image_2}} You can switch up the cheese in your jalapeño popper bites. Try using gouda or pepper jack cheese. These options add different flavors and textures. For a vegan twist, use cashew cheese or coconut-based cream cheese. They can taste just as rich and creamy. Want to add some protein? Chop up cooked bacon or sausage and mix it into the cheese filling. This adds a savory bite. If you prefer vegetarian options, use black beans or quinoa. They add heartiness without meat. To control the heat of your poppers, adjust the jalapeño amount. For milder poppers, use fewer jalapeños or remove the seeds. If you like it spicy, add cayenne pepper or hot sauce to the cheese mix. This way, you can customize the heat to your taste. To keep your jalapeño popper bites fresh, place them in an airtight container. Store them in the fridge. This method helps retain their taste and texture. Eat the leftovers within 3 to 4 days for best flavor. To reheat in an air fryer, set it to 350°F (175°C). Place the poppers in a single layer and heat for about 5 minutes. This will make them crispy again. You can also reheat them in the oven at 350°F (175°C) for about 10 minutes. You can freeze jalapeño popper bites before cooking. Arrange them in a single layer on a tray to freeze. Once frozen, transfer them to a freezer bag. For best taste, use them within 2 months. To thaw, place them in the fridge overnight before cooking. This keeps them fresh and delicious. Yes, you can use smaller jalapeños. They’ll need less filling. Just adjust the amount of cheese mixture based on the size. For a fun twist, try mini sweet peppers too. They add color and flavor. You can prep jalapeño popper bites a day ahead. Fill and coat them, then place them in the fridge. When ready, air fry them straight from the fridge. Add a couple of extra minutes to the cooking time. This way, you save time and enjoy fresh poppers! Ranch dressing is a classic choice. It cools the heat and adds creaminess. Other great options include blue cheese dressing or sour cream. For a spicy kick, try a chipotle dip. You can even make a simple avocado dip for a fresh taste! You now have a complete guide to making jalapeño poppers. We explored the main ingredients, including the tasty cheese mixture and the perfect spices. I outlined easy steps for prepping, filling, and cooking in an air fryer. Don’t forget the tips to achieve a crisp finish or to customize your poppers' flavors. Remember, you can adjust heat levels and try different cheese options. Enjoy your delicious poppers, and don’t hesitate to experiment with your favorite dips. Happy cooking!

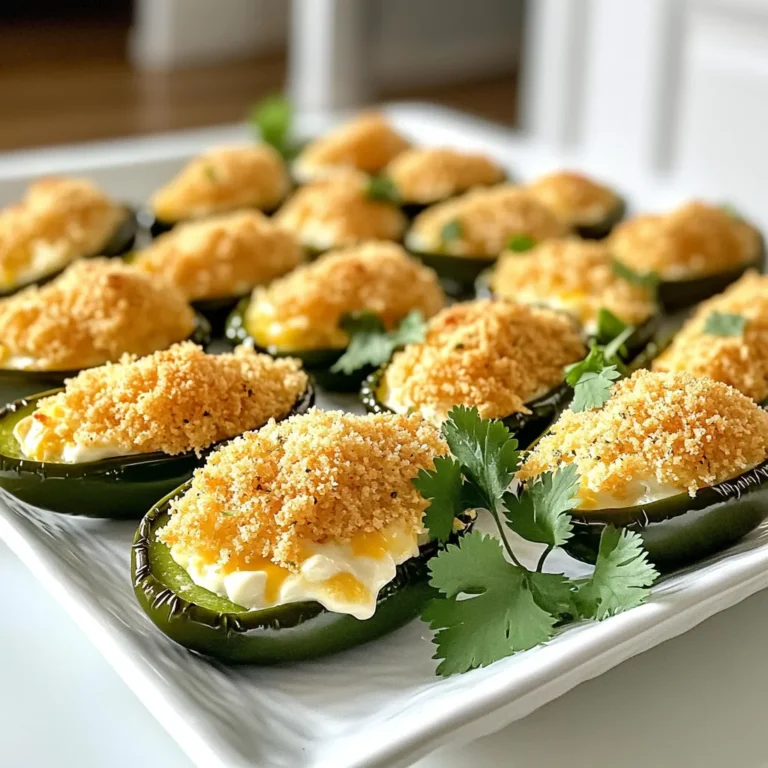
Jalapeño Popper Bites Air Fryer Tasty Crispy Treat

PREV 1 … 12 13 14 … 86 NEXT
spicy fork kitchen

explore

DessertsDinnerAppetizersDrinks

Our Policies

  • Cookie Policy
  • Copyright Policy
  • Disclaimer
  • GDPR Policy
  • Terms Of Use
Back to Top
  • About
  • Contact Us
  • Privacy Policy
© 2026 spicy fork kitchen