FREE DINNER EBOOK! Get your copy!
  • Cookie Policy
  • GDPR Policy
  • Disclaimer
  • Terms Of Use
  • Visit my other site: Fun Cookie Recipes
spicy fork kitchen
  • Home
  • Dinner
  • Desserts
  • Drinks
  • Appetizers
  • Contact
  • About
  • Privacy Policy
  • Home
  • Dinner
  • Desserts
  • Drinks
  • Appetizers
  • Contact
  • About
  • Privacy Policy
  • Cookie Policy
  • GDPR Policy
  • Disclaimer
  • Terms Of Use
Visit my other site: Fun Cookie Recipes

HOME / CATEGORIES /

Latest

For a tasty Slow Cooker Chicken & Dumplings, you will need: - 2 lbs bone-in, skinless chicken thighs - 4 cups chicken broth - 2 cups carrots, sliced - 1 cup celery, diced - 1 cup onion, chopped - 3 cloves garlic, minced - 1 teaspoon dried thyme - 1 teaspoon dried rosemary - 1 tablespoon Worcestershire sauce - 1 teaspoon salt - ½ teaspoon black pepper - 2 cups frozen peas - 2 cups biscuit dough (store-bought or homemade) - Fresh parsley, chopped (for garnish) Optional ingredients for extra flavor include diced potatoes or fresh herbs like thyme and rosemary. You can switch chicken thighs for chicken breasts if you prefer leaner meat. Keep in mind that breasts can dry out faster, so be careful with cooking time. For a gluten-free option, you can use gluten-free biscuit dough. If you want a dairy-free meal, ensure your biscuit dough is dairy-free or make your own. When selecting chicken, look for thighs with a nice, pink color and no dark spots. Fresh chicken should feel firm and moist but not slimy. For vegetables, pick seasonal ones for the best flavor. Fresh carrots and celery make a more vibrant and tasty dish. To start, gather all your ingredients. You need: - 2 lbs bone-in, skinless chicken thighs - 4 cups chicken broth - 2 cups carrots, sliced - 1 cup celery, diced - 1 cup onion, chopped - 3 cloves garlic, minced - 1 teaspoon dried thyme - 1 teaspoon dried rosemary - 1 tablespoon Worcestershire sauce - 1 teaspoon salt - ½ teaspoon black pepper - 2 cups frozen peas - 2 cups biscuit dough - Fresh parsley, chopped Place the chicken thighs at the bottom of your slow cooker. This keeps them moist. Next, add chicken broth, sliced carrots, diced celery, chopped onion, and minced garlic. Sprinkle in the thyme, rosemary, Worcestershire sauce, salt, and black pepper. Stir everything together to mix well. Cover your slow cooker and set it to cook. If you choose low, cook for 6-7 hours. For high, it’s 3-4 hours. You want the chicken to be very tender. When time is up, take out the chicken and shred it with two forks. Discard any bones. Return the shredded chicken to the slow cooker. Now, mix in the frozen peas and stir gently. Roll out your biscuit dough on a clean surface. Cut it into squares about ½ inch thick. Place the dough squares into the slow cooker evenly. Cover and cook for another 30 minutes on high. This gives you fluffy dumplings. Finally, gently stir the chicken and dumplings. Be careful not to break the dumplings. Serve hot and add fresh parsley on top for a nice touch! One common mistake is overcooking the chicken. This can make it dry and tough. Cook it just until tender. For perfect dumpling consistency, do not rush. Follow the cooking time closely. If you add the dumplings too early, they may turn out soggy. To boost flavor, try adding fresh herbs like parsley or basil. A pinch of cayenne can add heat. Adjust seasoning by tasting as you go. If it’s too salty, add more broth or veggies. For a richer taste, add a splash of lemon juice. Serve your chicken and dumplings with a fresh salad or steamed green beans. These sides add crunch and color. For garnish, sprinkle chopped parsley on top. This will make your dish look bright and inviting. A drizzle of olive oil can also enhance the look and flavor. {{image_2}} You can switch the chicken for turkey or pork. Turkey works great for a lighter dish. Pork adds a rich flavor that pairs well with the broth. If you want a meatless option, try using meat substitutes. Products made from soy or pea protein can mimic chicken. They absorb flavors well and keep the dish hearty. Looking for a kick? Add some red pepper flakes or hot sauce. You can also switch up herbs for a bolder taste. For a regional twist, try adding curry powder for a unique flavor. Mexican spices like cumin and chili powder will also change the vibe. These options keep your dish fresh and exciting. Dumplings don't have to be biscuits. You can make drop dumplings for a different texture. Just mix flour, baking powder, and milk to create a softer dough. For a flaky texture, use pastry instead of biscuit dough. This can give your meal a gourmet touch. Experimenting with these options can make your chicken and dumplings even more special. To keep your chicken and dumplings fresh, start by cooling the dish. Transfer the leftovers into airtight containers. Make sure to separate the dumplings from the chicken and broth. This helps maintain their texture. Use shallow containers to speed up cooling. You can refrigerate them for up to three days. For longer storage, freeze the chicken and dumplings in freezer-safe containers or bags. Just remember to label them with the date. When you are ready to enjoy your leftovers, reheat them safely. The best method is to use the stove or microwave. If using the stove, add a little broth or water to keep the dish moist. Heat over low to medium heat, stirring gently. In the microwave, use short bursts at medium power. This helps keep the dumplings fluffy. Avoid overheating, as this can make the dumplings tough. In the fridge, your chicken and dumplings will stay fresh for about three days. If you freeze them, they can last up to three months. Check for signs of spoilage. Look for off smells or changes in color. If the dumplings feel hard or dry, it’s best to toss them. Always trust your senses! Yes, you can use boneless chicken. Boneless chicken cooks faster than bone-in cuts. If you choose boneless, adjust the cooking time. Cook on low for about 4-5 hours or on high for 2-3 hours. The chicken should still be tender and juicy. To check if the chicken is done, look for a few signs. The meat should be white and not pink. You can also shred it easily with a fork. If it pulls apart easily, it is ready. If you have doubts, cook it a bit longer. Yes, you can prep this meal in advance. Chop your veggies and store them. You can also season the chicken ahead. Just keep everything in the fridge until you are ready to cook. This makes it easy to start your slow cooker in the morning. Chicken and dumplings pair well with simple sides. Try a green salad for freshness. You can also serve steamed veggies or crusty bread for dipping. These add color and flavor to your meal. This post walks you through making Slow Cooker Chicken & Dumplings. You learned about key ingredients, substitutes, and tips for quality selection. We covered steps from preparation to finishing touches for a great dish. You now know common mistakes and flavor enhancements to improve your meal. With variations for taste, storage info, and FAQs, you’re well-prepared. Enjoy trying new flavors and sharing this comforting recipe with friends and family. Happy cooking!

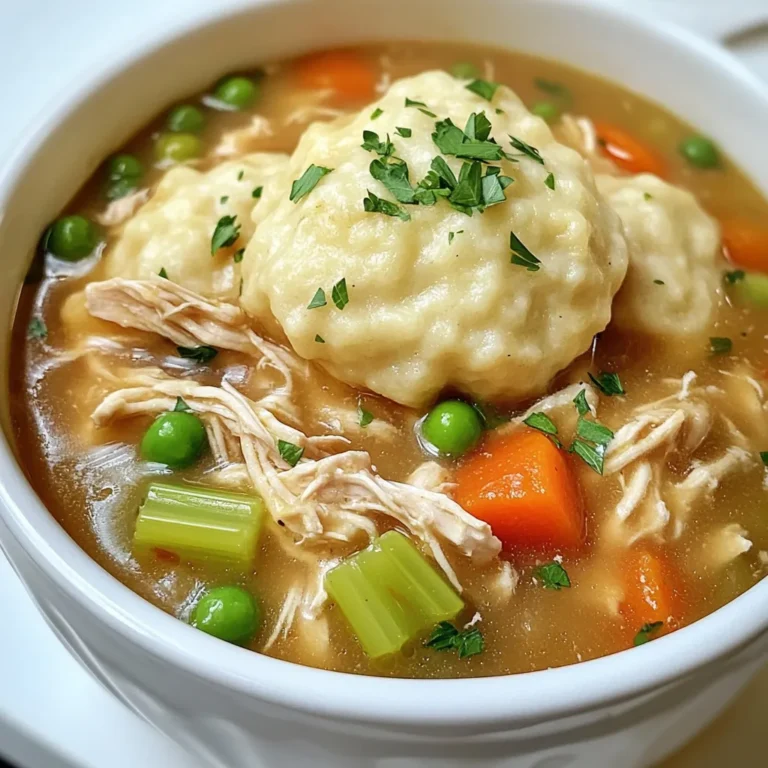
Savory Slow Cooker Chicken & Dumplings Comfort Meal

For this recipe, you need one bunch of fresh asparagus. Choose spears that are bright green and firm. Trim the ends to remove any tough parts. Fresh asparagus makes a big difference in taste. You will need 2 tablespoons of olive oil. This helps the seasoning stick and adds flavor. You also need 1 teaspoon of garlic powder, 1/2 teaspoon of lemon zest, and salt and pepper to taste. If you like a kick, add 1/4 teaspoon of red pepper flakes. These spices bring out the best in the asparagus. Use 1/2 cup of grated Parmesan cheese. This cheese gives the asparagus a crispy and cheesy crust. Toss it well with the asparagus for even coverage. Freshly grated cheese works best, but store-bought is fine too. First, I preheat my air fryer to 400°F (200°C). This takes about five minutes. Preheating helps the asparagus cook evenly and get crispy. I grab a large bowl and add my trimmed asparagus. Next, I pour in two tablespoons of olive oil. I toss the asparagus to coat them well. Then, I sprinkle in one teaspoon of garlic powder, half a teaspoon of lemon zest, and salt and pepper to taste. If I want some heat, I add a quarter teaspoon of red pepper flakes. I toss everything again to mix it well. Now, I add half a cup of grated Parmesan cheese to the bowl. I make sure every spear is covered in cheese. This will give it that tasty, crispy crust. I place the coated asparagus in a single layer in the air fryer basket. It’s important not to overcrowd the basket. This way, they cook evenly. I set the timer for 10 to 12 minutes. Halfway through, I give the basket a good shake. This helps the asparagus cook on all sides. When they’re done, they should be tender and golden brown. I take them out of the air fryer and let them cool for a moment. Then, they are ready to serve! To get that perfect crunch, keep the asparagus in a single layer. This helps all sides cook evenly. Shake the basket halfway through cooking. This action ensures that every spear gets hot air. For a truly crispy finish, try adding a bit more cheese just before the end of cooking. You can boost the flavor of your asparagus easily. Try adding lemon juice for brightness. A sprinkle of smoked paprika gives it a nice twist. If you want a bit of heat, the red pepper flakes are perfect. Remember, a little goes a long way, so start small. Overcrowding the basket can lead to soggy asparagus. Make sure there's enough space for air to flow. If you have a lot, cook in batches. This way, every spear gets the chance to become crispy and delicious. {{image_2}} You can change the flavor of your asparagus by adding more spices. Try mixing in smoked paprika or onion powder for a different taste. For a zestier option, add some cumin or Italian herbs. Even a dash of curry powder can give it an exciting twist. While Parmesan is great, you can use other cheeses too. Grated Pecorino Romano adds a sharp taste. If you want a creamier texture, try mozzarella or even cheddar. Just remember to adjust the amount based on the cheese type. Besides using an air fryer, you can roast the asparagus in the oven. Set your oven to 425°F (220°C) and bake for 15-20 minutes. You can also grill them for a smoky flavor. Just place them on a grill and cook until tender. Each method brings out unique textures and flavors. To keep your air fryer parmesan asparagus fresh, place it in an airtight container. Make sure it cools to room temperature first. You can store it in the fridge for up to three days. This method keeps the flavors intact and prevents sogginess. To reheat, use the air fryer for the best result. Set the air fryer to 350°F (175°C). Heat for about 3-5 minutes. This will keep the asparagus crispy. You can also use a microwave, but it may not maintain the texture. You can freeze your asparagus, but it’s best to do this before cooking. Blanch the asparagus in boiling water for 2 minutes, then cool it in ice water. Drain and place in a freezer-safe bag. It can last up to three months. When you're ready, just air fry it straight from frozen, adding a few extra minutes to the cook time. Yes, you can use frozen asparagus. However, fresh asparagus gives better taste and texture. If you use frozen, cook it for a few extra minutes. Thaw it first for best results. Check your asparagus after 10-12 minutes in the air fryer. It should be tender but still crisp. Look for a golden brown color on the cheese. If it’s not there, air fry for 1-2 more minutes. This dish pairs well with many foods. You can serve it with grilled chicken or fish. It also goes great with quinoa or rice. For a simple meal, add a salad on the side. We've covered how to make tasty air fryer parmesan asparagus. You learned about choosing fresh asparagus, the best seasonings, and how to achieve crispiness. You also discovered variations and how to store leftovers. Remember, keeping your air fryer clean and not overcrowding the basket makes a big difference. Enjoy experimenting with flavors and serving it with your favorite dishes. Happy cooking!

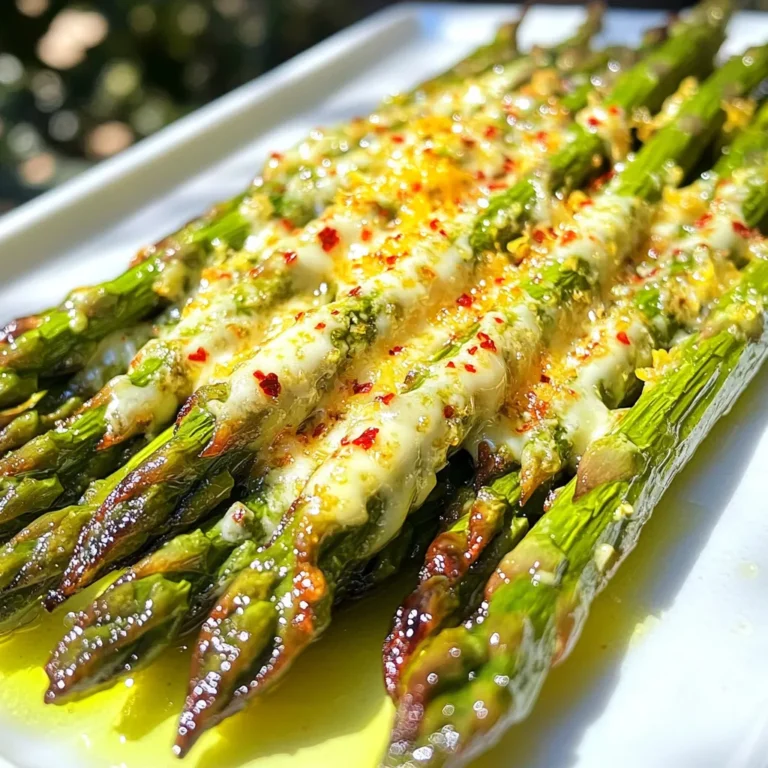
Air Fryer Parmesan Asparagus Tasty and Easy Recipe

For these tasty muffins, you need: - 1 ½ cups all-purpose flour - 1 teaspoon baking soda - ½ teaspoon baking powder - 1 teaspoon ground cinnamon - ½ teaspoon ground nutmeg - ¼ teaspoon ground ginger - ½ teaspoon salt - ½ cup unsalted butter, softened - 1 cup granulated sugar - 1 cup pumpkin puree (canned or fresh) - 2 large eggs - 1 teaspoon vanilla extract - 4 oz cream cheese, softened - 1 tablespoon powdered sugar (for filling) - 1 teaspoon vanilla extract (for filling) Let’s break down some key ingredients. - Pumpkin Puree: This is the star of the show. It gives flavor, moisture, and a beautiful orange color. You can use canned or fresh pumpkin. Both work well. - Cream Cheese: This adds a rich, creamy texture to the muffins. It creates a delightful surprise in the center. Softened cream cheese blends best for the filling. - Spices: Cinnamon, nutmeg, and ginger bring warmth and depth. They make these muffins taste like fall. - Unsalted Butter: It adds richness. Make sure it’s softened for easy mixing. You can switch some ingredients for different tastes: - Flour: Use whole wheat flour for a healthier option. - Sugar: Substitute brown sugar for a deeper flavor. - Eggs: Use flax eggs for a vegan option. Mix 1 tablespoon of flaxseed meal with 2.5 tablespoons of water to replace one egg. - Pumpkin: If you don’t have pumpkin, try mashed banana or applesauce. They’ll keep the muffins moist. - Spices: Feel free to add a pinch of cloves or allspice for more flavor. These simple swaps let you make the muffins your own while keeping them delicious! To start, preheat your oven to 350°F (175°C). This step is key. While the oven heats, line a muffin tin with paper liners or grease it with non-stick spray. This helps the muffins come out easily. Next, gather your ingredients. You need both dry and wet items. The dry mix includes flour, baking soda, baking powder, spices, and salt. For the wet mix, you have butter, sugar, pumpkin puree, eggs, and vanilla. 1. Mix Dry Ingredients: In a large bowl, whisk your dry ingredients. Combine 1 ½ cups of flour, 1 teaspoon of baking soda, ½ teaspoon of baking powder, 1 teaspoon of ground cinnamon, ½ teaspoon of ground nutmeg, ¼ teaspoon of ground ginger, and ½ teaspoon of salt. Set this aside. 2. Cream Butter and Sugar: In another bowl, beat ½ cup of softened butter and 1 cup of granulated sugar together. Mix until it looks light and fluffy. This step adds air to your mix. 3. Add Wet Ingredients: Now, mix in 1 cup of pumpkin puree, 2 large eggs, and 1 teaspoon of vanilla extract. Stir this until fully combined. 4. Combine Mixtures: Gradually add your dry mix to the wet mix. Stir just until combined. Remember, a few lumps are okay. Overmixing makes muffins tough. 5. Prepare Cream Cheese Filling: In a small bowl, mix 4 oz of softened cream cheese, 1 tablespoon of powdered sugar, and 1 teaspoon of vanilla extract until smooth. This is your tasty filling. 6. Fill Muffin Cups: Spoon a tablespoon of batter into each muffin cup. Add a dollop of cream cheese filling on top. Cover this with another tablespoon of batter. Repeat until you use all the batter and filling. 7. Bake Muffins: Place the muffin tin in your preheated oven. Bake for 18-20 minutes. Check doneness with a toothpick. It should come out clean. After baking, let the muffins cool in the pan for 5 minutes. This helps them firm up. Then, transfer them to a wire rack to cool completely. For serving, dust the cooled muffins lightly with powdered sugar. You can enjoy them warm with whipped cream or chopped pecans on top. These simple touches add a nice finish. Baking can be tricky. Here are some common mistakes to watch out for: - Overmixing Batter: Mixing too much can make your muffins tough. Stir gently until combined. - Incorrect Oven Temperature: Always preheat your oven. An oven that is too hot or too cold can ruin your muffins. - Not Measuring Ingredients: Use proper measuring cups. Accurate measurements ensure the right texture and flavor. To make your pumpkin cream cheese muffins shine, follow these expert tips: - Use Room Temperature Ingredients: Make sure your butter, eggs, and cream cheese are at room temperature. This helps them blend well. - Mix Dry and Wet Separately: Mix dry and wet ingredients in different bowls before combining. This ensures even distribution. - Fill Muffin Cups Properly: Fill each muffin cup only halfway with batter. Add the cream cheese filling, then top with more batter. You can boost the flavor and texture of your muffins easily: - Add Spices: Consider adding extra spices like allspice or cloves for more depth. - Mix in Nuts: Chopped pecans or walnuts add crunch and flavor. Fold them into the batter gently. - Top with Seeds: Sprinkle pumpkin seeds on top before baking for a lovely crunch and visual appeal. These tips will help you create delicious, fluffy muffins that everyone will love. {{image_2}} You can easily change the flavor of pumpkin cream cheese muffins. Try adding chocolate chips for a sweet twist. The rich chocolate pairs well with the pumpkin and cream cheese. You can also mix in dried cranberries. These tart berries add a fun pop and a lovely color. If you want gluten-free muffins, swap out the all-purpose flour. Use a gluten-free flour blend that works in baking. For a vegan option, replace the eggs with flaxseed meal or applesauce. You can use a plant-based cream cheese for the filling, which creates a similar taste. You can customize these muffins for different seasons. In fall, add chopped pecans or walnuts for a nutty crunch. During winter, try adding orange zest. This bright flavor works well with pumpkin. In spring, you could fold in some fresh blueberries for a touch of freshness. Each variation brings a new taste to your favorite muffin! After baking, let the muffins cool completely. Place them in an airtight container. This keeps them fresh. You can store them at room temperature for up to three days. If you want them to last longer, the fridge is a good option. Just remember to wrap them well to avoid drying out. To freeze, first, let the muffins cool. Then, wrap each muffin tightly in plastic wrap. You can also use a freezer bag. Label the bag with the date. Muffins can stay frozen for up to three months. When you want one, just take it out and let it thaw at room temperature. Reheating is easy! For best results, use the oven. Preheat it to 350°F (175°C). Place the muffins on a baking sheet for about 10 minutes. If you need them fast, use the microwave. Heat them for about 10-15 seconds. Enjoy your warm muffins just like fresh! Yes, you can use fresh pumpkin. To do this, cut a pumpkin and remove the seeds. Roast the pumpkin until soft, then scoop out the flesh. Puree it until smooth. Fresh pumpkin gives a great taste, but canned pumpkin is often easier. To make these muffins healthier, consider these swaps: - Use whole wheat flour instead of all-purpose flour. - Replace some sugar with applesauce for sweetness. - Use Greek yogurt instead of cream cheese in the filling for added protein. - Add nuts or seeds for extra fiber and healthy fats. Yes, you can prepare the cream cheese filling ahead of time. Mix the cream cheese, powdered sugar, and vanilla extract and store it in the fridge. This can save time on baking day. Just remember to let it soften before using. Making muffins is a fun and easy task. We covered all the essential ingredients, instructions, and helpful tips. You learned about key ingredients and how to make perfect muffins. We also looked at creative variations and smart storage tips. Now, with all this knowledge, you can bake delicious muffins for any occasion. Remember to experiment with flavors and enjoy the process. Happy baking!

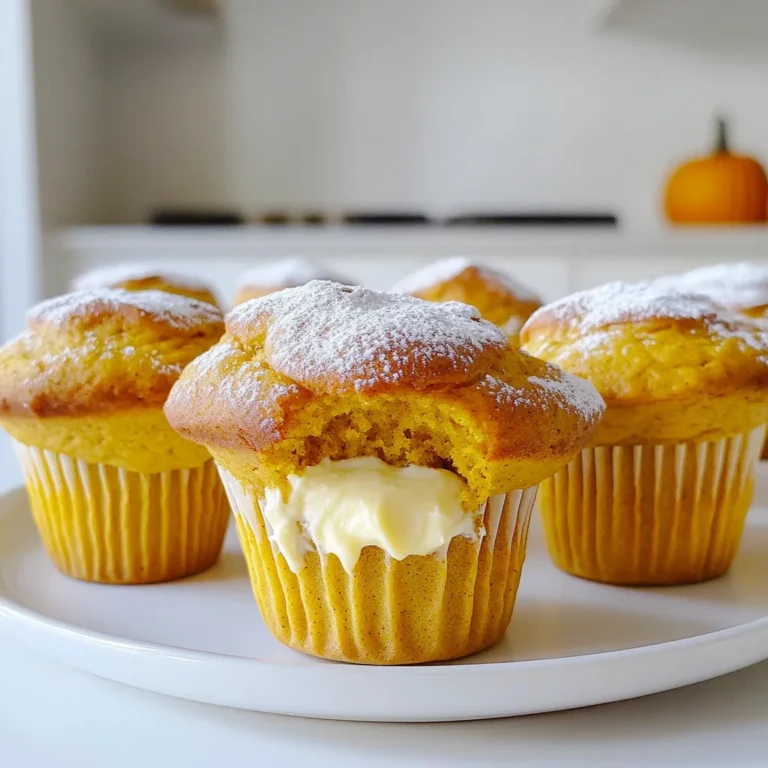
Pumpkin Cream Cheese Muffins Simple and Delicious Treat

- 1 cup cottage cheese (preferably low-fat) - 1 cup unsweetened almond milk (or milk of choice) - 2 tablespoons cocoa powder - 1-2 tablespoons honey or maple syrup (adjust to taste) - 1 shot espresso or 1/2 cup strong brewed coffee, cooled - 1 medium banana, frozen - 1/2 teaspoon vanilla extract - Ice cubes (optional, for a thicker texture) - Chocolate shavings or cocoa nibs for garnish When making this mocha cottage cheese smoothie, I recommend using low-fat cottage cheese. It blends smoothly and adds protein without too many calories. If you prefer regular cottage cheese, that works too. For the milk, I often choose unsweetened almond milk. It keeps the drink light. However, you can use any milk you like, such as whole, skim, or soy milk. Cocoa powder is key for that rich mocha flavor. Look for unsweetened cocoa to keep it healthy. If you want it sweeter, honey or maple syrup is great. Adjust the amount to make it just right for you. The coffee can be espresso or strong brewed coffee. I enjoy using a shot of espresso for a bold taste. Frozen bananas give the smoothie a creamy texture. If you don’t have one, fresh bananas work too, but they won’t be as thick. Adding vanilla extract enhances the flavor. You can skip it if you want. If you want your smoothie thicker, add a few ice cubes before blending. For a touch of fun, top your drink with chocolate shavings or cocoa nibs. They add a lovely crunch! Start by adding 1 cup of cottage cheese and 1 cup of unsweetened almond milk to your blender. Blend these two until they are smooth and creamy. The goal is to make a nice base that feels light and fluffy. If your mixture is too thick, you can add a bit more almond milk. This helps create a nice texture that will hold the flavors. Next, it's time to bring in some fun tastes! Add 2 tablespoons of cocoa powder and 1 to 2 tablespoons of honey or maple syrup to the blender. You can adjust the sweetness based on what you like. Now, choose your coffee. You can use either 1 shot of espresso or 1/2 cup of cooled brewed coffee. Both options work well; espresso gives a strong kick, while brewed coffee can be milder. Now, add 1 medium frozen banana and 1/2 teaspoon of vanilla extract to the mix. Blend everything together until it is fully combined and smooth. If you want your smoothie thicker, toss in a handful of ice cubes and blend again. This will give your smoothie a nice, frosty feel. After blending, taste it! If it needs more sweetness, add more honey or syrup. Pour the smoothie into glasses and feel free to top it with chocolate shavings or cocoa nibs for a fun touch. Enjoy your tasty treat! To make your Mocha Cottage Cheese Smoothie even better, consider adding spices. Nutmeg and cinnamon bring warmth and depth. A pinch of either spice can transform your drink. You can also try different sweeteners. Honey or maple syrup works well, but you can adjust the sweetness to your taste. Adding more or less sweetener can change the whole flavor profile. Blending is key to a smooth drink. Start with the cottage cheese and almond milk. Blend until creamy. If you want your smoothie thicker, ice cubes are your friend. Add a handful of ice and blend again. This gives a rich, thick texture, perfect for sipping. The way you serve your smoothie matters. Garnishing adds a nice touch. Chocolate shavings or cocoa nibs on top make it look fancy. They also add a bit of crunch. For glassware, choose tall glasses to show off the layers. Clear glass lets the beautiful color shine through. Enjoy your drink and impress your guests! {{image_2}} You can switch up the cocoa powder for a new taste. Dark cocoa gives a rich flavor. Light cocoa can make it milder. You might also add chocolate protein powder. This boosts protein and adds chocolatey goodness. Choose a flavor you enjoy. If you want a dairy-free version, try silken tofu or almond yogurt instead of cottage cheese. Both give a creamy texture. For milk, choose oat, soy, or coconut milk. Each adds a unique flavor and keeps it smooth. Adding fruit can change the whole drink. Berries like strawberries or blueberries mix well and add natural sweetness. Mango gives a tropical twist. You can also try spices like cinnamon or nutmeg. These add warmth and depth to your smoothie. Enjoy experimenting! To store leftovers, pour the smoothie into an airtight container. Seal it well to keep air out. This will help it stay fresh. Place the container in the fridge right away. To prevent spoilage, drink the smoothie within 1-2 days. If you notice any change in smell or color, throw it away. Always check the container for leaks before opening. You can freeze this smoothie for later. Pour it into a freezer-safe container, leaving some space at the top. The smoothie will expand as it freezes. To thaw, place the container in the fridge overnight. You can also run it under warm water for a quicker option. Blend it again before drinking to restore its smooth texture. In the fridge, this smoothie lasts about 2 days. After that, it may lose flavor and creaminess. Signs that the smoothie has gone bad include a sour smell or strange texture. If it separates, give it a shake. But if it smells off, it’s best to toss it. Yes, you can make this smoothie ahead of time. To prep ingredients in advance, measure out the cottage cheese, cocoa powder, and sweeteners. You can also brew your coffee and let it cool. Store these ingredients in the fridge. You can blend them right before serving. This saves time and keeps everything fresh. This smoothie is great for meal prep. You can portion it into jars for easy storage. Just blend and pour into containers. Seal them and keep them in the fridge. They should last about two days. When ready to drink, shake well or blend again for a smooth texture. Yes, you can use regular milk if you prefer. Whole, skim, and low-fat milk all work well. Each milk gives a slightly different taste. Almond milk is lighter, while regular milk adds creaminess. Choose what you enjoy most. To make it sweeter, try adding more honey or maple syrup. Start with one tablespoon and taste. If it’s not sweet enough, add more. You can also use ripe bananas; they add natural sweetness. Another option is to use a splash of vanilla syrup. This blog post covered a delicious smoothie recipe with cottage cheese and almond milk. We explored ingredient choices, preparation steps, and easy tips to enhance flavor and texture. Consider trying different variations for a unique taste experience. Remember to follow the storage guidelines to keep your smoothie fresh longer. Whether you make it for breakfast or a snack, enjoy experimenting with flavors and making it your own. Your smoothie journey starts today—let your creativity lead!

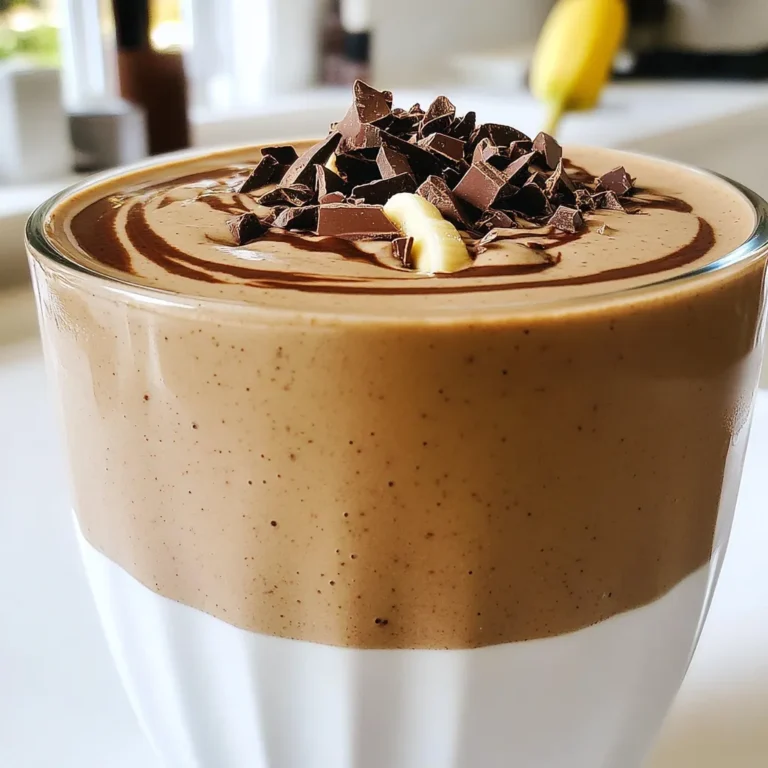
Mocha Cottage Cheese Smoothie Delicious and Simple Recipe

- 1 lb (450g) chicken or turkey sausage, sliced into 1-inch pieces - 1 red bell pepper, chopped - 1 yellow bell pepper, chopped - 1 medium zucchini, sliced - 1 cup cherry tomatoes, halved - 1 red onion, cut into wedges - 3 cloves garlic, minced - 3 tablespoons olive oil - 1 teaspoon dried oregano - 1 teaspoon smoked paprika - Salt and pepper to taste - Fresh parsley for garnish (optional) To get the best results, slice the sausage into 1-inch pieces. This size cooks evenly and is easy to eat. For the veggies, chop the bell peppers into bite-sized pieces. Slice the zucchini thin for a nice texture. Halve the cherry tomatoes for sweetness and cut the onion into wedges for a hearty bite. If you want to swap out any ingredients, keep the amounts similar. For instance, if you choose a different type of sausage like pork or beef, use the same weight. For veggies, you can mix in what you have on hand. Just keep it colorful for a great look! This dish serves four people. Each serving has about 400 calories. It contains protein from the sausage and many vitamins from the veggies. You get fiber from the zucchini and tomatoes, which helps digestion. The olive oil offers healthy fats that are good for your heart. The garlic adds flavor and boosts your immune system. This meal is balanced and keeps you full! - Preheating the oven: Start by preheating your oven to 400°F (200°C). This step ensures your food cooks evenly. - Preparing the sheet pan: Line a large sheet pan with parchment paper. This makes cleanup easy and helps with sticking. - Combining sausage and vegetables in a bowl: In a large mixing bowl, add the sliced sausage, red bell pepper, yellow bell pepper, zucchini, cherry tomatoes, and red onion. This mix gives you color and flavor. - Adding seasonings and oil: Drizzle 3 tablespoons of olive oil over the ingredients. Then add 3 cloves of minced garlic, 1 teaspoon of dried oregano, 1 teaspoon of smoked paprika, and salt and pepper to taste. Toss everything together well. Make sure all the veggies and sausage get coated with the oil and spices. - Spreading on the sheet pan: Once mixed, spread the sausage and veggie mix evenly on the prepared sheet pan. Keep it in a single layer to help everything roast nicely. - Roasting time and temperature: Roast in your preheated oven for 25-30 minutes. Stir halfway through to ensure even cooking. You want the sausage cooked through and the veggies tender with a slight caramelization. - Overcrowding the sheet pan When you pack too much on the pan, the food steams instead of roasts. This can make your veggies soggy and your sausage less crispy. Spread everything out in a single layer for the best results. - Not enough seasoning A dish can taste bland if you skip seasoning. Use salt, pepper, and spices to bring out the flavors. Don’t be shy; toss everything well to ensure even coverage. - Adding herbs and spices Fresh herbs like thyme or rosemary can add depth. You can also mix in spices like cumin or chili powder for a twist. Experiment with flavors to find what you love. - Cooking times for different sausages If you use different types of sausage, check their cook times. Chicken and turkey sausages cook faster than pork. Adjust your roasting time to ensure everything is cooked well. - Garnishing with parsley A sprinkle of fresh parsley brightens the dish. It adds color and a fresh taste. Just chop it finely and scatter it on top right before serving. - Plating suggestions Serve your sausage and veggies on a colorful plate. You can arrange them neatly or mix them for a fun look. Adding a wedge of lemon can also enhance the visual appeal and flavor. {{image_2}} You can easily change the sausage type in this recipe. Try pork or beef sausage for a different taste. If you like spice, go for chorizo. For a lighter option, chicken or turkey sausage works great. The veggies are also flexible. You can add broccoli, carrots, or asparagus. Each of these brings its own flavor and color. Mix and match based on what you have at home or what’s in season. If you want a vegan or vegetarian dish, simply swap the sausage for plant-based options. Look for soy or pea protein sausages in stores. They will give you the same hearty texture without meat. For a gluten-free meal, check the sausage label. Many brands now offer gluten-free options. Pair with fresh veggies, and you have a healthy meal that fits your diet. Want a kick? Add sliced jalapeños to the mix for a spicy twist. These bright peppers will heat things up nicely. For a Mediterranean flair, toss in crumbled feta cheese before serving. It adds creaminess and a salty bite. You can also try adding olives or artichokes for extra flavor. These swaps keep the dish fun and fresh every time you make it. To keep your sheet-pan sausage and veggies fresh, store them in the fridge. Use an airtight container to seal in the flavor. Make sure to cool the dish to room temperature before you store it. This helps prevent moisture buildup, which can lead to sogginess. You can keep leftovers for up to four days in the refrigerator. When you're ready to enjoy leftovers, the best way to reheat them is in the oven. Preheat your oven to 350°F (175°C). Spread the sausage and veggies on a baking sheet. Heat for about 10 to 15 minutes, until they're warm. You can also use a microwave for quick reheating. Just cover the dish to keep it moist. Leftovers stay fresh for four days in the fridge. If you want to save some for later, you can freeze this dish. Let the sausage and veggies cool completely. Then, place them in a freezer-safe container or bag. Label it with the date. You can freeze it for up to three months. When you’re ready to eat, thaw it in the fridge overnight. Reheat as mentioned above to enjoy a quick meal. Cook sausage and veggies for 25 to 30 minutes at 400°F (200°C). Halfway through, stir the mix to ensure even cooking. The sausage should be fully cooked, while the veggies should be tender and slightly caramelized. Check with a fork; they should be soft yet firm. This time gives the best flavor and texture. Yes, you can use frozen vegetables. They are quick and easy. However, there are pros and cons. Frozen veggies cook faster, but they can release extra water. This may make the dish less crispy. Fresh veggies offer a better texture and flavor, but take more prep time. If using frozen, adjust the cooking time and check for doneness. You can serve this dish with many sides. Here are some ideas: - Rice or quinoa: These grains absorb the flavors well. - Bread: A crusty loaf works great for dipping. - Salad: A fresh green salad adds crunch. - Pasta: Toss with olive oil for an easy pairing. Mix and match to find what you enjoy best! This blog post covered making a delicious sheet-pan meal with sausage and veggies. I shared the main ingredients you'll need, along with preparation tips and nutrition facts. I also provided step-by-step instructions, common mistakes to avoid, and ways to customize the dish for different diets. In closing, roasting sausage and vegetables is easy and gives great taste. With these tips, you'll impress everyone at the dinner table. Enjoy experimenting and making this dish your own!

Satisfying Sheet-Pan Sausage & Veggies Easy Recipe

- 2 packs of instant ramen noodles (discard the seasoning packets) - 4 tablespoons unsalted butter - 4 cloves garlic, minced - 1 tablespoon chili paste (adjust to taste) - 2 cups low-sodium chicken or vegetable broth - 1 tablespoon soy sauce - 1 tablespoon sesame oil - 1 teaspoon sugar - 1 teaspoon green onions, chopped (for garnish) - 1 soft-boiled egg (optional, for topping) - Sesame seeds (for garnish) - Salt and pepper to taste You can swap the instant ramen with other noodles, like udon or soba. If you want a vegan dish, use plant-based butter and skip the egg. For a gluten-free option, choose gluten-free ramen noodles. If you don’t have chili paste, you can use sriracha or hot sauce. Store any unused ingredients in the fridge. Keep the garlic and butter in airtight containers. Broth can last a few days in the fridge. If you have leftover noodles, store them separately to avoid mushiness. Always check for freshness before cooking! Start by boiling a pot of water. Once it bubbles, add the ramen noodles. Cook them for 3 to 4 minutes until they are al dente. Drain the noodles and set them aside. This step is key to getting the right texture. In a large skillet, melt 4 tablespoons of unsalted butter over medium heat. Once melted, add 4 minced garlic cloves. Cook for 1 to 2 minutes, stirring often. You want the garlic to smell great but not turn brown. Next, stir in 1 tablespoon of chili paste. Adjust the amount based on how spicy you like it. Pour in 2 cups of low-sodium chicken or vegetable broth. Add 1 tablespoon of soy sauce, 1 tablespoon of sesame oil, and a teaspoon of sugar. Bring this mix to a simmer. This sauce will give your ramen a rich flavor. Now, it’s time to add the cooked ramen noodles to the skillet. Toss them in the spicy garlic butter sauce. Make sure every noodle gets coated well. Cook for about 2 to 3 minutes, mixing gently. Taste and adjust with salt and pepper if needed. This final mix makes your dish pop with flavor. Serve your spicy garlic butter ramen in deep bowls. Top it off with a soft-boiled egg, sesame seeds, and chopped green onions for a beautiful finish. Enjoy your quick and tasty meal! To make your garlic butter pop, use fresh garlic. Fresh garlic gives a strong and bright taste. Mince it well for even flavor. Sauté it carefully; you want it fragrant but not browned. Browning can make it bitter, which is not what we want. Adding a little soy sauce boosts the umami. This adds depth to your dish. You control the heat in this recipe. Start with one tablespoon of chili paste. If you love spice, add more to taste. Always taste as you cook. This helps you find the right balance. Remember, some chili pastes are hotter than others. So adjust slowly. Serving your ramen nicely makes a big difference. Use deep bowls to showcase your dish. Top with a soft-boiled egg for richness. Sprinkle sesame seeds on top for crunch. Add chopped green onions for color. Drizzle extra chili paste for a pop of color. This not only looks good but makes it even tastier! {{image_2}} You can make this dish vegetarian by swapping the broth. Use vegetable broth instead of chicken broth. This change keeps all the great flavors while making it plant-based. You can add more veggies too. Try mushrooms, spinach, or even bok choy. Just sauté them with the garlic for added taste. Want to add some protein? Chicken or tofu works well. For chicken, cook bite-sized pieces in the skillet before adding the garlic. This adds a nice savory touch. If you prefer tofu, use firm tofu. Cut it into cubes and fry until golden. Then, add it to the ramen at the end. Both options boost the meal's heartiness. To change the flavor, try adding herbs or spices. Green onions are a great choice for freshness. You can also stir in some fresh basil or cilantro for a twist. If you want more heat, add a pinch of red pepper flakes. Each addition adds unique flavors to your spicy garlic butter ramen. This makes it exciting and new every time! Store your spicy garlic butter ramen in an airtight container. Let it cool first. Place it in the fridge. It will stay fresh for up to three days. Keep the soft-boiled egg separate if you added one. This helps it stay fresh longer. To reheat, use a pot on low heat. Add a splash of broth or water to prevent sticking. Stir gently as it warms. You can also use a microwave. Place it in a bowl, cover it loosely, and heat in short bursts. Stir after each burst to heat evenly. You can freeze the ramen, but it’s best without the noodles. Cooked noodles can become mushy when thawed. Store the sauce in a freezer-safe container. It can last up to three months. When ready to eat, defrost the sauce overnight in the fridge. Cook fresh noodles when you’re ready to enjoy your meal. Homemade spicy garlic butter ramen lasts about 2-3 days in the fridge. Store it in an airtight container. Make sure to let it cool before closing the lid. The flavors will blend even more in the fridge. However, the noodles may become soft over time. Yes, you can use other noodles. Try udon, soba, or even rice noodles. Each type has a different taste and texture. Just cook them according to the package directions. Keep in mind that cooking times may vary. You can serve spicy garlic butter ramen with a few tasty sides. A simple salad with sesame dressing works well. You can also add steamed veggies like bok choy or broccoli. For protein, try grilled chicken or shrimp on top. These options will make your meal more filling and fun. This post shared how to make spicy garlic butter ramen. We covered ingredient choices, cooking steps, and tips for the best flavor. Remember, you can adjust spice levels and choose between proteins like chicken or tofu. Storing leftovers is simple with these easy tips. You can enjoy this dish in many ways! Experiment with your ingredients and make it your own. This ramen is sure to be a hit for any meal. Enjoy your cooking journey!

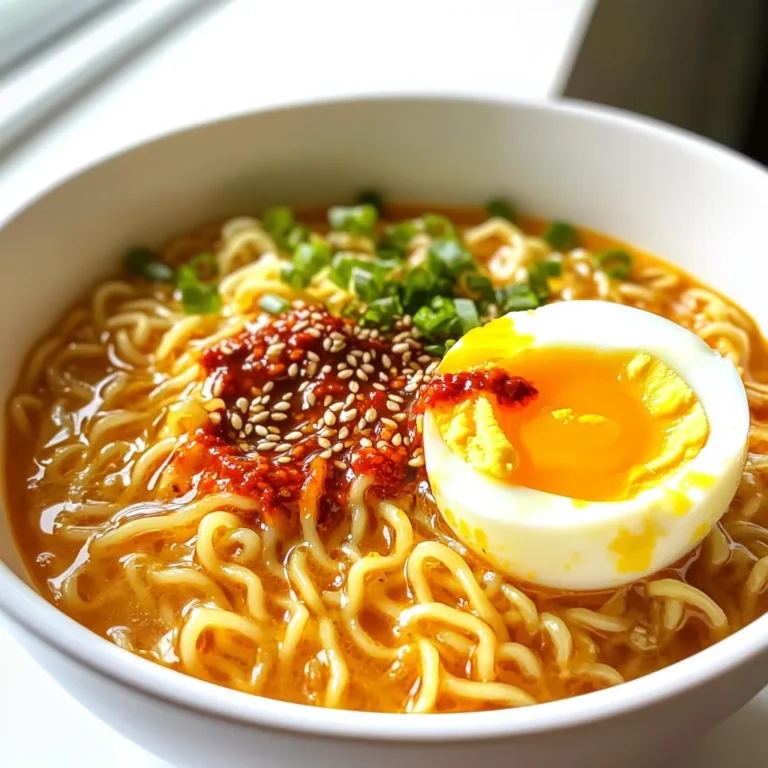
Spicy Garlic Butter Ramen Quick 15-Minute Meal

To make tasty Spicy Mango Shrimp Tacos, you need: - 1 pound large shrimp, peeled and deveined - 1 ripe mango, diced - 1 small red onion, finely chopped - 1 jalapeño, minced (adjust to taste) - 2 cloves garlic, minced - 1 tablespoon lime juice - 1 teaspoon chili powder - 1 teaspoon cumin - 1 tablespoon olive oil - Salt and pepper to taste - 8 small corn or flour tortillas These main ingredients create a perfect blend of flavors and textures. The shrimp brings protein, while the mango adds sweetness. The spices give it a nice kick. You can enhance your tacos with these garnishes: - Fresh cilantro, chopped - Lime wedges These optional garnishes add freshness and brightness to the dish. The cilantro complements the shrimp, and lime juice gives a zesty punch. This recipe serves four people. Each serving roughly contains: - Calories: 300 - Protein: 20g - Carbohydrates: 35g - Fat: 10g These tacos offer a balanced meal. They are rich in protein and provide essential nutrients. Enjoy them as a fresh and flavorful option for lunch or dinner. {{ingredient_image_1}} To start, gather your shrimp, chili powder, cumin, minced garlic, lime juice, salt, and pepper. In a bowl, mix the shrimp with these spices. Make sure every shrimp gets coated well. This step adds a lot of flavor. Let the shrimp sit for 15 minutes. This time allows the spices to soak in. Next, grab your ripe mango, red onion, and jalapeño. Dice the mango and chop the onion finely. Mince the jalapeño according to your spice level. In a separate bowl, combine these ingredients. Add a pinch of salt and a squeeze of lime juice. This salsa brings freshness to your tacos. Set it aside for later. Now, heat a large skillet on medium-high heat. Add olive oil once the pan is hot. Place the marinated shrimp in a single layer. Cook for about 2-3 minutes on each side. The shrimp should turn pink and opaque. Remove them from the heat. Warm the tortillas in a dry skillet for 30 seconds on each side. You can also use foil and heat them in the oven. Now, it’s time to assemble your tacos! Place a few shrimp on each tortilla. Top with a scoop of mango salsa and sprinkle with chopped cilantro. Serve with lime wedges for a zesty kick. Enjoy your delicious creation! To cook shrimp just right, focus on timing. Shrimp cook fast. They only need about 2-3 minutes on each side. When they turn pink and opaque, they are done. Overcooking makes shrimp tough. So, watch them closely. Another tip is to marinate the shrimp. Mix them with spices and lime juice. Let them rest for 15 minutes. This boosts flavor and keeps them juicy. To add more flavor, use fresh ingredients. Fresh lime juice brightens the dish. A good salsa makes a big difference. Mix ripe mango, red onion, and jalapeño for a sweet and spicy kick. Don’t forget about seasoning! A pinch of salt can enhance the flavors. You can also try adding some chili powder to the salsa for an extra zing. Serve your tacos with lime wedges. Squeezing fresh lime juice adds a zesty touch. You can also add more toppings like avocado or diced tomatoes. For a fun twist, serve the tacos with a side of corn salad. This adds crunch and freshness. Enjoy these tacos with friends for a tasty meal! Pro Tips Marinate for Flavor: Allow the shrimp to marinate for at least 15 minutes to enhance the flavors from the spices and lime juice. Adjust Spiciness: Modify the amount of jalapeño based on your heat preference; remove the seeds for a milder salsa. Perfectly Cooked Shrimp: Cook shrimp just until they turn pink and opaque to avoid overcooking, which can make them rubbery. Tortilla Warming: Keep tortillas warm in a clean kitchen towel after heating, so they stay pliable and delicious for serving. {{image_2}} You can switch the shrimp for chicken or fish. Chicken thighs are juicy and tender. Simply marinate them the same way. For fish, try tilapia or salmon. These fish cook quickly, just like shrimp. Adjust the cooking time to 2-4 minutes per side. While mango salsa shines in this dish, you can explore other salsas. Pineapple salsa adds a sweet touch. Combine diced pineapple, red onion, and cilantro. If you like heat, try a tomatillo salsa. Blend tomatillos, jalapeños, and lime juice for a tangy kick. For a vegan twist, replace shrimp with grilled veggies. Zucchini, bell peppers, and mushrooms work well. Season them with the same spices. You can also use canned jackfruit for a meat-like texture. Make sure to marinate it too! For vegetarian options, try black beans or lentils. They add protein and flavor. To store leftover tacos, you should separate the shrimp and salsa from the tortillas. Place the shrimp in an airtight container. The salsa can go in another container. This keeps everything fresh and prevents soggy tortillas. Store the containers in the fridge. They will last for about 2 days. If you want to freeze the shrimp, it’s best to do so before cooking. First, marinate the shrimp as directed. Then, place them in a single layer on a baking sheet. Freeze them for about an hour, then transfer to a freezer bag. This prevents them from sticking together. The shrimp can stay fresh for up to 3 months. For the salsa, it’s best to use fresh ingredients. However, you can freeze the mango separately. Just dice and freeze it in a bag. To reheat the shrimp, use a skillet over medium heat. Heat for about 3-4 minutes, stirring gently. This warms them through without drying them out. For tortillas, warm them in a dry skillet for 30 seconds on each side. You can also wrap them in foil and heat in a 350°F oven for about 10 minutes. Assemble your tacos after reheating for a fresh meal! You can tell shrimp are done when they turn pink and opaque. They should curl slightly, indicating they are cooked through. Cooking time is about 2-3 minutes per side. Overcooked shrimp become tough and rubbery. To avoid this, watch them closely as they cook. Yes, you can prep components in advance. You can marinate the shrimp up to 2 hours before cooking. The mango salsa can be made a few hours ahead and stored in the fridge. Just warm the tortillas and cook the shrimp right before serving. This keeps everything fresh and tasty. If you don't have mango, you can use pineapple or peach. Both fruits add sweetness and a nice texture. You can also try avocado for a creamy touch. Each option will give the tacos a different but delicious flavor profile. Just keep the seasoning in mind for balance. This blog post covered how to make spicy mango shrimp tacos. We explored the key ingredients, from shrimp to fresh mango salsa. You learned the steps to cook and assemble the dish, with helpful tips for great flavor. We also discussed variations for different tastes and the best ways to store leftovers. In the end, these tacos offer a vibrant meal full of flavor. Enjoy making this dish to impress your friends and family!

Spicy Mango Shrimp Tacos Flavorful and Fresh Meal

- 1 tablespoon coconut oil - 1 onion, chopped - 3 garlic cloves, minced - 1 tablespoon fresh ginger, grated - 2 tablespoons red curry paste - 1 can (14 oz) coconut milk - 4 cups vegetable broth - 2 medium carrots, sliced - 1 red bell pepper, chopped - 1 cup broccoli florets - 1 cup snap peas - 2 tablespoons soy sauce or tamari - 1 tablespoon lime juice - Salt and pepper to taste - Fresh cilantro leaves for garnish - Lime wedges for serving When making Vegan Thai Coconut Curry Soup, use fresh ingredients for the best taste. Fresh ginger adds a bright flavor that dried ginger cannot match. Choose a quality red curry paste. Look for brands with natural ingredients, and avoid those with preservatives. Fresh vegetables should be crisp and colorful. This will enhance the soup's flavor and appeal. If you're allergic to soy, use coconut aminos instead of soy sauce or tamari. For a nut-free version, ensure your red curry paste does not contain nuts. You can swap coconut milk with oat milk or cashew cream if you're avoiding coconut. Adjust the flavors to keep the soup tasty, even with substitutions. {{ingredient_image_1}} Start by heating 1 tablespoon of coconut oil in a large pot over medium heat. Once hot, add 1 chopped onion. Sauté it for about 3-4 minutes until it turns translucent. This step builds a great base for your soup. Next, stir in 3 minced garlic cloves and 1 tablespoon of grated fresh ginger. Cook them together for about a minute. You want to smell that lovely aroma! Now, add 2 tablespoons of red curry paste. Mix it well with the onion, garlic, and ginger. Let it cook for 2 more minutes. This step will deepen the flavor of your curry base. Once your base is ready, pour in 1 can of coconut milk and 4 cups of vegetable broth. Stir to combine all the ingredients. Bring the mixture to a gentle simmer. This is where the magic happens! After it simmers, add 2 sliced medium carrots and 1 chopped red bell pepper. Let these cook for about 5 minutes. This will allow them to soften a bit. Then, stir in 1 cup of broccoli florets and 1 cup of snap peas. Continue to simmer for another 5-7 minutes. You want your veggies to be tender but still bright and colorful. Now, lower the heat and stir in 2 tablespoons of soy sauce or tamari and 1 tablespoon of lime juice. This will enhance the flavor even more. Season with salt and pepper to taste. When ready to serve, ladle the soup into bowls. Garnish with fresh cilantro leaves for a pop of flavor. Don't forget to serve with lime wedges on the side. They add a nice zing to every spoonful! Enjoy your delicious Vegan Thai Coconut Curry Soup! To boost the flavor of your Vegan Thai Coconut Curry Soup, start with the aromatics. Sauté the onion, garlic, and ginger in coconut oil. This step brings out their natural sweetness. Cook them until the onion turns soft and clear. It usually takes about 3-4 minutes. Then, add the red curry paste and cook it in the pot. This helps release its rich flavors. Stir it well for about 2 minutes to blend everything together. To get the best texture, add vegetables in stages. Start with the carrots and bell pepper. They need about 5 minutes to soften. Then, add broccoli and snap peas. These veggies should stay bright and crisp. Simmer them for 5-7 minutes. This timing keeps their color and crunch. Spice levels can vary a lot! If you want more heat, add extra red curry paste. Start with a little, then taste as you go. For milder soup, reduce the curry paste. You can also add a splash of coconut milk to tone it down. Lime juice adds brightness, so feel free to adjust it too. Always taste before serving to find your perfect balance! Pro Tips Use Fresh Ingredients: Fresh vegetables and herbs will enhance the flavor and nutritional value of your soup. Whenever possible, opt for organic produce. Adjust Spice Level: If you prefer a milder soup, reduce the amount of red curry paste. Conversely, add extra paste for a spicier kick! Customize the Veggies: Feel free to swap in your favorite vegetables or whatever you have on hand. Zucchini, mushrooms, or spinach all work well in this soup. Make it a Meal: For a heartier option, serve this soup over cooked rice or quinoa. This adds substance and makes it a complete meal. {{image_2}} You can switch up the veggies in this soup. Try using: - Zucchini, sliced - Cauliflower florets - Sweet potatoes, cubed - Spinach or kale - Mushrooms, sliced These options add new tastes and textures. You can mix and match based on what you have. Each veggie brings its own flavor and keeps the soup exciting. To adjust the spice level, you have a few choices. For more heat, add: - Extra red curry paste - Sliced jalapeños or Thai chilies - A dash of hot sauce If you prefer it milder, try: - Reducing the curry paste - Adding more coconut milk or broth - Squeezing in more lime juice for brightness These tweaks let you find the perfect balance for your taste buds. Adding protein boosts the soup's heartiness. Here are some great options: - Tofu, cubed and sautéed until golden - Chickpeas, drained and rinsed - Edamame, shelled and cooked - Tempeh, diced and sautéed These additions make the soup filling and satisfying. You can choose any protein to match your diet or preference. To store your Vegan Thai Coconut Curry Soup, let it cool first. Use an airtight container. This way, it stays fresh in the fridge. It should last for 3 to 4 days. Make sure to label the container with the date. This keeps track of how long it has been stored. When it's time to reheat, use a pot on the stove. Pour the soup in and heat it slowly. Stir the soup often as it warms up. This helps it heat evenly. You can also use a microwave. Just put it in a microwave-safe bowl. Heat in short bursts, stirring in between. This keeps the flavors fresh and tasty. You can freeze the soup for longer storage. Use freezer-safe containers or bags. Leave some space for expansion as it freezes. The soup can last for up to 3 months in the freezer. When you're ready to eat, thaw it in the fridge overnight. Reheat it on the stove or in the microwave. Add a splash of coconut milk if it seems thick after thawing. Yes, you can make this soup ahead of time. It saves well in the fridge for up to three days. When you reheat it, the flavors deepen and become even better. Just store it in an airtight container. You can also freeze the soup for up to a month. To reheat, thaw it in the fridge overnight. Then, warm it on the stove on low heat. Stir well to mix the flavors again. This soup pairs well with many sides. Some great options include: - Steamed jasmine rice - Quinoa for a nutty flavor - Crusty bread to soak up the soup - Fresh spring rolls with a dipping sauce These sides add texture and flavor to your meal. They also help you enjoy each spoonful more. Absolutely! You can try different curry pastes. Green curry paste gives a fresher taste, while yellow curry paste is milder. Each paste changes the soup's flavor. Feel free to mix and match to find your favorite. Just remember that the spice level can vary. Adjust the amount of paste to suit your taste. This blog post covered how to make a tasty Vegan Thai Coconut Curry Soup. We discussed the ingredients, noting quality and substitutions. You learned clear steps for preparation and cooking. Tips improved flavor, texture, and spice levels. Variations let you customize with different veggies, spice, and protein. Finally, storing and reheating tips kept your soup fresh and flavorful. Experiment with these ideas for your perfect bowl of curry. Enjoy your cooking journey!

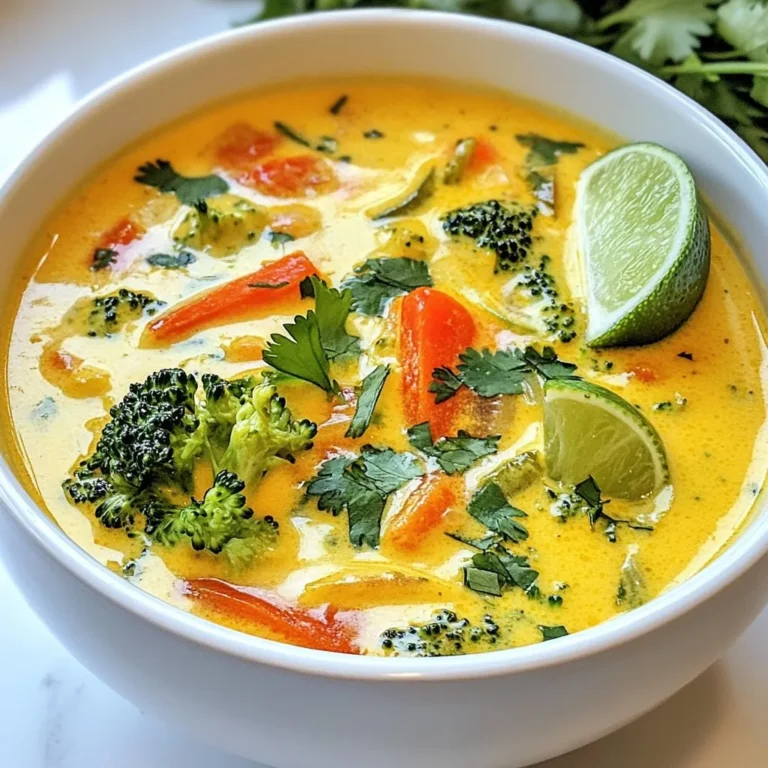
Vegan Thai Coconut Curry Soup Easy Flavorful Recipe

- 1 cup green or brown lentils - 1 medium onion, chopped - 2 carrots, diced - 2 celery sticks, diced - 3 cloves garlic, minced - Spices: ground cumin, smoked paprika, turmeric - 6 cups vegetable broth - 1 can (14 oz) diced tomatoes - 2 cups kale or spinach, chopped - Olive oil, salt, pepper, and fresh parsley for garnish I love the heartiness of lentil soup. It’s simple, yet so comforting. The base starts with lentils, a great source of protein and fiber. You can choose green or brown lentils, both work well. Chop one medium onion and two carrots. These veggies add sweetness and depth. Next, to boost the flavor, add celery and garlic. Two diced celery sticks and three minced garlic cloves make a big difference. The spices really shine here too. Ground cumin, smoked paprika, and turmeric all add warmth. Just one teaspoon of each spice will elevate your soup. Now, let’s talk about the liquid. You need six cups of vegetable broth for a rich base. One can of diced tomatoes gives it a nice acidity. Finally, I love adding greens. You can mix in two cups of chopped kale or spinach. They add color and nutrients. To finish, use olive oil, salt, and pepper. A sprinkle of fresh parsley on top is the cherry on the cake. This dish is not just easy to make; it’s also packed with flavor. Grab these ingredients, and let’s get cooking! {{ingredient_image_1}} To start, heat 2 tablespoons of olive oil in a large pot over medium heat. Once the oil is warm, add 1 chopped onion, 2 diced carrots, and 2 diced celery sticks. Cook these veggies until they become soft, about 5 to 7 minutes. This step builds a tasty base for your soup. Next, mix in 3 minced garlic cloves, 1 teaspoon of ground cumin, 1 teaspoon of smoked paprika, and 1/2 teaspoon of turmeric. Stir and cook for another minute. This helps to release the spices' rich flavors. Now, it’s time to add the main ingredients. Incorporate 1 cup of rinsed lentils and 1 can of diced tomatoes with their juices. Now, pour in 6 cups of vegetable broth and bring the mixture to a boil. Once it starts bubbling, reduce the heat to low and cover the pot. Let it simmer for 25 to 30 minutes, or until the lentils are tender. After that, stir in 2 cups of chopped kale or spinach. Cook for an additional 5 minutes to wilt the greens. Finally, season with salt and pepper to taste. Serve hot and enjoy the comfort of your lentil soup! To cook lentils just right, rinse them well before use. This removes dirt and debris. Use green or brown lentils for a hearty texture. These types hold their shape well during cooking. Simmer them in broth for great flavor. Season the soup as it cooks. Add salt and pepper toward the end. This helps enhance the taste without over-salting. Taste the soup before serving, and adjust as needed. You can also add a squeeze of lemon juice for brightness. Pair your soup with crusty bread for a cozy meal. The warm bread complements the soup's rich flavors. You can also serve it with a fresh salad for added crunch. For garnishing, sprinkle fresh parsley on top. This adds a pop of color and freshness. You can even drizzle a bit of olive oil for extra richness. Store any leftovers in an airtight container. Keep it in the fridge for up to three days. When reheating, use a gentle heat to avoid overcooking the lentils. You can add a splash of broth or water if it thickens too much. Get creative with leftovers! Use the soup as a filling for wraps or grain bowls. You can also blend it into a smooth puree for a different texture. Add some cooked grains for a hearty lunch. Pro Tips Rinse Your Lentils: Rinsing lentils before cooking helps to remove any dust or debris, ensuring a clean and tasty soup. Customize Your Greens: Feel free to swap out kale or spinach with other leafy greens like Swiss chard or collard greens for different flavors and textures. Add Extra Flavor: For a richer flavor, consider adding a splash of balsamic vinegar or a squeeze of lemon juice just before serving. Storage Tips: This soup keeps well in the fridge for up to 5 days and can be frozen for up to 3 months. Just reheat gently on the stove. {{image_2}} You can change the type of lentils you use. Red lentils cook faster and become soft. Black lentils add a nice texture. Both options work well in this soup. Seasonal vegetables are great too. In spring, try adding peas or asparagus. In winter, root veggies like parsnips or turnips shine. This keeps the soup fresh and fun. Want to make it heartier? Add protein! Cooked chicken or sausage really boosts flavor. If you prefer plant-based options, try chickpeas or tofu. These add texture and nutrition. For a creamy touch, add a splash of coconut milk or cashew cream. These options make the soup rich and satisfying. Adjust the spices for your taste. If you like heat, sprinkle in some chili flakes. They bring warmth and depth. You can also switch herbs to freshen it up. Thyme, rosemary, or even cilantro can change the soup's vibe. Experiment with these options to find your favorite flavor. To keep your lentil soup fresh, store it in the fridge. Use an airtight container. Make sure the soup cools down first. Proper cooling helps prevent bacteria growth. Lentil soup can last in the fridge for about 4-5 days. For long-term storage, freezing is a great option. Pour the cooled soup into freezer-safe containers. Leave some space at the top for expansion. Label the containers with the date. Your soup can last up to 3 months in the freezer. When reheating your lentil soup, the stove is best. Pour the soup into a pot. Heat it over medium heat. Stir often to prevent sticking. You can also use the microwave. Place the soup in a microwave-safe bowl. Heat it in short bursts, stirring in between. If the soup is too thick, add a splash of broth or water. Stir well to mix. This keeps your soup creamy and delicious. In the fridge, expect your lentil soup to last 4-5 days. If you freeze it, aim to use it within 3 months. Always check for signs of spoilage before eating. If the soup smells sour or has mold, it’s time to toss it. Eating spoiled soup can cause food sickness. Always trust your senses. When in doubt, throw it out. You can serve many tasty sides with lentil soup. Here are some great ideas: - Crusty bread: A warm, fresh loaf pairs perfectly. - Salads: A light green salad adds freshness. - Grilled cheese: This classic comfort food goes well with soup. - Rice or quinoa: These grains can add heartiness to your meal. Mix and match these options to create a cozy dining experience. Yes, lentil soup is very healthy. Lentils are packed with nutrients. They are rich in protein and fiber. This helps keep you full and satisfied. They also have vitamins and minerals, like iron and folate. Eating lentils can support heart health and digestive health. Plus, this soup is low in fat and calories. It’s a great choice for a healthy meal. Absolutely! To make lentil soup in a slow cooker, follow these steps: 1. Sauté the base: First, cook the onion, carrots, and celery in olive oil on the stove. This adds flavor. 2. Combine the ingredients: Add the sautéed veggies to the slow cooker with the rest of the ingredients. 3. Set the heat: Cook on low for 6-8 hours or high for 3-4 hours. 4. Finish up: Stir in the greens about 30 minutes before serving. Using a slow cooker makes this soup easy and convenient. Lentil soup is quick! Here’s a breakdown of the time: - Prep time: About 10 minutes to chop veggies and gather ingredients. - Cook time: Around 25-30 minutes on the stove. So, you can have a warm bowl of lentil soup ready in about 45 minutes. It’s a great option for a weeknight meal. Lentil soup is simple to make and packed with flavor. We covered the key ingredients, from lentils and veggies to spices and greens. I shared my step-by-step process, tips for perfecting taste and texture, and how to use leftovers creatively. Remember, you can adjust the recipe to fit your taste and dietary needs. Lentil soup is healthy, filling, and great for any time of year. Experiment with variations and enjoy each flavorful bite!

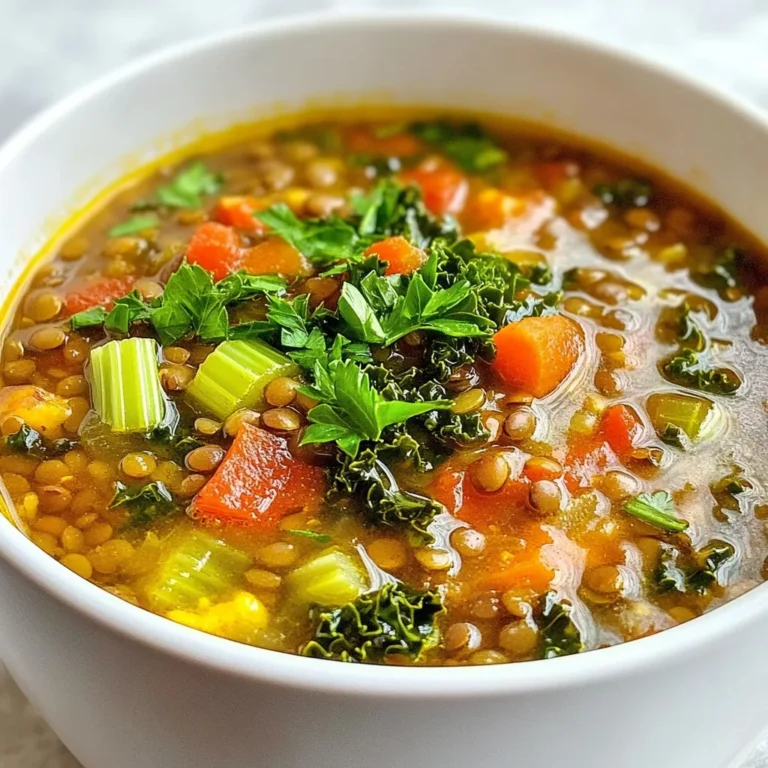
Easy Comforting Lentil Soup Simple and Flavorful Dish

- 4 cups apple cider - 1/2 cup caramel sauce (plus extra for drizzling) - 1 cinnamon stick - 1/2 teaspoon ground nutmeg - 4 whole cloves - 2 star anise - 1 tablespoon vanilla extract - 1 orange, zested and juiced - 1 tablespoon brown sugar (optional, for added sweetness) - Whipped cream for topping (optional) For the best taste, choose fresh apple cider. Look for brands without added sugars or preservatives. The caramel sauce should be smooth and rich. If you can, use homemade caramel. Fresh spices give your drink a vibrant taste. Whole spices work better than pre-ground ones. Fresh orange juice enhances the flavor. Always zest the orange before juicing it. If you need a dairy-free option, use coconut cream instead of whipped cream. For a vegan caramel sauce, find one made with coconut milk or dates. If you are avoiding sugar, skip the brown sugar or use a sugar substitute. You can use apple juice instead of cider for a lighter drink. To make warm spiced caramel apple cider, start with a large saucepan. In it, mix together the apple cider and caramel sauce. Add a cinnamon stick, ground nutmeg, whole cloves, star anise, and vanilla extract. Next, zest and juice the orange, then stir it all together. Set the saucepan over medium heat. Bring the mixture to a gentle simmer. Once simmering, lower the heat. Let the cider steep for 15 to 20 minutes. This step helps the spices fill the cider with rich flavor. After steeping, taste the cider. If you want more sweetness, stir in brown sugar. Once satisfied with the flavor, remove the saucepan from the heat. Use a fine mesh strainer to remove the whole spices. Now, your cider is ready to serve! To boost the flavor of your Warm Spiced Caramel Apple Cider, focus on the spices. Use fresh whole spices for the best taste. Ground spices can work too, but whole spices provide a richer flavor. You can also add a pinch of sea salt. This enhances the sweetness of the caramel. If you like citrus, try adding more orange zest. It brightens the drink and adds depth. Presentation matters! Serve your warm cider in clear mugs. This lets the beautiful color shine through. Top each mug with a swirl of whipped cream for a creamy touch. Drizzle extra caramel sauce on top for sweetness. For added flair, sprinkle a little cinnamon or add an apple slice to the rim. These small touches make the drink look festive and inviting. One common mistake is overheating the cider. Keep it on low heat to avoid boiling. Boiling can change the flavor and make it less pleasant. Another mistake is not straining the spices. Leaving them in can make the drink too spicy and overpowering. Lastly, don’t forget to taste! Adjust the sweetness with brown sugar if needed. This ensures you enjoy the perfect balance of flavors in every sip. {{image_2}} You can change the flavor of your warm spiced caramel apple cider. Try adding ginger for a kick. It brings warmth and spice. You can also use chai tea bags instead of spices. This gives a rich, aromatic taste. Want a citrus twist? Add a splash of lemon juice or more orange zest. Each option changes the drink into something new. This drink can be enjoyed by everyone! For a non-alcoholic version, stick to the recipe as is. For adults, add a splash of bourbon or rum. This gives a warm, cozy feel. Just be careful with the amount. A little goes a long way in changing the flavor. You can swap ingredients based on the season. In fall, use fresh apple slices for garnish. In winter, add a few cranberries for color. You can even use maple syrup instead of caramel for a different sweetness. Each season brings new options to explore. Don't be afraid to mix and match! To store any leftover warm spiced caramel apple cider, let it cool down first. Once it is cool, pour it into an airtight container. You can use a glass jar or a plastic container. Seal it tightly to keep out air and moisture. Refrigerate the cider and it will stay fresh for a few days. When you are ready to enjoy your cider again, pour it into a saucepan. Heat it over low to medium heat. Stir gently to mix and avoid burning. You can also use a microwave. Place the cider in a microwave-safe cup and heat for about 30 seconds. Stir and check the temperature before drinking. The shelf life of your cider in the fridge is about 3 to 5 days. If you want to keep it longer, you can freeze it. Pour the cooled cider into freezer-safe bags or containers. Leave some space for expansion. When you want to drink it, thaw it in the fridge overnight. Reheat as needed for a cozy treat! If you don’t have caramel sauce, try using maple syrup. It adds a nice sweetness. Another option is to make a quick caramel by melting sugar until golden. You can also blend brown sugar with a bit of water to create a syrup. Each option gives a unique flavor to your cider. Yes, you can! Just add all the ingredients to your slow cooker. Set it on low for about 2-3 hours. This lets the spices blend well. Stir occasionally to mix the flavors. It keeps the cider warm and ready for your guests. To adjust sweetness, start with less caramel sauce. Taste as you go. If it’s not sweet enough, add brown sugar. Mix it in until it dissolves. You can also add more caramel sauce if you want a richer flavor. Yes, this recipe is perfect for kids! The warm spiced cider is non-alcoholic. Just make sure to skip the whipped cream if there are allergies. This drink is cozy and fun for everyone. In this post, we explored all key aspects of making the perfect dish. We reviewed the essential ingredients, their quality, and substitutions. I guided you through detailed steps for preparation, cooking times, and checking doneness. We shared helpful tips to enhance flavor and avoid common mistakes. I offered exciting flavor variations and storage advice to keep your dish fresh. Finally, I answered common FAQs to help you along the way. Now, you can confidently create this recipe and impress everyone!

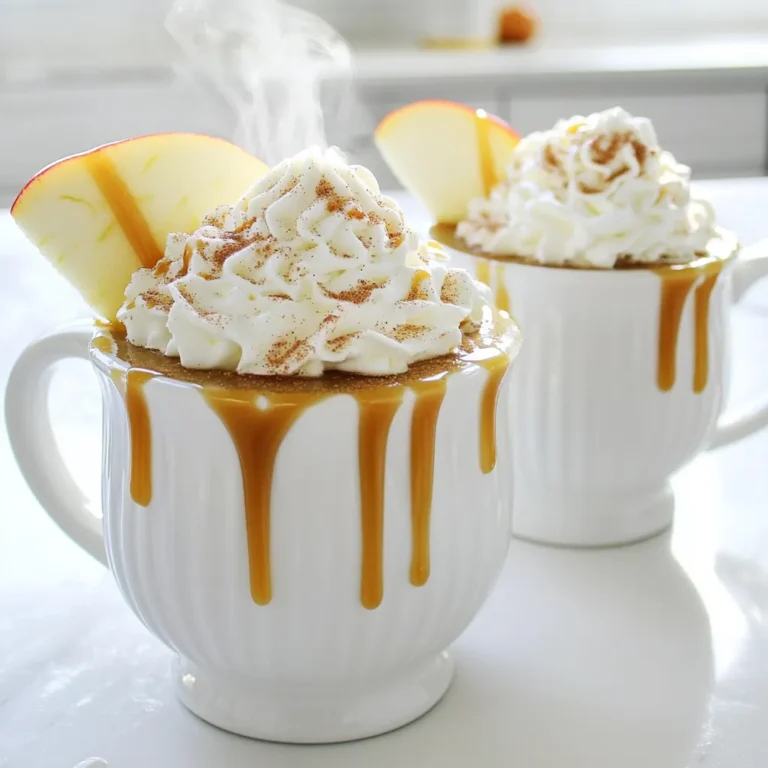
Warm Spiced Caramel Apple Cider Cozy Fall Drink

PREV 1 … 11 12 13 … 86 NEXT
spicy fork kitchen

explore

DessertsDinnerAppetizersDrinks

Our Policies

  • Cookie Policy
  • Copyright Policy
  • Disclaimer
  • GDPR Policy
  • Terms Of Use
Back to Top
  • About
  • Contact Us
  • Privacy Policy
© 2026 spicy fork kitchen