WANT TO SAVE THIS RECIPE?
Arepas con Queso are a tasty treat that’s easy to make! This beloved dish from Venezuela combines golden cornmeal and melted cheese for a delightful burst of flavor. In this guide, I’ll walk you through each simple step, from mixing the dough to cooking the arepas. You’ll also discover fun tips for variations and serving ideas. Let’s dive into this delicious recipe and bring a piece of Venezuela to your table!

Why I Love This Recipe
- Deliciously Cheesy: The combination of queso blanco or mozzarella creates a melty, gooey center that is simply irresistible!
- Quick and Easy: With only a few simple ingredients and minimal prep time, these arepas can be whipped up in no time.
- Customizable: Feel free to add your favorite fillings or toppings, such as avocado or salsa, to make it your own!
- Perfect for Sharing: These cheesy delights are great for gatherings, making them the perfect appetizer or snack for friends and family.
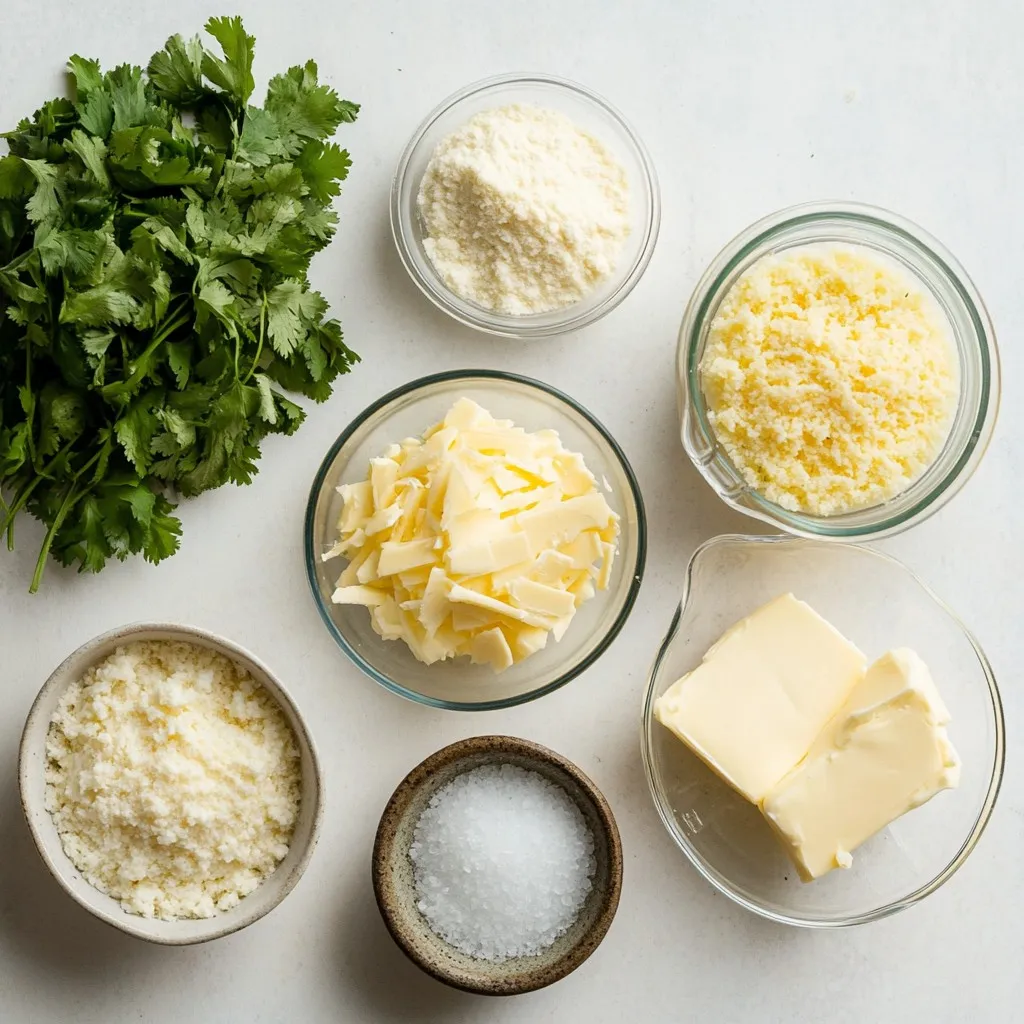
Ingredients
Main Ingredients
– 2 cups pre-cooked white cornmeal (masarepa)
– 2 1/2 cups warm water
– 1 teaspoon salt
– 1 cup shredded queso blanco or mozzarella cheese
– 2 tablespoons butter, melted
The key to great arepas con queso starts with the right ingredients. First, you’ll need pre-cooked white cornmeal, known as masarepa. This cornmeal gives the arepas their signature texture. Next, warm water helps the dough come together smoothly. Salt adds flavor, while shredded cheese brings that melty goodness inside. Finally, a bit of melted butter helps give the outside a lovely golden finish.
Optional Garnishes
– Fresh cilantro, chopped for garnish
– Sliced avocado
– Salsa for dipping
Garnishes make your arepas shine. Fresh cilantro adds a burst of flavor. Sliced avocado provides creaminess. A side of salsa can add a nice kick. You can mix and match these garnishes to create a dish that looks as good as it tastes!
Step-by-Step Instructions
Preparation of Dough
To start, you need to mix the cornmeal and salt. In a large bowl, combine 2 cups of pre-cooked white cornmeal with 1 teaspoon of salt. Gradually add 2 1/2 cups of warm water. Stir until the dough is smooth and holds together well.
Next, let the dough rest for about 5 minutes. This step helps the dough hydrate, making it easier to shape. A well-hydrated dough will give you better arepas.
Shaping the Arepas
Now it’s time to shape your arepas. Divide the dough into 8 equal portions. Roll each portion into a ball, then flatten each ball into a disc about 1/2-inch thick.
For the filling, take half of the discs and place a spoonful of shredded cheese in the center. You can use queso blanco or mozzarella cheese for a great taste. Cover with the other half of the discs. Press the edges firmly to seal them well. This step keeps the cheese inside while cooking.
Cooking Methods
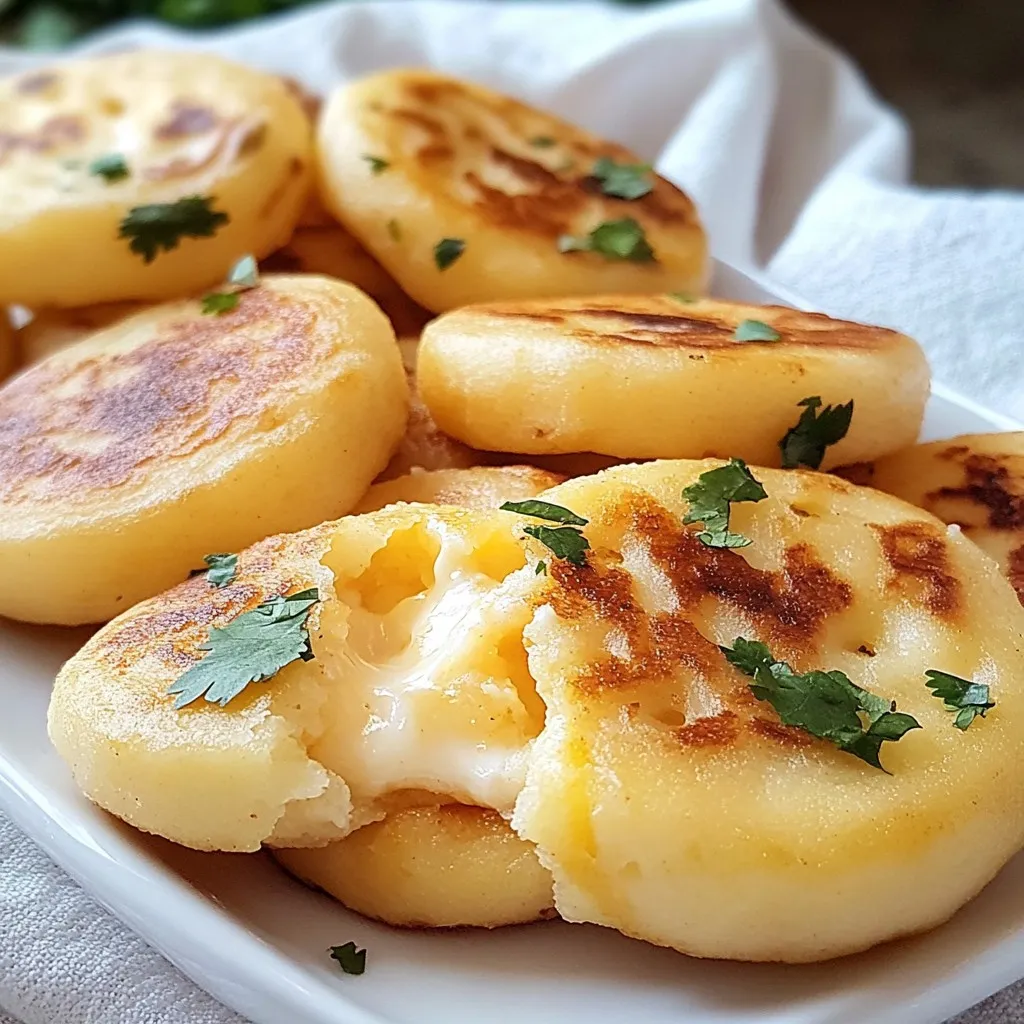
You can cook the arepas in two ways. First, heat a non-stick skillet or griddle over medium heat. Add some melted butter to the pan. Cook the arepas for about 5-7 minutes on each side. They should turn golden brown and be fully cooked.
If you prefer a crispier texture, bake the arepas in the oven. Preheat it to 375°F (190°C) and cook for 10-15 minutes. After cooking, let them cool slightly. Then slice them open to reveal the melty cheese inside. Enjoy your homemade arepas con queso!
Tips & Tricks
Perfecting the Arepas
To make the best arepas, focus on the dough. You want the dough to be smooth and not sticky. Mix the cornmeal and salt well. Gradually add warm water while stirring. This helps you get the right consistency. After mixing, let the dough rest for five minutes. This step helps the cornmeal soak up the water.
For cooking, use medium heat on your skillet or griddle. This ensures the outside gets golden brown while the inside stays soft. If you want a crispier texture, consider baking them at 375°F (190°C) for about 10 to 15 minutes. This method gives a great crunch.
Serving Suggestions
When serving arepas con queso, think about what goes well with them. Fresh cilantro adds a nice touch. You can also offer sliced avocado on the side. A bowl of salsa for dipping is a great choice too.
For presentation, serve the warm arepas on a wooden board. This looks nice and rustic. Garnish with chopped cilantro for a pop of color. This makes your dish more inviting and fun to eat.
Pro Tips
- Tip Title: Use Fresh Ingredients: For the best flavor, use fresh queso blanco or mozzarella cheese. Fresh cheese melts better and provides a creamier texture to your arepas.
- Tip Title: Rest the Dough: Allowing the dough to rest for 5 minutes is crucial. This hydration time ensures the arepas are soft and pliable, making them easier to shape and cook.
- Tip Title: Perfect Cooking Temperature: Cooking arepas at medium heat allows them to brown evenly without burning. Adjust the heat as needed, especially if they start to brown too quickly.
- Tip Title: Customize Fillings: Feel free to experiment with different fillings like seasoned ground beef, black beans, or sautéed vegetables for a unique twist on traditional arepas.
Variations
Cheese Substitutes
You can change up the cheese in your arepas. Try using queso de mano for a fresh twist. Cheddar works great too, giving a sharp flavor.
Adding spices or herbs can enhance your filling. A dash of cumin or some fresh parsley adds depth. Experiment to find what you love.
Alternative Fillings
You can fill arepas with meats or veggies for a hearty meal. Shredded chicken or black beans make tasty options.
If you crave something sweet, try adding jam or chocolate. A spoon of dulce de leche can make a delightful treat. These variations make arepas fun and versatile!
Storage Info
Short-term Storage
To keep your cooked arepas fresh, place them in an airtight container. You can store them in the refrigerator for up to three days. Before storing, let them cool to room temperature. This helps prevent moisture build-up. When you are ready to eat, simply reheat them in a skillet. They will taste great!
Long-term Storage
You can freeze uncooked arepas for up to three months. To do this, place them in a single layer on a baking sheet. Once frozen, transfer them to a freezer bag. For cooked arepas, allow them to cool first. Then, store them in an airtight container or freezer bag.
Reheating tips for optimal taste
To reheat cooked arepas, you can use a skillet or an oven. If using a skillet, heat over low heat until warmed through. If using an oven, preheat to 375°F (190°C) and bake for about 10 minutes. This keeps them crispy on the outside and warm inside. Enjoy your delicious arepas at any time!
FAQs
What are Arepas con Queso?
Arepas con Queso are a tasty dish from Venezuela. They are made from cornmeal dough. The dough is shaped into round patties and filled with cheese. These golden treats are crispy on the outside and soft on the inside. The melting cheese makes every bite special. Arepas are often served for breakfast or as a snack. You can top them with avocado or salsa for extra flavor.
Can I make the dough in advance?
Yes, you can make the dough ahead of time. Mix the cornmeal and salt with water as usual. After mixing, let the dough rest. Then, wrap it tightly in plastic wrap. Store the dough in the fridge for up to two days. When you’re ready to cook, shape and fill the arepas. If you want to store it longer, freeze the dough. Just make sure to thaw it before using.
What are the best types of cheese for Arepas?
You can use many types of cheese for Arepas. Queso blanco is a popular choice. It melts well and adds great taste. Mozzarella is another good option for its stretchiness. If you like stronger flavors, try queso de mano or even cheddar. Feel free to mix cheeses for a unique flavor. Adding herbs or spices can also give your arepas a personal touch.
Arepas con Queso are a tasty treat made from simple ingredients like cornmeal, cheese, and butter. You learned how to make the dough, shape the arepas, and cook them in different ways. I shared tips for perfecting the texture and the best ways to serve them. You can even personalize your arepas with various cheeses or fillings. Remember, good storage will keep them fresh longer. Enjoy making this flavorful dish that brings a taste of Venezuela to your kitche
Cheesy Arepas Delight
Delicious arepas filled with melty cheese, perfect for any meal.
Prep Time 15 minutes mins
Cook Time 25 minutes mins
Total Time 40 minutes mins
Course Main Course
Cuisine Latin American
Servings 4
Calories 300 kcal
- 2 cups pre-cooked white cornmeal (masarepa)
- 2.5 cups warm water
- 1 teaspoon salt
- 1 cup shredded queso blanco or mozzarella cheese
- 2 tablespoons butter, melted
- to taste Fresh cilantro, chopped for garnish (optional)
In a large bowl, mix the pre-cooked cornmeal and salt. Gradually add the warm water while stirring to combine until you obtain a smooth dough.
Let the dough rest for about 5 minutes to allow it to hydrate.
Divide the dough into 8 equal portions and roll each portion into a ball. Flatten each ball into a disc about 1/2-inch thick.
Place a spoonful of shredded cheese in the center of half the discs and cover with the other half, pressing the edges to seal.
Heat a non-stick skillet or griddle over medium heat and add a little melted butter.
Cook the arepas for about 5-7 minutes on each side, or until they are golden brown and cooked through. You can also cook them in the oven at 375°F (190°C) for 10-15 minutes for a crispier texture.
Remove from heat and let cool slightly before slicing to expose the melty cheese.
Serve warm, garnished with chopped cilantro and offer avocado slices or a side of salsa for dipping.
Keyword arepas, cheese, cornmeal, snack
WANT TO SAVE THIS RECIPE?