Looking for a sweet treat that’s both easy to make and delicious? You’ll love these Chocolate Mint Cheesecake Cups! With no baking required, they come together quickly and impress everyone. I’ll guide you through each step, from the perfect crust to a creamy filling. Whether you’re hosting a party or just in the mood for a dessert, these cups will satisfy your cravings without any fuss. Let’s dive into this easy no-bake delight!

Ingredients
Main Ingredients for Chocolate Mint Cheesecake Cups
For these tasty chocolate mint cheesecake cups, you need some key ingredients. Here’s what you’ll use:
– 1 cup chocolate cookie crumbs (like Oreo or Graham crackers)
– 4 tablespoons unsalted butter, melted
– 16 oz cream cheese, softened
– 1 cup powdered sugar
– 1 teaspoon mint extract
– 1 cup heavy whipping cream
– 2 tablespoons cocoa powder
These ingredients create the rich, creamy filling and a crunchy crust. The mint extract adds a nice burst of flavor that pairs perfectly with chocolate.
Optional Toppings and Garnishes
To make your cheesecakes even more fun, consider these toppings:
– 2 tablespoons mini chocolate chips (for topping)
– Fresh mint leaves (for garnish)
These toppings not only add flavor but also make your desserts look fancy. You can even drizzle some melted chocolate around the cups for extra flair.
Substitutions for Common Ingredients
If you need to swap out some ingredients, here are a few ideas:
– For cookie crumbs, use any chocolate cookie you like.
– Instead of cream cheese, try a non-dairy cream cheese for a dairy-free option.
– You can use a sugar substitute in place of powdered sugar if you want a lower sugar treat.
These substitutions keep the recipe flexible and fun. Enjoy customizing your cheesecake cups!
Step-by-Step Instructions
Preparing the Chocolate Crust
Start by gathering your chocolate cookie crumbs. You can use Oreo cookies or Graham crackers. In a medium bowl, mix the crumbs with melted butter. Stir until the mix looks like wet sand. This texture helps the crust hold together well. Next, divide the mixture into your serving cups. Press it down firmly to create a nice layer. This base is key to a great cheesecake cup.
Making the Cream Cheese Filling
Now, let’s make the creamy filling. In a large mixing bowl, beat softened cream cheese with an electric mixer. Keep mixing until it’s smooth and creamy. Gradually add powdered sugar and mint extract. It should taste sweet and minty. In a separate bowl, whip heavy cream until stiff peaks form. This makes the filling light and fluffy. Now, gently fold the whipped cream into the cream cheese mix. Be careful not to deflate the whipped cream. This step creates a velvety texture.
Assembling the Cheesecake Cups
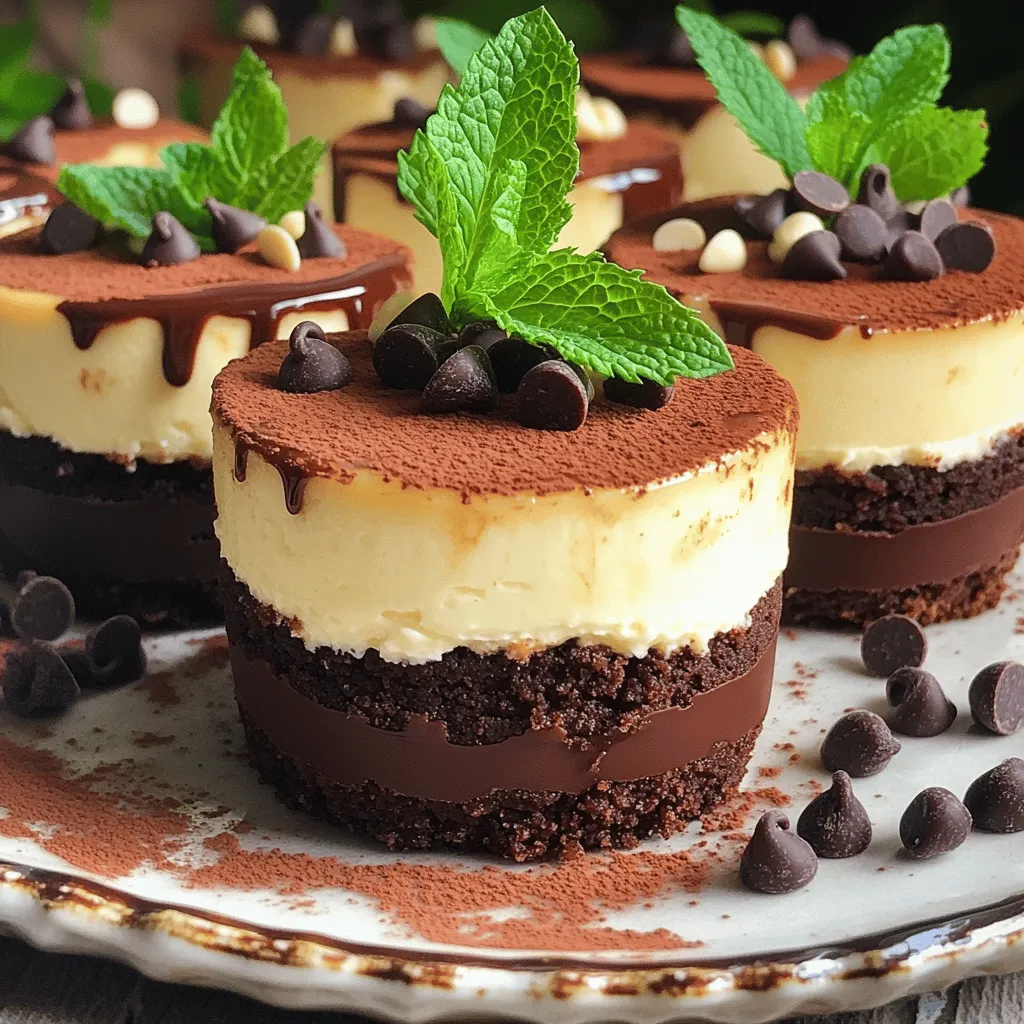
Next, it’s time to fill the cups. Scoop the cream cheese mixture onto the chocolate crust layer. Be sure to divide it evenly among all cups. For a fun touch, sprinkle a light layer of cocoa powder on top. This adds an extra chocolate layer.
Tips for Refrigeration
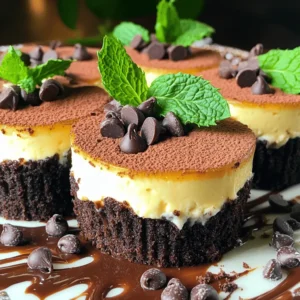
Refrigerate your cheesecake cups for at least four hours. This time allows them to set properly. The longer they chill, the firmer they become. For best results, cover the cups loosely with plastic wrap. This keeps them fresh without sticking. When ready to serve, add mini chocolate chips and a mint leaf on top. These last touches make each cup look beautiful and inviting.
Tips & Tricks
Perfecting the Whipped Cream Texture
To get the best whipped cream, start with cold heavy cream. Cold cream whips faster and gets thicker. Use a clean bowl and beaters for the best results. Beat the cream until you see stiff peaks. This means the cream holds its shape. Be gentle when you mix it with the cream cheese. Folding helps keep the air in the whipped cream, making it light and fluffy.
How to Avoid a Grainy Cheesecake Mixture
A smooth cheesecake is key to great flavor. Make sure your cream cheese is very soft before mixing. This helps it blend smoothly with the sugar and mint extract. Add powdered sugar slowly. Mixing too fast can cause lumps. If your mixture is grainy, try blending it a bit longer. Using an electric mixer helps break down any clumps.
Serving Suggestions for Best Presentation
For a stunning look, serve the cheesecake cups on a pretty platter. You can drizzle melted chocolate around the cups for flair. Sprinkle crushed cookies on top for added texture. Each cup can use a mint leaf for garnish. This adds color and freshness. It makes your dessert even more tempting.
Variations
Different Flavor Variations
You can mix things up with different flavors! Instead of mint, try vanilla or raspberry. For vanilla, swap the mint extract with pure vanilla extract. This gives a smooth and rich taste. For raspberry, add fresh or frozen raspberries to the cream cheese. This adds a fruity twist. Each flavor brings its own fun, so get creative!
Healthier Alternatives
Want a lighter option? Use low-fat cream cheese instead of regular cream cheese. It cuts some calories but keeps the flavor. You can also use sugar substitutes like stevia or erythritol. These sweeteners work well and lower the sugar content. Your cheesecake will still taste amazing, and you can enjoy it guilt-free.
Gluten-Free Options for the Crust
If you need a gluten-free crust, use gluten-free chocolate cookies. Brands like gluten-free Oreos or any chocolate gluten-free cookies work great. Just crush them and mix with melted butter like the recipe says. This way, everyone can enjoy these tasty cheesecake cups without worry.
Storage Info
Best Practices for Storing No-Bake Cheesecake Cups
Store your chocolate mint cheesecake cups in the refrigerator. Use an airtight container to keep them fresh. Make sure the cups are covered well to prevent drying out. If you stack them, place a piece of parchment paper between layers. This will help keep the toppings intact.
How Long Do They Last in the Refrigerator?
These cheesecake cups last about 3 to 5 days in the fridge. After that, they may lose their fresh taste. Always check for any signs of spoilage before eating. If they smell off or look strange, it’s best to toss them out.
Freezing Instructions for Long-Term Storage
You can freeze these cheesecake cups for up to 2 months. To freeze, wrap each cup tightly in plastic wrap. Then, place them in a freezer-safe bag. When you’re ready to enjoy them, thaw them in the fridge overnight. This keeps their taste and texture just right.
FAQs
Can I use a different type of cookie for the crust?
Yes, you can use other cookies for the crust. Graham crackers work well if you want a milder taste. You can also try chocolate wafer cookies for a richer flavor. Just crush them into fine crumbs and mix with melted butter. The key is to get a nice, firm base for your cheesecake cups.
How can I make these cheesecake cups ahead of time?
You can make these cheesecake cups a day before you plan to serve them. Follow all the steps and then chill them in the fridge for at least four hours. This way, they set nicely and the flavors blend together. Just remember to add toppings right before serving for the best look.
What are some good serving suggestions for these dessert cups?
For a great presentation, arrange the cups on a colorful platter. Drizzling melted chocolate around the cups adds a nice touch. You can also sprinkle crushed cookies on top for extra crunch. Fresh mint leaves not only look good but also enhance the mint flavor.
Is it possible to make these cheesecake cups dairy-free?
Yes, you can make these cheesecake cups dairy-free. Use dairy-free cream cheese and coconut cream instead of heavy cream. Check the labels to ensure they are free from dairy products. This way, everyone can enjoy these tasty treats without any worry.
This blog post covered how to make chocolate mint cheesecake cups from start to finish. We explored essential ingredients, step-by-step instructions, and tips to ensure success. You now know fun variations and how to store these treats.
Remember, with a few adjustments, you can customize this dessert for any taste. Enjoy making and sharing your delicious cheesecake cups!